Loading ...
Loading ...
Loading ...
En
27
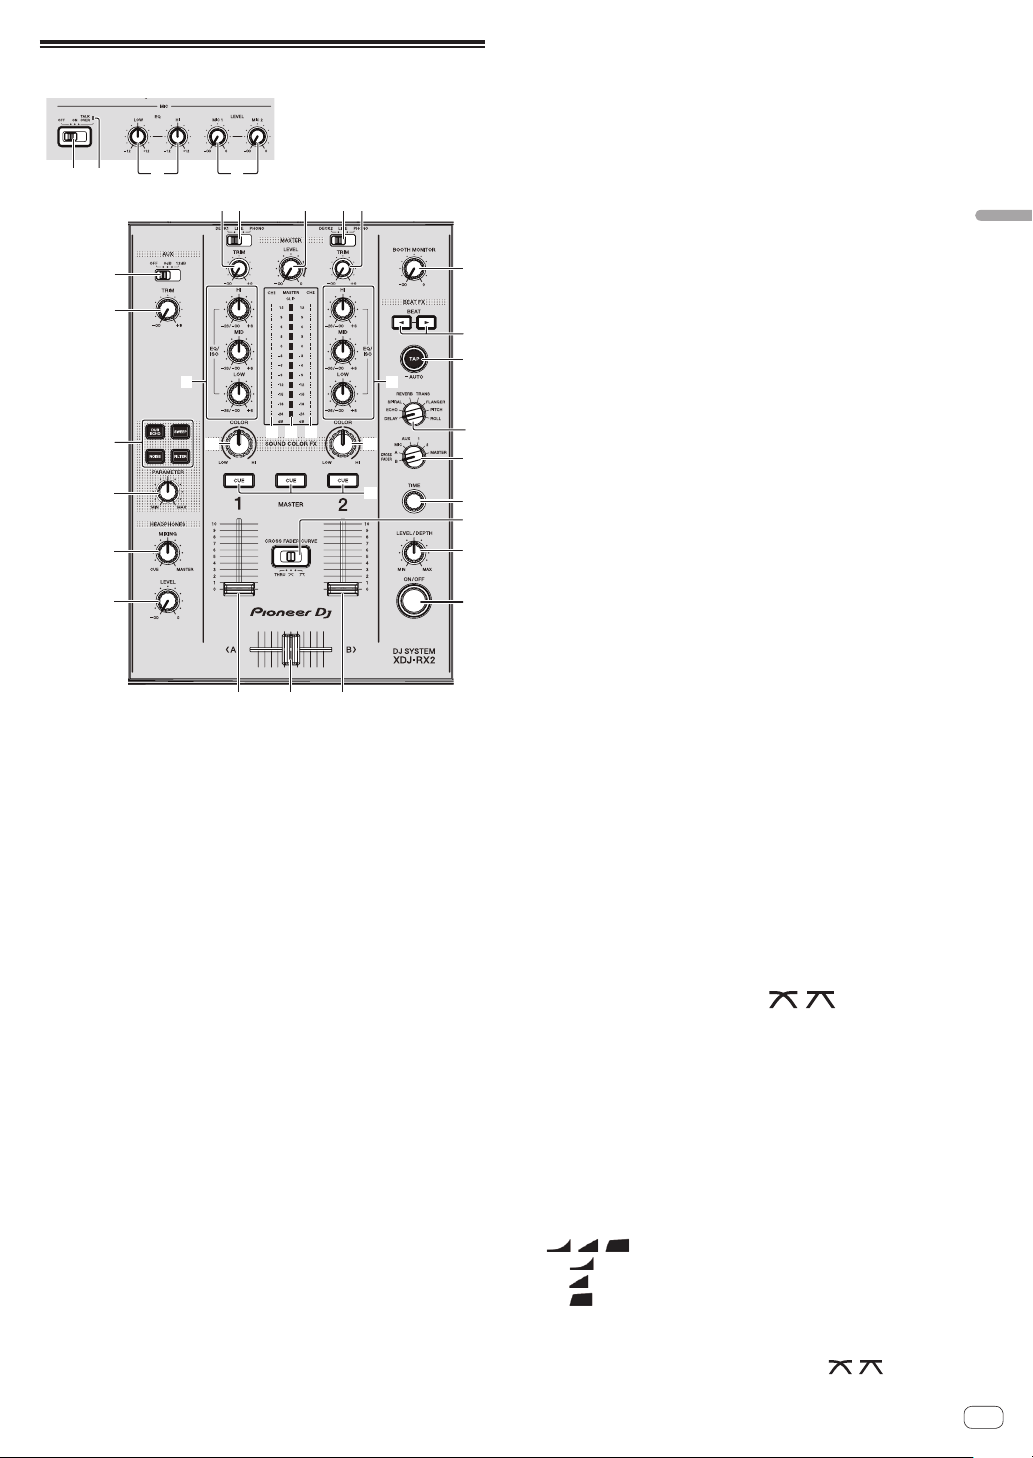
Part names and functions
Mixer/effect section
1 2
a
b
3 4
6 657 7
8
c c
g
i
j
k
l
mm
n
o
p
q
r
s
t
e
ff
9
b
d
h
1 MIC (OFF, ON, TALK OVER) selector switch
Turns the microphone on and off.
= Using a microphone (p. 28 )
2 MIC (OFF, ON, TALK OVER) indicator
Lights up when the microphone is on, and flashes when the talk over
function is on.
=
Using a microphone (p. 28 )
3 MIC EQ (HI, LOW) controls
Adjusts the sound quality of the microphones.
= Using a microphone (p. 28 )
4 MIC LEVEL (MIC1, MIC2) controls
Adjusts the level of sound input to the [MIC] terminal.
= Using a microphone (p. 28 )
5 MASTER LEVEL control
Adjusts the level of sound output from the [MASTER1] and
[MASTER2] terminals.
= Outputting sound (p. 30 )
6 DECK1, 2, LINE1, 2, PHONO1, 2 selector switch
Selects the [CH1] or [CH2] input source from among the devices
connected to this unit.
! When set to [LINE/PHONO], the mixer section can be used as a
DJ mixer.
= Outputting sound (p. 30 )
7 TRIM control
Adjusts the level of sound input to each channel.
= Outputting sound (p. 30 )
8 BOOTH MONITOR control
Adjusts the level of sound output from the [BOOTH] terminal.
= Outputting sound from the [BOOTH] terminals (p. 28 )
9 BEAT c, d buttons
Sets the beat fraction for synchronizing the effect sound.
= Using the beat effect function (p. 28 )
a TAP (AUTO) button
Sets the BPM measurement mode.
— Auto mode: The BPM is measured automatically from the audio
signal being input. [AUTO] mode is set when the power of this
unit is turned on.
—
Tap mode: The BPM is input manually by tapping the
[TAP (AUTO)] button. When the [TAP (AUTO)] button is pressed,
tap mode is set.
! The BPM measurement range in the AUTO mode is 70 BPM to
180 BPM. For some tracks, correct measurement may not be
possible.
! BPMs set in tap mode are only valid for the beat effect function.
= Inputting the BPM manually (p. 29 )
b EQ/ISO (HI, MID, LOW) controls
The control can be switched between [EQUALIZER] or [ISOLATOR]
through the settings on the [UTILITY] screen.
Adjusts the sound quality of each channel.
=
Adjusting the sound quality (p. 28 )
c Channel level indicator
Displays the sound levels of the respective channels.
d Master level indicator
Displays the level of sound output for the master channel.
[CLIP] blinks when the output level is too high.
— Blinking slowly: indicates that the sound is about to be distorted.
— Blinking fast: indicates that the sound is distorted.
e BEAT EFFECTS selector switch
Switches between the various beat effects.
= Using the beat effect function (p. 28 )
f COLOR control
Changes the parameters of the SOUND COLOR FX of the different
channels.
= Using the sound color FX function (p. 29 )
g Effect channel selector switch
Switches to the channel to which the beat effect is applied.
= Using the beat effect function (p. 28 )
h CUE (CH1, CH2, MASTER) buttons
Monitors the sound of the channel you want to monitor with the
headphones.
= Monitoring sound with headphones (p. 28 )
i TIME control
Controls the temporal parameter of the beat effect.
= Using the beat effect function (p. 28 )
j CROSS FADER CURVE (THRU, , ) (crossfader
curve selector switch)
Sets the curve characteristics of the crossfader.
k LEVEL/DEPTH control
Adjusts the quantitative parameter of the beat effect.
= Using the beat effect function (p. 28 )
l ON/OFF button
Turns the beat effect on and off.
= Using the beat effect function (p. 28 )
m Channel fader
Switches the channel fader’s curve characteristics from
[ , , ] through the settings on the [UTILITY] screen.
— [ ]: The curve rises suddenly at the back side.
— [ ]: Creates a curve that rises gradually on average.
— [ ]: Creates a curve that rises steeply at the front side.
n Crossfader
The sound of the respective channels is output according to the
curve characteristics selected with the [THRU, , ] selector
switch.
Loading ...
Loading ...
Loading ...