Loading ...
Loading ...
Loading ...
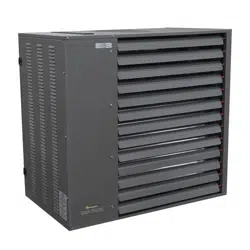
Large Unit Heater
7
Operating Instructions and Owner’s Manual
CAUTION: Do not install units below 7’ measured from the
bottom of the unit to the floor in commercial applications
(unless unit is properly guarded to provide user protection
from moving parts).
Be sure no obstructions block air intake and discharge of unit
heaters.
The minimum distance from combustible material is based
on the combustible material surface not exceeding 160�°F.
Clearance from the top of the unit may be required to be
greater than the minimum specified if heat damage, other
than fire, may occur to materials above the unit heater at the
temperature described.
Allow 18” clearance at rear (or 12” beyond end of motor at
rear of unit, whichever is greater) and access side to provide
ample air for proper operation of fan.
VENTING
Mr. Heater unit heaters must be vented as described here to properly
direct the flue gases from the unit to the outside atmosphere. The
venting can terminate vertically through the roof (up) or horizontally
through a sidewall (sideways).
WARNING: Gas-fired heaters must be vented. Do not operate
unvented. A built in power exhauster is provided. Additional
external power exhausters are not required or permitted.
Insufficient ventilation and/or improperly sealed vents may
release gas into the building which could result in health
problems, carbon monoxide poisoning, or death. Improper
venting may result in fire, explosion, injury, or death.
CAUTION: Installation must conform with local building
codes or in the absence of local codes, with Part 7, Venting
of Equipment, of the National Fuel Gas Code, ANSI Z223.1
(NFPA 54) – latest edition. In Canada installation must be in
accordance with CSA B149.1.
Mr. Heater heaters come with a factory-installed vent for attaching
vent pipe to the heater. Attach the venting material to the adapter
with three (3) non-corrosive sheet metal screws. If necessary, drill pilot
holes prior to attaching the vent pipe. The venting material must not
be smaller than the factory installed adapter.
WARNING: Do not vent this appliance into another heater’s
vents or through a masonry chimney.
Do not use dampers in the heater vent pipe.
The venting system must be exclusive to a single appliance
and no other appliance is allowed to be vented into it.
Precautions must be taken to prevent degradation of
building materials by flue products.
Single Wall vent pipe must not pass through any unoccupied
attic, inside wall, concealed space, or floor.
Un-insulated single wall vent pipe must not be used
outdoors for venting appliances in regions where winter
design temperature is below freezing.
REPLACING EXISTING EQUIPMENT
If the unit heater is replacing existing equipment and using an existing
vent system, inspect the venting for proper size and horizontal pitch as
directed in these instructions and the latest edition of the National Fuel
Gas Code, ANSI Z223.1 (NFPA 54) or CSA B149.1 Installation Code.
Determine that there is not blockage, restriction, leakage, corrosion,
or other deficiencies that can cause hazards. The vent pipe should
be corrosion-resistant galvanized steel of a thickness that meets the
National Fuel Gas Code. Minimum thickness for connectors varies
depending on the pipe diameter. Never vent this unit heater with PVC
or plastic pipe.
WARNING: If replacing an existing heater, vents may require
re-sizing. Improperly sized venting systems can result in vent
gas leakage or condensation. Refer to the National Fuel Gas
Code ANSI Z223.1 (NFPA 54) or CSA B149.1 - latest edition.
Failure to follow these instructions can result in serious injury
or death.
GENERAL VENTING REQUIREMENTS
NOTICE: The vent is a passageway, vertical or nearly so, used to
convey flue gases from an appliance, or its vent connector, to the
outside atmosphere. The vent connector is the pipe or duct that
connects a fuel-gas burning appliance to a vent or chimney.
Do not intermix different vent system parts from different
manufacturers in the same venting system.
Vent connectors serving Category I and Category II Appliances shall
not be connected into any portion of mechanical draft systems
operating under positive pressure.
All joints shall be secured with at least two corrosion resistant screws.
All joints must be checked for gas tightness after installation.
CAUTION: The heater and the venting system shall be
inspected once a year by a qualified service agency.
Configuration of the vent termination determines the category type.
All model heaters must be installed in accordance to the requirements
of this section, as well as the requirements of its category
determination, as described in this manual.
All Mr. Heater Model Requirements:
• Use vent pipe material that is corrosion-resistant galvanized steel
of a thickness that meets the National Fuel Gas Code.
• Do not exceed a maximum vent length as indicated in Table 4.
• Maintain a minimum vent length of 3 feet (914mm).
• Have all vent pipe seams or connectors fastened together with at
least three corrosion resistant sheet metal screws (supplied by the
installer).
• Maintain a 6 inch clearance around all single wall vent pipe from
any combustible materials. For double wall vent pipe (type B)
follow the vent manufacturer’s clearance to combustibles.
• The equivalent length for a 4 inch 90��elbow is 5 feet.
• The equivalent length for a 6 inch 90��elbow is 7 feet.
• Avoid using more than two 90��directional changes in the
venting system.
• Suspend and secure all horizontal runs at points no greater than 3
feet (914mm) apart.
• Vent termination must maintain a minimum distance of 6 feet
from any mechanical air supply inlet.
• Vent must terminate a minimum of 4 feet below, 4 feet
horizontally from, or 1 foot above any window or door that may
be opened or gravity air inlet into the building.
Loading ...
Loading ...
Loading ...