Loading ...
Loading ...
Loading ...
Large Unit Heater
18
Operating Instructions and Owner’s Manual
• The proper mounting height is observed for the application.
• All clearance to combustible distances or service clearances are
maintained.
• The unit is properly isolated or installed to prevent excessive
vibration.
• The unit is level horizontally.
• Venting is properly installed in accordance with this manual and
any applicable codes.
• Combustion air supply is sufficient to support proper operation at
all times.
See Annex 1 for a start up and performance check list to fill for each
unit.
Verify Proper Inlet Pressure
WARNING: Before starting up the unit, smell all around
the unit heater for gas. Be sure to smell next to the floor
because some gas is heavier than air and will settle on the
floor.
When turning the gas shut off valve, only use your hand. Never use
tools to turn the knobs, as it may damage the valve resulting in a fire
or explosion. If the knob is stuck, do not try to repair it.
Contact a qualified service technician or your local gas company.
To verify the proper inlet pressures, follow the following steps:
1. Turn off the gas supply at the manual gas shut off valve.
2. Unscrew the screw inside the inlet pressure hose connector. See
Figure 13.
3. Turn on the gas supply at the manual gas shut off valve.
4. Turn on the electrical power to the unit heater.
5. To light the main burners, set the room thermostat to a point
above room temperature.
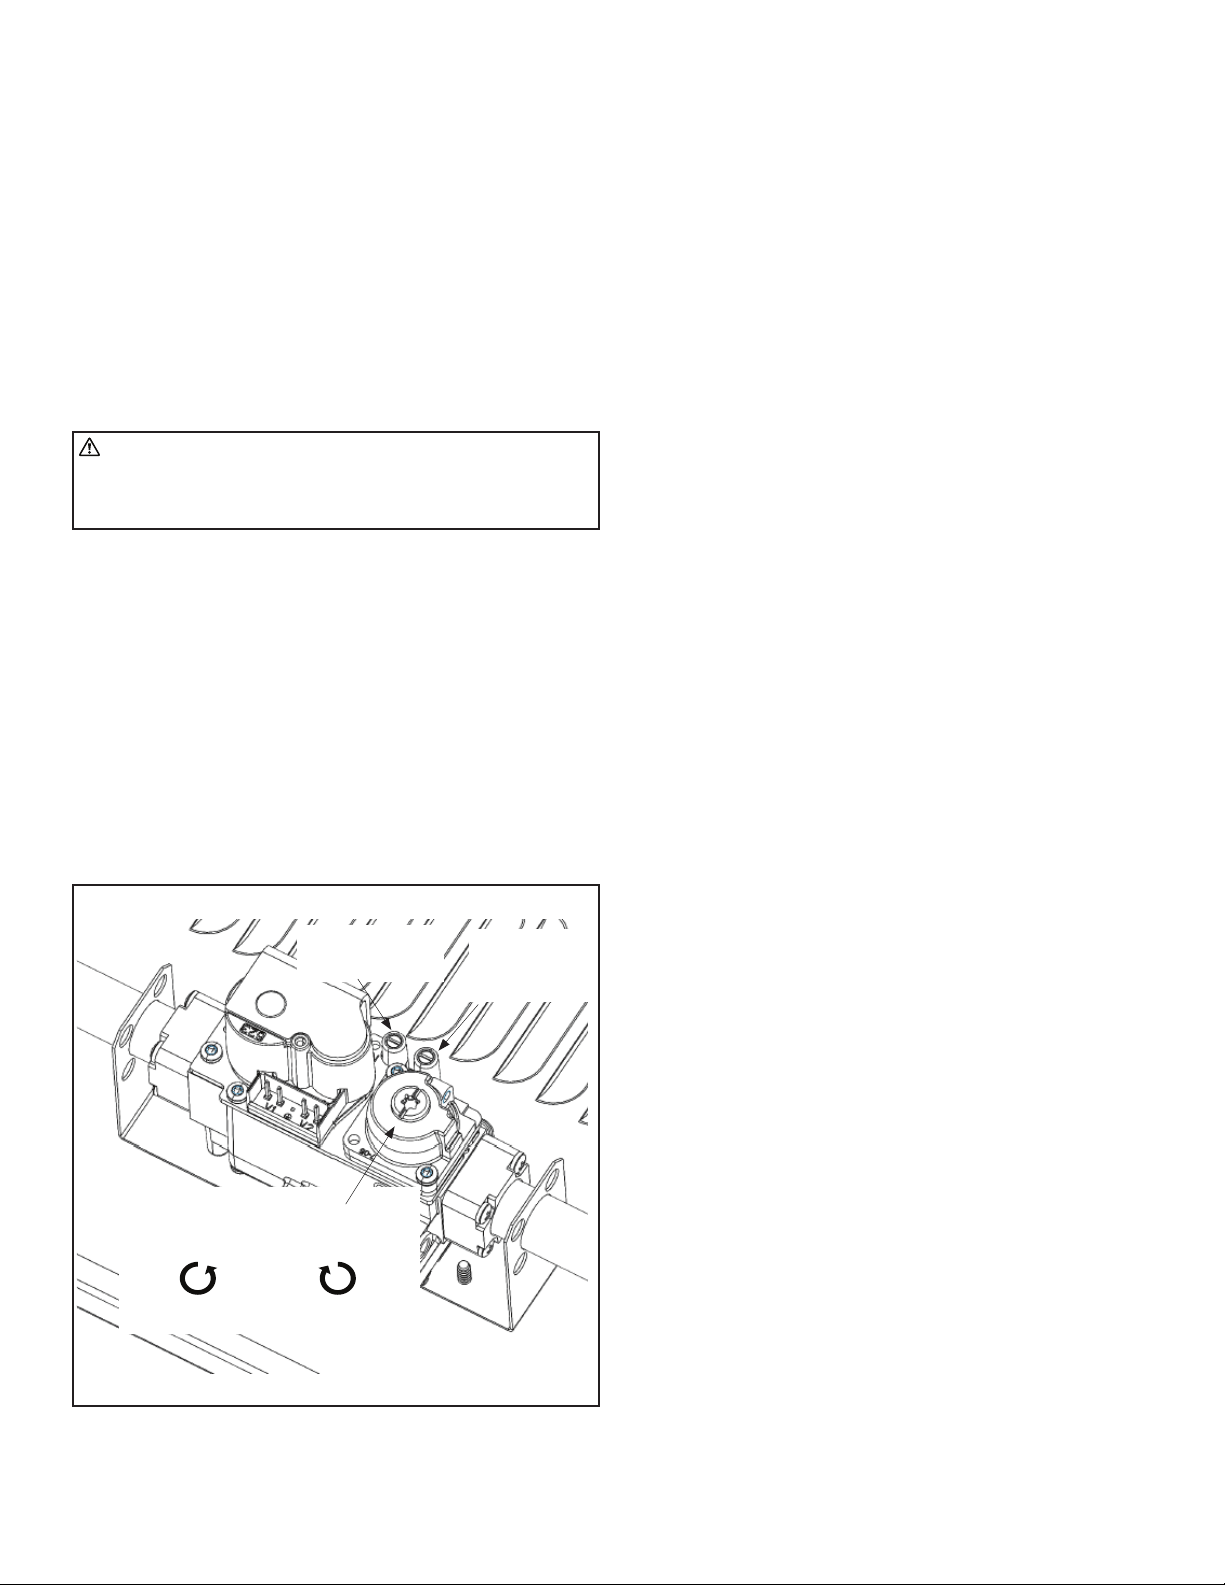
Gas Valve
FIGURE 13
Inlet Pressure:
Unscrew this screw to
read the pressure.
Manifold Pressure:
Unscrew this
screw to read the
pressure.
Manifold Pressure Regulation:
• Remove the cap with a flat blade screw
driver:
• Act on the plastic regulator:
Decrease pressure
Counter-clockwise
Increase pressure
Clockwise
FIGURE 13
NOTICE: This unit heater is equipped with an ignition device, which
automatically lights the burner. This unit heater cannot be lit manually.
Do not try to light the burner by hand.
The minimum and maximum inlet gas supply pressure are
indicated in Table 5 and in Table 6.
Verify minimum inlet gas supply pressure:
6. Turn on all other gas appliances that are on the same supply
line. If the other gas appliances have multiple inputs, set it to the
maximum rating.
7. Observe the pressure rating on the pressure gauge.
Verify maximum inlet gas supply pressure:
8. Turn off all other gas appliances on the same supply line.
9. Observe the pressure reading on the pressure gauge.
IMPORTANT: If the inlet gas supply pressure is not within the
minimum and maximum range as shown on the rating plate, contact
your gas supplier.
Removing pressure gauge from inlet port on gas valve:
10. Set thermostat or other control device to the lowest set point.
11. After heater has completed the post-purge cycle, turn off the
electrical power to the unit heater.
12. Turn off the gas supply at the manual gas shut off valve.
13. Remove the pressure gauge tube.
14. Close the screw inside the inlet pressure hose connector.
15. Leak check using a soap solution or equivalent method as
described in ANSI Z223.1 (NFPA 54).
Verify Manifold Pressure
Before starting up the unit, smell all around the unit heater for gas.
Be sure to smell next to the floor because some gas is heavier than air
and will settle on the floor.
When turning the gas shut off valve, only use your hand. Never use
tools to turn the knobs, as it may damage the valve resulting in a fire
or explosion. If the knob is stuck, do not try to repair it, contact a
qualified service technician or your local gas company.
To verify the proper manifold pressure, follow the following
steps:
1. Turn off the electrical power to the unit heater.
2. Unscrew the screw inside the manifold pressure hose connector
(see Figure 13).
3. Connect the pressure gauge tube and manometer.
4. Turn on the electrical power to the unit heater.
5. To light the main burners, set the room thermostat to a point
above room temperature.
NOTICE: This unit heater is equipped with an ignition device, which
automatically lights the burner. This unit heater cannot be lit manually.
Do not try to light the burner by hand.
6. After the unit has successfully ignited, wait five minutes prior to
taking any readings. The unit heater must be in a steady state of
operation prior to taking a manifold pressure reading.
7. While waiting for the unit to stabilize, observe the characteristics
of the flame. The flame should be stable and should not lift form
any burner. The burner color should be light blue, and not create
excessive noise.
8. After five minutes, observe the pressure rating on the pressure
gauge.
Loading ...
Loading ...
Loading ...