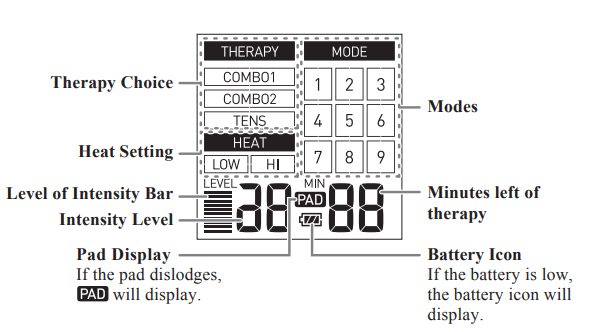
1. 2 Heating modes, low or high, warms up the muscle. 2. 3 therapy choices (COMBO 1, COMBO 2, TENS) 3. 9 pre-set modes work with each therapy choice. 4. 20 intensity levels (1 low to 20 high). 5. Pair of Gels (durable, re-usable, up to 30 uses). (Only use OMRON® manufactured pads with gels with the unit). 6. Automatic 30 minute shut off. 7. Big screen lets you clearly control your therapy with mode, intensity level and minutes left. 8. Low battery icon () displays to remind you to charge the unit. 9. displays if the pad falls off
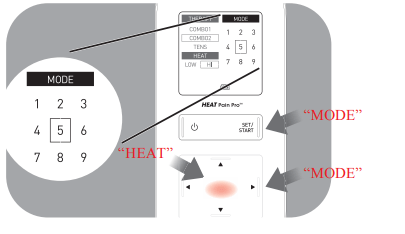
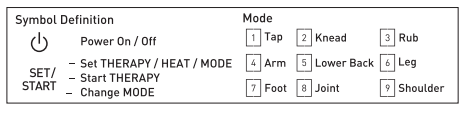
Buttons and Their Functions
Note: Low temperature - 107 °F (42 °C)
Hi temperature - 110 °F (43 °C)
Actual temperature may vary due to skin condition, age, location of pain and more.
INSPECT UNIT AND RECHARGE BATTERY
Before using your unit, inspect these things. 1. The cord is not broken. 2. The gel is not damaged. 3. The cord with pads connection is not broken. 4. The unit is intact and working.
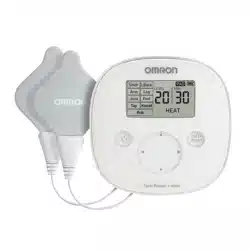
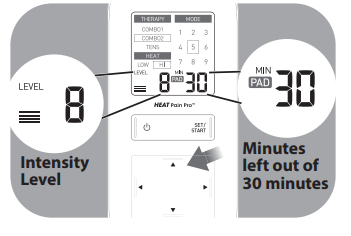
Before first time use:
We recommend charging the battery to a full 100 % charge.
After first time use:
Once fully charged, the battery will last for (4) 30 minutes uses on average. It takes about 5 hours to charge once battery is empty.
Note: If not using the unit for 3 months, recharge it. Battery may not charge at all under extreme environmental conditions, extreme high heat or cold temperatures.
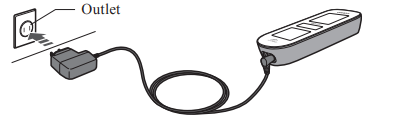
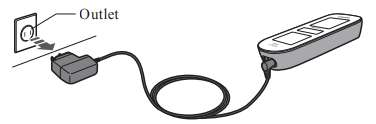
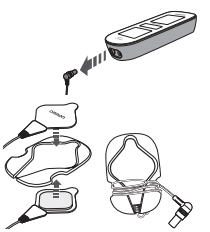
Step 1 – Connect the AC Adapter to the Jack on the Unit
Step 2 – Insert the Power Plug into an outlet
Note: Do not use another AC adapter other than the one provided.
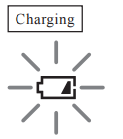
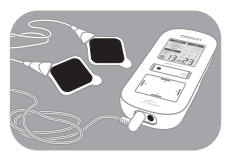
When charging the battery, the battery icon blinks on the screen.
When fully charged, the icon will display shortly on the screen, then power off. Press the (power) button to see if the battery is fully charged.
Press the (power) button when the display is off. Then the battery icon appears on the display.
Battery Icon
Note: While the battery is charging, the main unit does not work.
Battery life
Rechargeable battery will last for 500 uses when fully charged and under the following conditions: new battery was fully charged, used 1 time/day in normal temperatures of 73.4 °F (23 °C). Battery life depends on usage and storage conditions.
Note: Temperature during battery charging should be cool and dry, +41 to +95 °F (5 to +35 °C).
Step 3 – Unplug the AC Adapter and Power Plug Once the Battery is Fully Charged
ASSEMBLY STEPS
Step 1 – Prepare Pads
Put the jack into the bottom left side of the main unit. Place the pads (dark side up) onto a flat surface.
Note: Do not turn the power on before placing the pads on the body.
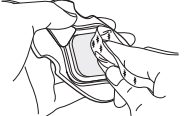
Step 2 – Assemble Gels
Remove the Gels from the sealed plastic container.
Note: The Pad and the Gel must be used together for safety and effectiveness. Clean and dry affected area so it’s free of all lotions/oils/sweat.
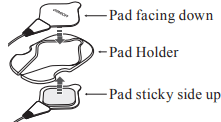
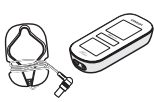
Storing the Pads on the Pad Holder
Remove the plastic film and place the sticky side of the gel on either side of the pad holder.
Step 3 – Place Gels onto the Pads
Each gel has 2 plastic films. Remove the blank plastic film and place it squarely onto the dark side of the pads.
Make sure the gel lays evenly and securely with no bubbles, bending or missing pieces. Check for damage and check the adhesion before each therapy session.
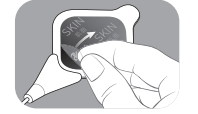
The gel should read “SKIN” on top. Remove the “SKIN” side’s plastic film and place onto the skin.
Note: Do NOT turn unit on until pads with gels are on your skin. You MUST USE BOTH PADS with GELS or stimulation will not work
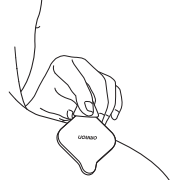
Step 4 – Attach the Pads to the Body
Make sure that pads stick to the skin.
For optimal therapy:
Place pads on either side of the pain, not directly on the pain.
Place pads at least 1 inch apart.
MUST USE TWO PADS at a time for therapy to work.
Do not overlap pads or put on top of each other.
Do not add spray, lotions or creams to skin or pads.
Do not share pads.
The pads and gel are not made with natural rubber latex.
GET STARTED WITH YOUR THERAPY
(USE FOR A MAXIMUM OF ONE 30 MINUTES PER SESSION)
Step 1 – Pad Placement
Clean and dry affected area so it is free of all lotions/oils/sweat. The PAD with GEL should be applied only to normal, intact, clean, healthy skin that is not experiencing any swelling or inflammation.
Before starting your therapy, rate your pain from 1 low to 10 high. This mental check gives you a basis you can compare to once the session is complete.
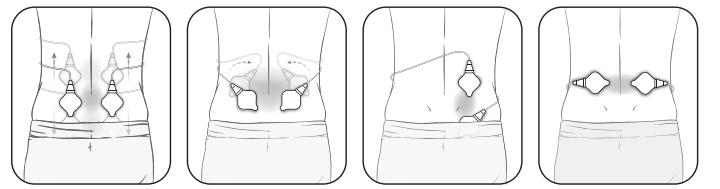
LOWER BACK
Attach both pads on the lower back according to your pain. Place pads on muscle of the back, not on spine, for optimal therapy.
LOWER BACK
Attach 1 pad below and above the region in pain, both on same side.
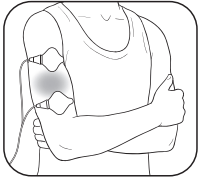
ARM
Attach both pads on either side of the region where you feel pain.
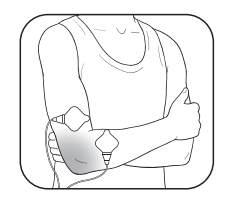
JOINT (ELBOW)
Attach both pads on either side of the joint with pain.
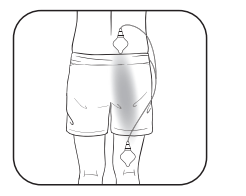
LEG (HIP & THIGH)
Attach both pads on either side of the area with pain.
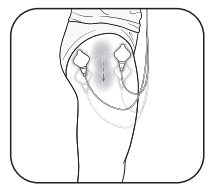
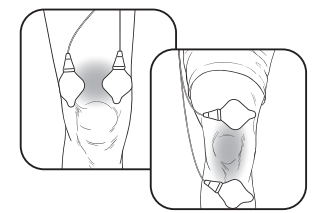
JOINT (KNEE)
Attach both pads above the knee or above and below the joint with pain.
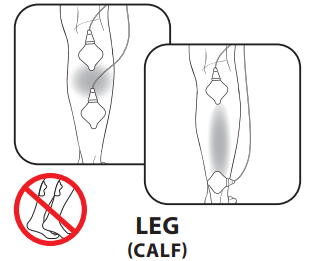
Attach both pads on the calf where you feel pain.
Pads should not be placed simultaneously on both legs, such as the calves.
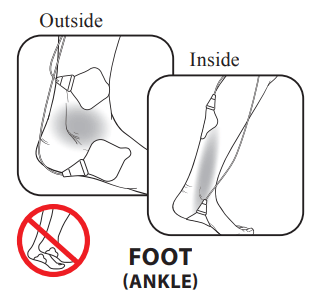
Attach pads on the left for pain on the outside of your ankle/foot. Attach the pads on the right for pain on the inside of your ankle/foot.
Do not put the pads on the bottom of both feet at the same time.
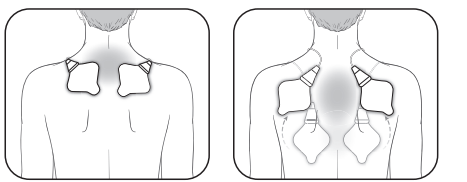
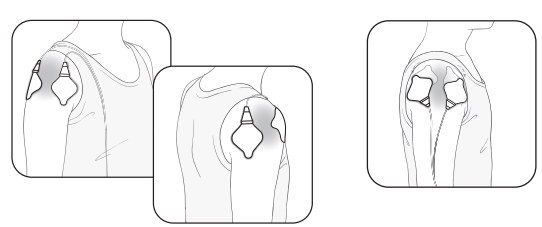
SHOULDER
Attach both pads on the shoulder according to your pain.
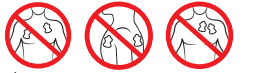
Do not use near the heart, on both sides of the chest cavity or across your chest becaus
SHOULDER
Attach 1 pad on the front and on the back of your shoulder.
TENS Only 1. Pick Therapy 2. Pick Mode 3. Adjust Power Level of Intensity
Note: TO CHANGE THERAPIES, Turn Main Unit OFF, then ON again
COMBO 1 Therapy*
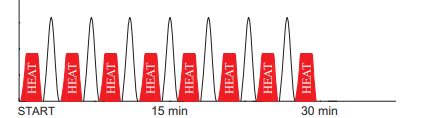
COMBO 1 Therapy delivers 15 minutes of heat followed by 15 minutes of any one of the TENS modes for a total of 30 minutes of therapy.
COMBO 2 Therapy*
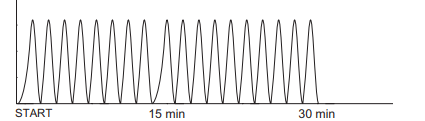
COMBO 2 Therapy delivers heat and TENS alternately for a total of 30 minutes of therapy.
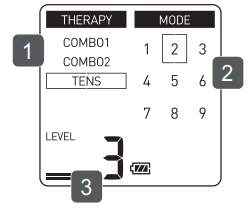
TENS Therapy*
TENS Therapy provides only TENS for 30 minutes.
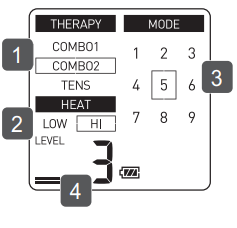
Step 3 – Pick the Therapy
Push (power) button to turn on. Select 1 of 3 therapies using the ▲▼ (up/down) arrow buttons. Next, push SET/START to lock in therapy.
COMBO 1 - Heat 15 min, TENS 15 min
COMBO 2 - Short sessions of HEAT / TENS/ HEAT / TENS alternating for 30 min.
TENS - Electrical Stimulation only for 30 min.
Note: All therapies automatically stop after 30 minutes. TO CHANGE THERAPIES, Turn Main Unit OFF, then ON again.
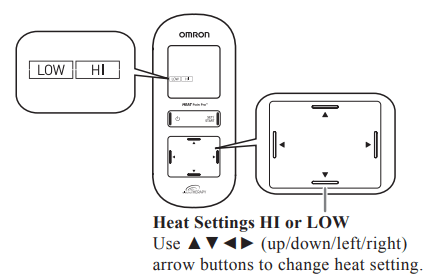
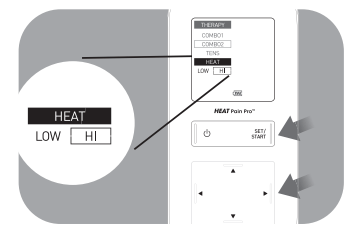
Step 4 – Pick Heat Setting
Select HEAT HI or LOW using the ◄► (left/right) arrow buttons. Next, push SET/START to lock in heat setting.
Note: Heat setting applies only to COMBO 1/COMBO 2 Therapies.
Note: Low temperature - 107 °F (42 °C) Hi temperature - 110 °F (43 °C) Actual temperature may vary due to skin condition, age, location of pain and more.
Step 5 – Pick 1 of 9 Modes
Select MODE by pushing the SET/START button. To CHANGE MODES, use the ▲▼ (up/down) and ◄► (left/right) arrow buttons.
Note: COMBO 1 & COMBO 2 therapies begin with “HEAT” and you will see a RED GLOW. When TENS is in use the RED GLOW will disappear.
How to switch modes
The unit automatically defaults to the last mode selected. Push SET/START button to switch modes. Use ▲▼ (up/down) and ◄► (left/right) arrow buttons to move from mode to mode. Push SET/ START to lock in the mode.
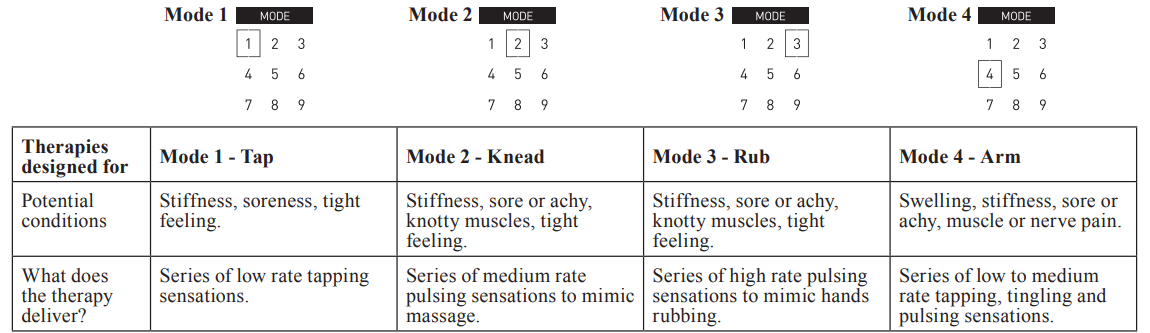
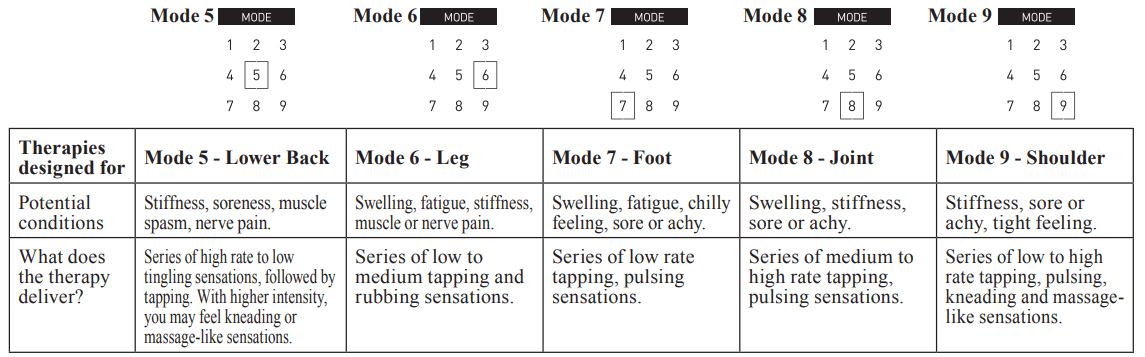
How to select the right mode
Any of the modes can be used on body parts or pains described in this manual or Quick Start Guide/Pad Placement Guide. Select the mode that feels comfortable for your unique pain.
Note: See side of device for easy reference of operation.
Step 6 – Adjust the Level of Intensity (1 Low - 20 High)
Start at the lowest intensity level and slowly increase it by pushing the ▲ (up) or ► (right) arrow button. You should feel a gentle pulsing sensation. When the main unit is in “TENS” stimulation, you can adjust the power level of intensity. Use any of the arrow buttons to CHANGE THE POWER LEVEL OF INTENSITY.
How do I pick the right intensity level for my pain?
Each time you press the ▲ (up) or ► (right) or ▼ (down) or ◄ (left) arrow button, it moves to another level. If the stimulation sensation becomes weaker or disappears, increase the intensity until it is restored. But, if the sensation is at all uncomfortable, press the ▼ (down) or ◄ (left) arrow button to decrease the intensity.
Press the ▲ (up) or ► (right) arrow button for higher intensity.
Press the ▼ (down) or ◄ (left) arrow button for lower intensity.
How long is the therapy?
The unit will operate automatically for 30 minutes before it shuts off. We recommend a maximum of one 30 minute therapy in one sitting, up to 3 times/day.
The screen shows you how many minutes are remaining.
HOW TO CONTROL AND REDUCE YOUR PAIN
When should I start therapy?
Use as soon as your pain begins. Start with 1 session (the unit automatically turns off at 30 minutes). Turn off with pads still on and RATE YOUR PAIN again (1 low to 10 high).
Get to your pain early
If you get to your pain early, it may prevent the pain from becoming worse, or even chronic. It’s better for you to get it under control sooner so that it does not reach a high pain threshold where it limits your daily activities.
How long should you use it?
Start with one 30 minute session. Always turn the unit off with pads still on. Rate your pain to check your progress, 1 low to 10 high. Stop therapy session if pain has reduced or stopped.
When to stop using the unit?
1. If you experienced an adverse reaction (skin irritation/ redness/burns, headache or other painful sensation, or if you feel any unusual discomfort).
2. If your pain does not improve, becomes seriously chronic and severe, or continues for more than 5 days.
Remember, the unit does not cure your pain or the original cause of the pain. It provides temporary relief or reduction of pain so that you can control your life and activities better.
CLEANING AND STORAGE
The Cord with Pads, and the Main Unit are permanent and CAN BE CLEANED, but you cannot clean the Gels.
Cleaning the main unit and the cord with permanent pads
1. Remove the Gel and discard before cleaning the Pad.
2. When the Pad or Main Unit have become dirty or soiled, wipe the surface with a soft cloth moistened with water or a neutral detergent.
Do not get the Main Unit or cord with pads wet.
Do not wash the pads with running water.
3. Let air dry before placing new Gels onto the Pads, do not use old gels.
4. Gels are replaceable and can be purchased when needed by calling 1-800-634-4350 or go to OmronHealthcare.com.
Cleaning the unit
1. Turn the unit off and disconnect the cord with pads from the unit.
2. Clean with a lightly moistened cloth (or a cloth soaked in a neutral cleaning solution) and wipe gently.
Do not use chemicals (like thinner, benzene).
Do not let water get into the internal area.
When should you replace your gels?
If the gel no longer sticks firmly to your skin, or if more than 25 % of the gel is not in contact with your skin, replace the Gel.
Storing the pads with gels 1. Turn the unit off and remove the cord from the bottom of the unit. 2. Remove the pads from your body. 3. Leave the cord connected to the pads. Place the pads on the pad holder, 1 pad on each side with the sticky side of each pad on the pad holder. 4. Wrap the pads with gels cord around the pad holder.
Storing the main unit and the pads with gels
Do not keep in areas subject to direct sunlight, high or low temperatures, humid area, near to fire, vibration, or shock.
Try not to bend or fold the cord with pads and gels during therapy or during storage.
Storage temperature +32 to +104 °F (0 to +40 °C) 30 to 80 % relative humidity.
Do not keep at places that can be easily reached by children.
Do not wrap the cord around the unit because it may damage the cord.
For information about how to dispose of the used battery and unit
Consult the guidelines of your city, county or state.
TROUBLESHOOTING
If this happens...
Possible causes...
Try this solution...
The intensity is not felt.
Very weak intensity level.
Are you using only 1 pad?
Place the other pad on your skin. You must use BOTH PADS for therapy to work.
Have you removed the transparent film from the gels?
Peel off the film on the adhesive surface of gels.
Are the pads stacked together or do pads overlap?
Check placement of pads. Refer to “Pad Placement Guide”.
Is the cord properly connected to the unit?
Connect the cord plug correctly into the jack at the bottom of the unit.
Is the intensity setting too low?
Press the ▲ (up) arrow button.
Is the gel damaged?
Replace the Gel.
The intensity is not felt.
Very weak intensity level.
Does the battery have enough charge?
Charge the battery fully.
The skin turns red or feels irritated.
Is the Gel dirty?
Replace the Gel.
Is therapy time too long?
Shorten therapy to less than 30 minutes.
Are the 2 pads attached properly to the body?
Refer to the “Pad Placement Guide” and attach correctly.
Is the gel surface worn out?
Replace both gels at the same time.
No power source.
Are the batteries depleted?
Recharge the battery fully.
If this happens...
Possible causes...
Try this solution...
No power source.
Is the battery properly charge?
Check if the AC adapter is properly connected to the unit.
Check if AC adapter is connected to a power outlet.
Power cut off during use.
Is the battery charge extremely low?
Recharge the battery fully.
Is the cord broken?
Replace the cord.
Are you using only 1 pad?
Put the other pad on your skin. You must use BOTH PADS for therapy to work.
Battery icon is depleted or close to empty.
Is the battery fully charged?
Recharge the battery fully.
The gel does not stick to skin.
Have you removed the transparent film from the gels?
Peel off the film on the adhesive surface of gels.
Is the pad wet? or Is your skin too wet?
Air dry the gel or skin.
The gel may be damaged.
Replace the gel.
Is there too much hair on your skin?
Shave the immediate area for proper pad adhesion.
The pad gel does not stick to skin.
Is your skin too wet?
Dry the skin area.
Were the gels stored under high temperature, high humidity, or direct sunshine?
Replace both gels.
The main unit or the AC adapter is abnormally hot when charging the battery.
The main unit or the AC adapter may be damaged.
Unplug the AC adapter from the outlet and the cord plug from the main unit immediately.
is displayed.
Only 1 pad is attached, or both pads are not attached.
Re-attach dislocated pad(s) onto the skin firmly.
Have you removed the transparent film from the gel?
Peel off the film on the adhesive surface of gels.
Is the cord properly connected to the main unit?
Connect the cord plug correctly into the jack at the bottom of the main unit.
Is the adhesive surface of gels dirty or dry?
Replace the Gels.
If this happens...
Possible causes...
Try this solution...
The pads are not getting hot. The RED GLOW does not come on.
Is the cord properly connected to the unit?
Check if the cord is properly connected.
Is the cord disconnected or short-circuited?
Replace the cord.
The Pads with Gels are too hot on the skin and there is a burning scent.
Is the cord shortcircuited?
Stop using the unit immediately, and replace the cord.
Is the Pad with Gel broken or bent?
Stop using the unit immediately, and replace the entire Cord with Pads and/or Gels.
Have you changed the heat setting too frequently during the therapy?
Stop using the unit immediately, and do not change the heat setting many times during the session.
If this happens...
Possible causes...
Try this solution...
E1 is displayed.
Is the cord properly connected to the unit?
Check if the cord is properly connected.
If the error is still displayed, the cord may be broken (damaged).
Replace the cord.
E2 is displayed.
Is the cord internally short-circuited?
Stop using the unit immediately, and replace the cord.
E3 is displayed.
Are there any abnormalities in the main unit of the device?
The main unit may be damaged.
Stop using the unit immediately, and contact OMRON Customer
Service Center.
E4 is displayed.
The unit is being used outside of the operating temperature.
Leave the unit within the operating temperature (+50 to +104 °F (+10 to +40 °C)) for a while before use.
The operating time is short, or the unit does not operate, even when the battery is fully charged.
This may be due to the life of the rechargeable battery. However, the battery cannot be replaced.
#1 Is this as powerful as the max power relief unit?
The power levels are comparable but the pad size is larger on the Max Power Relief so it may feel that more power is coming through the Max Power Relief product. The benefit of the Heat Pain Pro is that it alternates TENS therapy with Heat therapy. Note, the pads cannot be cross used from the Heat Pain Pro to the Max Power Relief. They each have their own special pads that allows the product to work.
Yes they certainly are, n hold a charge very well. I love this product n have recommended it to many people, all of whom also have had excellent results!!

 ) displays to remind you to charge the unit.
 displays if the pad falls off
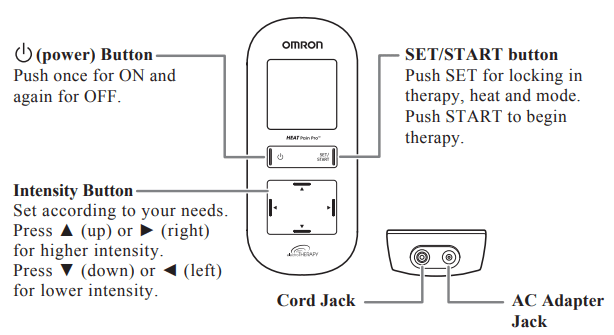
 (power) button to see if the battery is fully charged.
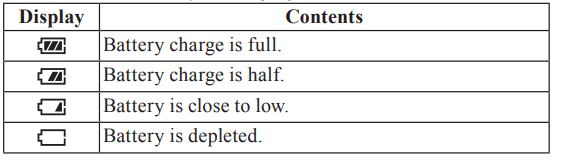

 (power) button to turn on. Select 1 of 3 therapies using the ▲▼ (up/down) arrow buttons. Next, push SET/START to lock in therapy.
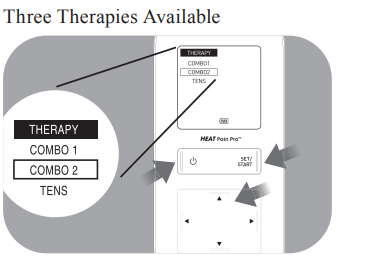


 is displayed.