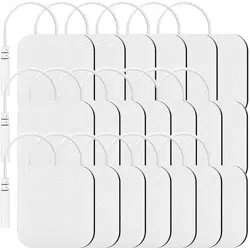
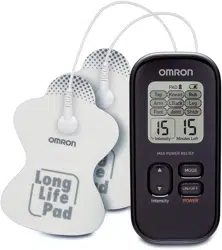
3. Pair of pads (durable, re-usable, washable, up to 150 uses).
(Only use OMRON manufactured pads or cords with this unit).
4. Automatic 15 minute shut off.
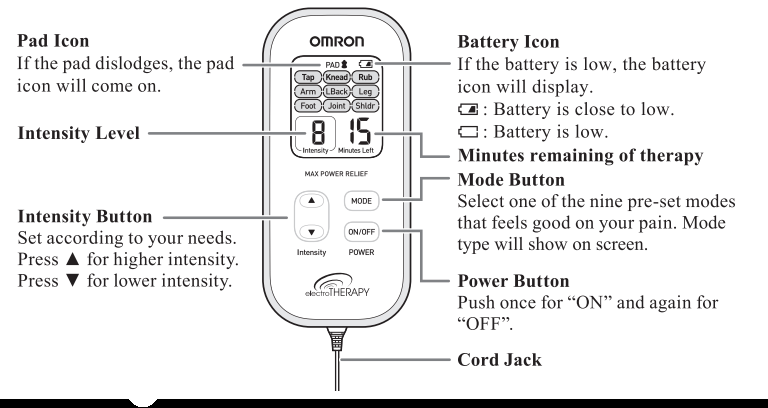
5. Big screen lets you dearly control your therapy with mode, intensity level and minutes left
6. Low battery Icon displays to remind you to replace the batteries.
7. Pad Icon displays if pad falls off,
ASSEMBLY STEPS
Before using your unit, inspect these things.
1. Cord is not broken.
2. Pad gel is not damaged.
3. Electrode cord connection is not broken.
4. Unit Is intact and working.
5. There is no battery leakage.
STEP 1 - INSERT BATTERIES
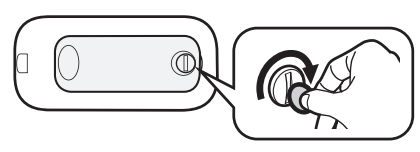
1. Remove the battery cover on the back using a coin.
2.Insert batteries e the signs correspond when inserting batteries.
3. Reinstall the battery cover. Tighten with a coin.
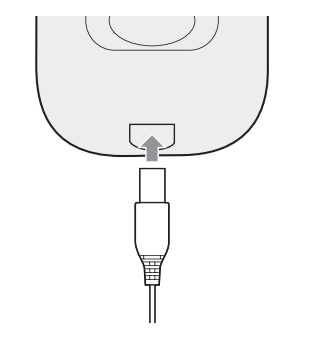
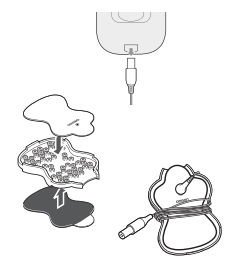
STEP 2 - ATTACH ELECTRODE CORD TO THE MAIN UNIT
Attach the electrode cord plug to the bottom of the main unit.
STEP 3 - SNAP EITHER ELECTRODE CORD TO EACH OF THE PADS
For the first time, take the pads out of the sealed package.
Do NOT turn unit on,until pads are on yonr skin.
You MUST USE BOTH PADS or stimulation will not work.
NOTE: Pads will not stick if the skin has too much hair. We recommend shaving the area for effective treatment.
STEP 4 - REMOVE AND DISCARD PLASTIC FILM FROM PADS
Remove the clear plastic film from the back of the pad.
Discard the plastic film backing as well as the clear packaging.
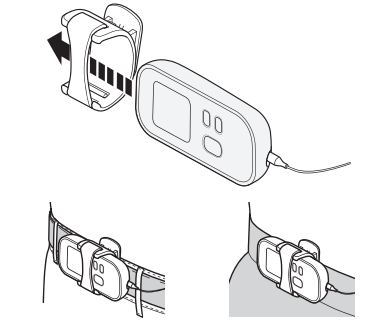
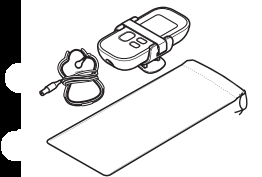
STEP 5 - ATTACH THE UNIT TO THE BELT CLIP
GET STARTED WITH YOUR THERAPY
(USE FOR A MAXIMUM OF 30 MINUTES PER SESSION)
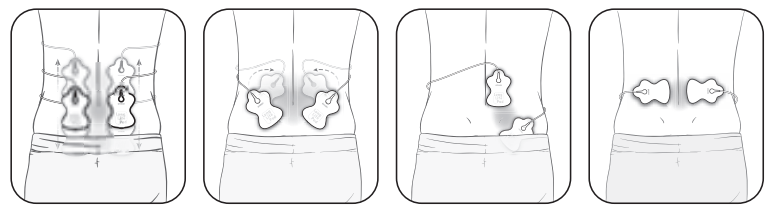
STEP 1 - PAD PLACEMENT
Before starting your therapy, rate your pain from 1 low to 15 high. This mental check gives you a basis you can compare to once the session is complete.
LOWER BACK
Attach both pads on the lower back according to your pain.
Place pads on muscle of back, not on spine, for optimal therapy.
LOWER BACK
Attach one pad below and above the region in pain, both on same side.
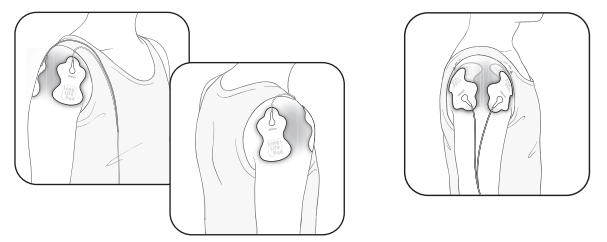
ARM
Attach both pads on either side of the region where you feel pain.
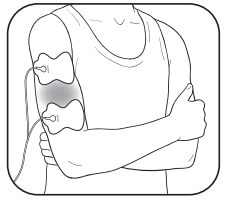
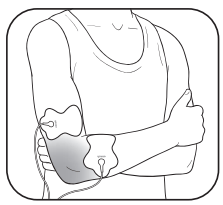
JOINT (ELBOW)
Attach both pads on either side of the joint with the pain.
LEG (HIP&THIGH)
Attach both pads on either side of the area with pain.
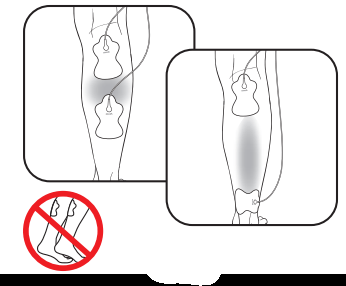
JOIN ( KNEE )
Attach both pad above the knee or above and below the joint with pain.
LEG ( CARF )
Attach both pad on the calf where you feel pain
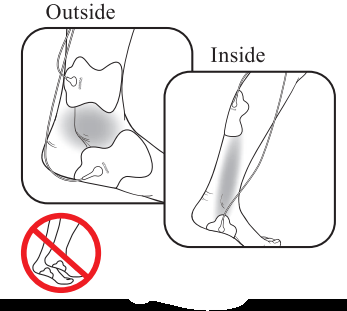
FOOT ( ANKLEE )
Attach pad on the lelf for pain on the outside of your ankle/foot. Attach the pads on the right for pain on the inside of the ankle/foot
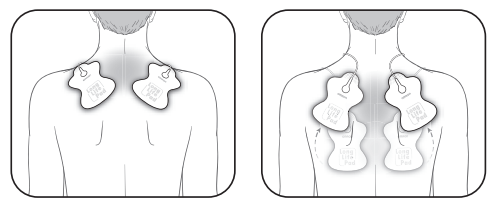
SHOULDER
Attach both pads on the shoulder according to your pain
SHOULDER
Attach one pad on the front and on the back of your shoulder.
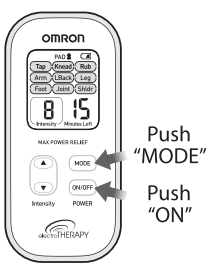
STEP 2 - SELECT 1 OF 9 MODES
Push "ON/OFF"
Choose 1 of the 9 modes. Modes cannot be combined
Choose a massage-like mode
1. Tapping
2. Kneading
3. Rubbing
Or choose a pain mode:
4. Arm
5. Lower Back
6. Leg
7. Foot
8. Joint (Knee/elbow/wrist)
9. Shoulder
How to switch modes?
The unit automatically defaults to the last mode selected. Each time you push the mode button, it switches to the next mode at the lowest intensity. You can only use ONE MODE at a time.
How to select the right mode
Any of the modes can be used on body parts or pains described in this manual or Quick Start Guide/Pad Placement Guide.
Select the mode that feels right for your unique pain.
Therapies designed for
Arm
Lower Back
Leg
Foot
Potential
conditions
Swelling, stiffness, sore or achy, muscle or nerve pain.
Stiffness, soreness, muscle spasm, nerve pain.
Swelling, fatigue, stiffness, muscle or nerve pain.
Swelling, fatigue, chilly feeling, sore or achy.
What does the therapy deliver?
Series of low to medium rate tapping, tingling and pulsing sensations.
Series of high rate to low tingling sensations, followed by tapping. With higher intensity, you may feel kneading or massage-like sensations
Series of low to medium tapping and rubbing
Series of low rate tapping, pulsing sensations.
Therapies designed for
Joint
Shoulder
Tap
Knead
Rub
Potential
conditions
Swelling, stiffness, sore
Stiffness, sore or achy, tight feeling.
Stiffness, soreness, tight
Stiffness, sore or achy, knotty muscles, tight feeling.
Stiffness, sore or achy, knotty muscles, tight
What does the therapy deliver?
Series of medium to high rate tapping.
Series of low to high rate tapping, pulsing,
like sensations.
Series of low rate tapping sensations.
Series of medium rate pulsing sensations to mimic massage.
Series of high rate pulsing sensations to mimic hands rubbing.
Start at the lowest Intensity level and slowly Increase It by pushing the “(Up)” arrow button. You should feel a gentle pulsing sensations
Haw do I pick the right intensity level for my pain?
Each time you push “(Up)” or “▼ (Down)” arrow, it moves to another level. If the stimulation sensation becomes weaker or disappears, increase the intensity until it is restored. But, if the sensation is at all uncomfortable, press the down arrow to decrease the intensity.
• Press for higher intensity.
• Press ▼ for lower intensity.
How long is the therapy?
The unit will continue automatically for 15 minutes before it shuts off. We recommend a total of 30 minutes therapy in one sitting, up to 3 times/day.
The screen shows you how many minutes are remaining.
HOW TO CONTROL AND REDUCE YOUR PAIN
When should I start therapy?
Use as soon as your pain begins. Start with one session (unit automatically turns off at 15 minutes). Turn off with pads still oi and RATE YOUR PAIN again (1 low to 15 high).
Get to your pain early
If you get to your pain early, it may prevent the pain from becoming worse, or even chronic. It’s better for you to get it under control sooner so that it does not reach a high pain threshold where it limits your daily activities.
How long should you use it?
Start with one 15 minute session. Always turn unit off with pads still on. Rate your pain to check your progress, 1 low to 15 high. Stop therapy session if pain has reduced or stopped. Press “On” button to continue therapy for another 15 minute session.
When to stop using the unit?
If you experienced an adverse reaction (skin irritation/ redness/bums, headache or other painful sensation, or if you feel any unusual discomfort).
If your pain does not improve, becomes seriously chronic 4 and severe, or continues for more than five days.
What type of pain is it best for?
This therapy works best on acute pain because it is localized. Acute pain is pain in one area for less than 3 months. If you have chronic pain, you may have pain in more than one area and for longer than 6 months. Chronic pain may be compounded by other issues that this unit cannot address.
Remember, this unit does not cure your pain or the original cause of the pain. It provides temporary relief or reduction of pain so that you can control your life and activities better.
Before using, check these points to make sure everything is working properly.
1. Make sure the cord is not broken.
2. Check that the pad adhesive sticks and Is not damaged.
3. The electrode cord connection is not broken.
4. The unit Is Intact and In working order.
5. There is no battery leakage.
CLEANING AND STORAGE
The unit is designed for repeated use over time. The pads will last up to 150 uses, or 5 months (based on use 1/day). Here are important cleaning and storage instructions:
Cleaning the pads
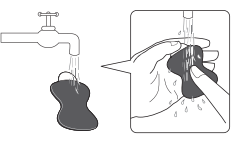
1. Turn the power off and remove the electrode cord from the pads.
2. Wash the pads when the adhesive surface becomes dirty and/or the pads are difficult to attach.
• Wash the pad softly with your fingertips under slow running cold water for several seconds (do not use a sponge/cloth/sharp object like a nail on adhesive side, do not use detergents, chemicals or soap).
3. Pads can be washed after 15 uses, approximately ten times for up to 150 uses. Do not wash the pads too long or too frequently.
4. Dry the pads and let the adhesive surface air-dry completely. Do not wipe with a tissue paper or cloth.
5. Pads are replaceable and can be purchased when needed by calling 1-800-634-4350 or go to omronhealthcare website
The life of the pads may vary by how often you wash the pads, the akin condition, and how you store the pads.
When should you replace your pads?
If the pad no longer sticks to your skin or if more than 25% of the pad’s surface is not in contact with your akin.
Cleaning the unit
1. Turn unit off and disconnect the electrode cords from the pads.
2. Clean with a lightly moistened cloth (or a cloth soaked in a neutral cleaning solution) and wipe gently.
• Do not use chemicals (like thinner, benzene).
• Do not let water get into the internal area.
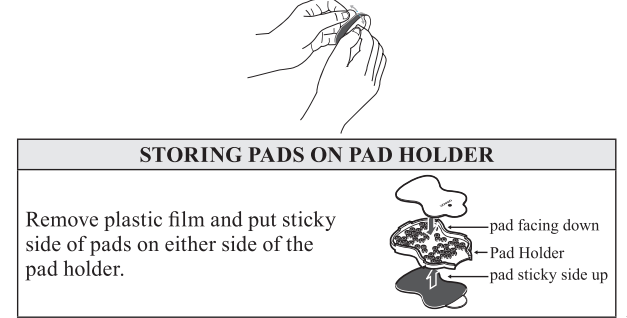
Staring the pads
1. Turn the unit off and remove the cord from the bottom of the unit.
2. Remove the pads from your body.
3. Leave the electrode cords connected to the pads.
Place the pads on the pad holder, one pad on each side with the sticky side of each pad on the pad holder.
4. Wrap the electrode cords around the pad holder.
Storing the unit and pads
• Store the unit with the belt clip on. Store the pads with the electrode cords on the pad holder on the pad holder, and put into the pouch.
• Do not keep in areas subject to direct sunlight, high or low temperatures, humid i, near to fire, vibration, or shock.

 signs correspond when inserting batteries.
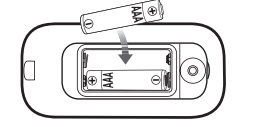
 Do NOT turn unit on,until pads are on yonr skin.
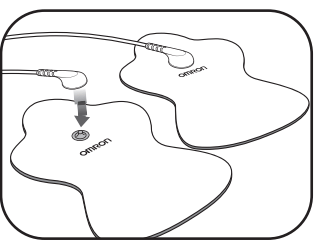


 (Up)” arrow button. You should feel a gentle pulsing sensations

 up button.