
INSTRUCTION MANUAL
TENS Therapy Pain Relief
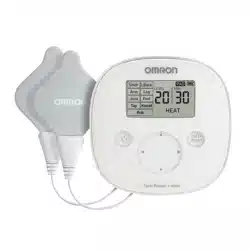
Pocket Pain Pro®
PM400
Pads are for Single Patient Use Only
®
All for Healthcare
ENGLISH


3
TABLE OF CONTENTS
1. INTRODUCTION ........................................................................................................... 4
2. INTENDED USE ............................................................................................................ 5
3. SAVE THESE INSTRUCTIONS ................................................................................... 6
4. IMPORTANT SAFETY PRECAUTIONS AND WARNINGS .................................... 7
5. HOW POCKET PAIN PRO WORKS........................................................................... 13
6. KNOW YOUR UNIT.....................................................................................................14
7. ASSEMBLY STEPS .......................................................................................................16
8. GET STARTED WITH YOUR THERAPY .................................................................18
9. HOW TO CONTROL AND REDUCE YOUR PAIN .................................................. 23
10. CLEANING AND STORAGE ................................................................................... 25
11. TROUBLESHOOTING .............................................................................................. 27
12. LIMITED WARRANTY ............................................................................................ 30
13. SPECIFICATIONS ....................................................................................................... 31
14. FCC STATEMENT ..................................................................................................... 33
15. GUIDANCE AND MANUFACTURER’S DECLARATION .................................. 34

4
1. INTRODUCTION
Thank you for purchasing the Omron Pocket Pain Pro Model PM400.
In order to use the unit safely, read the complete manual carefully before using the unit for
the rst time.
Keep this instruction manual in a convenient place or store with the unit for future reference.
•Keepyourpurchasereceiptasproofofpurchaseforwarrantycoverage.
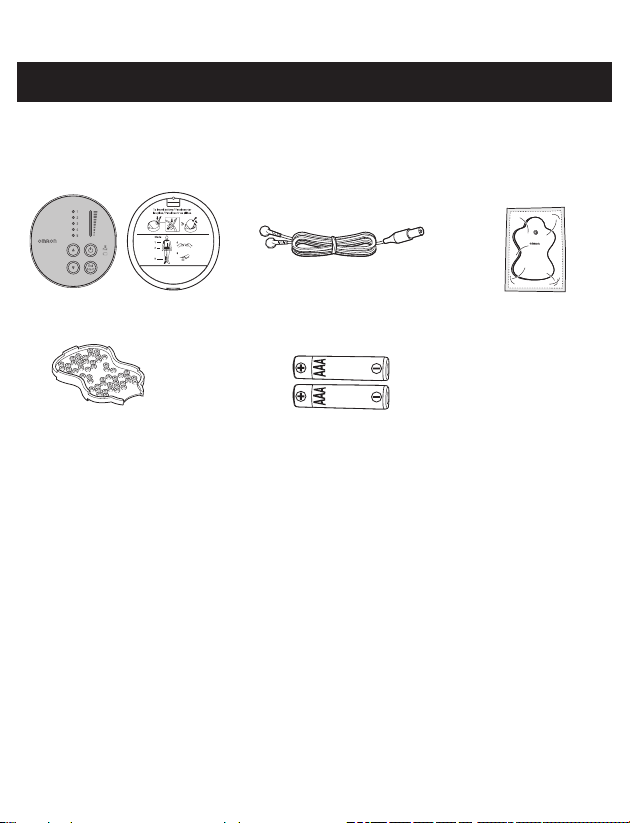
This box contains the following components:
• Pocket Pain Pro Unit
• Electrode Cords
• 2 LONG LIFE PADS™
• Pad Holder
• 2 AAA Batteries
• Instruction Manual
• Quick Start Guide / Pad Placement Guide

5
2. INTENDED USE
The OMRON Pocket Pain Pro is intended for:
The relief of pain associated with sore or aching, muscles of the lower back, arms, legs
shoulder, or foot due to strain from exercise or normal household and work activities. When
used for the symptomatic relief and management of chronic, intractable pain and relief of
pain associated with arthritis, use the Mode 1 (Arm/Shoulder) or Mode 3 (Leg/Foot) of
stimulation.
Environments of Use: Clinics, hospital and home environments
Patient Population: Adult

6
3. SAVE THESE INSTRUCTIONS
Symbols Glossary
For symbol information, visit: OmronHealthcare.com/symbols-glossary
Contraindication
Do not use this device if you have a cardiac pacemaker, implanted defibrillator or other
implanted metallic or electronic device. Such use could cause electric shock, burns, electrical
interference or death.

7
4. IMPORTANT SAFETY PRECAUTIONS AND WARNINGS
WARNING
Indicates a potentially hazardous situation which, if not avoided,
could result in death or serious injury.
DONOTUSETHISUNITWITHTHESEOTHERDEVICES:
• Donotuse this device whileusinganotherTENS device.
• Together with a life-supportingmedicalelectronicdevice such as an articial heart or
lung or respirator.
• For Hospitals and Clinics, in the presence of or whenattachedtothebody,electronic
monitoringequipment (e.g. cardiac monitors, ECG alarms), which may not operate
properly when the electrical stimulation device is in use.
• For Hospitals and Clinics, Simultaneous connection of a patient toahighfrequency
surgicalMEequipment may result in burns at the site of the stimulator electrodes and
possible damage to the stimulator.
• For Hospitals and Clinics, operation incloseproximity (e.g. 1m) to ashortwaveor
microwavetherapyMEequipmentmay produce instability to the stimulator output.
DONOTUSETHISUNITUNDERTHESECONDITIONS
•Consultwithyourphysicianbeforeusingthisunit.
The unit may cause lethal rhythm disturbances in certain susceptible individuals. If you
have had a recent surgical procedure, the stimulation may disrupt the healing process.
Beforeusingyourunit,ensurethat:
1.Cordisnotbroken.
2.Padgelisnotdamaged.
3.Electrodecordconnectionisnotbroken.
4.Unitisintactandworking.
5.Thereisnobatteryleakage.
8
DONOTUSEONTHESEINDIVIDUALS
•Pregnantwomen.
•
Do not use on childrenorinfants because this device has not been evaluated for pediatric use.
•Keep out of the reach of youngchildren because the electrode cord could cause
strangulation.
•Personsincapableofexpressingtheirthoughtsorintentions.
•Personsincapableofoperatingtheunitbythemselves.
•Use caution if youhaveatendencytobleedinternally, such as following an injury or
fracture.
•Ifyouhavesuspectedordiagnosedheartdisease, you should follow precautions
recommended by your physician.
•Ifyouhavesuspectedordiagnosedepilepsy, you should follow precautions
recommended by your physician.
•Use caution if stimulation is applied overthemenstruatinguterus.
•
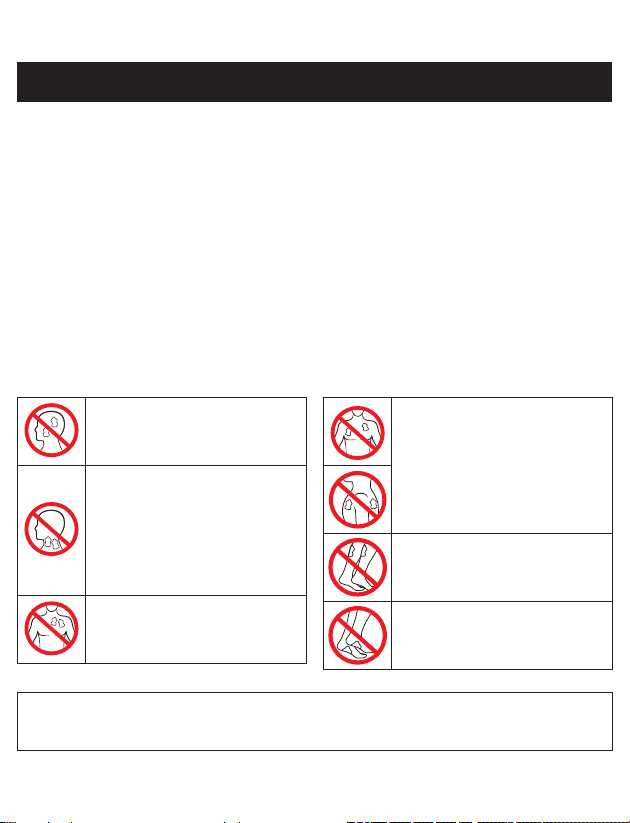
NEVERAPPLYTHEPADSTOTHESEBODYAREAS:
The head, the mouth, or any
area of the face.
The neck or any area of the
throat because this could cause
severe muscle spasms resulting
in closure of the airway,
difficulty in breathing, or
adverse effects on heart rhythm
or blood pressure.
Neartheheart, or on genital
area.
Both sides of the chestcavity
simultaneously (lateral or front
and back), or acrossyour
chest because the introduction
of electrical current may cause
rhythm disturbances which
could be lethal.
On the calvesofbothlegs at
the same time because this may
cause cardiac disturbance.
On the solesofbothfeet at the
same time because this may
cause cardiac disturbance.
Openwounds or rashes or overswollen, red, infectedorinamedareasorskineruptions
(such as varicose veins, phlebitis, thrombophlebitis and thrombosis), or on top of or close to
cancerouslesions, or over areas of skinthatlacknormalsensation.
4. IMPORTANT SAFETY PRECAUTIONS AND WARNINGS

9
DONOTUSETHISUNITDURINGTHESEACTIVITIES
•Wheninthebathorshower;
•Whilesleeping;
• While driving,operatingmachinery, or during any activity in which electrical
stimulation can put you at risk of injury.
PAINMANAGEMENTWARNINGS
• If you have had medical or physical treatment for your pain, consultwithyourphysician
before using this unit.
• If your pain does not improve, becomes seriously chronic or severe, or continues for more
thanvedays, stop using the unit and consultwithyourphysician.
• The mere existence of pain functions as a very important warning telling us that something
is wrong. Therefore, if you suffer from any serious illness, consultyourphysician in order
to conrm that it is advisable for you to use this unit.
• If you have any infectious disease or illness, consultwithyourphysician before using
this unit.
DONOTALTERTHEUNIT
• Do not plug this cord into anything other than this unit.
• Nomodication of this unit is allowed.
• Usethisunitonlywiththepads,leads,electrodes,andaccessoriesrecommended by
the manufacturer to avoid damage to the unit.
WARNINGSREGARDINGTHEPADS
• Apply padstonormal,healthy,dry,cleanskin(ofadultpatients)
because it may otherwise disrupt the healing process.
• If youexperienceanyskinirritationorredness after a session, do not continue
stimulation in that area of the skin.
CORD
• Do not wash the electrode cords.
PossibleAdverseReactions
• Youshouldstopusingtheunitandconsultwithyourphysician if you experience
adverse reactions from the unit.
• Youmayexperienceskinirritationandburns beneath the stimulation electrodes applied
to your skin.
• Youmayexperienceheadacheandotherpainfulsensations during or following the
application of electrical stimulation near your eyes and to your head and face.
4. IMPORTANT SAFETY PRECAUTIONS AND WARNINGS

10
CAUTION
Indicates a potentially hazardous situation which, if not avoided,
may result in minor or moderate injury to the user or patient, or
cause damage to the equipment or other property.
PRECAUTIONSREGARDINGTHEPADS
•Donotmovethepadstoanotherlocationwhiletheunitison.
• Therapy won’t work with just one pad. YouMUSTUSE2PADSatthesametime.
• Makesurethecomponents are connectedwellandthepadsarexed on the part of the
body you wish to treat or the therapy may not be effective.
• Padshouldnottouchanymetalobject, such as a belt buckle, necklace, or other metal
worn under clothing.
• Donotoverlappads or put pads on top of each other. It may weaken or stop therapy, or
the unit may stop working.
Gelpadsmayalsosticktogether and cause gel to be removed when separating.
•DonotusepadsafterExp.date.
•Donotapplypadswithwethands.
•Donotleavepadsattachedtotheskinaftertreatment.
• Donotbendorfoldpads because the gel may get damaged and it won’t stick or function
properly.
• To avoid damage to the adhesive surface of the pads, putthepadsonlyontheskinoron
theplasticpadholderprovided.
• Alwaysplacecleanpadsinaccordancewithillustrations provided (Refer to [GET
STARTEDWITHYOURTHERAPY]STEP1- Pad Placement).
• Donotapplyointmentoranysolvent to the pads or to your skin because it will disrupt
the pads from functioning properly. The self-adhesive pads will adhere to your skin.
• Placepadsoneithersideofthepain,notdirectlyonthepain.
•Donotsharepadswithanotherperson.This may cause a skin irritation or infection.
Pads are intended for use by one person.
4. IMPORTANT SAFETY PRECAUTIONS AND WARNINGS

11
CAUTIONWHILEUSINGUNIT
MAINUNIT
• Iftheunitisnotfunctioningproperly or you feel discomfort, immediately stop using the
unit.
• Donotuseforanyotherpurpose except for what it is intended.
• Do notplaceinaroomwithhighhumidity, such as a bathroom. This will damage the
unit. Idealtemperatureforusing 50 °F - 104 °F (10 °C - 40 °C), 30 % - 80 % relative
humidity.
• Do not use the unit without proper lighting. You may not be able to operate unit
successfully.
• While using this device, make sure that no mobile phone or any other electrical devices
that emit electromagnetic fields is within 12 inches (30 cm). This may result in poor
performance of the device.
• DoNOTturnuniton,untilpadsareonyourskin.
CORD
• Donotinserttheelectrodeplugintoanyplaceother than the jack on the unit.
• Donotpullontheelectrodecord during treatment.
•Donotbendorpulltheendofthecord.
• When pulling out the cord from the unit, holdtheplugandpull.
•Replacethecordwhenbrokenordamaged.
BATTERY
• Donotthrowthebatteriesintoare. The batteries may explode.
•
Disposeoftheunit,batteries,andcomponentsaccordingtoapplicablelegalregulations.
Unlawful disposal may cause environmental pollution.
• Donotmixalkalineandmanganesebatteries as this will shorten the battery life.
• During therapy, do not remove the battery cover and do not touch the battery terminals.
• Do not use rechargeable batteries.
• Do not use batteries after their expiration date.
PAD S
• Use onlypadsrecommendedbythemanufacturer to avoid affecting the safety and
effectiveness of electrical stimulation.
• The electricalperformancecharacteristicsofpadsmayaffectthesafetyand
effectiveness of electrical stimulation.
• Applyingpadsincorrectly could result in discomfort or skin burns.
• Detach the pads before replacing the batteries.
4. IMPORTANT SAFETY PRECAUTIONS AND WARNINGS

12
•Placepadsatleast1inch(3cm)apartforoptimalresults.
GeneralPrecautions
• The long-term effects of electrical stimulation are unknown.
• Apply stimulation to only normal, intact, clean, dry and healthy skin.
• TENS is not effective in treating the original source or cause of the pain, including
headache.
• TENS is not a substitute for pain medications and other pain management therapies.
• TENS devices do not cure disease or injuries.
• TENS is a symptomatic treatment and, as such, suppresses the sensation of pain that would
otherwise serve as a protective mechanism.
• Effectiveness is highly dependent upon patient selection by a practitioner qualied in the
management of pain patients.
• Youmayexperienceskinirritationorhypersensitivity due to the electrical stimulation or
electrical conductive medium (gel).
•
Keepunitawayfromyoungchildren. The unit contains small pieces that may be swallowed.
Immediately contact your physician.
• Ensure that this device has acclimated to room temperature before using. Using this
device after an extreme temperature change could lead to an improper operation. OMRON
recommends waiting for approximately 2 hours for the device to warm up or cool down
when the device is used in an environment within the temperature specied as operating
conditions after it is stored either at the maximum or at the minimum storage temperature.
For additional information of operating and storage/transport temperature, refer to
“SPECIFICATIONS”.
PossibleAdverseReactions
• Donotusetotreatoneregionforextendedperiodsoftime(morethan30minutesa
session,upto3times/day) or muscles in that region may become exhausted and sore.
4. IMPORTANT SAFETY PRECAUTIONS AND WARNINGS

13
5. HOW POCKET PAIN PRO WORKS
Whatisit?
TheOMRONPocketPainProisaportabledevicethatrelieveschronic,acute*andarthritic
painthroughthepainreliefofTENS. It is designed to reduce and relieve muscle and joint pain,
stiffness and numbness in the back, arms, legs, shoulder and foot by applying electrical nerve
stimulation to the surface of the skin near the site of the pain. Anyofthemodescansafelybeused
onbodypartsorpainsdescribedinthismanualorthe QuickStartGuide/PadPlacement
Guide. This device can be used in conjunction with any other pain treatment or medication.
TENS (Transcutaneous Electrical Nerve Stimulation) has been used for over 40 years by medical
professionals such as physical therapists and chiropractors.
* Acute pain refers to sore or achy muscles due to strain from exercise or normal household
and work activities
Howdoesitwork?
Scientic theory suggests that electrical stimulation therapy may work in several ways:
1. The gentle electrical pulses move through the skin to nearby nerves to block or shut out
the pain message from ever reaching the brain from the source of the pain.
2. The gentle electrical pulses increase the production of the body’s natural pain killer,
such as endorphins.
3. The electrical stimulation improves blood circulation. Muscles contract and relax with
the ow of the electrical stimulation. With repeated contracting and relaxing, the blood
ows in and out and the blood circulation is improved.
14
6. KNOW YOUR UNIT
PACKAGE CONTENTS
Pocket Pain Pro Unit
Front Back
Electrode Cords 2 LONG LIFE PADS™
(1 standard pair)
Batteries
(2 AAA size (LR03) batteries)
Instruction Manual
(This Manual)
Quick Start Guide /Pad
Placement Guide
Pad Holder (1 standard)
FEATURES
1. Fivepre-setmodes (Arm/Shoulder, Lower Back, Leg/Foot, Knead, Steady).
2. Tenintensitylevels (1 low to 10 high).
3. Pairofpads (durable, re-usable, washable, up to 150 uses).
(Only use OMRON manufactured pads or cords with this unit).
4. Automatic 15-minuteshutoff.
5. Thelights indicate what mode and intensity level the device is set.
6. BatteryLight lights up to remind you to replace the batteries.
7. PadLight blinks if pad falls off.
15
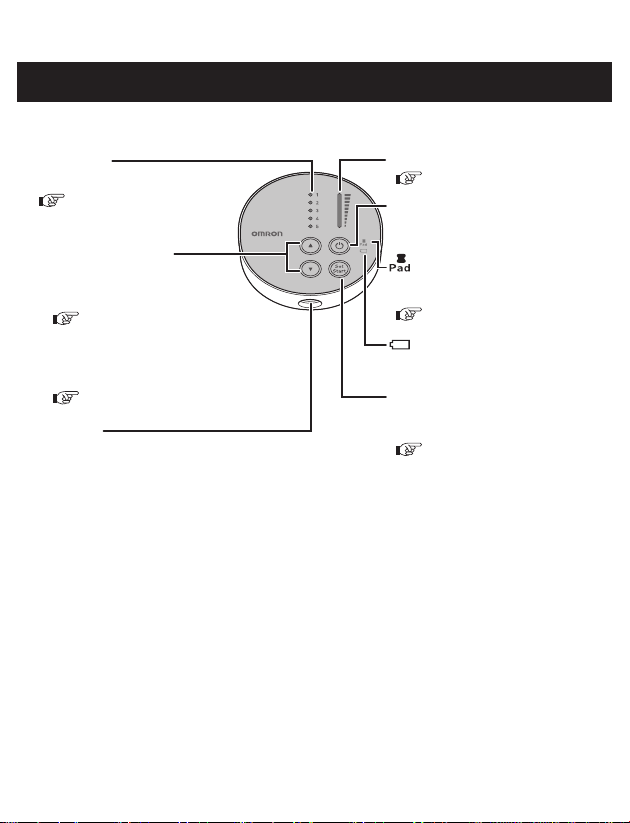
BUTTONS AND THEIR FUNCTIONS
Cord Jack
Mode Light
Each light corresponds to a mode.
Intensity Light
Power Button
1. Press ▲/▼ to choose mode.
2. After selecting the mode:
Press ▲ for higher intensity.
Press ▼ for lower intensity.
Pad Light
Battery Light
Set/Start Button
After choosing the mode:
Mode/Intensity Button
Press Set/Start to select the mode.
Select mode and intensity
according to your needs.
If the battery is low, battery light
will light up.
Press once for “ON” and again
for “OFF”.
If the pad detaches, pad light will
blink.
( [GETSTARTEDWITH
YOURTHERAPY] STEP 2 and
the Back of Main Unit)
( [GETSTARTEDWITH
YOURTHERAPY] STEP 2)
( [GETSTARTEDWITH
YOURTHERAPY] STEP 3)
( [GETSTARTEDWITH
YOURTHERAPY] STEP 3)
( [TROUBLESHOOTING])
( [GETSTARTEDWITH
YOURTHERAPY] STEP 2)
6. KNOW YOUR UNIT
16
Beforeusingyourunit,inspecttoensurethat:
1.Cordisnotbroken.
2.Padgelisnotdamaged.
3.Electrodecordconnectionisnotbroken.
4.Unitisintactandworking.
5.Thereisnobatteryleakage.
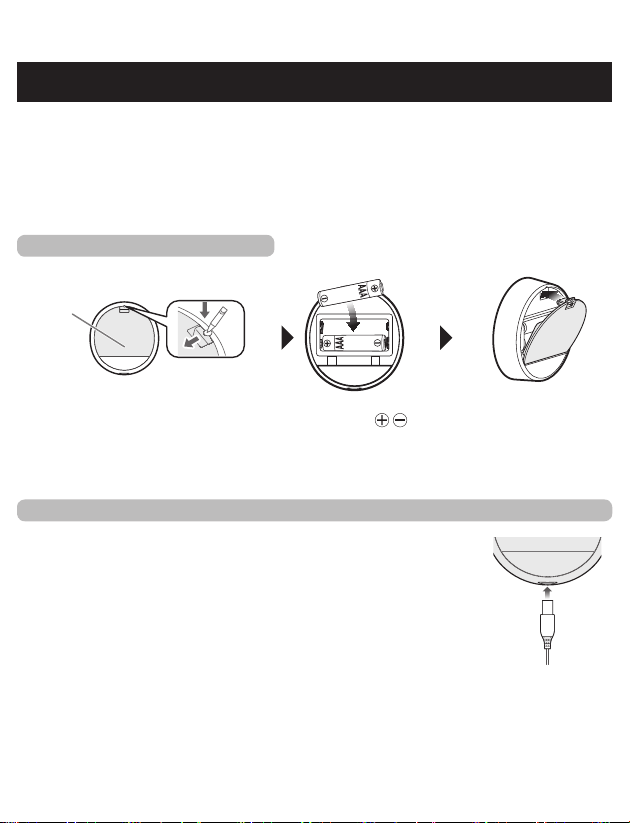
STEP 1 – INSERT BATTERIES
Battery Cover
1
Turn the unit over, and remove
the battery cover using a hard
object (such as the tip of a pen,
thin screwdriver).
2
Insert batteries.
Make sure the
signs correspond when
inserting batteries.
3
Reinstall the
battery cover.
STEP 2 – ATTACH ELECTRODE CORD TO THE MAIN UNIT
Attach the electrode cord plug to the bottom of the main unit.
7. ASSEMBLY STEPS
17
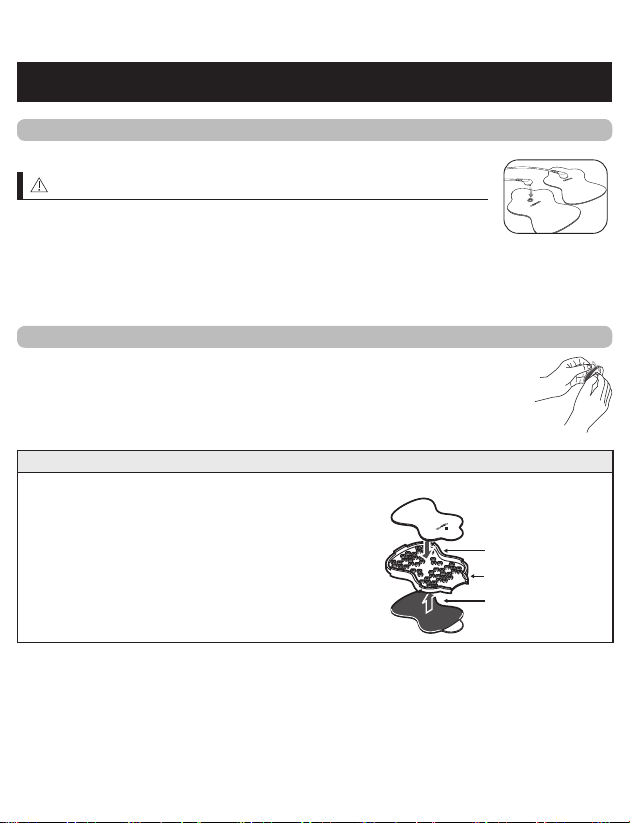
7. ASSEMBLY STEPS
STEP 3 – SNAP EITHER ELECTRODE CORD TO EACH OF THE PADS
Forthersttimeuse,takethepadsoutofthesealedpackage.
CAUTION
•DoNOTturnunitonuntilpadsareonyourskin.
•YouMUSTUSEBOTHPADSorstimulationwillnotwork.
NOTE:
Pads will not stick if the skin has too much hair. We recommend shaving the area for
effective treatment.
STEP 4 – REMOVE AND DISCARD PLASTIC FILM FROM PADS
Forthersttimeuse,removetheclearplasticlmfromthebackof
thepad.
Discard the plastic lm backing as well as the clear packaging.
STORING PADS ON PAD HOLDER
Remove plastic lm and put the sticky side of the pads on either side of the pad holder.
Pad Holder
pad sticky side up
pad facing down
18
8. GET STARTED WITH YOUR THERAPY
(USE FOR A MAXIMUM OF 30 MINUTES PER SESSION)
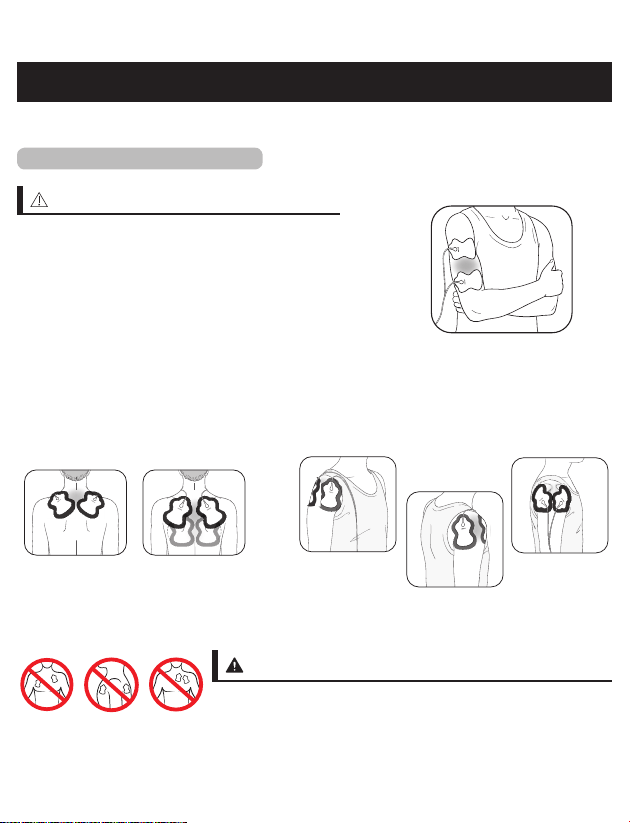
STEP 1 – PAD PLACEMENT
CAUTION
Foroptimaltherapy:
• Place padsoneithersideofthepain,not directly
on the pain.
• Place pads at least 1 inch (3 cm) apart.
• MUSTUSE2PADS at a time for therapy to work.
• Donotoverlappads or put on top of each other.
• Donotaddspray,lotionsorcreams to skin or
pads.
• Donotsharepads.
Before starting your therapy, rate your pain from 1 low to 10 high.
This mental check gives you a basis you can compare to once the session is complete.
Attach both pads on the shoulder
according to your pain.
Attach one pad on the front and on the back of
your shoulder.
SHOULDER
WARNING
• Do not use near the heart, on both sides of the chest cavity
or across your chest because the introduction of electrical
current may cause rhythm disturbances which could be
lethal.
Attach both pads on either side of
the region where you feel pain.
ARM

19
8. GET STARTED WITH YOUR THERAPY
Attach one pad below
and above the region in
pain, both on same side.
Attach both pads on the lower back according to your pain.
Place pads on muscle of back, not on spine, for optimal therapy.
LOWER BACK
(HIP & THIGH)
Attach both pads
on either side of
the area with pain.
(CALF)
Attach both pads on the calf
where you feel pain.
WARNING
• Pads should not be placed
simultaneously on the calves
of both legs.
Outside
Inside
(ANKLE)
Attach pads on the left for pain on
the outside of your ankle/foot. Attach
the pads on the right for pain on the
inside of your ankle/foot.
WARNING
• Do not put the pads on the bottom
of both feet at the same time.
LEG & FOOT
20
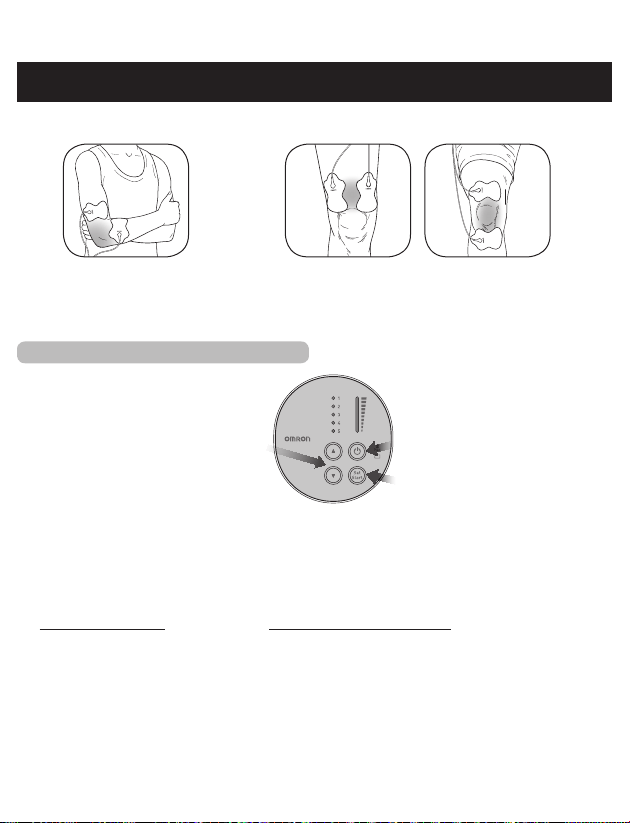
(KNEE)
Attach both pads above the knee or
above and below the joint with pain.
(ELBOW)
Attach both pads on either side of
the joint with the pain.
JOINT
STEP 2 – SELECT 1 OF 5 MODES
j
Press the Power button.
k
Press the ▲(Up) or ▼(Down) button to choose 1 of the 5 modes.
Modescannotbecombined.
l
Press the Set/Start button to select the mode.
It will start the therapy at the intensity level of 1.
Mode
Press
Set/Start Button
(Mode/Intensity Button)
Press
Power Button
Select a pain mode:
1. Arm/Shoulder
2. Lower Back
3. Leg/Foot
Select a massage-like mode:
4. Knead
5. Steady
8. GET STARTED WITH YOUR THERAPY
21
Howtochangemodesduringtherapy?
If you want to change modes during therapy, press the Set/Start button and the ▲(Up) or
▼(Down) button to select a new mode. You can only use ONE MODE at a time.
If you don’t press the Set/Start button to select the mode, the unit will automatically turn
off after 3 minutes.
Howtoselecttherightmode?
Any of the modes can be used on body parts or pains described in this manual or Quick Start
Guide/Pad Placement Guide.
Select the mode that feels right for your unique pain.
Therapies
designedfor
Arm/Shoulder LowerBack Leg/Foot
Mode Light
and the Back of
Main Unit
What does
the therapy
deliver?
Series of low to
high rate tapping,
pulsing, kneading
and massage-like
sensations.
Series of high rate to
low tingling sensations,
followed by tapping.
With higher intensity,
you may feel kneading or
massage-like sensations.
Series of low rate
tapping, pulsing
sensations.
Knead Steady
Series of medium rate
pulsing sensations to
mimic massage.
Series of regular
pulsing sensations that
do not change.
8. GET STARTED WITH YOUR THERAPY
22
STEP 3 – SELECT INTENSITY LEVEL (1 LOW – 10 HIGH)
Theunitautomaticallystartsattheintensitylevelof1. Slowly increase the intensity level
by pressing the ▲(Up) button. You should feel a gentle pulsing sensation.
HowdoIselecttherightintensitylevelformypain?
Each time you press the ▲(Up) or ▼(Down) button, it moves to another intensity level. If
the stimulation sensation becomes weaker or disappears, increase the intensity. But, if the
sensation is at all uncomfortable, press the ▼(Down) button to decrease the intensity.
• Press ▲ for higher intensity.
• Press ▼ for lower intensity.
If the pad light is blinking, the unit will automatically turn off after 30 seconds.
( “TROUBLESHOOTING”)
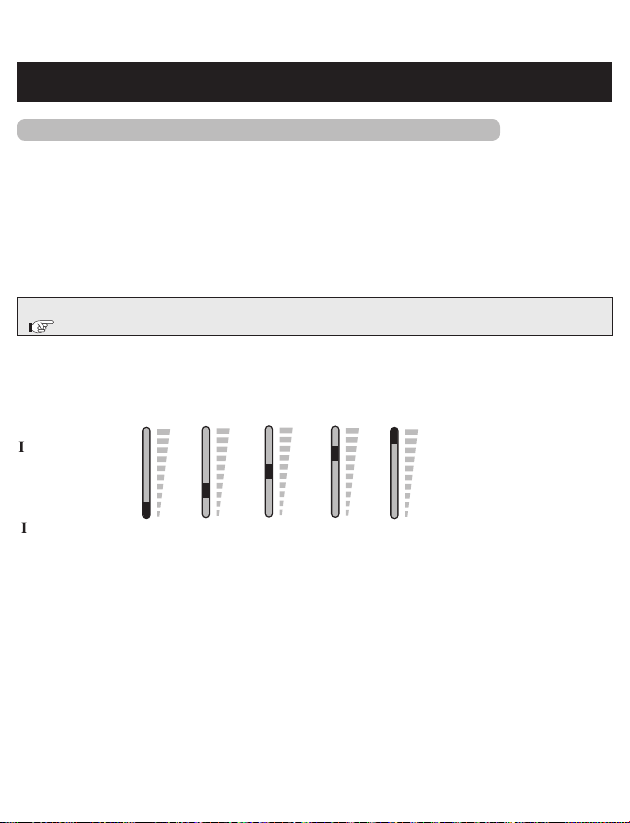
Whatintensitylevelismyuniton?
Press the ▲(Up)/▼(Down) button to increase/decrease the intensity. The intensity light moves
up/down after pressing it once or twice (as shown below). Therefore, the light may not move up/
down, but the intensity level does increase/decrease each time you press it.
ntensity Light:
ntensity level: 1 or 2 3 or 4 5 or 6 7 or 8 9 or 10
Howlongisthetherapy?
The unit will continue automatically for 15 minutes before it shuts off. If you want to stop
the therapy while in use, press the Power button. We recommend a total of 30 minutes
therapy in one sitting, up to 3 times/day.
8. GET STARTED WITH YOUR THERAPY

23
Whenshouldyoustarttherapy?
Use as soon as your pain begins. Start with one session (the unit automatically turns off at 15
minutes). Turn off with pads still on and rate your pain again (1 low to 10 high).
Gettoyourpainearly
If you get to your pain early, it may prevent the pain from becoming worse, or even chronic.
It’s better for you to get it under
control sooner so that it does not reach a high pain threshold where it limits your daily
activities.
Howlongshouldyouuseit?
Start with one 15-minute session. Always turn the unit off with the pads still on. Rate your
pain to check your progress, 1 low to 10 high. Stop your therapy session if pain has reduced or
stopped. Press the Power button to continue therapy for another 15-minute session.
1session:15-minute
automaticshut-off
Maxminutes/session:30
minutes
Maxtimes/day:3times
CAUTION
• Excessive treatment and strong stimulation may cause muscular fatigue and may generate
adverse effects.
Whentostopusingtheunit?
1. If you experience an adversereaction (skin irritation/redness/burns, headache or other
painful sensation, or if you feel any unusual discomfort).
2. If your pain doesnotimprove, becomes seriously chronic and severe, or continues for
morethanvedays.
9. HOW TO CONTROL AND REDUCE YOUR PAIN

24
Whattypeofpainisitbestfor?
This therapy works best on acute pain because it is localized. Acute pain is pain in one area
for less than 3 months. If you have chronic pain, you may have pain in more than one area
and for longer than 6 months. Chronic pain may be compounded by other issues that this
unit cannot address.
Remember, this unit does not cure your pain or the original cause of the pain. It provides
temporary relief or reduction of pain so that you can control your life and activities better.
Beforeusing,checktomakesureallcomponentsareworkingproperly.
1. Make sure the cord is not broken.
2. Check that the pad adhesive sticks and is not damaged.
3. The electrode cord connection is not broken.
4. The unit is intact and in working order.
5. There is no battery leakage.
9. HOW TO CONTROL AND REDUCE YOUR PAIN

25
10. CLEANING AND STORAGE
Theunitisdesignedforrepeateduseovertime.Thepadswilllastupto150uses,or
5months(basedonuseof1timeperday).Hereareimportantcleaningandstorage
instructions:
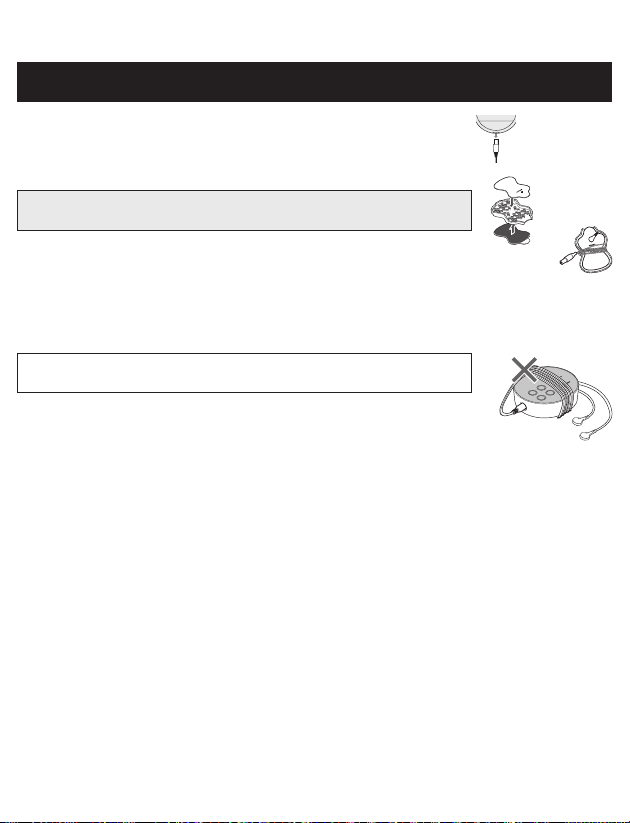
Cleaningthepads
1. Turn the power off and remove the electrode cord from the
pads.
2. Wash the pads when the adhesive surface becomes dirty and/
or the pads are difcult to adhere.
• Wash the pad softly with your ngertips under slow running
cold water for several seconds (do not use a sponge/cloth/sharp object like a nail on
adhesive side, do not use detergents, chemicals or soap).
3. Pads can be washed after 15 uses, approximately ten times for up to 150 uses. Do not wash the
pads too long or too frequently.
4. Dry the pads and let the adhesive surface air-dry completely. Do not wipe with a tissue paper
or cloth.
5. Padsarereplaceableandcanbepurchasedwhenneededbycalling1-800-634-4350orgo
toOmronHealthcare.com.
The life of the pads may vary by how often you wash the pads, the skin condition, and how
you store the pads.
Whenshouldyoureplaceyourpads?
If the pad no longer sticks to your skin or if more than 25 % of the pad’s surface is not in
contact with your skin.
Cleaningtheunit
1. Turn the unit off and disconnect the electrode cords from the pads.
2. Clean with a lightly moistened cloth (or a cloth soaked in a neutral cleaning solution) and
wipe gently.
• Do not use chemicals (like thinner, benzene).
• Do not let water get into the internal area.
26
Storingthepads
1. Turn the unit off and remove the cord from the bottom of the unit.
2. Remove the pads from your body.
3. Leavetheelectrodecordsconnectedtothepads.
Place the pads on the pad holder, one pad on each side with the
sticky side of each pad on the pad holder.
4. Wraptheelectrodecordsaroundthepadholder.
Storingtheunitandpads
• Place the unit, pads with electrode cords on pad holder, Pad Placement Guide and
Instruction Manual inside the original box.
• Do not keep in areas subject to direct sunlight, high or low temperatures, humid area, near
to re, vibration, or shock.
Storage temperature, 32 °F - 104 °F (0 °C - 40 °C), 30 % - 80 %
relative humidity.
• Donotkeepinplacesthatcanbeeasilyreachedbychildren.
• When not in use for a long period, remove the batteries before storage
to avoid liquid discharge from batteries.
• Do not wrap the electrode cords around the unit because it may damage
the cord.
10. CLEANING AND STORAGE

27
If any of the below problems occur, check to make sure that no other electrical device is within 12
inches (30 cm). If the problem persists, refer to the table below.
Ifthishappens... Possiblecauses... Trythissolution...
Theintensityisnotfelt.
Veryweakintensitylevel.
Are you using only 1 pad? Put the other pad on your
skin. You must use BOTH
PADS for therapy to work.
Have you removed the
transparent lm from the pad?
Peel off lm on the adhesive
surface of pads.
Are the pads stacked together
or do pads overlap?
Check placement of pads.
Refer to Pad Placement
Guide.
Is the cord properly
connected to the unit?
Connect cord plug correctly
into the jack at bottom of
this unit.
Is the intensity setting
getting weak?
Press the ▲(Up) button.
Is the gel damaged? Replace pad.
Are the batteries weak? Replace both AAA batteries.
Is the intensity “1”? Press the ▲(Up) button.
Theskinturnsredorthe
skinfeelsirritated.
Is the adhesive surface of
pads dirty or dry?
Wash adhesive surface
of pads softly with your
ngertips for about 3 seconds
under slow running water.
Is therapy time too long? Use less than 15 minutes.
Are the 2 pads attached
properly to the body?
Refer to the Pad Placement
Guide and attach correctly.
Is the pad surface worn out? Replace both pads at the
same time.
Nopowersource. Are the polarities of battery
(+ and -) aligned in the wrong
direction? or Are the batteries
depleted?
Check batteries for correct
alignment or replace
batteries.
11. TROUBLESHOOTING

28
Ifthishappens... Possiblecauses... Trythissolution...
Powercutoffduringuse. Are the batteries weak? Replace both batteries at the
same time.
Is the cord broken? Replace cord.
BatteryLightlightsup.
Are the batteries weak? Replace both batteries at the
same time.
Padgeldoesnotstickto
skin.
Have you removed the
transparent lm from the
pad?
Peel off lm on the adhesive
surface of pads.
Is the pad wet? or Is your
skin too wet?
Dry the pad or dry the skin.
The pad gel may be
damaged.
Replace the pad.
Is there too much hair on
your skin?
Shave the immediate area for
proper pad adhesion.
Is the adhesive surface of
pads dirty or dry?
Wash adhesive surface
of pads softly with your
ngertips for about 3
seconds under slow running
cold water.
Are you using pad during
perspiring?
Dry the pad placement area.
Have the pads been washed
too long and/ or too
frequently?
Leave the pad in freezer for
overnight.
Were the pads stored under
high temperature, high
humidity, or direct sunshine?
Replace both pads.
11. TROUBLESHOOTING

29
Ifthishappens... Possiblecauses... Trythissolution...
PadLightisblinking. Are both pads attached to the
body?
Re-attach dislocated pad(s)
onto the skin rmly.
Have you removed the
transparent lm from the
pad?
Peel off lm on the adhesive
surface of pads.
Is the cord properly
connected to the main unit?
Connect cord plug correctly
into the jack at the bottom of
the main unit.
Is the adhesive surface of
pads dirty or dry?
Wash adhesive surface
of pads softly with your
ngertips for about 3
seconds under slow running
cold water.
If the above measures are not effective, contact us at 1-800-634-4350.
11. TROUBLESHOOTING

30
12. LIMITED WARRANTY
Your OMRON Pocket Pain Pro unit, excluding the batteries and pads, is warranted to be free
from defects in materials and workmanship appearing within 1 year from the date of purchase,
when used in accordance with the instructions provided. The pads supplied with the unit are
warranted for 30 days from the date of purchase. The above warranties extend only to the
original retail purchaser. We will, at our option, replace without charge, any unit covered by the
above warranty. Replacement is our only responsibility and your only remedy under the above
warranties.
Toobtainwarrantyservice,contactCustomerServicebycalling1-800-634-4350forthe
addressoftheInspectionCenterandshippingandhandlingchargesthatmayapply.
EnclosetheProofofPurchase. Include a letter, with your name, address, phone number,
and description of the specific problem. Pack the product carefully to prevent damage in
transit. Because of possible loss in transit, we recommend insuring the product with return
receipt requested.
THIS WARRANTY GIVES YOU SPECIFIC LEGAL RIGHTS, AND YOU MAY HAVE
OTHER RIGHTS THAT VARY FROM STATE TO STATE (OR BY COUNTRY OR
PROVINCE). THE FOREGOING IS THE SOLE WARRANTY PROVIDED BY OMRON
IN CONNECTION WITH THIS PRODUCT, AND OMRON HEREBY DISCLAIMS
ANY OTHER WARRANTIES, EXPRESS OR IMPLIED, INCLUDING IMPLIED
WARRANTIES OF MERCHANTABILITY AND FITNESS FOR A PARTICULAR
PURPOSE. IMPLIED WARRANTIES AND OTHER TERMS THAT MAY BE IMPOSED
BY LAW, IF ANY, ARE LIMITED IN DURATION TO THE PERIOD OF THE ABOVE
EXPRESS WARRANTY.
SOME STATES (COUNTRIES AND PROVINCES) DO NOT ALLOW LIMITATIONS
ON HOW LONG AN IMPLIED WARRANTY LASTS, SO THE ABOVE LIMITATION
MAY NOT APPLY TO YOU. OMRON SHALL NOT BE LIABLE FOR LOSS OF USE
OR ANY OTHER SPECIAL, INCIDENTAL, CONSEQUENTIAL OR INDIRECT COSTS,
EXPENSES OR DAMAGES. SOME STATES (COUNTRIES AND PROVINCES) DO NOT
ALLOW THE EXCLUSION OR LIMITATION OF INCIDENTAL OR CONSEQUENTIAL
DAMAGES, SO THE ABOVE EXCLUSION OR LIMITATION MAY NOT APPLY TO
YOU.
This warranty provides you with specic legal rights, and you may have other rights that
vary by jurisdiction. Because of special local requirements, some of the above limitations
and exclusions may not apply to you.
FORCUSTOMERSERVICE
Visitourwebsiteat:
OmronHealthcare.com
Calltollfree:1-800-634-4350

31
Product Name OMRON Pocket Pain Pro
Model #
PM400
REF
HV-F013-Z2
Power Source DC 3 V (2 AAA alkaline batteries or 2 AAA
manganese batteries)
Battery Life
New batteries (2 AAA alkaline batteries) will last for
approx. 3 months (when used for 15 minutes a day,
Steady Mode, max. intensity).
Frequency Approx. 1 to 108 Hz
PULSE Duration 100 μsec
Maximum Output Voltage 32 V (during 500 Ω load)
Power Control 10 intensity levels
Operating Temperature, Humidity
(When using product)
50 °F to 104 °F (10 °C to 40 °C), 30 to 80 % RH
(non-condensing), 700 to 1060 hPa
Storage Temperature, Humidity 32 °F to 104 °F (0 °C to 40 °C), 30 to 80 % RH
Transportation Temperature,
Humidity, Air Pressure
-4 °F to 140 °F (-20 °C to 60 °C), 10 to 95 % RH,
700 to 1060 hPa
Weight Approx. 2.6 oz (75 g) (incl. batteries)
Outer Dimension Approx. 3” (W) X 2.8” (H) X 0.9” (D) (75 X 70 X
22 mm)
Classication of ME equipment Internally powered
IP classication IP 22
Operation Mode Continuous operation
Applied Part Type BF (Pads)
Durable period (Service Life) Device: 5 years
Pad: 150 uses
NOTE:
•These specications are subject to change without notice.
•This OMRON product is produced under the strict quality system of OMRON
HEALTHCARE Co. Ltd., Japan.
Designed for a minimum of 5 years life expectancy.
IP classification is degrees of protection provided by enclosures in accordance with IEC
60529. This device is protected against solid foreign objects of diameter 12.5 mm such as
a nger and greater, and against oblique falling water drops which gives trouble to normal
operation.
13. SPECIFICATIONS

32
Accessories/replacementparts(Toorder:OmronHealthcare.com)
•PMLLPAD-L(3”x4.5”(75mm×114mm))
•PMLLPAD(2.5”x4”(63mm×102mm))
13. SPECIFICATIONS

33
14. FCC STATEMENT
FCC CAUTION
Changes or modications not expressly approved by the party responsible for compliance could
void the user’s authority to operate the equipment.
Note:
This equipment has been tested and found to comply with the limits for a Class B digital device,
pursuant to part 15 of the FCC Rules. These limits are designed to provide reasonable protection
against harmful interference in a residential installation. This equipment generates, uses and can
radiate radio frequency energy and, if not installed and used in accordance with the instructions,
may cause harmful interference to radio communications. However, there is no guarantee that
interference will not occur in a particular installation. If this equipment does cause harmful
interference to radio or television reception, which can be determined by turning the equipment
off and on, the user is encouraged to try to correct the interference by one or more of the following
measures:
• Reorient or relocate the receiving antenna.
• Increase the separation between the equipment and receiver.
• Connect the equipment into an outlet on a circuit different from that to which the receiver is
connected.
• Consult the dealer or an experienced radio/TV technician for help.
This device complies with Part 15 of the FCC Rules. Operation is subject to the following two
conditions: (1) this device may not cause harmful interference, and (2) this device must accept any
interference received, including interference that may cause undesired operation of this device.

34
15. GUIDANCE AND MANUFACTURER’S DECLARATION
OMRON Pocket Pain Pro Information for Accompanying Documents in the Scope of
IEC60601-1-2:2014
ImportantinformationregardingElectromagneticCompatibility(EMC)
PM400 conforms to IEC60601-1-2:2014 Electromagnetic Compatibility (EMC) standard.
Further documentation in accordance with this EMC standard is available at
OmronHealthcare.com/emc. Refer to the EMC information for PM400 on the website.

OMRONHEALTHCARECo.,Ltd.
53, Kunotsubo, Terado-cho, Muko, Kyoto 617-0002
JA PA N
Distributed by:
OMRONHEALTHCARE,INC.
1925 West Field Court, Lake Forest, IL 60045
U.S.A.
For questions: 1-800-634-4350 Get general pain info:
OmronHealthcare.com
© 2019 OMRON HEALTHCARE, INC.
Made in China
HV-F013-Z2
4616057-0A