
Loading ...
Loading ...
Loading ...
The essentials
Action in the event of a punc-
t
ur
e
Wh
at to do first
●
Park the vehicle on a horizontal surface
and in a safe p
lace as far away from traffic as
possible.
●
Apply the handbrake.
●
Switch on the hazard warning lights.
●
Manual gearbox: select the 1st gear.
●
Automatic gearbox: Move the sel
ector lever
to position P.
●
If you are towing a trailer, unhitch it from
your vehicle.
●
Keep the vehicle tool kit ready*
›››
page 82.
●
Observe the applicable legislation for each
country (reflective vest, warning triangles,
etc.).
●
All occupants should leave the vehicle and
wait in a safe place (for instance behind the
roadside crash barrier).
WARNING
●
Alwa
ys observe the above steps and pro-
tect yourself and other road users.
●
If you change the wheel on a slope, block
the wheel on the opposite side of the car with
a stone or similar to prevent the vehicle from
moving.
Repairing a tyre with the anti-punc-
t
ur
e k
it
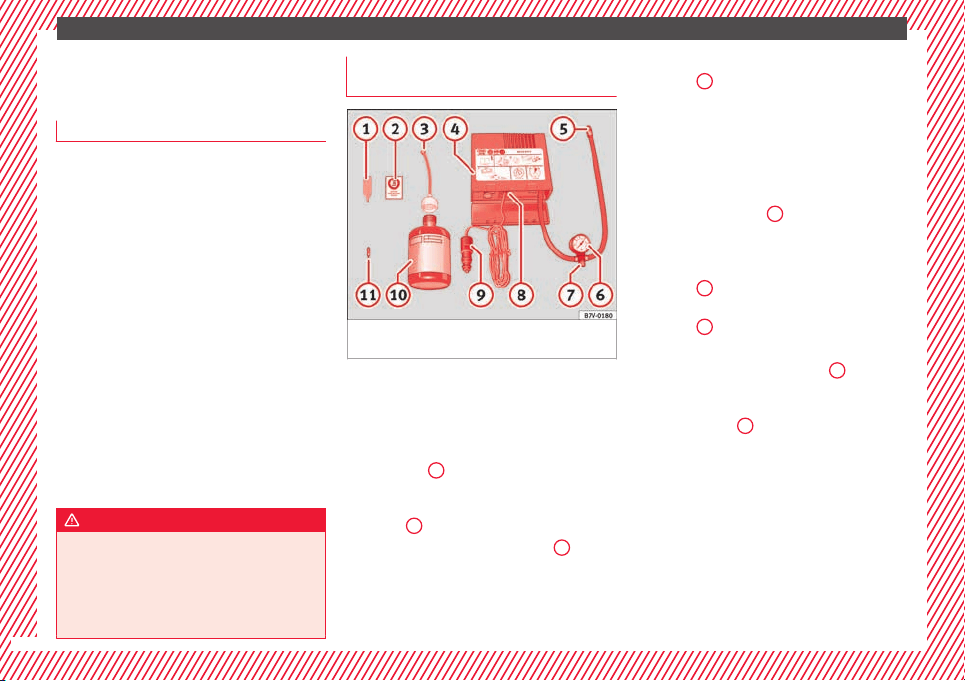
Fig. 64 Standard representation: Contents of
the ty
r
e mo
bility system.
The anti-puncture kit is located under the
floor p
anel
in the lug
gage compartment.
Sealing the tyre
●
Unscrew the tyre valve cap and insert. Use
the ››› Fig. 64
1
tool to remove the insert.
Pl
ac
e it
on a clean surface.
●
Shake the tyre sealant bottle vigorously
››› Fig. 64
10
.
●
Screw the inflator tube ›
›
›
Fig. 64
3
into
the se
al
ant
bottle. The bottle's seal will break
automatically.
●
Remove the lid from the filling tube
››› Fig. 64
3
and screw the open end of the
t
ube int
o the ty
re valve.
●
With the tyre sealant bottle upside down,
fill the tyre with the contents of the sealant
bottle.
●
Remove the bottle from the valve.
●
Place the insert back into the tyre valve us-
ing the tool ››› Fig. 64
1
.
Infl
atin
g the ty
re
●
Screw the compressor tyre inflator tube
››› Fig. 64
5
into the tyre valve.
●
Check that the air bleed screw is closed
›
›
›
Fig. 64
7
.
●
Start the engine and leave it running.
●
Insert the connector ›
›
›
Fig. 64
9
into the
v
ehic
l
e's 12-volt socket ›››
page 174.
●
Turn the air compressor on with the ON/OFF
switch ››› Fig. 64
8
.
●
Keep the air compressor running until it
r
e
ac
hes 2.0 to 2.5 bar
(29-36 psi/200-250 kPa). a maximum of 8
minutes.
●
Disconnect the air compressor.
●
If it does not reach the pressure indicated,
unscrew the tyre inflator tube from the valve.
●
Move the vehicle 10m so that the sealant is
distrib
uted throughout the tyre.
44
Loading ...
Loading ...
Loading ...