Loading ...
Loading ...
Loading ...
Changing the settings
! For Setting preferences see page 30
Change Procedure
1 Press the [UTILITY] button on the display or press the
[QUANTIZE (UTILITY, WAKE UP)] button for at least 1
second.
The [UTILITY] screen appears on the display.
2 Select a setting item.
Scroll the screen if necessary and select the item you wish to set.
Selecting an item displays the selection options for that item on the right
side of the screen.
3 Select a setting from the selection options.
The setting is changed.
4 Press the [UTILITY] button on the display of this unit.
The previous screen reappears.
Returning to default settings
If a factory reset is performed in an environment in which a router is con-
nected to the [INTERNET] terminal, the information registered to KUVO
will also be cleared. If you do not need to clear the information registered
to KUVO, disconnect the cable from the [INTERNET] terminal.
If the KUVO registration information is not cleared when a factory reset
is performed, a screen appears for confirming whether or not the instal-
lation location is correct when a connection is established to the KUVO
server for the first time after the factory reset.
If it is incorrect, see the KUVO website (http://kuvo.com/).
1 While pressing the [QUANTIZE (UTILITY, WAKE UP)]
buttons, press the [POWER] button.
The factory reset confirmation screen appears on the display.
! It may take between about 30 seconds to 1 minute for the screen to
appear on the display.
2 Select [OK].
If you wish to also clear the setting information registered to KUVO,
check that the router is connected to the [INTERNET] terminal. If you
do not need to clear the setting information registered to KUVO, do not
connect the router to the [INTERNET] terminal.
3 Select [OK].
The factory reset starts.
! If [Cancel] is selected, it returns to the screen of step 2. Turn off the
power to stop the process.
! If a connection could not be established to the KUVO server even
though the router was connected to the [INTERNET] terminal, a mes-
sage appears to notify you that the information registered to KUVO
will not be cleared.
4 Press [POWER] button.
When a message notifying that the factory reset is finished appears on
the screen, press the [POWER] button on this unit to turn off the power
of this unit.
About the auto standby function
When [AUTO STANDBY] is set to [ON], the unit automatically enters
the standby mode if 10 hours elapses with all of the following conditions
met.
— That none of this unit’s buttons or controls are operated.
— That no audio signal is input to each channel of this unit.
— That no PRO DJ LINK connections are made.
! When the [QUANTIZE (UTILITY, WAKE UP)] button is pressed, the
standby mode is canceled.
! This unit is shipped with the auto standby function turned on. If you
do not want to use the auto standby function, set [AUTO STANDBY]
to [OFF].
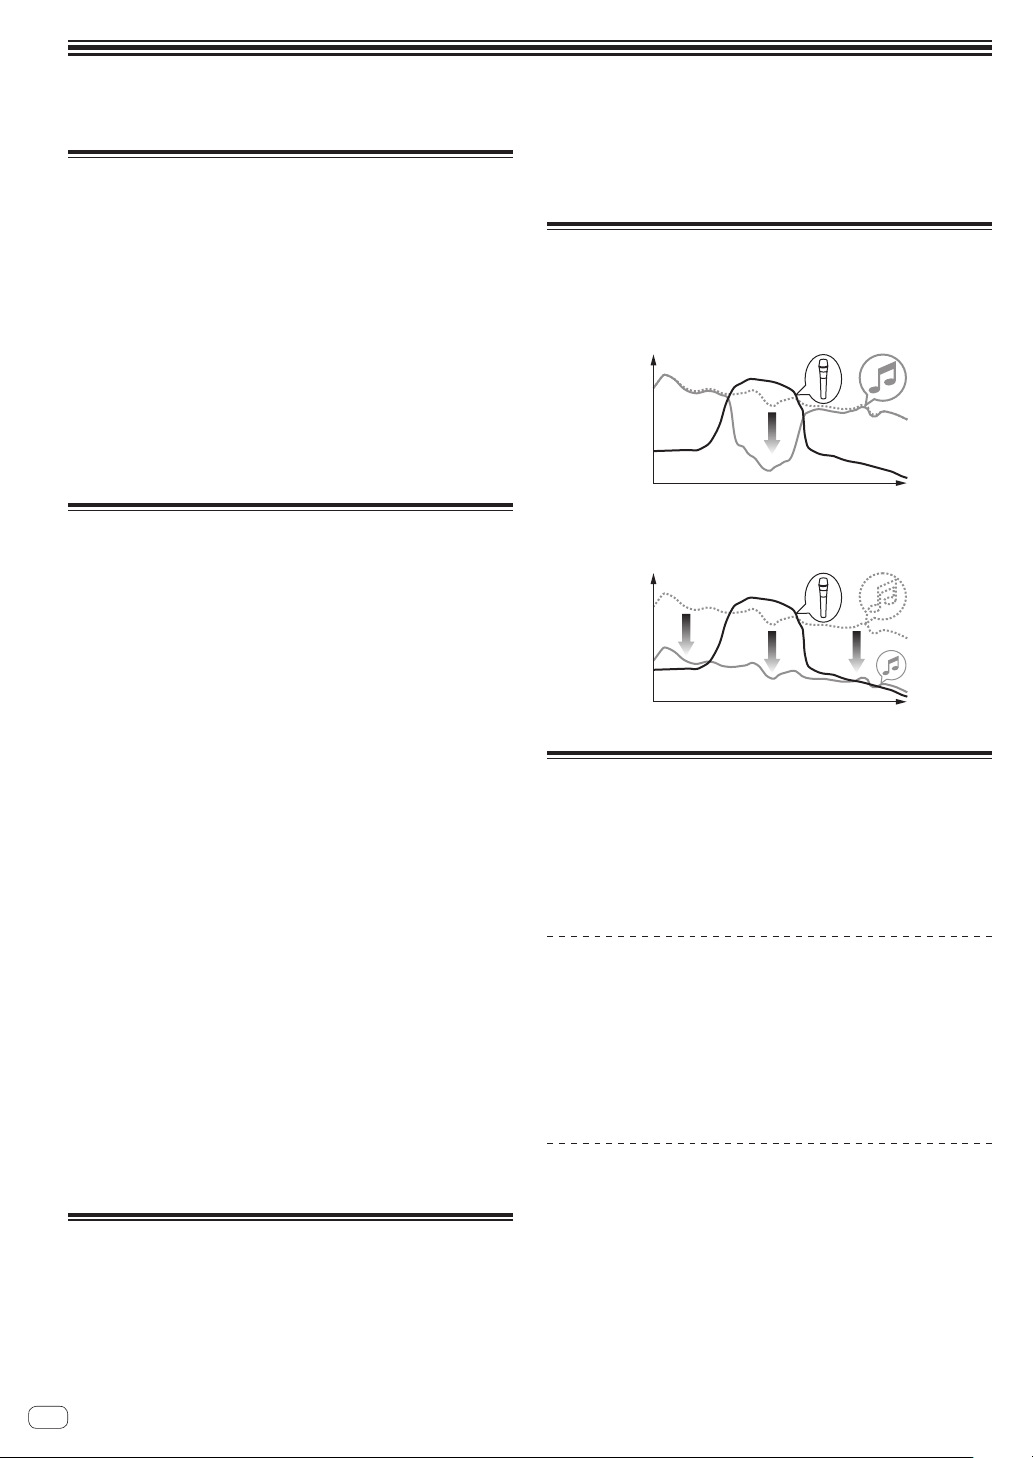
About the talk over function
The talk over function has the two modes described below.
— [ADVANCED] (advanced talk over): The mid-range only of the sound
of channels other than the [MIC] channel is attenuated according to
the [LEVEL] setting value and output.
dB
Frequency
— [NORMAL] (normal talk over): The sound of channels other than the
[MIC] channel is attenuated according to the [LEVEL] setting value
and output.
dB
Frequency
About the setting utility software
The setting utility can be used to make the checks and settings
described below.
— Checking the status of this unit’s input selector switches
— Setting the audio data output from this unit to the computer
— Adjusting the buffer size (when using Windows ASIO)
— Checking the version of the firmware and driver software
Displaying the setting utility
For Windows
Click [Start] menu > [All Programs] > [Pioneer] > [DJM-TOUR1] >
[DJM-TOUR1 Settings Utility].
For Mac OS X
Click [Macintosh HD] icon > [Application] > [Pioneer] > [DJM-
TOUR1] > [DJM-TOUR1 Settings Utility].
Checking the status of this unit’s input
selector switches
Display the setting utility before starting.
En
28
Loading ...
Loading ...
Loading ...