Loading ...
Loading ...
Loading ...
The effect’s quantitative parameter can be adjusted by turning the
[PARAMETER] control.
Canceling the SOUND COLOR FX effect
Press the [SOUND COLOR FX] selection button that is
flashing.
The effect is canceled.
Using the BEAT FX function
This function lets you instantaneously set various effects according to
the tempo (BPM = Beats Per Minute) of the currently playing track.
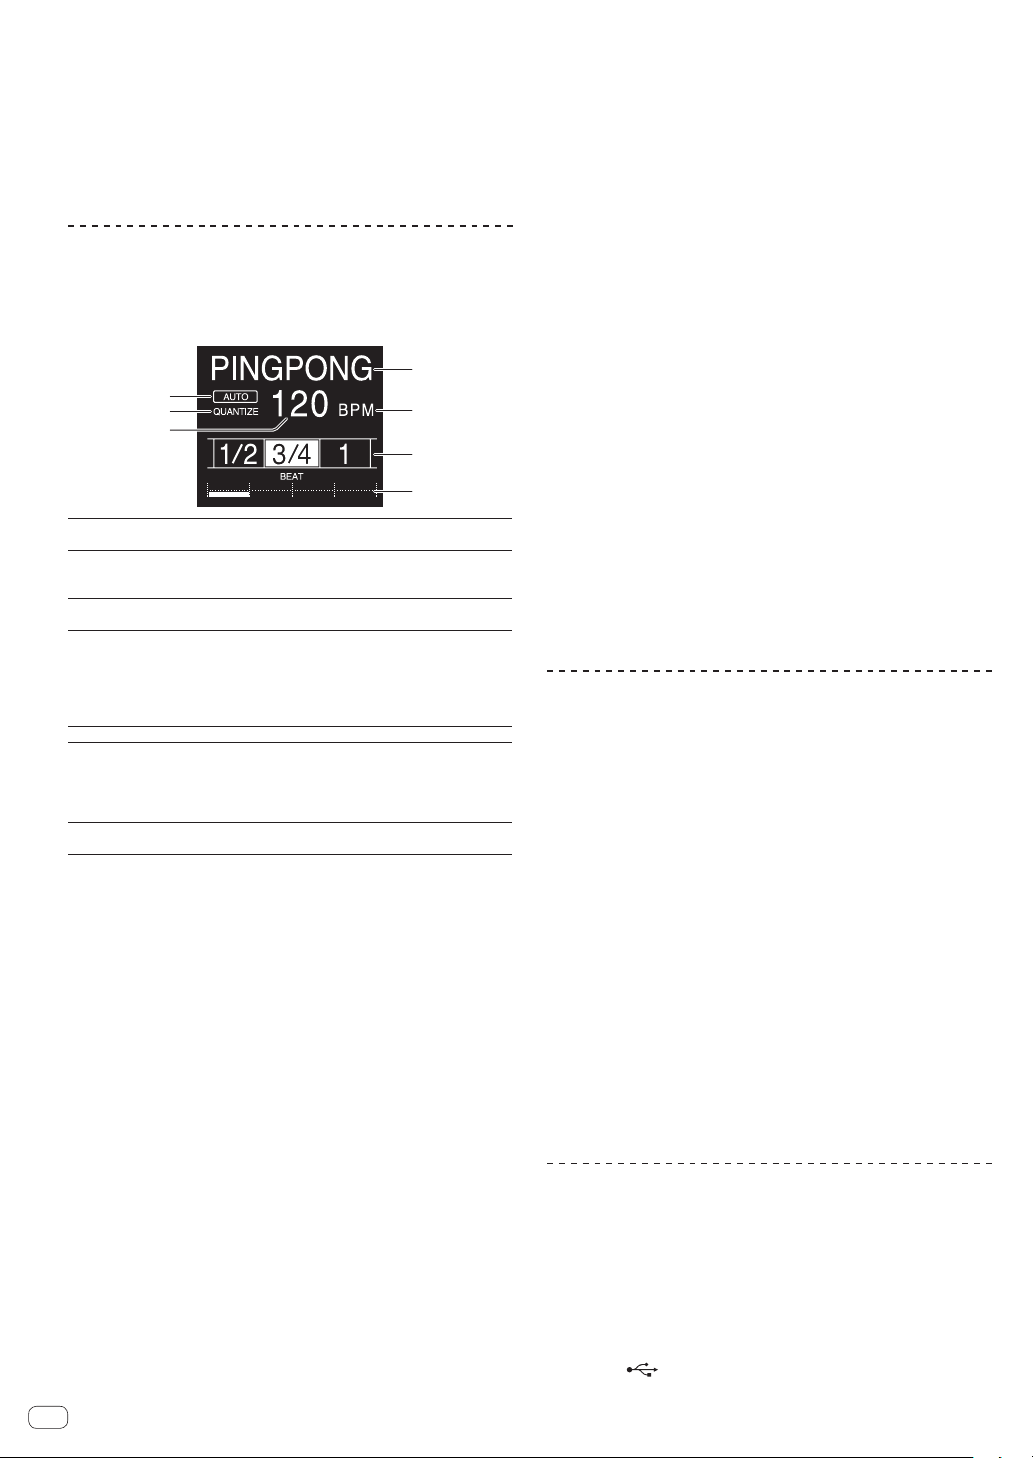
Main unit display
1
6
7
5
2
3
4
1
Effect display
section
The name of the selected effect is displayed.
2
AUTO (TAP)
[AUTO] lights when the BPM measurement mode is set
to the auto mode.
[TAP] lights when in the manual input mode.
3
QUANTIZE
Lights when the QUANTIZE can be used.QUANTIZE Blinks
or turns off when the function cannot be used.
4
BPM value dis-
play (3 digits)
When in the auto mode, this displays the automatically
detected BPM value.
When the BPM cannot be detected, the previously
detected BPM value is displayed and flashes.
When in the manual input mode, this displays the BPM
value that was input manually.
5
BPM
This is always lit.
6
Beat/parameter
display section
This lights according to the selected beat number
position.
Depending on the effect, parameters are displayed when
the [BEAT c, d] buttons are pressed. Blinks when outside
the parameter limits.
7
Touch display
section
Displays the positions shown in [X-PAD].
1 Press [AUTO/TAP] button.
Select the BPM measurement mode.
— [AUTO]: The BPM is measured automatically from the audio
signal that is being input. The [AUTO] mode is set when this
unit’s power is turned on.
— [TAP]: Enter the BPM manually For instructions on input meth-
ods, see Inputting the BPM manually on page 20 .
! The [AUTO] BPM measurement range is BPM = 70 to 180. With
some tracks it may not be possible to measure the BPM correctly. If
the BPM cannot be measured, the BPM value on the display flashes.
In such cases, use the [TAP] button to input the BPM manually.
2 Turn the beat effect selector switch.
This selects the type of effect.
! For the types of effects, see Types of BEAT FX on page 22 .
3 Turn the effect channel selector switch.
This selects the channel to which the effect is applied.
The [BEAT FX] indicator for the channel selected with the effect channel
selector lights.
— [1] – [4]: The effect is applied to the sound of the respective
channel.
— [MIC]: The effect is applied to the sound of [MIC] channel.
— [CROSS FADER A], [CROSS FADER B]: The effect is applied to
sound of the crossfader [A] (left) side or [B] (right) side.
— [MASTER]: The effect is applied to the sound of the [MASTER]
channel.
4 Press the [BEAT c, d] button.
Set the beat fraction for synchronizing the effect sound.
The effect time corresponding to the beat fraction is set automatically.
5 Press the [FX FREQUENCY] [HI][MID][LOW]buttons.
The range an effect is applied can be selected. When an effect is turned
on, the button lights and the effect is applied to the selected range.
When an effect is turned off, the button turns off and the effect is not
applied to the selected range.
6 Press the [ON/OFF] button for [BEAT FX].
The effect is applied to the sound.
The effect’s time parameter can be adjusted by turning the [TIME]
control.
The effect’s quantitative parameter can be adjusted by turning the
[LEVEL/DEPTH] control.
The [ON/OFF] button flashes when the effect is on.
! When the [ON/OFF] button is pressed again, the effect turns off.
Inputting the BPM manually
Tap the [TAP] button at least 2 times in rhythm with the
beat (in quarter notes) of the sound being played.
The average value of the interval at which the [TAP] button was tapped
by finger is set as the BPM.
! When the BPM is set using the [TAP] button, the beat fraction is set
to [1/1] and the time of one beat (quarter note) is set as the effect
time.
! The BPM can be set manually by turning the [TIME] control while
pressing the [TAP] button.
! The BPM can be set in units of 0.1 by pressing the [AUTO/TAP] but-
ton while pressing the [TAP] button and turning the [TIME] control
while pressing the two buttons.
Operating the [X-PAD]
Operating procedure 1
1 Perform steps 1 to 5 of the Using the BEAT FX
function procedure.
2 Touch the [X-PAD].
The two operations of turning the effect on/off and changing the time/
amount parameter of the effect can be performed by touching and slid-
ing a finger on the [X-PAD].
! When you release your finger from the [X-PAD], the effect turns off.
! To keep the effect on when you release your finger from the [X-PAD],
while touching the [X-PAD] press the [ON/OFF] button of [BEAT FX],
then release your finger from the [X-PAD].
Operating procedure 2
1 Using the BEAT FX functionPerform steps 1 to 6.
2 Touch the [X-PAD].
The time/amount parameter of the effect can be changed by sliding a
finger on the [X-PAD].
Using the SEND/RETURN function
External effector and mobile devices can be used.
1 Connect this unit and external effector.
For information on connecting, see Connecting output terminals on
page 16 .
2 Switch the [SEND/RETURN] selector switches.
Select the effector to use.
— [1/4” JACK]: Select when using external effector.
— [USB ]: Select when using a mobile device.
En
20
Loading ...
Loading ...
Loading ...