Documents: Go to download!
User Manual
- User Manual - (English)
- Installation Manual - (English)
- Warranty - (English)
- PARTS AND CONTROLS
- Basic operation
- Troubleshooting
- Specifications
Table of contents
PARTS AND CONTROLS
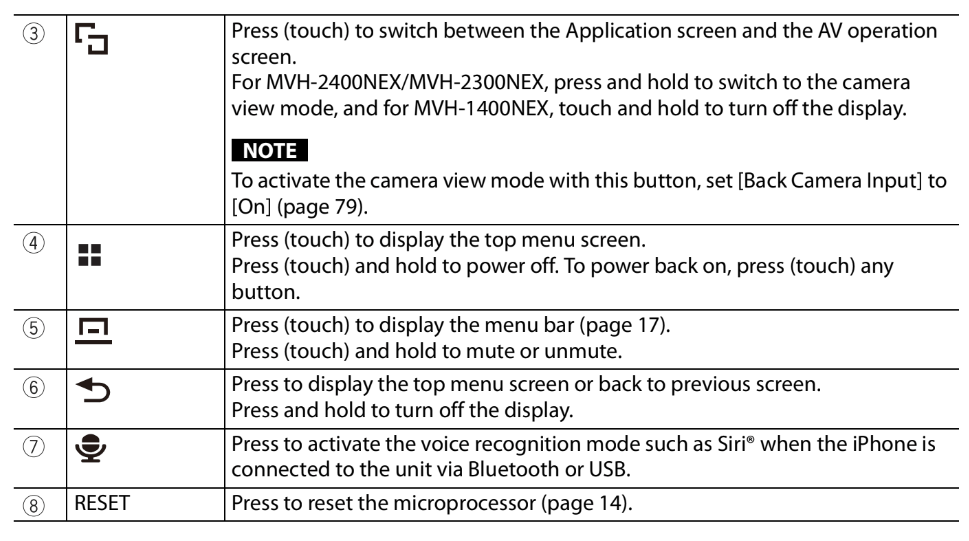
Main unit
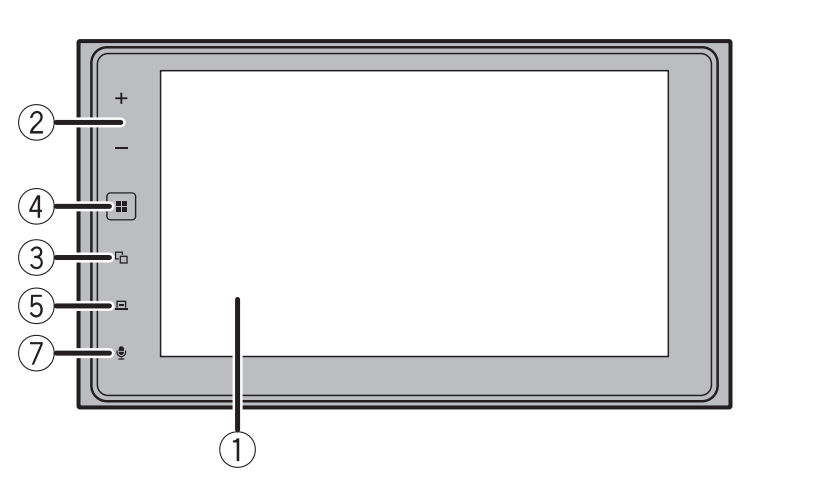
NOTE
For MVH-2400NEX/MVH-2300NEX, press buttons on the main unit, and for MVH-1400NEX, touch
buttons on the main unit.

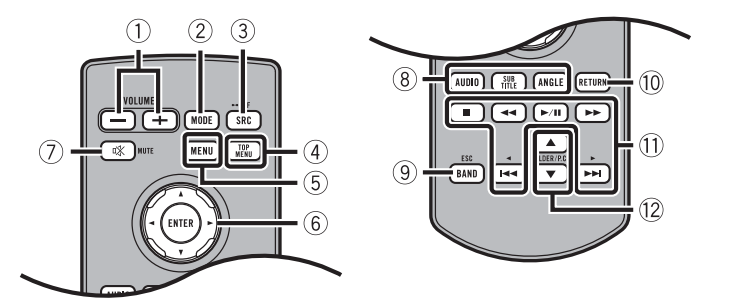
Remote Control
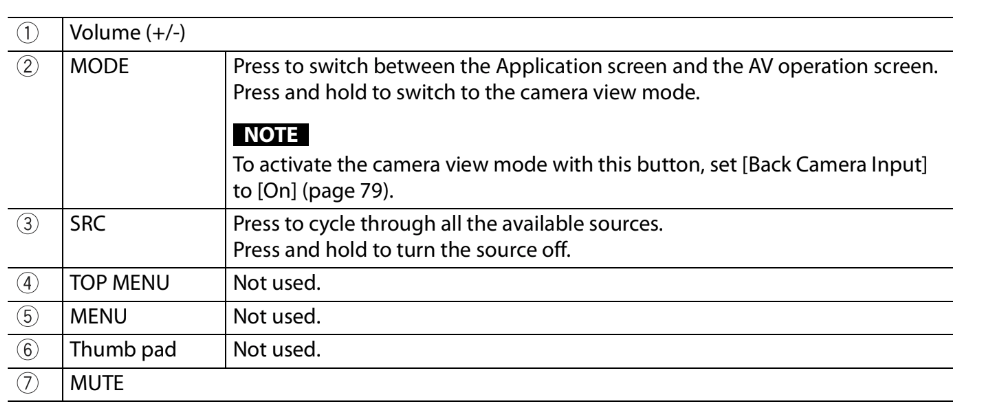
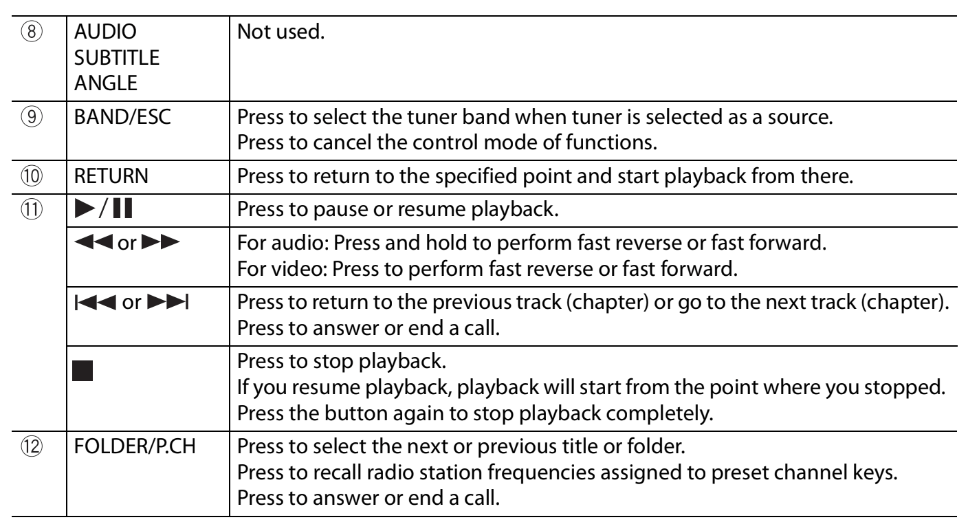
Basic operation
Resetting the microprocessor
 CAUTION
• Pressing the RESET button resets settings and recorded contents to the factory settings.
– Do not perform this operation when a device is connected to this product.
– Some of the settings and recorded contents will not be reset.
• The microprocessor must be reset under the following conditions:
– Prior to using this product for the first time after installation.
– If this product fails to operate properly.
– If there appears to be problems with the operation of the system.
1 Turn the ignition switch OFF.
2 Press RESET with a pen tip or other pointed tools.
Settings and recorded contents are reset to the factory settings.
Preparing the remote control
Remove the insulation sheet before use.
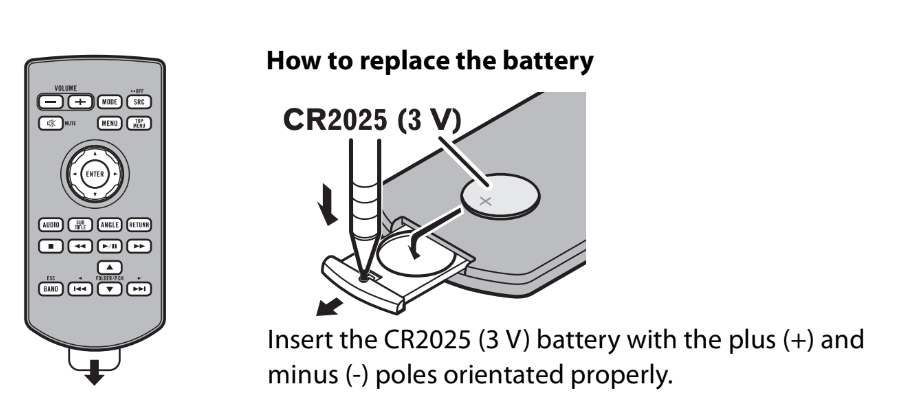
 WARNING
• Do not ingest the battery, Chemical Burn Hazard.
(The remote control supplied with) This product contains a coin/button cell battery. If the coin/
button cell battery is swallowed, it can cause severe internal burns in just 2 hours and can lead to death.
Keep new and used batteries away from children.
If the battery compartment does not close securely, stop using the product and keep it away from
children.
If you think batteries might have been swallowed or placed inside any part of the body, seek
immediate medical attention.
• Batteries (battery pack or batteries installed) must not be exposed to excessive heat such as sunshine,
fire or the like.
 CAUTION
• Remove the battery if the remote control is not used for a month or longer.
• There is a danger of explosion if the battery is incorrectly replaced. Replace only with the same or
equivalent type.
• Do not handle the battery with metallic tools.
• Do not store the battery with metallic objects.
• If the battery leaks, wipe the remote control completely clean and install a new battery.
• When disposing of used batteries, please comply with governmental regulations or environmental
public institutions’ rules that apply in your country/area.
• “Perchlorate Material – special handling may apply. See www.dtsc.ca.gov/hazardouswaste/
perchlorate. (Applicable to California, U.S.A.)”
Using the remote control
Point the remote control in the direction of the front panel to operate.
NOTE
The remote control may not function properly in direct sunlight. Important
• Do not store the remote control in high temperatures or direct sunlight.
• Do not let the remote control fall onto the floor, where it may become jammed under the brake or gas
pedal.
Starting up the unit
1 Start the engine to boot up the system.
The [Select Program Language] screen appears.
NOTE
From the second time on, the screen shown will differ depending on the previous conditions.
2 Touch the language.
3 Touch  .
.
The [Speaker Mode Settings] screen appears.
4 Touch the speaker modes.
[Standard Mode]
4-speaker system with front and rear speakers, or a 6-speaker system with front and
rear speakers and subwoofers.
[Network Mode]
3-way system with a high range speaker, middle range speaker and subwoofer (low
range speaker) for reproduction of high, middle and low frequencies (bands).
 WARNING
Do not use the unit in standard mode when a speaker system for 3-way network mode is
connected to the unit. This may cause damage to the speakers.
5 Touch [OK].
Initial Legal Disclaimer screen appears.
6 Touch [OK].
The top menu screen appears.
NOTE
Once the speaker mode is set, the setting cannot be changed unless this product is restored to the
default settings. Restore the default settings to change the speaker mode setting (page 95).
Switching the speaker mode
To change the speaker mode, you need to restore this product to the default settings.
1 Restore the default setting (page 95).
Using the touch panel
You can operate this product by touching the keys on the screen directly with your
fingers.
NOTE
To protect the LCD screen from damage, be sure to touch the screen only with your finger gently.
Common touch panel keys
 Returns to the previous screen.
 Close the screen.
Operating list screens
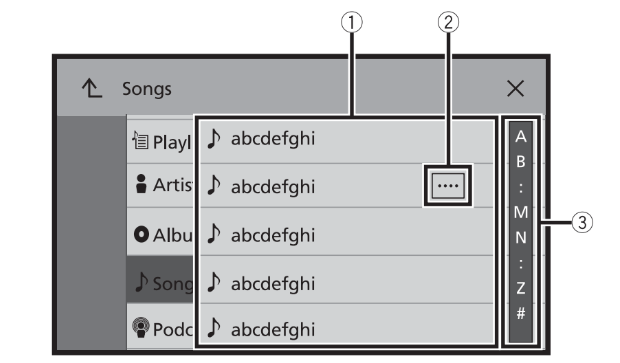
| 1 | Touching an item on the list allows you to narrow down the options and proceed to the next operation. |
| 2 | Appears when all characters are not displayed on the display area. NOTE |
| 3 | Appears when items cannot be displayed on a single page. Drag the side bar, the initial search bar or the list to view any hidden items. |
Operating the time bar

| 1 | You can change the playback point by dragging the key. The playback time corresponding to the position of the key is displayed while dragging the key. |
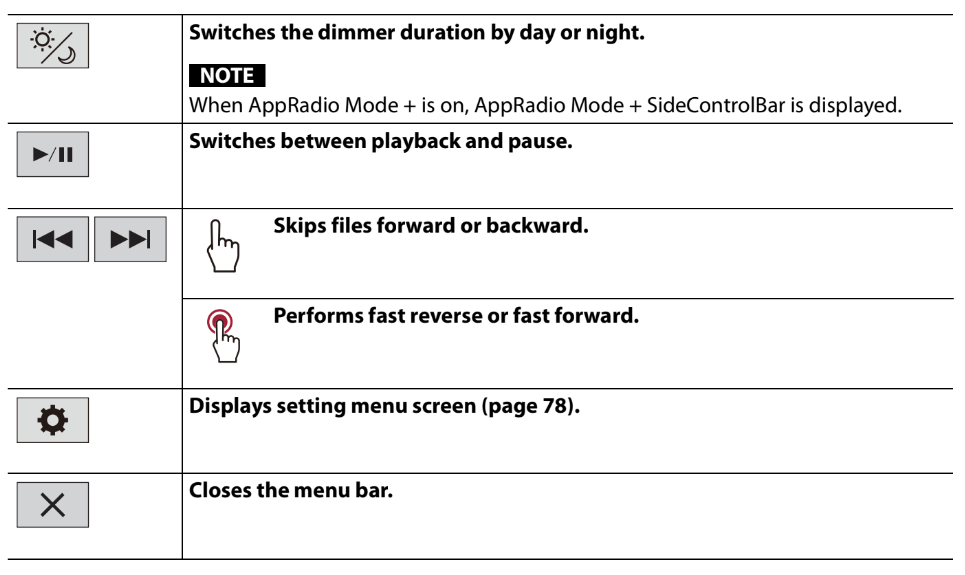
Operating the menu bar
1 Press (touch)  .
.
The menu bar pops up on the screen.
NOTE
The menu bar availability may vary depending on the activating source.

Operating the menu bar
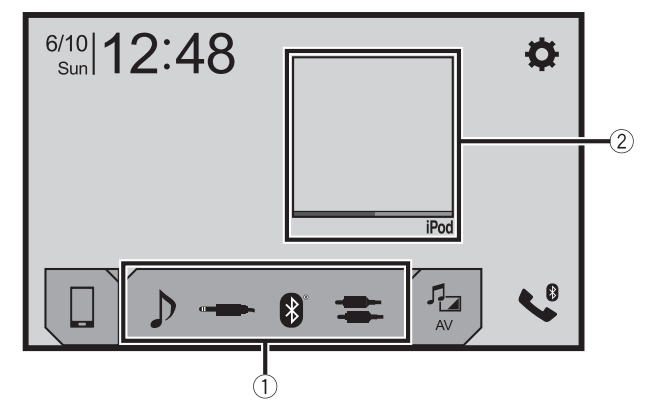
| 1 | Favorite source icons TIPS • When you connect the external navigation system to this unit, the navigation mode key is displayed at the middle of the right side of the display. • If you select [Power OFF], you can turn off almost all functions. – An incoming call is received (only for hands-free phoning via Bluetooth). – A rear view camera image is input when the vehicle is in reverse. – A button on this unit is pressed (touched). – The ignition switch is turned off (ACC OFF), then turned on (ACC ON). |
| 2 | AV operation key Displays the current source. TIP When the last source is displayed behind the key, you can switch the source by touching the key. |
 | Setting the time and date |
 | Settings (page 78) and Favorite menu (page 93) |
 | Connected device key Displays connected device. Switches the source or application with connected devices such as AppRadio Mode +, external navigation system, etc. TIP When a device with a compatible application is connected, the favorite application key appears. Once the key appears, you can adjust the range of the favorite application key area with the following steps. 1 Touch and hold  . . appears at the top right of the favorite application key. appears at the top right of the favorite application key.2 Drag  to the desired position. to the desired position.To finish the adjusting, touch any place of the display except for the favorite application key. NOTE This function is available only when you stop your vehicle in a safe place and apply the parking brake. |
 | AV source |
 | Hands-free phoning |
Troubleshooting
If you have problems operating this product, refer to this section. The most common problems are listed below, along with likely causes and solutions. If a solution to your problem cannot be found here, contact your dealer or the nearest authorized Pioneer service facility.
Common problems
A black screen is displayed, and operation is not possible using the touch panel keys.
→ [Power OFF] mode is on.
– Press (touch) any button on this product to release the mode.
→ [Back Camera Input] is set to [On] in
[Camera settings] without connecting the rear view camera.
– MVH-2400NEX/MVH-2300NEX:
Press the RESET button.
– MVH-1400NEX:
Disconnect the (-) battery cable then reconnect it, or remove this product then reinstall it.
Problems with the AV screen
The screen is covered by a caution
message and the video cannot be shown.
→ The parking brake lead is not connected or the parking brake is not applied.
– Connect the parking brake lead correctly, and apply the parking brake.
→ The parking brake interlock is activated.
– Park your vehicle in a safe place and apply the parking brake.
No video output from the connected
equipment.
→ The [AV Input] or [AUX Input] setting is incorrect.
– Correct the settings.
The audio or video skips.
→ This product is not firmly secured.
– Secure this product firmly.
No sounds are produced. The volume
level will not rise.
→ Cables are not connected correctly.
– Connect the cables correctly.
The icon  is displayed, and operation is
impossible.
→ The operation is not compatible with the video configuration.
Random playback in Music Browse mode
is released in the USB storage device.
→ Random playback in Music Browse mode is canceled after the ignition switch is turned off (ACC OFF).
– Switch to Music Browse mode again and turn on random playback.
The picture is stretched, with an incorrect
aspect ratio.
→ The aspect setting is incorrect for the display.
– Select the appropriate setting for that image.
iPod cannot be operated.
→ The iPod is frozen.
– Reconnect the iPod with the USB interface cable for iPod/iPhone.
– Update the iPod software version.
→ An error has occurred.
– Reconnect the iPod with the USB interface cable for iPod/iPhone.
– Park your vehicle in a safe place, and then turn off the ignition switch (ACC
OFF). Subsequently, turn the ignition switch to on (ACC ON) again.
– Update the iPod software version.
→ Cables are not connected correctly.
– Connect the cables correctly.
Sound from the iPod cannot be heard.
→ The audio output direction may switch automatically when the Bluetooth and USB connections are used at the same time.
– Use the iPod to change the audio output direction.
No back camera image when the vehicle is in reverse.
→ The back camera input setting on the receiver is set to Off.
– Change the back camera setting to On in the settings menu. (Refer to the System Settings section of this manual to adjust.)
→ The camera input may be loose or not connected.
– Check the connection and make sure the male end of the camera is connected to the brown input on the back of the receiver. (Refer to the installation manual.)
→ The reverse lead on the receiver may not be connected to the proper wire at the reverse lamp.
– Check the connection and make sure that the violet/white lead of the receiver is connected to the lead whose voltage changes when the shift lever is put in reverese. (Refer to the installation manual.)
Black screen displayed when the vehicle is in reverse, with no camera installed.
→ Back camera input is set to On.
– Turn the setting to Off in the settings menu. (Refer to the System Settings section of this manual to adjust.)
Back image displayed when vehicle is not
in reverse.
→ The camera polarity is not set properly in the Camera settings menu.
– Review System Settings section of this manual for steps to switch the camera polarity. Park in a safe place, then while keeping your foot firmly on the brake, put the vehicle in reverse, access the System Settings menu, and change the camera polarity setting. Put vehicle back in park. (Refer to the System Settings section of this manual to adjust.)
Problems with the phone screen
Dialing is impossible because the touch panel keys for dialing are inactive.
→ Your phone is out of range for service.
– Retry after re-entering the range for service.
→ The connection between the cellular phone and this product cannot be established.
– Perform the connection process.
→ Of the two cellular phones connected to this product at the same time, if the first phone is dialing, ringing or a call is in progress, dialing cannot be performed on the second phone.
– When the operation on the first of the two cellular phones is completed, use the switch devices key to switch to the second phone and then dial.
Problems with Application A black screen is displayed.
→ While operating an application, the application was ended on the smartphone side.screen
– Press (touch) to display the top menu screen.
→ The smartphone OS may be awaiting screen operation.
– Stop the vehicle in a safe place and check the screen on the smartphone.
The screen is displayed, but operation does not work at all.
→ An error has occurred.
– Park your vehicle in a safe place, and then turn off the ignition switch (ACC OFF). Subsequently, turn the ignition switch to on (ACC ON) again.
– When an Android device is connected, disconnect the Bluetooth connection from this product and then reconnect it.
The smartphone was not charged.
→ Charging stopped because the temperature of the smartphone rose due to prolonged use of the smartphone during charging.
– Disconnect the smartphone from the cable, and wait until the smartphone cools down.
→ More battery power was consumed than was gained from charging.
– This problem may be resolved by stopping any unnecessary services on the smartphone.
Sound from AppRadio Mode + of the Android device cannot be heard from the speakers of this unit.
→ Depending on the Android device, the sound from AppRadio Mode + may not be output from the speakers of this unit.
– Switch to [Smartphone] in the [AppRadio Mode Sound] settings
Specifications
General
Rated power source:
14.4 V DC (10.8 V to 15.1 V allowable)
Grounding system:
Negative type
Maximum current consumption:
10.0 A
Dimensions (W × H × D):
(MVH-2400NEX/MVH-2300NEX)
D
Chassis:
178 mm × 100 mm × 164 mm (7 in. × 3- 7/8 in. × 6-1/2 in.)
Nose:
171 mm × 97 mm × 14 mm (6-3/4 in. × 3-7/8 in. × 1/2 in.)
(MVH-1400NEX)
D
Chassis:
178 mm × 100 mm × 164 mm (7 in. × 3- 7/8 in. × 6-1/2 in.)
Nose:
171 mm × 97 mm × 7 mm (6-3/4 in. × 3-7/8 in. × 1/4 in.)
Weight:
1.2 kg (2.6 lbs)
Display
Screen size/aspect ratio:
(MVH-2400NEX/MVH-2300NEX)
6.94 inch wide/16:9 (effective display
area: 156.24 mm × 81.605 mm) (6-1/8 in. × 3-1/4 in.)
(MVH-1400NEX)
6.2 inch wide/16:9 (effective display area:
137.52 mm × 77.232 mm) (5-3/8 in. × 3 in.)
Pixels:
(MVH-2400NEX/MVH-2300NEX)
1 209 600 (2 520 × 480)
(MVH-1400NEX)
1 152 000 (2 400 × 480)
Display method:
TFT Active matrix driving
Color system:
PAL/NTSC/PAL-M/PAL-N/SECAM
compatible
Temperature range:
-10 ̊C to +60 ̊C (+14 ̊F to +140 ̊F)
Audio
Maximum power output:
• 50 W × 4 ch/4 Ω
• 50 W × 2 ch/4 Ω + 70 W × 1 ch/2 Ω (for subwoofer)
Continuous power output:
22 W × 4 (50 Hz to 15 kHz, 5 %THD, 4 Ω
LOAD, Both Channels Driven)
Load impedance:
4 Ω (4 Ω to 8 Ω [2 Ω for 1 ch] allowable)
Preout output level (max): 4.0 V
Equalizer (13-Band Graphic Equalizer):
Frequency:
50 Hz/80 Hz/125 Hz/200 Hz/315 Hz/
500 Hz/800 Hz/1.25 kHz/2 kHz/3.15
kHz/5 kHz/8 kHz/12.5 kHz
Gain: ±12 dB (2 dB/step)
<Standard Mode>
HPF:
Frequency:
25 Hz/31.5 Hz/40 Hz/50 Hz/63 Hz/80
Hz/100 Hz/125 Hz/160 Hz/200 Hz/250Hz
Slope:
-6 dB/oct, -12 dB/oct, -18 dB/oct, -24 dB/oct, OFF
Subwoofer/LPF:
Frequency:
25 Hz/31.5 Hz/40 Hz/50 Hz/63 Hz/80Hz/100 Hz/125 Hz/160 Hz/200 Hz/250 Hz
Slope:
-6 dB/oct, -12 dB/oct, -18 dB/oct, -24 dB/oct, -30 dB/oct, -36 dB/oct, OFF
Gain:
+10 dB to -24 dB (1 dB/step)
Phase: Normal/Reverse
Time alignment:
0 to 140 step (1 inch/step)
Bass boost:
Gain: +12 dB to 0 dB
Speaker level:
+10 dB to -24 dB (1 dB/step)
<Network Mode>
HPF (High):
Frequency:
1.25 kHz/1.6 kHz/2 kHz/2.5 kHz/3.15 kHz/4 kHz/5 kHz/6.3 kHz/8 kHz/10 kHz/ 12.5 kHz
Slope:
-6 dB/oct, -12 dB/oct, -18 dB/oct, -24 dB/oct
HPF (Mid):
Frequency:
25 Hz/31.5 Hz/40 Hz/50 Hz/63 Hz/80 Hz/100 Hz/125 Hz/160 Hz/200 Hz/250 Hz
Slope:
-6 dB/oct, -12 dB/oct, -18 dB/oct, -24 dB/oct, OFF
LPF (Mid):
Frequency:
1.25 kHz/1.6 kHz/2 kHz/2.5 kHz/3.15 kHz/4 kHz/5 kHz/6.3 kHz/8 kHz/10 kHz/12.5 kHz
Slope:
-6 dB/oct, -12 dB/oct, -18 dB/oct, -24 dB/oct, OFF
Subwoofer:
Frequency:
25 Hz/31.5 Hz/40 Hz/50 Hz/63 Hz/80 Hz/100 Hz/125 Hz/160 Hz/200 Hz/250 Hz
Slope:
-6 dB/oct, -12 dB/oct, -18 dB/oct, -24 dB/oct, -30 dB/oct, -36 dB/oct, OFF
Gain:
+10 dB to -24 dB (1 dB/step)
Phase: Normal/Reverse
Time alignment:
0 to 140 step (1 inch/step)
Bass boost:
Gain: +12 dB to 0 dB
Speaker level:
+10 dB to -24 dB (1 dB/step)
USB
USB standard spec:
USB 1.1, USB 2.0 full speed, USB 2.0 high speed
Max current supply: 1.5 A
USB Class:
MSC (Mass Storage Class), MTP (Media
Transfer Protocol)
File system: FAT16, FAT32, NTFS
<USB audio>
MP3 decoding format:
MPEG-1 & 2 & 2.5 Audio Layer 3
WMA decoding format:
Ver. 7, 7.1, 8, 9, 10, 11, 12 (2 ch audio)
(Windows Media Player)
AAC decoding format:
MPEG-4 AAC (iTunes encoded only) (Ver. 12.5 and earlier)
FLAC decoding format:
Ver. 1.3.0 (Free Lossless Audio Codec)
WAV signal format (MSC Mode only):
Linear PCM
Sampling frequency:
Linear PCM:
16 kHz/22.05 kHz/24 kHz/32 kHz/44.1 kHz/48 kHz <USB image>
JPEG decoding format (MSC Mode only):
.jpeg, .jpg, .jpe
Pixel Sampling: 4:2:2, 4:2:0
Decode Size:
MAX: 8 192 (H) × 7 680 (W)
MIN: 32 (H) × 32 (W)
PNG decoding format (MSC Mode only):
.png
Decode Size:
MAX: 720 (H) × 576 (W)
MIN: 32 (H) × 32 (W)
BMP decoding format (MSC Mode only):
.bmp
Decode Size:
MAX: 1 920 (H) × 936 (W)
MIN: 32 (H) × 32 (W)
<USB video>
H.264 video decoding format:
Base Line Profile, Main Profile, High
Profile
H.263 video decoding format:
Base Line Profile 0/3
VC-1 video decoding format:
Simple Profile, Main Profile, Advanced
Profile
DivX:
Home Theater
MPEG4 video decoding format:
Simple Profile, Advanced Simple Profile
MPEG2 video decoding format:
Main Profile
Bluetooth
Version:
Bluetooth 4.1
Output power:
+4 dBm Max. (Power class 2)
Frequency band:
2 400 MHz to 2 483.5 MHz
FM tuner
Frequency range:
87.9 MHz to 107.9 MHz
Usable sensitivity:
12 dBf (1.1 μV/75 Ω, mono, S/N: 30 dB)
Signal-to-noise ratio:
72 dB (IHF-A network)
AM tuner
Frequency range:
530 kHz to 1 710 kHz
Usable sensitivity:
28 μV (S/N: 20 dB)
Signal-to-noise ratio:
62 dB (IHF-A network)
See other models: TS-W310D4 AVH-3400NEX AVH-1330NEX TS-WH500A AVIC-6100NEX
