
English Français Español
DIGITAL MEDIA RECEIVER
RÉCEPTEUR MÉDIA NUMÉRIQUE
RECEPTOR DE MEDIOS DIGITALES
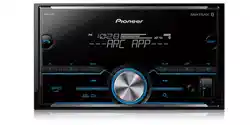
MVH-S600BS
MVH-S400BT
Owner’s Manual
Mode d’emploi
Manual de instrucciones
Important (Serial number)
The serial number is located on the bottom of this unit. For your own security and convenience, be sure to
record this number on the enclosed warranty card.
Important (Numéro de série)
Le numéro de série se trouve au bas de cet appareil. Pour votre sécurité et votre commodité, veillez à noter ce
numéro sur la carte de garantie fournie.
Importante (Número de serie)
El número de serie se encuentra en la parte inferior de esta unidad. Por su propia seguridad y comodidad,
asegúrese de anotar este número en la tarjeta de garantía que se adjunta.

- 2 -
English
Before You Start....................................................................................... 3
Getting Started ........................................................................................ 5
Radio....................................................................................................... 12
CD/USB/iPhone®/AUX.......................................................................... 13
Bluetooth ............................................................................................... 15
App Mode .............................................................................................. 20
Pandora® ................................................................................................ 22
Spotify® .................................................................................................. 23
SiriusXM Satellite Radio ...................................................................... 25
Using Pioneer ARC APP ....................................................................... 29
Audio Adjustments .............................................................................. 30
Settings .................................................................................................. 32
FUNCTION settings ............................................................................... 32
AUDIO settings ...................................................................................... 35
SYSTEM settings .................................................................................... 37
ILLUMINATION settings........................................................................ 41
MIXTRAX settings.................................................................................. 42
Connections/Installation .................................................................... 44
Additional Information ....................................................................... 50
About this manual:
• In the following instructions, a USB memory or USB audio player are referred to as
“USB device”.
• When an iPhone is connected to the unit, the source name on the unit appears as
[iPod®]. Please note that this unit supports only iPhones (iPhone 5 or later) regardless
of the source name (for details, refer to page 56).
Table of Contents

- 3 -- 3 -
English
Thank you for purchasing this PIONEER product
To ensure proper use, please read through this manual before using this product. It is especially
important that you read and observe WARNIN Gs and CAUTIONs in this manual. Please keep the
manual in a safe and accessible place for future reference.
The Safety of Your Ears is in Your Hands
Get the most out of your equipment by playing it at a safe level—a level that lets the sound come
through clearly without annoying blaring or distortion and, most importantly, without affecting your
sensitive hearing. Sound can be deceiving.
Before You Start
FCC ID: EW4C95
MODEL NO.: MVH-S600BS/MVH-S400BT
IC: 4250A-C95
This device complies with Part 15 of FCC Rules and Industry Canada licence-exempt RSS standard(s).
Operation is subject to the following two conditions: (1) this device may not cause interference, and
(2) this device must accept any interference, including interference that may cause undesired
operation of this device.
This transmitter must not be co-located or operated in conjunction with any other antenna or
transmitter.
The Bluetooth antenna cannot be removed (or replaced) by user.
This equipment complies with FCC/IC radiation exposure limits set forth for an uncontrolled
environment and meets the FCC radio frequency (RF) Exposure Guidelines and RSS-102 of the IC
radio frequency (RF) Exposure rules. This equipment has very low levels of RF energy that it deemed
to comply without maximum permissive exposure evaluation (MPE). But it is desirable that it should
be installed and operated keeping the radiator at least 20cm or more away from person’s body
(excluding extremities: hands, wrists, feet and ankles).
Alteration or modifications carried out without appropriate authorization may invalidate the user’s
right to operate the equipment.
Note
This equipment has been tested and found to comply with the limits for a Class B digital device,
pursuant to Part 15 of the FCC Rules. These limits are designed to provide reasonable protection
against harmful interference in a residential installation. This equipment generates, uses and can
radiate radio frequency energy and, if not installed and used in accordance with the instructions,
may cause harmful interference to radio communications. However, there is no guarantee that
interference will not occur in a particular installation. If this equipment does cause harmful
interference to radio or television reception, which can be determined by turning the equipment off
and on, the user is encouraged to try to correct the interference by one or more of the following
measures:
–Reorient or relocate the receiving antenna.
–Increase the separation between the equipment and receiver.
–Connect the equipment into an outlet on a circuit different from that to which the receiver is
connected.
–Consult the dealer or an experienced radio/TV technician for help.
- 4 -
English
Over time, your hearing “comfort level” adapts to higher volumes of sound, so what sounds “normal”
can actually be loud and harmful to your hearing. Guard against this by setting your equipment at a
safe level BEFORE your hearing adapts.
ESTABLISH A SAFE LEVEL:
• Set your volume control at a low setting.
• Slowly increase the sound until you can hear it comfortably and clearly, without distortion.
• Once you have established a comfortable sound level, set the dial and leave it there.
BE SURE TO OBSERVE THE FOLLOWING GUIDELINES:
• Do not turn up the volume so high that you can’t hear what’s around you.
• Use caution or temporarily discontinue use in potentially hazardous situations.
• Do not use headphones while operating a motorized vehicle; the use of headphones may create a
traffic hazard and is illegal in many areas.
WARNING
• Do not attempt to install or service this product by yourself. Installation or servicing of this
product by persons without training and experience in electronic equipment and automotive
accessories may be dangerous and could expose you to the risk of electric shock, injury or other
hazards.
• Do not attempt to operate the unit while driving. Make sure to pull off the road and park your vehicle
in a safe location before attempting to use the controls on the device.
CAUTION
• Do not allow this unit to come into contact with moisture and/or liquids. Electrical shock could result.
Also, damage to this unit, smoke, and overheating could result from contact with liquids.
• Always keep the volume low enough to hear outside sounds.
• This product is evaluated in moderate and tropical climate condition under the Audio, video and
similar electronic apparatus - Safety requirements, IEC 60065.
After-sales service for Pioneer products
Please contact the dealer, distributor from where you purchased this unit or the authorized PIONEER
Service Station for after-sales service or any other information. In case the necessary information is not
available, please contact the companies listed below:
Please do not ship your unit to the companies at the addresses listed below for repair without
contacting them in advance.
For warranty information please see the Limited Warranty sheet included with this unit.
U.S.A. and CANADA
Pioneer Electronics (USA) Inc.
CUSTOMER SUPPORT DIVISION
P.O. Box 1760
Long Beach, CA 90801-1760
800-421-1404
- 5 -- 5 -
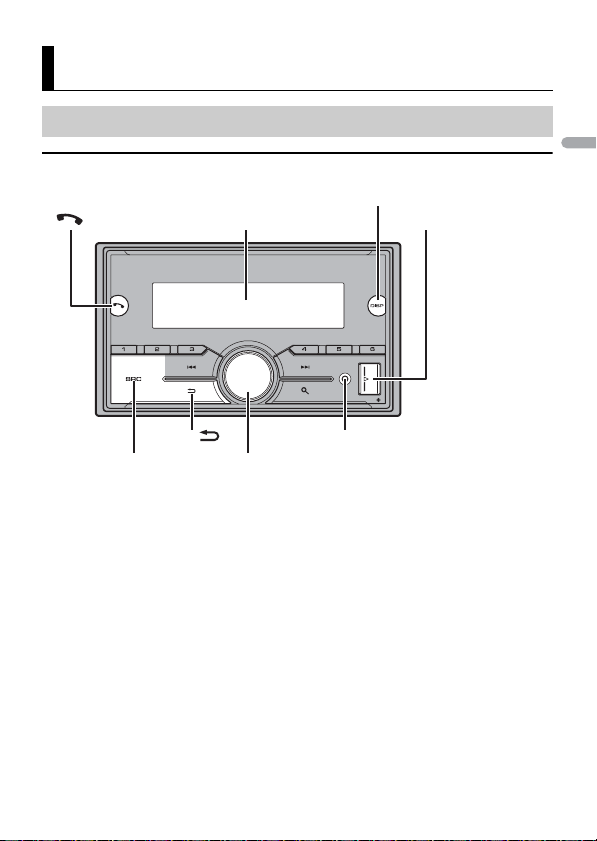
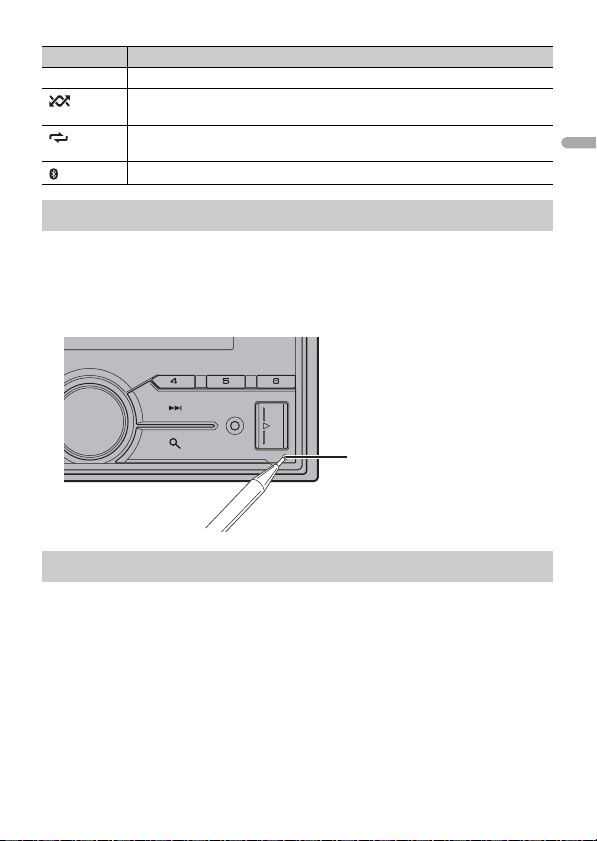
English
MVH-S600BS
Getting Started
Basic operation
Display window
M.C. (multi-control) dial
BAND/
DISP (display)
SRC (source)/OFF
USB port
AUX input jack (3.5 mm stereo jack)
- 6 -
English
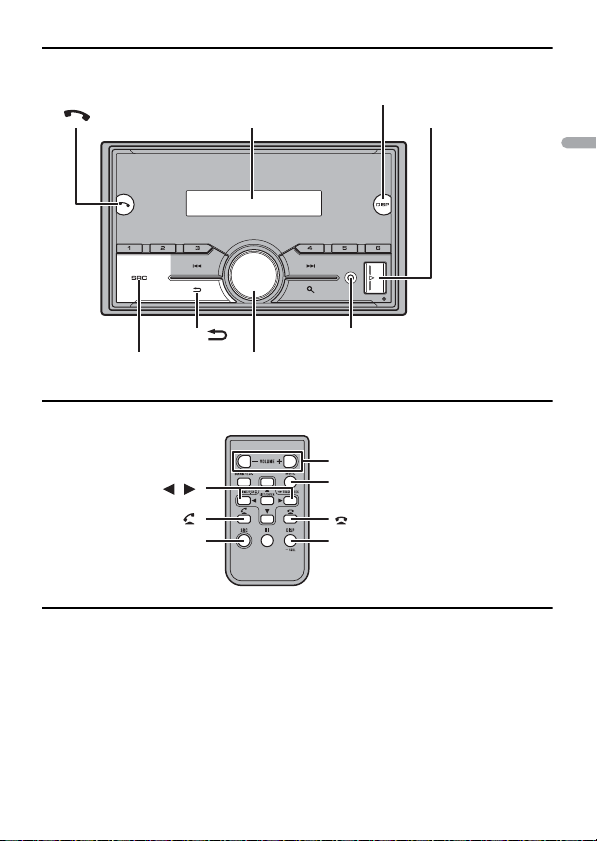
MVH-S400BT
Remote Control
Frequently used operations
The available buttons vary depending on the unit.
Display window
M.C. (multi-control) dial
BAND/
DISP (display)
SRC (source)/OFF
USB port
AUX input jack (3.5 mm stereo jack)
/
SRC (source)
VOLUME +/–
MUTE
DISP (display)

- 7 -- 7 -
English
* When this unit’s blue/white lead is connected to the vehicle’s auto-antenna relay control terminal,
the vehicle’s antenna extends when this unit’s source is turned on. To retract the antenna, turn the
source off.
Display indication
The indication varies depending on the unit.
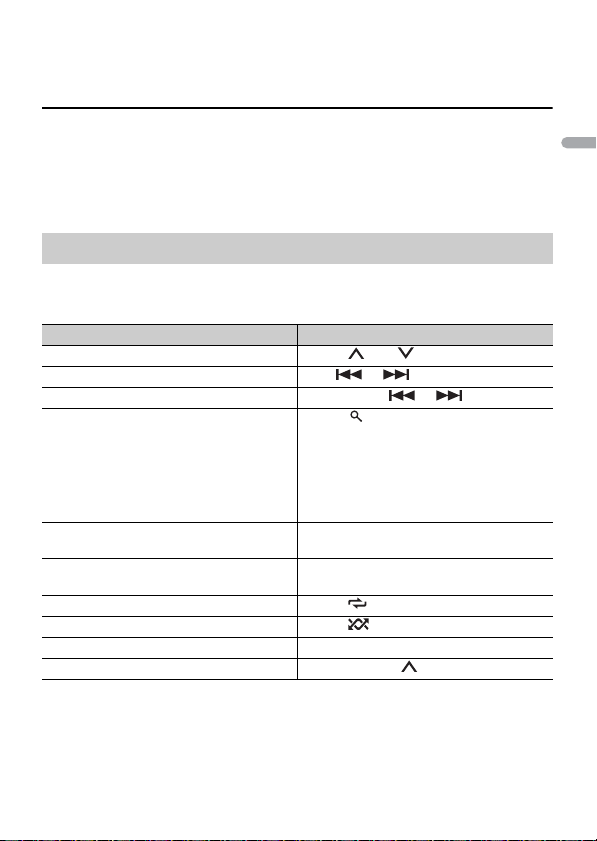
Purpose
Operation
Head Unit Remote Control
Turn on the power* Press SRC/OFF to turn on
the power.
Press and hold SRC/OFF to
turn off the power.
Press SRC to turn on the
power.
Press and hold SRC to turn
off the power.
Adjust the volume Turn the M.C. dial. Press VOLUME + or –.
Press MUTE to mute the
unit. Press MUTE again or
press VOLUME + or – to
unmute.
Select a source Press SRC/OFF repeatedly. Press SRC repeatedly.
Change the display
information
Press DISP repeatedly. Press DISP repeatedly.
Return to the previous
display/list
Press BAND/ . Press / to select the
next/previous folder.
Return to the normal display
from the menu
Press and hold BAND/ .
–
Change the display
brightness (not available
when [SIRIUSXM] is selected
as a source)
Press and hold BAND/ .
–
Answering a call Press . Press .
Ending a call Press . Press .
Indication Description
Appears when a lower tier of the menu or folder exists.
Appears when a Bluetooth telephone is connected to this unit by HFP
(Hands Free Profile) (page 15) and flashes while the telephone is on hold.
Appears when a Bluetooth audio player is connected to this unit by A2DP
(Advanced Audio Distribution Profile) (page 15).
Appears when the button is pressed.
Appears when the sound retriever function is set (page 33).
- 8 -
English
The microprocessor must be reset in the following situations:
– Before using this unit for the first time after installation
– If the unit fails to operate properly
– When strange or incorrect messages appear on the display
1 Press the RESET button with a pen tip or other pointed instrument.
Remove the insulation sheet before use.
BASS Appears when [HI]/[LOW] is selected in [D.BASS] (page 37).
Appears when random/shuffle play is set (except when BT AUDIO is
selected as the source).
Appears when repeat play is set (except when BT AUDIO is selected as the
source).
Appears when a Bluetooth connection is made (page 15).
Resetting the microprocessor
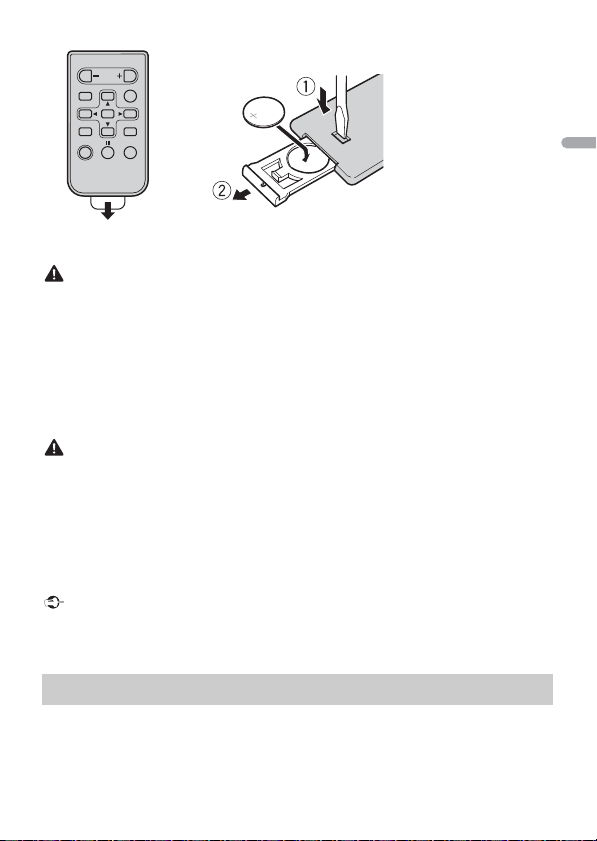
Preparing the remote control
Indication Description
RESET button
- 9 -- 9 -
English
WARNING
• Do not ingest the battery, Chemical Burn Hazard.
(The remote control supplied with) This product contains a coin/button cell battery. If the coin/
button cell battery is swallowed, it can cause severe internal burns in just 2 hours and can lead to
death.
Keep new and used batteries away from children.
If the battery compartment does not close securely, stop using the product and keep it away from
children.
If you think batteries might have been swallowed or placed inside any part of the body, seek
immediate medical attention.
• Do not expose the battery or remote control to excessive heat such as direct sunlight or fire.
CAUTION
• There is a potential danger of explosion if the battery is incorrectly replaced. When replacing the
battery, replace it with the same type.
• Do not handle or store the battery with metallic tools or objects.
• If the battery leaks, remove the battery and wipe the remote control completely clean. Then install a
new battery.
• When disposing of used batteries, please comply with governmental regulations or environmental
public institutions’ rules that apply in your country/area.
• “Perchlorate Material - special handling may apply.
See www.dtsc.ca.gov/hazardouswaste/perchlorate. (Applicable to California, U.S.A.)”
Important
• Do not store the remote control in high temperatures or direct sunlight.
• Do not let the remote control fall onto the floor, where it may become jammed under the brake or
accelerator pedal.
When you turn the ignition switch to ON after installation, the setup menu appears in
the display.
Setup menu
How to replace the battery
Insert the CR2025 (3 V) battery with the plus (+) and
minus (–) poles orientated properly.

- 10 -
English
WARNING
(Only for MVH-S600BS)
Do not use the unit in standard mode when a speaker system for network mode is connected to the
unit. Do not use the unit in network mode when a speaker system for standard mode is connected to
the unit. This may cause damage to the speakers.
1 Turn the M.C. dial to select the options, then press to confirm.
To proceed to the next menu option, you need to confirm your selection.
2 [QUIT :YES] appears when all the settings have been made.
To return to the first item of the setup menu, turn the M.C. dial to select [QUIT :NO],
then press to confirm.
3 Press the M.C. dial to confirm the settings.
NOTE
These settings other than [SPEAKER MODE] can be made at any time from the SYSTEM settings
(page 37).
Menu Item Description
LANGUAGE Select the language to display the text information from a
compressed audio file.
[ENG](English),
[ESP](Spanish),
[FRA] (Canadian
French)
CLOCK SET Set the clock.
1 Turn the M.C. dial to adjust the hour, then press to confirm.
The indicator moves to the minute setting automatically.
2 Turn the M.C. dial to adjust the minute, then press to confirm.
SPEAKER MODE (Only
for MVH-S600BS)
Switch between two operation modes: the 2-way network mode
(NETWORK) and the standard mode (STANDARD) according to
the connections you have established. For details on operation
modes, see page 31.
After selecting the appropriate mode, turn the M.C. dial to
select [YES], then press to confirm.
• You cannot complete the setup menu without setting the
[SPEAKER MODE].
• Once the speaker mode is set, this setting cannot be changed
unless the default settings of this product are restored. Restore
the default settings to change the speaker mode setting (refer
to SYSTEM RESET on page 12).
• When [NETWORK] is selected, the beep tone function is not
available.
[STANDARD],
[NETWORK]

- 11 -- 11 -
English
1 Press the M.C. dial to display the main menu.
2 Turn the M.C. dial to select [SYSTEM], then press to confirm.
3 Turn the M.C. dial to select [DEMO OFF], then press to confirm.
4 Turn the M.C. dial to select [YES], then press to confirm.
1 Press and hold SRC/OFF until the unit turns off.
2 Press the M.C. dial to display the main menu.
3 Turn the M.C. dial to select [INITIAL], then press to confirm.
4 Turn the M.C. dial to select an option, then press to confirm.
NOTE
The options vary depending on the unit.
Canceling the demonstration display (DEMO OFF)
INITIAL settings
Menu Item Description
REAR-SP Select when there is a full-range speaker connected to the rear
speaker output leads.
[FUL]
[SW] Select when there is a subwoofer connected directly to the rear
speaker output leads without any auxiliary amplifier.
SP-P/O MODE Select when there is a full-range speaker connected to the rear
speaker output leads and there is a subwoofer connected to the
RCA output.
[REAR/SUB.W]
[SUB.W/SUB.W] Select when there is a passive subwoofer connected directly to
the rear speaker output leads and there is a subwoofer
connected to the RCA output.
[REAR/REAR] Select when there are full-range speakers connected to the rear
speaker output leads and RCA output. If there is a full-range
speaker connected to the rear speaker output leads, and the
RCA output is not used, you may select either [REAR/SUB.W] or
[REAR/REAR].
SYSTEM UPDATE Select [SYSTEM INFO] to confirm the latest system information
on the unit.
Select [S/W UPDATE] to update the unit to the latest software
and initialize the unit settings. For details on the latest software
and updating, visit our website.
[SYSTEM INFO], [S/
W UPDATE]
- 12 -
English
The tuner frequencies on this unit are allocated for use in North America. Use in other
areas may result in poor reception.
1 Press SRC/OFF to select [RADIO].
2 Press BAND/ to select the band from [FM1], [FM2], [FM3] or [AM].
3 Press a number button (1/ to 6/).
NOTE
You can select a preset channel by pressing and turning the M.C. dial.
TIP
The / buttons can be also used to select a preset station when [SEEK] is set to [PCH] in the
FUNCTION settings (page 33).
The six strongest stations are stored on the number buttons (1/ to 6/).
1 After selecting the band, press the M.C. dial to display the main menu.
2 Turn the M.C. dial to select [FUNCTION], then press to confirm.
3 Turn the M.C. dial to select [BSM], then press to confirm.
To seek a station manually
1
After selecting the band, press / to select a station.
Press and hold / then release to seek an available station. Scanning stops
when the unit receives a station. To cancel seek tuning, press / .
SXM RESET Select to initialize the SiriusXM settings.
[YES], [NO]
SYSTEM RESET Select [YES] to initialize the unit settings. The unit will be
restarted automatically.
[YES], [NO]
Radio
Receiving preset stations
Best stations memory (BSM)
Menu Item Description
- 13 -- 13 -
English
NOTE
[SEEK] needs to be set to [MAN] in the FUNCTION settings (page 33).
To store stations manually
1
While receiving the station you want to store, press and hold one of the number
buttons (1/ to 6/ ) until it stops flashing.
NOTE
You can select a preset channel by pressing and turning the M.C. dial. After selecting a channel,
press and hold the M.C. dial to store a station.
Disconnect headphones from the device before connecting it to the unit.
USB devices (including Android™)/iPhone
1
Open the USB port cover.
2 Plug in the USB device/iPhone using an appropriate cable.
NOTE
To automatically switch to [USB] source when a USB device/iPhone is connected to the unit, set [USB
AUTO] to [ON] in the SYSTEM settings (page 39).
CAUTION
Use an optional Pioneer USB cable (CD-U50E) to connect the USB device as any device connected
directly to the unit will protrude out from the unit, which could be dangerous.
Before removing the device, stop playback.
AOA connections
For details on AOA connection, see page 29.
MTP connection
A device installed with Android OS 4.0 or later can be connected to the unit via MTP, using the cable
supplied with the device. However, depending on the connected device and the numbers of the files in
the device, audio files/songs may not be able to be played back via MTP. Note that MTP connection is
not compatible with WAV file formats and FLAC file formats, and cannot be used with the MIXTRAX
function.
CD/USB/iPhone®/AUX
Playing back
- 14 -
English
NOTE
If you use an MTP connection, [PHONE CONNECT] needs to be set to [USB MTP] in the SYSTEM settings
(page 39).
AUX
1
Insert the stereo mini plug into the AUX input jack.
2 Press SRC/OFF to select [AUX] as the source.
NOTE
If [AUX] is set to [OFF] in the SYSTEM settings, [AUX] cannot be selected as a source (page 38).
You can make various adjustments in the FUNCTION settings (page 32).
Note that the following operations do not work for an AUX device. To operate an AUX
device, use the device itself.
*1 Compressed audio files only
*2 When you use the fast forward or reverse function while playing a VBR file, the playback time may
be not correct.
Operations
Purpose Operation
Select a folder*1 Press 1/ or 2/.
Select a track/song (chapter) Press or .
Fast forward or reverse*2 Press and hold or .
Search for a file from a list (USB only) 1 Press to display the list.
2 Turn the M.C. dial to select the desired
file (folder) name or category, then press
to confirm.
3 Turn the M.C. dial to select the desired
file, then press to confirm.
Playback starts.
View a list of the files in the selected folder/
category*1
Press the M.C. dial when a folder/category
is selected.
Play a song in the selected folder/
category*1
Press and hold the M.C. dial when a folder/
category is selected.
Repeat play Press 6/.
Random/shuffle play Press 5/.
Pause/resume playback Press 4/PAUSE.
Return to root folder (USB only)*1 Press and hold 1/.
- 15 -- 15 -
English
The MIXTRAX function creates a non-stop mix of your music library, accompanied by
illumination effects. For details on MIXTRAX settings, see page 42.
NOTES
• iPhone needs to be connected with Pioneer ARC APP via USB for using this function (page 29).
• This function is not compatible with an Android device connected via MTP.
• Depending on the file/song, sound effects may not be available.
• Turn the MIXTRAX function off if the illumination effects it produces interfere with driving.
1 Press 3/MIX to turn MIXTRAX on/off.
Important
If ten or more Bluetooth devices (e.g. a phone and separate audio player) are connected, they may not
work properly.
1 Turn on the Bluetooth function of the device.
If you make a Bluetooth connection from the device, proceed to step 6.
2 Press to display the phone menu.
3 Turn the M.C. dial to select [BT SETTING], then press to confirm.
4 Turn the M.C. dial to select [ADD DEVICE], then press to confirm.
The unit starts to search for available devices, then displays them in the device list.
• To cancel searching, press the M.C. dial.
• If the desired device is not in the list, select [RE-SEARCH].
• If there is no device available, [NOT FOUND] appears in the display.
5 Turn the M.C. dial to select a device from the device list, then press to confirm.
Press and hold the M.C. dial to switch the displayed device information between the
Bluetooth device address and device name.
If you make a Bluetooth connection from the unit, proceed to step 7.
6 Select [Pioneer BT Unit] shown in the device display.
7 Make sure the same 6-digit number appears on this unit and the device, then
select “Yes” on the device.
About MIXTRAX (USB/iPhone only)
Bluetooth
Bluetooth connection

- 16 -
English
NOTES
• [DEVICE FULL] appears if the unit has already been paired with ten other devices. In this case, delete
one of the paired devices. See [DEL DEVICE] in the Bluetooth settings (page 16).
• Depending on the device, the PIN code is required in step 7. In this case, input [0000].
TIP
The Bluetooth connection can be also made by detecting the unit from the Bluetooth device. To do so,
[VISIBLE] in the Bluetooth settings needs to be set to [ON]. For details on Bluetooth device operations,
refer to the operating instructions supplied with the Bluetooth device.
Bluetooth settings
Menu Item Description
DEVICELIST Display the list of paired Bluetooth devices. “*” appears on the
device name when the Bluetooth connection is established.
When no device is selected in the device list, this function is not
available.
DEL DEVICE Delete the device information.
[DELETE YES],
[DELETE NO]
ADD DEVICE Register a new device.
If ten devices are already paired, this function is not available.
You can check the number of paired devices on the [DEVICELIST]
setting.
A.CONN Select [ON] to connect to a Bluetooth device automatically.
[ON], [OFF]
VISIBLE Select [ON] so that a Bluetooth device can detect the unit when
the unit is connected via Bluetooth to another device.
[ON], [OFF]
PIN CODE Change the PIN code.
1 Press the M.C. dial to display the setting mode.
2 Turn the M.C. dial to select a number.
3 Press the M.C. dial to move the cursor to the next position.
4 After inputting the PIN code, press and hold the M.C. dial.
After inputting the PIN code, pressing the M.C. dial returns you
to the PIN code input display, and you can change the PIN code.
DEV. INFO Switch the device information on the display between the
device name and Bluetooth device address.
- 17 -- 17 -
English
First, make a Bluetooth connection with the Bluetooth telephone (page 15). Up to two
Bluetooth telephones can be connected simultaneously.
Important
• Leaving the unit on standby to connect to your phone via Bluetooth while the engine is not running
can drain the vehicle’s battery.
• Be sure to park your vehicle in a safe place and apply the parking brake before operation.
To make a phone call
1
Press to display the phone menu.
When two phones are connected, a phone name appears first then a phone menu
will display. To switch to another phone, press again.
2 Turn the M.C. dial to select [RECENTS] or [PHONE BOOK], then press to confirm.
If you select [PHONE BOOK], proceed to step 4.
3 Turn the M.C. dial to select [MISSED], [DIALED] or [RECEIVED], then press to
confirm.
4 Turn the M.C. dial to select a name or phone number, then press to confirm.
The phone call starts.
To answer an incoming call
1
Press when a call is received.
A.PAIRING Select [ON] to pair the unit and iPhone or Android device
automatically when an iPhone or Android device is connected
to the unit via USB. (This function may not be available
depending on the version of iOS you are using.)
• When you are using an Android device, this function is
available in the following situations:
– Your device has Android OS 4.4 or later installed.
– Be sure to turn on the Bluetooth function of the device and confirm
that the device is not connected to the unit via Bluetooth.
– [P.APP AUTO ON] needs to be set to [ON] (page 39).
– Pioneer ARC APP needs to be installed on your Android device and
[PHONE CONNECT] needs to be set to [APP CONTROL] (page 29).
– A confirmation button should be pressed on the caution window
displayed on Pioneer ARC APP after a connection with the Pioneer
ARC APP is made.
[ON], [OFF]
Bluetooth telephone
Menu Item Description
- 18 -
English
TIP
When two phones are connected to the unit via Bluetooth and there is an incoming call while one
phone is being used for a call, a message will appear in the display. To answer that incoming call, you
need to end the existing call.
Basic operations
To preset phone numbers
1
Select a phone number from a phone book or call history.
2 Press and hold one of the number buttons (1/ to 6/).
The contact is stored in the selected preset number.
To make a call using a preset number, press one of the number buttons (1/ to 6/),
then press the M.C. dial.
Voice recognition (Only for iPhone)
This function is only available when an iPhone equipped with voice recognition is
connected to the unit via Bluetooth.
1 Press and hold to activate the voice recognition mode.
2 Press the M.C. dial and then talk into the microphone to input voice commands.
To exit the voice recognition mode, press BAND/.
NOTE
For details on the voice recognition features, refer to the manual supplied with your iPhone.
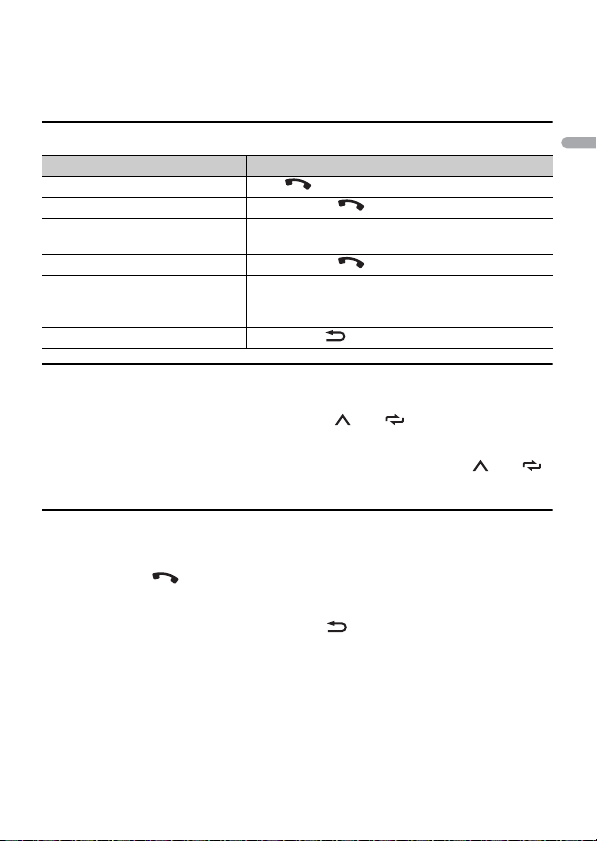
Purpose Operation
End a call Press .
Reject an incoming call Press and hold when a call is received.
Switch between the current caller
and a caller on hold
Press the M.C. dial.
Cancel a caller on hold Press and hold .
Adjust the volume of the caller’s
voice (When private mode is on,
this function is not available.)
Turn the M.C. dial during the call.
Turn the private mode on or off Press BAND/ during the call.

- 19 -- 19 -
English
Phone menu
* If two phones are connected, this function does not work on incoming calls that are received while
one of the phones is being used for a call.
Important
• Depending on the Bluetooth audio player connected to this unit, the available operations will be
limited to the following two levels:
– A2DP (Advanced Audio Distribution Profile) can only play back songs on your audio player.
– AVRCP (Audio/Video Remote Control Profile) can perform functions such as playback, pause, select
song, etc.
• The sound of the Bluetooth audio player will be muted when the phone is in use.
• When the Bluetooth audio player is in use, you cannot connect to a Bluetooth telephone
automatically.
• Depending on the type of Bluetooth audio player you have connected to this unit, operation and
information displayed may vary based on availability and functionality.
1 Make a Bluetooth connection with the Bluetooth audio player.
2 Press SRC/OFF to select [BT AUDIO] as the source.
3 Press BAND/ to start playback.
Menu Item Description
RECENTS Display the missed call history.
[MISSED]
[DIALED] Display the dialed call history.
[RECEIVED] Display the received call history.
PHONE BOOK Display the contacts in your phone. Set [VISIBLE] in the
Bluetooth settings to [ON] to browse the contacts via this unit.
PRESET 1-6 Recall the preset phone numbers. You can also recall the preset
phone numbers by pressing one of the number buttons (1/
to 6/).
A.ANSR* Select [ON] to answer an incoming call automatically.
[ON], [OFF]
R.TONE Select [ON] if the ring tone does not come out from the car
speakers. Depending on the connected phone, this function
may not work.
[ON], [OFF]
PB INVT Invert the order of names in the phone book (name view).
BT SETTING You can adjust various settings for Bluetooth connections. For
details on Bluetooth settings, see page 16.
Bluetooth audio
- 20 -
English
Basic operations
You can make various adjustments in the FUNCTION settings (page 32).
* Depending on the connected device, these operations may not be available.
You can enjoy listening to an application on an iPhone/Android device via the unit. In
some cases, you can control an application by using the unit.
For details on compatible devices, visit our website.
Important
Use of third party apps may involve or require the provision of personally identifiable information,
whether through the creation of a user account or otherwise, and for certain applications, the provision
of geolocation data.
ALL THIRD PARTY APPS ARE THE SOLE RESPONSIBILITY OF THE PROVIDERS, INCLUDING WITHOUT
LIMITATION COLLECTION AND SECURITY OF USER DATA AND PRIVACY PRACTICES. BY ACCESSING
THIRD PARTY APPS, YOU AGREE TO REVIEW THE TERMS OF SERVICE AND PRIVACY POLICIES OF THE
PROVIDERS. IF YOU DO NOT AGREE WITH THE TERMS OR POLICIES OF ANY PROVIDER OR DO NOT
CONSENT TO THE USE OF GEOLOCATION DATA WHERE APPLICABLE, DO NOT USE THAT THIRD PARTY
APP.
For iPhone users
This function is compatible with iPhones installed with iOS 6.0 or later.
For Android device users
This function is compatible with devices that have Android OS 2.3 or later installed.
Purpose Operation
Fast forward or reverse Press and hold or .
Select a track Press or .
Repeat play* Press 6/.
Random play* Press 5/.
Pause/resume playback Press 4/PAUSE.
Search for a file from a list 1 Press to display a list.
2 Turn the M.C. dial to select the desired
folder name, then press to confirm.
3 Turn the M.C. dial to select the desired
file, then press to confirm.
Playback starts.
Switch the Bluetooth device name in the
device list according to the connection
order
Press 1/ or 2/.
App Mode

- 21 -- 21 -
English
NOTE
PIONEER IS NOT LIABLE FOR ANY THIRD PARTY APPS OR CONTENT, INCLUDING WITHOUT LIMITATION
THEIR ACCURACY OR COMPLETENESS. THE CONTENT AND FUNCTIONALITY OF SUCH APPS ARE THE
SOLE RESPONSIBILITY OF THE APP PROVIDER.
1 Connect this unit with the mobile device.
• iPhone via USB (page 13)
• iPhone/Android device via Bluetooth (page 15)
2 Press the M.C. dial to display the main menu.
3 Turn the M.C. dial to select [SYSTEM], then press to confirm.
4 Turn the M.C. dial to select [PHONE CONNECT], then press to confirm.
5 Turn the M.C. dial to select one of the below, then press to confirm.
• Select [IPHONE] for iPhone.
• Select [ANDROID] for Android device.
6 Turn the M.C. dial to select one of the below.
• Select [WIRED] for the USB connection.
• Select [BLUETOOTH] for the Bluetooth connection.
NOTE
When the connection setting is changed, a message that lets you know that the connection
setting had been changed will appear in the display. Press the M.C. dial and turn the M.C. dial to
select [SRC OFF :YES], then press to confirm. The unit turns off automatically and the setting is
executed.
7 Press SRC/OFF to select [APP].
8 Operate the mobile device to start up the application.
NOTE
When you connect a mobile device other than iPhone/Android device, select [OTHERS] in the [PHONE
CONNECT] menu and select [WIRED] (for the USB connection) or [BLUETOOTH] (for the Bluetooth
connection). Depending on your mobile device, it may not operate correctly.
Basic operations
You can make various adjustments in the FUNCTION settings (page 32).
Playback of an application via the unit
Purpose Operation
Select a track Press or .
Fast forward or reverse Press and hold or .
Pause/resume playback Press BAND/.

- 22 -
English
Pandora internet radio is a music service not affiliated with Pioneer. More information is
available at http://www.pandora.com.
The Pandora mobile application is available for iPhone and Android phones. Please visit
www.pandora.com/everywhere/mobile for the latest compatibility information.
Update the firmware of the Pandora application to the latest version before use.
1 Connect this unit with the mobile device.
• iPhone via USB (page 13)
• iPhone/Android device via Bluetooth (page 15)
If you choose a USB connection, proceed to step 6.
2 Press SRC/OFF to select [PANDORA].
3 Press and hold 1/ to display [PHONE CONNECT].
4 Turn the M.C. dial to select one of the below, then press to confirm.
• Select [IPHONE] for iPhone.
• Select [ANDROID] for Android device.
5 Turn the M.C. dial to select [BLUETOOTH] for iPhone/Android device via
Bluetooth.
NOTE
When the connection setting is changed, a message that lets you know that the connection
setting had been changed will appear in the display. Press the M.C. dial and turn the M.C. dial to
select [SRC OFF :YES], then press to confirm. The unit turns off automatically and the setting is
executed.
6 Press SRC/OFF to select [PANDORA].
7 Launch the Pandora application on the mobile device and start playback.
NOTE
When you connect a mobile device other than iPhone/Android device, select [OTHERS] in the [PHONE
CONNECT] menu and select [WIRED] (for the USB connection) or [BLUETOOTH] (for the Bluetooth
connection). Depending on your mobile device, it may not operate correctly.
Basic operations
You can make various adjustments in the FUNCTION settings (page 32).
Pandora®
Listening to Pandora
- 23 -- 23 -
English
NOTE
Some functions of Pandora may not be operated from the unit.
Spotify is a music streaming distribution service not affiliated with Pioneer. More
information is available at http://www.spotify.com.
The Spotify application is available for compatible smartphones, please visit https://
support.spotify.com/ for the latest compatibility information.
To enjoy Spotify as you drive, first download the Spotify app to your iPhone or Android
device. You can download it on the iTunes® App Store® or Google Play™. Choose a free
account or a paid Premium account, either in the app or at spotify.com. A Premium
account gives you more features, like offline listening.
Purpose Operation
Skip a track Press .
Switch between Shuffle and the
station
Press (list), then turn the M.C. dial to select the
Shuffle or the desired station.
Change the sort order Press (list), then select one of the following.
[ABC]: Sort the items in the list alphabetically.
[DATE]: Sort the items in the list in order of the
dates on which the items were created.
Play When Shuffle or the station is selected, press the
M.C. dial.
Delete a station 1 When the station is selected, press and hold the
M.C. dial.
[DELETE YES] appears.
2 Press the M.C. dial.
To cancel, press BAND/ in step 1.
Pause/resume playback Press 4/PAUSE.
Thumbs Up Press 1/.
Thumbs Down Press 2/.
Create a new station based on the
track currently being played
Press and hold 5/.
Create a new station based on the
artist currently being played
Press and hold 6/.
Store the track information currently
being played in your Pandora
account.
1 Press and hold 3/MIX.
[BOOKMARK] appears.
2 Press the M.C. dial.
Spotify®

- 24 -
English
Important
• This product incorporates Spotify software which is subject to 3rd party licenses found here:
www.spotify.com/connect/third-party-licenses.
• For information on the countries and regions where Spotify can be used, take a look at https://
www.spotify.com/us/select-your-country/.
Update the firmware of the Spotify application to the latest version before use.
1 Connect this unit with the mobile device.
• iPhone via USB (page 13)
• iPhone/Android device via Bluetooth (page 15)
If you choose a USB connection, proceed to step 6.
2 Press SRC/OFF to select [SPOTIFY].
3 Press and hold 1/ to display [PHONE CONNECT].
4 Turn the M.C. dial to select one of the below, then press to confirm.
• Select [IPHONE] for iPhone.
• Select [ANDROID] for Android device.
5 Turn the M.C. dial to select [BLUETOOTH] for iPhone/Android device via
Bluetooth.
NOTE
When the connection setting is changed, a message that lets you know that the connection
setting had been changed will appear in the display. Press the M.C. dial and turn the M.C. dial to
select [SRC OFF :YES], then press to confirm. The unit turns off automatically and the setting is
executed.
6 Press SRC/OFF to select [SPOTIFY].
7 Launch the Spotify application on the mobile device and start playback.
NOTE
When you connect a mobile device other than iPhone/Android device, select [OTHERS] in the [PHONE
CONNECT] menu and select [WIRED] (for the USB connection) or [BLUETOOTH] (for the Bluetooth
connection). Depending on your mobile device, it may not operate correctly.
Basic operations
You can make various adjustments in the FUNCTION settings (page 32).
NOTE
The available operations may vary according to the type of contents (track/album/artist/playlist/radio)
you want to play.
Listening to Spotify
- 25 -- 25 -
English
NOTE
Some functions of Spotify may not be operated from the unit.
(Only for MVH-S600BS)
Only SiriusXM® brings you more of what you love to listen to, all in one place. Get over
140 channels, including commercial-free music plus the best sports, news, talk, comedy
and entertainment. Welcome to the world of satellite radio. A SiriusXM Vehicle Tuner and
Subscription are required. For more information, visit www.siriusxm.com
Replay™
You can pause, rewind or replay live satellite radio as well as the channel you are
currently listening to.
TuneStart™
Automatically start songs from the beginning when you tune to one of your preset
music channels stored on the current band of presets. For details, refer to TUNE START on
page 34.
Purpose Operation
Skip a track Press or .
Search for a track from a list 1 Press (list) to display the list.
2 Turn the M.C. dial to select the desired
category, then press to confirm.
3 Turn the M.C. dial to select the desired
file, then press to confirm.
Playback starts.
Pause/resume playback Press 4/PAUSE.
Thumbs Up (Only for radio) Press 1/.
Thumbs Down (Only for radio) Press 2/.
Random play (Only for track/album/artist/
playlist)
Press 5/.
Repeat play (Only for track/album/artist/
playlist)
Press 6/.
Start a radio channel based on the song
currently being played.
1 Press and hold 5/ to start a radio.
2 Press the M.C. dial.
• This function may not be available
depending on the selected song.
SiriusXM Satellite Radio
- 26 -
English
NOTE
TuneStart is compatible with SXV200 or later tuner models. Not compatible with SXV100.
TuneScan™
Scan through short previews of songs you may have missed on music channels stored
on the current band of presets.
Each song in the current channel plays for six seconds at a time.
For details, refer to TUNE SCAN (scanning the songs) on page 34.
NOTE
TuneScan is compatible with SXV200 or later tuner models. Not compatible with SXV100.
TuneMix™
Create a music channel that’s a blend of songs made up from the music channels stored
on the current band of presets. For details, refer to TUNEMIX on page 34.
NOTE
TuneMix™ is compatible with the SXV300 or later tuner models. Not compatible with the SXV200 or
SXV100.
1 Press SRC/OFF to select [SIRIUSXM].
2 Press / to select Channel 0.
The Radio ID appears on the display.
In addition, the Radio ID is located on the bottom of the SiriusXM Connect Vehicle
Tuner.
NOTE
The Radio ID does not include the letters I, O, S or F.
3 Activate the SiriusXM service online or by phone.
For US Subscriptions:
• Visit www.siriusxm.com/activatenow
• Call SiriusXM Listener Care at 1-866-635-2349
For Canadian Subscriptions:
• Visit www.siriusxm.ca/activatexm
• Call 1-877-438-9677
4 [SUBSCRIPTION UPDATED] appears on the display when your SiriusXM Connect
Vehicle Tuner has been subscribed successfully.
Press any key to clear the activation message.
NOTE
The activation process usually takes 10 minutes to 15 minutes but may take up to an hour in some
cases. Do not turn off the unit until you clear the activation message in step 4.
Preparing for the SiriusXM Satellite Radio service
- 27 -- 27 -
English
1 Press and hold DISP, then select [CHANNEL].
You can also select the operation mode by the SiriusXM settings (page 33).
2 Press SRC/OFF to select [SIRIUSXM].
3 Press BAND/ to select a band from [SXM1], [SXM2] or [SXM3].
4 Press / to select a channel.
Pressing and holding either button will rapidly browse through the channels.
Press and hold either button then release to tune automatically. Scanning stops
when the unit receives a channel. To cancel seek tuning, press / .
Basic operations
1
Press and hold DISP to select the operation mode [CHANNEL] or [REPLAY].
NOTE
You can exit the replay mode by pressing and holding BAND/.
NOTE
You can also make various adjustments in the SiriusXM settings (page 33).
Category scan
The live broadcast for each channel in the current category plays for six seconds at a
time. Follow the instructions below.
To search for a channel from a list
1 Press during playback.
2 Turn the M.C. dial to select a category.
3 Select one of the operations below.
Category scan: Press and hold the M.C. dial to switch to category scan.
Listening to a channel
Purpose Operation
Select a channel 1 Set the operation mode to [CHANNEL].
2 Press or .
Pressing and holding either button will
rapidly browse through the channels.
Skip backward/forward 1 Set the operation mode to [REPLAY].
2 Press or .
Fast forward or reverse 1 Set the operation mode to [REPLAY].
2 Press and hold or .
- 28 -
English
Channel search: Press the M.C. dial to stop a scan.
NOTE
Press DISP to change the display information between “Channel Name”, “Artist Name”, “Song Title”,
“Content Info” and “Channel Number”.
Scan options
Channel Preset
To preset a channel
1 While receiving a channel you want to store, press and hold one of the number
buttons (1/ to 6/ ) until it stops flashing.
To play the stored channels, select the band and then press a number button (1/ to
6/).
To preset a channel from the program list
1 While receiving a channel you want to store, press .
2 Turn the M.C. dial to select [PRESETS], then press to confirm.
3 Turn the M.C. dial to select a preset channel.
4 Press and hold the M.C. dial to store.
To play the stored channels, turn the M.C. dial to select a preset channel, then press to
confirm.
Parental Control
Some SiriusXM channels contain mature content. You can lock these channels. For
details, see [PARENTAL CTRL] in SiriusXM settings (page 35).
Purpose Operation
Stopping a scan (selecting the channel or
song playing)
Press the M.C. dial.
Switching to the next/previous song during
TuneScan
Press or .
Switching to the next/previous channel
during the category scan
Press or .
Aborting a scan (The last channel or song
will continue to play when scan ends.)
Press BAND/.

- 29 -- 29 -
English
You can operate the unit from Pioneer ARC APP installed on an iPhone/Android device.
In some cases, you can control aspects of the application, such as source selection,
pause, etc., by using the unit.
For details on what operations are available on the application, see the application’s help
section.
WARNING
Do not attempt to operate the application while driving. Make sure to pull off the road and park your
vehicle in a safe location before attempting to use the controls on the application.
For iPhone users
This function is compatible with iPhones (iPhone 5 or later) installed with iOS 8.0 or later.
You can download Pioneer ARC APP on iTunes App Store.
For Android device users
This function is compatible with devices that have Android OS 4.1 or later installed and
also support AOA (Android Open Accessory) 2.0.
You can download Pioneer ARC APP on Google Play.
NOTE
Some Android devices connected via AOA 2.0 may not work properly or emit sounds due to their own
software design, regardless of the OS version.
1 Connect this unit with the mobile device.
• iPhone/Android device via USB (page 13)
• iPhone/Android device via Bluetooth (page 15)
2 Press the M.C. dial to display the main menu.
3 Turn the M.C. dial to select [SYSTEM], then press to confirm.
4 Turn the M.C. dial to select [PHONE CONNECT], then press to confirm.
5 Turn the M.C. dial to select one of the below, then press to confirm.
• Select [IPHONE] for iPhone.
• Select [ANDROID] for Android device.
NOTE
When the connection setting is changed, a message that lets you know that the connection
setting had been changed will appear in the display. Press the M.C. dial and turn the M.C. dial to
select [SRC OFF :YES], then press to confirm. The unit turns off automatically and the setting is
executed.
Using Pioneer ARC APP
Making a connection with Pioneer ARC APP
- 30 -
English
6 Turn the M.C. dial to select one of the below.
When [IPHONE] is selected in step 5
• Select [WIRED] for the USB connection.
• Select [BLUETOOTH] for the Bluetooth connection.
When [ANDROID] is selected in step 5
• Select [APP CONTROL] for the USB connection.
• Select [BLUETOOTH] for the Bluetooth connection.
When you select the USB connection, Pioneer ARC APP on the Android device starts
automatically if [ON] is selected in [P.APP AUTO ON] (page 39).
NOTE
If Pioneer ARC APP has not been installed on your Android device yet, a message that prompts you
to install the application will appear on your Android device. Select [OFF] in [P.APP AUTO ON] to
clear the message (page 39).
7 Press SRC/OFF to select any source.
8 Launch Pioneer ARC APP on the mobile device via USB connection.
Press and hold M.C. dial via Bluetooth connection.
NOTE
When you connect a mobile device other than iPhone/Android device, select [OTHERS] in the [PHONE
CONNECT] menu and select [WIRED] (for the USB connection) or [BLUETOOTH] (for the Bluetooth
connection). Depending on your mobile device, it may not operate correctly.
1 Press SRC/OFF to select [ANDROID].
Basic operations
(Network mode is only available for MVH-S600BS.)
You can also make various adjustments in the AUDIO settings (page 35).
Listening to music on Android
Purpose Operation
Select a track Press or .
Fast forward or reverse Press and hold or .
Pause/resume playback Press 4/PAUSE.
Audio Adjustments

- 31 -- 31 -
English
This unit features two operation modes: network mode and standard mode. You can
switch between modes as desired (page 10).
Network mode
You can create a 2-way + SW multi-amp and multi-speaker system with high range
speaker, middle range speaker and subwoofer for reproduction of high, middle and low
frequencies (bands).
Standard mode
You can create a 4-speaker system with front and rear speakers or front speakers and
subwoofers, or a 6-speaker system with front and rear speakers and subwoofers.
You can adjust the cut-off frequency value and the slope value of each speaker.
The following speakers can be adjusted.
Network mode:
[HIGH] (high-range speaker HPF), [MID HPF] (middle-range speaker HPF), [MID LPF]
(middle-range speaker LPF), [SUBWOOFER]
Standard mode:
[FRONT], [REAR], [SUBWOOFER]
NOTE
[SUBWOOFER] can only be selected when [ON] is selected in [SUBWOOFER] (page 36).
1 Press the M.C. dial to display the main menu.
2 Turn the M.C. dial to select [AUDIO], then press to confirm.
3 Turn the M.C. dial to select [CROSSOVER], then press to confirm.
4 Turn the M.C. dial to select the speaker unit (filter) to be adjusted, then press to
confirm.
5 Turn the M.C. dial to select [HPF] or [LPF] according to the speaker unit (filter),
then press to confirm.
6 Turn the M.C. dial to select an appropriate cut-off frequency for the speaker unit
(filter) selected in step 4, then press to confirm.
Network mode:
[1.25K] to [12.5K] (if you choose [HIGH] or [MID LPF])
Operation modes
Adjusting the cut-off frequency value and the slope
value
- 32 -
English
[25] to [250] (if you choose [MID HPF] or [SUBWOOFER])
Standard mode:
[25HZ] to [250HZ]
7 Turn the M.C. dial to select an appropriate slope for the speaker unit (filter)
selected in step 4.
Network mode:
[–6] to [–24] (if you choose [HIGH], [MID HPF] or [MID LPF])
[–12] to [–36] (if you choose [SUBWOOFER])
Standard mode:
[–6] to [–24] (if you choose [FRONT] or [REAR])
[–6] to [–36] (if you choose [SUBWOOFER])
You can adjust various settings in the main menu.
1 Press the M.C. dial to display the main menu.
2 Turn the M.C. dial to select one of the categories below, then press to confirm.
• FUNCTION settings (page 32)
• AUDIO settings (page 35)
• SYSTEM settings (page 37)
• ILLUMINATION settings (page 41)
• MIXTRAX settings (page 42)
3 Turn the M.C. dial to select the options, then press to confirm.
The menu items vary according to the source.
Settings
FUNCTION settings
Menu Item Description
BSM
Store the six strongest stations on the number
buttons (1/ to 6/ ) automatically.
LOCAL
FM: [OFF], [LV1], [LV2], [LV3], [LV4]
AM: [OFF], [LV1], [LV2]
Restrict the tuning station according to the
signal strength.
- 33 -- 33 -
English
SiriusXM settings
(Only for MVH-S600BS)
SEEK
[MAN], [PCH] Assign or buttons to seek the stations
one by one (manual tuning) or select a station
from the preset channels.
SAVE
Store the information about the song currently
being played to your music list on Spotify.
UNSAVE
Remove the song information stored in [SAVE].
SEL DEVICE
Connect a Bluetooth device in the list.
S.RTRV
[1] (effective for low compression
rates),
[2] (effective for high
compression rates),
[OFF]
Enhance compressed audio and restore rich
sound.
BOOKMARK
Store the track information currently being
played in your Pandora account.
NEW STATION
[FROM TRACK], [FROM ARTIST] Create a new station based on the track or artist
currently being played.
PAUSE
Pause or resume playback.
PLAY
Start playback.
STOP
Stop playback.
Menu Item Description
iPod
USB
iPod
AUX
- 34 -
English
Menu Item Description
PAUSE
Pause or resume playback.
OPERATE MODE
[CHANNEL], [REPLAY] Press or buttons to select a channel
or skip backward/skip forward.
TUNEMIX
[ON], [OFF] Create a music channel that’s a blend of songs
made up from the music channels stored on the
current band of presets.
TUNE SCAN
Scan through songs from your music channel
presets.
TUNE START
[ON], [OFF] Start playback of the broadcast from the
beginning of a song when tuning to a preset
music channel.

- 35 -- 35 -
English
(Network mode is only available for MVH-S600BS.)
PARENTAL CTRL
[LOCKED CH], [CLEAR ALL], [EDIT
CODE]
Input the current passcode on the [PASSCODE]
screen (the default passcode is 0000).
1 Turn the M.C. dial to select a number.
2 Press the M.C. dial to move the cursor to the
next position.
3 After inputting the passcode, press the M.C.
dial.
4 Turn the M.C. dial to select one of the
following menu items, then press to confirm.
• [LOCKED CH]: Lock the current channel (except
for Channel 0 and Channel 1), which contains
mature content.
1 Press the M.C. dial to turn the lock on or off.
• [CLEAR ALL]: Unlock all the channels (except for
Channel 0 and Channel 1) that have restricted
access.
1 Turn the M.C. dial to switch to [YES], then
press to confirm.
• [EDIT CODE]: Change the passcode.
1 Repeat steps 1 to 3 to enter a new passcode.
2 After inputting the passcode, press the M.C.
dial.
The new passcode is saved.
AUDIO settings
Menu Item Description
EQ SETTING
[SUPER BASS], [POWERFUL],
[NATURAL], [VOCAL], [CUSTOM1],
[CUSTOM2], [FLAT]
Select an equalizer band and
level for further customizing.
Equalizer band: [50HZ] to
[12.5kHZ]
Equalizer level: [–6] to [+6]
Select or customize the equalizer curve.
• When you select a setting other than
[CUSTOM1] and [CUSTOM2], you can also
customize the equalizer curve by pressing and
holding the M.C. dial, then store the
customized equalizer curve in [CUSTOM1].
FADER*1*2 (Only for standard mode)
Adjust the front and rear speaker balance.
Menu Item Description

- 36 -
English
BALANCE
Adjust the left and right speaker balance.
SUBWOOFER
[ON], [OFF] Set to [ON] when using a subwoofer speaker.
SUBWOOFER*3*4
[NOR], [REV] Select the subwoofer phase.
SPEAKER LEVEL
Network mode: [HIGH L], [HIGH
R], [MID L], [MID R], [SUBWOOFER]
Standard mode: [FRONT L],
[FRONT R], [REAR L], [REAR R],
[SUBWOOFER]
Output level: [–24] to [10]
Select a speaker unit (filter) and adjust the
output level.
• Each value you have adjusted changes when
you change the [POSITION] setting (page 36).
CROSSOVER
Select a speaker unit (filter) to adjust the HPF or
LPF cut-off frequency and the slope for each
speaker unit.
For details on the [CROSSOVER] setting, see
page 31.
POSITION
[OFF], [FRONT LEFT] (front seat
left), [FRONT RIGHT] (front seat
right), [FRONT] (front seats), [ALL]*
* Only for standard mode
Select a listening position to adjust the speakers'
output levels automatically and add a delay time
that corresponds to the number and locations of
occupied seats.
TIME ALGNMNT
[INITIAL], [OFF], [CUSTOM]
Select a type of speaker and
adjust the speaker distance for
further customizing in [CUSTOM].
Network mode: [HIGH L], [HIGH
R], [MID L], [MID R], [SUBWOOFER]
Standard mode: [FRONT L],
[FRONT R], [REAR L], [REAR R],
[SUBWOOFER]
Speaker distance (inch): [140] to
[0]
Select or customize the time alignment settings
to reflect the distance between the listener’s
position and each speaker.
• Select [INITIAL] to initialize the setting value.
• Select [OFF] to reset all setting values to 0.
• The [CUSTOM] setting is available when
[FRONT LEFT] or [FRONT RIGHT] is selected in
[POSITION] (page 36).
• The [CUSTOM] setting is not available when
[OFF] is selected in [SUBWOOFER] (page 36).
Menu Item Description
- 37 -- 37 -
English
*1 Not available when [SW] is selected in [REAR-SP] in the INITIAL settings (page 11).
*2 Not available when [SUB.W/SUB.W] is selected in [SP-P/O MODE] in the INITIAL settings (page 11).
*3 Not available when [FUL] is selected in [REAR-SP] in the INITIAL settings (page 11).
*4 Not available when [REAR/REAR] is selected in [SP-P/O MODE] in the INITIAL settings (page 11).
You can also access to these menus when the unit is turned off.
SAVE SETTINGS
[YES], [NO] Save to later recall the following sound settings
at their current values: [CROSSOVER], [SPEAKER
LEVEL], [EQ SETTING], [POSITION], [TIME
ALGNMNT], [D.BASS], [SUBWOOFER].
LOAD SETTINGS
Load the sound settings, when you have already
performed [SAVE SETTINGS].
D.BASS
[OFF], [LOW], [HI] Boost the bass level dynamically to offer an
effect as if a subwoofer was added to the system.
LOUDNESS
[OFF], [LOW], [MID], [HI] Compensate for clear sound at low volume.
SLA
[+4] to [–4] Adjust the volume level for each source except
FM.
Each of the below combinations are set to the
same setting automatically.
• When making a USB connection, set USB, iPod,
PANDORA, ANDROID, SPOTIFY, and APP.
• When making a Bluetooth connection, set BT
AUDIO, iPod, PANDORA, ANDROID, SPOTIFY,
and APP.
SYSTEM settings
Menu Item Description
LANGUAGE
[ENG](English), [ESP](Spanish),
[FRA] (Canadian French)
Select the language to display the text
information from a compressed audio file.
CLOCK SET
Set the clock (page 10).
Menu Item Description

- 38 -
English
12H/24H
[12H], [24H] Select the time notation.
BEEP TONE (Only for standard mode)
[ON], [OFF] A beep can be heard when any button is pushed.
Select [OFF] to disable this function.
INFO DISPLAY (Only for MVH-S400BT)
[SOURCE/SPEANA], [CLOCK/
SPEANA], [SRC/LIVE FX], [CLOCK/
LIVE FX], [SOURCE], [SPEANA],
[OFF]
Display the item on the sub information display.
• When [SOURCE/SPEANA] or [CLOCK/SPEANA] is
selected, display the antenna instead of the
speana on the radio source.
INFO DISPLAY (Only for MVH-S600BS)
[SOURCE/BTINFO], [SOURCE/
SPEANA], [CLOCK/BTINFO],
[CLOCK/SPEANA], [LEVEL METER],
[SPEANA], [OFF]
Display the item on the sub information display.
• When [SOURCE/SPEANA] or [CLOCK/SPEANA] is
selected, display the antenna instead of the
speana on the radio source.
DOT DISPLAY (Only for MVH-S600BS)
[SPEANA], [ICON] Select [SPEANA] or [ICON] to appear on the left
side of the display.
AUX
[ON], [OFF] Set to [ON] when using an auxiliary device
connected to the unit.
BT AUDIO
[ON], [OFF] Set the Bluetooth signal on/off.
SPOTIFY
[ON], [OFF] Set to [ON] when using the Spotify function.
BT MEM CLEAR
[YES], [NO] Clear the Bluetooth device data (device list, PIN
code, call history, phone book, preset phone
numbers) stored in the unit.
[CLEARED] appears when data is successfully
deleted.
Menu Item Description
- 39 -- 39 -
English
Information on the connections for each device
The available sources differ depending on the setting value.
Please set [PHONE CONNECT] according to the table for the source you want to use.
For details on Pioneer ARC APP connection, see page 29.
When Pioneer ARC APP connection is NOT performed
PHONE CONNECT
[IPHONE], [ANDROID], [OTHERS] Select the type of device and the appropriate
connection method according to your device.
See page 39 for details on the connections for
each device.
• Select [OTHERS] when you connect a mobile
device other than iPhone/Android.
P. AP P AU TO O N
[ON], [OFF]
Select [ON] to automatically launch Pioneer ARC
APP when an Android device is connected to the
unit via AOA. (Only available when [APP CONTROL]
is selected in [PHONE CONNECT].)
USB AUTO
[ON], [OFF] Select [ON] to automatically switch to [USB]
source when a USB device/iPhone is connected
to the unit.
Select [OFF] when a USB device/iPhone is being
connected to the unit just for charging.
Setting Value Device Connection method Available source(s)
[WIRED]
(When [IPHONE] or
[OTHERS] is selected)
iOS USB iPod, PANDORA, APP,
SPOTIFY
Bluetooth -
Android USB ANDROID (AOA)
Bluetooth -
[USB MTP](MTP)
(When [ANDROID] is
selected)
iOS USB iPod, PANDORA, APP,
SPOTIFY
Bluetooth -
Android USB USB MTP
Bluetooth -
Menu Item Description

- 40 -
English
When Pioneer ARC APP connection is performed
[APP CONTROL](AOA)
(When [ANDROID] is
selected)
iOS USB iPod, PANDORA, APP,
SPOTIFY
Bluetooth -
Android USB ANDROID (AOA)
Bluetooth -
[BLUETOOTH] iOS USB -
Bluetooth iPod, PANDORA, APP,
SPOTIFY
Android USB USB MTP
Bluetooth PANDORA, APP,
SPOTIFY
Setting Value Device Connection method Available source(s)
[WIRED]
(When [IPHONE] or
[OTHERS] is selected)
iOS USB iPod, PANDORA,
SPOTIFY
Bluetooth -
Android USB ANDROID (Android
Music)
Bluetooth -
[USB MTP](MTP)
(When [ANDROID] is
selected)
iOS USB iPod, PANDORA,
SPOTIFY
Bluetooth -
Android USB USB MTP
Bluetooth -
[APP CONTROL](AOA)
(When [ANDROID] is
selected)
iOS USB iPod, PANDORA,
SPOTIFY
Bluetooth -
Android USB ANDROID (Android
Music)
Bluetooth -
Setting Value Device Connection method Available source(s)
- 41 -- 41 -
English
[BLUETOOTH] iOS USB -
Bluetooth iPod, PANDORA,
SPOTIFY
Android USB USB MTP
Bluetooth PANDORA, ANDROID
(Android Music),
SPOTIFY
ILLUMINATION settings
Menu Item Description
COLOR (Only for MVH-S600BS)
[KEY COLOR], [DISP COLOR],
[BOTH COLOR]
Select color for the keys/display of the unit from 12
preset colors, [SCAN] or [CUSTOM]*.
• [SCAN]: Cycle through a variety of colors
automatically.
• [CUSTOM]*:
1 Press and hold the M.C. dial until the color
setting display appears.
2 Set the primary color (R (red)/G (green)/B
(blue)) and brightness level ([0] to [60]).
You cannot select a level below 10 for all three
of R (red), G (green), B (blue) at the same time.
You can also customize the preset colors. Select
one of the preset colors, then press and hold the
M.C. dial until the color setting display appears.
* The CUSTOM setting is only available for [KEY
COLOR] and [DISP COLOR].
DIM SETTING
[SYNC ILLUMI]*, [SYNC CLOCK],
[MANUAL]
* Only for MVH-S600BS
Change the display brightness.
BRIGHTNESS (Only for MVH-S600BS)
[KEY], [DISP] Select the brightness for the keys/display of the
unit from [1] to [10].
The available setting ranges differ depending on
[DIM SETTING].
Setting Value Device Connection method Available source(s)

- 42 -
English
BRIGHTNESS (Only for MVH-S400BT)
[1] to [10] Change the display brightness.
The available setting ranges differ depending on
[DIM SETTING].
PHONE COLOR (Only for MVH-S600BS)
[FLASHING] Select the key color when a call is received.
Applies the color set by [KEY COLOR].
[FLASH FX1] to [FLASH FX6] Cycle through a variety of colors automatically.
[OFF] No change in key color made.
ILLUMI FX (Only for MVH-S600BS)
[ON], [OFF] The illumination effect can be seen when:
–there is an incoming call
–you are on a phone call
The illumination effect will activate when the
ACC power is turned on/off regardless of this
setting.
MIXTRAX settings
Menu Item Description
SHORT PLAYBCK
[1.0 MIN], [1.5 MIN], [2.0 MIN],
[2.5 MIN], [3.0 MIN], [OFF]
Select the length of the playback time.
FLASH AREA (Only for MVH-S600BS)
[KEY/DISPLAY], [KEY], [OFF] Select the area for the illumination effect.
When [OFF] is selected, the color set under the
ILLUMINATION settings (page 41) is used as the
display color.
Menu Item Description

- 43 -- 43 -
English
FLASH PATTERN (Only for MVH-S600BS)
[SOUND LEVEL 1] to [SOUND LEVEL
6]
Change the illumination effect according to
the sound and bass level.
The flash pattern changes according to the
sound level.
[LOW PASS 1] to [LOW PASS 6] The flash pattern changes according to the
bass level.
[RANDOM1] The flash pattern changes randomly according
to the sound level mode and low pass mode.
[RANDOM2] The flash pattern changes randomly according
to the sound level mode.
[RANDOM3] The flash pattern changes randomly according
to the low pass mode.
MIX PATTERN (Only for MVH-S400BT)
[SOUND LEVEL] Change the MIXTRAX special effects according
to the audio level.
The mix pattern changes according to the
sound level.
[LOW PASS] The mix pattern changes according to the bass
level.
[RANDOM] The mix pattern changes randomly according
to the sound level mode and low pass mode.
DISPLAY FX
[ON], [OFF] Set the MIXTRAX special effects on/off.
CUT IN FX
[ON], [OFF] Turn the MIXTRAX sound effects on/off while
manually changing the tracks.
Menu Item Description
- 44 -
English
(Network mode is only available for MVH-
S600BS.)
In the following, "NW" represents network
mode and "STD" represents standard
mode. According to the connections you
have established, change the speaker
mode to standard mode (STD) or network
mode (NW) (page 10).
WARNING
• When speaker output is used by 4
channels, use speakers over 50 W
(maximum input power) and between 4
Ω to 8 Ω (impedance value). Do not use 1
Ω to 3 Ω speakers for this unit.
• When rear speaker output is used by 2 Ω
of subwoofer, use speakers over 70 W
(maximum input power).
* Please refer to connections for a
connection method.
• The black cable is ground. When
installing this unit or power amp (sold
separately), make sure to connect the
ground wire first. Ensure that the ground
wire is properly connected to metal parts
of the car’s body. The ground wire of the
power amp and the one of this unit or
any other device must be connected to
the car separately with different screws. If
the screw for the ground wire loosens or
falls out, it could result in fire, generation
of smoke or malfunction.
Important
• When installing this unit in a vehicle
without an ACC (accessory) position on
the ignition switch, failure to connect the
red cable to the terminal that detects
operation of the ignition key may result
in battery drain.
• Use this unit with a 12-volt battery and
negative grounding only. Failure to do so
may result in a fire or malfunction.
• To prevent a short-circuit, overheating or
malfunction, be sure to follow the
directions below.
– Disconnect the negative terminal of the
battery before installation.
– Secure the wiring with cable clamps or
adhesive tape. Wrap adhesive tape
around wiring that comes into contact
with metal parts to protect the wiring.
– Place all cables away from moving parts,
such as the shift lever and seat rails.
– Place all cables away from hot places,
such as near the heater outlet.
Connections/Installation
Connections
Ground wire POWER AMP
Other devices
(Another electronic
device in the car)
Metal parts of
car’s body
*1 Not supplied for this unit
ACC position No ACC position

- 45 -
English
– Do not connect the yellow cable to the
battery by passing it through the hole
to the engine compartment.
– Cover any disconnected cable
connectors with insulating tape.
– Do not shorten any cables.
– Never cut the insulation of the power
cable of this unit in order to share the
power with other devices. The current
capacity of the cable is limited.
– Use a fuse of the rating prescribed.
– Never wire the negative speaker cable
directly to ground.
– Never band together negative cables of
multiple speakers.
• When this unit is on, control signals are
sent through the blue/white cable.
Connect this cable to the system remote
control of an external power amp or the
vehicle’s auto-antenna relay control
terminal (max. 300 mA 12 V DC). If the
vehicle is equipped with a glass antenna,
connect it to the antenna booster power
supply terminal.
• Never connect the blue/white cable to
the power terminal of an external power
amp. Also, never connect it to the power
terminal of the auto antenna. Doing so
may result in battery drain or a
malfunction.
• The graphical symbol placed on
the product means direct current.
This unit
Microphone 3 m (9 ft. 10-1/8 in.)
SiriusXM Connect Vehicle Tuner input
Power cord input
Microphone input
Rear output (STD) or middle range
output (NW)
Front output (STD) or high range output
(NW)
Antenna input
Fuse (10 A)
Wired remote input
Hard-wired remote control adapter can
be connected (sold separately).
Subwoofer output
SiriusXM Connect Vehicle Tuner (sold
separately)
Rear output or subwoofer output
MVH-S600BS
MVH-S400BT
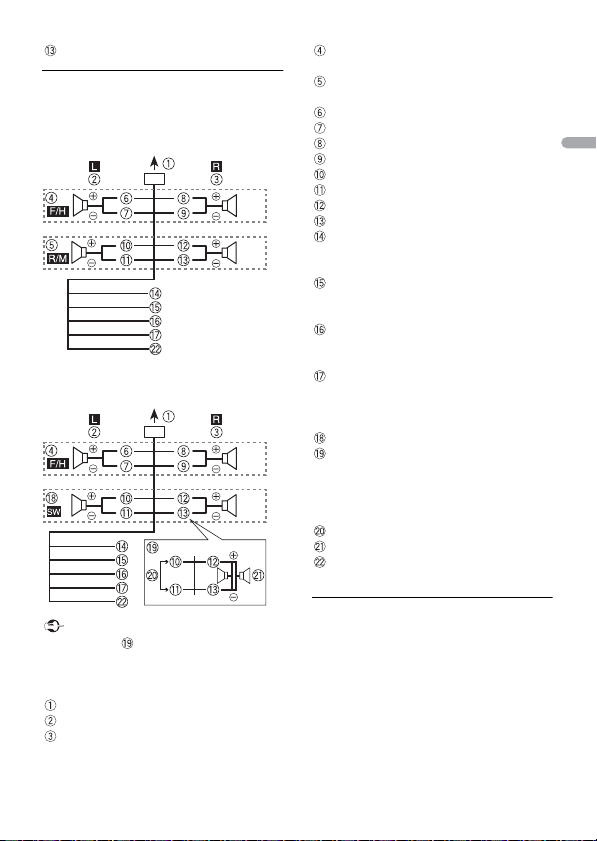
- 46 -
English
Front output
Power cord
Perform these connections when not
connecting a rear speaker or middle range
speaker lead to a subwoofer.
Perform these connections when using a
subwoofer without the optional amplifier.
Important
In the case of above, two 4 Ω
subwoofers wired in parallel will represent
a 2 Ω load.
To power cord input
Left
Right
Front speaker (STD) or high range
speaker (NW)
Rear speaker (STD) or middle range
speaker (NW)
White
White/black
Gray
Gray/black
Green
Green/black
Violet
Violet/black
Black (chassis ground)
Connect to a clean, paint-free metal
location.
Yel low
Connect to the constant 12 V supply
terminal.
Red
Connect to terminal controlled by the
ignition switch (12 V DC).
Blue/white
Connect to the system control terminal
of the power amp or auto-antenna relay
control terminal (max. 300 mA 12 V DC).
Subwoofer (4 Ω)
When using a subwoofer of 2 Ω, be sure
to connect the subwoofer to the violet
and violet/black leads of this unit. Do
not connect anything to the green and
green/black leads.
Not used.
Subwoofer (4 Ω) × 2
Orange/white (Only for MVH-S600BS)
Connect to a car’s illumination signal.
Power amp (sold separately)
Perform these connections when using the
optional amplifier.

- 47 -
English
System remote control
Connect to blue/white cable.
Power amp (sold separately)
Connect with RCA cables (sold
separately)
To rear output (STD) or middle range
output (NW)
Rear speaker (STD) or middle range
speaker (NW)
To front output (STD) or high range
output (NW)
Front speaker (STD) or high range
speaker (NW)
To subwoofer output
Subwoofer
System remote control
Connect to blue/white cable.
Power amp (sold separately)
Connect with RCA cables (sold
separately)
To front output
Front speaker
To rear output or subwoofer output
Rear speaker or subwoofer
Important
• Check all connections and systems before
final installation.
• Do not use unauthorized parts as this
may cause malfunctions.
• Consult your dealer if installation requires
drilling of holes or other modifications to
the vehicle.
• Do not install this unit where:
– it may interfere with operation of the
vehicle.
– it may cause injury to a passenger as a
result of a sudden stop.
• Install this unit away from hot places such
as near the heater outlet.
• Optimum performance is
obtained when the unit is
installed at an angle of less
than 60°.
• When installing, to ensure proper heat
dispersal when using this unit, make sure
you leave ample space behind the rear
panel and wrap any loose cables so they
are not blocking the vents.
1 Determine the appropriate position
where the holes on the bracket and
the side of the unit match.
MVH-S600BS
MVH-S400BT
Installation
Leave ample
space
5 cm
5 cm
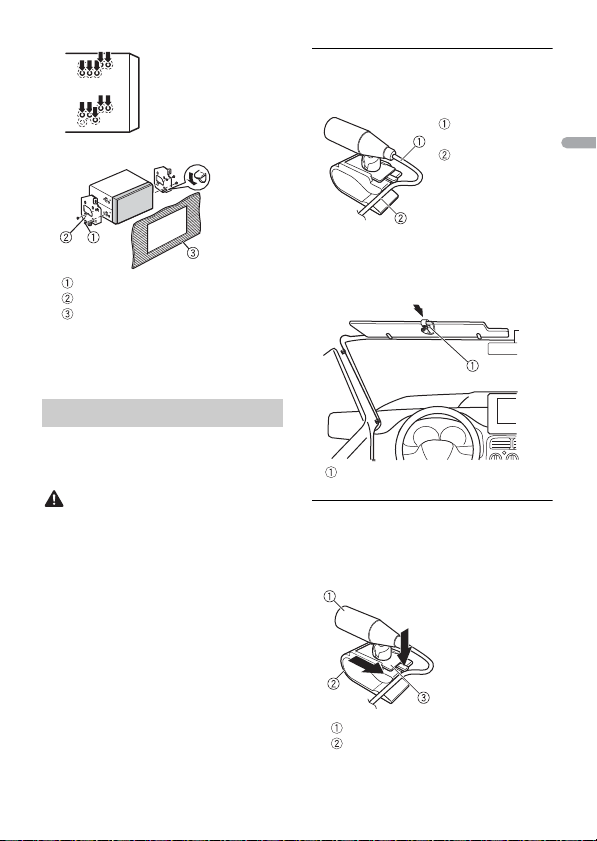
- 48 -
English
2 Tighten the screws on each side.
Screw
Mounting bracket
Dashboard or console
• Use either truss (5 mm × 9 mm) or
flush surface (5 mm × 9 mm) screws,
depending on the bracket screw
holes.
The microphone should be placed directly
in front of the driver at a suitable distance
to pick up their voice clearly.
CAUTION
It is extremely dangerous to allow the
microphone lead to become wound
around the steering column or shift lever.
Be sure to install the microphone in such a
way that it will not obstruct driving. It is
recommended to use the clamps (sold
separately) to arrange the lead.
NOTE
Depending on the vehicle model, the
microphone cable length may be too short
when you mount the microphone on the
sun visor. In such cases, install the
microphone on the steering column.
To install on the sun visor
1 Fit the microphone lead into the
groove.
2 Install the microphone clip on the sun
visor.
Lowering the sun visor reduces the
voice recognition rate.
To install on the steering
column
1 Slide the microphone base to detach it
from the microphone clip.
Microphone
Microphone clip
Installing the microphone
Microphone
lead
Groove
Microphone clip

- 49 -
English
Microphone base
2 Install the microphone on the rear side
of the steering column.
Double-sided tape

- 50 -
English
The display automatically returns to the
normal display.
→ No operations have been made for
about 30 seconds.
–Perform an operation.
The repeat play range changes
unexpectedly.
→ Depending on the repeat play range,
the selected range may change when
another folder or track is being selected
or during fast forwarding/reversing.
–Select the repeat play range again.
A subfolder is not played back.
→ Subfolders cannot be played when
[FLD] (folder repeat) is selected.
–Select another repeat play range.
The sound is intermittent.
→ You are using a device, such as a cellular
phone, that may cause audible
interference.
–Move electrical devices that may be
causing the interference away from
the unit.
The sound from the Bluetooth audio
source is not played back.
→ There is a call in progress on a
Bluetooth-connected cellular phone.
–The sound will be played back when
the call is terminated.
→ A Bluetooth-connected cellular phone
is currently being operated.
–Stop using the cellular phone.
→ The connection between the unit and
the cellular phone is not established
correctly after a call made by a
Bluetooth-connected cellular phone.
–Make a Bluetooth connection
between the unit and the cellular
phone again.
Common
AMP ERROR
→ This unit fails to operate or the speaker
connection is incorrect.
→ The protective circuit is activated.
–Check the speaker connection.
–Turn the ignition switch OFF and back
to ON again. If the message remains,
contact your dealer or an authorized
Pioneer Service Station for assistance.
NO XXXX (NO TITLE, for example)
→ There is no embedded text information.
– Switch the display or play another
track/file.
USB device/iPhone
FORMAT READ
→ Sometimes there is a delay between the
start of playback and when you start to
hear any sound.
–Wait until the message disappears and
you hear sound.
NO AUDIO
→ There are no songs.
–Transfer the audio files to the USB
device and connect.
→ The connected USB device has security
enabled.
–Follow the USB device instructions to
disable the security.
Additional Information
Troubleshooting
Error messages

- 51 -
English
SKIPPED
→ The connected USB device contains
DRM protected files.
–The protected files are skipped.
PROTECT
→ All the files on the connected USB
device are embedded with DRM.
–Replace the USB device.
N/A USB
→ The connected USB device is not
supported by this unit.
–Disconnect your device and replace it
with a compatible USB device.
HUB ERROR
→ The USB device connected via a USB
hub is not supported by this unit.
– Connect the USB device directly to this
unit using a USB cable.
CHECK USB
→ The USB connector or USB cable has
short-circuited.
–Check that the USB connector or USB
cable is not caught in something or
damaged.
→ The connected USB device consumes
more than maximum allowable current.
– Disconnect the USB device and do not
use it. Turn the ignition switch OFF
and back to ACC or ON. Connect only
compliant USB devices.
→ The iPhone operates correctly but does
not charge.
–Make sure the connection cable for
the iPhone has not shorted out (e.g.,
not caught in metal objects). After
checking, turn the ignition switch OFF
and back to ON, or disconnect the
iPhone and reconnect.
ERROR-19
→ Communication failed.
–Perform one of the following
operations, then return to the USB
source.
• Turn the ignition switch OFF and
back to ON.
• Disconnect the USB device.
• Change to a different source.
→ iPhone failure.
–Disconnect the cable from the iPhone.
Once the iPhone’s main menu is
displayed, reconnect the iPhone and
reset it.
ERROR-23
→ USB device was not formatted properly.
–Format the USB device with FAT12,
FAT16 or FAT32.
ERROR-16
→ The iPhone firmware version is old.
–Update the iPhone version.
→ iPhone failure.
–Disconnect the cable from the iPhone.
Once the iPhone’s main menu is
displayed, reconnect the iPhone and
reset it.
STOP
→ There are no songs in the current list.
–Select a list that contains songs.
NO BT DEVICE GO TO BT MENU TO
REGISTER
→ No Bluetooth device found.
–Connect the unit and iPhone via
Bluetooth (page 15).
CONN. FAILED PRESS BAND KEY TO
RETRY
→ Bluetooth connection with iPhone
failed.
–Press BAND/ to make a
connection again.
DISCONNECTED PRESS BAND KEY TO
RETRY
→ Bluetooth connection with iPhone
failed.

- 52 -
English
–Press BAND/ to make a
connection again.
Bluetooth device
ERROR-10
→ The power failed for the Bluetooth
module of the unit.
–Turn the ignition switch OFF and back
to ACC or ON.
Pandora
ERROR-19
→ Communication failed.
–Disconnect the cable from the device.
Once the device’s main menu is
displayed, reconnect the device and
reset it.
NOT FOUND
→ The Pandora application has not started
running yet.
–Start up the Pandora application.
RATING ERROR
→ The thumb rating operation was
disabled.
–Run the same command for another
track.
CAN'T SKIP
→ The skip operation was disabled.
–Run the same command for another
track.
THUMB ERROR
→ Unable to save thumb rating.
–Try again later.
BOOKMARK ERR
→ Unable to save BookMark.
–Try again later.
UNABLE TO ADD
→ Unable to add station.
–Try again later.
SKIP LIMIT
→ Due to music licensing restrictions,
Pandora limits the total number of skips
per hour.
–Wait until Pandora allows you to skip
again.
UPDATE APP
→ This version of the Pandora application
is not supported.
–Connect a device that has a
compatible version of the Pandora
application installed.
LOG IN ERROR
→ Your Pandora account is not logged in.
–Disconnect the cable from the device,
and log in to your Pandora account.
Then reconnect the device.
ERROR
→ Device error message displayed in the
Pandora application.
–Check the connected device.
→ Pandora system is undergoing
maintenance.
–Try again later.
NO STATIONS
→ No station found.
–Create a station in the Pandora
application on your connected device.
NO BT DEVICE GO TO BT MENU TO
REGISTER
→ No Bluetooth device found.
–Connect the unit and the device via
Bluetooth (page 15).
CONN. FAILED PRESS BAND KEY TO
RETRY
→ Bluetooth connection failed.
–Press BAND/ to make a
connection again.
CHECK APP PRESS BAND KEY TO RETRY
→ Connection to the Pandora application
failed.
- 53 -
English
–Press BAND/ to make a
connection again.
DISCONNECTED PRESS BAND KEY TO
RETRY
→ Bluetooth connection lost.
–Press BAND/ to make a
connection again.
STATION LIMIT
→ A new station cannot be added.
–Delete an old station to open a spot
for a new one.
CANNOT DELETE
→ The station could not be deleted.
–Run the same command for another
station.
BAD NETWORK
→ The connected device is out of area.
–Connect the device to a network.
UNAVAILAVLE
→ The connected device is out of area.
–Connect the device to a network.
→ The operation was disabled.
–Run the same command for another
station.
APP
NO BT DEVICE GO TO BT MENU TO
REGISTER
→ No Bluetooth device found.
–Connect the unit and the device via
Bluetooth (page 15).
CONN. FAILED PRESS BAND KEY TO
RETRY
→ Bluetooth connection failed.
–Press BAND/ to make a
connection again.
DISCONNECTED PRESS BAND KEY TO
RETRY
→ Bluetooth connection failed.
–Press BAND/ to make a
connection again.
CHECK APP
→ Connection to the application failed.
–Follow the instructions that appear on
the screen.
NOT FOUND
→ The application has not started running
yet.
–Operate the mobile device to start up
the application.
Spotify
NO BT DEVICE GO TO BT MENU TO
REGISTER
→ No Bluetooth device found.
–Connect the unit and the device via
Bluetooth (page 15).
CONN. FAILED PRESS BAND KEY TO
RETRY
→ Bluetooth connection failed.
–Press BAND/ to make a
connection again.
CHECK APP PRESS BAND KEY TO RETRY
→ Connection to the Spotify application
failed.
–Press BAND/ to make a
connection again.
DISCONNECTED PRESS BAND KEY TO
RETRY
→ Bluetooth connection lost.
–Press BAND/ to make a
connection again.
CHECK APP
→ Connection to the Spotify application
failed.
–Follow the instructions that appear on
the screen.

- 54 -
English
SiriusXM Satellite Radio (Only
for MVH-S600BS)
CHECK ANTENNA
→ The antenna cable may be either
disconnected or damaged.
–Check the antenna connection or
replace if damaged.
CHECK TUNER
→ The radio is having difficulty
communicating with the SiriusXM
Connect Vehicle Tuner. The tuner may
be disconnected or damaged.
–Verify that the SiriusXM Connect
Vehicle Tuner cable is securely
connected to the radio.
NO SIGNAL
→ The SiriusXM Connect Vehicle Tuner is
having difficulty receiving the SiriusXM
satellite signal.
–Move your vehicle outdoors with a
clear view of the southern sky.
–Make sure that the SiriusXM magnetic
mount antenna is mounted on a metal
surface on the outside the vehicle.
–Move the SiriusXM antenna away from
any obstructions.
SUBSCRIPTION UPDATED
→ This unit has detected a change in your
SiriusXM subscription status.
–Press any key to clear the message.
CH UNAVAIL
→ The channel that you have requested is
not available.
–Check the SiriusXM channel lineup.
CHAN UNSUB
→ The channel that you have requested is
not included in your SiriusXM
subscription package.
–Check the content of your SiriusXM
subscription package.
CH LOCKED
→ The channel has been locked by the
Parental Control function.
–Set [LOCKED CH] to [OFF] or [CLEAR
ALL] to [YES] in the FUNCTION settings
(page 35).
NO TUNEMIX CH
→ There is only one music channel in the
band.
– Select a band with two or more music
channels.
–Add more music channels to the
current band.
USB storage device
• Connections via USB hubs are not
supported.
• Firmly secure the USB storage device
before driving. Do not let the USB storage
device fall onto the floor, where it may
become jammed under the brake or
accelerator pedal.
• Depending on the USB storage device,
the following problems may occur.
–Operations may vary.
–The storage device may not be
recognized.
– Files may not be played back properly.
– The device may cause audible
interference when you are listening to
the radio.
iPhone
• Do not leave the iPhone in places with
high temperatures.
• Firmly secure the iPhone when driving.
Do not let the iPhone fall onto the floor,
where it may become jammed under the
brake or accelerator pedal.
• Incompatible text saved on the iPhone
will not be displayed by the unit.
Handling guidelines
- 55 -
English
• Only the first 32 characters can be
displayed as a file name (including the file
extension) or a folder name.
• The unit may not work properly
depending on the application used to
encode WMA files.
• There may be a slight delay at the start of
the playback of audio files embedded
with image data, or audio files stored on a
USB device with numerous folder
hierarchies.
CAUTION
• Pioneer cannot guarantee compatibility
with all USB mass storage devices, and
assumes no responsibility for any loss of
data on media players, smartphones, or
other devices while using this product.
• Do not leave a USB device in any place
that is subject to high temperatures.
WMA files
MP3 files
WAV files
• WAV file formats cannot be connected via
MTP.
AAC files
FLAC files
• FLAC file formats cannot be connected
via MTP.
• FLAC files may not be playable,
depending on the encoder.
Compressed audio
compatibility
File extension .wma
Bit rate 48 kbps to 320 kbps
(CBR), 48 kbps to 384
kbps (VBR)
Sampling frequency 32 kHz, 44.1 kHz, 48
kHz
Windows Media™
Audio Professional,
Lossless, Voice/DRM
Stream/Stream with
video
Not compatible
File extension .mp3
Bit rate 8 kbps to 320 kbps
(CBR), VBR
Sampling frequency 8 kHz to 48 kHz (32
kHz, 44.1 kHz, 48 kHz
for emphasis)
Compatible ID3 tag
version
1.0, 1.1, 2.2, 2.3, 2.4
(ID3 tag Version 2.x is
given priority over
Version 1.x.)
M3u playlist Not compatible
MP3i (MP3
interactive), mp3 PRO
Not compatible
File extension .wav
Quantization bits 8 and 16 (LPCM), 4
(MSADPCM)
Sampling frequency 16 kHz to 48 kHz
(LPCM), 22.05 kHz and
44.1 kHz (MS ADPCM)
Compatible format AAC encoded by
iTunes
File extension .m4a
Sampling frequency 11.025 kHz to 48 kHz
Transmission rate 16 kbps to 320 kbps,
VBR
Apple Lossless Not compatible
AAC file bought from
the iTunes Store (.m4p
file extension)
Not compatible
File extension .flac
Sampling frequency 8/11.025/12/16/22.05/
24/32/44.1/48/96 kHz
Quantization bit rate 16/24 bit
- 56 -
English
USB device
• There may be a slight delay when starting
playback of audio files on a USB storage
device with numerous folder hierarchies.
This unit supports only the following iPhone
models. Supported iPhone software versions are
shown below. Older versions may not be
supported.
Made for
–iPhone 7
–iPhone 7 Plus
–iPhone SE
–iPhone 6s
–iPhone 6s Plus
–iPhone 6
–iPhone 6 Plus
–iPhone 5s
–iPhone 5c
–iPhone 5
• Operations may vary depending on the
generation and/or software version of
the iPhone.
• Users of iPhone with the Lightning®
Connector should use the Lightning to
USB Cable (supplied with iPhone).
• Refer to the iPhone manuals for
information about the file/format
compatibility.
• Audiobook, Podcast: Compatible
CAUTION
Pioneer accepts no responsibility for data
lost on the iPhone, even if that data is lost
while this unit is used.
The user cannot assign folder numbers and
specify playback sequences with this unit.
Sequence of audio file depends on the
connected device.
Note that the hidden files in a USB device
cannot be played back.
Example of a hierarchy
Bluetooth
The Bluetooth® word mark and logos are
registered trademarks owned by Bluetooth SIG,
Inc. and any use of such marks by PIONEER
CORPORATION is under license. Other
trademarks and trade names are those of their
respective owners.
iTunes
Apple and iTunes are trademarks of Apple
Inc., registered in the U.S. and other
countries.
Channel mode 1/2 ch
Playable folder
hierarchy
Up to eight tiers (A
practical hierarchy is
less than two tiers.)
Playable folders Up to 1 500
Playable files Up to 15 000
Playback of copyright-
protected files
Not compatible
Partitioned USB
device
Only the first partition
can be played.
iPhone compatibility
Sequence of audio files
Copyright and trademark
Folder
Compressed
audio file
to : Playback sequence
01 to 05: Folder number

- 57 -
English
WMA
Windows Media is either a registered
trademark or trademark of Microsoft
Corporation in the United States and/or
other countries.
This product includes technology owned
by Microsoft Corporation and cannot be
used or distributed without a license from
Microsoft Licensing, Inc.
FLAC
Copyright © 2000-2009 Josh Coalson
Copyright © 2011-2014 Xiph.Org
Foundation
Redistribution and use in source and
binary forms, with or without modification,
are permitted provided that the following
conditions are met:
–Redistributions of source code must
retain the above copyright notice, this list
of conditions and the following
disclaimer.
–Redistributions in binary form must
reproduce the above copyright notice,
this list of conditions and the following
disclaimer in the documentation and/or
other materials provided with the
distribution.
–Neither the name of the Xiph.org
Foundation nor the names of its
contributors may be used to endorse or
promote products derived from this
software without specific prior written
permission.
THIS SOFTWARE IS PROVIDED BY THE
COPYRIGHT HOLDERS AND
CONTRIBUTORS “AS IS” AND ANY EXPRESS
OR IMPLIED WARRANTIES, INCLUDING, BUT
NOT LIMITED TO, THE IMPLIED
WARRANTIES OF MERCHANTABILITY AND
FITNESS FOR A PARTICULAR PURPOSE ARE
DISCLAIMED. IN NO EVENT SHALL THE
FOUNDATION OR CONTRIBUTORS BE
LIABLE FOR ANY DIRECT, INDIRECT,
INCIDENTAL, SPECIAL, EXEMPLARY, OR
CONSEQUENTIAL DAMAGES (INCLUDING,
BUT NOT LIMITED TO, PROCUREMENT OF
SUBSTITUTE GOODS OR SERVICES; LOSS OF
USE, DATA, OR PROFITS; OR BUSINESS
INTERRUPTION) HOWEVER CAUSED AND
ON ANY THEORY OF LIABILITY, WHETHER
IN CONTRACT, STRICT LIABILITY, OR TORT
(INCLUDING NEGLIGENCE OR OTHERWISE)
ARISING IN ANY WAY OUT OF THE USE OF
THIS SOFTWARE, EVEN IF ADVISED OF THE
POSSIBILITY OF SUCH DAMAGE.
iPhone and Lightning
Use of the Made for Apple badge means
that an accessory has been designed to
connect specifically to the Apple
product(s) identified in the badge, and has
been certified by the developer to meet
Apple performance standards. Apple is not
responsible for the operation of this device
or its compliance with safety and
regulatory standards.
Please note that the use of this accessory
with an Apple product may affect wireless
performance.
iPhone and Lightning are trademarks of
Apple Inc., registered in the U.S. and other
countries.
Siri®
Works with Siri through the microphone.
Android & Google Play
Android, Google Play, and the Google Play
logo are trademarks of Google Inc.
SiriusXM Satellite Radio
Sirius, XM and all related marks and logos
are trademarks of Sirius XM Radio Inc. All
rights reserved.
Pandora® internet radio
PANDORA, the PANDORA logo, and the
Pandora trade dress are trademarks or
registered trademarks of Pandora Media,
Inc. Used with permission.

- 58 -
English
Pandora is only available in certain
countries. Please visit
http://www.pandora.com/legal
for more information.
MIXTRAX
MIXTRAX is a trademark of the PIONEER
CORPORATION.
Spotify®
SPOTIFY and the Spotify logo are among
the registered trademarks of Spotify AB.
Compatible mobile digital devices and
premium subscription required, where
available, see https://www.spotify.com.
T-Kernel 2.0
This product uses the source code of T-
Kernel 2.0 under T-License 2.0 granted by
T-Engine Forum (www.tron.org).
MP3
Copyright (C) 1998-2009 PacketVideo
Licensed under the Apache License,
Version 2.0 (the "License"); you may not use
this file except in compliance with the
License.
You may obtain a copy of the License at
http://www.apache.org/licenses/LICENSE-
2.0
Unless required by applicable law or
agreed to in writing, software distributed
under the License is distributed on an "AS
IS" BASIS, WITHOUT WARRANTIES OR
CONDITIONS OF ANY KIND, either express
or implied.
See the License for the specific language
governing permissions and limitations
under the License.
General
Power source: 14.4 V DC (10.8 V to 15.1 V
allowable)
Grounding system: Negative type
Maximum current consumption: 10.0 A
Dimensions (W × H × D):
D
Chassis: 178 mm × 100 mm × 97 mm
(7 in. × 3-7/8 in. × 3-7/8 in.)
Nose: 170 mm × 96 mm × 16 mm (6-
3/4 in. × 3-3/4 in. × 5/8 in.)
Weight: 0.7 kg (1.5 lbs)
Audio
(Network mode is only available for MVH-
S600BS.)
Maximum power output:
• 50 W × 4 ch/4 Ω (for no subwoofer)
• 50 W × 2 ch/4 Ω + 70 W × 1 ch/2 Ω
(for subwoofer)
Continuous power output:
22 W × 4 (50 Hz to 15 000 Hz, 5 %
THD, 4 Ω load, both channels driven)
Load impedance: 4 Ω (4 Ω to 8 Ω (2 Ω for 1
ch) allowable)
Preout maximum output level: 2.0 V (MVH-
S400BT), 4.0 V (MVH-S600BS)
Equalizer (13-Band Graphic Equalizer):
Frequency: 50 Hz/80 Hz/125 Hz/200
Hz/315 Hz/500 Hz/800 Hz/1.25 kHz/2
kHz/3.15 kHz/5 kHz/8 kHz/12.5 kHz
Gain: ±12 dB (2 dB step)
High pass filter (Standard mode):
Frequency: 25 Hz/31.5 Hz/40 Hz/50
Hz/63 Hz/80 Hz/100 Hz/125 Hz/160
Hz/200 Hz/250 Hz
Slope: –6 dB/oct, –12 dB/oct, –18 dB/
oct, –24 dB/oct, OFF
Subwoofer/Low pass filter (Standard
mode):
Frequency: 25 Hz/31.5 Hz/40 Hz/50
Hz/63 Hz/80 Hz/100 Hz/125 Hz/160
Hz/200 Hz/250 Hz
Slope: –6 dB/oct, –12 dB/oct, –18 dB/
oct, –24 dB/oct, –30 dB/oct, –36 dB/
oct, OFF
Gain: +10 dB to –24 dB (1 dB step)
Phase: Normal/Reverse
Specifications

- 59 -
English
Speaker level (Standard mode):
+10 dB to –24 dB (1 dB step)
Time alignment (Standard mode):
0 Inch to 140 Inch (1 inch/Step)
High pass filter (HIGH) (Network mode):
Frequency: 1.25 kHz/1.6 kHz/2 kHz/
2.5 kHz/3.15 kHz/4 kHz/5 kHz/6.3 kHz/
8 kHz/10 kHz/12.5 kHz
Slope: –6 dB/oct, –12 dB/oct, –18 dB/
oct, –24 dB/oct
High pass filter (MID) (Network mode):
Frequency: 25 Hz/31.5 Hz/40 Hz/50
Hz/63 Hz/80 Hz/100 Hz/125 Hz/160
Hz/200 Hz/250 Hz
Slope: –6 dB/oct, –12 dB/oct, –18 dB/
oct, –24 dB/oct, OFF
Low pass filter (MID) (Network mode):
Frequency: 1.25 kHz/1.6 kHz/2 kHz/
2.5 kHz/3.15 kHz/4 kHz/5 kHz/6.3 kHz/
8 kHz/10 kHz/12.5 kHz
Slope: –6 dB/oct, –12 dB/oct, –18 dB/
oct, –24 dB/oct, OFF
Subwoofer (Network mode):
Frequency: 25 Hz/31.5 Hz/40 Hz/50
Hz/63 Hz/80 Hz/100 Hz/125 Hz/160
Hz/200 Hz/250 Hz
Slope: –12 dB/oct, –18 dB/oct, –24 dB/
oct, –30 dB/oct, –36 dB/oct, OFF
Gain: +10 dB to –24 dB (1 dB step)
Phase: Normal/Reverse
Speaker level (Network mode):
+10 dB to –24 dB (1 dB step)
Time alignment (Network mode):
0 Inch to 140 Inch (1 inch/Step)
USB
USB standard specification: USB 2.0 full
speed
Maximum current supply: 1.5 A
USB Protocol:
MSC (Mass Storage Class)
MTP (Media Transfer Protocol)
AOA (Android Open Accessory) 2.0
File system: FAT12, FAT16, FAT32
MP3 decoding format: MPEG-1 & 2 Audio
Layer 3
WMA decoding format: Ver. 7, 8, 9, 9.1, 9.2
(2 ch audio), Ver. 10, 11, 12 (Windows
Media Player)
AAC decoding format: MPEG-4 AAC (iTunes
encoded only) (Ver. 10.6 and earlier)
FLAC decoding format: v1.2.1 (Free
Lossless Audio Codec)
WAV signal format: Linear PCM (Non-
compressed)
FM tuner
Frequency range: 87.9 MHz to 107.9 MHz
Usable sensitivity: 11 dBf (1.0 μV/75 Ω,
mono, S/N: 30 dB)
Signal-to-noise ratio: 65 dB (analog
broadcasting) (IHF-A network)
AM tuner
Frequency range: 530 kHz to 1 710 kHz
Usable sensitivity: 25 μV (S/N: 20 dB)
Signal-to-noise ratio: 60 dB (analog
broadcasting) (IHF-A network)
Bluetooth
Version: Bluetooth 4.0 certified
Output power: +4 dBm Maximum (Power
class 2)
Frequency band(s): 2 400 MHz to 2 483.5
MHz
Bluetooth profiles:
GAP (Generic Access Profile)
SDAP (Service Discovery Application
Profile)
HFP (Hands Free Profile) 1.6
PBAP (Phone Book Access Profile)
A2DP (Advanced Audio Distribution
Profile)
AVRCP (Audio/Video Remote Control
Profile) 1.5
SPP (Serial Port Profile) 1.1

- 60 -
English
CEA2006 Specifications
Power output: 14 W RMS × 4 Channels (4 Ω
and 1 % THD+N)
S/N ratio: 91 dBA (reference: 1 W into 4 Ω)
NOTE
Specifications and the design are subject
to modifications without notice.
<
=

- 2 -
Français
Avant de commencer.............................................................................. 3
Pour commencer ..................................................................................... 5
Radio....................................................................................................... 12
CD/USB/iPhone®/AUX.......................................................................... 14
Bluetooth ............................................................................................... 16
Mode d’application.............................................................................. 22
Pandora® ................................................................................................ 24
Spotify® .................................................................................................. 26
Radio satellite SiriusXM....................................................................... 28
Utilisation de Pioneer ARC APP ......................................................... 32
Réglages audio ..................................................................................... 34
Réglages................................................................................................. 36
Réglages FUNCTION ............................................................................. 36
Réglages AUDIO .................................................................................... 39
Réglages SYSTEM .................................................................................. 41
Réglages ILLUMINATION...................................................................... 46
Réglages MIXTRAX................................................................................ 47
Connexions/Installation...................................................................... 49
Informations complémentaires......................................................... 55
À propos de ce manuel :
• Dans les instructions suivantes, une mémoire USB ou un lecteur audio USB est nommé
« périphérique USB ».
• Lorsqu’un iPhone est connecté à l’appareil, le nom de la source affiché sur l’appareil
est [iPod®]. Veuillez noter que cet appareil prend en charge uniquement les iPhone
(iPhone 5 ou version ultérieure), quel que soit le nom de la source (pour plus de détails,
reportez-vous à la page 61).
Table des matières

- 3 -- 3 -
Français
Nous vous remercions d’avoir acheté cet appareil PIONEER
Pour garantir une utilisation adéquate, lisez bien ce mode d’emploi avant d’utiliser cet appareil. Il est
particulièrement important que vous lisiez et respectiez les indications AT TEN TI ON et PRÉCAUTION
de ce mode d’emploi. Conservez-le dans un endroit sûr et facilement accessible pour toute
consultation ultérieure.
La protection de votre ouïe est entre vos mains
Pour assurer le rendement optimal de votre matériel et – plus important encore – la protection de votre
ouïe, réglez le volume à un niveau raisonnable. Pour ne pas altérer votre sens de la perception, le son
doit être clair mais ne produire aucun vacarme et être exempt de toute distorsion. Votre ouïe peut vous
jouer des tours.
Avec le temps, votre système auditif peut en effet s’adapter à des volumes supérieurs, et ce qui vous
semble un « niveau de confort normal » pourrait au contraire être excessif et contribuer à endommager
votre ouïe de façon permanente. Le réglage de votre matériel à un volume sécuritaire AVANT que votre
ouïe s’adapte vous permettra de mieux vous protéger.
CHOISISSEZ UN VOLUME SÉCURITAIRE :
• Réglez d’abord le volume à un niveau inférieur.
• Montez progressivement le volume jusqu’à un niveau d’écoute confortable ; le son doit être clair et
exempt de distorsions.
• Une fois que le son est à un niveau confortable, ne touchez plus au bouton du volume.
N’OUBLIEZ PAS DE RESPECTER LES DIRECTIVES SUIVANTES :
• Lorsque vous montez le volume, assurez-vous de pouvoir quand même entendre ce qui se passe
autour de vous.
• Faites très attention ou cessez temporairement l’utilisation dans les situations pouvant s’avérer
dangereuses.
• N’utilisez pas des écouteurs ou un casque d’écoute lorsque vous opérez un véhicule motorisé ; une
telle utilisation peut créer des dangers sur la route et est illégale à de nombreux endroits.
Avant de commencer
ID FCC : EW4C95
MODÈLE Nº : MVH-S600BS/MVH-S400BT
IC : 4250A-C95
Le présent appareil est conforme aux la partie 15 des règles de la FCC et CNR d’Industrie Canada
applicables aux appareils radio exempts de licence. L’exploitation est autorisée aux deux conditions
suivantes: (1) l’appareil ne doit pas produire de brouillage, et (2) l’utilisateur de l’appareil doit
accepter tout brouillage radioélectrique subi, même si le brouillage est susceptible d’en
compromettre le fonctionnement.
L'antenne Bluetooth ne peut pas etre supprime (ou remplace) par l'utilisateur.
Cet équipement est conforme aux limites d’exposition aux rayonnements énoncées pour un
environnement non contrôlé et respecte les règles les radioélectriques (RF) de la FCC lignes
directrices d'exposition et d’exposition aux fréquences radioélectriques (RF) CNR-102 de l’IC. Cet
équipement émet une énergie RF très faible qui est considérée conforme sans évaluation de
l’exposition maximale autorisée. Cependant, cet équipement doit être installé et utilisé en gardant
une distance de 20cm ou plus entre le dispositif rayonnant et le corps (à l’exception des extrémités :
mains, poignets, pieds et chevilles).

- 4 -
Français
ATTENTION
• N’essayez pas d’installer cet appareil ou d’en faire l’entretien vous-même. L’installation ou
l’entretien de cet appareil par des personnes sans formation et sans expérience en équipement
électronique et en accessoires automobiles peut être dangereux et vous exposer à des risques
d’électrocution ou à d’autres dangers.
• N’essayez pas de démonter ou de modifier cet appareil. Veillez à quitter la route et garer votre véhicule
en lieu sûr avant d’essayer d’utiliser les commandes de l’appareil.
PRÉCAUTION
• Ne laissez pas cet appareil entrer en contact avec de l’humidité et/ou des liquides. Cela pourrait
provoquer une électrocution. Tout contact avec des liquides pourrait également provoquer des
dommages, de la fumée et une surchauffe de l’appareil.
• Maintenez le niveau d’écoute à une valeur telle que vous puissiez entendre les sons provenant de
l’extérieur.
• Ce produit a été évalué sous des conditions climatiques tempérées et tropicales, selon la norme CEI
60065, « Appareils audio, vidéo et appareils électroniques analogues – Exigences de sécurité ».
Service après-vente des produits Pioneer
Veuillez contacter le détaillant ou le distributeur auprès duquel vous avez acheté cet appareil ou un
centre d’entretien PIONEER agréé pour le service après-vente ou toute autre information. Dans le cas où
les informations nécessaires ne seraient pas disponibles, veuillez contacter les entreprises indiquées ci-
dessous :
N’expédiez pas l’appareil pour réparation à l’une des adresses figurant ci-dessous sans avoir pris
contact au préalable.
Pour les informations de garantie, veuillez consulter le feuillet Garantie limitée qui accompagne cet
appareil.
ÉTATS-UNIS et CANADA
Pioneer Electronics (USA) Inc.
CUSTOMER SUPPORT DIVISION
P.O. Box 1760
Long Beach, CA 90801-1760
800-421-1404
- 5 -- 5 -
Français
MVH-S600BS
Pour commencer
Fonctionnement de base
Fenêtre d’affichage
Commande M.C. (multi-contrôle)
BAND/
DISP (affichage)
SRC (source)/OFF
Port USB
Prise d’entrée AUX (prise stéréo 3,5 mm)

- 6 -
Français
MVH-S400BT
Téléco mm an de
Opérations fréquemment utilisées
Les touches disponibles varient en fonction de l’appareil.
Fenêtre d’affichage
Commande M.C. (multi-contrôle)
BAND/
DISP (affichage)
SRC (source)/OFF
Port USB
Prise d’entrée AUX (prise stéréo 3,5 mm)
/
SRC (source)
VOLUME +/–
MUTE
DISP (affichage)
- 7 -- 7 -
Français
* Si le fil bleu/blanc de cet appareil est connecté à la borne de commande du relais d’antenne
automatique du véhicule, celle-ci se déploie lorsque la source est activée. Pour rétracter l’antenne,
désactivez la source.
Indications affichées
L’indication varie en fonction de l’appareil.
Objectif
Opération
Appareil principal Télécommande
Mise en marche de
l’appareil*
Appuyez sur SRC/OFF pour
mettre l’appareil en marche.
Appuyez de manière
prolongée sur SRC/OFF
pour éteindre l’appareil.
Appuyez sur SRC pour
mettre l’appareil en marche.
Appuyez de manière
prolongée sur SRC pour
éteindre l’appareil.
Réglage du volume Tournez la commande M.C..Appuyez sur VOLUME + ou
–.
Appuyez sur MUTE pour
couper le son de l’appareil.
Appuyez à nouveau sur
MUTE ou appuyez sur
VOLUME + ou – pour
réactiver le son.
Sélection d’une source Appuyez plusieurs fois sur
SRC/OFF.
Appuyez plusieurs fois sur
SRC.
Changement des
informations de l’affichage
Appuyez plusieurs fois sur
DISP.
Appuyez plusieurs fois sur
DISP.
Retour à la liste/l’affichage
précédent
Appuyez sur
BAND/
.
Appuyez sur / pour
sélectionner le dossier
suivant/précédent.
Retour à l’affichage normal à
partir du menu
Appuyez de manière
prolongée sur BAND/ .
–
Modification de la
luminosité de l’affichage
(non disponible lorsque
l’option [SIRIUSXM] est
sélectionnée comme
source)
Appuyez de manière
prolongée sur BAND/ .
–
Réponse à un appel Appuyez sur . Appuyez sur .
Fin d’un appel Appuyez sur . Appuyez sur .
Indication Description
Apparaît lorsqu’un niveau inférieur de menu ou de dossier existe.
- 8 -
Français
Le microprocesseur doit être réinitialisé dans les situations suivantes :
– Avant la première utilisation de cet appareil après l’installation
– Si l’appareil ne fonctionne pas correctement
– Lorsque des messages étranges ou incorrects s’affichent
1 Appuyez sur la touche RESET avec la pointe d’un stylo ou d’un autre instrument
pointu.
Apparaît lorsqu’un téléphone Bluetooth est connecté à cet appareil à
l’aide du profil HFP (Profil mains libres) (page 16) et clignote pendant que
le téléphone est en attente.
Apparaît lorsqu’un lecteur audio Bluetooth est connecté à cet appareil à
l’aide du profil A2DP (Profil de distribution audio avancé) (page 16).
Apparaît lorsque vous appuyez sur la touche .
Apparaît lorsque la fonction de correcteur sonore est réglée (page 37).
BASS Apparaît lorsque l’option [HI]/[LOW] est sélectionnée dans [D.BASS]
(page 40).
Apparaît lorsque la lecture aléatoire est réglée (sauf lorsque vous
sélectionnez BT AUDIO comme source).
Apparaît lorsque la lecture répétée est réglée (sauf lorsque vous
sélectionnez BT AUDIO comme source).
Apparaît lorsqu’une connexion Bluetooth est établie (page 16).
Réinitialisation du microprocesseur
Indication Description
Touche RESET

- 9 -- 9 -
Français
Retirez la feuille de protection avant l’utilisation.
ATTENTION
• Ne pas ingérer la batterie : risque de brûlure chimique.
(La télécommande qui accompagne) Ce produit contient une pile-bouton. Si la pile-bouton est
avalée, elle peut causer de graves brûlures internes au bout d’à peine deux heures et peut entraîner le
décès.
Gardez les batteries neuves et les batteries usées à l’écart des enfants.
Si le logement à pile ne se ferme pas fermement, cessez d’utiliser le produit et gardez-le à l’écart des
enfants.
Si vous croyez que les piles ont peut-être été avalées ou placées à l’intérieur de toute partie du corps,
consultez immédiatement un médecin.
• N’exposez pas la pile ou la télécommande à une chaleur excessive, notamment aux rayons directs du
soleil ou à une flamme.
PRÉCAUTION
• Un remplacement incorrect de la pile peut entraîner un risque d’explosion. Lors du remplacement de
la pile, remplacez-la uniquement par une pile de type identique.
• Ne manipulez ou ne rangez pas la pile avec des outils ou objets métalliques.
• En cas de fuite de la pile, retirez cette dernière et nettoyez soigneusement la télécommande. Installez
ensuite une nouvelle pile.
• Lors de la mise au rebut des piles usagées, respectez les règlements nationaux ou les instructions
locales en vigueur dans le pays ou la région en matière de conservation ou de protection de
l’environnement.
• « Matériaux de perchlorate – une manutention spéciale peut s’appliquer.
Voir www.dtsc.ca.gov/hazardouswaste/perchlorate. (Applicable à la Californie, États-Unis) »
Important
• Ne laissez pas la télécommande exposée à des températures élevées ou à la lumière directe du soleil.
• Ne laissez pas la télécommande tomber sur le plancher, où elle pourrait gêner le bon fonctionnement
de la pédale de frein ou d’accélérateur.
Préparation de la télécommande
Comment remplacer la pile
Insérez la pile CR2025 (3 V) avec les pôles plus (+) et
moins (–) orientés correctement.

- 10 -
Français
Lorsque vous tournez le commutateur d’allumage à ON après l’installation, le menu de
configuration s’affiche.
ATTENTION
(Uniquement pour MVH-S600BS)
N’utilisez pas l’appareil en mode standard lorsqu’un système de haut-parleurs pour mode réseau est
connecté à l’appareil. N’utilisez pas l’appareil en mode réseau lorsqu’un système de haut-parleurs pour
mode standard est connecté à l’appareil. Cela pourrait endommager les haut-parleurs.
1 Tournez la commande M.C. pour sélectionner les options, puis appuyez pour
confirmer.
Pour passer à la prochaine option de menu, vous devez confirmer votre sélection.
2 [QUIT :YES] s’affiche lorsque tous les réglages sont effectués.
Menu de configuration
Option de menu Description
LANGUAGE Sélection de la langue d’affichage des informations textuelles
d’un fichier audio compressé.
[ENG] (Anglais),
[ESP] (Espagnol),
[FRA] (Français
canadien)
CLOCK SET Réglage de l’horloge.
1 Tournez la commande M.C. pour régler l’heure, puis appuyez
pour confirmer.
L’indicateur passe automatiquement au réglage des minutes.
2 Tournez la commande M.C. pour régler les minutes, puis
appuyez pour confirmer.
SPEAKER MODE
(Uniquement pour
MVH-S600BS)
Commutation entre deux modes de fonctionnement : le mode
réseau 2 voies (NETWORK) et le mode standard (STANDARD) en
fonction des connexions établies. Pour les détails sur les modes
de fonctionnement, consultez la page 34.
Après la sélection du mode approprié, tournez la commande
M.C. pour sélectionner [YES], puis appuyez pour confirmer.
• Vous ne pouvez pas terminer les ajustements du menu de
configuration sans effectuer le réglage de [SPEAKER MODE].
• Une fois le mode de haut-parleurs réglé, ce réglage ne peut
être modifié qu’après le rétablissement des réglages par
défaut de ce produit. Rétablissez les réglages par défaut pour
modifier le réglage de mode de haut-parleurs (reportez-vous à
SYSTEM RESET à la page 12).
• Lorsque l’option [NETWORK] est sélectionnée, la fonction de
tonalité bip n’est pas disponible.
[STANDARD],
[NETWORK]

- 11 -- 11 -
Français
Pour retourner à la première option du menu de configuration, tournez la
commande M.C. pour sélectionner [QUIT :NO], puis appuyez pour confirmer.
3 Appuyez sur la commande M.C. pour confirmer les réglages.
REMARQUE
Ces réglages autres que [SPEAKER MODE] peuvent être effectués à tout moment à partir des réglages
SYSTEM (page 41).
1 Appuyez sur la commande M.C. pour afficher le menu principal.
2 Tournez la commande M.C. pour sélectionner [SYSTEM], puis appuyez pour
confirmer.
3 Tournez la commande M.C. pour sélectionner [DEMO OFF], puis appuyez pour
confirmer.
4 Tournez la commande M.C. pour sélectionner [YES], puis appuyez pour confirmer.
1 Appuyez de manière prolongée sur SRC/OFF jusqu’à ce que l’appareil s’éteigne.
2 Appuyez sur la commande M.C. pour afficher le menu principal.
3 Tournez la commande M.C. pour sélectionner [INITIAL], puis appuyez pour
confirmer.
4 Tournez la commande M.C. pour sélectionner une option, puis appuyez pour
confirmer.
REMARQUE
Les options varient en fonction de l’appareil.
Annulation de l’affichage de démonstration (DEMO
OFF)
Réglages INITIAL
Option de menu Description
REAR-SP Sélectionnez cette option lorsqu’un haut-parleur pleine gamme
est connecté aux fils de sortie de haut-parleur arrière.
[FUL]
[SW] Sélectionnez cette option lorsqu’un haut-parleur d’extrêmes
graves est connecté directement aux fils de sortie de haut-
parleur arrière sans amplificateur auxiliaire.
- 12 -
Français
Les fréquences du syntonisateur de cet appareil sont attribuées pour une utilisation en
Amérique du Nord. Son utilisation dans d’autres régions pourrait se traduire par une
réception de mauvaise qualité.
1 Appuyez sur SRC/OFF pour sélectionner [RADIO].
2 Appuyez sur BAND/ pour sélectionner la bande [FM1], [FM2], [FM3] ou [AM].
3 Appuyez sur une touche numérique (1/ à 6/).
SP-P/O MODE Sélectionnez cette option lorsqu’un haut-parleur pleine gamme
est connecté aux fils de sortie de haut-parleur arrière et qu’un
haut-parleur d’extrêmes graves est connecté à la sortie RCA.
[REAR/SUB.W]
[SUB.W/SUB.W] Sélectionnez cette option lorsqu’un haut-parleur d’extrêmes
graves passif est connecté directement aux fils de sortie de
haut-parleur arrière et qu’un haut-parleur d’extrêmes graves est
connecté à la sortie RCA.
[REAR/REAR] Sélectionnez cette option lorsque des haut-parleurs pleine
gamme sont connectés aux fils de sortie de haut-parleur arrière
et à la sortie RCA. Si un haut-parleur pleine gamme est connecté
aux fils de sortie de haut-parleur arrière et que la sortie RCA n’est
pas utilisée, vous pouvez sélectionner [REAR/SUB.W] ou [REAR/
REAR].
SYSTEM UPDATE Sélectionnez [SYSTEM INFO] pour confirmer les plus récentes
informations de système de l’appareil.
Sélectionnez [S/W UPDATE] pour mettre à jour l’appareil avec le
logiciel le plus récent et initialiser les réglages de l’appareil. Pour
les détails sur le logiciel le plus récent et la mise à jour, visitez
notre site Web.
[SYSTEM INFO], [S/
W UPDATE]
SXM RESET Sélection de la fonction d’initialisation des réglages SiriusXM.
[YES], [NO]
SYSTEM RESET Sélectionnez [YES] pour initialiser les réglages de l’appareil.
L’appareil redémarrera automatiquement.
[YES], [NO]
Radio
Réception des stations présélectionnées
Option de menu Description
- 13 -- 13 -
Français
REMARQUE
Vous pouvez sélectionner un canal présélectionné en appuyant sur et en tournant la commande
M.C..
CONSEIL
Les touches / peuvent également servir à sélectionner une station présélectionnée lorsque
l’option [SEEK] est réglée à [PCH] dans les réglages FUNCTION (page 36).
Les six stations au signal le plus puissant sont enregistrées sur les touches numériques
(1/ à 6/).
1 Après la sélection de la bande, appuyez sur la commande M.C. pour afficher le
menu principal.
2 Tournez la commande M.C. pour sélectionner [FUNCTION], puis appuyez pour
confirmer.
3 Tournez la commande M.C. pour sélectionner [BSM], puis appuyez pour
confirmer.
Pour rechercher une station manuellement
1
Après la sélection de la bande, appuyez sur / pour sélectionner une
station.
Appuyez de manière prolongée sur / , puis relâchez pour rechercher une
station disponible. Le balayage s’interrompt lorsque l’appareil reçoit une station. Pour
annuler la syntonisation par recherche, appuyez sur / .
REMARQUE
L’option [SEEK] doit être réglée à [MAN] dans les réglages FUNCTION (page 36).
Pour enregistrer des stations manuellement
1
Pendant la réception de la station que vous souhaitez enregistrer, appuyez de
manière prolongée sur l’une des touches numériques (1/ à 6/) jusqu’à ce
qu’elle cesse de clignoter.
REMARQUE
Vous pouvez sélectionner un canal présélectionné en appuyant sur et en tournant la commande
M.C.. Après la sélection d’un canal, appuyez de manière prolongée sur la commande M.C. pour
enregistrer une station.
Mémoire des meilleures stations (BSM)

- 14 -
Français
Déconnectez le casque d’écoute du périphérique avant de connecter ce dernier à
l’appareil.
Périphériques USB (y compris Android™)/iPhone
1 Ouvrez le couvercle du port USB.
2 Branchez le périphérique USB/iPhone en utilisant un câble approprié.
REMARQUE
Pour passer automatiquement à la source [USB] lorsqu’un périphérique USB/iPhone est connecté à
l’appareil, réglez [USB AUTO] à [ON] dans les réglages SYSTEM (page 43).
PRÉCAUTION
Utilisez un câble USB Pioneer en option (CD-U50E) pour connecter le périphérique USB, car les
périphériques connectés directement à l’appareil dépassent de ce dernier et peuvent s’avérer
dangereux.
Avant de retirer le périphérique, arrêtez la lecture.
Connexions AOA
Pour les détails sur la connexion AOA, consultez la page 32.
Connexion MTP
Vous pouvez connecter à l’appareil un périphérique doté d’Android OS 4.0 ou version ultérieure via
une connexion MTP, en utilisant le câble fourni avec le périphérique. Toutefois, selon le périphérique
connecté et le nombre de fichiers enregistrés sur celui-ci, la lecture des fichiers audio/chansons via MTP
pourrait être impossible. Veuillez noter que la connexion MTP n’est pas compatible avec les formats de
fichier WAV ou les formats de fichier FLAC et qu’il n’est pas possible de l’utiliser avec la fonction
MIXTRAX.
REMARQUE
Si vous utilisez une connexion MTP, [PHONE CONNECT] doit être réglé à [USB MTP] dans les réglages
SYSTEM (page 43).
AUX
1
Insérez la mini-fiche stéréo dans la prise d’entrée AUX.
2 Appuyez sur SRC/OFF pour sélectionner [AUX] comme source.
REMARQUE
Lorsque l’option [AUX] est réglée à [OFF] dans les réglages SYSTEM, vous ne pouvez pas sélectionner
[AUX] comme source (page 42).
CD/USB/iPhone®/AUX
Lecture
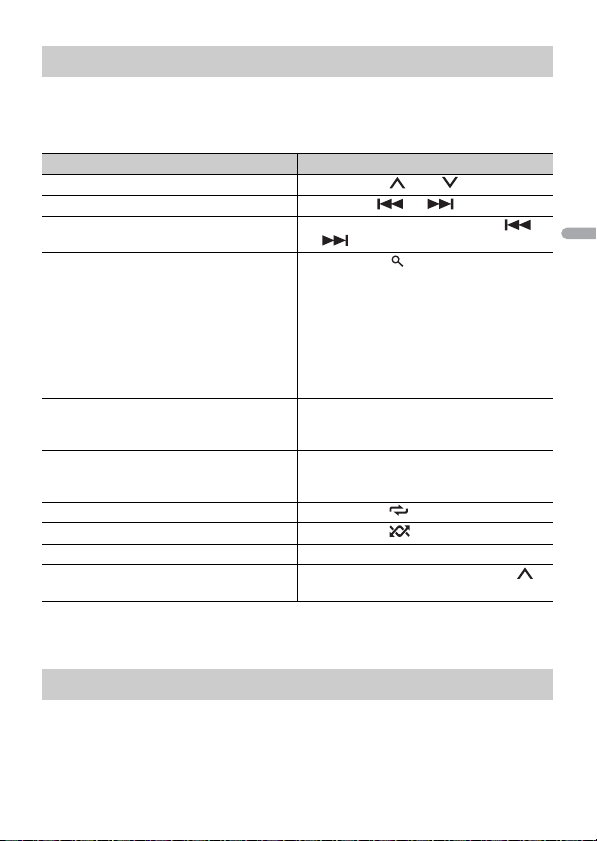
- 15 -- 15 -
Français
Vous pouvez effectuer divers ajustements dans les réglages FUNCTION (page 36).
Veuillez noter que les opérations suivantes ne sont pas disponibles pour un
périphérique AUX. Pour faire fonctionner un périphérique AUX, utilisez les commandes
du périphérique.
*1 Fichiers audio compressés uniquement
*2 Lorsque vous utilisez la fonction d’avance ou de retour rapide pendant la lecture d’un fichier VBR, la
durée de lecture pourrait être incorrecte.
La fonction MIXTRAX permet de créer un mixage sans interruption de votre
bibliothèque musicale, accompagné d’effets d’illumination. Pour les détails sur les
réglages MIXTRAX, consultez la page 47.
Opérations
Objectif Opération
Sélection d’un dossier*1 Appuyez sur 1/ ou 2/.
Sélection d’une plage/chanson (chapitre) Appuyez sur ou .
Avance ou retour rapide*2 Appuyez de manière prolongée sur
ou .
Recherche d’un fichier dans une liste (USB
uniquement)
1 Appuyez sur pour afficher la liste.
2 Tournez la commande M.C. pour
sélectionner le nom de fichier (dossier)
ou la catégorie de votre choix, puis
appuyez pour confirmer.
3 Tournez la commande M.C. pour
sélectionner le fichier souhaité, puis
appuyez pour confirmer.
La lecture démarre.
Affichage de la liste des fichiers dans le
dossier/la catégorie que vous
sélectionnez*1
Appuyez sur la commande M.C. après avoir
sélectionné un dossier/une catégorie.
Lecture d’une chanson dans le dossier/la
catégorie que vous sélectionnez*1
Appuyez de manière prolongée sur la
commande M.C. après avoir sélectionné un
dossier/une catégorie.
Lecture répétée Appuyez sur 6/.
Lecture aléatoire Appuyez sur 5/.
Pause/reprise de lecture Appuyez sur 4/PAUSE.
Retour au dossier racine (USB
uniquement)*1
Appuyez de manière prolongée sur 1/.
À propos de MIXTRAX (USB/iPhone uniquement)

- 16 -
Français
REMARQUES
• Le iPhone doit être connecté avec Pioneer ARC APP via USB pour l’utilisation de cette fonction
(page 32).
• Cette fonction n’est pas compatible avec les périphériques Android connectés via MTP.
• Selon le fichier/la chanson, les effets sonores pourraient ne pas être disponibles.
• Désactivez la fonction MIXTRAX si les effets d’illumination produits nuisent à la conduite.
1 Appuyez sur 3/MIX pour activer/désactiver MIXTRAX.
Important
Si dix périphériques Bluetooth ou plus (par exemple, un téléphone et un lecteur audio distinct) sont
connectés, ils pourraient ne pas fonctionner correctement.
1 Activez la fonction Bluetooth du périphérique.
Si vous établissez une connexion Bluetooth à partir du périphérique, passez à
l’étape 6.
2 Appuyez sur pour afficher le menu de téléphone.
3 Tournez la commande M.C. pour sélectionner [BT SETTING], puis appuyez pour
confirmer.
4 Tournez la commande M.C. pour sélectionner [ADD DEVICE], puis appuyez pour
confirmer.
L’appareil commence à rechercher des périphériques disponibles, pour ensuite les
afficher dans la liste des périphériques.
• Pour annuler cette recherche, appuyez sur la commande M.C..
• Si le périphérique souhaité n’apparaît pas dans la liste, sélectionnez [RE-SEARCH].
• Si aucun périphérique n’est disponible, [NOT FOUND] s’affiche.
5 Tournez la commande M.C. pour sélectionner un périphérique dans la liste, puis
appuyez pour confirmer.
Appuyez de manière prolongée sur la commande M.C. pour commuter les
informations de périphérique affichées entre l’adresse de périphérique Bluetooth et
le nom de périphérique.
Si vous établissez une connexion Bluetooth à partir de l’appareil, passez à l’étape 7.
6 Sélectionnez [Pioneer BT Unit] sur l’affichage du périphérique.
Bluetooth
Connexion Bluetooth

- 17 -- 17 -
Français
7 Assurez-vous que le même numéro à 6 chiffres s’affiche sur cet appareil et le
périphérique, puis sélectionnez « Oui » sur le périphérique.
REMARQUES
• [DEVICE FULL] s’affiche si l’appareil est déjà jumelé avec dix autres périphériques. En pareil cas,
supprimez l’un des périphériques jumelés. Consultez [DEL DEVICE] dans les réglages Bluetooth
(page 17).
• Selon le périphérique, le code NIP pourrait être requis à l’étape 7. En pareil cas, entrez [0000].
CONSEIL
La connexion Bluetooth peut également être établie en détectant l’appareil à partir du périphérique
Bluetooth. Pour ce faire, l’option [VISIBLE] doit être réglée à [ON] dans les réglages Bluetooth. Pour les
détails sur le fonctionnement du périphérique Bluetooth, reportez-vous au mode d’emploi fourni avec
le périphérique Bluetooth.
Réglages Bluetooth
Option de menu Description
DEVICELIST Affichage de la liste de périphériques Bluetooth jumelés. « * »
s’affiche sur le nom du périphérique lorsque la connexion
Bluetooth est établie.
Lorsqu’aucun périphérique n’est sélectionné dans la liste de
périphériques, cette fonction n’est pas disponible.
DEL DEVICE Suppression des informations de périphérique.
[DELETE YES],
[DELETE NO]
ADD DEVICE Enregistrement d’un nouveau périphérique.
Si dix périphériques sont déjà jumelés, cette fonction n’est pas
disponible. Vous pouvez vérifier le nombre de périphériques
jumelés dans le réglage [DEVICELIST].
A.CONN Sélectionnez [ON] pour établir automatiquement la connexion
à un périphérique Bluetooth.
[ON], [OFF]
VISIBLE Sélectionnez [ON] afin qu’un périphérique Bluetooth puisse
détecter l’appareil lorsque ce dernier est connecté via Bluetooth
à un autre périphérique.
[ON], [OFF]

- 18 -
Français
Commencez par établir une connexion Bluetooth avec le téléphone Bluetooth
(page 16). Jusqu’à deux téléphones Bluetooth peuvent être connectés simultanément.
Important
• Le fait de laisser l’appareil en veille pour établir la connexion à votre téléphone via Bluetooth pendant
que le moteur est à l’arrêt pourrait décharger la batterie du véhicule.
• Assurez-vous de stationner votre véhicule dans un endroit sûr et d’appliquer le frein à main avant
d’effectuer cette opération.
PIN CODE Modification du code NIP.
1 Appuyez sur la commande M.C. pour afficher le mode de
réglage.
2 Tournez la commande M.C. pour sélectionner un numéro.
3 Appuyez sur la commande M.C. pour déplacer le curseur à la
position suivante.
4 Après avoir entré le code NIP, appuyez de manière prolongée
sur la commande M.C..
Après avoir entré le code NIP, vous pouvez appuyer sur la
commande M.C. pour retourner à l’affichage d’entrée du code
NIP afin de modifier ce dernier.
DEV. INFO Commutation des informations de périphérique affichées entre
le nom de périphérique et l’adresse de périphérique Bluetooth.
A.PAIRING Sélectionnez [ON] pour jumeler l’appareil et le iPhone ou
périphérique Android automatiquement lorsqu’un iPhone ou
périphérique Android est connecté à l’appareil via USB. (Cette
fonction pourrait ne pas être disponible selon la version d’iOS
que vous utilisez.)
• Lorsque vous utilisez un périphérique Android, cette fonction
est disponible dans les situations suivantes :
– Votre périphérique est doté d’Android OS 4.4 ou version ultérieure.
– Assurez-vous d’activer la fonction Bluetooth du périphérique et
confirmez que le périphérique n’est pas connecté à l’appareil via
Bluetooth.
– L’option [P.APP AUTO ON] doit être réglée à [ON] (page 43).
– Pioneer ARC APP doit être installé sur votre périphérique Android et
l’option [PHONE CONNECT] doit être réglée à [APP CONTROL]
(page 32).
– Vous devez appuyer sur une touche de confirmation dans la fenêtre
de mise en garde affichée sur Pioneer ARC APP après l’établissement
d’une connexion avec Pioneer ARC APP.
[ON], [OFF]
Téléphone Bluetooth
Option de menu Description
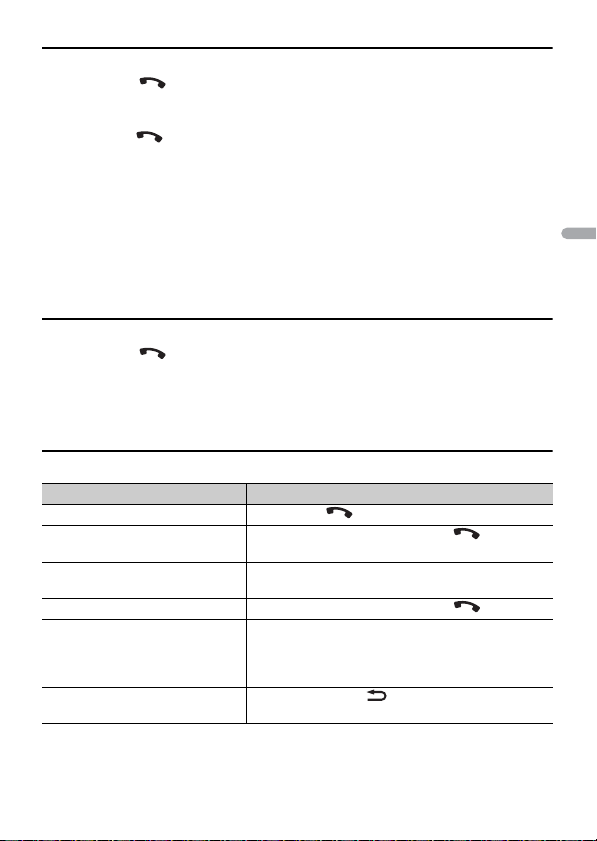
- 19 -- 19 -
Français
Pour effectuer un appel téléphonique
1
Appuyez sur pour afficher le menu de téléphone.
Lorsque deux téléphones sont connectés, un nom de téléphone apparaît d’abord,
puis un menu de téléphone s’affiche. Pour passer à un autre téléphone, appuyez à
nouveau sur .
2 Tournez la commande M.C. pour sélectionner [RECENTS] ou [PHONE BOOK], puis
appuyez pour confirmer.
Si vous sélectionnez [PHONE BOOK], passez à l’étape 4.
3 Tournez la commande M.C. pour sélectionner [MISSED], [DIALED] ou [RECEIVED],
puis appuyez pour confirmer.
4 Tournez la commande M.C. pour sélectionner un nom ou un numéro de
téléphone, puis appuyez pour confirmer.
L’appel téléphonique commence.
Pour répondre à un appel entrant
1
Appuyez sur pendant la réception d’un appel.
CONSEIL
Lorsque deux téléphones sont connectés à l’appareil via Bluetooth et qu’un appel entrant est reçu
pendant l’utilisation d’un téléphone pour un appel, un message s’affiche. Pour répondre à cet appel
entrant, vous devez mettre fin à l’appel en cours.
Opérations de base
Objectif Opération
Terminer un appel Appuyez sur .
Refuser un appel entrant Appuyez de manière prolongée sur pendant la
réception d’un appel.
Alterner entre l’appel en cours et
un appel en attente
Appuyez sur la commande M.C..
Annuler un appel en attente Appuyez de manière prolongée sur .
Régler le volume de la voix de
l’appelant (Lorsque le mode
confidentiel est activé, cette
fonction n’est pas disponible.)
Tournez la commande M.C. pendant l’appel.
Activer ou désactiver le mode
confidentiel
Appuyez sur BAND/ pendant l’appel.

- 20 -
Français
Pour présélectionner des numéros de téléphone
1
Sélectionnez un numéro de téléphone à partir d’un annuaire ou d’un historique
d’appels.
2 Appuyez de manière prolongée sur l’une des touches numériques (1/ à 6/).
Le contact est enregistré dans le numéro de présélection sélectionné.
Pour effectuer un appel en utilisant un numéro de présélection, appuyez sur l’une des
touches numériques (1/ à 6/ ), puis appuyez sur la commande M.C..
Reconnaissance vocale (Uniquement pour iPhone)
Cette fonction est disponible uniquement lorsqu’un iPhone doté de la reconnaissance
vocale est connecté à l’appareil via Bluetooth.
1 Appuyez de manière prolongée sur pour activer le mode de reconnaissance
vocale.
2 Appuyez sur la commande M.C., puis parlez dans le microphone pour entrer les
commandes vocales.
Pour quitter le mode de reconnaissance vocale, appuyez sur BAND/.
REMARQUE
Pour les détails sur les fonctions de reconnaissance vocale, reportez-vous au mode d’emploi fourni avec
votre iPhone.
Menu de téléphone
Option de menu Description
RECENTS Affichage de l’historique d’appels manqués.
[MISSED]
[DIALED] Affichage de l’historique d’appels composés.
[RECEIVED] Affichage de l’historique d’appels reçus.
PHONE BOOK Affichage des contacts dans votre téléphone. Réglez [VISIBLE] à
[ON] dans les réglages Bluetooth pour parcourir les contacts au
moyen de cet appareil.
PRESET 1-6 Rappel des numéros de téléphone présélectionnés. Vous
pouvez également rappeler des numéros de téléphone
présélectionnés en appuyant sur l’une des touches numériques
(1/ à 6/).
A.ANSR* Sélectionnez [ON] pour répondre automatiquement à un appel
entrant.
[ON], [OFF]
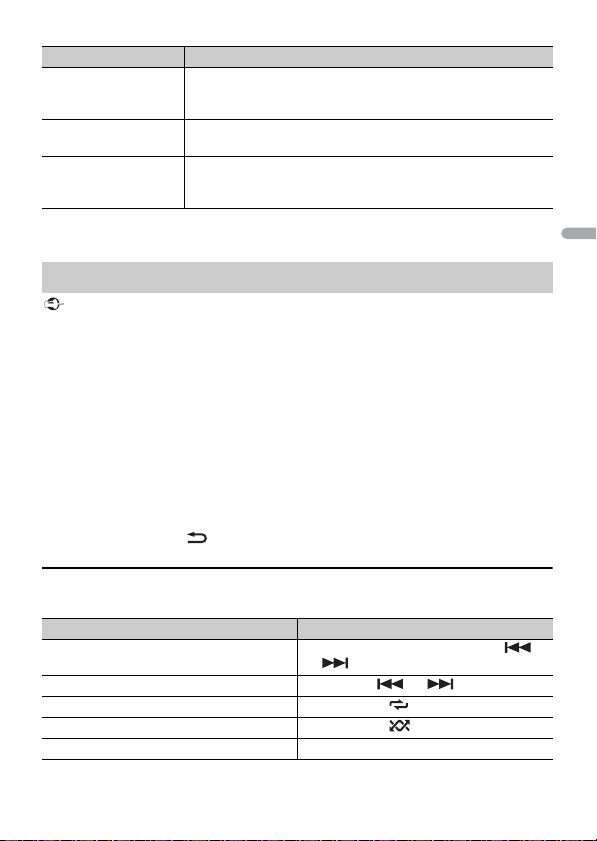
- 21 -- 21 -
Français
* Si deux téléphones sont connectés, cette fonction n’est pas disponible pour les appels entrants reçus
pendant l’utilisation d’un des téléphones pour un appel.
Important
• Selon le lecteur audio Bluetooth connecté à cet appareil, les opérations disponibles sont limitées aux
deux niveaux suivants :
– A2DP (Profil de distribution audio avancé) permet uniquement d’écouter des chansons sur votre
lecteur audio.
– AVRCP (Profil de commande audio/vidéo à distance) permet d’utiliser des fonctions telles que la
lecture, la mise en pause, la sélection de chanson, etc.
• Le son du lecteur audio Bluetooth est coupé lorsque le téléphone est utilisé.
• Lors de l’utilisation du lecteur audio Bluetooth, vous ne pouvez pas établir automatiquement la
connexion à un téléphone Bluetooth.
• Selon le type de lecteur audio Bluetooth connecté à cet appareil, les opérations et les informations
affichées pourraient varier en fonction de la disponibilité et des fonctionnalités.
1 Établissez une connexion Bluetooth avec le lecteur audio Bluetooth.
2 Appuyez sur SRC/OFF pour sélectionner [BT AUDIO] comme source.
3 Appuyez sur BAND/ pour démarrer la lecture.
Opérations de base
Vous pouvez effectuer divers ajustements dans les réglages FUNCTION (page 36).
R.TONE Sélectionnez [ON] si la sonnerie n’est pas émise à partir des
haut-parleurs de la voiture. Selon le téléphone connecté, cette
fonction pourrait ne pas fonctionner.
[ON], [OFF]
PB INVT Inversion de l’ordre des noms dans l’annuaire (affichage des
noms).
BT SETTING Vous pouvez ajuster divers réglages pour les connexions
Bluetooth. Pour les détails sur les réglages Bluetooth, consultez
la page 17.
Audio Bluetooth
Objectif Opération
Avance ou retour rapide Appuyez de manière prolongée sur
ou .
Sélection d’une plage Appuyez sur ou .
Lecture répétée* Appuyez sur 6/.
Lecture aléatoire* Appuyez sur 5/.
Pause/reprise de lecture Appuyez sur 4/PAUSE.
Option de menu Description
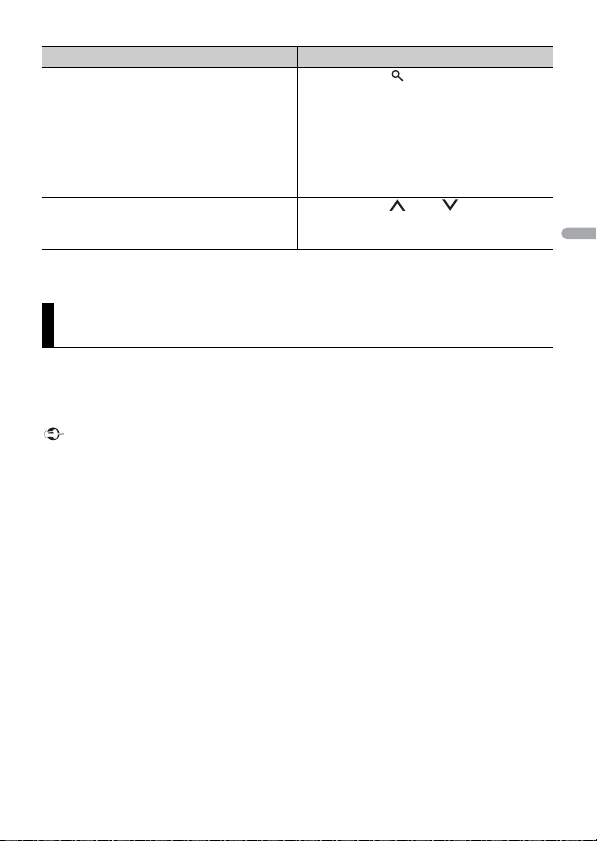
- 22 -
Français
* Selon le périphérique connecté, ces opérations pourraient ne pas être disponibles.
Vous pouvez écouter la musique d’une application sur un iPhone/périphérique Android
au moyen de l’appareil. Dans certains cas, il est possible de contrôler l’application à l’aide
de l’appareil.
Pour les détails sur les périphériques compatibles, visitez notre site Web.
Important
L’utilisation d’applications tierces peut impliquer ou nécessiter la fourniture d’informations
personnelles, que ce soit en créant un compte d’utilisateur ou une autre méthode ainsi que, pour
certaines applications, la fourniture de données de géolocalisation.
TOUTES LES APPLICATIONS TIERCES RELÈVENT DE L’ENTIÈRE RESPONSABILITÉ DES FOURNISSEURS,
NOTAMMENT MAIS SANS S’Y LIMITER, LA COLLECTE ET LA PROTECTION
DES DONNÉES UTILISATEUR ET LES BONNES PRATIQUES DE CONFIDENTIALITÉ. EN ACCÉDANT À UNE
APPLICATION TIERCE, VOUS ACCEPTEZ DE PRENDRE CONNAISSANCE DES CONDITIONS DE SERVICE ET
DES RÈGLES DE CONFIDENTIALITÉ DES FOURNISSEURS. SI VOUS N’ACCEPTEZ PAS LES CONDITIONS OU
RÈGLES D’UN FOURNISSEUR OU SI VOUS N’ACCEPTEZ PAS L’UTILISATION DES DONNÉES DE
GÉOLOCALISATION, LE CAS ÉCHÉANT, N’UTILISEZ PAS CETTE APPLICATION TIERCE.
Pour les utilisateurs de iPhone
Cette fonction est compatible avec les iPhone dotés d’iOS 6.0 ou version ultérieure.
Pour les utilisateurs de périphérique Android
Cette fonction est compatible avec les périphériques dotés d’Android OS 2.3 ou version ultérieure.
REMARQUE
PIONEER N’ASSUME AUCUNE RESPONSABILITÉ EN LIEN AVEC LES APPLICATIONS OU CONTENUS DE
TIERCE PARTIE, Y COMPRIS MAIS NON DE FAÇON LIMITATIVE, LEUR EXACTITUDE OU EXHAUSTIVITÉ. LE
CONTENU ET LA FONCTIONNALITÉ DE TELLES APPLICATIONS RELÈVENT DE L’ENTIÈRE RESPONSABILITÉ
DU FOURNISSEUR DE L’APPLICATION.
Recherche d’un fichier dans une liste 1 Appuyez sur pour afficher une liste.
2 Tournez la commande M.C. pour
sélectionner le nom de dossier souhaité,
puis appuyez pour confirmer.
3 Tournez la commande M.C. pour
sélectionner le fichier souhaité, puis
appuyez pour confirmer.
La lecture démarre.
Commutation du nom de périphérique
Bluetooth dans la liste de périphériques, en
fonction de l’ordre de connexion
Appuyez sur 1/ ou 2/.
Mode d’application
Objectif Opération

- 23 -- 23 -
Français
1 Connectez cet appareil avec le périphérique mobile.
• iPhone via USB (page 14)
• iPhone/Périphérique Android via Bluetooth (page 16)
2 Appuyez sur la commande M.C. pour afficher le menu principal.
3 Tournez la commande M.C. pour sélectionner [SYSTEM], puis appuyez pour
confirmer.
4 Tournez la commande M.C. pour sélectionner [PHONE CONNECT], puis appuyez
pour confirmer.
5 Tournez la commande M.C. pour sélectionner l’une des options ci-dessous, puis
appuyez pour confirmer.
• Sélectionnez [IPHONE] pour un iPhone.
• Sélectionnez [ANDROID] pour un périphérique Android.
6 Tournez la commande M.C. pour sélectionner l’une des options ci-dessous.
• Sélectionnez [WIRED] pour la connexion USB.
• Sélectionnez [BLUETOOTH] pour la connexion Bluetooth.
REMARQUE
Lorsque le réglage de connexion est modifié, un message s’affiche pour vous indiquer que le
réglage de connexion a été modifié. Appuyez sur la commande M.C. et tournez la commande M.C.
pour sélectionner [SRC OFF :YES], puis appuyez pour confirmer. L’appareil s’éteint
automatiquement et le réglage est exécuté.
7 Appuyez sur SRC/OFF pour sélectionner [APP].
8 Utilisez le périphérique mobile pour démarrer l’application.
REMARQUE
Lorsque vous connectez un périphérique mobile autre qu’un périphérique iPhone/Android,
sélectionnez [OTHERS] dans le menu [PHONE CONNECT] et sélectionnez [WIRED] (pour la connexion
USB) ou [BLUETOOTH] (pour la connexion Bluetooth). Selon votre périphérique mobile, il pourrait ne
pas fonctionner correctement.
Opérations de base
Vous pouvez effectuer divers ajustements dans les réglages FUNCTION (page 36).
Lecture d’une application au moyen de l’appareil
Objectif Opération
Sélection d’une plage Appuyez sur ou .
Avance ou retour rapide Appuyez de manière prolongée sur
ou .

- 24 -
Français
La radio Internet Pandora est un service musical qui n’est pas affilié à Pioneer. Des
informations supplémentaires sont disponibles sur le site http://www.pandora.com.
L’application mobile Pandora est disponible pour les téléphones iPhone et Android.
Veuillez visiter www.pandora.com/everywhere/mobile pour obtenir les plus récentes
informations de compatibilité.
Mettez à jour le micrologiciel de l’application Pandora avec la version la plus récente
avant l’utilisation.
1 Connectez cet appareil avec le périphérique mobile.
• iPhone via USB (page 14)
• iPhone/Périphérique Android via Bluetooth (page 16)
Si vous choisissez une connexion USB, passez à l’étape 6.
2 Appuyez sur SRC/OFF pour sélectionner [PANDORA].
3 Appuyez de manière prolongée sur 1/ pour afficher [PHONE CONNECT].
4 Tournez la commande M.C. pour sélectionner l’une des options ci-dessous, puis
appuyez pour confirmer.
• Sélectionnez [IPHONE] pour un iPhone.
• Sélectionnez [ANDROID] pour un périphérique Android.
5 Tournez la commande M.C. pour sélectionner [BLUETOOTH] pour un iPhone/
périphérique Android via Bluetooth.
REMARQUE
Lorsque le réglage de connexion est modifié, un message s’affiche pour vous indiquer que le
réglage de connexion a été modifié. Appuyez sur la commande M.C. et tournez la commande M.C.
pour sélectionner [SRC OFF :YES], puis appuyez pour confirmer. L’appareil s’éteint
automatiquement et le réglage est exécuté.
6 Appuyez sur SRC/OFF pour sélectionner [PANDORA].
7 Lancez l’application Pandora sur le périphérique mobile, puis démarrez la lecture.
Pause/reprise de lecture Appuyez sur BAND/.
Pandora®
Écoute de Pandora
Objectif Opération
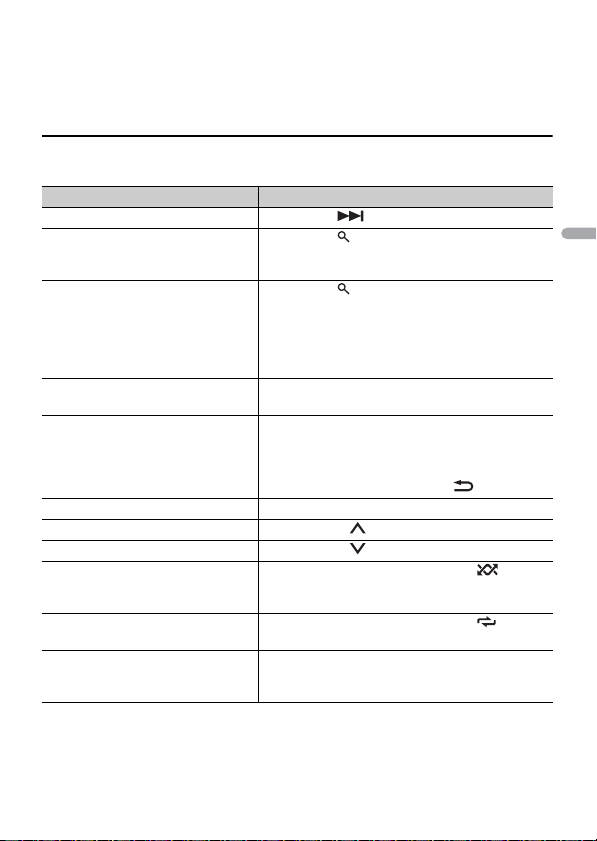
- 25 -- 25 -
Français
REMARQUE
Lorsque vous connectez un périphérique mobile autre qu’un périphérique iPhone/Android,
sélectionnez [OTHERS] dans le menu [PHONE CONNECT] et sélectionnez [WIRED] (pour la connexion
USB) ou [BLUETOOTH] (pour la connexion Bluetooth). Selon votre périphérique mobile, il pourrait ne
pas fonctionner correctement.
Opérations de base
Vous pouvez effectuer divers ajustements dans les réglages FUNCTION (page 36).
REMARQUE
Il pourrait être impossible de contrôler certaines fonctions de Pandora à partir de l’appareil.
Objectif Opération
Saut d’une plage Appuyez sur .
Commutation entre le mode
aléatoire et la station
Appuyez sur (liste), puis tournez la commande
M.C. pour sélectionner le mode aléatoire ou la
station souhaitée.
Modification de l’ordre de tri Appuyez sur (liste), puis sélectionnez l’une des
options suivantes.
[ABC] : Tri des éléments de la liste dans un ordre
alphabétique.
[DATE] : Tri des éléments de la liste par ordre de
date de création.
Lecture Après avoir sélectionné le mode aléatoire ou la
station, appuyez sur la commande M.C..
Suppression d’une station 1 Après avoir sélectionné la station, appuyez de
manière prolongée sur la commande M.C..
[DELETE YES] apparaît.
2 Appuyez sur la commande M.C..
Pour annuler, appuyez sur BAND/ à l’étape 1.
Pause/reprise de lecture Appuyez sur 4/PAUSE.
Évaluation positive Appuyez sur 1/.
Évaluation négative Appuyez sur 2/.
Création d’une nouvelle station
basée sur la plage en cours de
lecture
Appuyez de manière prolongée sur 5/.
Création d’une nouvelle station
basée sur l’artiste en cours de lecture
Appuyez de manière prolongée sur 6/.
Enregistrement des informations de
la plage en cours de lecture dans
votre compte Pandora.
1 Appuyez de manière prolongée sur 3/MIX.
[BOOKMARK] apparaît.
2 Appuyez sur la commande M.C..

- 26 -
Français
Spotify est un service de diffusion de musique en continu qui n’est pas affilié à Pioneer.
Des informations supplémentaires sont disponibles sur le site http://www.spotify.com.
L’application Spotify est disponible pour les téléphones intelligents compatibles;
veuillez visiter https://support.spotify.com/ pour obtenir les plus récentes informations
de compatibilité.
Pour apprécier Spotify pendant la conduite, téléchargez d’abord l’application Spotify sur
votre iPhone ou périphérique Android. Vous pouvez la télécharger depuis iTunes® App
Store® ou Google Play™. Choisissez un compte gratuit ou compte Premium payant, dans
l’application ou à partir de spotify.com. Un compte Premium vous offre davantage de
fonctions, telles que l’écoute hors ligne.
Important
• Ce produit intègre le logiciel Spotify qui est soumis aux licences de tierce partie disponibles sur cette
page : www.spotify.com/connect/third-party-licenses.
• Pour des informations sur les régions et les pays dans lesquels Spotify peut être utilisé, veuillez
consulter https://www.spotify.com/us/select-your-country/.
Mettez à jour le micrologiciel de l’application Spotify avec la version la plus récente
avant l’utilisation.
1 Connectez cet appareil avec le périphérique mobile.
• iPhone via USB (page 14)
• iPhone/Périphérique Android via Bluetooth (page 16)
Si vous choisissez une connexion USB, passez à l’étape 6.
2 Appuyez sur SRC/OFF pour sélectionner [SPOTIFY].
3 Appuyez de manière prolongée sur 1/ pour afficher [PHONE CONNECT].
4 Tournez la commande M.C. pour sélectionner l’une des options ci-dessous, puis
appuyez pour confirmer.
• Sélectionnez [IPHONE] pour un iPhone.
• Sélectionnez [ANDROID] pour un périphérique Android.
5 Tournez la commande M.C. pour sélectionner [BLUETOOTH] pour un iPhone/
périphérique Android via Bluetooth.
REMARQUE
Lorsque le réglage de connexion est modifié, un message s’affiche pour vous indiquer que le
réglage de connexion a été modifié. Appuyez sur la commande M.C. et tournez la commande M.C.
pour sélectionner [SRC OFF :YES], puis appuyez pour confirmer. L’appareil s’éteint
automatiquement et le réglage est exécuté.
Spotify®
Écoute de Spotify
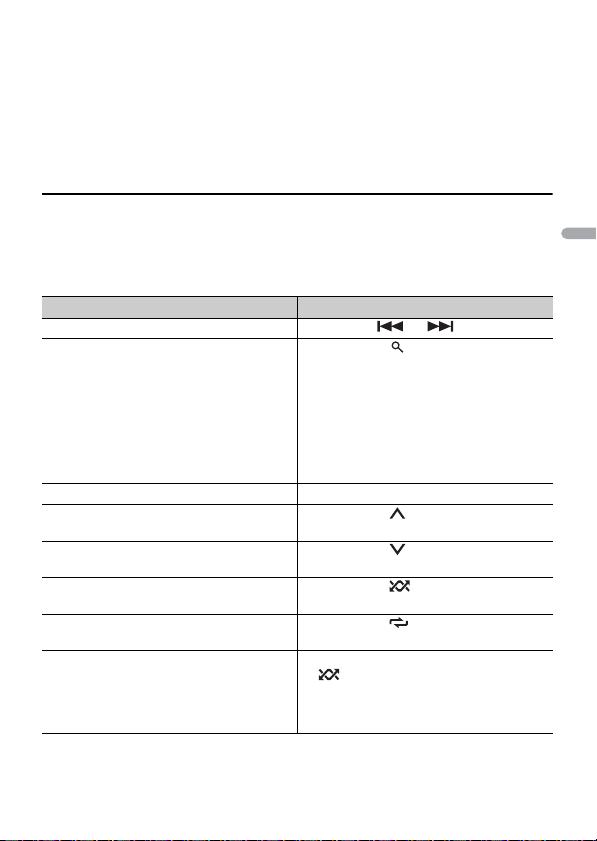
- 27 -- 27 -
Français
6 Appuyez sur SRC/OFF pour sélectionner [SPOTIFY].
7 Lancez l’application Spotify sur le périphérique mobile, puis démarrez la lecture.
REMARQUE
Lorsque vous connectez un périphérique mobile autre qu’un périphérique iPhone/Android,
sélectionnez [OTHERS] dans le menu [PHONE CONNECT] et sélectionnez [WIRED] (pour la connexion
USB) ou [BLUETOOTH] (pour la connexion Bluetooth). Selon votre périphérique mobile, il pourrait ne
pas fonctionner correctement.
Opérations de base
Vous pouvez effectuer divers ajustements dans les réglages FUNCTION (page 36).
REMARQUE
Les opérations disponibles pourraient varier en fonction du type de contenus (plage/album/artiste/
liste de lecture/radio) que vous souhaitez écouter.
Objectif Opération
Saut d’une plage Appuyez sur ou .
Recherche d’une plage dans une liste 1 Appuyez sur (liste) pour afficher la
liste.
2 Tournez la commande M.C. pour
sélectionner la catégorie souhaitée, puis
appuyez pour confirmer.
3 Tournez la commande M.C. pour
sélectionner le fichier souhaité, puis
appuyez pour confirmer.
La lecture démarre.
Pause/reprise de lecture Appuyez sur 4/PAUSE.
Évaluation positive (Uniquement pour la
radio)
Appuyez sur 1/.
Évaluation négative (Uniquement pour la
radio)
Appuyez sur 2/.
Lecture aléatoire (Uniquement pour un(e)
plage/album/artiste/liste de lecture)
Appuyez sur 5/.
Lecture répétée (Uniquement pour un(e)
plage/album/artiste/liste de lecture)
Appuyez sur 6/.
Démarrage d’un canal de radio basé sur la
chanson en cours de lecture.
1 Appuyez de manière prolongée sur 5/
pour démarrer un canal de radio.
2 Appuyez sur la commande M.C..
• Cette fonction pourrait ne pas être
disponible selon la chanson sélectionnée.

- 28 -
Français
REMARQUE
Il pourrait être impossible de contrôler certaines fonctions de Spotify à partir de l’appareil.
(Uniquement pour MVH-S600BS)
Seule la radio SiriusXM® vous permet d’écouter encore plus de chaînes que vous aimez,
le tout au même endroit. Obtenez plus de 140 canaux, y compris des chaînes musicales
sans publicité, ainsi que les meilleures émissions de sports, d’informations, de
discussion, d’humour et de divertissement. Bienvenue dans le monde de la radio
satellite. Syntonisateur de véhicule SiriusXM et abonnement requis. Pour plus
d’informations, visitez www.siriusxm.com
Replay™
Vous pouvez mettre en pause, faire reculer ou redémarrer la lecture de la radio satellite
en direct et du canal en cours d’écoute.
TuneStart™
Cette fonction permet de démarrer automatiquement les chansons à partir du début
lorsque vous syntonisez l’un de vos canaux musicaux présélectionnés enregistrés dans la
bande de présélections actuelle. Pour les détails, reportez-vous à TUNE START à la
page 38.
REMARQUE
TuneStart est compatible avec le SXV200 ou les modèles de syntonisateur ultérieurs. Non compatible
avec le SXV100.
TuneScan™
Cette fonction vous permet d’obtenir un court aperçu des chansons que vous n’avez pas
encore écoutées sur les canaux musicaux enregistrés dans la bande de présélections
actuelle.
Chaque chanson du canal en cours est audible pendant six secondes.
Pour les détails, reportez-vous à TUNE SCAN (balayage des chansons) à la page 38.
REMARQUE
TuneScan est compatible avec le SXV200 ou les modèles de syntonisateur ultérieurs. Non compatible
avec le SXV100.
TuneMix™
Création d’un canal musical en mélangeant des chansons provenant des canaux
musicaux enregistrés dans la bande de présélections actuelle. Pour les détails, reportez-
vous à TUNEMIX à la page 38.
Radio satellite SiriusXM
- 29 -- 29 -
Français
REMARQUE
TuneMix™ est compatible avec le SXV300 ou les modèles de syntonisateur ultérieurs. Non compatible
avec le SXV200 ou SXV100.
1 Appuyez sur SRC/OFF pour sélectionner [SIRIUSXM].
2 Appuyez sur / pour sélectionner le canal 0.
L’identifiant de radio s’affiche.
L’identifiant de radio est également indiqué sur la partie inférieure du syntonisateur
de véhicule SiriusXM Connect.
REMARQUE
L’identifiant de radio n’inclut pas les lettres I, O, S ou F.
3 Activez le service SiriusXM en ligne ou par téléphone.
Pour les abonnements aux États-Unis :
• Visitez www.siriusxm.com/activatenow
• Appelez le service à l’auditoire SiriusXM au 1-866-635-2349
Pour les abonnements au Canada :
• Visitez www.siriusxm.ca/activatexm
• Appelez au 1-877-438-9677
4 [SUBSCRIPTION UPDATED] s’affiche lorsque l’abonnement de votre syntonisateur
de véhicule SiriusXM Connect est correctement effectué.
Appuyez sur l’une des touches pour effacer le message d’activation.
REMARQUE
Le processus d’activation prend normalement entre 10 et 15 minutes, mais il pourrait nécessiter jusqu’à
une heure dans certains cas. N’éteignez pas l’appareil avant d’avoir effacé le message d’activation à
l’étape 4.
1 Appuyez de manière prolongée sur DISP, puis sélectionnez [CHANNEL].
Vous pouvez également sélectionner le mode de fonctionnement à l’aide des
réglages SiriusXM (page 37).
2 Appuyez sur SRC/OFF pour sélectionner [SIRIUSXM].
3 Appuyez sur BAND/ pour sélectionner la bande [SXM1], [SXM2] ou [SXM3].
4 Appuyez sur / pour sélectionner un canal.
Préparation pour le service de radio satellite
SiriusXM
Écoute d’un canal
- 30 -
Français
Le fait d’appuyer de manière prolongée sur l’une de ces touches permet de parcourir
les canaux rapidement.
Appuyez de manière prolongée sur l’une de ces touches, puis relâchez-la pour
effectuer la syntonisation automatiquement. Le balayage s’interrompt lorsque
l’appareil reçoit un canal. Pour annuler la syntonisation par recherche, appuyez sur
/.
Opérations de base
1
Appuyez de manière prolongée sur DISP pour sélectionner le mode de
fonctionnement [CHANNEL] ou [REPLAY].
REMARQUE
Vous pouvez quitter le mode de redémarrage de lecture en appuyant de manière prolongée sur BAND/
.
REMARQUE
Vous pouvez également effectuer divers ajustements dans les réglages SiriusXM (page 37).
Balayage de catégories
L’émission en direct sur chaque canal de la catégorie en cours est audible pendant six
secondes. Suivez les instructions ci-dessous.
Pour rechercher un canal dans une liste
1 Appuyez sur pendant la lecture.
2 Tournez la commande M.C. pour sélectionner une catégorie.
3 Sélectionnez une des opérations ci-dessous.
Objectif Opération
Sélection d’un canal 1 Réglez le mode de fonctionnement à
[CHANNEL].
2 Appuyez sur ou .
Le fait d’appuyer de manière prolongée sur
l’une de ces touches permet de parcourir
les canaux rapidement.
Saut vers l’avant/arrière 1 Réglez le mode de fonctionnement à
[REPLAY].
2 Appuyez sur ou .
Avance ou retour rapide 1 Réglez le mode de fonctionnement à
[REPLAY].
2 Appuyez de manière prolongée sur
ou .
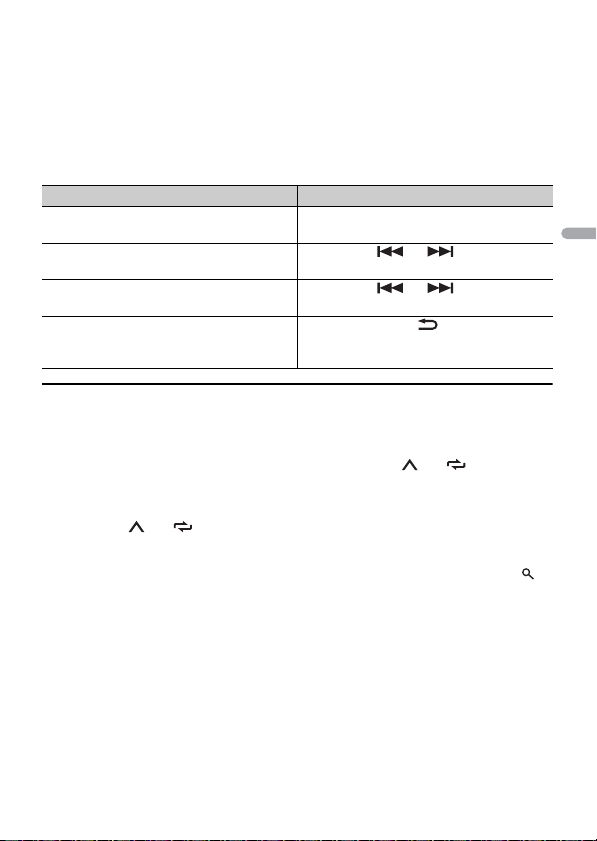
- 31 -- 31 -
Français
Catégorie balayage : appuyez de manière prolongée sur la commande M.C. pour
passer à la catégorie de balayage.
Recherche de canaux : Appuyez sur la commande M.C. pour arrêter un balayage.
REMARQUE
Appuyez sur DISP pour changer l’affichage des informations entre « Nom de canal », « Nom d’artiste », «
Titre de chanson », « Information de contenu » et « Numéro de canal ».
Options de balayage
Présélection de canal
Pour présélectionner un canal
1 Pendant la réception d’un canal que vous souhaitez enregistrer, appuyez de
manière prolongée sur l’une des touches numériques (1/ à 6/) jusqu’à ce
qu’elle cesse de clignoter.
Pour écouter les canaux enregistrés, sélectionnez la bande, puis appuyez sur une touche
numérique (1/ à 6/).
Pour présélectionner un canal dans la liste d’émissions
1 Pendant la réception d’un canal que vous souhaitez enregistrer, appuyez sur .
2 Tournez la commande M.C. pour sélectionner [PRESETS], puis appuyez pour
confirmer.
3 Tournez la commande M.C. pour sélectionner un canal présélectionné.
4 Appuyez de manière prolongée sur la commande M.C. pour l’enregistrer.
Pour écouter les canaux enregistrés, tournez la commande M.C. pour sélectionner un
canal présélectionné, puis appuyez pour confirmer.
Objectif Opération
Arrêt d’un balayage (sélection du canal ou
de la chanson en cours de lecture)
Appuyez sur la commande M.C..
Passage à la chanson suivante/précédente
pendant TuneScan
Appuyez sur ou .
Passage au canal suivant/précédent
pendant le balayage de catégories
Appuyez sur ou .
Annulation d’un balayage (Le dernier canal
ou la dernière plage continue d’être audible
lorsque le balayage s’arrête.)
Appuyez sur BAND/.

- 32 -
Français
Contrôle parental
Certains canaux SiriusXM proposent un contenu réservé aux adultes. Vous pouvez
verrouiller ces canaux. Pour les détails, consultez [PARENTAL CTRL] dans les réglages
SiriusXM (page 38).
Vous pouvez faire fonctionner l’appareil à partir de l’application Pioneer ARC APP
installée sur un iPhone/périphérique Android. Dans certains cas, vous pouvez contrôler
des éléments de l’application, notamment la sélection de source, la mise en pause, etc.,
en utilisant l’appareil.
Pour les détails sur les opérations disponibles dans l’application, consultez la section
d’aide de l’application.
ATTENTION
N’essayez pas de faire fonctionner l’application pendant que vous conduisez. Veillez à quitter la route et
stationner votre véhicule en lieu sûr avant d’essayer d’utiliser les commandes de l’application.
Pour les utilisateurs de iPhone
Cette fonction est compatible avec les iPhone (iPhone 5 ou modèle ultérieur) dotés
d’iOS 8.0 ou version ultérieure.
Vous pouvez télécharger Pioneer ARC APP depuis iTunes App Store.
Pour les utilisateurs de périphérique Android
Cette fonction est compatible avec les périphériques dotés d’Android OS 4.1 ou version
ultérieure; elle prend également en charge le profil AOA (Accessoire ouvert Android) 2.0.
Vous pouvez télécharger Pioneer ARC APP depuis Google Play.
REMARQUE
Certains périphériques Android connectés via AOA 2.0 pourraient ne pas fonctionner correctement ou
émettre des sons en raison de leur conception logicielle, indépendamment de la version OS.
1 Connectez cet appareil avec le périphérique mobile.
• iPhone/Périphérique Android via USB (page 14)
• iPhone/Périphérique Android via Bluetooth (page 16)
2 Appuyez sur la commande M.C. pour afficher le menu principal.
Utilisation de Pioneer ARC APP
Établissement d’une connexion avec Pioneer ARC
APP

- 33 -- 33 -
Français
3 Tournez la commande M.C. pour sélectionner [SYSTEM], puis appuyez pour
confirmer.
4 Tournez la commande M.C. pour sélectionner [PHONE CONNECT], puis appuyez
pour confirmer.
5 Tournez la commande M.C. pour sélectionner l’une des options ci-dessous, puis
appuyez pour confirmer.
• Sélectionnez [IPHONE] pour un iPhone.
• Sélectionnez [ANDROID] pour un périphérique Android.
REMARQUE
Lorsque le réglage de connexion est modifié, un message s’affiche pour vous indiquer que le
réglage de connexion a été modifié. Appuyez sur la commande M.C. et tournez la commande M.C.
pour sélectionner [SRC OFF :YES], puis appuyez pour confirmer. L’appareil s’éteint
automatiquement et le réglage est exécuté.
6 Tournez la commande M.C. pour sélectionner l’une des options ci-dessous.
Lorsque l’option [IPHONE] est sélectionnée à l’étape 5
• Sélectionnez [WIRED] pour la connexion USB.
• Sélectionnez [BLUETOOTH] pour la connexion Bluetooth.
Lorsque l’option [ANDROID] est sélectionnée à l’étape 5
• Sélectionnez [APP CONTROL] pour la connexion USB.
• Sélectionnez [BLUETOOTH] pour la connexion Bluetooth.
Lorsque vous sélectionnez la connexion USB, Pioneer ARC APP démarre
automatiquement sur le périphérique Android si [ON] est sélectionné dans [P.APP
AUTO ON] (page 43).
REMARQUE
Si l’application Pioneer ARC APP n’est pas installée sur votre périphérique Android, un message
vous invitant à installer l’application apparaîtra sur votre périphérique Android. Sélectionnez [OFF]
dans [P.APP AUTO ON] pour effacer le message (page 43).
7 Appuyez sur SRC/OFF pour sélectionner l’une des sources.
8 Lancez Pioneer ARC APP sur le périphérique mobile via la connexion USB.
Appuyez de manière prolongée sur la commande M.C. via la connexion
Bluetooth.
REMARQUE
Lorsque vous connectez un périphérique mobile autre qu’un périphérique iPhone/Android,
sélectionnez [OTHERS] dans le menu [PHONE CONNECT] et sélectionnez [WIRED] (pour la connexion
USB) ou [BLUETOOTH] (pour la connexion Bluetooth). Selon votre périphérique mobile, il pourrait ne
pas fonctionner correctement.
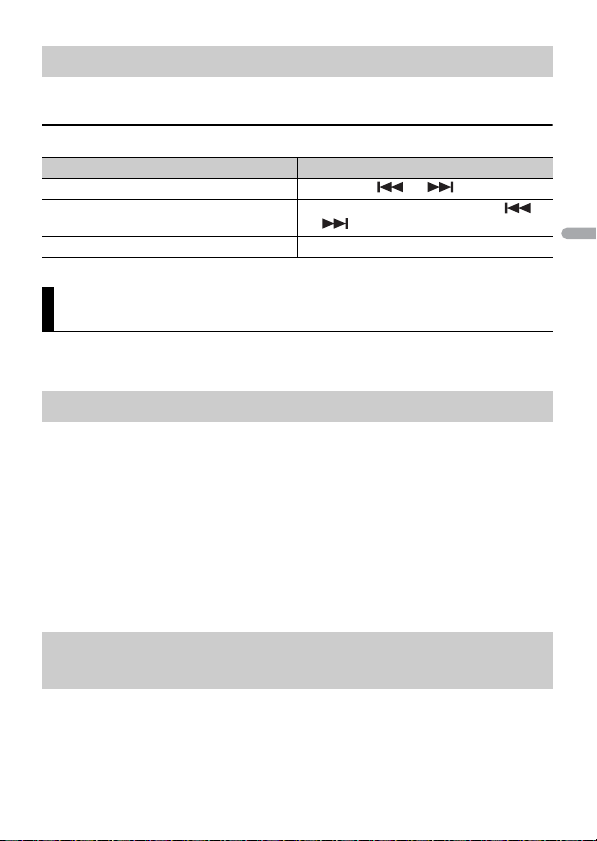
- 34 -
Français
1 Appuyez sur SRC/OFF pour sélectionner [ANDROID].
Opérations de base
(Le mode réseau est disponible uniquement pour le MVH-S600BS.)
Vous pouvez également effectuer divers ajustements dans les réglages AUDIO (page 39).
Cet appareil propose deux modes de fonctionnement : mode réseau et mode standard.
Vous pouvez alterner entre les modes, au besoin (page 10).
Mode réseau
Vous pouvez créer un système à amplificateurs et haut-parleurs multiples 2 voies +
extrêmes graves, constitué de haut-parleurs d’aigus, de médiums et d’extrêmes graves
pour la reproduction des fréquences (bandes) aiguës, moyennes et graves.
Mode standard
Vous pouvez créer un système à 4 haut-parleurs constitué de haut-parleurs avant et
arrière ou de haut-parleurs avant et d’extrêmes graves, ou encore un système à 6 haut-
parleurs constitué de haut-parleurs avant, arrière et d’extrêmes graves.
Vous pouvez régler la valeur de fréquence de coupure et la valeur de pente de chaque
haut-parleur.
Les haut-parleurs suivants peuvent être réglés.
Écoute de la musique sur Android
Objectif Opération
Sélection d’une plage Appuyez sur ou .
Avance ou retour rapide Appuyez de manière prolongée sur
ou .
Pause/reprise de lecture Appuyez sur 4/PAUSE.
Réglages audio
Modes de fonctionnement
Réglage de la valeur de fréquence de coupure et de
la valeur de pente

- 35 -- 35 -
Français
Mode réseau :
[HIGH] (haut-parleur d’aigus HPF), [MID HPF] (haut-parleur de médiums HPF), [MID LPF]
(haut-parleur de médiums LPF), [SUBWOOFER]
Mode standard :
[FRONT], [REAR], [SUBWOOFER]
REMARQUE
L’option [SUBWOOFER] peut être sélectionnée uniquement lorsque l’option [ON] est sélectionnée dans
[SUBWOOFER] (page 39).
1 Appuyez sur la commande M.C. pour afficher le menu principal.
2 Tournez la commande M.C. pour sélectionner [AUDIO], puis appuyez pour
confirmer.
3 Tournez la commande M.C. pour sélectionner [CROSSOVER], puis appuyez pour
confirmer.
4 Tournez la commande M.C. pour sélectionner l’unité de haut-parleur (filtre) à
régler, puis appuyez pour confirmer.
5 Tournez la commande M.C. pour sélectionner [HPF] ou [LPF] en fonction de
l’unité de haut-parleur (filtre), puis appuyez pour confirmer.
6 Tournez la commande M.C. pour sélectionner une fréquence de coupure
appropriée pour l’unité de haut-parleur (filtre) sélectionnée à l’étape 4, puis
appuyez pour confirmer.
Mode réseau :
[1.25K] à [12.5K] (si vous choisissez [HIGH] ou [MID LPF])
[25] à [250] (si vous choisissez [MID HPF] ou [SUBWOOFER])
Mode standard :
[25HZ] à [250HZ]
7 Tournez la commande M.C. pour sélectionner une pente appropriée pour l’unité
de haut-parleur (filtre) sélectionnée à l’étape 4.
Mode réseau :
[–6] à [–24] (si vous choisissez [HIGH], [MID HPF] ou [MID LPF])
[–12] à [–36] (si vous choisissez [SUBWOOFER])
Mode standard :
[–6] à [–24] (si vous choisissez [FRONT] ou [REAR])
[–6] à [–36] (si vous choisissez [SUBWOOFER])
- 36 -
Français
Vous pouvez ajuster divers réglages dans le menu principal.
1 Appuyez sur la commande M.C. pour afficher le menu principal.
2 Tournez la commande M.C. pour sélectionner l’une des catégories ci-dessous,
puis appuyez pour confirmer.
• Réglages FUNCTION (page 36)
• Réglages AUDIO (page 39)
• Réglages SYSTEM (page 41)
• Réglages ILLUMINATION (page 46)
• Réglages MIXTRAX (page 47)
3 Tournez la commande M.C. pour sélectionner les options, puis appuyez pour
confirmer.
Les options de menu varient en fonction de la source.
Réglages
Réglages FUNCTION
Option de menu Description
BSM
Enregistrement automatique des six stations au
signal le plus puissant sur les touches
numériques (1/ à 6/).
LOCAL
FM : [OFF], [LV1], [LV2], [LV3],
[LV4]
AM : [OFF], [LV1], [LV2]
Syntonisation de station restreinte en fonction
de l’intensité du signal.
SEEK
[MAN], [PCH] Attribution des touches ou pour
rechercher les stations une à une (syntonisation
manuelle) ou effectuer la sélection à partir des
canaux présélectionnés.
SAVE
Enregistrement des informations relatives à la
chanson en cours de lecture dans votre liste
musicale sur Spotify.
- 37 -- 37 -
Français
Réglages SiriusXM
(Uniquement pour MVH-S600BS)
UNSAVE
Suppression des informations de chanson
enregistrées dans [SAVE].
SEL DEVICE
Connexion d’un périphérique Bluetooth dans la
liste.
S.RTRV
[1] (efficace pour les taux de
compression faibles),
[2] (efficace pour les taux de
compression élevés),
[OFF]
Amélioration des signaux audio compressés et
restauration d’un son riche.
BOOKMARK
Enregistrement des informations de la plage en
cours de lecture dans votre compte Pandora.
NEW STATION
[FROM TRACK], [FROM ARTIST] Création d’une nouvelle station basée sur la
plage ou l’artiste en cours de lecture.
PAUSE
Pause ou reprise de lecture.
PLAY
Démarrage de la lecture.
STOP
Arrêt de la lecture.
Option de menu Description
PAUSE
Pause ou reprise de lecture.
OPERATE MODE
[CHANNEL], [REPLAY] Appuyez sur ou pour sélectionner un
canal ou effectuer un saut vers l’arrière/avant.
Option de menu Description
iPod
USB
iPod
AUX

- 38 -
Français
TUNEMIX
[ON], [OFF] Création d’un canal musical en mélangeant des
chansons provenant des canaux musicaux
enregistrés dans la bande de présélections
actuelle.
TUNE SCAN
Balayage des chansons dans vos présélections
de canaux musicaux.
TUNE START
[ON], [OFF] Démarrage de la lecture à partir du début d’une
chanson lors de la syntonisation d’un canal
musical présélectionné.
PARENTAL CTRL
[LOCKED CH], [CLEAR ALL], [EDIT
CODE]
Entrez le mot de passe actuel à l’écran
[PASSCODE] (le mot de passe par défaut est
0000).
1 Tournez la commande M.C. pour sélectionner
un numéro.
2 Appuyez sur la commande M.C. pour déplacer
le curseur à la position suivante.
3 Après avoir entré le mot de passe, appuyez sur
la commande M.C..
4 Tournez la commande M.C. pour sélectionner
l’une des options de menu suivantes, puis
appuyez pour confirmer.
• [LOCKED CH] : Verrouillage du canal actuel (à
l’exception du Canal 0 et du Canal 1), dont le
contenu est réservé aux adultes.
1 Appuyez sur la commande M.C. pour activer
ou désactiver le verrouillage.
• [CLEAR ALL] : Déverrouillage de tous les canaux
(à l’exception du Canal 0 et du Canal 1) dont
l’accès est restreint.
1 Tournez la commande M.C. pour passer à
[YES], puis appuyez pour confirmer.
• [EDIT CODE] : Modification du mot de passe.
1 Répétez les étapes 1 à 3 pour entrer un
nouveau mot de passe.
2 Après avoir entré le mot de passe, appuyez sur
la commande M.C..
Le nouveau mot de passe est enregistré.
Option de menu Description

- 39 -- 39 -
Français
(Le mode réseau est disponible uniquement pour le MVH-S600BS.)
Réglages AUDIO
Option de menu Description
EQ SETTING
[SUPER BASS], [POWERFUL],
[NATURAL], [VOCAL], [CUSTOM1],
[CUSTOM2], [FLAT]
Sélection d’une bande et d’un
niveau d’égaliseur pour apporter
des modifications.
Bande d’égaliseur : [50HZ] à
[12.5kHZ]
Niveau d’égaliseur : [–6] à [+6]
Sélection ou personnalisation de la courbe
d’égaliseur.
• Lorsque vous sélectionnez un réglage autre
que [CUSTOM1] ou [CUSTOM2], vous pouvez
également personnaliser la courbe d’égaliseur
en appuyant de manière prolongée sur la
commande M.C., puis enregistrer la courbe
d’égaliseur personnalisée dans [CUSTOM1].
FADER*1*2 (Uniquement pour le mode standard)
Réglage de l’équilibre entre les haut-parleurs
avant et arrière.
BALANCE
Réglage de l’équilibre entre les haut-parleurs
gauche et droit.
SUBWOOFER
[ON], [OFF] Réglez l’option à [ON] lors de l’utilisation d’un
haut-parleur d’extrêmes graves.
SUBWOOFER*3*4
[NOR], [REV] Sélection de la phase du haut-parleur d’extrêmes
graves.
SPEAKER LEVEL
Mode réseau : [HIGH L], [HIGH R],
[MID L], [MID R], [SUBWOOFER]
Mode standard : [FRONT L],
[FRONT R], [REAR L], [REAR R],
[SUBWOOFER]
Niveau de sortie : [–24] à [10]
Sélection d’une unité de haut-parleur (filtre) et
réglage du niveau de sortie.
• Chaque valeur que vous avez réglée est
modifiée lorsque vous modifiez le réglage
[POSITION] (page 40).
CROSSOVER
Sélection d’une unité de haut-parleur (filtre)
pour régler la fréquence de coupure HPF ou LPF
et la pente de chaque unité de haut-parleur.
Pour les détails sur le réglage [CROSSOVER],
consultez la page 34.

- 40 -
Français
POSITION
[OFF], [FRONT LEFT] (siège avant
gauche), [FRONT RIGHT] (siège
avant droit), [FRONT] (sièges
avant), [ALL]*
* Uniquement pour le mode
standard
Sélection d’une position d’écoute pour régler
automatiquement les niveaux de sortie des haut-
parleurs et ajouter un temps de retard
correspondant au nombre et aux emplacements
de sièges occupés.
TIME ALGNMNT
[INITIAL], [OFF], [CUSTOM]
Sélection d’un type de haut-
parleur et réglage de la distance
de haut-parleur pour apporter
des modifications dans
[CUSTOM].
Mode réseau : [HIGH L], [HIGH R],
[MID L], [MID R], [SUBWOOFER]
Mode standard : [FRONT L],
[FRONT R], [REAR L], [REAR R],
[SUBWOOFER]
Distance de haut-parleur (po) :
[140] à [0]
Sélection ou personnalisation des réglages
d’alignement temporel en fonction de la
distance entre la position d’écoute et chaque
haut-parleur.
• Sélectionnez [INITIAL] pour initialiser la valeur
de réglage.
• Sélectionnez [OFF] pour réinitialiser toutes les
valeurs de réglage à 0.
• Le réglage [CUSTOM] est disponible lorsque
l’option [FRONT LEFT] ou [FRONT RIGHT] est
sélectionnée dans [POSITION] (page 40).
• Le réglage [CUSTOM] n’est pas disponible
lorsque l’option [OFF] est sélectionnée dans
[SUBWOOFER] (page 39).
SAVE SETTINGS
[YES], [NO] Enregistrement pour rappel ultérieur des
réglages sonores suivants à leurs valeurs
actuelles : [CROSSOVER], [SPEAKER LEVEL], [EQ
SETTING], [POSITION], [TIME ALGNMNT],
[D.BASS], [SUBWOOFER].
LOAD SETTINGS
Chargement des réglages sonores, après
l’exécution de [SAVE SETTINGS].
D.BASS
[OFF], [LOW], [HI] Accentuation dynamique du niveau des graves
pour offrir un effet comparable à l’ajout d’un
haut-parleur d’extrêmes graves au système.
LOUDNESS
[OFF], [LOW], [MID], [HI] Compensation permettant d’obtenir un son clair
à un volume faible.
Option de menu Description

- 41 -- 41 -
Français
*1 Non disponible lorsque l’option [SW] est sélectionnée dans [REAR-SP] des réglages INITIAL
(page 11).
*2 Non disponible lorsque l’option [SUB.W/SUB.W] est sélectionnée dans [SP-P/O MODE] des réglages
INITIAL (page 12).
*3 Non disponible lorsque l’option [FUL] est sélectionnée dans [REAR-SP] des réglages INITIAL
(page 11).
*4 Non disponible lorsque l’option [REAR/REAR] est sélectionnée dans [SP-P/O MODE] des réglages
INITIAL (page 12).
Vous pouvez également accéder à ces menus lorsque l’appareil est éteint.
SLA
[+4] à [–4] Réglage du niveau de volume pour chaque
source, sauf FM.
Chacune des combinaisons ci-dessous est réglée
automatiquement au même réglage.
• Lors de l’établissement d’une connexion USB,
réglez USB, iPod, PANDORA, ANDROID, SPOTIFY
et APP.
• Lors de l’établissement d’une connexion
Bluetooth, réglez BT AUDIO, iPod, PANDORA,
ANDROID, SPOTIFY et APP.
Réglages SYSTEM
Option de menu Description
LANGUAGE
[ENG] (Anglais), [ESP] (Espagnol),
[FRA] (Français canadien)
Sélection de la langue d’affichage des
informations textuelles d’un fichier audio
compressé.
CLOCK SET
Réglage de l’horloge (page 10).
12H/24H
[12H], [24H] Sélection du format de l’heure.
BEEP TONE (Uniquement pour le mode standard)
[ON], [OFF] Un bip est émis lorsque vous appuyez sur l’une
des touches. Sélectionnez [OFF] pour désactiver
cette fonction.
Option de menu Description

- 42 -
Français
INFO DISPLAY (Uniquement pour MVH-S400BT)
[SOURCE/SPEANA], [CLOCK/
SPEANA], [SRC/LIVE FX], [CLOCK/
LIVE FX], [SOURCE], [SPEANA],
[OFF]
Affichage de l’élément dans la section des
informations secondaires.
• Lorsque l’option [SOURCE/SPEANA] ou [CLOCK/
SPEANA] est sélectionnée, affichage de
l’antenne à la place de l’analyseur de spectre
sur la source de radio.
INFO DISPLAY (Uniquement pour MVH-S600BS)
[SOURCE/BTINFO], [SOURCE/
SPEANA], [CLOCK/BTINFO],
[CLOCK/SPEANA], [LEVEL METER],
[SPEANA], [OFF]
Affichage de l’élément dans la section des
informations secondaires.
• Lorsque l’option [SOURCE/SPEANA] ou [CLOCK/
SPEANA] est sélectionnée, affichage de
l’antenne à la place de l’analyseur de spectre
sur la source de radio.
DOT DISPLAY (Uniquement pour MVH-S600BS)
[SPEANA], [ICON] Sélection de [SPEANA] ou [ICON] pour le côté
gauche de l’affichage.
AUX
[ON], [OFF] Réglez l’option à [ON] lors de l’utilisation d’un
périphérique auxiliaire connecté à l’appareil.
BT AUDIO
[ON], [OFF] Activation/désactivation du signal Bluetooth.
SPOTIFY
[ON], [OFF] Réglez l’option à [ON] lorsque vous utilisez la
fonction Spotify.
BT MEM CLEAR
[YES], [NO] Suppression des données de périphérique
Bluetooth (liste de périphériques, code NIP,
historique des appels, annuaire, numéros de
téléphone présélectionnés) enregistrées dans
l’appareil.
[CLEARED] s’affiche lorsque les données sont
correctement supprimées.
Option de menu Description

- 43 -- 43 -
Français
Informations sur les connexions de chaque périphérique
Les sources disponibles varient en fonction de la valeur de réglage.
Veuillez régler [PHONE CONNECT] en fonction du tableau de la source que vous
souhaitez utiliser.
Pour les détails sur la connexion Pioneer ARC APP, consultez la page 32.
Lorsque vous n’effectuez PAS la connexion Pioneer ARC APP
PHONE CONNECT
[IPHONE], [ANDROID], [OTHERS] Sélection du type de périphérique et de la
méthode de connexion appropriée en fonction
de votre périphérique.
Consultez la page 43 pour les détails sur les
connexions de chaque périphérique.
• Sélectionnez [OTHERS] lorsque vous connectez
un périphérique mobile autre qu’iPhone/
Android.
P. AP P AU TO O N
[ON], [OFF]
Sélectionnez [ON] pour lancer automatiquement
Pioneer ARC APP lorsqu’un périphérique Android
est connecté à l’appareil via AOA. (Uniquement
disponible lorsque l’option [APP CONTROL] est
sélectionnée dans [PHONE CONNECT].)
USB AUTO
[ON], [OFF] Sélectionnez [ON] pour passer
automatiquement à la source [USB] lorsqu’un
périphérique USB/iPhone est connecté à
l’appareil.
Sélectionnez [OFF] lorsqu’un périphérique USB/
iPhone est connecté à l’appareil seulement pour
la charge.
Valeur de réglage Périphériq
ue
Méthode de
connexion
Source(s)
disponible(s)
[WIRED]
(Lorsque l’option [IPHONE]
ou [OTHERS] est
sélectionnée)
iOS USB iPod, PANDORA, APP,
SPOTIFY
Bluetooth -
Android USB ANDROID (AOA)
Bluetooth -
Option de menu Description

- 44 -
Français
Lorsque vous effectuez la connexion Pioneer ARC APP
[USB MTP](MTP)
(Lorsque l’option
[ANDROID] est
sélectionnée)
iOS USB iPod, PANDORA, APP,
SPOTIFY
Bluetooth -
Android USB USB MTP
Bluetooth -
[APP CONTROL](AOA)
(Lorsque l’option
[ANDROID] est
sélectionnée)
iOS USB iPod, PANDORA, APP,
SPOTIFY
Bluetooth -
Android USB ANDROID (AOA)
Bluetooth -
[BLUETOOTH] iOS USB -
Bluetooth iPod, PANDORA, APP,
SPOTIFY
Android USB USB MTP
Bluetooth PANDORA, APP,
SPOTIFY
Valeur de réglage Périphériq
ue
Méthode de
connexion
Source(s)
disponible(s)
[WIRED]
(Lorsque l’option [IPHONE]
ou [OTHERS] est
sélectionnée)
iOS USB iPod, PANDORA,
SPOTIFY
Bluetooth -
Android USB ANDROID (Musique
Android)
Bluetooth -
[USB MTP](MTP)
(Lorsque l’option
[ANDROID] est
sélectionnée)
iOS USB iPod, PANDORA,
SPOTIFY
Bluetooth -
Android USB USB MTP
Bluetooth -
Valeur de réglage Périphériq
ue
Méthode de
connexion
Source(s)
disponible(s)

- 45 -- 45 -
Français
[APP CONTROL](AOA)
(Lorsque l’option
[ANDROID] est
sélectionnée)
iOS USB iPod, PANDORA,
SPOTIFY
Bluetooth -
Android USB ANDROID (Musique
Android)
Bluetooth -
[BLUETOOTH] iOS USB -
Bluetooth iPod, PANDORA,
SPOTIFY
Android USB USB MTP
Bluetooth PANDORA, ANDROID
(Musique Android),
SPOTIFY
Valeur de réglage Périphériq
ue
Méthode de
connexion
Source(s)
disponible(s)

- 46 -
Français
Réglages ILLUMINATION
Option de menu Description
COLOR (Uniquement pour MVH-S600BS)
[KEY COLOR], [DISP COLOR],
[BOTH COLOR]
Sélection de la couleur des touches/de
l’affichage de l’appareil à partir de 12 couleurs
présélectionnées, [SCAN] ou [CUSTOM]*.
• [SCAN] : Défilement automatique de diverses
couleurs.
• [CUSTOM]* :
1 Appuyez de manière prolongée sur la
commande M.C. jusqu’à ce que l’affichage du
réglage de couleur apparaisse.
2 Réglez la couleur primaire (R (rouge)/G (vert)/
B (bleu)) et le niveau de luminosité ([0] à [60]).
Vous ne pouvez pas sélectionner un niveau
inférieur à 10 pour les trois options R (rouge),
G (vert), B (bleu) en même temps.
Vous pouvez également personnaliser les
couleurs présélectionnées. Sélectionnez une des
couleurs présélectionnées, puis appuyez de
manière prolongée sur la commande M.C.
jusqu’à ce que l’affichage du réglage de couleur
apparaisse.
* Le réglage CUSTOM est disponible uniquement pour
[KEY COLOR] et [DISP COLOR].
DIM SETTING
[SYNC ILLUMI]*, [SYNC CLOCK],
[MANUAL]
* Uniquement pour MVH-S600BS
Modification de la luminosité de l’affichage.
BRIGHTNESS (Uniquement pour MVH-S600BS)
[KEY], [DISP] Sélection de la luminosité des touches/de
l’affichage de l’appareil, de [1] à [10].
Les plages de réglage disponibles varient en
fonction de [DIM SETTING].
BRIGHTNESS (Uniquement pour MVH-S400BT)
[1] à [10] Modification de la luminosité de l’affichage.
Les plages de réglage disponibles varient en
fonction de [DIM SETTING].

- 47 -- 47 -
Français
PHONE COLOR (Uniquement pour MVH-S600BS)
[FLASHING] Sélection de la couleur de touche lors de la
réception d’un appel.
Applique la couleur réglée à l’aide de [KEY
COLOR].
[FLASH FX1] à [FLASH FX6] Défilement automatique de diverses couleurs.
[OFF] Aucune modification n’est apportée à la couleur
de touche.
ILLUMI FX (Uniquement pour MVH-S600BS)
[ON], [OFF] L’effet d’illumination est visible lorsque :
–vous recevez un appel entrant
–vous parlez au téléphone
L’effet d’illumination s’active lorsque
l’alimentation ACC est activée/désactivée,
indépendamment de ce réglage.
Réglages MIXTRAX
Option de menu Description
SHORT PLAYBCK
[1.0 MIN], [1.5 MIN], [2.0 MIN],
[2.5 MIN], [3.0 MIN], [OFF]
Sélection de la durée de lecture.
FLASH AREA (Uniquement pour MVH-S600BS)
[KEY/DISPLAY], [KEY], [OFF] Sélection de la zone de l’effet d’illumination.
Lorsque l’option [OFF] est sélectionnée, la
couleur définie dans les réglages
ILLUMINATION (page 46) est utilisée comme
couleur d’affichage.
Option de menu Description

- 48 -
Français
FLASH PATTERN (Uniquement pour MVH-S600BS)
[SOUND LEVEL 1] à [SOUND LEVEL
6]
Modification de l’effet d’illumination en
fonction du niveau sonore et du niveau des
graves.
Le modèle de clignotement est modifié en
fonction du niveau sonore.
[LOW PASS 1] à [LOW PASS 6] Le modèle de clignotement est modifié en
fonction du niveau des graves.
[RANDOM1] Le modèle de clignotement est modifié de
manière aléatoire en fonction du mode de
niveau sonore et du mode passe-bas.
[RANDOM2] Le modèle de clignotement est modifié de
manière aléatoire en fonction du mode de
niveau sonore.
[RANDOM3] Le modèle de clignotement est modifié de
manière aléatoire en fonction du mode passe-
bas.
MIX PATTERN (Uniquement pour MVH-S400BT)
[SOUND LEVEL] Modification des effets spéciaux MIXTRAX en
fonction du niveau audio.
Le modèle de mixage est modifié en fonction
du niveau sonore.
[LOW PASS] Le modèle de mixage est modifié en fonction
du niveau des graves.
[RANDOM] Le modèle de mixage est modifié de manière
aléatoire en fonction du mode de niveau
sonore et du mode passe-bas.
DISPLAY FX
[ON], [OFF] Activation/désactivation des effets spéciaux
MIXTRAX.
CUT IN FX
[ON], [OFF] Activation/désactivation des effets spéciaux
MIXTRAX pendant le changement manuel des
plages.
Option de menu Description
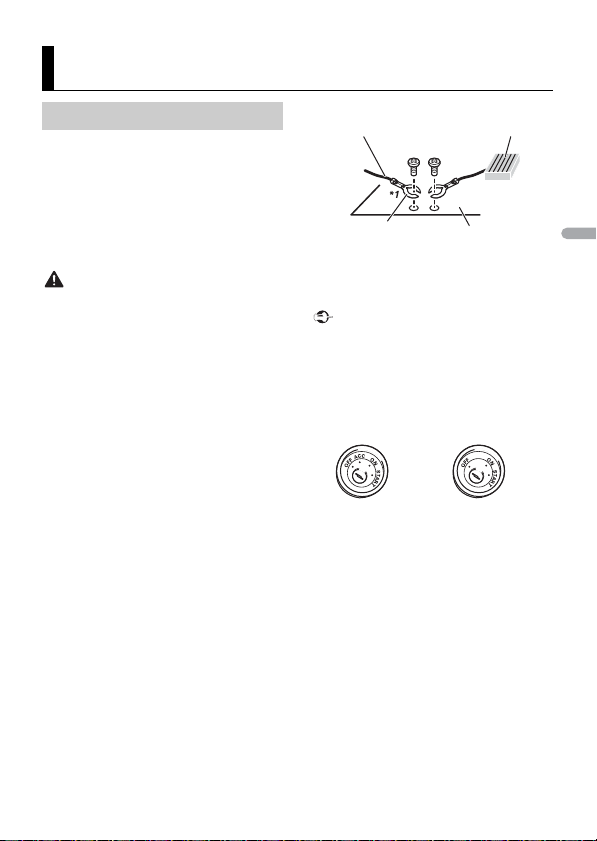
- 49 -
Français
(Le mode réseau est disponible
uniquement pour le MVH-S600BS.)
Dans la section suivante, « NW » représente
le mode réseau, et « STD », le mode
standard. En fonction des connexions
établies, changez le mode de haut-parleurs
au mode standard (STD) ou mode réseau
(NW) (page 10).
ATTENTION
• Lorsque la sortie de haut-parleur est
utilisée par 4 canaux, utilisez des haut-
parleurs de plus de 50 W (puissance
d’entrée maximale) et de 4 Ω à 8 Ω (valeur
d’impédance). N’utilisez pas de haut-
parleurs d’une impédance de 1 Ω à 3 Ω
avec cet appareil.
• Lorsque la sortie de haut-parleur arrière
est utilisée par un haut-parleur
d’extrêmes graves de 2 Ω, utilisez des
haut-parleurs de plus de 70 W (puissance
d’entrée maximale).
* Veuillez vous reporter aux connexions
pour connaître la méthode de connexion.
• Le câble noir est la masse. Lorsque vous
installez cet appareil ou un amplificateur
de puissance (vendu séparément),
assurez-vous de connecter le fil de masse
en premier. Assurez-vous que le fil de
masse est connecté correctement aux
parties métalliques de la carrosserie du
véhicule. Le fil de masse de
l’amplificateur de puissance et celui de
cet appareil ou de tout autre appareil
doivent être connectés au véhicule
séparément et avec des vis différentes. Si
la vis du fil de masse se desserre ou
tombe, il pourrait en résulter un incendie,
de la fumée ou un problème de
fonctionnement.
Important
• Lors de l’installation de cet appareil dans
un véhicule sans position ACC
(accessoire) sur le commutateur
d’allumage, le fait de ne pas connecter le
câble rouge à la borne détectant
l’utilisation de la clé de contact pourrait
entraîner le déchargement de la batterie.
• Utilisez cet appareil uniquement avec
une batterie 12 volts et une mise à la
masse négative. Le non-respect de cette
consigne pourrait entraîner un incendie
ou un problème de fonctionnement.
• Pour éviter un court-circuit, une
surchauffe ou un problème de
fonctionnement, assurez-vous de
respecter les instructions suivantes.
– Déconnectez la borne négative de la
batterie avant l’installation.
– Fixez le câblage avec des serre-câbles
ou du ruban adhésif. Pour protéger le
câblage, enroulez du ruban adhésif
Connexions/Installation
Connexions
Fil de masse
AMPLIFICATEUR
DE PUISSANCE
Autres appareils
(Autres appareils
électroniques dans le
véhicule)
Parties
métalliques de
la carrosserie
du véhicule
*1 Non fourni avec cet appareil
Avec position ACC Sans position ACC
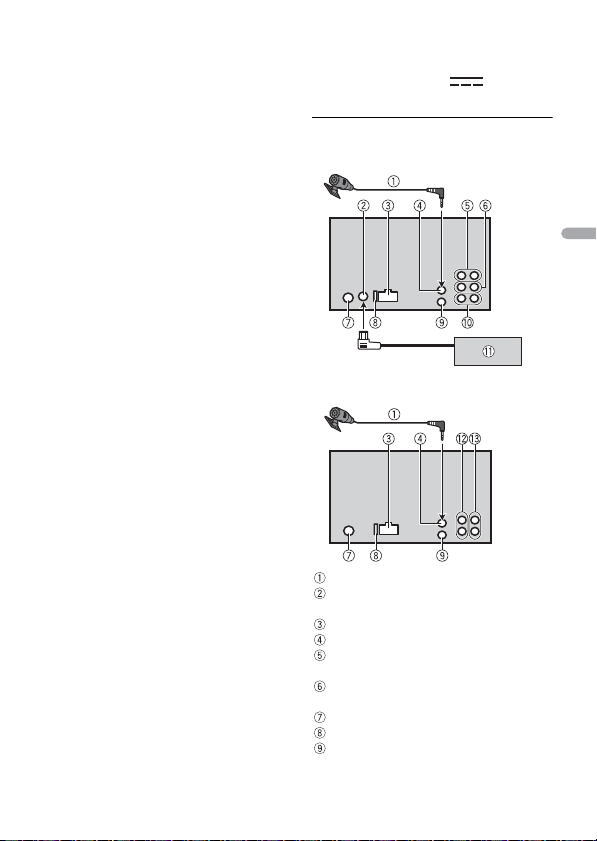
- 50 -
Français
autour des parties du câblage en
contact avec des pièces métalliques.
– Placez tous les câbles à distance des
pièces mobiles, telles que le levier de
vitesses et les rails des sièges.
– Placez tous les câbles à distance des
endroits chauds, tels que les
emplacements à proximité des sorties
de chauffage.
– Ne connectez pas le câble jaune à la
batterie en le faisant passer dans
l’ouverture du compartiment moteur.
– Recouvrez tous les connecteurs de
câbles qui ne sont pas connectés avec
du ruban isolant.
– Ne raccourcissez pas les câbles.
– Ne coupez jamais l’isolant du câble
d’alimentation de cet appareil afin de
partager l’alimentation avec d’autres
appareils. La capacité en courant du
câble est limitée.
–Utilisez un fusible correspondant aux
caractéristiques spécifiées.
– Ne reliez jamais le câble négatif du
haut-parleur directement à la masse.
– Ne réunissez jamais les câbles négatifs
de plusieurs haut-parleurs.
• Lorsque cet appareil est en marche, les
signaux de commande sont transmis via
le câble bleu/blanc. Connectez ce câble à
la télécommande de système d’un
amplificateur de puissance externe ou à
la borne de commande du relais
d’antenne automatique du véhicule
(max. 300 mA 12 V CC). Si le véhicule est
équipé d’une antenne intégrée dans une
vitre, connectez-la à la borne
d’alimentation de l’amplificateur
d’antenne.
• Ne connectez jamais le câble bleu/blanc
à la borne d’alimentation d’un
amplificateur de puissance externe. De
plus, ne le connectez jamais à la borne
d’alimentation de l’antenne automatique.
Sinon, il pourrait en résulter un
déchargement de la batterie ou un
problème de fonctionnement.
• Le symbole graphique placé sur le
produit signifie « courant continu ».
Cet appareil
Microphone 3 m
Entrée pour syntonisateur de véhicule
SiriusXM Connect
Entrée pour cordon d’alimentation
Entrée pour microphone
Sortie arrière (STD) ou sortie pour
médiums (NW)
Sortie avant (STD) ou sortie pour aigus
(NW)
Entrée pour antenne
Fusible (10 A)
Entrée pour télécommande câblée
MVH-S600BS
MVH-S400BT
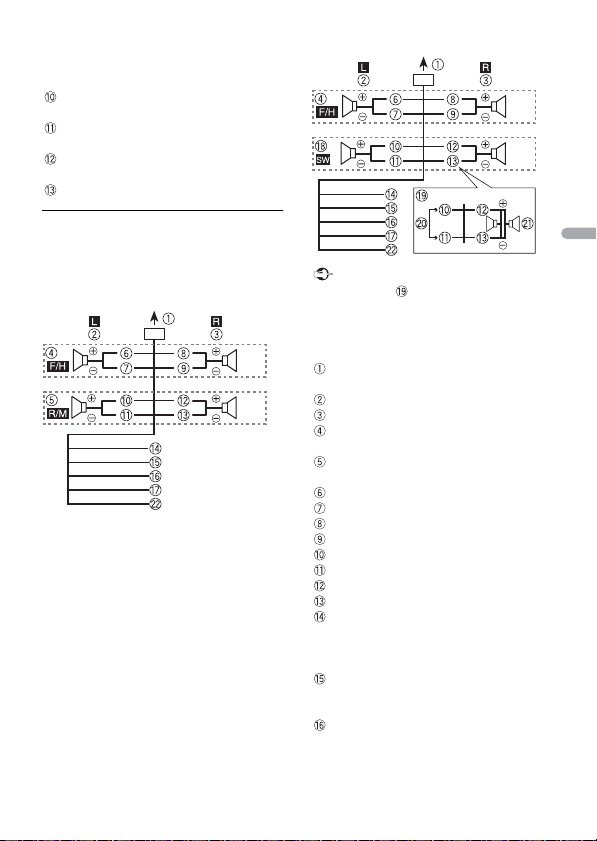
- 51 -
Français
Un adaptateur de télécommande
câblée (vendu séparément) peut être
connecté.
Sortie pour haut-parleur d’extrêmes
graves
Syntonisateur de véhicule SiriusXM
Connect (vendu séparément)
Sortie arrière ou sortie pour haut-
parleur d’extrêmes graves
Sortie avant
Cordon d’alimentation
Effectuez ces connexions lorsqu’aucun fil
de haut-parleur arrière ou haut-parleur de
médiums n’est connecté à un haut-parleur
d’extrêmes graves.
Effectuez ces connexions lors de
l’utilisation d’un haut-parleur d’extrêmes
graves sans l’amplificateur en option.
Important
Dans le cas de ci-dessus, deux haut-
parleurs d’extrêmes graves de 4 Ω câblés
en parallèle représentent une charge de
2Ω.
Vers l’entrée pour cordon
d’alimentation
Gauche
Droite
Haut-parleur avant (STD) ou haut-
parleur d’aigus (NW)
Haut-parleur arrière (STD) ou haut-
parleur de médiums (NW)
Blanc
Blanc/noir
Gris
Gris/noir
Vert
Vert/noir
Violet
Violet/noir
Noir (masse du châssis)
Connectez à un emplacement
métallique propre, non recouvert de
peinture.
Jaune
Connectez à la borne d’alimentation
12 V permanente.
Rouge
Connectez à la borne contrôlée par le
commutateur d’allumage (12 V CC).
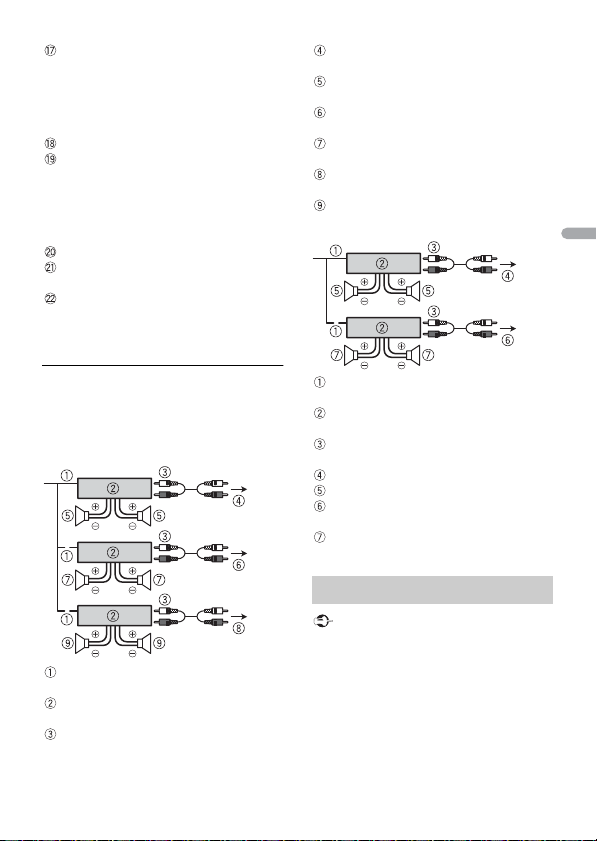
- 52 -
Français
Bleu/blanc
Connectez à la borne de commande du
système de l’amplificateur de puissance
ou à la borne de commande du relais
d’antenne automatique (max. 300 mA
12 V CC).
Haut-parleur d’extrêmes graves (4 Ω)
Lors de l’utilisation d’un haut-parleur
d’extrêmes graves de 2 Ω, assurez-vous
de connecter le haut-parleur d’extrêmes
graves aux fils violet et violet/noir de cet
appareil. Ne connectez aucun
équipement aux fils vert et vert/noir.
Non utilisé.
Haut-parleur d’extrêmes graves (4 Ω) ×
2
Orange/blanc (Uniquement pour MVH-
S600BS)
Connectez au signal d’illumination de la
voiture.
Amplificateur de puissance
(vendu séparément)
Effectuez ces connexions lors de
l’utilisation de l’amplificateur en option.
Télécommande de système
Connectez au câble bleu/blanc.
Amplificateur de puissance (vendu
séparément)
Connectez à l’aide de câbles RCA
(vendus séparément)
Vers la sortie arrière (STD) ou sortie pour
médiums (NW)
Haut-parleur arrière (STD) ou haut-
parleur de médiums (NW)
Vers la sortie avant (STD) ou sortie pour
aigus (NW)
Haut-parleur avant (STD) ou haut-
parleur d’aigus (NW)
Vers la sortie pour haut-parleur
d’extrêmes graves
Haut-parleur d’extrêmes graves
Télécommande de système
Connectez au câble bleu/blanc.
Amplificateur de puissance (vendu
séparément)
Connectez à l’aide de câbles RCA
(vendus séparément)
Vers la sortie avant
Haut-parleur avant
Vers la sortie arrière ou la sortie pour
haut-parleur d’extrêmes graves
Haut-parleur arrière ou haut-parleur
d’extrêmes graves
Important
• Vérifiez toutes les connexions et tous les
systèmes avant l’installation finale.
• N’utilisez pas de pièces non autorisées,
car il pourrait en résulter des problèmes
de fonctionnement.
• Consultez votre détaillant si l’installation
nécessite le perçage de trous ou d’autres
modifications du véhicule.
MVH-S600BS
Installation
MVH-S400BT

- 53 -
Français
• N’installez pas cet appareil dans les
endroits où :
– il risque de compromettre le
fonctionnement du véhicule.
– il pourrait blesser un passager en cas
d’arrêt soudain du véhicule.
• Installez cet appareil à distance des
endroits chauds, tels que les
emplacements à proximité des sorties de
chauffage.
• Des performances
optimales sont obtenues
lorsque l’appareil est
installé à un angle inférieur
à 60°.
• Lors de l’installation, pour assurer une
dispersion adéquate de la chaleur
pendant l’utilisation de cet appareil,
assurez-vous de laisser amplement
d’espace derrière la face arrière et
enroulez les câbles libres de façon à ce
qu’ils ne bloquent pas les orifices
d’aération.
1 Déterminez la position appropriée où
les trous du support sont alignés avec
les trous sur le côté de l’appareil.
2 Serrez les vis de chaque côté.
Vis
Support de montage
Tableau de bord ou console
• Utilisez des vis à tête bombée (5 mm ×
9 mm) ou des vis affleurantes (5 mm ×
9 mm), selon la forme des trous de vis
dans le support.
Le microphone doit être placé directement
devant le conducteur, à une distance
adéquate permettant de capter la voix
clairement.
PRÉCAUTION
Il est extrêmement dangereux de laisser le
fil du microphone s’enrouler autour de la
colonne de direction ou du levier de
vitesses. Assurez-vous d’installer le
microphone de manière à ce qu’il ne gêne
pas la conduite. Il est recommandé
d’utiliser des brides de fixation (vendues
séparément) pour acheminer le fil.
REMARQUE
Suivant le modèle de véhicule, la longueur
du câble de microphone peut être
insuffisante lorsque vous montez le
microphone sur le pare-soleil. Le cas
échéant, installez le microphone sur la
colonne de direction.
Laissez
amplement
d’espace
5cm
5cm
Installation du
microphone
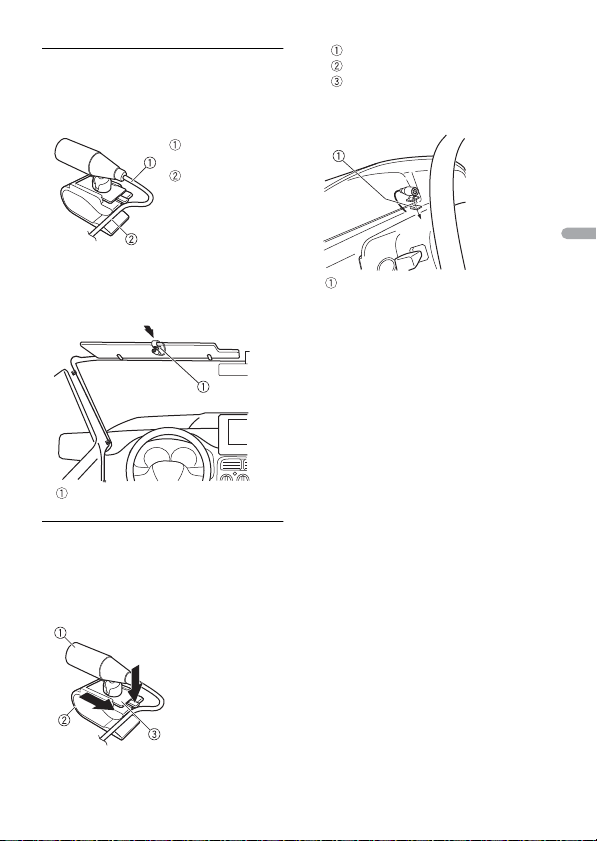
- 54 -
Français
Pour l’installation sur le pare-
soleil
1 Insérez le fil du microphone dans la
fente.
2 Installez le clip de microphone sur le
pare-soleil.
Abaisser le pare-soleil réduit le taux de
reconnaissance vocale.
Pour l’installation sur la colonne
de direction
1 Faites glisser la base du microphone
pour la détacher du clip de
microphone.
Microphone
Clip de microphone
Base du microphone
2 Installez le microphone sur la face
arrière de la colonne de direction.
Fil du
microphone
Fente
Clip de microphone
Ruban adhésif double face

- 55 -
Français
L’écran retourne automatiquement à
l’affichage normal.
→ Vous n’avez exécuté aucune opération
pendant 30 secondes.
–Effectuez une opération.
L’étendue de la lecture répétée change de
manière inattendue.
→ Selon l’étendue de la lecture répétée,
l’étendue sélectionnée pourrait changer
lors de la sélection d’un autre dossier ou
d’une autre plage ou pendant l’avance/
le retour rapide.
–Resélectionnez l’étendue de la lecture
répétée.
Un sous-dossier n’est pas lu.
→ Il est impossible de lire les sous-dossiers
lorsque l’option [FLD] (répétition du
dossier) est sélectionnée.
–Sélectionnez une autre étendue de
lecture répétée.
Le son est intermittent.
→ Vous utilisez un périphérique, tel qu’un
téléphone cellulaire, qui pourrait causer
des interférences sonores.
–Éloignez tous les appareils électriques
qui pourraient causer des
interférences.
Le son de la source audio Bluetooth n’est
pas audible.
→ Un appel est en cours sur un téléphone
cellulaire connecté via Bluetooth.
–Le son sera audible lorsque l’appel
sera terminé.
→ Un téléphone cellulaire connecté via
Bluetooth est en cours d’utilisation.
–Cessez d’utiliser le téléphone
cellulaire.
→ La connexion entre l’appareil et le
téléphone cellulaire n’est pas établie
correctement après un appel effectué à
l’aide d’un téléphone cellulaire
connecté via Bluetooth.
–Rétablissez la connexion Bluetooth
entre l’appareil et le téléphone
cellulaire.
Commun
AMP ERROR
→ Un problème de fonctionnement de
l’appareil s’est produit ou la connexion
des haut-parleurs est incorrecte.
→ Le circuit de protection est activé.
–Vérifiez la connexion des haut-
parleurs.
–Tournez le commutateur d’allumage à
OFF, puis ramenez-le à ON. Si le
message demeure affiché, contactez
votre détaillant ou un centre
d’entretien Pioneer agréé pour obtenir
de l’assistance.
NO XXXX (NO TITLE, par exemple)
→ Aucune information textuelle n’est
intégrée.
–Commutez l’affichage ou démarrez la
lecture d’une autre plage/d’un autre
fichier.
Périphérique USB/iPhone
FORMAT READ
→ Il y a parfois un délai entre le démarrage
de la lecture et le moment où le son est
audible.
Informations complémentaires
Dépannage
Messages d’erreur

- 56 -
Français
–Attendez que le message disparaisse
et que le son soit audible.
NO AUDIO
→ Il n’y a aucune chanson.
–Transférez les fichiers audio vers le
périphérique USB et procédez à la
connexion.
→ La sécurité est activée sur le
périphérique USB connecté.
–Suivez les instructions du
périphérique USB pour désactiver la
sécurité.
SKIPPED
→ Le périphérique USB connecté contient
des fichiers protégés par DRM.
–Les fichiers protégés sont ignorés.
PROTECT
→ Tous les fichiers sur le périphérique USB
connecté intègrent la protection par
DRM.
– Utilisez un autre périphérique USB.
N/A USB
→ Le périphérique USB connecté n’est pas
pris en charge par cet appareil.
–Déconnectez votre périphérique et
remplacez-le par un périphérique USB
compatible.
HUB ERROR
→ Le périphérique USB connecté via un
concentrateur USB n’est pas pris en
charge par cet appareil.
–Connectez le périphérique USB
directement à cet appareil en utilisant
un câble USB.
CHECK USB
→ Le connecteur USB ou le câble USB est
court-circuité.
–Vérifiez que le connecteur USB ou le
câble USB n’est pas coincé ou
endommagé.
→ La consommation du périphérique USB
est supérieure au courant maximal
autorisé.
–Déconnectez le périphérique USB et
ne l’utilisez pas. Tournez le
commutateur d’allumage à OFF, puis
ramenez-le à ACC ou ON. Connectez
uniquement des périphériques USB
compatibles.
→ Le iPhone fonctionne correctement
mais n’est pas chargé.
–Assurez-vous que le câble de
connexion du iPhone n’est pas court-
circuité (par exemple, qu’il n’est pas
coincé par des objets métalliques).
Après avoir vérifié, tournez le
commutateur d’allumage à OFF et
ramenez-le à ON, ou déconnectez le
iPhone et reconnectez-le.
ERROR-19
→ Échec de communication.
–Effectuez l’une des opérations
suivantes, puis retournez à la source
USB.
• Tournez le commutateur d’allumage
à OFF, puis ramenez-le à ON.
• Déconnectez le périphérique USB.
• Sélectionnez une autre source.
→ Défaillance du iPhone.
–Déconnectez le câble du iPhone.
Lorsque le menu principal du iPhone
s’affiche, reconnectez et réinitialisez le
iPhone.
ERROR-23
→ Le périphérique USB n’a pas été formaté
correctement.
–Formatez le périphérique USB avec
FAT12, FAT16 ou FAT32.
ERROR-16
→ La version de micrologiciel du iPhone
n’est pas récente.
–Mettez à jour la version du iPhone.
→ Défaillance du iPhone.
- 57 -
Français
–Déconnectez le câble du iPhone.
Lorsque le menu principal du iPhone
s’affiche, reconnectez et réinitialisez le
iPhone.
STOP
→ Aucune chanson dans la liste en cours.
– Sélectionnez une liste qui contient des
chansons.
NO BT DEVICE GO TO BT MENU TO
REGISTER
→ Aucun périphérique Bluetooth trouvé.
–Connectez l’appareil et le iPhone via
Bluetooth (page 16).
CONN. FAILED PRESS BAND KEY TO
RETRY
→ Échec de connexion Bluetooth avec
iPhone.
–Appuyez sur BAND/ pour établir
une connexion à nouveau.
DISCONNECTED PRESS BAND KEY TO
RETRY
→ Échec de connexion Bluetooth avec
iPhone.
–Appuyez sur BAND/ pour établir
une connexion à nouveau.
Périphérique Bluetooth
ERROR-10
→ Coupure de l’alimentation au niveau du
module Bluetooth de l’appareil.
–Tournez le commutateur d’allumage à
OFF, puis ramenez-le à ACC ou ON.
Pandora
ERROR-19
→ Échec de communication.
–Déconnectez le câble du
périphérique. Lorsque le menu
principal du périphérique s’affiche,
reconnectez et réinitialisez le
périphérique.
NOT FOUND
→ L’application Pandora n’a pas encore
démarré.
–Démarrez l’application Pandora.
RATING ERROR
→ L’opération d’évaluation est désactivée.
–Exécutez la même commande pour
une autre plage.
CAN'T SKIP
→ L’opération de saut est désactivée.
–Exécutez la même commande pour
une autre plage.
THUMB ERROR
→ Impossible d’enregistrer une évaluation.
–Réessayez plus tard.
BOOKMARK ERR
→ Impossible d’enregistrer un signet.
–Réessayez plus tard.
UNABLE TO ADD
→ Impossible d’ajouter une station.
–Réessayez plus tard.
SKIP LIMIT
→ En raison de restrictions liées aux
licences musicales, Pandora limite le
nombre total de sauts par heure.
–Attendez que Pandora vous permette
à nouveau d’effectuer des sauts.
UPDATE APP
→ Cette version de l’application Pandora
n’est pas prise en charge.
–Connectez un périphérique dont la
version de l’application Pandora
installée est compatible.
LOG IN ERROR
→ Vous n’êtes pas connecté à votre
compte Pandora.
–Déconnectez le câble du
périphérique, puis connectez-vous à
votre compte Pandora. Reconnectez
ensuite le périphérique.

- 58 -
Français
ERROR
→ Message d’erreur de périphérique
affiché dans l’application Pandora.
–Vérifiez le périphérique connecté.
→ Le système Pandora est en cours de
maintenance.
–Réessayez plus tard.
NO STATIONS
→ Aucune station trouvée.
–Créez une station dans l’application
Pandora sur votre périphérique
connecté.
NO BT DEVICE GO TO BT MENU TO
REGISTER
→ Aucun périphérique Bluetooth trouvé.
–Connectez l’appareil et le
périphérique via Bluetooth (page 16).
CONN. FAILED PRESS BAND KEY TO
RETRY
→ Échec de connexion Bluetooth.
–Appuyez sur BAND/ pour établir
une connexion à nouveau.
CHECK APP PRESS BAND KEY TO RETRY
→ Échec de connexion à l’application
Pandora.
–Appuyez sur BAND/ pour établir
une connexion à nouveau.
DISCONNECTED PRESS BAND KEY TO
RETRY
→ Connexion Bluetooth perdue.
–Appuyez sur BAND/ pour établir
une connexion à nouveau.
STATION LIMIT
→ Impossible d’ajouter une nouvelle
station.
–Supprimez une ancienne station afin
de libérer un emplacement pour une
nouvelle.
CANNOT DELETE
→ La station n’a pas pu être supprimée.
–Exécutez la même commande pour
une autre station.
BAD NETWORK
→ Le périphérique connecté est hors de la
zone de couverture.
–Connectez le périphérique à un
réseau.
UNAVAILAVLE
→ Le périphérique connecté est hors de la
zone de couverture.
–Connectez le périphérique à un
réseau.
→ L’opération est désactivée.
–Exécutez la même commande pour
une autre station.
APP
NO BT DEVICE GO TO BT MENU TO
REGISTER
→ Aucun périphérique Bluetooth trouvé.
–Connectez l’appareil et le
périphérique via Bluetooth (page 16).
CONN. FAILED PRESS BAND KEY TO
RETRY
→ Échec de connexion Bluetooth.
–Appuyez sur BAND/ pour établir
une connexion à nouveau.
DISCONNECTED PRESS BAND KEY TO
RETRY
→ Échec de connexion Bluetooth.
–Appuyez sur BAND/ pour établir
une connexion à nouveau.
CHECK APP
→ Échec de connexion à l’application.
–Suivez les instructions qui s’affichent à
l’écran.
NOT FOUND
→ L’application n’a pas encore démarré.
–Utilisez le périphérique mobile pour
démarrer l’application.
- 59 -
Français
Spotify
NO BT DEVICE GO TO BT MENU TO
REGISTER
→ Aucun périphérique Bluetooth trouvé.
–Connectez l’appareil et le
périphérique via Bluetooth (page 16).
CONN. FAILED PRESS BAND KEY TO
RETRY
→ Échec de connexion Bluetooth.
–Appuyez sur BAND/ pour établir
une connexion à nouveau.
CHECK APP PRESS BAND KEY TO RETRY
→ Échec de connexion à l’application
Spotify.
–Appuyez sur BAND/ pour établir
une connexion à nouveau.
DISCONNECTED PRESS BAND KEY TO
RETRY
→ Connexion Bluetooth perdue.
–Appuyez sur BAND/ pour établir
une connexion à nouveau.
CHECK APP
→ Échec de connexion à l’application
Spotify.
–Suivez les instructions qui s’affichent à
l’écran.
Radio satellite SiriusXM
(Uniquement pour MVH-
S600BS)
CHECK ANTENNA
→ Le câble d’antenne pourrait être
déconnecté ou endommagé.
–Vérifiez la connexion de l’antenne ou
remplacez-la en cas de dommage.
CHECK TUNER
→ La radio rencontre des problèmes de
communication avec le syntonisateur
de véhicule SiriusXM Connect. Le
syntonisateur pourrait être déconnecté
ou endommagé.
–Vérifiez que le câble du syntonisateur
de véhicule SiriusXM Connect est
correctement connecté à la radio.
NO SIGNAL
→ Le syntonisateur de véhicule SiriusXM
Connect rencontre des problèmes de
réception du signal satellite SiriusXM.
–Vérifiez que votre véhicule se trouve à
l’extérieur et que l’horizon au sud est
dégagé.
–Vérifiez que l’antenne à montage
magnétique SiriusXM est installée sur
une surface métallique à l’extérieur du
véhicule.
–Éloignez l’antenne SiriusXM de tout
obstacle.
SUBSCRIPTION UPDATED
→ Cet appareil a détecté un changement
de l’état de votre abonnement à
SiriusXM.
–Appuyez sur l’une des touches pour
effacer le message.
CH UNAVAIL
→ Le canal que vous avez demandé n’est
pas disponible.
–Vérifiez la liste des canaux SiriusXM
disponibles.
CHAN UNSUB
→ Le canal que vous avez demandé n’est
pas inclus dans votre abonnement à
SiriusXM.
–Vérifiez le contenu de votre
abonnement à SiriusXM.
CH LOCKED
→ Le canal est verrouillé par la fonction
Contrôle parental.
– Réglez [LOCKED CH] à [OFF] ou [CLEAR
ALL] à [YES] dans les réglages
FUNCTION (page 38).
- 60 -
Français
NO TUNEMIX CH
→ Il n’y a qu’un seul canal musical dans la
bande.
–Sélectionnez une bande comportant
au moins deux canaux musicaux.
–Ajoutez d’autres canaux musicaux
dans la bande actuelle.
Périphérique de stockage USB
• Les connexions au moyen d’un
concentrateur USB ne sont pas prises en
charge.
• Fixez fermement le périphérique de
stockage USB avant la conduite. Ne
laissez pas le périphérique de stockage
USB tomber sur le plancher, où il pourrait
gêner le bon fonctionnement de la
pédale de frein ou d’accélérateur.
• Selon le périphérique de stockage USB,
les problèmes suivants pourraient
survenir.
– Le fonctionnement peut varier.
– Le périphérique de stockage pourrait ne
pas être reconnu.
– Les fichiers pourraient ne pas être lus
correctement.
– Le périphérique pourrait générer des
interférences sonores lorsque vous
écoutez la radio.
iPhone
• Ne laissez pas le iPhone dans un endroit
soumis à une température élevée.
• Fixez fermement le iPhone lors de la
conduite. Ne laissez pas le iPhone tomber
sur le plancher, où il pourrait gêner le bon
fonctionnement de la pédale de frein ou
d’accélérateur.
• Les données de texte incompatibles
enregistrées sur le iPhone ne seront pas
affichées par cet appareil.
• Seuls les 32 premiers caractères d’un
nom de fichier (incluant l’extension de
fichier) ou d’un nom de dossier peuvent
être affichés.
• L’appareil pourrait ne pas fonctionner
correctement, selon l’application utilisée
pour encoder les fichiers WMA.
• Il pourrait se produire un léger retard au
début de la lecture de fichiers audio
intégrant des données d’image ou de
fichiers audio stockés sur un périphérique
USB avec de nombreuses hiérarchies de
dossiers.
PRÉCAUTION
• Pioneer ne peut garantir la compatibilité
avec tous les périphériques de stockage
de masse USB et décline toute
responsabilité en cas de perte de
données sur des lecteurs multimédias,
téléphones intelligents ou autres
périphériques lors de l’utilisation de cet
appareil.
• Ne laissez pas un périphérique USB dans
un endroit où les températures sont
élevées.
Fichiers WMA
Conseils sur la
manipulation
Formats audio
compressés compatibles
Extension de fichier .wma
Débit binaire 48 kbit/s à 320 kbit/s
(CBR), 48 kbit/s à
384 kbit/s (VBR)
Fréquence
d’échantillonnage
32 kHz, 44,1 kHz,
48 kHz
Windows Media™
Audio Professional,
sans perte, flux voix/
DRM ou flux avec
vidéo
Non compatible

- 61 -
Français
Fichiers MP3
Fichiers WAV
• Vous ne pouvez pas utiliser les formats de
fichier WAV avec la connexion via MTP.
Fichiers AAC
Fichiers FLAC
• Vous ne pouvez pas utiliser les formats de
fichier FLAC avec la connexion via MTP.
• Les fichiers FLAC pourraient être illisibles,
selon le type d’encodeur.
Périphérique USB
• Il pourrait se produire un léger retard au
début de la lecture de fichiers audio sur
un périphérique de stockage USB avec de
nombreuses hiérarchies de dossiers.
Cet appareil prend en charge uniquement les
modèles de iPhone suivants. Les versions de
logiciel iPhone prises en charge sont indiquées
ci-dessous. Les versions antérieures pourraient
ne pas être prises en charge.
Conçu pour
–iPhone 7
–iPhone 7 Plus
–iPhone SE
–iPhone 6s
Extension de fichier .mp3
Débit binaire 8 kbit/s à 320 kbit/s
(CBR), VBR
Fréquence
d’échantillonnage
8kHz à 48kHz
(32 kHz, 44,1 kHz,
48 kHz pour
accentuation)
Version d’étiquette
ID3 compatible
1.0, 1.1, 2.2, 2.3, 2.4 (la
version 2.x de
l’étiquette ID3 a
priorité sur la
version 1.x.)
Liste de lecture m3u Non compatible
MP3i (MP3 interactif),
mp3 PRO
Non compatible
Extension de fichier .wav
Bits de quantification 8 et 16 (LPCM), 4 (MS
ADPCM)
Fréquence
d’échantillonnage
16 kHz à 48 kHz
(LPCM), 22,05 kHz et
44,1 kHz (MS ADPCM)
Format compatible AAC encodé par
iTunes
Extension de fichier .m4a
Fréquence
d’échantillonnage
11,025 kHz à 48 kHz
Débit de transmission 16 kbit/s à 320 kbit/s,
VBR
Apple sans perte Non compatible
Fichier AAC acheté
dans la boutique
iTunes (extension de
fichier .m4p)
Non compatible
Extension de fichier .flac
Fréquence
d’échantillonnage
8/11,025/12/16/22,05/
24/32/44,1/48/96 kHz
Débit binaire de
quantification
16/24 bits
Mode de canal 1 canal/2 canaux
Hiérarchie des
dossiers pouvant être
lus
Jusqu’à huit niveaux
(Dans la pratique, la
hiérarchie compte
moins de deux
niveaux.)
Dossiers pouvant être
lus
Jusqu’à 1 500
Fichiers pouvant être
lus
Jusqu’à 15 000
Lecture des fichiers
protégés par des
droits d’auteur
Non compatible
Périphérique USB
partitionné
Seule la première
partition peut être lue.
Compatibilité iPhone
- 62 -
Français
–iPhone 6s Plus
–iPhone 6
–iPhone 6 Plus
–iPhone 5s
–iPhone 5c
–iPhone 5
• Certaines fonctions pourraient ne pas
être disponibles, selon la génération et/
ou la version de logiciel du iPhone.
• Les utilisateurs d’un iPhone avec
connecteur Lightning® doivent utiliser le
câble Lightning vers USB (fourni avec le
iPhone).
• Reportez-vous aux manuels du iPhone
pour obtenir des informations sur la
compatibilité des fichiers/formats.
• Livre audio, fichier balado : Compatible
PRÉCAUTION
Pioneer n’accepte aucune responsabilité
en cas de perte de données sur le iPhone,
même si la perte de données se produit
pendant l’utilisation de cet appareil.
Sur cet appareil, l’utilisateur ne peut pas
attribuer de numéros de dossier ni
spécifier les séquences de lecture. La
séquence des fichiers audio varie en
fonction du périphérique connecté.
Veuillez noter que la lecture des fichiers
cachés sur un périphérique USB est
impossible.
Exemple de hiérarchie
Bluetooth
La marque de mot et les logos Bluetooth® sont
des marques déposées appartenant à Bluetooth
SIG, Inc. et toute utilisation de ces marques par
PIONEER CORPORATION est faite sous licence.
Les autres marques de commerce ou noms
commerciaux sont la propriété de leur
propriétaire respectif.
iTunes
Apple et iTunes sont des marques
commerciales d’Apple Inc., enregistrées
aux États-Unis et dans d’autres pays.
WMA
Windows Media est une marque déposée
ou une marque commerciale de Microsoft
Corporation aux États-Unis et/ou dans
d’autres pays.
Ce produit intègre une technologie
détenue par Microsoft Corporation, qui ne
peut être utilisée et distribuée que sous
licence de Microsoft Licensing, Inc.
FLAC
Droit d’auteur © 2000-2009 Josh Coalson
Droit d’auteur © 2011-2014 Xiph.Org
Foundation
Séquence des fichiers
audio
Droits d’auteur et
marques de commerce
Dossier
Fichier audio
compressé
à : Séquence de lecture
01 à 05 : Numéro de dossier

- 63 -
Français
La redistribution et l’utilisation sous formes
binaire et source, avec ou sans
modification, sont permises sous réserve
des conditions suivantes :
–Les redistributions du code source
doivent conserver l’avis de droit d’auteur
ci-dessus, cette liste de conditions et la
renonciation suivante.
–Les redistributions sous forme binaire
doivent reproduire l’avis de droit d’auteur
ci-dessus, cette liste de conditions et la
renonciation suivante dans la
documentation et/ou tout autre matériel
fourni lors de la distribution.
–Ni le nom de la Xiph.org Foundation ni les
noms de ses contributeurs ne doivent
être utilisés pour endosser ou
promouvoir les produits dérivés de ce
logiciel sans autorisation écrite préalable.
CE LOGICIEL EST FOURNI « TEL QUEL » PAR
LES DÉTENTEURS DE DROITS D’AUTEUR ET
LES CONTRIBUTEURS, ET TOUTES LES
GARANTIES EXPRESSES OU IMPLICITES, Y
COMPRIS, SANS EN EXCLURE D’AUTRES, LES
GARANTIES IMPLICITES DE VALEUR
MARCHANDE ET D’ADAPTATION À UN
USAGE PARTICULIER SONT DÉCLINÉES. LA
FONDATION OU LES CONTRIBUTEURS NE
SERONT EN AUCUN CAS RESPONSABLES
DES DOMMAGES DIRECTS, INDIRECTS,
ACCESSOIRES, SPÉCIAUX, EXEMPLAIRES OU
CONSÉCUTIFS (Y COMPRIS, SANS EN
EXCLURE D’AUTRES,
L’APPROVISIONNEMENT DE BIENS OU DE
SERVICES DE REMPLACEMENT; LA PERTE
D’UTILISATION, DE DONNÉES OU DE
PROFITS; OU L’INTERRUPTION D’ACTIVITÉS
COMMERCIALES) QUELLES QU’EN SOIENT
LA CAUSE ET LA THÉORIE DE
RESPONSABILITÉ, PAR CONTRAT,
RESPONSABILITÉ STRICTE OU DÉLIT CIVIL
(Y COMPRIS LA NÉGLIGENCE OU AUTRE)
DÉCOULANT DE QUELQUE FAÇON QUE CE
SOIT DE L’UTILISATION DE CE LOGICIEL,
MÊME S’ILS ÉTAIENT INFORMÉS DE LA
POSSIBILITÉ DE TELS DOMMAGES.
iPhone et Lightning
L’utilisation du badge Conçu pour Apple
signifie qu’un accessoire a été conçu pour
être connecté spécifiquement à un ou
plusieurs produit(s) Apple identifié(s) dans
le badge, et qu’il a été certifié par le
développeur comme étant conforme aux
normes de performance d’Apple. Apple
n’est pas responsable du fonctionnement
de cet appareil, ni de sa conformité aux
normes sécuritaires et réglementaires.
Veuillez noter que l’utilisation de cet
accessoire avec un produit Apple peut
affecter la qualité de la communication
sans fil.
iPhone et Lightning sont des marques de
commerce d’Apple Inc., déposées aux
États-Unis et dans d’autres pays.
Siri®
Fonctionne avec Siri par le microphone.
Android & Google Play
Android, Google Play et le logo Google
Play sont des marques de commerce de
Google Inc.
Radio satellite SiriusXM
Sirius, XM et toutes les marques et tous les
logos associés sont des marques
commerciales de Sirius XM Radio, Inc. Tous
droits réservés.
Radio Internet Pandora®
PANDORA, le logo PANDORA et la
présentation de Pandora sont des marques
de commerce, déposées ou non, de
Pandora Media, Inc. Utilisation soumise à
autorisation.
Pandora n'est disponible que dans certains
pays. Pour de plus amples informations,
veuillez visiter
http://www.pandora.com/legal.

- 64 -
Français
MIXTRAX
MIXTRAX est une marque commerciale de
PIONEER CORPORATION.
Spotify®
SPOTIFY et le logo Spotify font partie des
marques de commerce déposées de
Spotify AB. Des appareils numériques
mobiles compatibles et un abonnement
Premium sont requis là où disponibles, voir
https://www.spotify.com.
T-Kernel 2.0
Ce produit utilise le code source de T-
Kernel 2.0 en vertu des termes de la T-
License 2.0 accordée par T-Engine Forum
(www.tron.org).
MP3
Droit d’auteur (C) 1998-2009 PacketVideo
Distribué selon les termes de la Licence
Apache, Version 2.0 (la « Licence »); vous ne
pouvez utiliser ce fichier que
conformément à la Licence.
Vous pouvez obtenir une copie de la
Licence à l’adresse
http://www.apache.org/licenses/LICENSE-
2.0
À moins que cela ne soit requis par la loi
applicable ou convenu par écrit, le logiciel
distribué selon les termes de la Licence est
fourni « TEL QUEL », SANS GARANTIE NI
CONDITION DE QUELQUE NATURE QUE CE
SOIT, expresse ou implicite.
Consultez la Licence pour connaître les
termes spécifiques régissant les
autorisations et limitations en vertu de la
Licence.
Généralités
Tension d’alimentation : 14,4 V CC (10,8 V à
15,1 V acceptable)
Mise à la masse : Type négatif
Consommation de courant maximale :
10,0 A
Dimensions (L × H × P) :
D
Châssis : 178 mm × 100 mm × 97 mm
(7 po × 3 7/8 po × 3 7/8 po)
Panneau avant : 170 mm × 96 mm ×
16 mm
Poids : 0,7 kg (1,5 lb)
Audio
(Le mode réseau est disponible
uniquement pour le MVH-S600BS.)
Puissance de sortie maximale :
• 50 W × 4 canaux/4 Ω (sans haut-
parleur d’extrêmes graves)
• 50 W × 2 canaux/4 Ω + 70 W ×
1 canal/2 Ω (pour le haut-parleur
d’extrêmes graves)
Puissance de sortie continue :
22 W × 4 (50 Hz à 15 000 Hz, 5 % de
DHT, charge de 4 Ω, avec les deux
canaux entraînés)
Impédance de charge : 4 Ω (4 Ω à 8 Ω (2 Ω
pour 1 canal) acceptable)
Niveau de sortie maximal de la sortie
préamplifiée : 2,0 V (MVH-S400BT),
4,0 V (MVH-S600BS)
Égaliseur (Égaliseur graphique à
13 bandes) :
Fréquence : 50 Hz/80 Hz/125 Hz/
200 Hz/315 Hz/500 Hz/800 Hz/
1,25kHz/2kHz/3,15kHz/5kHz/8kHz/
12,5 kHz
Gain : ±12 dB (par incréments de 2 dB)
Filtre passe-haut (Mode standard) :
Caractéristiques
techniques

- 65 -
Français
Fréquence : 25 Hz/31,5 Hz/40 Hz/
50 Hz/63 Hz/80 Hz/100 Hz/125 Hz/
160 Hz/200 Hz/250 Hz
Pente : –6 dB/oct, –12 dB/oct, –18 dB/
oct, –24 dB/oct, DÉSACTIVÉE
Haut-parleur d’extrêmes graves/Filtre
passe-bas (Mode standard) :
Fréquence : 25 Hz/31,5 Hz/40 Hz/
50 Hz/63 Hz/80 Hz/100 Hz/125 Hz/
160 Hz/200 Hz/250 Hz
Pente : –6 dB/oct, –12 dB/oct, –18 dB/
oct, –24 dB/oct, –30 dB/oct, –36 dB/
oct, DÉSACTIVÉE
Gain: +10dB à –24dB (par
incréments de 1 dB)
Phase : Normale/Inversée
Niveau de haut-parleur (Mode standard) :
+10dB à –24dB (par incréments de
1dB)
Alignement temporel (Mode standard) :
0po à 140po (1po/incrément)
Filtre passe-haut (AIGUS) (Mode réseau) :
Fréquence : 1,25 kHz/1,6 kHz/2 kHz/
2,5 kHz/3,15 kHz/4 kHz/5 kHz/
6,3 kHz/8 kHz/10 kHz/12,5 kHz
Pente : –6 dB/oct, –12 dB/oct, –18 dB/
oct, –24 dB/oct
Filtre passe-haut (MÉDIUMS) (Mode
réseau) :
Fréquence : 25 Hz/31,5 Hz/40 Hz/
50 Hz/63 Hz/80 Hz/100 Hz/125 Hz/
160 Hz/200 Hz/250 Hz
Pente : –6 dB/oct, –12 dB/oct, –18 dB/
oct, –24 dB/oct, DÉSACTIVÉE
Filtre passe-bas (MÉDIUMS) (Mode réseau) :
Fréquence : 1,25 kHz/1,6 kHz/2 kHz/
2,5 kHz/3,15 kHz/4 kHz/5 kHz/
6,3 kHz/8 kHz/10 kHz/12,5 kHz
Pente : –6 dB/oct, –12 dB/oct, –18 dB/
oct, –24 dB/oct, DÉSACTIVÉE
Haut-parleur d’extrêmes graves (Mode
réseau) :
Fréquence : 25 Hz/31,5 Hz/40 Hz/
50 Hz/63 Hz/80 Hz/100 Hz/125 Hz/
160 Hz/200 Hz/250 Hz
Pente : –12 dB/oct, –18 dB/oct, –
24 dB/oct, –30 dB/oct, –36 dB/oct,
DÉSACTIVÉE
Gain: +10dB à –24dB (par
incréments de 1 dB)
Phase : Normale/Inversée
Niveau de haut-parleur (Mode réseau) :
+10dB à –24dB (par incréments de
1dB)
Alignement temporel (Mode réseau) :
0po à 140po (1po/incrément)
USB
Spécification de norme USB : USB 2.0 haute
vitesse
Courant maximal : 1,5 A
Protocole USB :
MSC (Classe de stockage de masse)
MTP (Protocole de transfert de média)
AOA (Accessoire ouvert Android) 2.0
Système de fichier : FAT12, FAT16, FAT32
Format de décodage MP3 : MPEG-1 et 2 à
couche audio 3
Format de décodage WMA : Ver. 7, 8, 9, 9.1,
9.2 (2 canaux audio), Ver. 10, 11, 12
(Lecteur Windows Media)
Format de décodage AAC : MPEG-4 AAC
(encodage iTunes uniquement) (Ver.
10.6 et antérieures)
Format de décodage FLAC : v1.2.1 (Codec
audio sans perte libre)
Format du signal WAV : PCM Linéaire (Non
compressé)
Syntonisateur FM
Gamme de fréquences : 87,9 MHz à
107,9 MHz
Sensibilité utile : 11 dBf (1,0 μV/75 Ω,
mono, S/B : 30 dB)
Rapport signal/bruit : 65 dB (diffusion
analogique) (réseau IHF-A)
Syntonisateur AM
Gamme de fréquences : 530 kHz à
1 710 kHz
Sensibilité utile : 25 μV (S/B : 20 dB)

- 66 -
Français
Rapport signal/bruit : 60 dB (diffusion
analogique) (réseau IHF-A)
Bluetooth
Version : Certifié Bluetooth 4.0
Puissance de sortie : +4 dBm maximum
(Classe de puissance 2)
Gamme(s) de fréquences : 2 400 MHz à
2483,5MHz
Profils Bluetooth :
GAP (Profil d’accès générique)
SDAP (Profil d’application de
recherche de service)
HFP (Profil mains libres) 1.6
PBAP (Profil d’accès à l’annuaire)
A2DP (Profil de distribution audio
avancé)
AVRCP (Profil de commande audio/
vidéo à distance) 1.5
SPP (Profil de port série) 1.1
Spécifications CEA2006
Puissance de sortie : 14 W efficaces RMS ×
4 canaux (4 Ω et 1 % de DHT+bruit)
Rapport signal/bruit : 91 dBA (référence :
1W dans 4Ω)
REMARQUE
Les caractéristiques et la présentation
peuvent être modifiées sans avis préalable.
<
=

- 2 -
Español
Antes de comenzar.................................................................................. 3
Introducción ............................................................................................. 4
Radio....................................................................................................... 11
CD/USB/iPhone®/AUX.......................................................................... 12
Bluetooth ............................................................................................... 14
Modo de aplicaciones.......................................................................... 20
Pandora® ................................................................................................ 22
Spotify® .................................................................................................. 24
Radio satelital SiriusXM....................................................................... 26
Uso de la Pioneer ARC APP ................................................................. 30
Ajustes de audio ................................................................................... 32
Ajustes.................................................................................................... 33
Ajustes de FUNCTION........................................................................... 33
Ajustes de AUDIO .................................................................................. 36
Ajustes de SYSTEM................................................................................ 39
Ajustes de ILLUMINATION ................................................................... 43
Ajustes de MIXTRAX ............................................................................. 44
Conexiones/instalación....................................................................... 46
Información adicional.......................................................................... 52
Acerca de este manual:
• En las instrucciones siguientes, una memoria USB o un reproductor de audio USB se
denominan “dispositivo USB”.
• Cuando el iPhone está conectado a la unidad, el nombre fuente de la unidad aparece
como [iPod®]. Tenga en cuenta que esta unidad solo es compatible con iPhones
(iPhone 5 o versiones posteriores) sin importar el nombre fuente (para obtener
detalles, consulte la página 58).
Índice
- 3 -- 3 -
Español
Gracias por adquirir este producto PIONEER.
Para asegurar un uso correcto, lea este manual por completo antes de usar el producto. Es de especial
importancia que lea y cumpla con las ADVERTENCIAS y PRECAUCIONES de este manual. Conserve el
manual en un lugar seguro y de fácil acceso para consultarlo en el futuro.
ADVERTENCIA
• No trate de instalar o reparar este producto usted mismo. La instalación o la reparación de este
producto por parte de personas sin cualificación ni experiencia en equipos electrónicos y
accesorios para automóviles puede ser peligrosa y puede exponerle al riesgo de sufrir una
descarga eléctrica u otros peligros.
• No intente utilizar la unidad mientras esté conduciendo. Asegúrese de salir de la carretera y aparcar su
vehículo en un lugar seguro antes de intentar utilizar los controles del dispositivo.
PRECAUCIÓN
• No permita que esta unidad entre en contacto con humedad y/o líquidos. Puede sufrir un choque
eléctrico. Además, el contacto con líquidos puede provocar daños en la unidad, humo o
sobrecalentamiento.
• Mantenga siempre el volumen lo suficientemente bajo como para poder escuchar los sonidos que
provienen del exterior.
• Este producto es evaluado en condiciones de clima moderado y tropical en aparatos electrónicos de
audio, video y similares. Requisitos de seguridad, IEC 60065.
Servicio posventa para productos Pioneer
Póngase en contacto con el concesionario, el distribuidor donde compró la unidad o el centro de
servicio PIONEER autorizado para obtener el servicio posventa o información adicional. En caso de que
la información necesaria no esté disponible, póngase en contacto con las empresas que figuran a
continuación:
Póngase en contacto con las empresas siguientes antes de enviar la unidad para su reparación a las
direcciones que figuran a continuación.
Para ver la información de la garantía, vea la ficha de la Garantía limitada que se incluye con la unidad.
Antes de comenzar
EE. UU. y CANADÁ
Pioneer Electronics (USA) Inc.
CUSTOMER SUPPORT DIVISION
P.O. Box 1760
Long Beach, CA 90801-1760
800-421-1404

- 4 -
Español
MVH-S600BS
Introducción
Funcionamiento básico
Pantalla
Dial M.C.
(multicontrol)
BAND/
DISP (visualizar)
SRC (fuente)/OFF
Puerto USB
Toma de entrada AUX
(toma estéreo de 3,5 mm)

- 5 -- 5 -
Español
MVH-S400BT
Control remoto
Operaciones frecuentes
Los botones disponibles varían según la unidad.
Pantalla
Dial M.C.
(multicontrol)
BAND/
DISP (visualizar)
SRC (fuente)/OFF
Puerto USB
Toma de entrada AUX
(toma estéreo de 3,5 mm)
/
SRC (fuente)
VOLUME +/–
MUTE
DISP (visualizar)

- 6 -
Español
* Cuando el cable azul/blanco de la unidad está conectado al terminal de control del relé de la antena
automática del vehículo, la antena del vehículo se extiende cuando se enciende el origen de la
unidad. Para retraer la antena, apague el origen.
Indicación de visualización
El indicador varía según la unidad.
Objetivo
Método
Unidad principal Control remoto
Encender la unidad* Presione SRC/OFF para
encender la unidad.
Mantenga presionado SRC/
OFF para apagar la unidad.
Presione SRC para encender
la unidad.
Mantenga presionado SRC
para apagar la unidad.
Ajustar el volumen Gire el dial M.C..Presione VOLUME + o –.
Presione MUTE para
silenciar la unidad. Presione
MUTE nuevamente o
presione VOLUME + o –
para activar el sonido.
Seleccionar un origen Presione SRC/OFF varias
veces.
Presione SRC varias veces.
Cambiar la información de
visualización
Presione DISP varias veces. Presione DISP varias veces.
Volver a la visualización/lista
anterior
Presione BAND/ . Presione / para
seleccionar la carpeta
siguiente/anterior.
Volver a la visualización
normal desde el menú
Mantenga presionado
BAND/ .
–
Cambia el brillo de la
pantalla (no disponible
cuando se selecciona
[SIRIUSXM] como fuente)
Mantenga presionado
BAND/ .
–
Responder una llamada Presione . Presione .
Finalizar una llamada Presione . Presione .
Indicación Descripción
Aparece cuando existe un nivel inferior del menú o la carpeta.
Aparece cuando un teléfono Bluetooth se conecta a esta unidad por
medio de HFP (perfil de manos libres) (página 14) y parpadea cuando el
teléfono está en espera.
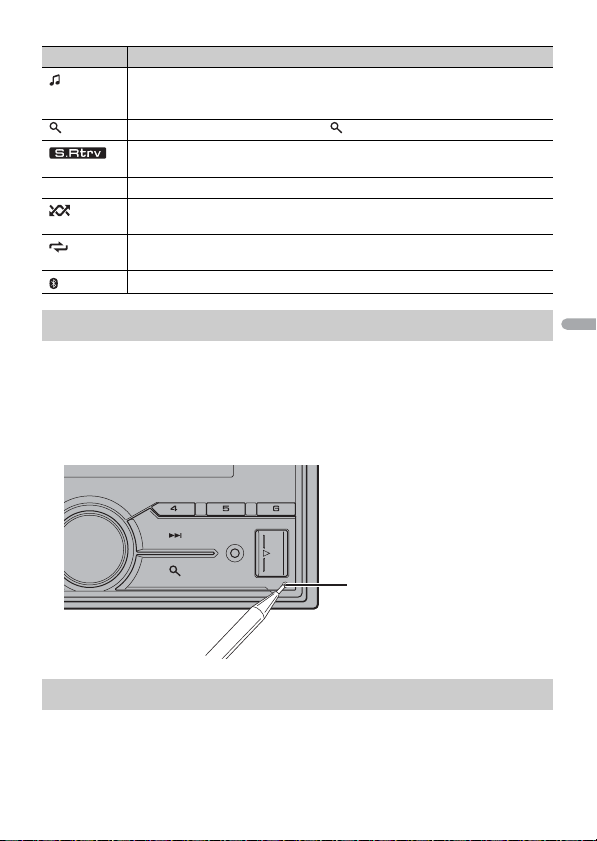
- 7 -- 7 -
Español
Se debe reiniciar el microprocesador en las siguientes situaciones:
– Antes de usar esta unidad por primera vez, tras al instalación
– Si la unidad no funciona correctamente
– Cuando aparecen mensajes incorrectos o extraños en la pantalla
1 Presione el botón RESET con la punta de un lapicero u otro instrumento
puntiagudo.
Quite la lámina de aislamiento antes de usarlo.
Aparece cuando un reproductor de audio Bluetooth se conecta a esta
unidad por medio de A2DP (perfil de distribución de audio avanzado)
(página 14).
Aparece cuando presiona el botón .
Aparece cuando está definida la función de recuperador de sonido
(página 34).
BASS Aparece cuando se selecciona [HI]/[LOW] en [D.BASS] (página 38).
Aparece cuando está definida la reproducción aleatoria (excepto cuando
seleccionó BT AUDIO como origen).
Aparece cuando está definida la repetición de reproducción (excepto
cuando seleccionó BT AUDIO como origen).
Aparece cuando se establece una conexión Bluetooth (página 14).
Restablecer el microprocesador
Preparación del control remoto
Indicación Descripción
Botón RESET
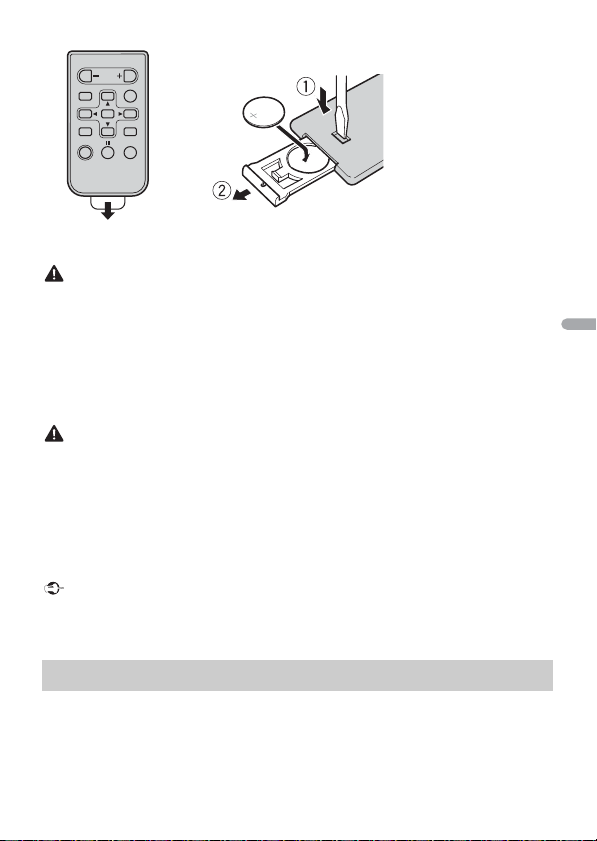
- 8 -
Español
ADVERTENCIA
• No ingiera la batería; hay peligro de una quemadura química.
(El control remoto proporcionado) Este producto contiene una pila de botón. Si la pila de botón es
tragada, puede causar severas quemaduras internas en solo dos horas y puede llevar a la muerte.
Mantenga las baterías nuevas y usadas lejos del alcance de los niños.
Si el compartimento de la batería no se cierra con seguridad, deje de utilizar el producto y
manténgalo alejado de los niños.
Si cree que la batería fue tragada o colocada dentro de cualquier parte del cuerpo, busque atención
médica inmediatamente.
• No exponga la pila ni el control remoto a calores excesivos, como la luz solar directa o fuego.
PRECAUCIÓN
• Existe el posible riesgo de explosión si la pila se sustituye de manera incorrecta. Cuando sustituya la
pila, sustitúyala por otra del mismo tipo.
• No manipule ni almacene la pila con herramientas ni objetos metálicos.
• Si la pila tiene una fuga, quite la pila y limpie el control remoto por completo. Luego, instale una pila
nueva.
• Para desechar las pilas usadas, cumpla con los reglamentos gubernamentales o las normas
ambientales pertinentes de las instituciones públicas aplicables en su país/zona.
• “Material de perclorato, es posible que se apliquen procedimientos especiales de manipulación.
Consulte www.dtsc.ca.gov/hazardouswaste/perchlorate (aplicable a California, EE. UU.)”.
Importante
• No almacene el control remoto a altas temperaturas ni bajo la luz solar directa.
• No deje caer el control remoto al piso, donde pueda quedar atascado bajo el pedal del freno o el
acelerador.
Después de la instalación, gire la llave de encendido hasta la posición ON y aparecerá el
menú de configuración en la pantalla.
Menú de configuración
Cómo sustituir la batería
Inserte la batería CR2025 (3 V) con los polos de más
(+) y menos (-) en la orientación correcta.

- 9 -- 9 -
Español
ADVERTENCIA
(Solo para MVH-S600BS)
No utilice la unidad en el modo estándar cuando tenga conectado un sistema de altavoces para el
modo de red. No utilice la unidad en el modo de red cuando tenga conectado un sistema de altavoces
para el modo estándar. Esto podría dañar los altavoces.
1 Gire el dial M.C. para seleccionar las opciones y presione para confirmar.
Para avanzar a la siguiente opción de menú, debe confirmar la selección.
2 [QUIT :YES] aparece cuando se han configurado todos los ajustes.
Para volver al primer elemento del menú de configuración, gire el dial M.C. para
seleccionar [QUIT :NO] y presione para confirmar.
3 Presione el dial M.C. para confirmar los ajustes.
NOTA
Este ajuste, a excepción de [SPEAKER MODE], se puede definir en cualquier momento desde los ajustes
de SYSTEM (página 39).
Elemento del menú Descripción
LANGUAGE Seleccione el idioma en el que aparecerá la información de texto
de un archivo de audio comprimido.
[ENG](inglés),
[ESP](español),
[FRA] (francés de
Canadá)
CLOCK SET Ajuste el reloj.
1 Gire el dial M.C. para ajustar la hora y presione para confirmar.
El indicador se mueve al ajuste de minutos automáticamente.
2 Gire el dial M.C. para ajustar los minutos y presione para
confirmar.
SPEAKER MODE (solo
para MVH-S600BS)
Cambie entre dos modos de operación —el modo de red
bidireccional (NETWORK) y el modo estándar (STANDARD)—
según las conexiones que haya establecido. Para obtener
información sobre los modos de operación, consulte página 32.
Después de seleccionar el modo adecuado, gire el dial M.C. para
seleccionar [YES] y presione para confirmar.
• No puede completar el menú de configuración sin ajustar el
[SPEAKER MODE].
• Una vez establecido el modo de altavoz, este ajuste no puede
cambiarse a menos que se restablezcan los ajustes
predeterminados del producto. Restablezca los ajustes
predeterminados para cambiar el ajuste del modo de altavoz
(consulte SYSTEM RESET en página 11).
• Cuando se selecciona [NETWORK], la función de pitido no está
disponible.
[STANDARD],
[NETWORK]
- 10 -
Español
1 Presione el dial M.C. para mostrar el menú principal.
2 Gire el dial M.C. para seleccionar [SYSTEM] y presione para confirmar.
3 Gire el dial M.C. para seleccionar [DEMO OFF] y presione para confirmar.
4 Gire el dial M.C. para seleccionar [YES] y presione para confirmar.
1 Mantenga presionado SRC/OFF hasta que la unidad se apague.
2 Presione el dial M.C. para mostrar el menú principal.
3 Gire el dial M.C. para seleccionar [INITIAL] y presione para confirmar.
4 Gire el dial M.C. para seleccionar una opción y presione para confirmar.
NOTA
Las opciones varían según la unidad.
Cancelación de la pantalla de demostración (DEMO
OFF)
Ajustes de INITIAL
Elemento del menú Descripción
REAR-SP Seleccione esta opción cuando haya un altavoz de gama
completa conectado a los cables de salida de los altavoces
traseros.
[FUL]
[SW] Seleccione esta opción cuando haya un subwoofer conectado
directamente a los cables de salida de los altavoces traseros sin
un amplificador auxiliar.
SP-P/O MODE Seleccione esta opción cuando haya un altavoz de gama
completa conectado a los cables de salida de los altavoces
traseros y haya un subwoofer conectado a la salida RCA.
[REAR/SUB.W]
[SUB.W/SUB.W] Seleccione esta opción cuando haya un subwoofer pasivo
conectado directamente a los cables de salida de los altavoces
traseros y haya un subwoofer conectado a la salida RCA.
[REAR/REAR] Seleccione esta opción cuando haya altavoces de gama
completa conectados a los cables de salida de los altavoces
traseros y la salida RCA. Si hay un altavoz de gama completa
conectado a los cables de salida de los altavoces traseros y la
salida RCA no se usa, puede seleccionar [REAR/SUB.W] o [REAR/
REAR].
- 11 -- 11 -
Español
Las frecuencias de sintonización en esta unidad están asignadas para su uso en América
del Norte. El uso en otras áreas puede acarrear problemas de recepción.
1 Presione SRC/OFF para seleccionar [RADIO].
2 Presione BAND/ para seleccionar la banda entre [FM1], [FM2], [FM3] o [AM].
3 Presione un botón de número (de 1/ a 6/).
NOTA
Puede seleccionar un canal predefinido presionando y girando el dial M.C..
SUGERENCIA
Los botones / también se pueden usar para seleccionar una estación predefinida cuando
[SEEK] está definido en [PCH] en los ajustes de FUNCTION (página 34).
Las seis estaciones con mejor recepción se almacenan en los botones de números (de 1/
a 6/).
1 Después de seleccionar la banda, presione el dial M.C. para mostrar el menú
principal.
2 Gire el dial M.C. para seleccionar [FUNCTION] y presione para confirmar.
SYSTEM UPDATE Seleccione [SYSTEM INFO] para confirmar la información más
reciente del sistema en la unidad.
Seleccione [S/W UPDATE] para actualizar la unidad con el
software más reciente e inicializar los ajustes en la unidad. Para
obtener la información más reciente sobre el software y la
actualización, visite nuestro sitio web.
[SYSTEM INFO], [S/
W UPDATE]
SXM RESET Seleccione para inicializar los ajustes de SiriusXM.
[YES], [NO]
SYSTEM RESET Seleccione [YES] para inicializar los ajustes de la unidad. La
unidad se reiniciará automáticamente.
[YES], [NO]
Radio
Recepción de estaciones predefinidas
Memoria de mejores estaciones (BSM)
Elemento del menú Descripción
- 12 -
Español
3 Gire el dial M.C. para seleccionar [BSM] y presione para confirmar.
Para buscar una estación manualmente
1
Después de seleccionar la banda, presione / para seleccionar una
estación.
Mantenga presionado / y suéltelo para buscar una estación disponible. La
exploración se detiene cuando la unidad recibe una estación. Para cancelar la
sintonización por búsqueda, presione / .
NOTA
[SEEK] se debe definir en [MAN] en los ajustes de FUNCTION (página 34).
Para almacenar estaciones manualmente
1
Mientras recibe la estación que desea almacenar, mantenga presionado uno de los
botones de número (de 1/ a 6/ ) hasta que deje de parpadear.
NOTA
Puede seleccionar un canal predefinido presionando y girando el dial M.C.. Después de seleccionar
un canal, mantenga presionado el dial M.C. para almacenar una estación.
Desconecte los auriculares del dispositivo antes de conectarlo a la unidad.
Dispositivos USB (incluidos Android™)/iPhone
1
Abra la tapa del puerto USB.
2 Conecte el dispositivo USB/iPhone mediante un cable apropiado.
NOTA
Para cambiar automáticamente al origen [USB] cuando un dispositivo USB/iPhone se conecta a la
unidad, defina [USB AUTO] en [ON] en la configuración de SYSTEM (página 41).
PRECAUCIÓN
Use un cable USB Pioneer opcional (CD-U50E) para conectar el dispositivo USB, ya que si conecta un
dispositivo directamente a la unidad, este sobresaldrá, lo que podría ser peligroso.
Antes de quitar el dispositivo, detenga la reproducción.
CD/USB/iPhone®/AUX
Reproducción
- 13 -- 13 -
Español
Conexión AOA
Para obtener información sobre la conexión AOA, consulte página 30.
Conexión MTP
Un dispositivo instalado con el sistema operativo Android 4.0 o posterior se puede conectar a la unidad
a través de MTP mediante el cable que se entrega con el dispositivo. No obstante, según el dispositivo
conectado y el número de archivos en el dispositivo, es posible que no se puedan reproducir archivos
de audio/canciones mediante MTP. Tenga en cuenta que la conexión MTP no es compatible con los
formatos de archivo WAV y FLAC, y no se puede utilizar con la función MIXTRAX.
NOTA
Si utiliza una conexión MTP, debe definir [PHONE CONNECT] en [USB MTP] en la configuración de
SYSTEM (página 40).
AUX
1
Inserte la miniclavija estéreo en la toma de entrada AUX.
2 Presione SRC/OFF para seleccionar [AUX] como origen.
NOTA
Si [AUX] se define en [OFF] en los ajustes de SYSTEM, no puede seleccionar [AUX] como origen
(página 40).
Puede realizar varias modificaciones en los ajustes de FUNCTION (página 33).
Tenga en cuenta que las operaciones siguientes no funcionan para un dispositivo AUX.
Para operar un dispositivo AUX, utilice el dispositivo mismo.
Operaciones
Objetivo Método
Seleccione una carpeta*1 Presione 1/ o 2/.
Seleccionar una pista/canción (capítulo) Presione o .
Adelantar o atrasar*2 Mantenga presionado o .
Busque un archivo en una lista (solo USB) 1 Presione para mostrar la lista.
2 Gire el dial M.C. para seleccionar el
nombre o la categoría deseados del
archivo (carpeta) y presione para
confirmar.
3 Gire el dial M.C. para seleccionar el
archivo deseado y presione para
confirmar.
Se inicia la reproducción.
Ver una lista de los archivos en la carpeta/
categoría seleccionada*1
Presione el dial M.C. cuando haya
seleccionado una carpeta/categoría.

- 14 -
Español
*1 Archivos de audio comprimido únicamente
*2 Cuando use la función de avance o retroceso mientras se reproduce un archivo VBR, el tiempo de
reproducción podría no ser correcto.
La función MIXTRAX crea una mezcla ininterrumpida de su biblioteca de música,
acompañada por efectos lumínicos. Para obtener información sobre los ajustes de
MIXTRAX, consulte la página 44.
NOTAS
• iPhone necesita conectarse con Pioneer ARC APP a través de una conexión USB para usar esta función
(página 30).
• Esta función no es compatible con un dispositivo Android conectado a través de MTP.
• Según el archivo/canción, es posible que los efectos sonoros no estén disponibles.
• Apague la función MIXTRAX si los efectos lumínicos que genera interfieren con la conducción.
1 Presione 3/MIX para activar/desactivar MIXTRAX.
Importante
Si hay conectados diez dispositivos Bluetooth o más (por ejemplo, un teléfono y un reproductor de
audio independiente), es posible que no funcionen correctamente.
1 Active la función Bluetooth del dispositivo.
Si selecciona una conexión Bluetooth desde el dispositivo, avance hasta el paso 6.
2 Presione para mostrar el menú del teléfono.
3 Gire el dial M.C. para seleccionar [BT SETTING] y presione para confirmar.
4 Gire el dial M.C. para seleccionar [ADD DEVICE] y presione para confirmar.
Reproducir una canción en la carpeta/
categoría seleccionada*1
Mantenga presionado el dial M.C. cuando
haya seleccionado una carpeta/categoría.
Repetición de reproducción Presione 6/.
Reproducción aleatoria Presione 5/.
Pausa/reanudación de reproducción Presione 4/PAUSE.
Volver a la carpeta raíz (solo USB)*1 Mantenga presionado 1/.
Acerca de MIXTRAX (solo USB/iPhone)
Bluetooth
Conexión Bluetooth
Objetivo Método

- 15 -- 15 -
Español
La unidad comienza a buscar los dispositivos disponibles y los muestra en la lista de
dispositivos.
• Para cancelar la búsqueda, presione el dial M.C..
• Si el dispositivo deseado no aparece en la lista, seleccione [RE-SEARCH].
• Si no hay ningún dispositivo disponible, aparece [NOT FOUND] en la pantalla.
5 Gire el dial M.C. para seleccionar un dispositivo de la lista de dispositivos y
presione para confirmar.
Mantenga presionado el dial M.C. para cambiar la información del dispositivo
mostrado entre la dirección del dispositivo Bluetooth y el nombre del dispositivo.
Si selecciona una conexión Bluetooth desde la unidad, avance hasta el paso 7.
6 Seleccione la [Pioneer BT Unit] que aparece en la pantalla del dispositivo.
7 Asegúrese de que el mismo número de 6 cifras aparezca en esta unidad y el
dispositivo, y seleccione “Sí” en el dispositivo.
NOTAS
• Aparece [DEVICE FULL] si la unidad ya se emparejó con otros diez dispositivos. En este caso, elimine
uno de los dispositivos emparejados. Consulte [DEL DEVICE] en el ajuste de Bluetooth (página 15).
• Según el dispositivo, el código PIN se le pide en el paso 7. En cuyo caso, ingrese [0000].
SUGERENCIA
Para establecer la conexión Bluetooth, también puede detectar la unidad desde el dispositivo
Bluetooth. Para ello, [VISIBLE] se debe definir en [ON] en la configuración de Bluetooth. Para obtener
información sobre las operaciones de un dispositivo Bluetooth, consulte las instrucciones de
funcionamiento que se entregan con el dispositivo Bluetooth.
Ajustes de Bluetooth
Elemento del menú Descripción
DEVICELIST Muestra la lista de dispositivos Bluetooth emparejados. Aparece
“*” en el nombre del dispositivo cuando se establece la conexión
Bluetooth.
Cuando no hay ningún dispositivo seleccionado en la lista, esta
función no está disponible.
DEL DEVICE Elimine la información del dispositivo.
[DELETE YES],
[DELETE NO]
ADD DEVICE Registre un nuevo dispositivo.
Si ya hay emparejados diez dispositivos, esta función no está
disponible. Puede consultar el número de dispositivos
emparejados en la configuración [DEVICELIST].

- 16 -
Español
En primer lugar, establezca una conexión Bluetooth con el teléfono Bluetooth
(página 14). Se pueden conectar hasta dos teléfonos Bluetooth a la vez.
A.CONN Seleccione [ON] para conectarse a un dispositivo Bluetooth
automáticamente.
[ON], [OFF]
VISIBLE Seleccione [ON] para que un dispositivo Bluetooth pueda
detectar la unidad cuando la unidad se conecte por Bluetooth a
otro dispositivo.
[ON], [OFF]
PIN CODE Cambie el código PIN.
1 Presione el dial M.C. para mostrar el modo de configuración.
2 Gire el dial M.C. para seleccionar un número.
3 Presione el dial M.C. para mover el cursor a la posición
siguiente.
4 Después de introducir el código PIN, mantenga presionado el
dial M.C..
Si presiona el dial M.C. después de introducir el código PIN,
volverá a la pantalla de introducción del código PIN y podrá
cambiar el código PIN.
DEV. INFO Cambie la información del dispositivo en pantalla entre el
nombre del dispositivo y la dirección del dispositivo Bluetooth.
A.PAIRING Seleccione [ON] para emparejar la unidad y iPhone o dispositivo
Android automáticamente cuando haya un iPhone o Android
conectado a la unidad mediante USB. (Es posible que esta
función no esté disponible, según la versión de iOS que utilice.)
• Cuando esté usando un dispositivo Android, esta función está
disponible en las siguientes situaciones:
– Su dispositivo tiene Android OS 4.4 o versiones posteriores
instaladas.
– Asegúrese de habilitar la función Bluetooth del dispositivo y
confirmar que el dispositivo no esté conectado a la unidad mediante
Bluetooth.
– [P.APP AUTO ON] necesita configurarse en [ON] (página 41).
– Pioneer ARC APP necesita instalarse en su dispositivo Android y
[PHONE CONNECT] necesita configurarse en [APP CONTROL]
(página 30).
– Deberá presionarse un botón de confirmación en la ventana de
precaución que se muestra en Pioneer ARC APP luego de realizada
una conexión con Pioneer ARC APP.
[ON], [OFF]
Teléfono Bluetooth
Elemento del menú Descripción
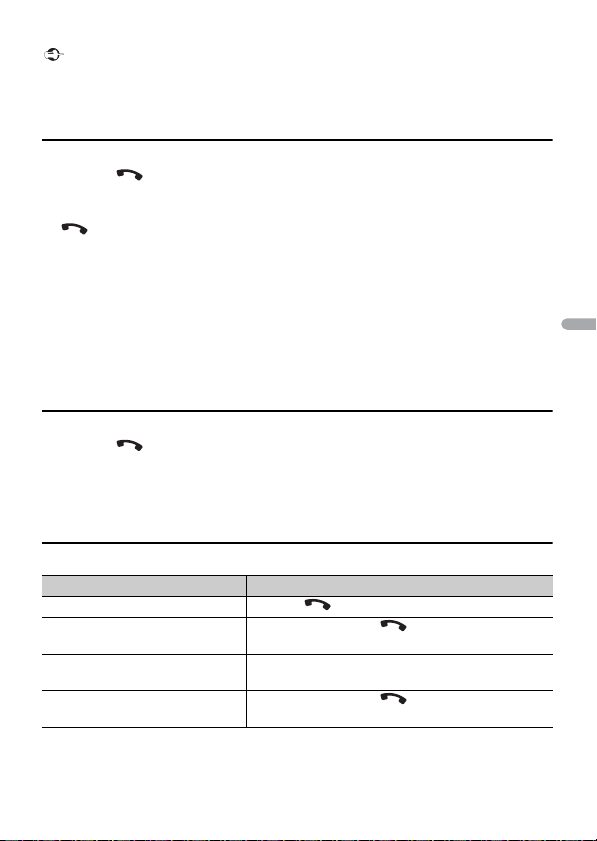
- 17 -- 17 -
Español
Importante
• Dejar la unidad en espera para conectarla al teléfono a través de Bluetooth mientras el motor no está
en marcha puede agotar la batería del vehículo.
• Asegúrese de estacionar el vehículo en un lugar seguro y colocar el freno de mano antes de la
operación.
Para realizar una llamada telefónica
1
Presione para mostrar el menú del teléfono.
Cuando se conectan dos teléfonos, primero aparece el nombre de un teléfono y, a
continuación, el menú del teléfono. Para cambiar al otro teléfono, vuelva a presionar
.
2 Gire el dial M.C. para seleccionar [RECENTS] o [PHONE BOOK] y presione para
confirmar.
Si selecciona [PHONE BOOK], avance al paso 4.
3 Gire el dial M.C. para seleccionar [MISSED], [DIALED] o [RECEIVED] y presione para
confirmar.
4 Gire el dial M.C. para seleccionar un nombre o número telefónico y presione para
confirmar.
Comienza la llamada telefónica.
Para responder una llamada entrante
1
Presione cuando reciba una llamada.
SUGERENCIA
Cuando hay dos teléfonos conectados a la unidad mediante Bluetooth y hay una llamada entrante
mientras usa un teléfono en otra llamada, aparece un mensaje en la pantalla. Para responder esa
llamada entrante, debe finalizar la llamada existente.
Funcionamiento básico
Objetivo Funcionamiento
Finalizar una llamada Presione .
Rechazar una llamada entrante Mantenga presionado cuando reciba una
llamada.
Cambiar entre el interlocutor
actual y un interlocutor en espera
Presione el dial M.C..
Cancelar a un interlocutor en
espera
Mantenga presionado .
- 18 -
Español
Para predefinir números telefónicos
1 Seleccione un número telefónico de una libreta telefónica o del historial de
llamadas.
2 Mantenga presionado uno de los botones de número (de 1/ a 6/).
El contacto se almacena en el número predefinido seleccionado.
Para realizar una llamada mediante un número predefinido, presione uno de los botones
de número (de 1/ a 6/ ) y presione el dial M.C..
Reconocimiento de voz (solo para iPhone)
Esta función solo está disponible cuando conecta a la unidad un iPhone equipado con
reconocimiento de voz mediante Bluetooth.
1 Mantenga presionado para activar el modo de reconocimiento de voz.
2 Presione el dial M.C. y hable al micrófono para dar los comandos de voz.
Para salir del modo de reconocimiento de voz, presione BAND/.
NOTA
Para obtener información sobre las características del reconocimiento de voz, consulte el manual que
se entrega con el iPhone.
Menú del teléfono
Ajustar el volumen de la voz del
interlocutor (cuando el modo
privado está activado, esta función
no está disponible)
Gire el dial M.C. durante la llamada.
Activar o desactivar el modo
privado
Presione BAND/ durante la llamada.
Elemento del menú Descripción
RECENTS Muestra el historial de llamadas perdidas.
[MISSED]
[DIALED] Muestra el historial de llamadas realizadas.
[RECEIVED] Muestra el historial de llamadas recibidas.
PHONE BOOK Muestra los contactos en su teléfono. Defina [VISIBLE] en [ON]
en la configuración de Bluetooth para explorar los contactos a
través de esta unidad.
Objetivo Funcionamiento
- 19 -- 19 -
Español
* Si hay dos teléfonos conectados, esta función no se activa para las llamadas entrantes que se reciben
mientras está usando los teléfonos para una llamada.
Importante
• Según el reproductor de audio Bluetooth conectado a la unidad, las operaciones disponibles estarán
limitadas a los siguientes dos niveles:
– A2DP (perfil de distribución de audio avanzada) solo puede reproducir canciones de su reproductor
de audio.
– AVRCP (perfil de control remoto de audio/vídeo) puede realizar funciones como reproducción,
pausa, selección de canción, etc.
• El sonido del reproductor de audio Bluetooth se silenciará cuando el teléfono esté en uso.
• Cuando el reproductor de audio Bluetooth está en uso, no puede conectar un teléfono Bluetooth
automáticamente.
• Según el tipo de reproductor de audio Bluetooth que haya conectado a la unidad, el funcionamiento
y la información que se muestre pueden variar según la disponibilidad y la funcionalidad.
1 Realice una conexión Bluetooth con el reproductor de audio Bluetooth.
2 Presione SRC/OFF para seleccionar [BT AUDIO] como origen.
3 Presione BAND/ para comenzar la reproducción.
Funcionamiento básico
Puede realizar varias modificaciones en los ajustes de FUNCTION (página 33).
PRESET 1-6 Recupera los números telefónicos predefinidos. También puede
presionar uno de los botones de número (de 1/ a 6/)
para recuperar los números telefónicos predefinidos.
A.ANSR* Seleccione [ON] para responder una llamada entrante
automáticamente.
[ON], [OFF]
R.TONE Seleccione [ON] si los altavoces del automóvil no emiten el tono
de llamada. Es posible que esta función no se active, según el
teléfono que haya conectado.
[ON], [OFF]
PB INVT Invierte el orden de los nombres en la libreta telefónica (vista de
nombres).
BT SETTING Puede ajustar distintas configuraciones para las conexiones
Bluetooth. Para obtener información sobre la configuración de
Bluetooth, consulte la página 15.
Audio Bluetooth
Objetivo Funcionamiento
Adelantar o atrasar Mantenga presionado o .
Elemento del menú Descripción

- 20 -
Español
* Según el dispositivo conectado, es posible que estas operaciones no estén disponibles.
Puede disfrutar de escuchar una aplicación en un iPhone/dispositivo Android a través de
la unidad. En algunos casos, puede controlar una aplicación a través de la unidad.
Para obtener información sobre los dispositivos compatibles, visite nuestro sitio web.
Importante
El uso de aplicaciones de terceros puede implicar o necesitar la puesta a disposición de información de
identificación personal, bien mediante la creación de una cuenta de usuario o de algún otro modo, y,
para ciertas aplicaciones, la puesta a disposición de datos de geoubicación.
TODAS LAS APLICACIONES DE TERCEROS SON RESPONSABILIDAD EXCLUSIVA DE LOS PROVEEDORES,
INCLUIDAS SIN LIMITACIÓN LA RECOPILACIÓN Y LA SEGURIDAD DE LOS DATOS DE USUARIO Y LAS
PRÁCTICAS DE PRIVACIDAD. AL ACCEDER A APLICACIONES DE TERCEROS, USTED SE MANIFIESTA DE
ACUERDO EN REVISAR LOS TÉRMINOS DE SERVICIO Y LAS POLÍTICAS DE PRIVACIDAD DE LOS
PROVEEDORES. SI NO ESTÁ DE ACUERDO CON LOS TÉRMINOS O LAS POLÍTICAS DE ALGÚN PROVEEDOR
O NO CONSIENTE EL USO DE DATOS DE GEOUBICACIÓN DONDE SEA APLICABLE, NO UTILICE ESTAS
APLICACIONES DE TERCEROS.
Para usuarios de iPhone
Esta función es compatible con los iPhones con iOS 6.0 o versiones posteriores.
Para usuarios de dispositivos Android
Esta función es compatible con dispositivos que tengan instalado Android 2.3 o posterior.
Seleccionar una pista Presione o .
Repetición de reproducción* Presione 6/.
Reproducción aleatoria* Presione 5/.
Pausa/reanudar reproducción Presione 4/PAUSE.
Buscar un archivo en una lista 1 Presione para mostrar una lista.
2 Gire el dial M.C. para seleccionar el
nombre de carpeta deseado y presione
para confirmar.
3 Gire el dial M.C. para seleccionar el
archivo deseado y presione para
confirmar.
Comienza la reproducción.
Cambie el nombre del dispositivo
Bluetooth en la lista de dispositivos de
acuerdo con el pedido de conexión
Presione 1/ o 2/.
Modo de aplicaciones
Objetivo Funcionamiento

- 21 -- 21 -
Español
NOTA
PIONEER NO ES RESPONSABLE POR NINGUNA APLICACIÓN NI CONTENIDO DE TERCEROS, INCLUIDA,
ENTRE OTRAS COSAS, SU EXACTITUD Y EXHAUSTIVIDAD. EL CONTENIDO Y LA FUNCIONALIDAD DE
DICHAS APLICACIONES SON RESPONSABILIDAD EXCLUSIVA DEL PROVEEDOR DE LA APLICACIÓN
CORRESPONDIENTE.
1 Conecte la unidad al dispositivo móvil.
• iPhone mediante USB (página 12)
• Dispositivo iPhone/Android mediante Bluetooth (página 14)
2 Presione el dial M.C. para mostrar el menú principal.
3 Gire el dial M.C. para seleccionar [SYSTEM] y presione para confirmar.
4 Gire el dial M.C. para seleccionar [PHONE CONNECT] y presione para confirmar.
5 Gire el dial M.C. para seleccionar una de las opciones siguientes y presione para
confirmar.
• Seleccione [IPHONE] para iPhone.
• Seleccione [ANDROID] para el dispositivo Android.
6 Gire el dial M.C. para seleccionar una de las opciones siguientes.
• Seleccione [WIRED] para la conexión USB.
• Seleccione [BLUETOOTH] para la conexión Bluetooth.
NOTA
Cuando cambie el ajuste de la conexión, aparecerá una pantalla con un mensaje que le advertirá
que se ha modificado el ajuste de la conexión. Presione el dial M.C. y gire el dial M.C. para
seleccionar [SRC OFF :YES] y presione para confirmar. La unidad se apagará automáticamente y se
ejecutará el ajusta.
7 Presione SRC/OFF para seleccionar [APP].
8 Opere el dispositivo móvil para iniciar la aplicación.
NOTA
Cuando conecte un dispositivo móvil que no sea un dispositivo iPhone/Android, seleccione [OTHERS]
en el menú [PHONE CONNECT] y seleccione [WIRED] (para la conexión USB) o [BLUETOOTH] (para la
conexión Bluetooth). Según el dispositivo móvil, es posible que no funcione correctamente.
Funcionamiento básico
Puede realizar varias modificaciones en los ajustes de FUNCTION (página 33).
Reproducción de una aplicación a través de la
unidad
- 22 -
Español
La radio por Internet Pandora es un servicio de música que no está afiliado a Pioneer.
Puede obtener más información en http://www.pandora.com.
La aplicación móvil Pandora está disponible para teléfonos iPhone y Android. Visite
www.pandora.com/everywhere/mobile para obtener la información más reciente sobre
compatibilidad.
Actualice el firmware de la aplicación Pandora a la versión más reciente antes de usarla.
1 Conecte la unidad al dispositivo móvil.
• iPhone mediante USB (página 12)
• Dispositivo iPhone/Android mediante Bluetooth (página 14)
Si selecciona una conexión USB, avance hasta el paso 6.
2 Presione SRC/OFF para seleccionar [PANDORA].
3 Mantenga presionado 1/ para mostrar [PHONE CONNECT].
4 Gire el dial M.C. para seleccionar una de las opciones siguientes y presione para
confirmar.
• Seleccione [IPHONE] para iPhone.
• Seleccione [ANDROID] para el dispositivo Android.
5 Gire el dial M.C. para seleccionar [BLUETOOTH] para un dispositivo iPhone/
Android conectado a través de Bluetooth.
NOTA
Cuando cambie el ajuste de la conexión, aparecerá una pantalla con un mensaje que le advertirá
que se ha modificado el ajuste de la conexión. Presione el dial M.C. y gire el dial M.C. para
seleccionar [SRC OFF :YES] y presione para confirmar. La unidad se apagará automáticamente y se
ejecutará el ajusta.
6 Presione SRC/OFF para seleccionar [PANDORA].
7 Inicie la aplicación Pandora en el dispositivo móvil y comience la reproducción.
Objetivo Funcionamiento
Seleccionar una pista Presione o .
Adelantar o atrasar Mantenga presionado o .
Pausa/reanudar reproducción Presione BAND/.
Pandora®
Escuchar Pandora
- 23 -- 23 -
Español
NOTA
Cuando conecte un dispositivo móvil que no sea un dispositivo iPhone/Android, seleccione [OTHERS]
en el menú [PHONE CONNECT] y seleccione [WIRED] (para la conexión USB) o [BLUETOOTH] (para la
conexión Bluetooth). Según el dispositivo móvil, es posible que no funcione correctamente.
Funcionamiento básico
Puede realizar varias modificaciones en los ajustes de FUNCTION (página 33).
NOTA
Es posible que no pueda operar algunas funciones de Pandora en esta unidad.
Objetivo Método
Saltar una pista Presione .
Cambiar entre Aleatorio y la estación Presione (lista) y gire el dial M.C. para
seleccionar Aleatorio o la estación deseada.
Cambiar el orden Presione (lista) y seleccione una de las opciones
siguientes.
[ABC]: Ordena alfabéticamente los elementos de
la lista.
[DATE]: Ordena los elementos de la lista según su
fecha de creación.
Reproducir Cuando haya seleccionado Aleatorio o la estación,
presione el dial M.C..
Eliminar una estación 1 Cuando haya seleccionado la estación,
mantenga presionado el dial M.C..
Aparece [DELETE YES].
2 Presione el dial M.C..
Para cancelar, presione BAND/ en el paso 1.
Pausa/reanudación de reproducción Presione 4/PAUSE.
Pulgar arriba Presione 1/.
Pulgar abajo Presione 2/.
Crear una nueva estación según la
pista que está reproduciendo
actualmente
Mantenga presionado 5/.
Crear una nueva estación según el
artista que está reproduciendo
actualmente
Mantenga presionado 6/.
Almacena la información de la pista
que se esté reproduciendo
actualmente en su cuenta de
Pandora.
1 Mantenga presionado 3/MIX.
Aparece [BOOKMARK].
2 Presione el dial M.C..

- 24 -
Español
Spotify es un servicio de distribución de música no afiliado a Pioneer. Puede obtener
más información en http://www.spotify.com.
La aplicación Spotify está disponible para teléfonos compatibles, ingrese a https://
support.spotify.com/ para consultar la información más reciente de compatibilidad.
Para disfrutar de Spotify mientras conduce, descargue primero la aplicación Spotify a su
dispositivo iPhone o Android. Puede descargarla en iTunes® App Store® o Google Play™.
Seleccione una cuenta gratuita o una cuenta Premium paga desde la aplicación o
spotify.com. Una cuenta Premium le proporciona más funciones, como escuchar sin
conexión.
Importante
• Este producto incorpora software Spotify sujeto a licencias de terceros que puede encontrar aquí:
www.spotify.com/connect/third-party-licenses.
• Para obtener información sobre los países y regiones donde se puede usar Spotify, ingrese a https://
www.spotify.com/us/select-your-country/.
Actualice el firmware de la aplicación Spotify a la versión más reciente antes de usarla.
1 Conecte la unidad al dispositivo móvil.
• iPhone mediante USB (página 12)
• Dispositivo iPhone/Android mediante Bluetooth (página 14)
Si selecciona una conexión USB, avance hasta el paso 6.
2 Presione SRC/OFF para seleccionar [SPOTIFY].
3 Mantenga presionado 1/ para mostrar [PHONE CONNECT].
4 Gire el dial M.C. para seleccionar una de las opciones siguientes y presione para
confirmar.
• Seleccione [IPHONE] para iPhone.
• Seleccione [ANDROID] para el dispositivo Android.
5 Gire el dial M.C. para seleccionar [BLUETOOTH] para un dispositivo iPhone/
Android conectado a través de Bluetooth.
NOTA
Cuando cambie el ajuste de la conexión, aparecerá una pantalla con un mensaje que le advertirá
que se ha modificado el ajuste de la conexión. Presione el dial M.C. y gire el dial M.C. para
seleccionar [SRC OFF :YES] y presione para confirmar. La unidad se apagará automáticamente y se
ejecutará el ajusta.
6 Presione SRC/OFF para seleccionar [SPOTIFY].
Spotify®
Escuchar Spotify
- 25 -- 25 -
Español
7 Inicie la aplicación Spotify en el dispositivo móvil y comience la reproducción.
NOTA
Cuando conecte un dispositivo móvil que no sea un dispositivo iPhone/Android, seleccione [OTHERS]
en el menú [PHONE CONNECT] y seleccione [WIRED] (para la conexión USB) o [BLUETOOTH] (para la
conexión Bluetooth). Según el dispositivo móvil, es posible que no funcione correctamente.
Funcionamiento básico
Puede realizar varias modificaciones en los ajustes de FUNCTION (página 33).
NOTA
Las operaciones disponibles pueden variar según el tipo de contenido (pista/álbum/artista/lista de
reproducción/radio) que quiera reproducir.
NOTA
Es posible que no pueda operar algunas funciones de Spotify en esta unidad.
Objetivo Funcionamiento
Saltar una pista Presione o .
Busque una pista en una lista 1 Presione (lista) para mostrar la lista.
2 Gire el dial M.C. para seleccionar la
categoría deseada y presione para
confirmar.
3 Gire el dial M.C. para seleccionar el
archivo deseado y presione para
confirmar.
Se inicia la reproducción.
Pausa/reanudar reproducción Presione 4/PAUSE.
Pulgar arriba (solo para radio) Presione 1/.
Pulgar abajo (solo para radio) Presione 2/.
Reproducción aleatoria (solo para pista/
álbum/artista/lista de reproducción)
Presione 5/.
Reproducción repetida (solo para pista/
álbum/artista/lista de reproducción)
Presione 6/.
Inicia un canal de radio basado en la
canción que se está reproduciendo.
1 Mantenga presionado 5/ para iniciar
una radio.
2 Presione el dial M.C..
• Es posible que esta función no esté
disponible, según la canción seleccionada.

- 26 -
Español
(Solo para MVH-S600BS)
Solo SiriusXM® le trae más de aquello que le gusta escuchar, todo en un solo lugar.
Disfrute de más de 140 canales, incluida música sin anuncios comerciales, la mejor
información deportiva, noticias, tertulias, comedias y entretenimiento. Bienvenido al
mundo de la radio satelital. Se necesita un sintonizador para vehículos y suscripción a
SiriusXM. Para obtener más información, visite www.siriusxm.com.
Replay™
Puede pausar, rebobinar o volver a reproducir la radio satelital en vivo, así como el canal
que esté escuchando actualmente.
TuneStart™
Comienza las canciones automáticamente desde el principio cuando sintoniza uno de
los canales de música predefinidos almacenados en la banda actual de valores
predefinidos. Para obtener más información, consulte TUNE START en la página 35.
NOTA
TuneStart es compatible con los modelos de sintonizadores SXV200 o superior. No compatible con
SXV100.
TuneScan™
Explore las vistas previas breves de las canciones que pueda haberse perdido en los
canales de música almacenados en la banda actual de valores predefinidos.
Cada canción del canal actual se reproduce durante seis segundos por vez.
Para obtener más información, consulte TUNE SCAN (exploración de las canciones) en la
página 35.
NOTA
TuneScan es compatible con los modelos de sintonizadores SXV200 o superior. No compatible con
SXV100.
TuneMix™
Cree un canal de música que reúna las canciones de los canales de música almacenados
en la banda actual de valores predefinidos. Para obtener más información, consulte
TUNEMIX en la página 35.
NOTA
TuneMix™ es compatible con los modelos de sintonizadores SXV300 o superior. No es compatible con
SXV200 ni SXV100.
Radio satelital SiriusXM

- 27 -- 27 -
Español
1 Presione SRC/OFF para seleccionar [SIRIUSXM].
2 Presione / para seleccionar el Canal 0.
Aparece el ID de la radio en la pantalla.
Además, el ID de la radio se encuentra en la base del sintonizador para vehículos
SiriusXM Connect.
NOTA
El ID de la radio ni incluye las letras I, O, S ni F.
3 Active el servicio SiriusXM en línea o por teléfono.
Para suscripciones desde EE. UU.:
• Visite www.siriusxm.com/activatenow
• Llame al servicio de atención al público de SiriusXM al 1-866-635-2349
Para suscripciones desde Canadá:
• Visite www.siriusxm.ca/activatexm
• Llame al 1-877-438-9677
4 Aparece [SUBSCRIPTION UPDATED] en la pantalla cuando el sintonizador para
vehículos SiriusXM Connect se suscribe correctamente.
Presione cualquier tecla para borrar el mensaje de activación.
NOTA
Normalmente, el proceso de activación tarda entre 10 y 15 minutos, pero puede tardar hasta una hora
en algunos casos. No apague la unidad hasta borrar el mensaje de activación del paso 4.
1 Mantenga presionado DISP y seleccione [CHANNEL].
También puede seleccionar el modo de funcionamiento mediante los ajustes de
SiriusXM (página 35).
2 Presione SRC/OFF para seleccionar [SIRIUSXM].
3 Presione BAND/ para seleccionar una banda entre [SXM1], [SXM2] o [SXM3].
4 Presione / para seleccionar un canal.
Si mantiene presionado cualquiera de los botones, navegará rápidamente por los
canales.
Preparación para el servicio de radio satelital
SiriusXM
Escuchar un canal
- 28 -
Español
Mantenga presionado cualquiera de los botones y suéltelo para sintonizar
automáticamente. La exploración se detiene cuando la unidad recibe un canal. Para
cancelar la sintonización por búsqueda, presione / .
Funcionamiento básico
1
Mantenga presionado DISP para seleccionar el modo de funcionamiento
[CHANNEL] o [REPLAY].
NOTA
Puede mantener presionado BAND/ para salir del modo de reproducción.
NOTA
También puede realizar varias modificaciones en los ajustes de SiriusXM (página 35).
Exploración de la categoría
La transmisión en vivo de cada canal de la categoría actual se reproduce durante seis
segundos por vez. Siga las instrucciones a continuación.
Para buscar un canal en una lista
1 Presione durante la reproducción.
2 TGire el dial M.C. para seleccionar una categoría.
3 Seleccione una de las operaciones siguientes.
Exploración de la categoría: Mantenga presionado el dial M.C. para cambiar a la
exploración de la categoría.
Búsqueda de canal: Presione el dial M.C. para detener una exploración.
NOTA
Presione DISP para cambiar la información de pantalla entre “Nombre del canal”, “Nombre del artista”,
“Título de la canción”, “Información del contenido” y “Número del canal”.
Objetivo Funcionamiento
Seleccionar un canal 1 Ajuste el modo de funcionamiento en
[CHANNEL].
2 Presione o .
Si mantiene presionado cualquiera de los
botones, navegará rápidamente por los
canales.
Retroceder/avanzar 1 Ajuste el modo de funcionamiento en
[REPLAY].
2 Presione o .
Adelantar o atrasar 1 Ajuste el modo de funcionamiento en
[REPLAY].
2 Mantenga presionado o .
- 29 -- 29 -
Español
Opciones de exploración
Predefinir canales
Para predefinir un canal
1 Mientras recibe un canal que desea almacenar, mantenga presionado uno de los
botones de número (de 1/ a 6/ ) hasta que deje de parpadear.
Para reproducir los canales almacenados, seleccione la banda y presione un botón de
número (de 1/ a 6/).
Para predefinir un canal de la lista de programas
1 Mientras recibe un canal que desee almacenar, presione .
2 Gire el dial M.C. para seleccionar [PRESETS] y presione para confirmar.
3 Gire el dial M.C. para seleccionar un canal predefinido.
4 Mantenga presionado el dial M.C. para almacenar.
Para reproducir los canales almacenados, gire el dial M.C. para seleccionar un canal
predefinido y presione para confirmar.
Control parental
Algunos canales de SiriusXM tienen contenido para adultos. Puede bloquear estos
canales. Para obtener más información, consulte [PARENTAL CTRL] en la configuración
de SiriusXM (página 36).
Objetivo Funcionamiento
Detener una exploración (seleccionar el
canal o la canción que se reproduce)
Presione el dial M.C..
Cambiar a la canción siguiente/anterior
durante TuneScan
Presione o .
Cambiar al canal siguiente/anterior durante
la exploración de la categoría
Presione o .
Abortar una exploración (el último canal o
canción seguirá en reproducción cuando
termine la exploración)
Presione BAND/.

- 30 -
Español
Puede operar la unidad desde la Pioneer ARC APP instalada en un dispositivo iPhone/
Android. En algunas ocasiones, puede controlar los aspectos de la aplicación, como la
selección de origen, la pausa, etc. usando la unidad.
Para obtener más detalles sobre las funciones disponibles de la aplicación, consulte la
ayuda de la aplicación.
ADVERTENCIA
No intente operar la aplicación mientras conduce. Asegúrese de orillarse y estacionar el vehículo en un
lugar seguro antes de intentar usar los controles de la aplicación.
Para usuarios de iPhone
Esta función es compatible con los iPhones (iPhone 5 o versiones posteriores) con iOS
8.0 o versiones posteriores.
Puede descargar la Pioneer ARC APP en iTunes App Store.
Para usuarios de dispositivos Android
La función es compatible con dispositivos que posean Android, OS 4.1 o superior
instalado y que sean compatibles con AOA (Android Open Accesory) 2.0.
Puede descargar la Pioneer ARC APP en Google Play.
NOTA
Algunos dispositivos Android conectados a través de AOA 2.0 podrían no funcionar correctamente o
emitir sonidos debido a su propio diseño de software, sin importar la versión del sistema operativo.
1 Conecte la unidad al dispositivo móvil.
• Dispositivo iPhone/Android mediante USB (página 12)
• Dispositivo iPhone/Android mediante Bluetooth (página 14)
2 Presione el dial M.C. para mostrar el menú principal.
3 Gire el dial M.C. para seleccionar [SYSTEM] y presione para confirmar.
4 Gire el dial M.C. para seleccionar [PHONE CONNECT] y presione para confirmar.
5 Gire el dial M.C. para seleccionar una de las opciones siguientes y presione para
confirmar.
• Seleccione [IPHONE] para iPhone.
• Seleccione [ANDROID] para el dispositivo Android.
NOTA
Cuando cambie el ajuste de la conexión, aparecerá una pantalla con un mensaje que le advertirá
que se ha modificado el ajuste de la conexión. Presione el dial M.C. y gire el dial M.C. para
Uso de la Pioneer ARC APP
Realizar una conexión con Pioneer ARC APP
- 31 -- 31 -
Español
seleccionar [SRC OFF :YES] y presione para confirmar. La unidad se apagará automáticamente y se
ejecutará el ajusta.
6 Gire el dial M.C. para seleccionar una de las opciones siguientes.
Cuando [IPHONE] está seleccionado en paso 5
• Seleccione [WIRED] para la conexión USB.
• Seleccione [BLUETOOTH] para la conexión Bluetooth.
Cuando [ANDROID] está seleccionado en paso 5
• Seleccione [APP CONTROL] para la conexión USB.
• Seleccione [BLUETOOTH] para la conexión Bluetooth.
Si selecciona la conexión USB, Pioneer ARC APP en el dispositivo Android se inicia
automáticamente si [ON] está seleccionado en [P.APP AUTO ON] (página 41).
NOTA
Si aún no instaló la Pioneer ARC APP en el dispositivo Android, aparecerá un mensaje en el
dispositivo Android para indicarle que instale la aplicación. Seleccione [OFF] en [P.APP AUTO ON]
para quitar el mensaje (página 41).
7 Presione SRC/OFF para seleccionar cualquier origen.
8 Inicie Pioneer ARC APP en el dispositivo móvil mediante una conexión USB.
Mantenga presionado el dial M.C. mediante la conexión Bluetooth.
NOTA
Cuando conecte un dispositivo móvil que no sea un dispositivo iPhone/Android, seleccione [OTHERS]
en el menú [PHONE CONNECT] y seleccione [WIRED] (para la conexión USB) o [BLUETOOTH] (para la
conexión Bluetooth). Según el dispositivo móvil, es posible que no funcione correctamente.
1 Presione SRC/OFF para seleccionar [ANDROID].
Funcionamiento básico
Escuchar música en Android
Objetivo Funcionamiento
Seleccionar una pista Presione o .
Adelantar o atrasar Mantenga presionado o .
Pausa/reanudar reproducción Presione 4/PAUSE.

- 32 -
Español
(El modo de red solo está disponible para MVH-S600BS.)
También puede realizar varias modificaciones en los ajustes de AUDIO (página 36).
Esta unidad posee dos modos de operación: modo de red y modo estándar. Puede
cambiar de modo según lo desee (página 9).
Modo de red
Puede crear un sistema bidireccional de varios altavoces y amplificadores subwoofer con
un altavoz de rango alto, uno de rango medio y un subwoofer para la reproducción de
frecuencias altas, medias y bajas (bandas).
Modo estándar
Puede crear un sistema de 4 altavoces con altavoces delanteros y traseros o delanteros y
subwoofers, o un sistema de 6 altavoces con altavoces delanteros, traseros y subwoofers.
Puede ajustar el valor de frecuencia de corte y el valor de la pendiente de cada altavoz.
Se pueden ajustar los siguientes altavoces.
Modo de red:
[HIGH] (altavoz de rango alto HPF), [MID HPF] (altavoz de rango medio HPF), [MID LPF]
(altavoz de rango medio LPF), [SUBWOOFER]
Modo estándar:
[FRONT], [REAR], [SUBWOOFER]
NOTA
[SUBWOOFER] solo se puede seleccionar cuando se selecciona [ON] en [SUBWOOFER] (página 37).
1 Presione el dial M.C. para mostrar el menú principal.
2 Gire el dial M.C. para seleccionar [AUDIO] y presione para confirmar.
3 Gire el dial M.C. para seleccionar [CROSSOVER] y presione para confirmar.
4 Gire el dial M.C. para seleccionar la unidad de altavoz (filtro) que va a ajustar y
presione para confirmar.
Ajustes de audio
Modos de operación
Ajustar el valor de frecuencia de corte y el valor de
la pendiente

- 33 -- 33 -
Español
5 Gire el dial M.C. para seleccionar [HPF] o [LPF] según la unidad de altavoz (filtro) y
presione para confirmar.
6 Gire el dial M.C. para seleccionar una frecuencia de corte adecuada para la unidad
de altavoz (filtro) seleccionada en el paso 4 y presione para confirmar.
Modo de red:
De [1.25K] a [12.5K] (si selecciona [HIGH] o [MID LPF])
De [25] a [250] (si selecciona [MID HPF] o [SUBWOOFER])
Modo estándar:
De [25HZ] a [250HZ]
7 Gire el dial M.C. para seleccionar una pendiente adecuada para la unidad de
altavoz (filtro) seleccionada en el paso 4.
Modo de red:
De [–6] a [–24] (si selecciona [HIGH], [MID HPF] o [MID LPF])
De [–12] a [–36] (si selecciona [SUBWOOFER])
Modo estándar:
De [–6] a [–24] (si elige [FRONT] o [REAR])
De [–6] a [–36] (si selecciona [SUBWOOFER])
Puede ajustar distintos valores de configuración en el menú principal.
1 Presione el dial M.C. para mostrar el menú principal.
2 Gire el dial M.C. para seleccionar una de las categorías siguientes y presione para
confirmar.
• Ajustes de FUNCTION (página 33)
• Ajustes de AUDIO (página 36)
• Ajustes de SYSTEM (página 39)
• Ajustes de ILLUMINATION (página 43)
• Ajustes de MIXTRAX (página 44)
3 Gire el dial M.C. para seleccionar las opciones y presione para confirmar.
Los elementos del menú varían según el origen.
Ajustes
Ajustes de FUNCTION
- 34 -
Español
Elemento del menú Descripción
BSM
Almacena automáticamente las seis estaciones
con mejor recepción en los botones de números
(de 1/ a 6/).
LOCAL
FM: [OFF], [LV1], [LV2], [LV3], [LV4]
AM: [OFF], [LV1], [LV2]
Restringe la estación de sintonización según la
intensidad de la señal.
SEEK
[MAN], [PCH] Asigna los botones o para buscar
estaciones una a una (sintonización manual) o
selecciona una estación de los canales
predefinidos.
SAVE
Almacene la información sobre la canción que se
está reproduciendo en la lista de música de
Spotify.
UNSAVE
Quite la información de la canción almacenada
en [SAVE].
SEL DEVICE
Conecte un dispositivo Bluetooth de la lista.
S.RTRV
[1] (eficaz para tasas de
compresión bajas),
[2] (eficaz para tasas de
compresión altas),
[OFF]
Mejora el audio comprimido y restaura el sonido
óptimo.
BOOKMARK
Almacena la información de la pista que se esté
reproduciendo actualmente en su cuenta de
Pandora.
NEW STATION
[FROM TRACK], [FROM ARTIST] Crea una nueva estación según la pista o el
artista que está reproduciendo actualmente.
iPod
USB
iPod
AUX
- 35 -- 35 -
Español
Ajustes de SiriusXM
(Solo para MVH-S600BS)
PAUSE
Pausa o reanuda la reproducción.
PLAY
Comienza la reproducción.
STOP
Detiene la reproducción.
Elemento del menú Descripción
PAUSE
Pausa o reanuda la reproducción.
OPERATE MODE
[CHANNEL], [REPLAY] Presione los botones o para
seleccionar un canal o retroceder/avanzar.
TUNEMIX
[ON], [OFF] Cree un canal de música que reúna las canciones
de los canales de música almacenados en la
banda actual de valores predefinidos.
TUNE SCAN
Explora las canciones a partir de los canales de
música predefinidos.
TUNE START
[ON], [OFF] Comienza la reproducción de la transmisión
desde el comienzo de una canción cuando se
sintoniza un canal de música predefinido.
Elemento del menú Descripción

- 36 -
Español
(El modo de red solo está disponible para MVH-S600BS.)
PARENTAL CTRL
[LOCKED CH], [CLEAR ALL], [EDIT
CODE]
Introduzca el código de acceso actual en la
pantalla [PASSCODE] (el código de acceso
predeterminado es 0000).
1 Gire el dial M.C. para seleccionar un número.
2 Presione el dial M.C. para mover el cursor a la
posición siguiente.
3 Después de introducir el código de acceso,
presione el dial M.C..
4 Gire el dial M.C. para seleccionar uno de los
elementos del menú siguientes y presione
para confirmar.
• [LOCKED CH]: Bloquea el canal actual (excepto
los canales 0 y 1), que tienen contenido para
adultos.
1 Presione el dial M.C. para activar o desactivar
el bloqueo.
• [CLEAR ALL]: Desbloquea todos los canales
(excepto los canales 0 y 1) que tienen acceso
restringido.
1 Gire el dial M.C. para cambiar a [YES] y
presione para confirmar.
• [EDIT CODE]: Cambia el código de acceso.
1 Repita los pasos 1 a 3 para introducir un nuevo
código de acceso.
2 Después de introducir el código de acceso,
presione el dial M.C..
Se guarda el nuevo código de acceso.
Ajustes de AUDIO
Elemento del menú Descripción
- 37 -- 37 -
Español
Elemento del menú Descripción
EQ SETTING
[SUPER BASS], [POWERFUL],
[NATURAL], [VOCAL], [CUSTOM1],
[CUSTOM2], [FLAT]
Selecciona una banda y un nivel
de ecualización para una mayor
personalización.
Banda de ecualizador: de
[50HZ] a [12.5kHZ]
Nivel de ecualizador: de [–6] a
[+6]
Seleccione o personalice la curva del ecualizador.
• Cuando seleccione un ajuste, excepto
[CUSTOM1] y [CUSTOM2], para personalizar la
curva del ecualizador puede mantener
presionado el dial M.C. y almacenar la curva de
ecualizador personalizada en [CUSTOM1].
FADER*1*2 (solo para modo estándar)
Ajusta el balance de los altavoces delanteros y
traseros.
BALANCE
Ajusta el balance de los altavoces izquierdos y
derechos.
SUBWOOFER
[ON], [OFF] Establecido en [ON] al usar un altavoz subwoofer.
SUBWOOFER*3*4
[NOR], [REV] Selecciona la fase del subwoofer.
SPEAKER LEVEL
Modo de red: [HIGH L], [HIGH R],
[MID L], [MID R], [SUBWOOFER]
Modo estándar: [FRONT L],
[FRONT R], [REAR L], [REAR R],
[SUBWOOFER]
Nivel de salida: de [–24] a [10]
Seleccione una unidad de altavoz (filtro) y ajuste
el nivel de salida.
• Cada valor que haya ajustado cambia cuando
cambia el ajuste [POSITION] (página 38).
CROSSOVER
Seleccione una unidad de altavoz (filtro) para
ajustar la frecuencia de corte HPF o LPF y la
pendiente de cada unidad de altavoz.
Para obtener información sobre el ajuste
[CROSSOVER], consulte página 32.

- 38 -
Español
POSITION
[OFF], [FRONT LEFT] (asiento
delantero izquierdo), [FRONT
RIGHT] (asiento delantero
derecho), [FRONT] (asientos
delanteros), [ALL]*
* Solo para modo estándar
Seleccione una posición de audición para ajustar
automáticamente los niveles de salida de los
altavoces y agregar tiempo de demora que
corresponda al número y ubicaciones de los
asientos ocupados.
TIME ALGNMNT
[INITIAL], [OFF], [CUSTOM]
Seleccione un tipo de altavoz y
ajuste la distancia del altavoz
para una mayor personalización
en [CUSTOM].
Modo de red: [HIGH L], [HIGH R],
[MID L], [MID R], [SUBWOOFER]
Modo estándar: [FRONT L],
[FRONT R], [REAR L], [REAR R],
[SUBWOOFER]
Distancia del altavoz
(pulgadas): de [140] a [0]
Seleccione o personalice el ajuste de alineación
de tiempo para que refleje la distancia entre la
posición de quien escucha y cada altavoz.
• Seleccione [INITIAL] para inicializar el valor del
ajuste.
• Seleccione [OFF] para restablecer todos los
valores de los ajustes a 0.
• El ajuste [CUSTOM] está disponible cuando
[FRONT LEFT] o [FRONT RIGHT] está
seleccionado en [POSITION] (página 38).
• El ajuste [CUSTOM] no está disponible cuando
[OFF] está seleccionado en [SUBWOOFER]
(página 37).
SAVE SETTINGS
[YES], [NO] Guarda para recuperar más tarde los siguientes
ajustes de sonido en sus valores actuales:
[CROSSOVER], [SPEAKER LEVEL], [EQ SETTING],
[POSITION], [TIME ALGNMNT], [D.BASS],
[SUBWOOFER].
LOAD SETTINGS
Carga los ajustes de sonido cuando ya haya
realizado [SAVE SETTINGS].
D.BASS
[OFF], [LOW], [HI] Intensifique el nivel de graves de forma dinámica
para dar un efecto de subwoofer al sistema.
LOUDNESS
[OFF], [LOW], [MID], [HI] Compensa deficiencias para lograr un sonido
claro a volumen bajo.
Elemento del menú Descripción

- 39 -- 39 -
Español
*1 No está disponible cuando [SW] está seleccionado en [REAR-SP] en los ajustes de INITIAL
(página 10).
*2 No está disponible cuando [SUB.W/SUB.W] está seleccionado en [SP-P/O MODE] en los ajustes de
INITIAL (página 10).
*3 No está disponible cuando [FUL] está seleccionado en [REAR-SP] en los ajustes de INITIAL
(página 10).
*4 No está disponible cuando [REAR/REAR] está seleccionado en [SP-P/O MODE] en los ajustes de
INITIAL (página 10).
También puede acceder a estos menús cuando la unidad está apagada.
SLA
De [+4] a [–4] Ajusta el nivel de volumen de cada origen,
excepto FM.
Cada una de las combinaciones siguientes se
define en los mismos ajustes automáticamente.
• Al establecer una conexión USB, establezca
USB, iPod, PANDORA, ANDROID, SPOTIFY y APP.
• Al establecer una conexión Bluetooth,
establezca BT AUDIO, iPod, PANDORA,
ANDROID, SPOTIFY y APP.
Ajustes de SYSTEM
Elemento del menú Descripción
LANGUAGE
[ENG](inglés), [ESP](español),
[FRA] (francés de Canadá)
Seleccione el idioma en el que aparecerá la
información de texto de un archivo de audio
comprimido.
CLOCK SET
Ajuste el reloj (página 9).
12H/24H
[12H], [24H] Seleccione la notación de hora.
BEEP TONE (Solo para modo estándar)
[ON], [OFF] Se puede oír un sonido cuando se presiona
cualquier botón. Seleccione [OFF] para
desactivar esta función.
Elemento del menú Descripción

- 40 -
Español
INFO DISPLAY (solo para MVH-S400BT)
[SOURCE/SPEANA], [CLOCK/
SPEANA], [SRC/LIVE FX], [CLOCK/
LIVE FX], [SOURCE], [SPEANA],
[OFF]
Muestra el elemento en la pantalla de
información secundaria.
• Cuando [SOURCE/SPEANA] o [CLOCK/SPEANA]
está seleccionado, muestra la antena en lugar
del analizador de espectro en la fuente de
radio.
INFO DISPLAY (solo para MVH-S600BS)
[SOURCE/BTINFO], [SOURCE/
SPEANA], [CLOCK/BTINFO],
[CLOCK/SPEANA], [LEVEL METER],
[SPEANA], [OFF]
Muestra el elemento en la pantalla de
información secundaria.
• Cuando [SOURCE/SPEANA] o [CLOCK/SPEANA]
está seleccionado, muestra la antena en lugar
del analizador de espectro en la fuente de
radio.
DOT DISPLAY (solo para MVH-S600BS)
[SPEANA], [ICON] Seleccione [SPEANA] o [ICON] para que aparezca
en el lado izquierdo de la pantalla.
AUX
[ON], [OFF] Se define en [ON] cuando se utiliza un
dispositivo auxiliar conectado a la unidad.
BT AUDIO
[ON], [OFF] Active/desactive la señal Bluetooth.
SPOTIFY
[ON], [OFF] Se define en [ON] cuando se usa la función
Spotify.
BT MEM CLEAR
[YES], [NO] Borra los datos de dispositivos Bluetooth (lista de
dispositivos, código PIN, historial de llamadas,
libreta telefónica, números telefónicos
predefinidos) almacenados en la unidad.
[CLEARED] aparece cuando los datos se eliminan
satisfactoriamente.
PHONE CONNECT
[IPHONE], [ANDROID], [OTHERS] Seleccione el tipo de dispositivo y el método de
conexión adecuado en función de su dispositivo.
Para obtener información sobre las conexiones
para cada dispositivo, consulte página 41.
• Seleccione [OTHERS] cuando conecte un
dispositivo móvil que no sea iPhone ni Android.
Elemento del menú Descripción
- 41 -- 41 -
Español
Información sobre las conexiones para cada dispositivo
Los orígenes disponibles difieren según el valor de los ajustes.
Ajuste [PHONE CONNECT] de acuerdo con la tabla siguiente para el origen que desee
usar.
Para obtener información sobre la conexión Pioneer ARC APP, consulte página 30.
Cuando NO se realiza la conexión Pioneer ARC APP
P. AP P AU TO O N
[ON], [OFF]
Seleccione [ON] para iniciar automáticamente
Pioneer ARC APP cuando haya un dispositivo
Android conectado a la unidad mediante AOA.
(Solo disponible cuando [APP CONTROL] está
seleccionado en [PHONE CONNECT].)
USB AUTO
[ON], [OFF] Seleccione [ON] para cambiar automáticamente
al origen [USB] cuando un dispositivo USB/
iPhone se conecta a la unidad.
Seleccione [OFF] cuando un dispositivo USB/
iPhone esté conectado a la unidad solo para
cargarlo.
Valor de ajuste Dispositivo Método de
conexión
Orígenes disponibles
[WIRED]
(Cuando [IPHONE] o
[OTHERS] está
seleccionado)
iOS USB iPod, PANDORA, APP,
SPOTIFY
Bluetooth -
Android USB ANDROID (AOA)
Bluetooth -
[USB MTP](MTP)
(Cuando [ANDROID] está
seleccionado)
iOS USB iPod, PANDORA, APP,
SPOTIFY
Bluetooth -
Android USB USB MTP
Bluetooth -
Elemento del menú Descripción
- 42 -
Español
Cuando se realiza la conexión Pioneer ARC APP
[APP CONTROL](AOA)
(Cuando [ANDROID] está
seleccionado)
iOS USB iPod, PANDORA, APP,
SPOTIFY
Bluetooth -
Android USB ANDROID (AOA)
Bluetooth -
[BLUETOOTH] iOS USB -
Bluetooth iPod, PANDORA, APP,
SPOTIFY
Android USB USB MTP
Bluetooth PANDORA, APP,
SPOTIFY
Valor de ajuste Dispositivo Método de
conexión
Orígenes disponibles
[WIRED]
(Cuando [IPHONE] o
[OTHERS] está
seleccionado)
iOS USB iPod, PANDORA,
SPOTIFY
Bluetooth -
Android USB ANDROID, (música
Android)
Bluetooth -
[USB MTP](MTP)
(Cuando [ANDROID] está
seleccionado)
iOS USB iPod, PANDORA,
SPOTIFY
Bluetooth -
Android USB USB MTP
Bluetooth -
[APP CONTROL](AOA)
(Cuando [ANDROID] está
seleccionado)
iOS USB iPod, PANDORA,
SPOTIFY
Bluetooth -
Android USB ANDROID, (música
Android)
Bluetooth -
Valor de ajuste Dispositivo Método de
conexión
Orígenes disponibles

- 43 -- 43 -
Español
[BLUETOOTH] iOS USB -
Bluetooth iPod, PANDORA,
SPOTIFY
Android USB USB MTP
Bluetooth PANDORA, ANDROID
(música Android),
SPOTIFY
Ajustes de ILLUMINATION
Elemento del menú Descripción
COLOR (solo para MVH-S600BS)
[KEY COLOR], [DISP COLOR],
[BOTH COLOR]
Seleccione el color para las teclas o la pantalla de
la unidad a partir de los 12 colores predefinidos,
[SCAN] o [CUSTOM]*.
• [SCAN]: Pasa automáticamente por una
variedad de colores.
• [CUSTOM]*:
1 Mantenga presionado el dial M.C. hasta que
aparezca la pantalla de ajuste del color.
2 Ajuste el color primario (R (rojo)/G (verde)/B
(azul)) y el nivel de brillo (de [0] a [60]).
No puede seleccionar un nivel por debajo de
10 para R (rojo), G (verde) y B (azul) a la vez.
También puede personalizar los colores
predefinidos. Seleccione uno de los colores
predefinidos y mantenga presionado el dial M.C.
hasta que aparezca la pantalla de ajuste del
color.
* El ajuste de CUSTOM solo está disponible para [KEY
COLOR] y [DISP COLOR].
DIM SETTING
[SYNC ILLUMI]*, [SYNC CLOCK],
[MANUAL]
* Solo para MVH-S600BS
Cambia el brillo de la pantalla.
Valor de ajuste Dispositivo Método de
conexión
Orígenes disponibles

- 44 -
Español
BRIGHTNESS (solo para MVH-S600BS)
[KEY], [DISP] Seleccione el brillo para las teclas o la pantalla de
la unidad entre [1] y [10].
Los rangos de ajuste disponibles difieren según
[DIM SETTING].
BRIGHTNESS (solo para MVH-S400BT)
De [1] a [10] Cambia el brillo de la pantalla.
Los rangos de ajuste disponibles difieren según
[DIM SETTING].
PHONE COLOR (solo para MVH-S600BS)
[FLASHING] Seleccione el color de las teclas para cuando
recibe una llamada.
Aplica el color definido por [KEY COLOR].
De [FLASH FX1] a [FLASH FX6] Pasa automáticamente por una variedad de
colores.
[OFF] El color de las teclas no cambia.
ILLUMI FX (solo para MVH-S600BS)
[ON], [OFF] El efecto lumínico se puede ver cuando:
–hay una llamada entrante
–está haciendo una llamada telefónica
El efecto lumínico se activará cuando se
encienda/apague la corriente de ACC,
independientemente de este ajuste.
Ajustes de MIXTRAX
Elemento del menú Descripción
SHORT PLAYBCK
[1.0 MIN], [1.5 MIN], [2.0 MIN],
[2.5 MIN], [3.0 MIN], [OFF]
Seleccione la duración de la reproducción.
FLASH AREA (solo para MVH-S600BS)
[KEY/DISPLAY], [KEY], [OFF] Seleccione el área del efecto lumínico.
Cuando [OFF] está seleccionado, la definición
de color en los ajustes de ILLUMINATION
(página 43) se usa como color de pantalla.
Elemento del menú Descripción
- 45 -- 45 -
Español
FLASH PATTERN (solo para MVH-S600BS)
De [SOUND LEVEL 1] a [SOUND
LEVEL 6]
Cambia el efecto lumínico según el nivel de
sonido y de graves.
El patrón intermitente cambia según el nivel
de sonido.
De [LOW PASS 1] a [LOW PASS 6] El patrón intermitente cambia según el nivel
de graves.
[RANDOM1] El patrón intermitente cambia al azar según el
modo de nivel de sonido y el modo de paso
bajo.
[RANDOM2] El patrón intermitente cambia al azar según el
modo de nivel de sonido.
[RANDOM3] El patrón intermitente cambia al azar según el
modo de paso bajo.
MIX PATTERN (solo para MVH-S400BT)
[SOUND LEVEL] Cambia los efectos especiales MIXTRAX según
el nivel de audio.
El patrón de mezcla cambia según el nivel de
sonido.
[LOW PASS] El patrón de mezcla cambia según el nivel de
graves.
[RANDOM] El patrón de mezcla cambia al azar según el
modo de nivel de sonido y el modo de paso
bajo.
DISPLAY FX
[ON], [OFF] Active/desactive los efectos especiales
MIXTRAX.
CUT IN FX
[ON], [OFF] Active/desactive los efectos sonoros MIXTRAX
mientras cambia las pistas manualmente.
Elemento del menú Descripción
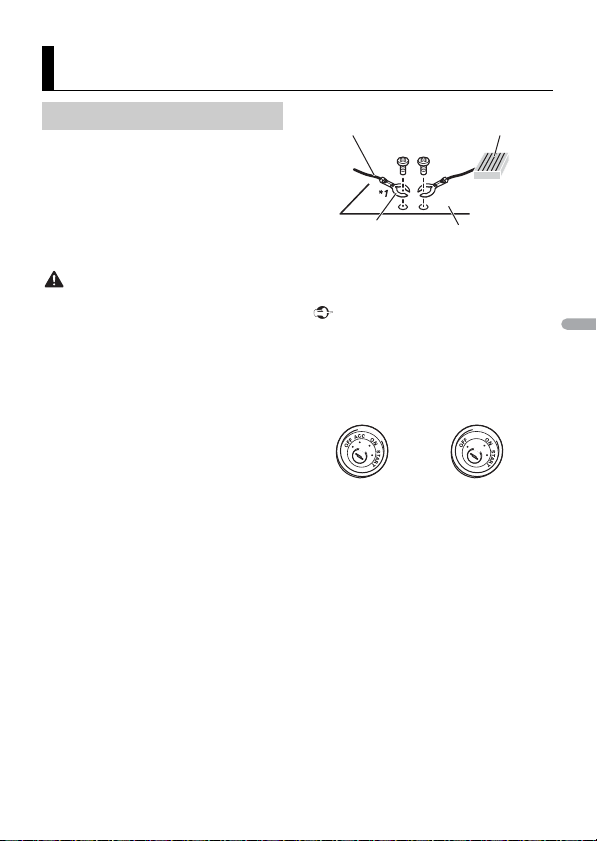
- 46 -
Español
(El modo de red solo está disponible para
MVH-S600BS.)
En el siguiente, "NW" representa el modo
de red y "STD" representa el modo
estándar. Según las conexiones que haya
establecido, cambie el modo del altavoz al
modo estándar (STD) o al modo de red
(NW) (página 9).
ADVERTENCIA
• Cuando se utiliza la salida de altavoces en
4 canales, use altavoces con más de 50 W
(potencia de entrada máxima) y entre 4 y
8 Ω (valor de impedancia). No utilice
altavoces de 1 a 3 Ω con esta unidad.
• Cuando la salida del altavoz trasero se usa
con 2 Ω de subwoofer, use altavoces con
más de 70 W (potencia de entrada
máxima).
* Consulte las conexiones para ver un
método de conexión.
• El cable negro es la tierra. Al instalar esta
unidad o un amplificador de potencia (se
vende por separado), asegúrese de
conectar primero el cable a tierra.
Asegúrese de que el cable a tierra esté
conectado correctamente a las piezas
metálicas de la carrocería del automóvil.
El cable a tierra del amplificador de
potencia y el de esta unidad o de
cualquier otro dispositivo deben
conectarse al automóvil por separado
con tornillos independientes. Si el tornillo
del cable a tierra se afloja o cae, podría
producir un incendio, lo que provocaría
humo o un mal funcionamiento.
Importante
• Al instalar esta unidad en un vehículo sin
posición ACC (accesorio) en la llave de
encendido, si no se conecta el cable rojo
al terminal que detecta el
funcionamiento de la llave de encendido,
es posible que se agote la batería.
• Utilice esta unidad con una batería de
12 voltios y conexión a tierra negativa
únicamente. En caso contrario, se podría
producir un incendio o un mal
funcionamiento.
• Para evitar un cortocircuito,
sobrecalentamiento o un mal
funcionamiento, asegúrese de seguir las
indicaciones siguientes.
– Desconecte el terminal negativo de la
batería antes de la instalación.
– Asegure el cableado con pinzas para
cable o cinta adhesiva. A fin de proteger
el cableado que entre en contacto con
las piezas metálicas, envuélvalo en cinta
adhesiva.
Conexiones/instalación
Conexiones
Cable a tierra
AMPLIFICADOR
DE POTENCIA
Otros dispositivos
(Otro dispositivo
electrónico en el
automóvil)
Piezas metálicas
de la carrocería
del automóvil
*1 No se suministra para esta unidad
Posición ACC Sin posición ACC
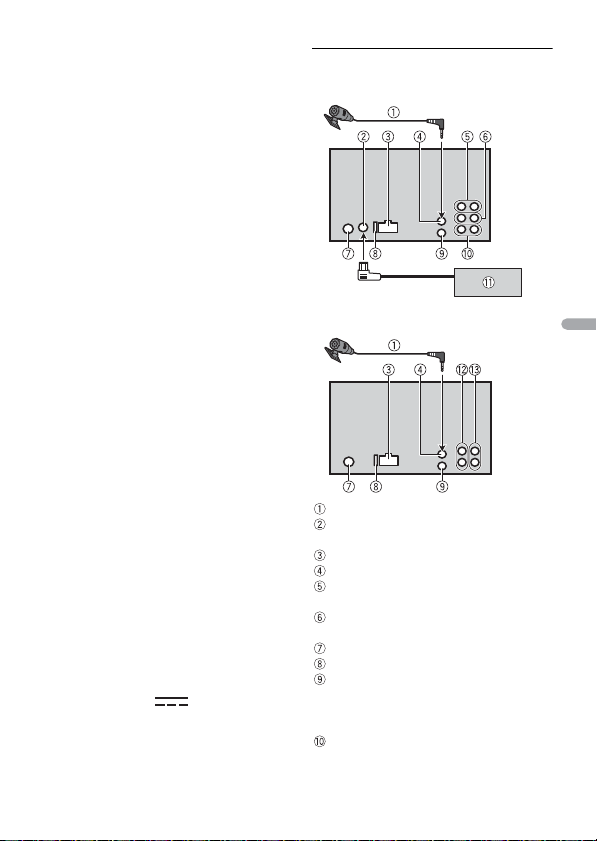
- 47 -
Español
–Coloque todos los cables lejos de las
piezas móviles, como la palanca de
cambios y los rieles de los asientos.
– Coloque todos los cables lejos de
lugares calientes, como cerca de la
salida de la calefacción.
– No pase el cable amarillo por el orificio
del compartimiento del motor para
conectarlo a la batería.
– Cubra los conectores de los cables
desconectados con cinta aisladora.
– No acorte ningún cable.
– Nunca corte el aislamiento del cable de
alimentación de esta unidad para
compartir la alimentación con otros
dispositivos. La capacidad actual del
cable es limitada.
– Utilice un fusible con la capacidad
indicada.
– Nunca conecte el cable negativo del
altavoz directamente a la tierra.
– Nunca use cinta para unir los cables
negativos de varios altavoces.
• Cuando esta unidad está encendida, las
señales de control se envían a través del
cable azul/blanco. Conecte este cable al
control remoto del sistema de un
amplificador de potencia externo o al
terminal de control del relé de la antena
automática del vehículo (máx. 300 mA,
12 V cc). Si el vehículo está equipado con
una antena en el parabrisas, conéctelo al
terminal de alimentación del
amplificador de la antena.
• Nunca conecte el cable azul/blanco al
terminal de alimentación de un
amplificador de potencia externo.
Además, nunca lo conecte al terminal de
alimentación de la antena automática. De
lo contrario, es posible que la batería se
agote o se produzca un mal
funcionamiento.
• El símbolo gráfico que se
encuentra en el producto significa
corriente continua.
Esta unidad
Micrófono 3 m
Entrada del sintonizador para vehículos
SiriusXM Connect
Entrada del cable de alimentación
Entrada del micrófono
Salida trasera (STD) o salida de rango
medio (NW)
Salida delantera (STD) o salida de rango
alto (NW)
Entrada de la antena
Fusible (10 A)
Entrada para control remoto cableado
Se puede conectar el adaptador
cableado para control remoto (se vende
por separado).
Salida del subwoofer
MVH-S600BS
MVH-S400BT
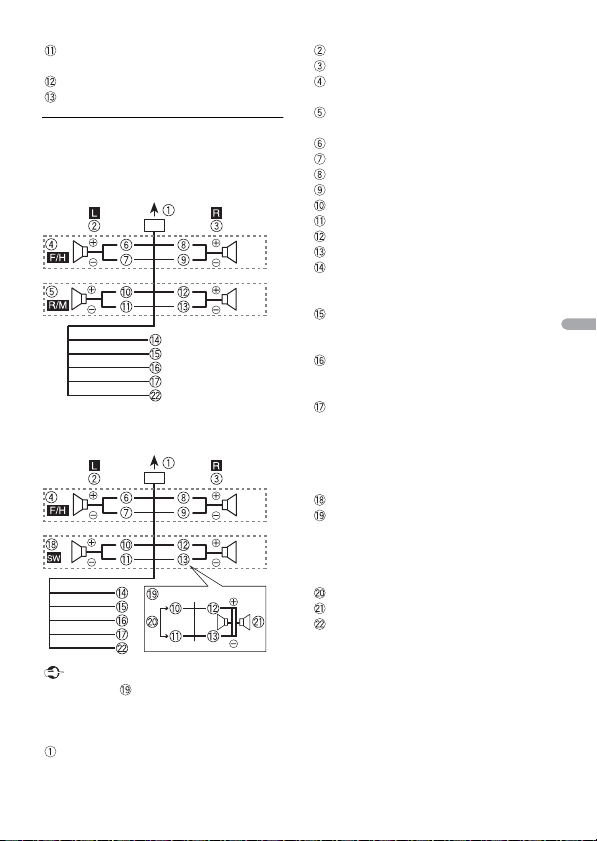
- 48 -
Español
Sintonizador para vehículos SiriusXM
Connect (se vende por separado)
Salida trasera o salida del subwoofer
Salida delantera
Cable de alimentación
Realice estas conexiones cuando no
conecte un cable de altavoz trasero o de
altavoz de rango medio a un subwoofer.
Realice estas conexiones cuando use un
subwoofer sin el amplificador opcional.
Importante
En el caso de que figura arriba, dos
subwoofers de 4 Ω en paralelo
representarán una carga de 2 Ω.
A la entrada del cable de alimentación
Izquierda
Derecha
Altavoz delantero (STD) o altavoz rango
alto (NW)
Altavoz trasero (STD) o altavoz de rango
medio (NW)
Blanco
Blanco/negro
Gris
Gris/negro
Verde
Verde/negro
Violeta
Violeta/negro
Negro (tierra de la carrocería)
Conéctelo a una ubicación metálica
limpia y sin pintura.
Amarillo
Conéctelo al terminal de alimentación
constante de 12 V.
Rojo
Conéctelo al terminal controlado por la
llave de encendido (12 V cc).
Azul/blanco
Conéctelo al terminal de control del
sistema del amplificador de potencia o
al terminal de control del relé de la
antena automática (máx. 300 mA,
12 V cc).
Subwoofer (4 Ω)
Cuando use un subwoofer de 2 Ω,
asegúrese de conectar el subwoofer a
los cables violeta y violeta/negro de
esta unidad. No conecte nada en los
cables verde y verde/negro.
No se usa.
Subwoofer (4 Ω) × 2
Naranja/blanco (solo para MVH-
S600BS)
Conéctelo a la señal de iluminación del
automóvil.
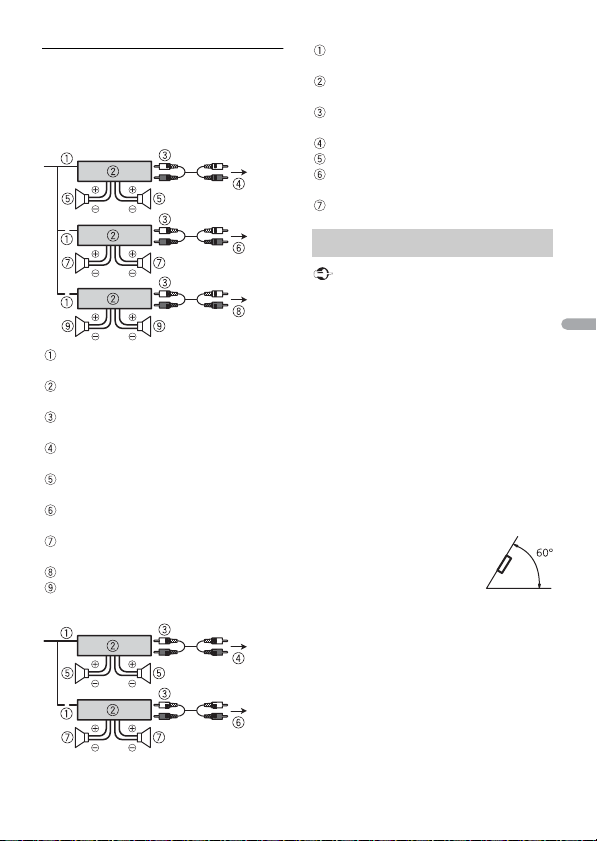
- 49 -
Español
Amplificador de potencia (se
vende por separado)
Realice estas conexiones cuando use un
amplificador opcional.
Control remoto del sistema
Conéctelo al cable azul/blanco.
Amplificador de potencia (se vende por
separado)
Conéctelo a los cables RCA (se venden
por separado)
A la salida trasera (STD) o salida de
rango medio (NW)
Altavoz trasero (STD) o altavoz de rango
medio (NW)
A la salida delantera (STD) o salida de
rango alto (NW)
Altavoz delantero (STD) o altavoz rango
alto (NW)
A la salida del subwoofer
Subwoofer
Control remoto del sistema
Conéctelo al cable azul/blanco.
Amplificador de potencia (se vende por
separado)
Conéctelo a los cables RCA (se venden
por separado)
A la salida delantera
Altavoz delantero
A la salida trasera o la salida del
subwoofer
Altavoz trasero o subwoofer
Importante
• Compruebe todas las conexiones y los
sistemas antes de la instalación final.
• No utilice piezas no autorizadas, ya que
pueden causar un mal funcionamiento.
• Consulte con su concesionario si la
instalación exige hacer orificios u otras
modificaciones en el vehículo.
• No instale esta unidad donde:
– pueda interferir con el funcionamiento
del vehículo.
– pueda causar lesiones a un pasajero
como resultado de una frenada
repentina.
• Instale esta unidad lejos de lugares
calientes, como cerca de la salida de la
calefacción.
• Se logra un rendimiento
óptimo cuando la unidad
se instala con un ángulo de
menos de 60°.
• En la instalación, asegure una debida
dispersión del calor durante el
funcionamiento de la unidad, deje
espacio suficiente detrás del panel
trasero y envuelva los cables sueltos para
que no bloqueen la ventilación.
MVH-S600BS
MVH-S400BT
Instalación

- 50 -
Español
1 Establezca la posición adecuada
donde coincidan los orificios del
soporte y del costado de la unidad.
2 Apriete los tornillos a cada lado.
Tornillo
Soporte de montaje
Tablero o consola
• Use tornillos de cabeza redonda
(5 mm × 9 mm) o cabeza plana
(5 mm × 9 mm), según los orificios
para tornillos del soporte.
El micrófono se debe colocar directamente
en frente al conductor, a una distancia
adecuada para captar la voz con claridad.
PRECAUCIÓN
Si el cable del micrófono se enrosca en la
columna de dirección o la palanca de
cambios, puede ser sumamente peligroso.
Asegúrese de instalar el micrófono de
modo que no obstruya la conducción. Se
recomienda utilizar las pinzas (se venden
por separado) para recoger el cable.
NOTA
Según el modelo del vehículo, el largo del
cable del micrófono puede ser muy corto
cuando monte el micrófono en la visera. En
estos casos, instale el micrófono en la
columna de dirección.
Para instalarlo en la visera
1 Calce el cable del micrófono en la
ranura.
2 Instale la pinza del micrófono en la
visera.
Si baja la visera, se reducirá la tasa de
reconocimiento de voz.
Para instalarlo en la columna de
dirección
1 Deslice la base del micrófono para
desconectarla de la pinza del
micrófono.
Instalación del micrófono
Deje espacio
suficiente
5cm
5cm
Cable del
micrófono
Ranura
Pinza del micrófono
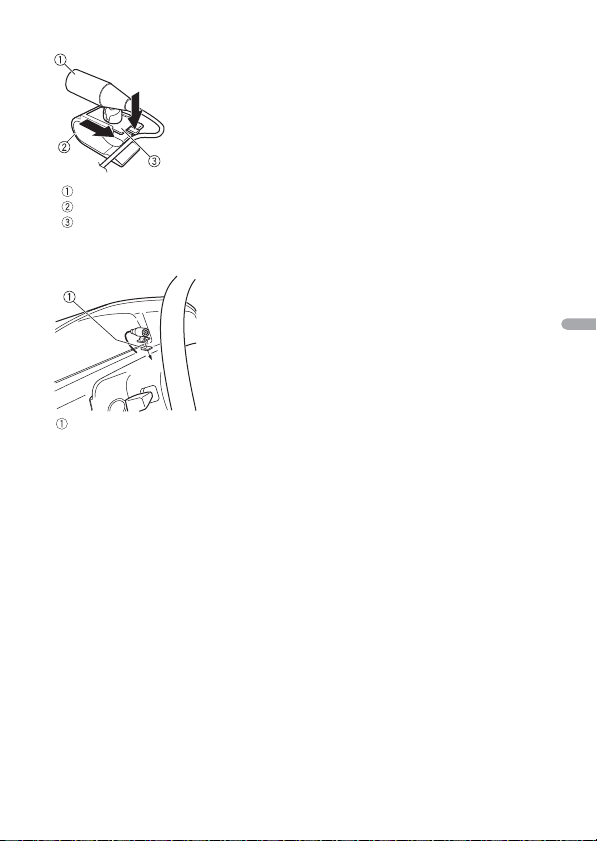
- 51 -
Español
Micrófono
Pinza del micrófono
Base del micrófono
2 Instale el micrófono en la parte trasera
de la columna de dirección.
Cinta de dos caras

- 52 -
Español
La pantalla vuelve automáticamente a la
pantalla normal.
→ No se ha efectuado ninguna operación
en 30 segundos aproximadamente.
–Realice una operación.
El rango de repetición de reproducción
cambia inesperadamente.
→ Según el rango de repetición de
reproducción, el rango seleccionado
puede cambiar cuando selecciona otra
carpeta o pista, o cuando adelanta/
atrasa.
–Vuelva a seleccionar el rango de
repetición de reproducción.
No se reproduce una subcarpeta.
→ Las subcarpetas no se reproducen
cuando [FLD] (repetición de carpeta)
está seleccionado.
–Seleccione otro rango de repetición
de reproducción.
El sonido es intermitente.
→ Utiliza un dispositivo, como un teléfono
celular, que puede causar interferencia
audible.
–Aleje de la unidad los dispositivos
eléctricos que puedan causar
interferencia.
El sonido del origen de audio Bluetooth
no se reproduce.
→ Hay una llamada en curso en un
teléfono celular conectado por
Bluetooth.
–El sonido se reproducirá cuando
finalice la llamada.
→ Se está utilizando un teléfono celular
conectado por Bluetooth.
–Deje de usar el teléfono celular.
→ La conexión entre la unidad y el
teléfono celular no se estableció
correctamente después de una llamada
hecha por un teléfono celular
conectado por Bluetooth.
–Vuelva a establecer la conexión
Bluetooth entre la unidad y el teléfono
celular.
Comunes
AMP ERROR
→ Esta unidad no funciona o la conexión
con los altavoces es incorrecta.
→ El circuito de protección está activado.
–Compruebe la conexión de los
altavoces.
–Gire la llave de encendido a la posición
OFF y nuevamente a ON. Si el mensaje
se mantiene, pida asistencia al
concesionario o a un centro de
servicio Pioneer autorizado.
NO XXXX (NO TITLE, por ejemplo)
→ No hay información de texto
incorporada.
–Cambie la pantalla o reproduzca otra
pista/archivo.
Dispositivo USB/iPhone
FORMAT READ
→ En ocasiones, hay una demora entre el
comienzo de la reproducción y el
momento en que empieza a oír el
sonido.
–Espere hasta que desaparezca el
mensaje y oiga el sonido.
Información adicional
Solución de problemas
Mensajes de error

- 53 -
Español
NO AUDIO
→ No hay canciones.
–Transfiera los archivos de audio al
dispositivo USB y conéctelo.
→ El dispositivo USB conectado tiene
activada la seguridad.
–Siga las instrucciones del dispositivo
USB para desactivar la seguridad.
SKIPPED
→ El dispositivo USB conectado contiene
archivos con protección DRM.
–Se omiten los archivos protegidos.
PROTECT
→ Todos los archivos del dispositivo USB
conectado están protegidos por DRM.
–Sustituya el dispositivo USB.
N/A USB
→ Esta unidad no admite el dispositivo
USB conectado.
– Desconecte el dispositivo y sustitúyalo
por un dispositivo USB compatible.
HUB ERROR
→ El dispositivo USB conectado a través de
concentradores USB no es compatible
con esta unidad.
–Conecte el dispositivo USB
directamente a la unidad usando un
cable USB.
CHECK USB
→ El conector USB o el cable USB están en
cortocircuito.
–Compruebe que el conector USB o el
cable USB no estén atrapados por algo
o dañados.
→ El dispositivo USB conectado consume
por encima de la corriente máxima
permitida.
–Desconecte el dispositivo USB y no lo
use. Gire la llave de encendido a la
posición OFF y nuevamente a ACC u
ON. Conecte únicamente dispositivos
USB aptos.
→ El iPhone funciona correctamente, pero
no se carga.
–Asegúrese de que el cable de
conexión del iPhone no esté
provocando un cortocircuito (por
ejemplo, no esté atrapado entre
objetos metálicos). Después de
comprobarlo, gire la llave de
encendido a la posición OFF y
nuevamente a ON, o desconecte el
iPhone y vuelva a conectarlo.
ERROR-19
→ Error de comunicación.
–Realice una de las operaciones
siguientes y vuelva al origen USB.
• Gire la llave de encendido a la
posición OFF y nuevamente a ON.
• Desconecte el dispositivo USB.
• Cambie a otro origen.
→ Error del iPhone.
–Desconecte el cable del iPhone. Una
vez que aparezca el menú principal
del iPhone, vuelva a conectar el
iPhone y reinícielo.
ERROR-23
→ El dispositivo USB no se formateó
correctamente.
–Formatee el dispositivo USB con
FAT12, FAT16 o FAT32.
ERROR-16
→ La versión de firmware del iPhone es
antigua.
–Actualice la versión del iPhone.
→ Error del iPhone.
–Desconecte el cable del iPhone. Una
vez que aparezca el menú principal
del iPhone, vuelva a conectar el
iPhone y reinícielo.
STOP
→ No hay canciones en la lista actual.
–Seleccione una lista que contenga
canciones.
- 54 -
Español
NO BT DEVICE GO TO BT MENU TO
REGISTER
→ No se encontró ningún dispositivo
Bluetooth.
–Conecte la unidad y el iPhone
mediante Bluetooth (página 14).
CONN. FAILED PRESS BAND KEY TO
RETRY
→ Error de conexión Bluetooth con
iPhone.
–Presione BAND/ para volver a
establecer una conexión.
DISCONNECTED PRESS BAND KEY TO
RETRY
→ Error de conexión Bluetooth con
iPhone.
–Presione BAND/ para volver a
establecer una conexión.
Dispositivo Bluetooth
ERROR-10
→ Error de alimentación del módulo
Bluetooth de la unidad.
–Gire la llave de encendido a la posición
OFF y nuevamente a ACC u ON.
Pandora
ERROR-19
→ Error de comunicación.
–Desconecte el cable del dispositivo.
Una vez que aparezca el menú
principal del dispositivo, vuelva a
conectar el dispositivo y reinícielo.
NOT FOUND
→ La aplicación Pandora aún no comenzó
a ejecutarse.
–Inicie la aplicación Pandora.
RATING ERROR
→ La función de calificación con pulgar
está deshabilitada.
–Ejecute el mismo comando para otra
pista.
CAN'T SKIP
→ La operación de salto está
deshabilitada.
–Ejecute el mismo comando para otra
pista.
THUMB ERROR
→ No se puede guardar la calificación.
–Vuelva a intentarlo más tarde.
BOOKMARK ERR
→ No se puede guardar el Favorito.
–Vuelva a intentarlo más tarde.
UNABLE TO ADD
→ No se puede agregar la estación.
–Vuelva a intentarlo más tarde.
SKIP LIMIT
→ Debido a restricciones de las licencias
musicales, Pandora limita el número
total de saltos por hora.
–Espere a que Pandora le permita
volver a realizar saltos.
UPDATE APP
→ La versión de la aplicación Pandora no
es compatible.
–Conecte un dispositivo que tenga
instalada una versión compatible de la
aplicación Pandora.
LOG IN ERROR
→ No inició sesión en su cuenta Pandora.
–Desconecte el cable del dispositivo e
inicie sesión en su cuenta Pandora.
Luego, vuelva a conectar el
dispositivo.
ERROR
→ Aparece un mensaje de error del
dispositivo en la aplicación Pandora.
–Compruebe el dispositivo conectado.
→ El sistema Pandora está en
mantenimiento.
- 55 -
Español
–Vuelva a intentarlo más tarde.
NO STATIONS
→ No se encontró ninguna estación.
–Cree una estación en la aplicación
Pandora en su dispositivo conectado.
NO BT DEVICE GO TO BT MENU TO
REGISTER
→ No se encontró ningún dispositivo
Bluetooth.
–Conecte la unidad y el dispositivo
mediante Bluetooth (página 14).
CONN. FAILED PRESS BAND KEY TO
RETRY
→ Error de conexión Bluetooth.
–Presione BAND/ para volver a
establecer una conexión.
CHECK APP PRESS BAND KEY TO RETRY
→ Error de conexión a la aplicación
Pandora.
–Presione BAND/ para volver a
establecer una conexión.
DISCONNECTED PRESS BAND KEY TO
RETRY
→ Se perdió la conexión Bluetooth.
–Presione BAND/ para volver a
establecer una conexión.
STATION LIMIT
→ No se puede agregar una nueva
estación.
–Elimine una estación antigua para
dejar un lugar libre para una nueva.
CANNOT DELETE
→ No se puede eliminar la estación.
–Ejecute el mismo comando para otra
estación.
BAD NETWORK
→ El dispositivo conectado está fuera del
área.
–Conecte el dispositivo a una red.
UNAVAILAVLE
→ El dispositivo conectado está fuera del
área.
–Conecte el dispositivo a una red.
→ La operación está deshabilitada.
–Ejecute el mismo comando para otra
estación.
APP
NO BT DEVICE GO TO BT MENU TO
REGISTER
→ No se encontró ningún dispositivo
Bluetooth.
–Conecte la unidad y el dispositivo
mediante Bluetooth (página 14).
CONN. FAILED PRESS BAND KEY TO
RETRY
→ Error de conexión Bluetooth.
–Presione BAND/ para volver a
establecer una conexión.
DISCONNECTED PRESS BAND KEY TO
RETRY
→ Error de conexión Bluetooth.
–Presione BAND/ para volver a
establecer una conexión.
CHECK APP
→ Error de conexión a la aplicación.
–Siga las instrucciones que aparecen en
pantalla.
NOT FOUND
→ La aplicación aún no comenzó a
ejecutarse.
–Opere el dispositivo móvil para iniciar
la aplicación.
Spotify
NO BT DEVICE GO TO BT MENU TO
REGISTER
→ No se encontró ningún dispositivo
Bluetooth.
- 56 -
Español
–Conecte la unidad y el dispositivo
mediante Bluetooth (página 14).
CONN. FAILED PRESS BAND KEY TO
RETRY
→ Error de conexión Bluetooth.
–Presione BAND/ para volver a
establecer una conexión.
CHECK APP PRESS BAND KEY TO RETRY
→ Error de conexión a la aplicación
Spotify.
–Presione BAND/ para volver a
establecer una conexión.
DISCONNECTED PRESS BAND KEY TO
RETRY
→ Se perdió la conexión Bluetooth.
–Presione BAND/ para volver a
establecer una conexión.
CHECK APP
→ Error de conexión a la aplicación
Spotify.
–Siga las instrucciones que aparecen en
pantalla.
Radio satelital SiriusXM (solo
para MVH-S600BS)
CHECK ANTENNA
→ El cable de la antena puede estar
desconectado o dañado.
–Compruebe la conexión de la antena o
sustitúyala si está dañada.
CHECK TUNER
→ La radio tiene problemas para
comunicarse con el sintonizador para
vehículos SiriusXM Connect. El
sintonizador puede estar desconectado
o dañado.
–Compruebe que el cable del
sintonizador para vehículos SiriusXM
Connect esté conectado
correctamente a la radio.
NO SIGNAL
→ El sintonizador para vehículos SiriusXM
Connect tiene dificultades para recibir
la señal satelital de SiriusXM.
–Mueva el vehículo a un lugar exterior
con una vista despejada del cielo sur.
–Asegúrese de que la antena SiriusXM
de montaje magnético esté ubicada
sobre una superficie metálica en el
exterior del vehículo.
–Aleje la antena SiriusXM de las
obstrucciones.
SUBSCRIPTION UPDATED
→ Esta unidad detectó un cambio en el
estado de su suscripción a SiriusXM.
–Presione cualquier tecla para borrar el
mensaje.
CH UNAVAIL
→ El canal que solicitó no está disponible.
–Compruebe el listado de canales de
SiriusXM.
CHAN UNSUB
→ El canal que solicitó no está incluido en
su paquete de suscripción a SiriusXM.
–Compruebe el contenido de su
paquete de suscripción a SiriusXM.
CH LOCKED
→ La función de control parental bloqueó
el canal.
–Defina [LOCKED CH] en [OFF] o [CLEAR
ALL] en [YES] en los ajustes de
FUNCTION (página 36).
NO TUNEMIX CH
→ Hay solo un canal de música en la
banda.
–Seleccione una banda con dos canales
de música o más.
–Agregue más canales de música a la
banda actual.
- 57 -
Español
Dispositivo de almacenamiento
USB
• No se admiten las conexiones a través de
concentradores USB.
• Asegure el dispositivo de
almacenamiento USB con firmeza antes
de conducir. No deje caer el dispositivo
de almacenamiento USB al piso, donde
pueda quedar atascado bajo el pedal del
freno o el acelerador.
• Según el dispositivo de almacenamiento
USB, pueden producirse los problemas
siguientes.
– Las operaciones pueden variar.
–Es posible que no se reconozca el
dispositivo de almacenamiento.
–Es posible que los archivos no se
reproduzcan correctamente.
– Es posible que el dispositivo provoque
interferencia audible cuando escuche la
radio.
iPhone
• No deje el iPhone en lugares con altas
temperaturas.
• Asegure el iPhone con firmeza cuando
conduzca. No deje caer el iPhone al piso,
donde pueda quedar atascado bajo el
pedal del freno o el acelerador.
• La unidad no mostrará los textos
incompatibles guardados en el iPhone.
• Solo se pueden mostrar los primeros 32
caracteres del nombre de archivo
(incluida la extensión del archivo) o el
nombre de la carpeta.
• Es posible que la unidad no funcione
correctamente según la aplicación usada
para codificar los archivos WMA.
• Puede existir un leve retraso al comienzo
de la reproducción de archivos de audio
que contienen datos de imagen, o
archivos de audio almacenados en un
dispositivo USB con varias jerarquías de
carpeta.
PRECAUCIÓN
• Pioneer no puede garantizar la
compatibilidad con todos los dispositivos
de almacenamiento masivo USB y no
asume responsabilidad por ninguna
pérdida de datos en los reproductores
multimedia, teléfonos inteligentes ni
demás dispositivos mientras se use este
producto.
• No deje un dispositivo USB en un lugar
sometido a altas temperaturas.
Archivos WMA
Archivos MP3
Pautas de manipulación
Compatibilidad de audio
comprimido
Extensión de archivos .wma
Velocidad de bits De 48 kbps a 320 kbps
(CBR), de 48 kbps a
384 kbps (VBR)
Frecuencia de
muestreo
32 kHz, 44,1 kHz,
48 kHz
Windows Media™
Audio Professional,
Lossless, transmisión
de voz/DRM/
transmisión con video
No compatible
Extensión de archivos .mp3
Velocidad de bits De 8 kbps a 320 kbps
(CBR), VBR
Frecuencia de
muestreo
De 8 kHz a 48 kHz
(32 kHz, 44,1 kHz,
48 kHz para énfasis)
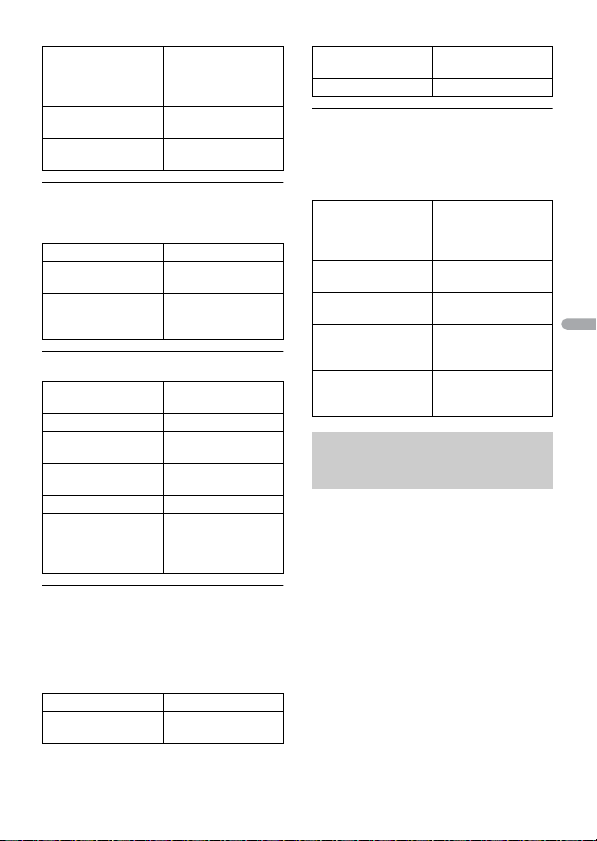
- 58 -
Español
Archivos WAV
• Los formatos de archivo WAV no se
pueden conectar mediante MTP.
Archivos AAC
Archivos FLAC
• Los formatos de archivo FLAC no se
pueden conectar mediante MTP.
• Es posible que los archivos FLAC no
puedan reproducirse, según el
codificador.
Dispositivo USB
• Puede haber un leve retraso al comenzar
a reproducir archivos de audio en un
dispositivo de almacenamiento USB con
varias jerarquías de carpetas.
Esta unidad es compatible con los modelos de
iPhone siguientes. A continuación se muestran
las versiones de software de iPhone
compatibles. Es posible que las versiones
anteriores no sean compatibles.
Fabricado para
–iPhone 7
–iPhone 7 Plus
–iPhone SE
–iPhone 6s
– iPhone 6s Plus
–iPhone 6
–iPhone 6 Plus
–iPhone 5s
–iPhone 5c
–iPhone 5
Versión de etiqueta
ID3 compatible
1.0, 1.1, 2.2, 2.3, 2.4 (la
versión de etiqueta
ID3 2.x tiene prioridad
sobre la versión 1.x.)
Lista de reproducción
M3u
No compatible
MP3i (MP3
interactivo), mp3 PRO
No compatible
Extensión de archivos .wav
Bits de cuantificación 8 y 16 (LPCM), 4
(MSADPCM)
Frecuencia de
muestreo
De 16 kHz a 48 kHz
(LPCM), 22,05 kHz y
44,1 kHz (MS ADPCM)
Formato compatible AAC codificado por
iTunes
Extensión de archivos .m4a
Frecuencia de
muestreo
De 11,025 kHz a 48
kHz
Tasa de transmisión De 16 kbps a 320
kbps, VBR
Apple Lossless No compatible
Archivo AAC
comprado en iTunes
Store (extensión de
archivo .m4p)
No compatible
Extensión de archivos .flac
Frecuencia de
muestreo
8/11,025/12/16/22,05/
24/32/44,1/48/96 kHz
Velocidad de bits de
cuantificación
16/24 bits
Modo de canal 1/2 canales
Jerarquía de carpetas
reproducible
Hasta ocho niveles
(una jerarquía práctica
tiene menos de dos
niveles).
Carpetas
reproducibles
Hasta 1 500
Archivos
reproducibles
Hasta 15 000
Reproducción de
archivos protegidos
por derechos de autor
No compatible
Dispositivo USB
particionado
Solo se puede
reproducir la primera
partición.
Compatibilidad con
iPhone
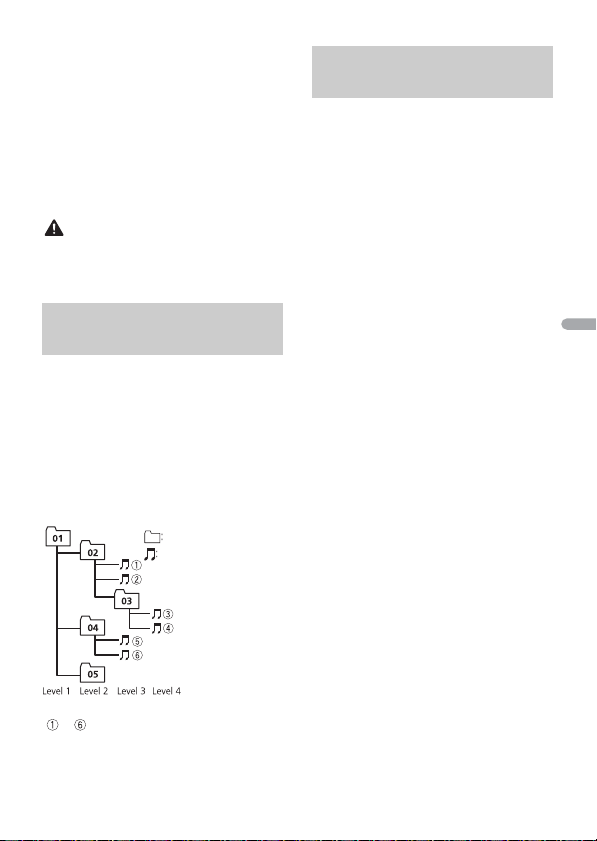
- 59 -
Español
• Las operaciones pueden variar según la
generación y/o la versión de software del
iPhone.
• Los usuarios de iPhone con el conector
Lightning® deben usar el cable de
Lightning a USB (se suministra con el
iPhone).
• Consulte los manuales del iPhone para
obtener información sobre la
compatibilidad de archivos/formatos.
• Audiolibro, Podcast: compatible
PRECAUCIÓN
Pioneer no acepta responsabilidad por la
pérdida de datos en el iPhone, incluso si los
datos se pierden mientras se usa la unidad.
El usuario no puede asignar los números
de carpeta y especificar las secuencias de
reproducción con esta unidad. La
secuencia de los archivos de audio
depende del dispositivo conectado.
Tenga en cuenta que no se pueden
reproducir los archivos ocultos en un
dispositivo USB.
Ejemplo de una jerarquía
Bluetooth
La marca literal y los logotipos Bluetooth® son
marcas registradas propiedad de Bluetooth SIG,
Inc., y cualquier uso de dichas marcas por
PIONEER CORPORATION se hace bajo licencia.
Otras marcas y nombres comerciales son
propiedad de sus respectivos propietarios.
iTunes
Apple e iTunes son marcas comerciales de
Apple Inc., registradas en los EE.UU. y en
otros países.
WMA
Windows Media es una marca registrada o
una marca de fábrica de Microsoft
Corporation en los Estados Unidos y/u
otros países.
Este producto incluye tecnología
propiedad de Microsoft Corporation, y no
se puede usar ni distribuir sin una licencia
de Microsoft Licensing, Inc.
FLAC
Copyright © 2000-2009 Josh Coalson
Copyright © 2011-2014 Xiph.Org
Foundation
La redistribución y el uso en formas de
código fuente y binaria, con y sin
modificaciones, se permiten siempre que
se cumplan las condiciones siguientes:
–Las redistribuciones de código fuente
deben conservar el aviso anterior de
derechos de autor, esta lista de
condiciones y el siguiente descargo de
responsabilidad.
–Las redistribuciones en forma binaria
deben reproducir el aviso anterior de
derechos de autor, esta lista de
condiciones y el siguiente descargo de
responsabilidad y/o los demás materiales
entregados con la distribución.
– No se podrán usar el nombre de Xiph.org
Foundation ni los nombres de sus
Secuencia de archivos de
audio
Carpeta
Archivo de audio
comprimido
a : secuencia de reproducción
01 a 05: número de carpeta
Copyright y marcas
comerciales

- 60 -
Español
contribuyentes para avalar o
promocionar productos generados a
partir de este software sin el permiso
específico previo por escrito.
LOS TITULARES DE LOS DERECHOS DE
AUTOR Y LOS CONTRIBUYENTES
ENTREGAN ESTE SOFTWARE “TAL CUAL”, Y
SE RECHAZAN LAS GARANTÍAS EXPRESAS
O TÁCITAS, INCLUIDAS, ENTRE OTRAS, LAS
GARANTÍAS IMPLÍCITAS DE
COMERCIABILIDAD Y APTITUD PARA UN
FIN EN PARTICULAR EN NINGÚN CASO, LA
FUNDACIÓN NI LOS CONTRIBUYENTES
SERÁN RESPONSABLES POR DAÑOS
DIRECTOS, INDIRECTOS, INCIDENTALES,
ESPECIALES, EJEMPLARES O
CONSECUENTES (INCLUIDA, ENTRE OTRAS,
LA ADQUISICIÓN DE BIENES O SERVICIOS
SUSTITUTOS; PÉRDIDA DE USO, DATOS O
LUCRO CESANTE; NI INTERRUPCIÓN
COMERCIAL) INDEPENDIENTEMENTE DE LA
CAUSA O LA TEORÍA DE
RESPONSABILIDAD, YA SE DEBA A
OBLIGACIÓN CONTRACTUAL,
EXTRACONTRACTUAL O
RESPONSABILIDAD ESTRICTA (SEA POR
NEGLIGENCIA O NO) QUE SURJA EN
ALGUNA MEDIDA POR EL USO DE ESTE
SOFTWARE, INCLUSO SI SE HA ADVERTIDO
DE LA POSIBILIDAD DE DICHO DAÑO.
iPhone y Lightning
El uso de la insignia Made for Apple
significa que un accesorio se diseñó para
conectarlo específicamente a los
productos Apple identificados por la
insignia, y que el desarrollador certificó
que cumple con las normas de
rendimiento de Apple. Apple no es
responsable del funcionamiento de este
dispositivo o de su cumplimiento con la
seguridad y las normas regulatorias.
Observe que el uso de este accesorio con
un producto Apple podría afectar al
rendimiento inalámbrico.
iPhone y Lightning son marcas comerciales
de Apple Inc., registradas en los EE. UU. y
en otro países.
Siri®
Funciona con Siri a través del micrófono.
Android & Google Play
Android, Google Play y el logotipo de
Google Play son marcas comerciales de
Google Inc.
Radio satelital SiriusXM
Sirius, XM y todas las marcas y logotipos
relacionados son marcas comerciales de
Sirius XM Radio Inc. Todos los derechos
reservados.
Radio por Internet Pandora®
PANDORA, el logotipo de PANDORA y la
imagen comercial Pandora son marcas
comerciales o registradas de Pandora
Media, Inc. y se usan con su permiso.
Pandora solo está disponible en algunos
países. Ingrese a
http://www.pandora.com/legal
para obtener más información.
MIXTRAX
MIXTRAX es una marca comercial de
PIONEER CORPORATION.
Spotify®
SPOTIFY y el logotipo de Spotify son
marcas comerciales registradas de Spotify
AB. Es necesario tener dispositivos
digitales móviles compatibles y una
suscripción premium, cuando estén
disponibles, consulte https://
www.spotify.com.
T-Kernel 2.0
Este producto usa el código fuente de T-
Kernel 2.0 bajo T-License 2.0 otorgada por
T-Engine Forum (www.tron.org).

- 61 -
Español
MP3
Copyright (C) 1998-2009 PacketVideo
Bajo licencia de Apache, versión 2.0 (la
“Licencia”); no puede usar este archivo a
menos que cumpla con la licencia.
Puede obtener una copia de la licencia en
http://www.apache.org/licenses/LICENSE-
2.0
A menos que lo solicite la ley o esté
acordado por escrito, el software
distribuido bajo la Licencia se distribuye A
BASE “TAL COMO ES”, SIN GARANTÍAS NI
CONDICIONES DE NINGÚN TIPO, expresas
o implícitas.
Consulte la Licencia para conocer los
permisos específicos del idioma y las
limitaciones bajo la Licencia.
Generalidades
Fuente de alimentación: 14,4 V cc (posible
entre 10,8 V y 15,1 V)
Sistema de conexión a tierra: tipo negativo
Consumo máximo de corriente: 10,0 A
Dimensiones (An. × Al. × Prof.):
D
Bastidor: 178 mm × 100 mm × 97 mm
(7 in × 3-7/8 in × 3-7/8 in)
Cara anterior: 170 mm × 96 mm ×
16 mm
Peso: 0,7 kg (1,5 lbs)
Audio
(El modo de red solo está disponible para
MVH-S600BS.)
Salida de potencia máxima:
• 50 W × 4 canales/4 Ω (si no se utiliza
el subwoofer)
• 50 W × 2 ch/4 Ω + 70 W × 1 ch/2 Ω
(para subwoofer)
Salida de potencia continua:
22 W × 4 (de 50 Hz a 15 000 Hz, 5 %
THD, 4 Ω de carga, ambos canales
activados)
Impedancia de carga: 4 Ω (posible entre 4 y
8Ω (2 Ω para 1 canal))
Nivel de salida máxima preamplificada:
2,0 V (MVH-S400BT), 4,0 V (MVH-
S600BS)
Ecualizador (ecualizador gráfico de 13
bandas):
Frecuencia: 50 Hz/80 Hz/125 Hz/200
Hz/315 Hz/500 Hz/800 Hz/1,25 kHz/2
kHz/3,15 kHz/5 kHz/8 kHz/12,5 kHz
Ganancia: ±12 dB (incrementos de
2dB)
Filtro de paso alto (modo estándar):
Frecuencia: 25 Hz/31,5 Hz/40 Hz/50
Hz/63 Hz/80 Hz/100 Hz/125 Hz/160
Hz/200 Hz/250 Hz
Pendiente: –6 dB/oct, –12 dB/oct, –18
dB/oct, –24 dB/oct, OFF
Subwoofer/filtro de paso bajo (modo
estándar):
Frecuencia: 25 Hz/31,5 Hz/40 Hz/50
Hz/63 Hz/80 Hz/100 Hz/125 Hz/160
Hz/200 Hz/250 Hz
Pendiente: –6 dB/oct, –12 dB/oct, –18
dB/oct, –24 dB/oct, –30 dB/oct, –36
dB/oct, OFF
Ganancia: de +10 dB a –24 dB
(incrementos de 1 dB)
Fase: normal/inversa
Nivel del altavoz (modo estándar):
de +10 dB a –24 dB (incrementos de 1
dB)
Alineación de tiempo (modo estándar):
de 0 a 140 pulgadas (1 pulgada/
incremento)
Filtro de paso alto (HIGH) (modo de red):
Frecuencia: 1,25 kHz/1,6 kHz/2 kHz/
2,5 kHz/3,15 kHz/4 kHz/5 kHz/6,3 kHz/
8 kHz/10 kHz/12,5 kHz
Pendiente: –6 dB/oct, –12 dB/oct, –18
dB/oct, –24 dB/oct
Filtro de paso alto (MID) (modo de red):
Especificaciones

- 62 -
Español
Frecuencia: 25 Hz/31,5 Hz/40 Hz/50
Hz/63 Hz/80 Hz/100 Hz/125 Hz/160
Hz/200 Hz/250 Hz
Pendiente: –6 dB/oct, –12 dB/oct, –18
dB/oct, –24 dB/oct, OFF
Filtro de paso bajo (MID) (modo de red):
Frecuencia: 1,25 kHz/1,6 kHz/2 kHz/
2,5 kHz/3,15 kHz/4 kHz/5 kHz/6,3 kHz/
8 kHz/10 kHz/12,5 kHz
Pendiente: –6 dB/oct, –12 dB/oct, –18
dB/oct, –24 dB/oct, OFF
Subwoofer (modo de red):
Frecuencia: 25 Hz/31,5 Hz/40 Hz/50
Hz/63 Hz/80 Hz/100 Hz/125 Hz/160
Hz/200 Hz/250 Hz
Pendiente: –12 dB/oct, –18 dB/oct, –
24 dB/oct, –30 dB/oct, –36 dB/oct,
OFF
Ganancia: de +10 dB a –24 dB
(incrementos de 1 dB)
Fase: normal/inversa
Nivel del altavoz (modo de red):
de +10 dB a –24 dB (incrementos de 1
dB)
Alineación de tiempo (modo de red):
de 0 a 140 pulgadas (1 pulgada/
incremento)
USB
Especificación del estándar USB: USB 2.0
velocidad máxima
Consumo máximo de corriente: 1,5 A
USB Protocolo:
MSC (clase de almacenamiento
masivo)
MTP (Media Transfer Protocol)
AOA (Android Open Accessory) 2.0
Sistema de archivos: FAT12, FAT16, FAT32
Formato de decodificación de MP3: MPEG-
1 y 2 Audio Layer 3
Formato de decodificación de WMA:
versión 7, 8, 9, 9.1, 9.2 (audio de 2
canales) versión 10, 11, 12 (Windows
Media Player)
Formato de decodificación de AAC: MPEG-
4 AAC (solo codificado por iTunes)
(versión 10.6 y anterior)
Formato de decodificación FLAC: v1.2.1
(códec de audio sin pérdida gratuito)
Formato de señal WAV: Linear PCM (sin
comprimir)
Sintonizador FM
Rango de frecuencia: de 87,9 MHz a
107,9 MHz
Sensibilidad utilizable: 11 dBf (1,0 μV/75 Ω,
monoaural, señal/ruido: 30 dB)
Relación señal/ruido: 65 dB (transmisión
analógica) (red IHF-A)
Sintonizador AM
Rango de frecuencia: de 530 kHz a
1 710 kHz
Sensibilidad utilizable: 25 μV (señal/ruido:
20 dB)
Relación señal/ruido: 60 dB (transmisión
analógica) (red IHF-A)
Bluetooth
Versión: certificada para Bluetooth 4.0
Potencia de salida: máximo de +4 dBm
(clase de potencia 2)
Bandas de frecuencia: de 2 400 MHz a
2 483,5 MHz
Perfiles Bluetooth:
GAP (perfil de acceso genérico)
SDAP (perfil de aplicación de
descubrimiento de servicios)
HFP (perfil de manos libres) 1.6
PBAP (perfil de acceso a libreta
telefónica)
A2DP (perfil de distribución de audio
avanzada)
AVRCP (perfil de control remoto de
audio/video) 1.5
SPP (perfil de puerto serial) 1.1

- 63 -
Español
Especificaciones de CEA2006
Salida de potencia: 14 W RMS × 4 canales
(4 Ω y 1 % THD+N)
Relación señal/ruido: 91 dBA (referencia:
1W a 4Ω)
NOTA
Las especificaciones y el diseño están
sujetos a modificaciones sin previo aviso.
<
=
© 2017 PIONEER CORPORATION. All rights reserved.
© 2017 PIONEER CORPORATION. Tous droits de reproduction et de traduction réservés.
<QRI3030-B> UC