SX-10AE
STEREO RECEIVER
Instruction Manual
En
SN29403247_SX-10AE_En_1707XX.book 1 ページ 2017年7月19日 水曜日 午後1時59分

2
Before Start
Table of Contents
Before Start.............................................................2
What's in the box .....................................................3
Part Names .............................................................4
Part Names .............................................................4
Install.......................................................................8
Step1: Connect the Speakers .................................8
Step2: Connect an other External Device ...............9
Step3: Connect Other Cables ...............................10
Playback ............................................................... 11
Playing Audio from a Connected Device .............. 11
BLUETOOTH
®
Playback ......................................12
Listening to the AM/FM Radio................................13
Registering a Station .............................................15
Naming Radio Stations Registered as Presets ..... 16
Adjusting the Sound Quality ..................................17
Setup .....................................................................18
Setup Menu ...........................................................18
Others ..................................................................21
Troubleshooting .................................................... 21
General Specifications ..........................................23
> Before Start > Part Names > Install > Playback
Setup | Others
SN29403247_SX-10AE_En_1707XX.book 2 ページ 2017年7月19日 水曜日 午後1時59分
3
En
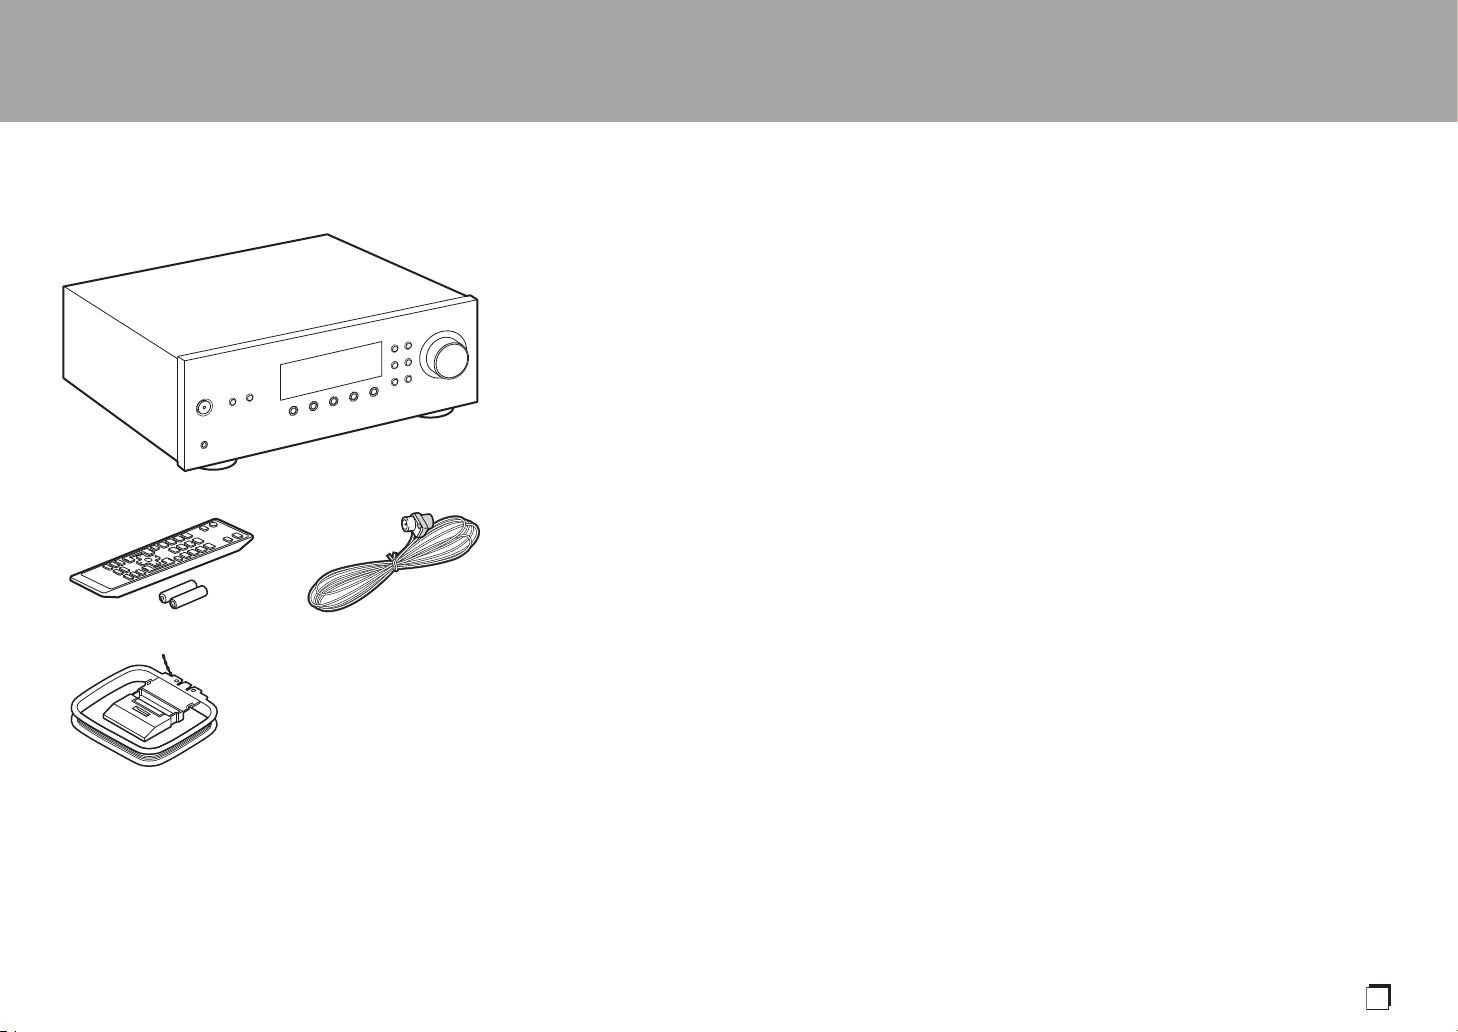
What's in the box
1. Main unit (1)
2. Remote controller (RC-963R) (1), batteries (AAA/R03)
(2)
3. FM indoor antenna (1)
4. AM indoor antenna (1)
≥ Instruction Manual (This document) (1)
0 Connect speakers with 4 ≠ to 16 ≠ impedance. Note that
when connecting to both SPEAKERS A and B terminals,
connect speakers with 8 ≠ to 16 ≠ impedance to both A
and B.
0 The power cord must be connected only after all other
cable connections are completed.
0 We will not accept responsibility for damage arising from
the connection of equipment manufactured by other
companies.
0 Specifications and appearance are subject to change
without prior notice.
> Before Start > Part Names > Install > Playback
Setup | Others
32
4
1
SN29403247_SX-10AE_En_1707XX.book 3 ページ 2017年7月19日 水曜日 午後1時59分
4
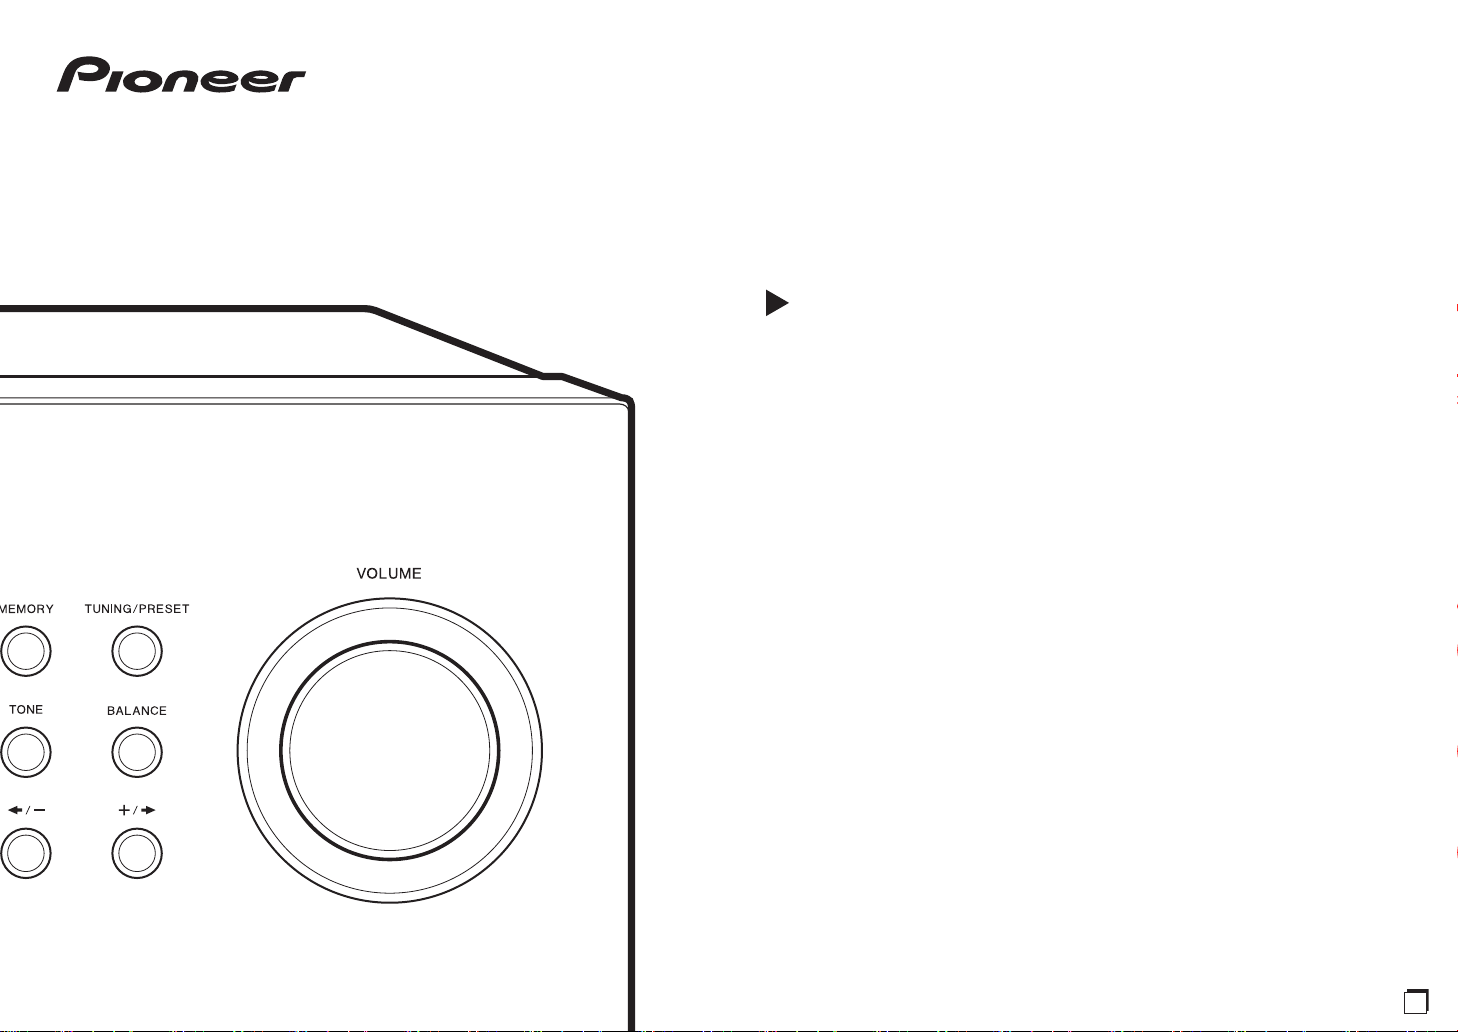
Part Names
Part Names
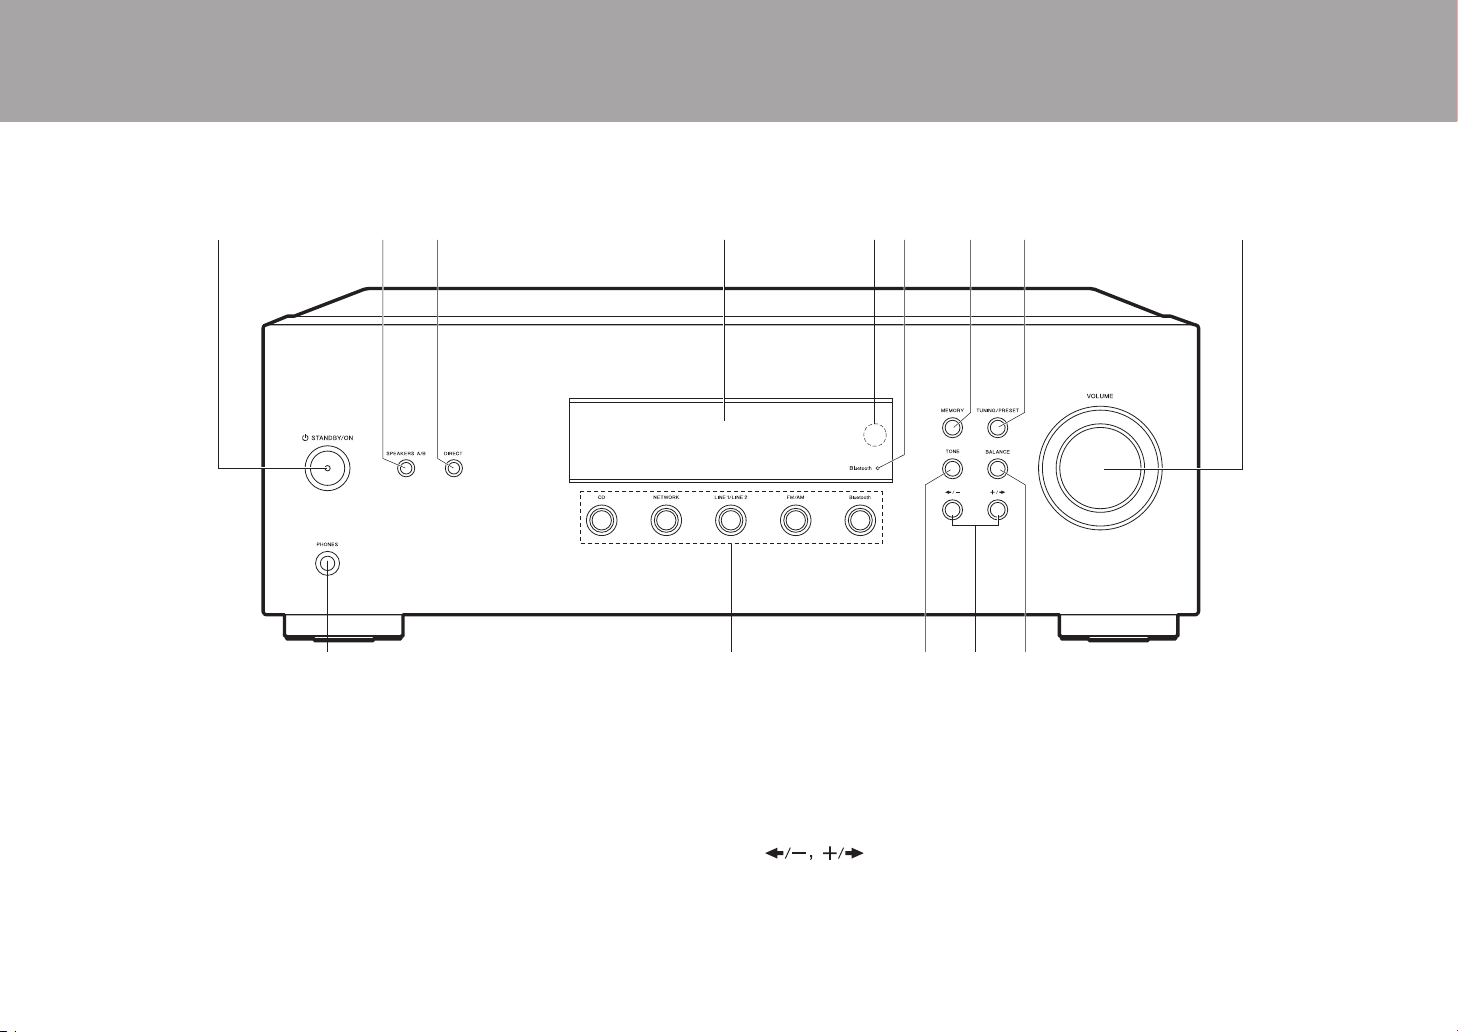
Front Panel
1. Í STANDBY/ON button
2. SPEAKERS A/B button: Select the terminals to output audio from between SPEAKERS
A/B.
3. DIRECT button: Switches to the DIRECT mode which outputs pure sound as it was
intended.
4. Display (P5)
5. Remote control sensor: Receives signals from the remote controller.
0 The signal range of the remote controller is within about 16y/5 m, at an angle of 20° on
the perpendicular axis and 30° to either side.
6. Bluetooth indicator: Lights when the unit is connected by BLUETOOTH. It will flash during
pairing or if the connection is not correct.
7. MEMORY button: Used to register AM/FM radio stations (P15).
8. TUNING/PRESET button: Switch between the TUNING mode, where you select a
frequency to tune to a station, and the PRESET mode, where you select a preset station.
9. VOLUME
10.
PHONES jack: Connect stereo headphones with a standard plug (Ø1/4z/6.3 mm).
11.
Input Selector buttons: Switches the input to be played.
12.
TONE button: Switches to the TONE mode which enables BASS and TREBLE. After
switching to the TONE mode, press again to see the settings for "Bass", "Treble", and
"P.BASS" with each press.
13.
buttons: Used to tune to AM/FM stations, select preset numbers, and to
adjust the sound quality.
14.
BALANCE button: Adjusts the balance of the sounds output from the left and right
speakers (P17).
> Before Start >Part Names > Install > Playback
Setup | Others
SN29403247_SX-10AE_En_1707XX.book 4 ページ 2017年7月19日 水曜日 午後1時59分
5
> Before Start >Part Names > Install > Playback
Setup | Others
En
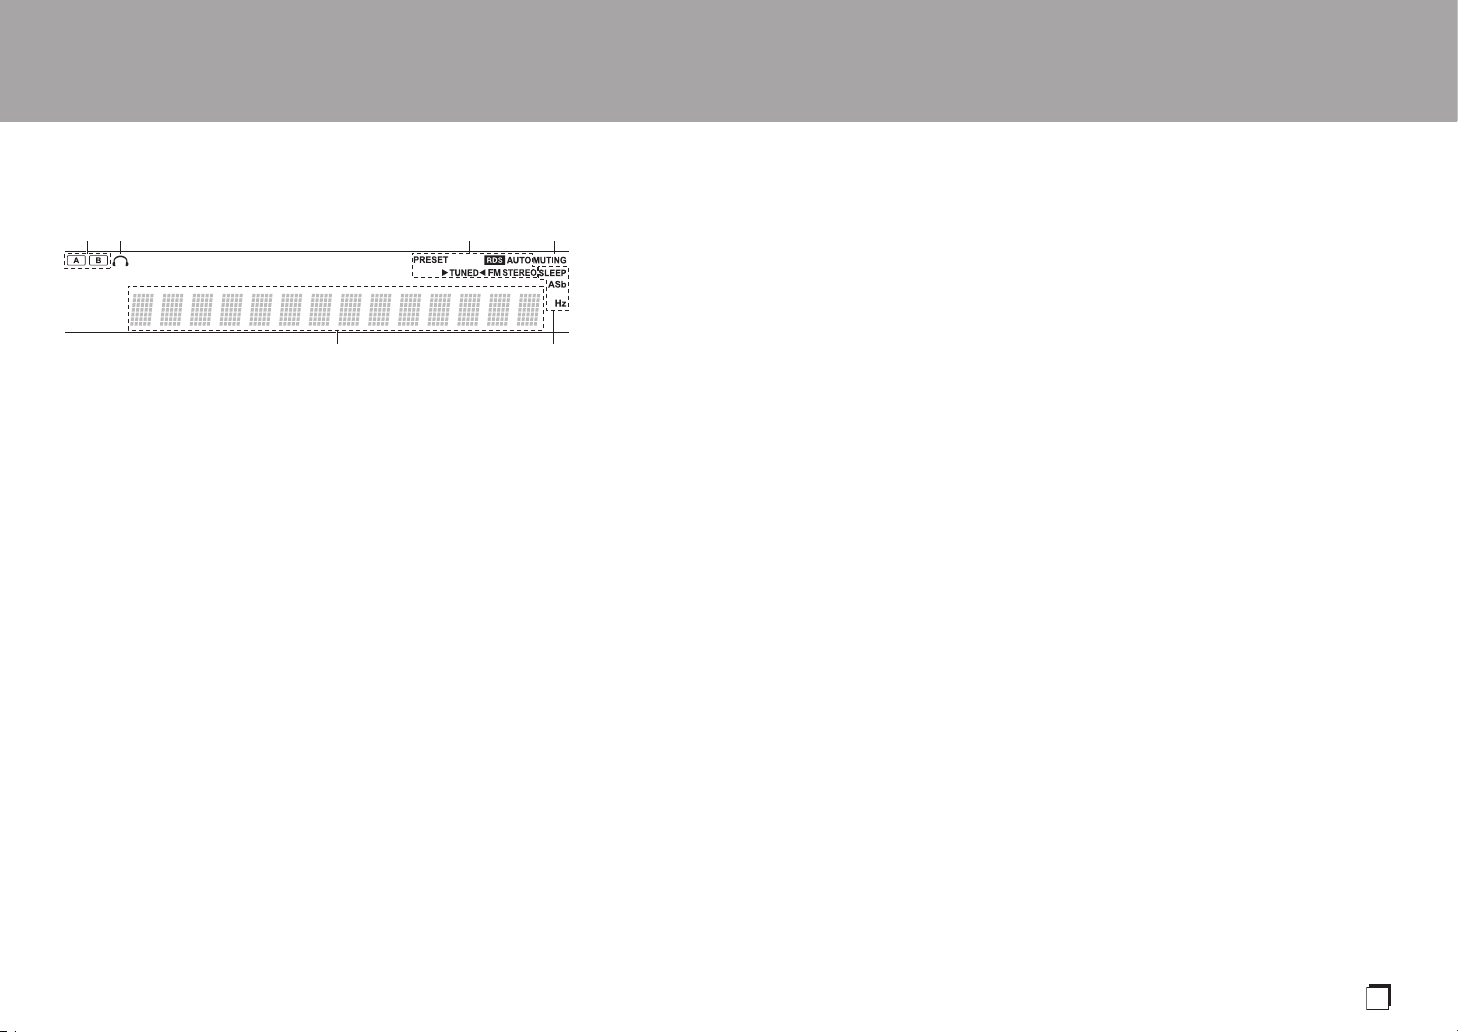
Display
1. The currently selected speaker system lights.
2. Lights when headphones are connected.
3. Lights in the following conditions.
PRESET: PRESET mode has been selected with
TUNING/PRESET on the main unit.
RDS (European and Australian models): Receiving
RDS broadcasting.
AUTO: When tuning mode is auto.
1TUNED2: Receiving AM/FM radio.
FM STEREO: Receiving FM stereo.
4. Flashes when muting is on.
5. Displays radio and a variety of other information.
6. Lights in the following conditions.
SLEEP: Sleep timer has been set.
ASb: Auto Standby has been set.
Hz: May light while "Tuner Setting" in the Setup menu
is being set.
SN29403247_SX-10AE_En_1707XX.book 5 ページ 2017年7月19日 水曜日 午後1時59分
6
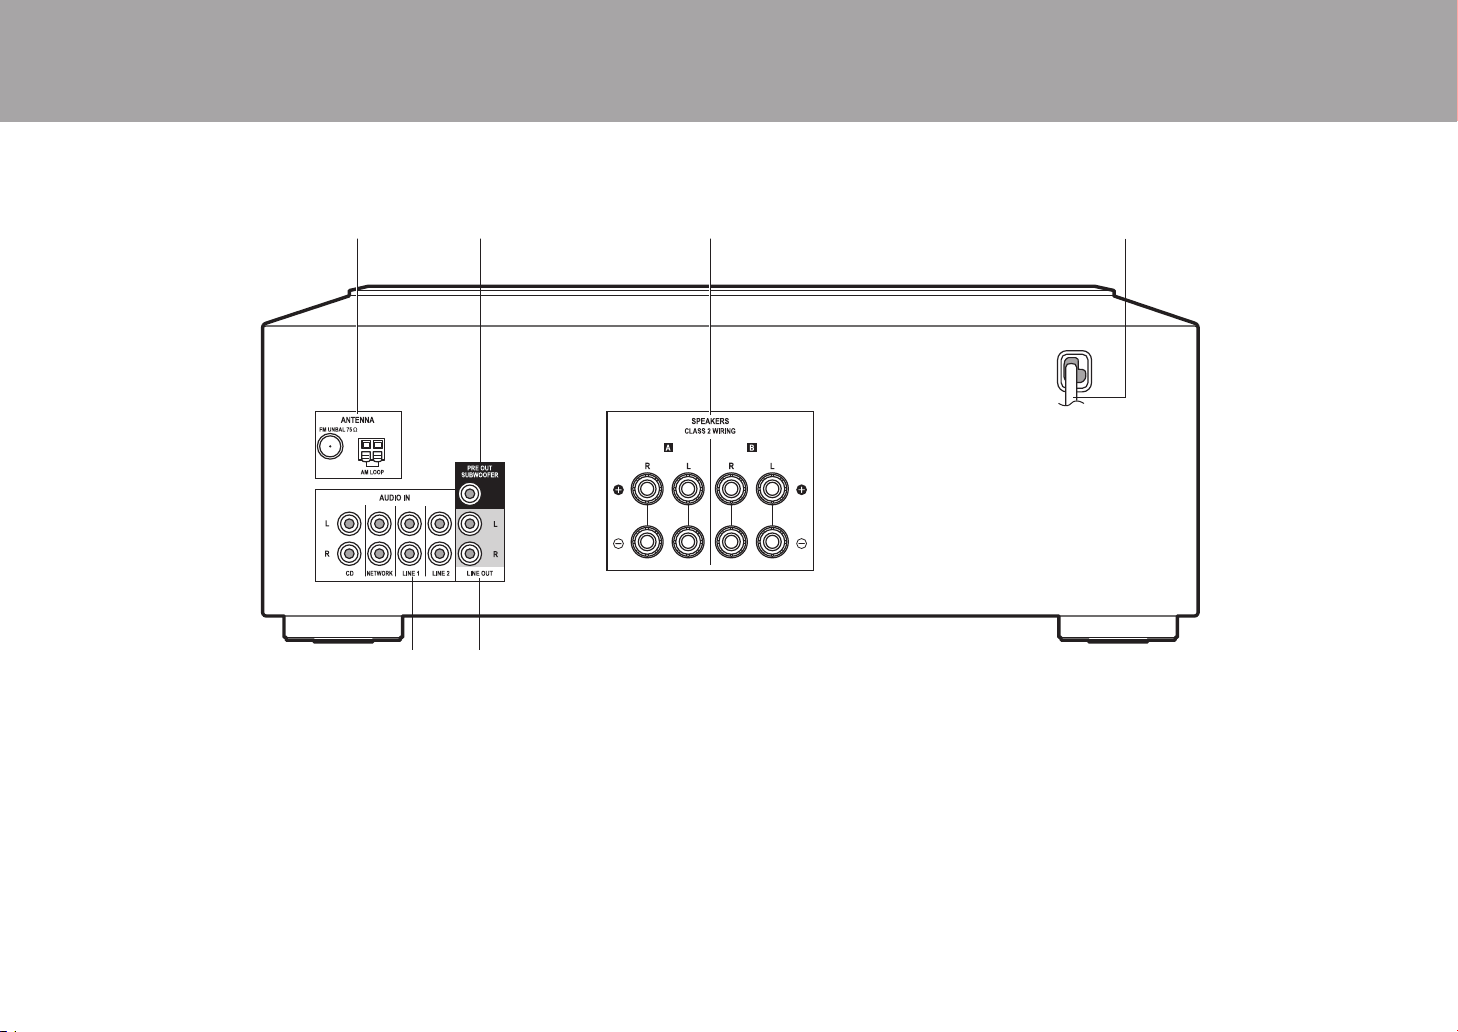
Rear Panel
1. FM UMBAL 75Ω/AM LOOP ANTENNA terminals: Connect the supplied FM indoor
antenna and AM indoor antenna.
2. PRE OUT SUBWOOFER jack: Connect a powered subwoofer with a subwoofer cable.
3. SPEAKERS jacks: Connect speakers with speaker cables. You can connect a set of left
and right speakers to each of the A/B terminals.
4. Power cord
5. AUDIO IN jacks: Input audio signals from an other external device with an analog audio
cable.
6. LINE OUT jacks: Connect a recording device, such as a cassette tape deck. Connect to
the AUDIO IN jacks on the recording device using analog audio cable.
> Before Start >Part Names > Install > Playback
Setup | Others
SN29403247_SX-10AE_En_1707XX.book 6 ページ 2017年7月19日 水曜日 午後1時59分

7
En
Remote Controller
1. Í STANDBY/ON button
2. SLEEP button: Set the sleep timer (P20).
3. INPUT SELECTOR buttons: Switches the input to be played.
4. Numbered buttons
5. DIRECT TUNING button: Use to select the number of a preset station or to directly input
the frequency of the station.
6. button: Temporarily mutes audio. Press again to cancel muting.
7. VOLUME buttons
8. Cursors (Up / Down / Left / Right), ENTER button: Select the item with the cursors and
press ENTER to confirm.
9. SETUP button: You can show advanced setting items on the display to provide you with
an even better experience (P18).
10.
BASS buttons: Enhance or moderate the bass range (P17).
11.
TREBLE buttons: Enhance or moderate the treble range (P17).
12.
DISPLAY button: Switches the information on the display.
13.
DIMMER button: You can adjust the brightness of the display in three steps. It cannot be
turned off completely.
14.
buttons: Select the input to be played. The input changes CD NETWORK
LINE 1 LINE 2 FM AM BLUETOOTH each time you press the button.
15.
CLEAR button: Deletes all characters you have entered when entering text.
16.
PAIRING button: Used to connect to another BLUETOOTH wireless technology enabled
device (P12).
17.
PRESET buttons: Used to select AM/FM radio stations (P15).
18.
RETURN button: Returns the display to the previous state during setting.
19.
DIRECT button: Switches to the DIRECT mode which outputs pure sound as it was
intended (P17).
20.
TONE button: Switches to the TONE mode which enables BASS and TREBLE (P17).
> Before Start >Part Names > Install > Playback
Setup | Others
SN29403247_SX-10AE_En_1707XX.book 7 ページ 2017年7月19日 水曜日 午後1時59分

8
Install
Step1: Connect the Speakers
You can connect two systems, Speaker A and Speaker B,
as the Speaker System. When connecting only one set,
connect to the SPEAKERS A terminals. With one set, use
speakers with 4 ≠ to 16 ≠ impedance.
Note that when connecting to both SPEAKERS A and B
terminals, connect speakers with 8 ≠ to 16 ≠ impedance to
both A and B.
Connect the speaker cable so the wires do not protrude
from the speaker jacks. If the exposed wires of the
speakers touch the rear panel or the + and – wires touch
each other, the protection circuit will be activated.
(*)You can also connect a powered subwoofer to the PRE
OUT SUBWOOFER jack to boost bass playback even
more. Use a subwoofer cable for connection.
> Before Start > Part Names >Install > Playback
Setup | Others
a
a
5/8˝
(15 mm)
Speaker B
Speaker A
*
Right Left Right Left
a Speaker Cable
Setup
0 When connected as a Speaker B System, you
can output the same audio as Speaker A System
by switching with A/B/A+B. Press SPEAKER A/B
on the main unit to switch. The selection changes
in the order SPEAKER A, SPEAKER B,
SPEAKER A+B, Off with each press.
0 If any of the connected speakers have an
impedance of 4 ≠ or more to less than 6 ≠, or
when a Speaker B system is to be used, press
SETUP (P7) on the remote controller, and set "SP
Impedance" to "4 ohm".
SN29403247_SX-10AE_En_1707XX.book 8 ページ 2017年7月19日 水曜日 午後1時59分
9
En
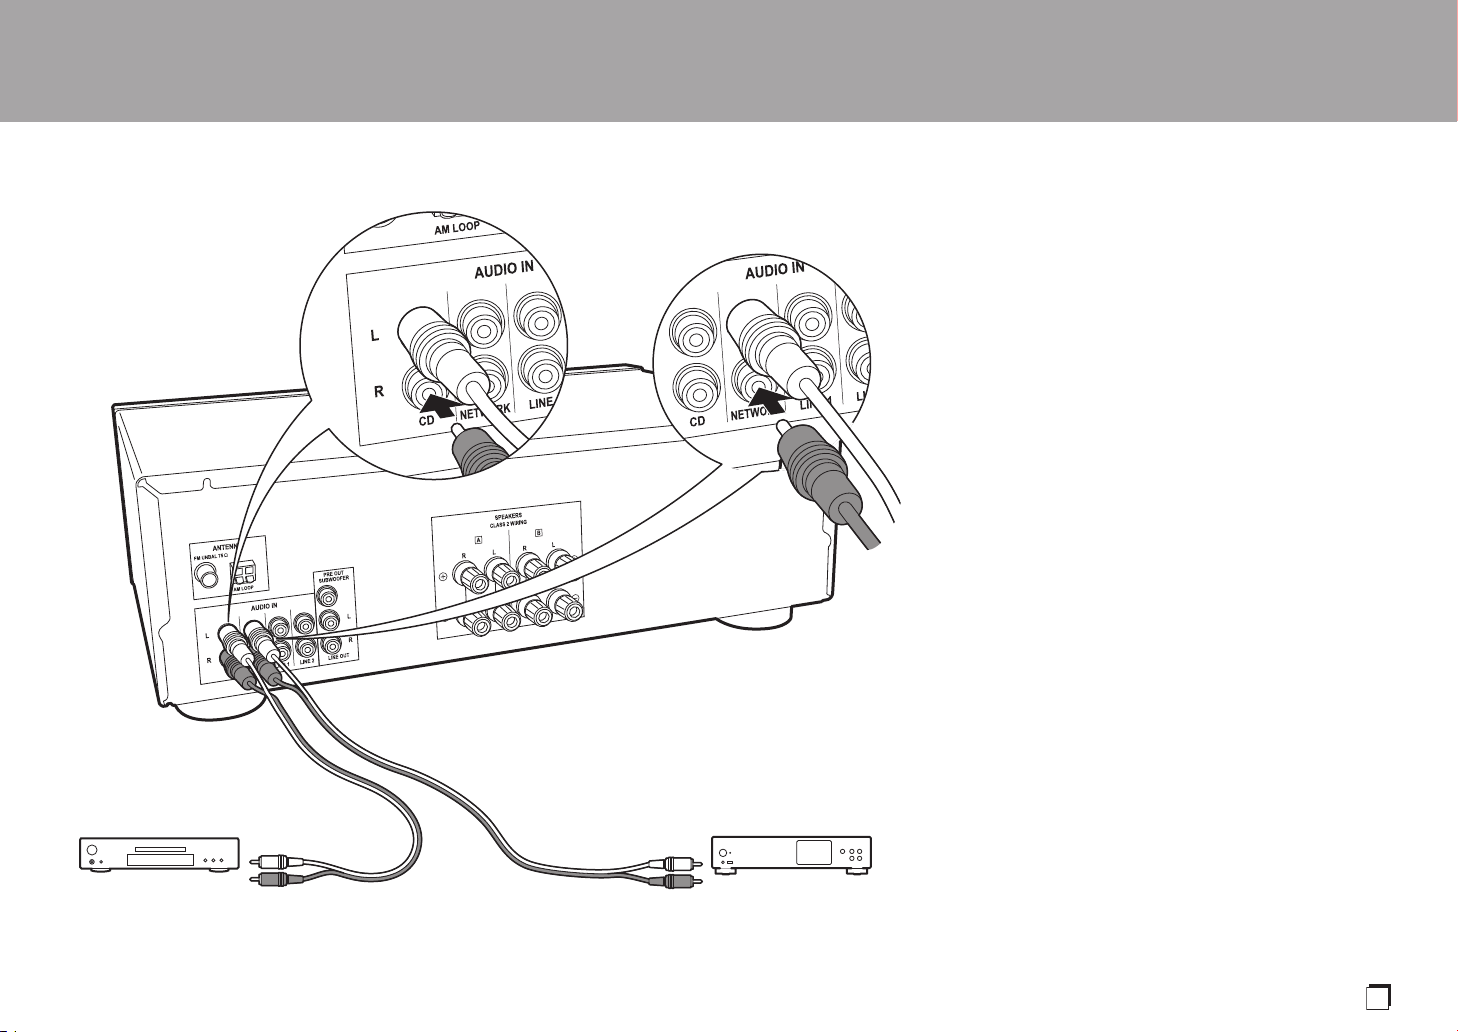
Step2: Connect an other External Device
AUDIO IN connection
Connect an other external device with an analog audio
cable.
> Before Start > Part Names >Install > Playback
Setup | Others
CD
a
Network Audio
Player
a Analog Audio Cable
SN29403247_SX-10AE_En_1707XX.book 9 ページ 2017年7月19日 水曜日 午後1時59分
10
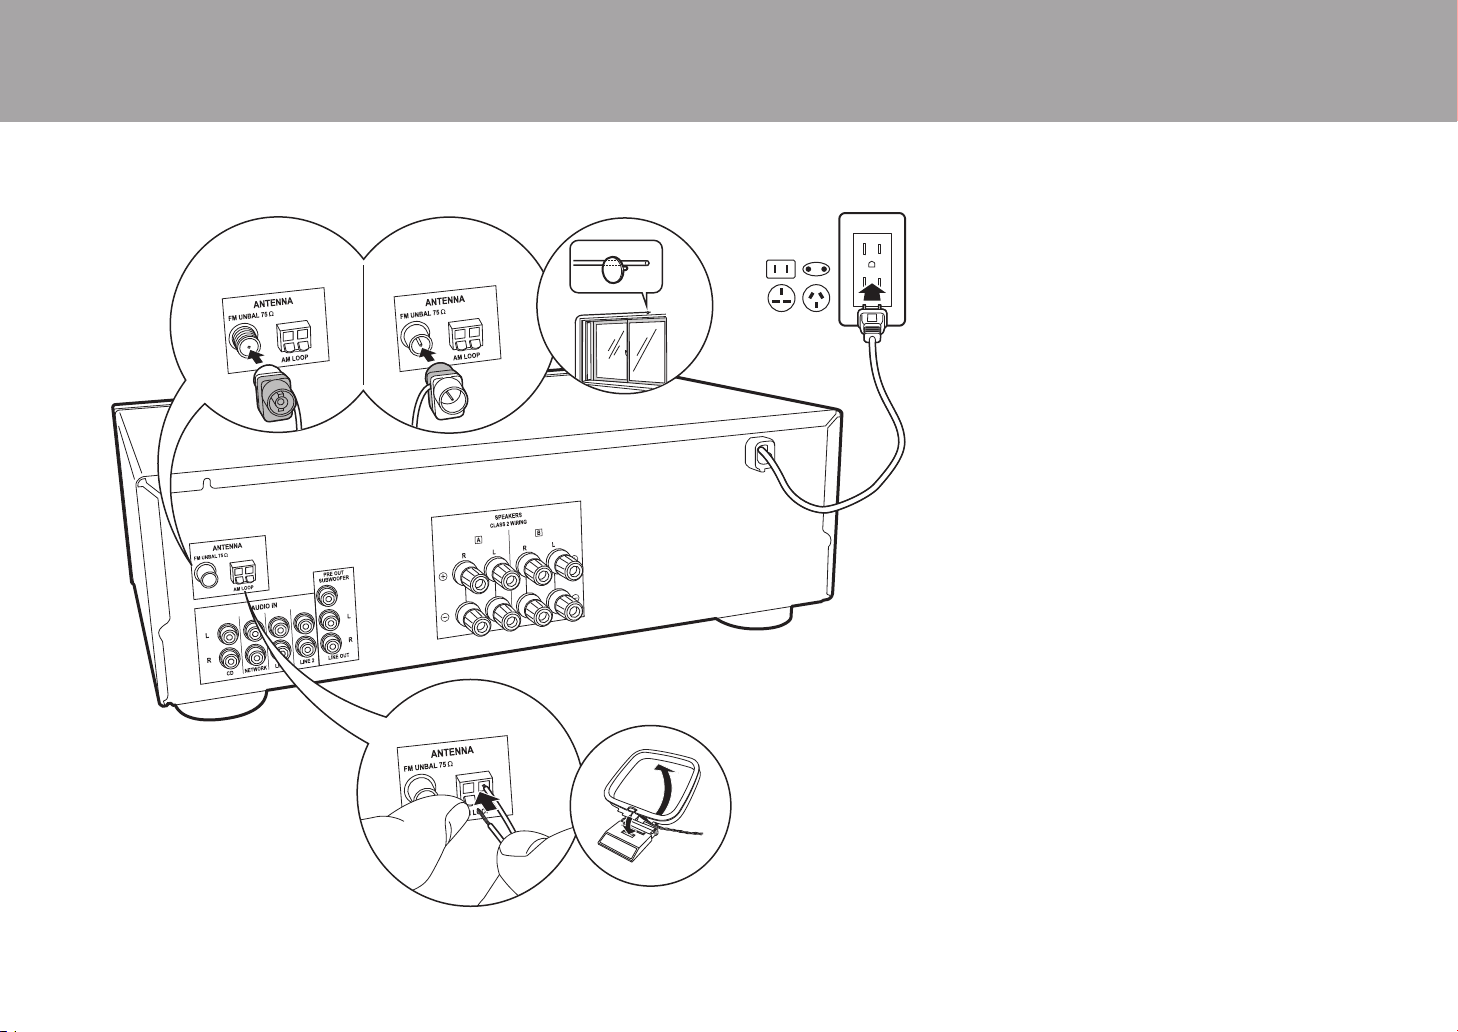
Step3: Connect Other Cables
Antenna Hookup
Move the antenna around while playing the radio to find the
position with the best reception.
Power Cord Hookup
The power cord must be connected only after all other
connections are completed.
> Before Start > Part Names >Install > Playback
Setup | Others
b
a
a
FM
AM
(North American
models)
(European and
Australian models)
a FM indoor antenna, b AM indoor antenna
SN29403247_SX-10AE_En_1707XX.book 10 ページ 2017年7月19日 水曜日 午後1時59分
11
En
Playback
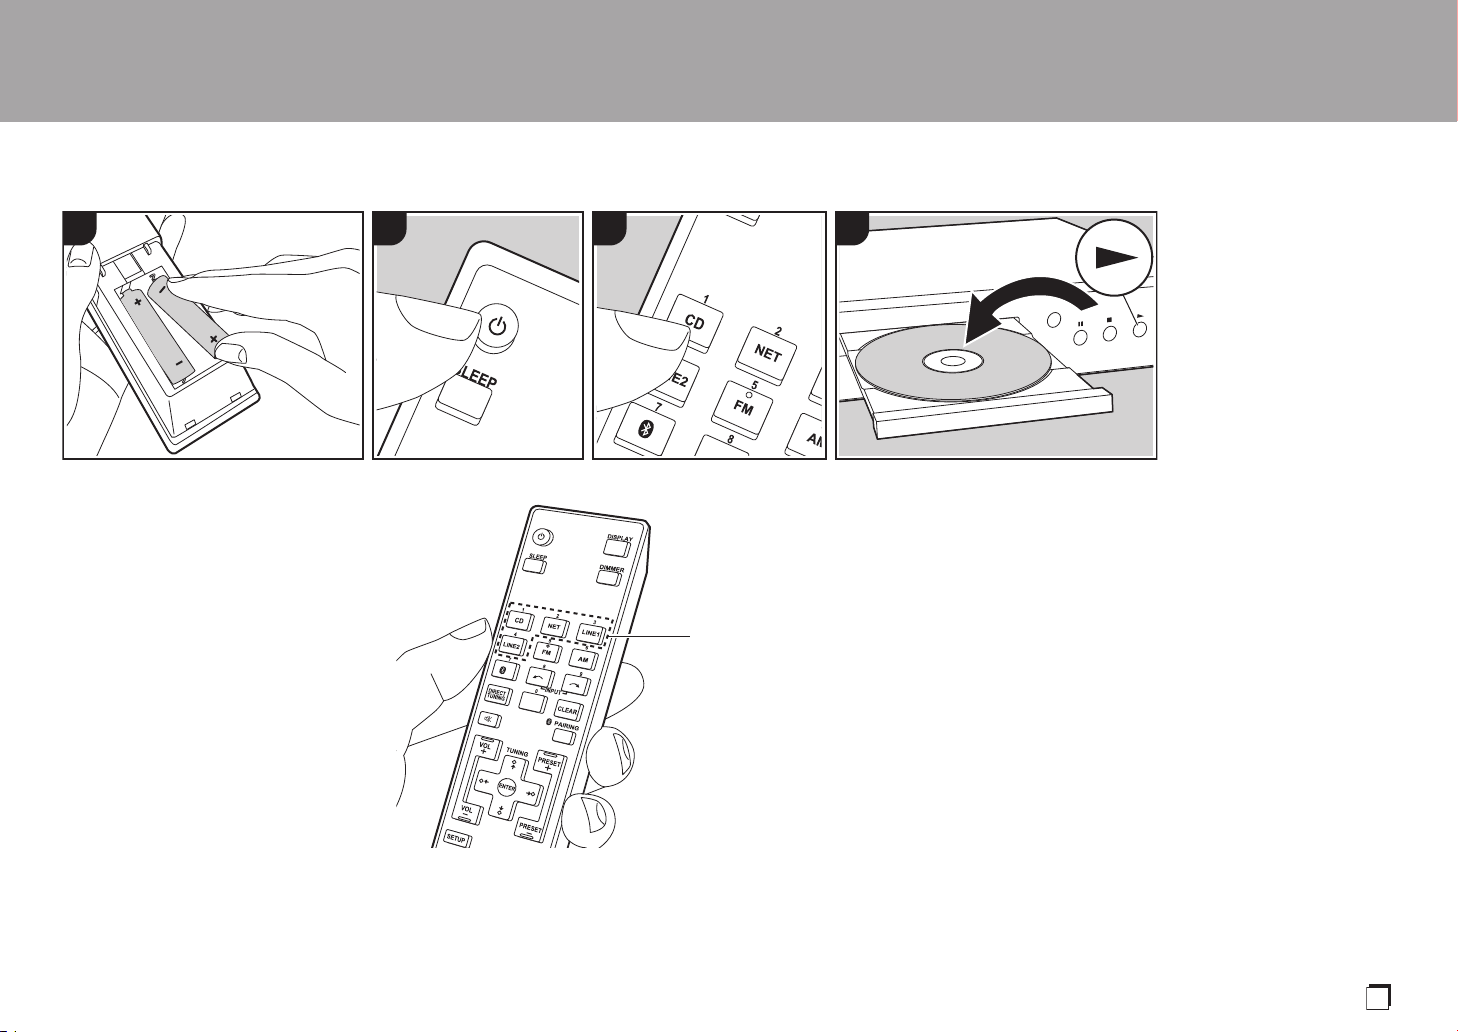
Playing Audio from a Connected Device
Basic Operations
You can play the audio from other external
devices such as CD players through this
unit.
Perform the following procedure when the
unit is on.
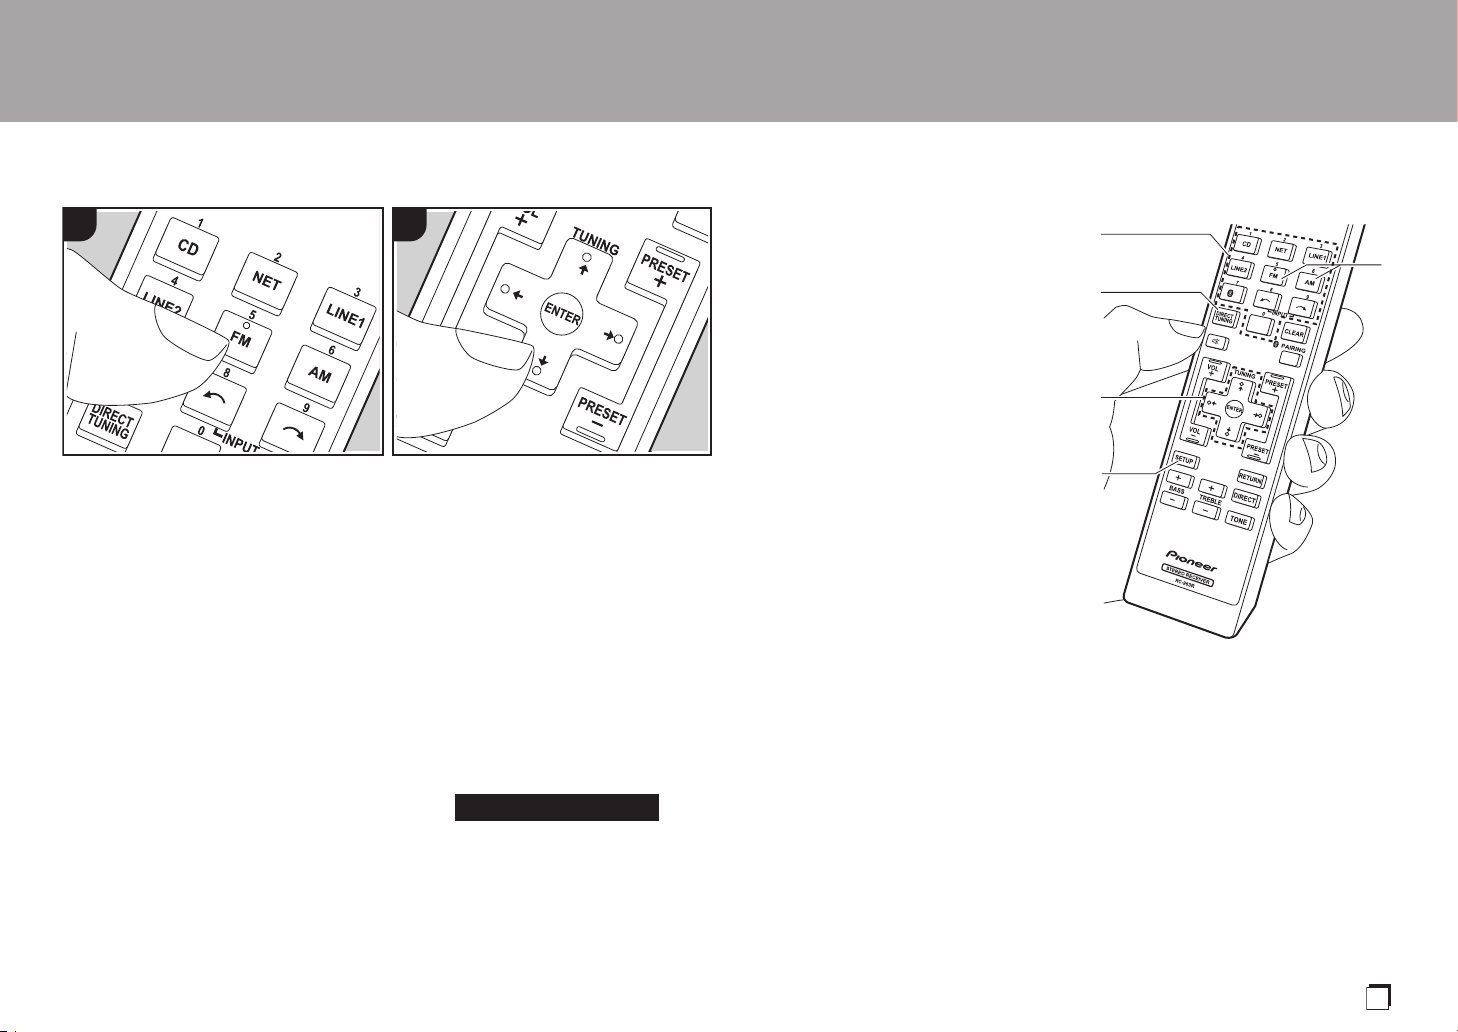
1. Press the input selector button (a) on the
remote controller with the same name as
the jack to which you connected the
player to switch the input.
For example, press CD to play the
player connected to the CD jack. Press
NET to listen the Network Audio Player's
sound.
2. Start play on the connected player.
> Before Start > Part Names > Install > Playback
Setup | Others
41 2 3
a
SN29403247_SX-10AE_En_1707XX.book 11 ページ 2017年7月19日 水曜日 午後1時59分
12
BLUETOOTH
®
Playback
You can wirelessly play music on a
smartphone or other BLUETOOTH
wireless technology enabled device.
Perform the following procedure when the
unit is on.
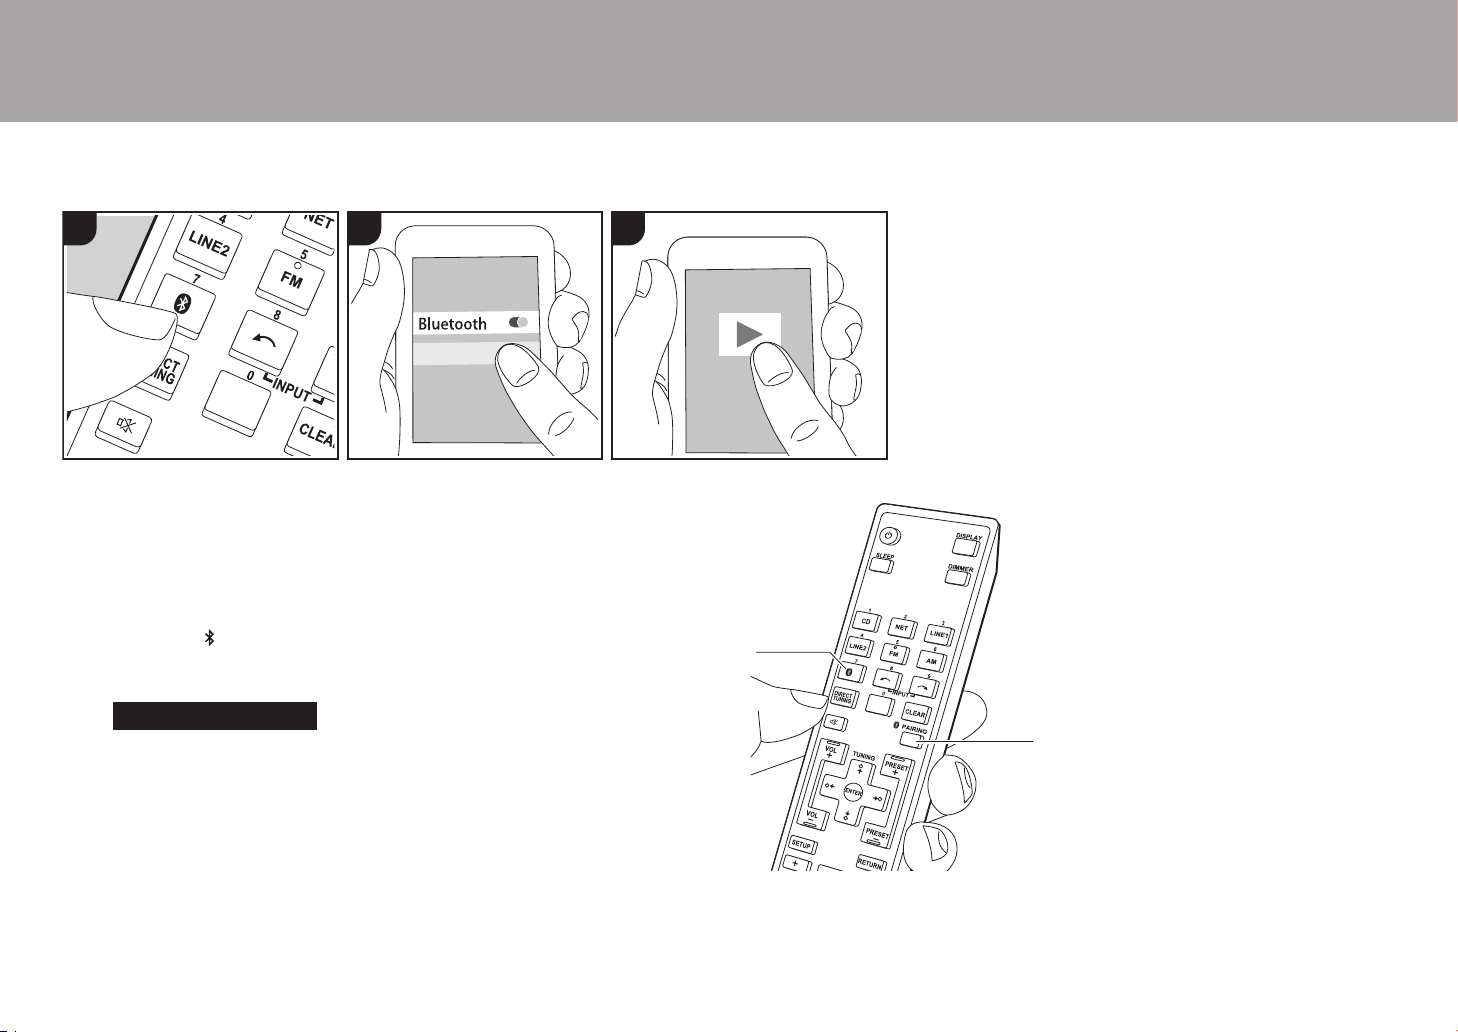
Pairing
1. When you press (a), "Now Pairing..."
is displayed on this unit's display, and
the pairing mode is enabled.
2. Enable (turn on) the BLUETOOTH
function of the BLUETOOTH wireless
technology enabled device, then select
this unit from amongst the devices
displayed. If a password is requested,
enter "0000".
0 This unit is displayed as "Pioneer SX-
10AE".
0 To connect another BLUETOOTH
wireless technology enabled device,
press PAIRING (b), then perform step
2. This unit can store the data of up to
eight paired devices.
0 The coverage area is 32y/10 m. Note
that connection is not always
guaranteed with all BLUETOOTH
wireless technology enabled devices.
Playing Back
1. Perform the connection procedure on
the BLUETOOTH wireless technology
enabled device.
The input on this unit automatically
switches to "BLUETOOTH".
2. Play the music files. Increase the volume
of the BLUETOOTH wireless technology
enabled device to an appropriate level.
0 Due to the characteristics of
BLUETOOTH wireless technology, the
sound produced on this unit may slightly
be behind the sound played on the
BLUETOOTH wireless technology
enabled device.
> Before Start > Part Names > Install > Playback
Setup | Others
PioneerSX-10AE
2 31
Now Pairing . . .
b
a
SN29403247_SX-10AE_En_1707XX.book 12 ページ 2017年7月19日 水曜日 午後1時59分
13
En
> Before Start > Part Names > Install > Playback
Setup | Others
Listening to the AM/FM Radio
You can receive AM/FM radio stations on
this unit with the built-in tuner. Perform the
following procedure when the unit is on.
∫ Tuning into a Radio Station
Tuning Automatically
The unit is set to the auto-tuning mode by
default. If the signal from a radio station is
weak, perform the procedure for "Tuning
Manually" in the next section. Note that if
you tune manually, the reception for FM
broadcasts will be monaural rather than
stereo, irrespective of the sensitivity of the
reception.
1. Press AM or FM (e) on the remote
controller.
2. When you press the cursor Up/Down
buttons (c) on the remote controller,
automatic tuning starts, and searching
stops when a station is found. When
tuned into a radio station, the
"1TUNED2" indicator on the display
lights. When tuned into a stereo FM
radio station, the "FM STEREO"
indicator lights.
Tuning Manually
If you tune manually, the reception for FM
broadcasts will be monaural rather than
stereo, irrespective of the sensitivity of the
reception.
1. Press AM or FM (e) on the remote
controller.
2. After pressing SETUP (d) on the remote
controller, use the cursor Up/Down
buttons (c) to select "Mono" in "Tuner
Setting" - "Tuning Mode", and then press
ENTER to set.
3. While pressing the cursor Up/Down
buttons (c) on the remote controller,
select the desired radio station.
0 The frequency changes by 1 step
each time you press Up/Down
buttons. The frequency changes
1 2
Mode : Mono
continuously if the button is held down
and stops when the button is
released.
Tuning into Stations by Frequency
It allows you to directly enter the frequency
of the radio station you want to listen to.
1. Press AM or FM (e) on the remote
controller.
2. Press DIRECT TUNING (b) on the
remote controller twice.
3. Using the number buttons (a) on the
remote controller, enter the frequency of
the radio station within 8 seconds.
0 To enter 87.5 (FM), for example,
press 8, 7, 5 or 8, 7, 5, 0. If the
entered number is incorrect, press
DIRECT TUNING twice again and re-
enter the number.
AM Frequency step setting (European
and Australian models):
Press SETUP on the remote controller,
then use the cursor buttons and ENTER on
the remote controller to select "Tuner
Setting" - "AM Freq Step", and select the
frequency step for your region. Note that
when this setting is changed, all radio
presets are deleted.
e
c
a
d
b
SN29403247_SX-10AE_En_1707XX.book 13 ページ 2017年7月19日 水曜日 午後1時59分

14
> Before Start > Part Names > Install > Playback
Setup | Others
∫ Using RDS (European and
Australian models)
RDS stands for Radio Data System and is
a method of transmitting data in FM radio
signals. In regions using RDS, the radio
station name is displayed when you tune
into a radio station broadcasting program
information. Further, when you press
DISPLAY on the remote controller in this
state, you can use the following functions.
Displaying Text Information (Radio
Text)
1. While the name of the station is being
displayed on the display, press DISPLAY
on the remote controller once.
Text information broadcast by the station
(Radio Text) is displayed scrolling across
the display. "No Text" is displayed when
no text information is available.
Search for Stations by Program
Type
1. While the name of the station is being
displayed on the display, press DISPLAY
on the remote controller twice.
2. Press the cursors Left/Right buttons on
the remote controller to select the
Program Type you want to find, then
press ENTER to start the search.
0 The Program Types displayed are as
follows: News (News reports) / Affairs
(Current affairs) / Info (Information) /
Sport / Educate (Education) / Drama /
Culture / Science (Science and
technology) / Varied / Pop M (Pop
music) / Rock M (Rock music) / Easy
M (Middle of the road music) / Light M
(Light classics) / Classics (Serious
classics) / Other M (Other music) /
Weather / Finance / Children
(Children’s programmes) / Social
(Social affairs) / Religion / Phone In /
Travel / Leisure / Jazz (Jazz music) /
Country (Country music) / Nation M
(National music) / Oldies (Oldies
music) / Folk M (Folk music) /
Document (Documentary)
0 In addition, there are three other
program types, Alarm, Test (Alarm
test), and None. Alarm and Test
(Alarm test) are used for emergency
announcements. None appears when
a program type cannot be found.
0 The information displayed may
sometimes not match the content
being broadcast by the station.
3. When a station is found, the station
flashes on the display. Press ENTER
while this is happening to start receiving
that station. If you don't press ENTER,
the unit continues to search for another
station.
0 If no stations are found, the message
"Not Found" is displayed.
0 Unusual characters may be displayed
when the unit receives unsupported
characters. However, this is not a
malfunction. Also, if the signal from a
station is weak, information may not be
displayed.
SN29403247_SX-10AE_En_1707XX.book 14 ページ 2017年7月19日 水曜日 午後1時59分
15
En
Registering a Station
You can register up to 40 of your favorite
radio stations.
Registering
After tuning into the radio station you want
to register, perform the following
procedure.
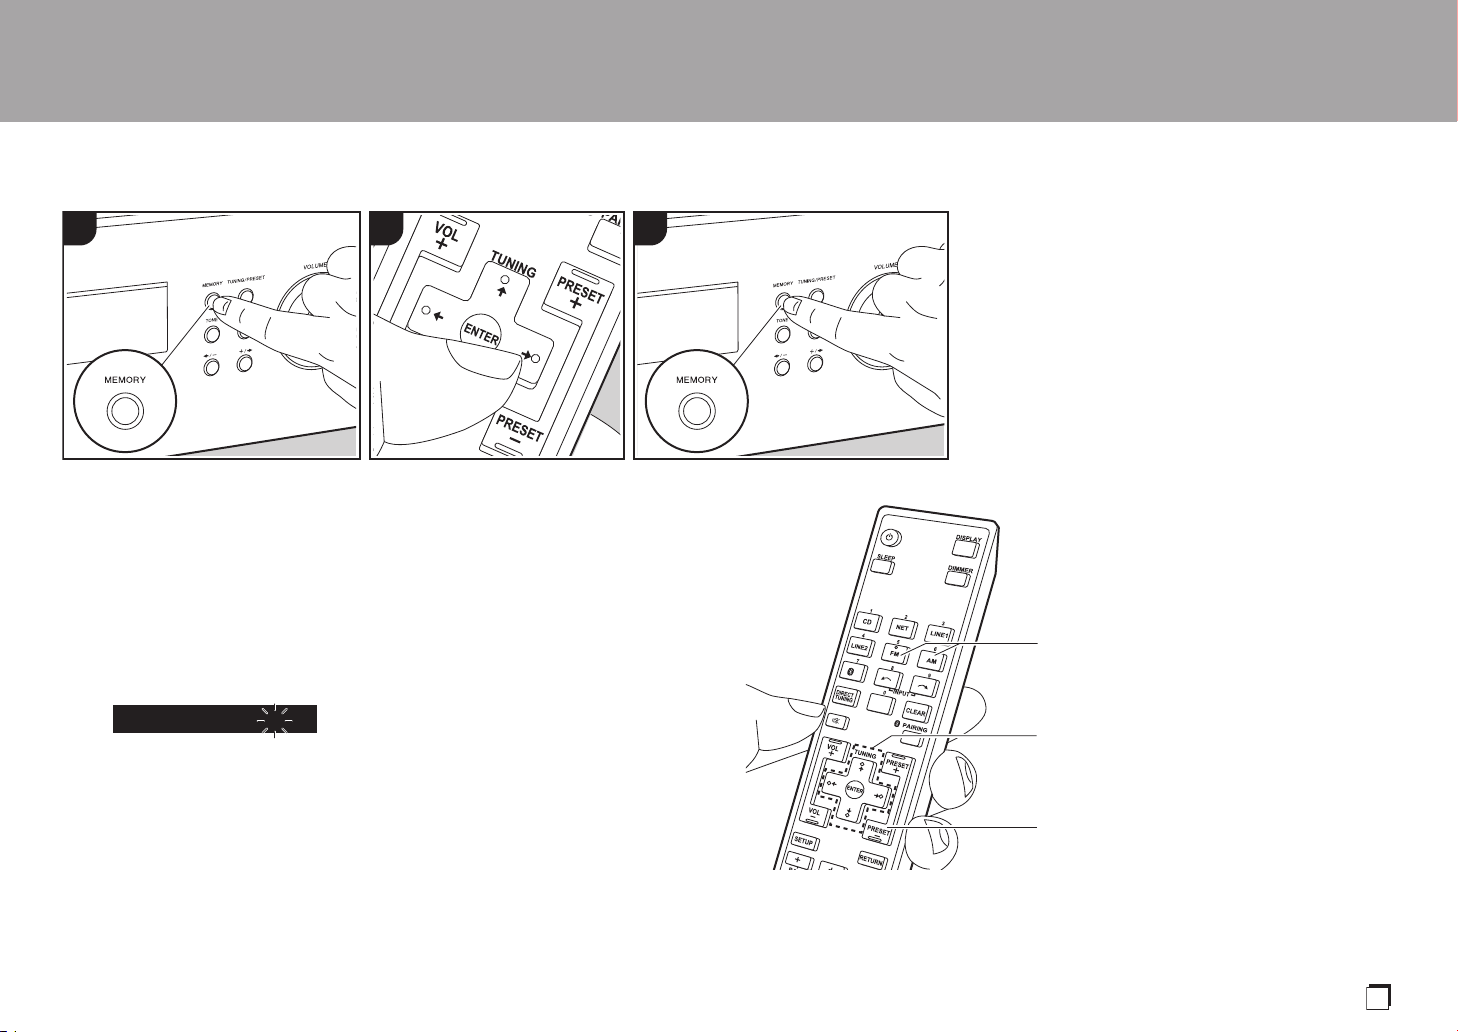
1. Press MEMORY on the main unit so that
the preset number on the display
flashes.
2. While the preset number is flashing
(about 8 seconds), repeatedly press the
cursor Left/Right buttons (b) on the
remote controller to select a number
between 1 and 40.
3. Press MEMORY again on the main unit
to register the station.
When the station is registered, the
preset number stops flashing. Repeat
this procedure for all of your favorite
radio stations.
Selecting a Preset Radio Station
1. Press AM or FM (a) on the remote
controller.
2. Press PRESET (c) on the remote
controller to select a preset number.
Deleting a Preset Radio Station
1. Press PRESET (c) on the remote
controller to select the preset number to
delete.
2. Press SETUP on the remote controller,
then use the cursors and ENTER to start
"Tuner Setting" - "Preset Erase" and
delete the preset number. When deleted,
the number on the display goes off.
> Before Start > Part Names > Install > Playback
Setup | Others
1 2 3
STATION 1
1
a
b
b
c
c
SN29403247_SX-10AE_En_1707XX.book 15 ページ 2017年7月19日 水曜日 午後1時59分
16
Naming Radio Stations Registered as Presets
You can enter names of up to 8 characters
for the stations you have preset. Uses the
following procedure.
1. After pressing AM or FM on the remote
controller, select a preset number.
2. After pressing SETUP on the remote
controller, use the cursor Up/Down
buttons (c) to select "Tuner Setting" -
"Name Edit", and then press ENTER to
set.
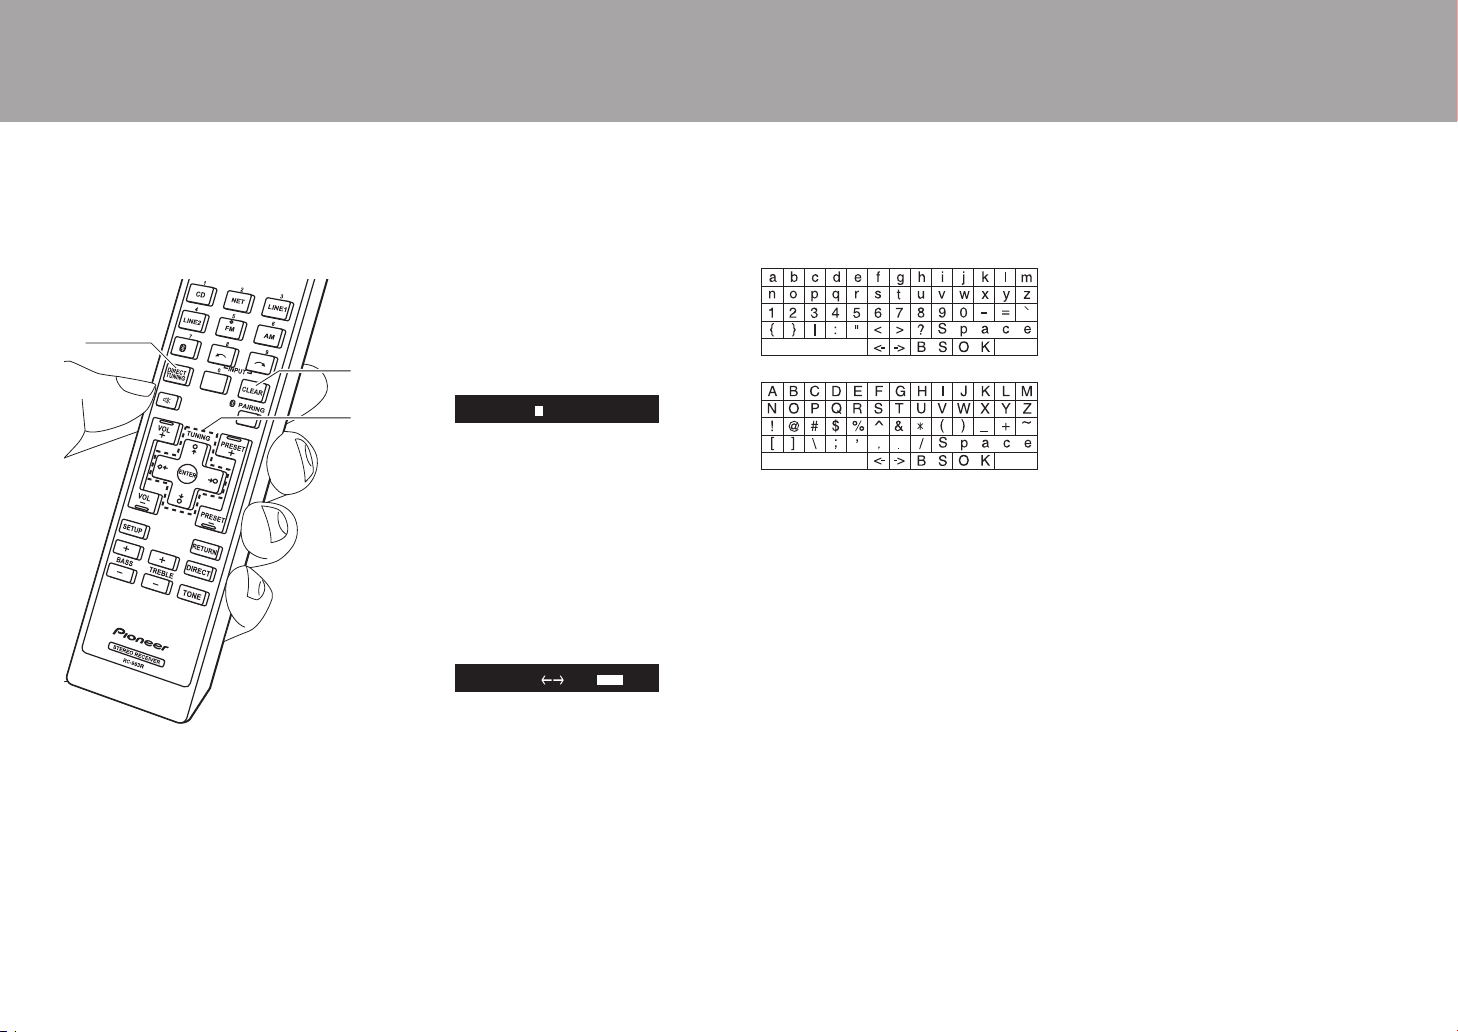
3. Select the characters or symbols with
Up/Down/Left/Right buttons (c).
4. Press ENTER (c) to confirm the selected
character. Repeat this to enter text.
0 Press DIRECT TUNING (a) to change
the characters to be entered, for
example to switch between upper and
lower case.
0 Press CLEAR (b) to delete all the
input characters.
5. After completing input, select "OK" with
Up/Down/Left/Right buttons (c) and
press ENTER (c).
Characters that can be entered
Space: A single space the size of a
character is entered.
Shift: Switches between characters
displayed. (a A)
(left) / (right): Select to move the
cursor.
BS (backspace): Removes a character on
the left of the cursor. The cursor moves left.
OK: Confirms the entered content.
> Before Start > Part Names > Install > Playback
Setup | Others
c
b
a
abcdefghijklm
Shift B
S
O
K
á
Á
Shift
Shift
SN29403247_SX-10AE_En_1707XX.book 16 ページ 2017年7月19日 水曜日 午後1時59分
17
En
Adjusting the Sound Quality
By pressing BASS, TREBLE, etc. on the
remote controller during play, you can
adjust frequently used settings, such as the
sound quality.
0 BALANCE adjustments can only be
made with the buttons on the main unit.
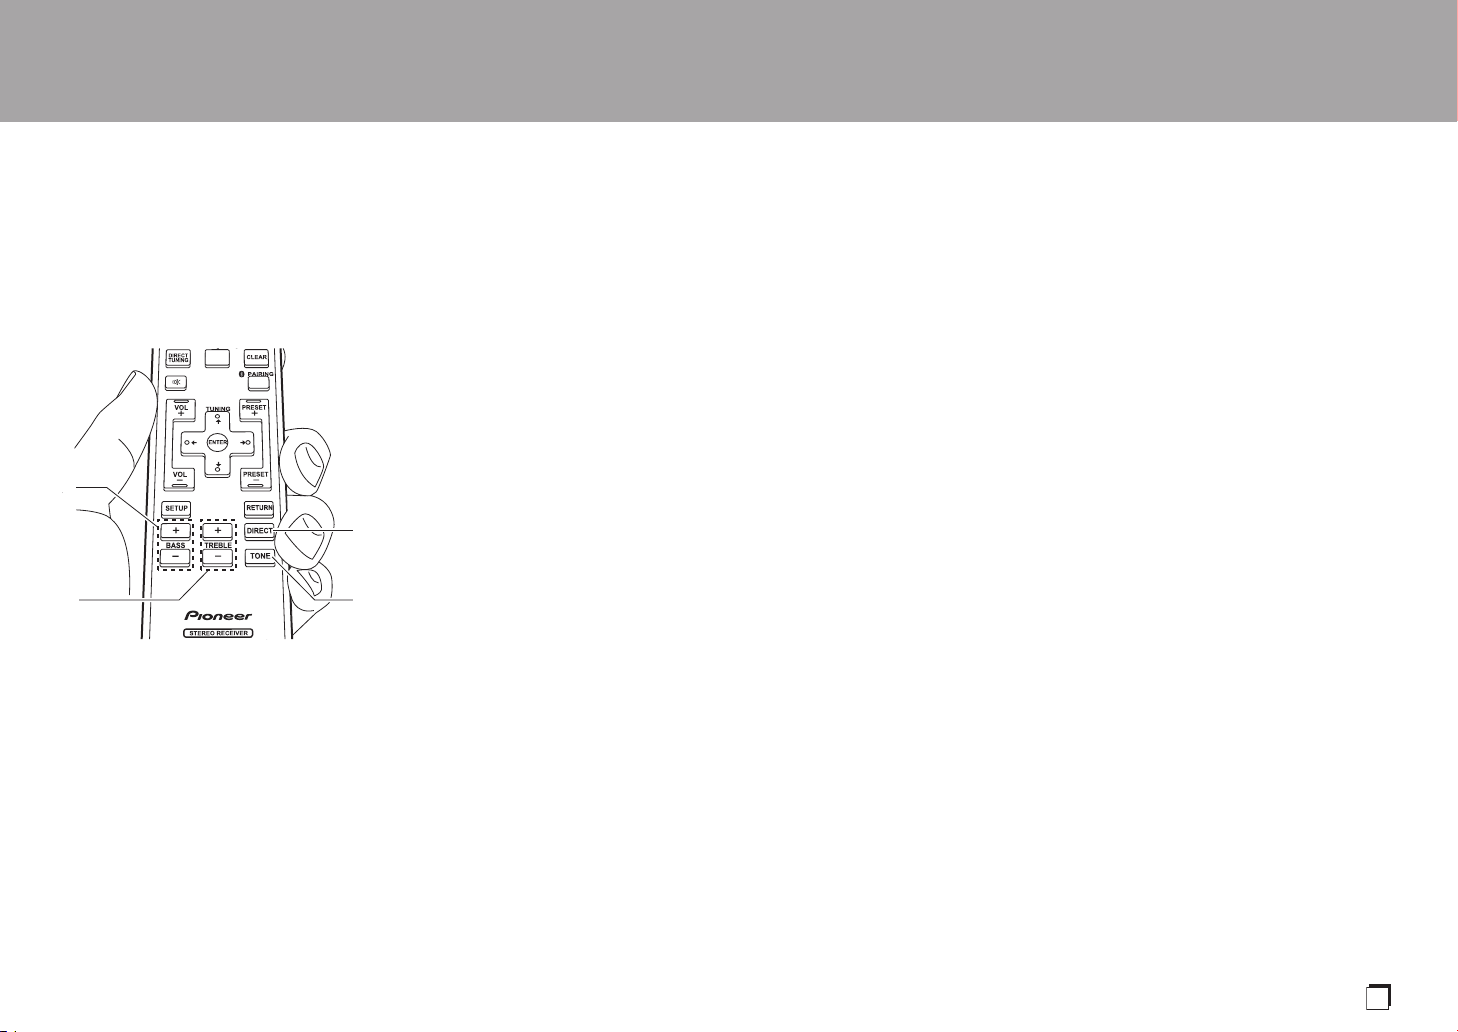
∫ BASS (a)
Enhance or moderate the bass range of the
speakers.
Select between j5 and i5 in 1 dB
increments. (default value: 0)
0 It cannot be set if the DIRECT mode is
selected.
∫ TREBLE (b)
Enhance or moderate the treble range of
the speakers.
Select between j5 and i5 in 1 dB
increments. (default value: 0)
0 It cannot be set if the DIRECT mode is
selected.
∫ DIRECT (c)
Switch to the DIRECT mode which outputs
pure sound as it was intended by
bypassing the tone control circuits during
play.
∫ TONE (d)
Switch to the TONE mode which enables
BASS and TREBLE.
∫ P.BASS
P.BASS is enabled which emphasizes the
bass. Repeatedly press TONE (d) to
display "P.BASS", then press the Left/Right
cursors to switch On or Off. (Default value:
Off)
∫ BALANCE (main unit only)
Adjust the balance of the sounds output
from the left and right speakers.
Select between Li10 and Ri10 in 1 steps
increments. (default value: 0)
> Before Start > Part Names > Install > Playback
Setup | Others
c
d
a
b
SN29403247_SX-10AE_En_1707XX.book 17 ページ 2017年7月19日 水曜日 午後1時59分
18
Setup
Setup Menu
The unit allows you to configure advanced settings to provide you with an even better
experience.
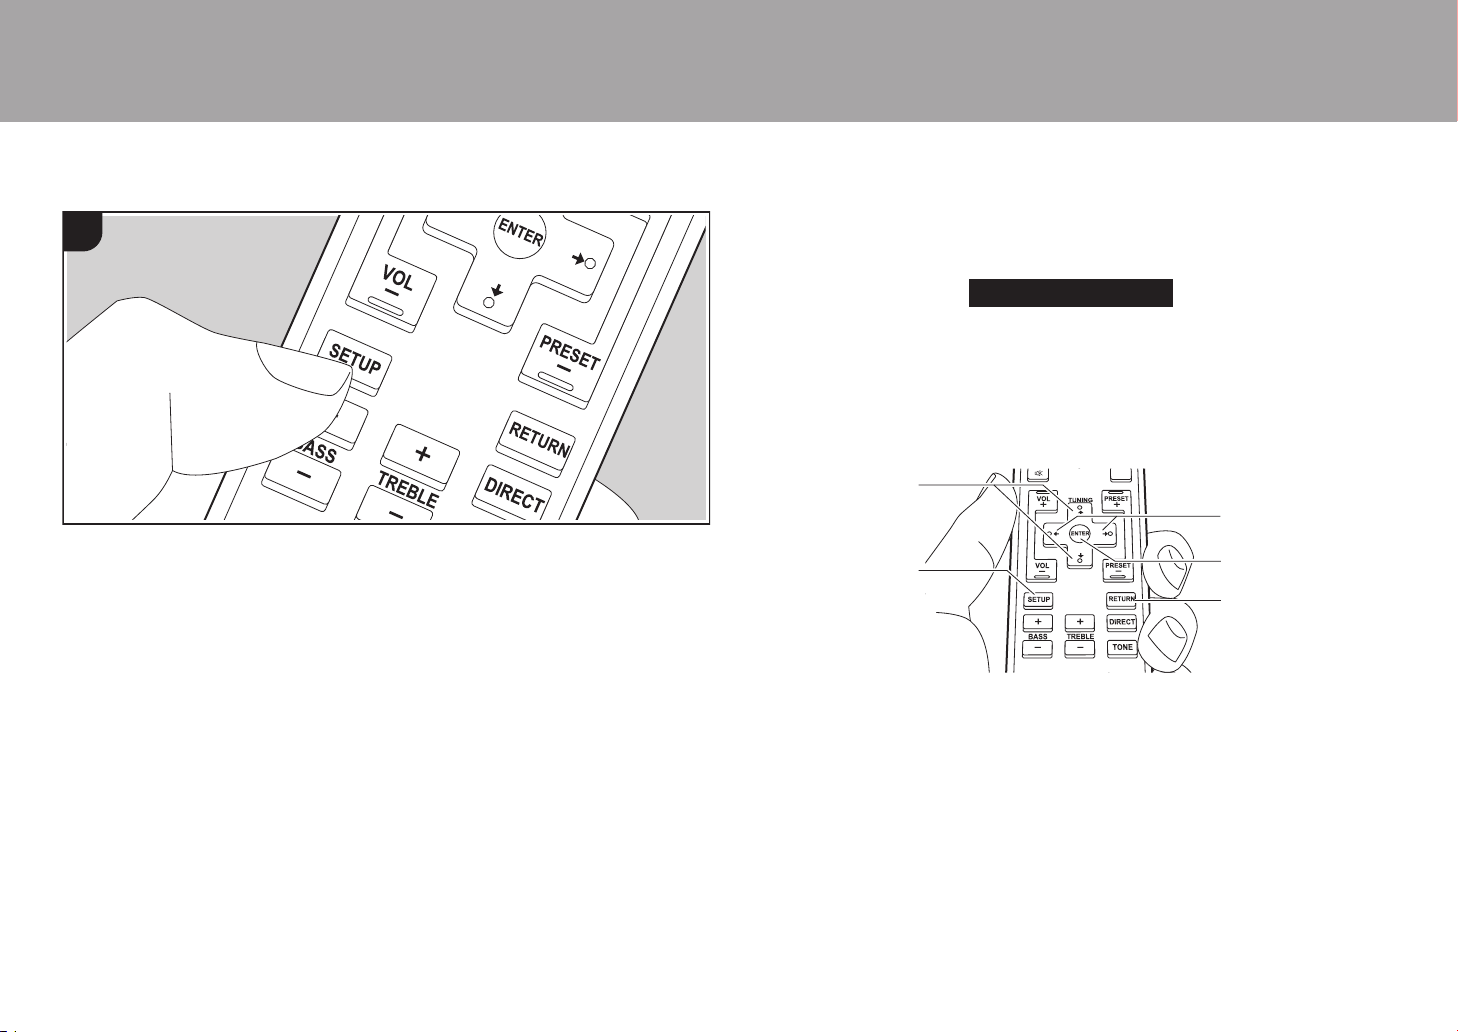
1. Press SETUP (b) on the remote controller.
2. Select the item with the Up/Down buttons (a) on the remote controller and press ENTER
(d) to confirm your selection.
3. Select the submenu with the Up/Down buttons (a) on the remote controller.
4. Select the setting value with the Left/Right buttons (c) on the remote controller and press
ENTER (d) to confirm your selection.
0 To return to the previous display, press RETURN (e).
5. To exit the settings, press SETUP (b).
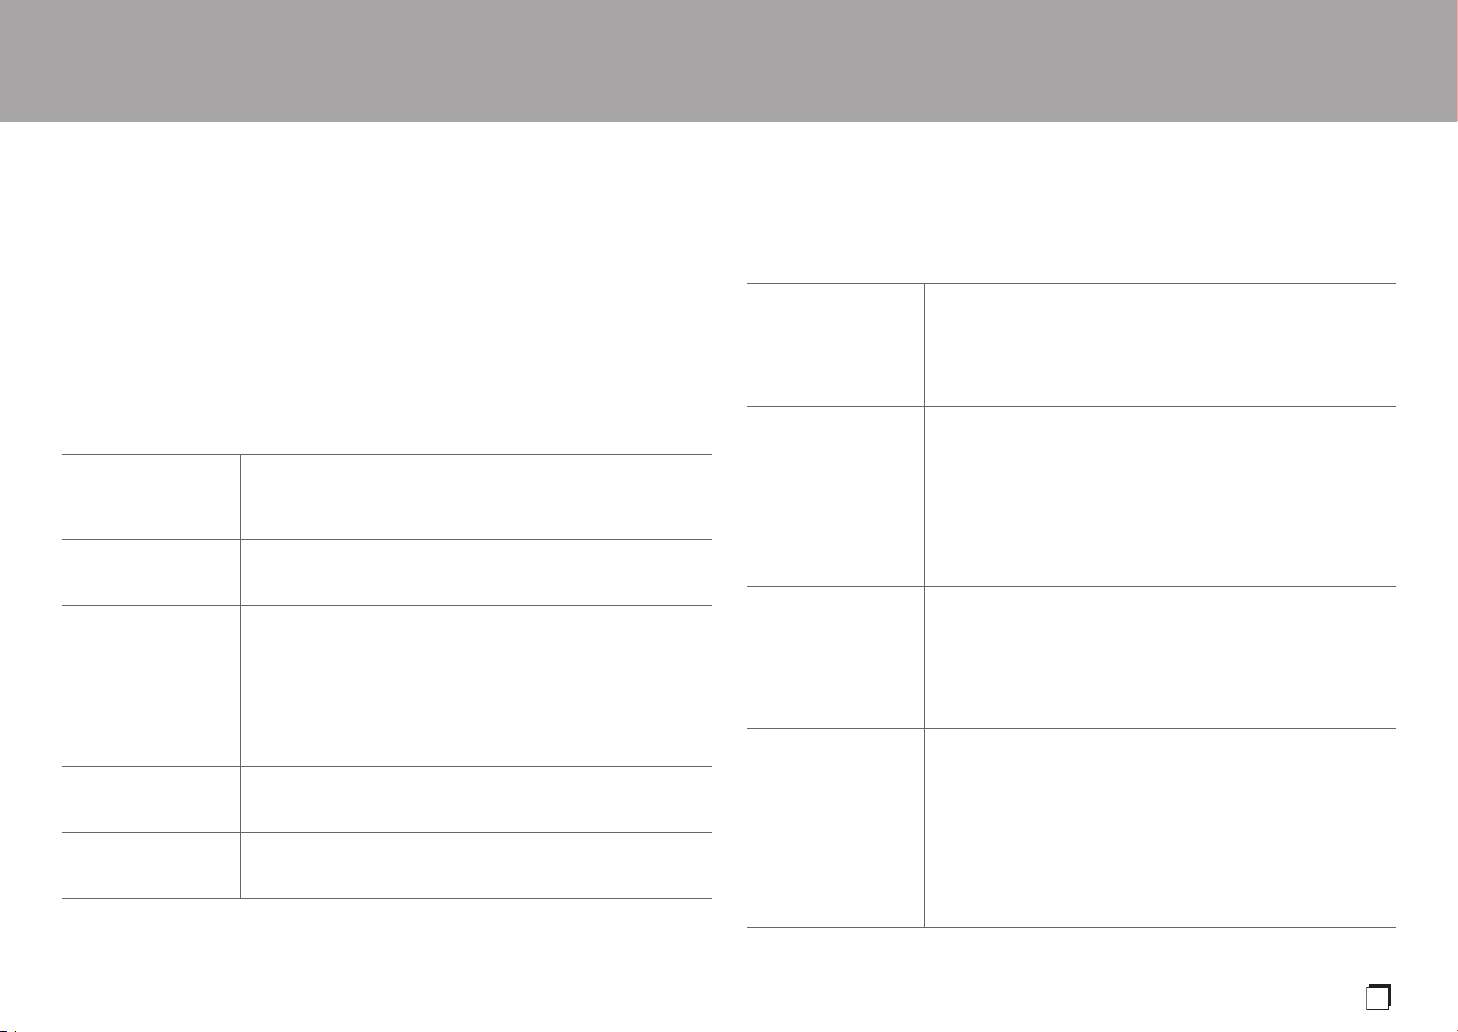
AutoStandby
This setting places the unit on standby automatically after 20 minutes of inactivity without
any audio input.
"On": The unit will automatically enter standby mode. "ASb" lights on the display.
"Off": The unit will not automatically enter standby mode.
0 "AutoStandby" is displayed on the display 30 seconds before the Auto Standby comes on.
0 Default values vary depending on the regions.
SP Impedance
Set the impedance (≠) of the connected speakers.
> Before Start > Part Names > Install > Playback
Setup |Others
1
AutoStandby
a
c
d
b
e
SN29403247_SX-10AE_En_1707XX.book 18 ページ 2017年7月19日 水曜日 午後1時59分
> Before Start > Part Names > Install > Playback
Setup |Others
19
En
"4 ohm": When any of the connected speakers have 4 ≠ or more to less than 6 ≠
impedance, or when speaker systems are connected to both of the SPEAKERS A/B
terminals
"6 ohm (default value)": When the connected speakers all have 6 ≠ or more impedance
0 Note that when connecting to both SPEAKERS A and B terminals, connect speakers with
8 ≠ to 16 ≠ impedance to both A and B.
0 For impedance, check the indications on the back of the speakers or their instruction
manual.
Tuner Setting
The setting cannot be selected when input other than "AM" or "FM" is selected.
Bluetooth
Preset Write You can register up to 40 of your favorite radio stations. While
the preset number is flashing (about 8 seconds), repeatedly
press the cursor Left/Right buttons on the remote controller to
select a number between 1 and 40.
Preset Erase Delete a registered preset number.
0 This setting is not available if you have not selected a preset
number.
Name Edit Set simple names for the stations you have preset. The set
name will be shown on the main unit display. To name a preset
radio station, after pressing AM or FM on the remote controller,
select the preset number.
For details on how to enter text, refer to "Naming Radio Stations
Registered as Presets" (P16).
0 This setting is not available if you have not selected a preset
number.
AM Freq Step
(European and
Australian models)
Select a frequency step depending on your area of residence.
Select "9 kHz (default value)" or "10 kHz".
0 When this setting is changed, all radio presets are deleted.
Tuning Mode Switches tuning to AM/FM automatic tuning/manual tuning.
"Auto (default value)": Tuning Automatically.
"Mono": Tuning Manually.
Bluetooth Select whether or not to use the BLUETOOTH function.
"On (default value)": Enables connection with a BLUETOOTH
wireless technology enabled device by using the BLUETOOTH
function. Select "On" also when making various BLUETOOTH
settings.
"Off": When the BLUETOOTH function is not to be used
AutoChange The input of the unit will automatically be switched to
"BLUETOOTH" when connection is made from a BLUETOOTH
wireless technology enabled device to the unit.
"On (default value)": The input will automatically become
"BLUETOOTH" when a BLUETOOTH wireless technology
enabled device is connected.
"Off": The function is disabled.
0 If the input is not switched automatically, set to "Off" and
change the input manually.
Reconnect This function automatically reconnects to the BLUETOOTH
wireless technology enabled device connected last when you
change the input to "BLUETOOTH".
"On (default value)": When this function is to be used
"Off": When this function is not to be used
0 This may not work with some BLUETOOTH wireless
technology enabled devices.
Pairing Info You can initialize the pairing information saved on this unit.
Pressing ENTER when "Clear" is displayed initializes the pairing
information stored in this unit.
0 This function does not initialize the pairing information on the
BLUETOOTH wireless technology enabled device. When
pairing the unit again with the device, be sure to clear the
pairing information on the BLUETOOTH wireless technology
enabled device in advance. For information on how to clear
the pairing information, refer to the BLUETOOTH wireless
technology enabled device's instruction manual.
SN29403247_SX-10AE_En_1707XX.book 19 ページ 2017年7月19日 水曜日 午後1時59分

20
> Before Start > Part Names > Install > Playback
Setup |Others
Sleep Timer
You can make the unit enter standby automatically when the specified time elapses.
1. Press SLEEP on the remote controller to display the time to set on the display.
0 Press SLEEP repeatedly on the remote controller to make the setting in 10-minute steps
from "90", "80", "70", down to "OFF".
0 After pressing SLEEP on the remote controller, you can make the setting in 1-minute
steps by repeatedly pressing the Up/Down buttons on the remote controller.
0 To see how much time is left on the Sleep time, press SLEEP on the remote controller.
While the remaining time is being displayed, you can reduce the set time in 10-minute
steps by pressing SLEEP on the remote controller.
Device Displays the name of the BLUETOOTH wireless technology
enabled device connected to the unit.
0 The name is not displayed when "Stat" is "Ready" or "Pairing".
Stat Displays the status of the BLUETOOTH wireless technology
enabled device connected to the unit.
"Ready": Not paired
"Pairing": Pairing
"Connected": Successfully connected
Sleep 90
SN29403247_SX-10AE_En_1707XX.book 20 ページ 2017年7月19日 水曜日 午後1時59分

21
En
Others
Troubleshooting
Before starting the procedure
Problems may be solved by simply turning the power on/off
or disconnecting/connecting the power cord, which is easier
than working on the connection, setting and operating
procedure. Try the simple measures on both the unit and
the connected device. If the problem isn't fixed after
referring to "Troubleshooting", resetting the unit to the
status at the time of shipment may solve the problem. Note
that your settings will also be initialized when you reset, so
we recommend that you note down your settings before
doing the following.
0 This unit contains a microPC for signal processing and
control functions. In very rare situations, severe
interference, noise from an external source, or static
electricity may cause it to lockup. In the unlikely event
that this happens, unplug the power cord from the wall
outlet, wait at least 5 seconds, and then plug it back in.
0 We are not responsible for reparations for damages
(such as CD rental fees) due to unsuccessful recordings
caused by the unit’s malfunction. Before you record
important data, make sure that the material will be
recorded correctly.
If operation becomes unstable
Try unplugging the power cord of the unit and connected
devices, and then plugging them in again.
Resetting the unit (this resets the unit settings to the
default)
If the issue is not fixed by unplugging the power cord,
resetting the unit to the status at the time of shipment may
solve the problem. Your settings will also be initialized when
you reset, so note down your settings before doing the
following.
1. While holding down SPEAKERS A/B on the main unit,
press Í STANDBY/ON.
2. The unit switches to standby and the settings are reset.
∫ Power
Cannot turn on the unit
0 Make sure that the power cord is properly plugged into
the wall outlet.
0 Unplug the power cord from the wall outlet, wait 5
seconds or more, then plug it in again.
The unit turns off unexpectedly
0 The unit automatically switches to standby when the
"AutoStandby" setting in the Setup menu functions.
0 A speaker cable may have shorted and the protective
circuit function may have been activated. Make sure bare
speaker wires are not touching each other or the back
panel of the unit, then turn the unit on again. If "NG" is
displayed, immediately unplug the power cord from the
wall outlet and contact your dealer.
0 The protective circuit function may have been activated
because the temperature of the unit rose abnormally. If
this happens, then the power will continue to turn off after
you have turned the unit on again. Make sure the unit
has plenty of space for ventilation around it, wait for the
unit to cool down sufficiently, and then try turning it on
again.
WARNING: If smoke, smell or abnormal noise is produced
by the unit, unplug the power cord from the wall outlet
immediately and contact the dealer or customer support.
∫ Audio
0 Confirm that the connection between the output jack on
the device and the input jack on this unit is correct.
0 Make sure that none of the connecting cables are bent,
twisted, or damaged.
0 If the MUTING indicator on the display flashes, press
on the remote controller to cancel muting.
0 While headphones are connected to the PHONES jack,
no sound is output from the speakers.
No sound from an other connected external device
0 Change the input selector on this unit to the position of
the terminal to which the other external device is
connected.
A speaker produces no sound
0 Make sure that the polarity of the speaker cables (+/–) is
correct, and that no bare wires are in contact with the
metal part of speaker terminals.
0 Make sure that the speaker cables have not shorted.
0 Make sure the speakers are connected correctly (P8).
Noise can be heard
0 Using cable ties to bundle analog audio cables, power
cord, speaker cables, etc. may degrade the audio
performance. Do not bundle cords.
0 An audio cable may be picking up interference. Try
repositioning your cables.
∫ AM/FM broadcasting
Radio reception is poor or there is a lot of noise
0 Re-check the antenna connection.
0 Separate the antenna from speaker cables and the
power cord.
0 Move the unit away from your TV or PC.
0 Passing cars and airplanes can cause interference.
0 Concrete walls weaken radio signals.
0 Listen to the station in mono.
0 When listening to an AM station, operating the remote
controller may cause noise.
0 FM reception may become clearer if you use the antenna
jack on the wall used for the TV.
∫ The BLUETOOTH feature
0 Try plugging/unplugging the power of the unit and try
turning on/off the BLUETOOTH wireless technology
enabled device. Restarting the BLUETOOTH wireless
> Before Start > Part Names > Install > Playback
Setup | Others
SN29403247_SX-10AE_En_1707XX.book 21 ページ 2017年7月19日 水曜日 午後1時59分

22
> Before Start > Part Names > Install > Playback
Setup | Others
technology enabled device may be effective.
0 The BLUETOOTH wireless technology enabled devices
must support the A2DP profile.
0 Radio wave interference may occur in the vicinity of
components, such as microwave ovens or cordless
phones, which use radio waves in the 2.4 GHz range.
This interference may render this unit unusable.
0 If there is a metallic object near the unit, BLUETOOTH
connection may not be possible as the metal can effect
on the radio waves.
Cannot connect with this unit
0 Check that the BLUETOOTH function of the
BLUETOOTH wireless technology enabled device is
enabled.
Music playback is unavailable on the unit even after
successful BLUETOOTH connection
0 When the audio volume of your BLUETOOTH wireless
technology enabled device is set low, the playback of
audio may be unavailable. Turn up the volume on the
BLUETOOTH wireless technology enabled device.
0 Some BLUETOOTH wireless technology enabled
devices may be equipped with a Send/Receive selector
switch. Select Send mode.
0 Depending on the characteristics or specifications of
your BLUETOOTH wireless technology enabled device,
playback on this unit may not be possible.
Sound is interrupted
0 There may be a problem with the BLUETOOTH wireless
technology enabled device. Check the information on the
internet.
The audio quality is poor after connection with a
BLUETOOTH wireless technology enabled device
0 Reception is poor. Move the BLUETOOTH wireless
technology enabled device closer to the unit or remove
any obstacle between the BLUETOOTH wireless
technology enabled device and this unit.
∫ Remote Controller
0 Make sure that the batteries are installed with the correct
polarity.
0 Install new batteries. Do not mix different types of
batteries, or old and new batteries.
0 Make sure that the unit is not subjected to direct
sunshine or inverter-type fluorescent lights. Relocate if
necessary.
0 If the unit is installed in a rack or cabinet with colored-
glass doors or if the doors are closed, the remote
controller may not work reliably.
∫ Display
The display doesn't light
0 The display may go dim while the Dimmer is working.
Press DIMMER to change the brightness level of the
display.
∫ Others
Strange noises can be heard from the unit
0 If you have connected another unit to the same wall
outlet as this unit, this noise may be an effect from the
other unit. If the symptoms improve by unplugging the
power cord of the other unit, use different wall outlets for
this unit and the other unit.
SN29403247_SX-10AE_En_1707XX.book 22 ページ 2017年7月19日 水曜日 午後1時59分

23
En
General Specifications
Amplifier (Audio) section
Rated Output Power (FTC) (North American)
0 With 8 ohm loads, both channels driven, from 20 -
20,000 Hz; rated 45 watts per channel minimum RMS
power, with no more than 0.08% total harmonic
distortion from 250 milliwatts to rated output.
0 With 6 ohm loads, both channels driven, at 1 kHz;
rated 85 watts per channel minimum RMS power, with
no more than 0.9% total harmonic distortion from
250 milliwatts to rated output.
Rated Output Power (IEC) (European and Australian)
2 ch k 100 W at 6 ohms, 1 kHz, 1ch Driven of 1%THD
MAXIMUM Effective Output Power (JEITA)
2 ch k 100 W at 6 ohms, 1 kHz, 2ch Driven of 10%THD
Dynamic Power (*)
(*)IEC60268-Short-term maximum output power
140 W (3 ≠)
120 W (4 ≠)
80 W (8 ≠)
THD+N (Total Harmonic Distortion+Noise)
0.08% (20 - 20,000 Hz, half power)
Input Sensitivity and Impedance
450 mV/40 k≠ (LINE (Unbalance))
Rated RCA Output Level and Impedance
420 mV/2.2 k≠ (LINE OUT)
2.8 V/3.3 k≠ (SUBWOOFER PRE OUT)
Frequency Response
10 Hz - 100 kHz/i1 dB, j3 dB (DIRECT)
Tone Control Characteristics
n10 dB, 100 Hz (BASS)
n10 dB, 10 kHz (TREBLE)
4 dB (P.BASS)
Signal to Noise Ratio
100 dB (IHF-A, LINE IN, SP OUT)
Speaker Impedance
4 ≠ - 16 ≠
Headphone Output Impedance
390 ≠
Headphone Rated Output
60 mW (32 ≠, 1 kHz, 10%THD)
Tuner Section
FM Tuning Frequency Range
87.5 MHz - 107.9 MHz (North American)
87.5 MHz - 108.0 MHz, RDS (European and Australian)
AM Tuning Frequency Range
530 kHz - 1710 kHz (North American)
9 kHz Frequency Step (Default value): 522 kHz -
1611 kHz (European and Australian)
10 kHz Frequency Step: 530 kHz - 1710 kHz (European
and Australian)
Preset Channel
40
BLUETOOTH Section
Communication system
BLUETOOTH Specification version 4.2
Frequency band
2.4 GHz band
Modulation method
FHSS (Frequency Hopping Spread Spectrum)
Compatible BLUETOOTH profiles
A2DP 1.3
AVRCP 1.5
Supported Codecs
SBC
AAC
Transmission range (A2DP)
20 Hz - 20 kHz (Sampling frequency 44.1 kHz)
Maximum communication range
Line of sight approx. 32 ft. / 10 m (*)
(*)The actual range will vary depending on factors such as
obstacles between devices, magnetic fields around a
microwave oven, static electricity, cordless phone,
reception sensitivity, antenna’s performance, operating
system, software application, etc.
General
Power Supply
AC 120 V, 60 Hz (North American)
AC 220-240 V, 50/60 Hz (European and Australian)
Power Consumption
150 W (North American)
160 W (European and Australian)
0.4 W (Stand-by)
20 W (No-sound)
Dimensions (W k H k D)
435 mm k 147 mm k 321 mm
17-1/8" k 5-13/16" k 12-5/8"
Weight
6.7 kg / 14.8 lbs (North American)
7 kg / 15.4 lbs (European and Australian)
Audio Inputs
Analog
CD, NETWORK, LINE1, LINE2
Audio Outputs
Analog
PRE OUT SUBWOOFER
LINE OUT L/R
Speaker Outputs
SPEAKERS A: L/R
SPEAKERS B: L/R
Phones
PHONES (Front, Ø1/4"/6.3 mm)
> Before Start > Part Names > Install > Playback
Setup | Others
SN29403247_SX-10AE_En_1707XX.book 23 ページ 2017年7月19日 水曜日 午後1時59分

24
All other trademarks are the property of their respective owners. / Toutes les
autres marques commerciales sont la propriété de leurs détenteurs respectifs.
/ El resto de marcas comerciales son propiedad de sus respectivos
propietarios. / Tutti gli altri marchi di fabbrica sono di proprietà dei rispettivi
proprietari. / Alle anderen Warenzeichen sind das Eigentum ihrer jeweiligen
Eigentümer. / Alle andere handelsmerken zijn eigendom van de
desbetreffende rechthebbenden. / Alla andra varumärken tillhör deras
respektive ägare. / Kaikki muut tuotemerkit ovat omistajiensa omaisuutta. /
㎕
㡞⋋⚛㭮䈏╙匿㎕㡞党㎕㡞
ѳ
The BLUETOOTH
®
word mark and logos are registered trademarks owned by
Bluetooth SIG, Inc.
SN29403247_SX-10AE_En_1707XX.book 24 ページ 2017年7月19日 水曜日 午後1時59分

25
En
SN29403247_SX-10AE_En_1707XX.book 25 ページ 2017年7月19日 水曜日 午後1時59分

26
SN29403247_SX-10AE_En_1707XX.book 26 ページ 2017年7月19日 水曜日 午後1時59分

27
En
SN29403247_SX-10AE_En_1707XX.book 27 ページ 2017年7月19日 水曜日 午後1時59分

Register your product on
http://www.pioneerelectronics.com (US)
http://www.pioneerelectronics.ca (Canada)
http://www.pioneer.eu (Europe)
Корпорация О энд Пи
2-3-12, Яэсу, Чуо-ку, г. Токио, 104-0028, ЯПОНИЯ
<Germany>
Hanns-Martin-Schleyer-Straße 35, 47877 Willich, Germany
Tel: +49(0)8142 4208 188 (Product Support)
<UK>
Anteros Building, Odyssey Business Park, West End Road, South Ruislip,
Middlesex, HA4 6QQ United Kingdom
Tel: +44(0)208 836 3612
<France>
6, Avenue de Marais F - 95816 Argenteuil Cedex FRANCE
Tel: +33(0)969 368 050
<U.S.A.>
18 PARK WAY, UPPER SADDLE RIVER, NEW JERSEY 07458, U.S.A.
Tel: 1-201-785-2600
Tel: 1-844-679-5350
2-3-12 Yaesu, Chuo-ku, Tokyo 104-0028 JAPAN
F1707-0
SN 29403247
Printed in Malaysia / Imprimé en Malaisie
*29403247*
“Pioneer” is a trademark of Pioneer Corporation, and is used under license.
© 2017 Onkyo & Pioneer Corporation. Tous droits de reproduction et de traduction réservés.
© 2017 Onkyo & Pioneer Corporation.
All rights reserved.
SN29403247_SX-10AE_En_1707XX.book 1 ページ 2017年7月19日 水曜日 午後1時59分