OWNER’S MANUAL Blender
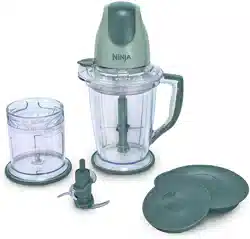
GETTING TO KNOW YOUR NINJA MASTER PREP
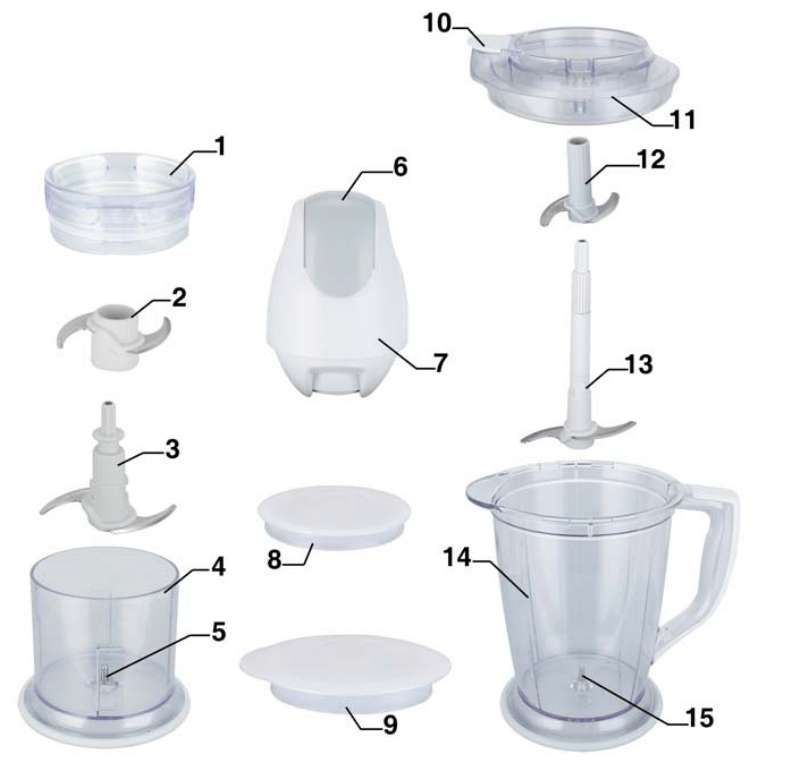
- Bowl Splash Guard
- Upper Blade
- Lower Blade
- Master Prep Bowl
- Spindle Pin
- On/Off Pulse Button
- Power Head
- Bowl Storage Lid
- Pitcher Storage Lid
- Pouring Spout
- Pitcher Splash Guard
- Upper Blade
- Lower Blade
- Master Prep Pitcher
- Spindle Pin
- Power Cord (not shown)
Technical Specifications
- Voltage: 120V., 60Hz.
- Power: 400 Watts
- Pitcher Capacity: 48 ounces (6 cups)
- Bowl Capacity: 16 ounces (2 cups)
*Illustrations may differ from actual product
OPERATING INSTRUCTIONS
The Ninja Master Prep is an indispensable kitchen tool that is perfect for blending, chopping, mixing or pureeing when preparing your favorite recipes. For best results, be sure to carefully read all the instructions contained in the manual before using this appliance
400 Watt Power Head
- The 400 watt power head operates on 120V., 60 Hz. electrical power. Never allow the power head to become wet when plugged into an electrical outlet.
- WARNING: The power head should never be immersed in water or any other liquid.
- CAUTION: Make sure that the power head is unplugged from the electrical outlet and that the blades have stopped turning before attaching or removing any accessory.
Using the Master Prep Pitcher
CAUTION: Blades are sharp! Use extreme caution when handling the blades. Always hold them by the hub.
IMPORTANT: Never run the appliance empty.
- Place the master prep pitcher on a clean, dry, level surface.
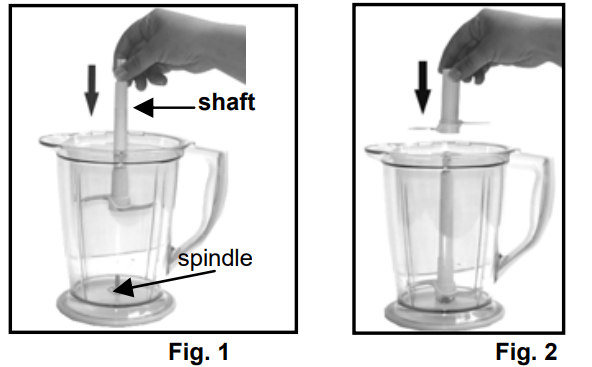
- Holding the lower blade by the shaft, place it onto the spindle pin inside the master prep pitcher and then carefully slide the upper blade onto the shaft of the lower blade. Make sure that the upper blade slides down into the slots of the lower blade shaft. (Fig. 1, Fig. 2) Make sure that when you are inserting the upper blade, the blades are on the bottom.
WARNING: Do not try to place the blades onto the power head and then into the Master prep pitcher. (Fig. 3)

3. Add the ingredients to be processed into the master prep pitcher.
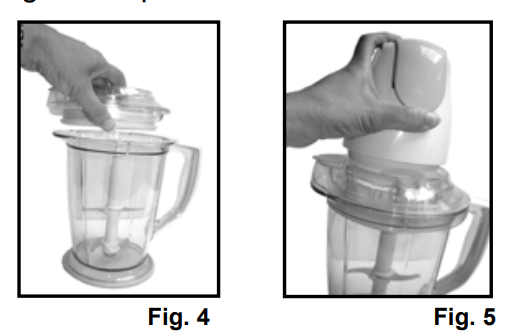
4. Place the pitcher splash guard onto the top of the master prep pitcher. (Fig. 4)
5. Place the power head on top of the pitcher splash guard making sure that it is securely in place. (Fig. 5) Do not attempt to operate the appliance without the safety splash guard in place.
6. To start the appliance, press on the On/Off Pulse button located on the top of the power head. To stop the appliance, remove your fingers from the On/Off Pulse button. In order to obtain a better quality of chopping, operate the appliance by using the “pulse” method. If the ingredients stick to the side of the master prep pitcher, stop the appliance, remove the power head and the splash guard. Use a spatula to dislodge the pieces and then replace the splash guard and the power head. Continue processing.
NOTE: Do not operate the appliance continuously for more than 20 seconds at a time.
7. Hold the master prep pitcher firmly while depressing the On-Off/Pulse button to ensure the unit stays in place.
8. Make sure that the blades have stopped completely before removing the splash guard.
9. Remove the blade assembly by its shaft before you empty the contents of the master prep pitcher.
10. Never add ingredients into the master prep pitcher before placing the blade assembly in first.
Using the Master Prep Bowl
CAUTION: Blades are sharp! Use extreme caution when handling the blades. Always hold them by the shaft.
IMPORTANT: Never run the appliance empty.
1. Place the master prep bowl on a clean, dry, level surface.
2. Holding the lower blade by the shaft, place it over the spindle pin inside the master prep bowl. (Fig. 6)

3. Carefully insert the upper blade over the lower blade rotating it until it locks onto the lower blade. (Fig. 7, Fig. 8)
IMPORTANT: Always assemble the blades inside the container.

CAUTION: Be careful not to hold by the blades as the blades are very sharp.
4. Place the food that you want to process into the master prep bowl and place the splash guard on the bowl.
NOTE: Do not add more than 2 cups dry or 1 cup liquid ingredients as this will strain the motor and may cause overflow.
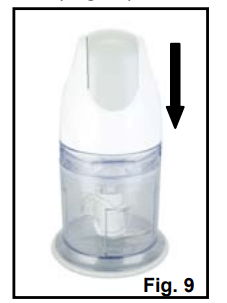
5. Place the power head on the master prep bowl. (Fig. 9)
6. Plug the power cord into the electrical outlet.
7. To start the appliance, press on the On/Off Pulse button located on the top of the power head. To stop the appliance, remove your fingers from the On/Off Pulse button. In order to obtain a better quality of chopping, operate the appliance by using the “pulse” method. If the ingredients stick to the side of the master prep bowl, stop the appliance, remove the power head and the splash guard. Use a spatula to dislodge the pieces and then replace the splash guard and the power head. Continue processing.
NOTE: Do not operate the appliance continuously for more than 20 seconds at a time. Be careful not to over process. For coarsely chopped foods, use repeated short pulsing action until the desired consistency is reached.
8. Hold the master prep bowl firmly while depressing the On-Off/Pulse button to ensure the unit stays in place.
9. Make sure that the blades have stopped completely before removing the splash guard.
IMPORTANT SAFETY INSTRUCTIONS
When using electrical appliances, basic safety precautions should always be followed, including the following:
- Read all instructions before using your Ninja Master Prep.
- Close supervision is necessary when any appliance is used by or near children.
- To protect against electric shock, DO NOT immerse cord, plug or any part of the main unit in water or any other liquids.
- DO NOT let cord hang over edge of table or counter, or touch hot surfaces.
- DO NOT operate appliance with damaged cord or plug or after the appliance malfunctions, or is dropped or has been damaged in any manner. Return appliance to EURO-PRO Operating LLC for examination, repair or adjustment.
- Unplug appliance from outlet when not in use and before cleaning.
- DO NOT place on or near a hot gas or electric burner.
- The use of accessory attachments, including canning jars not recommended by EURO-PRO Operating LLC may cause fire, electrical shock or risk of personal injury.
- Extreme caution must be used when moving an appliance containing hot food, water or other liquids.
- Use this appliance on a stable work surface away from water.
- DO NOT remove the motor head before the chopping blades have stopped turning.
- CAUTION! Chopping blades are sharp, handle with care. When handling the chopping blades, always hold by the plastic hub.
- DO NOT expose jars to extreme temperature changes.
- DO NOT use jars if they are cracked or chipped.
- DO NOT use the appliance if chopping blades are bent or damaged.
- Avoid contact with moving parts at all times. Keep hands, hair, clothing as well as spatulas and other utensils away from pitcher or chopping container during operation to prevent risk of personal injury and/or damage to the appliance.
- Exercise extreme caution when blending hot liquids.
- Immediately release the On/Off button on the motor head in the event that the appliance malfunctions during use.
- To reduce the risk of injury, NEVER operate the appliance without the splash guard in place; DO NOT try to defeat the interlock mechanism; make sure that the cutting blades are properly assembled before operating the appliance.
- DO NOT use outdoors.
- DO NOT use appliance for other than intended use.
NOTE: This unit has a short power supply cord to reduce the risk resulting from becoming entangled in or tripping over a long cord. An extension cord may be used if you are careful in its use:
- The electrical rating of the extension cord should be at least as great as the electrical rating of the appliance.
- An extension cord with the power cord must be arranged so that it will not drape over the countertop or tabletop where they can be pulled on by children or tripped over accidentally
POLARIZED PLUG WARNING: To reduce the risk of electric shock, this appliance has a polarized plug (one blade is wider than the other). This plug will fit in a polarized outlet only one way. If the plug does not fit fully in the outlet, reverse the plug. If it still does not fit, contact a qualified electrician to install the proper outlet. Do not modify the plug in any way
CLEANING & MAINTENANCE
CAUTION: Make sure that the power head is unplugged from power source before inserting or removing any attachments and before cleaning.
Cleaning
- Do NOT immerse the power head into water or any other liquid. Clean with a damp sponge and cloth and wipe dry.
- The master prep pitcher, master prep bowl and the chopping blades may be cleaned in the upper basket of the dishwasher.
- Use extreme caution when cleaning the chopping blades as the blades are very sharp.
- The splash guards and the storage lids, may be washed in upper basket of the dishwasher.
Hints & Tips:
- The double chopping blades can be used for chopping meat, fish, vegetables, cheese, etc.
- For finer chopping, increase the length of time you process.
- For coarser chopping, use the pulse button for a few seconds and monitor food texture.
- Pre-cut larger pieces to make them fit into the master prep bowl. When chopping hard foods (e.g. meat, cheese) cut into 1-inch cubes.
Trouble Shooting
1. Motor doesn't start or blades don't rotate:
- Check that the plug is securely inserted into the electrical outlet.
2. Food is unevenly chopped:
- Either you are chopping too much food at one time, or the pieces are not small enough. Try cutting the food into smaller pieces of even size and processing smaller amounts per batch.
3. Food is chopped too fine or is too watery:
- The food has been over processed. Use brief pulses or process for shorter time. Let blades stop completely between pulses.
4. Food collects on splash guard/safety cover or on the sides of the master prep pitcher or master prep bowl:
- You may be processing too much food. Turn the machine off. When the blades stop rotating, remove the power head and the splash guard. Remove some of the food being processed.