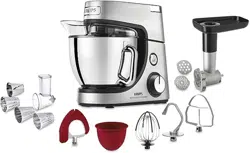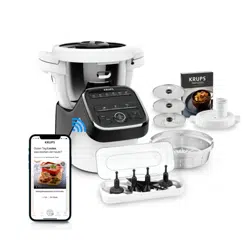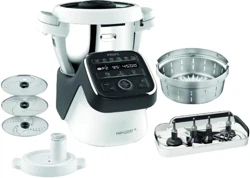
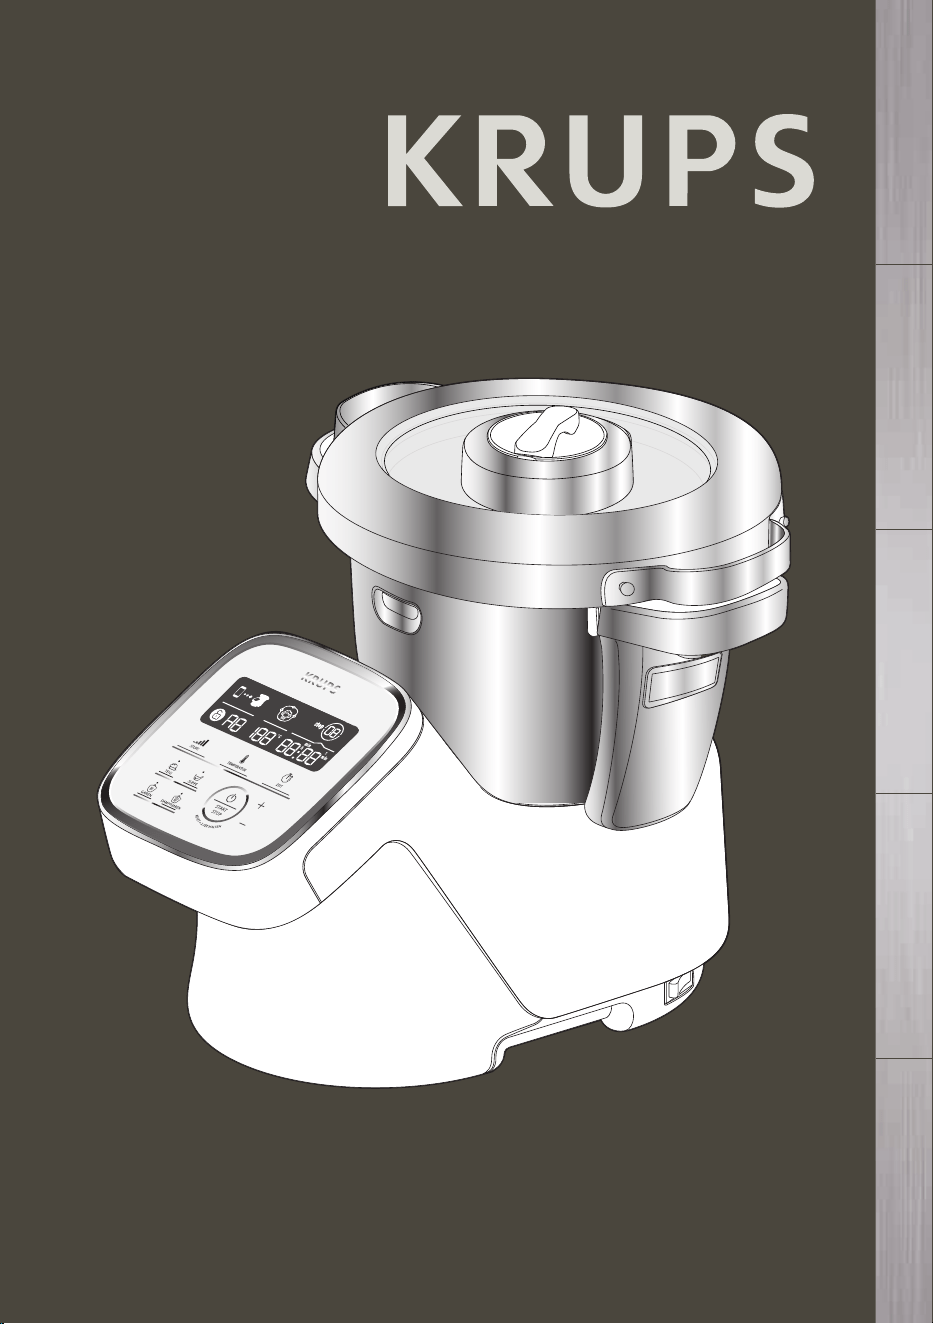
i Prep & Cook XL
www.krups.com
FRNLDEITEN
A
B
C4
C5
B6
H
B
C
C6 C7
B5
B1
B2
B3
B4
C3C2C1
D3
D2
D1
D5
D
I
D4
E3
E2
E1
E
E4
F
G
F1
F2
F3
F4
F0
F5
A
B
C4
C5
B6
H
B
C
C6 C7
B5
B1
B2
B3
B4
C3C2C1
D3
D2
D1
D5
D
I
D4
E3
E2
E1
E
E4
F
G
F1
F2
F3
F4
F0
F5
3
2
D3
D4
1
1 2
3
4.1
4.2 4.3
2
1
“clic”
a
MAX
b
MIN
5 6
7
8
9
10.1
3
2
D3
D4
1
1 2
3
4.1
4.2 4.3
2
1
“clic”
a
MAX
b
MIN
5 6
7
8
9
10.1
2
1
3
D3
D2
1
D3
D4
!!
D5
10.2
11
12
13
14 15
2
1
3
50°C
5
10s
16 17
18a 18b
19
2
1
3
D3
D2
1
D3
D4
!!
D5
10.2
11
12
13
14 15
2
1
3
50°C
5
10s
16 17
18a 18b
19

21
FRANÇAIS
Vis-à-vis de la sécurité de la per-sonne
Lisez attentivement le mode d’emploi avant la première utilisation
de votre appareil et conservez-le : une utilisation non conforme au
mode d’emploi dégagerait le fabricant de toute responsabilité.
Toujours déconnecter l’appareil de l’alimentation si on le laisse
sans surveillance et avant montage, démontage ou nettoyage. Ne
pas laisser les enfants utiliser l’appareil sans surveillance.
Cet appareil ne doit pas être utilisé par les enfants. Conserver
l’appareil et son câble hors de portée des enfants.
Cet appareil n’est pas prévu pour être utilisé par des personnes (y
compris les enfants) dont les capacités physiques, sensorielles ou
mentales sont réduites ou des personnes dénuées d’expérience ou
de connaissance, sauf si elles ont pu bénécier, par l’intermédiaire
d’une personne responsable de leur sécurité, d’une surveillance
ou d’instructions préalables concernant l’utilisation de l’appareil.
Il convient de surveiller les enfants pour s’assurer qu’ils ne jouent
pas avec l’appareil.
Maintenez votre appareil hors de portée des enfants.
Lors de l’utilisation de l’appareil, certaines pièces
atteignent des températures élevées (paroi inox du bol,
et du bouchon, entraîneur commun amovible, parties
transparentes du couvercle pièces métalliques sous le bol, panier).
Elles peuvent occasionner des brûlures. Manipulez l’appareil par
les pièces plastiques froides (poignées, bloc moteur). Le témoin
lumineux de chauffe rouge indique qu’il y a un risque de brûlure.
La température des surfaces accessibles peut être élevée lorsque
l’appareil est en fonctionnement.
L’ appareil n’est pas destiné à être mis en fonctionnement au moyen
d’une minuterie extérieure ou par un système de commande à
distance séparé.
N’utilisez pas votre appareil s’il ne fonctionne pas correctement,
s’il a été endommagé ou si le câble d’alimentation ou la prise sont
endommagés. An d’éviter tout danger, faites obligatoirement
remplacer le cordon par un centre service agréé (voir liste dans le
livret service).
CONSIGNES DE SÉCURITÉ
L’appareil ne doit pas être immergé. Ne passez pas le bloc moteur
(A) sous l’eau courante.
Cet appareil est exclusivement destiné à un usage domestique
à l’intérieur de la maison et à une altitude inférieure à 2000 m.
Le fabricant décline toute responsabilité et se réserve le droit de
résilier la garantie en cas d’utilisation commerciale ou inadaptée,
ou de non respect des consignes.
Cet appareil n’a pas été conçu pour être utilisé dans les cas
suivants qui ne sont pas couverts par la garantie :
– zone de travail de cuisine dans les magasins, bureaux et autres
environnements de type travail.
– des coins cuisine réservés au personnel dans des magasins,
bureaux et autres environnements professionnels.
– des fermes.
– l’utilisation par les clients des hôtels, motels et autres
environnements à caractère résidentiel.
– des environnements du type chambres d’hôtes.
AVERTISSEMENT : Votre appareil émet de la vapeur
qui peut occasionner des brûlures.
Manipulez avec précaution le couvercle et le bouchon
(utilisez si nécessaire un gant, une manique, etc).
Manipulez le bouchon par sa partie centrale.
Ne faites pas fonctionner l’appareil si le joint n’est pas
positionné sur le porte joint, si le porte joint n’est pas assemblé
dans le couvercle. Il est impératif de faire fonctionner l’appareil
avec le bouchon positionné dans l’orifice du couvercle (sauf
en cas d’information spécifique recette).
AVERTISSEMENT : Attention aux risques de blessure
en cas de mauvaise utilisation de l’appareil.
Prenez des précautions avec les lames du couteau
hachoir ultrablade (F1) et du couteau pour pétrir/
concasser (F4) lorsque vous les nettoyez et lorsque vous videz
le bol, elles sont extrêmement coupantes. Rangez le couteau
hachoir ultrablade (F1) dans le bol après chaque utilisation.
Soyez vigilant si un liquide chaud est versé dans le préparateur
culinaire dans la mesure où il peut être éjecté de l’appareil en
raison d’une ébullition soudaine.

43
FRANÇAIS
AVERTISSEMENT : Soyez prudent lors de la manipulation de
votre appareil (nettoyage, remplissage et versage) : évitez tout
débordement de liquide sur les connecteurs.
AVERTISSEMENT : Certains aliments comportant une peau
superficielle (saucisses entières, langue, volaille...) ou de gros
morceaux de viande peuvent générer des éclaboussures en
emprisonnant des liquides bouillants. C’est pourquoi nous vous
conseillons de les piquer avant cuisson à l’aide d’un couteau ou
d’une fourchette.
AVERTISSEMENT : La surface de l’élément chauffant présente
une chaleur résiduelle après utilisation.
Assurez vous de ne toucher que les poignées de votre produit
(gâchettes D2, poignée du couvercle E2 et du bouchon E1)
pendant la chauffe et jusqu’au refroidissement complet.
Reportez-vous au mode d’emploi pour le réglage des vitesses et
le temps de fonctionnement de chaque accessoire et de chaque
programme.
Reportez-vous au mode d’emploi pour l’assemblage et le montage
des accessoires sur l’appareil.
Reportez-vous au mode d’emploi pour le nettoyage et l’entretien de
votre appareil.
Toujours suivre les instructions de nettoyage pour nettoyer votre
appareil:
Débranchez l’appareil.
Ne pas nettoyer l’appareil chaud.
Nettoyez avec un chiffon ou une éponge humide.
Ne jamais mettre l’appareil dans l’eau ou sous l’eau courante.
MARCHES EUROPEENS SEULEMENT:
Conservez l’appareil et son câble hors de portée des enfants âgés
de moins de 8 ans.
Les enfants ne doivent pas utiliser l’appareil comme un jouet.
Cet appareil peut être utilisé par des personnes dont les capacités
physiques, sensorielles ou mentales sont réduites ou dont
l’expérience ou les connaissances ne sont pas sufsantes, à
condition qu’ils bénécient d’une surveillance ou qu’ils aient reçu
des instructions quant à l’utilisation de l’appareil en toute sécurité
et en comprennent bien les dangers potentiels.
Cet appareil peut être utilisé par des enfants âgés d’au moins 8 ans,
à condition qu’ils bénécient d’une surveillance ou qu’ils aient reçu
des instructions quant à l’utilisation de l’appareil en toute sécurité
et qu’ils comprennent bien les dangers encourus. Le nettoyage et
l’entretien par l’utilisateur ne doivent pas être effectués par des
enfants sans surveillance, à moins qu’ils ne soient âgés de plus de
8 ans et qu’ils soient sous la surveillance d’un adulte.
Vis-à-vis du raccordement électrique
L’appareil doit être branché sur une prise de courant électrique
reliée à la terre.
L’appareil est conçu pour fonctionner uniquement en courant
alternatif. Vériez que la tension d’alimentation indiquée sur la
plaque signalétique de l’appareil corresponde bien à celle de votre
installation électrique.
Toute erreur de branchement annule la garantie.
Ne tirez jamais sur le câble d’alimentation pour débrancher
l’appareil.
Ne mettez pas l’appareil, le câble d’alimentation, ou la prise dans
du liquide, à proximité ou en contact avec les parties chaudes de
l’appareil, près d’une source de chaleur ou sur un angle vif.
Vis-à-vis d’une mauvaise utilisation
Ne touchez pas au couvercle avant l’arrêt complet de l’appareil
(touche stop), attendez que les aliments mixés ne tournent
plus.
Versez toujours les ingrédients solides en premier dans le bol avant
d’ajouter des ingrédients liquides (Cf. Fig. 10), sans dépasser le
repère MAX gravé à l’intérieur du bol (Cf. Fig. 10). Si le bol est trop
rempli, de l’eau bouillante peut-être éjectée.
Attention dans le cadre du programme cuisson vapeur, respectez
le niveau de 0.7 litre d’eau (Cf. Fig. 3.2).
Ne placez jamais vos doigts ou tout objet dans le bol pendant le
fonctionnement de l’appareil.
N’utilisez pas le bol comme récipient (conservation, congélation,
stérilisation).
Placez l’appareil sur un plan de travail stable, résistant à la chaleur,
propre et sec.

65
FRANÇAIS
En parcourant cette notice , vous découvrirez des conseils d’utilisation qui vous
feront entrevoir le potentiel de votre appareil : préparation de soupes, de mijotés,
de cuissons vapeur, de pâtes.
Ne placez pas l’appareil près d’un mur ou d’un placard, la vapeur
produite pouvant endommager les éléments.
Ne placez pas votre appareil près d’une source de chaleur en
fonctionnement (plaque de cuisson, appareil électro-ménager,
etc…).
Ne couvrez pas votre couvercle avec un torchon ou autre, ne
cherchez pas à boucher l’orice du couvercle, utilisez le bouchon
régulateur de vapeur.
Ne laissez pas pendre vos cheveux, un foulard, une cravate,… au
dessus du bol pendant le fonctionnement de l’appareil.
Ne passez jamais les accessoires dans un four à micro ondes.
N’utilisez pas l’appareil en plein air.
Ne dépassez jamais la quantité maximum indiquée dans la notice.
Rangez l’appareil lorsqu’il est refroidi.
Ne placez pas le bol au congélateur pour le refroidir, utilisez le
réfrigérateur.
SAV
Pour votre sécurité, n’utilisez pas d’accessoires ou de pièces
de rechange, autres que ceux fournis par les centres de service
après-vente agréés.
Toute intervention autre que le nettoyage et l’entretien usuel par le
client doit être effectuée par un centre service agréé.
Consultez le tableau “ Si votre appareil ne fonctionne pas, que
faire ? ” à la n du mode d’emploi.
DESCRIPTION DE L’APPAREIL:
DONNÉES TECHNIQUES DE L’APPAREIL:
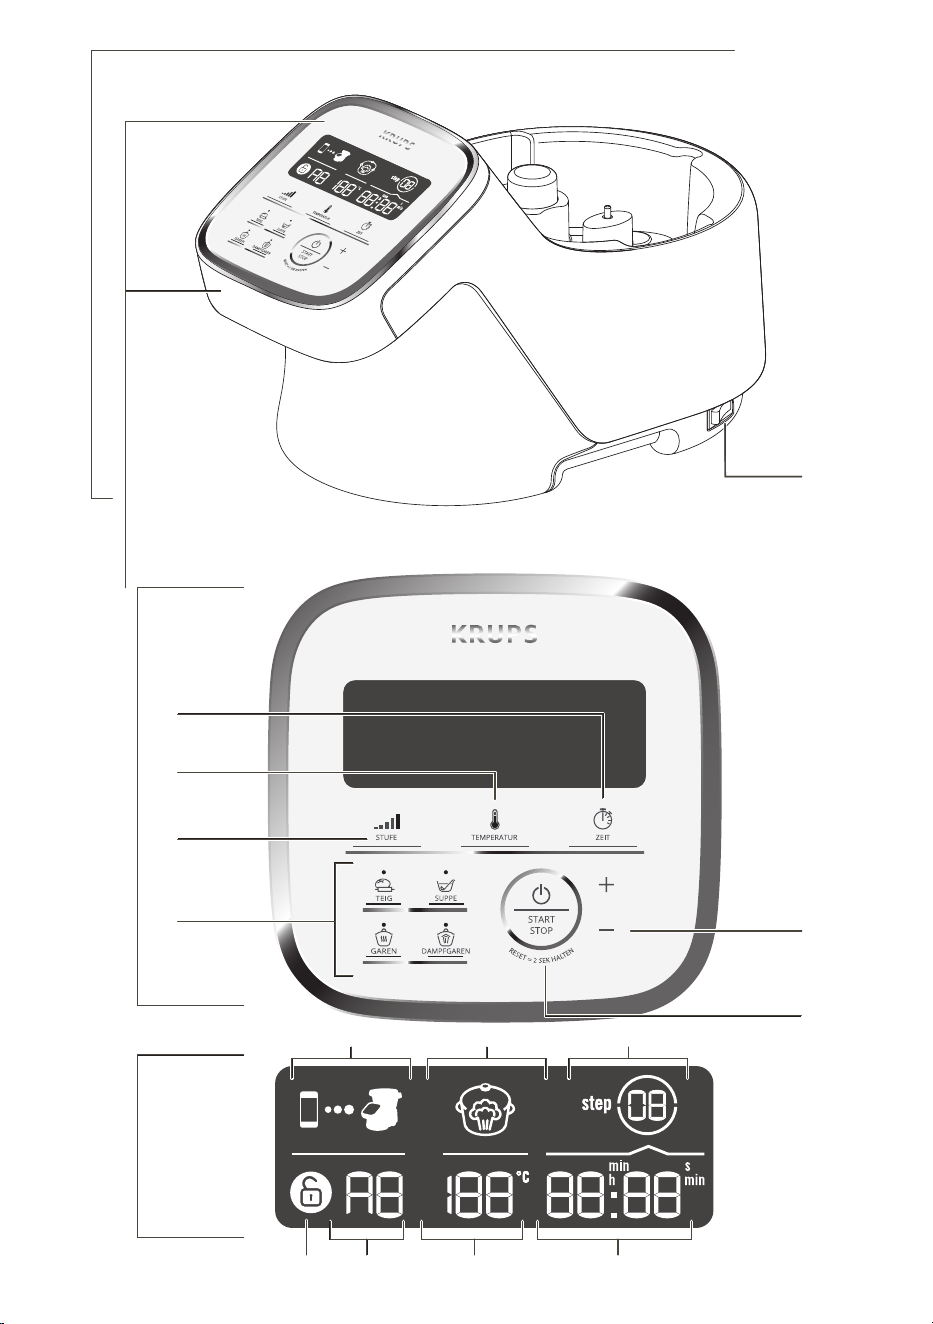
A Bloc moteur.
B Tableau de commandes.
B1 : Sélecteur de vitesse.
B2 : Sélecteur de température de cuisson
et/ou témoin lumineux de chauffe.
B3 : Sélecteur de durée de
fonctionnement/appairage.
B4 : Touches de sélection de
programmes automatiques.
B5 : Bouton START/STOP/RESET.
B6 : Sélecteur + / -.
C Ecran LCD.
C1 : Afchage témoin de connexion.
C2 : Afchage programme vapeur.
C3 : Afchage de l’étape en cours
dans le pas à pas de la recette.
C4 : Afchage témoin de sécurité.
C5 : Afchage vitesse.
C6 : Afchage température.
C7 : Afchage temps.
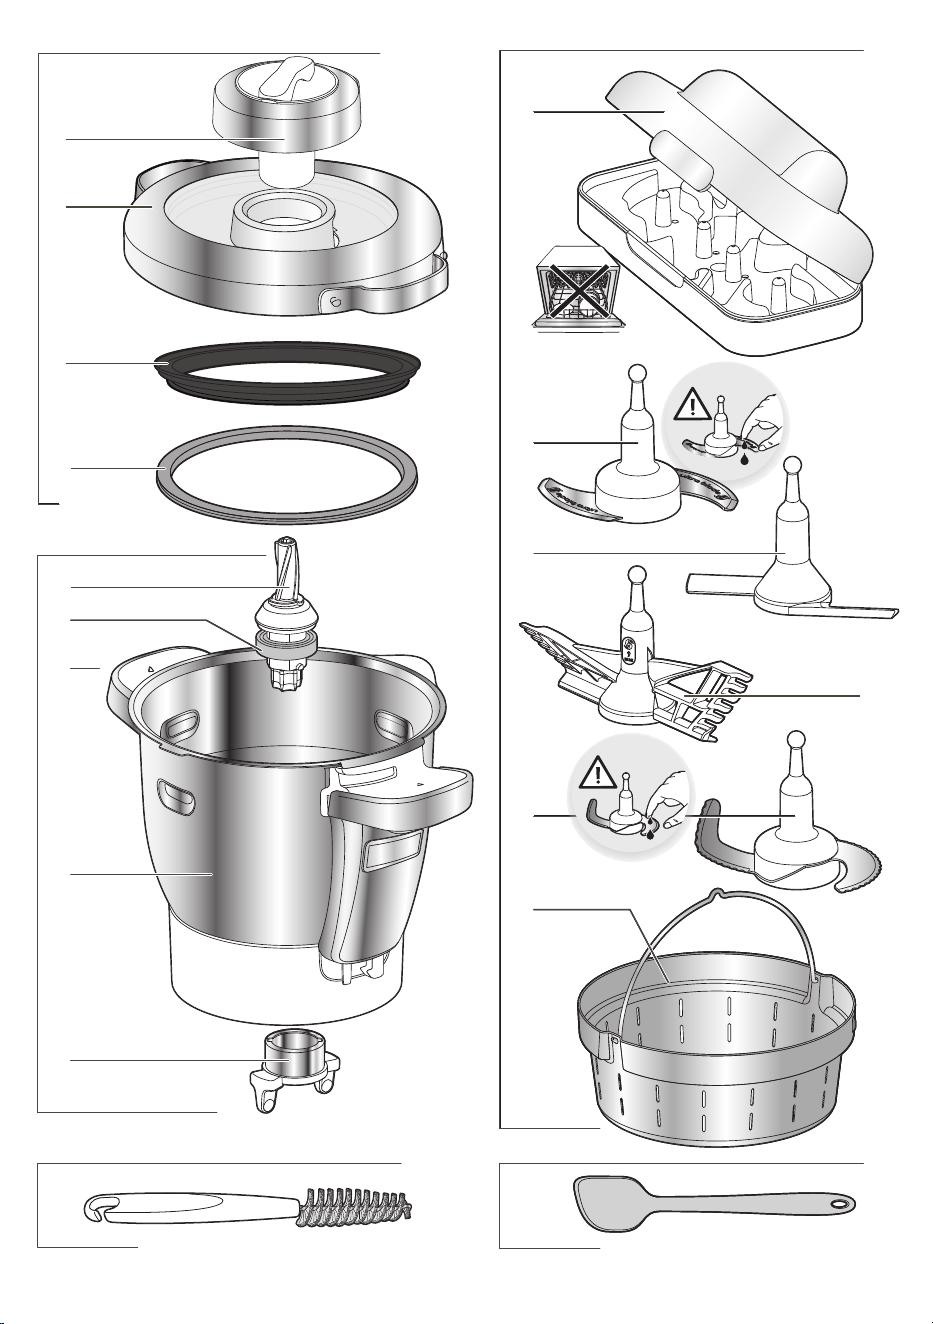
D Ensemble Bol.
D1 : Bol inox.
D2 : Gâchettes.
D3 : Entraîneur commun amovible.
D4 : Joint d’étanchéité.
D5 : Bague de verrouillage entraîneur.
E Ensemble couvercle.
E1 : Bouchon régulateur vapeur.
E2 : Couvercle.
E3 : Porte joint.
E4 : Joint étanchéité.
F Accessoires :
F0 : Boîte rangement accessoires.
F1 : Couteau hachoir ultrablade.
F2 : Mélangeur.
F3 : Batteur.
F4 : Couteau pour pétrir / concasser.
F5 : Panier vapeur.
G Spatule.
H Interrupteur 0/1 pour couper
l’alimentation électrique de votre appareil.
I Brosse de nettoyage.
Puissance: 1550W (1000W : résistance chauffante / 550W :
moteur )
Plage de température: de 30°C à 150°C
réglable par pas de 5°C.
Plage de durée de fonctionnement: de 5 secondes à 2 heures
réglable par pas de 5 secondes mini à 1 minute maxi.
Nombre de vitesses: 13 – 2 vitesses intermittentes :
vitesse 1 ( 5s On / 20s Off ).
vitesse 2 ( 10s On / 10s Off ).
– 10 vitesses continues progressives
(vitesses 3 à 12).
– 1 vitesse intermittente max (vitesse 13).
– La marque et les logos Bluetooth® sont des marques déposées par Bluetooth SIG, Inc. et leur utilisation par le Groupe SEB a
fait l’objet d’une autorisation.
– Google Play et Android sont des marques de Google Inc.
– Apple et le logo Apple sont des marques d’Apple Inc., déposées aux États-Unis et d’autres pays. App Store est une marque
de service d’Apple Inc.

65
FRANÇAIS
En parcourant cette notice , vous découvrirez des conseils d’utilisation qui vous
feront entrevoir le potentiel de votre appareil : préparation de soupes, de mijotés,
de cuissons vapeur, de pâtes.
Ne placez pas l’appareil près d’un mur ou d’un placard, la vapeur
produite pouvant endommager les éléments.
Ne placez pas votre appareil près d’une source de chaleur en
fonctionnement (plaque de cuisson, appareil électro-ménager,
etc…).
Ne couvrez pas votre couvercle avec un torchon ou autre, ne
cherchez pas à boucher l’orice du couvercle, utilisez le bouchon
régulateur de vapeur.
Ne laissez pas pendre vos cheveux, un foulard, une cravate,… au
dessus du bol pendant le fonctionnement de l’appareil.
Ne passez jamais les accessoires dans un four à micro ondes.
N’utilisez pas l’appareil en plein air.
Ne dépassez jamais la quantité maximum indiquée dans la notice.
Rangez l’appareil lorsqu’il est refroidi.
Ne placez pas le bol au congélateur pour le refroidir, utilisez le
réfrigérateur.
SAV
Pour votre sécurité, n’utilisez pas d’accessoires ou de pièces
de rechange, autres que ceux fournis par les centres de service
après-vente agréés.
Toute intervention autre que le nettoyage et l’entretien usuel par le
client doit être effectuée par un centre service agréé.
Consultez le tableau “ Si votre appareil ne fonctionne pas, que
faire ? ” à la n du mode d’emploi.
DESCRIPTION DE L’APPAREIL:
DONNÉES TECHNIQUES DE L’APPAREIL:
A Bloc moteur.
B Tableau de commandes.
B1 : Sélecteur de vitesse.
B2 : Sélecteur de température de cuisson
et/ou témoin lumineux de chauffe.
B3 : Sélecteur de durée de
fonctionnement/appairage.
B4 : Touches de sélection de
programmes automatiques.
B5 : Bouton START/STOP/RESET.
B6 : Sélecteur + / -.
C Ecran LCD.
C1 : Afchage témoin de connexion.
C2 : Afchage programme vapeur.
C3 : Afchage de l’étape en cours
dans le pas à pas de la recette.
C4 : Afchage témoin de sécurité.
C5 : Afchage vitesse.
C6 : Afchage température.
C7 : Afchage temps.
D Ensemble Bol.
D1 : Bol inox.
D2 : Gâchettes.
D3 : Entraîneur commun amovible.
D4 : Joint d’étanchéité.
D5 : Bague de verrouillage entraîneur.
E Ensemble couvercle.
E1 : Bouchon régulateur vapeur.
E2 : Couvercle.
E3 : Porte joint.
E4 : Joint étanchéité.
F Accessoires :
F0 : Boîte rangement accessoires.
F1 : Couteau hachoir ultrablade.
F2 : Mélangeur.
F3 : Batteur.
F4 : Couteau pour pétrir / concasser.
F5 : Panier vapeur.
G Spatule.
H Interrupteur 0/1 pour couper
l’alimentation électrique de votre appareil.
I Brosse de nettoyage.
Puissance: 1550W (1000W : résistance chauffante / 550W :
moteur )
Plage de température: de 30°C à 150°C
réglable par pas de 5°C.
Plage de durée de fonctionnement: de 5 secondes à 2 heures
réglable par pas de 5 secondes mini à 1 minute maxi.
Nombre de vitesses: 13 – 2 vitesses intermittentes :
vitesse 1 ( 5s On / 20s Off ).
vitesse 2 ( 10s On / 10s Off ).
– 10 vitesses continues progressives
(vitesses 3 à 12).
– 1 vitesse intermittente max (vitesse 13).
– La marque et les logos Bluetooth® sont des marques déposées par Bluetooth SIG, Inc. et leur utilisation par le Groupe SEB a
fait l’objet d’une autorisation.
– Google Play et Android sont des marques de Google Inc.
– Apple et le logo Apple sont des marques d’Apple Inc., déposées aux États-Unis et d’autres pays. App Store est une marque
de service d’Apple Inc.
87
FRANÇAIS
Vous disposez avec votre appareil des accessoires suivants :
Ces accessoires sont également pourvus de zones de préhension pour en faciliter la
manipulation lors de leur utilisation au cours d’une préparation.
VOTRE APPAREIL
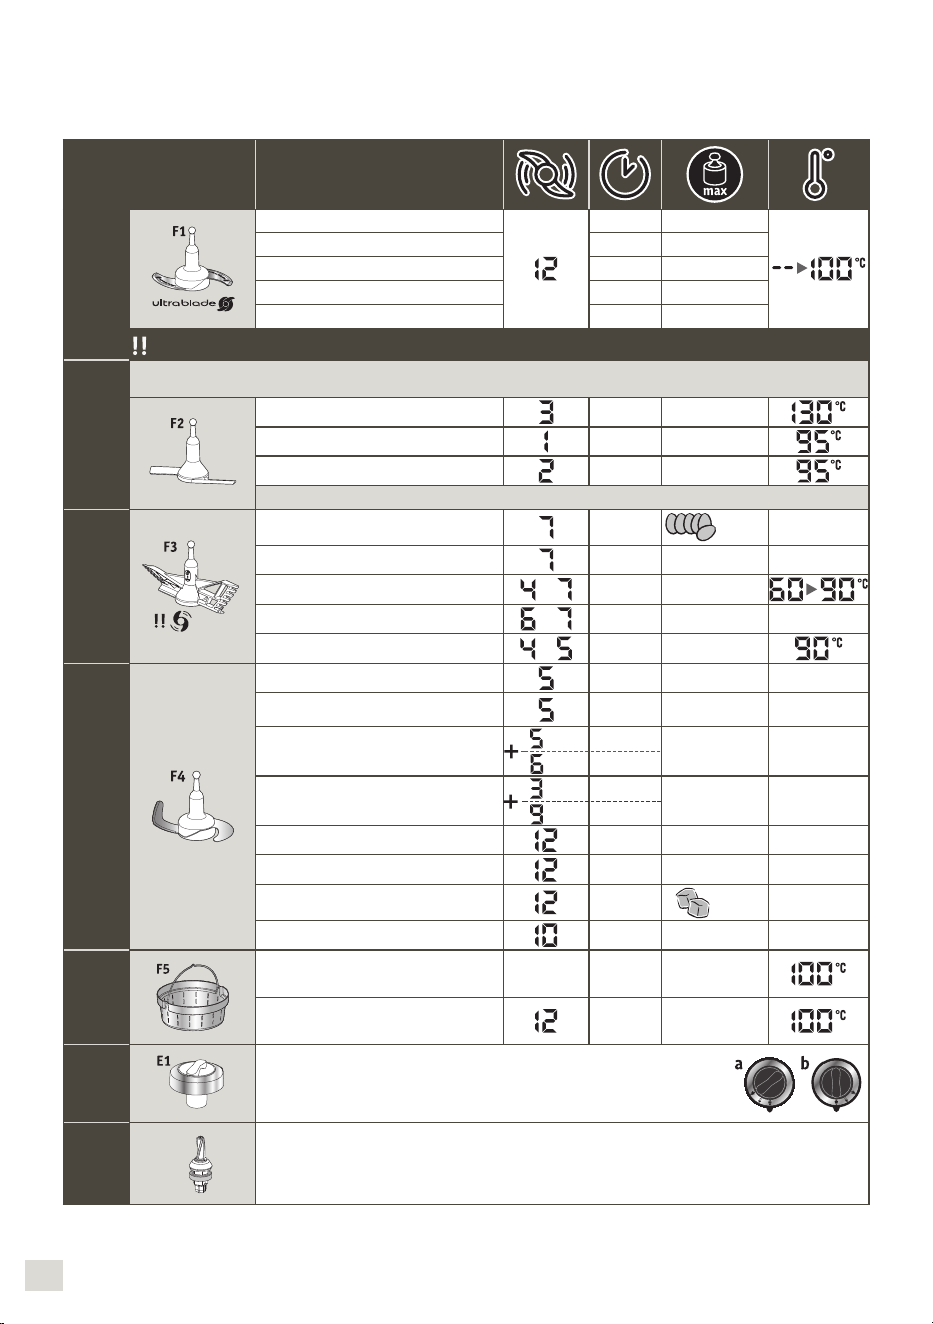
Couteau hachoir
Mixer des soupes
3min 3L
Mixer des compotes 40s 1Kg
Hacher les légumes 15s 1Kg
Hacher de la viande 30s 1Kg
Hacher du poisson 15s 1Kg
N’utilisez pas cet accessoire pour hacher des produits durs, utilisez le couteau pétrin/concasseur F4.
Mélangeur
Il mélange les Plats cuisinés sans abimer les ingrédients,
Très utile pour les phases de rissolage en amont des préparations (risottos, soupes).
Rissolés 5min 500g
Mijotés 45min 3L
Risottos 22min 1,5Kg
Ratatouilles, Chutneys, Légumineuses (réglages : voir livret recettes)
Batteur
9 max
Blancs en neige 5/10min
7
max
Mayonnaises, Crèmes fouettées 2/5min 0,5L
Sauces, Crèmes
to
1/20min 1L
Ecrasé de pommes de terre
to
1min 1L
Polenta
to
1/16min 1L
Couteau pétrin/concasseur
Pétrir les pâtes à pain blanc 2min 30s 1,2Kg
Pétrir les pâtes brisées, sablées,
pains spéciaux
2min 30s 1Kg
Pétrir les pâtes levées
(brioche, kouglof…)
1min 30s
2 min
0,8Kg
Mélanger les pâtes légères
(cake…)
40 s
3min
1Kg
Pulvériser les fruits à coques
1min 0,6Kg
Hacher les produits durs
1min 0,6Kg
Piler la glace
1min
6 à 10
Pâte à crêpes, gaufres
1min 1,5L
Panier
vapeur
Cuisson vapeur de légumes,
de poissons ou de viandes
20/40min 1Kg
Soupes avec morceaux
3min 3L
Bouchon
Bouchon de régulation d’extraction de vapeur
– maxi (a) = cuisson vapeur.
– mini (b) = Risotto, crèmes dessert, sauces…
Entraîneur
commun
D3
Entraîneur commun amovible
Rissolage et cuisson sans couvercle
Votre appareil i Prep & Cook XL propose
un fonctionnement « connecté » mais peut
également fonctionner « non connecté
». De plus il possède deux modes de
fonctionnement : le mode programme
automatique et le mode manuel.
Mode programme automatique :
Vitesse, température de cuisson et durée
sont préprogrammées pour réaliser des
soupes, des mijotés, des cuissons vapeur
et des pâtes en automatique.
Mode manuel :
Réglages personnalisés des paramètres
vitesse, température de cuisson et
durée pour une utilisation selon votre
convenance.
Utilisation avec ou sans couvercle
Température de
30°C à 130°C
Température de
135°C à 150°C
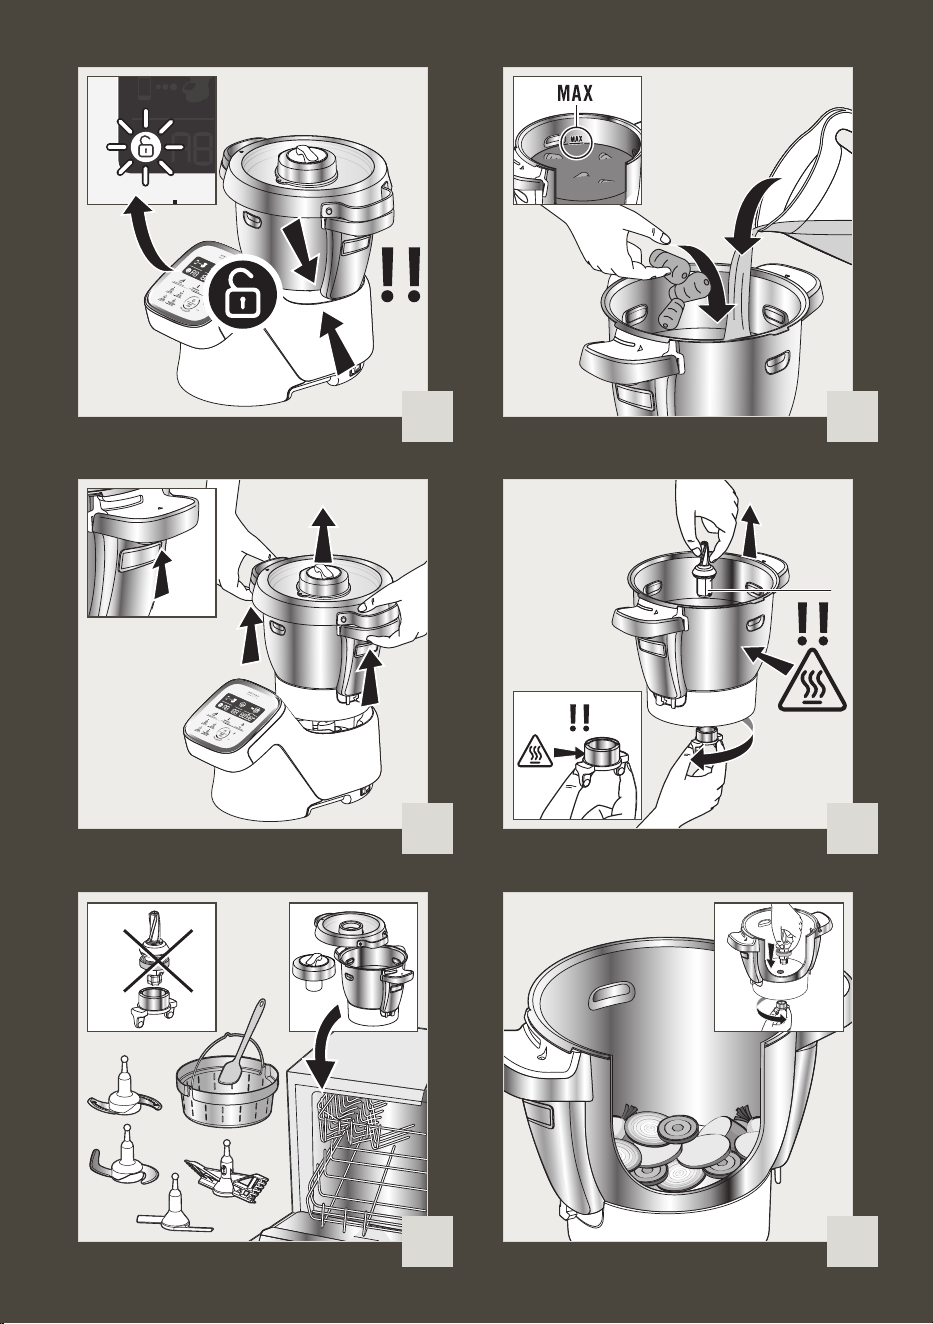
– Lorsque vous avez sélectionné une
température entre 135°C et 150°C,
vous devez utiliser votre appareil sans
couvercle. Si le couvercle est positionné
sur le bol, un cadenas s’afchera
sur l’écran LCD, vous invitant à le
déverrouiller.
– Dès l’ajout des aliments, remuez-les
à l’aide de la spatule et renouvelez
l’opération régulièrement, an d’éviter
que le fond du bol ne se tâche, (Cf
paragraphe nettoyage).
– Si vous choisissez d’utiliser l’appareil
avec son couvercle, la température de
cuisson sera alors de 130°C maximum.
VOTRE APPAREIL EST ÉQUIPÉ D’UNE
SÉCURITÉ DE VERROUILLAGE DU
COUVERCLE
Le couvercle est sécurisé à chaque
démarrage de l’appareil. Cette sécurité
empêche l’ouverture du couvercle pendant
la réalisation d’une recette (Cf. Fig.17).
Ne tentez pas de forcer sur le couvercle
lorsqu’il est verrouillé. Cette sécurité se
débloque à chaque arrêt de l’appareil. Si
vous avez sélectionné une température
supérieure ou égale à 50°C et une vitesse
supérieure ou égale à 5, un décompte de
10 secondes apparaît alors sur l’ecran LCD
du tableau de commandes. (Cf.Fig.18).
L’ouverture du couvercle ne sera possible
qu’à la n du décompte.
MISE EN PLACE DU BOL, DE SES
ACCESSOIRES ET DE L’ENSEMBLE
COUVERCLE
Avant la première utilisation, nettoyez
tous les éléments (D, E, F, G) à l’eau
chaude savonneuse, mais pas le bloc
moteur (A). Votre bol (D) est équipé d’un
entraîneur démontable (D3) pour faciliter
le nettoyage.
Assurez-vous que tout emballage soit
retiré avant utilisation, notamment la
protection située entre le bol (D) et le bloc
moteur (A).
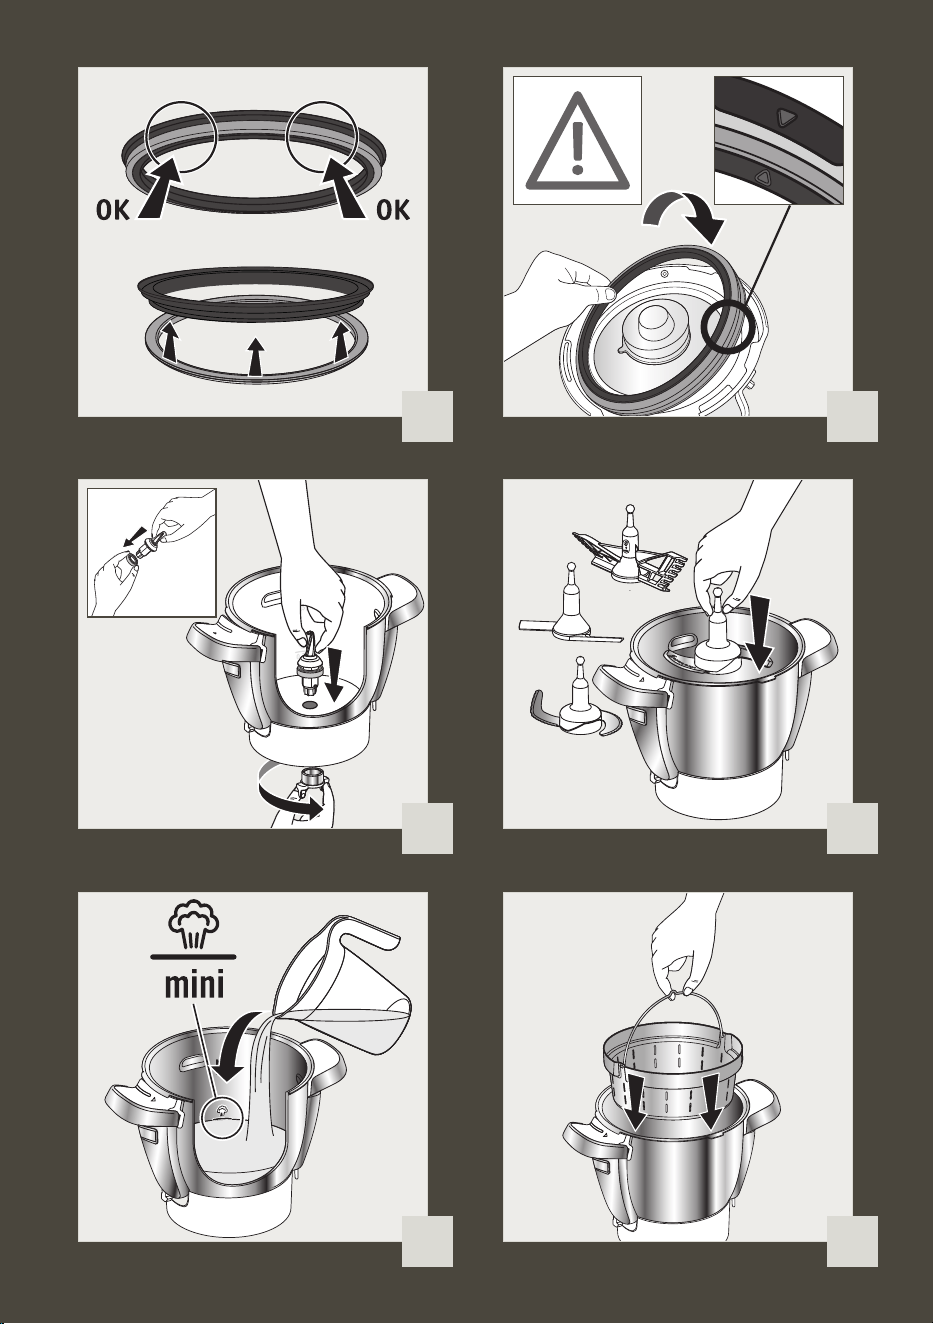
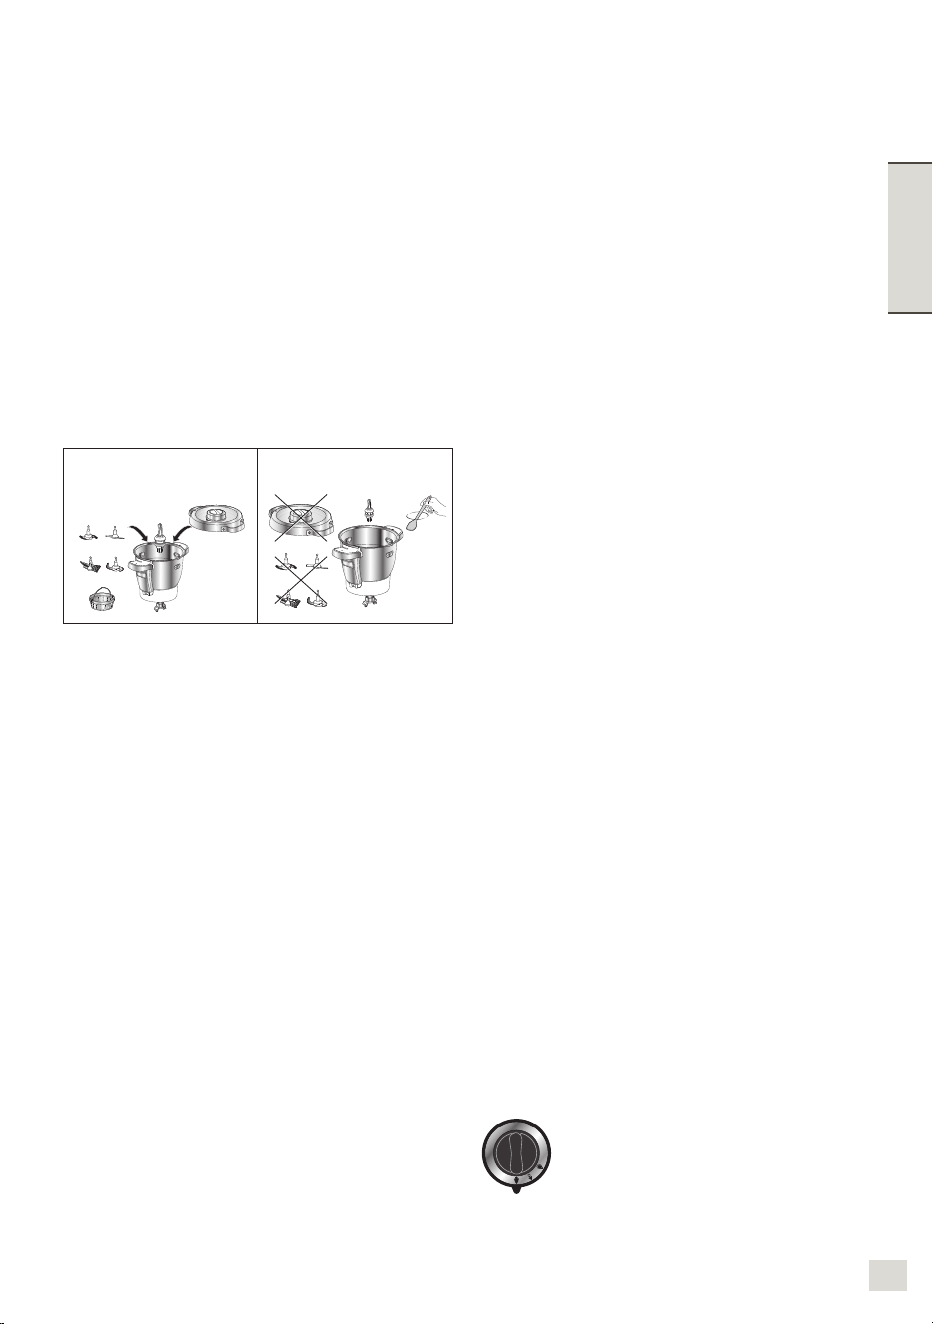
Placez le joint d’étanchéité (E4) sur le porte
joint (E3) (Cf. Fig. 1), clipsez l’ensemble
sur le couvercle (E2) (Cf. Fig 2).
Positionnez le joint d’étanchéité (D4) sur
l’entraîneur commun (D3). Verrouillez
l’ensemble sur le fond du bol avec la bague
de verrouillage (D5) (Cf. Fig. 3). Si vous
utilisez le mode cuisson sans couvercle,
positionnez le joint d’etancheite (D4) sur
l’entraîneur commun (D3). Verrouillez
l’ensemble sur le fond du bol avec la bague
de verrouillage (D5) (Cf. Fig. 3).
Positionnez l’accessoire choisi dans le bol:
– les accessoires (F1, F2, F3, ou F4) sur
l’entraîneur commun au fond du bol (Cf.
Fig. 4.1),
– en cas de cuisson vapeur, le panier
vapeur (F5) à l’intérieur du bol, (Cf. Fig.
4.3 ), en ayant pris soin au préalable de
remplir la cuve de 0.7l de préparation
liquide (eau, sauce…) (Cf. Fig. 4.2 ).
Incorporez les ingrédients à l’intérieur du
bol ou du panier vapeur.
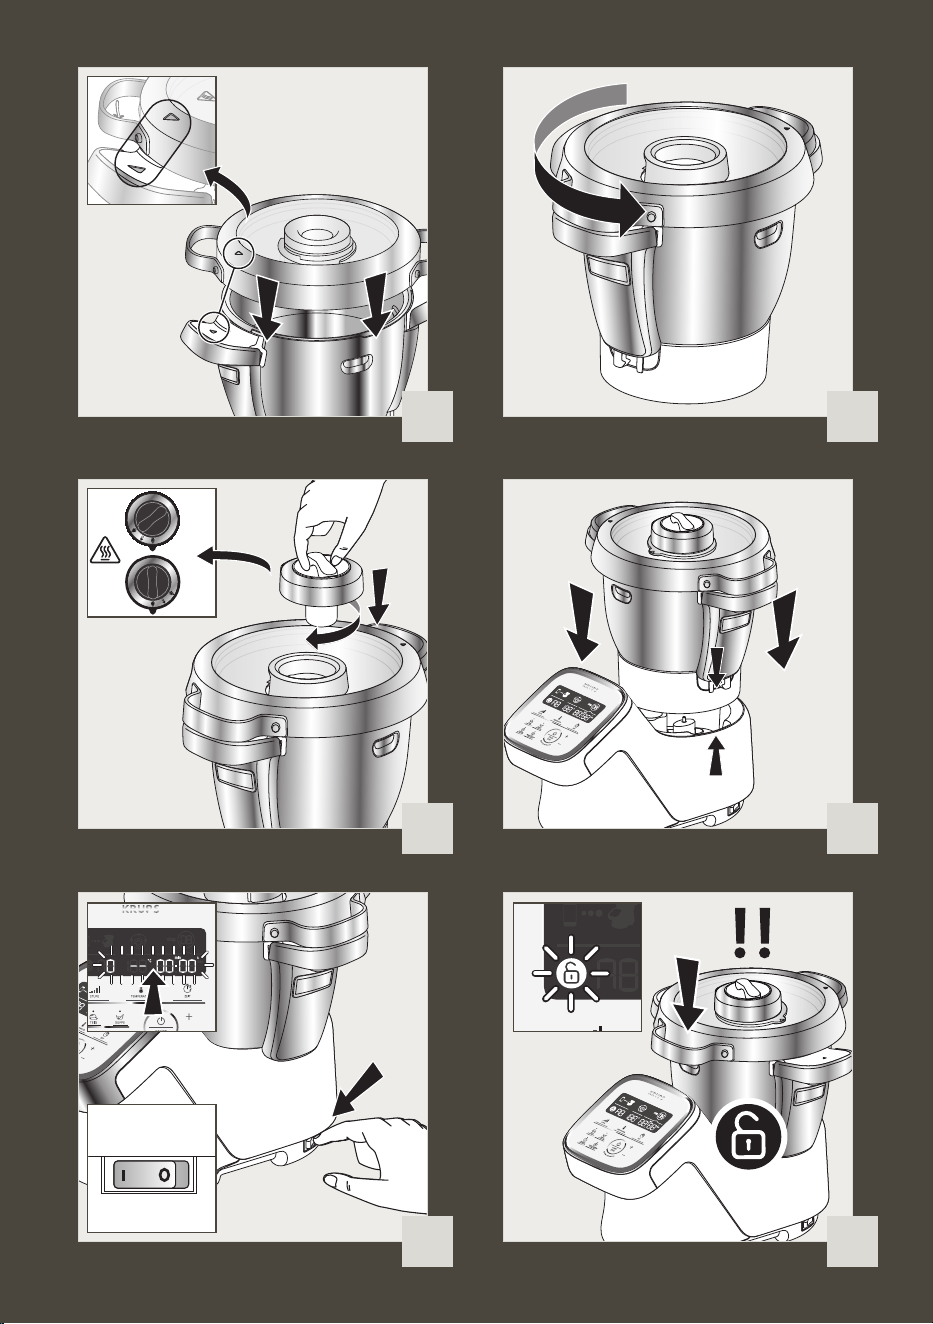
Positionnez le couvercle sur le bol (D) en
alignant les deux triangles (Cf. Fig. 5),
verrouillez le couvercle sans appuyer en
le tournant dans le sens de la èche (Cf.
Fig. 6).
Positionnez le bouchon régulateur de vapeur
(E1) sur le couvercle, 2 positions sont
possibles (Cf. Fig. 7):
La position « mini » permet de
laisser échapper un maximum
de condensation et ainsi obtenir
des plats ou des sauces avec une
meilleure consistance (Risotto, crèmes
dessert , sauces, etc...).
F1 F2
F3 F4
F5
F1 F2
F3 F4
87
FRANÇAIS
Vous disposez avec votre appareil des accessoires suivants :
Ces accessoires sont également pourvus de zones de préhension pour en faciliter la
manipulation lors de leur utilisation au cours d’une préparation.
VOTRE APPAREIL
Couteau hachoir
Mixer des soupes
3min 3L
Mixer des compotes 40s 1Kg
Hacher les légumes 15s 1Kg
Hacher de la viande 30s 1Kg
Hacher du poisson 15s 1Kg
N’utilisez pas cet accessoire pour hacher des produits durs, utilisez le couteau pétrin/concasseur F4.
Mélangeur
Il mélange les Plats cuisinés sans abimer les ingrédients,
Très utile pour les phases de rissolage en amont des préparations (risottos, soupes).
Rissolés 5min 500g
Mijotés 45min 3L
Risottos 22min 1,5Kg
Ratatouilles, Chutneys, Légumineuses (réglages : voir livret recettes)
Batteur
9 max
Blancs en neige 5/10min
7
max
Mayonnaises, Crèmes fouettées 2/5min 0,5L
Sauces, Crèmes
to
1/20min 1L
Ecrasé de pommes de terre
to
1min 1L
Polenta
to
1/16min 1L
Couteau pétrin/concasseur
Pétrir les pâtes à pain blanc 2min 30s 1,2Kg
Pétrir les pâtes brisées, sablées,
pains spéciaux
2min 30s 1Kg
Pétrir les pâtes levées
(brioche, kouglof…)
1min 30s
2 min
0,8Kg
Mélanger les pâtes légères
(cake…)
40 s
3min
1Kg
Pulvériser les fruits à coques
1min 0,6Kg
Hacher les produits durs
1min 0,6Kg
Piler la glace
1min
6 à 10
Pâte à crêpes, gaufres
1min 1,5L
Panier
vapeur
Cuisson vapeur de légumes,
de poissons ou de viandes
20/40min 1Kg
Soupes avec morceaux
3min 3L
Bouchon
Bouchon de régulation d’extraction de vapeur
– maxi (a) = cuisson vapeur.
– mini (b) = Risotto, crèmes dessert, sauces…
Entraîneur
commun
D3
Entraîneur commun amovible
Rissolage et cuisson sans couvercle
Votre appareil i Prep & Cook XL propose
un fonctionnement « connecté » mais peut
également fonctionner « non connecté
». De plus il possède deux modes de
fonctionnement : le mode programme
automatique et le mode manuel.
Mode programme automatique :
Vitesse, température de cuisson et durée
sont préprogrammées pour réaliser des
soupes, des mijotés, des cuissons vapeur
et des pâtes en automatique.
Mode manuel :
Réglages personnalisés des paramètres
vitesse, température de cuisson et
durée pour une utilisation selon votre
convenance.
Utilisation avec ou sans couvercle
Température de
30°C à 130°C
Température de
135°C à 150°C
– Lorsque vous avez sélectionné une
température entre 135°C et 150°C,
vous devez utiliser votre appareil sans
couvercle. Si le couvercle est positionné
sur le bol, un cadenas s’afchera
sur l’écran LCD, vous invitant à le
déverrouiller.
– Dès l’ajout des aliments, remuez-les
à l’aide de la spatule et renouvelez
l’opération régulièrement, an d’éviter
que le fond du bol ne se tâche, (Cf
paragraphe nettoyage).
– Si vous choisissez d’utiliser l’appareil
avec son couvercle, la température de
cuisson sera alors de 130°C maximum.
VOTRE APPAREIL EST ÉQUIPÉ D’UNE
SÉCURITÉ DE VERROUILLAGE DU
COUVERCLE
Le couvercle est sécurisé à chaque
démarrage de l’appareil. Cette sécurité
empêche l’ouverture du couvercle pendant
la réalisation d’une recette (Cf. Fig.17).
Ne tentez pas de forcer sur le couvercle
lorsqu’il est verrouillé. Cette sécurité se
débloque à chaque arrêt de l’appareil. Si
vous avez sélectionné une température
supérieure ou égale à 50°C et une vitesse
supérieure ou égale à 5, un décompte de
10 secondes apparaît alors sur l’ecran LCD
du tableau de commandes. (Cf.Fig.18).
L’ouverture du couvercle ne sera possible
qu’à la n du décompte.
MISE EN PLACE DU BOL, DE SES
ACCESSOIRES ET DE L’ENSEMBLE
COUVERCLE
Avant la première utilisation, nettoyez
tous les éléments (D, E, F, G) à l’eau
chaude savonneuse, mais pas le bloc
moteur (A). Votre bol (D) est équipé d’un
entraîneur démontable (D3) pour faciliter
le nettoyage.
Assurez-vous que tout emballage soit
retiré avant utilisation, notamment la
protection située entre le bol (D) et le bloc
moteur (A).
Placez le joint d’étanchéité (E4) sur le porte
joint (E3) (Cf. Fig. 1), clipsez l’ensemble
sur le couvercle (E2) (Cf. Fig 2).
Positionnez le joint d’étanchéité (D4) sur
l’entraîneur commun (D3). Verrouillez
l’ensemble sur le fond du bol avec la bague
de verrouillage (D5) (Cf. Fig. 3). Si vous
utilisez le mode cuisson sans couvercle,
positionnez le joint d’etancheite (D4) sur
l’entraîneur commun (D3). Verrouillez
l’ensemble sur le fond du bol avec la bague
de verrouillage (D5) (Cf. Fig. 3).
Positionnez l’accessoire choisi dans le bol:
– les accessoires (F1, F2, F3, ou F4) sur
l’entraîneur commun au fond du bol (Cf.
Fig. 4.1),
– en cas de cuisson vapeur, le panier
vapeur (F5) à l’intérieur du bol, (Cf. Fig.
4.3 ), en ayant pris soin au préalable de
remplir la cuve de 0.7l de préparation
liquide (eau, sauce…) (Cf. Fig. 4.2 ).
Incorporez les ingrédients à l’intérieur du
bol ou du panier vapeur.
Positionnez le couvercle sur le bol (D) en
alignant les deux triangles (Cf. Fig. 5),
verrouillez le couvercle sans appuyer en
le tournant dans le sens de la èche (Cf.
Fig. 6).
Positionnez le bouchon régulateur de vapeur
(E1) sur le couvercle, 2 positions sont
possibles (Cf. Fig. 7):
La position « mini » permet de
laisser échapper un maximum
de condensation et ainsi obtenir
des plats ou des sauces avec une
meilleure consistance (Risotto, crèmes
dessert , sauces, etc...).
F1 F2
F3 F4
F5
F1 F2
F3 F4
109
FRANÇAIS
Conseil d’utilisation :
Votre appareil est équipé d’un micro processeur qui contrôle et analyse sa stabilité. En
cas d’instabilité, la vitesse de rotation du moteur sera automatiquement réduite, si cette
instabilité persiste, le moteur sera arrêté et un “ STOP ” s’afchera sur votre écran.
Vériez que la quantité d’ingrédients ne soit pas trop importante et que la vitesse
utilisée soit adaptée.
Vériez que vous utilisez l’accessoire recommandé.
Puis redémarrez votre appareil normalement.
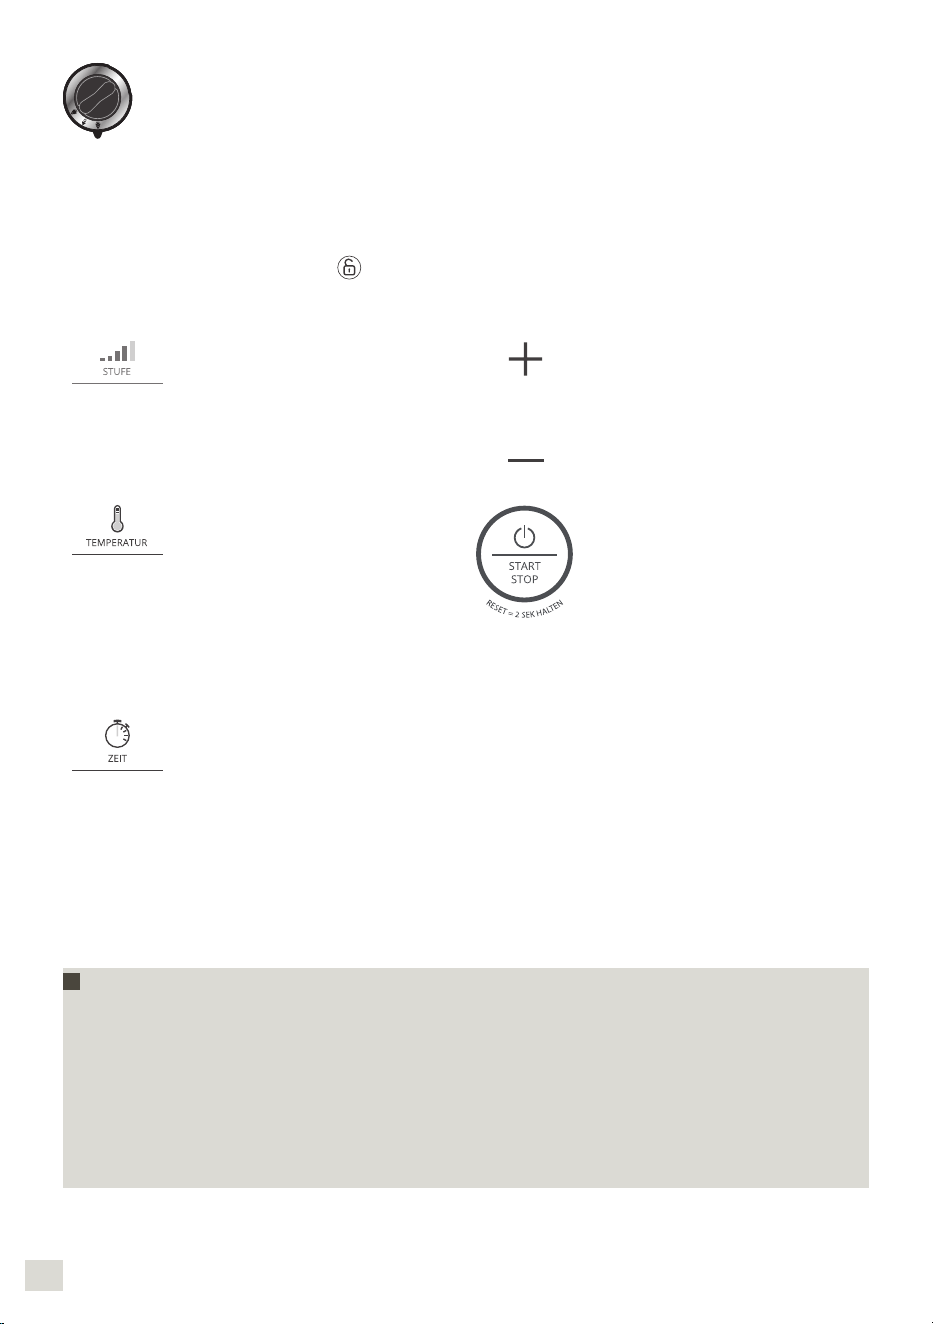
Sélection paramètres personnalisés :
Sélection de la vitesse moteur.
2 vitesses intermittentes
et 10 vitesses continues
progressives.
Vitesse intermittente max
(V13).
Augmentation de la vitesse,
de la température de cuisson
et de la durée.
Diminution de la vitesse, de la
température de cuisson et de
la durée.
Sélection de la température
de cuisson.
De 30° à 150°C.
Témoin lumineux de chauffe :
il s’allume au démarrage de
la cuisson et s’éteint lorsque
la température à l’intérieur
du bol passe en dessous des
50°C.
Ce bouton a 3 fonctions :
– “ Validation ” du choix
de votre programme
automatique ou de vos
paramètres choisis dans
le cadre d’une utilisation
manuelle (vitesse,
température de cuisson,
temps).
– “ Pause ” au cours d’une
utilisation, une fois que
l’appareil est lancé.
– “ Réinitialisation ” des
paramètres sélectionnés de
l’appareil par une pression
de 2 secondes.
– “ Validation de l’étape
” dans le pas à pas des
recettes.
Sélection de la durée de
fonctionnement.
De 5s à 2 heures.
Appairage 1ère connexion
En cas de mauvais positionnement ou de mauvais verrouillage de l’un ou de l’autre
(Cf. Fig. 10.1 et 10.2), le logo
se met à clignoter lorsque l’on active une fonction.
La position « maxi » permet de
gagner un maximum de chaleur
et de vapeur dans le bol pour
toutes les cuissons à la vapeur
(soupes, etc...).
Cette position évite également les
éclaboussures pendant le mixage.
Positionnez le bol (D) sur le bloc moteur
(A) jusqu’à entendre un “ clic ” (Cf. Fig. 8).
L ’appareil démarre uniquement si le
bol et le couvercle sont correctement
positionnés et verrouillés sur le bloc
moteur.
UTILISATION EN MODE CONNECTE
Mise sous tension de votre appareil
Fréquence : 2,40GHz. Puissance maximum transmise : 7,7dBm
Votre appareil est équipé d’un interrupteur 0/1. Basculez cet interrupteur sur 1. (Cf. Fig. 9).
L’écran LCD afche tous les paramètres à « 0 ».
En mode connecté, l’afchage de l’écran LCD i Prep & Cook XL est bleu.
PREPARATION DE L’INSTALLATION
Retrouvez la liste des modèles de Smartphones et Tablettes compatibles avec i Prep
& Cook XL sur www.krups.com
iPhone 4S or newer
iPad 3 / iPad mini or later
From iOS 9 and following ones.
From Android 4.4 and following ones.
INSTALLER I PREP & COOK XL
Ce qu’il faut pour procéder à l’installation de i Prep & Cook XL :
L’application Prep & Cook téléchargeable gratuitement sur App Store (iPhone/iPad) et
Google Play (Android)
Une connexion Bluetooth fournie par votre Smartphone ou votre tablette Bluetooth®
Smart 4.0: i Prep & Cook XL se connecte à votre Smartphone/tablette via une connexion
sans l autonome
Le Smartphone/tablette doit se trouver à proximité i Prep & Cook XL (La portée de la
connexion varie en fonction de la conguration du logement).
Une prise de courant pour brancher i Prep & Cook XL : i Prep & Cook XL est connecté
avec votre Smartphone/tablette uniquement lorsqu’il est branché au secteur.
A propos de Bluetooth® Smart
La technologie Bluetooth® Smart 4.0 (ou Bluetooth Low Energy) permet une
communication sans l entre une application et un appareil tout en consommant très
peu d’énergie.
PREMIERE CONNEXION I PREP & COOK XL EN MODE CONNECTE
Téléchargement de l ’application
Pour commencer, téléchargez l’application sur votre Smartphone/tablette en vous
connectant à l’App Store pour iOS ou à Google Play pour Android.
Lorsque vous avez téléchargé l’application, en quelques minutes et sans création de
compte, vous pourrez réaliser vos premières recettes avec i Prep & Cook XL. (50 recettes
vous sont proposées sans création de votre compte).
La création de votre compte sur l’application vous permettra d’accéder à l’intégralité du
contenu pour varier vos menus.

109
FRANÇAIS
Conseil d’utilisation :
Votre appareil est équipé d’un micro processeur qui contrôle et analyse sa stabilité. En
cas d’instabilité, la vitesse de rotation du moteur sera automatiquement réduite, si cette
instabilité persiste, le moteur sera arrêté et un “ STOP ” s’afchera sur votre écran.
Vériez que la quantité d’ingrédients ne soit pas trop importante et que la vitesse
utilisée soit adaptée.
Vériez que vous utilisez l’accessoire recommandé.
Puis redémarrez votre appareil normalement.
Sélection paramètres personnalisés :
Sélection de la vitesse moteur.
2 vitesses intermittentes
et 10 vitesses continues
progressives.
Vitesse intermittente max
(V13).
Augmentation de la vitesse,
de la température de cuisson
et de la durée.
Diminution de la vitesse, de la
température de cuisson et de
la durée.
Sélection de la température
de cuisson.
De 30° à 150°C.
Témoin lumineux de chauffe :
il s’allume au démarrage de
la cuisson et s’éteint lorsque
la température à l’intérieur
du bol passe en dessous des
50°C.
Ce bouton a 3 fonctions :
– “ Validation ” du choix
de votre programme
automatique ou de vos
paramètres choisis dans
le cadre d’une utilisation
manuelle (vitesse,
température de cuisson,
temps).
– “ Pause ” au cours d’une
utilisation, une fois que
l’appareil est lancé.
– “ Réinitialisation ” des
paramètres sélectionnés de
l’appareil par une pression
de 2 secondes.
– “ Validation de l’étape
” dans le pas à pas des
recettes.
Sélection de la durée de
fonctionnement.
De 5s à 2 heures.
Appairage 1ère connexion
En cas de mauvais positionnement ou de mauvais verrouillage de l’un ou de l’autre
(Cf. Fig. 10.1 et 10.2), le logo
se met à clignoter lorsque l’on active une fonction.
La position « maxi » permet de
gagner un maximum de chaleur
et de vapeur dans le bol pour
toutes les cuissons à la vapeur
(soupes, etc...).
Cette position évite également les
éclaboussures pendant le mixage.
Positionnez le bol (D) sur le bloc moteur
(A) jusqu’à entendre un “ clic ” (Cf. Fig. 8).
L ’appareil démarre uniquement si le
bol et le couvercle sont correctement
positionnés et verrouillés sur le bloc
moteur.
UTILISATION EN MODE CONNECTE
Mise sous tension de votre appareil
Fréquence : 2,40GHz. Puissance maximum transmise : 7,7dBm
Votre appareil est équipé d’un interrupteur 0/1. Basculez cet interrupteur sur 1. (Cf. Fig. 9).
L’écran LCD afche tous les paramètres à « 0 ».
En mode connecté, l’afchage de l’écran LCD i Prep & Cook XL est bleu.
PREPARATION DE L’INSTALLATION
Retrouvez la liste des modèles de Smartphones et Tablettes compatibles avec i Prep
& Cook XL sur www.krups.com
iPhone 4S or newer
iPad 3 / iPad mini or later
From iOS 9 and following ones.
From Android 4.4 and following ones.
INSTALLER I PREP & COOK XL
Ce qu’il faut pour procéder à l’installation de i Prep & Cook XL :
L’application Prep & Cook téléchargeable gratuitement sur App Store (iPhone/iPad) et
Google Play (Android)
Une connexion Bluetooth fournie par votre Smartphone ou votre tablette Bluetooth®
Smart 4.0: i Prep & Cook XL se connecte à votre Smartphone/tablette via une connexion
sans l autonome
Le Smartphone/tablette doit se trouver à proximité i Prep & Cook XL (La portée de la
connexion varie en fonction de la conguration du logement).
Une prise de courant pour brancher i Prep & Cook XL : i Prep & Cook XL est connecté
avec votre Smartphone/tablette uniquement lorsqu’il est branché au secteur.
A propos de Bluetooth® Smart
La technologie Bluetooth® Smart 4.0 (ou Bluetooth Low Energy) permet une
communication sans l entre une application et un appareil tout en consommant très
peu d’énergie.
PREMIERE CONNEXION I PREP & COOK XL EN MODE CONNECTE
Téléchargement de l ’application
Pour commencer, téléchargez l’application sur votre Smartphone/tablette en vous
connectant à l’App Store pour iOS ou à Google Play pour Android.
Lorsque vous avez téléchargé l’application, en quelques minutes et sans création de
compte, vous pourrez réaliser vos premières recettes avec i Prep & Cook XL. (50 recettes
vous sont proposées sans création de votre compte).
La création de votre compte sur l’application vous permettra d’accéder à l’intégralité du
contenu pour varier vos menus.
1211
FRANÇAIS
Mise sous tension de i Prep & Cook XL
Votre appareil est équipé d’un interrupteur 0/1 (H). Basculez cet interrupteur sur 1 (Cf. Fig. 9).
Activation du Bluetooth
Veuillez vous rapprocher de i Prep & Cook XL et vérier que le Bluetooth de votre
Smartphone/tablette est bien activé.
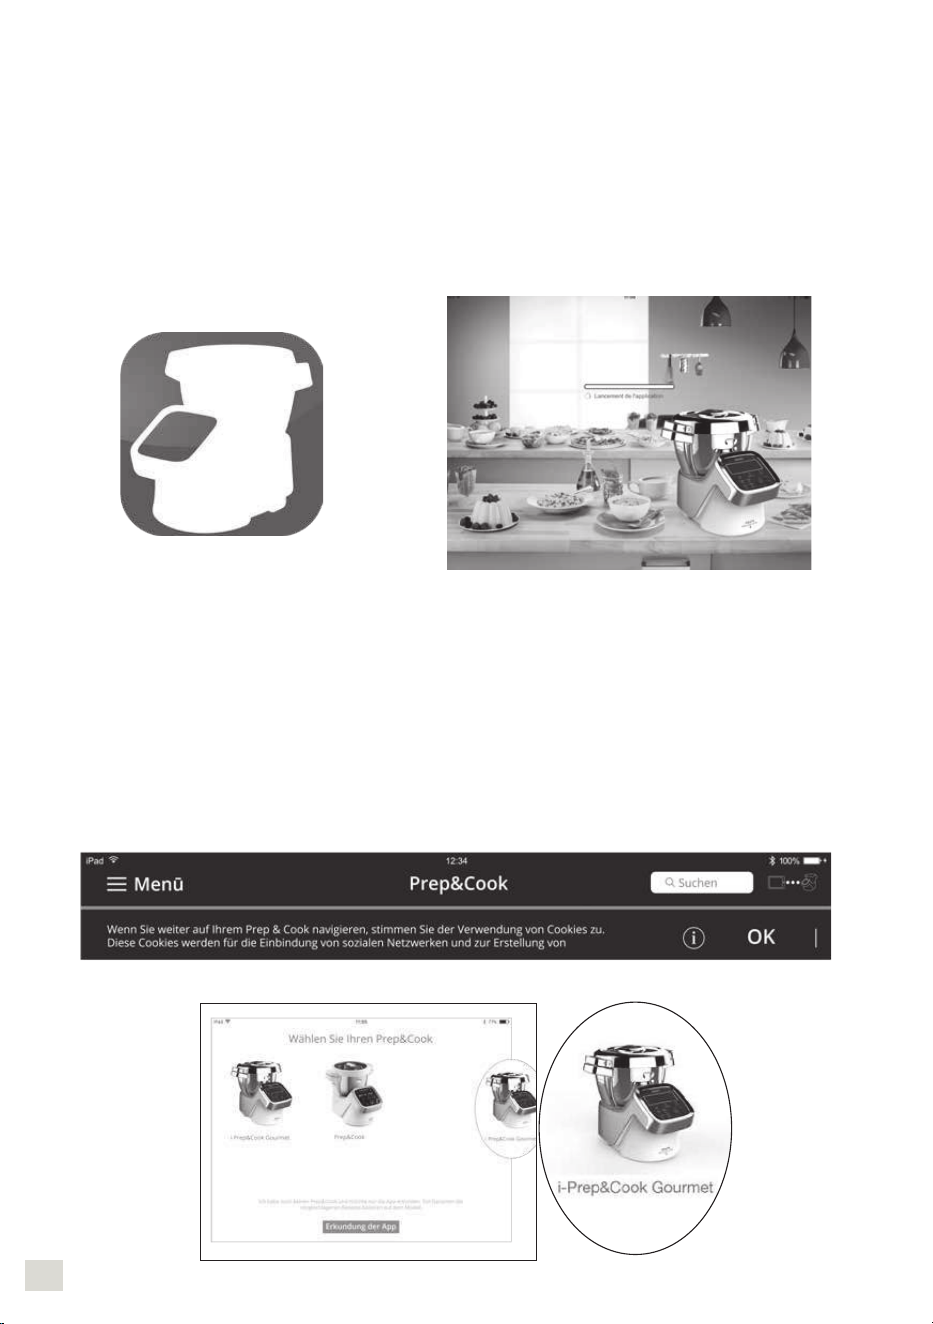
Lancement de l’application
Lancez l’application Prep & Cook en cliquant sur l’icône « Prep & Cook ».
Appairage
Qu’appelle-t-on l’appairage ?
Lors de la première connexion, l’application que vous avez téléchargée sur votre
Smartphone/tablette et i Prep & Cook XL se détecteront automatiquement et rapidement, à
condition de bien suivre les étapes suivantes.
Si vous le désirez, vous pouvez appairer jusqu’à 10 appareils à i Prep & Cook XL.
Pour cela, procédez à l’appairage de chaque appareil indépendamment.(Cf. appairage).
Néanmoins un seul appareil peut être connecté simultanément.
Acceptez les cookies, qui permettent d’améliorer l’application en recueillant vos
préférences d’utilisations.
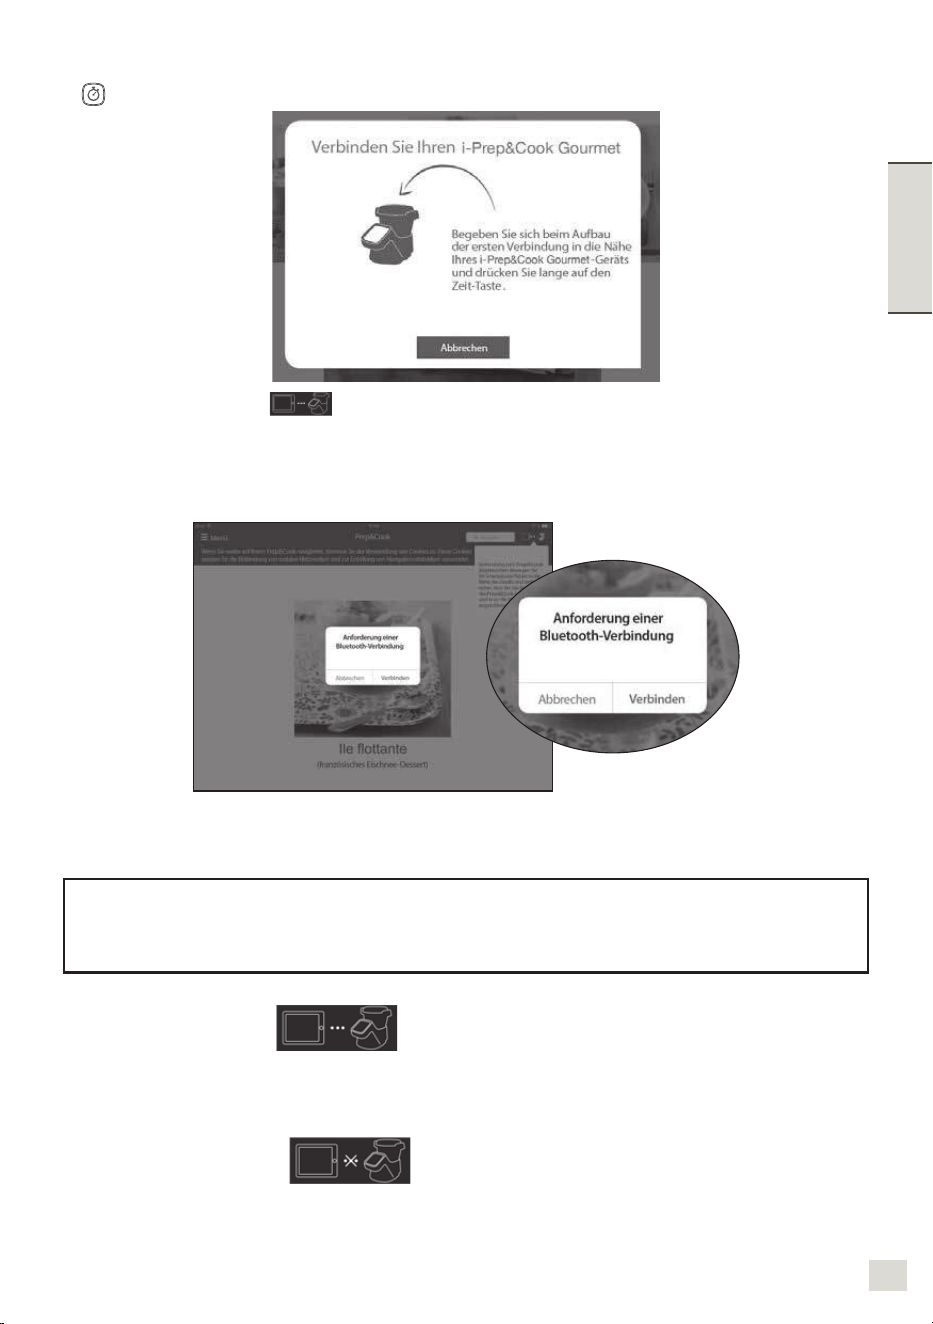
Sélectionnez votre appareil
Lorsque l’application le demande, faites un appui long (4 secondes) sur le bouton Timer
(B3) de i Prep & Cook XL.
Le témoin de connexion
(C1) clignote pendant 30 secondes au maximum, période
durant laquelle i Prep & Cook XL se connecte à votre Smartphone/tablette.
Acceptez la demande d’appairage qui apparait sur votre Smartphone/tablette ou accédez
au centre de notication pour accepter l’appairage.
Le témoin de connexion (C1) xe indique que la connexion est établie.
NB : Lorsque l’appairage est effectué, i Prep & Cook XL reconnaitra automatiquement
votre Smartphone/tablette lors des connexions futures. Vous n’aurez pas besoin de
renouveler cette étape d’appairage
La connexion a réussi
Votre i Prep & Cook XL est désormais connecté avec votre Smartphone/tablette. L’icone,
ci-dessus, vous indique que la connexion est établie.
La connexion a échoué
L’icône, ci-dessus, vous indique que la connexion n’ a pas été établie.
Veuillez renouveler les opérations suivantes :
Approchez vous de i Prep & Cook XL.
1211
FRANÇAIS
Mise sous tension de i Prep & Cook XL
Votre appareil est équipé d’un interrupteur 0/1 (H). Basculez cet interrupteur sur 1 (Cf. Fig. 9).
Activation du Bluetooth
Veuillez vous rapprocher de i Prep & Cook XL et vérier que le Bluetooth de votre
Smartphone/tablette est bien activé.
Lancement de l’application
Lancez l’application Prep & Cook en cliquant sur l’icône « Prep & Cook ».
Appairage
Qu’appelle-t-on l’appairage ?
Lors de la première connexion, l’application que vous avez téléchargée sur votre
Smartphone/tablette et i Prep & Cook XL se détecteront automatiquement et rapidement, à
condition de bien suivre les étapes suivantes.
Si vous le désirez, vous pouvez appairer jusqu’à 10 appareils à i Prep & Cook XL.
Pour cela, procédez à l’appairage de chaque appareil indépendamment.(Cf. appairage).
Néanmoins un seul appareil peut être connecté simultanément.
Acceptez les cookies, qui permettent d’améliorer l’application en recueillant vos
préférences d’utilisations.
Sélectionnez votre appareil
Lorsque l’application le demande, faites un appui long (4 secondes) sur le bouton Timer
(B3) de i Prep & Cook XL.
Le témoin de connexion
(C1) clignote pendant 30 secondes au maximum, période
durant laquelle i Prep & Cook XL se connecte à votre Smartphone/tablette.
Acceptez la demande d’appairage qui apparait sur votre Smartphone/tablette ou accédez
au centre de notication pour accepter l’appairage.
Le témoin de connexion (C1) xe indique que la connexion est établie.
NB : Lorsque l’appairage est effectué, i Prep & Cook XL reconnaitra automatiquement
votre Smartphone/tablette lors des connexions futures. Vous n’aurez pas besoin de
renouveler cette étape d’appairage
La connexion a réussi
Votre i Prep & Cook XL est désormais connecté avec votre Smartphone/tablette. L’icone,
ci-dessus, vous indique que la connexion est établie.
La connexion a échoué
L’icône, ci-dessus, vous indique que la connexion n’ a pas été établie.
Veuillez renouveler les opérations suivantes :
Approchez vous de i Prep & Cook XL.
1413
FRANÇAIS
Vériez que i Prep & Cook XL est bien branché sur le secteur et que la prise fonctionne
correctement.
Vérier que votre Smartphone/tablette est compatible (Cf. liste de compatibilité sur
www.krups.com).
Vériez que le Bluetooth de votre Smartphone/tablette est activé.
Recommencez les étapes d’appairage et consultez la FAQ (questions fréquentes).
Si le problème persiste assurez-vous que votre Smartphone/tablette est compatible
Si vous utilisez un appareil Android, assurez-vous que celui-ci fait partie des modèles
compatibles (Cf. liste de compatibilité sur www.krups.com).
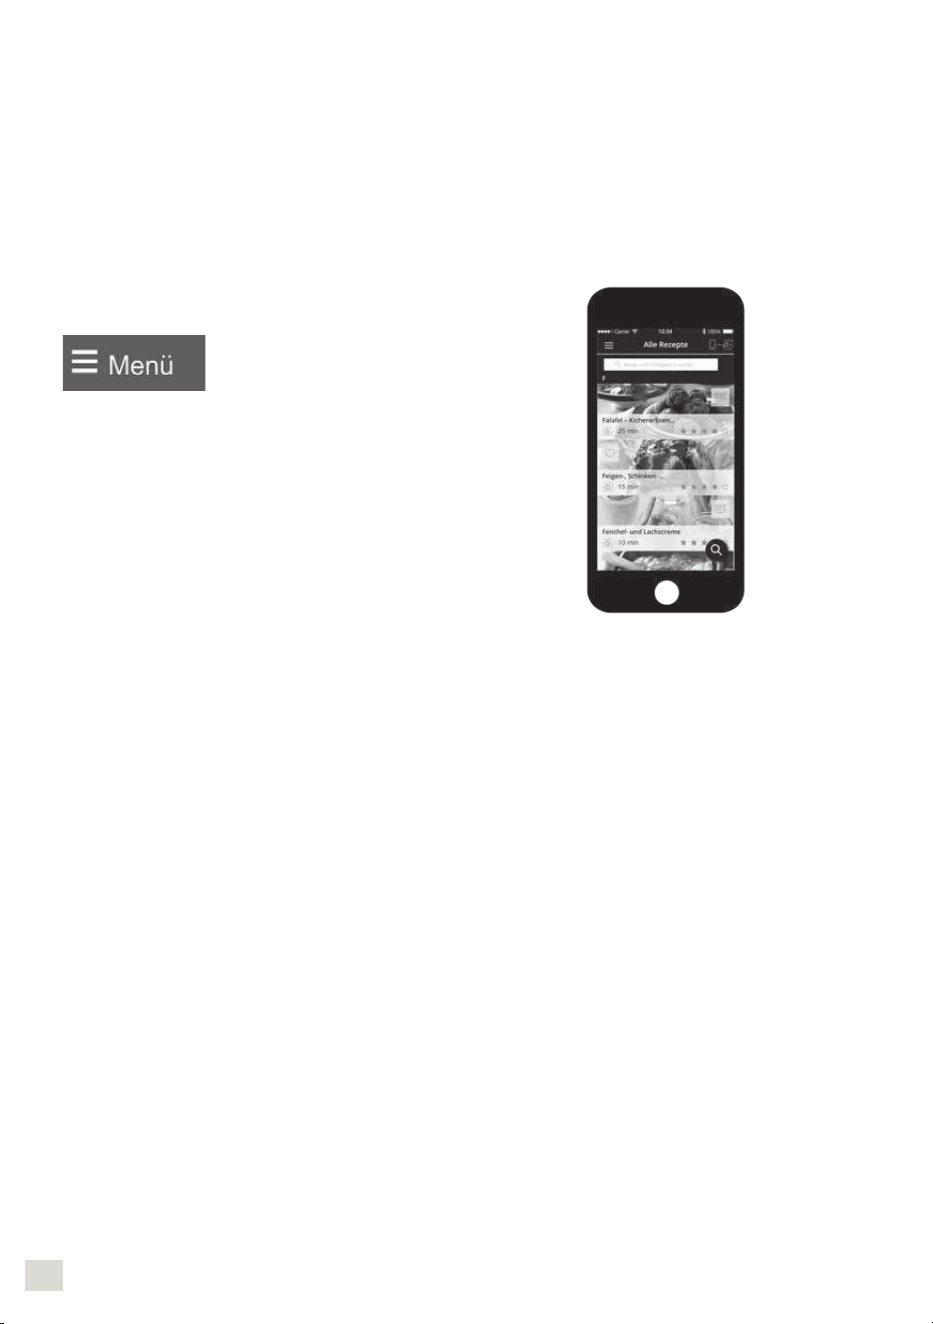
Accédez au menu de l’application pour découvrir
notre gamme de recettes.
En mode connecté, au cours d’une recette pas à pas,
le premier reset met n à l’étape, le second reset met
n à la recette.
FAQ : QUESTIONS FREQUENTES
A quel endroit placer i Prep & Cook XL :
Placez i Prep & Cook XL sur une surface plane stable.
Pour obtenir une connexion optimale entre i Prep & Cook XL et votre Smartphone/tablette,
il est recommandé d’effectuer toutes les manipulations nécessitant une connexion à une
distance raisonnable.
La présence du témoin de connexion xe (C1) vous garantit que vos appareils sont
connectés.
Si la connexion est interrompue (le symbole de la connexion est barré), veuillez vous
rapprocher i Prep & Cook XL pour retrouver la connexion.
Que se passe-t-il si la connexion est interrompue au cours d’une recette ?
Si la connexion entre i Prep & Cook XL et votre Smartphone/tablette est interrompue au
cours d’une recette, la synchronisation entre les deux appareils se fera automatiquement
dès que la connexion sera rétablie. Vous pourrez reprendre la progression de votre recette,
à l’étape à laquelle vous vous trouviez, lors de la perte de connexion.
Puis-je utiliser i Prep & Cook XL sans l’application ?
Votre appareil peut être utilisé sans l’application. (Cf. Mise en service en mode non connecté).
Pour cela se référer au paragraphe utilisation de l’appareil.
Néanmoins, seule l’application vous permettra de proter des nombreux avantages du
produit connecté.
I Prep & Cook XL peut-il être utilisé avec plusieurs Smartphones ou tablettes ?
Si vous le désirez, vous pouvez jumeler plusieurs appareils à i Prep & Cook XL. Pour cela,
procédez au jumelage de chaque appareil indépendamment.(Cf. appairage).
Néanmoins un seul appareil peut être connecté simultanément.
Le Bluetooth de mon téléphone doit -il être activé en continu ?
Le Bluetooth doit être activé pour synchroniser l’application et i Prep & Cook XL.
UTILISATION EN MODE NON CONNECTE
UTILISATION DU TABLEAU DE COMMANDE (B)
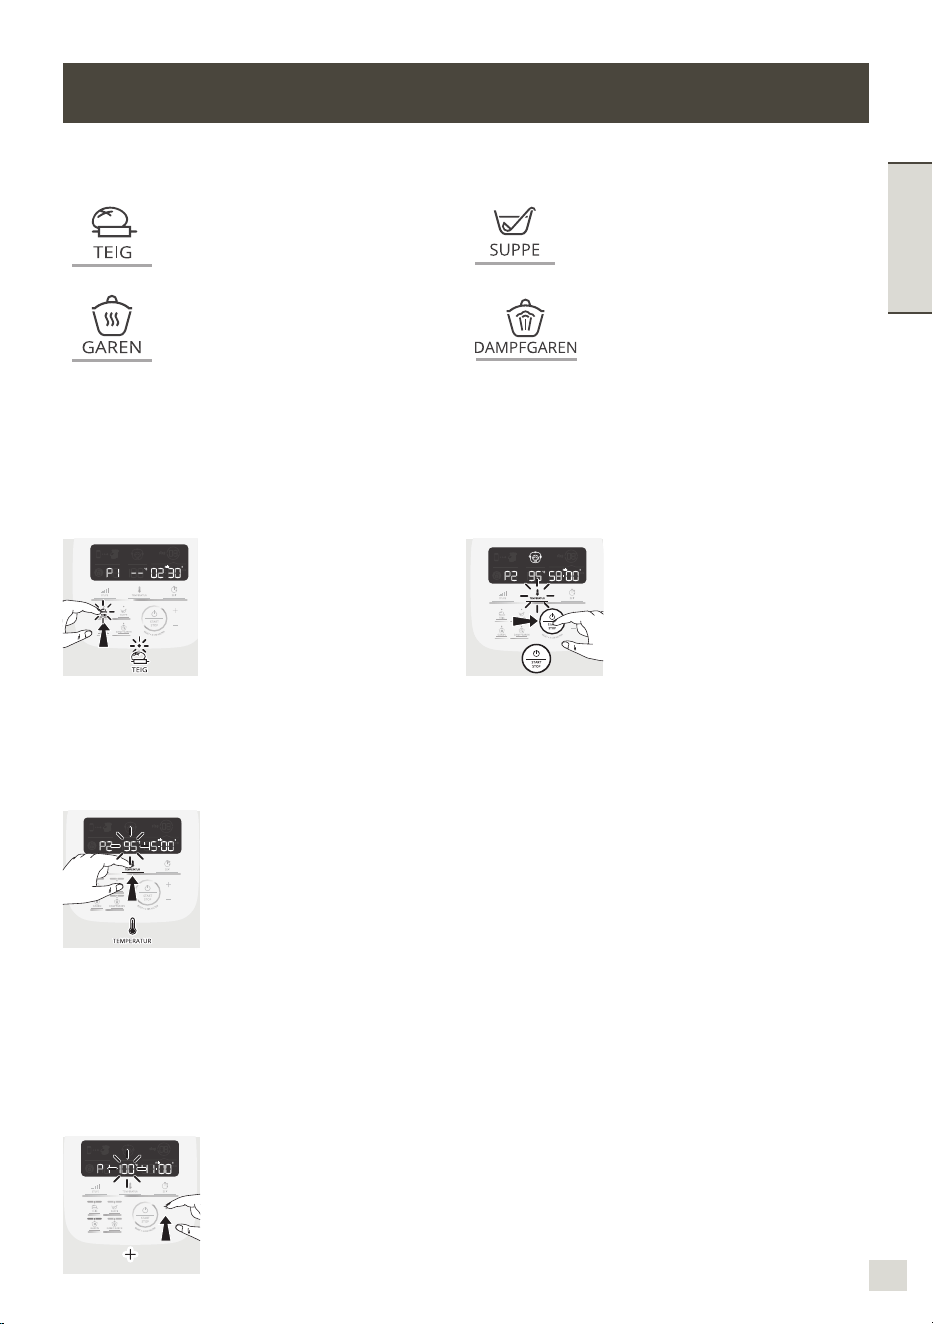
Sélection d’un programme automatique :
Pâtes (liste des sous pro-
grammes)
Soupes (liste des sous pro-
grammes)
Slow cook (liste des sous
programmes)
Cuisson vapeur (liste des
sous programmes)
Mise sous tension de votre appareil
Votre appareil est équipé d’un interrupteur 0/1. Basculez cet interrupteur sur 1.
L’écran LCD afche tous les paramètres à « 0 ». (Cf. Fig. 9).
En mode non connecté, l’afchage de l’écran LCD i Prep & Cook XL est blanc.
MODE PROGRAMME AUTOMATIQUE
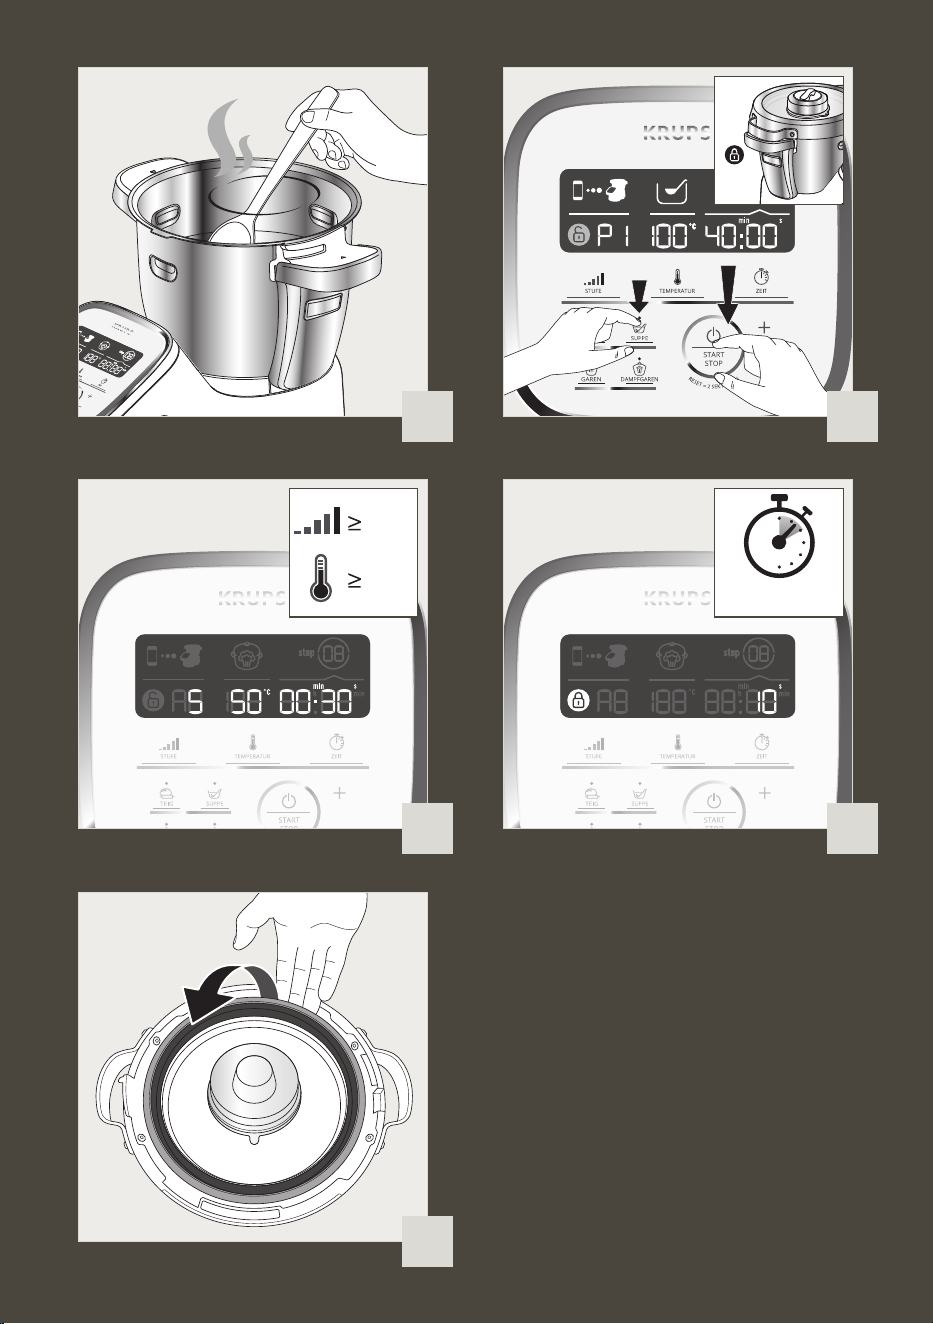
1. Appuyez sur le
programme de votre
choix (B4). Un point
lumineux apparaît au
dessus du programme
sélectionné. Des appuis
successifs permettent
de faire déler les
différents sous
programmes.
4. Lorsque vous avez ni
de modier tous vos
paramètres, appuyez
sur le bouton “ start ”
(B5) pour démarrer le
programme. Lorsque
votre appareil utilise le
mode cuisson, le témoin
lumineux rouge s’allume
pour vous informer que
la cuisson a démarré.
2. Les paramètres pré-pro-
grammés peuvent être
modiés le temps d’une
recette (selon la recette
choisie, les ingrédients,
les quantités préparées).
Appuyez sur le sélecteur
température de cuis-
son (B2) ou le sélecteur
temps (B3), le paramètre
choisi clignote à l’écran
(C6-C7).
5. Lorsque le programme est terminé,
l’appareil émet 3 bips.
6. A la n des programmes soupes, slow
cook P2 et P3, cuisson vapeur, l’appareil
passe automatiquement en maintien
au chaud pendant 45 minutes pour
conserver la préparation prête à être
consommée. En programme slow cook
P2 et P3 et en mode manuel, le moteur
de l’appareil fonctionne à une vitesse
spécique, dans le but de préserver
la préparation et d’éviter que celle-ci
n’adhère au fond du bol. Pour stopper le
maintien au chaud, il suft d’appuyer sur
le bouton “ stop ” (B5). Si vous ouvrez
le couvercle, appuyez sur les gâchettes
(D2) ou retirez le bol, le maintien au
chaud sera automatiquement arrêté.
3. Réglez le(s) paramètre(s)
à l’aide du sélecteur +/-
(B6).
1413
FRANÇAIS
Vériez que i Prep & Cook XL est bien branché sur le secteur et que la prise fonctionne
correctement.
Vérier que votre Smartphone/tablette est compatible (Cf. liste de compatibilité sur
www.krups.com).
Vériez que le Bluetooth de votre Smartphone/tablette est activé.
Recommencez les étapes d’appairage et consultez la FAQ (questions fréquentes).
Si le problème persiste assurez-vous que votre Smartphone/tablette est compatible
Si vous utilisez un appareil Android, assurez-vous que celui-ci fait partie des modèles
compatibles (Cf. liste de compatibilité sur www.krups.com).
Accédez au menu de l’application pour découvrir
notre gamme de recettes.
En mode connecté, au cours d’une recette pas à pas,
le premier reset met n à l’étape, le second reset met
n à la recette.
FAQ : QUESTIONS FREQUENTES
A quel endroit placer i Prep & Cook XL :
Placez i Prep & Cook XL sur une surface plane stable.
Pour obtenir une connexion optimale entre i Prep & Cook XL et votre Smartphone/tablette,
il est recommandé d’effectuer toutes les manipulations nécessitant une connexion à une
distance raisonnable.
La présence du témoin de connexion xe (C1) vous garantit que vos appareils sont
connectés.
Si la connexion est interrompue (le symbole de la connexion est barré), veuillez vous
rapprocher i Prep & Cook XL pour retrouver la connexion.
Que se passe-t-il si la connexion est interrompue au cours d’une recette ?
Si la connexion entre i Prep & Cook XL et votre Smartphone/tablette est interrompue au
cours d’une recette, la synchronisation entre les deux appareils se fera automatiquement
dès que la connexion sera rétablie. Vous pourrez reprendre la progression de votre recette,
à l’étape à laquelle vous vous trouviez, lors de la perte de connexion.
Puis-je utiliser i Prep & Cook XL sans l’application ?
Votre appareil peut être utilisé sans l’application. (Cf. Mise en service en mode non connecté).
Pour cela se référer au paragraphe utilisation de l’appareil.
Néanmoins, seule l’application vous permettra de proter des nombreux avantages du
produit connecté.
I Prep & Cook XL peut-il être utilisé avec plusieurs Smartphones ou tablettes ?
Si vous le désirez, vous pouvez jumeler plusieurs appareils à i Prep & Cook XL. Pour cela,
procédez au jumelage de chaque appareil indépendamment.(Cf. appairage).
Néanmoins un seul appareil peut être connecté simultanément.
Le Bluetooth de mon téléphone doit -il être activé en continu ?
Le Bluetooth doit être activé pour synchroniser l’application et i Prep & Cook XL.
UTILISATION EN MODE NON CONNECTE
UTILISATION DU TABLEAU DE COMMANDE (B)
Sélection d’un programme automatique :
Pâtes (liste des sous pro-
grammes)
Soupes (liste des sous pro-
grammes)
Slow cook (liste des sous
programmes)
Cuisson vapeur (liste des
sous programmes)
Mise sous tension de votre appareil
Votre appareil est équipé d’un interrupteur 0/1. Basculez cet interrupteur sur 1.
L’écran LCD afche tous les paramètres à « 0 ». (Cf. Fig. 9).
En mode non connecté, l’afchage de l’écran LCD i Prep & Cook XL est blanc.
MODE PROGRAMME AUTOMATIQUE
1. Appuyez sur le
programme de votre
choix (B4). Un point
lumineux apparaît au
dessus du programme
sélectionné. Des appuis
successifs permettent
de faire déler les
différents sous
programmes.
4. Lorsque vous avez ni
de modier tous vos
paramètres, appuyez
sur le bouton “ start ”
(B5) pour démarrer le
programme. Lorsque
votre appareil utilise le
mode cuisson, le témoin
lumineux rouge s’allume
pour vous informer que
la cuisson a démarré.
2. Les paramètres pré-pro-
grammés peuvent être
modiés le temps d’une
recette (selon la recette
choisie, les ingrédients,
les quantités préparées).
Appuyez sur le sélecteur
température de cuis-
son (B2) ou le sélecteur
temps (B3), le paramètre
choisi clignote à l’écran
(C6-C7).
5. Lorsque le programme est terminé,
l’appareil émet 3 bips.
6. A la n des programmes soupes, slow
cook P2 et P3, cuisson vapeur, l’appareil
passe automatiquement en maintien
au chaud pendant 45 minutes pour
conserver la préparation prête à être
consommée. En programme slow cook
P2 et P3 et en mode manuel, le moteur
de l’appareil fonctionne à une vitesse
spécique, dans le but de préserver
la préparation et d’éviter que celle-ci
n’adhère au fond du bol. Pour stopper le
maintien au chaud, il suft d’appuyer sur
le bouton “ stop ” (B5). Si vous ouvrez
le couvercle, appuyez sur les gâchettes
(D2) ou retirez le bol, le maintien au
chaud sera automatiquement arrêté.
3. Réglez le(s) paramètre(s)
à l’aide du sélecteur +/-
(B6).
1615
FRANÇAIS
A la n du pétrissage des programmes pâte
P1 et P2, l’appareil passe en mode “ levée
de la pâte ” à 30°C pendant 40 minutes
pour donner un meilleur volume à vos
pâtes. Si vous ouvrez le couvercle, appuyez
sur les gâchettes (D2) ou retirez le bol,
l’appareil passe en mode pause, vous avez
la possibilité de le relancer en appuyant
de nouveau sur “ start ”. Si vous souhaitez
stopper ce mode, appuyez pendant 2
secondes sur le bouton “ stop ”.
7. ppuyez sur les gâchettes (D2) puis
soulevez l’ensemble bol (D) (Cf. Fig. 12).
En mode connecté, lorsque le
programme automatique est lancé, vous
avez la possibilité d’arrêter l’appareil à
tout moment en appuyant sur le bouton
“ stop ”. Le programme automatique
est alors en mode pause, vous avez la
possibilité de le relancer en appuyant de
nouveau sur “ start ”. Si vous vous êtes
trompé de programme et si vous voulez
annuler, appuyez pendant 2 secondes
sur le bouton “ stop ”.
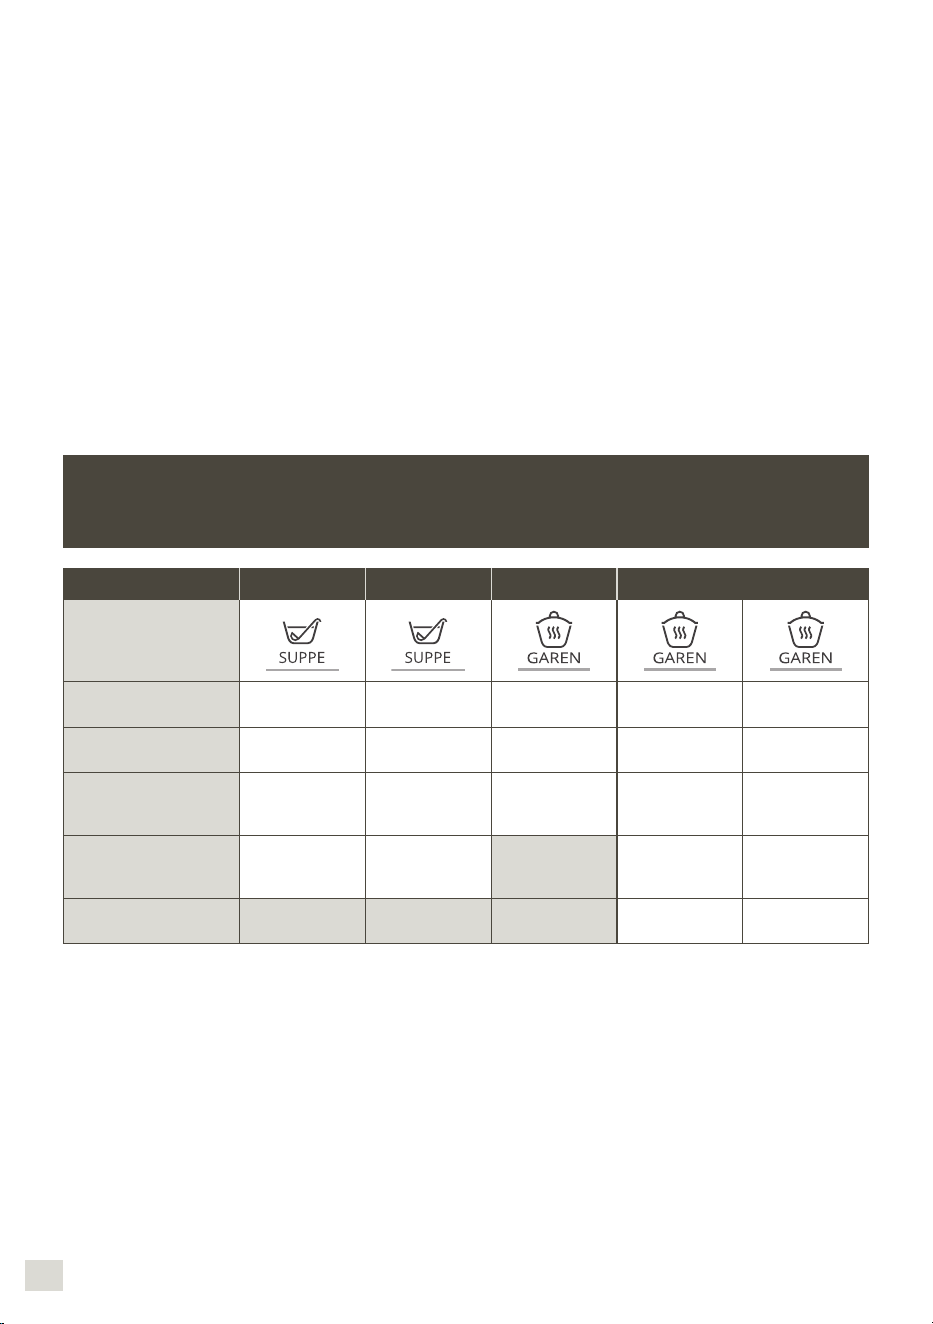
DÉCOUVREZ LES PROGRAMMES AUTOMATIQUES
PROPOSÉS:
Soupe P1 Soupe P2 Slow cook P1 Slow cook P2 Slow cook P3
Programmes
automatiques
Vitesse “ par défaut ”
(ajustable)
10 Pulses et V12
pendant 2 min.
V7 à V10
pendant 30s
V3 V1 V2
Température “ par
défaut ” (ajustable)
100°C
(90°C à 100°C)
100°C
(90°C à 100°C)
130°C
(nonajustable)
95°C
(80°C à 100°C)
95°C
(80°C à 100°C)
Temps “ par défaut ”
(ajustable)
40 min
(20min
à 60 min)
45 min
(20min
à 60 min)
5 min
(2min
à 15 min)
45 min
(10 min
à 2hr)
20 min
(10 min
à 2hr)
Maintien au chaud
“par défaut” en n de
programme
45 min 45 min 45 min 45 min
Vitesse moteur en
maintien au chaud
5s ON en V3
/ 20s OFF
10s ON en V3 /
10s OFF
Certaines recettes peuvent provoquer des débordements intempestifs, en raison de
l’apparition de bulles, en particulier lors de l’utilisation de légumes congelés. Dans ce
cas, il vous appartient de réduire les volumes en conséquence.
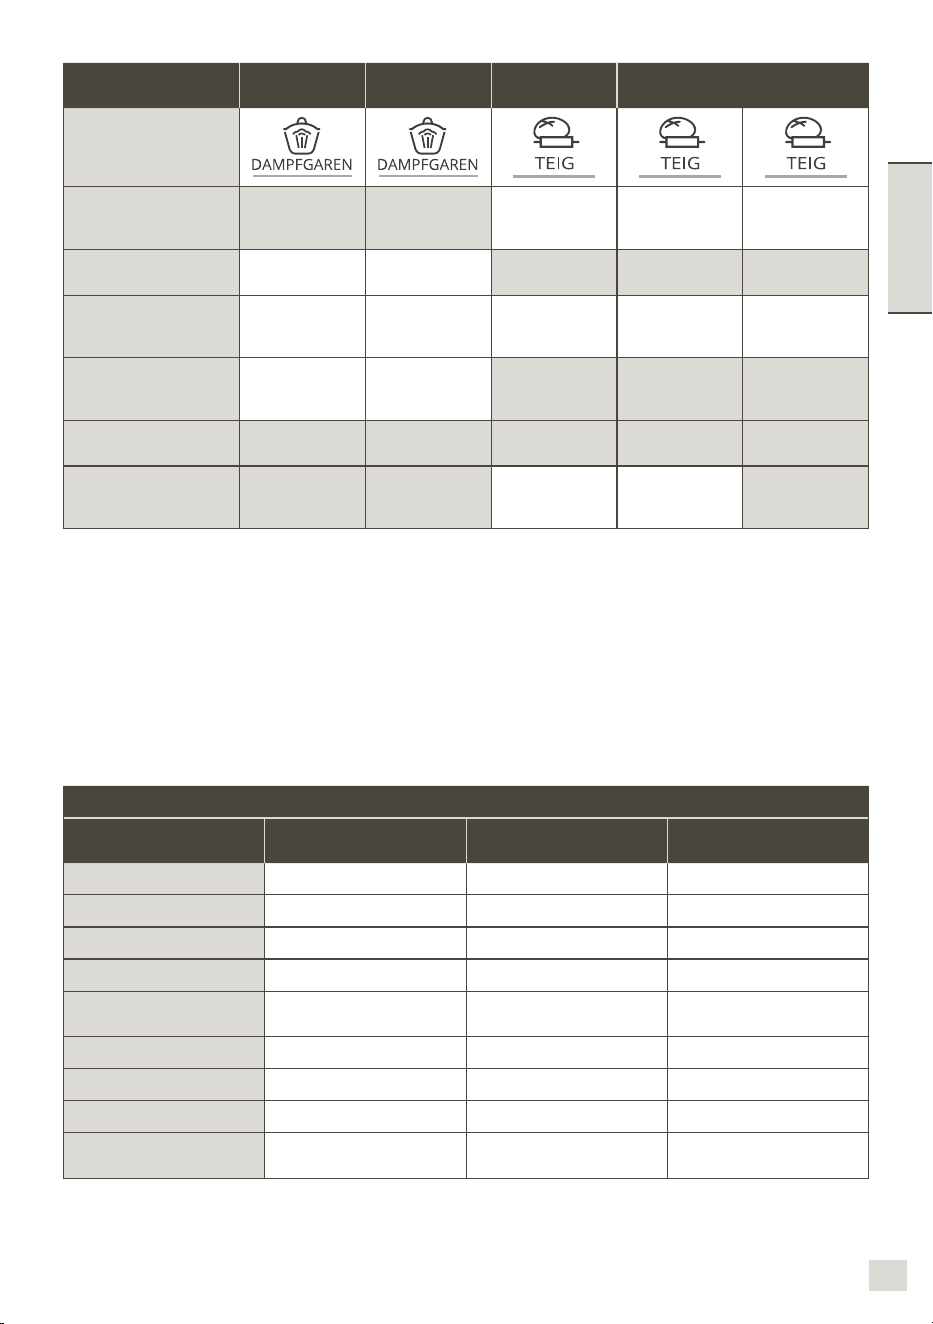
Cuisson
Vapeur P1
Cuisson
Vapeur P2
Pâte P1 Pâte P2 Pâte P3
Programmes
automatiques
Vitesse “ par défaut ”
(ajustable)
V5 pendant
2 min 30s
V5 pendant 1
min 30s puis V6
pendant 2 min
V3 pendant 40s
puis V9 pendant
3 min
Température “ par
défaut ” (ajustable)
100°C
(nonajustable)
100°C
(nonajustable)
Temps “ par défaut ”
(ajustable)
30 min
(1 min
à 60 min)
35 min
(1 min
à 60 min)
2 min 30 s
(30 s à
2 min 30s)
3 min 30 s
(30 s à
3 min 30 s)
3 min 40 s
(1 min 40 s
à 3 min 40 s)
Maintien au chaud
«par défaut» en n de
programme
45 min 45 min
Vitesse moteur en
maintien au chaud
Levée de la pâte 30°
“par défaut” en n de
programme
40 min 40 min
UTILISATION DU PANIER VAPEUR INTERNE
Les temps de cuisson sont donnés à titre
indicatif, ils permettent dans la plupart des
cas une cuisson satisfaisante.
Néanmoins, certaines conditions vont
inuer sur le temps de cuisson :
– la taille des légumes (coupés ou non-coupés)
– la quantité des ingrédients dans le panier
– la variété des légumes, leur maturité
– la quantité d’eau dans le bol, qui doit
correspondre à la graduation (0.7L).
Bien penser à utiliser le bouchon vapeur
dans le sens “maxi” (a).
Si la cuisson est insufsante, vous pouvez
ajouter un temps de cuisson supplémentaire.
Temps de cuisson vapeur
Ingrédients Quantités (max) Temps de cuisson estimé
Programme vapeur
préconisé
Courgettes 800 g 20 min P1
Panais 800 g 25 min P1
Blancs de poireaux 800 g 25 min P1
Brocolis 500 g 20 min P1
Poissons
600 g
(avec papier cuisson)
15 min P1
Pommes de terre 1 kg 30 min P2
Carottes 1 kg 30 min P2
Haricots verts 800 g 30 min P2
Viandes blanches
600 g
(avec papier cuisson)
20 min P2
Certaines recettes peuvent provoquer des débordements intempestifs, en raison de
l’apparition de bulles, en particulier lors de l’utilisation de légumes congelés. Dans ce
cas, il vous appartient de réduire les volumes en conséquence.
1615
FRANÇAIS
A la n du pétrissage des programmes pâte
P1 et P2, l’appareil passe en mode “ levée
de la pâte ” à 30°C pendant 40 minutes
pour donner un meilleur volume à vos
pâtes. Si vous ouvrez le couvercle, appuyez
sur les gâchettes (D2) ou retirez le bol,
l’appareil passe en mode pause, vous avez
la possibilité de le relancer en appuyant
de nouveau sur “ start ”. Si vous souhaitez
stopper ce mode, appuyez pendant 2
secondes sur le bouton “ stop ”.
7. ppuyez sur les gâchettes (D2) puis
soulevez l’ensemble bol (D) (Cf. Fig. 12).
En mode connecté, lorsque le
programme automatique est lancé, vous
avez la possibilité d’arrêter l’appareil à
tout moment en appuyant sur le bouton
“ stop ”. Le programme automatique
est alors en mode pause, vous avez la
possibilité de le relancer en appuyant de
nouveau sur “ start ”. Si vous vous êtes
trompé de programme et si vous voulez
annuler, appuyez pendant 2 secondes
sur le bouton “ stop ”.
DÉCOUVREZ LES PROGRAMMES AUTOMATIQUES
PROPOSÉS:
Soupe P1 Soupe P2 Slow cook P1 Slow cook P2 Slow cook P3
Programmes
automatiques
Vitesse “ par défaut ”
(ajustable)
10 Pulses et V12
pendant 2 min.
V7 à V10
pendant 30s
V3 V1 V2
Température “ par
défaut ” (ajustable)
100°C
(90°C à 100°C)
100°C
(90°C à 100°C)
130°C
(nonajustable)
95°C
(80°C à 100°C)
95°C
(80°C à 100°C)
Temps “ par défaut ”
(ajustable)
40 min
(20min
à 60 min)
45 min
(20min
à 60 min)
5 min
(2min
à 15 min)
45 min
(10 min
à 2hr)
20 min
(10 min
à 2hr)
Maintien au chaud
“par défaut” en n de
programme
45 min 45 min 45 min 45 min
Vitesse moteur en
maintien au chaud
5s ON en V3
/ 20s OFF
10s ON en V3 /
10s OFF
Certaines recettes peuvent provoquer des débordements intempestifs, en raison de
l’apparition de bulles, en particulier lors de l’utilisation de légumes congelés. Dans ce
cas, il vous appartient de réduire les volumes en conséquence.
Cuisson
Vapeur P1
Cuisson
Vapeur P2
Pâte P1 Pâte P2 Pâte P3
Programmes
automatiques
Vitesse “ par défaut ”
(ajustable)
V5 pendant
2 min 30s
V5 pendant 1
min 30s puis V6
pendant 2 min
V3 pendant 40s
puis V9 pendant
3 min
Température “ par
défaut ” (ajustable)
100°C
(nonajustable)
100°C
(nonajustable)
Temps “ par défaut ”
(ajustable)
30 min
(1 min
à 60 min)
35 min
(1 min
à 60 min)
2 min 30 s
(30 s à
2 min 30s)
3 min 30 s
(30 s à
3 min 30 s)
3 min 40 s
(1 min 40 s
à 3 min 40 s)
Maintien au chaud
«par défaut» en n de
programme
45 min 45 min
Vitesse moteur en
maintien au chaud
Levée de la pâte 30°
“par défaut” en n de
programme
40 min 40 min
UTILISATION DU PANIER VAPEUR INTERNE
Les temps de cuisson sont donnés à titre
indicatif, ils permettent dans la plupart des
cas une cuisson satisfaisante.
Néanmoins, certaines conditions vont
inuer sur le temps de cuisson :
– la taille des légumes (coupés ou non-coupés)
– la quantité des ingrédients dans le panier
– la variété des légumes, leur maturité
– la quantité d’eau dans le bol, qui doit
correspondre à la graduation (0.7L).
Bien penser à utiliser le bouchon vapeur
dans le sens “maxi” (a).
Si la cuisson est insufsante, vous pouvez
ajouter un temps de cuisson supplémentaire.
Temps de cuisson vapeur
Ingrédients Quantités (max) Temps de cuisson estimé
Programme vapeur
préconisé
Courgettes 800 g 20 min P1
Panais 800 g 25 min P1
Blancs de poireaux 800 g 25 min P1
Brocolis 500 g 20 min P1
Poissons
600 g
(avec papier cuisson)
15 min P1
Pommes de terre 1 kg 30 min P2
Carottes 1 kg 30 min P2
Haricots verts 800 g 30 min P2
Viandes blanches
600 g
(avec papier cuisson)
20 min P2
Certaines recettes peuvent provoquer des débordements intempestifs, en raison de
l’apparition de bulles, en particulier lors de l’utilisation de légumes congelés. Dans ce
cas, il vous appartient de réduire les volumes en conséquence.

1817
FRANÇAIS
MODE MANUEL:
1. Appuyez directement sur
le sélecteur représentant le
paramètre que vous avez
choisi de régler, c’est-à-dire
le sélecteur vitesse (B1) ou
le sélecteur température de
cuisson (B2) ou le sélecteur
temps (B3), le paramètre
choisi clignote à l’écran
(C5-C6-C7).
La programmation est alors en mode
pause, vous avez la possibilité de
la relancer en appuyant de nouveau
sur “ start ”. Si vous vous êtes
trompé de programmation et si vous
voulez annuler, appuyez pendant 2
secondes sur le bouton “ stop ”.
4. Lorsque la programmation est
terminée, l’appareil émet 3 bips.
5. Appuyez sur les gâchettes (D2)
puis soulevez l’ensemble bol (D)
(Cf. Fig. 12).
CUISSON SANS COUVERCLE
Vous pouvez rissoler des aliments
dans votre bol sans le couvercle tout
en remuant et surveillant la cuisson.
(Cf. Fig. 16). Pour ce mode de
cuisson vous devez obligatoirement
sélectionner une température allant
de 135°C à 150°C. Réglez votre
durée de fonctionnement (jusqu’à 20
min). La fonction CUISSON SANS
COUVERCLE n’est pas adaptée au
contures et aux préparations à base
de lait (risque de débordements).
2. Ensuite réglez le(s)
paramètre(s) à l’aide du
sélecteur +/- (B6). Pour des
raisons de sécurité, il n’est
pas possible de régler une
température sans régler un
temps de cuisson.
3. Lorsque vous avez ni de
régler tous vos paramètres,
appuyez sur le bouton “
start ” (B5). Lorsque vo-
tre appareil utilise le mode
cuisson, le témoin lumineux
rouge s’allume pour vous
informer que la cuisson a
démarré. Lorsque la pro-
grammation est lancée,
vous avez la possibilité
d’arrêter l’appareil à tout
moment en appuyant sur le
bouton “ stop ” (B5).
NETTOYAGE DE L’ APPAREIL
L’appareil ne doit pas être
immergé. Ne passez pas le bloc
moteur (A) sous l’eau courante.
Une fois l’utilisation terminée, débranchez
l’appareil.
Nettoyez immédiatement votre bol après
utilisation.
Appuyez sur les gâchettes (D2) puis
soulevez l’ensemble bol (D).
Placez le bol sur une surface plane.
Déverrouillez le couvercle en le tournant
d’un quart de tour dans le sens des
aiguilles d’une montre. Retirez le
couvercle avec précaution.
Prenez des précautions avec les lames
du couteau hachoir ultrablade (F1) et
du couteau pour pétrir/concasser (F4)
lorsque vous les nettoyez et lorsque
vous videz le bol, elles sont extrêmement
coupantes.
Lorsque les pièces sont refroidies :
–démontez l’entraîneur commun (D3), le
joint (D4), la bague de verrouillage (D5)
(Cf. Fig. 13).
–nettoyez le bol (D), l’entraîneur commun
(D3), la bague de verrouillage (D5), les
accessoires (F1), (F2), (F3), (F4),(F5),
le bouchon régulateur de vapeur (E1),
le couvercle (E2) , le joint d’étanchéité
(E4) et le porte joint (E3), à l’aide d’une
éponge et d’eau chaude savonneuse.
Rincez ces différents éléments sous l’eau
courante.
En cas d’encrassement prononcé, laissez
tremper pendant plusieurs heures avec
de l’eau additionnée de liquide vaisselle
et grattez si besoin avec la spatule (G) ou
bien avec le coté grattoir d’une éponge.
En cas d’entartrage du bol, vous pouvez
utiliser le coté grattoir d’une éponge
imbibée si nécessaire de vinaigre blanc.
Pour nettoyer le bloc moteur (A), utilisez un
chiffon humide. Séchez-le soigneusement.
Pour vous faciliter le nettoyage, sachez
que le bol, l’ensemble couvercle et les
accessoires passent au lave vaisselle à
l’exception de l’entraîneur commun (D3
et D4) et de la bague de verrouillage (D5)
(Cf. Fig. 14).
Les accessoires, l’entraineur commun
amovible et les éléments du couvercle,
peuvent se colorer légèrement avec
certains ingrédients comme le curry, le
jus de carottes, etc… ; cela ne représente
aucun danger pour votre santé, ni pour
le fonctionnement de votre appareil.
Pour éviter cela, nettoyez les éléments
rapidement après l’usage.
Avant de réutiliser votre ensemble bol (D),
assurez-vous que les contacts électriques
sous le bol sont toujours propres et secs.
An de préserver l’aspect et la longévité
du couvercle de votre appareil, lavez-le à
la main. N’utilisez pas le côté abrasif de
l’éponge an d’éviter les rayures.
Pour ne pas altérer les matériaux du bol
(D), veillez à respecter les consignes
d’utilisation de votre lave-vaisselle, ne
pas augmenter les doses de sel ou de
produits pour lave-vaisselle.
IMPORTANT : MISE EN SECURITE DE L’APPAREIL
(“SECU”)
Votre appareil est
équipé, de série, de
protections électron-
iques du moteur afin
d’en garantir sa lon-
gévité. Cette sécurité
électronique vous ga-
rantit contre toute uti-
lisation anormale ; ainsi votre moteur est
parfaitement protégé.
Dans certaines conditions d’utilisation très
sévères, ne respectant pas les recommanda-
tions de la notice (Cf. paragraphe “MISE EN
SERVICE” : quantités éventuellement trop im-
portantes et/ou une utilisation anormalement
longue et / ou un enchainement de recettes
trop rapprochées), la protection électronique
se déclenche pour préserver le moteur ; dans
ce cas, l’appareil s’arrête et un afchage
“SECU” apparait dans l’écran LCD du tableau
de commande pour indiquer que l’appareil
n’est momentanément plus opérationnel.
Si “SECU” s’affiche sur votre tableau
de commandes et que votre appareil
s’arrête, procédez comme suit :
Laissez votre appareil branché et
l’interrupteur 0/1 sur la position 1 “ON” (H).
Référez-vous aux recommandations de la
notice pour réadapter votre préparation
(Cf. paragraphe “MISE EN SERVICE”
: quantités d’ingrédients /temps de la
recette / température / type accessoires).
Attendez une demi-heure pour que le
moteur refroidisse.
Réinitialisez l’appareil en appuyant 2
secondes sur le bouton “Start / Stop /
Reset” (B5).
Votre appareil est de nouveau totalement
apte à l’emploi
Le service consommateur reste à votre
disposition pour toute question (voir
coordonnées dans livret de garantie).
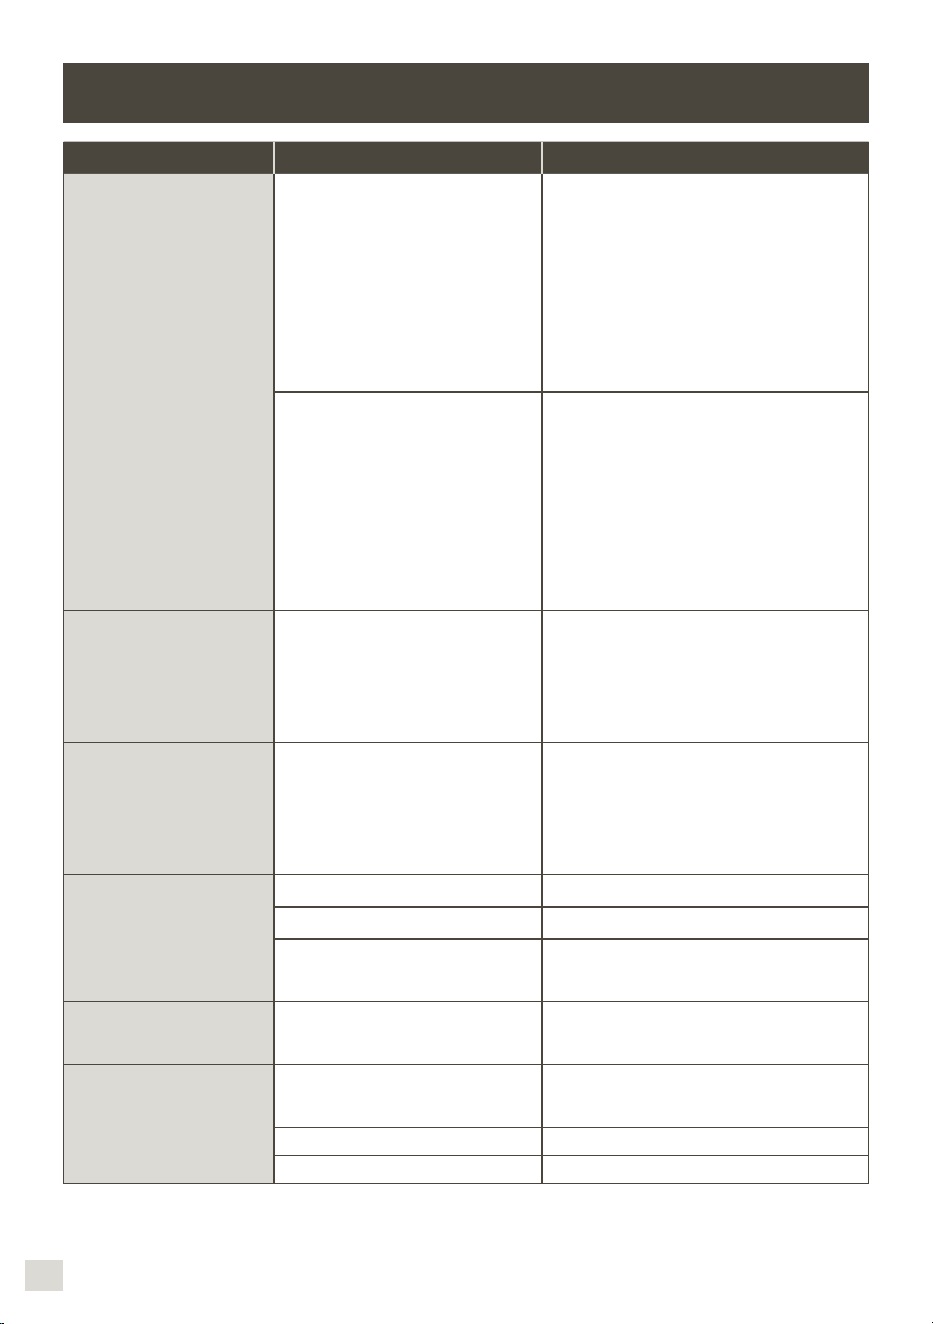
2019
FRANÇAIS
SI VOTRE APPAREIL NE FONCTIONNE PAS, QUE FAIRE ?
PROBLÈMES CAUSES SOLUTIONS
Cuisson insufsante
Les temps de cuisson sont donnés
à titre indicatif, ils permettent dans
la plupart des cas une cuisson
satisfaisante. Néanmoins, certaines
conditions vont inuer sur le temps de
cuisson :
– la taille des aliments (coupés ou non
coupés)
– la quantité des ingrédients
– la variété des légumes, leur maturité
– si les ingrédients sont surgelés ou
non ....
Ajouter un temps de cuisson supplémentaire
en utilisant le sélecteur de durée de
fonctionnement (B4).
Réduisez la taille des morceaux.
Bouchon vapeur mal positionné ou
absent
Positionnez le bouchon vapeur dans le sens «
maxi vapeur » vers vous, cette position permet
de gagner un maximum de chaleur dans le bol
pour toutes les cuissons (soupes, cuisson à la
vapeur, etc.).
Cette position évite également les
éclaboussures pendant le mixage.
La position “mini vapeur” permet de laisser
échapper un maximum de condensation et
ainsi obtenir des plats ou des sauces avec une
meilleure consistance (Risotto, crèmes dessert,
sauces, etc.)
Cuisson vapeur
insatisfaisante
Quantité inadaptée d’eau dans le bol.
Morceaux trop gros.
La quantité d’eau dans le bol doit correspondre
à la graduation (0.7L).
Vous pouvez aussi utiliser le mode manuel en
sélectionnant la température de 120°C et le
temps de cuisson selon la quantité et le type
d’ingrédients.
Réduisez la taille des morceaux.
Difcultés pour réussir
certaines recettes
Recettes inadaptées
Vos recettes, personnelles ou prises sur
Internet peuvent ne pas être adaptées à votre
appareil et à ses accessoires (quantités, temps
de cuisson, durée, accessoires inadaptés)
: avant de commencer votre recette, assurez
vous que vous respectez les consignes
d’utilisation indiquées dans ce mode d’emploi.
L’appareil ne fonctionne pas.
La prise n’est pas branchée. Branchez l’appareil sur une prise.
L’interrupteur (H) est en position 0. Basculez l’interrupteur en position 1.
Le bol ou le couvercle ne sont
pas correctement positionnés ou
verrouillés.
Vériez que le bol ou le couvercle sont bien
positionnés et verrouillés suivant les schémas
de la notice.
Le couvercle ne se verrouille
pas.
Le couvercle n’est pas complet.
Vériez que le joint est correctement assemblé
sur le porte joint et que le porte joint est
correctement assemblé sur le couvercle.
Vibrations excessives.
L’appareil n’est pas posé sur une
surface plane, l’appareil n’est pas
stable.
Placez l’appareil sur une surface plane.
Volume d’ingrédients trop important. Réduisez la quantité d’ingrédients traités.
Erreur d’accessoires. Vériez que vous utilisez l’accessoire préconisé.
PROBLÈMES CAUSES SOLUTIONS
Léger bruit en
fonctionnement
L’entraineur de votre appareil peut
emettre un bruit en fonctionnement
à vitesse réduite ou avec certains
ingrédients (riz…)
C’est un phénomène passager, qui n’a pas
de conséquence sur la durée de vie de votre
appareil. Il s’estompera ou disparaîtra après
quelques usages et nettoyages de l’entraineur
commun amovible (reportez-vous au
paragraphe «Nettoyage de l’appareil»).
Bruit excessif en
fonctionnement
Utilisation d’un mauvais accessoire
Veillez à utiliser un accessoire adéquat (ex
: n’utilisez pas le batteur F3 pour pétrir ou
mélanger des pâtes, utilisez le couteau F4).
Pour cela reportez-vous aux préconisations
des recettes et aux consignes d’utilisation
indiquées dans ce mode d’emploi.
Fuite par le couvercle.
Volume d’ingrédients trop important. Réduisez la quantité d’ingrédients traités.
Le couvercle n’est pas bien positionné
ou verrouillé.
Verrouillez correctement le couvercle sur le bol.
Le joint d’étanchéité n’est pas présent.
Positionnez le joint d’etancheite sur le porte-
joint et clipsez l’ensemble sur le couvercle.
Le joint d’étanchéité est coupé,
détérioré.
Changez le joint, contactez un centre service
agréé.
Erreur d’accessoires. Vériez que vous utilisez l’accessoire préconisé.
Fuite par l’entraîneur du bol.
Le joint n’est pas bien positionné. Positionnez correctement le joint.
Le joint est détérioré. Contactez un centre service agréé.
La bague de verrouillage (D5) est mal
verrouillée.
Vérrouillez correctement la bague (D5).
Les lames ne tournent pas
facilement.
Morceaux d’aliments trop gros ou
trop durs.
Réduisez la taille ou la quantité d’ingrédients
traités.
Ajoutez du liquide.
Odeur moteur.
A la première utilisation de l’appareil,
ou bien en cas de surcharge
moteur provoquée par une quantité
d’ingrédients trop importante ou des
morceaux trop durs ou trop gros.
Laissez refroidir le moteur (environ 30 minutes)
et réduisez la quantité d’ingrédients dans le bol.
Afchage “ STOP ”.
L’appareil a détecté des vibrations
trop importantes et s’est placé en
position de sécurité.
Vériez que vous êtes à la vitesse préconisée
ou que vous utilisez l’accessoire recommandé.
Afchage “ SECU ”.
Surcharge moteur provoquée par une
quantité d’ingrédients trop importante
ou des morceaux trop durs ou trop
gros ou une succession de recettes
sans sufsamment de temps de
refroidissement.
Laissez refroidir le moteur (environ 30 minutes)
et réduisez la quantité d’ingrédients dans le bol.
Afchage “ SECU ” + témoin
lumineux rouge clignote.
Surchauffe capteurs de température. Contactez un centre agréé.
Afchage “ Err1 ”
+ témoin lumineux rouge
clignote.
La résistance chauffante ne fonctionne
pas.
Vériez que les broches d’alimentations sous
le bol ne sont pas encrassées. Si c’est le cas,
nettoyez-les et réessayez.
Si cela ne fonctionne toujours pas, contactez
un centre agréé.
Afchage “ Err2 ”. Défaut électronique. Contactez un centre agréé.
Afchage “ Err3 ”. Défaut vitesse. Contactez un centre agréé.
Afchage “ Err4 ”.
Défaut communication avec carte
électronique chopper.
Contactez un centre agréé.
2221
NEDERLANDS
RECYCLAGE
Votre appareil ne fonctionne toujours pas ?
Adressez-vous à un centre service agréé (voir la liste dans le livret service).
– *La marque et les logos Bluetooth® sont des marques déposées par Bluetooth SIG, Inc. et leur utilisation par le Groupe
SEB a fait l’objet d’une autorisation.
– Google Play et Android sont des marques de Google Inc.
– Apple et le logo Apple sont des marques d’Apple Inc., déposées aux États-Unis et d’autres pays. App Store est une
marque de service d’Apple Inc.
LEXIQUE
Appairer : Action de grouper ou associer deux appareils.
Cette action s’effectue lors de la première connexion entre votre Smartphone ou tablette avec i Prep & Cook XL.
Synchroniser : Action de mise à jour des informations. L’application et i Prep & Cook XL se synchronisent an d’échanger
les informations lorsqu’ils sont connectés.
Connecter : Etablir une liaison entre l’application (Smartphone/tablette) et l’appareil (i Prep & Cook XL). Cette action est
indispensable pour la synchronisation.
Cookies : Ce sont les informations d’utilisation envoyées à Moulinex pour améliorer l’application.
Produits électroniques ou produits électriques en n de vie :
Participons à la protection de l’environnement !
Votre appareil contient de nombreux matériaux valorisables ou recyclables.
Conez celui-ci dans un point de collecte pour que son traitement soit
effectué.
Elimination des matériaux d’emballage et de l’appareil
L’emballage comprend exclusivement des matériaux sans danger pour
l’environnement, pouvant être jetés conformément aux dispositions de recyclage
en vigueur. Pour la mise au rebut de l’appareil, se renseigner auprès du service
approprié de votre commune.
PROBLÈMES CAUSES SOLUTIONS
Afchage “ Err8 ”
Défaut capteur sécurité de
verrouillage.
Contactez un centre agréé.
Afchage “ ntc1 ”
+ témoin lumineux rouge
clignote.
Le capteur 1 de température ne
fonctionne plus.
Contactez un centre agréé.
Afchage “ ntc2 ”
+ témoin lumineux rouge
clignote.
Le capteur 2 de température ne
fonctionne plus.
Contactez un centre agréé.
Afchage du témoin de
sécurité (C4)
Mauvais verrouillage du bol ou du
couvercle
Avant de mettre en fonction l’appareil, vériez
si le bol est correctement verrouillé sur le bloc
moteur et si le couvercle est correctement
verrouillé sur le bol. Si le problème persiste,
contactez un centre agréé.
Le couvercle est verrouillé sur le bol
en mode « cuisson sans couvercle »
Déverrouiller le couvercle avant de lancer le
programme de cuisson. Si le problème persiste,
contactez un centre agréé.
La sécurité de verrouillage
du couvercle est restée
active (tige sortie) et elle ne
permet pas de verrouiller le
couvercle.
L’appareil a été éteint en-cours de
recette en basculant l’interrupteur I/O
sur O ou simplement débranché en-
cours de recette.
Il suft de basculer l’interrupteur I/O
sur I pour réinitialiser le robot et donc
la sécurité de verrouillage du couvercle, la tige
va automatiquement reprendre sa position
d’origine, vous pouvez maintenant verrouiller
le couvercle.
Problème de connexion Reportez-vous au guide de l’application.
Ten aanzien van de persoonlijke veiligheid
Lees de gebruiksaanwijzing aandachtig voor het eerste gebruik en
bewaar ze zorgvuldig: Niet-naleving ontheft de fabrikant van alle
aansprakelijkheid.
Trek de stekker van het apparaat uit het stopcontact wanneer
u het apparaat zonder toezicht laat en voordat u het monteert,
demonteert, of schoonmaakt. Laat kinderen dit apparaat niet
zonder toezicht gebruiken.
Bewaar dit apparaat en het snoer buiten het bereik van kinderen.
Dit apparaat mag niet worden gebruikt door personen (of kinderen)
met verminderde, fysieke, zintuiglijke of mentale capaciteiten, of
personen die te weinig ervaring of kennis hebben tenzij ze onder
de supervisie staan van een persoon die voor hen verantwoordelijk
is of als ze genoeg richtlijnen gekregen hebben om het apparaat
correct te hanteren.
Er moet toezicht op kinderen zijn, zodat zij niet met het apparaat
kunnen spelen.
Houd uw apparaat buiten het bereik van kinderen.
Tijdens de werking van het apparaat kunnen er bepaalde
onderdelen zeer warm worden (RVS-wand van de kom,
afneembare aandrijving, transparante delen van het
deksel, metalen delen onder de kom, mand). Ze kunnen
brandwonden veroorzaken. Houd het apparaat vast aan de koude,
plastic onderdelen (handvatten, motorblok). Het rode controlelampje
geeft aan dat er gevaar voor verbranding bestaat.
De toegankelijke oppervlakken van het apparaat kunnen zeer
warm worden tijdens het gebruik.
Het apparaat is niet ontworpen om met een externe timer of
afstandsbediening te worden bestuurd.
Gebruik uw apparaat niet als het niet correct werkt of als het
apparaat, het netsnoer of de stekker is beschadigd. Om gevaarlijke
situaties te voorkomen, dient u het netsnoer door een erkend
service center te laten vervangen (zie bijgevoegde lijst).
Houd het apparaat nooit onder de kraan. Houd het motorblok (A)
niet onder stromend water.
VEILIGHEIDSVOORSCHRIFTEN:

2423
NEDERLANDS
Dit apparaat is uitsluitend geschikt voor huishoudelijk gebruik
binnenshuis en op een hoogte van minder dan 2000 m. De fabrikant
is niet verantwoordelijk en behoudt zich het recht voor de garantie
te annuleren in geval van commercieel of oneigenlijk gebruik of
niet-naleving van de instructies.
Dit apparaat is niet bedoeld voor gebruik in huishoudelijke of
analoge toepassingen (gebruik dat niet onder de garantie valt)
zoals
– in keukens van winkels, kantoren en andere werkomgevingen.
– in personeelskeukens van winkels, kantoren en andere
werkomgevingen.
– door de gasten van hotels, motels of andere verblijfsvormen.
Uw apparaat geeft hete stoom af die brandwonden
kan veroorzaken. Ga voorzichtig om met het deksel
en de dop (gebruik indien nodig een handschoen, een
pannenlap ... ). Houd de dop vast aan het middelste
gedeelte.
Gebruik het apparaat nooit wanneer de afdichtingsring zich niet
op de afdichtingshouder bevindt of als de afdichtingshouder
niet in het deksel is aangebracht. U moet de dop op de opening
in het deksel plaatsen voor gebruik (tenzij anders vermeld in
het recept).
WAARSCHUWING : let op voor verwondingen door slecht
gebruik van het apparaat.
Wees voorzichtig wanneer u de messen van
het ultrablade hakmes (F1) en van het mes
om te kneden/hakken (F4) schoonmaakt en de kom
leegt. De messen zijn zeer scherp.
Berg het ultrablade hakmes (F1) op in de kom na elk gebruik.
Wees voorzichtig wanneer u een warme vloeistof in de
keukenmachine giet. De vloeistof kan uit het apparaat spuiten
wanneer haar kookpunt wordt bereikt.
WAARSCHUWING: Ga voorzichtig te werk als u het apparaat
hanteert (reinigen, vullen en uitgieten): zorg ervoor dat er geen
vloeistof op de contacten terechtkomt.
WAARSCHUWING: Sommige levensmiddelen voorzien van een
vel ( zoals volledige worsten, rundertong, gevogelte,…) of grote
stukken vlees kunnen het opspatten van de kokende vloeistof
binnenin veroorzaken. Wij raden u dus aan om ze van tevoren
met een mes of vork te doorprikken.
WAARSCHUWING: Het oppervlak van het verwarmingselement
blijft na gebruik nog even warm.
Raak tijdens het opwarmen en tot alles volledig is afgekoeld enkel
de handgrepen van uw product aan (trekkers D2, handgreep van
het deksel E2 en van de stoomregeldop E1) .
Raadpleeg de gebruiksaanwijzing voor het instellen van de
werkingssnelheid en -tijd van elk accessoire en elk programma.
Raadpleeg de gebruiksaanwijzing voor het monteren en demonteren
van de accessoires op het apparaat.
Raadpleeg de gebruiksaanwijzing voor het reinigen en onderhouden
van uw apparaat.
Volg voor de reiniging van uw apparaat steeds de reinigingsinstructies:
Het apparaat uitschakelen.
Niet reinigen als het apparaat nog warm is.
Reinigen met een vochtige doek of spons.
Het apparaat nooit in water onderdompelen of onder stromend
water houden.
UITSLUITEND VOOR DE EUROPESE MARKT:
Bewaar het apparaat en het snoer buiten het bereik van kinderen
jonger dan 8 jaar.
Kinderen mogen niet met het apparaat spelen.
Dit apparaat mag worden gebruikt door personen met verminderde
fysieke, mentale of zintuiglijke capaciteiten of personen die te
weinig ervaring of kennis hebben als ze onder toezicht staan of als
ze richtlijnen hebben gekregen om het apparaat veilig te kunnen
hanteren en de risico’s kennen.
Dit apparaat mag worden gebruikt door kinderen vanaf 8 jaar
als ze onder toezicht staan of als ze richtlijnen hebben gekregen
om het apparaat veilig te kunnen hanteren en de risico’s kennen.
De reinigings- en onderhoudswerkzaamheden mogen niet door
kinderen zonder toezicht worden uitgevoerd tenzij ze ouder
zijn dan 8 jaar en onder toezicht staan van een volwassene.

2625
NEDERLANDS
Ten aanzien van de elektrische aansluiting
U moet de stekker van het apparaat in een geaard stopcontact steken.
Het apparaat is uitsluitend geschikt om op wisselstroom te werken.
Controleer of de voedingsspanning op de gegevensplaat van het
apparaat overeenkomt met de spanning van uw elektrische installatie.
Als u het apparaat niet correct aansluit, vervalt de garantie.
Trek nooit aan het snoer om de stekker van het apparaat uit het
stopcontact te trekken.
Dompel het apparaat, het netsnoer of de stekker niet in vloeistof
en laat ze niet in de buurt of in contact komen met de warme
onderdelen van het apparaat, warmtebronnen of scherpe hoeken.
Ten aanzien van een slecht gebruik
Raak het deksel niet aan voordat het apparaat volledig tot
stilstand is gekomen (‘stop’-knop), wacht tot de gemixte
ingrediënten tot stilstand zijn gekomen.
Doe altijd eerst de vaste ingrediënten in de kom en voeg daarna
de vloeibare ingrediënten toe (Cf. Fig. 10). Respecteer altijd de
aanduiding MAX aan de binnenkant van de kom (Cf.Fig. 10). Als
de kom te vol is, kan er kokend water uit spuiten.
Let op. Respecteer het niveau van 0,7 liter water dat wordt
aangegeven in het stoomkookprogramma (Cf.Fig.3.2).
Steek nooit uw vingers of andere voorwerpen in de kom wanneer
het apparaat in werking is.
Gebruik de kom niet om ingrediënten te bewaren, in te vriezen, te
steriliseren…
Zet het apparaat op een stabiel, hittebestendig, schoon en droog
werkvlak.
Zet het apparaat niet naast een muur of kast: de geproduceerde
stoom kan de elementen beschadigen.
Plaats uw apparaat niet in de buurt van een ingeschakelde
warmtebron (kookplaat, huishoudapparaat ...).
Bedek uw deksel niet met een doek of een ander voorwerp, stop
de opening in het deksel niet dicht, gebruik de stoomregelknop.
Zorg ervoor dat er geen lang haar, sjaals, stropdassen ... boven de
kom hangen wanneer het apparaat in werking is.
Plaats de accessoires nooit in de magnetron.
Bij het doorlezen van deze handleiding vindt u gebruiksadviezen die u alle
mogelijkheden van het apparaat tonen: het klaarmaken van soepen en
stoofschotels, stoombereiding, het maken van beslag.
Het apparaat niet in de open lucht gebruiken.
Overschrijd nooit de maximale hoeveelheid die wordt aangegeven
in de gebruiksaanwijzing.
Berg het apparaat op wanneer het is afgekoeld.
Plaats de kom niet in de diepvriezer om hem af te koelen, gebruik
de koelkast.
SAV
Voor uw eigen veiligheid dient u geen andere accessoires of
onderdelen te gebruiken dan die door de erkende service centers
worden geleverd.
Elke handeling anders dan gewone onderhouds- of
schoonmaakwerkzaamheden dient door een erkend service center
te worden uitgevoerd.
Raadpleeg de tabel “Uw apparaat werkt niet. Wat nu? ” aan het
einde van de gebruiksaanwijzing.

2827
NEDERLANDS
BESCHRIJVING VAN HET APPARAAT:
TECHNISCHE GEGEVENS VAN HET APPARAAT:
A Motorblok.
B Bedieningspaneel.
B1: Snelheidsschakelaar.
B2: Temperatuurschakelaar en/of
controlelampje verwarming.
B3: Schakelaar bereidingsduur/
koppeling.
B4: Keuzetoetsen automatische
programma’s.
B5: Knop START/STOP/RESET.
B6: Schakelaar + / -.
C LCD-Scherm.
C1: Weergave controlelampje
verbinding.
C2: Weergave stoomprogramma.
C3: Weergave stap van recept.
C4: Weergave veiligheidslampje.
C5: Weergave snelheid.
C6: Weergave temperatuu.
C7: Weergave tijd.
D Kom.
D1: Roestvrijstalen kom.
D2: Trekkers.
D3: Afneembare aandrijfas.
D4: Afdichtingsring
D5: Vergrendelingsring.
E Deksel.
E1: Stoomregeldop.
E2: Deksel.
E3: Afdichtingsring.
E4: Afdichtingsring.
F Accessoires:
F0: Opbergdoos voor accessoires.
F1: Ultrablade hakmes.
F2: Menger.
F3: Garde.
F4: Mes om te kneden/hakken.
F5: Stoommand.
G Spatel.
H ‘0/1’-Schakelaar om de stroomtoevoer
af te sluiten.
I Schoonmaakborstel.
Vermogen: 1550W (1000W : verwarmingsweerstand / 550W :
motor )
Temperatuurbereik: van 30°C tot 150°C
regelbaar per 5°C.
Werkingsduurbereik: van 5 s tot 2 uur
regelbaar per 5 s min en 1 min max.
Aantal snelheden: 13 – 2 intermitterende snelheden:
snelheid 1 ( 5 s On / 20 s Off ).
snelheid 2 ( 10 s On / 10 s Off ).
– 10 continue, progressieve snelheden
(snelheden 3 tot 12).
– 1 maximumsnelheid met onderbrekingen
(snelheid 13).
– *Het merk en de logo’s van Bluetooth® zijn gedeponeerde merken van Bluetooth SIG, Inc.; de SEB-groep heeft toestemming
deze te gebruiken.
– Google Play en Android zijn merken van Google Inc.
– Apple en het Apple-logo zijn merken van Apple Inc., die zijn gedeponeerd in de Verenigde Staten en in andere landen. App
Store is een servicemerk van Apple Inc.
Je i Prep & Cook XL beschikt over de volgende accessoires:
Deze accessoires zijn eveneens voorzien van handgrepen zodat u ze gemakkelijker kunt
vasthouden tijdens het koken.
OVER JE i Prep & Cook XL
HAKMES
Soepen mixen
3min 3L
Compotes mixen 40s 1Kg
Groenten hakken 15s 1Kg
Vlees hakken 30s 1Kg
Vis hakken 15s 1Kg
Gebruik dit accessoire niet om harde producten jn te hakken, gebruik het kneed-/hakmes F4.
MENGER
Mengt de Bereide schotels zonder de ingrediënten te beschadigen,
Zeer nuttig voor de bruinbakfase van bepaalde gerechten (risotto, soepen).
Braadschotels 5min 500g
Stoofschotels 45min 3L
Risotto 22min 1,5Kg
Ratatouille, Chutneys, Peulvruchten (Instellingen: zie kookboek)
GARDE
9 max
Eiwitten 5/10min
7
max
Mayonaise, Slagroom 2/5min 0,5L
Sauzen, crèmes
to
1/20min 1L
Aardappelpuree
to
1min 1L
Polenta
to
1/16min 1L
MES OM TE KNEDEN/HAKKEN
Witbrooddeeg kneden 2min 30s 1,2Kg
Kruimeldeeg, zout deeg, speciaal
brooddeeg kneden
2min 30s 1Kg
Het gistdeeg kneden (brioche,
kouglof…)
1min 30s
2 min
0,8Kg
Licht deeg mengen
(cake…)
40 s
3min
1Kg
Noten verpulveren
Harde ingrediënten hakken
1min 0,6Kg
Hakken van harde producten
1min 0,6Kg
Ijs crushen
1min
6 tot 10
Pannenkoekenbeslag, wafelbeslag
1min 1,5L
STOOM-
MAND
Stoombereidingen van groenten,
vis of vlees
20/40min 1Kg
Soepen met stukjes
3min 3L
DOP
Stoomregeldop
– Maxi (a) = stoomkoken.
– Mini (b) = risotto, roomdesserts, sauzen enz.
AFNEEM-
BARE AAN-
DRIJFAS
D3
Afneembare aandrijfas
Bruin bakken en braden zonder deksel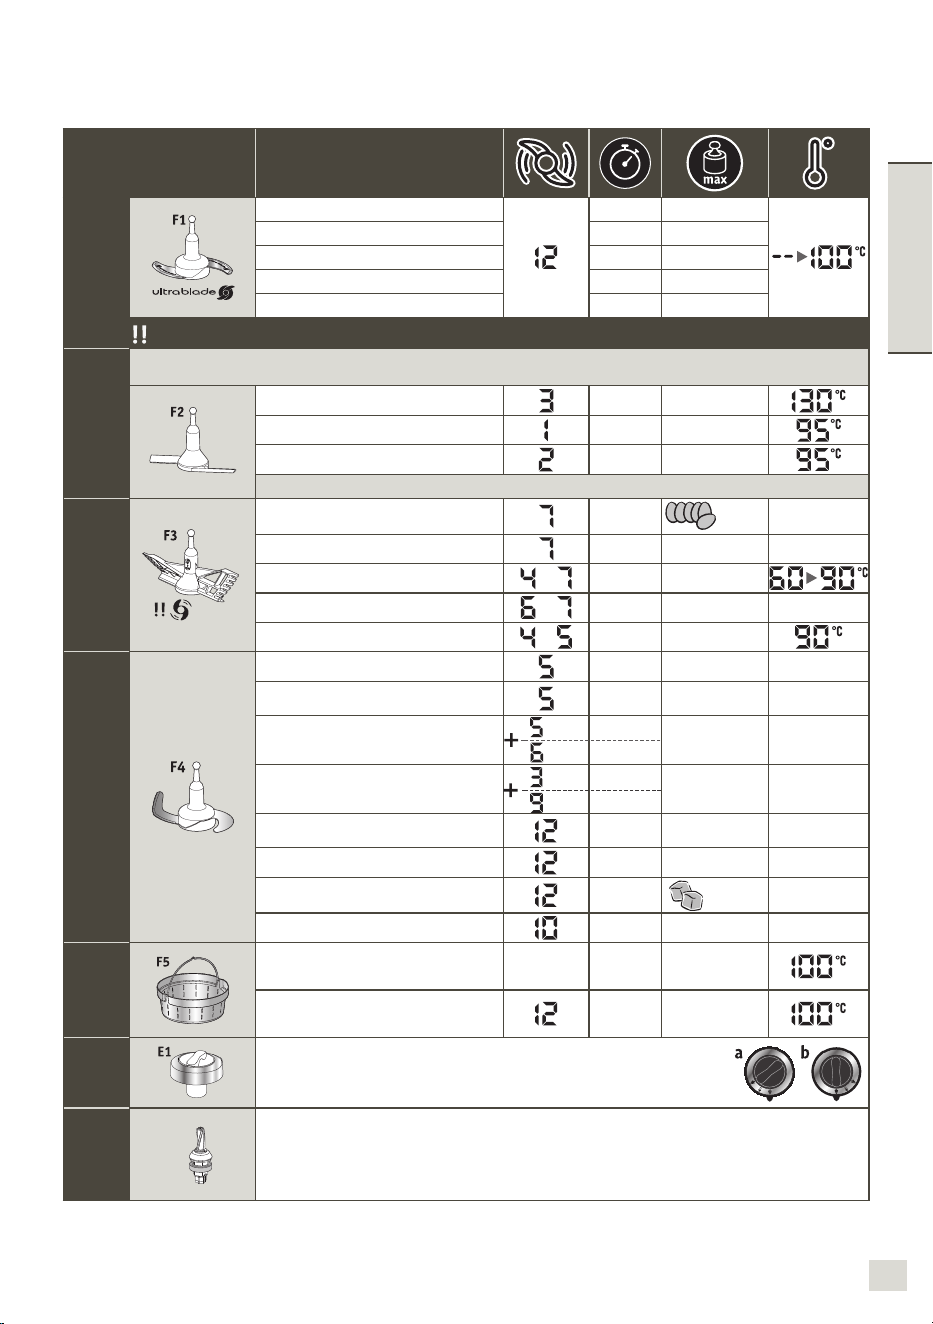

3029
NEDERLANDS
Het apparaat speciaal ontworpen voor
‘verbonden’ gebruik, maar kan ook ‘niet-
verbonden’ worden gebruikt. Bovendien
zijn er twee werkstanden: automatisch
programma en handbediening.
Modus automatisch programma:
de snelheid, bereidingstemperatuur en
duur zijn voorgeprogrammeerd voor
het automatisch bereiden van soepen,
stoofschotels, stoomgerechten en beslag.
Handbediening:
zelf de snelheid, temperatuur en
bereidingstijd instellen, zodat het apparaat
precies werkt zoals jij dat wilt.
Gebruik met of zonder deksel
Temperatuur van
30°C tot 130°C
Temperatuur van
135°C tot 150°C
– Als u een temperatuur tussen 135 °C en
150 °C hebt geselecteerd, moet u uw
apparaat gebruiken zonder deksel. Als het
deksel op de kom staat, wordt een hangslot
weergegeven op het LCD-scherm, met de
uitnodiging om hem te ontgrendelen.
– Zodra u de voedingsmiddelen hebt
toegevoegd, roert u ze om met behulp
van de spatel en herhaalt u de bewerking
regelmatig, om te voorkomen dat de
bodem van de kom vlekkerig wordt. (cf.
reinigingsparagraaf).
– Als u ervoor kiest om het apparaat te
gebruiken met deksel, mag de baktem-
peratuur maximaal 130 °C bedragen.
UW APPARAAT IS UITGERUST MET EEN
DEKSELVERGRENDELING
Het deksel wordt bij elke inschakeling van het
apparaat vergrendeld. Deze beveiliging belet
het openen van het deksel tijdens het bereiden
van een recept (Zie Afb.17). Oefen geen druk
op het deksel uit wanneer het vergrendeld
is. Het deksel wordt opnieuw ontgrendeld
zodra het apparaat stopt met werken. Als u
een temperatuur hoger dan of gelijk aan 50°C
en een snelheid hoger dan of gelijk aan 5 hebt
geselecteerd, worden er eerst 10 seconden
op het LCD-scherm van het bedieningspaneel
afgeteld. (Zie Afb.18). U kunt het deksel pas
openen eenmaal het aftellen is beëindigd.
PLAATSING VAN DE KOM, DE
ACCESSOIRES EN HET DEKSEL
Reinig voor het eerste gebruik alle onderdelen
(D, E, F, G) met warm zeepsop, maar niet
het motorblok (A). De kom (D) beschikt
over een demonteerbare koppeling (D3),
waardoor deze gemakkelijk te reinigen is.
Zorg ervoor dat je alle verpakkingsmate-
rialen verwijdert voordat je het apparaat
voor het eerst gebruikt, met name de be-
scherming tussen de kom (D) en het mo-
torblok (A).
Breng de afdichtingsring (E4) aan op de
afdichtingshouder (E3) (Zie Fig. 1) en
klem het geheel vast op het deksel (E2)
(Zie Fig. 3).
Plaats de pakking (D4) op de gemeen-
schappelijke koppeling (D3). Vergrendel
het geheel op de bodem van de kom met
de vergrendelingsring (D5) (Zie Afb. 2). Als
u de bakmodus zonder deksel gebruikt,
breng de afdichting (D4) over de afneem-
bare aandrijfas (D3). Maak het geheel vast
aan de onderkant van de kom met behulp
van de vastzetring (D5) (Zie Fig. 3).
Plaats het accessoire van je keuze in de kom:
– de accessoires (F1, F2, F3 of F4) op de
gemeenschappelijke koppeling onderin
de kom (Zie Fig. 4.1),
– om te stomen het stoommandje (F5)
in de kom (Zie Fig. 4.3), nadat de kom
vooraf is gevuld met 0,7 l vloeistof (water,
saus…) (Zie Fig. 4.2).
Doe de ingrediënten in de kom of het
stoommandje.
Plaats het deksel op de kom (D) met
de twee driehoeken in lijn (zie Fig. 5),
vergrendel het deksel zonder erop te
drukken door het in de richting van de pijl
te draaien (Zie Fig. 6).
Plaats de stoomregelknop (E1) op het deksel.
Er zijn 2 mogelijke standen (Zie Fig. 7):
Met de “mini” kunt u een
maximale hoeveelheid
condensatie laten ontsnappen,
waardoor uw gerechten of
sauzen een betere consistentie krijgen
(risotto, roomdesserts, sauzen enz.).
Met de “maxi” maakt u voor al
uw stoomgerechten (soepen enz.)
optimaal gebruik van warmte en
stoom in de kom.
Dankzij deze stand vermijdt u ook spatten
tijdens het mixen.
Plaats de kom (D) op het motorblok (A).
tot u ‘klik’ hoort (Cf. Fig. 8).
Het apparaat werkt alleen als de kom en
het deksel correct zijn geplaatst en zijn
vergrendeld op het motorblok.
F1 F2
F3 F4
F5
F1 F2
F3 F4
Gebruikstip:
Uw apparaat is voorzien van een microprocessor die de stabiliteit analyseert en controleert.
Bij instabiliteit wordt de rotatiesnelheid van de motor automatisch verlaagd, als de
instabiliteit blijft voortduren, wordt de motor gestopt en verschijnt er ‘STOP’ op uw scherm.
Controleer of de hoeveelheden van de ingrediënten niet te groot zijn en of de gebruikte
snelheid de geschikte is.
Controleer of u het correcte accessoire gebruikt.
Zet uw apparaat opnieuw aan.
Keuze van de gepersonaliseerde parameters:
Keuze van de motorsnelheid.
2 intermitterende snelheden
en 10 continue, progressieve
snelheden.
Maximumsnelheid met onder-
brekingen (snelheid 13).
Verhoging van de snelheid, de
kooktemperatuur en -tijd.
Verlaging van de snelheid, de
kooktemperatuur en -tijd.
Keuze van de kooktemperatuur.
Van 30° tot 150°C
Verwarmingscontrolelampje:
dit lampje licht op wanneer
de bereiding start en dooft
wanneer de temperatuur in de
kom onder de 50°C zakt.
Deze knop heeft 3 functies:
– “Bevestiging” van
de keuze van het
automatische programma
of van de parameters
die je hebt gekozen bij
handbediening (snelheid,
temperatuur, tijd).
– “ Pauze ” tijdens gebruik,
wanneer het apparaat is
gestart.
– “ Reset ” van de
geselecteerde parameters
door de knop 2 seconden
in te drukken.
– “Bevestiging van de stap”
in het recept.
Keuze van de kooktijd.
van 5 s tot 2 uur.
Koppeling bij 1e verbinding.
Wanneer één van beide onderdelen niet correct is geplaatst of vergrendeld (Cf.Fig.10.1
en 10.2), begint het logo
te knipperen wanneer we een functie activeren.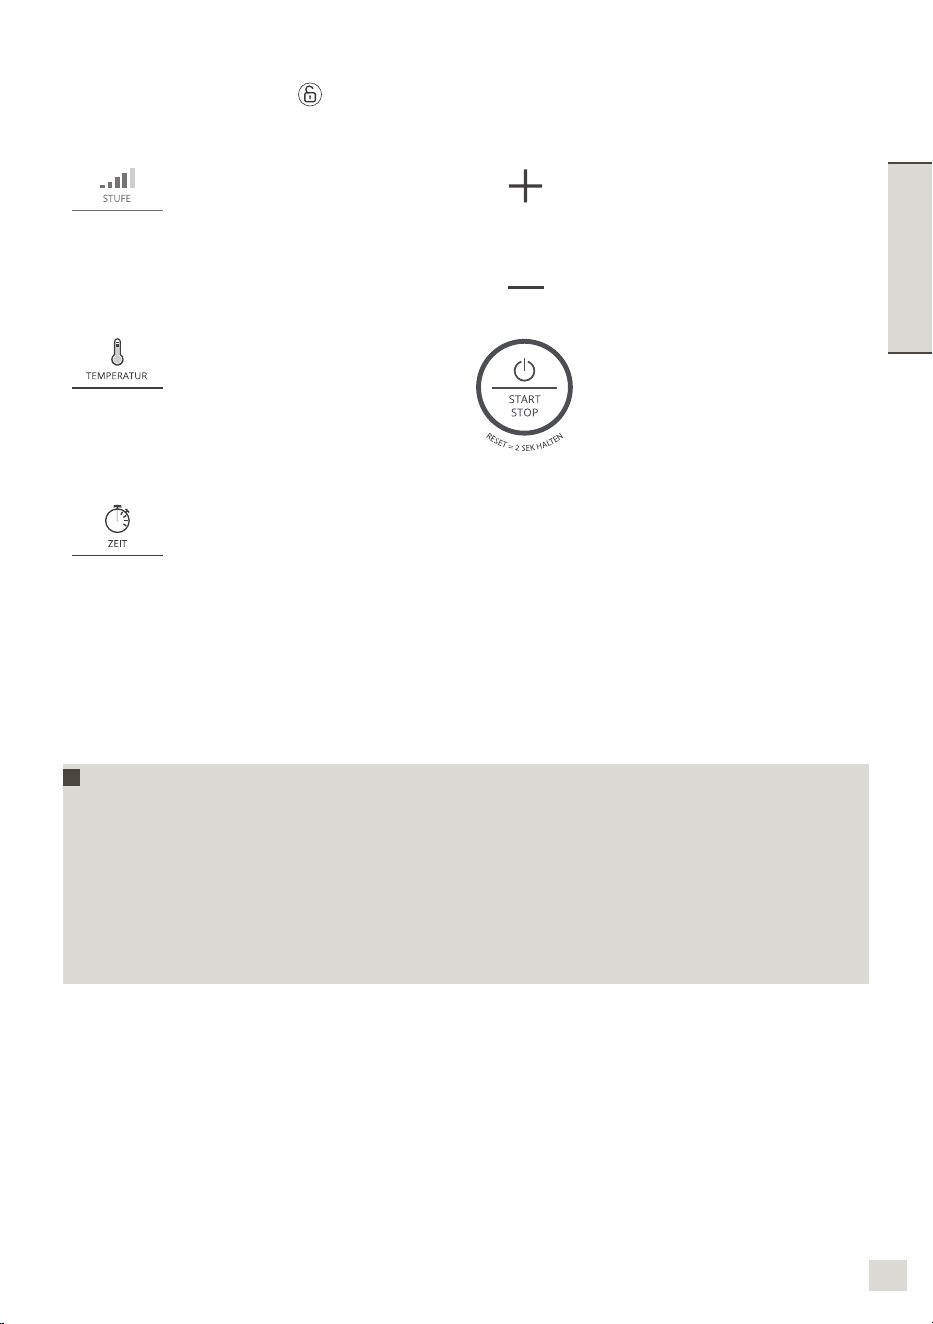

3231
NEDERLANDS
GEBRUIK IN VERBINDING MET EEN SMARTPHONE OF
TABLET
Inschakeling van het apparaat
Frequentie: 2,40GHz. Maximaal uitgezonden vermogen: 7,7dBm
Je apparaat heeft een 0/1-schakelaar. Zet deze op 1. (Zie Fig. 9).
Op het lcd-scherm staan alle parameters op ‘0’.
Wanneer het apparaat verbonden is met een smartphone of tablet, is het lcd-scherm van
de i Prep & Cook XL blauw.
VOORBEREIDING VAN DE INSTALLATIE
Raadpleeg de lijst met smartphones en tablets die met i Prep & Cook XL compatibel zijn op
www.krups.com
iPhone 4S of nieuwer
iPad 3 / iPad mini of hoger
Vanaf iOS 9 en de volgenden.
Van Android 4.4 en de volgenden.
(lijst van compatibele modellen www.krups.com)
I Prep & Cook XL INSTALLEREN
Om i Prep & Cook XL te installeren is het volgende nodig:
De Prep & Cook-app, die gratis kan worden gedownload van de App Store (iPhone/iPad)
en Google Play (Android)
Een Bluetooth® Smart 4.0-verbinding vanuit je smartphone of tablet: i Prep & Cook XL
maakt verbinding met je smartphone/tablet via een autonome draadloze verbinding
De smartphone/tablet moet zich dicht bij de ’i Prep & Cook XL bevinden (De afstand
waarover de verbinding kan worden gelegd, varieert afhankelijk van de woning).
Een stopcontact om de i Prep & Cook XL op aan te sluiten: de i Prep & Cook XL kan
alleen verbinding maken met je smartphone of tablet wanneer hij op de elektriciteit is
aangesloten.
Over Bluetooth® Smart
De Bluetooth® Smart 4.0-technologie (Bluetooth Low Energy) maakt draadloze
communicatie tussen een app en een apparaat mogelijk waarbij maar heel weinig
energie wordt verbruikt.
DE I Prep & Cook XL VOOR HET EERST VERBINDEN
Downloaden van de app
Download eerst de app op je smartphone/tablet door verbinding te maken met de App
Store voor iOS of Google Play voor Android.
Het downloaden kost maar een paar minuten en je hoeft geen account aan te maken. Als de
app is gedownload, kan je je eerste recepten maken met de i Prep & Cook XL. (Als je geen
account aanmaakt, krijg je 50 recepten).
Wanneer je een account hebt aangemaakt op de app, krijg je toegang tot alle inhoud voor
een maximale variatie in je menu’s.
De i Prep & Cook XL aanzetten
Je apparaat heeft een 0/1-schakelaar (H). Zet deze op 1 (Zie Fig. 9).
Activering van Bluetooth
Ga dicht bij de i Prep & Cook XL staan en controleer of de Bluetooth van je smartphone/
tablet is ingeschakeld.
De app starten
Start de Prep & Cook-appe door te klikken op het pictogram “Prep & Cook”.
Koppeling
Wat wordt verstaan onder koppeling?
De eerste keer zullen de app die je hebt gedownload op de smartphone of tablet en de
i Prep & Cook XL elkaar automatisch en snel vinden, als je de volgende stappen uitvoert.
Je kunt tot wel 10 apparaten koppelen aan je i Prep & Cook XL.
Daartoe moet je voor elk apparaat apart de koppeling uitvoeren.
Er kan echter maar één apparaat tegelijkertijd met de i Prep & Cook XL zijn verbonden.
Accepteer cookies; daarmee werkt de app beter, omdat hij je gebruiksvoorkeuren kan
ophalen.
Selecteer je apparaat.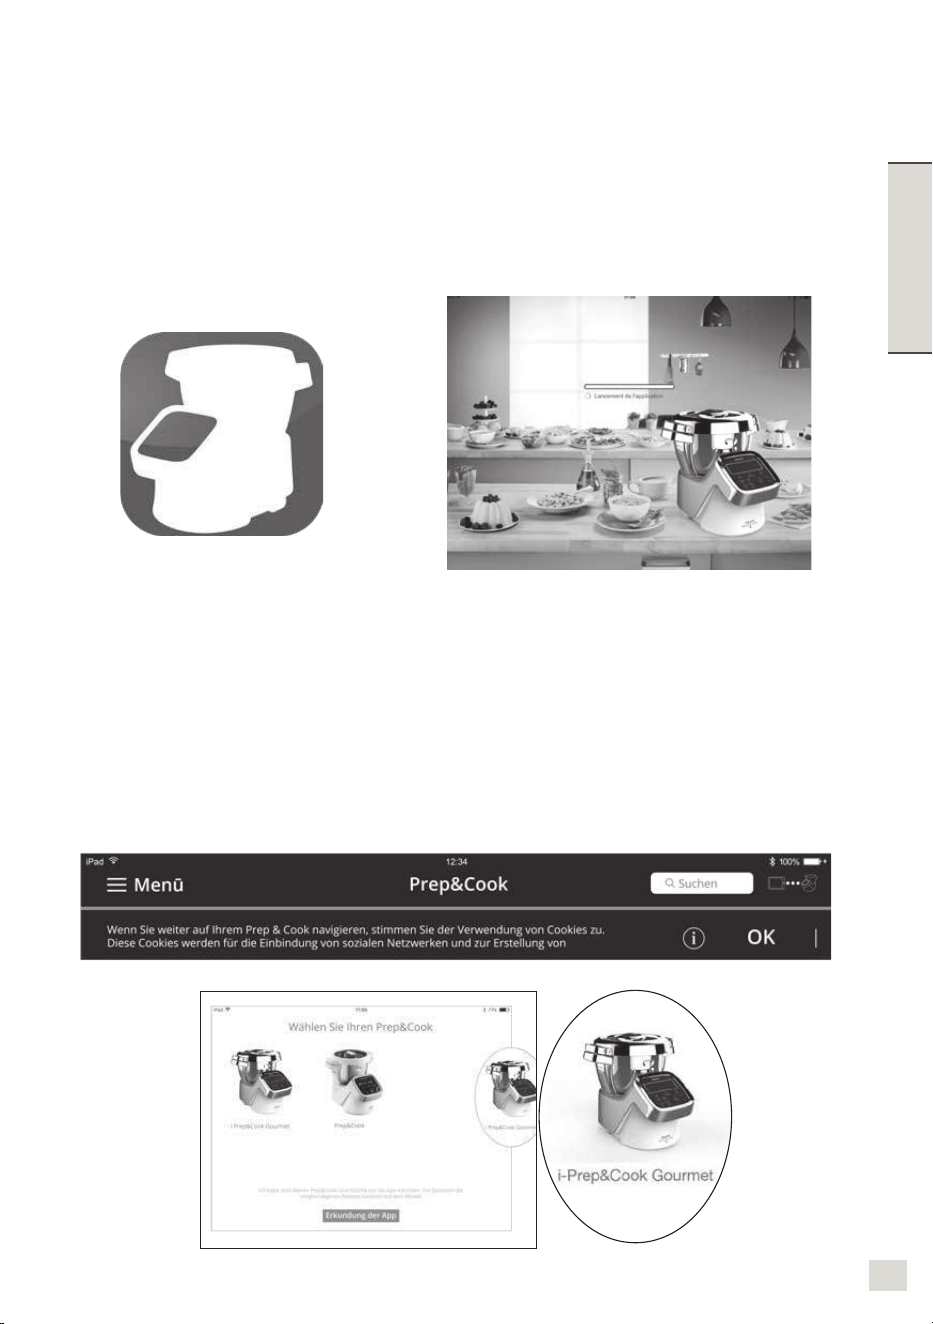

3433
NEDERLANDS
Druk, wanneer de app daarom vraagt, lang (4 seconden op de knop Timer (B3) van
de i Prep & Cook XL.
Het controlelampje verbinding (C1) gaat maximaal 30 seconden knipperen. In die tijd
wordt de verbinding tot stand gebracht tussen de i Prep & Cook XL en je Smartphone/tablet.
Accepteer het koppelingsverzoek dat op je Smartphone/tablet verschijnt of ga naar het
noticatiecentrum om de koppeling te accepteren.
Het controlelampje verbinding (C1) gaat ononderbroken branden om aan te geven dat de
verbinding tot stand is gebracht.
NB : Nadat de koppeling is uitgevoerd, zal de i Prep & Cook XL bij toekomstige
verbindingen je smartphone/tablet automatisch herkennen. Je hoeft deze koppeling dus
niet opnieuw uit te voeren.
De verbinding is geslaagd
Je i Prep & Cook XL is nu verbonden met je Smartphone/tablet. Het icoontje hierboven
geeft aan dat de verbinding tot stand is gebracht
De verbinding is mislukt
Het icoontje hierboven geeft aan dat de verbinding niet tot stand is gebracht.
Voer de volgende handelingen uit:
Ga dicht bij de i Prep & Cook XL staan.
Controleer of de stekker van de i Prep & Cook XL in het stopcontact zit en of het
stopcontact in orde is.
Controleer of je smartphone/tablet compatibel is (zie de lijst van compatibele apparaten
op www.krups.com).
ontroleer of de Bluetooth van je smartphone/tablet is ingeschakeld.
Voer de koppelingsprocedure opnieuw uit en raadpleeg de FAQ (veelgestelde vragen).
Als het probleem aanhoudt, ga dan nog eens na of je smartphone/tablet compatibel is.
Als je een Android-apparaat gebruikt, controleer dan of deze op de lijst van compatibele
modellen staat (de lijst van compatibele apparaten op www.krups.com).
Ga naar het menu van de app voor onze recepten.
Bij gebruik in verbinding wordt bij een stap-
voorstaprecept met de eerste reset de stap beëindigd
en met de tweede reset het hele recept.
FAQ : VEELGESTELDE VRAGEN
Waar moet ik de i Prep & Cook XL plaatsen?
Plaats de i Prep & Cook XL op een stabiele, vlakke ondergrond.
Voor een optimale verbinding tussen de i Prep & Cook XL en je smartphone/tablet, raden
wij aan alle handelingen waarvoor een verbinding nodig is, op een niet al te grote afstand
te verrichten.
Als het controlelampje verbinding (C1) ononderbroken brandt, weet je zeker dat de
apparaten zijn verbonden.
Wanneer de verbinding wordt onderbroken (he verbindingssymbool is doorgestreept), ga
dan dichter bij de i Prep & Cook XL staan om de verbinding te herstellen.
Wat gebeurt er als de verbinding wordt verbroken tijdens het bereiden van een recept?
Als de verbinding tussen de i Prep & Cook XL en je smartphone/tablet tijdens het bereiden van
een recept wordt onderbroken, worden de twee apparaten automatisch gesynchroniseerd
zodra de verbinding wordt hersteld.
Je kunt dan verdergaan met de bereiding van je recept vanaf de stap waar je was toen de
vebinding werd verbroken.
Kan ik de i Prep & Cook XL gebruiken zonder de app?
Het apparaat kan worden gebruikt zonder de app. (Zie Ingebruikname zonder verbinding).
Raadpleeg daarvoor het gedeelte over het gebruik van het apparaat.
Alleen met de app kan je echter proteren van de vele voordelen van het gebruik met
verbinding.
Kan de i Prep & Cook XL worden gebruikt met verscheidene smartphones of tablets?
Als je wilt, kan je verscheidene apparaten koppelen aan de i Prep & Cook XL. Daartoe moet
je voor elk apparaat apart de koppeling uitvoeren. (zie Koppeling)
Er kan echter maar één apparaat tegelijkertijd met de i Prep & Cook XL zijn verbonden.
Moet de Bluetooth van mijn telefoon continu zijn ingeschakeld?
De Bluetooth moet zijn ingeschakeld om de app met de i Prep & Cook XL te synchroniseren.
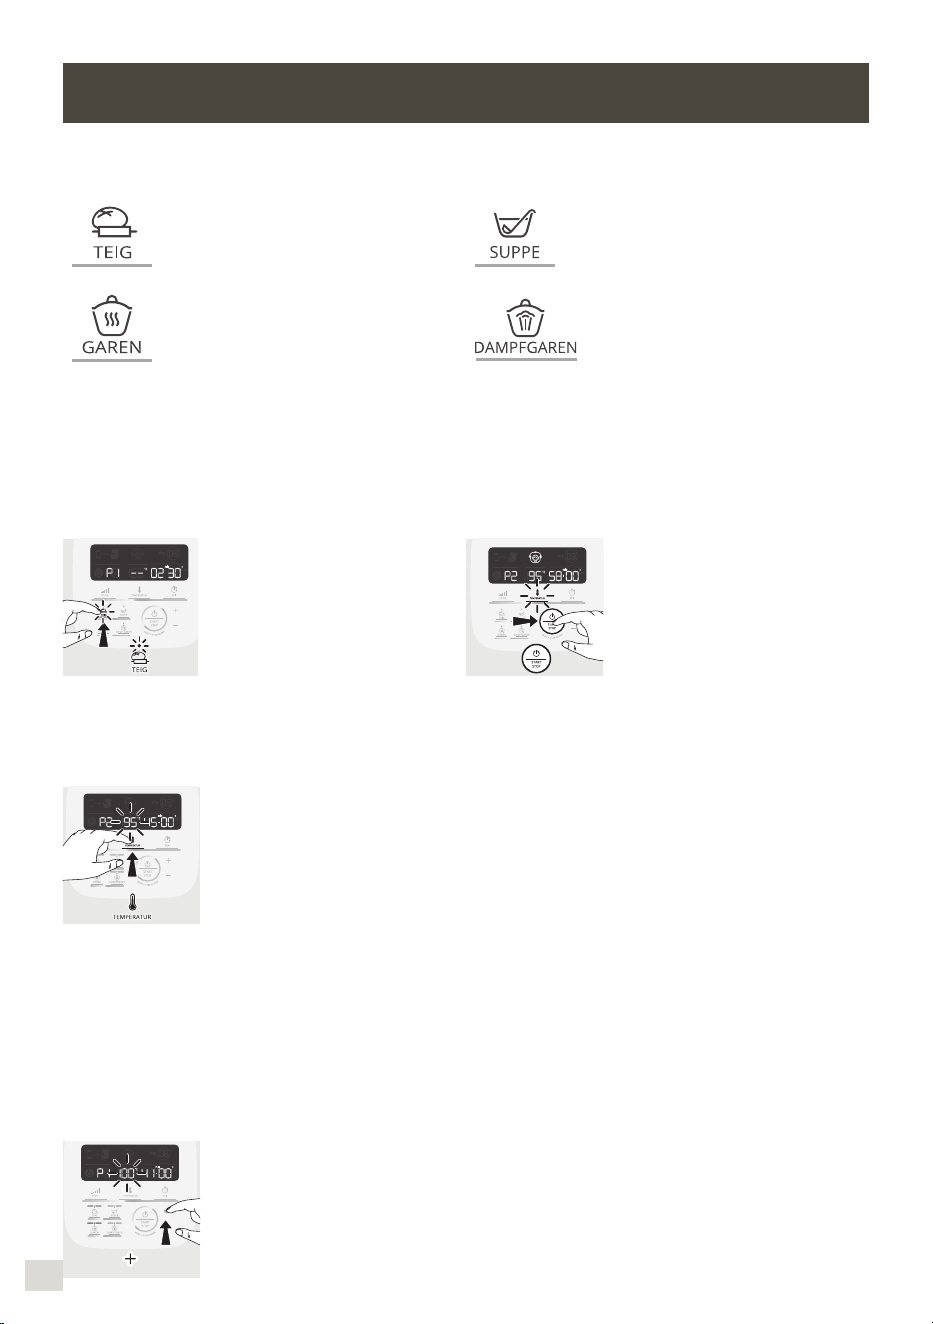
3635
NEDERLANDS
GEBRUIK ZONDER VERBINDING
Gebruik van het bedieningspaneel (B)
Een automatisch programma selecteren:
Beslag (lijst van subprogram-
ma’s)
Soepen (lijst van subprogram-
ma’s)
Stoofschotels (lijst van sub-
programma’s)
Stomen (lijst van subpro-
gramma’s)
Inschakeling van het apparaat
Je apparaat heeft een 0/1-schakelaar. Zet deze op 1.
Op het lcd-scherm staan alle parameters op ‘0’. (Zie Fig. 9).
Wanneer de i Prep & Cook XL niet is verbonden, is het lcd-scherm wit.
AUTOMATISCHE MODUS
1. Druk op het progamma
van je keuze (B4). Er
verschijnt een lichtend
puntje boven het gese-
lecteerde programma.
Door herhaald drukken
loop je door de lijst van
subprogramma’s heen.
4. Wanneer u al uw
parameters heeft
gewijzigd, drukt u op de
‘start’-knop (B5) om het
programma te starten.
Wanneer uw apparaat in
werking is getreden, licht
het rode controlelampje
op om aan te geven dat
de bereiding is gestart.
2. De voorgeprogrammeer-
de parameters kunnen
worden gewijzigd tijdens
de bereiding van een re-
cept (in functie van het
gekozen recept, de in-
grediënten en de hoe-
veelheden). Druk op de
keuzeschakelaar berei-
dingstemperatuur (B2) of
de tijdkeuzeschakelaar
(B3); de gekozen pa-
rameter knipper op het
scherm (C6-C7).
5. Wanneer het programma stopt, klinken
er 3 pieptonen.
6. Aan het einde van de programma’s
soepen, stoofschotels P2 en P3 en
stomen gaat het apparaat automatisch
over op de warmhoudfunctie gedurende
45 minuten, zodat het gerecht serveerklaar
blijft. Bij de programma’s stoofschotels
P2 en P3 en bij handbediening werkt de
motor van het apparaat op een specieke
snelheid om te zorgen dat het gerecht
de goede substantie houdt en niet blijft
plakken op de bodem van de kom. Om de
warmhoudfunctie uit te schakelen, drukt u
eenvoudigweg op de knop ‘stop’ (B5). Als
je het deksel opent, op de trekkers (D2)
drukt of de kom verwijdert, schakelt de
warmhoudfunctie automatisch uit.
3. Regel de parameter(s)
met behulp van de ‘+/-’-
schakelaar (B6).
Wanneer de programma’s voor stoven
P2 en P3 en het bereiden van sauzen en
roomdesserts zijn afgelopen, blijft de motor
draaien tijdens het warmhouden om te
vermijden dat de bereiding aan de bodem
van de kom blijft kleven.
Na de kneedfase van de deegprogramma’s
P1 en P2, schakelt het apparaat over naar
de “rijsmodus” op 30°C om uw deeg meer
volume te geven. Deze fase duurt 40 minuten.
Als u het deksel opent, op de trekkers (D2)
drukt of de kom verwijdert, schakelt het
apparaat over naar de “pauzemodus”. Druk
opnieuw op ‘start’ om de bereiding voort te
zetten.
Houd de ‘stop’-knop 2 seconden ingedrukt
om deze modus uit te schakelen.
7. Druk op de trekkers (D2) en verwijder de
kom (D) (Cf. Fig. 12).
Wanneer je een automatisch programma
gebruikt bij verbinding met je smartphone
of tablet, kan je het apparaat op ieder
moment uitschakelen door een druk op de
knop ‘stop’.Het automatische programma
schakelt over naar de pauzemodus. Druk
opnieuw op ‘start’ om de bereiding voort
te zetten. Als u het verkeerde programma
heeft gekozen en u het programma wilt
annuleren, houdt u de ‘stop’-knop 2
seconden ingedrukt-.
ONTDEK DE VOORGESTELDE, AUTOMATISCHE
PROGRAMMA’S:
Soep P1 Soep P2
Stoofschotel
P1
Stoofschotel
P2
Stoofschotel
P3
Automatische
programma’s
Snelheid “standaard”
(instelbaar)
10 x pulse et
V12 gedurende
2 min.
V7 tot V10
gedurende
30 sec.
V3 V1 V2
Standaard temperatuur
(instelbaar)
100°C
(90°C tot
100°C)
100°C
(90°C tot
100°C)
130°C
(niet instelbaar)
95°C
(80°C tot
100°C)
95°C
(80°C tot
100°C)
Tijd
“standaard”
(instelbaar)
40 min
(20 min
tot 60 min)
45 min
(20 min
tot 60 min)
5 min
(2 min
tot 15 min)
45 min
(10 min
tot 2h)
20 min
(10 min
tot 2h)
“Standaard”-duur voor
warmhouden na aoop
van het programma
45 min 45 min 45 min 45 min
Motortoerental tijdens
het warmhouden
5s ON
in V3
/ 20s OFF
10s ON
in V3
/ 10s OFF
Tijdens bepaalde bereidingen worden luchtbelletjes gevormd en kan de kom
overlopen. Wees vooral voorzichtig als u diepvriesgroenten gebruikt. Gebruik kleinere
hoeveelheden om overlopen te voorkomen.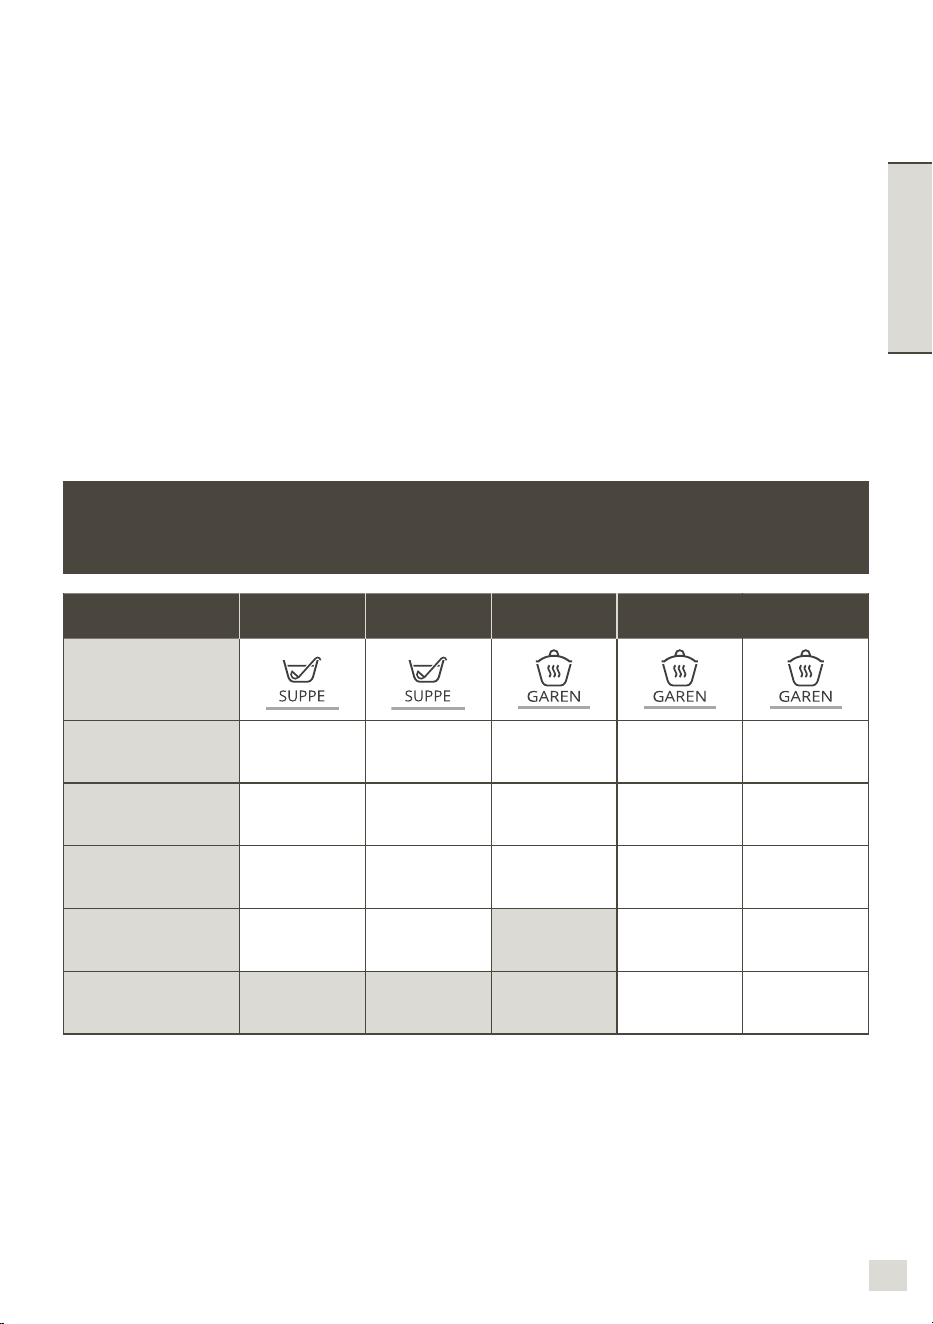
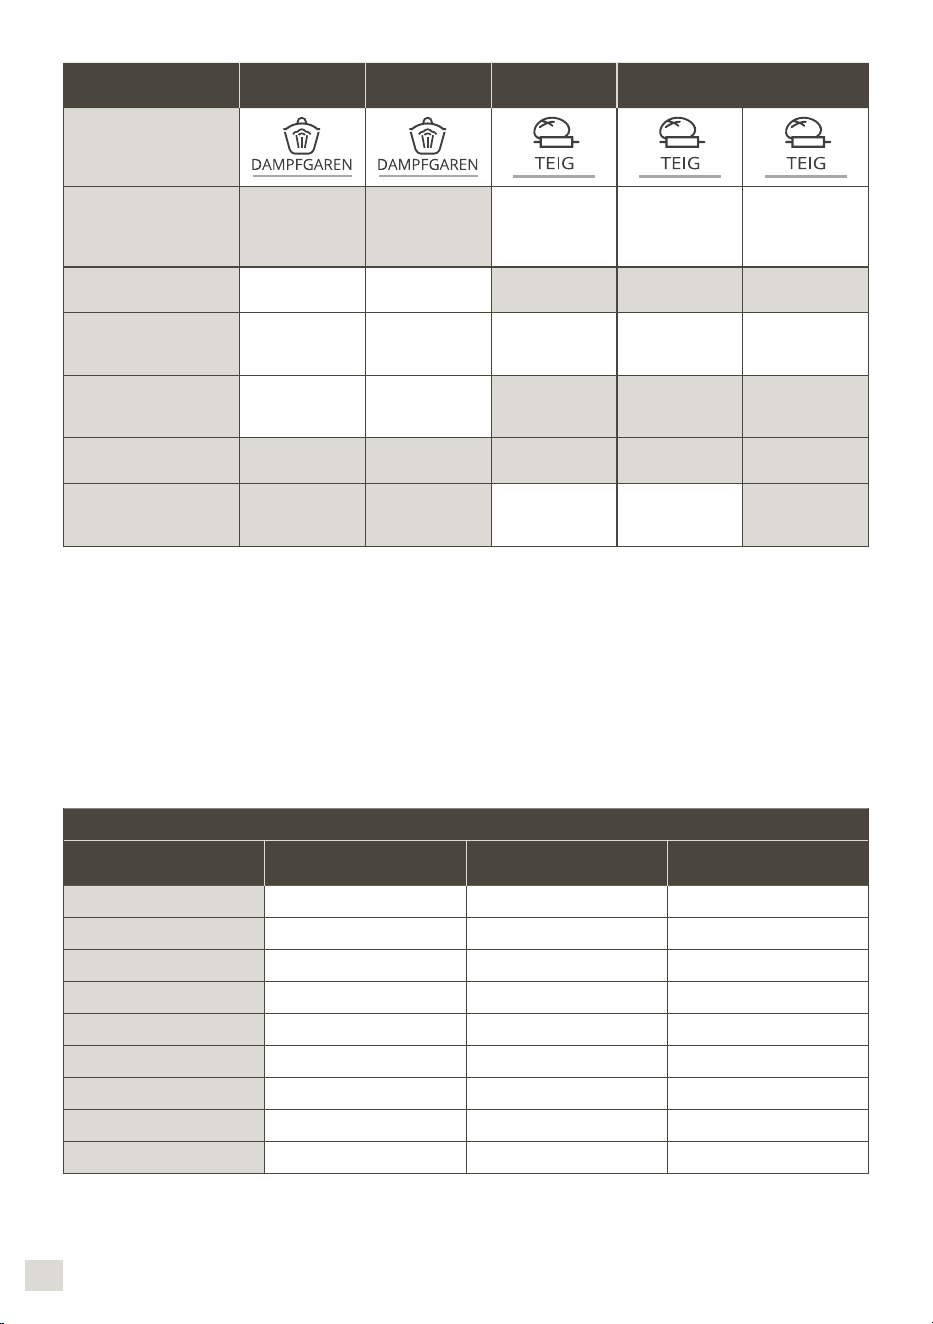
3837
NEDERLANDS
Bereiding
stoom P1
Bereiding
stoom P2
Deeg P1 Deeg P2 Deeg P3
Automatische
programma’s
Snelheid “standaard”
(instelbaar)
V5 gedurende
2 min 30 s
V5 gedurende
1 min. 30 sec.
vervolgens v6
gedurende 2 min.
V3 gedurende
40 sec.
vervolgens V9
gedurende 3 min.
Standaard temperatuur
(instelbaar)
100°C
(niet instelbaar)
100°C
(niet instelbaar)
Tijd “standaard”
(instelbaar)
30 min
(1 min
tot 60 min)
35 min
(1 min
tot 60 min)
2 min 30 s
(30 s tot
2 min 30sec)
3 min 30 s
(30 s tot
3 min 30 sec)
3 min 40 s
(1 min 40 s tot
3 min 40 sec)
«Standaard»-duur voor
warmhouden na aoop
van het programma
45 min 45 min
Motortoerental tijdens
het warmhouden
Laat het deeg ‘standaard’
30° rijzen op het einde
van het programma
40 min 40 min
Kooktijd stomen
Ingrediënten Hoeveelheden (max.) Geschatte kooktijd
Aanbevolen
stoomprogramma
Courgettes 800 g 20 min P1
Pastinaak 800 g 25 min P1
Preiwit 800 g 25 min P1
Broccoli 500 g 20 min P1
Vis 600 g (met bakpapier) 15 min P1
Aardappelen 1 kg 30 min P2
Wortelen 1 kg 30 min P2
Prinsessenbonen 800 g 30 min P2
Wit vlees 600 g (met bakpapier) 20 min P2
Bepaalde recepten kunnen omwille van bellenvorming tot overstroming van de
ingrediënten leiden, in het bijzonder wanneer bevroren groente wordt gebruikt. Als dit
zich voordoet, doe minder ingrediënten in de kom.
De kooktijden zijn ter indicatie gegeven, ze
bieden doorgaans voldoende tijd voor een
geslaagde bereiding.
Toch zullen bepaalde omstandigheden de
kooktijd beïnvloeden:
– de grootte van de groenten (gesneden of
niet gesneden)
– de hoeveelheid ingrediënten in het mandje
– de variëteit van de groenten, hun rijpheid
– de hoeveelheid water in de kom,
die moet overeenstemmen met de
graadverdeling (0,7 l).
Vergeet niet om de stoomregeldop naar u
toe te draaien tot in de hoge (a).
Als de kooktijd onvoldoende blijkt, kunt u
nog wat extra tijd toevoegen.
GEBRUIK VAN HET STOOMMANDJE
HANDMATIGE MODUS
1. Druk op de schakelaar van
de parameter die u wilt in-
stellen (de snelheidsscha-
kelaar (B1), de tempera-
tuurschakelaar (B2) of de
tijdschakelaar (B3). De ge-
kozen parameter knippert
op het scherm (C5-C6-C7).
Het programma schakelt over naar de
pauzemodus Druk opnieuw op ‘start’
om de bereiding voort te zetten. Als
u het verkeerde programma heeft
gekozen en u het programma wilt
annuleren, houdt u de ‘stop’-knop 2
seconden ingedrukt-.
4. Wanneer het programma stopt,
klinken er 3 pieptonen.
5. Druk op de trekkers (D2) en
verwijder de kom (D) (Cf. Fig. 12).
BAKKEN ZONDER DEKSEL
U kunt levensmiddelen in uw kom
bakken zonder het deksel te gebruiken
om ze op elk moment te kunnen roeren
en controleren. (Zie. Fig.16).
Voor deze bakmodus dient u een
temperatuur tussen 135°C en 150°C
in te stellen. Stel uw gewenste baktijd
in (tot 20 min).
De functie BAKKEN ZONDER DEKSEL
is niet geschikt voor conturen en
voor bereidingen op basis van melk
(risico op overkoken).
2. Regel vervolgens de para-
meter(s) met behulp van de
‘+/-’- schakelaar (B6). Om
veiligheidsredenen kunt u
de temperatuur niet regelen
zonder eerst een kooktijd in
te stellen.
3. Wanneer u al uw parameters
heeft ingesteld, drukt u op
de ‘start’-knop (B5). Wan-
neer uw apparaat in werking
is getreden, licht het rode
controlelampje op om aan
te geven dat de bereiding
is gestart. Wanneer het pro-
gramma is gestart, kunt u
het op elk moment onder-
breken door op de ‘stop’-
knop te drukken (B5).
HET APPARAAT SCHOONMAKEN
Houd het apparaat nooit onder
de kraan. Houd het motorblok
(A) niet onder stromend water.
Trek de stekker van het apparaat uit het
stopcontact na gebruik.
Maak de kom onmiddellijk schoon na
gebruik.
Druk op de trekkers (D2) en verwijder de
kom (D).
Zet de kom op een vlak werkblad.
Draai het deksel een kwartslag in wijzerzin
om het te ontgrendelen. Verwijder het
deksel voorzichtig.
Wees voorzichtig wanneer u de
messen van het ultrablade hakmes (F1)
en van het mes om te kneden/hakken
(F4) schoonmaakt en de kom leegt. De
messen zijn zeer scherp.
Wanneer de onderdelen zijn afgekoeld:
–demonteert u de aandrijfas (D3),
de afdichtingsring (D4) en de
vergrendelingsring (D5) (Cf. Fig. 13).
– maakt u de kom (D), de aandrijfas (D3), de
afdichtingsring (D4), de vergrendelingsring
(D5), de accessoires (F1), (F2), (F3),
(F4), (F5), de stoomregelknop (E1), het
deksel (E2), afdichtingsring (E4) en de
afdichtingsring (E3) schoon met een
spons en warm zeepwater.
Spoel de verschillende elementen onder
stromend water.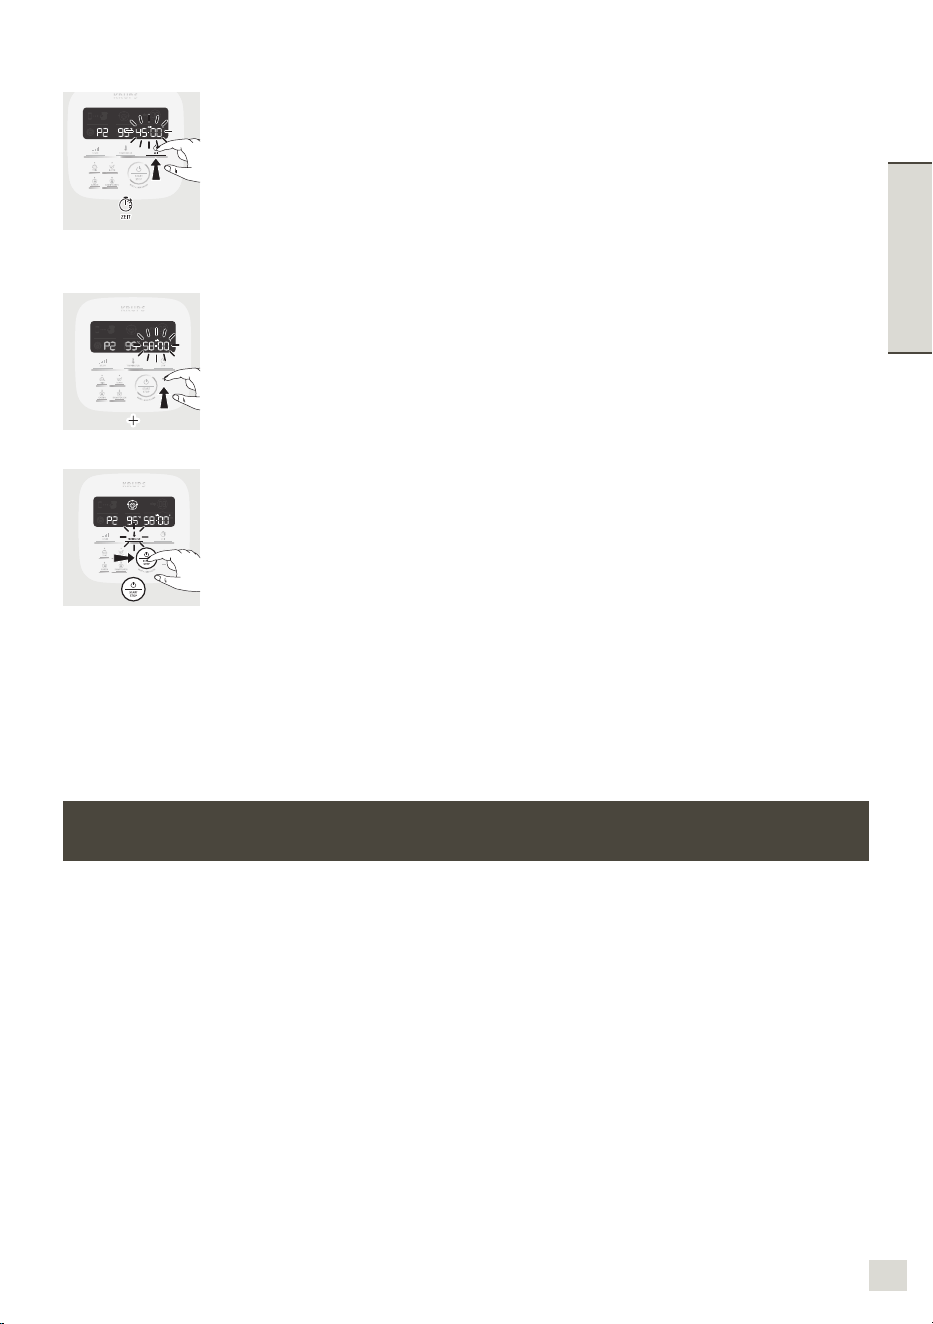

4039
NEDERLANDS
Als het apparaat zeer vuil is, laat u het
onderdeel enkele uren in zeepwater
weken en krabt u het, indien nodig, met
een spatel (G) of met een schuursponsje
schoon.
Bij kalkaanslag kunt u een schuurspons
gebruiken, eventueel gedrenkt in azijn.
Gebruik een vochtige doek om het
motorblok (A) schoon te maken. Droog
het daarna zorgvuldig af.
De kom, het deksel en de accessoires
zijn vaatwasbestendig. De aandrijfas (D3
en D4) en de vergrendelingsring (D5)
mogen niet in de vaatwasser worden
schoongemaakt (Cf. Fig. 14).
De accessoires, de afneembare aandrijfas
en de elementen van het deksel kunnen
licht verkleuren als u bepaalde ingrediënten
gebruikt zoals curry, wortelsap… De
verkleuring is niet schadelijk voor uw
gezondheid en heeft geen invloed op
de werking van uw apparaat. Maak de
elementen snel schoon na gebruik om dit
te voorkomen.
Controleer voordat u uw komset (D) opnieuw
gebruikt altijd of de elektrische contacten
onder de kom schoon en droog zijn.
Om het deksel van uw apparaat lang te
kunnen gebruiken en in goede staat te
houden, kunt u het het beste met de hand
afwassen. Om krassen te vermijden, kunt
u beter geen schuursponsje gebruiken.
Om de materialen van de kom (D),
niet aan te tasten, houd rekening
met de gebruiksaanwijzingen van uw
vaatwasmachine en gebruik geen hogere
dosis zout of vaatwasmiddel dan wat is
aanbevolen.
BELANGRIJK - AANVULLING OP DE HANDLEIDING
VOOR DE BEVEILIGING AN HET APPARAAT (“SECU”)
De motor van uw ap-
paraat is standaard
elektronisch bevei-
ligd, om ervoor te
zorgen dat u het zo
lang mogelijk kan
gebruiken. Dankzij
deze elektronische
beveiliging bent u be-
schermd tegen afwijkend gebruik van het
apparaat; op die manier is de motor per-
fect beveiligd.
In bepaalde buitengewone gebruiksom-
standigheden, wanneer de richtlijnen van
de gebruikshandleiding niet worden ge-
volgd (zie hiervoor ook de paragraaf “EER-
STE GEBRUIK”: bijvoorbeeld als er te grote
hoeveelheden worden gebruikt en/of het
apparaat ongewoon lang moet functioneren
en/of de recepten te snel na elkaar worden
gekozen), treedt er een elektronische bevei-
liging in werking om de motor te sparen. In
dat geval wordt het apparaat uitgeschakeld
en verschijnt de melding “SECU” op het lcd-
scherm van het bedieningspaneel om aan te
geven dat het apparaat tijdelijk niet kan wor-
den gebruikt.
Als uw apparaat wordt uitgeschakeld en
u de melding “SECU” ziet op het bedie-
ningspaneel, neem dan onderstaande
stappen:
Zorg ervoor dat uw apparaat ingeschakeld
blijft, druk niet op de “0/1”-schakelaar.
Raadpleeg de richtlijnen van de
gebruikshandleiding om uw bereiding
aan te passen (zie de paragraaf “EERSTE
GEBRUIK”: hoeveelheid ingrediënten/
bereidingstijd/temperatuur/type
accessoires).
Wacht een half uur om de motor te laten
afkoelen.
Voer een reset uit van het apparaat door
2 seconden de knop “Start/Stop/Reset”
(B5) ingedrukt te houden.
Uw apparaat is nu opnieuw helemaal klaar
voor gebruik.
Met mogelijke vragen kan u terecht bij
de klantendienst (Bekijk de details in het
garantieboekje).
UW APPARAAT WERKT NIET. WAT NU?
PROBLEMEN OORZAKEN OPLOSSINGEN
Problemen bij stomen.
Stoomregeldop slecht gepositioneerd.
Draai de stoomknop naar u toe op de stoomstand
«maxi». Met deze stoomstand kunt u voor al
uw stoomgerechten (soepen enz.) optimaal
gebruikmaken van warmte en stoom in de
kom,waardoor er dus meer stoom in de kom blijft,
wat efciënter is om te koken.
Met de positie «mini stoomstand» kunt u voor alle
stoombereidingen (soepen enz.) een maximale
hoeveelheid warmte en stoom in de kom bereiken.
Met deze positie vermijdt u ook dat de bereiding
tijdens het mixen gaat spatten.
Met de positie «veel stoom» kunt u een maximale
hoeveelheid condensatie laten ontsnappen en dus
gerechten of sauzen met een betere consistentie
verkrijgen (risotto, roomdesserts, sauzen enz.).
Onvoldoende kooktijd.
De kooktijden zijn ter indicatie gegeven, ze bieden
doorgaans voldoende tijd voor een geslaagde
bereiding.
Toch zullen bepaalde omstandigheden de kooktijd
beïnvloeden:
– de grootte van de groenten (gesneden of niet
gesneden)
– de hoeveelheid ingrediënten in het mandje
– de variëteit van de groenten, hun rijpheid
– de hoeveelheid water in de kom, die moet
overeenstemmen met de graadverdeling (0,7 l).
– Als de kooktijd onvoldoende blijkt, kunt u nog
wat tijdtoevoegen.
U kunt de manuele modus ook gebruiken door de
temperatuur van 130 °C en de kooktijd te kiezen
op basis van de hoeveelheid en
het type ingrediënten.
Het apparaat werkt niet.
De stekker zit niet in het stopcontact.
Steek de stekker van het apparaat in het
stopcontact.
De schakelaar (H) staat in de stand 0. Schuif de schakelaar naar stand 1.
De kom of het deksel zijn niet correct
geplaatst of vergrendeld.
Controleer of de kom en het deksel correct zijn
geplaatst en vergrendeld volgens de schema’s in
de gebruiksaanwijzing.
Overmatige trillingen.
Het apparaat staat niet op een vlakke
en stabiele ondergrond.
Zet het apparaat op een vlakke
ondergrond.
De hoeveelheid ingrediënten is te
groot.
Verminder de hoeveelheid ingrediënten.
Storing accessoires. Controleer of u het correcte accessoire gebruikt.
Het deksel lekt.
De hoeveelheid ingrediënten is te
groot.
Verminder de hoeveelheid ingrediënten.
Het deksel is niet correct geplaatst of
vergrendeld.
Vergrendel het deksel correct op de kom.
De afdichtingsring is niet geplaatst. Breng de afdichting juist aan op het deksel.
De afdichtingsring is gebarsten of
versleten.
Vervang de afdichtingsring. Neem contact op met
een erkend service.
Storing accessoires. Controleer of u het correcte accessoire gebruikt.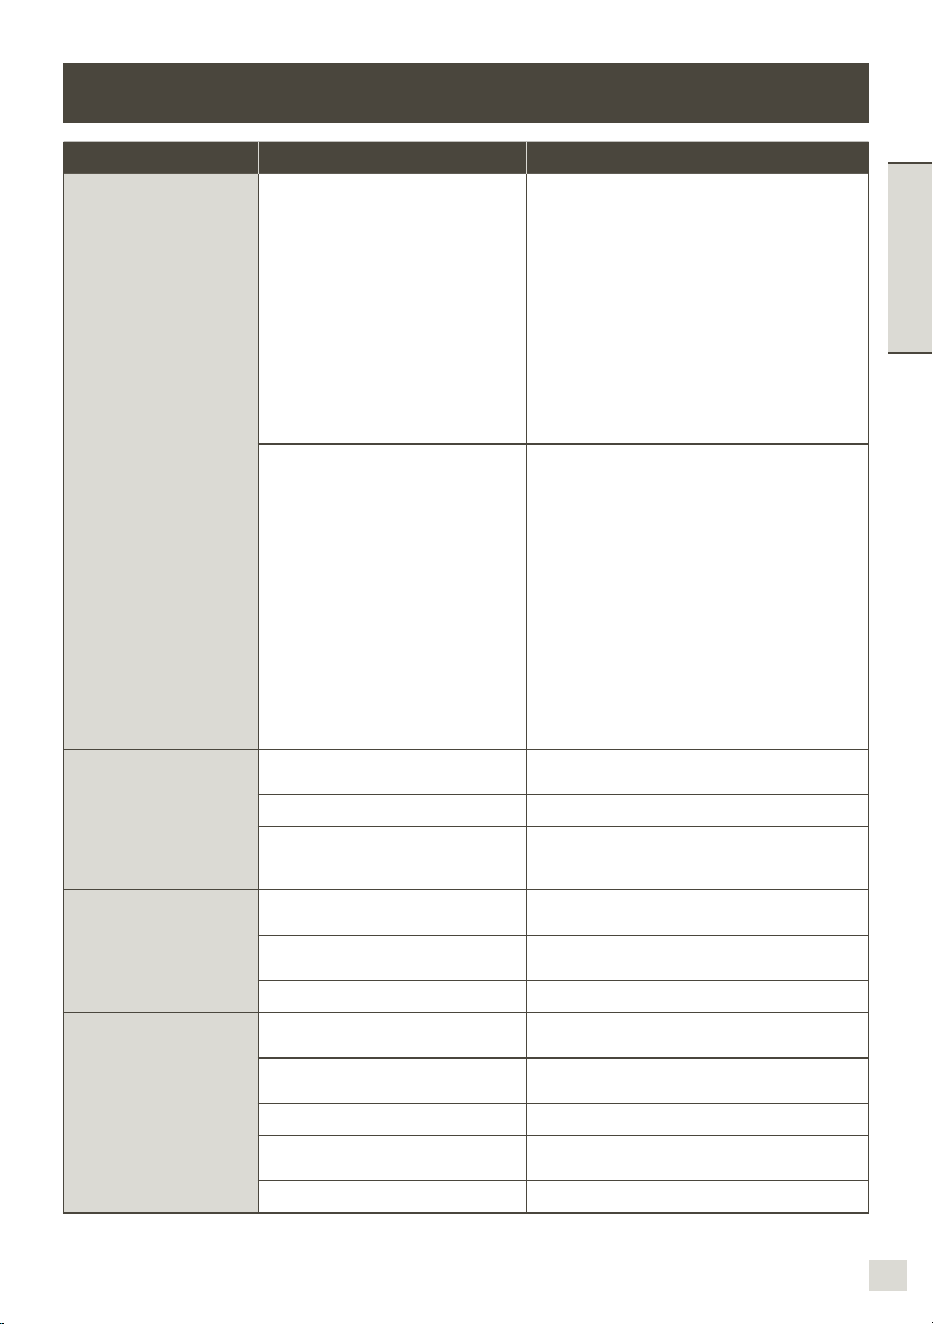
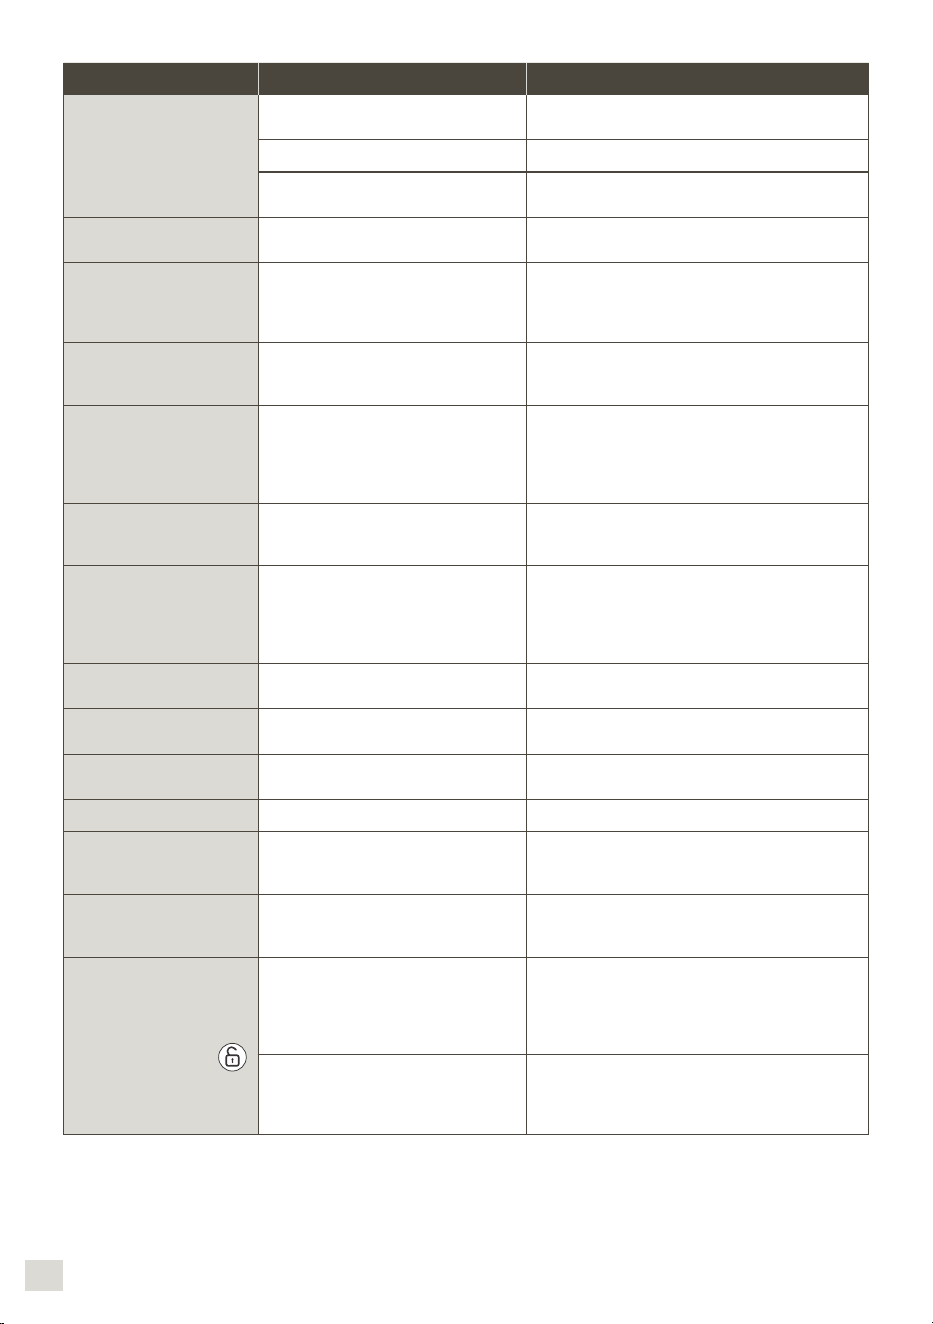
4241
NEDERLANDS
PROBLEMEN OORZAKEN OPLOSSINGEN
Lek van de driver in de kom.
De afdichtingsring is niet correct
geplaatst.
Plaats de afdichtingsring goed.
De afdichtingsring is versleten. Neem contact op met een Erkend Center.
De vergrendelingsring (D5) is niet
goed vergrendeld.
Vergrendel de ring goed (D5).
De messen draaien niet
vrij rond.
De stukjes zijn te groot of te hard.
Maak kleinere stukjes of verminder de
hoeveelheden. Voeg vloeistof toe.
Motorgeur.
Tijdens het eerste gebruik of wanneer
de motor wordt overbelast door een
te grote hoeveelheid ingrediënten of te
harde of te grote stukjes.
Laat de motor afkoelen (ongeveer 30 minuten)
en doe een kleinere hoeveelheid ingrediënten in
de kom.
‘STOP’ verschijnt op het
scherm.
Het apparaat heeft trillingen
gedetecteerd en is overgeschakeld
naar de veiligheidsstand.
Controleer of u de aanbevolen snelheid en het
aanbevolen accessoire gebruikt.
‘SECU’ verschijnt op het
scherm.
Overbelaste motor veroorzaakt door
een te grote hoeveelheid ingrediënten,
te harde of te grote stukken of een te
snelle opeenvolging van bereidingen
zonder voldoende afkoelingstijd.
Laat de motor afkoelen (ongeveer 30 minuten)
en doe een kleinere hoeveelheid ingrediënten in
de kom.
‘SECU’ verschijnt op
het scherm + rode
controlelampje knippert.
Oververhitting van de
temperatuursensoren.
Neem contact op met een erkend center.
‘Err1’ verschijnt op het
scherm.
+ rode controlelampje
knippert.
De verwarmingsweerstand werkt niet.
Zorg ervoor dat de voedingspinnen onder de
kom niet verzadigd zijn. Maak ze schoon als ze
verzadigd zijn en probeer opnieuw.
Als het probleem zich blijft voordoen, neemt u
contact op met een erkend center.
‘Err2’ verschijnt op het
scherm.
Elektronische storing. Neem contact op met een erkend center.
‘Err3’ verschijnt op het
scherm.
Storing snelheid. Neem contact op met een erkend center.
‘Err4’ verschijnt op het
scherm.
Storing communicatie met de
elektronische kaart - chopper.
Neem contact op met een erkend center.
Weergave van “Err8” Defecte vergrendelingssensor. Neem contact op met een erkend center.
‘Ntc1’ verschijnt op
het scherm. + rode
controlelampje knippert.
De temperatuursensor 1 werkt niet
meer.
Neem contact op met een erkend center.
‘Ntc2’ verschijnt op
het scherm. + rode
controlelampje knippert.
De temperatuursensor 2 werkt niet
meer.
Neem contact op met een erkend center.
Weergave van
veiligheidslampje (C4)
Slechte vergrendeling van de kom of
het deksel
Alvorens het apparaat te activeren, dient u te
controleren of de kom correct vergrendeld is op
de motorblok en of het deksel correct vergrendeld
is op de kom. Als het probleem blijft aanhouden,
neem u contact op met een erkend centrum.
Het deksel is vergrendeld op de kom
in de modus ‘bakken zonder deksel’
Ontgrendel het deksel alvorens het
bakprogramma te starten. Als het probleem blijft
aanhouden, neemt u contact op met een erkend
centrum.
AFVALVERWERKING
– *Het merk en de logo’s van Bluetooth® zijn gedeponeerde merken van Bluetooth SIG, Inc.; de SEB-groep heeft
toestemming deze te gebruiken.
– Google Play en Android zijn merken van Google Inc.
– Apple en het Apple-logo zijn merken van Apple Inc., die zijn gedeponeerd in de Verenigde Staten en in andere landen. App
Store is een servicemerk van Apple Inc.
WOORDENLIJST
Koppelen: de handeling van het elkaar laten herkennen van twee apparaten.
Dit moet eenmalig gebeuren wanneer je voor het eerst een verbinding tot stand brengt tussen je smartphone of tablet en de
i Prep & Cook XL.
Synchroniseren: de handeling van het bijwerken van informatie. De synchronisatie tussen de app en de i Prep & Cook XL
vindt plaats wanneer ze met elkaar worden verbonden.
Verbinden: een verbinding tot stand brengen tussen de app (smartphone/tablet) en het apparaat (i Prep & Cook XL) Voor de
synchronisatie is een verbinding vereist.
Cookies: Gebruiksinformatie die naar Moulinex wordt gestuurd om de app te verbeteren.
Elektrisch of elektronisch product aan het eind van de levenscyclus:
Bescherm het milieu!
Uw apparaat bevat verschillende materialen die geschikt zijn voor terugwinning
of recycling.
Breng het apparaat naar een afvalinzamelpunt voor een correcte verwerking.
Vernietiging van de verpakking en het apparaat
De verpakking bestaat voor 100% uit milieuvriendelijk materiaal dat in overeenstemming
met de bepalingen omtrent afvalverwerking kan worden vernietigd.
Breng het apparaat naar een gemeentelijk afvalinzamelpunt.
Uw apparaat werkt nog steeds niet?
Ga naar een erkend service center (zie bijgevoegde lijst).
PROBLEMEN OORZAKEN OPLOSSINGEN
De beveiliging van de
vergrendeling van het
deksel blijft actief (stang
naar buiten), waardoor het
deksel niet kan vergrendeld
worden.
Het apparaat werd uitgeschakeld
tijdens het recept door de I/O-
schakelaar op O te zetten of door
eenvoudigweg de stekker uit te
trekken tijdens het recept.
Het volstaat om de I/O-schakelaar op I te zetten om
de robot te resetten en bijgevolg de beveiliging van
de vergrendeling van het deksel. De stang neemt
automatisch terug de aanvangspositie in en u kunt
het deksel nu vergrendelen.
Verbindingsprobleem Raadpleeg de handleiding voor de app.

4443
DEUTSCH
Hinsichtlich der Personensicherheit
Lesen Sie diese Bedienungsanleitung vor der ersten Verwendung
des Geräts aufmerksam durch und bewahren Sie diese gut auf: Die
unsachgemäße Verwendung entbindet den Hersteller von jeglicher
Haftung.
Für Montage-, Demontage- und Reinigungszwecke bzw., wenn
Sie das Gerät unbeaufsichtigt lassen, sollten Sie dieses immer von
der Stromversorgung trennen. Kinder dürfen das Gerät nur unter
Aufsicht durch Erwachsene verwenden.
Dieses Gerät darf nicht von Kindern verwendet werden. Bewahren
Sie das Gerät und dessen Stromkabel außerhalb der Reichweite
von Kindern auf.
Dieses Gerät ist nicht zur Verwendung durch Personen
(einschließlich Kindern) mit eingeschränkten körperlichen,
sensorischen oder mentalen Fähigkeiten oder durch Personen
ohne entsprechende Erfahrung oder Kenntnisse vorgesehen, es
sei denn, diese werden von einer Person, die für ihre Sicherheit
verantwortlich ist, beaufsichtigt oder haben von dieser zuvor
Anweisungen zum Gebrauch des Geräts erhalten.
Es empehlt sich, die Kinder zu beaufsichtigen, um sicherzustellen,
dass sie nicht mit dem Gerät spielen.
Stellen Sie das Gerät außerhalb der Reichweite von Kindern auf.
Während des Betriebs des Gerätes werden bestimmte
Bestandteile heiß (Wand des Edelstahlbehälters und
Verschlusses, abnehmbare Mitnehmer, transparente Teile
des Deckels und des Dosierverschlusses, Metallteile unter dem
Behälter, Korb). Diese können Verbrennungen verursachen. Fassen
Sie das Gerät an den kalten Kunststoffteilen an (Griffe, Motorblock).
Die rote Aufheizkontrollleuchte weist auf Verbrennungsgefahr hin.
Die zugänglichen Teile des Geräts können sehr heiß werden, wenn
dieses in Betrieb ist.
Dieses Gerät darf nicht über eine externe Schaltuhr oder eine
separate Fernsteuerung betrieben werden.
Benutzen Sie das Gerät nicht, wenn es nicht richtig funktioniert,
wenn es beschädigt wurde oder wenn das Stromkabel oder der
SICHERHEITSHINWEISE:
Stecker beschädigt sind. Aus Sicherheitsgründen darf das Kabel
nur von einem autorisierten Kundendienstzentrum ausgetauscht
werden (siehe Liste im Serviceheft).
Das Gerät darf nicht in Wasser getaucht werden. Halten Sie den
Motorblock (A) niemals unter ießendes Wasser.
Dieses Gerät dient ausschließlich der Zubereitung von Speisen
in geschlossenen Räumen und in Höhenlagen unter 2000 m. Der
Hersteller übernimmt weder Garantie noch Haftung für den Fall
einer gewerblichen, unsachgemäßen oder nicht den Angaben der
Bedienungsanleitung entsprechenden Nutzung des Gerätes.
Dieses Gerät ist nicht für folgende haushaltsübliche Anwendungen
vorgesehen (wird nicht von der Garantie abgedeckt), wie zum
Beispiel:
– In Kochnischen in Geschäften, Büros oder anderen
Arbeitsumgebungen.
– In Teeküchen für das Personal in Geschäften, Büros oder
anderen Arbeitsumgebungen.
– In landwirtschaftlichen Betrieben.
– Für Hotel- und Motelkunden, bzw. in sonstigen derartigen
Unterbringungen,
– In Gästezimmern o. Ä.
Während des Betriebs entsteht Dampf, der
Verbrennungen verursachen kann. Gehen Sie
mit Deckelund Dosierverschluss vorsichtig um
(verwenden Sie bei Bedarf einen Handschuh,
Topflappen usw.). Fassen Sie den Dosierverschluss
an seinem Mittelteil an.
Schalten Sie das Gerät nicht ein, wenn die Dichtung nicht auf
der Dichtungshalterung sitzt und/oder wenn die Dichtungs-
halterung nicht im Deckel befestigt ist.
Achtung: Bei unsachgemäßer Verwendung des Geräts
besteht Verletzungsgefahr. Gehen Sie vorsichtig mit
den Messern des Ultrablade-Hackmessers (F1) und des
Knet-/Mahlmessers (F4) um, wenn Sie diese reinigen
und wenn Sie den Behälter leeren. Diese sind sehr scharf.
Verstauen Sie das Ultrablade-Hackmesser (F1) nach jedem
Gebrauch im Behälter.

4645
DEUTSCH
Seien Sie vorsichtig, wenn Sie heiße Flüssigkeiten in das
Küchengerät geben; diese können bei Siedetemperaturen aus
dem Gerät spritzen.
WARNHINWEIS: Seien Sie bei der Bedienung Ihres Gerätes stets
vorsichtig (bei Reinigung, Befüllen und Ausgießen): Vermeiden
Sie jegliches Überlaufen von Flüssigkeiten auf den Stecker.
WARNHINWEIS: Manche Lebensmittel mit einer Haut (Würstchen,
Zunge, Geflügel …) oder große Fleischstücke können durch das
Einschließen kochender Flüssigkeiten platzen. Wir empfehlen
Ihnen aus diesem Grund, diese Lebensmittel vor dem Garen mit
einem Messer oder einer Gabel anzustechen.
WARNHINWEIS: Die Oberfläche des Heizelements gibt auch
nach dem Gebrauch Restwärme ab.
Achten Sie darauf, dass Sie die Griffe Ihres Produktes während
des Heizvorgangs und bevor das Gerät nicht komplett abgekühlt
ist, nicht anfassen (Griff mit Drücker D2, Griff für den Deckel E2
und Dampfregler E1).
Lesen Sie die Gebrauchsanweisung durch, um Informationen über
den richtigen Umgang mit der Geschwindigkeitsregulierung und
den Funktionszeiten von jedem Zubehör und jedem Programm zu
erhalten.
Lesen Sie die Gebrauchsanweisung, um Informationen über den
Aufbau und das Anbringen des Zubehörs am Gerät zu erhalten.
Lesen Sie die Gebrauchsanweisung, um Informationen über die
Reinigung und Wartung des Gerätes zu erhalten.
Befolgen Sie bei der Reinigung des Gerätes die
Reinigungsanweisungen:
Ziehen Sie den Stecker aus der Steckdose.
Reinigen Sie das Gerät nicht, wenn es noch heiß ist.
Reinigen Sie es mit einem feuchten Tuch oder Schwamm.
Tauchen Sie das Gerät niemals in Wasser und halten Sie es nicht
unter ießendes Wasser.
NUR FÜR DEN EUROPÄISCHEN MARKT:
Bewahren Sie das Gerät und dessen Kabel außerhalb der
Reichweite von Kindern unter 8 Jahren auf.
Es ist untersagt, Kinder mit dem Gerät spielen zu lassen.
Dieses Gerät kann von Personen mit eingeschränkten physischen,
sensorischen oder mentalen Fähigkeiten oder mit mangelnden
Erfahrungen bzw. Kenntnissen verwendet werden, sofern diese
beaufsichtigt werden oder zuvor eine adäquate Unterweisung
bezüglich der sicheren Verwendung des Gerätes erhalten haben
und sich der möglichen Risiken bewusst sind.
Dieses Gerät kann von Kindern ab 8 Jahren verwendet werden,
sofern diese beaufsichtigt werden oder zuvor eine adäquate
Unterweisung bezüglich der sicheren Verwendung des Gerätes
erhalten haben und sich der möglichen Risiken bewusst sind.
Reinigung und Pege dürfen nur von Kindern durchgeführt
werden, wenn diese älter als 8 Jahre sind und dabei von einem
Erwachsenen beaufsichtigt werden.
Hinsichtlich des elektrischen Anschlusses
Das Gerät muss an eine geerdete Steckdose angeschlossen
werden.
Das Gerät ist ausschließlich für den Betrieb mit Wechselstrom
ausgelegt. Bitte stellen Sie sicher, dass die Netzspannung mit
der auf dem Typenschild des Gerätes angegebenen Spannung
übereinstimmt.
Jeglicher Anschlussfehler führt zum Verlust des Garantieanspruchs.
Trennen Sie das Gerät nie von der Stromversorgung, indem Sie am
Kabel ziehen.
Lassen Sie das Gerät, das Stromkabel oder den Stecker niemals
in die Nähe von oder in Berührung mit Flüssigkeiten, heißen
Geräteteilen, einer Wärmequelle oder einer scharfen Kante
kommen.
Hinsichtlich eines falschen Gebrauches
Berühren Sie den Deckel nicht, bevor sich das Gerät vollständig
im Stillstand befindet (Stopptaste); warten Sie, bis sich die
gemixten Zutaten nicht mehr in Bewegung befinden.
Geben Sie immer zuerst die festen Zutaten in den Behälter und
fügen Sie erst dann die üssigen Zutaten hinzu (siehe Abb.
10), ohne jedoch die Höchstmarke zu überschreiten, die auf der
Innenseite des Behälters gekennzeichnet ist. Wenn der Behälter zu
voll ist, kann kochendes Wasser herausspritzen.

4847
DEUTSCH
Achten Sie beim Dampfgaren darauf, dass das Wasservolumen
von 0,7 Liter nicht überschritten wird (siehe Abb. 3.2) (außer im
Falle anderslautender Angaben im Rezept).
Halten Sie niemals Ihre Finger oder sonstige Gegenstände in den
Behälter, wenn das Gerät in Betrieb ist.
Benutzen Sie den Behälter nicht zum Tiefgefrieren oder Sterilisieren.
Verwenden Sie Ihr Gerät nur auf einer stabilen, hitzebeständigen,
sauberen und trockenen Arbeitsäche.
Stellen Sie das Gerät nicht in der Nähe von empndlichen
Gegenständen, einer Wand oder in einem Schrank auf: Der
austretende Dampf könnte Schäden verursachen.
Stellen Sie Ihr Gerät nicht in die Nähe einer eingeschalteten
Wärmequelle (Kochplatte, elektrisches Haushaltsgerät, usw.).
Bedecken Sie den Deckel nicht mit einem Lappen o. ä., und
versuchen Sie nicht die Öffnung für den Deckel zu verstopfen;
verwenden Sie dazu den Dampfregler.
Vermeiden Sie es, Ihre Haare, Schals, Krawatten usw. über das
sich im Betrieb bendende Gerät zu halten.
Die Zubehörteile dürfen nicht in den Mikrowellenherd gegeben
werden.
Verwenden Sie das Gerät nicht im Freien.
Die in der Bedienungsanleitung angegebene Höchstmenge darf
keinesfalls überschritten werden.
Reinigen oder verstauen Sie das Gerät erst in abgekühltem
Zustand.
Stellen Sie den Behälter zum Abkühlen nicht ins Gefrierfach,
sondern in den Kühlschrank.
Kundendienst
Reinigen oder verwenden Sie zu Ihrer eigenen Sicherheit nur für
Ihr Gerät geeignete und bei einem autorisierten Kundendienst
erworbene Zubehör- und Ersatzteile.
Außer den üblichen Reinigungs- und Instandhaltungsarbeiten,
welche der Kunde selbst durchführen kann, muss jeder weitere
Eingriff von einem autorisierten Kundendienstzentrum durchgeführt
werden.
Siehe Tabelle „Was tun, wenn Ihr Gerät nicht funktioniert?“ am
Ende der Bedienungsanleitung.
Beim Durchlesen dieser Bedienungsanleitung erhalten Sie Tipps für die vielfältigen
Verwendungsmöglichkeiten Ihres Geräts - die Zubereitung von Suppen,
Schmorgerichten und Pasta oder das Dampfgaren.
BESCHREIBUNG DES GERÄTES:
TECHNISCHE GERÄTEDATEN:
A Motorblock.
B Bedienfeld.
B1: Geschwindigkeitsregler.
B2: Temperaturschalter
für den Garprozess und/oder
Aufheizkontrollleuchte.
B3: Schalter Betriebsdauer/Peering.
B4: Wahltasten Automatikprogramme.
B5: Taste START/STOP/RESET.
B6: Schalter „+“ / „-“.
C LCD-Display.
C1:
Anzeige Verbindungskontrollleuchte.
C2: Anzeige Dampfgarprogramm.
C3: Anzeige des aktuellen Schritts in
der detaillierten Rezeptanleitung.
C4:
Anzeige Sicherheitskontrollleuchte.
C5: Anzeige Geschwindigkeit.
C6: Anzeige Temperatur.
C7: Anzeige Zeit.
D Mixaufsatz.
D1: Edelstahlbehälter.
D2: Griff mit Drücke.r
D3: Abnehmbare Mitnehmer.
D4: Dichtungsring.
D5: Sicherungsring für den Antrieb.
E Deckeleinheit.
E1: Dampfregler.
E2: Deckel.
E3: Dichtungsring.
E4: Dichtungsring.
F Zubehörteile:
F0: Zubehördose.
F1: Ultrablade-Hackmesser.
F2: Mischer.
F3: Rührer.
F4: Knet-/Mahlmesser.
F5: Dampfkorb.
G Küchenspachtel.
H Schalter 0/1 zum Abschalten der
Stromversorgung Ihres Geräts.
I Reinigungsbürste.
Leistung: 1550 W (1000 W: Heizelement / 550 W: Motor )
Temperaturbereich: von 30 °C bis 150 °C;
erhöhbar in Stufen von 5 °C.
Betriebsdauer: 5 Sekunden bis 2 Stunden
erhöhbar in Stufen von min. 5 Sekunden und
max. 1 Minute.
Anzahl der Geschwindigkeiten: 13 – 2 Intervall Geschwindigkeitsstufen:
Geschwindigkeit 1 (5 s On / 20 s Off).
Geschwindigkeit 2 (10 s On / 10 s Off).
– 10 progressive Geschwindigkeitsstufen
(Geschwindigkeiten 3 bis 12).
– 1 Intervallbetrieb bei maximaler Geschwindig-
keit (V13)
– * Die Marke und Logos Bluetooth® sind eingetragene Marken der Bluetooth SIG, Inc. Ihre Verwendung durch die SEB-Gruppe
wurde vorab genehmigt.
– Google Play und Android sind eingetragene Marken der Google Inc.
– Apple und das Apple-Logo sind in den Vereinigten Staaten und anderen Ländern eingetragene Marken der Apple Inc. App
Store ist eine Dienstleistermarke der Apple Inc.
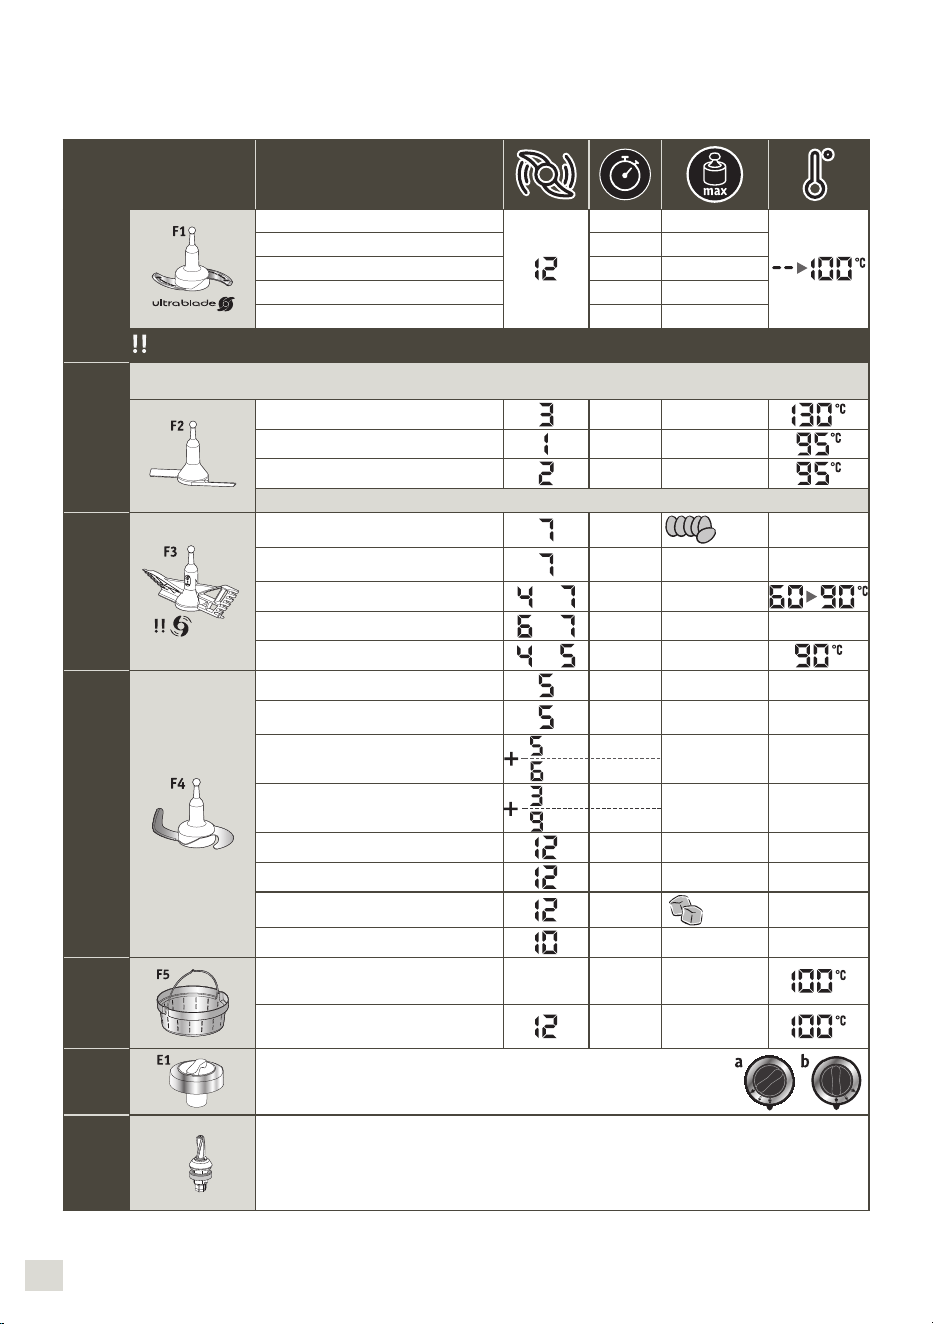
5049
DEUTSCH
Ihr Gerät bietet folgendes Zubehör:
Diese Zubehörteile verfügen ebenfalls über Greifächen, um die Handhabung bei deren
Verwendung während der Zubereitung zu erleichtern.
IHR GERÄT
Hackmesser
Suppenmixer
3min 3L
Kompottmixer 40s 1Kg
Gemüse zerkleinern 15s 1Kg
Fleisch zerkleinern 30s 1Kg
Fisch zerkleinern 15s 1Kg
Verwenden Sie dieses Zubehörteil nicht, um harte Zutaten zu zerkleinern, verwenden Sie dafür das Knet-/
Mahlmesser F4.
Mischer
Er mischt gekochte Gerichte, ohne die Zutaten zu beeinträchtigen;
äußerst nützlich zur Zubereitung von progressiv aufzukochenden Gerichten (Risottos, Suppen).
Rissolen 5min 500g
Schmortopf 45min 3L
Risottos 22min 1,5Kg
Ratatouilles, Chutneys, Hülsenfrüchte (Einstellungen: siehe Rezeptbuch)
Rührer
9 max
Eiweiß 5/10min
7
max
Mayonnaisen,
Schlagsahne
2/5min 0,5L
Soßen, Cremes
bis
1/20min 1L
Kartoffelbrei
bis
1min 1L
Polenta
bis
1/16min 1L
Knet- und Mahlmesser
Kneten von Nudeln und Weißbrotteig 2min 30s 1,2Kg
Kneten von Biskuitteig, Brandteig
und Spezialbroten
2min 30s 1Kg
Kneten von Hefeteigen
(Brioche, Napfkuchen)
1min 30s
2 min
0,8Kg
Lockere Teigmassen
mischen (Sandkuchen)
40 s
3min
1Kg
Schalenfrüchte fein mahlen
1min 0,6Kg
Zerkleinern von harten Produkten
1min 0,6Kg
Zerstoßen von Eis
1min
6 bis 10
Pfannkuchen-, Waffelteig
1min 1,5L
Panier
vapeur
Dampfgaren von Gemüse,
Fisch oder Fleisch
20/40min 1Kg
Suppe mit Stückchen
3min 3L
Deckel
Dampfreglerverschluss
– Maxi (a) = Dampfgaren
– Mini (b) = Risotto, Dessertcremes, Saucen…
Abnehmbare
Mitnehmer
D3
Abnehmbare Mitnehmer
Rösten und Garen ohne Deckel
Der i Prep & Cook XL kann sowohl im
verbundenen als auch im nicht verbundenen
Modus betrieben werden. Ebenso bietet er
zwei Betriebsmodi: das Automatikprogramm
und den manuellen Modus.
Betrieb mit Automatikprogramm:
Geschwindigkeit, Gartemperatur und
Dauer sind voreingestellt, um die
Zubereitung von Suppen, Schmorgerichten
und Pasta oder das Dampfgaren im
Automatikbetrieb zu ermöglichen.
Manueller Betrieb:
Geschwindigkeit, Gartemperatur und
Dauer können individuell eingestellt
werden, um die Zubereitung Ihren
persönlichen Wünschen anzupassen.
Verwendung mit oder ohne Deckel
Temperatur von
30°C bis 130°C
Temperatur von
135°C bis 150°C
– Wenn Sie eine Temperatur zwischen
135°C und 150°C ausgewählt haben,
müssen Sie Ihr Gerät ohne Deckel
verwenden. Falls der Deckel auf dem
Behälter sitzt, wird auf dem LCD-Display
ein Vorhängeschloss angezeigt, das zum
Entriegeln des Deckels auffordert.
– Nach dem Hinzufügen der Zutaten
müssen diese regelmäßig mit dem Spatel
umgerührt werden, damit der Inhalt am
Boden des Behälters nicht anbrennt
(siehe Abschnitt Reinigung).
– Wenn Sie das Gerät mit Deckel
verwenden, darf die Gartemperatur
130°C nicht übersteigen.
IHR GERÄT IST MIT EINER
SICHERHEITSVERRIEGELUNG DES
DECKELS AUSGESTATTET
Der Deckel wird bei jeder Inbetriebnahme
des Geräts gesichert. Diese Sicherung
verhindert ein Öffnen des Deckels während
der Rezeptzubereitung (siehe Abb. 17).
Versuchen Sie nicht, den Deckel mit
Gewalt zu öffnen, wenn er verriegelt ist. Die
Sicherung wird jedes Mal, wenn das Gerät
angehalten wird, freigegeben. Wenn Sie eine
Temperatur von mindestens 50 °C und eine
Geschwindigkeit von mindestens 5 wählen,
wird auf dem LCD-Display des Bedienfeldes
eine Restzeit von 10 Sekunden angezeigt.
(Siehe Abb. 18). Der Deckel lässt sich erst
nach Ablauf der eingestellten Zeitdauer
öffnen.
ANBRINGEN DES BEHÄLTERS, DER ZUBE-
HÖRTEILE UND DER DECKELEINHEIT
Reinigen Sie vor dem ersten Gebrauch
mit Ausnahme des Motorblocks (A) alle
Zubehörteile (D, E, F, G) mit warmem
Seifenwasser. Ihr Behälter (D) ist mit
einem Achszapfen ausgestattet (D3),
der zur leichten Reinigung abgenommen
werden kann.
Stellen Sie vor dem Gebrauch sicher,
dass das gesamte Verpackungsmaterial
entfernt wurde, insbesondere der Schutz
zwischen Behälter (D) und Motorblock
(A).
Setzen Sie die Verschlussdichtung (E4)
auf die Dichtungshalterung (E3) (s. Abb.
1), lassen Sie die Einheit auf dem Deckel
(E2) einrasten (s. Abb. 2).
Legen Sie den Dichtungsring (D4) auf
den gemeinsamen Achszapfen (D3).
Verriegeln Sie die Einheit am Boden des
Behälters, indem Sie den Verriegelungsring
(D5) verwenden (sieheAbb. 3). Wenn Sie
den Kochmodus ohne Deckel verwenden,
setzen Sie den Dichtungsring (D4) auf den
Abnehmbare Mitnehmer (D3). Befestigen
Sie die Einheit unten im Behälter mittels
des Sicherungsrings (D5) (siehe Abb. 3).
Positionieren Sie das gewünschte
Zubehör auf dem Boden:
– das Zubehör (F1, F2, F3, oder F4) auf
dem gemeinsamen Achszapfen am
Behälterboden (siehe Abb. 4.1),
– beim Dampfgaren den Dampfkorb (F5)
im Behälter (siehe Abb. 4.3), nachdem
zuvor der Behälter mit 0,7 l Flüssigkeit
(Wasser, Sauce…) befüllt wurde (siehe
Abb. 4.2).
Geben Sie die Zutaten in den Behälter
oder den Dampfkorb.
Setzen Sie den Deckel auf den Behälter
(D) und ordnen Sie die beiden Dreiecke
gegenüberliegend an (siehe Abb. 5),
verriegeln Sie dann ohne Druckausübung
den Deckel durch Drehen in Pfeilrichtung
(siehe Abb. 6).
Positionieren Sie den Dampfregler (E1) auf
dem Deckel, 2 Positionen sind möglich
(siehe Abb. 7):
Bei der Einstellung „Mini“ kann
am meisten Kondensflüssigkeit
entweichen, wodurch Sie Speisen
oder Saucen mit einer besseren
Konsistenz erhalten (Risotto,
Dessertcremes, Saucen etc...).
Bei der Einstellung „Maxi“ kann
am meisten Hitze und Dampf im
Behälter gehalten werden, für
das Dampfgaren verschiedenster
Speisen (Suppen etc...).
F1 F2
F3 F4
F5
F1 F2
F3 F4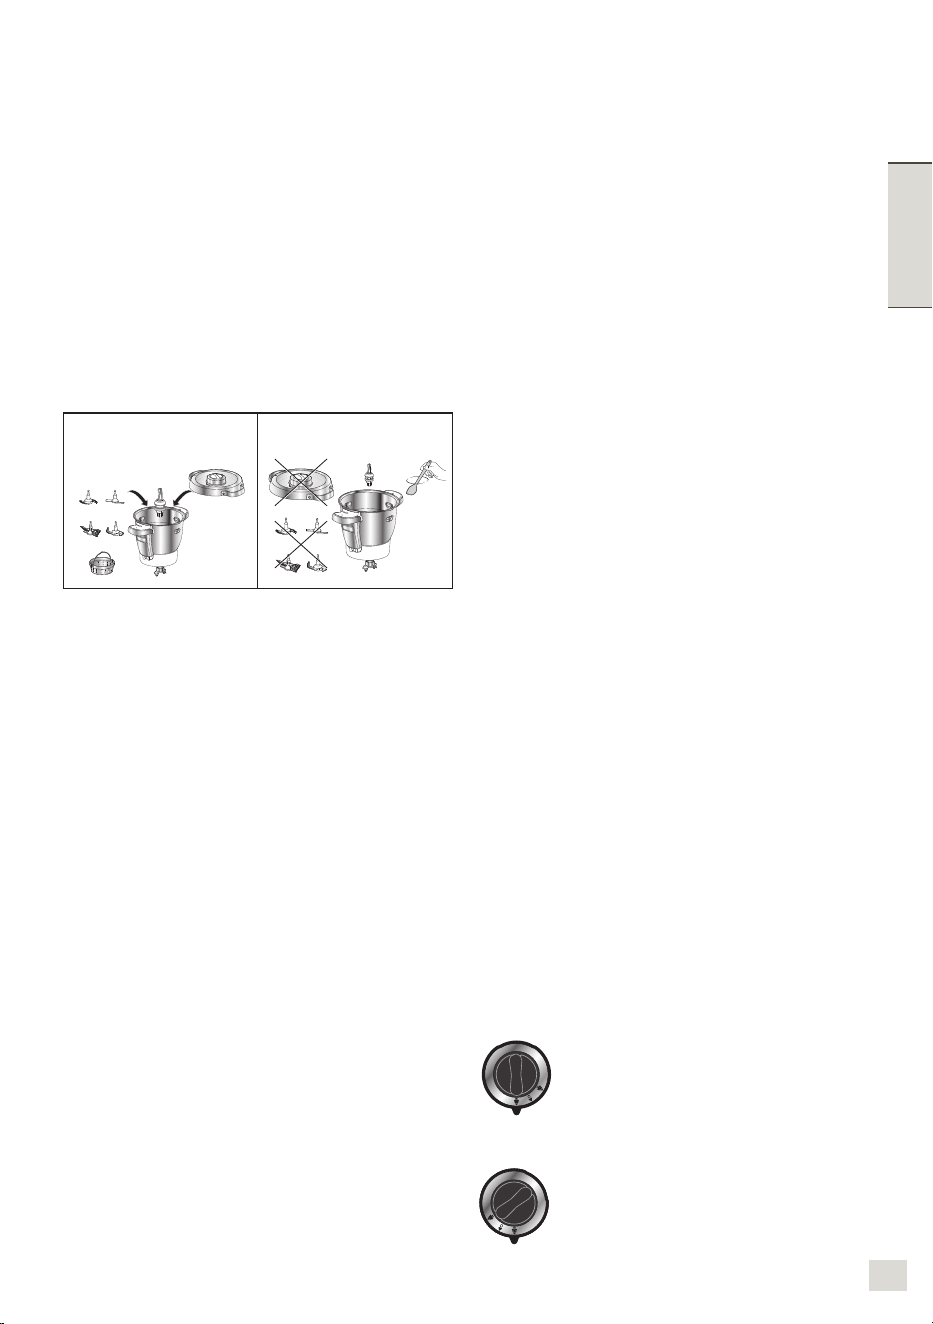
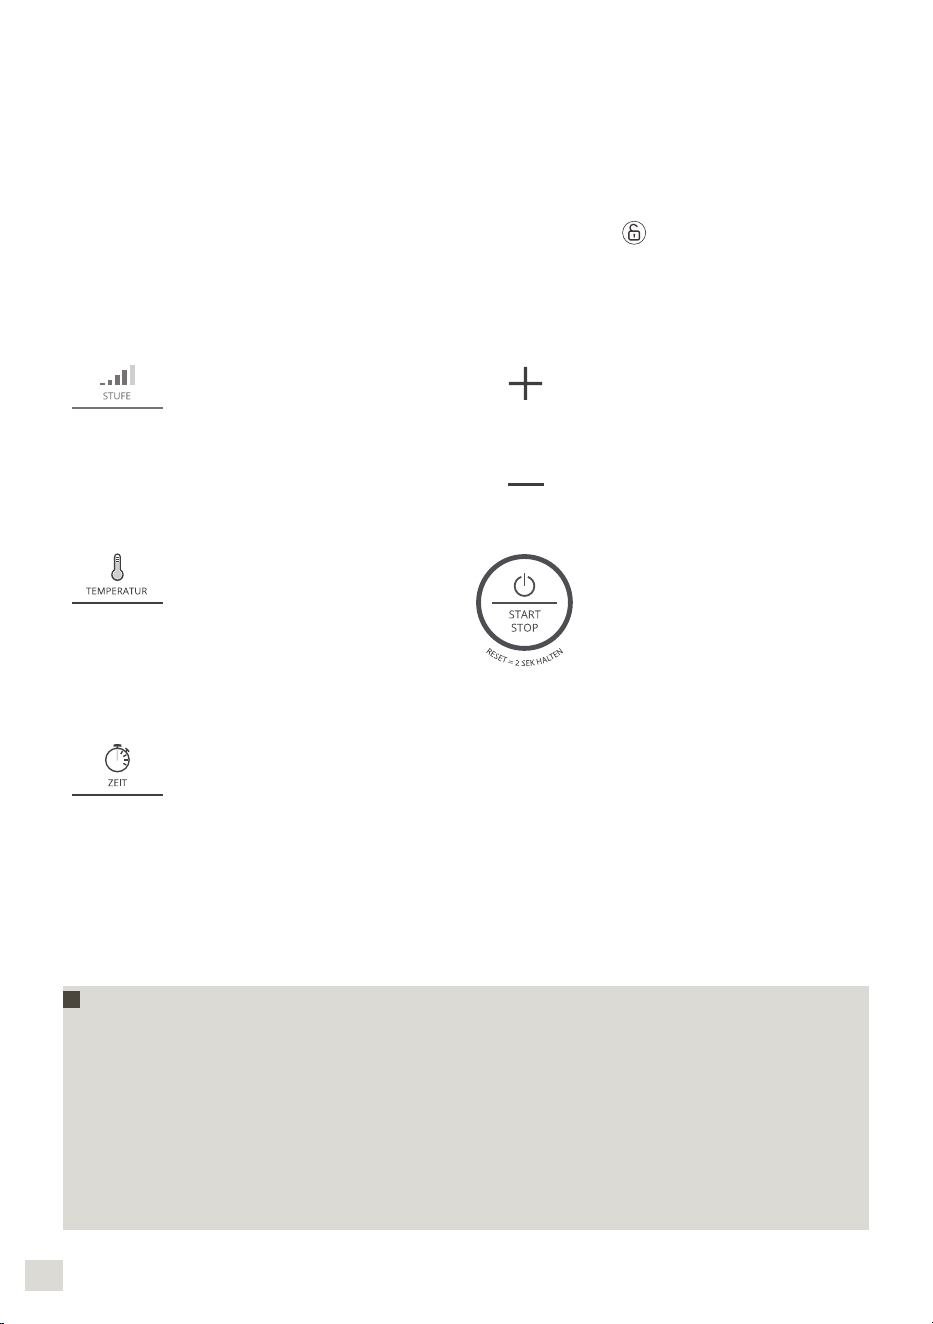
5251
DEUTSCH
Gebrauchstipps:
Ihr Gerät ist mit einem Mikroprozessor ausgestattet, der dessen Stabilität kontrolliert
und analysiert. Im Falle der Instabilität wird die Geschwindigkeit des Motors automatisch
verringert. Falls das Problem anhält, wird der Motor angehalten und auf dem Bildschirm
wird „STOPP“ angezeigt.
Überprüfen Sie, ob die Menge der Zutaten nicht zu groß ist, und ob die Geschwindigkeit
korrekt ausgewählt wurde.
Überprüfen Sie, ob Sie das empfohlene Zubehör verwenden.
Starten Sie Ihr Gerät anschließend neu.
VERWENDUNG DES BEDIENFELDES (B)
Auswahl eines automatischen Programms:
Auswahl der Motorge-
schwindigkeit 2 Intervall Ge-
schwindigkeitsstufen und 10
progressive Geschwindig-
keitsstufen.
Intervallbetrieb bei maximaler
Geschwindigkeit (V13)
Erhöhung der Geschwindig-
keit, der Dauer und der Tem-
peratur
Verringerung der Geschwin-
digkeit, der Dauer und der
Temperatur.
Auswahl der Kochtemperatur.
Von 30 °C bis 150 °C
Aufheizkontrollleuchte: Sie
leuchtet beim Start des Koch-
vorganges auf und erlischt,
sobald die Temperatur im In-
neren des Behälters auf unter
50 °C abgesunken ist.
Taste mit 3 Funktionen:
– „Bestätigen“ des gewähl-
ten Automatikprogramms
oder, im manuellen Modus,
der gewählten Parameter
(Geschwindigkeit, Gartem-
peratur, Zeit).
– „Pause“ während eines
Gebrauchs, wenn das Ge-
rät gestartet wurde.
– „Zurücksetzen“ der aus-
gewählten Einstellungen,
indem die Taste zwei Se-
kunden lang gedrückt wird.
– „Bestätigen des Schritts“
in der detaillierten Rezept-
anleitung.
Auswahl der Betriebsdauer.
5 Sekunden bis 2 Stunden.
Peering bei erster Verbindung
Bei falscher Anordnung oder schlechter Verriegelung von einem der beiden (siehe
Abb. 10.1 und 10.2), beginnt die Sicherheitskontrollleuchte
zu blinken, sobald eine
Funktion aktiviert wird.
Mit dieser Einstellung werden Spritzer
während des Mixvorganges verhindert.
Positionieren Sie den Behälter (D) so auf
den Motorblock (A), dass beim Einrasten
ein Klickgeräusch ertönt (siehe Abb. 8).
Das Gerät lässt sich nur dann einschalten,
wenn Behälter und Deckel richtig
angeordnet und auf dem Motorblock
verriegelt sind.
INBETRIEBNAHME IM VERBUNDENEN MODUS
Einschalten Ihres Geräts
Frequenz: 2,40 GHz. Maximale Übertragungsleistung: 7,7 dBm
Ihr Gerät ist mit einem Ein-/Aus-Schalter ausgestattet. Stellen Sie diesen Schalter auf „1“
(siehe Abb. 9).
Auf dem LCD-Display werden sämtliche Parameter mit „0“ angezeigt.
VORBEREITUNG DER INSTALLATION
Die Liste der mit i Prep & Cook XL kompatiblen Smartphone- und Tablet-Modelle
finden Sie auf www.krups.com
iPhone 4S oder neuer
iPad 3 / iPad mini oder später
Von iOS 9 und die Folgende.
Ab Android 4.4 und die Folgende
(Liste der kompatiblen Modelle www.krups.com)
I Prep & Cook XL-INSTALLATION
Was brauche ich für die i Prep & Cook XL-Installation?
Die Prep & Cook-Anwendung - kostenloser Download im App Store (iPhone/iPad) und
auf Google Play (Android).
Eine Bluetooth-Verbindung mit Ihrem Smartphone oder Tablet Bluetooth® Smart 4.0:
Der i Prep & Cook XL verbindet sich mit Ihrem Smartphone/Tablet, ohne dass ein Kabel
benötigt wird.
Das Smartphone/Tablet muss sich in der Nähe des i Prep & Cook XL benden (die
Reichweite der Verbindung variiert mit den räumlichen Gegebenheiten).
Eine Steckdose für den Anschluss des i Prep & Cook XL: Nur bei bestehender
Stromversorgung verbindet sich der i Prep & Cook XL mit Ihrem Smartphone/Tablet.
Zu Bluetooth® Smart
Mit der Bluetooth® Smart 4.0-Technologie (oder Bluetooth Low Energy) ist eine
kabellose Verbindung zwischen einer Anwendung und einem Gerät bei sehr geringem
Stromverbrauch möglich.
ERSTE VERBINDUNG DES I Prep & Cook XL IM VERBUNDENEN MODUS
Download der Anwendung
Laden Sie zunächst die Anwendung auf Ihr Smartphone/Tablet herunter. Gehen Sie hierfür
in den App Store für iOS oder auf Google Play für Android.
Haben Sie die Anwendung heruntergeladen, können Sie mit dem i Prep & Cook XL in nur
wenigen Minuten und ohne Erstellen eines Kontos Ihre ersten Speisen zubereiten (zur
Auswahl stehen 50Rezepte, ohne dass Sie ein Konto einrichten müssen).
Haben Sie Ihr Konto in der Anwendung erstellt, steht Ihnen der gesamte Inhalt zur Verfügung,
um unterschiedlichste Menüs kreieren zu können.

5453
DEUTSCH
Einschalten des i Prep & Cook XL
Ihr Gerät ist mit einem Ein-/Aus-Schalter (H) ausgestattet. Stellen Sie diesen Schalter auf
„1“ (siehe Abb. 9).
Aktivieren der Bluetooth-Verbindung
Nähern Sie sich dem i Prep & Cook XL und stellen Sie sicher, dass die Bluetooth-Verbindung
Ihres Smartphones/Tablets aktiviert ist.
Starten der Anwendung
Starten Sie die Prep & Cook-Anwendung, indem Sie auf das Icon „Prep & Cook“ klicken.
Peering
Was bedeutet Peering?
Bei der ersten Verbindung erkennen sich die von Ihnen auf Ihr Smartphone/Tablet
heruntergeladene Anwendung und der i Prep & Cook XL schnell und automatisch, sofern
Sie die nachstehenden Schritte korrekt befolgen.
Wenn Sie möchten, können Sie den i Prep & Cook XL mit bis zu 10 Geräten verknüpfen.
Verknüpfen Sie hierfür jedes Gerät einzeln (siehe Peering).
Zeitgleich kann jedoch immer nur ein Gerät verbunden sein.
Lassen Sie Cookies zu. Indem Cookies Ihre Nutzereinstellungen erfassen, tragen sie zur
Verbesserung der Anwendung bei.
Wählen Sie Ihr Gerät aus.
Verlangt die Anwendung dies, halten Sie die Timer-Taste (B3) des i Prep & Cook XL 4
Sekunden lang gedrückt.
Die Verbindungskontrollleuchte (C1) blinkt über einen Zeitraum von maximal 30
Sekunden. In dieser Zeit verbindet sich der i Prep & Cook XL mit Ihrem Smartphone/Tablet.
Bestätigen Sie die Peering-Anfrage, die auf Ihrem Smartphone/Tablet angezeigt wird,
oder gehen Sie in das Nachrichtencenter, um das Peering zu bestätigen.
Leuchtet die Verbindungskontrollleuchte (C1) permanent, ist die Verbindung hergestellt.
Anmerkung: Nach erfolgtem Peering erkennt der i Prep & Cook XL bei späteren
Verbindungen Ihr Smartphone/Tablet automatisch. Sie müssen den Peering-Vorgang
nicht wiederholen.
Die Verbindung wurde hergestellt.
Ihr i Prep & Cook XL ist jetzt mit Ihrem Smartphone/Tablet verbunden. Das vorstehende
Icon gibt an, dass die Verbindung hergestellt wurde.
Die Verbindung konnte nicht hergestellt werden.
Das vorstehende Icon gibt an, dass die Verbindung nicht hergestellt wurde.
Wiederholen Sie die nachfolgenden Schritte:
Nähern Sie sich dem i Prep & Cook XL.
Stellen Sie sicher, dass der i Prep & Cook XL an den Strom angeschlossen ist und die
Steckdose einwandfrei funktioniert.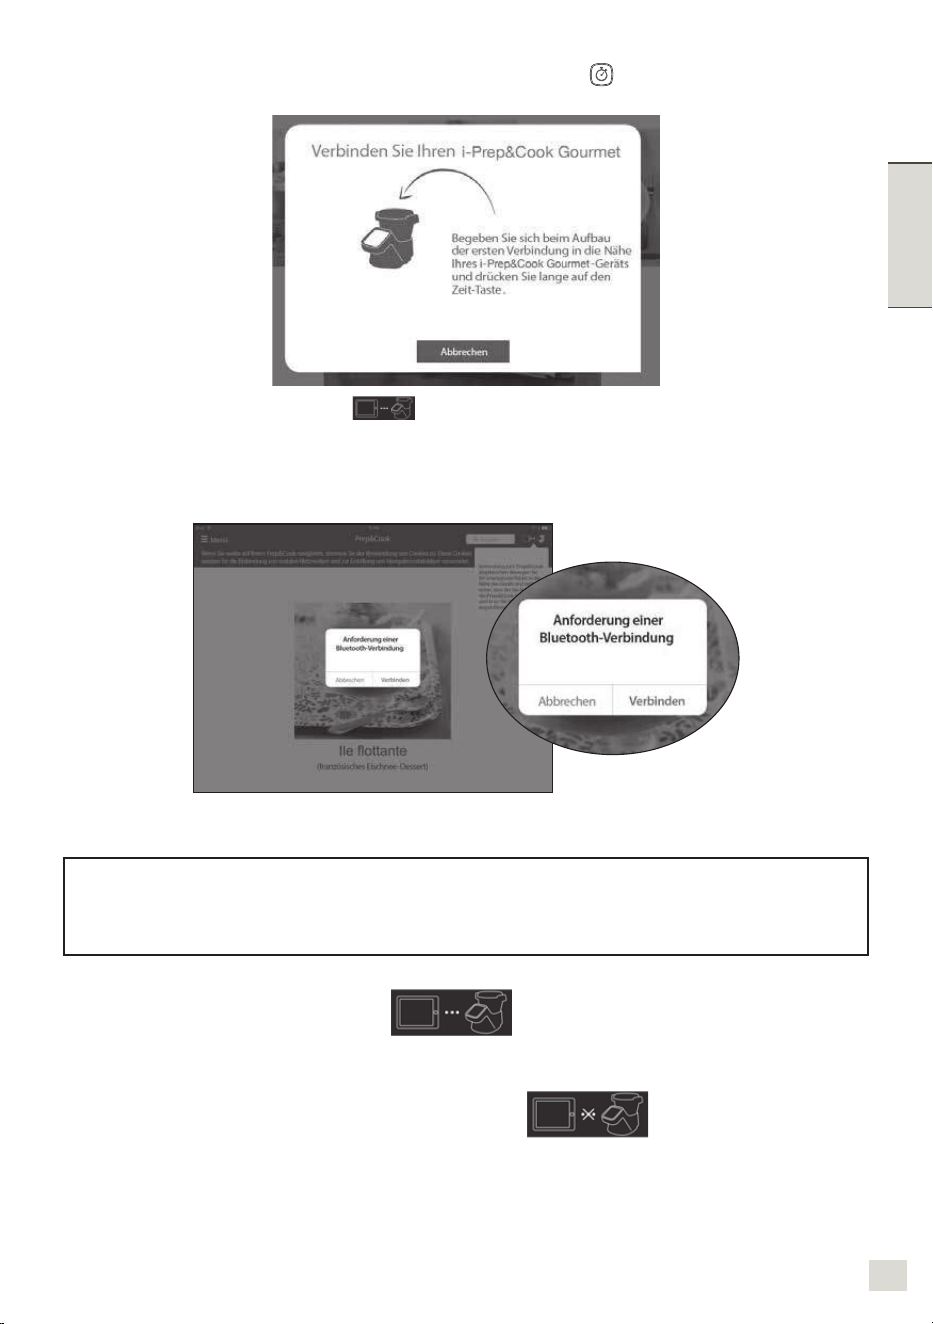
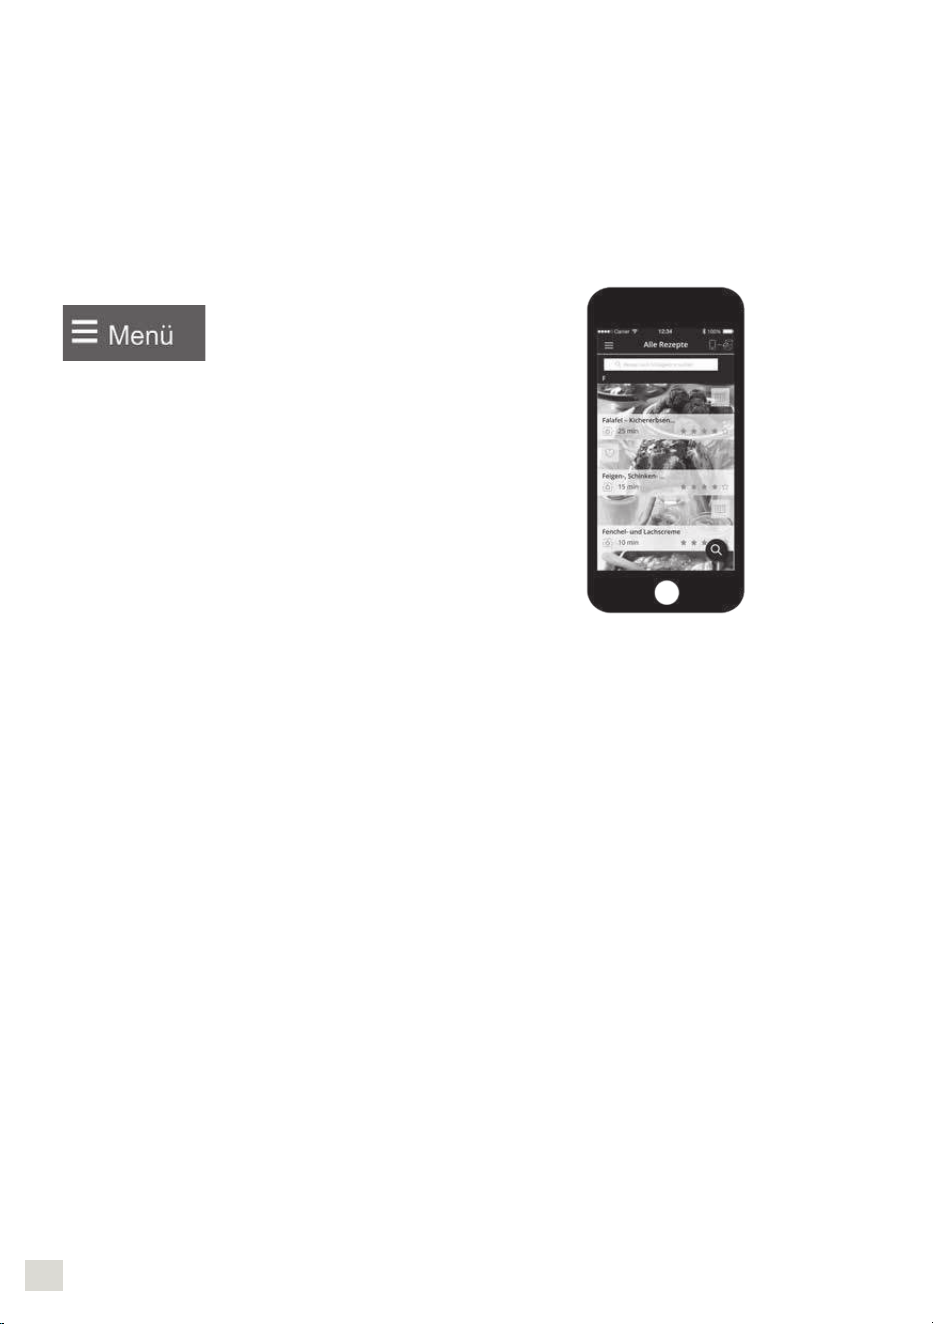
5655
DEUTSCH
Stellen Sie sicher, dass Ihr Smartphone/Tablet kompatibel ist (siehe Kompatibilitätsliste
auf www.krups.com).
Stellen Sie sicher, dass die Bluetooth-Verbindung Ihres Smartphones/Tablets aktiviert ist.
Wiederholen Sie das Peering und lesen Sie die FAQ (häug gestellte Fragen).
Besteht das Problem weiter, stellen Sie sicher, dass Ihr Smartphone/Tablet kompatibel ist.
Wenn Sie ein Android-Gerät verwenden, stellen Sie sicher, dass es sich um ein kompatibles
Modell handelt (siehe Kompatibilitätsliste auf www.krups.com).
Im Menü der Anwendung können Sie unsere
gesamte Rezeptauswahl entdecken.
Im verbundenen Modus wird bei einem Garprozess
mit detaillierter Rezeptanleitung der aktuelle Schritt
durch einmaliges Drücken der Reset-Taste beendet.
Ein erneutes Drücken der Reset-Taste beendet den
Garprozess.
FAQ: HÄUFIG GESTELLTE FRAGEN
Welcher Platz ist für den i Prep & Cook XL geeignet?
Stellen Sie den i Prep & Cook XL auf eine ebene und stabile Oberäche.
Um zwischen dem i Prep & Cook XL und Ihrem Smartphone/Tablet eine optimale
Verbindung zu gewährleisten, wird empfohlen, jedwede Bedienung, die einer Verbindung
bedarf, in angemessener Entfernung vorzunehmen.
Leuchtet die Verbindungskontrollleuchte (C1) permanent, sind Ihre Geräte verbunden.
Wurde die Verbindung unterbrochen (das Symbol der Verbindung ist durchgestrichen),
nähern Sie sich Ihrem i Prep & Cook XL, um die Verbindung wiederherzustellen.
Was geschieht, wenn die Verbindung während eines Garprozesses unterbrochen wird?
Wurde die Verbindung zwischen dem i Prep & Cook XL und Ihrem Smartphone/Tablet während
eines Garprozesses unterbrochen, werden beide Geräte automatisch synchronisiert, sobald die
Verbindung wiederhergestellt ist. Sie können dann mit dem Schritt des Garprozesses fortführen,
der zum Zeitpunkt der Unterbrechung der Verbindung durchgeführt wurde.
Kann ich den i Prep & Cook XL auch ohne die Anwendung nutzen?
Ihr Gerät kann auch ohne Anwendung genutzt werden (siehe Inbetriebnahme im nicht
verbundenen Modus).
Lesen Sie hierzu den Abschnitt „Gebrauch des Geräts“.
Von den zahlreichen Vorteilen des verbundenen Produkts können Sie aber nur mit der
Anwendung protieren.
Kann der i Prep & Cook XL mit mehreren Smartphones oder Tablets genutzt werden?
Wenn Sie möchten, können Sie den i Prep & Cook XL mit mehreren Geräten verknüpfen.
Hierzu verknüpfen Sie jedes Gerät einzeln (siehe Peering).
Zeitgleich kann jedoch immer nur ein Gerät verbunden sein.
Muss die Bluetooth-Verbindung meines Smartphones ständig aktiviert sein?
Die Bluetooth-Verbindung muss aktiviert sein, um die Anwendung und den i Prep & Cook
XL zu synchronisieren.
INBETRIEBNAHME IM NICHT VERBUNDENEN MODUS
Verwendung des Bedienfeldes (B)
Wahl eines Automatikprogramms:
Pasta (Liste der Unterpro-
gramme)
Suppen (Liste der Unterpro-
gramme)
Schmorgerichte (Liste der
Unterprogramme)
Dampfgaren (Liste der Unter-
programme)
Einschalten Ihres Geräts
Ihr Gerät ist mit einem Ein-/Aus-Schalter ausgestattet. Stellen Sie diesen Schalter auf „1“.
Auf dem LCD-Display werden sämtliche Parameter mit „0“ angezeigt (siehe Abb. 9).
Im nicht verbundenen Modus leuchtet das LCD-Display des i Prep & Cook XL weiß.
AUTOMATISCHER PROGRAMMBETRIEB
1. Wählen Sie das ge-
wünschte Programm
(B4). Über dem gewähl-
ten Programm leuchtet
eine LED. Durch wieder-
holtes Drücken können
die verschiedenen Un-
terprogramme aufgeru-
fen werden.
4. Nachdem Sie alle Ein-
stellungen vorgenommen
haben, drücken Sie auf
die „Start“-Taste (B5), um
das Programm zu star-
ten. Wenn sich Ihr Gerät
im Kochmodus bendet,
leuchtet die rote Kontroll-
leuchte auf, um Ihnen an-
zuzeigen, dass der Koch-
vorgang begonnen hat.
2. Die vorprogrammierten
Einstellungen, beispiels-
weise die Dauer, können
(je nach ausgewähltem
Rezept bzw. je nach
Zutaten oder zuberei-
teten Mengen) geändert
werden. Drücken Sie
den Temperaturschalter
(B2) oder den Zeitschal-
ter (B3). Der gewählte
Parameter blinkt im Dis-
play (C6-C7).
5. D
rei Pieptöne signalisieren das Ende der
Zubereitung.
6. Nach Abschluss der Programme für die
Zubereitung von Suppen, der Schmorge-
richte P2 und P3 oder das Dampfgaren
schaltet das Gerät automatisch auf die
45-minütige Warmhaltefunktion, um die
Speise verzehrbereit zu halten. Im Pro-
gramm für die „Schmorgerichte“ P2 und
P3 und im manuellen Modus läuft der
Motor des Geräts mit einer bestimm-ten
Geschwindigkeit. Dadurch werden die
Speisen schonend zubereitet und es wird
vermieden, dass sie am Boden des Be-
hälters festkleben. Zum Abschalten der
Warmhaltefunktion genügt es, die Stop-Ta-
ste (B5) zu drücken. Wenn Sie den Deckel
öffnen, die Drücker (D2) betätigen oder
den Behälter abnehmen, wird die Warm-
haltefunktion automatisch ausgeschaltet.
3. Stellen Sie diese
Einstellung(-en) mittels
des „+/-“-Reglers ein
(B6).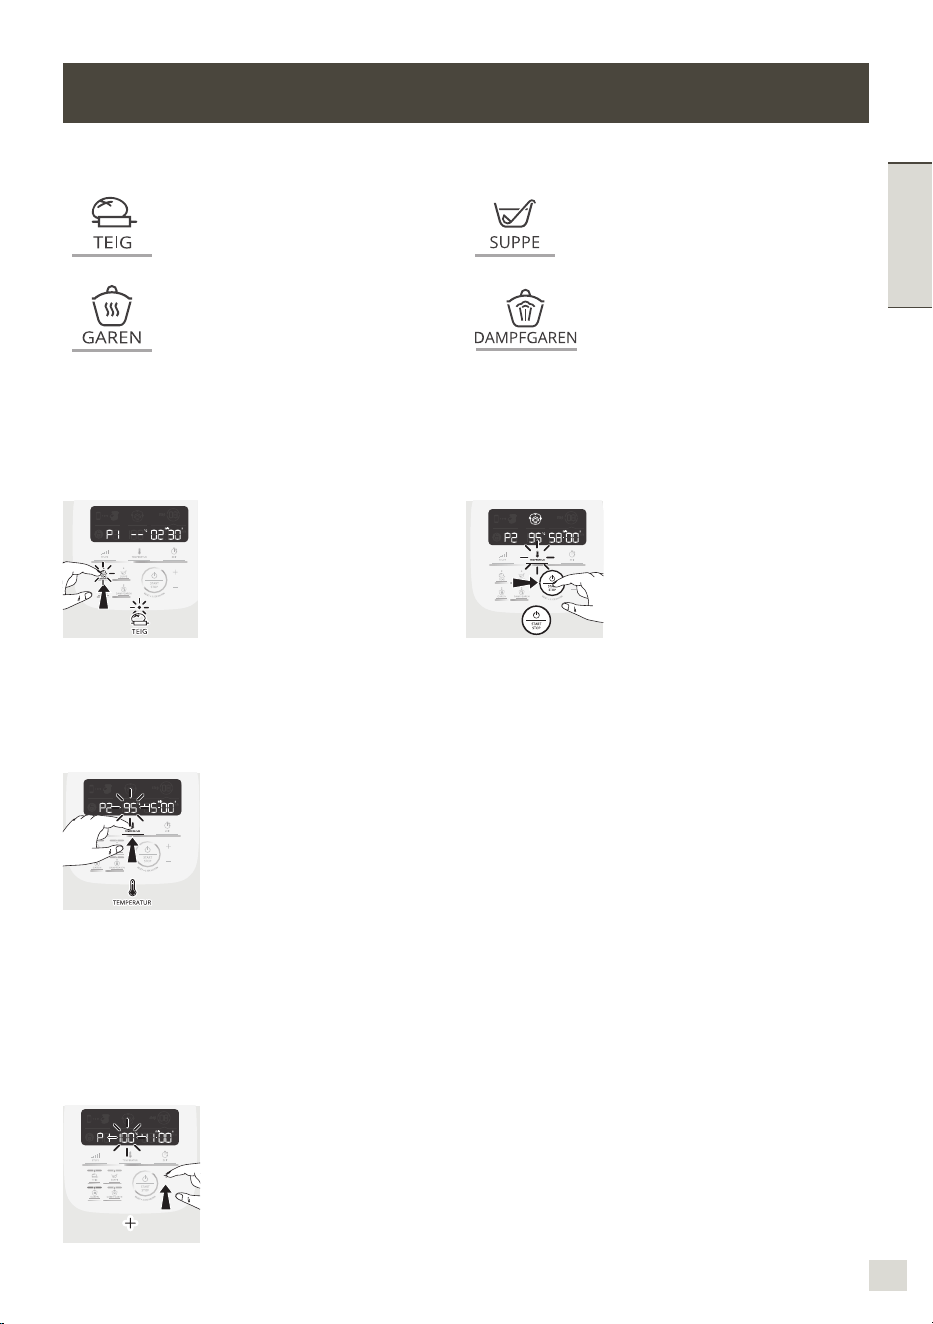
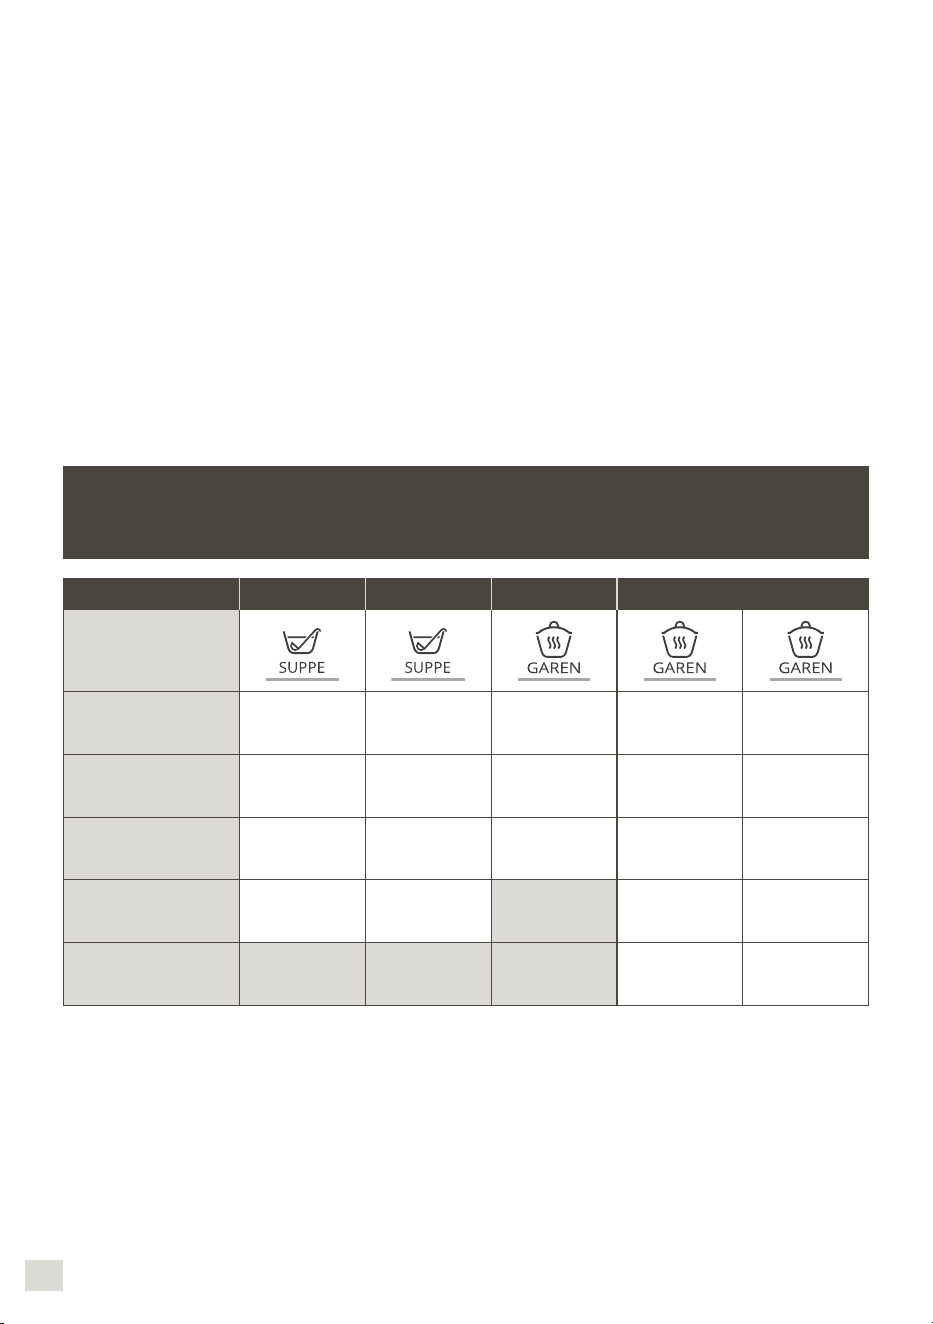
5857
DEUTSCH
Am Ende des Knetvorgangs der Teigwaren-
Programme P1 und P2 geht das Gerät in den
Modus „Teig aufgehen lassen” über; hierbei
beträgt die Temperatur während 40 Minuten
30°C und erlaubt es dadurch, Ihrem Teig
ein größeres Volumen zu verleihen. Wenn
Sie den Deckel öffnen, auf die Griffe (D2)
drücken oder den Behälter entfernen, wird
die Pause-Funktion des Geräts aktiviert. Um
mit der Zubereitung fortzufahren, müssen
Sie auf die „Start“-Taste drücken. Wenn Sie
diesen Modus abschalten wollen, drücken
Sie 2 Sekunden lang auf die „Stopp“-Taste.
7. Drücken Sie auf die Griffe (D2), und
heben Sie den gesamten Behälter hoch
(D) (siehe Abb. 12).
Wurde das Automatikprogramm im ver-
bundenen Modus gestartet, haben Sie je-
derzeit die Möglichkeit, das Gerät durch
Drücken der Stop-Taste anzuhalten. Da-
durch wird das automatische Programm
in den Pause-Modus gesetzt. Sie können
mit der Zubereitung fortfahren, indem
Sie auf die „Start“-Taste drücken. Wenn
Sie versehentlich das falsche Programm
ausgewählt haben oder wenn Sie es ab-
brechen möchten, halten Sie 2 Sekunden
lang die Taste „Stopp“ gedrückt.
ENTDECKEN SIE DIE VORGESCHLAGENEN
AUTOMATISCHEN PROGRAMME:
Suppe P1 Suppe P2 Schmortopf P1 Schmortopf P2 Schmortopf P3
Automatische
Programme
„Standardgeschwin-
digkeit“
(einstellbar)
10 Mal drücken
und 2 min V12
30 s V7 bis V10 V3 V1 V2
„Standardtemperatur”
(einstellbar)
100 °C
(90 °C
bis 100 °C)
100 °C
(90 °C
bis 100 °C)
130°C
(nicht
einstellbar)
95°C
(80°C
bis 100°C)
95°C
(80°C
bis 100°C)
„Standarddauer“
(einstellbar)
40 min
(20min
bis 60 min)
45 min
(20min
bis 60 min)
5 min
(2min
bis 15 min)
45 min
(10 min
bis 2hr)
20 min
(10 min
bis 2hr)
Warmhalten als
„Standard“ am Ende
eines Programms
45 min 45 min 45 min 45 min
Motorgeschwindigkeit
während des
Warmhaltens
5 s ON bei G3 /
20 s OFF
10 s ON bei G3 /
10 s OFF
Einige Rezepte können aufgrund des Auftretens von Blasenbildungen besonders
stark überkochen, vor allem bei der Verwendung von tiefgefrorenem Gemüse. In
diesem Fall müssen Sie die Mengen entsprechend verringern.
Dampf-garen
P1
Dampf-garen
P2
Teig P1 Teig P2 Teig P3
Automatische
Programme
„Standardgeschwin-
digkeit“
(einstellbar)
V5 während
2 min 30 s
1 min 30 s V5,
dann 2 min V6
40 s V3,
dann 3 min V9
„Standardtemperatur”
(einstellbar)
100°C
(nicht
einstellbar)
100°C
(nicht
einstellbar)
„Standarddauer“
(einstellbar)
30 min
(1 min
bis 60 min)
35 min
(1 min
bis 60 min)
2 min 30 s
(30 sec bis
2 min 30s)
3 min 30 s
(30 sec bis
3 min 30 s)
3 min 40 s
(1 min 40 s
bis 3 min 40 s)
Warmhalten als
„Standard“ am Ende
eines Programms
45 min 45 min
Motorgeschwindigkeit
während des
Warmhaltens
Gehen des Teigs
Voreinstellung 30° am
Ende des Programms
40 min 40 min
Dauer des Dampfgarens
Zutaten Mengen (max) Geschätzte Kochdauer
Empfehlung für
Dampfprogramm
Zucchini 800 g 20 min P1
Pastinake 800 g 25 min P1
Lauch (weißer Teil) 800 g 25 min P1
Brokkoli 500 g 20 min P1
Fisch 600 g (mit Backpapier) 15 min P1
Kartoffeln 1 kg 30 min P2
Karotten 1 kg 30 min P2
Grüne Bohnen 800 g 30 min P2
Helles Fleisch 600 g (mit Backpapier) 20 min P2
Bei einigen Rezepten kann der Inhalt aufgrund von Blasenbildungen besonders stark
überkochen, vor allem bei der Verwendung von tiefgefrorenem Gemüse. In diesem
Fall müssen Sie die Mengen entsprechend verringern.
Die Garzeiten sind Richtwerte und sind in
der Regel ausreichend.
Verschiedene Bedingungen können die
Garzeit dennoch beeinussen:
– Größe des Gemüses (geschnitten oder
nicht geschnitten)
– Menge der Zutaten im Behälter
– Gemüsevielfalt und Reifegrad
– Menge an Wasser im Behälter, die der
Messskala entsprechen muss (0,7 l)
Achten Sie darauf, den Dampfverschluss so
einzusetzen, dass die Markierung „maxi“ (a)
zu Ihnen hinzeigt
Wenn der Dampf nicht ausreicht, können
Sie eine zusätzliche Garzeit einstellen.
VERWENDUNG DES INNEREN DAMPFKORBS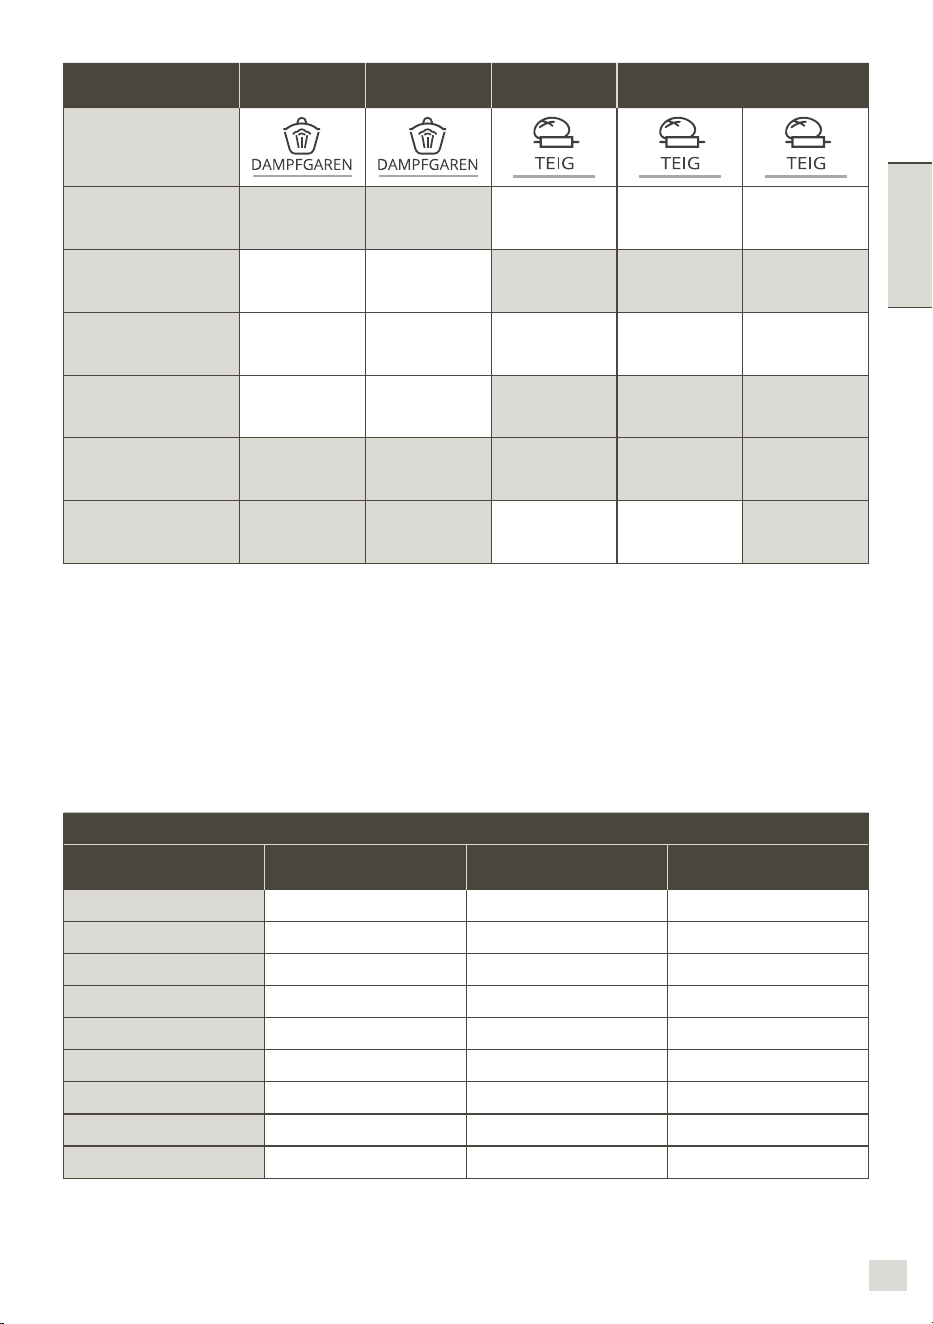
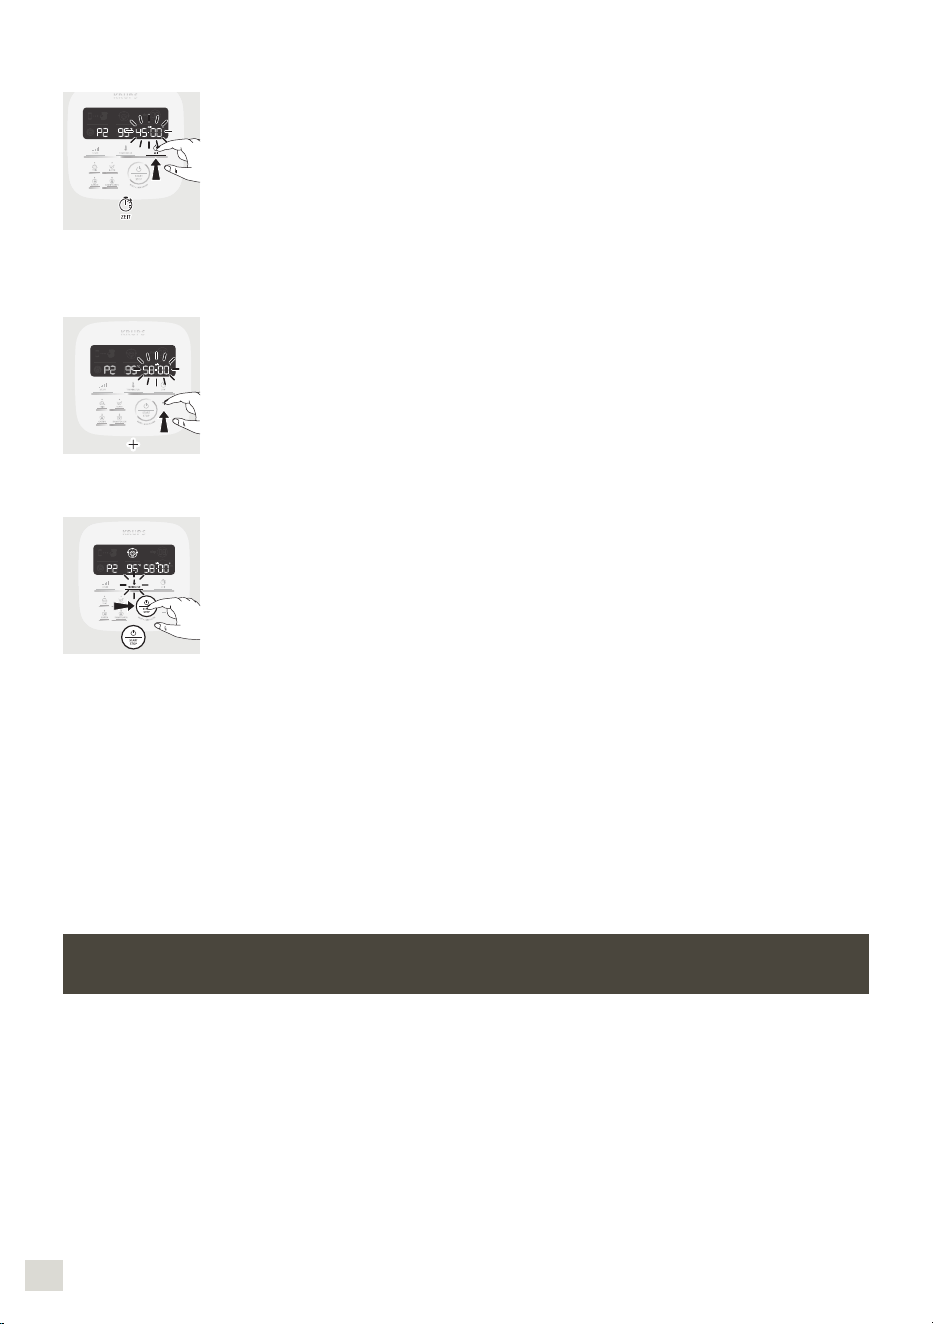
6059
DEUTSCH
MANUELLER BETRIEB:
1. Drücken Sie auf die Aus-
wahltaste der Einstellung,
die Sie ändern möchten: den
Geschwindigkeitsregler (B1)
oder den Gartemperaturreg-
ler (B2) oder den Zeitregler
(B3). Daraufhin blinkt der
ausgewählte Parameter auf
der Anzeige auf (C5- C6-C7).
In diesem Fall wird das Programm
auf Pause geschaltet, zum Fortfahren
drücken Sie einfach erneut auf die
„Start“-Taste. Wenn Sie versehentlich
das falsche Programm ausgewählt
haben oder wenn Sie es abbrechen
möchten, halten Sie 2 Sekunden lang
die Taste „Stopp“ gedrückt.
4. Drei Pieptöne signalisieren das
Ende der Zubereitung.
5. Drücken Sie auf die Griffe (D2),
und heben Sie den gesamten
Behälter hoch (D) (siehe Abb. 12).
KOCHEN OHNE DECKEL
Sie können Lebensmittel in der
Schüssel ohne Deckel braten und
dabei umrühren und den Kochvorgang
beaufsichtigen. (siehe Abb. 16).
Für diese Garmethode müssen
Sie unbedingt eine Temperatur
im Bereich von 135 °C bis 150 °C
wählen. Stellen Sie die Betriebszeit
ein (bis zu 20 Min).
Die Funktion GAREN OHNE
DECKEL ist nicht für Kontüren und
Zubereitungen mit Milch geeignet
(Inhalt kann überkochen).
2. Stellen Sie diese Einstellung
(-en) mittels des „+/-“-Reg-
lers ein (B6). Aus Sicher-
heitsgründen ist es nicht
möglich, eine Änderung der
Temperatur vorzunehmen,
ohne eine Kochzeit einzu-
stellen.
3. Nachdem Sie alle Einstel-
lungen vorgenommen ha-
ben, drücken Sie auf die
„Start“-Taste (B5). Wenn sich
Ihr Gerät im Kochmodus be-
ndet, leuchtet die rote Kon-
trollleuchte auf, um Ihnen
anzuzeigen, dass der Koch-
vorgang begonnen hat. Wur-
de das Programm gestar-
tet, haben Sie jederzeit die
Möglichkeit, das Gerät durch
Drücken der „Stopp“-Taste
anzuhalten (B5).
REINIGUNG DES GERÄTS
Das Gerät darf nicht in Wasser
getaucht werden. Halten Sie
den Motorblock (A) niemals
unter ießendes Wasser.
Nach Abschluss des Programms ziehen
Sie den Stecker des Gerätes aus der
Steckdose.
Reinigen Sie den Behälter sofort nach der
Verwendung.
Drücken Sie auf die Griffe (D2), und heben
Sie den gesamten Behälter hoch (D).
Stellen Sie den Behälter auf eine ebene
Fläche.
Entriegeln Sie den Deckel, indem Sie ihn
eine Vierteldrehung im Uhrzeigersinn drehen.
Nehmen Sie den Deckel vorsichtig ab.
Gehen Sie vorsichtig mit den Messern des
geschliffenen Ultrablade-Hackmessers
(F1) und des Knet-/Mahlmessers (F4) um,
wenn Sie sie reinigen und wenn Sie den
Behälter leeren. Diese sind sehr scharf.
Wenn die Teile abgekühlt sind:
–Entfernen Sie den Antrieb (D3), die
Dichtung (D4), den Sicherungsring (D5)
(siehe Abb. 13).
–Reinigen Sie den Behälter (D), den
Antrieb (D3), die Dichtung (D4), den
Sicherungsring (D5), die Zubehörteile
(F1), (F2), (F3), (F4), (F5), den
Dampfreglerverschluss (E1), den
Deckel (E2), Dichtungsring (E4) den
Dichtungsring (E3), mit einem Schwamm
und warmem Seifenwasser.
Spülen Sie die einzelnen Bestandteile
unter ießendem Wasser.
Bei starker Verschmutzung mehrere
Stunden in Wasser mit Spülmittel
einweichen lassen und, falls nötig, mit
dem Küchenspachtel (G) oder einem
Topfkratzer abkratzen.
Wenn der Behälter verkalkt ist, können Sie
einen Topfkratzer verwenden und diesen,
falls nötig, in weißen Essig tränken.
Reinigen Sie den Motorblock (A) mit
einem feuchten Tuch. Trocknen Sie ihn
sorgfältig ab.
Um Ihnen die Reinigung zu erleichtern,
können Sie den Behälter, die Deckeleinheit
und die Zubehörteile in der Spülmaschine
reinigen. Dies gilt nicht für den Antrieb
(D3 und D4) und den Sicherungsring (D5)
(siehe Abb. 14).
Bei der Zubereitung mit Zutaten wie Curry u.
Ä., bzw. bei der Zubereitung von Karottensaft,
usw. können sich die Zubehörteile, der
abnehmbare Antrieb und die Deckel leicht
verfärben; dies beeinträchtigt jedoch
keinesfalls Ihre Gesundheit oder die korrekte
Funktionsweise Ihres Geräts. Reinigen Sie
aus diesem Grund die Teile umgehend nach
der Verwendung.
Bevor Sie den kompletten Behälter (D)
wieder verwenden, stellen Sie stets sicher,
dass die elektrischen Kontakte unter dem
Behälter sauber und trocken sind.
Um das Aussehen und die Lebensdauer
des Deckels Ihres Gerätes zu schützen,
waschen Sie ihn manuell ab. Benutzen
Sie nicht die scheuernde Seite des
Schwamms, um Kratzer zu vermeiden.
Um das Material der Schüssel nicht zu
beeinträchtigen (D), sollten Sie die Ge-
brauchsanweisung Ihrer Spülmaschine
beachten, die Salz- bzw. Geschirrspülrei-
nigermengen nicht erhöhen.
WICHTIG - ERGÄNZUNG DER ANLEITUNG ZUR
SICHERUNG DES GERÄTES („SECU“)
Ihr Gerät ist serienmä-
ßig mit elektronischen
Motorschutzfunkti-
onen ausge- stattet,
um seine Langlebig-
keit zu gewährleisten.
Diese elektronische
Sicherung schützt Sie
vor jeglicher anormaler
Verwendung. So ist Ihr Motor perfekt ge-
schützt.
Unter bestimmten Bedingungen, bei einer
sehr intensiven Verwendung, bei der die
Empfehlungen der Anleitung nicht berück-
sichtigt werden (vgl. Ab-schnitt „Inbetrieb-
nahme“: mögliche Überladung und/oder
ungewöhnlich lange Verwendung und/oder
zu kurze Aneinanderreihung von Zuberei-
tungen) wird der elektronische Schutz aus-
gelöst, um den Motor zu schützen. In die-
sem Fall schaltet sich das Gerät aus und
es erscheint die Anzeige „SECU“ auf dem
LCD-Display des Bedienfeldes, um anzuzei-
gen, dass das Gerät momentan nicht mehr
einsatzbereit ist.
Wenn „SECU“ auf Ihrem Bedienfeld er-
scheint und sich Ihr Gerät abschaltet, ge-
hen Sie folgendermaßen vor:

6261
DEUTSCH
Lassen Sie Ihr Gerät eingeschaltet,
betätigen Sie nicht den Schalter „0/1“ (H).
Orientieren Sie sich an den Empfehlungen
in der Anleitung, um Ihre Einstellungen
wieder anzupassen (vgl. Abschnitt „IN-
BETRIEBNAHME“: Menge der Zutaten/
Zubereitungszeit/Temperatur/Zubehör).
Warten Sie eine halbe Stunde, damit sich
der Motor wieder abkühlt.
Starten Sie Ihr Gerät neu, indem Sie 2
Sekunden lang den Knopf „Start/Stop/
Reset“ drücken (B5).
Ihr Gerät ist wieder vollständig einsatzbereit.
Der Kundendienst steht Ihnen bei sämtlichen
Fragen zur Verfügung (weitere Informationen
im Garantieheft).
WAS TUN, WENN IHR GERÄT NICHT FUNKTIONIERT?
PROBLEME URSACHEN LÖSUNGEN
Probleme beim Dampfgaren.
Der Dampfregulierungsschalter ist
falsch eingestellt.
Positionieren Sie den Einsatz mit „Dampf
maxi“ in Ihre Richtung; mit dieser Einstellung
erhalten Sie maximale Hitze im Behälter zum
Dampfgaren verschiedenster Speisen (Suppen
etc.), somit ist mehr Dampf im Behälter und das
Garen ist effektiver.
Die Einstellung „Dampf mini»
erzeugt maximale Wärme und Dampf im
Behälter für alle Dampfgarvorgänge (Suppen,
etc.). Mit dieser Einstellung werden Spritzer
während des Mixvorganges verhindert.
Die Einstellung „viel Dampf» lässt eine
maximale Menge an Kondenswasser
entweichen und ermöglicht die ideale
Konsistenz der Gerichte oder Saucen (Risotto,
Dessertcremes, Saucen etc.).
Unzureichende Garzeit.
Die Garzeiten sind Richtwerte und sind in der
Regel ausreichend.
Verschiedene Bedingungen können die Garzeit
dennoch beeinussen:
– Größe des Gemüses (geschnitten oder nicht
geschnitten)
– Menge der Zutaten im Behälter
– Gemüsevielfalt und Reifegrad
– Menge an Wasser im Behälter, die der
Messskala entsprechen muss (0,7 l)
Wenn der Dampf nicht ausreicht, können Sie
eine zusätzliche Garzeit einstellen.
Sie können außerdem den manuellen Modus
auswählen und die Temperatur 130 °C,
sowie je nach Art und Menge der Zutaten die
entsprechende Garzeit einstellen.
Das Gerät funktioniert nicht.
Der Netzstecker ist nicht
angeschlossen.
Schließen Sie das Gerät an eine
Steckdose an.
Der Schalter (H) bendet sich in der
Position 0.
Stellen Sie den Schalter auf die Position 1.
Der Behälter oder der Deckel
sind nicht richtig angeordnet oder
eingerastet.
Prüfen Sie, ob der Behälter und der Deckel
gemäß den Abbildungen in der Bedienungs-
anleitung aufgesetzt und eingerastet sind.
Extrem starke Vibrationen.
Das Gerät steht nicht auf einer ebenen
Fläche; das Gerät ist nicht stabil.
Stellen Sie das Gerät auf eine ebene Fläche.
Eine zu große Menge an Zutaten.
Verringern Sie die Menge der verarbeiteten
Zutaten.
Zubehörteile-Defekt.
Überprüfen Sie, ob Sie das empfohlene
Zubehör verwenden.
Der Deckel leckt.
Eine zu große Menge an Zutaten.
Verringern Sie die Menge der verarbeiteten
Zutaten.
Der Deckel ist nicht richtig aufgesetzt
oder eingerastet.
Schließen Sie den Deckel
ordnungsgemäß auf dem Behälter.
Der Dichtungsring ist nicht vorhanden. Legen Sie die Dichtung auf den Deckel.
Der Dichtungsring ist durchgetrennt
oder beschädigt.
Wechseln Sie die Dichtung oder kontaktieren
Sie ein zugelassenes Kundendienstzentrum.
Zubehörteile-Defekt.
Überprüfen Sie, ob Sie das empfohlene
Zubehör verwenden.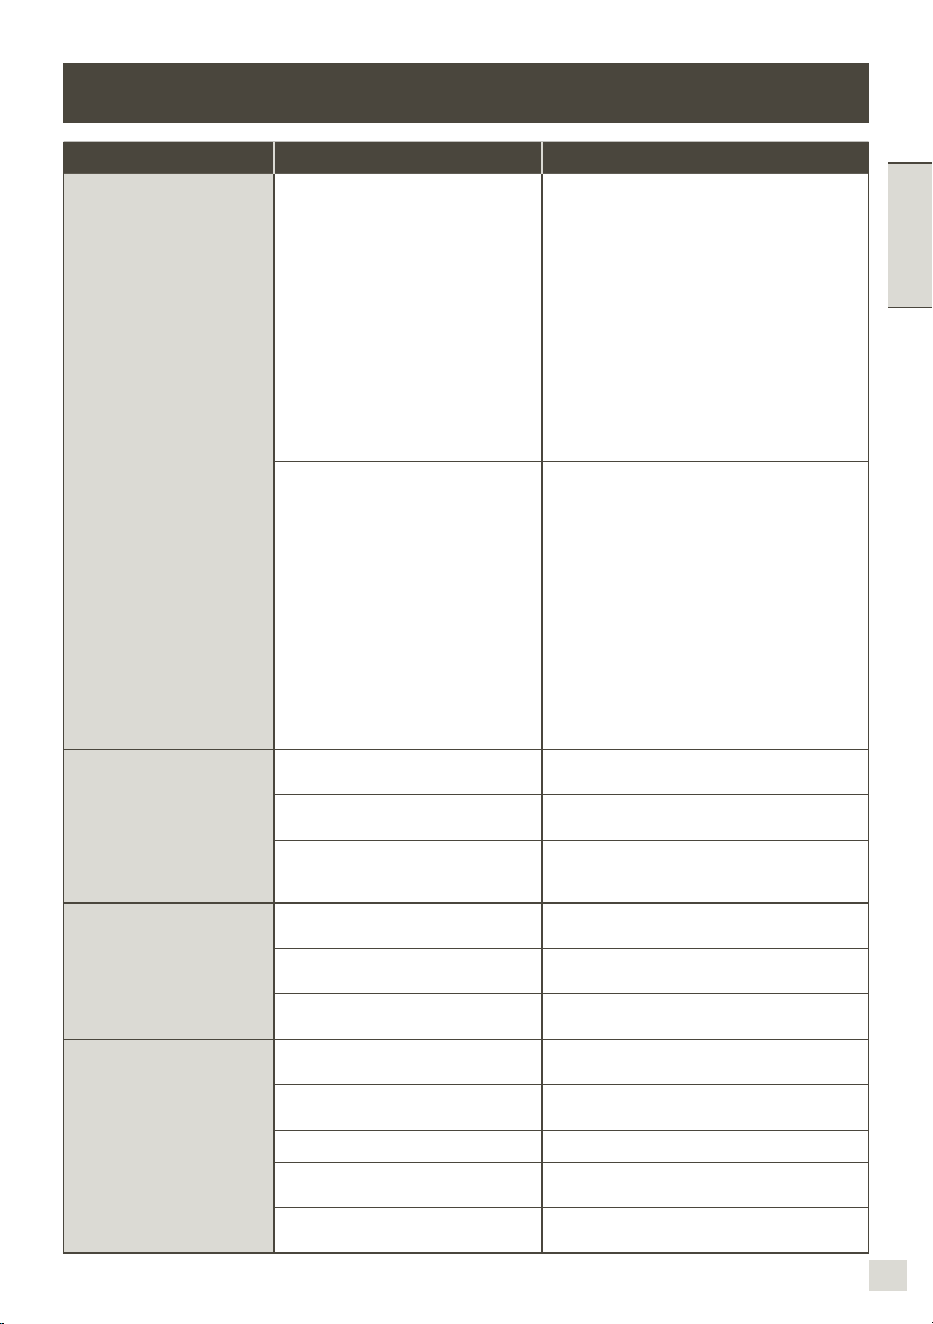
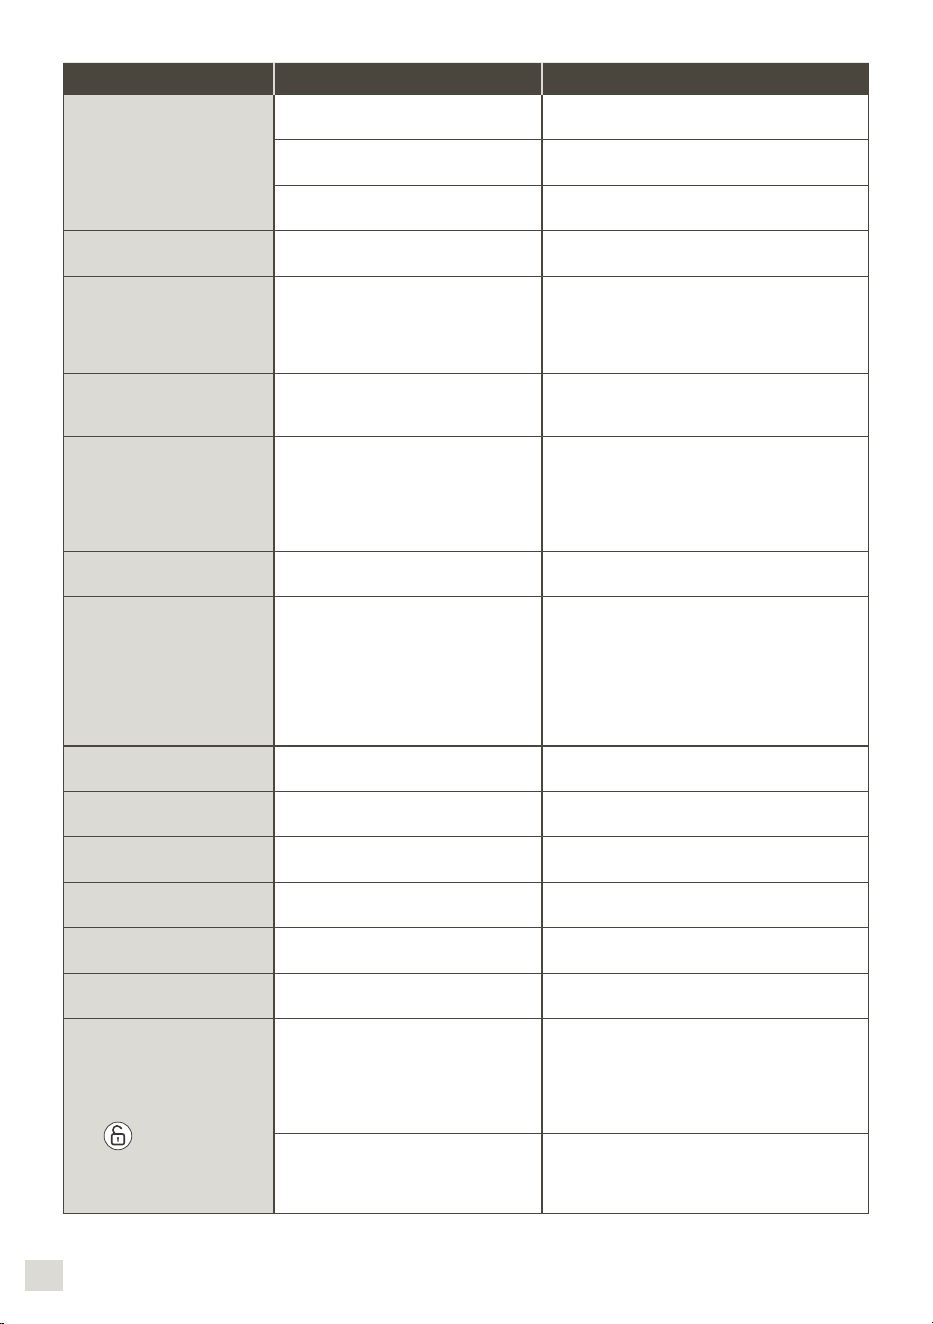
6463
DEUTSCH
PROBLEME URSACHEN LÖSUNGEN
Leck vom Antrieb in den
Behälter.
Die Dichtung wurde nicht korrekt
eingesetzt.
Positionieren Sie die Dichtung korrekt.
Die Dichtung ist beschädigt.
Kontaktieren Sie ein zugelassenes
Kundendienstzentrum.
Der Sicherungsring (D5) wurde
unzureichend befestigt.
Befestigen Sie den Ring korrekt (D5).
Die Messer drehen sich
schwer.
Zu große oder zu harte Stücke.
Verringern Sie die Größe oder Menge der
verarbeiteten Zutaten. Flüssigkeit hinzufügen.
Motorgeruch.
Bei der ersten Verwendung des Geräts
oder bei Überlastung des Motors
aufgrund einer zu großen Menge an
Zutaten oder zu harter oder zu großer
Stücke.
Lassen Sie den Motor abkühlen (etwa 30
Minuten) und verringern Sie die Menge der
Zutaten im Behälter.
„STOP” wird angezeigt.
Das Gerät vibriert zu stark und wurde
in die Sicherheitsposition gesetzt.
Überprüfen Sie, ob die empfohlene
Geschwindigkeit eingehalten wurde bzw., ob
Sie das empfohlene Zubehörteil verwenden.
„SECU“ wird angezeigt.
Überlastung des Motors aufgrund
einer zu großen Menge an Zutaten
oder zu harter oder zu großer
Stücke. Oder aufgrund von nah
aufeinanderfolgenden Zubereitungen
ohne ausreichende Abkühlzeiten.
Lassen Sie den Motor abkühlen (etwa 30
Minuten) und verringern Sie die Menge der
Zutaten im Behälter.
„SECU“ wird angezeigt + rote
LED blinkt.
Überhitzung der Temperaturfühler.
Kontaktieren Sie ein zugelassenes
Kundendienstzentrum.
„Err1“ wird angezeigt
+ rote LED blinkt.
Das Heizelement funktioniert nicht.
Überprüfen Sie, ob die Anschlussstifte für die
Stromversorgung unter dem
Behälter nicht verschmutzt sind. Wenn dies der
Fall ist, reinigen Sie diese und versuchen Sie
es erneut.
Wenn das Problem trotzdem weiterhin besteht,
kontaktieren Sie bitte ein zugelassenes
Kundendienstzentrum.
„Err2“ wird angezeigt. Elektronischer Defekt.
Kontaktieren Sie ein zugelassenes
Kundendienstzentrum.
„Err3“ wird angezeigt. Geschwindigkeitsfehler.
Kontaktieren Sie ein zugelassenes
Kundendienstzentrum.
„Err4“ wird angezeigt.
Kommunikationsfehler mit der
elektronischen Karte. Zerhacker.
Kontaktieren Sie ein zugelassenes
Kundendienstzentrum.
Anzeige „Err8“ Sensorfehler Sicherheitsverriegelung
Wenden Sie sich an ein zugelassenes
Kundendienstzentrum.
„ntc1“ wird angezeigt + rote
LED blinkt.
Der Temperaturfühler 1 funktioniert
nicht mehr.
Kontaktieren Sie ein zugelassenes
Kundendienstzentrum.
„ntc2“ wird angezeigt + rote
LED blinkt.
Der Temperaturfühler 2 funktioniert
nicht mehr.
Kontaktieren Sie ein zugelassenes
Kundendienstzentrum.
Anzeige der
Sicherheitskontrollleuchte
(C4)
Behälter oder Deckel nicht richtig
verriegelt
Überprüfen Sie vor der Inbetriebnahme des
Geräts die richtige Verriegelung des Behälters
auf dem Motorblock und des Deckels auf dem
Behälter. Falls das Problem weiterbesteht,
kontaktieren Sie ein zugelassenes
Kundendienstzentrum.
Der Deckel ist im Modus „Garen ohne
Deckel“ auf dem Behälter verriegelt.
Vor dem Start des Garprogramms den Deckel
entriegeln. Falls das Problem weiterbesteht,
kontaktieren Sie ein zugelassenes
Kundendienstzentrum.
Ihr Gerät funktioniert immer noch nicht?
Wenden Sie sich an ein zugelassenes Kundendienstzentrum (siehe Liste im Serviceheft).
RECYCLING
– *La marque et les logos Bluetooth® sont des marques déposées par Bluetooth SIG, Inc. et leur utilisation par le Groupe
SEB a fait l’objet d’une autorisation.
– Google Play et Android sont des marques de Google Inc.
– Apple et le logo Apple sont des marques d’Apple Inc., déposées aux États-Unis et d’autres pays. App Store est une
marque de service d’Apple Inc.
WÖRTERBUCH
Peering: Zwei Geräte werden zusammengeschlossen oder verknüpft.
Das Peering erfolgt, wenn Ihr Smartphone oder Tablet zum ersten Mal mit dem i Prep & Cook XL verbunden wird.
Synchronisieren: Informationen werden aktualisiert. Anwendung und i Prep & Cook XL werden synchronisiert, um im
verbundenen Modus Informationen austauschen zu können.
Verbinden: Zwischen der Anwendung (auf dem Smartphone/Tablet) und dem Gerät (i Prep & Cook XL) wird eine Verbindung
hergestellt. Für die Synchronisierung ist eine Verbindung zwingend erforderlich.
Cookies: Cookies sind Nutzerinformationen, die an Moulinex gesendet werden, um die Anwendung zu verbessern.
Entsorgung elektrischer und elektronischer Geräte:
Denken Sie an den Schutz der Umwelt!
Ihr Gerät enthält zahlreiche wiederverwertbare oder recyclebare Materialien.
Bringen Sie das Gerät zur Entsorgung zu einer Sammelstelle ihrer Stadt
oder Gemeinde.
Entsorgung des Gerätes und der Verpackungsmaterialien
Die Verpackung besteht ausschließlich aus umweltfreundlichen Materialien, die
nach den geltenden Recycling-Bestimmungen entsorgt werden können.
Für die Entsorgung des Gerätes informieren Sie sich bitte bei den zuständigen
Stellen Ihrer Gemeinde.
PROBLEME URSACHEN LÖSUNGEN
Die Verriegelungssicherung
des Deckels ist noch aktiviert
(Stift außen) und gestattet
das Verriegeln des Deckels
nicht.
Das Gerät wurde im Verlauf eines
Rezepts durch Betätigen des I/O-
Schalters oder durch Ziehen des
Netzsteckers ausgeschaltet.
Um die Küchenmaschine und damit die
Verriegelungssicherung des Deckels
zurückzusetzen, wird der I/O-Schalter auf „I“
gestellt. Der Stift geht automatisch in seine
Ausgangsstellung zurück und der Deckel kann
nun verriegelt werden.
Verbindungsproblem
Sehen Sie in der Bedienungsanleitung der
Anwendung nach.

6665
ITALIANO
Per la sicurezza della persona
Leggere attentamente le istruzioni per l’uso prima di utilizzare l’apparecchio per
la prima volta e conservarle: un utilizzo non conforme alle istruzioni per l’uso
solleva il produttore da qualsiasi responsabilità.
Scollegare sempre l’apparecchio dall’alimentazione se viene lasciato incustodito
e prima del montaggio, dello smontaggio o della pulizia. Non consentire ai
bambini di utilizzare l’apparecchio senza sorveglianza.
L’uso di questo apparecchio è vietato ai bambini. Tenere l’apparecchio e il cavo
fuori della portata dei bambini.
Si sconsiglia l’utilizzo del presente apparecchio da parte di persone (bambini
compresi) con capacità siche, sensoriali o mentali ridotte, o da persone prive
di esperienza o di conoscenza, se non in presenza di gure responsabili della
loro sicurezza, che possano monitorarle ed istruirle preventivamente all’uso.
Sorvegliare i bambini per evitare che giochino con l’apparecchio.
Tenere l’apparecchio fuori della portata dei bambini.
Quando l’apparecchio è in funzione, alcune parti
raggiungono temperature elevate (pareti in acciaio inox
del recipiente e del tappo, perno comune removibile,
parti trasparenti del coperchio, parti metalliche sotto il recipiente,
cestello). Possono provocare scottature. Maneggiare l’apparecchio
toccando solo le parti fredde in plastica (impugnature, blocco
motore). La spia luminosa che segnala il riscaldamento, di colore
rosso, indica il rischio di scottature.
La temperatura delle superci accessibili può essere elevata
quando l’apparecchio è in funzione.
Questo apparecchio non è predisposto per essere messo in
funzione mediante un timer esterno o un sistema di comando a
distanza separato.
Non utilizzare l’apparecchio nel caso in cui non funzioni
correttamente, sia stato danneggiato o qualora il cavo di
alimentazione o la presa risultino danneggiati. Per evitare qualsiasi
tipo di rischio, richiedere obbligatoriamente la sostituzione del
cavo presso un centro assistenza autorizzato (consultare l’elenco
nelle istruzioni per l’uso).
Questo apparecchio non deve essere immerso in acqua. Non
mettere mai il blocco motore (A) sotto l’acqua corrente.
L’apparecchio è destinato al solo uso domestico, all’interno
NORME DI SICUREZZA
dell’abitazione e ad altitudini inferiori ai 2000 m. Il fabbricante
declina ogni responsabilità e si riserva il diritto di annullare la
garanzia in caso di un uso commerciale o improprio del dispositivo,
o del mancato rispetto delle istruzioni.
Questo apparecchio non è destinato ad essere utilizzato in
applicazioni domestiche e simili come:
– in angoli cottura riservati al personale nei negozi, negli ufci e in
altri ambienti professionali,
– in angoli cucina riservati al personale di punti vendita, ufci e
altri ambienti professionali;
– nelle fattorie/agriturismi;
– da parte dei clienti di alberghi, motel e altre strutture a carattere
residenziale;
– in ambienti di tipo B&B.
L’apparecchio emette vapore, che può provocare
scottature. Maneggiare con attenzione il coperchio e il
tappo (se necessario servirsi di un guanto, una presina,
ecc.). Maneggiare il tappo impugnandolo nella parte centrale.
• Non mettere in funzione l’apparecchio se la guarnizione non è
installata sul porta-guarnizione, e se il porta-guarnizione non
è assemblato nel coperchio. È tassativamente obbligatorio
utilizzare l’apparecchio con il tappo inserito nell’apposito
alloggiamento del coperchio (tranne in caso di indicazioni
specifiche per la ricetta).
AVVERTENZA Prestare attenzione ai rischi di infortunio
in caso di cattivo utilizzo dell’apparecchio.
Prendere le dovute precauzioni nel maneggiare le lame
affilate della mezzaluna (F1) e del coltello seghettato
(F4) durante la pulizia e lo svuotamento del recipiente: sono
estremamente taglienti.
Riporre il coltello tritatutto Ultrablade (F1) nel contenitore
dopo ogni utilizzo.
Prestare particolare attenzione nel caso vengano versati
nel robot da cucina liquidi caldi: potrebbero fuoriuscire
dall’apparecchio in seguito ad un’ebollizione improvvisa.
AVVERTENZA Procedere con cautela nel manipolare
l’apparecchio (pulizia, riempimento e versamento): evitare
qualunque traboccamento del liquido sui connettori.

6867
ITALIANO
AVVERTENZA Alcuni alimenti dotati di rivestimento superficiale
(salsicce intere, lingua, pollame…) o grandi pezzi di carne
possono generare schizzi a causa dei liquidi bollenti trattenuti.
Pertanto, si raccomanda di forarli prima della cottura con un
coltello o una forchetta.
AVVERTENZA La superficie della resistenza rimane ancora calda
dopo l’uso.
Assicurarsi di toccare solo le impugnature del prodotto (levette
D2, impugnatura del coperchio E2 e del tappo E1) durante il
riscaldamento e fino al raffreddamento completo.
Fare riferimento alle istruzioni d’uso per regolare la velocità e i tempi
di funzionamento di ciascun accessorio e di ciascun programma.
Fare riferimento alle istruzioni d’uso per l’assemblaggio e il montaggio
degli accessori sull’apparecchio.
Fare riferimento alle istruzioni d’uso per la pulizia e la manutenzione
dell’apparecchio.
Seguire sempre le istruzioni per la pulizia dell’apparecchio:
Scollegare l’apparecchio.
Non pulire l’apparecchio quando è ancora caldo.
Pulire con un panno o una spugna umida.
Non immergere né mettere sotto l’acqua corrente l’apparecchio
SOLO MERCATI EUROPEI:
Tenere l’apparecchio e il cavo fuori dalla portata dei bambini di età
inferiore agli 8 anni. I bambini non devono utilizzare l’apparecchio
come un giocattolo.
Questo apparecchio può essere utilizzato da persone le cui capacità
siche, sensoriali o mentali siano ridotte o la cui esperienza o
conoscenza non siano sufcienti, a condizione che ricevano una
supervisione o che abbiano ricevuto istruzioni in merito ad un
uso sicuro dell’apparecchio e ne comprendano correttamente i
potenziali pericoli.
Questo apparecchio può essere utilizzato da bambini di almeno 8
anni d’età, a condizione che ricevano una supervisione o che abbiano
ricevuto istruzioni in merito ad un uso sicuro dell’apparecchio e
ne comprendano correttamente i potenziali pericoli. La pulizia e il
mantenimento spettanti all’utente non devono essere eseguiti da
bambini senza supervisione, a meno che non abbiano più di 8 anni
e siano sotto la supervisione di un adulto.
Collegamento elettrico
Collegare sempre l’apparecchio a una presa di corrente dotata di
messa a terra.
L’apparecchio è progettato per funzionare esclusivamente a
corrente alternata. Vericare che la tensione di alimentazione
indicata sulla targhetta dell’apparecchio corrisponda a quella
dell’impianto elettrico di casa.
Eventuali errori di collegamento annullano la garanzia.
Non tirare mai il cavo d’alimentazione per scollegare l’apparecchio
dalla presa di corrente.
Non immergere in liquidi l’apparecchio, il cavo di alimentazione o
la presa, non collocarli in prossimità o a contatto con le parti calde
dell’apparecchio e tenerli lontani da fonti di calore e spigoli vivi.
Cattivo utilizzo
Non toccare il coperchio prima del completo arresto
dell’apparecchio (tasto stop): attendere che gli alimenti in
lavorazione abbiano smesso di girare.
Nel recipiente, versare sempre gli ingredienti solidi prima di
aggiungere quelli liquidi (cfr. fig. 10) e non oltrepassare il livello
massimo previsto, segnalato con un’incisione all’interno del
recipiente (cfr. fig.10). Se il recipiente è troppo pieno, è possibile
che fuoriesca acqua bollente.
Attenzione: durante il programma di cottura al vapore, rispettare il
livello di 0,7 l d’acqua (cfr. fig. 3.2).
Non appoggiare mai le dita o qualsiasi altro oggetto nel recipiente
durante il funzionamento dell’apparecchio.
Non utilizzare il recipiente come contenitore (per conservare,
congelare, sterilizzare).
Posizionare l’apparecchio su un piano di lavoro stabile, resistente
al calore, pulito e asciutto.
Non posizionare l’apparecchio vicino a pareti o armadi: il vapore
prodotto potrebbe danneggarli.
Non posizionare l’apparecchio vicino a fonti di calore in funzione
(piastre di cottura, elettrodomestici, ecc.).

7069
ITALIANO
Non coprire il coperchio con canovacci o altro e non cercare di
otturare la sua cavità: utilizzare il tappo di regolazione del vapore
apposito.
Mentre l’apparecchio è in funzione, non avvicinarsi con capelli,
sciarpe, cravatte o simili sopra il recipiente.
Non mettere gli accessori nel forno a microonde.
Non utilizzare l’apparecchio all’aperto.
Non superare mai le quantità massime indicate nelle istruzioni.
Riporre l’apparecchio solo una volta che si è raffreddato
completamente.
Per raffreddare il recipiente, non usare il congelatore ma il frigorifero.
Servizio post-vendita
Per la propria sicurezza, non utilizzare accessori o parti di ricambio
diverse da quelle fornite dai centri di servizio post-vendita
autorizzati.
Eventuali interventi diversi dalla pulizia e dalle normali operazioni
di manutenzione spettanti all’utente devono essere svolti da un
centro assistenza autorizzato.
Consultare la tabella “Cosa fare se l’apparecchio non funziona?”
riportata al termine delle istruzioni per l’uso.
Le presenti istruzioni contengono consigli d’uso che consentiranno di scoprire le
funzionalità di questo apparecchio: preparazione di zuppe, cottura lenta, cottura
a vapore, impasti.
DESCRIZIONE DELL’APPARECCHIO
DATI TECNICI DELL’APPARECCHIO
A Blocco motore.
B Quadro dei comandi.
B1: Selettore di velocità.
B2: Selettore della temperatura
di cottura e/o spia luminosa
riscaldamento.
B3: Selettore della durata di
funzionamento/tasto per
connessione dispositivo.
B4: Tasti di selezione dei programmi
automatic.i
B5: Tasto START/STOP/RESET.
B6: Selettore + / -.
C Display LCD.
C1:
Visualizzazione spia di connessione.
C2:
Visualizzazione programma vapore.
C3:
Visualizzazione dello step in corso.
C4: Visualizzazione spia di sicurezza.
C5: Vvisualizzazione velocità.
C6: Visualizzazione temperatura.
C7: Visualizzazione tempo.
D Insieme recipiente.
D1: Recipiente inox.
D2: Levette.
D3: Perno comune removibile.
D4: Guarnizione.
D5: Anello di chiusura del cilindro.
E Gruppo coperchio.
E1: Tappo di regolazione del vapore.
E2: Coperchio.
E3: Guarnizione.
E4: Guarnizione.
F Accessori.
F0: Contenitore per accessori.
F1: Mezzaluna ultrablade
F2: Miscelatore.
F3: Sbattitore.
F4: Lama per impasto/frantumazione.
F5: Cestello a vapore.
G Spatola.
H Interruttore 0/1 per interrompere
l’alimentazione elettrica dell’apparecchio.
I Spazzola per la pulizia.
Potenza : 1550W (1000W : Resistenza riscaldante/550 W:
Motore)
Range di temperatura : Da 30°C a 150°C
regolabile per incrementi di 5°C
Durata di funzionamento : Da 5 secondi a 2 ore,
regolabile per incrementi di 5 sec minimo a 1 min
massimo.
Numero delle velocità: 13 – 2 velocità intermittenti:
velocità 1 (5 sec acceso/20 sec spento).
velocità 2 (10 sec acceso/10 sec spento).
– 10 velocità continue progressive
(velocità da 3 a 12).
– 1 velocità intermittente max (velocità 13).
– *Il marchio e i loghi Bluetooth® sono marchi depositati da Bluetooth SIG, Inc. e il loro utilizzo da parte del Gruppo SEB è stato
autorizzato.
– Google Play e Android sono marchi di Google Inc.
– Apple e il logo Apple sono marchi di Apple Inc., depositati negli Stati Uniti e in altri paesi. App Store è un marchio di servizio
di Apple Inc.
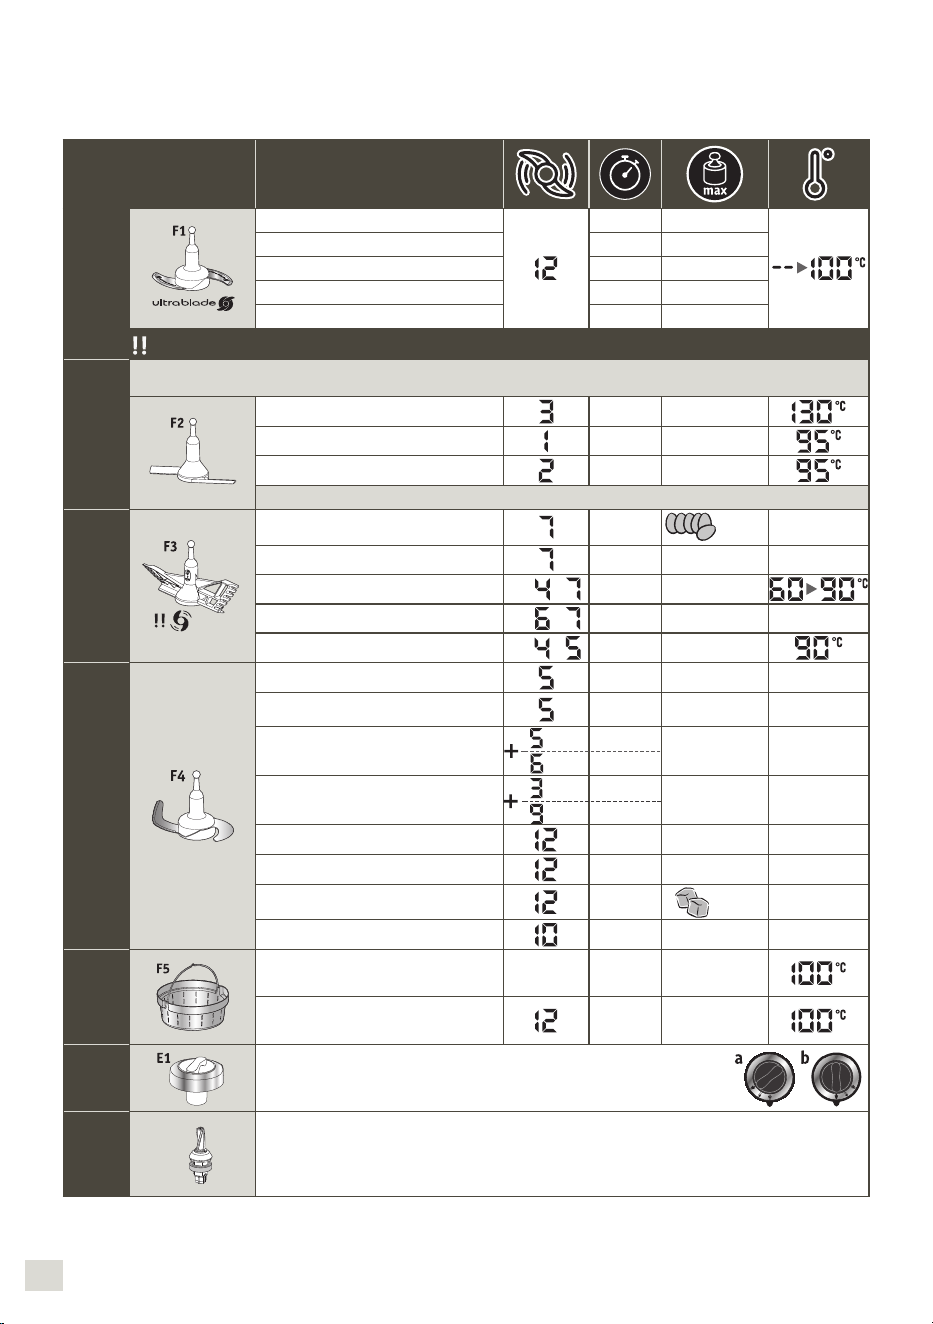
7271
ITALIANO
Con questo apparecchio avete a disposizione i seguenti accessori:
Questi accessori sono anche dotati di zone di impugnatura apposite, per facilitarne il
maneggiamento durante l’uso e la preparazione delle ricette.
IL VOSTRO APPARECCHIO
Coltello tritatutto
Miscelare zuppe
3min 3L
Miscelare composte 40s 1Kg
Tritare le verdure 15s 1Kg
Tritare la carne 30s 1Kg
Tritare il pesce 15s 1Kg
Non utilizzare questo accessorio per tagliare prodotti duri; utilizzare il coltello impastatore / le lame per tritare F4.
Miscelatore
Lavora i piatti cucinati senza rovinarne gli ingredienti,
Molto utile per le fasi di rosolatura a fuoco lento iniziali di alcune preparazioni (risotti, zuppe).
Rosolatura 5min 500g
Cottura a fuoco lento 45min 3L
Risotti 22min 1,5Kg
Ratatouille, chutney, legumi (Impostazioni: vedi ricettario)
Sbattitore
9 max
Albumi montati a neve 5/10min
7
max
Maionese, panna montata 2/5min 0,5L
Salse, creme
Da
a
1/20min 1L
Patate schiacciate
Da
a
1min 1L
Polenta
Da
a
1/16min 1L
Lama impastatrice/frantumatrice
Impasto di pane bianco 2min 30s 1,2Kg
Impasto di pasta brisé, sablé, pani
speciali
2min 30s 1Kg
Impasto di lieviti
(brioche, ciambelle)
1min 30s
2 min
0,8Kg
Lavorazione di impasti
(torte soffici)
40 s
3min
1Kg
Polverizzazione di frutti a guscio
1min 0,6Kg
Pestatura del ghiaccio
1min 0,6Kg
Crushing ice
1min
6 a 10
Pastella per crêpe, gaufre
1min 1,5L
Cestello
a vapore
Cottura a vapore di verdure, pesce
o carne
20/40min 1Kg
Zuppe con pezzetti
3min 3L
Tappo
Tappo di regolazione dell’estrazione del vapore
– Massimo (a) = cottura a vapore.
– Minimo (b) = risotto, crema pasticcera, salse …
Perno
comune
removibile
D3
Perno comune removibile
Rosolatura e cottura senza coperchio
Il vostro apparecchio i Prep & Cook XL
propone un funzionamento “connesso”, ma
può anche essere utilizzato in modalità “ non
connessa “. Inoltre dispone di due modalità di
funzionamento: la modalità con programma
automatico e la modalità manuale.
Modalità programma automatico:
velocità, temperatura di cottura e
durata sono programmate per realizzare
automaticamente zuppe, cotture lente,
cotture a vapore e impasti.
Modalità manuale:
Regolazioni personalizzate dei parametri
velocità, temperatura di cottura e durata
per un utilizzo in base alle proprie esigenze.
Utilizzo con o senza coperchio
Temperatura da
30°C a 130°C
Temperatura da
135°C a 150°C
– Dopo aver impostato una temperatura
tra 135°C e 150°C, è necessario utilizzare
l’apparecchio senza coperchio. Se il
coperchio è posizionato sul recipiente, sul
display apparirà il simbolo del lucchetto, a
indicare che è necessario rimuoverlo.
– Dopo aver aggiunto gli alimenti, mescolarli
con la spatola regolarmente per evitare
di macchiare il fondo del recipiente
(consultare il paragrafo «Pulizia»).
– Se si desidera utilizzare l’apparecchio
con il coperchio, la temperatura di
cottura non deve superare i 130°C.
QUESTO APPARECCHIO È DOTATO DI UN
SISTEMA DI BLOCCAGGIO DI SICUREZZA
DEL COPERCHIO
Il coperchio viene bloccato a ogni avvio
dell’apparecchio. Il sistema di sicurezza
impedisce l’apertura del coperchio durante
la preparazione di una ricetta (Fig. 17). Non
tentare di forzare il coperchio quando è
bloccato. Il sistema di sicurezza si sblocca
a ogni arresto dell’apparecchio. Se è stata
selezionata una temperatura superiore o pari
a 50°C e una velocità superiore o pari a 5, sul
display del pannello di controllo apparirà un
conto alla rovescia di 10 secondi (Fig. 18).
L’apertura del coperchio sarà possibile esclu-
sivamente al termine del conto alla rovescia.
INSERIMENTO DEL VASO, DEGLI ACCES-
SORI E DEL GRUPPO COPERCHIO
Al primo utilizzo lavare tutti gli elementi (D,
E, F, G) con acqua calda e detersivo per
piatti, ad esclusione del blocco motore
(A). Il vaso (D) è dotato di un elemento
trascinatore smontabile (D3) per facilitare la
pulizia.
Prima dell’uso accertarsi di aver rimosso
tutte le parti dell’imballaggio, in particolare
la protezione situata tra il vaso (D) e il
blocco motore (A).
Posizionare la guarnizione (E4) sul porta-
guarnizione (E3) (Fig. 1) e ssare l’insieme
sul coperchio (E2) (Fig. 2).
Posizionare la guarnizione (D4) sul perno
comune removibile (D3). Bloccare il gruppo
sul fondo del vaso con l’anello di bloccag
-
gio (D5) (v. Fig. 3). Per la modalità di cottura
senza coperchio, posizionare la guarnizione
(D4) sul perno comune removibile (D3). Fis
-
sare l’insieme sul fondo del recipiente con
l’anello di bloccaggio (D5) (Fig. 3).
Posizionare l’accessorio prescelto nel vaso:
– gli accessori (F1, F2, F3, o F4)
sull’elemento trascinatore comune sul
fondo del vaso (v.Fig. 4.1),
– in caso di cottura a vapore, il cestello vapore
(F5) all’interno del vaso, (v. Fig. 4.3),
avendo cura di riempire precedentemente
la vaschetta con 0,7 l di preparato liquido
(acqua, salsa…) (v. Fig. 4.2).
Incorporare gli ingredienti all’interno del
vaso o del cestello vapore.
Posizionare il coperchio sul vaso (D)
allineando i due triangoli (v. Fig. 5), bloccare
il coperchio senza premere ruotandolo nel
senso della freccia (v. Fig. 6).
Posizionare il tappo regolatore del vapore
(E1) sul coperchio, sono possibili 2 posizioni
(v.Fig.7):
La posizione “minimo” permette di
rilasciare la condensa massima e
di ottenere anche dei piatti o delle
salse dalla consistenza migliore
(risotto, creme per dolci, salse, ecc.).
La posizione “massimo” permette
di raggiungere il calore e il vapore
massimo nella pentola, per tutte le
cotture a vapore (zuppe, ecc.).
Tale posizione evita allo stesso modo gli
schizzi durante il mescolamento.
Posizionare il recipiente (D) sul blocco
motore (A): si deve udire un “click” sonoro
(cfr.fig.8).
L’apparecchio parte solo se il recipiente e il
coperchio sono correttamente posizionati
e ssati sul blocco motore.
F1 F2
F3 F4
F5
F1 F2
F3 F4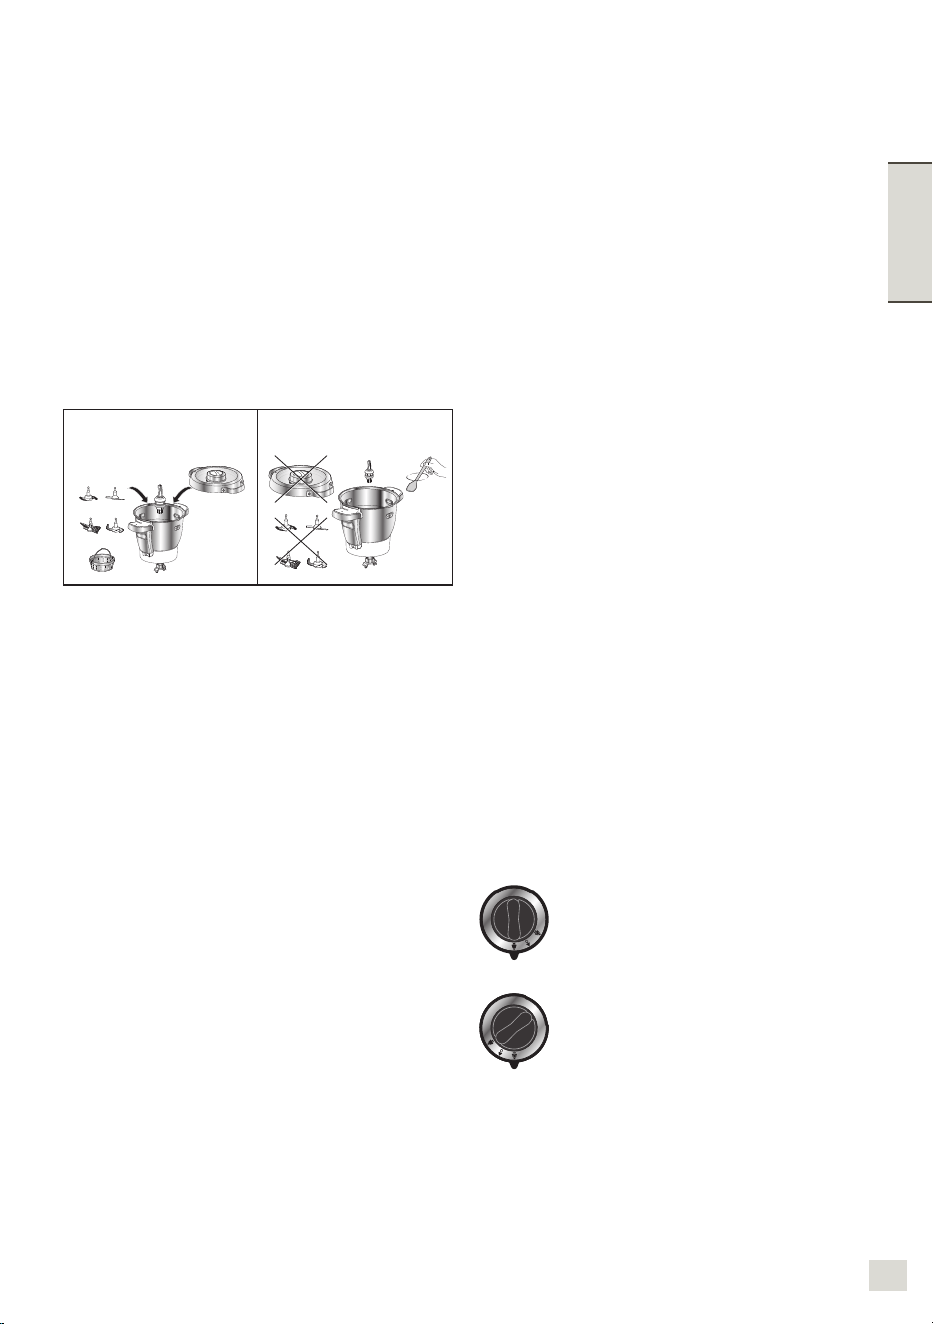
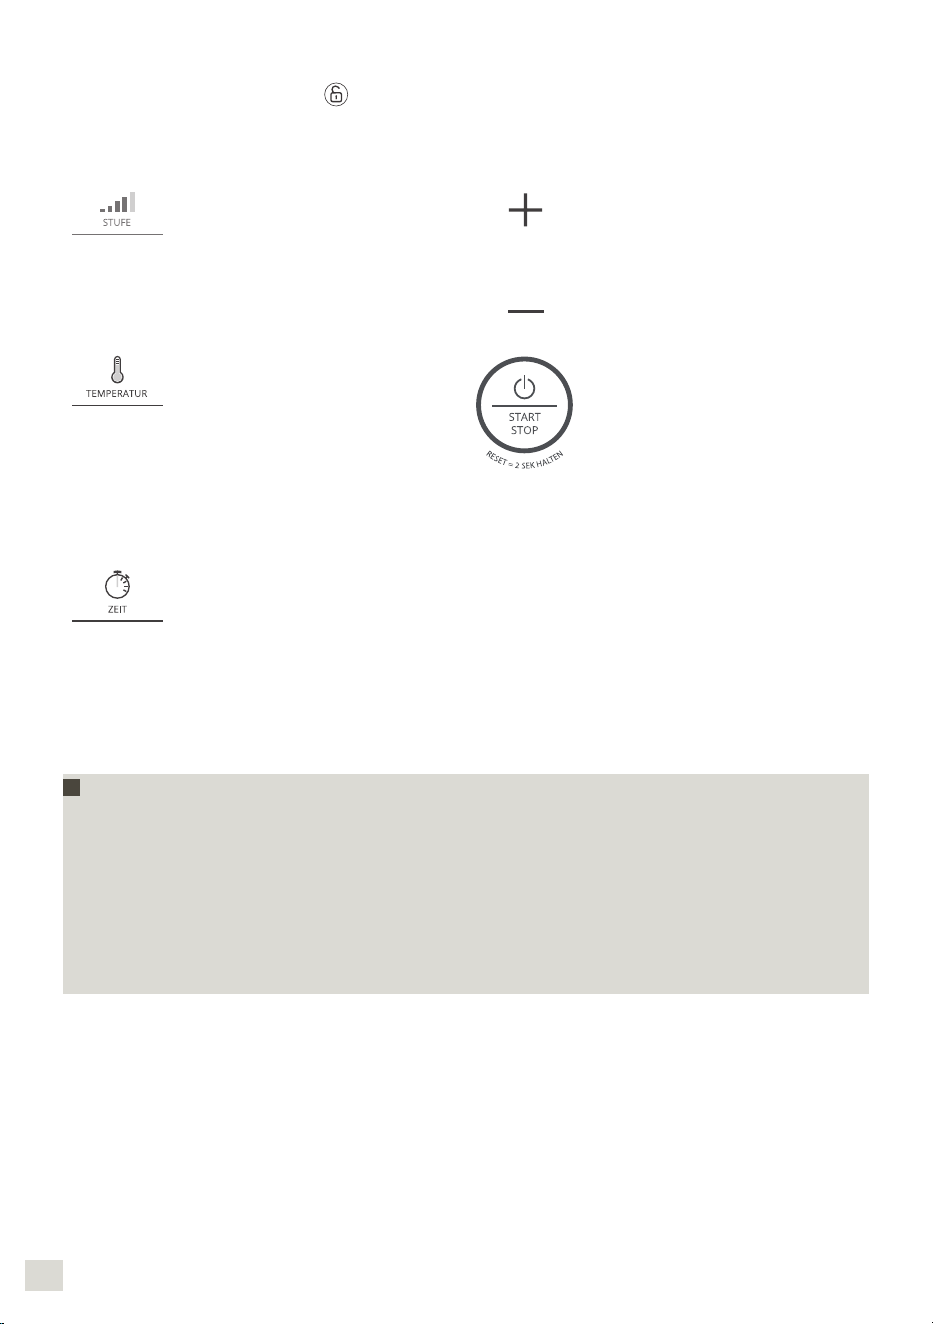
7473
ITALIANO
Consigli di utilizzo
L’apparecchio è dotato di un microprocessore che controlla e analizza la sua stabilità.
In caso di instabilità, la velocità di rotazione del motore si riduce automaticamente. Se
l’instabilità persiste, il motore si arresta e sullo schermo appare l’indicazione “STOP”.
Vericare che la quantità degli ingredienti non sia eccessiva e che la velocità utilizzata
sia idonea alla preparazione.
Controllare che l’accessorio in uso sia quello raccomandato.
Quindi, far ripartire normalmente l’apparecchio.
Selezione delle impostazioni personalizzate
Selezione della velocità del
motore.
2 velocità intermittenti e 10
velocità continue progressive.
Velocità intermittente max
(V13).
Aumento della velocità, della
temperatura di cottura e della
durata.
Diminuzione della velocità,
della temperatura di cottura e
della durata.
Selezione della temperatura
di cottura.
Da 30° a 150°C.
Spia luminosa di riscaldamento:
Si accende all’avvio della
cottura e si spegne quando
la temperatura interna del
recipiente scende al di sotto dei
50°C.
Questo pulsante ha 3 funzioni:
– “Convalida” della scelta del
programma automatico o
dei parametri selezionati nel
quadro di un utilizzo manuale
(velocità, temperatura di
cottura, tempo).
– “Pausa” nel corso di
un utilizzo una volta che
l’apparecchio è partito.
– “Reset” dei parametri
selezionati dell’apparecchio
con una pressione di 2
secondi.
– “Convalida della fase”
nelle ricette step by step.
Selezione della durata di
funzionamento.
Da 5 secondi a 2 ore.
Prima connessione: tenere
premuto per l’accoppiamento
tra I Prep & Cook XL gourmet
e smartphone/tablet
In caso di posizionamento errato o di un cattivo fissaggio di uno o dell’altro elemento
(cfr. fig. 10.1 e 10.2), il logo si mette a lampeggiare quando si tenta di attivare una
funzione.
UTILIZZO IN MODALITÀ CONNESSA
Accensione dell’apparecchio
Frequenza: 2,40 GHz. Potenza massima trasmessa: 7,7 dBm
L’apparecchio è dotato di un interruttore 0/1. Spostare l’interruttore su 1. (v. Fig. 9).
Il display LCD visualizza tutti i parametri a “0”.
In modalità connessa, la visualizzazione del display LCD dell’ i Prep & Cook XL è blu.
PREPARAZIONE DELL’INSTALLAZIONE
L’elenco dei modelli di smartphone e tablet compatibili con i Prep & Cook XL è
disponibile su www.krups.com
iPhone 4S o più recente
iPad 3 / iPad mini o successiva
Da iOS 9 e il seguente.
Da Android 4.4 e il seguente.
(elenco dei modelli compatibili www.krups.com)
INSTALLAZIONE DELL’ I Prep & Cook XL
Requisiti per l’installazione di i Prep & Cook XL:
L’applicazione Prep & Cook scaricabile gratuitamente su App Store (iPhone/iPad) e
Google Play (Android)
Una connessione Bluetooth fornita dal vostro smartphone o tablet Bluetooth® Smart
4.0: i Prep & Cook XL si collega al vostro smartphone/tablet tramite una connessione
autonoma senza li
Lo smartphone/tablet deve trovarsi in prossimità dell’ i Prep & Cook XL (la portata della
connessione varia in funzione della congurazione dello slot).
Una presa elettrica per il collegamento dell’ i Prep & Cook XL: i Prep & Cook XL si connette
al vostro smartphone/tablet solo quando è collegato alla rete elettrica.
Informazioni su Bluetooth® Smart
La tecnologia Bluetooth® Smart 4.0 (o Bluetooth Low Energy) permette una comunicazione
senza li tra un’applicazione e un apparecchio consumando pochissima energia.
PRIMA CONNESSIONE DELL’ I Prep & Cook XL IN MODALITÀ CONNESSA
Download dell ’applicazione
Per cominciare, scaricate l’applicazione sul vostro smartphone/tablet collegandovi all’App
Store per iOS o a Google Play per Android.
Una volta scaricata l’applicazione, in pochi minuti e senza creare un account, potrete
realizzare le prime ricette con i Prep & Cook XL. (300 ricette proposte senza la creazione di
un account personale).
La creazione di un account sull’applicazione vi permetterà di accedere a tutti i contenuti per
variare i vostri menu.
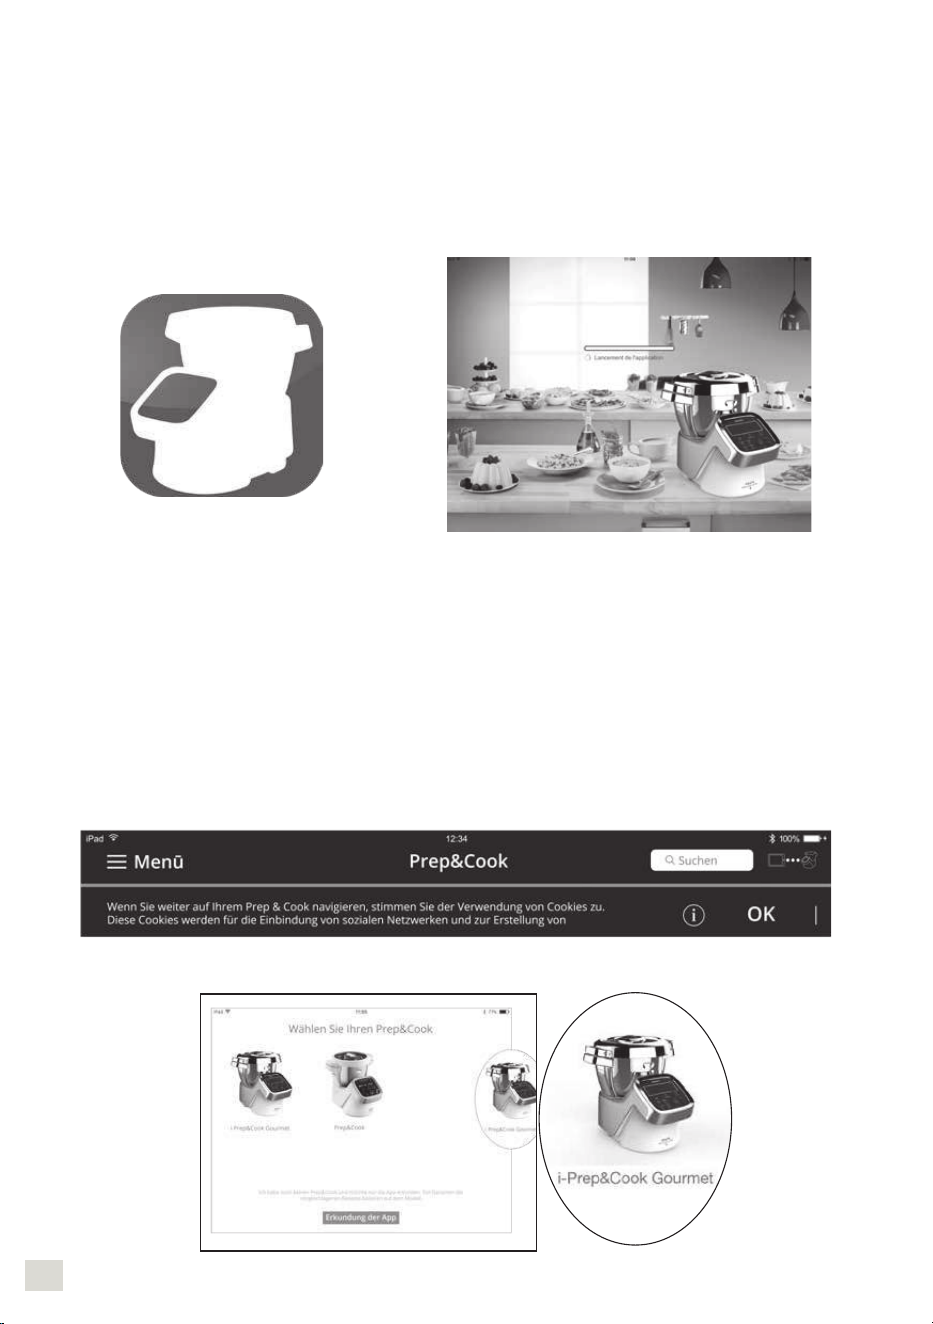
7675
ITALIANO
Accensione dell’i Prep & Cook XL
L’apparecchio è dotato di un interruttore 0/1 (H). Spostare l’interruttore su 1 (v. Fig. 9).
Attivazione del Bluetooth
Avvicinatevi all’i Prep & Cook XL e vericate che il Bluetooth del vostro smartphone/tablet
sia attivo.
Avvio dell’applicazione
Avviate l’applicazione Prep & Cook cliccando sull’icona “ Prep & Cook “.
Accoppiamento
Cosa signica accoppiamento?
Al momento della prima connessione, l’applicazione precedentemente scaricata sullo
smartphone/tablet e l’i Prep & Cook XL si rilevano automaticamente e rapidamente, a
condizione che vengano seguite le fasi sottoindicate.
Se lo desiderate potete accoppiare no a 10 dispositivi con i Prep & Cook XL.
A tale scopo dovrete procedere singolarmente all’accoppiamento di ciascun dispositivo
(v.accoppiamento).
Tuttavia è possibile connettere un solo dispositivo alla volta.
Accettare i cookie: permettono di migliorare l’applicazione raccogliendo le vostre
preferenze d’uso.
Selezionare il proprio dispositivo
Quando l’applicazione lo richiede, esercitare una pressione prolungata (4 secondi) sul
tasto Timer (B3) dell’i Prep & Cook XL.
La spia di connessione (C1) lampeggia per 30 secondi al massimo, durante i quali
l’i Prep & Cook XL si connette allo smartphone/tablet.
Accettare la richiesta di accoppiamento che appare sullo smartphone/tablet o accedere
al menu delle notiche per accettare l’accoppiamento.
La spia di connessione (C1) ssa indica che la connessione è stata stabilita.
NB : Una volta effettuato l’accoppiamento, l’i Prep & Cook XL riconoscerà automaticamente
lo smartphone/tablet in occasione delle connessioni future. Non sarà più necessario
ripetere questa fase di accoppiamento
Connessione riuscita
L’i Prep & Cook XL ora è connesso allo smartphone/tablet. L’icona rafgurata indica che la
connessione è stata stabilita
Connessione non riuscita
L’icona rafgurata indica che la connessione non è stata stabilita
Ripetere le seguenti operazioni:
Avvicinarsi all’i Prep & Cook XL.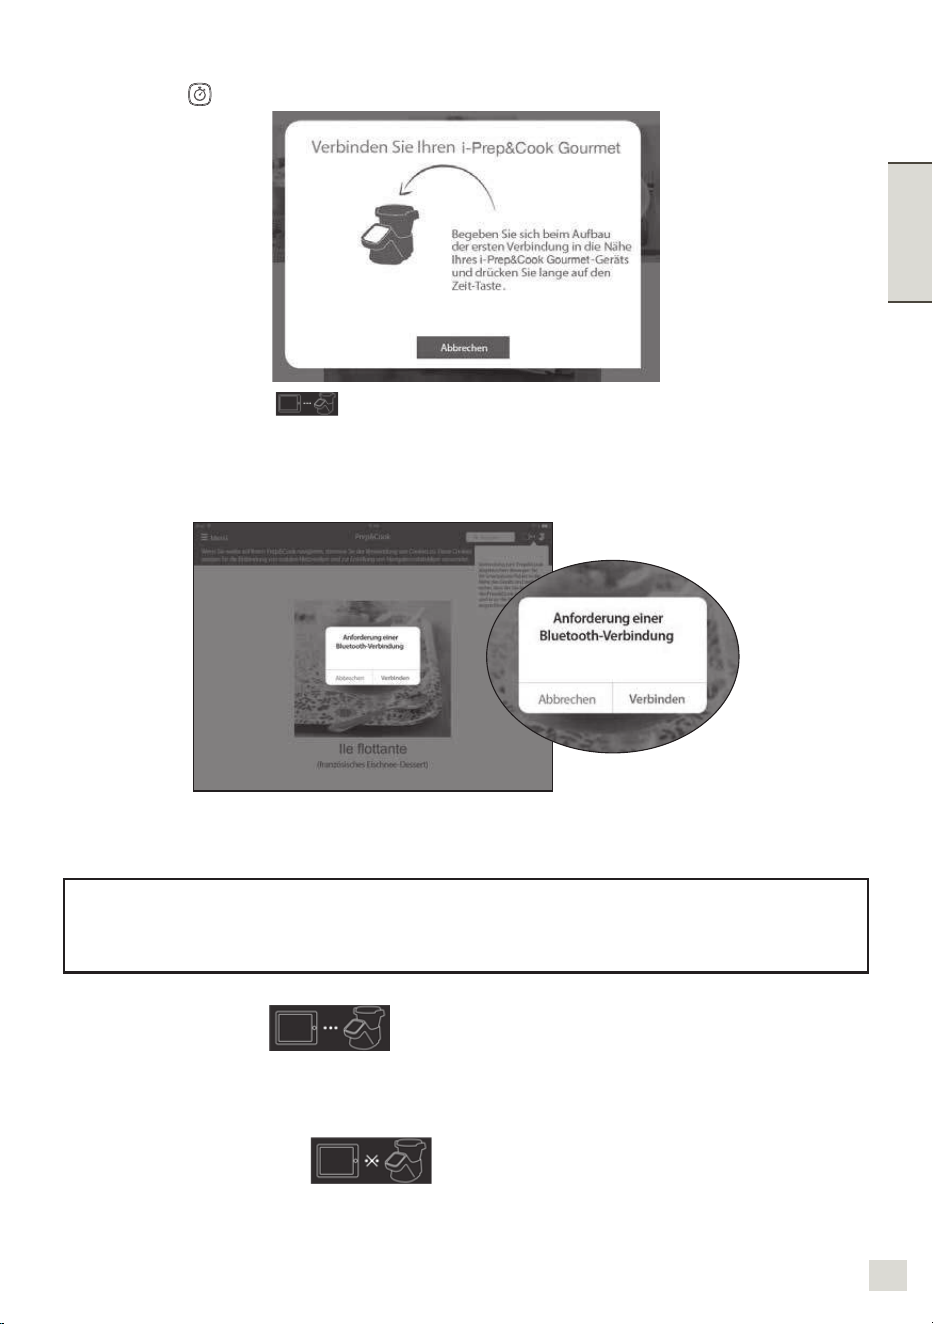
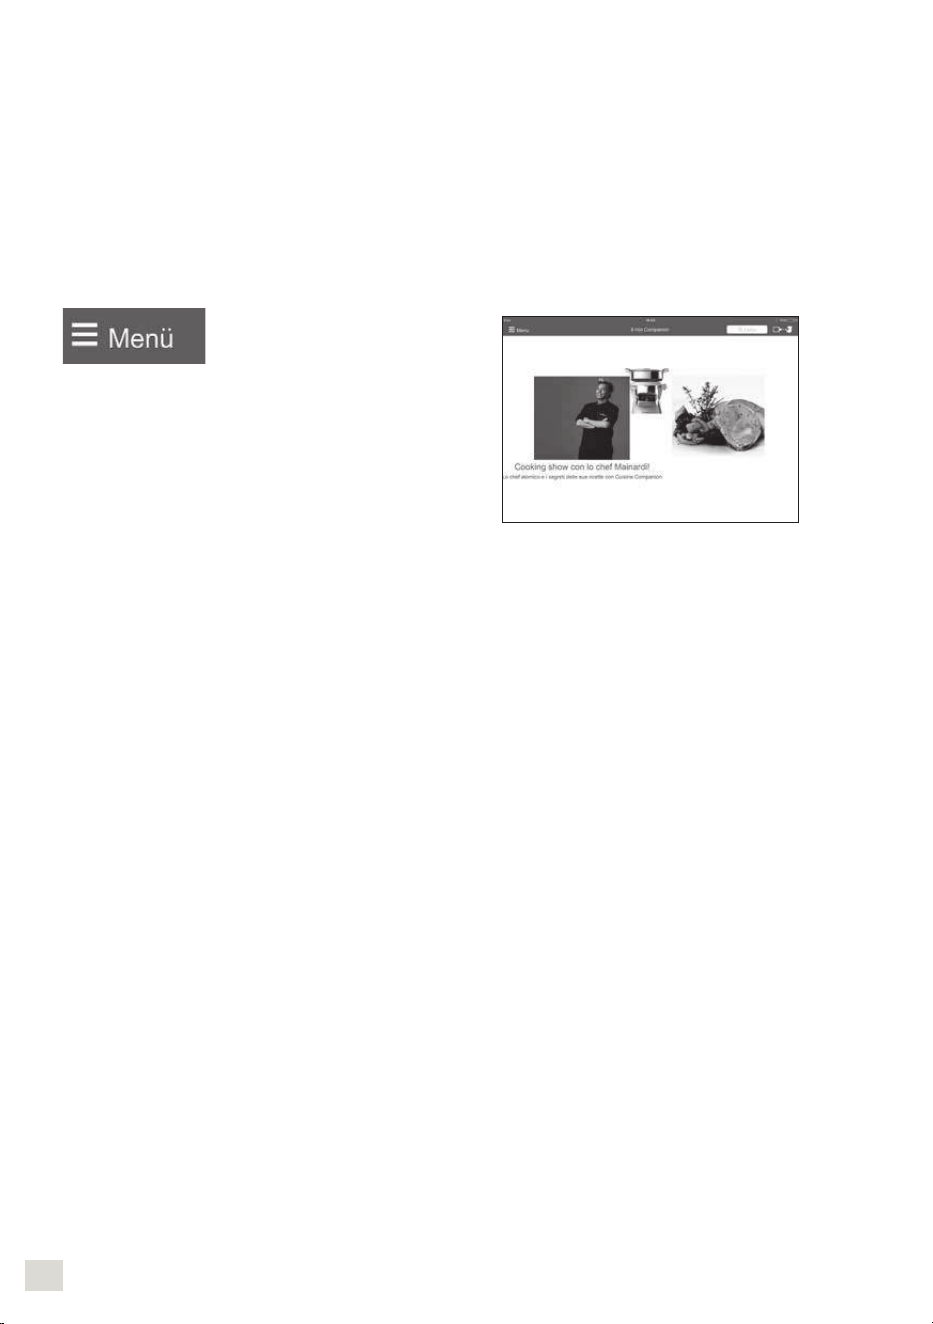
7877
ITALIANO
Vericare che l’i Prep & Cook XL sia correttamente collegato alla rete elettrica e che la
presa funzioni correttamente.
Vericare che lo smartphone/tablet sia compatibile (v. lista di compatibilità su
www.krups.com).
Vericare che il Bluetooth dello smartphone/tablet sia attivo.
Ripetere le fasi di accoppiamento e consultare le FAQ (domande frequenti).
Se il problema persiste, accertarsi che lo smartphone/tablet sia compatibile
Se si utilizza un dispositivo Android, accertarsi che sia incluso nei modelli compatibili
(v. lista di compatibilità su www.krups.com).
Accedere al menu dell’applicazione per scoprire la nostra gamma di ricette.
In modalità connessa, durante una ricetta step
by step, il primo reset conclude la fase e il
secondo reset conclude la ricetta.
FAQ: DOMANDE FREQUENTI
Dove collocare l’i Prep & Cook XL:
Collocare l’i Prep & Cook XL su una supercie piana e stabile.
Per ottenere una connessione ottimale tra l’i Prep & Cook XL e lo smartphone/tablet, è
consigliabile eseguire tutte le operazioni che richiedono la connessione a una distanza
ragionevole.
La presenza della spia di connessione ssa (C1) garantisce che gli apparecchi sono
connessi.
Se la connessione si interrompe (il simbolo della connessione è barrato) bisogna ridurre
la distanza dall’i Prep & Cook XL per ripristinarla.
Cosa succede se la connessione si interrompe durante una ricetta?
Se la connessione tra l’i Prep & Cook XL e lo smartphone/tablet si interrompe durante una
ricetta, la sincronizzazione tra i due apparecchi sarà eseguita automaticamente non appena
la connessione sarà ripristinata. Si potrà riprendere l’esecuzione della ricetta dalla fase in
cui si è interrotta al momento della perdita di connessione.
Posso utilizzare l’i Prep & Cook XL senza l’applicazione?
L’apparecchio può essere usato senza l’applicazione. (V. Messa in funzione in modalità non
connessa).
A tale scopo consultare il paragrafo “Utilizzo dell’apparecchio”.
Tuttavia, solo l’applicazione permette di usufruire dei tanti vantaggi del prodotto connesso.
I Prep & Cook XL può essere utilizzato con più smartphone o tablet?
Se lo desiderate potete accoppiare vari dispositivi all’i Prep & Cook XL. A tale scopo dovete
procedere singolarmente all’accoppiamento di ciascun dispositivo (v. accoppiamento).
Tuttavia è possibile connettere un solo apparecchio alla volta.
Il Bluetooth del mio telefono deve essere sempre attivo?
Il Bluetooth deve essere attivo per sincronizzare l’applicazione e l’i Prep & Cook XL.
UTILIZZO IN MODALITÀ NON CONNESSA
Utilizzo del pannello comandi (B)
Selezione di un programma automatico:
Impasti (lista dei sub
programmi)
Zuppe (lista dei sub
programmi)
Cottura lenta (lista dei sub
programmi)
Cottura a vapore (lista dei sub
programmi)
Accensione dell’apparecchio
L’apparecchio è dotato di un interruttore 0/1. Spostare l’interruttore su 1.
Il display LCD visualizza tutti i parametri a “ 0 “. (V. Fig. 9).
In modalità non connessa, la visualizzazione del display LCD dell’i Prep & Cook XL è bianca.
PROGRAMMI AUTOMATICI
1. Premere il programma
prescelto (B4). Un punto
luminoso appare al di
sopra del programma
selezionato. Le pressioni
successive permettono
di scorrere i vari sub
programmi.
4. Una volta modicati tutti
i parametri, premere il
pulsante “start” (B5) per
avviare il programma.
Quando l’apparecchio
è in modalità cottura, la
spia luminosa rossa si
accende per segnalare
che la cottura è iniziata.
2. Le impostazioni pre-
programmate possono
essere modicate per
una sola ricetta (in base
ricetta scelta, gli ingre-
dienti, le quantità). Pre-
mere il selettore della
temperatura di cottura
(B2) o il selettore del
tempo (B3), il parametro
prescelto lampeggia sul-
lo schermo (C6-C7).
5. Quando il programma è terminato,
l’apparecchio emette 3 bip.
6. Al termine dei programmi zuppe,
cottura lenta P2 e P3, cottura a vapore,
l’apparecchio passa automaticamente
alla modalità di mantenimento al caldo
per 45 minuti, in modo che la pietanza
preparata rimanga pronta per essere
consumata. Nel programma cottura
lenta P2 e P3 e in modalità manuale,
il motore dell’apparecchio funziona
a una velocità specica allo scopo
di preservare la pietanza preparata e
di evitare che aderisca al fondo del
vaso. Per arrestare il mantenimento
al caldo è sufciente premere il tasto
“stop” (B5). Se si apre il coperchio, si
premono le levette (D2) o si rimuove il
vaso, il mantenimento al caldo si arresta
automaticamente.
3. Regolare i parametri
servendosi del selettore
+/- (B6).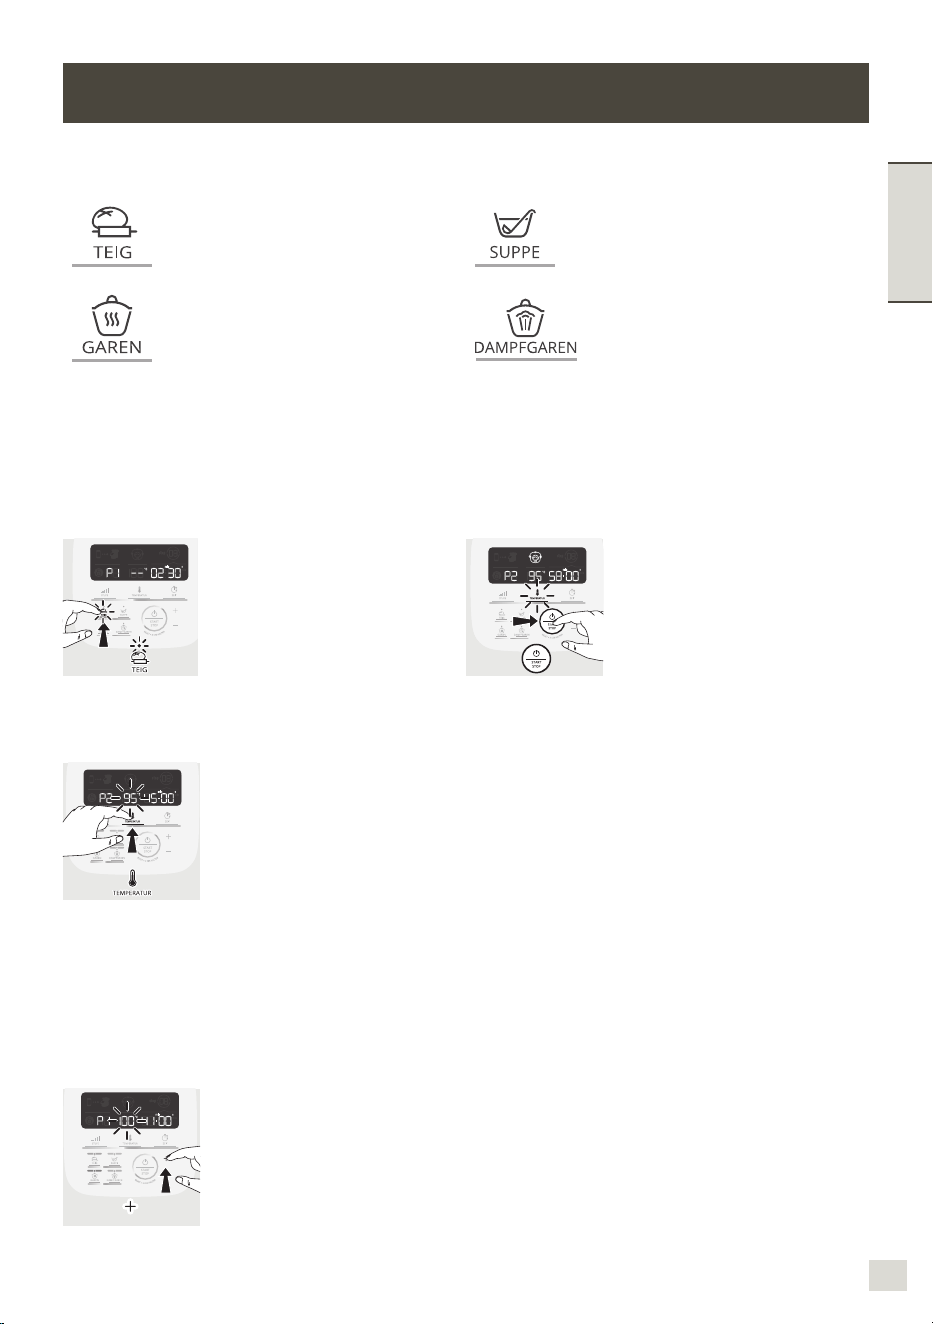
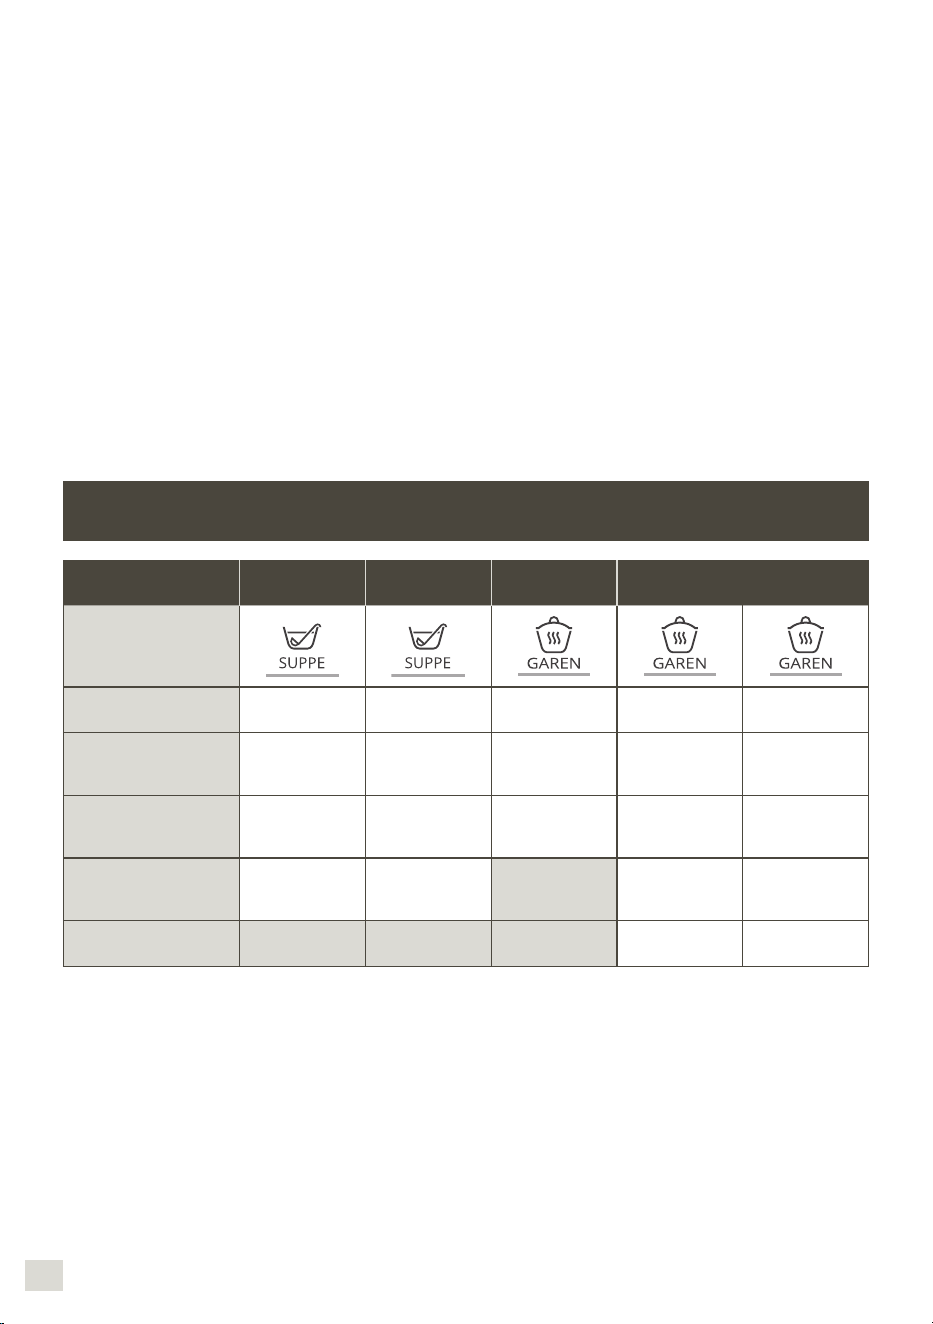
8079
ITALIANO
Alla ne dei programmi per le salse, per la
cottura a fuoco lento P2 e P3 e per la crema
pasticcera e durante la tenuta in caldo, il
motore continua a girare al ne di evitare
che il preparato aderisca al fondo della
pentola.
Al termine della lavorazione dell’impasto nei
programmi impasto P1 e P2, l’apparecchio
passa in modalità “lievitazione dell’impasto”
a 30°C per 40 minuti, per dare un migliore
volume al preparato. Aprendo il coperchio,
premere sulle levette (D2) o estrarre il
recipiente: l’apparecchio passa in modalità
pausa e può essere riavviato premendo
nuovamente su “start”. Se si desidera
arrestare questa modalità, premere per 2
secondi sul pulsante “stop”.
7. Premere sulle levette (D2) e sollevare il
gruppo del recipiente (D) (cfr. fig. 12).
In modalità connessa, una volta avviato
il programma automatico, è possibile
fermare l’apparecchio in qualsiasi momento
premendo il tasto “stop”. Il programma
automatico è quindi in modalità pausa: è
possibile riavviarlo premendo nuovamente
su “start”. Se il programma scelto non è
corretto e si desidera annullare, premere per
2 secondi sul pulsante “stop”.
ALLA SCOPERTA DEI PROGRAMMI AUTOMATICI
Zuppa P1 Zuppa P2
Cottura a fuoco
P1
Cottura a fuoco
P2
Cottura a fuoco
P3
Programmi
automaticioci
Velocità preimpostata
(regolabile)
10 impulsi e V12
per 2 min
Da V7 a V10 per
30 sec
V3 V1 V2
Temperatura
preimpostata
(regolabile)
100°C
(da 90°C a
100°C)
100°C
(da 90°C a
100°C)
130°C
(non regolabile)
95°C
(da 80°C a
100°C)
95°C
(da 80°C a
100°C)
Tempo preimpostato
(regolabile)
40 min
(da 20min
a 60 min)
45 min
(da 20min
a 60 min)
5 min
(da 2min
a 15 min)
45 min
(da 10 min
a 2hr)
20 min
(da 10 min
a 2hr)
Funzione di tenuta in
caldo “predenita” al
termine del programma
45 min 45 min 45 min 45 min
Velocità motore nella
tenuta in caldo
5s On in V3
/ 20s OFF
10s ON in V3 /
10s OFF
Alcune ricette possono provocare fuoriuscite improvvise causate dalla comparsa
di bolle, in particolare nel caso della cottura di verdure congelate. In questo caso,
ridurre i volumi di conseguenza.
Cottura al
vapore P1
Cottura al
vapore P2
Impasto P1 Impasto P2 Impasto P3
Programmi automatici
Velocità preimpostata
(regolabile)
V5 per 2,5 min
V5 per 1 min 30
sec, quindi V6
per 2 min
V3 per 40 sec,
quindi V9
per 3 min
Temperatura
preimpostata
(regolabile)
100°C
(non regolabile)
100°C
(non regolabile)
Tempo
preimpostato
(regolabile)
30 min
(da 1 min a
60 min)
35 min
(da 1 min a
60 min)
2,5 min
(da 30s a
2 min 30s)
3,5 min
(da 30s a
3 min 30s)
3 min 40s
(da 1 min 40s a
3 min 40s)
Funzione di tenuta
in caldo «predenita» al
termine del programma
45 min 45 min
Velocità motore nella
tenuta in caldo
Lievitazione dell’impasto
a 30° «predenita» al
termine del programma
40 min 40 min
Tempi di cottura al vapore
Ingredienti Quantità (max) Tempi di cottura stimati
Programma vapore
raccomandato
Zucchine 800 g 20 min P1
Pastinaca 800 g 25 min P1
Porri (parte bianca) 800 g 25 min P1
Broccoli 500 g 20 min P1
Pesce
600 g (con carta alimentare
adatta alla cottura)
15 min P1
Patate 1 kg 30 min P2
Carote 1 kg 30 min P2
Fagiolini 800 g 30 min P2
Carni bianche
600 g (con carta alimentare
adatta alla cottura)
20 min P2
Alcune ricette possono provocare fuoriuscite improvvise a causa della formazione di
bolle, in particolare durante l’uso di verdure surgelate. In tal caso, ridurre il volume
degli ingredienti.
I tempi di cottura forniti hanno un valore
indicativo, permettendo una cottura
soddisfacente nella maggior parte dei casi.
Alcune condizioni inuenzano, tuttavia, i
tempi di cottura :
– la grandezza delle verdure (tagliate o meno)
– la quantità degli ingredienti nel cestello
– la varietà delle verdure e quanto sono
mature
– la quantità d’acqua nella pentola, che
corrisponde alla graduazione (0,7L).
Prestare attenzione all’utilizzo del tappo vapore
nel senso “massimo” (a) rivolto verso di voi.
Nel caso in cui la cottura non sia sufciente,
è possibile aggiungere un tempo di cottura
supplementare.
USING THE INTERNAL STEAM BASKET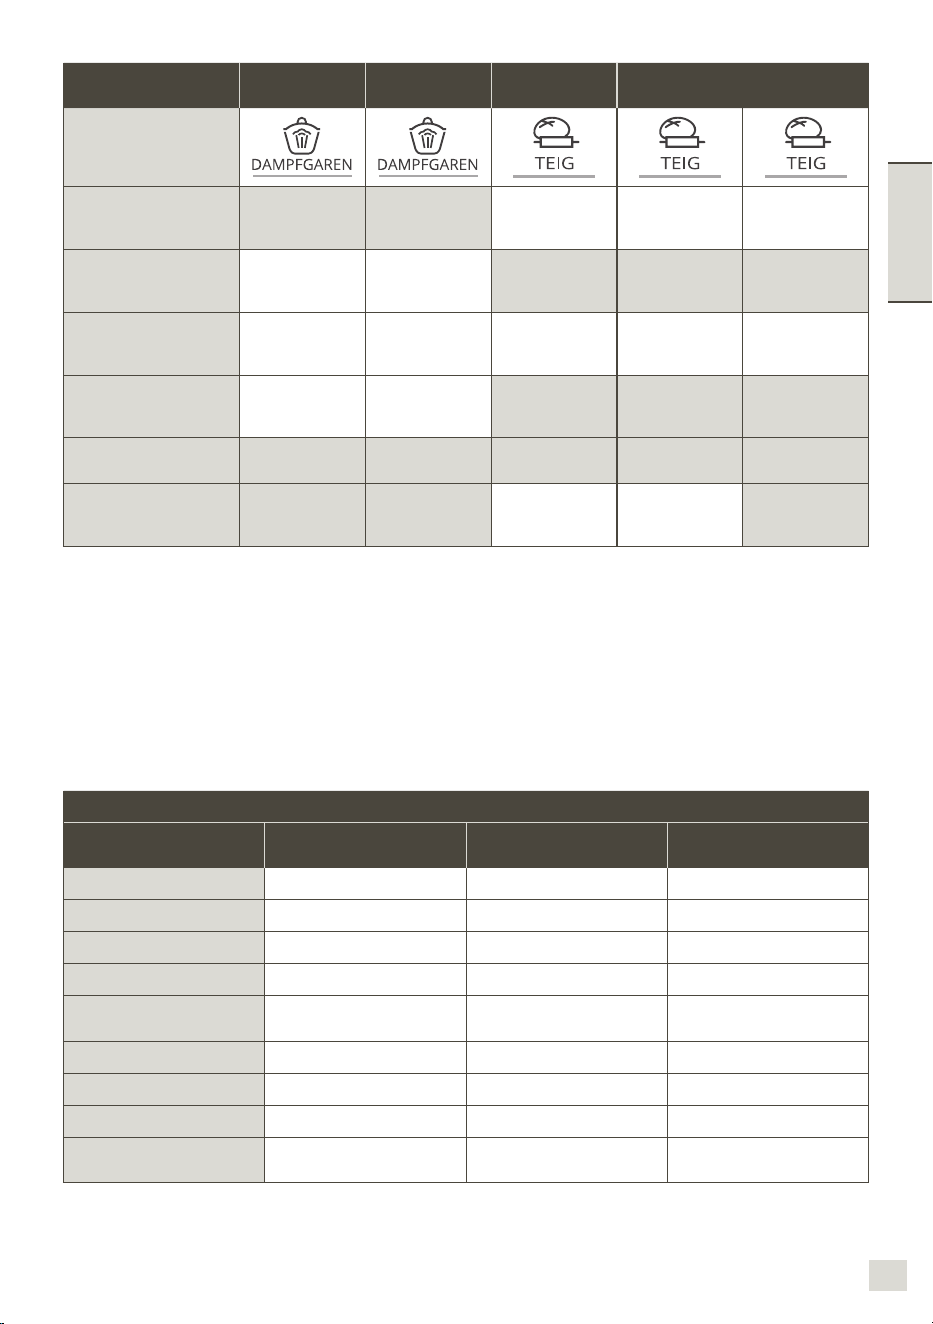
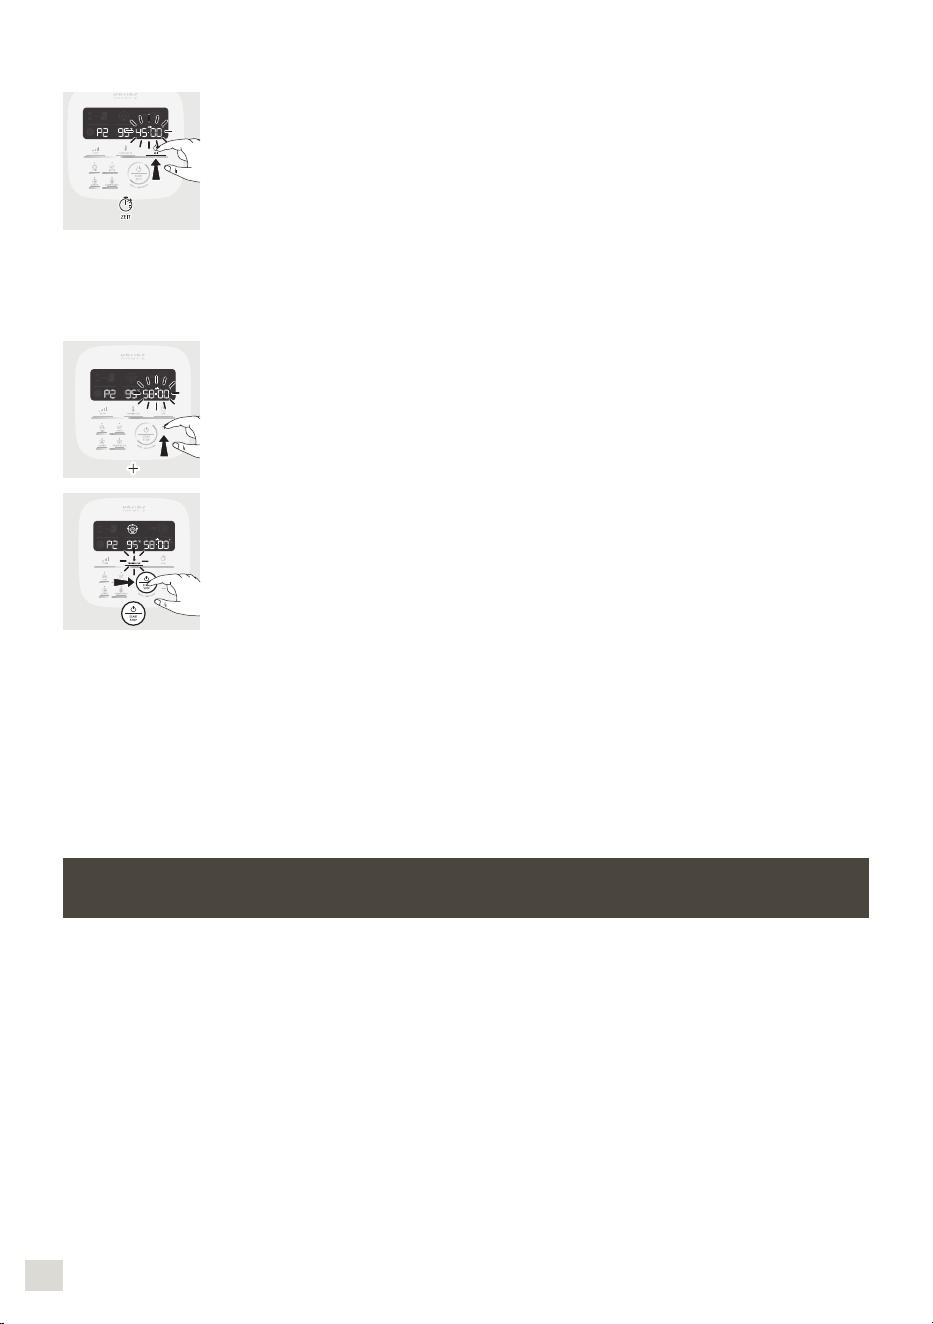
8281
ITALIANO
MODE MANUEL:
1. Premere direttamente sul
selettore del parametro
che si è scelto di regolare,
ovvero quello della veloci-
tà (B1), quello del selettore
della temperatura di cottura
(B2) o sul selettore del tem-
po (B3): il parametro scelto
lampeggia sullo schermo
(C5-C6-C7).
Il programma è quindi in pausa:
è possibile riavviarlo premendo
nuovamente su “start”. Se il
programma scelto non è corretto e
si desidera annullare, premere per 2
secondi sul pulsante “stop”.
4. Quando il programma è terminato,
l’apparecchio emette 3 bip.
5. Premere sulle levette (D2) e
sollevare il gruppo del recipiente
(D) (cfr. fig. 12).
COTTURA SENZA COPERCHIO
È possibile rosolare gli alimenti nel re-
cipiente senza coperchio mescolan-
doli e sorvegliando la cottura (Fig.16).
Per questa modalità di cottura è ob-
bligatorio selezionare una tempera-
tura compresa tra 135°C e 150°C.
Impostare la durata di funzionamento
(no a 20 minuti).
La funzione COTTURA SENZA CO-
PERCHIO non è adatta alle confettu-
ra e alle preparazione a base di latte
(rischio di fuoriuscite).
2. Regolare i parametri ser-
vendosi del selettore +/-
(B6). Per sicurezza, non è
possibile regolare la tempe-
ratura senza regolare i tem-
pi di cottura.
3. Quando si è terminata la
modica di tutti i parametri,
premere il pulsante “avvio”
(B5). Quando l’apparecchio
è in modalità cottura, la spia
luminosa rossa si accende
per segnalare che la cottu-
ra è iniziata. Quando viene
avviato il programma, l’ap-
parecchio può essere arre-
stato in qualsiasi momen-
to premendo sul pulsante
“stop”(B5).
PULIZIA DELL’APPARECCHIO
Questo apparecchio non deve
essere immerso in acqua. Non
mettere mai il blocco motore
(A) sotto l’acqua corrente.
Una volta terminato l’uso dell’apparecchio,
scollegarlo.
Pulire immediatamente il recipiente dopo
l’uso.
Premere sulle levette (D2) e sollevare il
gruppo del recipiente (D).
Posizionare il recipiente su una supercie
piana.
Sbloccare il coperchio ruotandolo di un
quarto di giro in senso orario. Rimuovere
il coperchio con attenzione!
Prendere le dovute precauzioni nel
maneggiare le lame aflate della mezzaluna
(F1) e del coltello seghettato (F4) durante
la pulizia e lo svuotamento del recipiente:
sono estremamente taglienti.
Una volta che gli elementi si sono raffreddati:
– Smontare il perno comune removibile (D3),
la guarnizione ’(D4) e l’anello di ssaggio
(D5) (cfr. fig. 13).
–Pulire il recipiente (D), il perno comune
removibile (D3) e la guarnizione (D4),
el’anello di ssaggio (D5), gli accessori
(F1) (F2) (F3) (F4) (F5), il tappo di
regolazione del vapore (E1), il coperchio
(E2), guarnizione (E4) e la guarnizione
(E3) con una spugna e acqua calda e
sapone.
Sciacquare gli elementi sotto l’acqua
corrente.
In caso di incrostazioni pronunciate,
lasciare in immersione per diverse ore
in acqua e detersivo per i piatti; se
necessario, grattare con la spatola (G) o
con il lato ruvido di una spugna.
In caso di calcare sul recipiente, utilizzare
la parte ruvida di una spugna imbevuta,
se necessario, nell’aceto bianco.
Per pulire il blocco motore (A), utilizzare
un panno umido. Asciugarlo con cura.
Per facilitare la pulizia, il recipiente, il
gruppo coperchio e gli accessori possono
essere lavati in lavastoviglie. Non possono
invece essere messi in lavastoviglie il
perno comune (D3 e D4) e l’anello di
ssaggio (D5) (cfr. fig. 14).
Gli accessori, il cilindro comune
removibile e gli elementi del coperchio,
con certi ingredienti potrebbero colorarsi
leggermente, come con il curry, il succo
di carote e simili. Questo non costituisce
un pericolo per la salute, né per il buon
funzionamento dell’apparecchio. Per
evitare colorazioni, pulire gli elementi
subito dopo l’uso.
Prima di riutilizzare il gruppo contenitore
(D), controllare che i contatti elettrici sotto
la pentola siano sempre puliti e asciutti.
Per preservare l’aspetto e la longevità
del coperchio dell’apparecchio, lavarlo
a mano. Non usare il lato abrasivo della
spugna per evitare di grafarlo.
Per non alterare i materiali del recipiente
(D), rispettare le istruzioni per l’uso della
propria lavastoviglie senza aumentare le
dosi di sale o detersivo.
ISTRUZIONI D’USO SULLA MESSA IN SICUREZZA
DELL’APPARECCHIO ( “ SECU “ )
L’apparecchio è dota-
to, di serie, di prote-
zioni elettroniche del
motore per garantire
la sua durata. Questa
sicurezza elettroni-
ca garantisce contro
qualsiasi utilizzo ano-
malo; in tal modo il motore è perfetta-
mente protetto.
In determinate condizioni di utilizzo molto
dure, che non rispettano le raccomandazio-
ni delle istruzioni d’uso (Cfr. paragrafo “ AV-
VIAMENTO “ : quantità eventualmente mol-
to importanti e/o un utilizzo anormalmente
lungo e /o una sequenza di ricette molto
vicine), la protezione elettronica si attiva per
preservare il motore; in questo caso, l’appa-
recchio si arresta e visualizza “ SECU “ sullo
schermo LCD del quadro di controllo per
indicare che l’apparecchio non è momenta-
neamente più operativol.
Se si visualizza “ SECU “ sul quadro di
comando e l’apparecchio si arresta, pro-
cedere nel seguente modo:
Lasciare l’apparecchio in funzione, non
attivare l’interruttore “ 0/1 “(H).
Fare riferimento alle raccomandazioni delle
istruzioni d’uso per riadattare la preparazione
(Cfr. paragrafo “ AVVIAMENTO “ :
quantità di ingredienti / tempo della ricetta/
temperatura/tipo accessori)
Attendere mezz’ora afnché il motore si
raffreddi.
Reimpostare l’apparecchio premendo 2
secondi sul pulsante “ Start /Stop/Reset “
(B5).
L’apparecchio è di nuovo completamente
pronto all’uso.
Il servizio consumatori è disponibile per
qualsiasi domanda (maggiori dettagli nel
libretto di garanzia).

8483
ITALIANO
COSA FARE SE L’APPARECCHIO NON FUNZIONA?
PROBLEMA CAUSE SOLUZIONI
Difcoltà per la cottura a
vapore.
Tappo di regolazione del vapore
posizionato non correttamente.
Posizionare il tappo vapore nel senso «vapore
massimo» rivolto verso di voi, tale posizione
consente di avere un massimo di calore nella
pentola per tutte le cottura a vapore (zuppe,
ecc.), dunque un vapore maggiore nella pentola
per una cottura più efcace.
La posizione «vapore minimo» permette di
raggiungere il calore e il vapore massimo nella
pentola, per tutte le cotture a vapore (zuppe,
ecc.). Tale posizione evita allo stesso modo gli
schizzi d’acqua durante il mescolamento.
La posizione «vapore grande» permette di
rilasciare la condensa massima e di ottenere
anche dei piatti o delle salse dalla consistenza
migliore (risotto, creme per dolci, salse, ecc.)
Tempi di cottura insufciente
I tempi di cottura forniti hanno un valore
indicativo, permettendo una cottura
soddisfacente nella maggior parte dei casi.
Alcune condizioni inuenzano, tuttavia, i tempi
di cottura:
– la grandezza delle verdure (tagliate o meno)
– la quantità degli ingredienti nel cestello
– la varietà delle verdure e quanto sono mature
– la quantità d’acqua nella pentola, che
corrisponde alla graduazione (0,7L).
Nel caso in cui la cottura non sia sufciente,
è possibile aggiungere un tempo di cottura
supplementare.
È possibile, inoltre, utilizzare la modalità
manuale selezionando la temperatura di 130°C
e i tempi di cottura secondo la quantità e il tipo
d’ingredienti.
L’apparecchio non funziona.
La presa non è collegata. Collegare l’apparecchio a una presa di corrente.
L’interruttore (H) è in posizione 0. Portare l’interruttore in posizione 1.
Il recipiente o il coperchio non sono
correttamente posizionati o ssati.
Vericare che il recipiente o il coperchio siano
correttamente posizionati e bloccati come
descritto nelle illustrazioni delle istruzioni.
Vibrazioni eccessive.
L’apparecchio non è posizionato su
una supercie piana, non è stabile.
Posizionare l’apparecchio su una supercie
piana.
Un volume di ingredienti eccessivo.
Ridurre la quantità degli ingredienti in
preparazione.
Errore nella scelta degli accessori.
Controllare che l’accessorio in uso sia quello
raccomandato.
Fuoriuscite dal coperchio.
Un volume di ingredienti eccessivo.
Ridurre la quantità degli ingredienti in
preparazione.
Il coperchio non è ben posizionato o
ssato.
Fissare correttamente il coperchio sulla ciotola.
Manca la guarnizione. Posizionare la guarnizione sul coperchio.
La guarnizione è tagliata, deteriorata.
Cambiare la guarnizione, contattare un centro
assistenza autorizzato.
Errore nella scelta degli accessori.
Controllare che l’accessorio in uso sia quello
raccomandato.
PROBLEMA CAUSE SOLUZIONI
Fuoriuscite dal perno del
recipiente.
La guarnizione non è ben posizionata. Posizionare correttamente la guarnizione.
La guarnizione è tagliata, deteriorata. Contattare un centro assistenza autorizzato.
L’anello di ssaggio (D5) è ssato male. Fissare correttamente l’anello (D5).
Le lame non girano
facilmente.
Pezzetti di ingredienti troppo grossi o
troppo duri.
Ridurre la dimensione o la quantità degli
ingredienti in preparazione.
Aggiungere del liquido.
Il motore emette odori.
Al primo utilizzo dell’apparecchio,
oppure in caso di sovraccarico del
motore provocato da una quantità
d’ingredienti troppo eccessiva o da
pezzi troppo duri o troppo grandi.
Fare raffreddare il motore (circa
30 minuti) e ridurre la quantità degli ingredienti
nel recipiente.
Indicazione “STOP”.
L’apparecchio ha rivelato vibrazioni
troppo forti ed è passato il posizione
di sicurezza.
Controllare che l’apparecchio sia alla velocità
indicata o che l’accessorio in uso sia quello
raccomandato.
Indicazione “SECU”.
Sovraccarico del motore provocato da
una quantità d’ingredienti eccessiva o
da pezzi troppo duri o troppo grandi o
una successione
di ricette, senza i sufcienti tempi di
raffreddamento.
Fare raffreddare il motore (circa
30 minuti) e ridurre la quantità degli ingredienti
nel recipiente.
Indicazione “SECU” + spia
rossa luminosa lampeggiante
Sovraccarico dei rilevatori di
temperatura.
Contattare un centro assistenza autorizzato.
Indicazione “Err1” + spia
rossa luminosa lampeggiante
La resistenza di riscaldamento non
funziona.
Vericare che le spazzole d’alimentazione sotto
il recipiente non siano ricoperte di grasso. In
caso affermativo, pulirle e riprovare.
Se il problema persiste, contattare un centro di
assistenza autorizzato.
Indicazione “Err2”. Guasto elettronico. Contattare un centro assistenza autorizzato.
Indicazione “Err3”. Guasto velocità. Contattare un centro assistenza autorizzato.
Indicazione “Err4”.
Guasto di comunicazione con la carta
elettronica chopper.
Contattare un centro assistenza autorizzato.
Sul display appare «Err8»
Malfunzionamento sensore sicurezza
di bloccaggio.
Contattare un centro di assistenza autorizzato.
Indicazione “ntc1” + spia
rossa luminosa lampeggiante.
Il rilevatore di temperatura 1 ha
smesso di funzionare.
Contattare un centro assistenza autorizzato.
Indicazione “ntc2” + spia
rossa luminosa lampeggiante.
Il rilevatore di temperatura 2 ha
smesso di funzionare.
Contattare un centro assistenza autorizzato.
Accensione del simbolo di
sicurezza (C4)
Chiusura non corretta del recipiente o
del coperchio.
Prima di mettere in funzione l’apparecchio,
vericare che il recipiente sia bloccato
correttamente sul blocco motore e che il
coperchio sia bloccato correttamente sul
recipiente. Se il problema persiste, contattare
un centro di assistenza autorizzato.
Il coperchio è bloccato sul recipiente
in modalità «cottura senza coperchio».
Rimuovere il coperchio prima di avviare il
programma di cottura. Se il problema persiste,
contattare un centro di assistenza autorizzato.
Il dispositivo di bloccaggio
del coperchio è rimasto
attivo (asticella sollevata),
impedendo la chiusura del
coperchio.
L’apparecchio è stato scollegato dalla
rete elettrica o è stato spento tramite
l’interruttore durante una ricetta.
Portare l’interruttore in posizione «I» per
riavviare l’apparecchio e ripristinare il
dispositivo di bloccaggio del coperchio;
l’asticella tornerà nella posizione originale,
consentendo la chiusura del coperchio.
Problema di connessione Fare riferimento alla guida dell’applicazione.
L’apparecchio continua a non funzionare?
Rivolgersi ad un centro di assistenza autorizzato (consultare l’elenco nel libretto di istruzioni).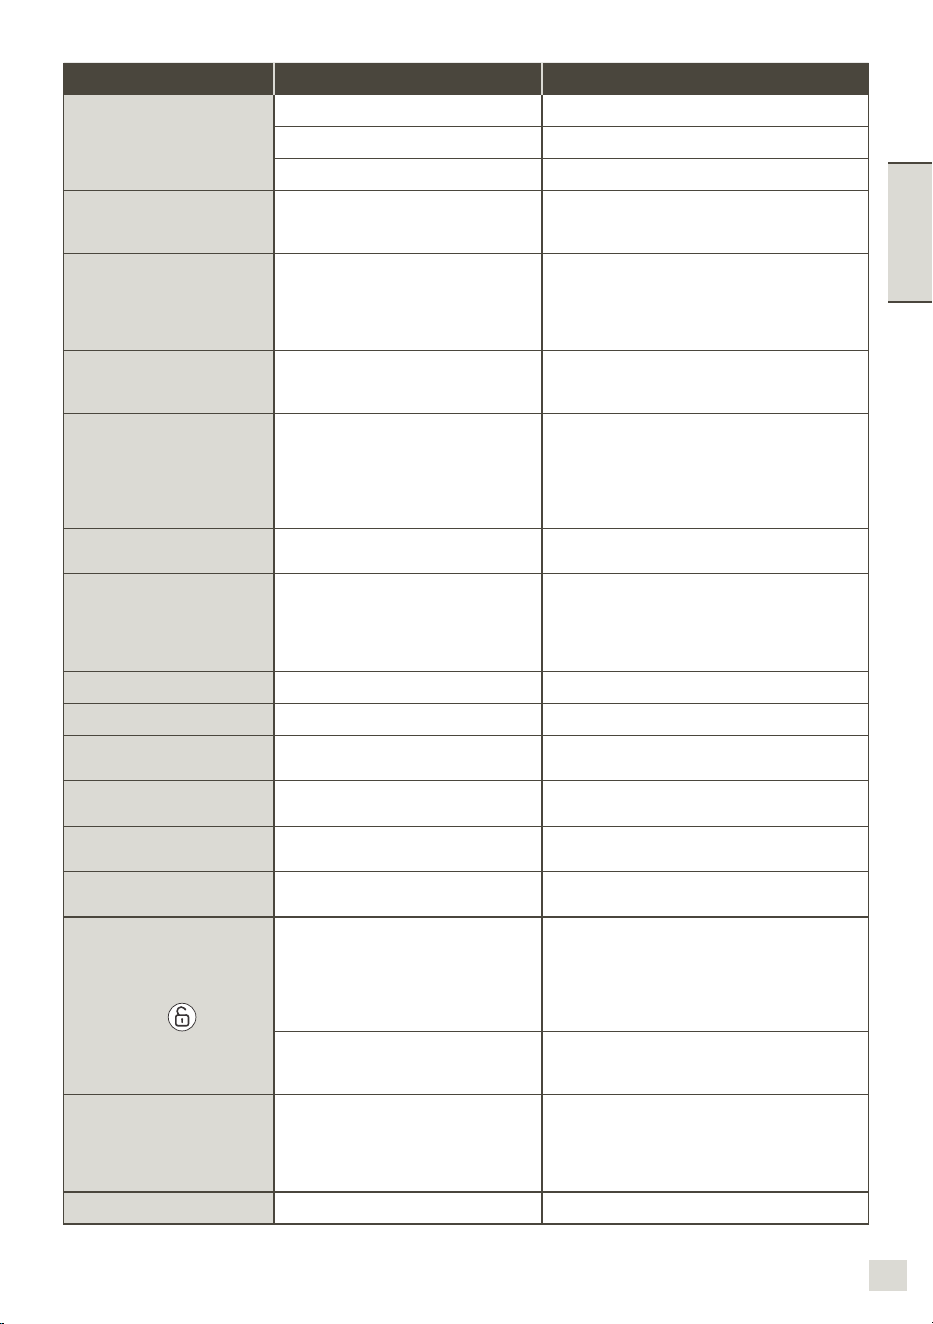

8685
ENGLISH
RICICLAGGIO
– *Il marchio e i loghi Bluetooth® sono marchi depositati da Bluetooth SIG, Inc. e il loro utilizzo da parte del Gruppo SEB è
stato autorizzato.
– Google Play e Android sono marchi di Google Inc.
– Apple e il logo Apple sono marchi di Apple Inc., depositati negli Stati Uniti e in altri paesi. App Store è un marchio di
servizio di Apple Inc.
GLOSSARIO
Accoppiare: azione che consiste nel raggruppare o associare due apparecchi.
Questa azione si effettua al momento della prima connessione tra lo smartphone o tablet e l’i Prep & Cook XL.
Sincronizzare: azione che consiste nell’aggiornamento delle informazioni. L’applicazione e l’i Prep & Cook XL si
sincronizzano per scambiare informazioni quando sono connessi.
Connettere: stabilire un collegamento tra l’applicazione (smartphone/tablet) e l’apparecchio (i Prep & Cook XL). Questa
azione è indispensabile per la sincronizzazione.
Cookie: informazioni sull’utilizzo che vengono inviate a Moulinex per migliorare l’applicazione.
Prodotti elettrici o elettronici da smaltire
Contribuiamo alla salvaguardia dell’ambiente!
Questo apparecchio è composto da diversi materiali che possono essere
smaltiti o riciclati.
Per lo maltimento rivolgersi ad un centro per la raccolta differenziata.
Eliminazione dei materiali di imballaggio e dell’apparecchio
L’imballaggio si compone esclusivamente di materiali non dannosi per l’ambiente
che possono essere smaltiti conformemente alle disposizioni in vigore in materia
di riciclaggio.
Per lo smaltimento dell’apparecchio rivolgersi presso il centro servizi apposito
della propria zona.
Personal safety
Read the instructions for use carefully before using your appliance for the rst
time and keep them in a safe place. The manufacturer shall not accept any
liability in the event of any use that does not comply with the instructions.
Always disconnect the appliance from the power supply if you are to leave it
unattended and before assembly, dismantling or cleaning. Do not allow children
to use the appliance without supervision.
This appliance should not be used by children. Keep the appliance
and its power cable out of reach of children.
This appliance is not intended for use by persons (including
children) with reduced physical, sensory or mental capabilities, or
lack of experience and knowledge, unless they have been given
supervision or instruction concerning use of the appliance by a
person responsible for their safety.
Children should be supervised to ensure that they do not play with
the appliance.
Keep your appliance out of reach of children.
When the product is in use, some parts become hot
(stainless steel wall of the bowl and stopper, removable
spindle, clear parts of the lid, metal parts under the bowl,
basket). They can cause burns. Handle the appliance by the cool
plastic parts (handles, motor unit). The red heating indicator light
shows that there is a risk of burning.
The temperature of the accessible surfaces may be high when the
appliance is in operation.
The appliance is not intended to be operated using an external
timer or by a separate remote control system.
Do not use your appliance if it is not working properly, if it is
damaged or if the power cable or plug is damaged. To avoid any
danger have the power cable replaced by an approved service
centre (see list in the guarantee booklet).
The appliance should not be immersed in water. Never put the
motor unit (A) under running water.
This appliance is designed for indoor household use only and
at an altitude below 2000 m. The manufacturer shall not accept
any liability and reserves the right to cancel the guarantee in the
SAFETY INSTRUCTIONS

8887
ENGLISH
event of commercial or inappropriate use or failure to follow the
instructions.
This appliance is intended for indoor, domestic household use
only. It is not intended to be used in the following applications and
the guarantee will not apply for:
– Staff kitchen areas in shops, ofces and other working
environments.
– In kitchen areas reserved for staff in shops, ofces and other
professional environments.
– On farms.
– Use by clients of hotels, motels and other residential
environments.
– In guest room environments.
Your appliance gives off steam which can cause
burns. Handle the lid and the cap with caution (use
oven gloves, a potholder, etc. if necessary). Handle
the cap by its central section.
Do not operate the appliance if the seal is not positioned on the
seal carrier, or if the seal carrier is not assembled in the lid. It is
essential to operate the appliance with the cap positioned in the
hole in the lid (unless specifically otherwise stated in the recipe).
WARNING: Be aware of the risk of injury in the event of
incorrect use of the appliance.
Take care with the knives of the Ultrablade knife (F1) and
the kneading/grinding & crushing blade (F4) when you are cleaning
them and when you empty the bowl, they are extremely sharp. Be
careful if a hot liquid is poured into the food processor because it
could be ejected from the appliance due to it suddenly boiling.
Place the Ultrablade chopper blade (F1) in the bowl after use.
WARNING: Be careful to avoid any spillage on the connector
during cleaning, filling or pouring.
WARNING: Some foods that have an outer skin (whole sausages,
tongue, poultry, etc.) or large pieces of meat may produce
spatters as they trap boiling liquids. We therefore recommend
piercing them with a knife or a folk prior to cooking.
WARNING: The heating element surface is subjected to residual
heat after use.
– Be sure to touch only the handles of your appliance (locks
D2, handle of the lid E2 and handle of the cap E1) during
heating and until complete cooling down.
Refer to the instructions for setting the operating times and
speed settings of each accessory and each program.
Refer to the instructions for assembly and mounting
accessories to the appliance.
Refer to the instructions for cleaning and maintenance of your
appliance.
Always follow the cleaning instructions on how to clean your
appliance :
– Unplug the appliance.
– Do not clean the appliance while hot.
– Clean with a damp cloth or sponge.
– Never immerse the appliance in water or put it under running
water.
EUROPEAN MARKETS ONLY:
Keep the appliance and its lead out of reach of children under 8
years of age.
Children should not use the appliance as a toy.
This appliance may be used by persons with reduced physical,
sensory or mental capabilities or whose experience or knowledge
is insufcient, as long as they have the benet of supervision or
they have received instructions regarding safe use of the appliance
and they understand its potential dangers.
This appliance may be used by children of at least 8 years of age,
as long as they are supervised and have been given instructions
about using the appliance safely and are fully aware of the dangers
involved. Cleaning and maintenance by the user should not be
carried out by children without supervision unless they are at least
8 years of age and are supervised by an adult.
Connection to the power supply
The appliance should be plugged in to an earthed electrical socket.
The appliance is designed to work with alternating current only.
Check that the supply voltage indicated on the rating plate of the
appliance corresponds to that of your electrical installation.

9089
ENGLISH
Any connection error will negate the guarantee.
Never pull on the power lead to unplug the appliance.
Do not immerse the appliance, power cord or plug in any liquid.
The power cord must never be left near or in contact with the hot
parts of your appliance, near a source of heat or on a sharp edge.
Incorrect use
Do not touch the lid before the appliance comes to a complete
stop (stop button); wait until the food being mixed is no longer
rotating.
Always pour the solid ingredients into the bowl rst before adding
the liquid ingredients (See Fig. 10), without exceeding the MAX
limit marked inside the bowl (See Fig. 10). If the bowl is too full,
boiling liquid may be ejected.
Please note, in the steam cooking program, do not exceed 0.7
litres water (See Fig. 3.2).
Never put your ngers or any other object in the bowl while the
appliance is in operation.
Do not use the bowl as container (storage, freezing, sterilisation).
Place the appliance on a stable at, heat-resistant, clean and dry
surface.
Do not place the appliance near a wall or a cupboard: the steam
produced may damage them.
Do not place your appliance near a heat source in operation (hob,
household appliance, etc.).
Do not cover the lid with a dishcloth or other item, do not attempt
to block the hole in the lid, use the steam regulator cap.
Never allow long hair, scarves, etc. to hang over the accessories
while in operation.
Never put the accessories, bowl and lid in a microwave.
Do not use the appliance outdoors.
Never exceed the maximum quantity indicated in the instructions.
Store the appliance when it has cooled down.
Do not place the bowl in the freezer to cool it; use the refrigerator.
After-sales Service
For your own safety, do not use accessories or spare parts other
than those provided by the approved after-sales centres.
On reading this instruction manual, you will nd recommendations for use, which
will help you to see the potential of your appliance: preparation of soups, stews,
steamed dishes and desserts.
DESCRIPTION:
APPLIANCE TECHNICAL DATA:
A Motor unit.
B Control panel.
B1: Speed selector.
B2: Cooking temperature selector
and/or heat indicator light.
B3: Operating duration/pairing
selector.
B4: Automatic program selection
buttons.
B5: START/STOP/RESET button.
B6: + / - selector.
C LCD screen.
C1: Connection indicator display.
C2: Steam program display.
C3: Current step display in the
step-by-step recipes.
C4: Safety indicator display.
C5: Speed display.
C6: Temperature display.
C7: Time display.
D Bowl assembly.
D1: Stainless steel bowl.
D2: Locks (located under handles).
D3: Detachable spindle.
D4: Bowl seal.
D5: Spindle locking ring.
E Lid assembly.
E1: Steam regulator cap/stopper.
E2: Lid.
E3: Lid seal.
E4: Lid seal.
F Accessories:
F0: Accessory storage box.
F1: Ultrablade chopping knife.
F2: Mixer.
F3: Whisk.
F4: Knife for kneading/grinding blade.
F5: Steam basket.
G Spatula.
H On/Off switch 0/1 switches off the power
supply to your appliance.
I Cleaning brush.
Power: 1550W (1000W: heating element / 550W: motor)
Temperature range: 30°C to 150°C
adjustable in steps of 5°C.
Operating duration range: 5 sec to 2 hours
adjustable in steps of 5 sec min to 1 min max.
Number of speeds: 13 – 2 intermittent speeds:
speed 1 (5 sec On / 20 sec Off).
speed 2 (10 sec On / 10 sec Off).
– 10 progressive continuous speeds (speeds 3 to 12).
– 1 max intermittent speed (speed 13).
Any intervention other than cleaning and usual maintenance by the
customer must be carried out by an approved service centre.
Consult the table “What to do if your appliance does not work” at
the end of the instruction manual.
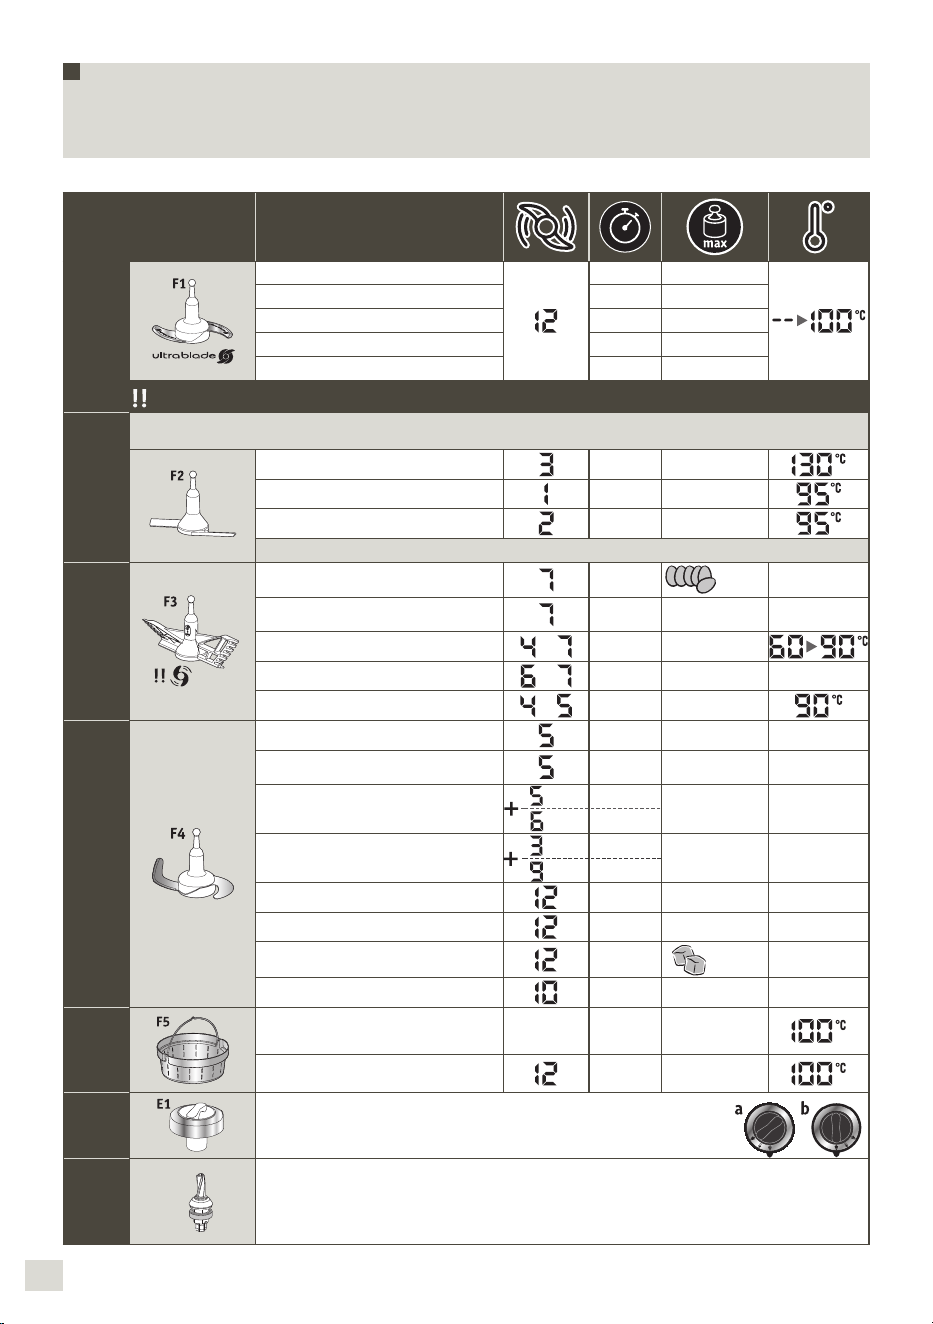
9291
ENGLISH
Your appliance comes with the following accessories:
These accessories are also tted with gripping areas to facilitate easier handling.
Ultrablade knife
Mixing soups
3min 3L
Mixing fruit purees 40s 1Kg
Chopping vegetables 15s 1Kg
Chopping meat 30s 1Kg
Chopping fish 15s 1Kg
Do not use this accessory to chop hard products, use the F4 kneading blade/crusher.
Mixer
It mixes Cooked dishes without damaging the ingredients
Very useful for browning phases before preparations (risottos, soups).
Browned dishes 5min 500g
Stews 45min 3L
Risottos 22min 1.5Kg
Ratatouille, Chutney, Pulses (settings: check the recipe booklet)
Whisk
9 max
Wisking egg whites, 5/10min
7
max
Mayonnaise,
Whipped cream, meringues
2/5min 0.5L
Sauces, creams
to
1/20min 1L
Mashed potato
to
1min 1L
Polenta
to
1/16min 1L
Kneading/grinding knife
Kneading white bread dough 2min 30s 1.2Kg
Kneading short crust pastry,
biscuit dough, special bread
2min 30s 1Kg
Kneading rich dough
(brioche, kugelhopf. etc.)
1min 30s
2 min
0.8Kg
Mixing light batters (cake
mixture, etc.)
40 s
3min
1Kg
Grinding nuts
1min 0.6Kg
Grinding hard texture foods
1min 0.6Kg
Crushing ice
1min
6 to 10
Pancake batter, waffle batter
1min 1.5L
Steam
basket
Steam cooking vegetables,
fish or meat
20/40min 1Kg
Soup with chunks
3min 3L
Cap/
Stopper
Cap/Stopper for regulating steam extraction
– High setting (a) = steam cooking.
– Low setting (b) = risotto, creamy puddings, sauces, etc.
Detachable
spindle
D3
Detachable spindle
Lidless browning and cooking.
Your i Prep & Cook XL appliance can operate in
‘connected’ mode, and also in ‘unconnected’
mode. It also has two operating modes:
automatic program mode and manual mode.
Automatic program mode:
the speed, cooking temperature and
cooking time are pre-programed to
make soups, stews, steamed dishes and
pastries automatically.
Manual mode:
you can personalise the settings for
speed, cooking temperature and cooking
time as you wish.
Use with or without the lid
Temperature from
30°C to 130°C
Temperature from
135°C to 150°C
– When you have selected a temperature
between 135°C and 150°C, you must use
your appliance without the lid. If the lid
is positioned on the bowl, a lock will be
displayed on the LCD screen, prompting
you to unlock it.
– Once you have added the food items,
stir them using the spatula and regularly
repeat the operation to prevent the
formation of stains on the bottom of the
bowl. (See “Cleaning” paragraph).
– If you choose to use the appliance with
its lid in place, the maximum cooking
temperature shall then be 130°C.
YOUR APPLIANCE IS EQUIPPED WITH
SAFETYLOCKING LID
The lid is secure each time the appliance
starts. This security feature prevents the
lid from opening when preparing a recipe
(See Fig.17). Do not attempt to force the
lid when it is locked. This security lock is
released each time that the appliance stops. If
you have selected a temperature greater than
or equal to 50°C and a speed greater than or
equal to 5, a countdown of 10 seconds then
appears on the control-panel ‘s LCD display.
(See Fig.18). It will only be possible to open
it at the end of the countdown.
FITTING THE BOWL, ACCESSORIES AND
LID ASSEMBLY
Before using your appliance for the rst
time, clean all the parts (D, E, F, G) in
warm soapy water, except for the motor
unit (A). Your bowl (D) has a removable
drive (D3) to make cleaning easier.
Make sure that all the packaging has
been removed before use, especially the
protection between the bowl (D) and the
motor unit (A).
Place the seal (E4) on the seal carrier (E3)
(See Fig. 1) and clip the assembly on the
lid (E2) (See Fig. 2).
Position the gasket (D4) on the detachable
spindle (D3). Lock the assembly to the
bottom of the bowl with the locking ring
(D5) (See Fig. 3). If you use the cooking
mode without the lid, position the seal (D4)
on the detachable spindle (D3). Lock the
entire appliance to the bottom of the bowl
with the locking ring (D5) (See Fig. 3).
Position the chosen accessory in the bowl:
– the accessories (F1, F2, F3, or F4) on the
shared drive at the bottom of the bowl
(See Fig. 4.1),
– for steam cooking, the steam basket (F5)
inside the bowl, (See Fig. 4.3), taking
care to rst ll the 0.7l basin with a liquid
(water, sauce, etc.) (See Fig. 4.2).
Add the ingredients to the inside of the
bowl or steam basket.
Position the lid on the bowl (D) by
aligning the two triangles (See Fig. 5),
lock the lid without pressing by turning it
in the direction of the arrow (See Fig. 6).
Position the steam regulator cap (E1) on the
lid. There are 2 possible positions (See Fig. 7):
The low setting allows a maximum
amount of condensation to
be released and therefore it is
recommended to prepare dishes
and sauces with a better consistency
(risotto, creamy puddings, sauces, etc.).
The high setting allows a maximum
amount of heat and steam to build
up in the bowl for all types of steam
cooking (soups, etc.).
This setting also prevents splashing during
mixing.
Position the bowl (D) on the motor unit (A)
until you hear a “click” (See Fig. 8).
The appliance only starts up if the bowl
and the lid are correctly positioned and
locked on the motor unit.
F1 F2
F3 F4
F5
F1 F2
F3 F4
– *The Bluetooth® brand and logos are registered brands of Bluetooth SIG, Inc. and their use by the SEB Group has been
ofcially authorised.
– Google Play and Android are Google Inc. brands.
– Apple and the Apple logo are Apple Inc. brands, registered in the USA and other countries. App Store is an Apple Inc. service mark.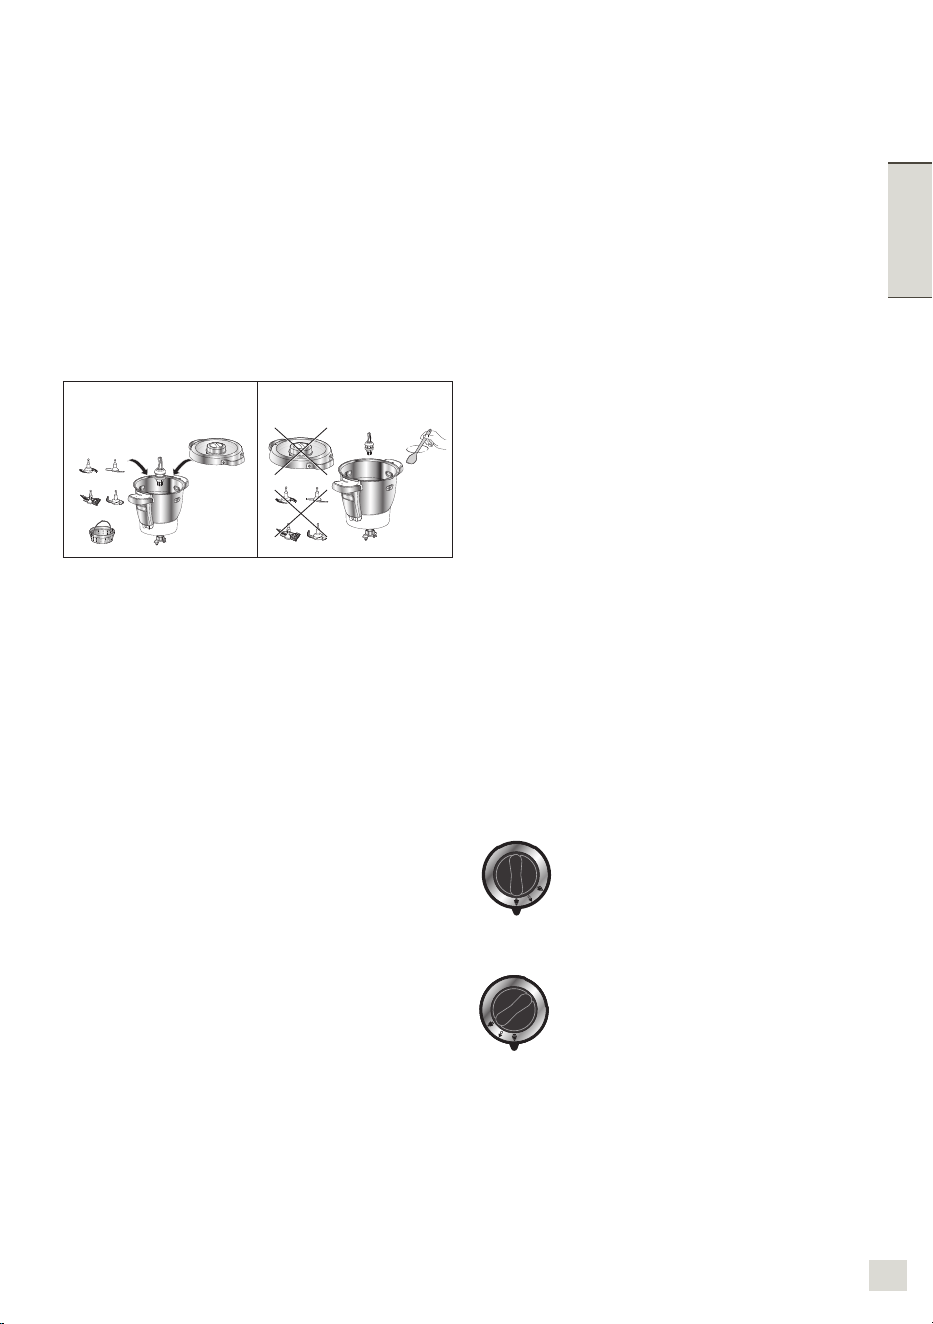
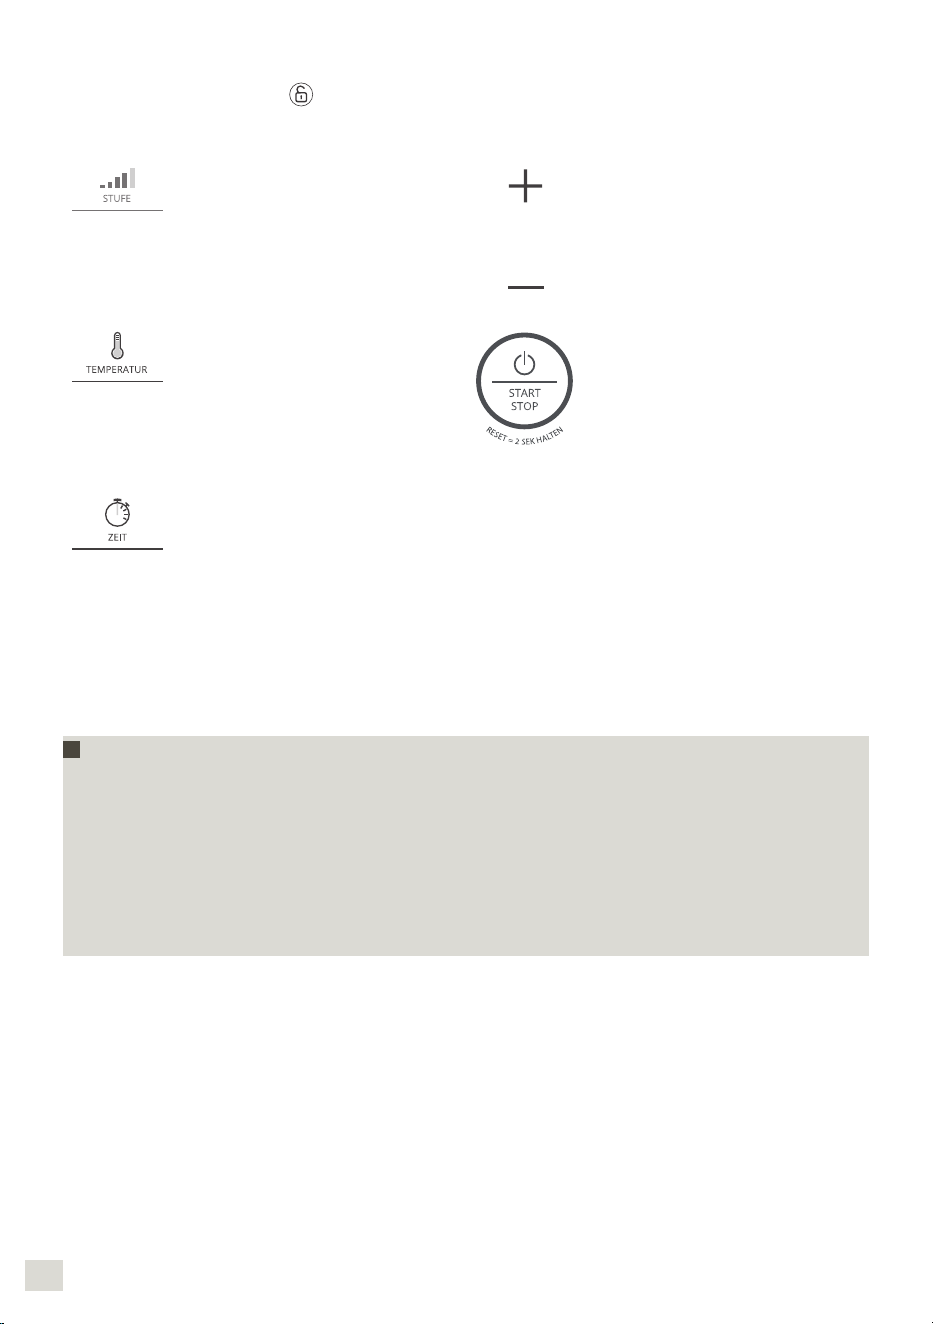
9493
ENGLISH
Tips for use:
Your appliance is tted with a microprocessor that controls and analyses its stability. In the
event of instability, the motor rotation speed will be automatically reduced, if this instability
continues, the motor will be stopped and “STOP” will be displayed on the screen.
Check that the quantity of ingredients is not too large and that the speed used is the
correct one.
Check that you are using the recommended accessory.
Then restart your appliance normally.
Selecting custom settings:
Selecting the motor speed.
2 intermittent speeds (Speed
1 & 2) and 10 continuous
progressive speeds (Speed 3
to 12)
Max intermittent speed (S13).
Increase speed, cooking
temperature and duration.
Decrease speed, cooking
temperature and duration.
Selecting cooking speed.
From 30° to 150°C.
Heating indicator light: lights
up when cooking starts
and switches off when the
temperature inside the bowl
falls to below 50°C.
This button has 3 functions:
– ‘Validation’ of your
automatic program
selection or the settings
you have chosen in manual
mode (speed, cooking
temperature, time).
– ‘Pause’ when operating,
once the appliance has
been started.
– ‘Reset’ of the appliance
settings, selected by
pressing and holding for 2
seconds.
– ‘Validation of step’ in
step-by step recipes.
Selecting operating time.
From 5 sec to 2 hours.
1st connection pairing
In the event of incorrect positioning of the bowl or incorrect locking of the lid (See Fig.
10.1 and 10.2), the logo starts to flash when a function is activated.
USE IN CONNECTED MODE
Powering up your appliance
Frequency: 2.40 GHz. Maximum transmitted output: 7.7 dBm
Your appliance has an on/off switch marked 0/1. Switch it to 1. (See Fig. 9).
The LCD screen will display all the settings as ‘0’.
In connected mode, the i Prep & Cook XL LCD screen is blue.
PREPARING TO INSTALL
Go to www.krups.com to find the list of Smartphone and Tablet models that are
compatible with i Prep & Cook XL
iPhone 4S or newer
iPad 3 / iPad mini or later
From iOS 9 and following ones.
From Android 4.4 and following ones.
INSTALL I Prep & Cook XL
What you need to install i Prep & Cook XL:
The Prep & Cook app, which can be downloaded for free from App Store (iPhone/iPad)
and Google Play (Android)
A Bluetooth connection supplied by your Bluetooth® Smart 4.0 smartphone or tablet: i
Prep & Cook XL connects to your smartphone/tablet via a stand-alone wireless connection
The smartphone/tablet must be close to the i Prep & Cook XL (the connection range
varies, depending on the layout of the home).
A power point for plugging in the i Prep & Cook XL : i Prep & Cook XL is only connected
to your smartphone/tablet when it is plugged in to the power supply.
About Bluetooth® Smart
Bluetooth® Smart 4.0 technology (or Bluetooth Low Energy) makes it possible to
communicate wirelessly between an app and a device with very low energy consumption.
FIRST CONNECTION OF I PREP & COOK XL IN CONNECTED MODE
Downloading the app
To start, download the app onto your smartphone/tablet by connecting to App Store for iOS
or Google Play for Android.
Once you have downloaded the app, you will be able to make your rst recipes with i Prep
& Cook XL within just a few minutes, without creating an account. (50 recipes are available
to you without creating an account).
If you create an account on the app you will be able to access all the content, and vary your
menus.
9695
ENGLISH
Powering up the i Prep & Cook XL
Your appliance has an on/off switch marked 0/1 (H). Switch this to 1 (See Fig. 9).
Bluetooth activation
Move close to the i Prep & Cook XL and check that Bluetooth is activated on your
smartphone/tablet.
Launching the app
Launch the Prep & Cook app by clicking on the ‘Prep & Cook’ icon.
Pairing
What is pairing?
On rst connection, the app you have downloaded onto your smartphone/tablet and i Prep
& Cook XL will automatically and quickly detect each other, provided you follow the steps
below.
If you wish, you can pair up to 10 devices with i Prep & Cook XL.
To do this, pair each device separately. (See pairing).
However, only one device may be connected at a time.
Accept the cookies, which will improve the app by collecting your usage preferences.
Select your device
When requested by the app, press and hold the Timer button (B3) on the i Prep & Cook
XL (for 4 seconds).
The connection indicator (C1) will blink for a maximum of 30 seconds, while the i
Prep & Cook XL connects to your smartphone/tablet.
Accept the pairing request displayed on your smartphone/tablet or access the notication
centre to accept the pairing.
When the connection indicator (C1) is constantly lit it indicates that the connection has
been established.
NB : When the pairing has been carried out, i Prep & Cook XL will automatically recognise
your smartphone/tablet when you next connect. You will not have to carry out this pairing
step again.
The connection has been successful
Your i Prep & Cook XL is now connected to your smartphone/tablet. The icon above shows
you that the connection has been established.
The connection has failed
The icon above shows you that the connection has not been established.
Please repeat the following operations:
Move close to i Prep & Cook XL.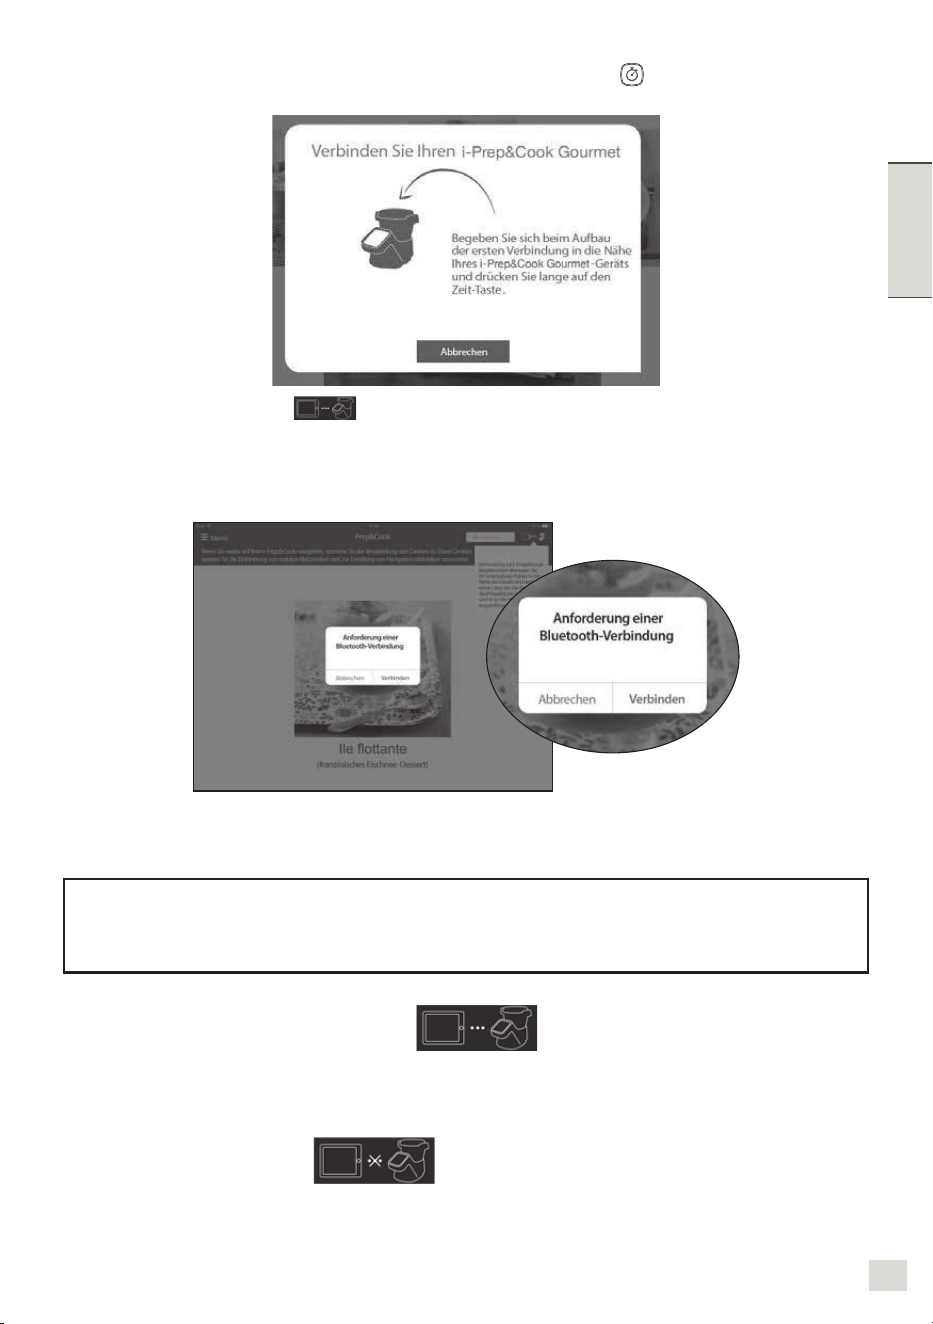
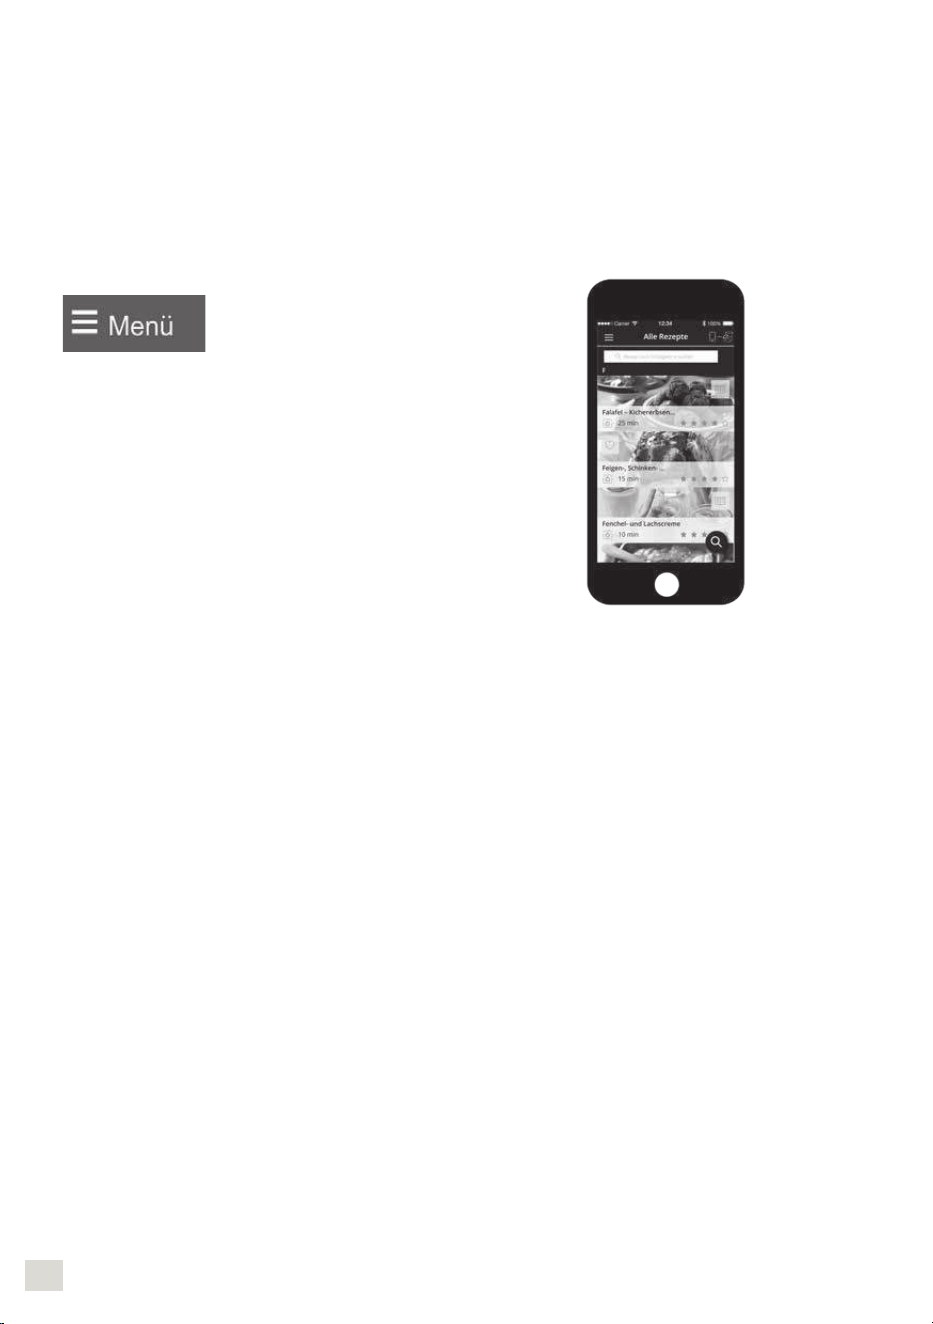
9897
ENGLISH
Check that i Prep & Cook XL is properly plugged into the socket and that the plug is
working properly.
Check that your smartphone/tablet is compatible (see compatibility list at www.krups.com).
Check that Bluetooth is activated on your smartphone/tablet.
Start the pairing steps again, and consult the FAQs (frequently asked questions).
If there is still a problem, make sure that your smartphone/tablet is compatible
If you are using an Android device, make sure that it is one of the compatible models (see
compatibility list at www.krups.com).
Access the app menu to see our range of recipes.
In connected mode, during a step-by-step recipe, the
rst reset ends the step, and the second reset ends the
recipe.
FAQs: FREQUENTLY ASKED QUESTIONS
Where should I put i Prep & Cook XL?
Put i Prep & Cook XL on a at, stable, heat resistant work surface.
For the best connection between i Prep & Cook XL and your smartphone/tablet,
we recommend you make any changes required to ensure the connection is at
a reasonable distance.
If the connection indicator (C1) is constantly lit, this shows that your devices are
connected.
If the connection is lost (the connection symbol is shown crossed out), move
closer to i Prep & Cook XL to re-establish the connection.
What happens if the connection is lost during a recipe?
If the connection between i Prep & Cook XL and your smartphone/tablet is lost during a recipe, the
two devices will be automatically synchronised as soon as the connection is re-established. You
will be able to carry on with your recipe from the step you were on when the connection was lost.
Can I use i Prep & Cook XL without the app?
Your appliance may be used without the app. (See rst use in unconnected mode).
For this, please refer to the ‘use of the appliance’ paragraph.
However, only the app will enable you to benet from the many advantages of the connected
product.
Can i Prep & Cook XL be used with more than one smartphone or tablet?
If you wish, you can pair several devices with i Prep & Cook XL. To do this, pair each device
separately. (See pairing).
However, only one device may be connected at a time.
Must the Bluetooth on my phone by constantly activated?
Bluetooth must be activated in order to synchronise the app with i Prep & Cook XL.
USE IN UNCONNECTED MODE
USING THE CONTROL PANEL (B)
Selecting an automatic program:
Pastries (list of sub-programs) Soups (list of sub-programs)
Stews (list of sub-programs) Steamed dishes (list of
subprograms)
Powering up your appliance
Your appliance has an on/off switch marked 0/1. Switch it to 1.
The LCD screen will display all the settings as ‘0’. (See Fig. 9).
In unconnected mode, the i Prep & Cook XL LCD screen is white.
AUTOMATIC PROGRAM MODE
1. Press the program you
wish to use (B4). A bright
dot will appear above
the program you have
selected. Each time you
press again, the various
subprograms will be
shown, one after the
other.
4. When you have nished
modifying all your
settings, press the
“start” button (B5) to
start the program. When
your appliance is using
cooking mode, the red
indicator light (B3) lights
up to inform you that
cooking has started.
2. The pre-programed set-
tings can be modied for
the time of a recipe (de-
pending on the chosen
recipe, ingredients and
quantities prepared).
Press the cooking tem-
perature selector (B2) or
the time selector (B3):
the chosen setting will
ash on the screen (C6-
C7).
5. When the program has ended, the
appliance sounds 3 beeps.
6. At the end of the soups, P2 and P3 slow
cook and steam cooking programs,
the appliance will automatically switch
to keep-warm mode for 45 minutes to
keep your meal hot until it is ready to
serve. On slow cook programs P2 and
P3 and in manual mode, the appliance’s
motor operates at a specic speed, to
keep the food in good condition and
prevent it from sticking to the bottom
of the bowl. To stop the keep-warm
mode, just press the ‘stop’ button
(B5). The keep-warm mode will stop
automatically if you open the lid, press
the triggers (D2) or remove the bowl.
3. Adjust the setting(s)
using the +/- selector
(B6).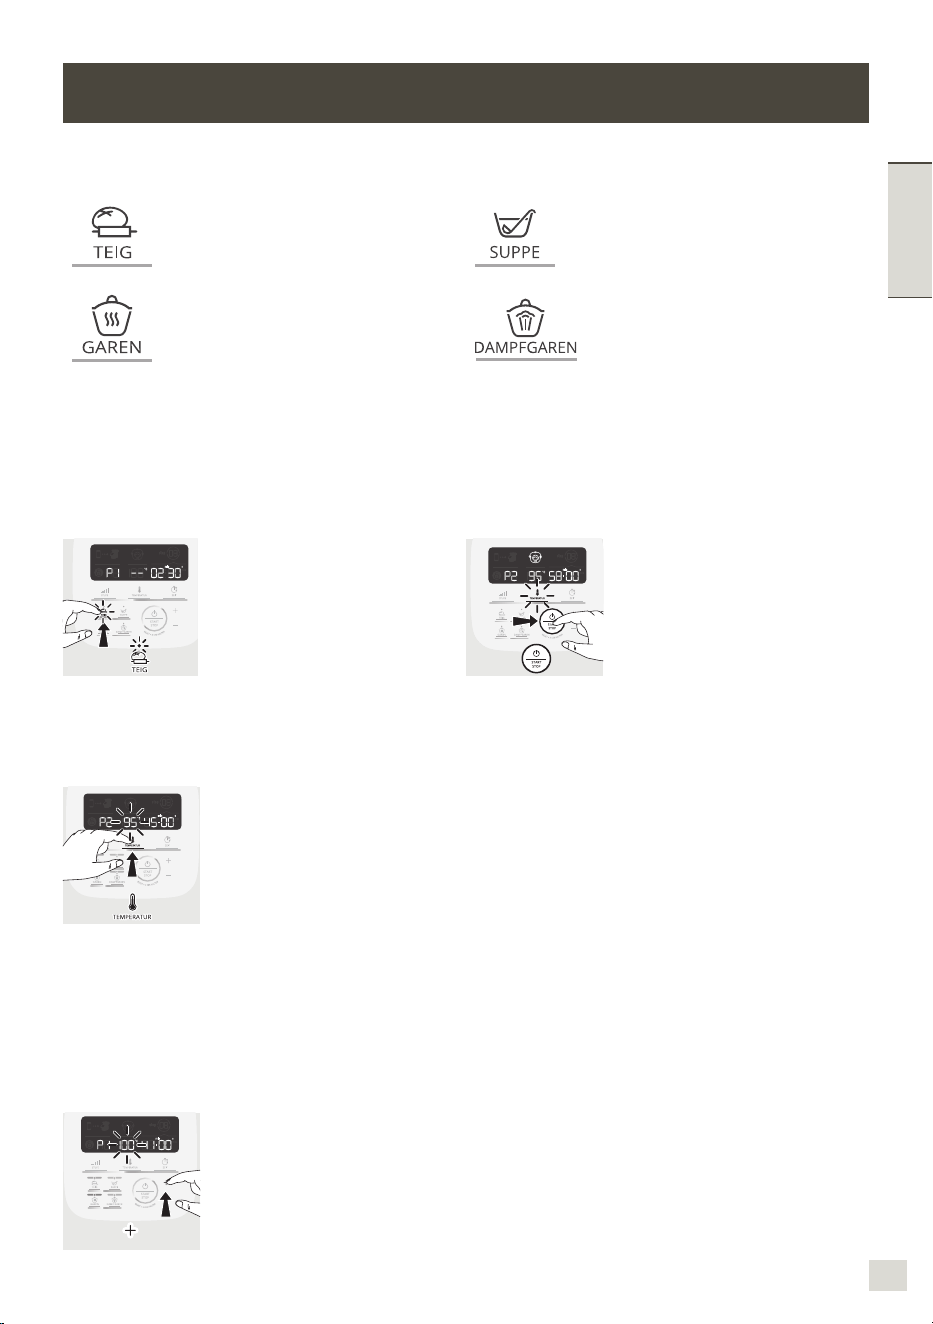
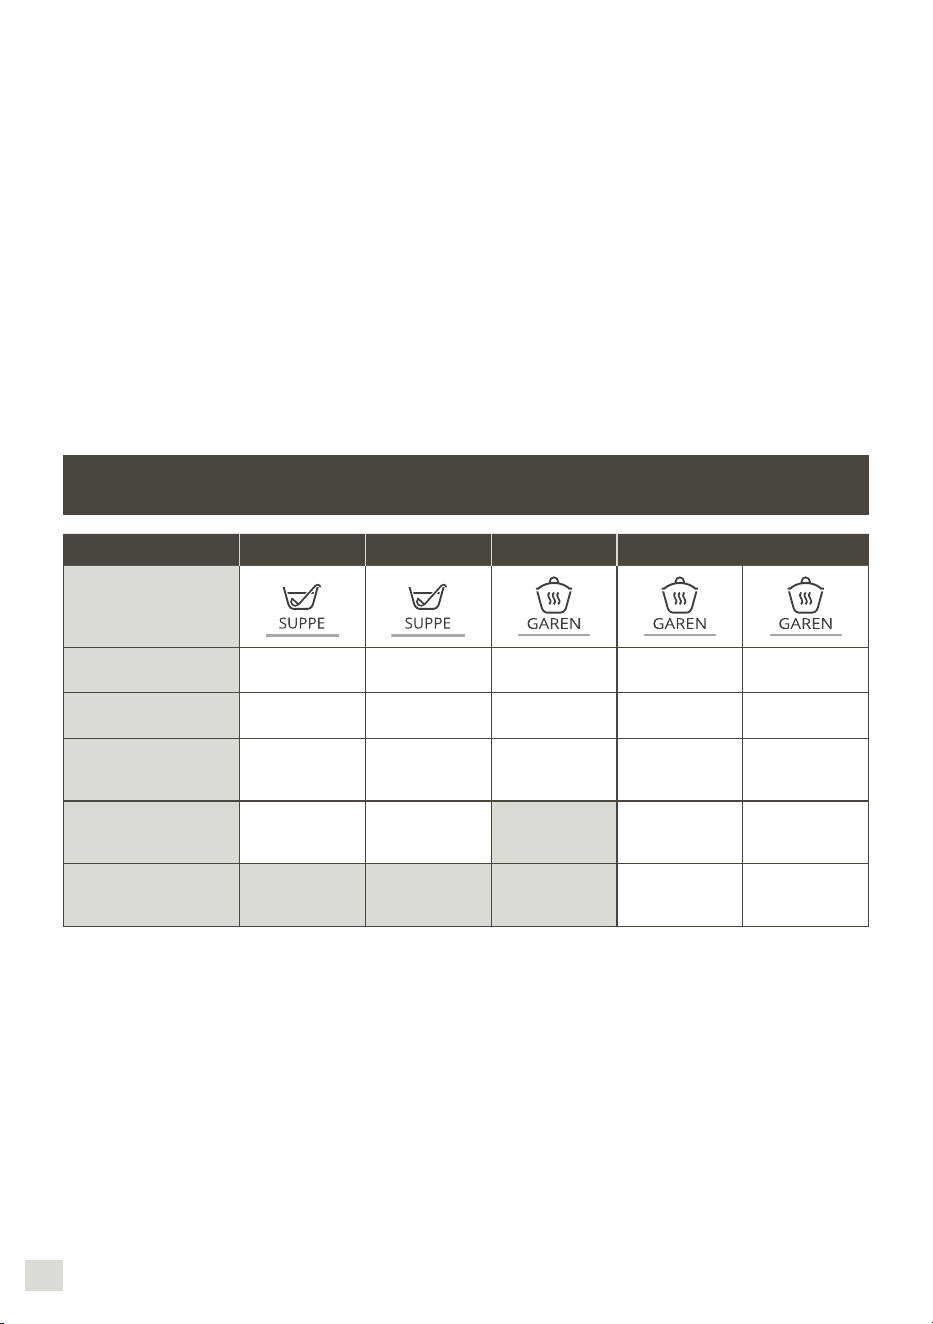
10099
ENGLISH
At the end of kneading in the pastry
programs P1 and P2, the appliance changes
to “dough rising” mode at 30°C for 40
minutes for your dough to prove. If you open
the lid, press the locks (D2) or remove the
bowl, the appliance changes to pause mode
and you have the possibility of restarting it
by pressing “start” again.
If you wish to stop this mode, press and
hold the “stop” button for 2 seconds.
7. Press the locks (D2) and then remove
the bowl assembly (D) (See Fig. 12).
In connected mode, after the automatic
program has started, you can stop the
appliance at any time by pressing the
‘stop’ button. The automatic program
is then in pause mode, you have the
possibility of restarting by pressing the
“start” button again. If you have chosen
the wrong program and if you want to
cancel it, press and hold the “stop”
button for 2 seconds.
DISCOVER THE AUTOMATIC PROGRAMS AVAILABLE:
Soup P1 Soup P2 Stew P1 Stew P2 Stew P3
Automatic programs
«Default» speed
(adjustable)
10 pulses and
S12 for 2 min
S7 to S10 for
30 s
Speed 3 Speed 1 Speed 2
«Default» temperature
(adjustable)
100°C
(90°C to 100°C)
100°C
(90°C to 100°C)
130°C
(nonadjustable)
95°C
(80°C to 100°C)
95°C
(80°C to 100°C)
Time speed
(adjustable)
40 min
(20min
to 60 min)
45 min
(20min
to 60 min)
5 min
(2min
to 15 min)
45 min
(10 min
to 2hr)
20 min
(10 min
to 2hr)
Keep warm ‘default
function’ at the end of
the program
45 min 45 min 45 min 45 min
Motor speed at keep-
warm level
5s ON
at Speed 3
/ 20s OFF
10s ON
at Speed 3
/ 10s OFF
Some recipes may cause unexpected overflow due to the formation of bubbles,
particularly when using frozen vegetables. In this case, you should reduce the volumes
accordingly.
Steamed
dishes P1
Steamed
dishes P2
Pastry P1 Pastry P2 Pastry P3
Automatic programs
«Default» speed
(adjustable)
S5 for
2 min 30 s
S5 for 1 min
30 s
then S6 for 2
min
S3 for 40 s then
S9
for 3 min
«Default» temperature
(adjustable)
100°C
(nonadjustable)
100°C
(nonadjustable)
Time speed
(adjustable)
30 min
(1 min
to 60 min)
35 min
(1 min
to 60 min)
2 min 30 sec
(30 sec to
2 min 30sec)
3 min 30 sec
(30 sec to
3 min 30 sec)
3 min 40 sec
(1 min 40 sec
to 3 min 40 sec)
Keep warm ‘default
function’ at the end
of the program
45 min 45 min
Motor speed at keep-
warm level
“Default” dough rising
mode at 30°C at the
end of the program
40 min 40 min
USING THE INTERNAL STEAM BASKET
Cooking times are for information purposes
only; in most cases the food will be properly
cooked.
However, certain conditions may affect the
cooking time:
– size of the vegetables (cut or uncut)
– quantity of ingredients in the basket
– type of vegetables, their ripeness
– quantity of water in the bowl, which
corresponds to the measurement (0.7l).
Remember to use the steam cap with “maxi”
(a) facing towards you.
If the food is not properly cooked, you can
set an additional cooking time.
Steam cooking time (for fresh ingredients)
Ingredients Quantities (max) Estimated cooking times
Recommended steam
program
Courgettes (sliced) 800 g 20 min P1
Parsnips (sliced or cubed) 800 g 25 min P1
White part of the leek 800 g 25 min P1
Broccoli (orets) 500 g 20 min P1
Fish (thick llets or steaks)
600 g
(with baking parchment)
15 min P1
Potatoes (small whole new) 1 kg 30 min P2
Carrots (sliced) 1 kg 30 min P2
Green beans 800 g 30 min P2
White meat (chicken
breast llets)
600 g
(with baking parchment)
20 min P2
Some recipes may cause the water to overflow due to the formation of bubbles,
particularly when using frozen vegetables. In this case, you need to reduce the
volumes accordingly.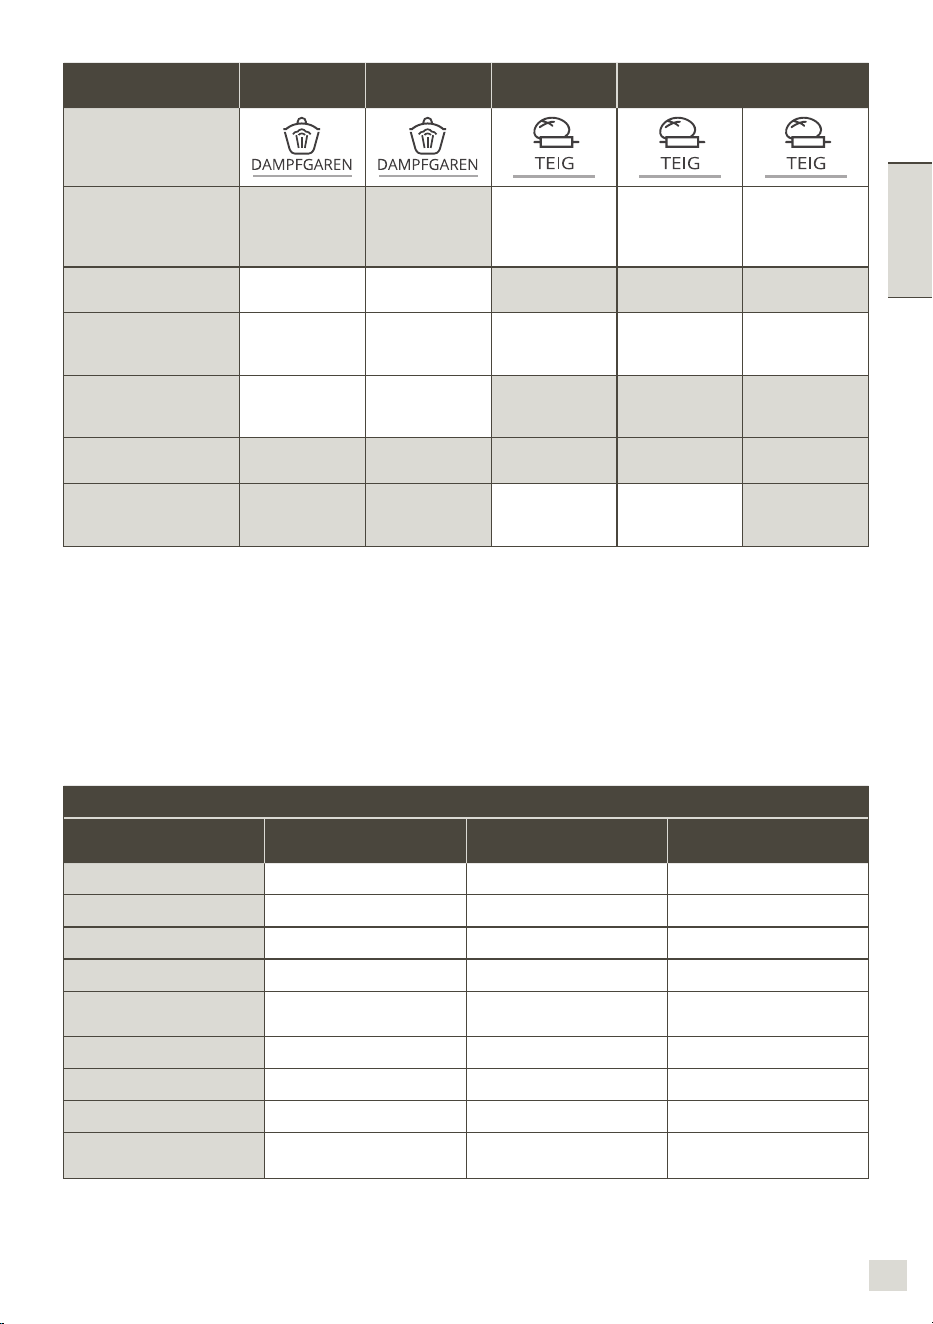
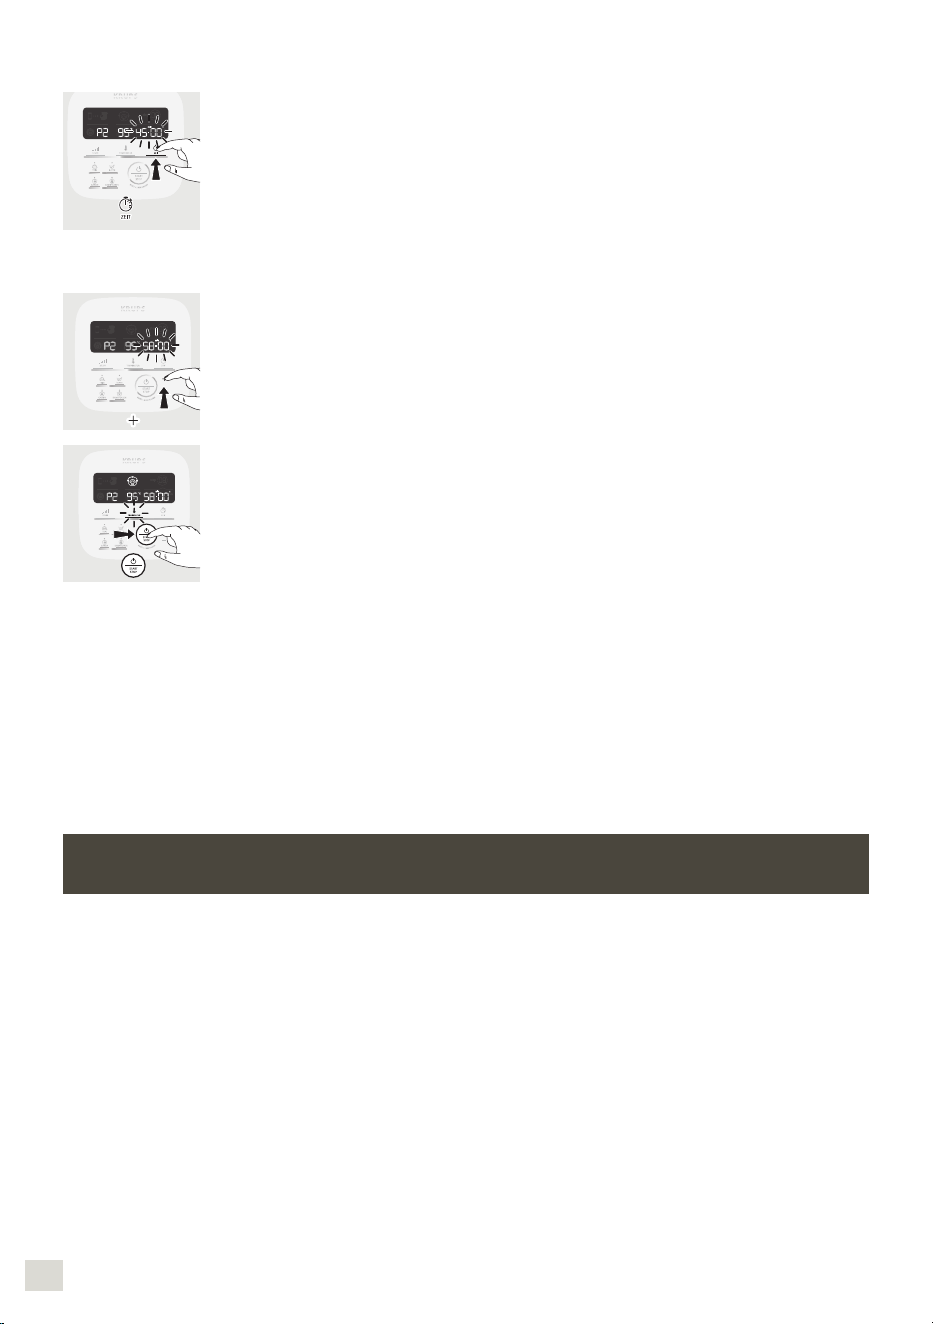
102101
ENGLISH
MODE MANUEL:
1. Press directly on the button
for the setting you want to
adjust, i.e. the speed selec-
tor (B1) or the cooking tem-
perature selector (B2) or
the time selector (B3), the
chosen parameter ashes
on the screen (C5-C6-C7).
The program is then in pause mode
and you have the possibility of
restarting by pressing “start” again. If
you have chosen the wrong program
and if you want to cancel it, press and
hold the “stop” button for 2 seconds.
4. When the program has ended,
the appliance sounds 3 beeps.
5. Press the locks (D2) and then
remove the bowl assembly (D)
(See Fig.12).
COOKING WITHOUT THE LID
You can brown foods in your bowl
without the lid while stirring and
monitoring the cooking. (See Fig.16).
For this method of cooking you must
select a temperature ranging from
135°C to 150°C. Set the operating
time (up to 20 min).
The COOKING WITHOUT A LID
mode is not suitable for making jams
and milk-based preparations (risk of
overowing).
2. Then adjust the setting(s)
using the +/- selector (B6).
For safety reasons, it is not
possible to set a tempera-
ture without setting a cook-
ing time.
3. When you have nished
entering all your settings,
press the “start” button
(B5). When your appliance
is using cooking mode, the
red indicator light, lights up
to inform you that cooking
has started. When the pro-
gram has started, you have
the possibility of stopping
the appliance at any time
by pressing the “stop” but-
ton (B5).
CLEANING YOUR APPLIANCE
The appliance should not be immersed.
Never put the motor unit (A) under running
water. Once you have nished using it,
disconnect the appliance.
Clean the bowl immediately after use to
avoid staining.
Press the locks (D2) then lift the bowl
assembly (D).
Place the bowl on a at surface.
Unlock the lid by rotating one quarter of a
turn clockwise. Carefully remove the lid.
Take care with the knives of the ultrablade
knife (F1) and the kneading / grinding
knife (F4) when you are cleaning them
and when you empty the bowl, they are
extremely sharp.
When the parts have cooled down:
–dismantle the detachable spindle (D3),
the seal (D4) and the locking ring (D5)
(See Fig.13).
–clean the bowl (D), the detachable
spindle (D3), the seal (D4), the locking
ring (D5), the accessories (F1), (F2), (F3),
(F4), (F5), the steam regulator cap (E1),
the lid (E2), the seal (E3) ,and lid seal (E4)
using a sponge and some soapy water.
Rinse these different parts under running
water.
For baked-on food, let the bowl soak for
several hours in water and dishwashing
detergent and scrape, if necessary, with
a spatula (G) or with the abrasive side of
a sponge.
If there is a build up of limescale in
the bowl, use a damp sponge and, if
necessary, white vinegar.
To clean the motor unit (A), use a damp
cloth. Dry carefully.
To help you with cleaning, the bowl, lid
assembly and accessories are dishwasher
safe, with the exception of the detachable
spindle (D3 and D4) and its locking ring
(D5) (See Fig.14).
The accessories, the detachable common
spindle and the parts of the lid may
become slightly discoloured with certain
ingredients such as curry, carrot juice,
etc; this does not represent any danger
for your health or for the operation of your
appliance. To avoid this, clean these parts
immediately after use.
Before using your bowl set (D), make sure
that the electrical contacts under the bowl
are clean and dry.
To preserve the appearance and service
life of the lid of your appliance, hand wash
it. Do not use the abrasive side of the
sponge to avoid scratches.
To not adversely affect the materials of
the bowl (D), ensure that you follow your
dishwasher’s instructions for use, do not
increase doses of salt or dishwasher
products.
IMPORTANT - ‘MAKING YOUR APPLIANCE SECURE’
INSTRUCTIONS ( ‘SECU’ )
Your appliance is
equipped, as stand-
ard, with electronic
motor protection to
guarantee its longev-
ity. This electronic
security safeguards
against incorrect use;
in this way, the motor is properly pro-
tected.
In cases of extreme use which disregard the
recommendations in the instructions (see
paragraph ‘FIRST USE’: potentially exces-
sively large quantities and/or abnormally
long use and/or preparing different recipes
at short intervals), the electronic protection
will be triggered to preserve the motor; in
this case, the appliance will stop functioning
and the message ‘SECU’ will be displayed
on the LCD screen of the control panel to in-
dicate that the appliance is temporarily out
of service.
If ‘SECU’ is displayed on the control pan-
el and your appliance stops working, pro-
ceed accordingly:
Leave your appliance plugged in, do not
press the ‘0/1’ switch (H).
Please refer to the recommendations in
the instructions and readapt your use
of the appliance (see paragraph ‘FIRST
USE’: amount of ingredients/recipe
preparation time/temperature/ type of
accessories).
Allow the motor to cool down for half an
hour.
Restart the appliance by clicking on
the ‘Start / Stop/Reset’ button for two
seconds (B5).
Your appliance is now ready to be used again.
For further information, customer service
department is at your disposal (see details
in the guarantee booklet).
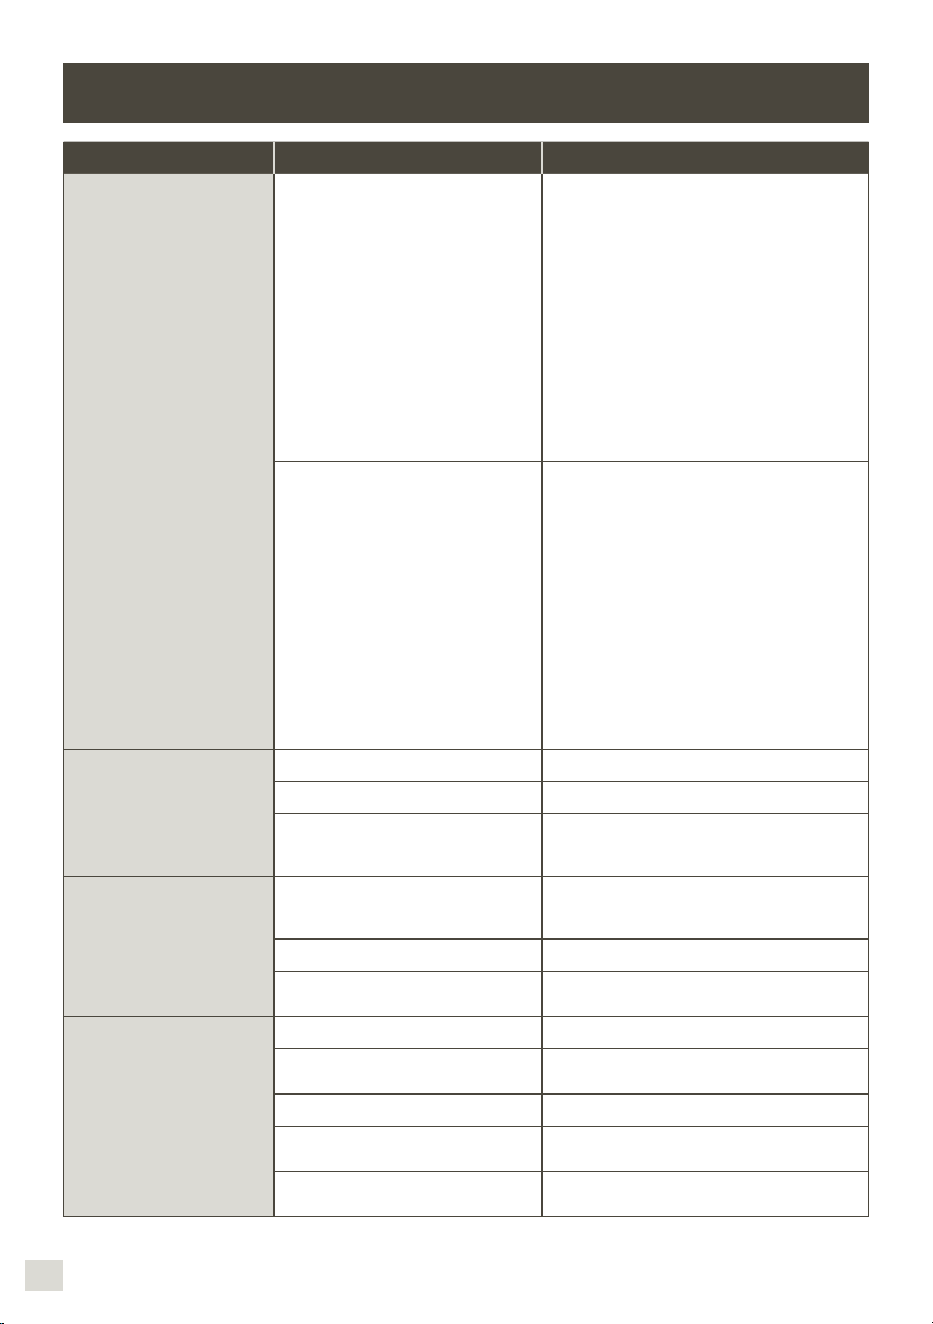
104103
ENGLISH
WHAT TO DO IF YOUR APPLIANCE DOES NOT WORK
PROBLEMS CAUSES SOLUTIONS
Problems when steam
cooking.
The steam regulator cap is not
properly attached.
Set the steam cap to ‘high steam’ (turn
towards you); this setting allows a
maximum amount of steam to build up in the
bowl for all types of steam cooking (soups,
etc.), so there will be more steam in the bowl
and the cooking process will be more efcient.
The ‘low steam’ position allows a maximum
amount of heat and steam to be dispersed into
the bowl for all steam cooking (soups, etc.).
This position also helps to avoid splashing
during cooking.
The ‘high steam’ position allows a
maximum amount of condensation to
escape and results in dishes or sauces
with a better consistency (risotto, cream
desserts, sauces, etc.).
Insufcient cooking time
Cooking times are for information purposes
only; in most cases it ensures that the food is
properly cooked.
However, certain conditions may affect the
cooking time:
– size of the vegetables (cut or uncut)
– quantity of ingredients in the basket
– type of vegetables, their ripeness
– quantity of water in the bowl, which
corresponds to the measurement (0.7l).
If the food is not properly cooked, you can set
an additional cooking time.
You can also use the manual mode by selecting
a temperature of 130°C and the cooking
time according to the quantity and type of
ingredients.
The appliance does not work.
It is not plugged in. Plug the appliance into an electrical socket.
The switch (H) is in position 0. Move the switch to position 1.
The bowl or the lid are not correctly
positioned or locked.
Check that the bowl or the lid are correctly
positioned and locked according to the
diagrams in the instruction manual.
Excessive vibration.
The appliance is not positioned on
a at surface, the appliance is not
stable.
Place the appliance on a at surface.
Volume of ingredients too high. Reduce the quantity of ingredients processed.
Accessory error.
Check that you are using the recommended
accessory.
Leak through lid.
Volume of ingredients too high. Reduce the quantity of ingredients processed.
The lid is incorrectly positioned or
locked.
Lock the lid correctly on the bowl.
The lid seal is not present. Position the seal on the lid.
The seal is cut or damaged.
Change the seal, contact an approved service
centre.
Accessory error.
Check that you are using the recommended
accessory.
PROBLEMS CAUSES SOLUTIONS
Leak through the bowl
spindle.
The bowl seal is not correctly
positioned.
Position the seal correctly.
The bowl seal is damaged. Contact an approved service centre.
The locking ring (D5) is not locked
correctly.
Lock the ring correctly (D5).
The blades do not rotate
easily.
Pieces of food that are too big or too
hard are blocking it from rotating.
Reduce the size or quantity of the ingredients
processed. Add some liquid.
Smell from motor.
On using the appliance for the rst
time, or in the event of overload of the
motor caused by too large a quantity
of ingredients or by pieces that are too
hard or too big.
Allow the motor to cool down (about 30
minutes) and reduce the number of ingredients
in the bowl.
“STOP” is displayed.
The appliance has detected too many
vibrations and has changed to the
safety mode.
Check that you are using the right speed
and that you are using the recommended
accessory.
“SECU” is displayed.
Motor overload caused by too many
ingredients or pieces which are too
hard or too large or overuse without
sufcient cooling down time.
Allow the motor to cool down (about 30
minutes) and reduce the number of ingredients
in the bowl.
“SECU” is displayed + red
indicator light is ashing.
Overheating of temperature sensors. Contact an approved service centre.
“Err1” is displayed.
+ red indicator light is
ashing.
The heating element is not working.
Check that the power pins under the bowl are
not clogged with food. If this is the case, clean
them and try again.
If that still does not work, contact an
approved service centre.
“Err2” is displayed. Electronic fault. Contact an approved service centre.
“Err3” is displayed. Speed fault. Contact an approved service centre.
“Err4” is displayed.
Communication fault with chopper
electronic card.
Contact an approved service centre.
Displays «Err8» Default security sensor lock. Contact an approved service centre.
“ntc1” is displayed.
+ red indicator light is
ashing.
Temperature sensor 1 is no longer
working.
Contact an approved service centre.
“ntc2” is displayed.
+ red indicator light is
ashing.
Temperature sensor 2 is no longer
working.
Contact an approved service centre.
Safety indicator display (C4)
Improper locking of the bowl or lid
Prior to operating the appliance, check that the
bowl is properly locked on the motor unit and
that the lid is properly locked on the bowl. If the
problem persists, contact an authorised centre.
The lid is locked on the bowl in the
“cooking without a lid” mode
Unlock the lid prior to launching the cooking
program. If the problem persists, contact an
authorised centre.
The safety lock on the
lid remained active (rod
extended) and prevents the
lid from locking.
The appliance was turned off as a
recipe was in progress by toggling the
I/O switch to the “O” position or was
simply unplugged as a recipe was in
progress.
Simply toggle the I/O switch to the “I” position
to reset the food processor, along with the
safety lock on the lid; the rod will automatically
return to its original position. You may now lock
the lid.
Connection problem See the app guide
Is your appliance still not working?
Contact an approved service centre (see list in service booklet).

105
RECYCLING
– *The Bluetooth® brand and logos are registered brands of Bluetooth SIG, Inc. and their use by the SEB Group has been
ofcially authorised.
– Google Play and Android are Google Inc. brands.
– Apple and the Apple logo are Apple Inc. brands, registered in the USA and other countries. App Store is an Apple Inc.
service mark.
GLOSSARY
Pairing: grouping or associating two devices.
This is carried out when your smartphone or tablet rst connects with i Prep & Cook XL.
Synchronising: updating of information. The app and i Prep & Cook XL synchronise with each other to exchange information
when they are connected.
Connecting: establishing a link between the app (smartphone/tablet) and the appliance (i Prep & Cook XL). Connecting is
vital for synchronisation.
Cookies: usage information sent to Moulinex to improve the app.
End-of-life electronic or electrical appliances:
Environmental protection first!
Your appliance contains numerous materials that can be recovered or recycled.
Take it to a collection point for processing.
Elimination of packaging and appliance materials.
The packaging exclusively contains materials that are not dangerous to the
environment, which can be disposed of in accordance with the recycling
regulations in force.
To dispose of your appliance, ask the appropriate department of your local
authority.

8020007868
FR ................. P. 1 – 21
NL ................. P. 22 – 42
DE ................. P. 43 – 64
IT ................... P. 65 – 85
EN ................. P. 86 – 105