Use and care
GUIDE
THERMADOR.COM
Masterpiece
®
Series
Built-in Double Steam and Conventional Oven
MEDS302WS


Table of
CONTENTS
Table of Contents
Use and care manual
Safety Definitions ....................................................... 4
IMPORTANT SAFETY INSTRUCTIONS ........................ 5
Proper Installation and Maintenance .............................. 5
Fire Safety ....................................................................... 5
Burn Prevention .............................................................. 6
Child Safety ..................................................................... 7
Cleaning Safety ............................................................... 7
Cookware Safety ............................................................. 7
State of California Proposition 65 Warning: ................... 7
Causes of Damage ...................................................... 8
Protecting the Environment ....................................... 8
Saving Energy ................................................................. 8
Accessories ................................................................. 9
Accessories Included - Steam Oven ............................... 9
Special Accessories - Steam Oven .................................. 9
Accessories Included - Conventional Oven .................. 10
Special Accessories - Conventional Oven ..................... 10
Getting to Know the Appliance ................................ 11
Oven Overview ............................................................. 11
Oven Cavities ................................................................ 11
Oven Cavity Features .................................................... 12
Control Panel ................................................................ 13
Main Menu .................................................................... 14
Heating Modes Menu ................................................... 15
Before First Use ........................................................ 19
Before Using the Appliance for the First Time ............. 19
Water Hardness ............................................................. 19
Initial Use ....................................................................... 19
Calibrating the Appliance and Cleaning the
Oven Cavity ................................................................... 20
Cleaning the Accessories .............................................. 21
Adjust Basic Settings .................................................... 21
General Operation ................................................... 22
High Altitude Baking ..................................................... 22
Switching the Appliance On and Off ............................ 22
Timer Options ............................................................... 22
Setting a Heating Mode ............................................... 23
Changing or Cancelling the Appliance Operation ....... 24
Fast Preheat .................................................................. 25
Panel Lock ..................................................................... 25
Auto Convection Conversion ........................................ 25
Temperature Offset ....................................................... 25
Meat Probe ................................................................... 25
Sabbath Mode .............................................................. 27
Yom Tov Mode .............................................................. 28
Home Connect ......................................................... 28
Setting Up ..................................................................... 28
Remote Start ................................................................. 30
Home Connect Settings ................................................ 30
Software Update ........................................................... 31
Information on Data Protection .................................... 31
Wi-Fi
®
Module .............................................................. 32
Steam Operation ..................................................... 32
Noises ............................................................................ 32
Inserting Accessories .................................................... 32
Steam Cooking .............................................................. 33
Steam Assisted Cooking ............................................... 34
Proof .............................................................................. 35
Defrost ......................................................................... 35
Reheating ...................................................................... 35
Refill Water Tank ........................................................... 36
After Every Steam Operation ........................................ 37
Steam Programs ............................................................ 37
Cleaning Your Steam Oven ........................................... 39
Cleaning Functions Steam Oven ................................... 41
Conventional Oven Operation ................................. 44
Rack Positions ............................................................... 44
Inserting Racks .............................................................. 44
Rotisserie ....................................................................... 45
Cleaning Your Conventional Oven ................................ 48
Service ..................................................................... 51
Troubleshooting Chart .................................................. 51
Maximum Operating Time Exceeded ........................... 52
Oven Light ..................................................................... 52
Product Rating Label ..................................................... 54
How to Obtain Service or Parts .................................... 54
STATEMENT OF LIMITED PRODUCT WARRANTY ... 55
What this Warranty Covers & Who it Applies to .......... 55
How Long the Warranty Lasts ....................................... 55
Repair/Replace as Your Exclusive Remedy ................... 55
4
Out of Warranty Product ............................................... 55
Warranty Exclusions ...................................................... 55
THERMADOR® Support .......................................... 56
Service ........................................................................... 56
Parts and Accessories .................................................... 56
Safety Definitions
Safety Defi nitions
9 WARNING
This indicates that death or serious injuries may
occur as a result of non-observance of this warning.
9 CAUTION
This indicates that minor or moderate injuries may
occur as a result of non-observance of this warning.
NOTICE: This indicates that damage to the appliance or
property may occur as a result of non-compliance with
this advisory.
Note: This alerts you to important information and/or
tips.

5
9 IMPORTANT SAFETY INSTRUCTIONS
READ AND SAVE THESE INSTRUCTIONS
IMPORTANT SAFET Y I NST RUCT I ONSRE AD AND SAVE THESE INSTRUCTIONS
WARNING
When properly cared for, your new appliance has been
designed to be safe and reliable. Read all instructions
carefully before use. These precautions will reduce the
risk of burns, electric shock, fire, and injury to persons.
When using kitchen appliances, basic safety precautions
must be followed, including those in the following pages.
Proper Installation and Maintenance
Have the installer show you the location of the circuit
breaker or fuse. Mark it for easy reference.
This appliance must be properly installed and grounded
by a qualified technician. Connect only to properly
grounded outlet. Refer to Installation Instructions for
details.
This appliance is intended for normal family household
use only. It is not approved for outdoor use. See the
Statement of Limited Product Warranty. If you have any
questions, contact the manufacturer.
Do not store or use corrosive chemicals, vapors,
flammables or nonfood products in or near this
appliance. It is specifically designed for use when
heating or cooking food. The use of corrosive chemicals
in heating or cleaning will damage the appliance and
could result in injury.
Do not operate this appliance if it is not working properly,
or if it has been damaged. Contact an authorized
servicer.
Do not obstruct oven vents.
Do not repair or replace any part of the appliance unless
specifically recommended in this manual. Refer all
servicing to an authorized servicer.
In the event of an error the display will show an error
code. If pressing the TIMERS button does not resolve the
error, disconnect the appliance from the power supply
and call Customer Service.
WARNING
When removing the door make sure oven is cool and
power to the oven has been turned off before removing
the door. Failure to do so could result in burns.
The oven door is heavy and fragile. Use both hands to
remove the oven door. The door front is glass. Handle
carefully to avoid breaking.
Grasp only the sides of the oven door. Do not grasp the
handle as it may swing in your hand and cause injury or
damage.
Failure to grasp the oven door firmly and properly could
result in personal injury or product damage.
Lay the door on a flat smooth surface so that the door
cannot fall over. Failure to do so may result in personal
injury or damage to the appliance.
WARNING
To avoid injury from hinge bracket snapping closed, be
sure that both levers are securely in place before
removing door. Also, do not force door open or closed -
the hinge could be damaged and injury could result.
WARNING
Make sure the appliance and lights are cool and power
to the appliance has been turned off before replacing the
light bulb(s). Failure to do so could result in electrical
shock or burns. The lenses (if equipped) must be in
place when using the appliance. The lenses (if equipped)
serve to protect the light bulb from breaking. The lenses
(if equipped) are made of glass. Handle carefully to
avoid breaking. Broken glass can cause an injury.
WARNING
Light socket is live when door is open if main power
supply is not turned off. To avoid electric shock
disconnect main fuse or circuit breaker before accessing
light bulb(s).
Fire Safety
WARNING
NEVER cover any slots, holes or passages in the oven
bottom or cover an entire rack with materials such as
aluminum foil. Doing so blocks air flow through the oven.
Aluminum foil linings may also trap heat, causing a fire
hazard.
If materials inside an oven or warming drawer should
ignite, keep door closed. Turn off the appliance and
disconnect the circuit at the fuse or circuit breaker panel.
WARNING
Use this appliance only for its intended use as described
in this manual. NEVER use this appliance as a space
heater to heat or warm the room. Doing so may result in
overheating the appliance. Never use the appliance for
storage.
Always have a working smoke detector near the kitchen.
In the event that personal clothing or hair catches fire,
drop and roll immediately to extinguish flames.
Have an appropriate fire extinguisher available, nearby,
highly visible and easily accessible near the appliance.
Smother flames from food fires other than grease fires
with baking soda. Never use water on cooking fires.

9 IMPORTANT SAFETY INSTRUCTIONS
READ AND SAVE THESE INSTRUCTIONS
6
WARNING
TO REDUCE THE RISK OF INJURY TO PERSONS IN
THE EVENT OF A GREASE FIRE, OBSERVE THE
FOLLOWING:
a.
SMOTHER FLAMES with a close-fitting lid, cookie
sheet, or metal tray, then turn off the burner. BE
CAREFUL TO PREVENT BURNS. If the flames do not
go out immediately, EVACUATE AND CALL THE FIRE
DEPARTMENT.
b.
NEVER PICK UP A FLAMING PAN – You may be
burned.
c.
DO NOT USE WATER, including wet dishcloths or
towels – a violent steam explosion will result.
d.
Use an extinguisher ONLY if:
- You know you have a Class ABC extinguisher, and
you already know how to operate it.
- The fire is small and contained in the area where it
started.
- The fire department is being called.
- You can fight the fire with your back to an exit.
Burn Prevention
DO NOT TOUCH HEATING ELEMENTS OR INTERIOR
SURFACES OF OVEN - Heating elements may be hot
even though they are dark in color. Interior surfaces of an
oven become hot enough to cause burns. During and
after use, do not touch, or let clothing, potholders, or
other flammable materials contact heating elements or
interior surfaces of oven until they have had sufficient
time to cool. Other surfaces of the appliance may
become hot enough to cause burns. Among these
surfaces are oven vent openings, surfaces near these
openings and oven doors.
Exercise caution when opening the appliance. Standing
to the side, open the door (or drawer) slowly and slightly
to let hot air and/or steam escape. Keep your face clear
of the opening and make sure there are no children or
pets near the unit. After the release of hot air and/or
steam, proceed with your cooking. Keep doors shut
unless necessary for cooking or cleaning purposes. Do
not leave open doors unattended.
Do not heat or warm unopened food containers. Build-up
of pressure may cause the container to burst and cause
injury.
Always place oven racks in desired location while oven is
cool. Always use oven mitts, when the oven is warm. If a
rack must be moved while oven is hot, do not let
potholder contact the heating elements.
CAUTION
To avoid possible injury or damage to the appliance,
ensure rack is installed exactly per installation
instructions and not backwards or upside down.
Always use dry potholders. Moist or damp potholders on
hot surfaces may result in burns from steam. Do not let
potholder touch hot heating elements. Do not use a towel
or other bulky cloth.
WARNING
SCALDING HAZARD
Movement when opening the appliance door and when
removing the cookware can cause hot liquid to spray
out. Do not stand too close to the appliance when
opening it. Open appliance door carefully. Remove
cookware carefully. Keep children away.
Secure all loose garments, etc. before beginning. Tie
long hair so that it does not hang loose, and do not wear
loose fitting clothing or hanging garments, such as ties,
scarves, jewelry, or dangling sleeves.
Use caution when cooking foods with high alcohol
content (e.g. rum, brandy, bourbon) in the oven. Alcohol
evaporates at high temperatures. There is a risk of
burning as the alcohol vapors may catch fire in the oven.
Use only small quantities of alcohol in foods, and open
the oven door carefully.
WARNING
RISK OF SCALDING
Hot liquid may spill over the sides of cooking
accessories when they are removed from the oven
cavity. Carefully remove cooking accessories with oven
mitts.
WARNING
RISK OF SCALDING
Hot steam can escape when you open the appliance
door. Steam is not visible at certain temperatures. Do not
stand too close to the appliance when opening it. Open
the appliance door with caution. Keep children away.
WARNING
RISK OF BURNS
Hot steam can leak during operation. Do not touch the
ventilation openings. Keep children away.
WARNING
RISK OF SCALDING
Even after switching off, the water on the oven bottom is
still hot. Do not wipe up water from oven bottom
immediately after use. Allow the appliance to cool down
before cleaning it.

7
9 IMPORTANT SAFETY INSTRUCTIONS
READ AND SAVE THESE INSTRUCTIONS
Child Safety
When children become old enough to use the appliance,
it is the responsibility of the parents or legal guardians to
ensure that they are instructed in safe practices by
qualified persons.
Do not allow anyone to climb, stand, lean, sit, or hang on
any part of an appliance, especially a door, warming
drawer, or storage drawer. This can damage the
appliance, and the unit may tip over, potentially causing
severe injury.
Do not allow children to use this appliance unless closely
supervised by an adult. Children and pets should not be
left alone or unattended in the area where the appliance
is in use. They should never be allowed to play in its
vicinity, whether or not the appliance is in use.
WARNING
Items of interest to children should not be stored in an
appliance, in cabinets above an appliance or on the
backsplash. Children climbing on an appliance to reach
items could be seriously injured.
Cleaning Safety
Risk of severe burns! Do not clean the appliance
immediately after turning it off. The water in the bottom of
the oven cavity is still hot. Wait until the appliance has
cooled down.
Keep oven free from grease build up.
WARNING
RISK OF INJURY
Scratched glass in the appliance door can burst. Do not
use any glass scrapers or strong or abrasive cleaning
agents.
WARNING
RISK OF ELECTRICAL SHOCK
Moisture entering the appliance can cause an electrical
shock. Don't use a high-pressure cleaner or steam
cleaner.
Birds have very sensitive respiratory systems. Keep pet
birds out of the kitchen or other rooms where kitchen
fumes could reach them. During self-clean, fumes are
released that may be harmful to birds. Other kitchen
fumes such as overheating margarines and cooking oils
may also be harmful.
When self-cleaning, confirm that the door locks and will
not open. If the door does not lock, do not run Self-
Clean. Contact service.
Do not block the oven vent(s) during the self-cleaning
cycle. Always operate the unit according to the
instructions in this manual.
IMPORTANT SAFETY NOTICE: The California Safe
Drinking Water and Toxic Enforcement Act requires the
Governor of California to publish a list of substances
known to the state to cause cancer, birth defects or other
reproductive harm, and requires businesses to warn
customers of potential exposure to such substances. The
burning of gas cooking fuel and the elimination of soil
during self-cleaning can generate some by-products
which are on the list. To minimize exposure to these
substances, always operate this unit according to the
instructions contained in this booklet and provide good
ventilation.
Cookware Safety
Do not place food directly on oven bottom.
Follow the manufacturer’s directions when using cooking
or roasting bags.
WARNING
RISK OF ELECTRIC SHOCK
Use of a wrong meat probe can damage the insulation.
Use only the meat probe intended for this appliance.
Ovenware must be heat and steam resistant. Silicone
baking pans are not suitable for conventional heating
mode with added steam.
When using Steam mode with a perforated cooking pan,
always slide the universal pan in rack position 1 or 2.
The universal pan will catch any drippings.
The oven bottom must always remain clear. Always place
ovenware on the rack or in the perforated cooking pan.
State of California Proposition 65
Warning:
WARNING
This product can expose you to chemicals including vinyl
chloride, which is known to the State of California to
cause cancer and birth defects or other reproductive
harm. For more information go to
www.P65Warnings.ca.gov.

8
Causes of Damage
NOTICES
▯ Do not place accessories, foil, greaseproof paper or
ovenware on the oven cavity bottom. This will prevent
the oven from heating properly resulting in increased
cooking (or baking and roasting) times and overheat
the oven cavity bottom causing damage to the enamel.
▯ Aluminum foil: Aluminum foil in the oven cavity must
not come into contact with the door glass. This could
cause permanent discoloration of the door glass.
▯ Water in a hot oven cavity: Do not pour water into the
oven cavity when it is hot. This will cause steam. The
change in temperature can cause damage to the
enamel.
▯ Moisture in the oven cavity: Over an extended period
of time, moisture in the oven cavity may lead to
corrosion. Allow the oven cavity to dry after use. Do
not keep moist food in the closed oven cavity for
extended periods of time. Do not store food in the
oven cavity.
▯ Cooling with the appliance door open: Following
operation at high temperatures, only allow the oven
cavity to cool down with the door closed. Do not use
anything to block the door from closing. Even if the
door is only left ajar, the front of nearby furniture may
become damaged over time.
Only leave the oven cavity to dry with the door open if
a large amount of moisture was produced during
operation.
▯ Fruit juice: When baking juicy fruit pies, do not pack
the dish too generously. Dripping fruit juice leaves
stains that cannot be removed. If possible, place on a
baking sheet lined with aluminum foil.
▯ Dirty gasket: If the steam oven door gasket is dirty, the
appliance door may not close properly during
operation. The fronts of adjacent cabinets could be
damaged. Always keep the gasket clean.
▯ Appliance door: Do not sit on the appliance door, or
place or hang anything on it. Do not place any
cookware or accessories on the appliance door. The
appliance door should never be used as a seat, shelf
or worktop.
▯ Inserting accessories: Depending on the appliance
type, accessories can scratch the door glass when
closing the door. Always fully slide accessories into
the oven cavity.
▯ Transporting the appliance: Do not carry or hold the
appliance by the door handle. The door handle cannot
support the weight of the appliance and could break.
Protecting the Environment
Your new appliance is energy-efficient. Here you can find
tips on how to save even more energy when using the
appliance, and how to dispose of your appliance
properly.
Unpack the appliance and dispose of the packaging in
an environmentally friendly manner.
Saving Energy
▯ You may remove unneeded oven racks or accessories
from the oven cavity before cooking. This will reduce
the amount of preheat time required.
▯ Open the appliance door as infrequently as possible
when the appliance is in use.
▯ It is best to bake several cakes one after the other
while the cavity is still warm and the oven does not
need to preheat again.
▯ Keep your oven clean and avoid grease buildup as
this may lengthen preheat times and increase
emissions.
9
Accessories
Your appliance is accompanied with a variety of
accessories. Below is an overview of the accessories
included and information on how to use them correctly.
Accessories listed below can be ordered through
Thermador’s eshop. The address is
Store.thermador.com/us.
9 CAUTION
Do not slide any accessories between the rack
positions. This may cause the accessory to tip.
Accessories Included - Steam Oven
--------
Only use original accessories. They are specially
adapted for your appliance.
You can buy accessories from Customer Service, from
specialist retailers or online.
Note: The accessories may deform when they become
hot. This does not affect their function. Once they have
cooled down again, they regain their original shape.
Special Accessories - Steam Oven
(not included - available via eShop)
--------
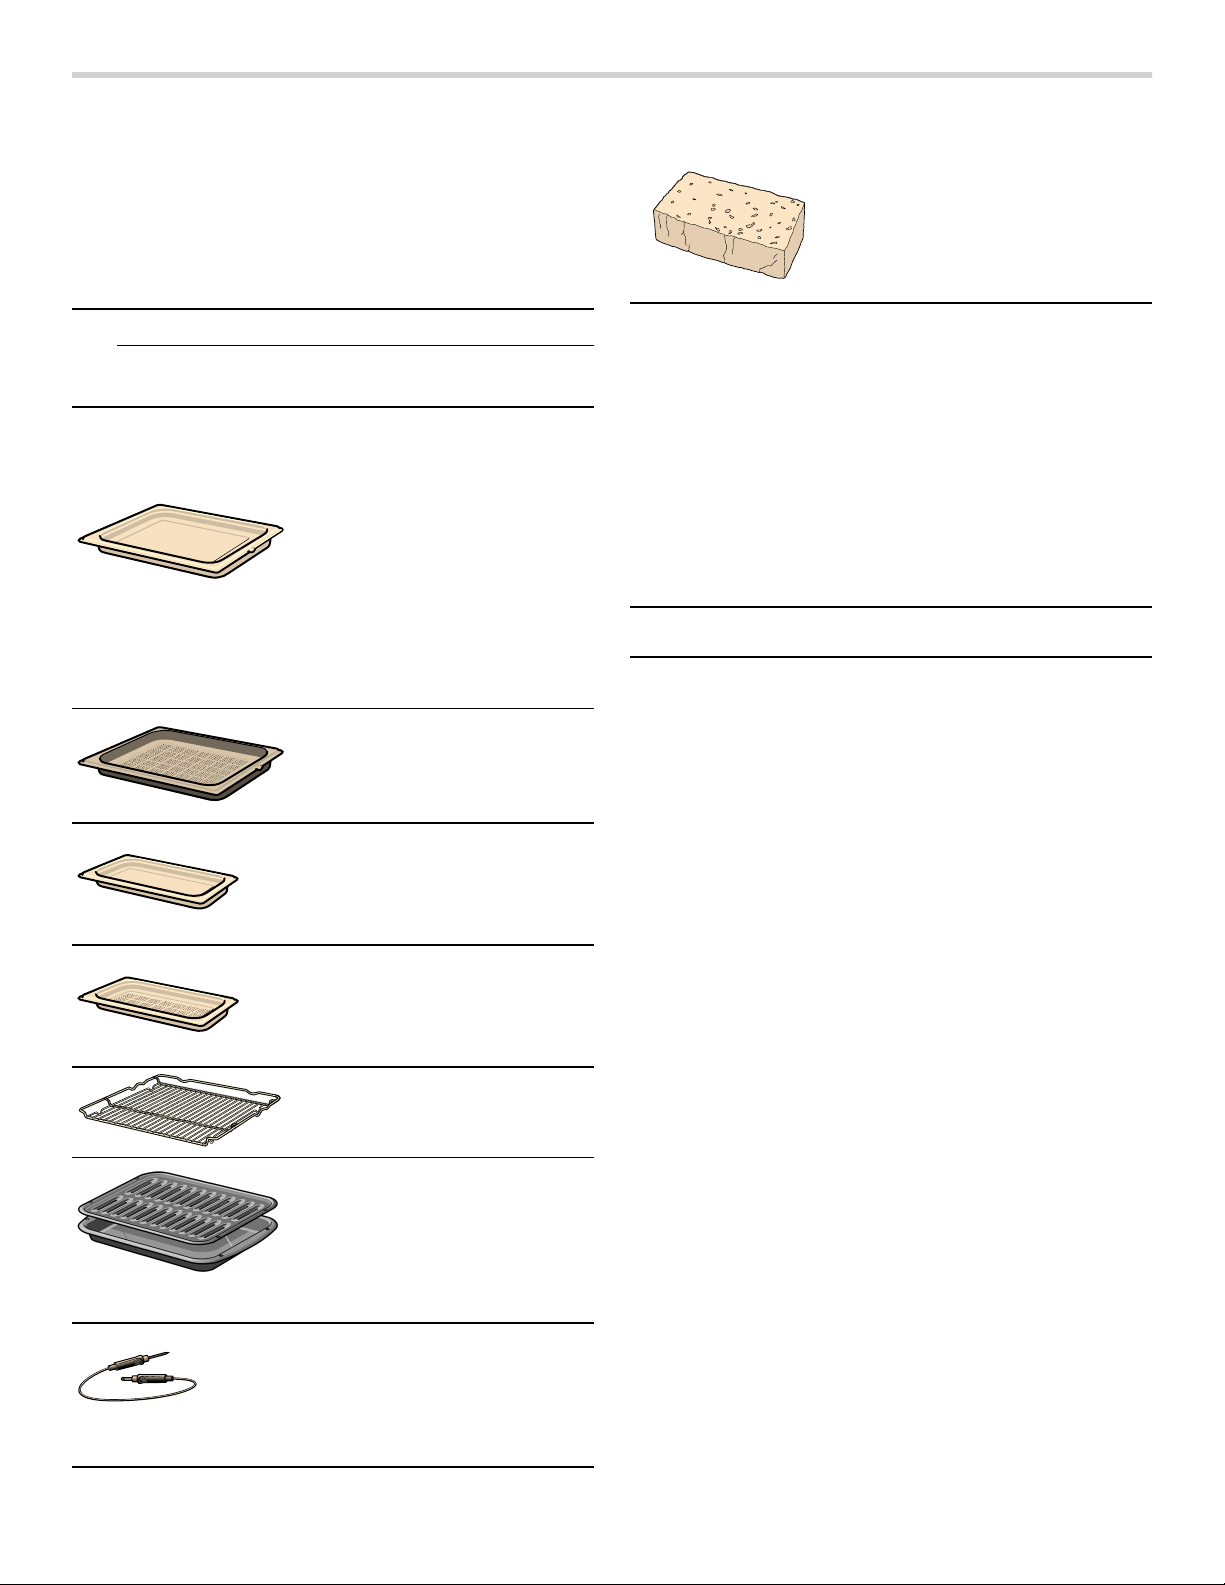
Universal Pan
Full size, 1
5
/
8
" (40 mm) deep
For crisping food items or
cooking convenience foods.
Place on rack 1 when
steaming to catch water and
food soils.
Perforated Pan
Full size, 1
5
/
8
" (40 mm) deep
For steaming large quantities.
Small Unperforated Pan
Half size, 1
5
/
8
" (40 mm) deep
For cooking rice, legumes and
cereals.
Small Perforated Pan
Half size, 1
5
/
8
" (40 mm) deep
For steaming vegetables,
juicing berries and defrosting.
Wire Rack
For baking sheets, cake pans
and ovenproof dishes.
Broil Pan and Grid
Use for broiling and roasting.
Remove from oven when
running Self Clean mode.
Multi-Point Meat Probe
Three measurement points
enables precision roasting to
your exact requirements.
Its use is described in the
relevant section.
Sponge
Removes water from the oven
cavity bottom.
Descaler #10008170
Water Hardness Test
Strips
#056317
10
Accessories Included - Conventional Oven
--------
Only use original accessories. They are specially
adapted for your appliance.
You can buy accessories from Customer Service, from
specialist retailers or online.
Note: The accessories may deform when they become
hot. This does not affect their function. Once they have
cooled down again, they regain their original shape.
Special Accessories - Conventional Oven
(not included - available via eShop)
--------
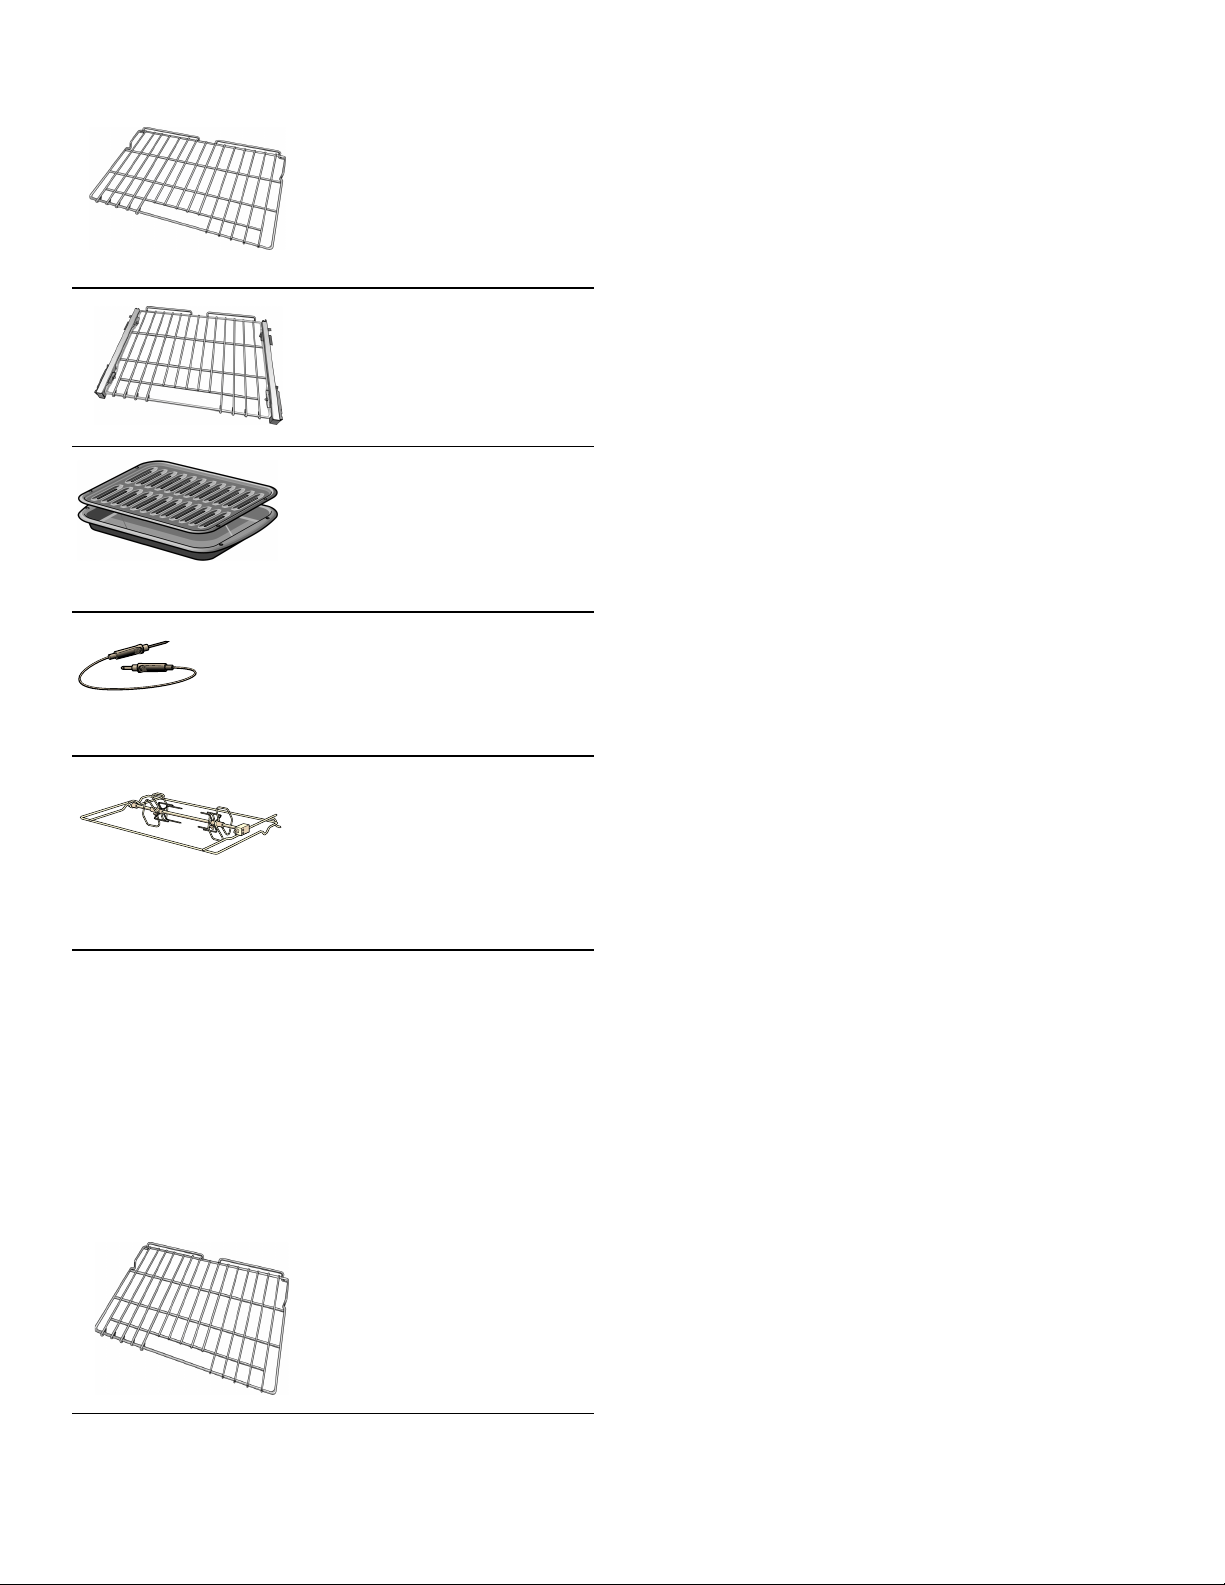
Wire Rack
For baking sheets, cake pans
and ovenproof dishes.
Do not clean in the self-clean
oven.
Telescopic Rack
Allows for easier access when
inserting or removing food.
Do not clean in the self-clean
oven.
Broil Pan and Grid
Use for broiling and roasting.
Remove from oven when
running Self Clean mode.
Multi-Point Meat Probe
Three measurement points
enables precision roasting to
your exact requirements.
Its use is described in the
relevant section.
Rotisserie
Use this accessory when using
the rotisserie mode. See
Rotisserie under Conventional
Oven Operation Chapter for
additional information.
Do not clean in the self-clean
oven.
Self Cleaning Rack (3 Pack)
(available via eShop)
#SDCLNRCK30
For ovenware, cake pans and
ovenproof dishes.
These racks do not need to be
removed during self clean.
11
Getting to Know the Appliance
This section outlines and describes the features,
indicators and controls of the appliance. You will also
find information on the various functions of your
appliance.
Note: Depending on the appliance model, individual
details and colors may differ.
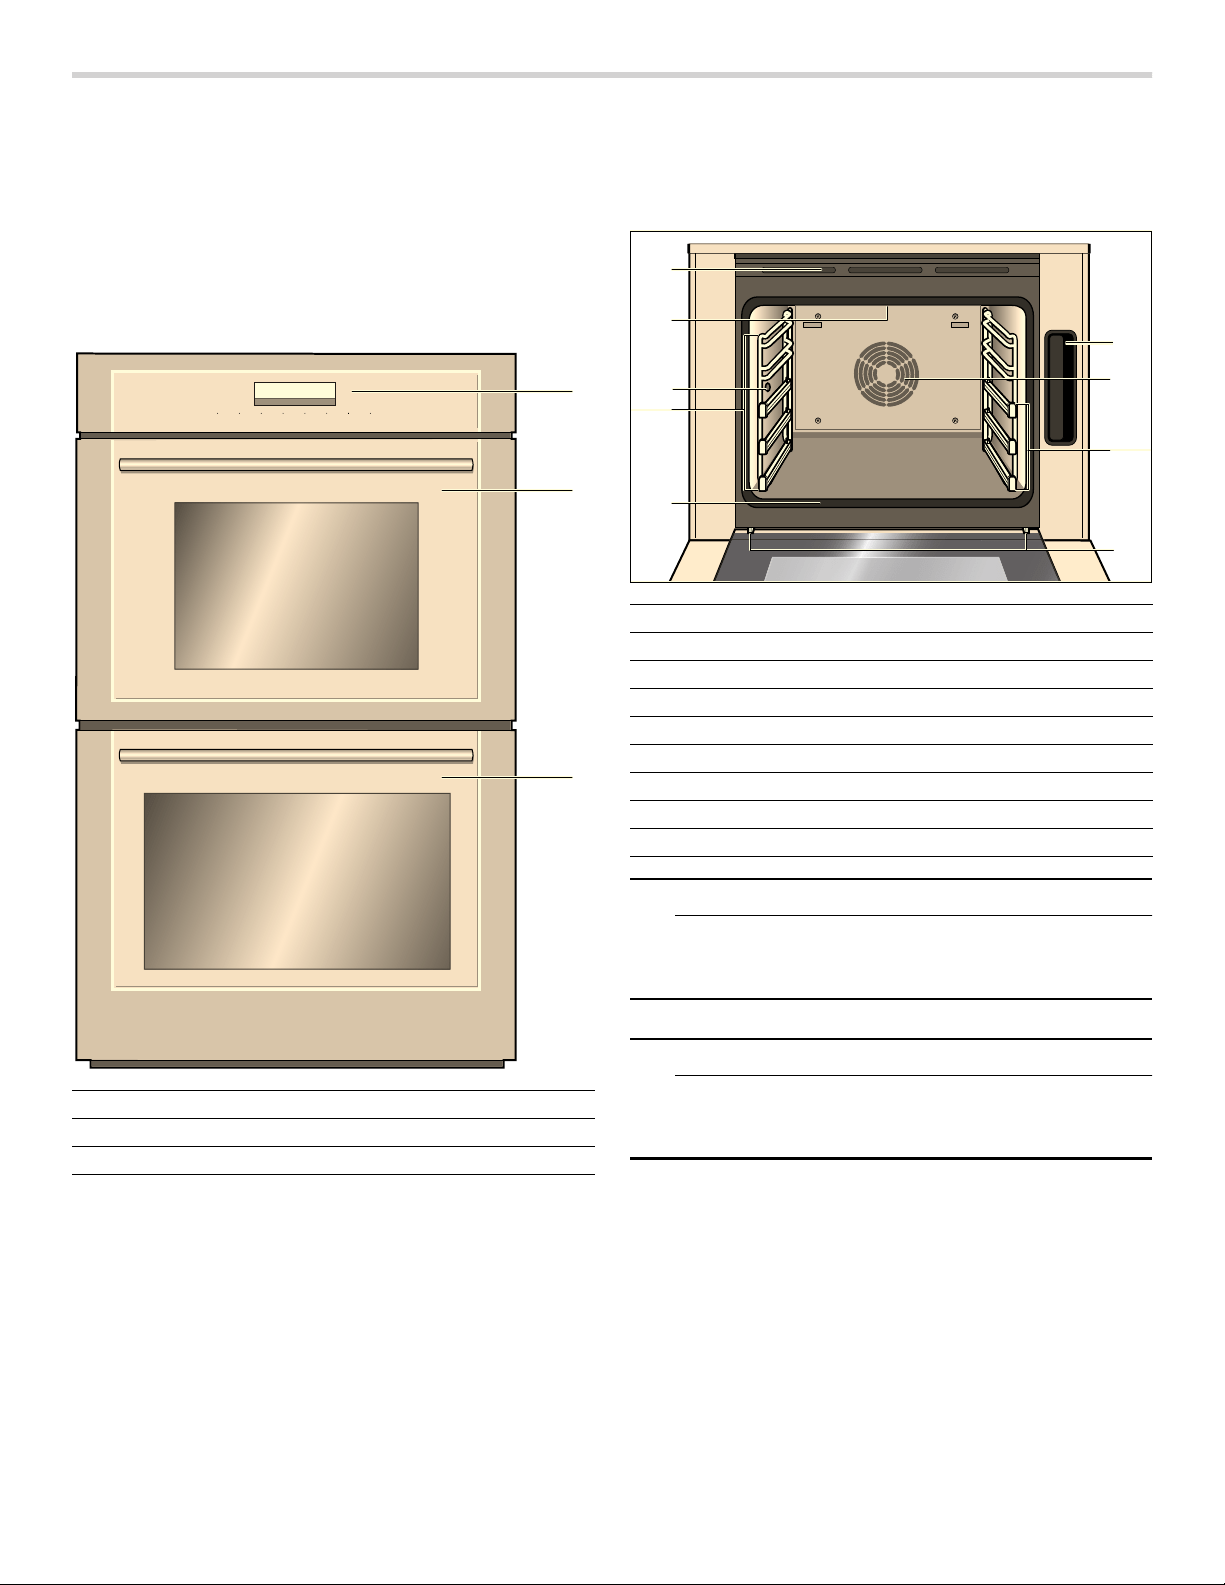
Oven Overview
Oven Cavities
Upper Oven Cavity - Steam Oven
9 CAUTION
Do not place anything on the bottom of the oven
cavity. Do not cover it with aluminum foil. A build-up
of heat could damage the appliance or cause injury.
9 CAUTION
The bottom of the oven cavity must always be left
free. Always place cookware in the perforated
cooking pan or on a rack.
A Control panel and display
B Upper oven cavity - Steam Oven
C Lower oven cavity - Conventional Oven
$
%
&
)$673 5(+( $721O2)) /,*+7 7,0(56 0(18 ,1)2
$
''67($0 67$57O6723
7UXH&RQYHFWLRQ
Ý
³
1 Water tank
2 Convection system
3 Telescopic rack guides
4 Door hinges
5 Door gasket
6 Accessory rack guides
7 Meat probe socket
8 Broil element
9 Oven vents

12
Lower Oven Cavity - Conventional Oven
9 CAUTION
Do not place anything on the bottom of the oven
cavity. Do not cover it with aluminum foil. A build-up
of heat could damage the appliance or cause injury.
Oven Bottom
The oven bottom conceals the lower heating element. As
a result the element is protected from damage and spills.
Tip: Do not place food directly on the oven bottom.
9 WARNING
Do not use aluminum foil or protective liners to line
any part of the appliance, especially the oven
bottom. Installation of these liners may result in a
risk of electric shock or fire.
NOTICE: Do not place broil pan on the oven bottom to
catch spills. Doing so will damage the oven bottom
porcelain.
9 WARNING
NEVER cover any slots, holes or passages in the
oven bottom or cover an entire rack with materials
such as aluminum foil. Doing so blocks air flow
through the oven. Aluminum foil linings may also
trap heat, causing a fire hazard.
Oven Cavity Features
Oven Vent
The oven vent is located along the top and bottom of the
unit. Warm air may be released from the vent before,
during and after cooking. It is normal to see steam
escaping from the vent and condensation may collect.
This area may be warm when the oven is in use. Do not
block the vent since it is important for air circulation.
Cooling Fan
The cooling fan runs based on the oven temperature.
Warm air may be felt as it is released from the oven
vents while the fan operates. The fan may also operate
after the oven is off.
Convection Fan
The convection fan operates during all convection
modes. When the oven is operating in a convection
mode, the fan turns off automatically when the door is
opened.
Oven Light
When you open the appliance door, the oven light turns
on. If the door remains open for longer than 20 minutes,
the lighting switches off again. To turn the light back on,
touch the LIGHT button.
Water Tank
The steam oven is equipped with a water tank. When you
open the door you can see the water tank at the right
side of the oven cavity. Fill the water tank with water to
operate the appliance using steam modes.
1 Convection system
2 Accessory racks
3 Door hinges
4 Door gasket
5 Meat probe socket
6 Broil element
7 Oven vents
8 Rotisserie socket
13
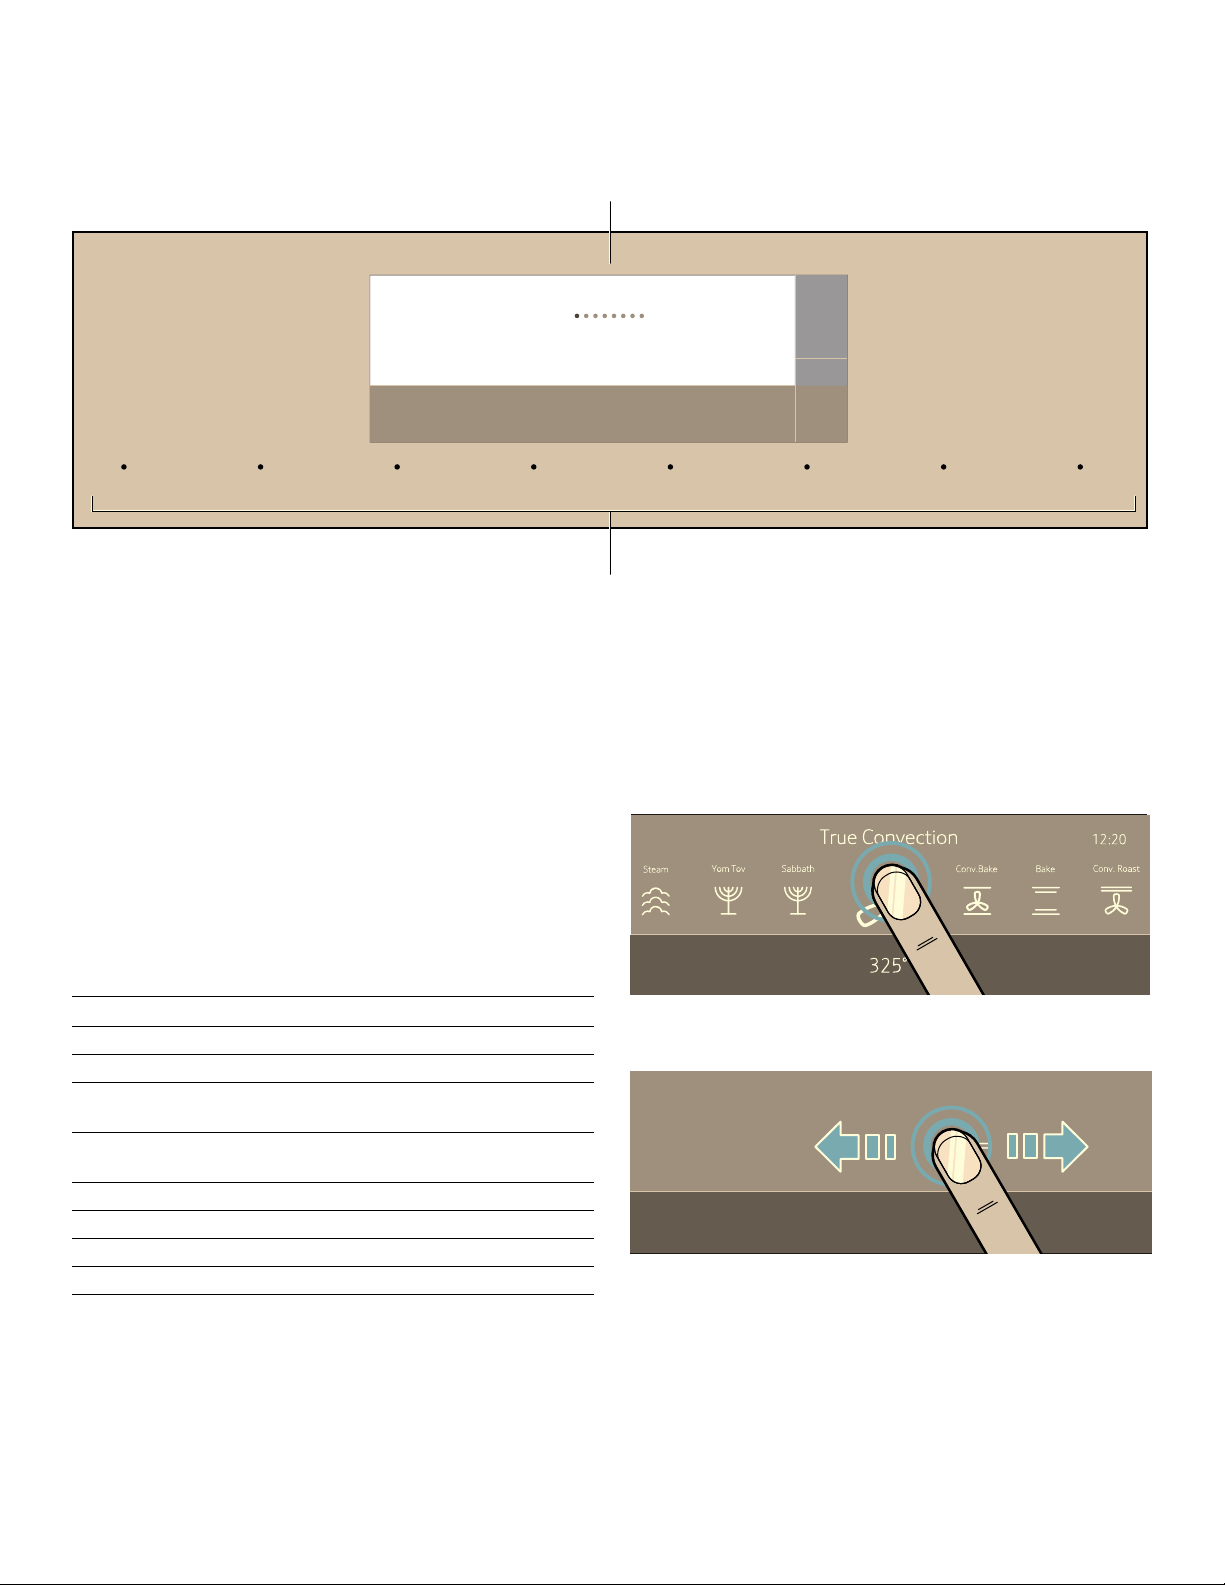
Control Panel
You can set your appliance's various functions on the
control panel using the full touch color display. The full
touch color display shows you the current settings.
Operating Controls
Use the controls to set your appliance simply and
directly.
Touch Buttons
There are sensors under the touch buttons. Press on the
words of the touch buttons to select a function. The
available functions are indicated by a light above the
respective touch button. Depending on the operation you
are running, the number of available functions can
change.
--------
Full Touch Color Display
Use the full touch color display to navigate through the
menus and select the settings. The feature that is active
will be illuminated in blue.
Basic way of operating the display:
▯ To select a feature/setting, touch the desired area on
the display.
▯ The touch screen also supports swiping to move left or
right through the various settings.
)$6735(+($721O2)) /,*+7 7,0(56 0(18 ,1)2 $''67($0 67$57O6723
+HDWLQJ0RGHV
Ê
(DV\&OHDQ
Õ
6WHDP3U
6HWWLQJV 'HVFDOH
'U\ (FRO\WLF&OHDQ
U
T
(
Full touch color display
0
Touch buttons
Touch button Use
ON I OFF Switches the appliance on or off
LIGHT Switches the appliance light on or off
TIMERS Sets the kitchen timer, or cooking
time
MENU Selects operating modes and set-
tings
FAST PREHEAT Activates/Deactivates fast preheating
INFO Displays additional information
ADD STEAM Turns on steam-assisted cooking
START I STOP Starts or pauses the operation
&RQYHFWLRQ%DNH
%DNH
°
6DEEDWK
&RQY5RDVW
5RDVW
°
<RP7RY
³
7UXH&RQY
14
In some instances you have further options to navigate
through the menu:
▯ Touch the q symbol to select the upper steam oven
cavity. Touch the
r symbol to select the lower
conventional oven cavity.
The settings you make afterwards will only affect the
oven cavity you have selected.
▯ Some operations allow returning to the prior screen by
touching the ; symbol.
▯ Some operations allow confirmation by touching the
8 symbol.
Main Menu
Touch the MENU touch button to access the main menu.
--------
Menu Use
¢
Heating Modes
Select the desired conventional
heating mode and temperature for
your food
²
Steam Programs
Preparing dishes with steam
ª
Drying
Drying the oven cavity after a steam
operation
š
Easy Clean
Uses steam to help lift food soils for
cleaning
™
Ecolytic Clean
Refresh ecolytic surfaces
,
Descaling
Allows the steam oven to continue
running properly
4
Settings
Individually adjusting the appliance
settings ~ "Adjust Basic Settings"
on page 21
F
Remote Start
This symbol appears when the Home
Connect set-up is complete.

15
Heating Modes Menu
Your appliance has multiple heating modes. After
switching the appliance on, the Heating Modes menu is
the default menu. The pre-selected mode is Convection
Bake. You may then choose your desired heating mode
by scrolling left or right.
Heating Mode Availability
Heating Modes Menu Steam Oven
Heating Mode
Steam Oven
Upper Cavity
Conventional Oven
Lower Cavity
True Convection
ØØ
Convection Bake
ØØ
Bake
ØØ
Convection Roast
ØØ
Roast
ØØ
Convection Broil
ØØ
Broil
ØØ
Max Broil
ÞØ
Max Convection Broil
ÞØ
Pizza
ØØ
Speed Convection
ØØ
Slow Roast
ØØ
Dehydrate
ØØ
Rotisserie
ÞØ
Proof
ØØ
Warm
ØØ
Steam
ØÞ
Steam Convection
ØÞ
Reheat
ØÞ
Defrost
ØÞ
Easy Clean
ØØ
Self Clean
ÞØ
Ecolytic Clean
ØÞ
Steam Auto Programs
ØÞ
Yom Tov
ØØ
Sabbath
ØØ
Ø
=Available Þ=Not Available
Heating mode Temperature
°F (°C)
Use
‚
True Convection* 150-475°
(65-250°)
For baking and cooking small food items on one or more racks.
The fan distributes the heat from the ring heating element in the
back panel evenly around the oven cavity.
¶
Convection Bake* 150-475°
(65-250°)
Use for large baked items and breads on 1 or 2 racks. Also
suitable for side dishes and casseroles.
Heat is emitted from above and below while the fan distributes
the heat evenly around the oven cavity.
ƒ
Bake* 150-475°
(65-250°)
For traditional baking and roasting on one level.
Heat is emitted evenly from the top and bottom.

16
--------
þ
Convection Roast* 150-475°
(65-250°)
Roasting of poultry, larger pieces of meat and vegetables.
Heat is emitted from above and below while the fan distributes
heat evenly around the oven cavity.
ü
Roast* 150-475°
(65-250°)
For roasting poultry or meats.
The heat is emitted from above and below.
‡
Convection Broil 450-500°
(230-260°)
For roasting poultry, whole fish and larger pieces of meat.
The broil element and the fan switch on and off intermittently.
The fan circulates the hot air around the food.
‰
Broil 450-500°
(230-260°)
For broiling flat items such as steaks or hamburgers, for making
toast and for cooking au gratin.
The whole area under the broil heating element becomes hot.
ú
Pizza 150-475°
(65-250°)
For preparing pizza fresh or frozen.
Heat is emitted from above and below. The fan distributes the
heat evenly around the oven cavity.
÷
Speed Convection* 150-475°
(65-250°)
For frozen convenience foods. No preheat is required.
Heat is emitted from top and bottom while the fan circulates hot
air around the food.
ÿ
Slow Roast 150-250°
(65-120°)
For gentle slow cooking of seared, tender pieces of meat in
ovenware without a lid.
Heat is emitted evenly from the top and bottom at low
temperatures.
ý
Dehydrate 100-160°
(40-70°)
For drying herbs, fruits and vegetables.
Œ
Proof** 85-110°
(30-45°)
For yeast doughs and sourdough.
Dough will rise considerably more quickly than at room
temperature. The surface of the dough does not dry out.
¿
Warm 150-225°
(65-110°)
For keeping cooked food warm.
‹
Steam** 85-212°
(30-100°)
For vegetables, fish, side dishes, juicing fruit and blanching.
§
Steam Convection** 250-450°
(120-230°)
Combines steam and convection oven mode.
¨
Reheat** 175-350°
(80-175°)
For plated meals and baked items.
Cooked food is gently reheated. The steam ensures that the
food does not dry out.
“
Defrost** 100-125°
(40-50°)
For vegetables, meat, fish and fruit.
The moisture gently transfers the heat to the food. The food
does not dry out or lose its shape.
›
Sabbath 100-450°
(40-230°)
Will appear in Heating Modes if enabled in Settings.
See Sabbath Mode section under General Operations Chapter.
›
Yom Tov 100-450°
(40-230°)
Will appear in Heating Modes if enabled in Settings.
See Yom Tov Mode section under General Operations Chapter.
*Steam assistance possible with this type of heating in upper oven only (water reservoir MUST be full before
appliance is operated).
**Steam heating mode (water reservoir MUST be full before appliance is operated).

17
Heating Modes Menu Conventional Oven
--------
Heating mode Temperature
°F (°C)
Use
‚
True Convection 150-525°
(65-275°)
For baking and cooking small food items on one or more racks.
The fan distributes the heat from the ring heating element in the
back panel evenly around the oven cavity.
¶
Convection Bake 150-525°
(65-275°)
Use for large baked items and breads on 1 or 2 racks. Also
suitable for side dishes and casseroles.
Heat is emitted from above and below while the fan distributes
the heat evenly around the oven cavity.
ƒ
Bake 150-525°
(65-275°)
For traditional baking and roasting on one level. Especially
suitable for cakes on multiple racks. Heat is emitted evenly from
the top and bottom.
þ
Convection Roast 150-525°
(65-275°)
Roasting of poultry, larger pieces of meat and vegetables.
Heat is emitted from above and below while the fan distributes
heat evenly around the oven cavity.
ü
Roast 150-525°
(65-275°)
For roasting poultry or meats.
The heat is emitted from above and below.
¿
Warm 150-225°
(65-110°)
For keeping cooked food warm.
÷
Speed Convection 150-525°
(65-275°)
For frozen convenience foods.
Heat is emitted from top and bottom while the fan circulates hot
air around the food.
ý
Dehydrate 100-160°
(40-70°)
For drying herbs, fruits and vegetables.
ÿ
Slow Roast 150-250°
(65-120°)
For gentle slow cooking of seared, tender pieces of meat in
ovenware without a lid.
Heat is emitted evenly from the top and bottom at low
temperatures.
ù
Max Convection Broil 450°-550°
(230°-290°)
For thick tender cuts of meat, poultry and fish. Uses the larger
broil element with the convection fan to allow for more food to
cook at one time.
‡
Convection Broil 450-550°
(230-290°)
For roasting poultry, whole fish and larger pieces of meat.
The broil element and the fan switch on and off intermittently.
The fan circulates the hot air around the food.
‰
Broil 450-550°
(230-290°)
For broiling flat items, such as steaks or hamburgers, for
making toast, and for cooking au gratin.
The whole area under the broil heating element becomes hot.
ú
Pizza 150-525°
(65-275°)
For preparing pizza fresh or frozen.
Heat is emitted from above and below. The fan distributes the
heat evenly around the oven cavity.
Œ
Proof 85-110°
(30-45°)
For yeast doughs and sourdough.
Dough will rise considerably more quickly than at room tem-
perature. The surface of the dough does not dry out.
μ
Rotisserie 175°-550°
(80°-290°)
For roasting poultry and large pieces of meat. Food is slowly
turned on a skewer.
Uses heat radiated from the upper element.
ˆ
Max Broil 450°-550°
(230°290°)
For cooking thin, tender cuts of meat, poultry and fish. Uses the
larger broil element to allow cooking more food at one time.
›
Sabbath 100-450°
(40-230°)
Will appear in Heating Modes if enabled in Settings.
See Sabbath Mode section under General Operations Chapter.
›
Yom Tov 100-450°
(40-230°)
Will appear in Heating Modes if enabled in Settings.
See Yom Tov Mode section under General Operations Chapter.
18
General Tips-Conventional Oven
Pan Placement
Baking results are better if pans are placed in the center
of the oven. If baking more than one pan on a rack, allow
at least 1’’ to 1 1/2’’ of air space around the pan.
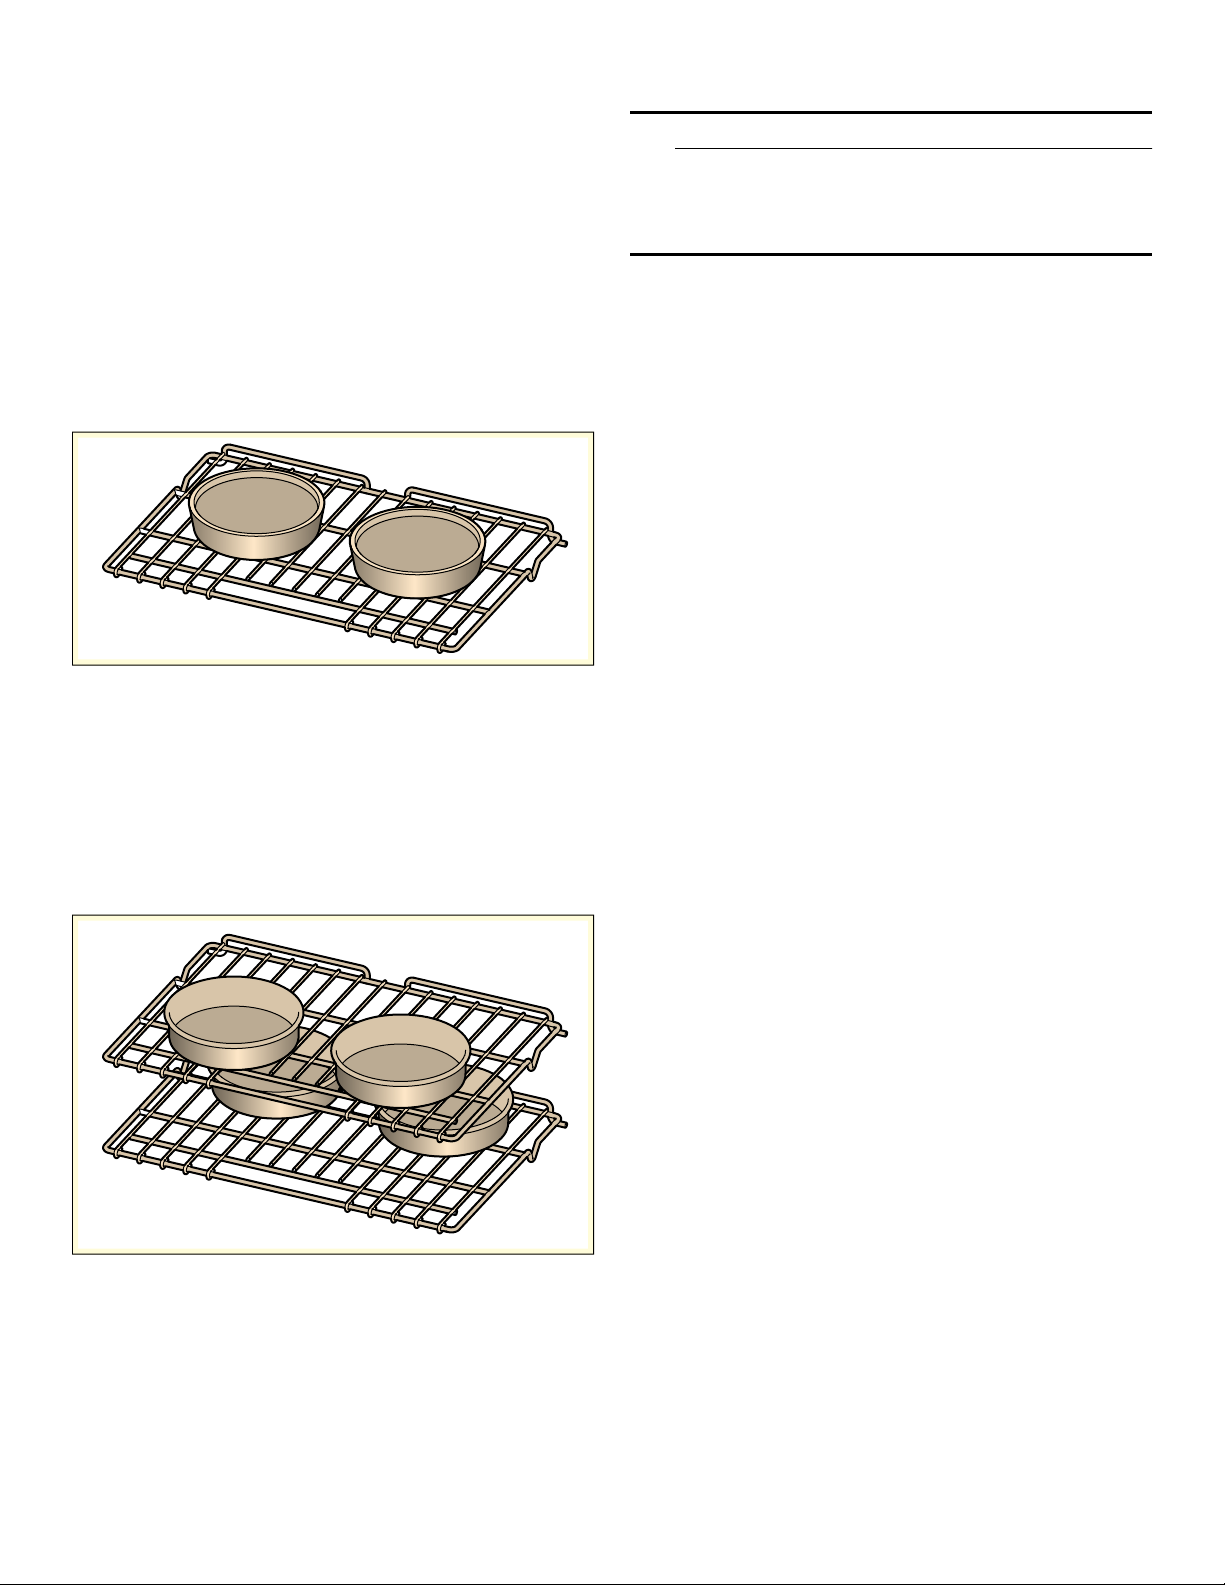
One Rack Baking
For best results when baking layer cakes on one rack,
use Bake Mode. Place the cakes on rack 4 in the oven
as shown below.
Note: Pan placement only applies to the conventional
oven.
2 Cakes, Rack Level 4
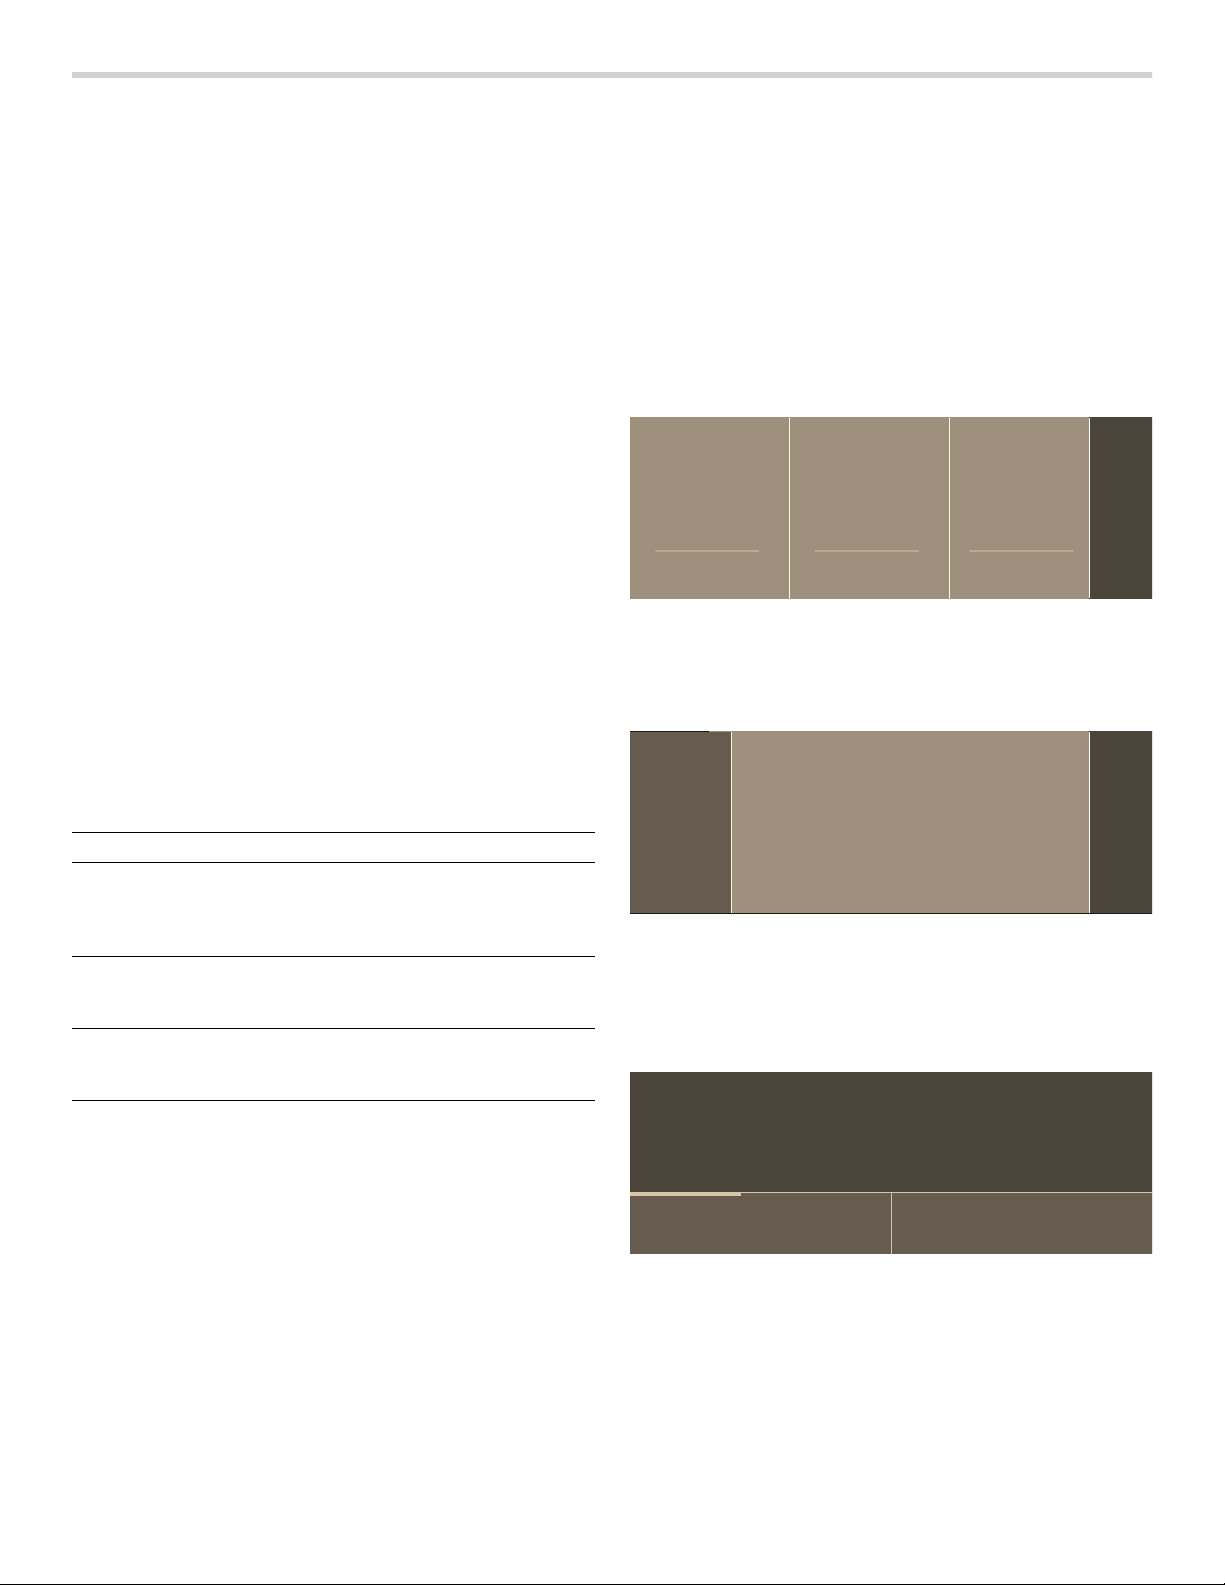
Multiple Rack Baking for Cakes
When baking four layer cakes at the same time, stagger
pans on two racks so that one pan is not directly above
the other. For best results use Bake mode. Place the
cakes on racks 3 and 5, staggering the cakes in the
oven as shown below.
4 Cakes, Rack Placement 3 and 5
For best results when baking cookies on multiple racks,
use True Convection mode. Place cookies on racks 3
and 6.
Aluminum Foil
9 WARNING
Do not use aluminum foil or protective liners to line
any part of the appliance, especially the oven
bottom. Installing these liners may result in risk of
electric shock or fire.
Preheating the Oven
▯ Place oven racks in desired position before heating
the oven.
▯ Preheat the oven when using the Bake, Convection
Bake, True Convection, Pizza, Broil, Convection Broil,
and Warm modes.
▯ Preheat is not required for Speed Convection, Roast,
Convection Roast, Proof, and Dehydrate modes.
▯ Allow oven to preheat while preparing recipe
ingredients or food items.
▯ Setting a higher temperature does not shorten preheat
time.
▯ Once oven is preheated, open the oven door and
place food in the oven as quickly as possible to
minimize the loss of heat and reduction of oven
temperature.
▯ Use Fast Preheat to speed up preheating.
Preheat Reminders
The lower element is hidden under the oven bottom. It is
normal that the preheat time is different than your
previous oven that had an exposed element on the
bottom.
▯ Preheating is not necessary for meats, poultry,
casseroles and Speed Convection mode.
▯ Preheat time will be longer when the electrical supply
to your house is less than 240 volts.
▯ Increasing the oven temperature will require a longer
preheat time. For example, the preheat time for 425° F
is longer than the preheat time for 350° F.
When broiling, preheat the oven 3-4 minutes. Do not
preheat for more than 5 minutes.
For Best Results
▯ Use the cooking recommendation charts which can be
found in the Cooking Charts Use and Care Guide.
▯ Open the door as briefly as possible to avoid
temperature reduction.
▯ Use the interior oven light to view the food through the
oven window rather than opening the door frequently.
▯ Use the timer to keep track of cooking times.

19
Baking Pans and Dishes
▯ Glass baking dishes absorb heat. Some cookware
manufacturers recommend reducing the temperature
25° F when using this type of dish. Follow
manufacturers’ recommendations.
▯ Use pans that provide the desired browning. For
tender, light, golden brown crusts, use light, anodized
or shiny metal bakeware.
▯ Dark, rough or dull pans (nonstick or anodized) will
absorb heat and result in a browner, crisper crust.
Some manufacturers recommend reducing the
temperature 25° F when using this type of pan. Follow
manufacturers’ recommendations.
▯ Insulated cookie sheets or bakeware may increase the
length of cooking time.
▯ Do not set broil pans or any other heavy object on the
open oven door.
▯ Do not keep the empty broil pan in the oven during
cooking as this changes cooking performance. Store
the broil pan outside the oven.
High Altitude Baking
When cooking at high altitudes, recipes and cooking
times will vary.
Condensation
It is normal for certain amount of moisture to evaporate
from the food during any cooking process. The amount
depends on the moisture content of the food. The
moisture may condense on any surface cooler than the
inside of the oven, such as the control panel.
Before First Use
Before you can use your new appliance, you must enter
certain settings. You must also clean the oven cavity and
accessories.
Before Using the Appliance for the First
Time
▯ Appliance must be properly installed by a qualified
technician before use.
▯ Remove all packing materials from inside and outside
the oven.
▯ While cool, wipe with a clean, damp cloth and dry.
▯ There may be a slight odor from your new appliance;
this is normal and will disappear after a short time.
▯ Optimum cooking results depend on proper cookware
being used.
▯ Read and understand all safety precautions and Use
and Care Manual information.
Execute the following sections prior to operating:
Water Hardness
Before using the appliance for the first time, enquire
about the water hardness of your tap water from your
water supplier.
In order for the appliance to reliably remind you to
descale it when required, you must correctly set your
water hardness range.
NOTICES
▯ The appliance may become damaged due to the use
of unsuitable liquids.
Do not use distilled water or other liquids.
Only use cold, fresh tap water, softened water or non-
carbonated mineral water.
▯ If your water is very hard, we recommend that you use
softened water.
▯ If you only use softened water, you can set the water
hardness range to "softened" in this case.
▯ If you use mineral water, set the water hardness range
to "4 very hard".
▯ If you use mineral water, you must only use non-
carbonated mineral water.
Initial Use
As soon as the appliance is connected to the power
supply, the first setting "Time of day" appears on the
display.
Setting the time of day
1.
Touch the bottom line.
The time setting options are displayed.
2.
Touch the “Hours” touch field and swipe to the left or
right to select the current hour.
3.
Touch the "Minutes" touch field and swipe to the left or
right to select the current minute.
4.
Touch the 8 symbol to apply the settings.
Water hardness range Setting
0 0 softened
1 (up to 60 ppm) 1 soft
2 (60-120 ppm) 2 medium
3 (120-180 ppm) 3 hard
4 (above 180 ppm) 4 very hard
0LQXWHV
+RXUV

20
Setting the language
1.
Touch the bottom line.
2.
Swipe to the left or right to select the required
language.
3.
Touch the top line.
Setting the Clock Display
1.
Touch "Clock display".
2.
Touch the bottom line.
3.
Swipe to the left or right to select “digital” or
“analogue”.
4.
Touch the top line.
Setting the water hardness
1.
Touch "Water hardness".
2.
Touch the bottom line.
3.
Swipe to the left or right to select the appropriate water
hardness.
4.
Touch the top line.
Setting up Home Connect
You can start the Home Connect assistant to connect to
the Home Connect network and pair your mobile device.
1.
Touch “Home Connect”.
2.
Touch “Start assistant”.
3.
Follow the instructions in the chapter “Home
Connect”.~ "Home Connect" on page 28
Note: You can also activate this feature later in the
“Settings” menu.~ "Adjust Basic Settings" on page 21
Notes
▯ You can change these settings at any time in the basic
settings.
▯ After connecting the appliance to the power or
following a power failure, the settings for initial use are
shown in the display.
Calibrating the Appliance and Cleaning
the Oven Cavity
The boiling temperature of water depends on the altitude.
The oven needs to be calibrated in order to ensure
optimum performance after installation.
Preparing the Appliance for Calibration
1.
Remove the accessories from the oven cavity.
2.
Remove any remaining packaging, such as
polystyrene pellets, from the oven cavity.
3.
Before calibrating the appliance, wipe the smooth
surfaces in the oven cavity with a soft, wet cloth.
Calibration and Cleaning
Notes
▯ The calibration can only be started when the oven
cavity is cold (room temperature).
▯ Do not open the appliance door during calibration as it
will be interrupted.
NOTICE: ENAMEL DAMAGE! Do not start an operation if
water is on the bottom of the oven cavity. Let appliance
cool down and wipe the water from the oven cavity
bottom before starting an operation.
1.
Fill the water tank.
2.
Press the ON l OFF touch button to switch on the
appliance.
3.
The oven will calibrate automatically after running a
Steam heating mode at 212° F (100 °C) for
30 minutes. Set the heating mode, temperature and
duration for the calibration. Press START to begin the
appliance operation.
4.
After calibration, allow the appliance to cool down.
5.
Dry the oven cavity bottom floor.
6.
Set Bake to 475° F (245°C).
7.
Keep the kitchen ventilated while the appliance is
heating.
8.
Stop the appliance operation after the indicated
duration. Use the ON l OFF touch button to switch off
the appliance.
/DQJXDJH
(QJOLVK
6HWWKHODQJXDJH\RXUHTXLUH
7LPHRI'D\ &ORFN'LVSOD\
/DQJXDJH
(QJOLVK
6HWWKHODQJXDJH\RXUHTXLUH
)UDQoDLV(VSDxRO
Calibration
Heating mode
Steam‹
Temperature 212° F (100 °C)
Duration 30 minutes
Heating up
Heating mode
Bake ƒ
Temperature 475° F (245 °C)
Cooking time 30 minutes

21
9.
Wait until the oven cavity has cooled down.
10.
Clean the smooth surfaces with soapy water and a
dish cloth.
11.
Empty the water tank and dry the oven cavity.
Note: The appliance saves the calibration settings, even
in the event of a power outage or disconnection from the
power supply. The calibration does not need to be
repeated.
Cleaning the Accessories
Clean the accessories thoroughly using soapy water and
a dish cloth or soft brush.
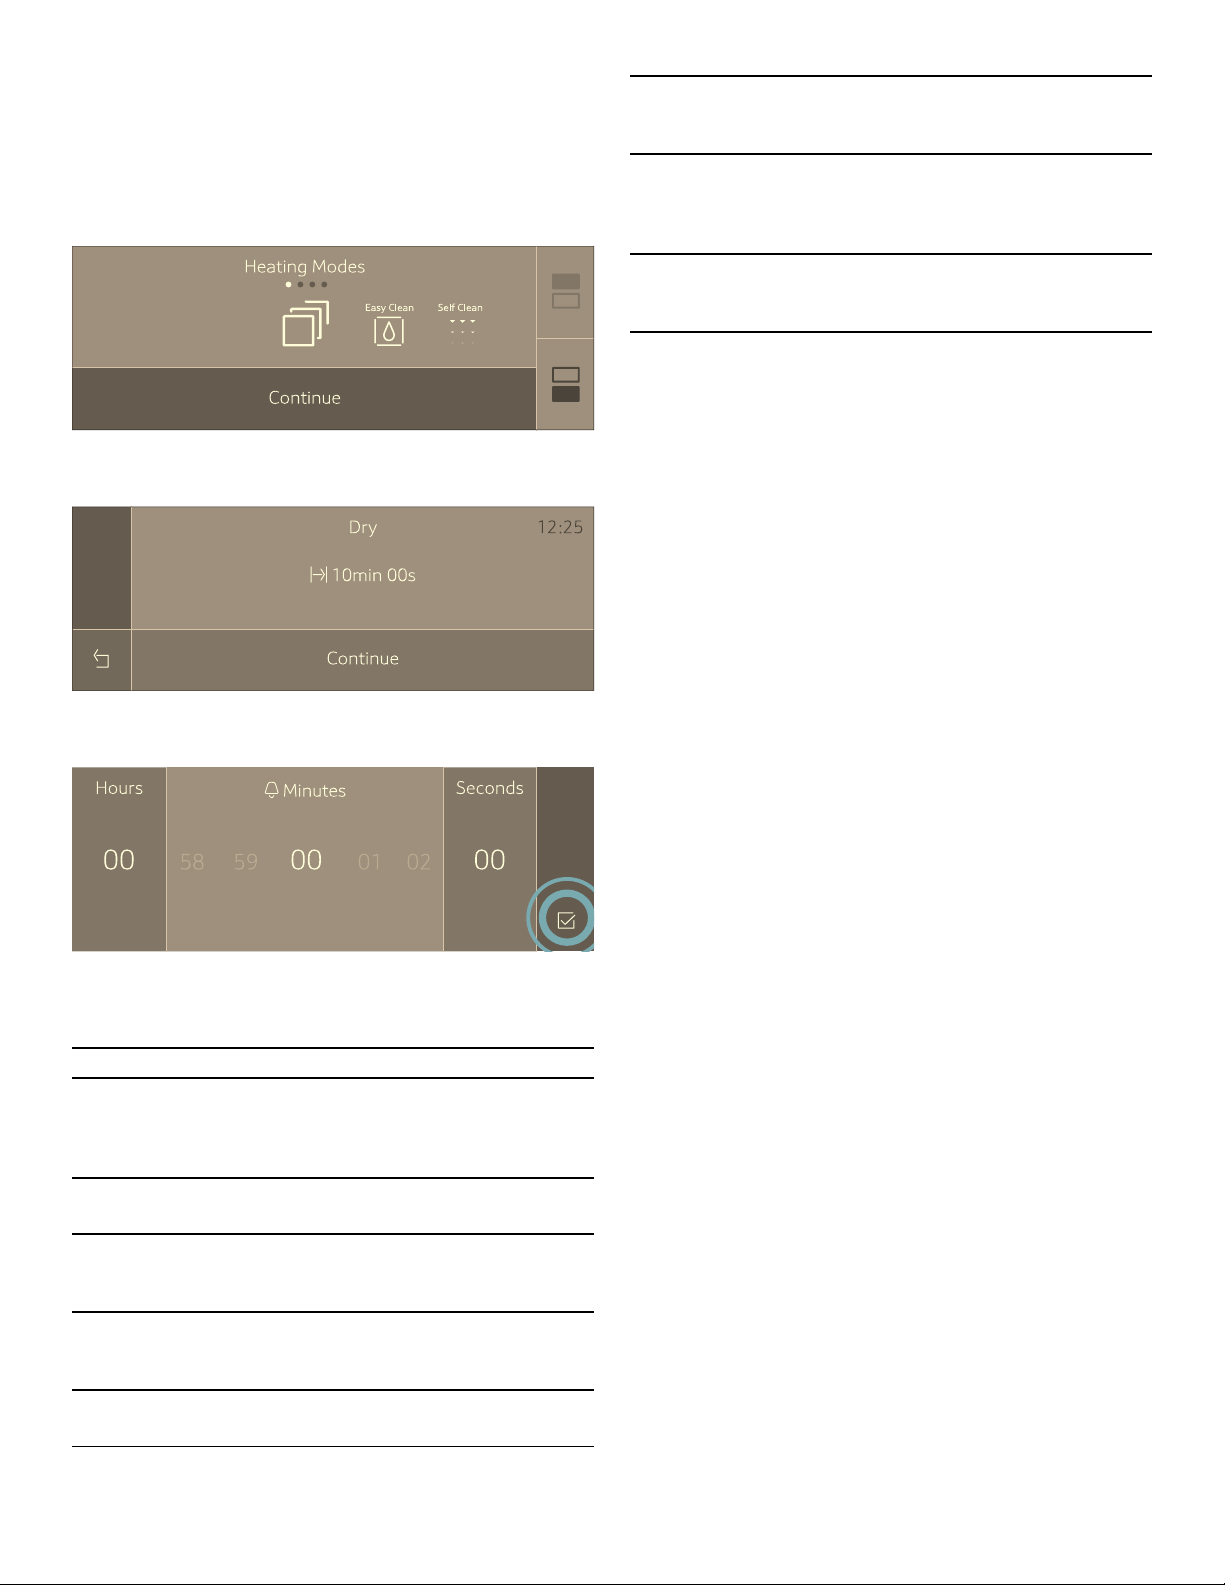
Adjust Basic Settings
You can adjust various settings of your appliance, to
make using your appliance easy and convenient. If
necessary, you can change these settings in the menu
“Settings”.
Changing the Settings
1.
Touch the ON l OFF touch button.
2.
Touch the MENU touch button.
3.
Swipe to the left or right to select "Settings 4".
4.
Touch “Continue”.
5.
Swipe to the left or right to select the desired setting.
6.
Touch the bottom touch field.
7.
Swipe to the left or right to select the desired setting.
8.
Touch the 8 icon (where applicable) to apply the
setting.
9.
Touch the MENU touch button.
10.
Touch "Save" to save the changes.
Available Settings
--------
Setting Option
Time of day Time in hours and minutes
Language English, Français, Español
Clock format 12 hr, 24 hr
Clock display Digital, Analogue
Temperature
format
Fahrenheit (°), Celsius (°C)
Weight format Pound (lb), Kilogram (kg)
Water hardness 0 (softened)
1 (soft)
2 (medium)
3 (hard)
4 (very hard)
Signal volume 1 - 5
Key press sound On, Off
Display
brightness
1 - 5
Standby mode On, Off
Start-up
animation
On, Off
Convection
Conversion
On, Off
Decreases oven temperature by
25° F (4 °C)
Temperature
offset
▯ Temp offset: Upper
-35°F to +35° F
(-20 °C to +20 °C)
▯ Temp offset: Lower
-35°F to +35° F
(-20 °C to +20 °C)
Sabbath mode On, Off
Home Connect WiFi: On, Off
Remote control: On, Off
Disconnect from network
Connect to app
Show network status
Customer Service access:
▯ Allow (Display shows t)
▯ Deny
Demo mode On, Off
Factory settings Restore
Customer Ser-
vice
Displays Customer Service contact
information
22
General Operation
This chapter will describe how to use the settings and
modes available on your appliance as well as highlight
additional functions and features.
High Altitude Baking
When cooking at high altitudes, recipes and cooking
times will vary.
Switching the Appliance On and Off
Touch the ON l OFF touch button to switch the appliance
on or off.
On the display, you will see whether the residual heat in
the oven cavity is still high after switching the appliance
off. “Oven hot” is displayed in the left lower corner of the
display.
Notes
▯ Certain displays and notes, such as those relating to
the residual heat in the oven cavity, remain visible on
the display after the appliance has been switched off.
▯ After device operation, the cooling fan may continue to
operate until the oven cavity has cooled.
▯ Switch off your appliance when you do not need to use
it. If no settings are applied for a long time, the
appliance switches itself off automatically.
Timer Options
Your appliance will beep once your set time has elapsed.
Displaying and hiding timer options
To display or hide the timer options, touch the TIMERS
touch button.
Note: The timer options displayed are hidden
automatically after a particular time. If you have already
set a cooking time, this is automatically stored.
Oven Timer
You can set the cooking time for your meal on the
appliance. This means that the oven will turn off after the
oven timer is complete. This offers convenience for you
so you do not need to interrupt other work to tend to your
meal.
1.
Touch the ON l OFF touch button.
2.
Set the heating mode and temperature.
3.
Touch the TIMERS touch button.
The timer options are shown on the display.
4.
Touch the “+ Oven Timer” touch field.
5.
Touch the required field and swipe to the left or right to
set the oven timer.
You can set hours and minutes.
6.
Touch the 8 symbol.
The heating mode and the cook time are displayed.
7.
Touch the START l STOP touch button.
The appliance starts heating and the cook timer
begins to count down.
Note: When the set time has elapsed, a signal sounds.
“Oven Timer completed” is displayed. The appliance
ends the operation automatically. Touch the ON l
OFF touch button to turn off the appliance.
Timer option Use
.
Kitchen Timer The kitchen timer works like any
standard egg timer. The appliance
does not switch on and off
automatically.
+
Oven Timer After the set time has elapsed, the
appliance switches off
automatically.
*
End time The appliance switches on and off
automatically after setting a
cooking time and end time.
PLQV
&DQFHO
.LWFKHQ7LPHU
KPLQ
&DQFHO
2YHQ7LPHU
5HVHW
(QG7LPH
0LQXWHV
+RXUV
7UXH&RQYHFWLRQ
³
KPLQ

23
Kitchen Timer
The Kitchen Timer can be set when the appliance is
switched on or off.
1.
Touch the TIMERS touch button.
The kitchen timer is shown in the display.
If the appliance is switched on, first touch the
. field.
2.
Swipe to the left or right to select the timer value. You
can set hours, minutes and seconds.
3.
Touch the 8 icon.
The kitchen timer begins to count down.
The . symbol and timer value are displayed in the top
left corner of the display.
Note: When the set time has elapsed, a signal sounds.
“Kitchen Timer completed” is displayed.
Delayed Operation - "End time"
The appliance switches on automatically, then off at the
time preselected for the end of operation. To do this, you
set the cooking time and specify the end of operation.
Delayed operation can only be used in combination with
a heating mode.
Notes
▯ Ensure that food is not left in the oven cavity for too
long, as it may spoil.
▯ The option to delay the start of operation is not
available for every heating mode.
9 CAUTION
To maintain food safety, do not leave food in the
oven for more than one hour before or after
cooking.
1.
Place the food onto the appropriate accessory in the
oven cavity and close the appliance door.
2.
Touch the ON l OFF touch button.
3.
Set the heating mode.
4.
Touch the TIMERS touch button. The timer options are
shown in the display.
5.
Select Oven Timer and set a cook time. Touch the 8
icon.
6.
Select TIMERS again and set End Time. Touch the 8
icon.
7.
Touch the START l STOP touch button.
The appliance waits until the appropriate time to start
the operation.
As soon as the end time has been reached, an audible
signal sounds and the appliance ends the operation
automatically.
Checking, changing or deleting settings
1.
Touch the TIMERS touch button.
The time-setting options are shown in the display.
2.
Touch the required timer option.
3.
Swipe to the left or right on the touch display to
change the settings.
To delete a timer value, set “00:00“, or touch
“Cancel”.
Setting a Heating Mode
Use the touch buttons and the touch fields on the touch
screen to enter the different operating menus.
Example: True Convection with 325° F (160 °C)
1.
Touch the ON l OFF touch button to switch on the
appliance.
You go directly to the heating modes menu.
2.
Swipe to the left in the top line of the display to select
“True Convection” ‚.
3.
Swipe to the left or right in the bottom line of the
display to select the temperature.
0LQXWHV+RXUV 6HFRQGV
7UXH&RQYHFWLRQ
%DNH
³
¯
6WHDP
°
6DEEDWK
&RQY%DNH
&RQY5RDVW
°
<RP7RY
7UXH&RQYHFWLRQ
³

24
4.
Touch the START l STOP touch button to start the
appliance operation.
The status bar appears in the display to indicate the
preheating progress.
When the appliance has reached the set temperature,
“Oven preheated” is displayed and an audible signal
sounds. The oven continues cooking with the set
temperature.
Setting double oven
1.
Select the upper or lower compartment by touching
the q or r symbol to select the upper or lower oven
cavity.
2.
Make your settings as usual.
3.
When you have finished the settings for the first oven
cavity, touch the q or r symbol to select the other
compartment.
The settings for the two oven cavities are shown side
by side on the display. The upper compartment is on
the left, the lower compartment on the right side of the
display.
To adjust the settings, touch the field of the required
oven cavity on the display.
Note: You can only make setting for one oven cavity at a
time.
Default Values
The appliance suggests a temperature or setting for each
heating mode. You can accept this value or change it in
the appropriate area.
Preheating Bar
As soon as a new heating mode is started, the
preheating bar appears on the display. The preheating
bar indicates the temperature increase in the oven cavity.
When the oven is fully preheated, a sound signal will
occur.
INFO Touch Button
If the INFO touch button lights up, important information
regarding the mode you are using is available. This may
include for example recommendations on suitable
cookware or how to prepare food for a safe cooking
result. When you touch the INFO touch button, the
information is displayed for a few seconds.
To exit the INFO text immediately, touch the INFO touch
button or the display.
Sounds
The appliance uses various sound signals during
operation. A sound signal can be heard whenever you
use a touch button or touch field, or when an operation is
started or finished. You can adjust the volume of these
sounds in the Settings menu. ~ "Adjust Basic Settings"
on page 21
Changing or Cancelling the Appliance
Operation
Note: In a double oven, if both cavities are operating, it
is necessary to select the cavity in which you wish to
make changes.
Changing the appliance operation
1.
Use the START l STOP touch button to stop the
operation.
2.
Touch the area for the setting that should be changed.
3.
Swipe to the left or right to change the setting.
4.
Use the START l STOP touch button to start the
changed operation.
Notes
▯ If only adjusting temperature, the oven may restart
automatically.
▯ The cooling fan may continue to run while an operation
is interrupted.
Cancelling the appliance operation
Press the START l STOP button to cancel the appliance
operation.
Note: With double ovens, if both cavities are operating
the cavity must be selected before pressing
START|STOP.
7UXH&RQYHFWLRQ
³
7UXH&RQYHFWLRQ
³
U
T
7UXH&RQYHFWLRQ
³
%DNH
7UXH&RQYHFWLRQ
³

25
Fast Preheat
With "Fast Preheat", you can shorten the preheat time
required for some heating modes.
Fast Preheat is available for the following modes:
▯ True Convection
▯ Convection Bake
▯ Bake
▯ Roast
▯ Convection Roast
To achieve an even cooking result, do not place your
food or accessories into the oven cavity until
“Fast Preheat” is complete.
Notes
▯ If the FAST PREHEAT touch button is lit, the function
can be activated.
▯ To deactivate the function before it has finished, touch
the FAST PREHEAT touch button.
Activating the "Fast Preheat" function
1.
Set a heating mode and temperature.
2.
Touch the START l STOP touch button to start the
heating mode.
3.
Touch the FAST PREHEAT touch button to activate the
function.
The ° symbol appears on the display.
4.
Once the set temperature has been reached, the
"Fast Preheat" function switches itself off automatically.
The ° symbol disappears from the display. Place the
food in the oven cavity.
Panel Lock
Your appliance is equipped with a panel lock so that it
cannot be switched on or a setting cannot be changed
accidentally.
Activating and Deactivating
The appliance has to be turned off.
1.
Touch and hold the TIMERS touch button for
approximately 4 seconds until "Panel Lock activated"
is displayed. The lock is activated. The 1 symbol is
displayed in the top left corner of the display.
2.
Touch and hold the TIMERS touch button for
approximately 4 seconds until "Panel Lock
deactivated" is displayed.
The lock is deactivated.
Auto Convection Conversion
True Convection and Convection Bake modes require a
25° F (10 °C) reduction in temperature. Auto Convection
Conversion reduces the temperature you enter
automatically.
Enter the package or recipe temperature when setting
the mode. The oven control calculates the correct
temperature for these modes automatically by reducing
the input temperature by 25° F (10 °C). This is then
shown in the display.
To turn on this feature:
1.
Go to Settings
2.
Press the ON|OFF touch button to turn the oven on.
3.
Press the MENU touch button.
4.
Scroll over to Settings on the touch screen.
5.
Select Conv. Conversion and press ON.
6.
Exit Settings and select “Save” to save your settings.
Temperature Offset
This feature is useful if food is consistently either too
brown or too light. The setting increases or decreases
the set oven temperature according to the chosen value.
The following heating modes support this functionality:
▯ Bake
▯ Convection Bake
▯ Roast
▯ Convection Roast
▯ True Convection
Note: The oven is carefully calibrated to provide
accurate results. This feature is useful if you prefer your
foods darker or lighter.
Refer to the section entitled “Adjusting Basic Settings” to
apply a temperature offset.
Note: For double ovens you can set a different
temperature offset for each oven cavity.
Meat Probe
Your oven comes with a multi-point meat probe. This
probe measures the temperature in three different areas
of your food ensuring the most accurate cooking results.
Once the set temperature has been reached, the
appliance automatically switches itself off.
Suitable Heating Modes
▯ True Convection ‚
▯ Convection Bake ¶
▯ Bake ƒ
▯ Convection Roast þ
▯ Roast ü
▯ Slow Roast ÿ
Notes
▯ The meat probe measures the temperature on the
inside of the food between 85° F (30 °C) and 210° F
(99 °C).
▯ Use only the meat probe supplied with your appliance.
Additional or replacement meat probes can be
ordered as a spare part from Customer Service.
▯ After use, always remove the meat probe from the
oven cavity. Never store it inside the oven cavity.
26
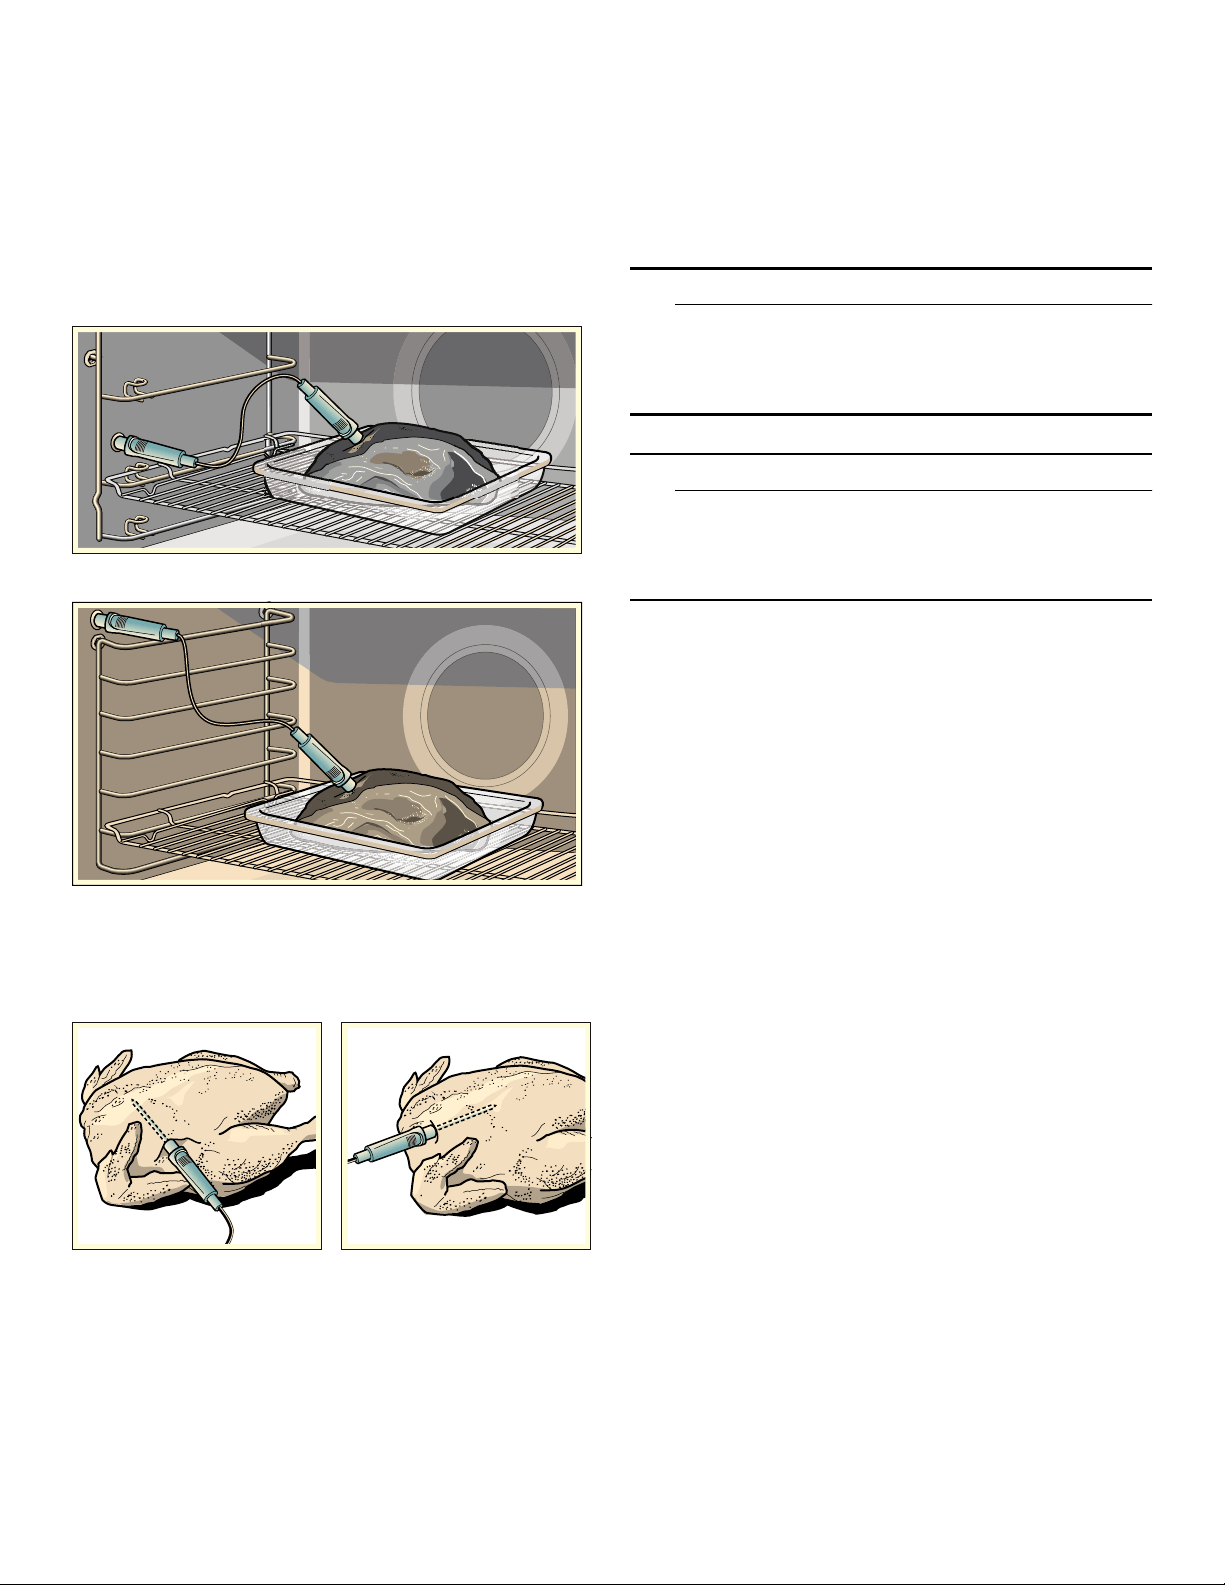
Inserting the Meat Probe into the Food
Before placing your food into the oven cavity, insert the
meat probe into the food.
The meat probe has three measuring points. Ensure that
the middle measuring point is inserted in the food.
Meat: For large pieces of meat, insert the meat probe at
an angle from above as far as it will go into the meat.
For relatively thin pieces of meat, insert the meat probe
from the side at the thickest point.
Steam Oven Cavity:
Conventional Oven Cavity:
Poultry: Insert the meat probe as far as it will go into the
thickest point in the breast. Insert the meat probe into the
poultry crosswise or lengthwise depending on its
structure. Put the chicken in a roasting dish and place it
on the wire rack.
Turning the food: If you wish to turn the food, do not
unplug the meat probe from the oven. Once you have
turned the food, check that the meat probe is correctly
repositioned in the food.
If you unplug the meat probe from the oven, all settings
will be reset and you will have to apply them again.
NOTICE: Ensure that the meat probe's cable does not
become trapped.
To prevent the meat probe from being damaged by
excessive heat, there must be a gap of at least an inch or
more between the broil element and the meat probe. The
meat may expand during the cooking process.
Setting and Starting Appliance Operation
9 WARNING
RISK OF BURNS
The oven interior and the meat probe become very
hot. Use oven mitts to plug and unplug the meat
probe.
9 WARNING
RISK OF ELECTRIC SHOCK
Use of a wrong meat probe can damage the
insulation. Use only the meat probe intended for this
appliance.
Notes
▯ The set oven cavity temperature must be at least
50° F (10 °C) higher than the meat probe
temperature.
▯ To prevent the meat probe from being damaged, the
oven cavity temperature must not be set higher than
480° F (250 °C).
1.
Insert the meat probe into the socket on the left-hand
side of the oven cavity.
Note: The probe icon will appear on the oven display
screen.
2.
Close the appliance door.
NOTICE: When doing so, ensure that the meat
probe’s cable is not trapped in the appliance door. It
may be damaged.
3.
Touch the ON l OFF touch button.
4.
Set the heating mode.
Note: When the meat probe is plugged into the
socket, you can only select a heating mode that is
suitable to be used with the meat probe.
5.
Touch the oven cavity temperature on the left in the
bottom line.
6.
Swipe to the left or right to select the required oven
cavity temperature.
7.
Touch the 8 symbol to apply the setting.
8.
Touch the ¥ core temperature on the right in the
bottom line.
9.
Swipe to the left or right to select the required core
temperature.
10.
Touch the START l STOP touch button.
The appliance starts the operation.

27
Changing or Stopping the Appliance Operation
Changing: During appliance operation, you can change
the oven cavity temperature and meat probe
temperature.
1.
Touch the oven cavity temperature or meat probe
temperature.
2.
Swipe to the left or right to change the temperature.
3.
Touch the 8 symbol to apply the setting.
Stopping: Once the set meat probe temperature has
been reached, a signal sounds and the appliance stops
the operation automatically.
1.
Use the ON l OFF touch button to switch off the
appliance.
2.
Using an oven glove, unplug the meat probe from the
socket.
Core Temperatures of Different Foods
Do not use frozen food. The figures in the table are given
as a guide. They will depend on the quality and
composition of the food.
You can find detailed information on heating modes and
temperatures in the Use and Care Cooking Charts
manual.
Sabbath Mode
With the Sabbath mode, a cooking time of up to
74 hours can be set. You can keep the food in the oven
cavity warm without having to switch the oven on or off.
Note: Sabbath mode has to be activated in the Basic
Settings, to use this mode.
Note: You can set Sabbath mode in both oven cavities
at the same time. The set time will run simultaneously for
both oven cavities.
Starting
The oven is automatically in Bake mode. The
temperature can be set between 100° F (40 °C) and
450° F (230 °C).
1.
Touch the ON l OFF touch button.
2.
Swipe to the left or right to select "Sabbath ›".
3.
Touch the temperature in the bottom line.
4.
Swipe to the left or the right to select the required
temperature.
5.
Touch the 8 icon to apply the setting.
6.
Touch the cooking time + in the bottom line.
7.
Swipe to the left or the right to select the required
duration.
8.
Touch the 8 symbol to apply the setting.
9.
Touch the START l STOP touch button.
“Sabbath Mode will start in 5min 00sec” appears on the
display. After five minutes the appliance starts the
operation. All controls apart from the ON l OFF and
START|STOP touch buttons are deactivated. You can
switch off the appliance at any time.
Notes
▯ Once Sabbath mode has started, you can no longer
change any settings using the START l STOP touch
button.
▯ The operation is not interrupted if you open the
appliance door.
Once the Sabbath mode duration has elapsed, a signal
sounds. The appliance stops heating. Use the ON l OFF
touch button to switch off the appliance.
Cancelling
Touch the ON l OFF touch button to cancel the
operation.
Food Core temperature in
°F (°C)
Poultry 170° (75°)
Pork* 145° (65°)
Pork 160° (70°)
Beef, medium rare 145° (65°)
Beef, medium 160° (70°)
Beef, well done 170° (75°)
Lamb 145° (65°)
Other: Heating/reheating food 150°-165° (65°-75°)
*allow for a three minute rest period.

28
Yom Tov Mode
With the Yom Tov mode, you can set a cooking time of
up to 74 hours, during which you can select from six
cooking temperatures.
Note: Sabbath mode has to be activated in the Basic
Settings, to use this mode.
Note: You can set Sabbath mode in both oven cavities
at the same time. The set time will run simultaneously for
both oven cavities.
Starting
The oven is automatically in Bake mode. The
temperature can be set between 100° F (40 °C) and
450° F (230 °C).
1.
Touch the ON l OFF touch button.
2.
Swipe to the left or right to select "Yom Tov ›".
3.
Touch the temperature in the bottom touch field.
4.
Swipe to the left or the right to select the required
temperature.
5.
Touch the 8 icon to apply the setting.
6.
Touch the cooking time + in the bottom touch field.
7.
Swipe to the left or the right to select the required
duration.
8.
Touch the 8 icon to apply the setting.
9.
Touch the START l STOP touch button.
“Yom Tov Mode will start in 5min 00sec” appears on the
display. After five minutes the appliance starts the
operation. All controls apart from the ON l OFF and
START l STOP touch buttons are deactivated. You can
switch off the appliance at any time.
Notes
▯ Once Yom Tov mode has started, the temperature
may be changed by pressing one of the six displayed
temperatures. The display will not respond to this
input, but the temperature will be adjusted in the
cavity. The START l STOP touch button will not cancel
the mode.
▯ The operation is not interrupted if you open the
appliance door.
Once the Yom Tov mode duration has elapsed, a signal
sounds. The appliance stops heating up. Use the ON l
OFF touch button to switch off the appliance.
Cancelling
Touch the ON l OFF touch button to cancel the
operation.
Home Connect
This appliance is Wi-Fi-capable and can be remotely
controlled using a mobile device.
If the appliance is not connected to the home network,
the appliance functions in the same way as an oven with
no network functionality and can still be operated via the
display.
Notes
▯ Ensure that you follow the safety instructions in this
instruction manual and that these are complied with
when operating the appliance via the Home Connect
app and when you are away from home.
▯ Operating the appliance directly always has priority
over the Home Connect app.
Setting Up
To implement settings via Home Connect, you must have
installed and set up the Home Connect app on your
mobile device.
Follow the steps specified by the app to implement the
settings.
The app must be open in order to perform the setup
process.
Connecting Your Oven to Home Connect
Connecting your oven to Home Connect is a three step
process:
1.
Install the Home Connect app.
2.
Connect your oven to the Wi-Fi network.
3.
Connect your oven to the app.
You will need a smartphone or tablet equipped with the
latest operating system (Apple or Android), a secure Wi-
Fi network where the appliance is located and the Home
Connect app.
Follow instructions below or other supplied Home
Connect documents for set up.
1.
Install the Home Connect app.
On your smartphone or tablet, go to the App Store
(Apple devices) or Google Play Store (Android
devices). Download “Home Connect (America)” app
published by BSH Home Appliances and install.
Start the app and create a Home Connect account.
2.
Connect your oven to the Wi-Fi network.
Before proceeding, determine whether your network
router has a WPS function (automatic connection).
If it does, follow steps under Automatic Registration
in the Home Network.
If it does not or you are unsure, follow steps under
Manual Registration in the Home Network.

29
Automatic Registration in the Home Network
Notes
▯ A router that has WPS functionality is required.
▯ You can start the Home Connect assistant during initial
start-up or using the main menu.
1.
Touch the MENU touch button.
2.
Swipe to the left or right to select “Settings”.
3.
Swipe to the left or right to select “Home Connect”.
4.
Touch “Start assistant”.
5.
Touch “Continue”.
The appliance is ready to connect to the network
automatically.
6.
Within 2 minutes press the WPS button on the router.
Wait until “Network connection successful” is shown in
the display.
The connection may fail. The display will alert you to
try again or connect manually.
7.
The appliance is ready to connect to the app.
8.
Follow the instructions of the app on your mobile
device for automatic network registration.
The process for registering is completed once “Pairing
successful” is shown in the display.
Manual Registration in the Home Network
Note: You can start the Home Connect Assistant during
initial start-up or using the menu.
1.
Touch the MENU touch button.
2.
Swipe to the left or right to select "Settings".
3.
Swipe to the left or right to select "Home Connect".
4.
Touch “Start assistant”.
5.
Touch “Continue”.
6.
Touch "Connect manually".
7.
Touch “Continue”.
The appliance is ready to connect to the network
manually.
The SSID and the key for the oven network are shown
on the display.
8.
Use the "HomeConnect" SSID and the "HomeConnect"
key to register the mobile device on the oven network.
Follow the instructions in the app.
&RQQHFWPDQXDOO\
$XWRPDWLFQHWZRUNFRQQHFWLRQ
3UHVVWKH:36EXWWRQRQWKHURXWHU
PLQV
&DQFHO
1HWZRUNFRQQHFWLRQVXFFHVVIXO
&RQQHFWPDQXDOO\
$XWRPDWLFQHWZRUNFRQQHFWLRQ
1HWZRUNFRQQHFWLRQIDLOHG
7U\DJDLQ
&RQQHFWWRDSS
&RQILUPFRQQHFWLRQRQ\RXUPRELOHGHYLFH
PLQV
(
&DQFHO
0DQXDOQHWZRUNFRQQHFWLRQ
&RQWLQXH
$IWHUSUHVVLQJÄ&RQWLQXH¶FRQQHFWWRWKHQHWZRUNÄ+RPH
&RQQHFW¶RQ\RXUPRELOHGHYLFHDQGIROORZWKHLQVWUXFWLRQVRQ
\RXU+RPH&RQQHFWDSS
0DQXDOQHWZRUNFRQQHFWLRQ
&RQQHFWDXWRPDWLFDOO\&DQFHO
66,'+RPH&RQQHFW
3DVVZRUG+RPH&RQQHFW
PLQV

30
9.
Wait until "Network connection successful" is shown
on the display.
The connection may fail. The display will alert you to
try again or connect automatically.
10.
The appliance is ready to connect to the app.
11.
Follow the instructions of the app on your mobile
device for manual network registration.
The process for registering is completed once "Pairing
successful" is shown on the display.
Remote Start
If you want to start an oven operation using your mobile
device, you must activate Remote Start.
Notes
▯ The “Remote start” text field is only visible if the Home
Connect assistant has been successfully completed.
▯ Some operating modes can only be started on the
oven itself.
1.
Touch the MENU touch button.
2.
Touch “Remote start”.
F appears in the display.
Remote Start is automatically deactivated in the
following situations:
▯ The oven door is opened 15 minutes after Remote
Start is activated.
▯ The oven door is opened 15 minutes after the oven
operation has ended.
▯ 24 hours after Remote Start has been activated.
When you start the oven operation on the appliance,
Remote Start is automatically activated. You can
therefore make changes from your mobile device or
start a new operation.
Home Connect Settings
You can adjust Home Connect to suit your requirements
at any time.
Note: In the Home Connect settings, press the INFO
touch button to display network and device information.
Wi-Fi
You can use the Home Connect functions, if Wi-Fi is
activated.
1.
Touch the MENU touch button.
2.
Swipe to the left or right to select "Settings".
3.
Swipe to the left or right to select "Home Connect".
4.
Touch “Open settings”.
5.
Swipe to the left or right to select "Wi-Fi".
6.
Touch the bottom line to select “On” or “Off”.
7.
Touch the ; field to return to the Home Connect
settings menu.
Disconnecting from the Network
You can disconnect your oven from the network at any
time.
Note: If your oven is disconnected from the network, it is
not possible to operate the oven using Home Connect.
1.
Touch the MENU touch button.
2.
Swipe to the left or right to select "Settings".
3.
Swipe to the left or right to select "Home Connect".
4.
Touch “Open settings”.
5.
Swipe to the left or right to select "Disconnect".
6.
Touch “Disconnect from network”.
7.
Confirm by touching “Disconnect”.
All connections are deleted.
Note: You can abort the action by touching “Cancel”.
1HWZRUNFRQQHFWLRQVXFFHVVIXO
&RQQHFWDXWRPDWLFDOO\
0DQXDOQHWZRUNFRQQHFWLRQ
1HWZRUNFRQQHFWLRQIDLOHG
7U\DJDLQ
&RQQHFWWRDSS
&RQILUPFRQQHFWLRQRQ\RXUPRELOHGHYLFH
PLQV
(
&DQFHO
+RPH&RQQHFW
:L)L
(
5HPRWH&RQWURO&RQQHFWWRDSS
2Q 2II
+RPH&RQQHFW
'LVFRQQHFW
(
&RQQHFWWRDSS5HPRWH&RQWURO
'LVFRQQHFWIURPQHWZRUN

31
Connecting to the network
Connecti ng to the network
1.
Touch the MENU touch button.
2.
Swipe to the left or right to select "Settings".
3.
Swipe to the left or right to select "Home Connect".
4.
Touch “Open settings”.
5.
Swipe to the left or right to select "Connect to
network".
6.
Touch “Start assistant”.
7.
Follow the instructions in the section entitled “Manual
registration in the home network” or “Automatic
registration in the home network”.
Connect to App
If the Home Connect app is installed on your mobile
device, you can connect it to your oven.
Note: The appliance must be connected to the network.
1.
Touch the MENU touch button.
2.
Swipe to the left or right to select "Settings".
3.
Swipe to the left or right to select "Home Connect".
4.
Touch “Open settings”.
5.
Swipe to the left or right to select "Connect to app".
6.
Touch the bottom line to select “Start”.
Remote control
You can use the Home Connect app to easily access the
functions of your oven.
Notes
▯ Operating the appliance directly from the oven always
has priority. During this time, it is not possible to
operate the oven using the Home Connect app.
▯ The remote control is already activated when the oven
is delivered.
▯ If the remote control has been deactivated, only the
oven's operating statuses will be displayed in the
Home Connect app.
▯ The remote control is automatically activated when the
remote start is activated.
1.
Touch the MENU touch button.
2.
Swipe to the left or right to select "Settings".
3.
Swipe to the left or right to select "Home Connect".
4.
Touch “Open settings”.
5.
Swipe to the left or right to select "Remote control".
6.
Touch the bottom line to select “On” or “Off”.
7.
Touch the ; field to return to the Home Connect
settings menu.
Software Update
Using the software update function, your oven’s software
can be updated (e.g. for the purpose of optimization,
troubleshooting or security updates). To do this, you
need to be a registered Home Connect user, have
installed the app on your mobile device and be
connected to the Home Connect server.
As soon as a software update is available, you will be
informed by the Home Connect app, from which you will
also be able to download the update.
Once the update has been successfully downloaded, you
can start installing it via the basic settings of your oven,
or the Home Connect app if you are on your local area
network.
The Home Connect app will notify you once installation is
complete.
Notes
▯ You can continue to use your oven as usual while
updates are downloading.
▯ Depending on your personal settings in the app,
software updates can also be set to download
automatically.
▯ We recommend that you install security updates as
soon as possible.
Information on Data Protection
When your appliance is connected to a WLAN network
that is connected to the Internet for the first time, your
appliance transmits the following categories of data to
the Home Connect server (initial registration):
▯ Unique appliance identification (consisting of
appliance codes as well as the MAC address of the
installed Wi-Fi communication module).
▯ Security certificate of the Wi-Fi communication module
(to ensure a secure data connection).
▯ The current software and hardware version of your
domestic appliance.
▯ Status of any previous resetting to factory settings.
This initial registration prepares the Home Connect
functions for use and is only required when you want to
use these Home Connect functions for the first time.
Note: Ensure that the Home Connect functions can be
used only in conjunction with the Home Connect app.
Information on data protection can be accessed in the
Home Connect app.
+RPH&RQQHFW
&RQQHFWWRDSS
(
1HWZRUNFRQQHFWLRQ'LVFRQQHFW
6WDUW
+RPH&RQQHFW
5HPRWH&RQWURO
(
'LVFRQQHFW:LIL
2II2Q
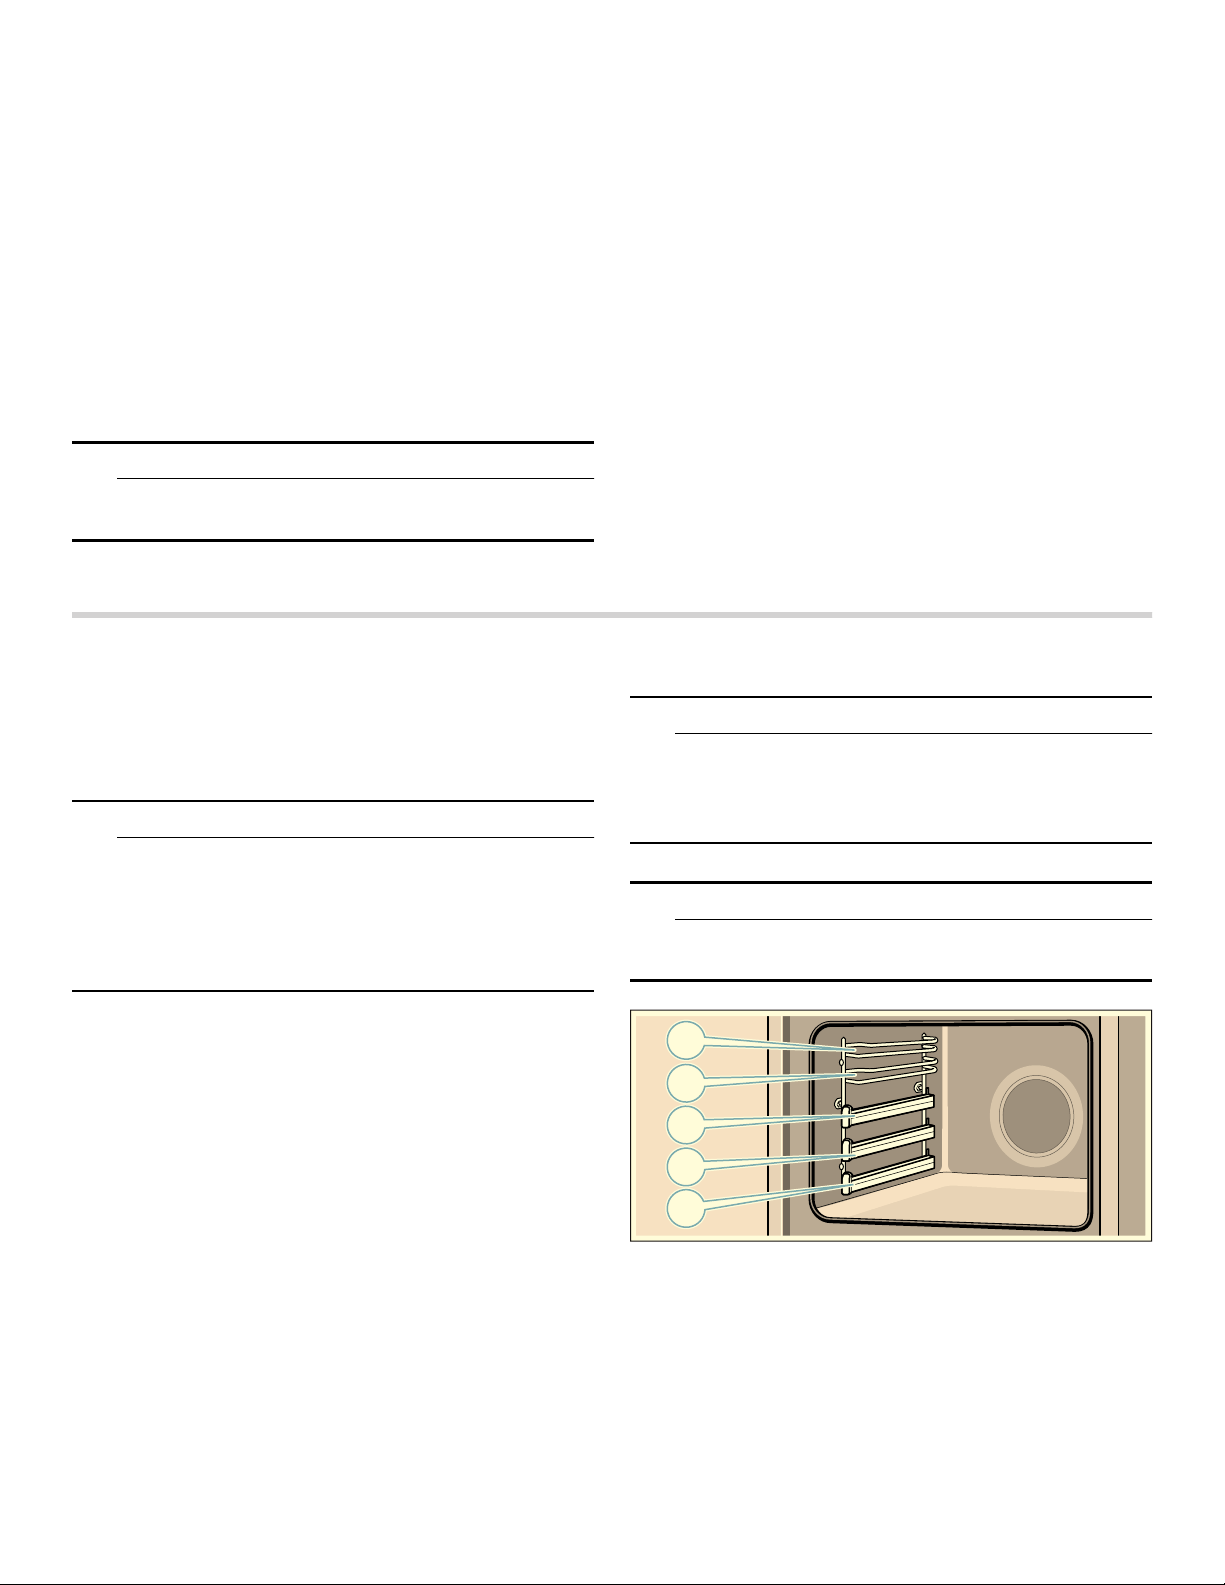
32
Wi-Fi
®
Module
FCC/IC Statements
Model: COM2
FCC ID: 2AHES-COM2
IC: 21152-COM2
The Home Connect module is a communication device
designed to provide communication between appliances
and smart devices.
This module is integrated at the factory, under direct
control of BSH Home Appliances Corporation, and is not
user servicable or upgradable. At least 7
7
/
8
inch (20 cm)
separation distance should be maintained from device to
user.
FCC COMPLIANCE STATEMENT
9 CAUTION
Changes or modifications not expressly approved
could void your authority to use this equipment.
This device complies with Part 15 of the FCC Rules.
Operation is subject to the following two conditions:
1.
This device may not cause harmful interference, and
2.
This device must accept any interference received,
including interference that may cause undesired
operation.
INDUSTRY CANADA STATEMENT
This device complies with Industry Canada license-
exempt RSS standard(s).
Operation is subject to the following two conditions:
1.
This device may not cause interference, and
2.
This device must accept any interference, including
interference that may cause undesired operation of the
device.
Operation in the band 5150-5250 MHz is only for indoor
use to reduce the potential for harmful interference to co-
channel mobile satellite systems.
Steam Operation
Food can be cooked very gently using steam. With some
heating modes, you can prepare food with steam
assistance. In addition, the Proof, Defrost and Reheat
modes are available.
9 WARNING
RISK OF SCALDING
Hot steam can escape when you open the
appliance door. Steam is not visible at certain
temperatures. Do not stand too close to the
appliance when opening it. Open the appliance
door with caution. Keep children away.
Noises
You will hear a humming noise while the pump is in
operation and after switching it off. This noise is caused
by the pump function test. It is a normal operating noise.
You will also hear this noise after running non-steam
modes when the oven is turned off. This is normal.
Inserting Accessories
The oven cavity has 5 rack positions. The rack positions
are counted from the bottom up.
Racks 1 to 3 are fitted with telescopic rack guides.
Note: Always place the Universal Pan on Rack 1 when
using Full Steam. This will prevent food drippings from
burning on to the bottom of the oven.
9 WARNING
RISK OF BURNS
The telescopic rack guides become hot when the
appliance is in use. You must take great care to
avoid burning yourself when they are pulled out.
9 CAUTION
Do not insert any accessories between the
accessory racks as the accessory may tilt over.
NOTICE: Always insert the accessories fully into the
oven cavity so that they do not touch the appliance door
or the glass panel might be damaged.
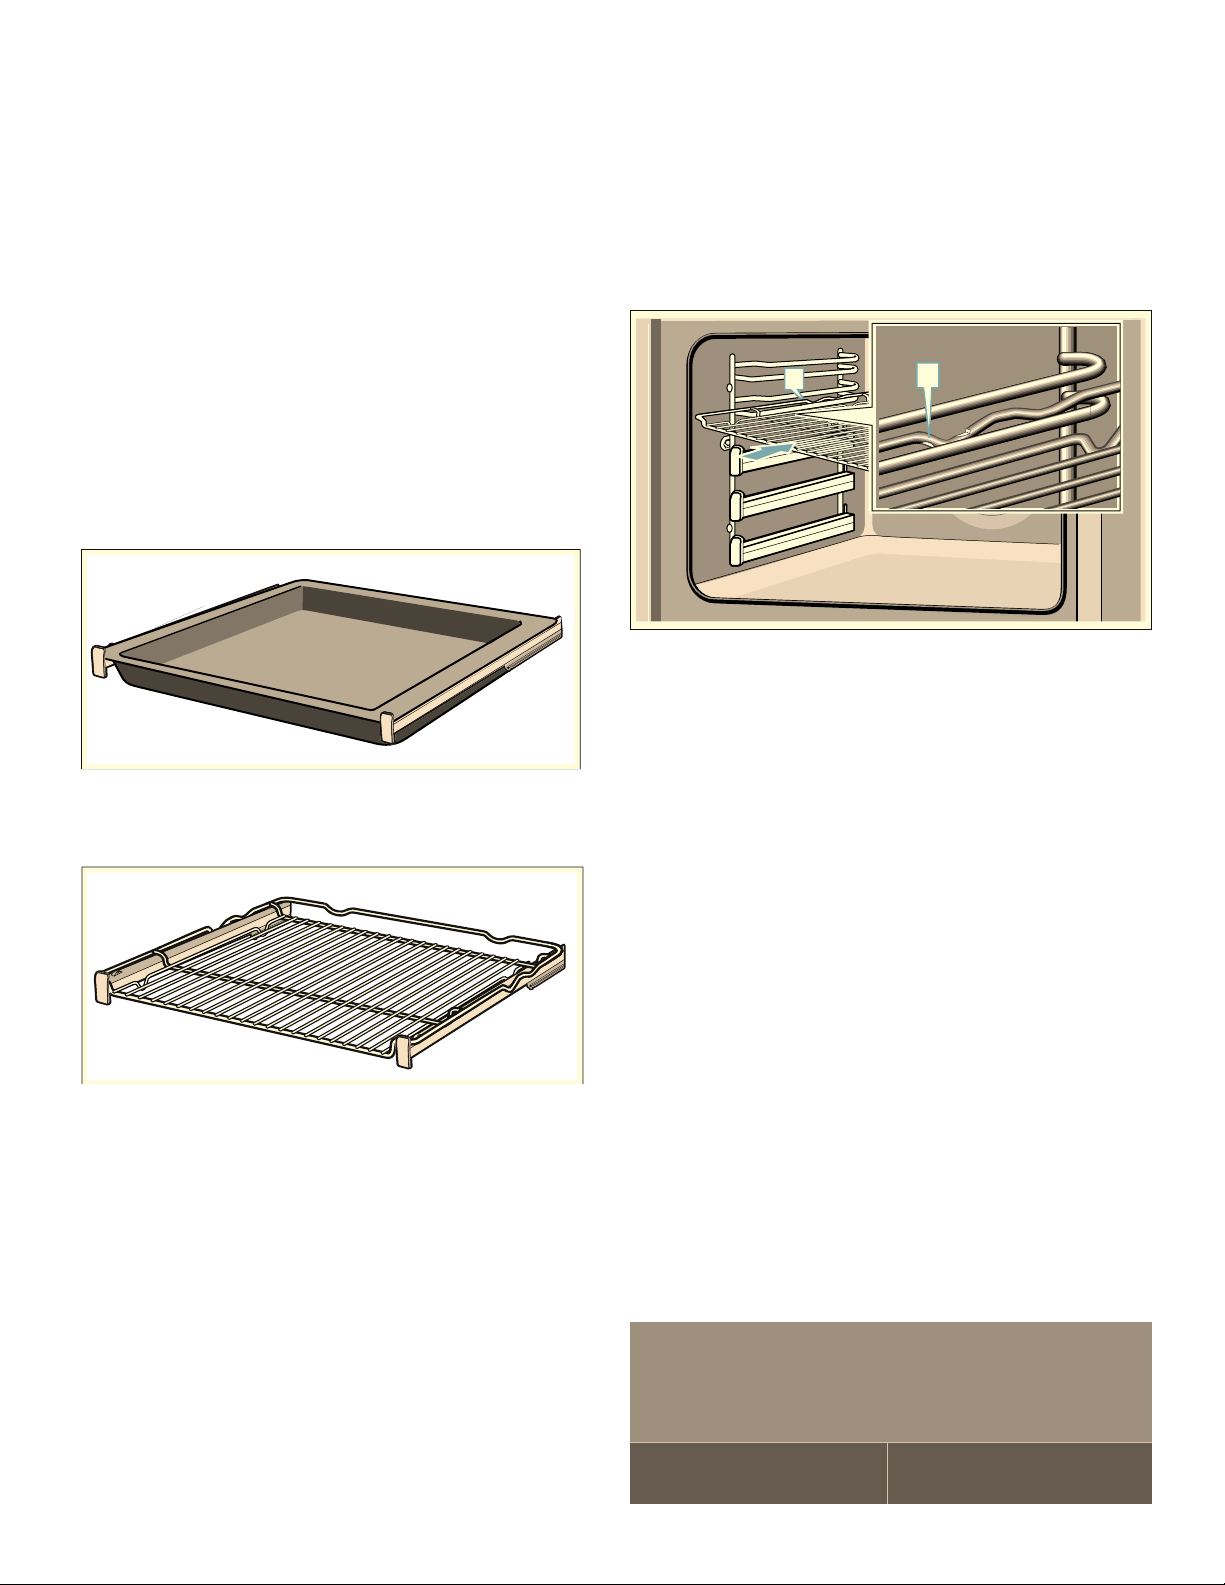
33
Racks 4 and 5:
▯ Always insert the accessory between the two guide
rods for a rack position.
▯ The accessories can be pulled out approximately
halfway without tipping.
Note: Ensure that you always insert the accessories into
the oven cavity facing the correct way. See the diagrams
in the following sections for further information.
Telescopic Rack Guides:
▯ You can use the telescopic rack guides to pull the
accessories out further.
▯ Ensure that the accessory is placed evenly onto the
telescopic rack guides. The accessory must rest on
both telescopic rack guides and within the notches at
the front and rear end of the telescopic rack guides.
Example in the picture: Universal pan
Example in the picture: Rack
▯ To remove the accessory, pull it out until the
telescopic rack guides stop. Hold the accessory on
both sides and lift it up.
Stop Function
The accessories can be pulled out approximately halfway
until they lock in place. The stop function prevents the
accessories from tilting when they are pulled out. The
accessories must be inserted into the oven cavity
correctly for the tilt protection to work properly.
When inserting the wire rack, ensure that the stop catch
‚ is at the rear and is facing downwards. The open side
must be facing towards the appliance door and the
curvature must be facing downwards
¾.
Steam Cooking
During steaming, hot steam surrounds the food and
therefore prevents loss of nutrients from the food. The
shape, color and typical aroma of the dishes are retained
as a result of this preparation method. With steam,
flavors are not affected when cooking a whole meal at
the same time.
Note: If the water tank runs dry during steaming,
operation is interrupted. Fill the water tank. After the
water tank is reinserted, Steam cooking will resume.
Your oven has five modes for Steam cooking:
▯ Steam ‹
▯ Steam Convection §
▯ Proof Œ
▯ Defrost “
▯ Reheat ¨
Setting
Example: Set heating mode Steam ‹ with 212°F
(100°C) for 20 minutes.
1.
Refill water tank.
Note: Only switch on steaming once the oven cavity
has cooled down completely (to room temperature).
2.
Touch the ON l OFF touch button.
3.
Swipe to the left or right to select "Steam ‹".
D
D
6WHDP
¯
PLQV
°
6DEEDWK
°
<RP7RY
µ
%URLO
±
&RQY%URLO
~
3L]]D

34
4.
Touch the temperature field.
5.
Swipe to the left or the right to select the required
temperature.
6.
Touch the timer field +.
7.
Swipe to the left or the right to select the required
duration.
8.
Touch the START l STOP touch button.
The appliance starts the operation.
As soon as the cooking time has elapsed, an audible
signal sounds and the appliance ends the operation
automatically. Touch the TIMERS touch button to end the
audible signal.
Cancelling
Press the START l STOP button to cancel the appliance
operation.
Note: In a double oven, if both cavities are operating, it
is necessary to select the cavity in which you wish to
make changes.
Exit
Touch the ON l OFF touch button to switch off the
appliance.
Steam Assisted Cooking
When cooking with steam assistance, steam is
introduced into the oven cavity at various intervals and
with varying degrees of intensity. This gives you a better
cooking result.
Your food:
▯ Becomes crispy on the outside
▯ Develops a shiny surface
▯ Is juicy and tender on the inside
▯ Only undergoes a minimum reduction in volume
You set the desired heating mode and steam intensity
combination. Use the information in the table to select a
suitable heating mode and steam intensity. Select a
program from the available steam programs that meets
your cooking needs.
Steam Intensity
Different intensity levels are available when adding
steam:
▯ low
▯ medium
▯ high
Suitable Heating Modes
You can add steam for these heating modes:
▯ True Convection ‚
▯ Convection Bake ¶
▯ Bake ƒ
▯ Speed Convection ÷
▯ Convection Roast û
▯ Roast ü
Start
1.
Refill water tank.
Note: Only switch on the Add Steam setting once the
oven cavity has completely cooled down (to room
temperature).
2.
Touch the ON l OFF touch button.
3.
Set the heating mode and temperature.
4.
Touch the ADD STEAM touch button to switch on
steam assistance.
5.
On the display, swipe to the left or right to select the
steam intensity.
6.
Touch the 8 symbol to apply the setting.
7.
Touch the START l STOP touch button.
The appliance starts the operation.
Note: If the water tank runs out of water during an
operation with steam assistance, a message appears on
the display prompting you to fill the water tank.
Cancelling Steam Addition
1.
Touch the ADD STEAM touch button to cancel the
addition of steam early.
2.
Touch the steam intensity in the bottom right corner of
the display.
3.
Swipe to the left or right to select "Off".
4.
Touch the 8 symbol to apply the setting.
Note: The operation continues without adding steam.
Cancelling
Press the START l STOP button to cancel the appliance
operation.
Note: In a double oven, if both cavities are operating, it
is necessary to select the cavity in which you wish to
make changes.
Exit
Touch the ON l OFF touch button to switch off the
appliance.
7UXH&RQYHFWLRQ
³
+LJK
Ü

35
Proof
Dough will proof more quickly using the "Proof Œ" mode
than at room temperature and does not dry out.
Use the information in the tables found in the Cooking
Charts Use and Care Guide to select the appropriate
level.
Note: If the water tank runs out of water during operation
with the Proof setting, operation is interrupted. Fill the
water tank.
Start
1.
Refill water tank.
Note: Only switch on the Proof setting once the oven
cavity has completely cooled down (to room
temperature).
2.
Touch the ON l OFF touch button.
3.
Swipe to the left or right to select "Proof".
4.
Touch "1" in the bottom touch field.
5.
Swipe to the left or right to select the required setting.
6.
Touch the 8 symbol to apply the setting.
7.
Touch "+" in the bottom touch field.
8.
Swipe to the left or the right to select the required
duration.
9.
Touch the 8 symbol to apply the setting.
10.
Touch the START l STOP touch button.
The appliance starts the operation.
As soon as the cooking time has elapsed, an audible
signal sounds and the appliance ends the operation
automatically. Touch the TIMERS touch button to end the
audible signal.
Cancelling
Press the START l STOP button to cancel the appliance
operation.
Note: In a double oven, if both cavities are operating, it
is necessary to select the cavity in which you wish to
make changes.
Exit
Touch the ON l OFF touch button to switch off the
appliance.
Defrost
Use the "Defrost “" heating mode to defrost frozen
products.
Note: If the water tank runs dry during operation with the
Defrost setting, operation is interrupted. Fill the water
tank. After the water tank is reinserted, Defrost will
resume.
Start
1.
Refill water tank.
Note: Only switch on the Defrost setting once the
oven cavity has completely cooled down (to room
temperature).
2.
Touch the ON l OFF touch button.
3.
Swipe to the left or right to select "Defrost “".
4.
Touch the temperature in the bottom line.
5.
Swipe to the left or the right to select the required
temperature.
6.
Touch the 8 icon to apply the setting.
7.
Touch "+" in the bottom touch field.
8.
Swipe to the left or the right to select the required
duration.
9.
Touch the 8 icon to apply the setting.
10.
Touch the START l STOP touch button.
The appliance starts the operation.
As soon as the cooking time has elapsed, an audible
signal sounds and the appliance ends the operation
automatically. Touch the TIMERS touch button to end the
audible signal.
Cancelling
Press the START l STOP button to cancel the appliance
operation.
Note: In a double oven, if both cavities are operating, it
is necessary to select the cavity in which you wish to
make changes.
Exit
Touch the ON l OFF touch button to switch off the
appliance.
Reheating
With the "Reheat ¨" heating mode, you can gently
reheat food that has already been cooked or crisp up
day-old baked goods. Steam is switched on
automatically.
Note: If the water tank runs out of water during the
operation with the Reheating setting, the operation is
interrupted. Fill the water tank. After the water tank is
reinserted, Reheating will resume.
Start
1.
Refill water tank.
Note: Only switch on the Reheat setting once the
oven cavity has completely cooled down (to room
temperature).
2.
Touch the ON l OFF touch button.
3.
Swipe to the left or right to select "Reheat ¨".
4.
Touch the temperature in the bottom touch field.
5.
Swipe to the left or the right to select the required
temperature.
6.
Touch the 8 icon to apply the setting.
7.
Touch "+" in the bottom touch field.
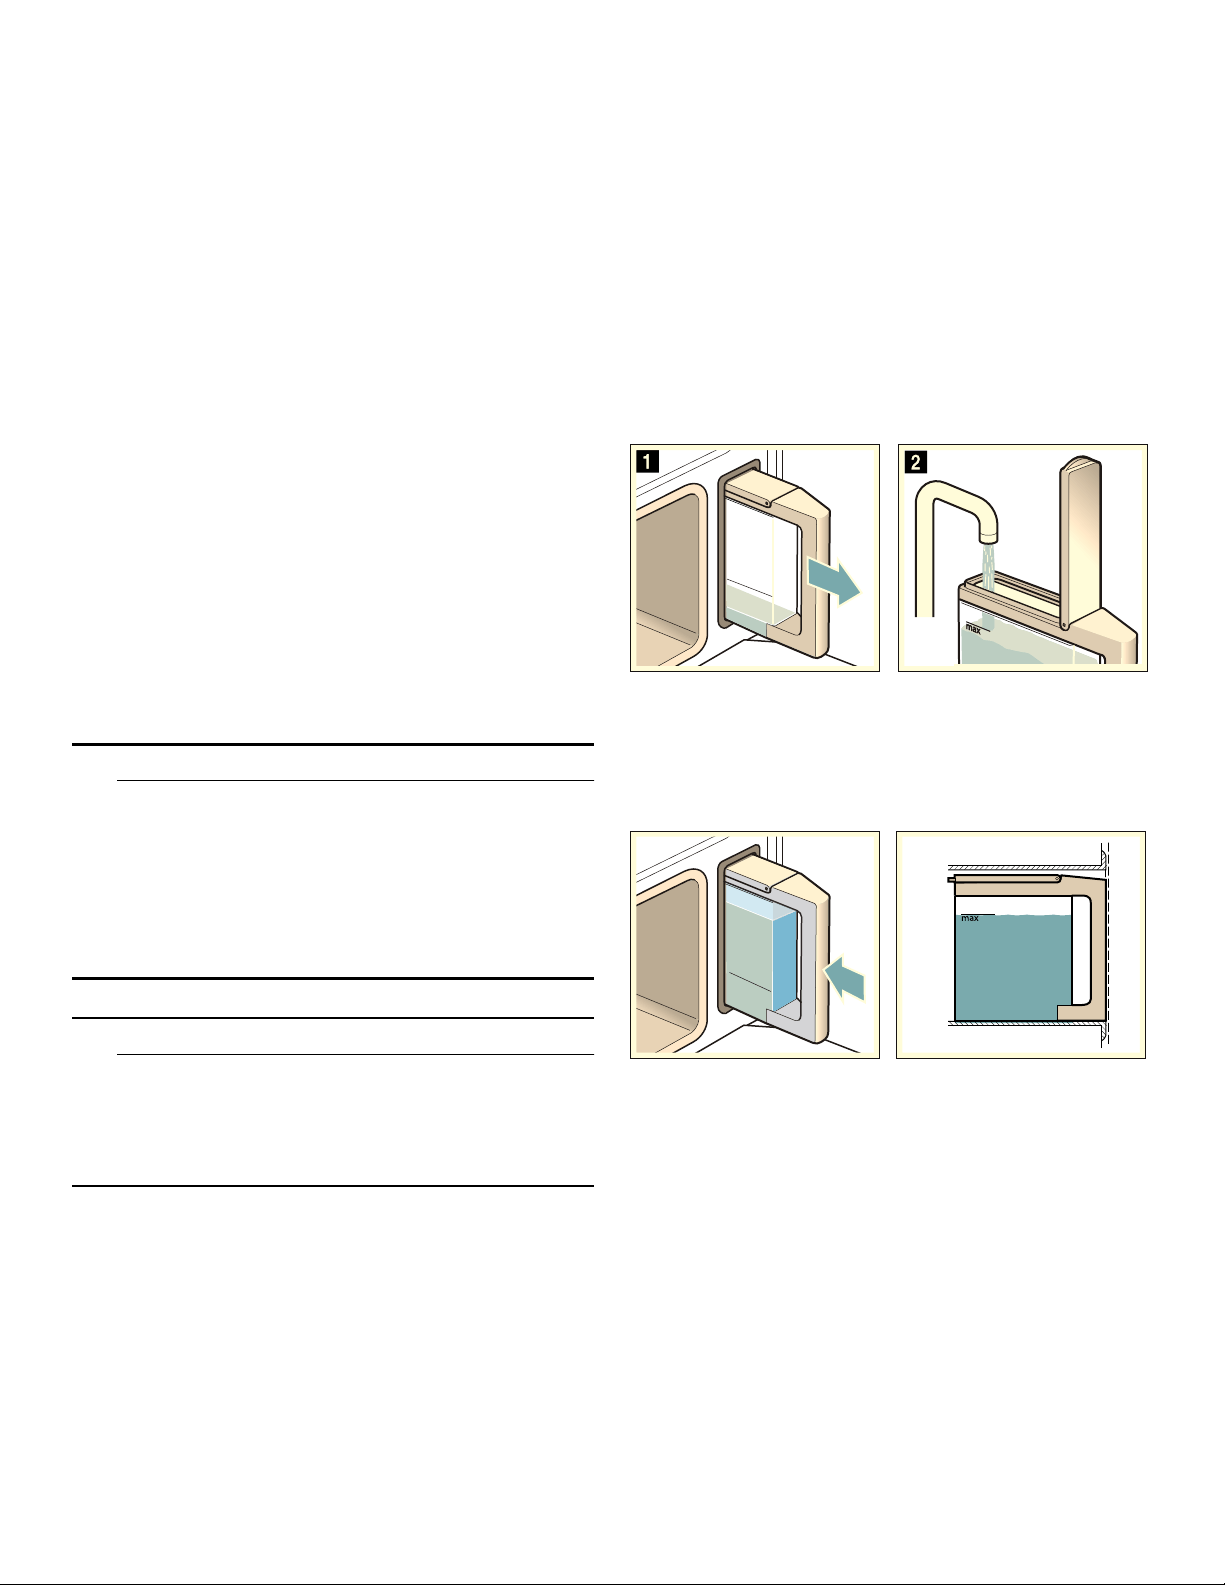
36
8.
Swipe to the left or the right to select the required
duration.
9.
Touch the 8 icon to apply the setting.
10.
Touch the START l STOP touch button.
The appliance starts the operation.
As soon as the cooking time has elapsed, an audible
signal sounds and the appliance ends the operation
automatically. Touch the TIMERS touch button to end the
audible signal.
Cancelling
Press the START l STOP button to cancel the appliance
operation.
Note: In a double oven, if both cavities are operating, it
is necessary to select the cavity in which you wish to
make changes.
Exit
Touch the ON l OFF touch button to switch off the
appliance.
Refill Water Tank
The water tank is located at the right side of the oven
cavity. Before starting an operation with steam, fill the
water tank with water.
Ensure that the water hardness range has been set
correctly.
9 WARNING
RISK OF INJURY AND FIRE
Only fill the water tank with water or with the
descaling solution we have recommended. Do not
pour any flammable liquids (e.g. alcoholic drinks)
into the water tank. Due to hot surfaces, vapors from
flammable liquids may catch fire in the oven cavity
(explosion). The appliance door may spring open.
Hot steam and flames may escape.
9 WARNING
RISK OF BURNS
The water tank may heat up while the appliance is in
operation. Wait until the water tank has cooled down
after the previous appliance operation. Remove the
water tank from the water tank recess.
NOTICE: The appliance may become damaged due to
the use of unsuitable liquids.
Do not use distilled water, highly chlorinated tap water
(>4 mg/l) or other liquids.
Only use cold, fresh tap water, softened water or non-
carbonated mineral water.
Do not overfill tank above max level line to avoid water
from spilling inside the tank housing.
Notes
▯ If your water is very hard, we recommend that you use
softened water.
▯ If you only use softened water, you can set the water
hardness range to "softened".
▯ If you use mineral water, set the water hardness range
to "4 very hard".
▯ If you use mineral water, you must only use non-
carbonated mineral water.
1.
Open the appliance door.
2.
Pull out the water tank from the right side of the oven
cavity (figure
!).
3.
Fill the water tank with cold water up to the “max.”
mark (figure
")
4.
Fully close the tank cover until it locks.
5.
Insert the filled water tank (figure #).
6.
Ensure that the water tank has been pushed in all the
way. The water tank should be level with the tank
cavity (figure $).
7.
Close the appliance door.

37
After Every Steam Operation
9 WARNING
RISK OF SCALDING
Hot steam can escape when you open the
appliance door. Steam is not visible at certain
temperatures. Do not stand too close to the
appliance when opening it. Open the appliance
door with caution. Keep children away.
9 WARNING
RISK OF BURNS
The appliance grows hot during operation. Let
appliance cool down prior to cleaning.
NOTICE: ENAMEL DAMAGE: Do not start any
operations when there is water on the oven cavity floor.
Before the operation, wipe the water from the oven cavity
floor.
The remaining water is pumped back into the water tank
after every operation with steam. Then empty and dry the
water tank. Moisture remains in the oven cavity. To dry
the oven cavity, you can either use the "Drying ª"
operating mode or dry the oven cavity by hand.
Notes
▯ Once the appliance has been switched off, the display
remains lit for a little longer to remind you to empty the
water tank.
▯ Remove limescale marks with a cloth soaked in
vinegar, then wipe with clean water and dry with a soft
cloth.
Empty Water Tank
NOTICE:
▯ Do not dry the water tank in the hot oven cavity. This
will damage the water tank.
▯ Do not clean the water tank in the dishwasher. This will
damage the water tank.
1.
Open the appliance door.
2.
Remove the water tank.
3.
Empty the water tank, clean it with detergent and then
rinse it thoroughly with clean water.
4.
Dry all parts with a soft cloth.
5.
Rub the seal on the cover until dry.
6.
Leave to dry with the cover open.
7.
Close the cover on the water tank and push it down.
8.
Insert the water tank and close the appliance door.
Starting Drying
During drying, the oven cavity is heated up so that the
moisture in the oven cavity evaporates. When the Drying
mode is complete open the appliance door so that the
steam escapes.
1.
Let the appliance cool down.
2.
Remove the worst of the food remnants from the oven
cavity immediately and use a sponge to wipe away
moisture from the oven cavity floor.
3.
If necessary, touch the ON l OFF touch button to
switch the appliance on.
4.
Touch the MENU touch button to display the operating
modes.
5.
On the touch display, swipe to the left or right to select
"Drying
ª".
6.
Touch the bottom touch field.
The duration is displayed. It cannot be changed.
7.
Touch the bottom touch field.
8.
Touch the START l STOP touch button.
The drying function starts and ends automatically after
10 minutes.
9.
Open the appliance door and leave it open for 1 to
2 minutes so that the moisture in the oven cavity can
escape.
Drying the Oven Cavity by Hand
1.
Let the appliance cool down.
2.
Remove any soil from the oven cavity.
3.
Dry the oven cavity with a sponge.
4.
Leave the appliance door open for 1 hour so that the
oven cavity dries completely.
Steam Programs
Preparing food is very easy using the various programs.
Select a program either directly through the appliance or
by using the Home Connect App. Enter the food’s weight
or amount. The program then runs automatically and
notifies you when your food is finished cooking.
To achieve the best results, the oven cavity must not be
too hot for the type of food selected. If the cavity is too
hot, a message will appear on the display. Allow the oven
cavity to cool down and start again.
9 WARNING
RISK OF SCALDING
Hot steam can escape when you open the
appliance door. Steam is not visible at certain
temperatures. Do not stand too close to the
appliance when opening it. Open the appliance
door with caution. Keep children away.

38
Information on the Settings
▯ The cooking result depends on the quality of the food
and the type of cookware. For an optimal cooking
result, use food that is fresh. For frozen food, use food
straight out of the freezer only.
▯ For some dishes, you will be required to enter the
weight. The appliance will then apply the time and
temperature settings for you.
It is not possible to set weights outside of the intended
weight range.
▯ Recommendations are provided on cookware, shelf
position or the addition of liquid when cooking meat.
Some food requires turning or stirring, etc. during
cooking. This is shown in the display shortly after
operation starts. An audible signal will remind you at
the right time.
▯ Information on the right kind of cookware to use and
tips and tricks for the preparation can be found in the
Cooking Tips and Instructions Guide provided with
your appliance. You may also touch the INFO button
on the control panel for this information.
Selecting a Dish
The following table shows the available categories and
dishes.
Setting a Program
You will be guided through the entire setting process for
your chosen food.
1.
Touch the ON l OFF touch button to switch on the
appliance.
2.
Touch the MENU touch button.
3.
Swipe to the left or right to select "Steam programs".
4.
Touch the bottom line.
5.
Touch the required category.
6.
Swipe to the left or right to select the required steam
program.
7.
Touch the required steam program.
The settings for this dish appear on the display.
Note: For some meals, you can also display notes,
e.g. on the rack level and cookware. To do this, swipe
to the left until all of the notes are displayed.
8.
Some programs require a weight. Press the weight
and scroll to adjust.
Touch the appropriate setting and adjust it.
9.
Touch the START l STOP touch button to start the
appliance operation.
The estimated cooking time is shown.
Note: For some programs, the displayed cooking time
may change during the first few minutes, as the
heating-up time depends on the temperature of the
food and the water, among other things.
Categories Dishes
Reheat Pizza - thin 1 pc.
Pizza - thin 2 pcs.
Pizza - thin 3 pcs.
Pizza - thin 4 pcs.
Pizza - thin 5 pcs.
Pizza - thin 6 pcs.
Pizza - thin whole
Pizza - thick 1 pc.
Pizza - thick 2 pcs.
Pizza - thick 3 pcs.
Pizza - thick 4 pcs.
Pizza - thick 5 pcs.
Pizza - thick 6pcs.
Pizza - thick whole
Vegetables Steamed cauliflower florets
Steamed green beans
Steamed broccoli florets
Steamed green asparagus
Fresh brussel sprouts
Sliced carrots
Fresh artichokes
Steamed fresh spinach
Snow peas
Potatoes Boiled potatoes w/ skin
Boiled potatoes
Cereals and grains Couscous
Poultry Whole chicken - fresh
Chicken portions
Beef Sirloin - fresh
Pot roast - fresh
Pork Roast - fresh
Lamb Leg of lamb- fresh
Fish Fresh fish - whole
Fresh fish - fillets
Frozen fish - fillets
Shellfish
Shrimp
Baked goods, Des-
serts
Fruit compote
Rice pudding
Breads White bread
Multigrain bread
Rye bread
Fresh bread rolls
Frozen bread rolls
Braided loaf
Flat bread
Defrost Berries
Eggs Hard-boiled eggs 1-24
Hard-boiled eggs 25-36
Rice Basmati rice
Brown rice
Long grain rice
Risotto, Arborio rice
Categories Dishes

39
As soon as the cooking time has elapsed, an audible
signal sounds and the appliance ends the operation
automatically. Touch the TIMERS touch button to end the
audible signal.
Some programs offer you the opportunity to continue
cooking your dish.
If you are satisfied with the cooking result, touch "End".
If you are not happy with the cooking result, you can
continue cooking your dish.
Continue cooking
1.
Touch "Continue cooking".
2.
If necessary, adjust the recommended setting or time
amount.
3.
Touch the START l STOP touch button to start
"Continue cooking".
Cancelling
Press the START l STOP button to cancel the appliance
operation.
Note: In a double oven, if both cavities are operating, it
is necessary to select the cavity in which you wish to
make changes.
Exit
Touch the ON l OFF touch button to switch off the
appliance.
Cleaning Your Steam Oven
With good care and cleaning, the oven will retain its
appearance and remain fully functioning for a long time
to come. This section will explain how to correctly care
for and clean the steam oven.
Suitable Cleaning Agents
To ensure that the different surfaces are not damaged by
using the wrong cleaning agent, follow the information in
the following table. Depending on the appliance model,
not all of the areas listed may be on/in your appliance.
NOTICE: Surface damage!
Do not use any
▯ Harsh or abrasive cleaning agents
▯ Cleaning agents with a high alcohol content
▯ Hard scouring pads or abrasive cleaning sponges
▯ High-pressure cleaners or steam cleaners
▯ Special cleaners for cleaning the appliance while it is
hot
Wash new soft sponges and cloths thoroughly before
use.
Tip: Recommended cleaning and care products can be
purchased through Customer Service. Observe the
respective manufacturer's instructions.
9 WARNING
RISK OF BURNS
The appliance becomes very hot. Never touch the
hot inside surfaces of the oven interior or heating
elements. Always allow the appliance to cool down.
Keep children away.
Notes
▯ Slight differences in color on the front of the appliance
are caused by the use of different materials, such as
glass, plastic and metal.
▯ Shadows on the door panels, which look like streaks,
are caused by reflections made by the interior lighting.
▯ Enamel is baked on at very high temperatures. This
can cause some slight color variation. This is normal
and does not affect operation.
Cleaning Guide
Part Recommendations
Broil Pan and Grid Wash with hot soapy water.
Rinse thoroughly and dry, or
gently rub with cleansing
powder or soap-filled pads as
directed. DO NOT clean broil pan
and grid in the self-cleaning
oven.
Flat Rack Wash with hot soapy water.
Rinse thoroughly and dry, or
gently rub with cleansing
powder or soap-filled pads as
directed. DO NOT clean the rack
in a self-cleaning oven.
If the flat racks are cleaned in the
oven during the self clean mode,
they will lose their shiny finish
and may not glide smoothly. If
this happens, wipe the rack
edges with a small amount of
vegetable oil. Then wipe off
excess.
Telescopic Rack Wash with soapy water. Rinse
thoroughly and dry, or gently rub
with cleansing powder or
soap-filled pads as directed.
Avoid getting cleansing powder
in the telescopic slides.
Re-lubrication may become nec-
essary. Use only
high-temperature food-grade
lubricants to re-lubricate slides.
DO NOT clean the rack in a
self-cleaning oven.
Telescopic Guides Hot soapy water:
Clean with a dish cloth.
Do not remove the lubricant
while the pull-out rails are pulled
out. It is best to clean them when
they are pushed in.
Do not place in dishwasher.

40
Notes
▯ Slight differences in color on the front of the appliance
are caused by the use of different materials, such as
glass, plastic and metal.
▯ Shadows on the door panels, which look like streaks,
are caused by reflections made by the interior lighting.
▯ Enamel is baked on at very high temperatures. This
can cause some slight color variation. This is normal
and does not affect operation.
Surfaces in the Oven Cavity
The slightly textured surface of the back wall, ceiling and
sides in the oven cavity consists of Ecolyse coating
material and should not be cleaned with harsh
chemicals.
The oven cavity bottom is enameled and has a smooth
surface.
Cleaning the oven is easier because there is no cleaning
around a coil element showing on the bottom of the
oven. The hidden lower element is protected from food
soils and spills. Wiping up excess spills is easy.
Cleaning Enamel Surfaces
Clean the smooth enamel surfaces with a dish cloth and
hot soapy water. Dry with a soft cloth.
Soften baked-on food residues with a damp cloth and
soapy water. If there are heavy food deposits use a soap-
filled pad.
Note: Food residues can leave a white coating behind.
These are harmless and do not affect performance. You
can remove these residues using lemon juice if required.
Keeping the Appliance Clean
Always keep the appliance clean and remove food and
food spills immediately so that stubborn deposits do not
build up.
▯ Clean the oven cavity after each use. This will ensure
that food and food spills cannot be baked on.
▯ Always remove flecks of limescale, grease, starch and
albumin (e.g. egg white) immediately.
▯ Use suitable ovenware for roasting, e.g. a roasting
dish.
▯ For cakes or pies that may spill over, place on baking
sheet lined with aluminum foil and place on wire rack.
Water Tank Hot soapy water:
Clean with a dish cloth and rinse
thoroughly to remove residual
detergent.
Dry with a soft cloth. Leave to dry
with the cover open.
Do not place in dishwasher.
Silicone Door Gasket Clean with hot soapy water.
Glass Wash with soap and water or
glass cleaner. Use Fantastik® or
Formula 409® to remove grease
spatters and stubborn stains.
Glass Control Panel Use warm soapy water on a dish
cloth or glass cleaner sprayed
directly on a paper towel.
Painted Surfaces Clean with hot soapy water or
apply Fantastik® or Formula
409® to a clean sponge or
paper towel and wipe clean.
Avoid using powder cleaning
agents, steel wool pads and
oven cleaners.
Porcelain Surfaces
(bottom of oven
cavity)
Immediately wipe up acid spills
like fruit juice, milk and tomatoes
with a dry cloth. Do not use a
moistened sponge/cloth on hot
porcelain. When cool, clean with
hot soapy water or apply
Bon-Ami® or Soft Scrub® to a
damp sponge. Rinse and dry.
For stubborn stains, use
soap-filled pads. It is normal for
porcelain to show fine lines with
age due to exposure to heat and
food soil.
Stainless Steel
Surfaces
Always wipe or rub in the
direction of the grain. Clean with
a soapy sponge, then rinse and
dry, or wipe with Fantastik® or
Formula 409® sprayed on a
paper towel. Protect and polish
with Stainless Steel Magic® and
a soft cloth. Remove water spots
with a cloth dampened with white
vinegar. Use Bar Keeper´s
Friend® to remove heat
discoloration.
Plastic & Controls When cool, clean with soapy
water, rinse and dry.
Probe Wipe with soapy water. Do not
submerge. Do not wash in the
dishwasher.
Printed areas (words
& numbers)
Do not use abrasive cleaners or
petroleum based solvents.
Part Recommendations

41
Cleaning Functions Steam Oven
NOTICE: Do not use oven cleaner on the self-cleaning
surfaces. These will damage the surfaces. If oven cleaner
does get onto these surfaces, wipe it off immediately
using water and a sponge. Do not rub the surface and do
not use abrasive cleaning aids.
Your appliance is equipped with “Ecolytic Clean”,
“Easy Clean” and a “Descale” function. The self-cleaning
surfaces in the oven cavity are cleaned with the
"Ecolytic Clean" cleaning function. Use the “Easy Clean”
function for intermediate cleaning of the oven cavity
bottom. Food and food spills are saturated with steam
enabling soils to loosen when using the “Easy Clean”
function and can then be removed more easily. You can
use the “Descale” function to remove limescale from the
evaporator.
Ecolytic Clean
Some surfaces in the oven cavity are cleaned with the
Ecolytic Clean operating mode.
Ecolytic cleaning is constantly cleaning. The side panels,
ceiling panel and back panel are coated with a porous,
matte ceramic material known as an ecolytic coating.
The coating absorbs and breaks down splashes over
time from baking, roasting and broiling while the oven is
in operation.
If the surfaces no longer clean themselves adequately
and dark patches appear, the surfaces can be
“refreshed” using the Ecolytic Clean mode which helps
clean the ecolytic coating by operating the unit at a
higher temperature to help speed the process.
Note: During normal operation the appliance records
the number of times it is used and indicates when it has
reached a point where cleaning is recommended. The
recommendation is displayed until the Ecolytic Clean
mode has finished.
If this function is not performed, then the ecolytic
surfaces may become damaged.
If your appliance becomes prematurely soiled or if you
notice dark patches on the back panel, do not wait until
your appliance recommends cleaning. The more often
the appliance is cleaned, the longer the porous surfaces
will retain their cleaning capability. You can clean your
appliance at any time needed using the Ecolytic Clean
function.
Wipe out large spills from the oven before running the
Ecolytic Cleaning function.
Do not clean parts or accessories in the self-clean oven.
Before Running the Ecolytic Clean Function
Remove racks, rails, accessories and ovenware from the
oven cavity.
Cleaning the Oven Bottom and the Inside of the
Appliance Door
Remove the worst food spills from the oven bottom, the
inside of the appliance door and the interior lighting.
Otherwise, patches will appear that cannot be removed.
NOTICE: Do not use oven cleaner on the ecolytic
cleaning surfaces. These will damage the surfaces. If
oven cleaner does get onto these surfaces, wipe it off
immediately using water and a sponge. Do not rub the
surface and do not use abrasive cleaning aids.
Start
Before setting the cleaning function, ensure that you
have followed all instructions for preparation.
Cleaning takes 1 hour. The duration cannot be changed.
1.
Touch the ON l OFF touch button.
2.
Touch the MENU touch button.
3.
Swipe to the left or right to select "Ecolytic Clean ™".
4.
Touch the bottom line.
The cleaning time with Ecolytic Clean is displayed.
5.
Touch the bottom line.
6.
Touch the START l STOP touch button.
The appliance starts Ecolytic Clean. The remaining
time appears on the display.
Keep the kitchen ventilated while the cleaning function is
running.
As soon as the cleaning aid has run through, a signal
sounds and the appliance ends the operation
automatically.
Once the Cleaning Function has Ended
Once the oven cavity has cooled down, wipe down the
oven cavity with a damp cloth if necessary.
Note: During operation and while the cleaning function
is active, reddish patches may form on the surfaces. This
is not rust, but food residues. These patches are not
hazardous to your health and do not limit the cleaning
capacity of the self-cleaning surfaces.

42
Easy Clean
The Easy Clean function makes it easier to clean the
oven floor. Food and food spills are soaked beforehand
by vaporizing the vinegar solution. It can then be
removed more easily.
9 WARNING
RISK OF SCALDING
Hot steam can arise due to water in the hot oven
cavity. Never pour water into the hot oven cavity.
Setting
The "Easy Clean š" function can only be started once
the oven cavity is cold (room temperature) and the
appliance door is closed.
Do not open the appliance door during this operation.
Doing this will interrupt the "Easy Clean š" function.
1.
Remove the accessories and racks from the oven
cavity.
2.
Touch the ON l OFF touch button.
3.
Touch the MENU touch button.
4.
Swipe to the left or right to select "Easy Clean š".
5.
Touch the bottom line.
6.
Touch the START l STOP touch button.
The appliance starts the Easy Clean function. The
remaining time appears on the display.
Exit
As soon as the cleaning function has run through, a
signal sounds and the appliance ends the operation
automatically.
As soon as you open the appliance door, the interior
lighting is switched on so that you can rinse the oven
cavity more easily. The remaining water in the oven cavity
must be removed promptly. Do not leave the remaining
water in the oven cavity for a long time (e.g. overnight).
The appliance must not be operated when the oven
cavity is still wet or damp.
Subsequent Cleaning
1.
Open the appliance door and remove the remaining
water with an absorbent sponge cloth.
2.
Clean the smooth surfaces in the oven cavity with a
dish cloth or a soft brush. Stubborn residues can be
removed using a soft scouring pad.
3.
Remove limescale with a cloth soaked in vinegar.
Then wipe with clean water and rub dry with a soft
cloth (including under the door seal).
4.
Use the ON l OFF touch button to switch off the
appliance.
5.
Leave the appliance door ajar in the stop position
(approx. 30°) for approx. one hour to allow the enamel
surfaces in the oven cavity to dry thoroughly.
Alternatively, you can also run the Drying function for
the oven cavity.
Running the Drying Function for the Oven Cavity
1.
Touch the ON l OFF touch button.
2.
Touch the MENU touch button.
3.
Swipe to the left or right to select "Drying ª".
4.
Touch the bottom line.
5.
Touch the START l STOP touch button.
The appliance starts Drying. The remaining time
appears on the display.
As soon as the Drying function has run through, a signal
sounds and the appliance ends the operation
automatically.
Removing Heavy Food Deposits
You have several options for removing particularly
stubborn food deposits.
▯ Leave the vinegar solution to work for some time
before starting Easy Clean.
▯ Rub vinegar solution onto the food and food spills on
the smooth surfaces before starting Easy Clean.
▯ Repeat the Easy Clean function after the oven cavity
has cooled down.
Descale
The appliance must be descaled regularly in order for it
to continue operating correctly.
There are several steps in the descaling program. For
hygiene reasons, the descaling program must be run
through completely so that the appliance can be ready
for operation again. In total, the descaling program runs
for approx. 70-90 minutes.
▯ Descale (approx. 55-70 minutes)
▯ First rinsing cycle (approx. 6-9 minutes)
▯ Second rinsing cycle (approx. 6-9 minutes)
If descaling is interrupted (for example, due to a power
failure or because the appliance is switched off), you are
prompted to rinse the appliance twice after it is switched
back on. The appliance cannot be used until the second
rinsing cycle comes to an end.
The frequency with which the appliance must be
descaled depends on the hardness of the water used.
When only five more steam-assisted operations are
possible, or fewer, the appliance reminds you to descale
it with a message on the display. The number of
remaining operations is displayed after the appliance is
switched on. You can therefore prepare for the descaling
in good time.

43
Start
NOTICES
▯ Only use the descaler recommended by Thermador
for the descaling program. Other descalers may
damage the appliance.
Descaler order no. 10008170
▯ If you have used a steam-assisted operation
immediately before descaling, you must first switch the
appliance off so that the residual water is pumped out
of the evaporator system.
▯ Descaling solution: Do not allow the unmixed
descaling chemicals or mixed solution to come into
contact with the control panel or other surfaces on the
appliance as prolonged exposure may cause damage
to the surfaces. Immediately remove any descaler by
rinsing with tap water.
1.
Touch the ON l OFF touch button.
2.
Touch the MENU touch button.
3.
Swipe to the left or right to select "Descale ,".
4.
Touch continue.
The duration of the descaling program is displayed. It
cannot be changed.
5.
Touch continue again.
6.
Remove the water tank and fill it with descaling
solution.
7.
Mix 32 fluid oz. (950 ml) of water with 1/2 bottle
(approximately 200 ml) of descale solution.
8.
Once the water tank has been filled with descaling
solution, push it back in again fully.
9.
Follow the on-screen instructions.
The appliance will now be descaled. The remaining
time counts down on the display. As soon as the
descaling program has finished, an audible signal
sounds.
First Rinsing Cycle
1.
The display will prompt to open the appliance door.
Remove the water tank and rinse thoroughly. Fill the
tank with fresh water and reinsert.
2.
Close the appliance door.
The first rinse will begin automatically once the door is
closed. When complete an audible sound will be
heard and the display will prompt for the next step.
Second Rinsing Cycle
1.
The display will prompt to open the appliance door.
Remove the water tank and rinse throughly. Fill the
tank with fresh water and reinsert.
2.
Close the appliance door.
The second rinse will begin automatically once the
door is closed. When complete an audible sound will
be heard and the display will prompt for the next step.
Completing Descale
1.
Open the appliance door.
2.
Empty water tank. Rinse thoroughly. Dry and reinsert.
3.
Descaling is complete and the appliance is ready for
use again.

44
Conventional Oven Operation
Rack Positions
There are seven positions with position one starting at
the bottom of the oven. Rack positions are called out
throughout the manual to help optimize cooking
performance.
Inserting Racks
9 CAUTION
▯ To avoid burns, place oven racks in desired
positions before turning oven on. Always use
oven mitts when the oven is warm. If a rack must
be moved while the oven is hot, do not let oven
mitts contact hot heating elements.
▯ Use caution when removing oven racks from the
lowest rack position to avoid contact with the hot
oven door.
▯ To avoid possible injury or damage to the
appliance, ensure racks are installed exactly per
installation instructions and not backwards or
upside down.
Flat Rack
The rack is designed with a stop so it will stop before
coming completely out of the oven and not tilt.
To insert Flat Rack into Oven:
1.
Grasp rack firmly on both sides.
2.
Insert rack (see picture).
3.
Tilt rack up to allow stop into rack guide.
4.
Bring rack to a horizontal position and push the rest of
the way in.
Rack should be straight and flat, not crooked.
To remove Flat Rack from Oven:
1.
Grasp rack firmly on both sides and pull rack toward
you.
2.
When the stop is reached, tilt rack up and pull the rest
of the way out.
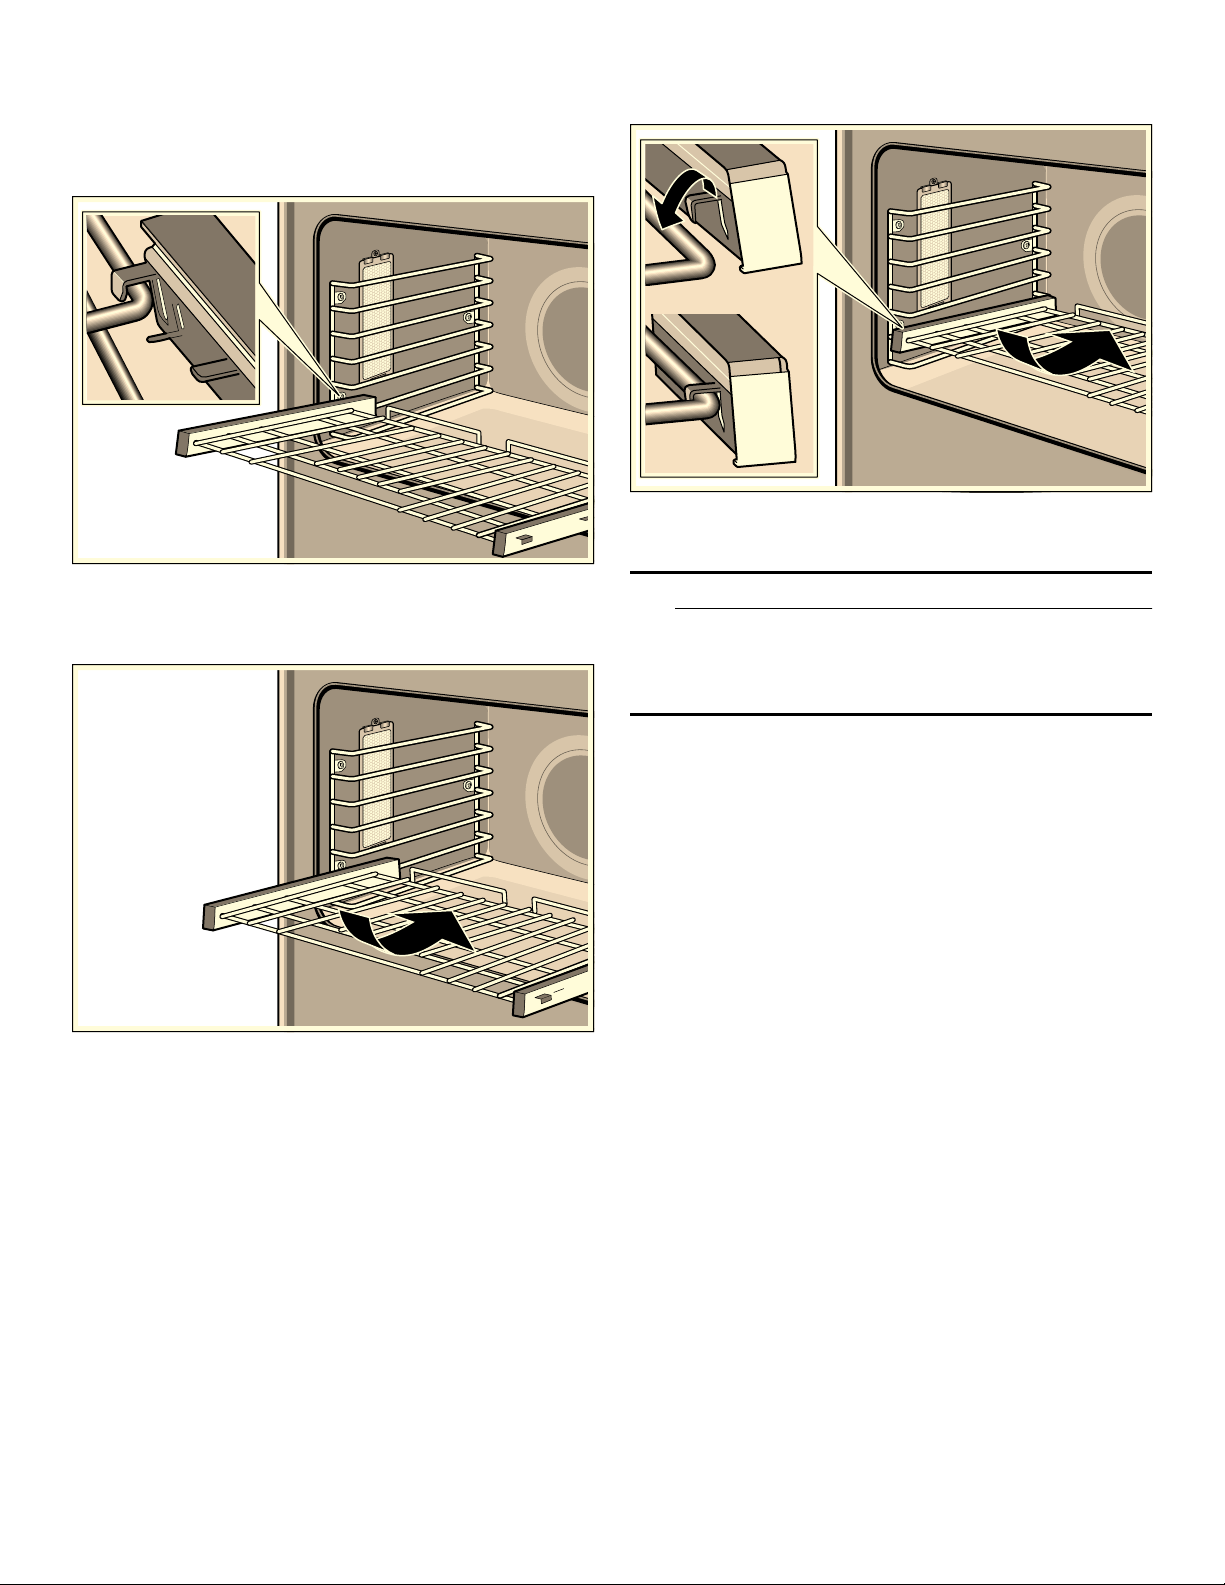
45
Telescopic Rack
To insert Telescopic Rack into Oven:
1.
Hold the rack at a slight angle.
2.
Engage the rear hooks in the accessory brackets.
3.
Hold the rack straight to allow second tab to rest over
rack guide.
4.
Push the rack in until it is even with the front hooks.
5.
Lift the rack up to lock the last hook into place.
6.
Push the rack in completely.
7.
Engage the rack’s front hooks in the accessory
brackets.
This is very important to ensure that the rack is
installed correctly (see the enlarged picture).
9 CAUTION
To avoid possible injury or damage to the
appliance, ensure telescopic rack is installed
exactly per installation instructions and not
backwards or upside down.
Rotisserie
Rotisseries uses heat radiated from the upper element.
Food is slowly turned on a skewer in the center of the
oven. This allows food to receive equal heat on all sides.
The Rotisserie mode is best suited for cooking large
pieces of meat (for example a whole chicken, turkey or a
large roast). This mode helps seal in flavor and juices
while allowing the meat to be cooked without the addition
of fats or liquids.
▯ The maximum weight allowed for the rotisserie is 12 lb
(6 kg).
▯ Use a meat thermometer to check the internal
temperature of the meat.
▯ Allowable oven temperature is 175 - 550°F (80 -
290°C).
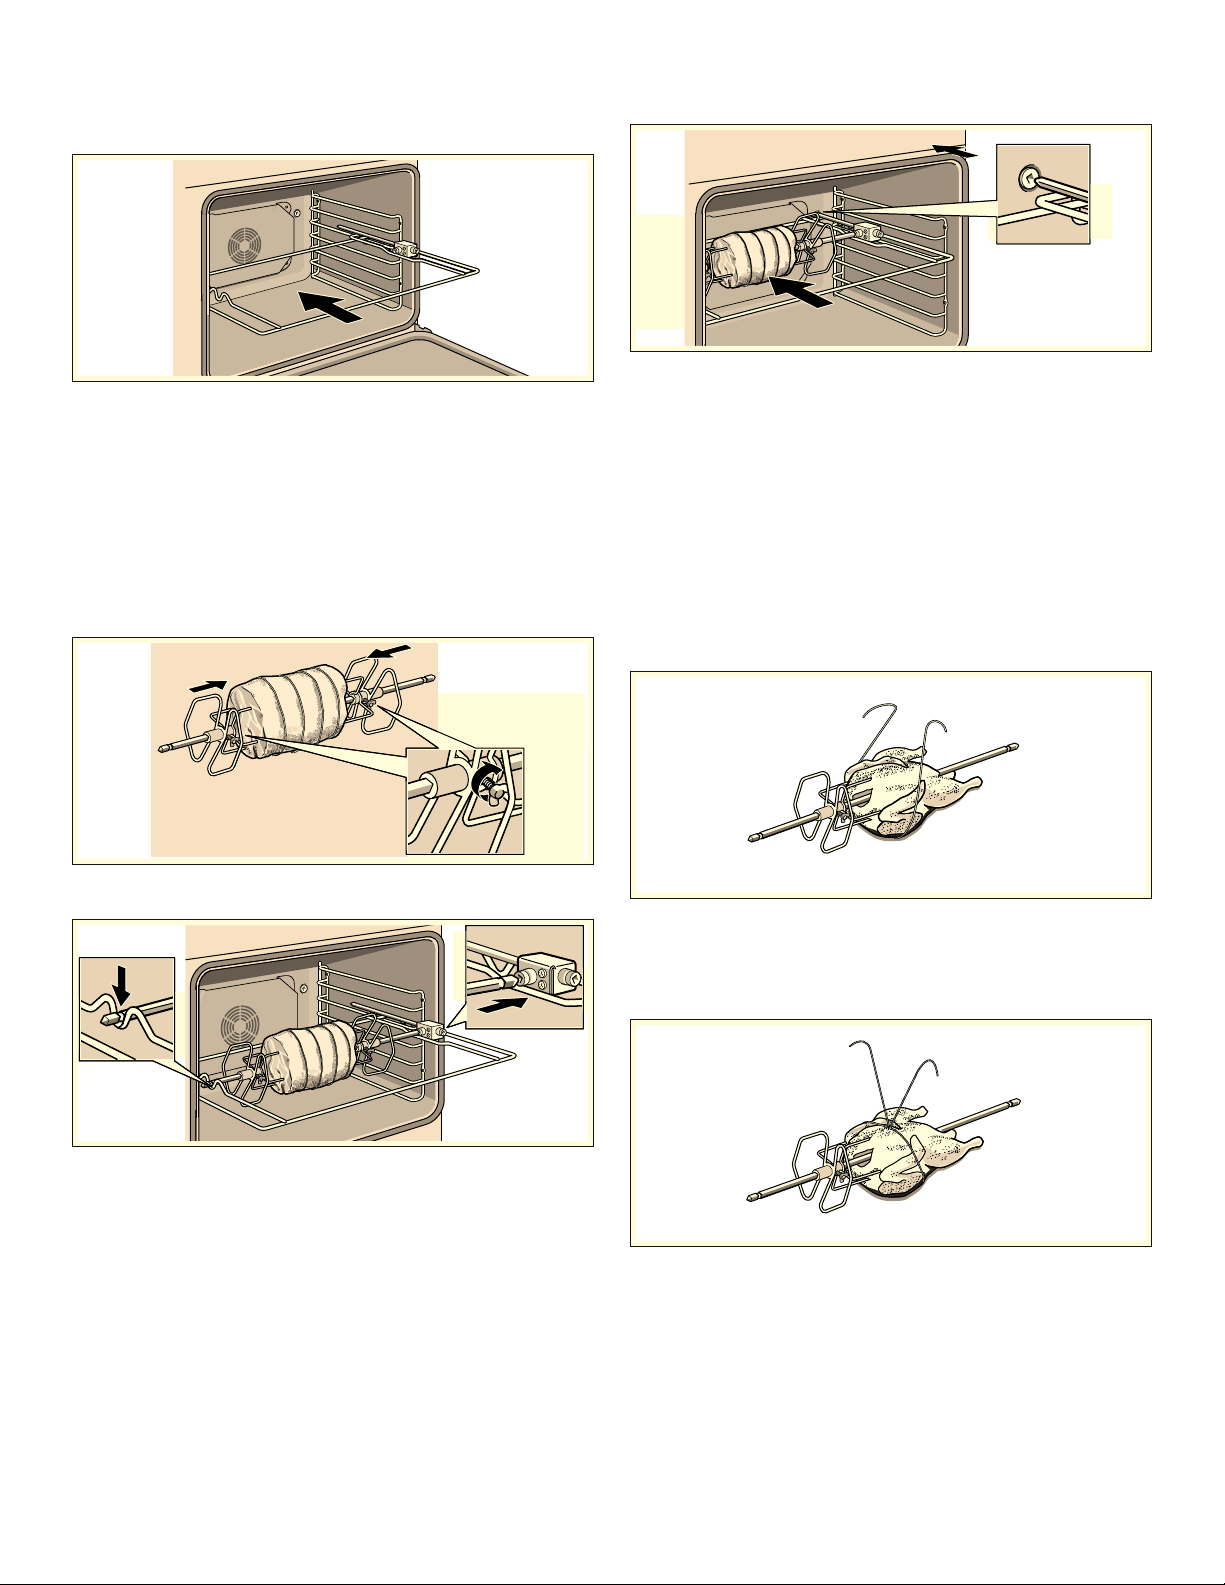
46
Assembling the Rotisserie:
1.
Insert the rotisserie rack half way into the oven on rack
position 5.
2.
Slide the left fork into the skewer and tighten the
screw.
3.
Slide meat or poultry for roasting onto the skewer and
tighten the screw.
4.
Slide the right fork onto the skewer and tighten the
screw.
5.
Check the balance of the food on the skewer by rolling
the skewer in the palms of your hands. Food that is not
evenly balanced on the skewer will not cook evenly.
6.
Place the rotisserie skewer onto the rack.
7.
Place the skewer rack into the oven and insert the
drive shaft into the opening on the back oven wall.
8.
If necessary, turn the rotisserie skewer slightly so that
the drive shaft fits properly into the opening.
9.
Insert flat rack on position 1 and insert broil pan to
catch drippings.
Trussing Poultry for the Rotisserie
1.
Slip one of the forks on the skewer with the tines
pointing to the tip of the skewer. Loosely tighten the
screw to keep it from slipping.
2.
Insert the skewer through the poultry securing with the
fork.
3.
Cut 24" (61 cm) of kitchen string and lay it under the
poultry, breast side up, with equal lengths of string on
each side.
4.
Wrap each end of the string around each of the wings;
catch each wing tip as the string is brought tightly
together at the top and knotted. Do not cut off the
extra string.

47
5.
Cut another 24" (61 cm) of string and lay it under the
back. Wrap it around the tail and then around the
skewer. Cinch tightly.
6.
Pull legs forward; cross them on top of the skewer,
bring string around and tie a knot.
7.
Connect the string holding the legs to the string
holding the wings; then knot. Add the other fork and
push tines into the drumsticks to secure.
8.
Check the balance by rolling the skewer in your palms.
Poultry should not rotate or be loose in any way. If so,
redo the trussing. The poultry will not cook evenly if it
is not balanced on the skewer.
Start
Select Rotisserie mode. The default temperature is
400°F (200°C). Swipe to the left or right to adjust
temperature and press START.
Cooking Chart for Rotisserie
Food Item Weight (lb) Temp. in °F (°C) Time (min. per lb) Internal Temp.
°F (°C)
Beef
Rib Eye Roast, Medium Rare 3.0 - 5.5 400° (200°) 17 - 23 145° (65°)
Rib Eye Roast, Medium 3.0 - 5.5 400° (200°) 18 - 27 160° (70°)
Pork
Loin Roast, boneless 1.5 - 4.0 400° (200°) 16 - 24 145° (65°)
Loin Roast, boneless 1.5 - 4.0 400° (200°) 20 - 26 160° (70°)
Poultry
Chicken whole 4.0 - 8.0 450° (230°) 12 - 17 180° (80°)
Turkey, whole 10.0 - 12.0 400° (200°) 10 - 12 180° (80°)
Turkey Breast 4.0 - 7.0 400° (200°) 16 - 19 170° (75°)
4 Cornish Hens 1.5 each 450° (230°) 60 - 70 min. total 180° (80°)
Lamb
Leg, boneless, Medium 4.0 - 6.0 400° (200°) 20 - 23 160° (70°)
Leg, boneless, Well 4.0 - 6.0 400° (200°) 27 - 29 170° (75°)

48
Cleaning Your Conventional Oven
With good care and cleaning, your appliance will retain
its appearance and remain fully functioning for a long
time to come. We will explain here how you should
correctly care for and clean your conventional oven.
Suitable Cleaning Agents
To ensure that the different surfaces are not damaged by
using the wrong cleaning agent, follow the information in
the following table. Depending on the appliance model,
not all of the areas listed may be on/in your appliance.
NOTICE: Surface damage!
Do not use any
▯ Harsh or abrasive cleaning agents
▯ Cleaning agents with a high alcohol content
▯ Hard scouring pads or abrasive cleaning sponges
▯ High-pressure cleaners or steam cleaners
▯ Special cleaners for cleaning the appliance while it is
hot
Wash new soft sponges and cloths thoroughly before
use.
Tip: Recommended cleaning and care products can be
purchased through Customer Service. Observe the
respective manufacturer's instructions.
9 WARNING
RISK OF BURNS
The appliance becomes very hot. Never touch the
hot inside surfaces of the oven interior or heating
elements. Always allow the appliance to cool down.
Keep children away.
Cleaning Guide
Part Recommendations
Broil Pan and Grid Wash with hot soapy water.
Rinse thoroughly and dry, or
gently rub with cleansing
powder or soap-filled pads as
directed. DO NOT clean broil pan
and grid in the self-cleaning
oven.
Flat Rack Wash with hot soapy water.
Rinse thoroughly and dry, or
gently rub with cleansing
powder or soap-filled pads as
directed. DO NOT clean the rack
in the self-cleaning oven.
If the flat racks are cleaned in the
oven during the self clean mode,
they will lose their shiny finish
and may not glide smoothly. If
this happens, wipe the rack
edges with a small amount of
vegetable oil. Then wipe off
excess.
Telescopic Rack Wash with soapy water. Rinse
thoroughly and dry, or gently rub
with cleansing powder or
soap-filled pads as directed.
Avoid getting cleansing powder
in the telescopic slides.
Re-lubrication may become
necessary. Use only
high-temperature food-grade
lubricants to re-lubricate slides.
DO NOT clean the rack in the
self-cleaning oven. If the
telescopic rack is cleaned in the
oven during the self clean mode
it will lose its shiny finish and will
not glide smoothly.
Fiberglass Gasket DO NOT CLEAN GASKET.
Glass Wash with soap and water or
glass cleaner. Use Fantastik® or
Formula 409® to remove grease
spatters and stubborn stains.
Glass Control Panel Use warm soapy water on a dish
cloth or glass cleaner sprayed
directly on a paper towel.
Painted Surfaces Clean with hot soapy water or
apply Fantastik® or Formula
409® to a clean sponge or
paper towel and wipe clean.
Avoid using powder cleaning
agents, steel wool pads and
oven cleaners.
Porcelain Surfaces Immediately wipe up acid spills
like fruit juice, milk and tomatoes
with a dry cloth. Do not use a
moistened sponge/cloth on hot
porcelain. When cool, clean with
hot soapy water or apply
Bon-Ami® or Soft Scrub® to a
damp sponge. Rinse and dry.
For stubborn stains, use
soap-filled pads. It is normal for
porcelain to show fine lines with
age due to exposure to heat and
food soil.
Stainless Steel
Surfaces
Always wipe or rub in the
direction of the grain. Clean with
a soapy sponge, then rinse and
dry, or wipe with Fantastik® or
Formula 409® sprayed on a
paper towel. Protect and polish
with Stainless Steel Magic® and
a soft cloth. Remove water spots
with a cloth dampened with white
vinegar.
Chlorine or chlorine compounds
in some cleaners are corrosive to
stainless steel. Check ingredients
on label before using.
Plastic & Controls When cool, clean with soapy
water, rinse and dry.
Part Recommendations

49
Notes
▯ Slight differences in color on the front of the appliance
are caused by the use of different materials, such as
glass, plastic and metal.
▯ Shadows on the door panels, which look like streaks,
are caused by reflections made by the interior lighting.
▯ Enamel is baked on at very high temperatures. This
can cause some slight color variation. This is normal
and does not affect operation.
Surfaces in the Oven Cavity
The oven cavity bottom is enameled and has a smooth
surface.
Cleaning the oven is easier because there is no cleaning
around a coil element showing on the bottom of the
oven. The hidden lower element is protected from food
soils and spills. Wiping up excess spills is easy.
Cleaning Enamel Surfaces
Clean the smooth enamel surfaces with a dish cloth and
hot soapy water. Dry with a soft cloth.
Soften baked-on food residues with a damp cloth and
soapy water. If there are heavy food deposits use a soap-
filled pad.
Note: Food residues can leave a white coating behind.
These are harmless and do not affect performance. You
can remove these residues using lemon juice if required.
Keeping the Appliance Clean
Always keep the appliance clean and remove food and
food spills immediately so that stubborn deposits do not
build up.
▯ Clean the oven cavity after each use. This will ensure
that food and food spills cannot be baked on.
▯ Always remove flecks of limescale, grease, starch and
albumin (e.g. egg white) immediately.
▯ Use suitable ovenware for roasting, e.g. a roasting
dish.
▯ For cakes or pies that may spill over, place on baking
sheet lined with aluminum foil and place on wire rack.
Easy Clean
The Easy Clean function makes it easier to clean the
oven floor. Food and food spills are soaked beforehand
by vaporizing the vinegar solution. It can then be
removed more easily.
9 WARNING
RISK OF SCALDING
Hot steam can arise due to water in the hot oven
cavity. Never pour water into the hot oven cavity.
Setting
The "Easy Clean š" function can only be started once
the oven cavity is cold (room temperature) and the
appliance door is closed.
Do not open the appliance door during this operation.
Doing this will interrupt the "Easy Clean š" function.
1.
Leave rack 3 and remove all other racks and
accessories from the oven cavity.
2.
Mix 2 cups water and
1/
2
cup vinegar and place in broil
pan tray on rack 3.
3.
Touch the ON l OFF touch button.
4.
Touch the MENU touch button.
5.
Swipe to the left or right to select "Easy Clean š".
6.
Touch the bottom line.
7.
Touch the START l STOP touch button.
The appliance starts the Easy Clean function. The
remaining time appears on the display.
Exit
As soon as the cleaning function has run through, a
signal sounds and the appliance ends the operation
automatically.
As soon as you open the appliance door, the interior
lighting is switched on so that you can rinse the oven
cavity more easily. The remaining water in the oven cavity
must be removed promptly. Do not leave the remaining
water in the oven cavity for a long time (e.g. overnight).
The appliance must not be operated when the oven
cavity is still wet or damp.
Subsequent Cleaning
1.
Open the appliance door and remove the remaining
water with an absorbent sponge cloth.
2.
Clean the smooth surfaces in the oven cavity with a
dish cloth or a soft brush. Stubborn residues can be
removed using a soft scouring pad.
3.
Remove limescale with a cloth soaked in vinegar.
Then wipe with clean water and rub dry with a soft
cloth.
4.
Use the ON l OFF touch button to switch off the
appliance.
5.
Leave the appliance door ajar in the stop position
(approx. 30°) for approx. one hour to allow the enamel
surfaces in the oven cavity to dry thoroughly.
Probe Wipe with soapy water. Do not
submerge. Do not wash in the
dishwasher.
Printed areas
(words & numbers)
Do not use abrasive cleaners or
petroleum based solvents.
Part Recommendations

50
Removing Heavy Food Deposits
You have several options for removing particularly
stubborn food deposits.
▯ Leave the vinegar solution to work for some time
before starting Easy Clean.
▯ Rub vinegar solution onto the food and food spills on
the smooth surfaces before starting Easy Clean.
▯ Repeat the Easy Clean function after the oven cavity
has cooled down.
Self Clean
During Self Clean, the oven is heated to a very high
temperature. Remnants from roasting, broiling or baking
are burned off and all you have to do is wipe the ash out
of the oven cavity after the oven has cooled.
9 WARNING
WHEN USING THE SELF CLEAN FEATURE
▯ During the elimination of soil during self-cleaning,
small amounts of Carbon Monoxide can be
created and the fiberglass insulation could give
off very small amounts of formaldehyde during
the first several cleaning cycles. To minimize
exposure to these substances, provide good
ventilation with an open window, or use a
ventilation fan or hood.
▯ Do not block the oven vent(s) during the Self
Clean cycle. Always operate the unit according to
the instructions in this User Guide.
▯ When using the Self Clean feature, confirm that
the door locks and will not open. If the door does
not lock, do not run Self Clean. Contact Customer
Service.
▯ The appliance becomes very hot during Self
Clean. Never hang flammable items such as
dishcloths on the door handle. Keep the front of
the appliance clear. Keep children away.
▯ The high temperature during Self Clean destroys
non-stick coatings on trays and molds and toxic
gases are produced. Never leave anything in the
oven during Self Clean.
NOTICE: Do not clean parts or accessories with the Self
Clean feature.
Preparing the pyrolytic self-cleaning feature
9 CAUTION
Risk of fire! Loose food remnants, fat and meat
juices may catch fire. Wipe the cooking
compartment with a damp cloth.
▯ Remove the worst food spills from the oven.
▯ Clean the door seals, the inside of the door and the
glass pane by hand as these parts are not cleaned
during the pyrolytic self-cleaning cycle.
▯ Remove any loose parts from inside the cooking
compartment. Make sure that nothing is left inside the
cooking compartment.
▯ Close the oven door.
Setting
The "Self Clean ˜" function can only be started once the
oven cavity is cold (room temperature) and the appliance
door is closed.
For your safety the appliance door is locked during this
operation.
Depending on the degree of soiling you can select three
different intensity levels for the Self Clean cycle:
1.
Remove the accessories from the oven cavity.
2.
Touch the ON l OFF touch button.
3.
Touch the MENU touch button.
4.
Swipe to the left or right to select "Self Clean˜".
5.
Select a cleaning intensity.
6.
Touch “Continue”.
7.
Confirm that you have removed heavy soil and
accessories from the oven cavity.
8.
Touch the START l STOP touch button.
The door lock is activated automatically. The Self
Clean program is started.
Note: After the completion of a Self Clean cycle, the
oven will not allow you to start another Self Clean cycle
for 24 hours. For a double oven, if one cavity runs Self
Clean, neither cavity may operate a Self Clean cycle for
24 hours.
Intensity level Duration (excluding cool off)
high 3 hours
medium 2 ½ hours
low 2 hours

51
When Self Clean is Completed
When the Self Clean program has run through, a signal
sounds and the appliance ends the operation
automatically.
The appliance will remain locked while cooling off. Once
the oven cavity has cooled off, the lock will be
deactivated automatically.
Wipe out the remaining ash from the oven cavity with a
damp cloth.
Avoid These Cleaners
Do not use commercial oven cleaners such as Easy
Off®. They may damage the oven finish or parts.
Never use scouring pads or abrasive cleaners.
Service
Faults often have simple explanations. Before calling
Customer Service, please refer to the table below and
attempt to correct the fault yourself.
9 WARNING
RISK OF ELECTRIC SHOCK
Improper repairs are dangerous. Only an authorized
servicer may perform repairs and may replace
damaged plug and connections. Remove the power
plug or turn off the circuit breaker or fuse in the fuse
box if the appliance is damaged or not working. Call
Customer Service.
9 WARNING
RISK OF ELECTRIC SHOCK
▯ Work on the appliance electronics must be
performed by an authorized servicer.
▯ Always disconnect the appliance from the power
supply when work is carried out on the
electronics. Switch off the circuit breaker or
remove the fuse from your household fuse box.
Troubleshooting Chart
Oven Problem Possible Causes and Suggested Solutions
Oven door is locked and will not open, even after
cooling.
Turn the oven off at the circuit breaker and wait five minutes.
Turn breaker back on. The oven should reset itself and will be
operable.
Oven is not heating. Check circuit breaker or fuse box to your house. Make sure
there is proper electrical power to the oven. Be sure oven
temperature has been selected.
Operations with steam or descaling do not start or do
not continue.
The water tank is empty or operations are locked due to the
descaling process. Fill the water tank and continue the
descaling process.
After switching on an operating mode, a message is
shown on the display that indicates that the
temperature is too high.
The appliance has not cooled sufficiently. Allow the appliance
to cool and switch the operating mode on again.
The appliance prompts you to rinse. The power supply has been disconnected or the appliance
has been switched off during the descaling process. Once
the appliance is switched on again, rinse it twice.
Oven temperature is too hot or too cold. The oven thermostat needs adjustment. See “Oven
Temperature Offset“ under “Adjust Basic Settings“.
Oven light is not working properly. Replace or reinsert the light bulb if loose or burned out.
Touching the bulb with fingers may cause the bulb to burn
out.
Oven light does not turn off. Check for obstruction in oven door. Check to see if hinge is
bent.
Cannot remove lens cover on light. There may be soil build-up around the lens cover. Wipe lens
cover area with a clean dry towel prior to attempting to
remove the lens cover.
Oven is not self-cleaning properly. Allow the oven to cool before running self-clean. Always wipe
out loose soils or heavy spillovers before running self-clean. If
oven is badly soiled, set oven for the maximum self-clean
time.
Clock and timer are not working properly. Make sure there is electrical power to oven.
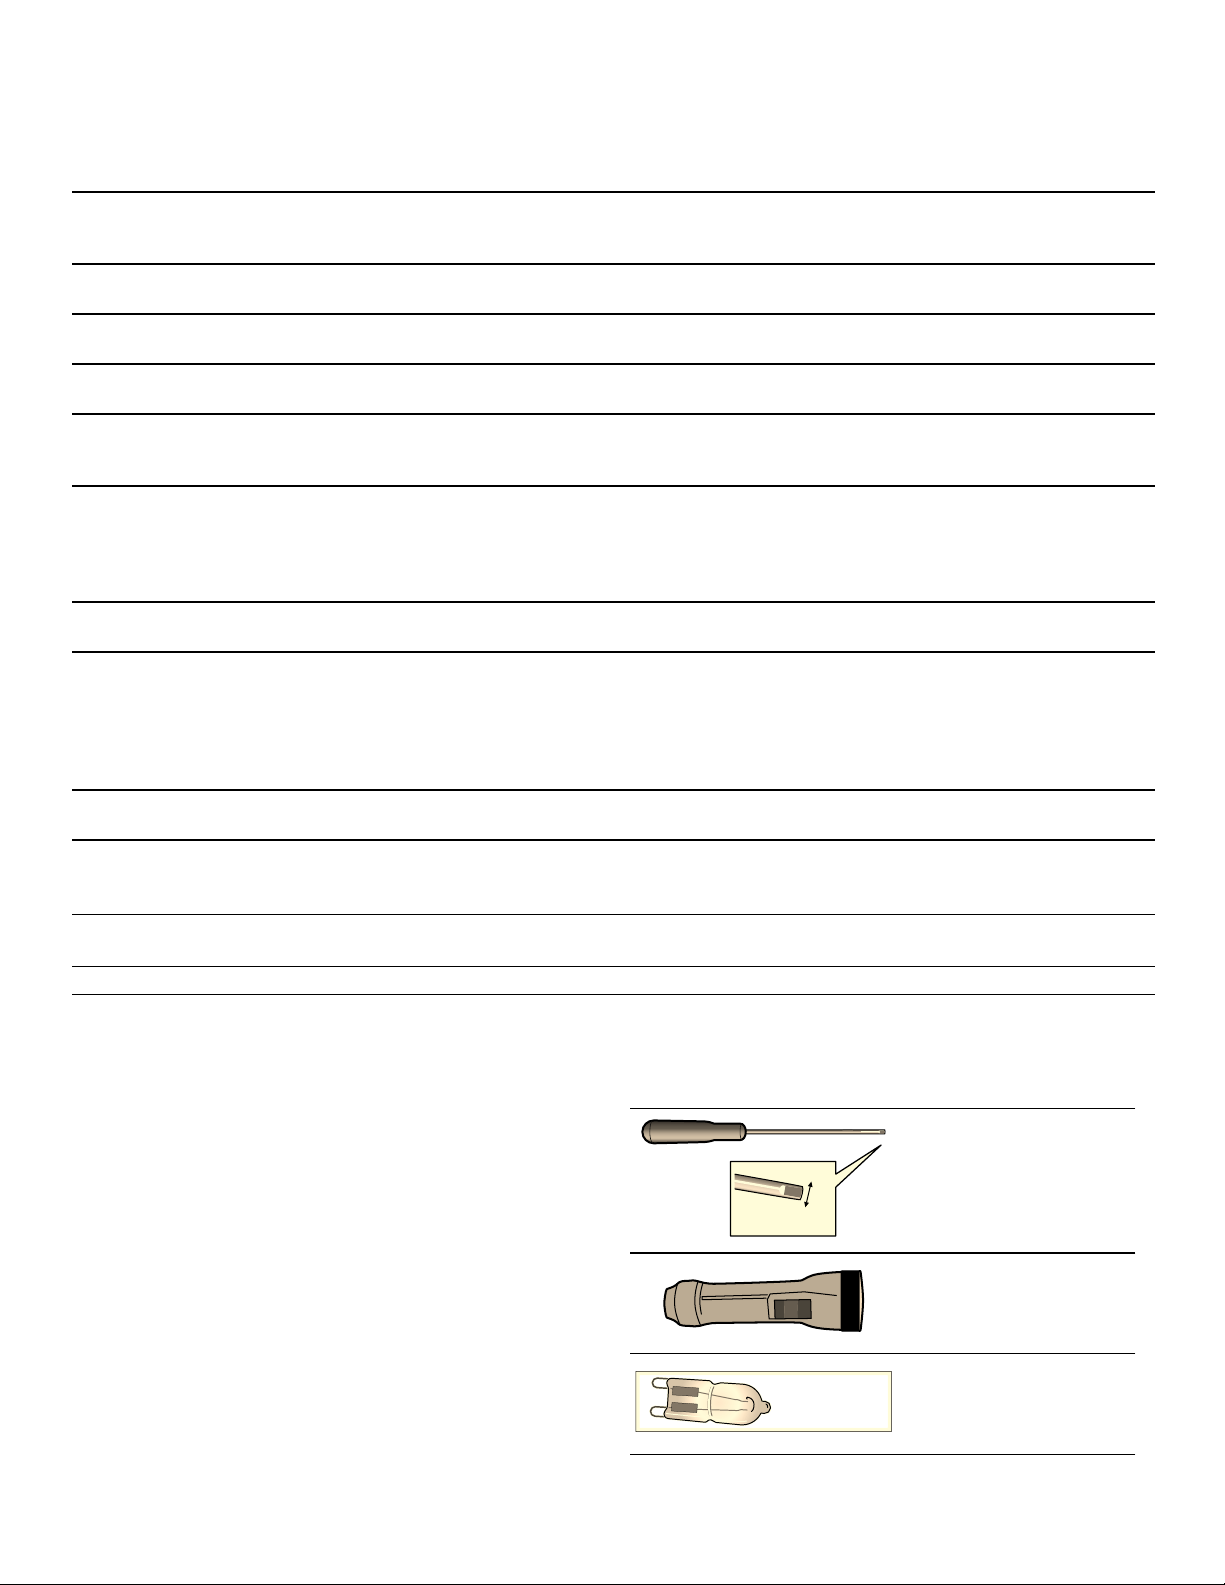
52
Maximum Operating Time Exceeded
Your appliance automatically ends the operation if no
duration has been set and the setting has not been
changed for 24 hours.
The actual cooking time until the operation is stopped
automatically varies according to the selected settings.
A message appears on the display on the appliance to
say that the operation is being ended automatically.
Afterwards, the operation is stopped.
To use the appliance again, first switch it off. To switch
the appliance back on set the required operation.
Oven Light
Steam Oven Cavity Bulbs
To light the interior of your steam oven cavity, your
appliance has one or more long-life LED bulbs.
However, if ever an LED bulb or the bulb's glass cover
fails, call Customer Service. The lamp cover cannot be
removed.
Conventional Oven Cavity Bulbs
To replace the halogen bulb on the oven sidewall:
“E“ and a number appears in display and control
beeps.
This is a fault code. Follow the instructions in the display. If
the code remains or there are no instructions in the display,
press INFO to display more information (if applicable) and to
turn off the beep. If the code is still displayed, write down the
fault code number, turn off the oven, and call Service.
With a new oven there is a strong odor when oven is
turned on.
This is normal with a new oven and will disappear after a few
uses. Operating the self-clean cycle also “burns-off“ the smell
more quickly.
Control does not react when a key is touched. Be sure that pad is clean. Touch the center of the touchpad.
Use the flat part of your finger.
Fan is running during modes that do not use
convection.
On some models, the convection fan runs while the oven is
preheating for the bake mode. This is normal.
Warm air or steam escapes from oven vent. It is normal to see or feel steam or warm air escaping from
the oven vent. Do not block the vent.
Cooling fan runs even when the oven is turned off. This is normal. The cooling fan will continue to run, even after
the oven has been turned off, until the oven has cooled
sufficiently.
Oven door closes faster/slower than normal. The soft-close door hinges contain a damping fluid that is
affected by temperature. If the oven is in a cold environment,
the door will close slower than it will in a warmer environment.
A warmer than normal environment, such as when cooking,
may cause the door to close slightly faster.
The appliance prompts you to descale without the
counter appearing beforehand.
The set water hardness range is too low. Check the set water
hardness range and adjust if necessary. Carry out descaling.
The “Fill water tank” message appears even though
the water tank is full.
Check that the water tank is fully pushed in to place. The tank
could also possibly be damaged from being dropped. Due to
impact, components inside the water tank have come loose
and the tank is leaking. If the message still appears and
neither of these problems are the issue, it may need a new
sensor. Call Customer Service.
When cooking with steam, a lot of steam is produced. The appliance is being automatically calibrated and is a
normal occurance.
The appliance cannot be switched on or is on and
cannot be operated; the ‚ symbol is shown on the
display.
The panel lock is activated. Press and hold the TIMERS touch
button until the ‚ symbol goes away.
The appliance does not heat up; 6 is shown on the
display.
Demo mode is activated in the basic settings. Turn demo
mode to OFF in the settings menu.
There is a “pop” noise during cooking. Cold/warm effect with food, caused by the steam.
Tools required
Narrow flat blade
screwdriver (blade tip
width 1/5" (5 mm) or
less to fit in slot).
Flashlight (to see socket
holes to plug in bulb
prongs).
G-9 Halogen bulb
èɊȯPP
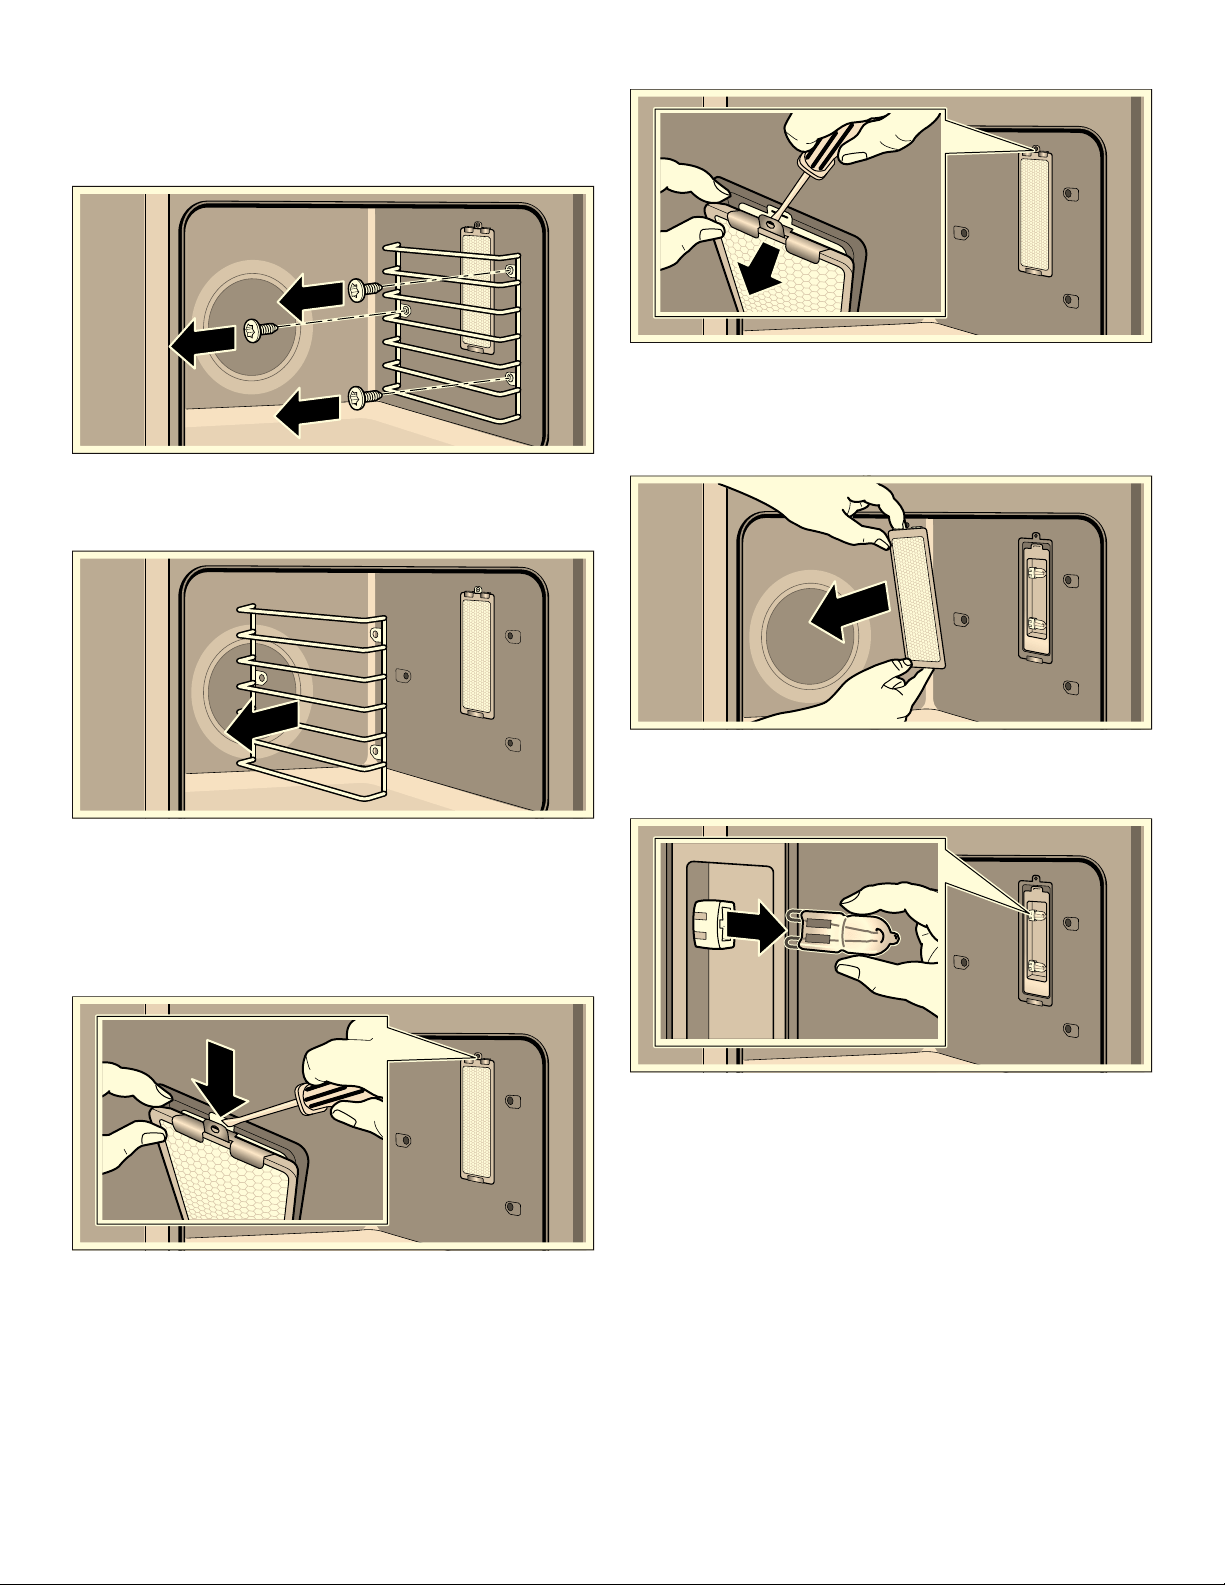
53
1.
Turn off power to the oven at the main power supply
(fuse or breaker box).
2.
Remove three screws from oven cavity holding the
rack in place.
3.
Remove oven rack to provide access to the bulb
housing.
4.
Remove screw from top of bulb housing.
5.
Insert the tip of a narrow flat blade screwdriver
between the metal clips at about a 40° angle. The
screwdriver blade must be able to pass between the
metal clips to reach the inner catch.
6.
Push the screwdriver blade inward to disengage the
catch from the slot in the bulb housing. Gently pry the
lens off by moving the screwdriver handle away from
the oven wall.
7.
Support the glass lens cover to prevent it from
falling.The lens should detach easily. Do not attempt to
force it.
8.
Pull the halogen bulb from its socket.
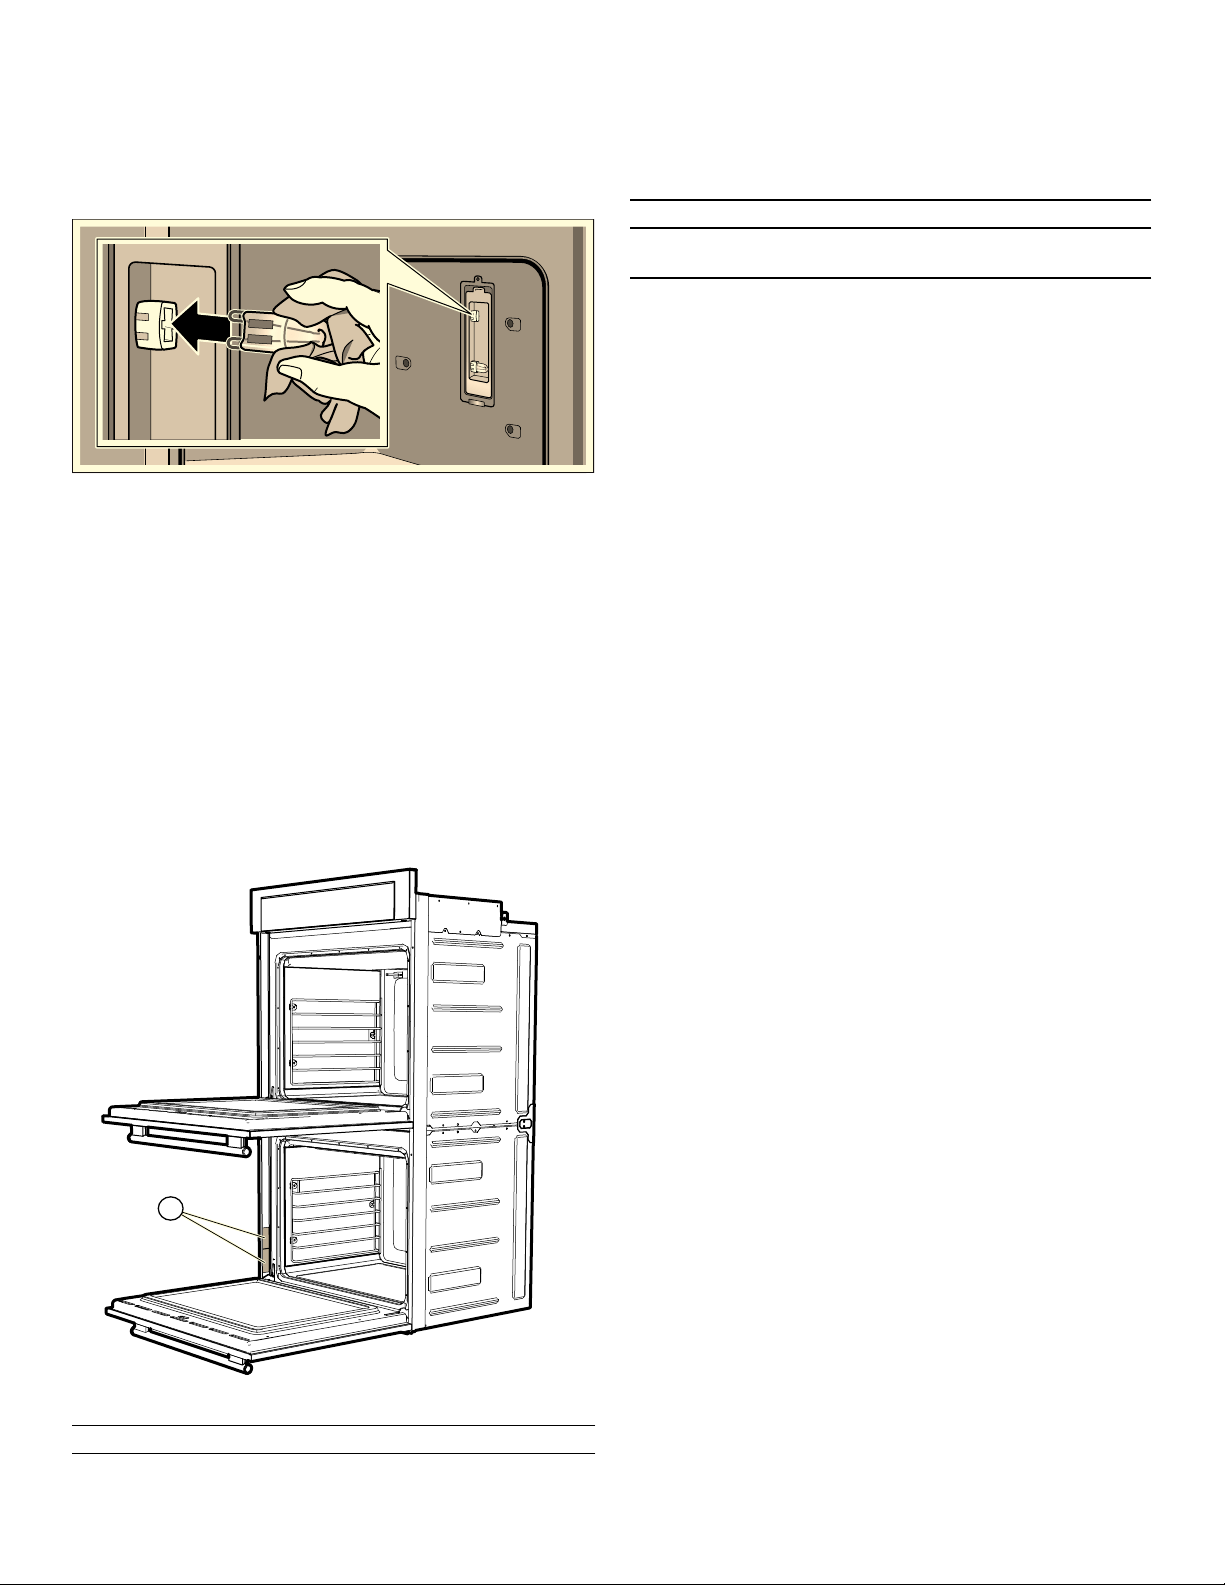
54
9.
Replace the halogen bulb. Grasp the new bulb with a
clean, dry cloth. Align the bulb prongs with the socket
holes and press into place.
Note: Direct finger contact with the bulb may cause
premature bulb failure.
10.
Put the glass cover back on by inserting it into the
mounting clip and pressing the end nearest you into
the housing until it locks into place. Insert screw
through glass cover and tighten.
11.
Reinstall the oven rack.
12.
Turn power back on at the main power supply (fuse or
breaker box).
Product Rating Label
The rating label shows the model number and the FD
number (production number/product’s unique identifier)
of your oven. The location of the rating label is shown in
the image below.
Rating Label Location
Model Number and FD Number
The model number and the FD number of your appliance
are found on the rating label. Make a note of these
numbers in the space below to save time in the event
your appliance requires service.
Keep your invoice or escrow papers for warranty
validation if service is needed.
How to Obtain Service or Parts
To reach a service representative, see the contact
information at the front of the manual. Please be
prepared with the information printed on your product
rating label when calling.
A Rating Label
$
Model # FD #
Thermador
Customer Support
800-735-4328

55
STATEMENT OF LIMITED PRODUCT WARRANTY
What this Warranty Covers & Who it Applies
to
The limited warranty provided by BSH Home Appliances
Corporation (“BSH“) in this Statement of Limited Product
Warranty applies only to the THERMADOR
®
appliance
(“Product“) sold to you, the first using purchaser,
provided that the Product was purchased:
▯ For your normal, household (non-commercial) use,
and has in fact at all times only been used for normal
household purposes.
▯ New at retail (not a display, "as is", or previously
returned model), and not for resale, or commercial
use.
▯ Within the United States or Canada, and has at all
times remained within the country of original purchase.
The warranties stated herein apply to the original
purchaser of the Product warranted herein and to each
succeeding owner of the product purchased for ordinary
home use during the term of the warranty.
BSH reserves the right to request proof of purchase at
the time any warranty claim is submitted to confirm that
the Product falls within the scope of this limited product
warranty.
Please make sure to return your registration card; while
not necessary to effectuate warranty coverage, it is the
best way for BSH to notify you in the unlikely event of a
safety notice or product recall.
How Long the Warranty Lasts
BSH warrants that the Product is free from defects in
materials and workmanship for a period of seven
hundred and thirty (730) days from the date of purchase.
The foregoing timeline begins to run upon the date of
purchase, and shall not be stalled, tolled, extended, or
suspended, for any reason whatsoever.
This Product is also warranted to be free from cosmetic
defects in material and workmanship (such as scratches
of stainless steel, paint/porcelain blemishes, chip, dents,
or other damage to the finish of the Product), for a period
of sixty (60) days from the date of purchase or closing
date for new construction. This cosmetic warranty
excludes slight color variations due to inherent
differences in painted and porcelain parts, as well as
differences caused by kitchen lighting, product location,
or other similar factors. This cosmetic warranty
specifically excludes any display, floor, “As Is”, or “B”
stock appliances.
Repair/Replace as Your Exclusive Remedy
During this warranty period, BSH or one of its authorized
service providers will repair your Product without charge
to you (subject to certain limitations stated herein) if your
Product proves to have been manufactured with a defect
in materials or workmanship. If reasonable attempts to
repair the Product have been made without success,
then BSH will replace your Product (upgraded models
may be available to you, in BSH’s sole discretion, for an
additional charge). All removed parts and components
shall become the property of BSH at its sole option. All
replaced and/or repaired parts shall assume the identity
of the original part for purposes of this warranty and this
warranty shall not be extended with respect to such
parts. BSH's sole liability and responsibility hereunder is
to repair manufacturer-defective Product only, using a
BSH-authorized service provider during normal business
hours. For safety and property damage concerns, BSH
highly recommends that you do not attempt to repair the
Product yourself, or use an un-authorized servicer; BSH
will have no responsibility or liability for repairs or work
performed by a non-authorized servicer. If you choose to
have someone other than an authorized service provider
work on your Product, THIS WARRANTY WILL
AUTOMATICALLY BECOME NULL AND VOID. Authorized
service providers are those persons or companies that
have been specially trained on BSH products, and who
possess, in BSH's opinion, a superior reputation for
customer service and technical ability (note that they are
independent entities and are not agents, partners,
affiliates or representatives of BSH). Notwithstanding the
foregoing, BSH will not incur any liability, or have
responsibility, for the Product if it is located in a remote
area (more than 100 miles from an authorized service
provider) or is reasonably inaccessible, hazardous,
threatening, or treacherous locale, surroundings, or
environment; in any such event, if you request, BSH
would still pay for labor and parts and ship the parts to
the nearest authorized service provider, but you would
still be fully liable and responsible for any travel time or
other special charges by the service company, assuming
they agree to make the service call.
Out of Warranty Product
BSH is under no obligation, at law or otherwise, to
provide you with any concessions, including repairs, pro-
rates, or Product replacement, once this warranty has
expired.
Warranty Exclusions
The warranty coverage described herein excludes all
defects or damage that are not the direct fault of BSH,
including without limitation, one or more of the following:
▯ Use of the Product in anything other than its normal,
customary and intended manner (including without
limitation, any form of commercial use, use or storage
of an indoor product outdoors, use of the Product in
conjunction with air or water-going vessels).
▯ Any party's willful misconduct, negligence, misuse,
abuse, accidents, neglect, improper operation, failure
to maintain, improper or negligent installation,
tampering, failure to follow operating instructions,
mishandling, unauthorized service (including self-
performed "fixing" or exploration of the appliance's
internal workings).
▯ Adjustment, alteration or modification of any kind.
▯ A failure to comply with any applicable state, local,
city, or county electrical, plumbing and/or building
codes, regulations, or laws, including failure to install

56
the product in strict conformity with local fire and
building codes and regulations.
▯ Ordinary wear and tear, spills of food, liquid, grease
accumulations, or other substances that accumulate
on, in, or around the Product.
▯ Any external, elemental and/or environmental forces
and factors, including without limitation, rain, wind,
sand, floods, fires, mud slides, freezing temperatures,
excessive moisture or extended exposure to humidity,
lightning, power surges, structural failures surrounding
the appliance, and acts of God.
In no event shall BSH have any liability or responsibility
whatsoever for damage to surrounding property,
including cabinetry, floors, ceilings, and other structures
or objects around the Product. Also excluded from this
warranty are Products on which the serial numbers have
been altered, defaced, or removed; service visits to teach
you how to use the Product, or visits where there is
nothing wrong with the Product; correction of installation
problems (you are solely responsible for any structure
and setting for the Product, including all electrical,
plumbing or other connecting facilities, for proper
foundation/flooring, and for any alterations including
without limitation cabinetry, walls, floors, shelving, etc.);
and resetting of breakers or fuses.
TO THE EXTENT ALLOWED BY LAW, THIS WARRANTY
SETS OUT YOUR EXCLUSIVE REMEDIES WITH
RESPECT TO PRODUCT, WHETHER THE CLAIM ARISES
IN CONTRACT OR TORT (INCLUDING STRICT LIABILITY,
OR NEGLIGENCE) OR OTHERWISE. THIS WARRANTY
IS IN LIEU OF ALL OTHER WARRANTIES, WHETHER
EXPRESS OR IMPLIED. ANY WARRANTY IMPLIED BY
LAW, WHETHER FOR MERCHANTABILITY OR FITNESS
FOR A PARTICULAR PURPOSE, OR OTHERWISE,
SHALL BE EFFECTIVE ONLY FOR THE PERIOD THAT
THIS EXPRESS LIMITED WARRANTY IS EFFECTIVE. IN
NO EVENT WILL THE MANUFACTURER BE LIABLE FOR
CONSEQUENTIAL, SPECIAL, INCIDENTAL, INDIRECT,
"BUSINESS LOSS", AND/OR PUNITIVE DAMAGES,
LOSSES, OR EXPENSES, INCLUDING WITHOUT
LIMITATION TIME AWAY FROM WORK, HOTELS AND/
OR RESTAURANT MEALS, REMODELLING EXPENSES
IN EXCESS OF DIRECT DAMAGES WHICH ARE
DEFINITIVELY CAUSED EXCLUSIVELY BY BSH, OR
OTHERWISE. SOME STATES DO NOT ALLOW THE
EXCLUSION OR LIMITATION OF INCIDENTAL OR
CONSEQUENTIAL DAMAGES, AND SOME STATES DO
NOT ALLOW LIMITATIONS ON HOW LONG AN IMPLIED
WARRANTY LASTS, SO THE ABOVE LIMITATIONS MAY
NOT APPLY TO YOU. THIS WARRANTY GIVES YOU
SPECIFIC LEGAL RIGHTS, AND YOU MAY ALSO HAVE
OTHER RIGHTS WHICH VARY FROM STATE TO STATE.
No attempt to alter, modify or amend this warranty shall
be effective unless authorized in writing by an officer of
BSH.
THERMADOR® Support
Service
We realize that you have made a considerable
investment in your kitchen. We are dedicated to
supporting you and your appliance so that you have
many years of creative cooking.
Please do not hesitate to contact our STAR® Customer
Support Department if you have any questions or in the
unlikely event that your THERMADOR® appliance needs
service. Our service team is ready to assist you.
USA
800-735-4328
www.thermador.com/support
Canada
800-735-4328
www.thermador.ca
Parts and Accessories
Parts, filters, descalers, stainless steel cleaners and more
can be purchased in the THERMADOR® eShop or by
phone.
USA
http://store.thermador.com/us
Canada
▯ If you live in any of the Atlantic provinces, Ontario, or
Québec contact:
Marcone
1.800.287.1627
▯ If you live in any of the Territories, Manitoba,
Saskatchewan, Alberta, or British Columbia contact:
Reliable Parts
1.800.663.6060

Table de
MATIÈRES
Table des Matières
Notice d’uti l i sati on
Définitions de sécurité ............................................. 58
IMPORTANTES CONSIGNES DE SÉCURITÉ .............. 59
Installation et entretien corrects ................................... 59
Sécurité-incendie .......................................................... 59
Prévention des brûlures ................................................ 60
Sécurité des enfants ...................................................... 61
Consignes en matière de nettoyage ............................. 61
Sécurité pour la batterie de cuisine .............................. 62
Avertissement issue de la proposition 65 de
l’État de la Californie : .................................................. 62
Causes des dommages ............................................. 63
Protection de l'Environnement ................................. 63
Économie d’énergie ...................................................... 63
Accessoires ............................................................... 64
Accessoires inclus - Four à vapeur ................................ 64
Accessoires spéciaux - Four à vapeur ........................... 64
Accessoires inclus - Four conventionnel ....................... 65
Accessoires spéciaux- Four conventionnel ................... 65
Familiarisation avec l'appareil .................................. 66
Vue d’ensemble du four ................................................ 66
Cavités du four .............................................................. 66
Caractéristiques de la cavité du four ............................ 67
Panneau de commande ................................................ 68
Menu principal .............................................................. 69
Menu Modes de cuisson ............................................... 70
Avant la première utilisation .................................... 75
Avant la première utilisation ......................................... 75
Dureté de l’eau ............................................................. 75
Première mise en service .............................................. 75
Étalonnage de l’appareil électroménager et
nettoyage la cavité du four ........................................... 76
Nettoyer les accessoires ............................................... 76
Réglages de base .......................................................... 76
Généralités sur le fonctionnement ........................... 77
Cuisson à haute altitude ............................................... 77
Mise sous tension ou hors tension de l'appareil ........... 77
Options de minuterie .................................................... 78
Réglage d’un mode de cuisson .................................... 79
Modification ou annulation du fonctionnement de
l’appareil électroménager ............................................. 80
Préchauffage rapide ...................................................... 81
Verrouillage du Panneau de Commande ...................... 81
Conversion Convection Auto ........................................ 81
Écart de température .................................................... 81
Sonde à viande .............................................................. 82
Mode Sabbat ................................................................ 84
Mode Yom Tov .............................................................. 84
Home Connect ......................................................... 85
Configuration ................................................................ 85
Démarrage à distance ................................................... 87
Réglages Home Connect .............................................. 87
Mise à jour du logiciel ................................................... 88
Remarque liée à la protection des données ................. 89
Module Wi-Fi
MD
............................................................ 89
Commande de vapeur ............................................. 90
Bruits ............................................................................. 90
Insertion des accessoires ............................................... 90
Cuisson à la vapeur ....................................................... 91
Cuisson à l’aide de vapeur ............................................ 92
Levée de Pâte ............................................................... 92
Décongeler .................................................................... 93
Réchauffage .................................................................. 93
Remplissage du réservoir d’eau .................................... 94
Après chaque utilisation de la vapeur ........................... 94
Programmes à vapeur ................................................... 95
Nettoyage du four à vapeur ......................................... 97
Fonctions de nettoyage du four à vapeur .................... 99
Fonctionnement du four conventionnel ................. 102
Positions des grilles ..................................................... 102
Mise en place de la grille ............................................ 102
Tournebroche .............................................................. 103
Nettoyage du four conventionnel ............................... 105
Dépannage ............................................................ 109
Tableau de dépannage ............................................... 110
Temps de fonctionnement maximum excédé ............. 111
Éclairage de four ......................................................... 111
Plaque signalétique du produit ................................... 113
Comment obtenir des services de dépannage
ou des pièces .............................................................. 113
58
DÉCLARATION DE GARANTIE LIMITÉE
DU PRODUIT ......................................................... 114
Couverture de la garantie limitée ............................... 114
Durée de la garantie ................................................... 114
Réparation ou remplacement : votre recours
exclusif ......................................................................... 114
Produit hors garantie .................................................. 114
Exclusions de garantie ................................................ 115
Soutien THERMADOR® ......................................... 116
Dépannage .................................................................. 116
Pièces et accessoires ................................................... 116
Définitions de sécurité
Défi nitions de sécurité
9 AVERTISSEMENT
Ceci indique que le non-respect de cet
avertissement peut entraîner des blessures graves,
voire la mort.
9 ATTENTION
Ceci indique que le non-respect de cet
avertissement peut entraîner des blessures légères
ou de gravité moyenne.
AVIS : Ceci indique que la non-conformité à cet avis de
sécurité peut entraîner des dégâts matériels ou
endommager l'appareil.
Remarque : Ceci vous signale des informations et/ou
indications importantes.

59
9 IMPORTANTES CONSIGNES DE SÉCURITÉ
LIRE ET CONSERVER CES INSTRUCTIONS
IMPORTANTES CONSI GNES DE S ÉCURI TÉ LI RE ET CONS E RV E R CE S INSTRUCTIONS
AVERTISSEMENT
Votre nouvel appareil a été conçu pour un
fonctionnement sûr et fiable si vous en prenez bien soin.
Lire attentivement toutes les consignes avant l'emploi.
Ces précautions réduiront les risques de brûlures, de
choc électrique, d'incendie et de lésions corporelles.
Lors de l'utilisation d'un appareil électroménager,
quelques précautions de sécurité élémentaires doivent
être observées, y compris celles qui figurent aux pages
suivantes.
Installation et entretien corrects
Demandez à l'installateur de vous montrer où se trouve
le disjoncteur ou le fusible. Identifier sa position pour
pouvoir le retrouver facilement.
Cet appareil doit être adéquatement installé et mis à la
terre par un technicien agréé. Branchez l'appareil
uniquement dans une prise correctement reliée à la
terre. Pour plus de détails, reportez-vous à la notice
d'installation.
Cet appareil est destiné uniquement à une utilisation
domestique normale. Il n'est pas homologué pour un
usage en extérieur. Voyez la Ènoncé de la Garantie
Limitée. Si vous avez des questions, communiquez avec
le fabricant.
Ne pas entreposer ni utiliser de produits chimiques
corrosifs, vapeurs, substances inflammables ou produits
non alimentaires à l'intérieur ou à proximité de l'appareil.
Il a été spécialement conçu pour être utilisé pendant le
chauffage et la cuisson des aliments. L'emploi de
produits chimiques corrosifs pour chauffer ou nettoyer
l'appareil endommagera ce dernier et peut provoquer
des blessures.
Ne pas se servir de cet appareil s'il ne fonctionne pas
correctement ou s'il est endommagé. Communiquer
avec un réparateur autorisé.
Ne pas obstruer les évents du four.
Ne pas réparer ni remplacer toute pièce de l'appareil à
moins que cela ne soit spécifiquement recommandé par
ce manuel. Toute réparation doit être effectuée par un
réparateur autorisé.
En cas d’erreur, un code clignotera à l’écran. Si un appui
sur la touche MINUTERIES (TIMERS) ne résout pas
l’erreur, débranchez l’appareil électroménager de
l’alimentation électrique et communiquez avec le service
après-vente.
AVERTISSEMENT
Avant de démonter la porte, s'assurer que le courant qui
alimente le four est coupé. Le non respect de cette
instruction peut entraîner des brûlures.
La porte du four est lourde et fragile. Utilisez les deux
mains pour retirer la porte du four. La face avant de la
porte est en verre. Manipuler avec précaution pour éviter
les cassures.
Saisir la porte uniquement par les côtés. Ne pas tenir la
porte par la poignée car elle risque de tourner et
provoquer des blessures ou des dommages.
Si la porte n'est pas maintenue fermement et
correctement, des lésions corporelles ou des dommages
matériels pourraient survenir.
Placer la porte sur une surface plane et stable afin
qu'elle ne puisse pas tomber. Le non respect de cette
consigne peut entraîner des lésions corporelles ou des
dommages à l'appareil.
AVERTISSEMENT
Pour éviter les blessures dues à l'enclenchement des
charnières, s'assurer que les deux leviers sont bien en
place avant de retirer la porte. D'autre part, ne pas forcer
la porte pour la fermer ou l'ouvrir - cela pourrait
endommager une charnière et provoque des blessures.
AVERTISSEMENT
S'assurer que l'appareil et les ampoules ont refroidi et
que le courant qui alimente l'appareil a été coupé avant
de changer une ou plusieurs ampoules. Le non respect
de cette instruction peut entraîner un choc électrique ou
des brûlures. Les lentilles (le cas échéant) doivent être
mises en place lors de l'utilisation de l'appareil. Les
lentilles (le cas échéant) permettent d'éviter que les
ampoules ne se brisent. Les lentilles (le cas échéant)
sont en verre. Manipuler avec précaution pour éviter les
cassures. Le verre brisé peut être une cause de
blessures.
AVERTISSEMENT
La douille de l’ampoule est sous tension à l’ouverture de
la porte même si l’alimentation principale n’est pas
active. Pour éviter un choc électrique, déconnectez le
fusible ou le disjoncteur principal avant d’accéder à
l’ampoule.
Sécurité-incendie
AVERTISSEMENT
Ne JAMAIS couvrir les encoches, orifices ou passages
pratiqués au fond du four et ne jamais recouvrir
complètement la grille avec des matériaux tels que le
papier d'aluminium. Vous risquez autrement de bloquer
la circulation de l'air à l'intérieur du four. Les feuilles
d'aluminium peuvent également emprisonner la chaleur
et présenter ainsi un risque d'incendie.
Si une matière à l’intérieur du four ou un tiroir-réchaud
venait à prendre feu, conservez la porte fermée. Éteignez
l’appareil électroménager et déconnectez le circuit au
fusible ou depuis le boîtier de disjoncteurs.

9 IMPORTANTES CONSIGNES DE SÉCURITÉ
LIRE ET CONSERVER CES INSTRUCTIONS
60
AVERTISSEMENT
Utiliser cet appareil uniquement dans le cadre de
l'utilisation prévue tel que décrit dans ce manuel. NE
JAMAIS utiliser pour chauffer ou réchauffer une pièce.
Ceci pourrait faire surchauffer l'appareil. L'appareil ne
doit jamais servir à entreposer quoi que ce soit.
Toujours avoir un détecteur de fumée en état de marche
près de la cuisine.
Si des vêtements s’enflamment, rouler par terre
immédiatement pour éteindre les flammes.
Veillez à avoir à portée de main un extincteur d'incendie
en bon état de marche, placé visiblement près de
l'appareil et facile d'accès.
Étouffez les flammes d'un feu d'aliments autre qu'un feu
de graisse à l'aide de bicarbonate de soude. Ne jamais
utiliser d'eau sur les feux de cuisson.
AVERTISSEMENT
POUR RÉDUIRE LE RISQUE DE LÉSIONS
CORPORELLES DANS L'ÉVENTUALITÉ D'UN FEU DE
GRAISSE, OBSERVER LES CONSIGNES SUIVANTES :
a.
ÉTOUFFER LES FLAMMES à l'aide d'un couvercle bien
hermétique, d'une tôle à biscuits ou d'un plateau en
métal, puis éteindre l'appareil. FAIRE ATTENTION À NE
PAS SE BRÛLER. Si les flammes ne s'éteignent pas
immédiatement, ÉVACUER LES LIEUX ET FAIRE
APPEL AU SERVICE D'INCENDIE.
b.
NE JAMAIS SAISIR UN RÉCIPIENT QUI BRÛLE. Vous
pourriez vous brûler.
c.
NE PAS UTILISER D'EAU, y compris les chiffons ou
serviettes mouillées. Une violente explosion de vapeur
risque de se produire.
d.
Utiliser un extincteur uniquement si :
- Vous savez que vous possédez un extincteur de
CLASSE ABC, et vous en connaissez déjà le
maniement.
- L'incendie est de petite ampleuret contenu dans la
zone où il s'est déclaré.
- Le service d'incendie est appelé.
- On peut combattre l'incendie le dos tourné vers la
sortie.
Prévention des brûlures
NE PAS TOUCHER LES ÉLÉMENTS CHAUFFANTS OU
LES SURFACES INTÉRIEURES DU FOUR - Les éléments
chauffants peuvent être chauds même s'ils ne sont pas
rouges. Les parois intérieures d'un four peuvent devenir
suffisamment chaudes pour provoquer des brûlures.
Avant et après l'utilisation, ne pas toucher les éléments
chauffants ou les surfaces intérieures du four et ne pas
mettre des vêtements, des maniques ou d'autres
matériaux inflammables en contact avec ces éléments et
ces surfaces tant qu'ils n'auront pas suffisamment
refroidi. Les autres surfaces de l'appareil peuvent devenir
suffisamment chaudes pour provoquer des brûlures.
Parmi ces surfaces, citons les ouvertures d'évent, les
surfaces situées près de ces ouvertures et les portes du
four.
Faire attention en ouvrant le tiroir-réchaud. En se plaçant
sur le côté, ouvrir la porte (ou le tiroir) lentement et
légèrement pour laisser l'air chaud et/ou la vapeur
s'échapper du four. Éloigner le visage de l'ouverture et
s'assurer qu'aucun enfant ou animal ne se trouve près
de l'appareil. Une fois l'air chaud et/ou la vapeur sortis,
continuez la cuisson. Ne pas laisser les portes ouvertes
à moins que vous ne soyez en train de cuisiner ou de
nettoyer. Ne pas laisser les portes ouvertes sans
surveillance.
Ne pas chauffer ou réchauffer des contenants d'aliments
non ouverts. L'accumulation de pression peut faire
exploser le contenant et provoquer desblessures.
Placez toujours les grilles du four à la position souhaitée
alors que le four est froid. Toujours utiliser des maniques
quand le four est chaud. Si une grille doit être déplacée
alors que le four est chaud, ne pas laisser les poignées
isolantes entrer en contact avec les éléments chauffants.
ATTENTION
Afin d'éviter toute blessure ou dommage potentiels,
s'assurer d'installer la grille en suivant exactement les
instructions d'installation, et ne pas la mettre à l'envers ni
dans le mauvais sens.
Toujours utiliser des poignées isolantes sèches. Des
poignées mouillées ou humides entrant en contact avec
les surfaceschaudes peuvent provoquer des blessures
par dégagement de vapeur. Ne laissez pas les poignées
toucher les éléments chauffants chauds. Ne pas utiliser
de serviette ni de chiffon volumineux.
AVERTISSEMENT
RISQUES DE BRÛLURES
Tout mouvement lorsque vous ouvrez la porte de
l'appareil ou que vous retirez des ustensiles de cuisson
peut causer des dégâts de liquides chauds. Ne vous
tenez pas trop près de l'appareil lorsque vous l'ouvrez.
Ouvrez la porte de l'appareil prudemment. Retirez les
ustensiles de cuisine soigneusement. Gardez les enfants
éloignés.
Attacher les vêtements lâches, etc. avant de commencer.
Attacher les cheveux longs de façon à ce qu'ils ne
pendent pas et ne pas porter de vêtements lâches ou
d'habits ou objets qui pendillent, tels que cravates,
foulards, bijoux ou manches.
Prendre des précautions lors de la cuisson d'aliments au
contenu élevé en alcool (e.g. le rhum, le brandy, le
bourbon) dans le four. L'alcool s'évapore à des
températures élevées. Il existe un risque d'incendie car
les vapeurs d'alcool peuvent prendre feu à l'intérieur du
four. Utiliser de petites quantité d'alcool dans les
aliments et ouvrir la porte du four avec précautions.

61
9 IMPORTANTES CONSIGNES DE SÉCURITÉ
LIRE ET CONSERVER CES INSTRUCTIONS
AVERTISSEMENT
RISQUE DE BRÛLURE
Du liquide chaud peut déborder lors de l'enlèvement de
l'accessoire. Retirer l'accessoire chaud prudemment
avec des gants isolants.
AVERTISSEMENT
RISQUE D'ÉBOUILLANTEMENT
De la vapeur très chaude peut s'échapper à l'ouverture
de la porte. Selon sa température, la vapeur peut être
invisible. Ne pas se tenir trop près de l'appareil en
ouvrant la porte. Ouvrir avec précaution la porte du four.
Tenir les enfants à distance.
AVERTISSEMENT
RISQUE DE BRÛLURE
De la vapeur très chaude peut s'échapper pendant la
marche. Ne pas toucher aux entrées d'air. Tenir les
enfants à distance.
AVERTISSEMENT
RISQUE DE BRÛLURES
Même après avoir éteint l’appareil électroménager, l’eau
sur la sole du four est toujours chaude. N’essuyez pas
l’eau sur la sole immédiatement après utilisation du four.
Laissez l’appareil refroidir avant de le nettoyer.
Sécurité des enfants
Lorsque les enfants sont assez âgés pour utiliser
l'appareil, il incombe aux parents ou tuteurs légaux de
veiller à ce qu'ils soient formés aux pratiques sécuritaires
par des personnes qualifiées.
Ne permettre à personne de grimper, rester debout,
s'appuyer, s'asseoir ou se pencher sur toute partie d'un
appareil, notamment une porte, un tiroir-réchaud ou un
tiroir de rangement. Ceci peut endommager l'appareil qui
risque de basculer et causer des blessures sérieuses.
Ne pas permettre aux enfants d'utiliser cet appareil sauf
sous la surveillance attentive d'un adulte. Ne pas laisser
les enfants et les animaux seuls ou sans surveillance
lorsque l'appareil est en service. Ne jamais les laisser
jouer aux alentours de l'appareil, que ce dernier soit en
service ou non.
AVERTISSEMENT
Les articles qui pourraient intéresser les enfants ne
doivent pas être rangés dans un appareil
électroménager, dans les armoires au-dessus ou sur le
dosseret de l’appareil. Les enfants qui essaient de
monter sur un appareil électroménager pour atteindre
ces articles pourraient être gravement blessés.
Consignes en matière de nettoyage
Risque de brûlures graves! Ne pas nettoyer l’appareil
immédiatement après l’avoir éteint. L’eau sur la sole de
la cavité du four est toujours chaude. Attendre que
l’appareil électroménager se soit refroidi.
Ne laissez jamais de graisse s'accumuler dans le four.
AVERTISSEMENT
RISQUE DE BLESSURE
Lorsque le verre de la porte est rayé, il peut sauter.Ne
pas utiliser de grattoir à verre, ni de produits agressifs ou
abrasifs.
AVERTISSEMENT
RISQUE DE CHOC ÉLECTRIQUE
La pénétration d'humidité peut provoquer un choc
électrique. Ne pas utiliser de nettoyeur à haute pression
ou à vapeur.
Les oiseaux ont un système respiratoire très sensible.
Éloignez les oiseaux de compagnie de la cuisine ou des
pièces où les fumées de cuisine peuvent les atteindre.
Pendant l'autonettoyage, les émanations qui se dégagent
de l'appareil peuvent porter atteinte aux oiseaux.
D'autres émanations provenant de la cuisine comme la
margarine et les huiles de cuisson surchauffées peuvent
également être dangereuses.
Lors de l'autonettoyage, s'assurer que la porte est bien
verrouillée et qu'elle ne s'ouvre pas. Si la porte ne se
verrouille pas, ne pas procéder à l'autonettoyage.
Communiquer avec un centre de dépannage.
Ne pas bloquer le ou les évents du four pendant le cycle
d'autonettoyage. Toujours utiliser l'appareil
conformément aux instructions du présent manuel.
AVIS DE SÉCURITÉ IMPORTANT : en application de la
loi de la Californie sur la qualité de l'eau potable et sur
les produits toxiques (« California Safe Drinking Water
and Toxic Enforcement Act »), le Gouverneur de
Californie est tenu de publier une liste des substances
reconnues par l'État de Californie comme étant
cancérigènes ou pouvant causer des malformations ou
nuire à la reproduction, et les entreprises sont tenues
d'avertir les consommateurs des risques potentiels
d'exposition à de telles substances. L'incinération de
combustible gazeux de cuisson et l'élimination de

9 IMPORTANTES CONSIGNES DE SÉCURITÉ
LIRE ET CONSERVER CES INSTRUCTIONS
62
salissures lors d'un autonettoyage peuvent générer des
sous-produits qui figurent sur cette liste. Pour minimiser
l'exposition à ces substances, toujours faire fonctionner
cet appareil conformément aux instructions contenues
dans cette brochure et assurer une bonne ventilation.
Sécurité pour la batterie de cuisine
Ne pas placer les aliments directement sur le fond du
four.
Observer les instructions du fabricant lors de l'utilisation
de sacs de cuisson ou de rôtissage.
AVERTISSEMENT
RISQUE DE CHOC ÉLECTRIQUE
L’utilisation de la mauvaise sonde thermométrique peut
endommager l’isolant. Utiliser uniquement la sonde
thermométrique conçue pour cet appareil
électroménager.
Les plats allant au four doivent résister à la chaleur et à
la vapeur. Les plats de cuisson à la silicone ne
conviennent pas au mode conventionnel de cuisson
avec ajout de vapeur.
Lors de l’utilisation du mode vapeur avec un plat de
cuisson perforée, insérez toujours la poêle universelle
sur la grille à la position 1 ou 2. Elle recueillera la
graisse.
La sole du four doit toujours être dégagée. Placez
toujours les plats de cuisson sur la grille ou sur un plat
de cuisson perforé.
Avertissement issue de la proposition 65
de l’État de la Californie :
AVERTISSEMENT
Ce produit peut vous exposer à des produits chimiques,
comme du chlorure de vinyle, reconnus par l’État de la
Californie comme causant le cancer, des malformations
congénitales ou d’autres effets nocifs sur la
reproduction. Pour de plus amples renseignements,
consultez www.P65Warnings.ca.gov.

63
Causes des dommages
AVIS
▯ Ne déposez pas d’accessoires, du papier
d’aluminium, du papier sulfurisé ou des plats de
cuisson sur la sole de la cavité du four. Cela nuira au
bon résultat de cuisson en augmentant le temps de
cuisson (ou de braisage) et surchauffera la sole de la
cavité du four, endommageant l’émail.
▯ Papier d’aluminium : le papier d’aluminium dans la
cavité du four ne doit pas toucher à la porte de verre.
Cela pourrait tacher le verre de manière permanente.
▯ Eau dans une cavité de four chaude : ne versez pas
d’eau dans la cavité du four alors qu’elle est chaude.
Cela générera de la vapeur. Le changement de
température peut endommager l’émail.
▯ Humidité dans la cavité du four : de l’humidité dans la
cavité du four pendant une période prolongée peut
entraîner de la corrosion. Laissez la cavité du four
sécher après usage. Ne conservez pas d’aliments
humides dans la cavité du four avec la porte fermée
pendant de longues périodes de temps. Ne conservez
pas d’aliments dans la cavité du four.
▯ Refroidissement avec la porte de l’appareil
électroménager ouverte : après un fonctionnement à
hautes températures, laissez la cavité du four refroidir
uniquement avec la porte fermée. N’utilisez
absolument rien pour empêcher la porte de se fermer.
Même si la porte du four n’est qu’entrouverte, la
façade des meubles à proximité pourrait être
endommagée au fil du temps.
Laissez la cavité du four sécher avec la porte ouverte
uniquement si une grande quantité d’humidité a été
produite lors de la cuisson.
▯ Jus de fruits : lors de la cuisson de tartes aux fruits
particulièrement juteuses, ne remplissez pas trop le
moule à tarte. Le jus de fruit qui s’égoutte laisse des
taches qui ne s’enlèvent pas. Si possible, déposez le
moule à tarte sur une plaque doublée d’une feuille
d’aluminium.
▯ Joint sale : si le joint de la porte du four à vapeur est
sale, il est possible que la porte du four ne se ferme
pas correctement en cours de fonctionnement. La
façade des armoires adjacentes pourrait être
endommagée. Gardez toujours le joint propre.
▯ Porte de l’appareil électroménager : ne déposez ni ne
suspendez quoique ce soit sur la porte. Ne vous
assoyez pas sur la porte de l’appareil électroménager.
Ne placez pas de plats de cuisson ou des accessoires
sur la porte de l’appareil électroménager. Elle ne doit
jamais servir de siège, d’étagère ou de surface de
travail.
▯ Insertion d’accessoires : en fonction du type d’appareil
électroménager, les accessoires peuvent rayer la
porte vitrée lors de la fermeture. Glissez toujours
entièrement les accessoires dans la cavité du four.
▯ Transport de l’appareil électroménager : ne
transportez pas ni ne saisissez l’appareil
électroménager par la poignée de la porte. La poignée
de la porte du four ne peut pas supporter le poids de
l’appareil et pourrait casser.
Protection de l'Environnement
Votre nouvel appareil est d'efficacité énergétique. Vous
trouverez ici des conseils sur comment vous pouvez
économiser encore plus d'énergie lors de l'utilisation de
l'appareil et sur comment correctement éliminer
l'appareil.
Déballez l'appareil et jetez l'emballage dans le respect
de l'environnement.
Économie d’énergie
▯ Vous pouvez retirer toutes les grilles du four ou tous
les accessoires inutiles de la cavité du four avant de
commencer à cuire quoique ce soit. Cela réduira la
durée du préchauffage requis.
▯ Ouvrez la porte de l’appareil électroménager aussi
peu que possible lorsque le four fonctionne.
▯ Il vaut mieux cuire plusieurs gâteaux les uns après les
autres alors que la cavité est encore chaude sans
avoir à préchauffer le four de nouveau.
▯ Conservez toujours votre four propre et évitez les
accumulations de graisse. Les souillures peuvent
accroître la durée du préchauffage et les émissions.
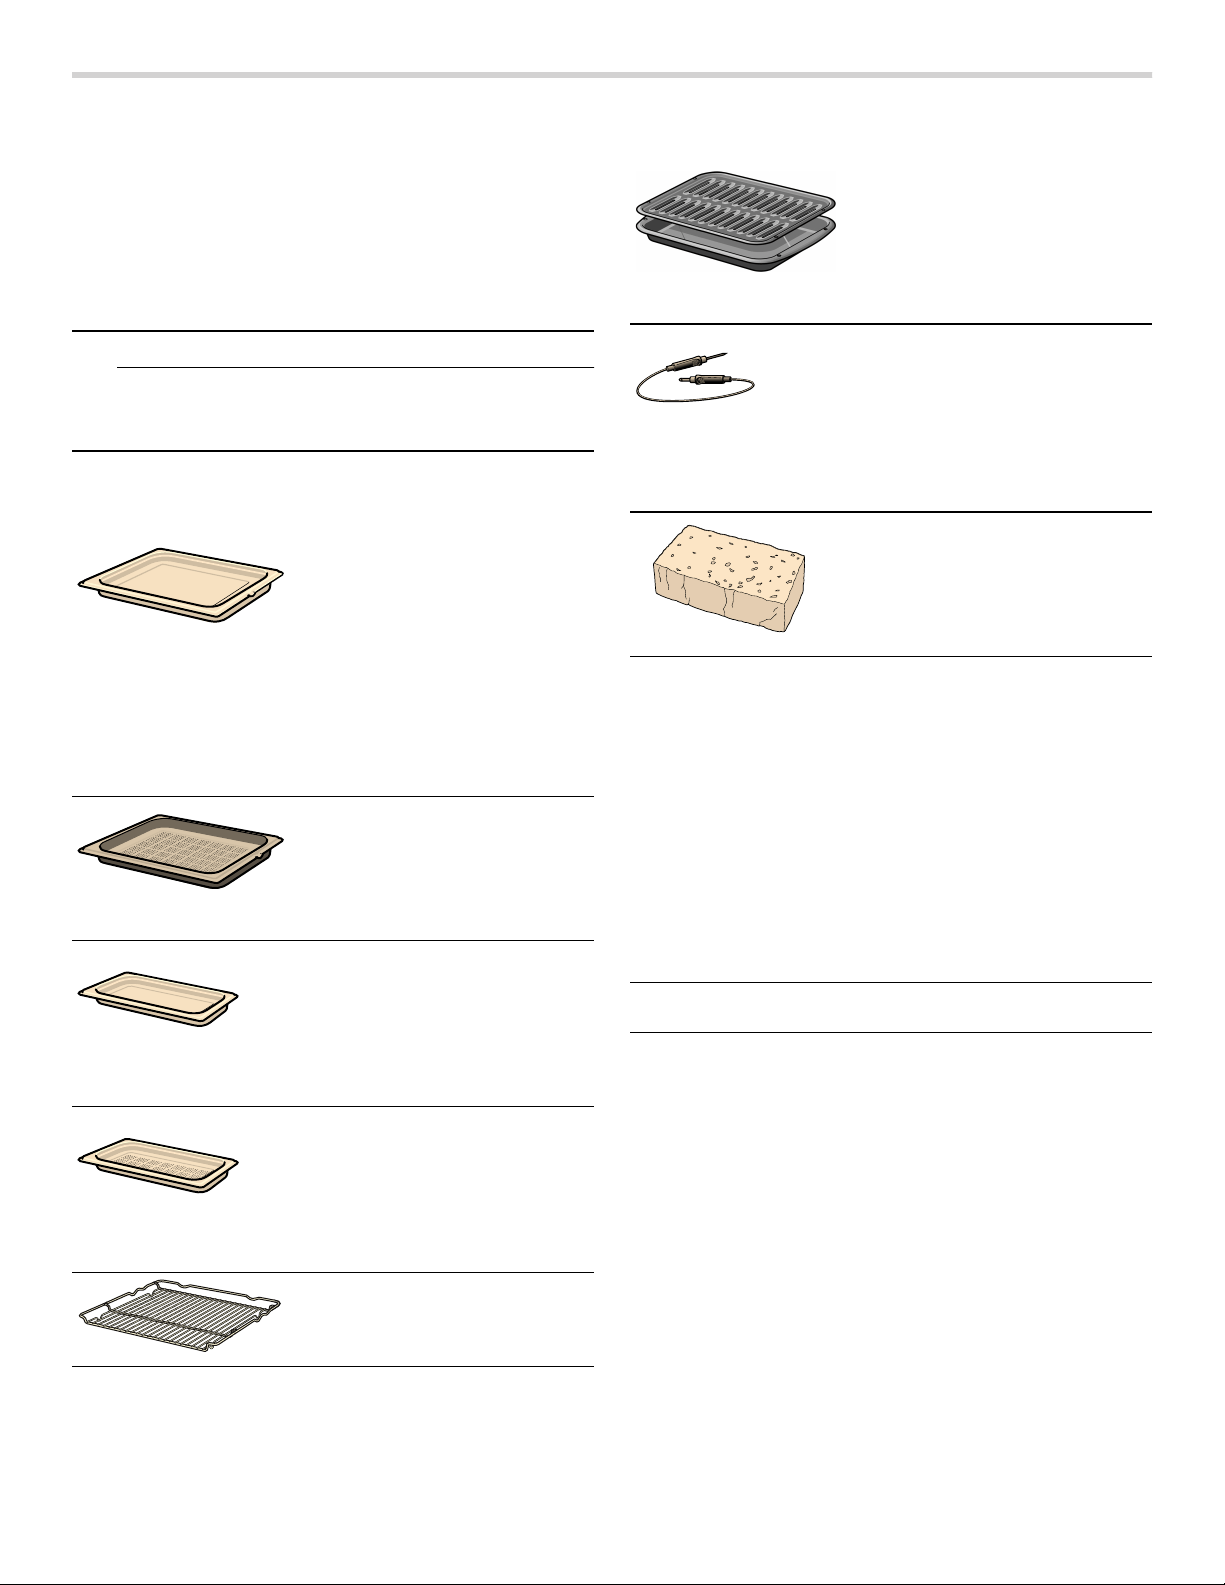
64
Accessoires
L’appareil électroménager est livré avec plusieurs
accessoires. Vous trouverez ci-dessous un aperçu des
accessoires inclus ainsi que les renseignements sur leur
bonne utilisation.
Il est possible de commander les accessoires ci-dessous
à la boutique en ligne de Thermador. Consultez : http://
store.thermador.com/us.
9 ATTENTION
Ne glissez aucun accessoire entres les positions de
grilles. Cela risque de faire basculer les
accessoires.
Accessoires inclus - Four à vapeur
--------
Utiliser uniquement des accessoires d'origine. Ils ont été
spécialement élaborés pour votre appareil.
Vous pouvez acheter des accessoires auprès du service
après-vente, dans les commerces spécialisés ou sur
Internet.
Remarque : Lorsque l'accessoire devient chaud il peut
se déformer. Cela n'influe en rien le fonctionnement.
Cette déformation disparaît dès qu'il refroidit.
Accessoires spéciaux - Four à vapeur
(non inclus - offert à la boutique en ligne)
--------
Poêle universelle
Pleine grandeur, 1
5
/
8
po
(40 mm) de profondeur
Pour faire croustiller des
aliments ou des plats préparés
surgelés.
Placez-le au niveau 1 lors de
la cuisson à la vapeur pour
recueillir l’eau et les salissures.
Plat de cuisson perforé
Pleine grandeur, 1
5
/
8
po
(40 mm) de profondeur
Pour utiliser la vapeur avec de
grandes quantités d’aliments.
Petit plat de cuisson non
perforé
Demi-format, 1
5
/
8
po (40 mm)
de profondeur
Pour la cuisson de riz, de
légumineuses et de grains.
Petit plat de cuisson perforé
Demi-format, 1
5
/
8
po (40 mm)
de profondeur
Pour cuire les légumes,
extraire le jus de baies et
décongeler à la vapeur.
Grille
Pour les tôles à cuisson, les
moules à gâteau et les plats
allant au four.
Plat à rôtir et lèchefrite
Sert à griller et rôtir.
Les retirer du four pour le
mode autonettoyage.
Sonde thermométrique
multipoints
Les trois points de mesure
permettent de rôtir à la
perfection selon vos propres
critères.
Son utilisation est expliquée
dans la section à cet effet.
Éponge
Sert au à sécher la sole de la
cavité du four.
Détartrant N° 10008170
Bandes d’essai de
dureté de l’eau
No 056317
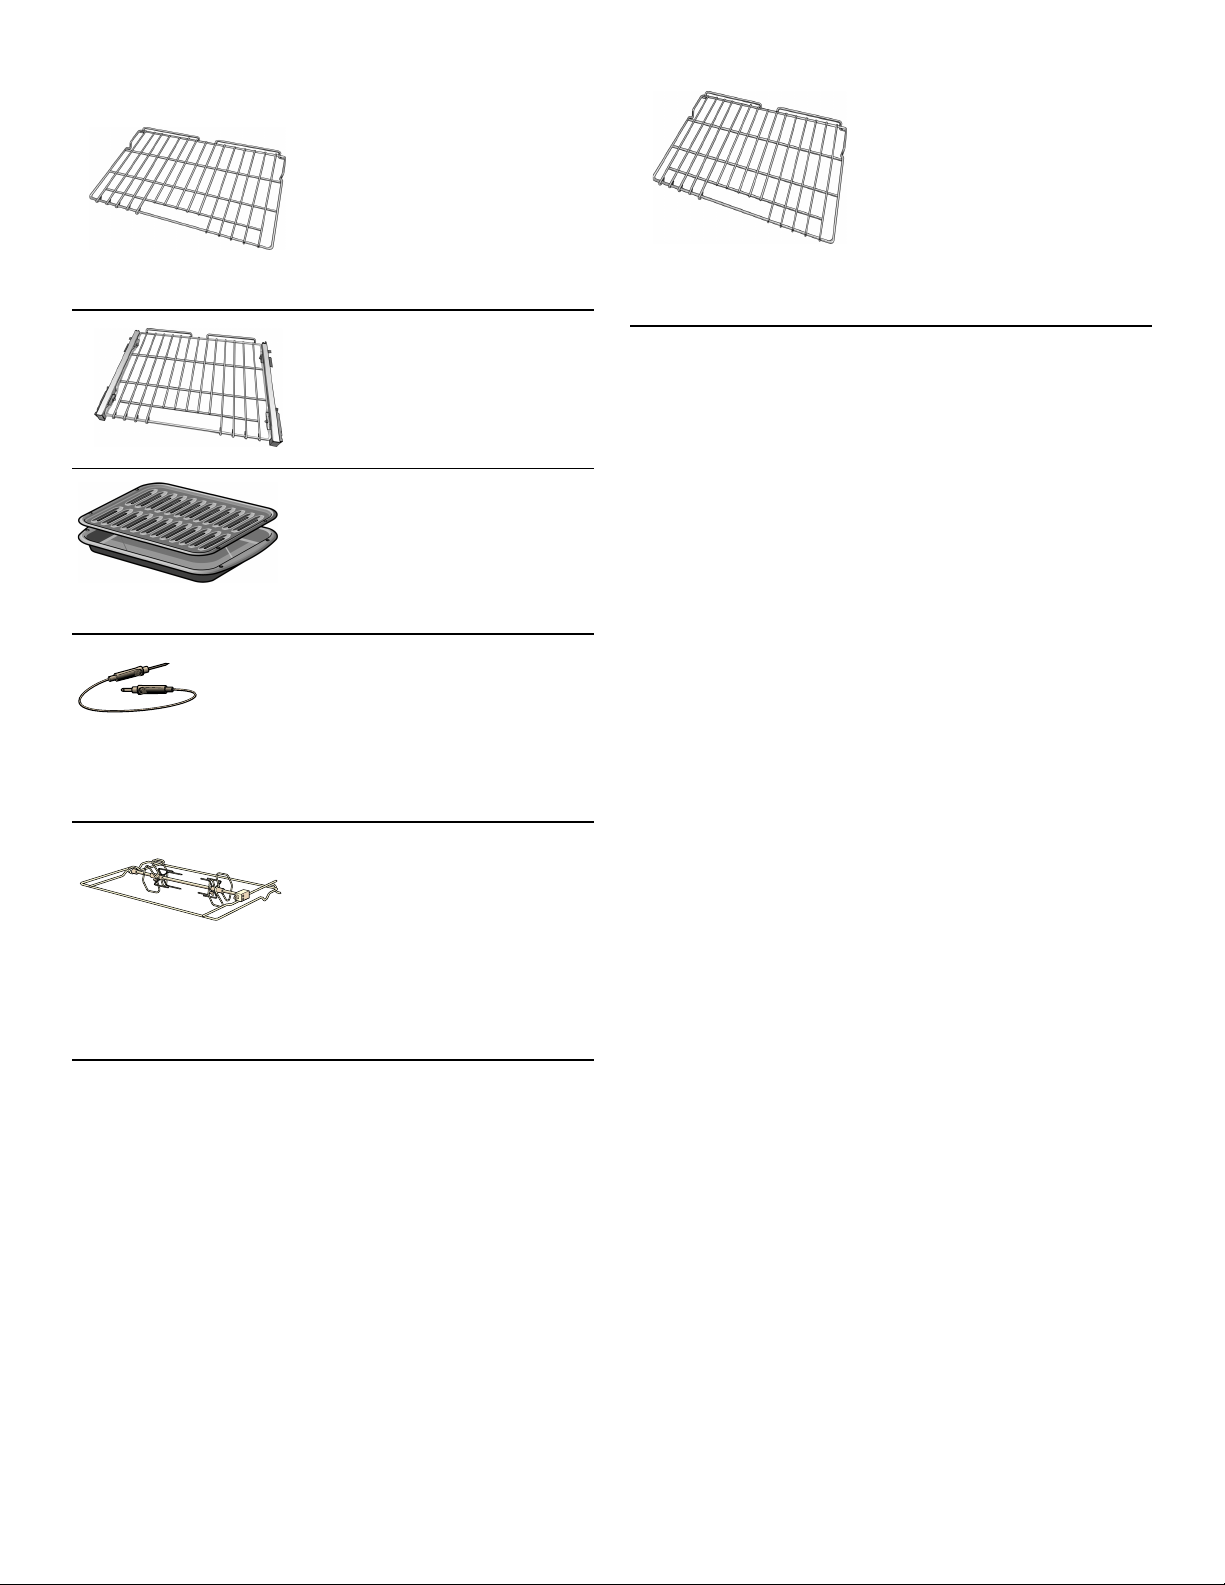
65
Accessoires inclus - Four conventionnel
--------
Utiliser uniquement des accessoires d'origine. Ils ont été
spécialement élaborés pour votre appareil.
Vous pouvez acheter des accessoires auprès du service
après-vente, dans les commerces spécialisés ou sur
Internet.
Remarque : Lorsque l'accessoire devient chaud il peut
se déformer. Cela n'influe en rien le fonctionnement.
Cette déformation disparaît dès qu'il refroidit.
Accessoires spéciaux- Four
conventionnel
(non inclus - offert à la boutique en ligne)
--------
Grille
Pour les tôles à cuisson, les
moules à gâteau et les mets
allant au four.
Ne les nettoyez pas dans le
four autonettoyant.
Grille télescopique
Cette grille facilite l’accès lors
de l’insertion ou du retrait de
mets.
Ne nettoyez pas dans le four
autonettoyant.
Plat à rôtir et lèchefrite
Sert à griller et rôtir.
Les retirer du four pour le
mode autonettoyage.
Sonde thermométrique
multipoints
Les trois points de mesure
permettent de rôtir à la
perfection selon vos propres
critères.
Son utilisation est expliquée
dans la section à cet effet.
Tournebroche
Utilisez cet accessoire en
mode Tournebroche. Pour de
plus amples renseignements,
consultez la section
Tournebroche dans le
chapitre du Fonctionnement
traditionnel du four.
Ne le nettoyez pas dans le four
autonettoyant.
Grille autonettoyante
(emballage de 3)
(offerte à la boutique en ligne)
No SDCLNRCK30
Pour les plats et les mets
allant au four, et les moules à
gâteau.
Il n’est pas nécessaire de
retirer ces grilles au cours de
l’autonettoyage.
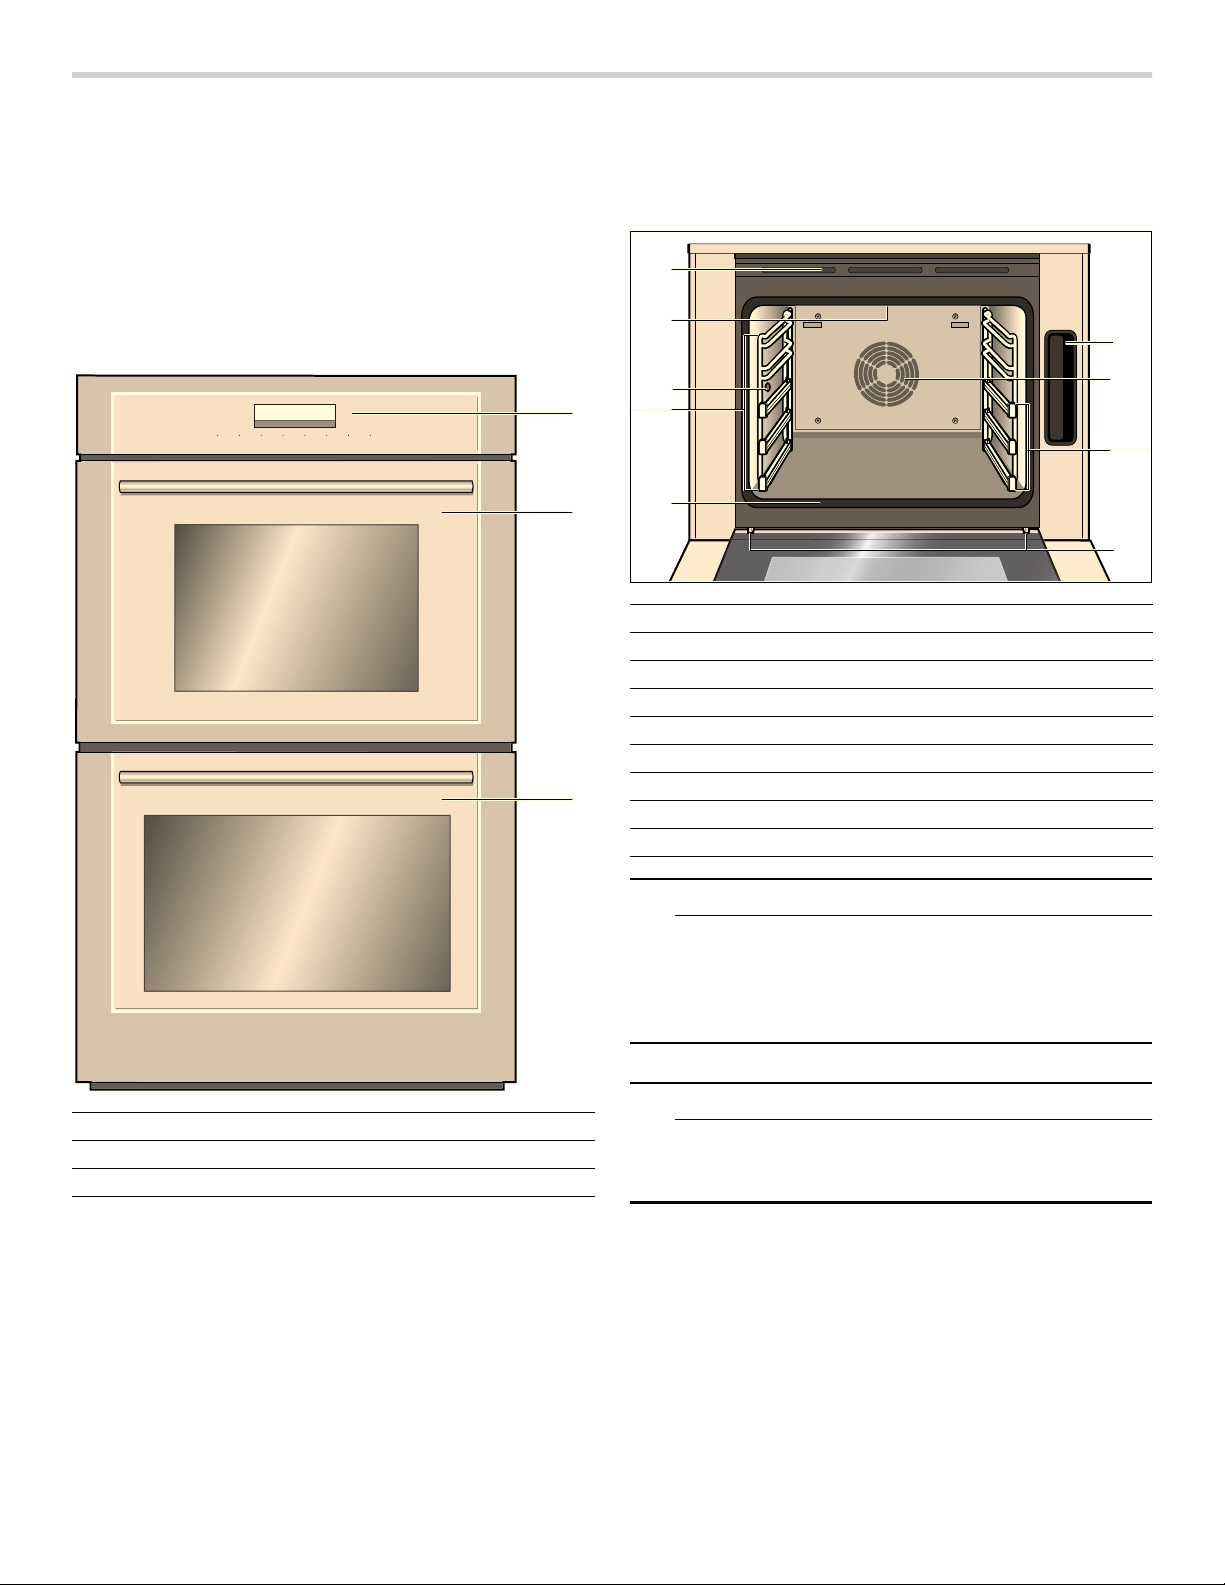
66
Familiarisation avec l'appareil
Dans cette section, vous trouverez les explications
concernant les témoins et les commandes. Vous y
trouverez également des renseignements concernant les
diverses fonctions de l’appareil.
Remarque : Les garnitures et les couleurs individuelles
peuvent être différentes selon le modèle de l’appareil
électroménager.
Vue d’ensemble du four
Cavités du four
Cavité du four supérieur - Four à vapeur
9 ATTENTION
Ne placez rien sur la sole de la cavité du four. Ne
couvrez pas la sole avec une feuille de papier
aluminium. Une accumulation de chaleur risque
d’endommager l’appareil électroménager ou de
provoquer une blessure.
9 ATTENTION
La sole de la cavité du four doit toujours être
dégagée. Placez toujours l’ustensile de cuisson sur
le plat de cuisson perforé ou sur une grille.
A Panneau de commandes et écran
B Cavité du four supérieur - Four à vapeur
C Cavité du four inférieur - Four conventionnel
$
%
&
)$673 5(+( $721O2)) /,*+7 7,0(56 0(18 ,1)2
$
''67($0 67$57O6723
7UXH&RQYHFWLRQ
Ý
³
1 Réservoir d’eau
2 Système à convection
3 Guides de la grille télescopique
4 Charnières de porte
5 Joint d’étanchéité de porte
6 Guides de la grille accessoire
7 Prise pour sonde thermométrique
8 Élément de gril
9 Évents de four

67
Cavité du four inférieur - Four conventionnel
9 ATTENTION
Ne placez sur le fond de la cavité du four. Ne
couvrez pas le fond avec une feuille de papier
aluminium. Une accumulation de chaleur risque
d’endommager l’appareil électroménager ou de
provoquer une blessure.
Sole du four
La sole du four dissimule l’élément chauffant inférieur.
Par conséquent, l’élément est protégé des dommages et
des éclaboussures.
Astuce : Ne déposez pas d’aliments directement sur la
sole du four.
9 AVERTISSEMENT
N’utilisez pas de papier aluminium ou de doublure
de protection pour revêtir toute partie de l’appareil
électroménager, et en particulier la sole du four.
L’utilisation de ces doublures peut entraîner un
risque de choc électrique ou d’incendie.
AVIS : Ne déposez pas un plat à rôtir sur la sole du four
pour récupérer les éclaboussures. Il risque
d’endommager la porcelaine de la sole du four.
9 AVERTISSEMENT
Ne JAMAIS couvrir les encoches, orifices ou
passages pratiqués au fond du four et ne jamais
recouvrir complètement la grille avec des matériaux
tels que le papier d'aluminium. Vous risquez
autrement de bloquer la circulation de l'air à
l'intérieur du four. Les feuilles d'aluminium peuvent
également emprisonner la chaleur et présenter ainsi
un risque d'incendie.
Caractéristiques de la cavité du four
Évent de four
L’évent de four se trouve le long du haut et du bas de
l’unité. De l’air chaud peut être évacué de l’évent avant,
pendant et après la cuisson. Il est normal de voir de la
vapeur s’échapper de l’évent, et de la condensation
pourrait s’accumuler. Cette zone peut être chaude
lorsque le four fonctionne. Ne bloquez pas l’évent, car il
est important pour la circulation d’air.
Ventilateur de refroidissement
Le ventilateur de refroidissement fonctionne selon la
température du four. Vous pourriez sentir de l’air chaud
qui s’échappe des évents du four lorsque le ventilateur
fonctionne. Il se peut également que le ventilateur
fonctionne après que le four est éteint.
Ventilateur à convection
Le ventilateur à convection fonctionne pendant tous les
modes de cuisson à convection. Lorsque le four est en
mode de cuisson par convection, le ventilateur s'arrête
automatiquement lorsque la porte est ouverte.
Éclairage de four
Lorsque vous ouvrez la porte l’appareil électroménager,
l’éclairage de four s’allume. L’éclairage s’éteint lorsque la
porte reste ouverte plus de 20 minutes. Pour rallumer,
effleurez la touche tactile LIGHT (Éclairage).
Réservoir d’eau
Le four à vapeur est doté d’un réservoir d’eau. Quand
vous ouvrez la porte du four, vous pouvez voir le
réservoir d’eau du côté droit de la cavité du four.
Remplissez le réservoir d’eau avec de l’eau pour faire
fonctionner l’appareil électroménager en modes vapeur.
1 Système à convection
2 Grilles accessoires
3 Charnières de porte
4 Joint d’étanchéité de porte
5 Prise pour sonde thermométrique
6 Élément de gril
7 Évents de four
8 Orifice du tournebroche
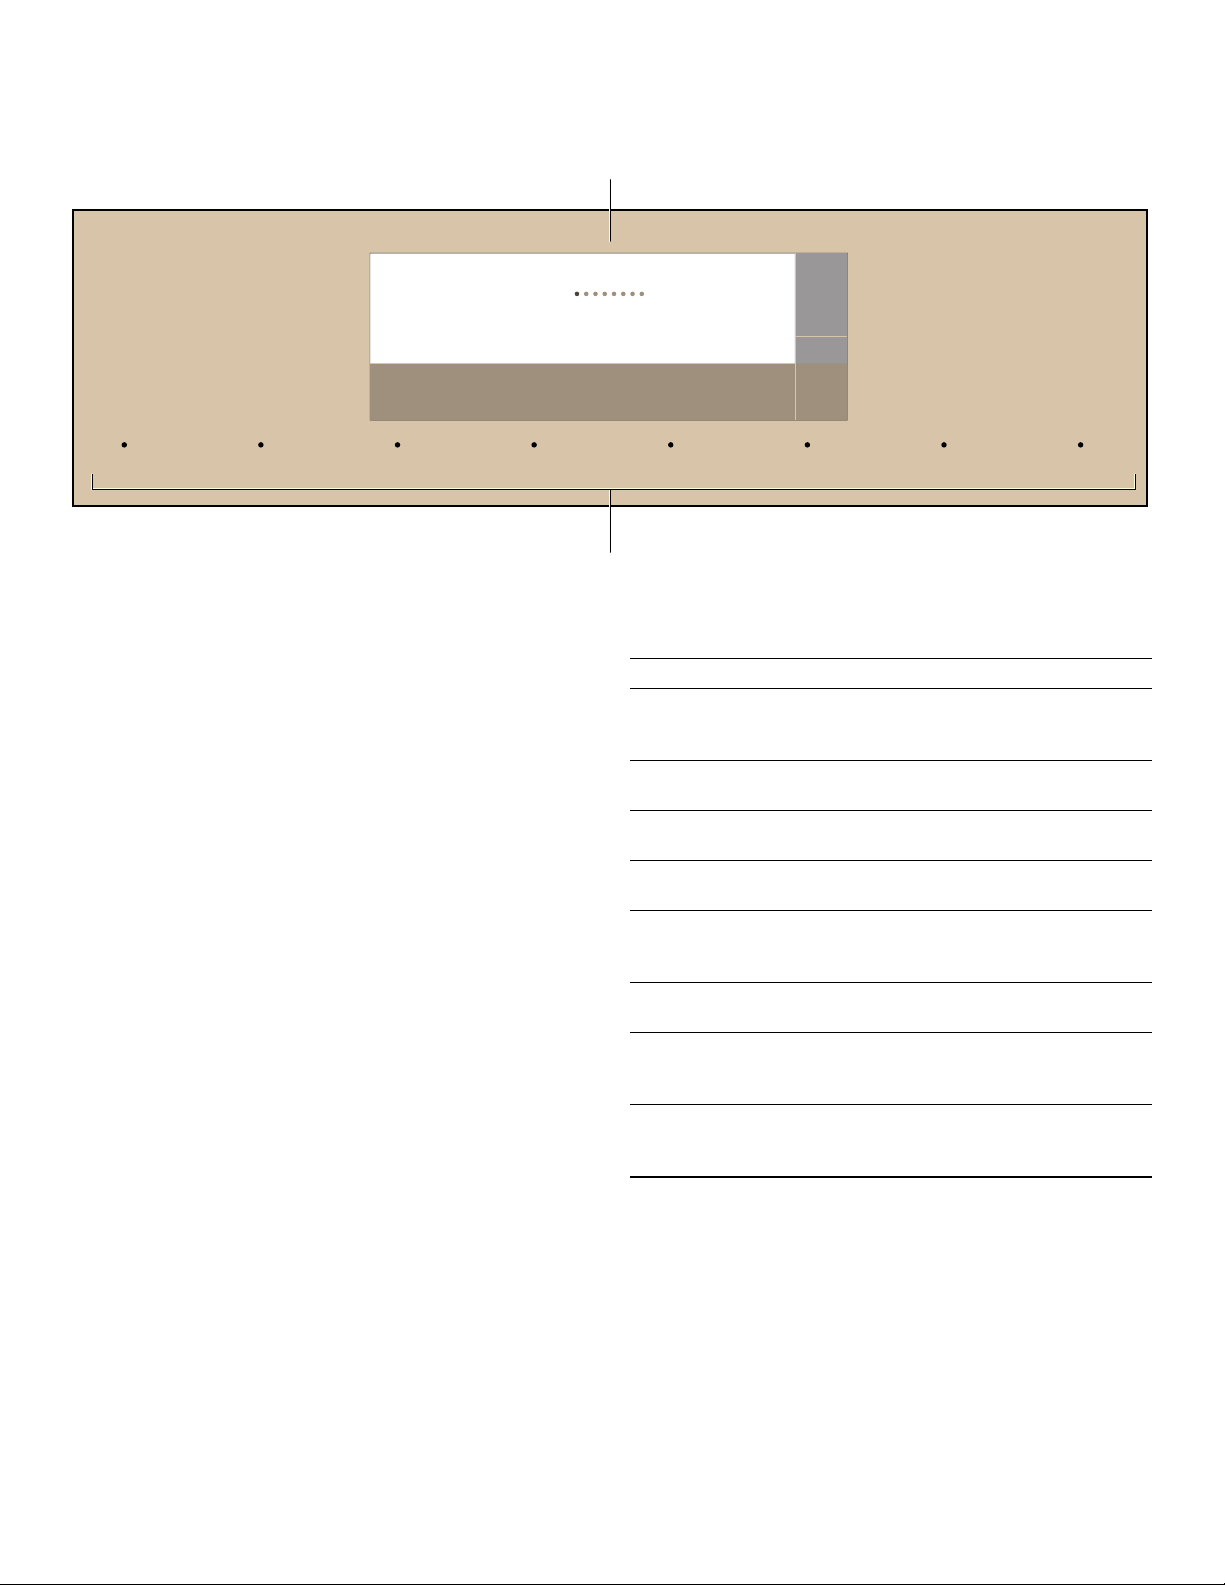
68
Panneau de commande
Vous pouvez régler les différentes fonctions de l’appareil
sur le panneau de commande au moyen de l’écran
tactile en couleur. L’écran tactile en couleur indique les
réglages actuels.
Commandes
Utilisez les commandes pour régler simplement et
directement l’appareil.
Touches tactiles
Les touches tactiles comportent des capteurs. Effleurez
le mot de la touche tactile correspondante pour
sélectionner une fonction. Les fonctions disponibles sont
indiquées par une lumière au-dessus du bouton tactile
respectif. Le nombre de fonctions disponibles dépend de
l'opération que vous utilisez.
Le témoin au-dessus de la touche tactile START l STOP
devient bleu lorsqu'un mode four est en marche.
--------
Écran tactile en couleur
Utilise l’écran tactile en couleur pour naviguer entre les
menus et sélectionner les réglages. La fonctionnalité
active s’illumine de bleu.
0RGHVGHFXLVVRQ
Ê
1HWWIDFLOH
Õ
3URJYDSHXU
3DUDPqWUHV 'pWDUWUDJH
6pFKDJH 1HWWpFRO\VH
U
T
)$6735(+($721O2)) /,*+7 7,0(56 0(18 ,1)2 $''67($0 67$57O6723
(
Écran tactile en couleur
0
Touches tactiles
Touche tactile Utilisation
ON l OFF
(MARCHE I ARR
ÊT)
Met l’appareil en marche ou l’éteint
LIGHT
(ÉCLAIRAGE)
Allume ou éteint l’éclairage de
l’appareil
TIMERS
(MINUTERIES)
Règle la minuterie de cuisine ou le
temps de cuisson
MENU Sélectionne les modes de
fonctionnement et les réglages
FAST PREHEAT
(PRÉCHAUF-
FAGE RAPIDE)
Active/désactive le préchauffage
rapide
INFO Affiche des renseignements
supplémentaires
ADD STEAM
(AJOUT
VAPEUR)
Permet de cuire à l’aide de vapeur
START l STOP
(DÉMARRAGE I
ARRÊT)
Démarre ou interrompt l’opération
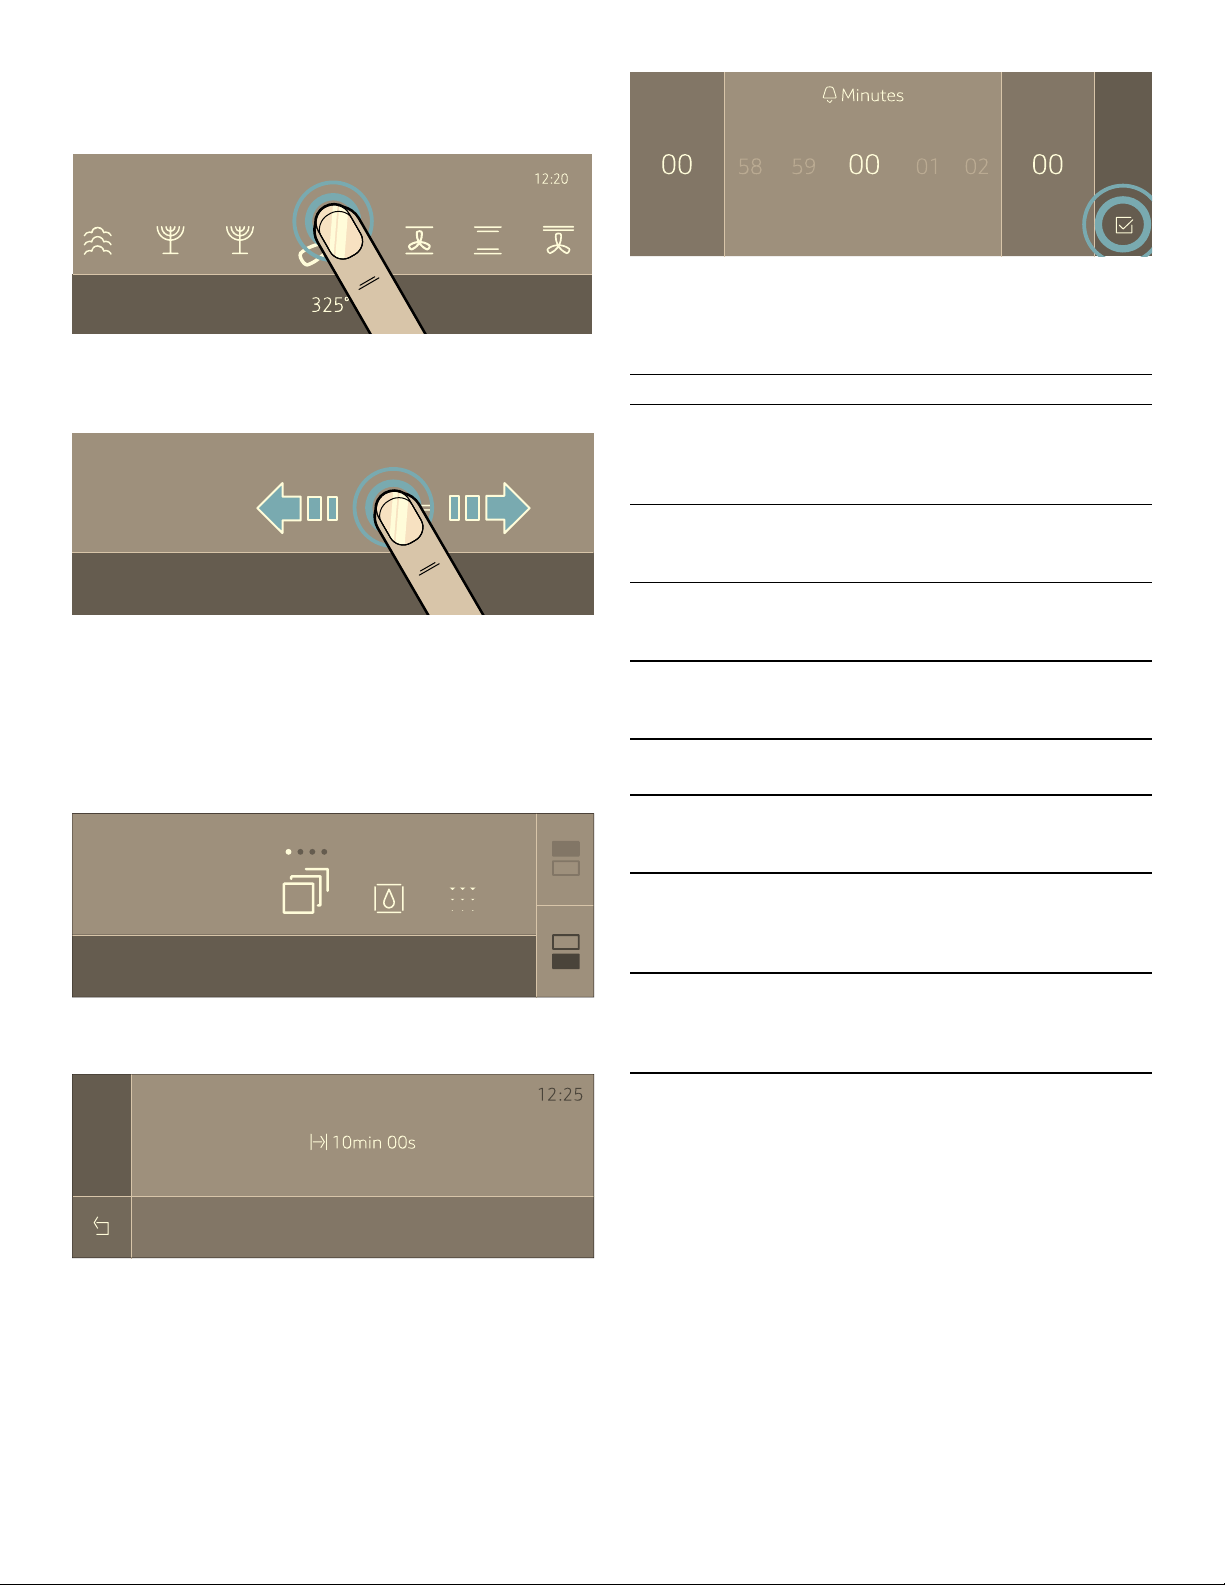
69
Éléments de base de fonctionnement de l’écran :
▯ Pour sélectionner une fonctionnalité ou un réglage,
effleurez la zone désirée à l’écran.
▯ Vous pouvez également utiliser l’écran tactile pour
glisser vers la gauche ou la droite parmi les différents
réglages.
Dans certains cas, on vous offre d’autres options de
navigation dans le menu :
▯ Effleurez le symbole q pour sélectionner la cavité du
four à vapeur supérieur. Effleurez le symbole r pour
sélectionner la cavité du four conventionnel inférieur.
Les réglages subséquents s’appliqueront uniquement
à la cavité du four sélectionnée.
▯ Certaines commandes permettent de revenir à l’écran
antérieur en effleurant le symbole ;.
▯ Certaines commandes permettent de confirmer en
effleurant le symbole 8.
Menu principal
Effleurez la touche tactile MENU pour accéder au menu
principal.
--------
&RQYHFWLRQUpHOOH
9DSHXU <RP7RY 6DEEDW &XLVVRQFRQY &XLVVRQ 5{WLVVFRQY
&XLVVRQFRQYHFWLRQ
&XLVVRQ
°
6DEEDW
5{WLVVFRQY
5{WL
°
<RPâ7RY
³
&RQYUpHOOH
0RGHVGHFXLVVRQ
&RQWLQXHU
1HWWIDFLOH 1HWW$XWR
&RQWLQXHU
6pFKDJH
Menu Utilisation
¢
Modes de cuisson
Sélectionne le mode conventionnel
de cuisson et la température pour
l’aliment
²
Programmes vapeur
Préparation de plats avec cuisson à
la vapeur
ª
Séchage
Permet de sécher la cavité du four
après une utilisation de la vapeur
š
Nettoyage facile
Utilise la vapeur pour dégager les
débris d’aliments pour le nettoyage
™
Nettoyage par écolyse
Régénère les surfaces écolytiques
,
Détartrage
Permet au four à vapeur de bien
fonctionner en permanence
4
Paramètres
Personnalisation des paramètres de
l’appareil ~ "Réglages de base"
à la page 76
F
Démarrage à distance
Ce symbole apparaît lorsque la
configuration de Home Connect est
terminée.
+HXUHV 6HFRQGHV

70
Menu Modes de cuisson
L’appareil électroménager dispose de plusieurs modes
de cuisson. Les modes de cuisson sont le menu par
défaut qui apparaît lorsqu’on met l’appareil
électroménager sous tension. Le mode présélectionné
est le mode de cuisson à convection. Vous pouvez
choisir le mode de cuisson voulu en défilant vers la
gauche ou la droite.
Disponibilité du mode de cuisson
Menu Modes de cuisson- Four à vapeur
Mode de cuisson
Four à vapeur
Cavité supérieure
Four conventionnel
Cavité inférieure
Convection véritable
ØØ
Cuisson à convection
ØØ
Cuisson
ØØ
Rôtissage par convection
ØØ
Rôtissage
ØØ
Gril à convection
ØØ
Gril
ØØ
Gril max
ÞØ
Gril à convection max
ÞØ
Pizza
ØØ
Convection rapide
ØØ
Cuisson lente
ØØ
Déshydratation
ØØ
Tournebroche
ÞØ
Apprêt
ØØ
Garder chaud
ØØ
Vapeur
ØÞ
Convection à la vapeur
ØÞ
Réchaud
ØÞ
Décongélation
ØÞ
Nettoyage facile
ØØ
Nettoyage auto
ÞØ
Nettoyage par écolyse
ØÞ
Programmes automatiques à vapeur
ØÞ
Yom Tov
ØØ
Sabbat
ØØ
Ø
= Disponible Þ= Non disponible
Mode de cuisson Température
°F (°C)
Utilisation
‚
Convection réelle* 150 à 475°
(65 à 250°)
Pour la cuisson de petits mets sur une ou plusieurs grilles.
Le ventilateur distribue uniformément la chaleur émise par
l’élément chauffant annulaire du panneau arrière, dans la cavité
du four.
¶
Cuisson par
convection*
150 à 475°
(65 à 250°)
Sert à cuire les grands plats d’aliment et les pains sur
1 ou 2 grilles. Convient également aux plats
d’accompagnement et aux casseroles.
La chaleur est émise par le haut et la sole alors que le
ventilateur la distribue uniformément dans la cavité du four.

71
--------
ƒ
Cuisson* 150 à 475°
(65 à 250°)
Pour la cuisson et le braisage traditionnels sur un niveau.
La chaleur est émise uniformément du haut et de la sole du
four.
þ
Rôtissage par
convection*
150 à 475°
(65 à 250°)
Pour rôtir la volaille, de gros morceaux de viande et des
légumes.
La chaleur est émise par le haut et la sole alors que le
ventilateur la distribue uniformément dans la cavité du four.
ü
Rôti* 150 à 475°
(65 à 250°)
Pour rôtir de la volaille ou des viandes.
La chaleur est émise du haut et de la sole du four.
‡
Gril à convection 450 à 500°
(230 à 260°)
Pour rôtir de la volaille, des poissons entiers et de gros
morceaux de viande.
L’élément du gril et le ventilateur fonctionnent de façon
intermittente. Le ventilateur fait circuler l’air chaud autour des
aliments.
‰
Gril 450 à 500°
(230 à 260°)
Pour griller des aliments plats comme des steaks ou des
hamburgers, pour préparer des rôtis et gratiner des plats.
Toute la zone sous l’élément chauffant du gril devient chaude.
ú
Pizza 150 à 475°
(65 à 250°)
Pour la préparation de pizzas fraîches ou surgelées.
La chaleur est émise du haut et de la sole du four. Le ventilateur
la distribue uniformément dans la cavité du four.
÷
Convection rapide* 150 à 475°
(65 à 250°)
Pour des plats préparées surgelés. Aucun préchauffage n’est
requis.
La chaleur est émise du haut et de la sole du four alors que le
ventilateur fait circuler l’air chaud autour des aliments.
ÿ
Cuisson lente 150 à 250°
(65 à 120°)
Pour cuire lentement des morceaux de viande tendres poêlés
pour aller dans un plat allant au four, sans couvercle.
La chaleur est émise uniformément du haut et de la sole du four
à faible température.
ý
Déshydratation 100 à 160°
(40 à 70°)
Pour déshydrater des herbes, des fruits et des légumes.
Œ
Levée de pâte* 85 à 110°
(30 à 45°)
Fermentation de la pâte levée et du pain au levain.
La pâte lèvera beaucoup plus rapidement qu’à la température
ambiante, sans assécher la surface de la pâte.
¿
Maintien au chaud 150 à 225°
(65 à 110°)
Pour conserver les aliments cuits au chaud.
‹
Vapeur** 85 à 212°
(30 à 100°)
Pour cuire les légumes, le poisson et les plats
d’accompagnement, l’extraction de jus de fruits et le
blanchiment.
§
Convection à vapeur** 250 à 450°
(120 à 230°)
Conjugue la vapeur au mode de four à convection.
¨
Réchauffer** 175 à 350°
(80 à 175°)
Pour les plats cuisinés et les aliments cuits.
Les aliments cuits sont délicatement réchauffés. La vapeur
empêche les aliments de sécher.
“
Décongeler** 100 à 125°
(40 à 50°)
Pour les légumes, la viande, le poisson et les fruits.
L’humidité transfère délicatement la chaleur aux aliments. Ils ne
sèchent pas ni ne perdent leur forme.
›
Sabbat 100° à 450°
(40° à 230°)
Apparaît en modes de cuisson si activé dans les réglages.
Consultez la section Mode Sabbat au chapitre Fonctionnement
général.
›
Yom Tov 100° à 450°
(40° à 230°)
Apparaît en modes de cuisson si activé dans les réglages.
Consultez la section Mode Yom Tov au chapitre
Fonctionnement général.
*Il est possible d’utiliser la vapeur pour aider dans ce type de cuisson uniquement dans le four supérieur (il FAUT
remplir complètement le réservoir d’eau avant de lancer la commande de l’appareil électroménager).
**Mode de cuisson à la vapeur (il FAUT remplir complètement le réservoir d’eau avant de lancer la commande de
l’appareil électroménager).

72
Menu des modes conventionnels de cuisson au four
Mode de cuisson Température
°F (°C)
Utilisation
‚
Convection réelle 150° à 525°
(65° à 275°)
Pour la cuisson de petits mets sur un ou plusieurs grilles.
Le ventilateur distribue uniformément la chaleur émise par
l’élément chauffant du panneau arrière dans la cavité du four.
¶
Cuisson par convection 150° à 525°
(65° à 275°)
Sert à cuire les grands plats d’aliment et les pains sur
1 ou 2 grilles. Convient également aux plats
d’accompagnement et aux casseroles.
La chaleur est émise par le haut et la sole alors que le
ventilateur la distribue uniformément dans la cavité du four.
ƒ
Cuisson 150° à 525°
(65° à 275°)
Pour la cuisson et le braisage traditionnels sur un niveau.
Convient particulièrement aux gâteaux sur plusieurs grilles.
Consultez ci-dessous le placement des plats au four.
La chaleur est émise uniformément du haut et de la sole du
four.
þ
Rôtissage par
convection
150° à 525°
(65° à 275°)
Pour rôtir la volaille, de gros morceaux de viande et des
légumes.
La chaleur est émise par le haut et la sole alors que le
ventilateur la distribue uniformément dans la cavité du four.
ü
Rôti 150° à 525°
(65° à 275°)
Pour rôtir de la volaille ou des viandes.
La chaleur est émise du haut et de la sole du four.
¿
Maintien au chaud 150° à 225°
(65° à 110°)
Pour conserver les aliments cuits au chaud.
÷
Convection rapide 150° à 525°
(65° à 275°)
Pour préparer des aliments surgelés.
La chaleur est émise du haut et de la sole du four alors que le
ventilateur fait circuler l’air chaud autour des aliments.
ý
Déshydratation 100° à 160°
(40° à 70°)
Pour déshydrater des herbes, des fruits et des légumes.
ÿ
Cuisson lente 150° à 250°
(65° à 120°)
Pour cuire lentement des morceaux de viande tendres poêlés
pour aller dans un plat allant au four, sans couvercle.
La chaleur est émise uniformément du haut et de la sole du four
à faible température.
ù
Gril à convection max 450° à 550°
(230° à 290°)
Pour des pièces tendes et épaisses de viande, de volaille et de
poisson. Utilisez le grand élément chauffant du gril avec le
ventilateur du mode convection pour permette de cuire
plusieurs aliments simultanément.
‡
Gril à convection 450° à 550°
(230° à 290°)
Pour rôtir de la volaille, des poissons entiers et des gros
morceaux de viande.
L’élément du gril et le ventilateur fonctionnent de façon
intermittente. Le ventilateur fait circuler l’air chaud autour des
aliments.
‰
Gril 450° à 550°
(230° à 290°)
Pour griller des aliments plats comme un steak et des
hamburgers, pour préparer des rôtis et gratiner des plats.
Toute la zone sous l’élément chauffant du gril devient chaude.
ú
Pizza 150° à 525°
(65° à 275°)
Pour la préparation de pizzas fraîches ou surgelées.
La chaleur est émise du haut et de la sole du four. Le ventilateur
distribue uniformément la chaleur dans la cavité du four.
Œ
Levée de pâte 85° à 110°
(30° à 45°)
Fermentation pour la pâte levée et le pain au levain.
La pâte lèvera beaucoup plus rapidement qu’à la température
ambiante. La surface de la pâte ne s’assèche pas.
μ
Rôtisserie 175° à 550°
(80° à 290°)
Pour rôtir de la volaille et des gros morceaux de viande. Les
aliments tournent lentement sur une broche.
Le mode tournebroche utilise la chaleur diffusée par l’élément
supérieur.
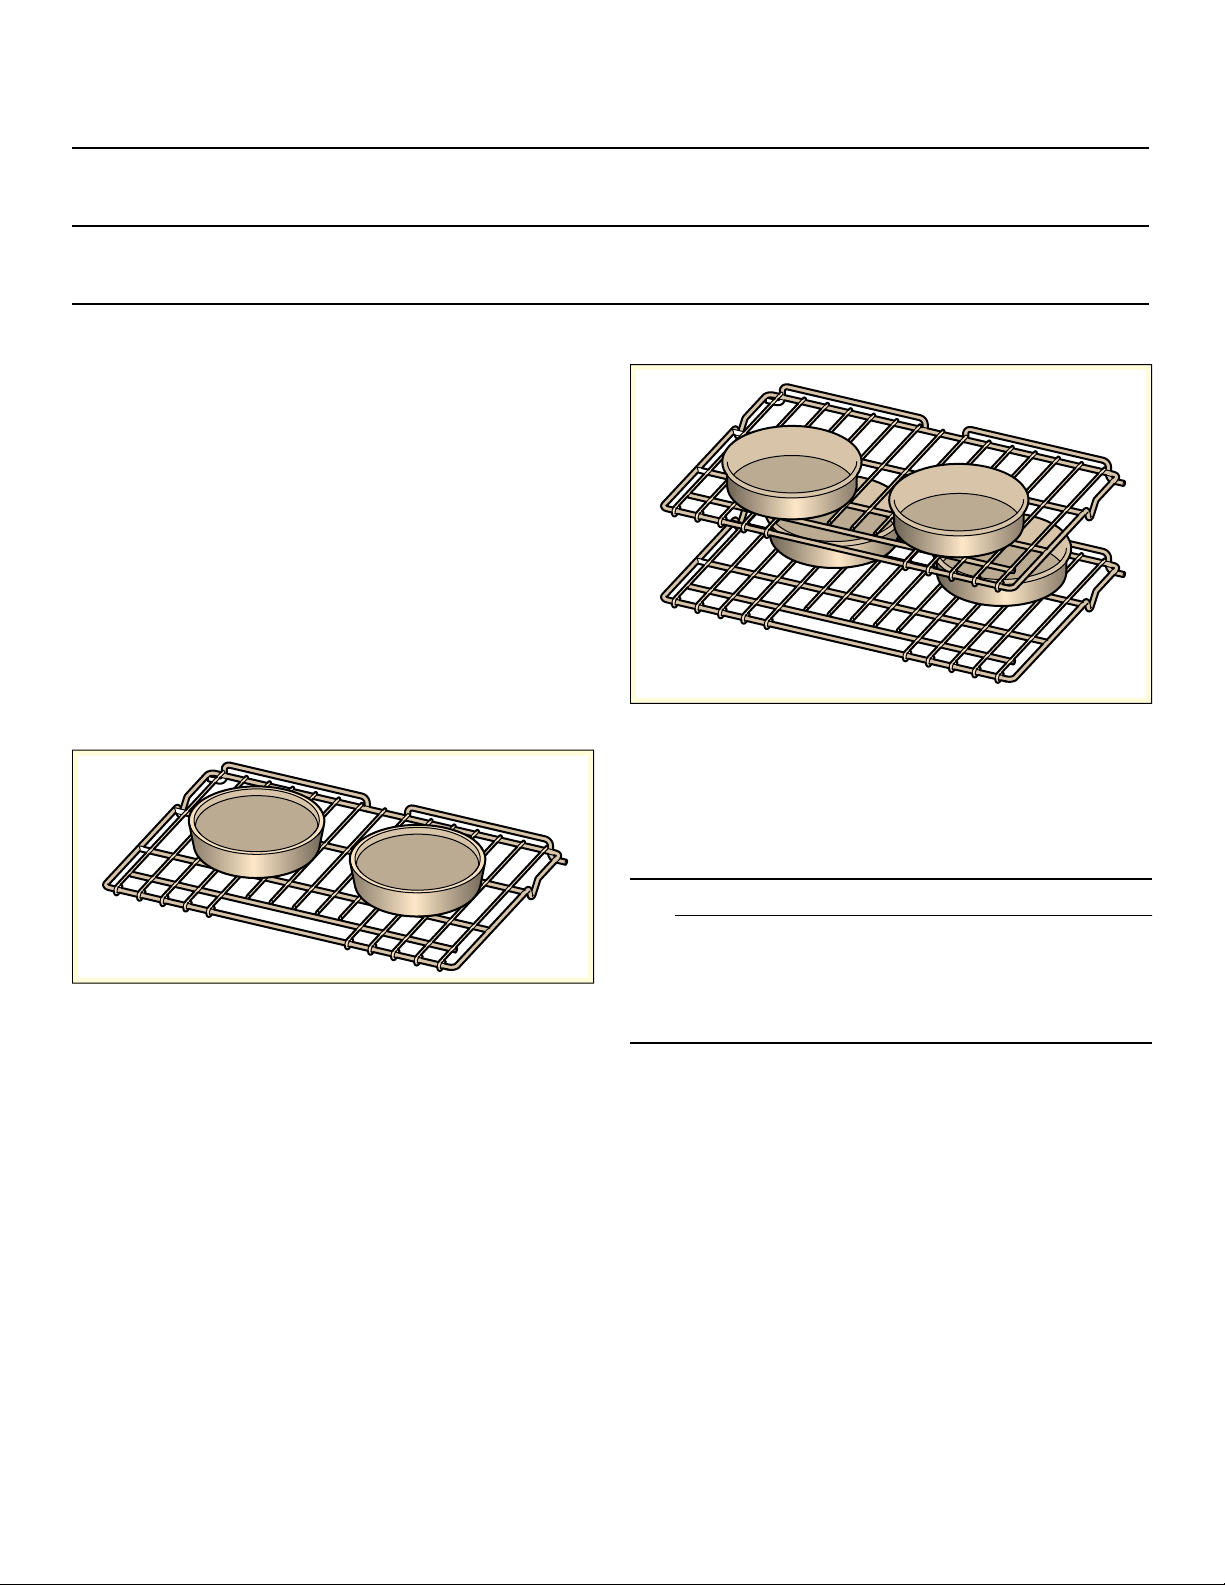
73
Conseils généraux pour four conventionnel
Positionnement de plats de cuisson
Les résultats de cuissons sont meilleurs si les plats sont
placés au centre du four. Si plus d’un plat cuit sur une
grille, laissez environ 1 à 1,5 po (2 à 2,5 cm) d’espace
entre les plats.
Cuisson sur une seule grille
Utilisez le mode Cuisson pour optimiser les résultats
lorsque vous y cuisez des gâteaux à étages sur une
seule grille. Déposez les moules à gâteau sur la grille au
niveau 4 dans le four comme illustré ci-dessous.
Remarque : Les recommandations de positionnement
des plats de cuisson ne s’appliquent qu’au four
conventionnel.
Deux moules à gâteau, grille niveau 4
Cuisson sur plusieurs grilles pour les gâteaux
Lors de la cuisson d’un gâteau à quatre étages en même
temps, étagez les moules sur deux grilles de manière à
ce qu’un moule ne soit pas placé directement au-dessus
de l’autre. Pour d’excellents résultats, utilisez le mode
Cuisson. Déposez les moules à gâteau sur les grilles aux
niveaux 3 et 5 en les étageant dans le four comme
illustré.
Gâteau 4 étages Grilles aux niveaux 3 et 5
Utilisez le mode Convection véritable pour optimiser les
résultats en cuisant des biscuits sur plusieurs niveaux.
Déposez les plaques à biscuits sur les grilles des
niveaux 3 et 6.
Papier aluminium
9 AVERTISSEMENT
Ne pas utiliser de papier aluminium ou de doublure
de protection pour revêtir toute partie de l'appareil,
et en particulier le fond du four. L'utilisation de ces
doublures peut entraîner un risque de choc
électrique ou d'incendie.
ˆ
Gril max 450° à 550°
(230° à 290°)
Pour des pièces minces et tendres de viandes, de volaille et de
poisson. Utilisez le grand élément chauffant du gril pour cuire
plusieurs aliments simultanément.
›
Sabbat 100° à 450°
(40° à 230°)
Apparaît en modes de cuisson si activé dans les réglages.
Consultez la section Mode Sabbat au chapitre Fonctionnement
général.
›
Yom Tov 100° à 450°
(40° à 230°)
Apparaît en modes de cuisson si activé dans les réglages.
Consultez la section Mode Yom Tov au chapitre
Fonctionnement général.

74
Préchauffage du four
▯ Placez les grilles dans la position désirée avant de
faire chauffer le four.
▯ Préchauffez le four lors de l’utilisation des modes
Cuisson, Cuisson par convection, Convection
véritable, Pizza, Gril, Gril à convection et Garder au
chaud.
▯ Le préchauffage n’est pas utilisé pour les modes
Convection rapide, Tournebroche, Rôtisserie à
convection, Fermentation/Apprêt et Déshydratation.
▯ Faites préchauffer le four tout en préparant les
ingrédients de la recette ou les aliments.
▯ Le réglage d’une température plus élevée n’écourte
pas le temps de préchauffage.
▯ Une fois le four préchauffé, ouvrez la porte du four et
insérez les aliments le plus vite possible pour
minimiser la perte de chaleur et éviter la baisse de
température du four.
▯ Pour aller plus vite, utilisez la fonction de Préchauffage
rapide.
Rappels concernant le préchauffage
L’élément inférieur est masqué par la sole du four. Il est
normal que le temps de préchauffage diffère de celui de
votre four précédent, dont l’élément chauffant était
exposé dans le bas du four.
▯ Le préchauffage est inutile pour les viandes, la
volailles et les plats en casserole, et le mode
Convection rapide.
▯ Le temps de préchauffage sera plus long si
l’alimentation électrique du domicile est inférieure
à 240 volts.
▯ Toute augmentation de la température du four
entraînera un temps de préchauffage supplémentaire.
Par exemple, le temps de préchauffage pour un four à
425 °F (220 °C) est plus long que celui d’un four à
350 °F (180 °C).
Pour la cuisson au gril, préchauffez le four pendant
3 à 4 minutes. Ne préchauffez pas le four au-delà de
5 minutes.
Pour de meilleurs résultats
▯ Servez-vous des tableaux de recommandations de
cuisson que vous retrouverez dans les Tableaux de
cuisson, Guide d’utilisation et d’entretien.
▯ Ouvrez la porte aussi brièvement que possible pour
éviter les chutes de température.
▯ Utilisez l’éclairage intérieur du four pour vérifier la
cuisson des aliments par le hublot plutôt que d’ouvrir
souvent la porte du four.
▯ Servez-vous de la minuterie pour comptabiliser les
temps de cuisson.
Casseroles et plats allant au four
▯ Les plats de cuisson en verre absorbent la chaleur.
Certains fabricants d’ustensiles de cuisine
recommandent de réduire la température de 25 °F
lors de l’utilisation de ce type de plat. Respectez les
recommandations du fabricant.
▯ Utilisez des plats adaptés au degré de brunissage
désiré. Pour obtenir une croûte tendre, légère et brun
doré, utilisez des plats allant au four en métal anodisé
ou brillant.
▯ Les plats foncés, rugueux ou mats (antiadhésifs ou
anodisés) absorbent la chaleur et donnent une croûte
plus dorée et plus croustillante. Certains fabricants
recommandent de réduire la température de 25 °F
lors de l’utilisation de ce type de plat. Respectez les
recommandations du fabricant.
▯ Les plaques à biscuits ou les plats allant au four isolés
feront augmenter la durée de cuisson.
▯ Ne déposer pas de plat à rôtir ou tout autre objet lourd
sur la porte ouverte du four.
▯ Ne laissez pas un plat à rôtir vide dans le four pendant
la cuisson, car cela risque de modifier le rendement
de la cuisson. Rangez le plat à rôtir à l’extérieur du
four.
Cuisson à haute altitude
À haute altitude, les recettes et les temps de cuisson
peuvent varier.
Condensation
Il est normal de voir une certaine quantité de vapeur
d'eau s'échapper des aliments au cours d'un processus
de cuisson. La quantité dépend de la teneur en humidité
des aliments. L'humidité peut se condenser sur n'importe
quelle surface plus froide que la cavité du four, comme
par exemple sur le tableau de commande.

75
Avant la première utilisation
Avant d'utiliser l’appareil neuf, vous devez procéder à
certains réglages. Vous devez également nettoyer le
compartiment de cuisson et les accessoires.
Avant la première utilisation
▯ Avant l'utilisation, le four doit être correctement installé
par un technicien qualifié.
▯ Retirer tout matériau d'emballage à l'intérieur et à
l'extérieur du four.
▯ Essuyer le four tant qu'il est froid à l'aide d'un chiffon
propre et humide et sécher.
▯ Il peut y avoir une légère odeur aux premières
utilisations. Ceci est normal et disparaîtra.
▯ Pour obtenir des résultats de cuisson optimaux, utiliser
une batterie de cuisine adéquate.
▯ Lire et comprendre toutes les précautions de sécurité
et le Manuel d'utilisation et d'entretien avant toute
utilisation.
Exécutez les sections suivantes avant d’utilisation :
Dureté de l’eau
Avant d’utiliser l’appareil électroménager pour la
première fois, vérifiez la dureté de l’eau du robinet
auprès de la société de distribution d’eau.
Vous devez bien régler la plage de dureté de l’eau afin
que l’appareil électroménager vous envoie un rappel de
détartrage au bon moment.
AVIS
▯ L’utilisation de liquides qui ne conviennent pas risque
d’endommager l’appareil électroménager.
N’utilisez pas d’eau distillée ou d’autres liquides.
Utilisez uniquement de l’eau adoucie fraîche et froide
du robinet ou de l’eau minérale plate.
▯ Si l’eau est très dure, nous vous recommandons
d’utiliser de l’eau adoucie.
▯ Si vous utilisez uniquement de l’eau adoucie, vous
pouvez régler la plage de dureté de l’eau à
« adoucie ».
▯ Si vous utilisez de l’eau minérale, réglez la plage de
dureté de l’eau à « 4 très dure ».
▯ Si vous utilisez de l’eau minérale, utilisez uniquement
de l’eau minérale plate.
Première mise en service
Dès que l’appareil électroménager est raccordé à
l’alimentation électrique, le premier réglage « Heure du
jour » apparaît à l’écran.
Réglage de l’heure du jour
1.
Effleurez la ligne du bas.
Les options de réglage du temps sont affichées.
2.
Effleurez le champ tactile « Heure » et glissez vers la
gauche ou la droite pour sélectionner l’heure actuelle.
3.
Effleurez le champ tactile « Minute » et glissez vers la
gauche ou la droite pour sélectionner les minutes
actuelles.
4.
Effleurez le symbole 8 pour confirmer les réglages.
Réglage de la langue
1.
Effleurez la ligne du bas.
2.
Glissez vers la gauche ou la droite pour sélectionner
la langue requise.
3.
Effleurez la ligne du haut.
Réglages de l’affichage de l’heure
1.
Effleurez « Affichage de l’heure ».
2.
Effleurez la ligne du bas.
3.
Glissez vers la gauche ou la droite pour sélectionner
« Numérique » ou « Analogue ».
4.
Effleurez la ligne du haut.
Plage de dureté de l’eau Réglage
0 0 adoucie
1 (maximum de 60 ppm) 1 douce
2 (entre 60 et 120 ppm) 2 moyenne
3 (entre 120 et 180 ppm) 3 dure
4 (plus de 180 ppm) 4 très dure
0LQXWHV
+RXUV
/DQJXDJH
(QJOLVK
6HWWKHODQJXDJH\RXUHTXLUH
7LPHRI'D\ &ORFN'LVSOD\
/DQJXDJH
(QJOLVK
6HWWKHODQJXDJH\RXUHTXLUH
)UDQoDLV(VSDxRO

76
Réglage de la dureté de l'eau
1.
Effleurez « Dureté de l’eau ».
2.
Effleurez la ligne du bas.
3.
Glissez vers la gauche ou la droite pour sélectionner
la bonne dureté de l’eau.
4.
Effleurez la ligne du haut.
Réglage de Home Connect
Vous pouvez démarrer l’assistant Home Connect pour
établir la connexion au réseau Home Connect et appairer
l’appareil mobile.
1.
Effleurez « Home Connect ».
2.
Effleurez « Démarrer assistant ».
3.
Respectez les directives du chapitre
« Home Connect ».~ "Home Connect" à la page 85
Remarque : Vous pouvez également activer cette
fonctionnalité plus tard à partir du menu
« Réglages ».~ "Réglages de base" à la page 76
Remarques
▯ Vous pouvez modifier ces réglages à tout moment
dans les réglages de base.
▯ Après le branchement de l'appareil ou une panne de
courant, les réglages pour la première mise en service
apparaissent à l'écran.
Étalonnage de l’appareil électroménager
et nettoyage la cavité du four
Le point d’ébullition de l’eau varie en fonction de
l’altitude. Il faut étalonner le four afin d’optimiser le
rendement après son installation.
Préparation de l’appareil électroménager pour
étalonnage
1.
Retirez les accessoires de la cavité du four.
2.
Retirez toutes pièces restantes de l’emballage de la
cavité du four notamment le granulé de polystyrène.
3.
Avant d’étalonner l’appareil électroménager, essuyez
les surfaces lisses de la cavité du four avec un chiffon
doux et humide.
Étalonnage et nettoyage
Remarques
▯ Il est possible d’amorcer l’étalonnage uniquement
lorsque la cavité du four est froide (température
ambiante).
▯ N’ouvrez pas la porte de l’appareil électroménager au
cours de l’étalonnage. Cela interrompra le processus.
AVIS : DOMMAGES À L’ÉMAIL! Ne lancez pas une
commande s’il y a de l’eau sur la sole de la cavité du
four. Laissez l’appareil électroménager refroidir et
essuyez l’eau sur la sole de la cavité du four avant de
lancer une commande.
1.
Remplissez le réservoir d’eau.
2.
Effleurez la touche tactile ON l OFF pour mettre
l’appareil électroménager sous tension.
3.
Le four s’étalonne automatiquement après un cycle en
mode de chauffage vapeur à 212 °F (100 °C)
pendant 30 minutes. Réglez le mode de cuisson, la
température et la durée pour l’étalonnage. Effleurez
START pour lancer la commande.
4.
Après l’étalonnage, laissez l’appareil électroménager
refroidir.
5.
Séchez la sole de la cavité du four.
6.
Réglez la cuisson à 475 °F (245 °C).
7.
Maintenez la cuisine aérée lorsque l’appareil
électroménager chauffe.
8.
Éteignez l’appareil électroménager après la durée
indiquée. Utilisez la touche tactile ON l OFF pour
éteindre l’appareil électroménager.
9.
Attendez le refroidissement de la cavité du four.
10.
Nettoyez les surfaces lisses avec un torchon à
vaisselle et de l’eau savonneuse.
11.
Videz le réservoir d’eau et séchez la cavité du four.
Remarque : L’appareil électroménager enregistre les
réglages d’étalonnage et les conserve même après une
panne de courant ou un débranchement de la prise
électrique. Il n’y a aucune raison de relancer
l’étalonnage.
Nettoyer les accessoires
Nettoyer soigneusement les accessoires avec de l'eau
additionnée de produit à vaisselle et une serviette ou une
brosse douce.
Réglages de base
Vous pouvez ajuster plusieurs réglages de l’appareil
pour faciliter son utilisation. Au besoin, vous pouvez
modifier ces réglages dans le menu « Paramètres ».
Modification des paramètres
1.
Effleurez la touche tactile ON l OFF (Marche l Arrêt).
2.
Effleurez la touche tactile MENU.
3.
Glissez vers la gauche ou la droite pour sélectionner
« Paramètres 4 ».
4.
Effleurez « Continuer ».
5.
Glissez vers la gauche ou la droite pour sélectionner
le réglage désiré.
Étalonnage
Mode de cuisson
Vapeur ‹
Température 212 °F (100 °C)
Durée 30 minutes
Chauffage
Mode de cuisson
Cuisson
ƒ
Température 475 °F (245 °C)
Temps de cuisson 30 minutes

77
6.
Effleurez le champ tactile inférieur.
7.
Glissez vers la gauche ou la droite pour sélectionner
le réglage désiré.
8.
Effleurez l’icône 8 (le cas échéant) pour activer le
réglage.
9.
Effleurez la touche tactile MENU.
10.
Effleurez « Sauvegarder » pour conserver les
modifications.
Réglages Offerts
Généralités sur le fonctionnement
Ce chapitre décrit comment procéder aux réglages de
l’appareil électroménager et quels sont les modes
disponibles. Il met également en vedette des fonctions et
des caractéristiques supplémentaires.
Cuisson à haute altitude
À haute altitude, les recettes et les temps de cuisson
peuvent varier.
Mise sous tension ou hors tension de
l'appareil
Effleurez la touche tactile ON l OFF (MARCHE l ARRÊT)
pour mettre l’appareil sous ou hors tension.
À l’écran, vous verrez si la chaleur résiduelle de la cavité
du four est toujours aussi élevée après avoir éteint
l’appareil électroménager. Vous verrez « Four chaud »
dans le coin inférieur gauche de l’écran.
Remarques
▯ Certains affichages et certaines remarques,
notamment la chaleur résiduelle de la cavité du four,
demeurent visibles à l’écran après avoir éteint
l’appareil électroménager.
▯ Après le fonctionnement de l’appareil, le ventilateur de
refroidissement peut encore fonctionner jusqu’au
refroidissement de la cavité du four.
▯ Éteignez l’appareil électroménager lorsque vous ne
l’utilisez pas. Il s’éteint de lui-même automatiquement
lorsqu’aucun paramètre n’est saisi pendant un certain
temps.
Réglage Options
Heure Temps donnée en heures et en
minutes
Langue english, français, español
Format de
l’heure
12 h, 24 h
Affichage de
l’heure
Numérique, Analogue
Format
température
Fahrenheit (°F), Celsius (°C)
Format du poids Livre (lb), Kilogramme (kg)
Dureté de l’eau 0 (adoucie)
1 (douce)
2 (moyenne)
3 (dure)
4 (très dure)
Volume du signal 1 à 5
Touche son Activé, désactivé
Luminosité écran 1 à 5
Mode Veille Activé, désactivé
Démarrage
animation
Activé, désactivé
Conversion
Convection
Activée, désactivée
Réduit la température du four de
25 °F (4 °C)
Écart de
température
▯ Écart temp. : Supérieur
de -35 °F à +35 °F
(de -20 °C à +20 °C)
▯ Écart temp. : Inférieur
de -35 °F à +35 °F
(de -20 °C à +20 °C)
Mode Sabbat Activé, Désactivé
Home Connect Wi-Fi : Activé, désactivé
Télécommande : Activée, désactivée
Déconnexion du réseau
Connexion à l’appli
Afficher l’état du réseau
Accès au Service après-vente :
▯ Autorisé (écran montre t)
▯ Refusé
Mode Démo Activé, désactivé
Réglages d’usine Restaurer
Service
après-vente
Affiche les coordonnées du Service
après-vente

78
Options de minuterie
Une fois le temps écoulé, l’appareil électroménager
émettra un seul bip sonore.
Affichage et dissimulation des options de minuterie
Pour afficher ou masquer les options de minuterie,
effleurez la touche tactile TIMERS.
Remarque : Les options de minuterie affichées sont
masquées automatiquement après un certain temps. Si
vous avez déjà réglé un temps de cuisson, il est
automatiquement conservé.
Minuterie du four
Vous pouvez régler le temps de cuisson du repas sur
l’appareil électroménager. Autrement dit, le four s’éteint à
la fin du temps écoulé. Il s’agit d’une fonction pratique
vous permettant de poursuivre ce que vous faites sans
avoir à penser au repas.
1.
Effleurez la touche tactile ON l OFF.
2.
Réglez le mode de cuisson et la température.
3.
Effleurez la touche tactile TIMERS.
Les options de minuteries s’affichent à l’écran.
4.
Effleurez le champ tactile « + Minuterie de four ».
5.
Effleurez le champ requis et glissez vers la gauche ou
la droite pour régler la minuterie de four.
Vous pouvez régler les heures et les minutes.
6.
Effleurez le symbole 8.
Le mode et le temps de cuisson s’affichent.
7.
Effleurez la touche tactile START l STOP.
L’appareil électroménager commence à chauffer et le
compte à rebours de la minuterie du four est lancé.
Remarque : Un signal sonore retentit à la fin du temps
écoulé. « Minuterie du four terminée » s’affiche.
L’appareil électroménager met fin automatiquement à la
cuisson. Effleurez la touche tactile ON l OFF pour
éteindre l’appareil électroménager.
Minuterie de cuisine
Vous pouvez régler la minuterie de cuisine lorsque
l’appareil électroménager est sous ou hors tension.
1.
Effleurez la touche tactile TIMERS.
La minuterie de cuisine s’affiche à l’écran.
Si l’appareil électroménager est sous tension, effleurez
d’abord le champ . .
2.
Glissez vers la gauche ou la droite pour sélectionner
la valeur de la minuterie. Vous pouvez régler les
heures, les minutes et les secondes.
3.
Effleurez l’icône 8.
La minuterie de cuisine lance le compte à rebours.
Le symbole . et la valeur de la minuterie sont affichés
dans le coin supérieur gauche de l’écran.
Remarque : Un signal sonore retentit à la fin du temps
écoulé. « Minuterie de cuisine terminée » s’affiche.
Option de
minuterie
Utilisation
.
Minuterie de
cuisine
La minuterie de cuisine fonctionne
comme tout autre minuteur
mécanique standard. L’appareil
électroménager ne s’allume pas
et ne s’éteint pas
automatiquement.
+
Minuterie du
four
Après le temps écoulé, l’appareil
électroménager s’éteint
automatiquement.
*
Heure de fin L’appareil électroménager
s’allume et s’éteint
automatiquement après avoir
réglé le temps de cuisson et une
heure de fin.
PLQV
$QQXOHU
0LQXWHULHGHFXLVLQH
KPLQ
$QQXOHU
0LQXWHULHGXIRXU
5pLQLWLDOLVHU
+HXUHGHILQ
0LQXWHV
+HXUHV
&RQYHFWLRQYpULWDEOH
³
KPLQ
â
0LQXWHV+HXUHV 6HFRQGHV

79
Opération reportée - « Heure de fin »
L’appareil électroménager s’allume automatiquement
puis s’éteint à l’heure de fin préselectionnée. Pour ce
faire, réglez le temps de cuisson et précisez l’heure de
fin de cuisson.
Il est possible d’utiliser le report d’opération uniquement
en association avec un mode de cuisson.
Remarques
▯ Assurez-vous que les aliments ne resteront pas dans
la cavité du four trop longtemps, car ils pourraient se
gaspiller.
▯ L’option de reporter le démarrage de la cuisson n’est
pas offerte pour tous les modes de cuisson.
9 ATTENTION
Pour préserver la sécurité alimentaire, ne pas
laisser les aliments dans le four plus d’une heure
avant ou après leur cuisson.
1.
Placez les aliments dans le bon accessoire et glissez-
le dans la cavité du four. Fermez la porte de l’appareil
électroménager.
2.
Effleurez la touche tactile ON l OFF.
3.
Réglez le mode de cuisson.
4.
Effleurez la touche tactile TIMERS. Les options de
minuterie s’affichent à l’écran.
5.
Sélectionnez la minuterie du four et réglez un temps
de cuisson. Effleurez l’icône 8.
6.
Sélectionnez de nouveau les TIMERS et réglez l’heure
de fin de cuisson. Effleurez l’icône 8.
7.
Effleurez la touche tactile START l STOP.
L’appareil électroménager attend la bonne heure pour
lancer la commande.
Dès que l’heure de fin est atteinte, un signal sonore
retentit et le fonctionnement de l’appareil prend fin
automatiquement.
Vérification, modification ou annulation des réglages
1.
Effleurez la touche tactile TIMERS.
Les options de réglage de temps s’affichent à l’écran.
2.
Effleurez l’option de minuterie requise.
3.
Glisser vers la gauche ou la droite sur l’écran tactile
pour modifier les réglages.
Pour supprimer une valeur de la minuterie, réglez
« 00:00 » ou effleurez « Annuler ».
Réglage d’un mode de cuisson
Utilisez les touches et les champs tactiles de l’écran pour
passer dans les différents menus de modes de
fonctionnement.
Par exemple : Convection réelle à 325 °F (160 °C)
1.
Effleurez la touche tactile ON l OFF pour mettre
l’appareil électroménager sous tension.
Vous serez amené directement au menu des modes
de cuisson.
2.
Glissez vers la gauche sur la ligne supérieure de
l’écran pour sélectionner « Convection réelle »
‚.
3.
Glissez vers la gauche ou la droite sur la ligne
inférieure de l’écran pour sélectionner la température.
4.
Effleurez la touche tactile START l STOP pour lancer la
commande.
La barre d’état apparaît à l’écran et indique le progrès
du préchauffage.
Quand l’appareil électroménager a atteint la température
réglée, « Préchauffage terminé » s’affiche et un signal
sonore retentit. Le four poursuit la cuisson à la
température réglée.
&RQYHFWLRQUpHOOH
&XLVVRQ
³
¯
9DSHXU
°
6DEEDW
&XLVVRQFRQY
5{WLVVFRQY
°
<RPâ7RY
&RQYHFWLRQUpHOOH
³
&RQYHFWLRQUpHOOH
³

80
Réglage du four double
1.
Effleurez le symbole q ou r pour sélectionner la
cavité du four inférieur ou supérieur.
2.
Procédez aux réglages comme d’habitude.
3.
Une fois les réglages terminés pour la première cavité
du four, effleurez le symbole q ou r pour sélectionner
l’autre compartiment.
L’écran affiche les réglages des deux cavités du four
côte-à-côte. Le compartiment supérieur est affiché à
gauche et le compartiment inférieur, à droite.
Pour ajuster les réglages, effleurez le champ de la cavité
du four désirée sur l’écran.
Remarque : Vous pouvez seulement ajuster les
réglages d’une cavité de four à la fois.
Valeurs par défaut
L’appareil électroménager suggère une température ou
un réglage pour chaque mode de cuisson. Vous pouvez
accepter cette valeur ou la modifier dans la section
appropriée.
Barre de préchauffage
Dès qu’un nouveau mode de cuisson est amorcé, la
barre de préchauffage apparaît à l’écran. Elle indique
l’augmentation de la température dans la cavité du four.
Lorsque le four est bien chauffé, un signal sonore
retentira.
Touche Tactile INFO
Si le touche tactile INFO s'allume, des informations
importantes concernant le mode que vous utilisez sont
disponibles. Cela peut inclure, par exemple, des
recommandations sur des ustensiles de cuisine
appropriés ou comment préparer des aliments pour un
résultat de cuisson sûr. Lorsque vous appuyez sur le
bouton INFO, les informations s'affichent pendant
quelques secondes.
Pour quitter l'information immédiatement, appuyez sur le
bouton INFO ou sur l'écran.
Sons
L’appareil émet plusieurs sons en cours de
fonctionnement. Un signal sonore est émis à chaque fois
que vous effleurez une touche ou un champ tactile, ou à
l’amorce ou à la fin de la cuisson. Vous pouvez modifier
le volume des signaux sonores dans le menu Réglages.
~ "Réglages de base" à la page 76
Modification ou annulation du
fonctionnement de l’appareil
électroménager
Remarque : Dans un four double, si les deux cavités
fonctionnent, il faut choisir celle qui sera modifiée.
Modification du fonctionnement de l’appareil
électroménager
1.
Effleurez la touche tactile START l STOP pour
interrompre la cuisson.
2.
Effleurez la zone de l’écran du réglage à modifier.
3.
Glissez vers la gauche ou la droite pour modifier le
réglage.
4.
Effleurez la touche tactile START l STOP pour lancer le
changement de commande.
Remarques
▯ S’il s’agit uniquement d’une modification de
température, le four pourrait redémarrer
automatiquement.
▯ Le ventilateur de refroidissement peut continuer à
tourner même avec l’interruption d’un fonctionnement.
Annulation du fonctionnement de l’appareil
électroménager
Effleurez la touche tactile START l STOP pour annuler la
commande à l’appareil électroménager.
Remarque : Dans le cas d’un four double, si les deux
cavités fonctionnent, vous devez choisir une cavité avant
d’effleurer la touche tactile START l STOP.
&RQYHFWLRQUpHOOH
³
U
T
&RQYHFWLRQUpHOOH
³
&XLVVRQ
&RQYHFWLRQUpHOOH
³

81
Préchauffage rapide
Pour certains modes de cuisson, vous pouvez réduire la
durée du temps de préchauffage en appuyant sur
Préchauffage rapide.
La fonction Préchauffage rapide est offerte pour les
modes de cuisson suivants :
▯ Convection réelle
▯ Cuisson par convection
▯ Cuisson
▯ Rôti
▯ Rôtissage à convection
Pour un résultat de cuisson uniforme, ne déposez pas
les aliments ou les accessoires dans la cavité du four
avant la fin du Préchauffage rapide.
Remarques
▯ Si la touche tactile FAST PREHEAT est illuminée, Vous
pouvez activer la fonction.
▯ Pour désactiver la fonction avant qu’elle n’est
terminée, effleurez la touche tactile FAST PREHEAT.
Activation de la fonction « Préchauffage rapide »
1.
Réglez un mode de cuisson et la température.
2.
Effleurez la touche tactile START l STOP pour lancer le
mode de cuisson.
3.
Effleurez la touche tactile FAST PREHEAT pour activer
la fonction.
Le symbole ° apparaît à l’écran.
4.
Une fois la température réglée atteinte, la fonction
« Préchauffage rapide » s’éteint automatiquement. Le
symbole ° disparaît de l’écran. Placez les aliments
dans la cavité du four.
Verrouillage du Panneau de Commande
L’appareil est doté d’un verrouillage du panneau afin qu'il
ne puisse pas être activé accidentellement ou modifier
les réglages.
Activation et désactivation
L’appareil électroménager doit être éteint.
1.
Appuyer et maintenez la touche tactile TIMERS
enfoncée pendant près de quatre secondes jusqu’à ce
que « Verrouillage du panneau activé » s’affiche. Le
verrouillage du panneau est activé. Le symbole 1 est
affiché dans le coin supérieur gauche de l’écran.
2.
Appuyer et maintenez la touche tactile TIMERS
enfoncée pendant près de quatre secondes jusqu’à ce
que « Verrouillage du panneau désactivé » s’affiche.
Le verrouillage du panneau est désactivé.
Conversion Convection Auto
Les modes de cuisson par convection véritable et
convection nécessitent une réduction de température de
25 °F (10 °C). La fonction Conversion Convection Auto
réduit automatiquement la température saisie.
Saisissez la température de la recette ou indiquée sur
l’emballage lors du réglage du mode. Les commandes
du four calculent automatiquement la bonne température
pour ces modes en réduisant la température saisie de
25 °F (10 °C). Ces résultats apparaissent alors à
l’écran.
Pour activer cette fonction :
1.
Passez à Réglages
2.
Effleurez la touche tactile MARCHE l ARRÊT
(ON l OFF) pour mettre le four sous tension.
3.
Effleurez la touche tactile MENU.
4.
Défilez vers Réglages sur l’écran tactile.
5.
Sélectionnez Conversion convection et effleurez
MARCHE (ON).
6.
Quittez les réglages et sélectionnez « Enregistrer »
pour les conserver.
Écart de température
Cette fonction est utile si les aliments sont
systématiquement trop ou pas assez dorés. Les réglages
augmentent ou diminuent la température réglée du four
selon la valeur choisie.
Les modes de cuisson suivants prennent en charge cette
fonctionnalité :
▯ Cuisson
▯ Cuisson par convection
▯ Rôti
▯ Rôtissage par convection
▯ Convection réelle
Remarque : Le four est soigneusement étalonné de
manière à offrir des résultats précis. La fonction est utile
si vous préférez des aliments plus ou moins dorés.
Consultez la section intitulée « Ajustement des réglages
de base » pour programmer un écart de température.
Remarque : Pour les fours doubles, vous pouvez régler
un écart de température différents pour chacune des
cavités.
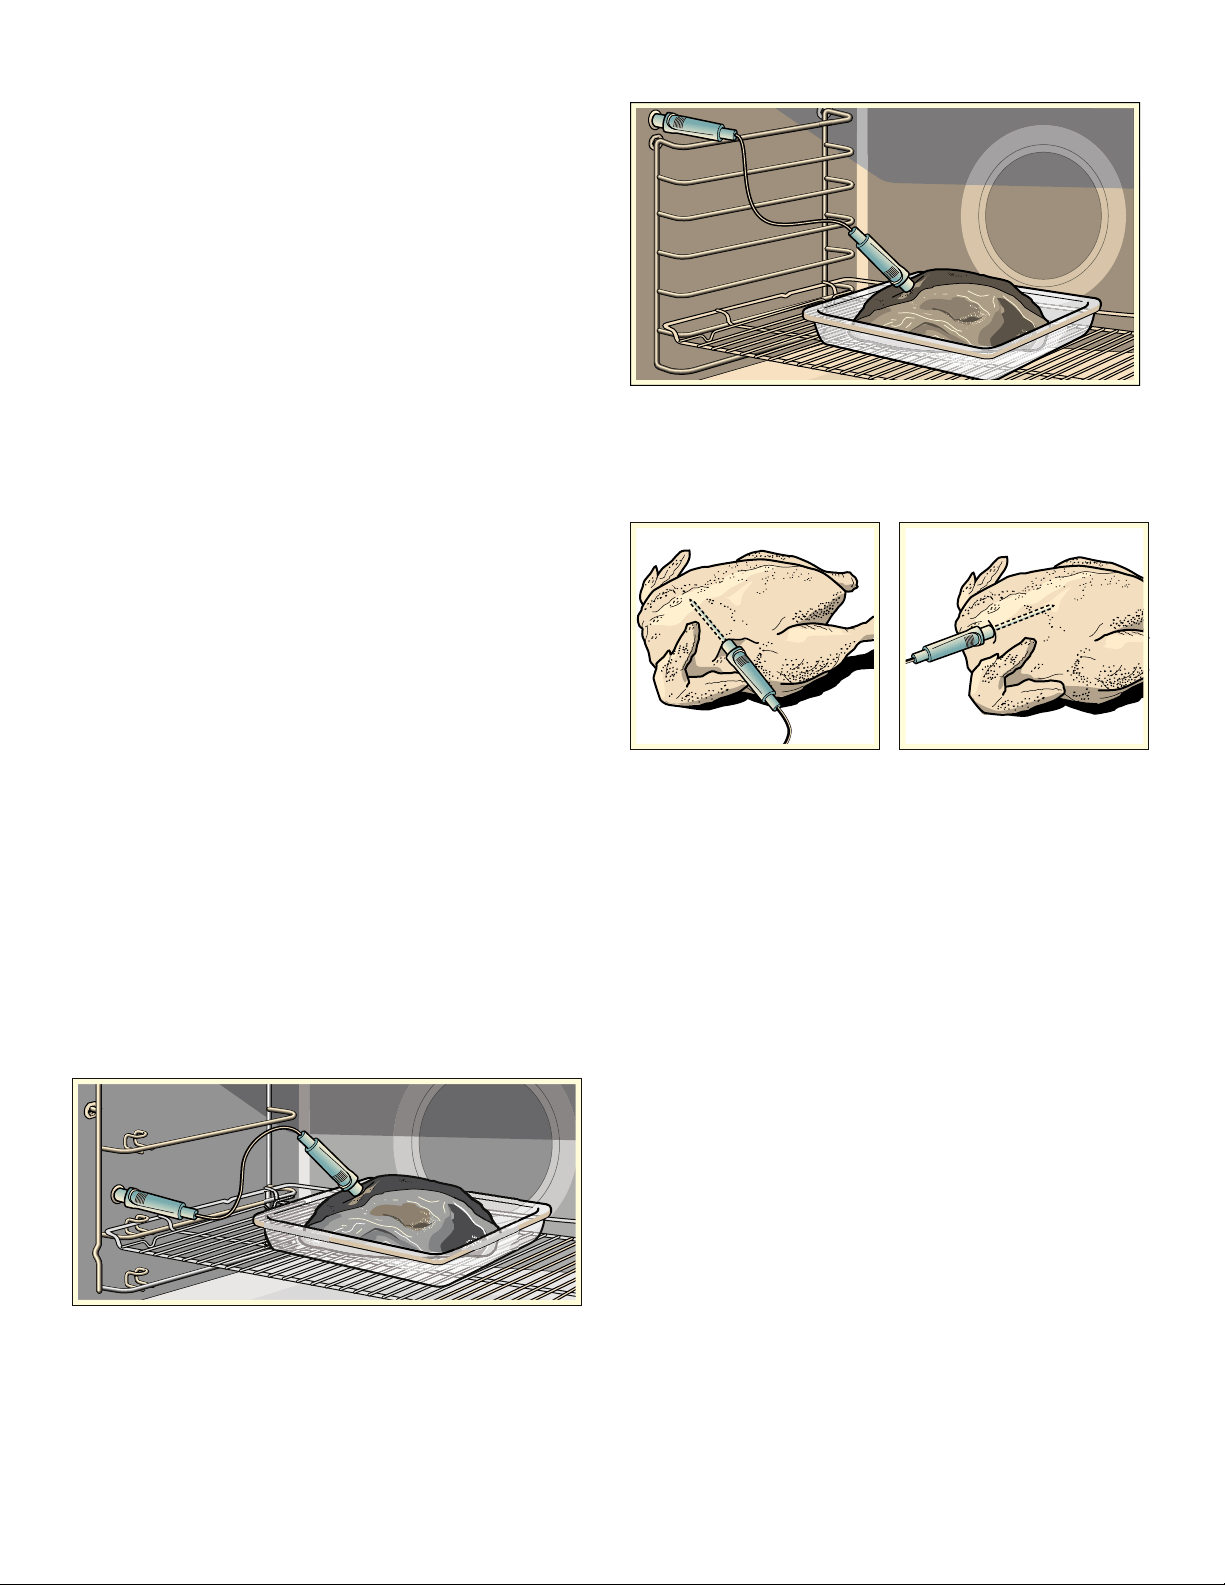
82
Sonde à viande
Une sonde thermométrique multipoints est livrée avec le
four. Elle mesure la température à trois endroits
différents de l’aliment pour garantir les résultats de
cuisson les plus précis. Une fois la température réglée
atteinte, l’appareil électroménager s’éteint
automatiquement.
Modes de cuisson convenables
▯ Convection réelle ‚
▯ Cuisson par convection ¶
▯ Cuisson ƒ
▯ Rôtissage par convection þ
▯ Rôti ü
▯ Cuisson lente ÿ
Remarques
▯ La sonde à viande mesure la température interne des
mets entre 85 °F et 210 °F (30 °C et 99 °C).
▯ Utilisez uniquement la sonde à viande fournie avec cet
appareil électroménager. Commandez des sondes à
viande supplémentaires ou de rechange comme une
pièce détachée auprès du Service après-vente.
▯ Après utilisation, retirez toujours la sonde à viande de
la cavité du four. Ne la rangez jamais à l’intérieur de la
cavité du four.
Insertion de la sonde thermométrique dans les
aliments
Insérez la sonde thermométrique dans l’aliment avant de
le déposer dans la cavité du four.
La sonde thermométrique dispose de trois points de
mesure. Assurez-vous que le point du milieu est inséré
dans l’aliment.
Viande : Pour de grands morceaux de viande, insérez la
sonde thermométrique à un angle à partir du dessus,
aussi loin que possible dans la viande.
Pour des morceaux de viande relativement minces,
insérez la sonde thermométrique depuis le côté, à
l’endroit le plus épais de la viande.
Cavité du four à vapeur :
Cavité du four conventionnel :
Volaille : Insérez la sonde thermométrique aussi loin que
possible dans la poitrine, à l’endroit le plus épais. Selon
la structure de la volaille, insérez la sonde
thermométrique de biais ou sur la longueur. Placez le
poulet dans un plat à rôtir et déposez-le sur la grille.
Tourner les aliments : Si vous désirez tourner les
aliments, ne débranchez pas la sonde thermométrique
du four. Après avoir tourné les aliments, vérifiez que la
sonde thermométrique est bien positionnée dans
l’aliment.
Si vous débranchez la sonde thermométrique du four,
tous les réglages seront réinitialisés et vous devrez les
saisir de nouveau.
AVIS : Assurez-vous que le câble de la sonde
thermométrique ne se coince pas.
Pour prévenir tout dommage par la chaleur excessive,
laissez au moins un pouce (2,5 cm) ou plus d’écart entre
l’élément du gril et la sonde thermométrique. La viande
peut prendre de l’expansion au cours du processus de
cuisson.

83
Démarrer et arrêter l'appareil
9 AVERTISSEMENT
RISQUE DE BRÛLURES
L’intérieur du four et la sonde thermométrique
peuvent devenir très chauds. Utiliser des gants de
four pour enficher et débrancher la sonde
thermométrique.
9 AVERTISSEMENT
RISQUE DE CHOC ÉLECTRIQUE
L’utilisation de la mauvaise sonde thermométrique
peut endommager l’isolant. Utiliser uniquement la
sonde thermométrique conçue pour cet appareil
électroménager.
Remarques
▯ La température réglée de la cavité du four doit être
d’au moins 50 °F (10 °C) de plus que la température
de la sonde thermométrique.
▯ La température de la cavité du four ne doit pas
dépasser 480 °F (250 °C) pour éviter d’endommager
la sonde thermométrique.
1.
Insérez la sonde thermométrique dans la douille du
côté gauche de la cavité du four.
Remarque : L’icône de la sonde apparaîtra à l’écran
du four.
2.
Fermez la porte de l’appareil électroménager.
AVIS : Assurez-vous que le câble de la sonde
thermométrique ne se coince pas dans la porte de
l’appareil électroménager à la fermeture. Il risque
d’être endommagé.
3.
Effleurez la touche tactile ON l OFF.
4.
Réglez le mode de cuisson.
Remarque : Une fois la sonde thermométrique
insérée dans la douille, vous pouvez sélectionner
uniquement un mode de cuisson approprié à l’usage
de la sonde.
5.
Effleurez la température de la cavité du four à gauche
sur la ligne inférieure.
6.
Glissez vers la gauche ou la droite pour sélectionner
la température requise pour la cavité du four.
7.
Effleurez le symbole 8 pour activer le réglage.
8.
Effleurez la température interne ¥ à droite sur la ligne
inférieure.
9.
Glissez vers la gauche ou la droite pour sélectionner
la température interne requise.
10.
Effleurez la touche tactile START l STOP.
L’appareil électroménager lance la commande.
Modification ou arrêt du fonctionnement de l’appareil
Modification : Vous pouvez modifier la température de la
cavité du four et la température interne en cours de
fonctionnement.
1.
Effleurez la température de la cavité du four ou la
température interne.
2.
Glissez vers la gauche ou la droite pour modifier la
température.
3.
Effleurez le symbole 8 pour activer le réglage.
Arrêt : Dès que la température interne réglée est atteinte,
un signal sonore retentit et l’appareil électroménager
arrête automatiquement le fonctionnement.
1.
Utilisez la touche tactile ON l OFF pour éteindre
l’appareil électroménager.
2.
Portez un gant de four pour débrancher la sonde
thermométrique de la douille.
Températures internes de différents aliments
N’utilisez pas d’aliments surgelés. Les valeurs du tableau
présentées servent de guide. Les valeurs dépendent de
la qualité et de la composition des aliments.
Vous trouverez des renseignements détaillés sur les
modes de cuisson et les températures dans le manuel
de Tableaux de cuisson : utilisation et entretien.
Aliment Température interne
en degré F (°C)
Volaille 170° (75°)
Porc* 145° (65°)
Porc 160° (70°)
Bœuf, rosé 145° (65°)
Bœuf, à point 160° (70°)
Bœuf, bien cuit 170° (75°)
Agneau 145° (65°)
Autre : chauffer/réchauffer des
aliments
150°-165° (65°-75°)
*laisser reposer trois minutes.

84
Mode Sabbat
Il est possible de régler un temps de cuisson jusqu’à
74 heures en mode Sabbat. Vous pouvez maintenir les
aliments au chaud dans la cavité du four sans avoir à
allumer ou éteindre le four.
Remarque : Pour utiliser ce mode, le mode Sabbath doit
est activé dans les réglages de base.
Remarque : Vous pouvez régler simultanément le mode
Sabbath pour les deux cavités. La durée réglée
s’appliquera simultanément aux deux cavités.
Démarrage
Le four est automatiquement en mode Cuisson. Vous
pouvez régler la température entre 100 °F et 450 °F
(40 °C et 230 °C).
1.
Effleurez la touche tactile ON l OFF.
2.
Glissez vers la gauche ou la droite pour sélectionner
« Sabbat
› ».
3.
Effleurez la température sur la ligne inférieure.
4.
Glissez vers la gauche ou la droite pour sélectionner
la température requise.
5.
Effleurez l’icône 8 pour activer le réglage.
6.
Effleurez le temps de cuisson + sur la ligne du bas.
7.
Glissez vers la gauche ou la droite pour sélectionner
la durée requise.
8.
Effleurez le symbole 8 pour activer le réglage.
9.
Effleurez la touche tactile START l STOP.
« Le Mode Sabbat commencera dans 5min 00sec »
apparaît à l’écran. Après cinq minutes, l’appareil
électroménager lance la commande. Toutes les
commandes sont désactivées sauf les touches tactiles
ON l OFF et START l STOP. À tout moment, vous pouvez
éteindre l’appareil électroménager.
Remarques
▯ Une fois le mode Sabbat lancé, vous ne pouvez plus
modifier les réglages avec la touche tactile
START l STOP.
▯ Le fonctionnement se poursuit même si vous ouvrez la
porte de l’appareil électroménager.
Une fois la durée du mode Sabbat écoulée, un signal
sonore retentit. L’appareil électroménager cesse de
chauffer. Utilisez la touche tactile ON l OFF pour éteindre
l’appareil électroménager.
Annulation
Effleurez la touche tactile START l STOP pour annuler la
commande.
Mode Yom Tov
Avec le mode Yom Tov, vous pouvez régler une durée
de cuisson jusqu’à 74 heures au cours laquelle vous
pouvez sélectionner six températures de cuisson.
Remarque : Pour utiliser ce mode, le mode Sabbath doit
est activé dans les réglages de base.
Remarque : Vous pouvez régler simultanément le mode
Sabbath pour les deux cavités. La durée réglée
s’appliquera simultanément aux deux cavités.
Démarrage
Le four est automatiquement en mode Cuisson. Vous
pouvez régler la température entre 100 °F et 450 °F
(40 °C et 230 °C).
1.
Effleurez la touche tactile ON l OFF.
2.
Glissez vers la gauche ou la droite pour sélectionner
« Yom Tov
› ».
3.
Effleurez la température dans le champ tactile
inférieur.
4.
Glissez vers la gauche ou la droite pour sélectionner
la température requise.
5.
Effleurez l’icône 8 pour activer le réglage.
6.
Effleurez le temps de cuisson + dans le champ tactile
inférieur.
7.
Glissez vers la gauche ou la droite pour sélectionner
la durée requise.
8.
Effleurez l’icône 8 pour activer le réglage.
9.
Effleurez la touche tactile START l STOP.
Le « Mode Yom Tov commencera dans 5min 00sec »
apparaît à l’écran. Après cinq minutes, l’appareil
électroménager lance la commande. Toutes les
commandes sont désactivées sauf les touches tactiles
ON l OFF et START l STOP. À tout moment, vous pouvez
éteindre l’appareil électroménager.
Remarques
▯ Une fois le mode Yom Tov lancé, il est possible de
changer la température en effleurant une des
six températures affichées. L’écran ne réagit pas à
cette pression, mais la température de la cavité sera
ajustée. La touche tactile START l STOP n’annulera
pas le mode.
▯ Le fonctionnement se poursuit même si vous ouvrez la
porte de l’appareil électroménager.
Une fois la durée du mode Yom Tov écoulée, un signal
sonore retentit. L’appareil électroménager cesse de
chauffer. Utilisez la touche tactile ON l OFF pour éteindre
l’appareil électroménager.
Annulation
Effleurez la touche tactile START l STOP pour annuler la
commande.

85
Home Connect
L’appareil électroménager prend en charge le Wi-Fi. Il
peut être télécommandé au moyen d’un appareil mobile.
Si l’appareil électroménager n’est pas connecté au
réseau domestique, il fonctionne de la même façon
qu’un four normal sans fonctionnalité réseautique et peut
toujours être commandé par l’écran.
Remarques
▯ Assurez-vous de respecter les directives de sécurité
décrites au présent mode d’emploi et que ces
directives sont aussi respectées lors de la
télécommande de l’appareil électroménager par l’appli
Home Connect quand vous êtes absent de la maison.
▯ Les commandes données directement depuis
l’appareil ont toujours préséance sur l’appli
Home Connect.
Configuration
Pour activer les réglages par Home Connect, vous devez
avoir installé l’appli Home Connect sur l’appareil mobile
et l’avoir réglé.
Respectez les étapes précisées par l’appli pour mettre
en œuvre les réglages.
L’appli peut être ouvert pour exécuter le processus de
configuration.
Connexion du four à Home Connect
La connexion du four à Home Connect s’effectue en trois
étapes :
1.
Installez l’appli Home Connect.
2.
Connectez le four au réseau Wi-Fi.
3.
Connectez le four à l’appli.
Vous aurez besoin d’un téléphone intelligent ou d’une
tablette doté du dernier système opérationnel (Apple ou
Android), un réseau Wi-Fi sécurisé à l’emplacement de
l’appareil électroménager et l’appli Home Connect.
Pour la configuration, respectez les directives ci-dessous
ou d’autres directives dans la documentation
Home Connect.
1.
Installez l’appli Home Connect.
Depuis le téléphone intelligent ou la tablette, accédez
à l’App Store (appareils Apple) ou à Google Play Store
(appareils Android). Téléchargez l’application
« Home Connect » (États-Unis) développée par BSH
Home Appliances et installez-la.
Démarrez l’appli et créez un compte Home Connect.
2.
Connectez le four au réseau Wi-Fi.
Avant de poursuivre, déterminez si le routeur du
réseau dispose d’une fonctionnalité WPS (connexion
automatique).
Si tel est le cas, respectez les étapes de la section
intitulée Inscription automatique au réseau
domestique.
Si vous ne savez pas, respectez les étapes de la
section intitulée Inscription manuelle au réseau
domestique.
Connexion automatique au réseau domestique
Remarques
▯ Il faut un routeur qui prend en charge la
fonctionnalité WPS.
▯ Vous pouvez lancer l’assistant Home Connect au
démarrage initial ou en utilisant le menu principal.
1.
Effleurez la touche tactile MENU.
2.
Glissez vers la gauche ou la droite pour sélectionner
« Réglages ».
3.
Glissez vers la gauche ou la droite pour sélectionner
« Home Connect ».
4.
Effleurez « Démarrer assistant ».
5.
Effleurez « Continuer ».
L’appareil électroménager est prêt pour une
connexion automatique au réseau.
&RQQH[LRQPDQXHOOH
&RQQH[LRQUpVHDXDXWRPDWLTXH
$SSX\HUVXUOHERXWRQ:36GXURXWHXU
PLQV
$QQXOHU
86
6.
Dans les deux minutes, appuyez sur le bouton WPS
du routeur.
Attendez que « Connexion réseau réussie » s’affiche à
l’écran.
Il est possible que la connexion échoue. Un message
d’alerte à l’écran vous demandera de réessayer ou de
procéder à une connexion manuelle.
7.
L’appareil électroménager est prêt à se connecter à
l’appli.
8.
Respectez les directives de l’appli sur l’appareil
mobile pour une inscription automatique au réseau.
Le processus d’inscription est terminé à l’affichage de
« Appairage réussi » à l’écran.
Connexion manuelle au réseau domestique
Remarque : Vous pouvez lancer l’assistant
Home Connect au démarrage initial ou en utilisant le
menu.
1.
Effleurez la touche tactile MENU.
2.
Faites défiler vers la gauche ou la droite pour
sélectionner « Réglages ».
3.
Faites défiler vers la gauche ou la droite pour
sélectionner « Home Connect ».
4.
Effleurez « Démarrer assistant ».
5.
Effleurez « Continuer ».
6.
Effleurez « Connexion manuelle ».
7.
Effleurez « Continuer ».
L’appareil électroménager est prêt pour une
connexion manuelle au réseau.
Le SSID et la clé du réseau du four sont affichés à
l’écran.
8.
Utilisez le SSID « HomeConnect » et la clé
« HomeConnect » pour enregistrer l’appareil mobile
au réseau du four.
Respectez les directives de l’appli.
&RQQH[LRQUpVHDXUpXVVLH
&RQQH[LRQPDQXHOOH
&RQQH[LRQUpVHDXDXWRPDWLTXH
eFKHFGHODFRQQH[LRQUpVHDX
(VVD\HUGHQRXYHDX
&RQQH[LRQjO·DSSOL
&RQILUPHUODFRQQH[LRQjO·DSSDUHLOPRELOH
PLQV
(
$QQXOHU
&RQQH[LRQUpVHDXPDQXHOOH
&RQWLQXHU$QQXOHU
$SUqVDYRLUHIIOHXUp©â&RQWLQXHUâªVHFRQQHFWHUDXUpVHDX©â+RPH
&RQQHFWâªVXUO·DSSDUHLOPRELOHHWUHVSHFWHUOHVGLUHFWLYHVGH
O·DSSOL+RPH&RQQHFW
&RQQH[LRQUpVHDXPDQXHOOH
&RQQH[LRQDXWRPDWLTXH$QQXOHU
66,'â+RPH&RQQHFW
0RWGHSDVVHâ+RPH&RQQHFW
PLQV

87
9.
Attendez que « Connexion réseau réussie » s’affiche à
l’écran.
Il est possible que la connexion échoue. Un message
d’alerte à l’écran vous demandera de réessayer ou de
procéder à une connexion automatique.
10.
L’appareil électroménager est prêt à se connecter à
l’appli.
11.
Respectez les directives de l’appli sur l’appareil
mobile pour une inscription manuelle au réseau.
Le processus d’inscription est terminé à l’affichage de
« Appairage réussi » à l’écran.
Démarrage à distance
Vous devez activer le démarrage à distance pour lancer
une commande pour le four avec l’appareil mobile.
Remarques
▯ Le champ « Démarrage à distance » est visible
uniquement après la réussite de la connexion à
Home Connect.
▯ Certaines commandes se lancent uniquement sur le
four.
1.
Effleurez la touche tactile MENU.
2.
Effleurez « Démarrage à distance ».
F apparaît à l’écran.
Le démarrage à distance est automatiquement
désactivé dans les situations suivantes :
▯ La porte du four est ouverte 15 minutes après
l’activation du démarrage à distance.
▯ La porte du four est ouverte 15 minutes après la fin
du fonctionnement du four.
▯ Vingt-quatre heures après l’activation du démarrage
à distance.
Quand vous démarrez le fonctionnement du four sur
l’appareil électroménager, le démarrage à distance est
automatiquement activé. Vous pouvez alors procéder
à des modifications depuis l’appareil mobile ou lancer
une nouvelle commande.
Réglages Home Connect
À tout moment, vous pouvez régler Home Connect pour
satisfaire à vos besoins.
Remarque : Dans Home Connect Réglages, effleurez la
touche tactile INFO pour afficher les informations
pertinentes au réseau et au dispositif.
WiFi
Vous pouvez utiliser les fonctionnalités Home Connect si
le Wi-Fi est activé.
1.
Effleurez la touche tactile MENU.
2.
Glissez vers la gauche ou la droite pour sélectionner
« Réglages ».
3.
Glissez vers la gauche ou la droite pour sélectionner
« Home Connect ».
4.
Effleurez « Ouvrir réglages ».
5.
Glissez vers la gauche ou la droite pour sélectionner
« Wi-Fi ».
6.
Effleurez la ligne du bas pour sélectionner « Activé »
ou « Désactivé ».
7.
Effleurez le champ ; pour revenir au menu de
réglages de Home Connect.
Se déconnecter du réseau
Se déconnecter du réseau
Vous pouvez déconnecter le four du réseau à tout
moment.
Remarque : Lorsque le four est déconnecté du réseau, il
est impossible de le faire fonctionner par Home Connect.
1.
Effleurez la touche tactile MENU.
2.
Glissez vers la gauche ou la droite pour sélectionner
« Réglages ».
3.
Glissez vers la gauche ou la droite pour sélectionner
« Home Connect ».
4.
Effleurez « Ouvrir réglages ».
5.
Glissez vers la gauche ou la droite pour sélectionner
« Déconnexion ».
&RQQH[LRQUpVHDXUpXVVLH
&RQQH[LRQDXWRPDWLTXH
&RQQH[LRQUpVHDXPDQXHOOH
eFKHFGHODFRQQH[LRQUpVHDX
(VVD\HUGHQRXYHDX
&RQQH[LRQjO·DSSOL
&RQILUPHUODFRQQH[LRQjO·DSSDUHLOPRELOH
PLQV
(
$QQXOHU
+RPHâ&RQQHFW
:L)L
(
7pOpFRPPDQGH&RQQH[LRQjO·DSSOL
$FWLYp 'pVDFWLYp

88
6.
Effleurez « Déconnexion du réseau ».
7.
Confirmez le choix en effleurant « Déconnexion ».
Toutes les connexions sont supprimées.
Remarque : Vous pouvez annuler la commande en
effleurant « Annuler ».
Se connecter au réseau
Se connecter au réseau
1.
Effleurez la touche tactile MENU.
2.
Glissez vers la gauche ou la droite pour sélectionner
« Réglages ».
3.
Glissez vers la gauche ou la droite pour sélectionner
« Home Connect ».
4.
Effleurez « Ouvrir réglages ».
5.
Glissez vers la gauche ou la droite pour sélectionner
« Connexion au réseau ».
6.
Effleurez « Démarrer assistant ».
7.
Respectez les directives de la section intitulée
« Inscription manuelle au réseau domestique » ou
« Inscription automatique au réseau domestique ».
Connexion avec l'appli
Vous pouvez vous connecter au four si l’appli
Home Connect est installé sur l’appareil mobile.
Remarque : L’appareil électroménager doit être
connecté au réseau.
1.
Effleurez la touche tactile MENU.
2.
Glissez vers la gauche ou la droite pour sélectionner
« Réglages ».
3.
Glissez vers la gauche ou la droite pour sélectionner
« Home Connect ».
4.
Effleurez « Ouvrir réglages ».
5.
Glissez vers la gauche ou la droite pour sélectionner
« Connexion à l’appli ».
6.
Effleurez la ligne du bas pour sélectionner
« Démarrer ».
Télécommande
Vous pouvez utiliser l’appli Home Connect pour accéder
facilement aux fonctions du four.
Remarques
▯ Les commandes données directement depuis le four
ont toujours préséance sur les autres. Au cours de
cette période, il est impossible de faire fonctionner le
four avec l’appli Home Connect.
▯ La télécommande est déjà active à la livraison du four.
▯ Si elle a été désactivée, seul l’état du fonctionnement
du four apparaîtra à l’appli Home Connect.
▯ La télécommande est automatiquement activée
lorsque le démarrage à distance est activé.
1.
Effleurez la touche tactile MENU.
2.
Glissez vers la gauche ou la droite pour sélectionner
« Réglages ».
3.
Glissez vers la gauche ou la droite pour sélectionner
« Home Connect ».
4.
Effleurez « Ouvrir réglages ».
5.
Glissez vers la gauche ou la droite pour sélectionner
« Télécommande ».
6.
Effleurez la ligne du bas pour sélectionner « Activée »
ou « Désactivée ».
7.
Effleurez le champ ; pour revenir au menu de
réglages de Home Connect.
Mise à jour du logiciel
Il est possible de mettre à jour le logiciel du four avec la
fonctionnalité à cet effet (par ex., mises à jour
d’optimisation, de dépannage ou de sécurité). Pour ce
faire, vous devez être inscrit comme utilisateur
Home Connect, disposer de l’appli sur votre appareil
mobile et avoir une connexion au serveur
Home Connect.
Dès l’offre d’une mise à jour, l’appli Home Connect vous
en avise. Vous pourrez aussi l’utiliser pour télécharger
cette mise à jour.
Une fois le téléchargement réussi, installez la mise à jour
par les réglages de base du four ou l’appli
Home Connect si vous êtes sur le réseau domestique.
L’appli Home Connect vous avisera à la fin de
l’installation.
+RPHâ&RQQHFW
'pFRQQH[LRQ
(
&RQQH[LRQjO·DSSOL7pOpFRPPDQGH
'pFRQQH[LRQGXUpVHDX
+RPHâ&RQQHFW
&RQQH[LRQjO·DSSOL
(
&RQQH[LRQUpVHDX'pFRQQH[LRQ
&RPPHQFHU
+RPHâ&RQQHFW
7pOpFRPPDQGH
(
'pFRQQH[LRQ:L)L
'pVDFWLYpH$FWLYpH

89
Remarques
▯ Vous pouvez utiliser le four comme d’habitude au
cours du téléchargement des mises à jour.
▯ Dans les réglages personnels de l’appli, il est
également possible d’automatiser les
téléchargements.
▯ Nous vous recommandons d’installer les mises à jour
de sécurité dès que possible.
Remarque liée à la protection des
données
Lors de la première connexion de votre appareil avec un
réseau WLAN relié à Internet, votre appareil transmet les
catégories suivantes de données au serveur Home
Connect (premier enregistrement) :
▯ code d'appareil univoque (constitué de clés d'appareil
ainsi que de l'adresse MAC du module de
communication Wi-Fi).
▯ Certificat de sécurité du module de communication Wi-
Fi (pour la protection technique des informations de la
connexion).
▯ La version actuelle du logiciel et du matériel de votre
appareil ménager.
▯ État d’une précédente restauration éventuelle des
réglages d’usine.
Ce premier enregistrement prépare l'utilisation des
fonctionnalités Home Connect et ne s'avère nécessaire
qu'au moment où vous voulez utiliser les fonctionnalités
Home Connect pour la première fois.
Remarque : Notez que les fonctionnalités Home
Connect ne sont utilisables qu'en liaison avec l'appli
Home Connect. Vous pouvez consulter les informations
sur la protection des données dans l'appli Home
Connect.
Module Wi-Fi
MD
Déclarations FCC/IC
Modèle : COM2
FCC ID : 2AHES-COM2
IC : 21152-COM2
Le module Home Connect est un dispositif de
communication conçu pour permettre des échanges
entre les appareils électroménagers et les appareils
intelligents.
Ce module est intégré en usine, sous le contrôle direct
de BSH Home Appliances Corporation, et ne peut pas
être entretenu ou mis à jour par l’utilisateur. 7
7
/
8
po.
(20 cm) de distance minimum doivent séparer
l’utilisateur de l’appareil.
DÉCLARATION DE CONFORMITÉ DE LA FCC
9 ATTENTION
Tout changement ou toute modification n’ayant pas
fait l’objet d’une autorisation expresse peut entraîner
l’annulation du droit d’utilisation de l’équipement.
Ce dispositif est conforme à la section 15 des
réglementations de la FCC. Le fonctionnement est sous
réserve des deux conditions qui suivent :
1.
cet appareil ne peut causer d’interférences nuisibles;
et
2.
cet appareil doit accepter toute interférence reçue,
notamment celle pouvant entraîner un
dysfonctionnement.
AVIS D’INDUSTRIE CANADA
Le présent appareil est conforme aux CNR d'Industrie
Canada applicables aux appareils radio exempts de
licence.
L'exploitation est autorisée aux deux conditions suivantes
:
1.
L'appareil ne doit pas produire de brouillage, et
2.
L'utilisateur de l'appareil doit accepter tout brouillage
radioélectrique subi, même si le brouillage est
susceptible d'en compromettre le fonctionnement.
Le fonctionnement dans la plage de 5150 à 5250 MHz
est uniquement pour une utilisation intérieure afin de
réduire le potentiel d’interférences nuisibles aux
systèmes de satellites mobiles sur les canaux.
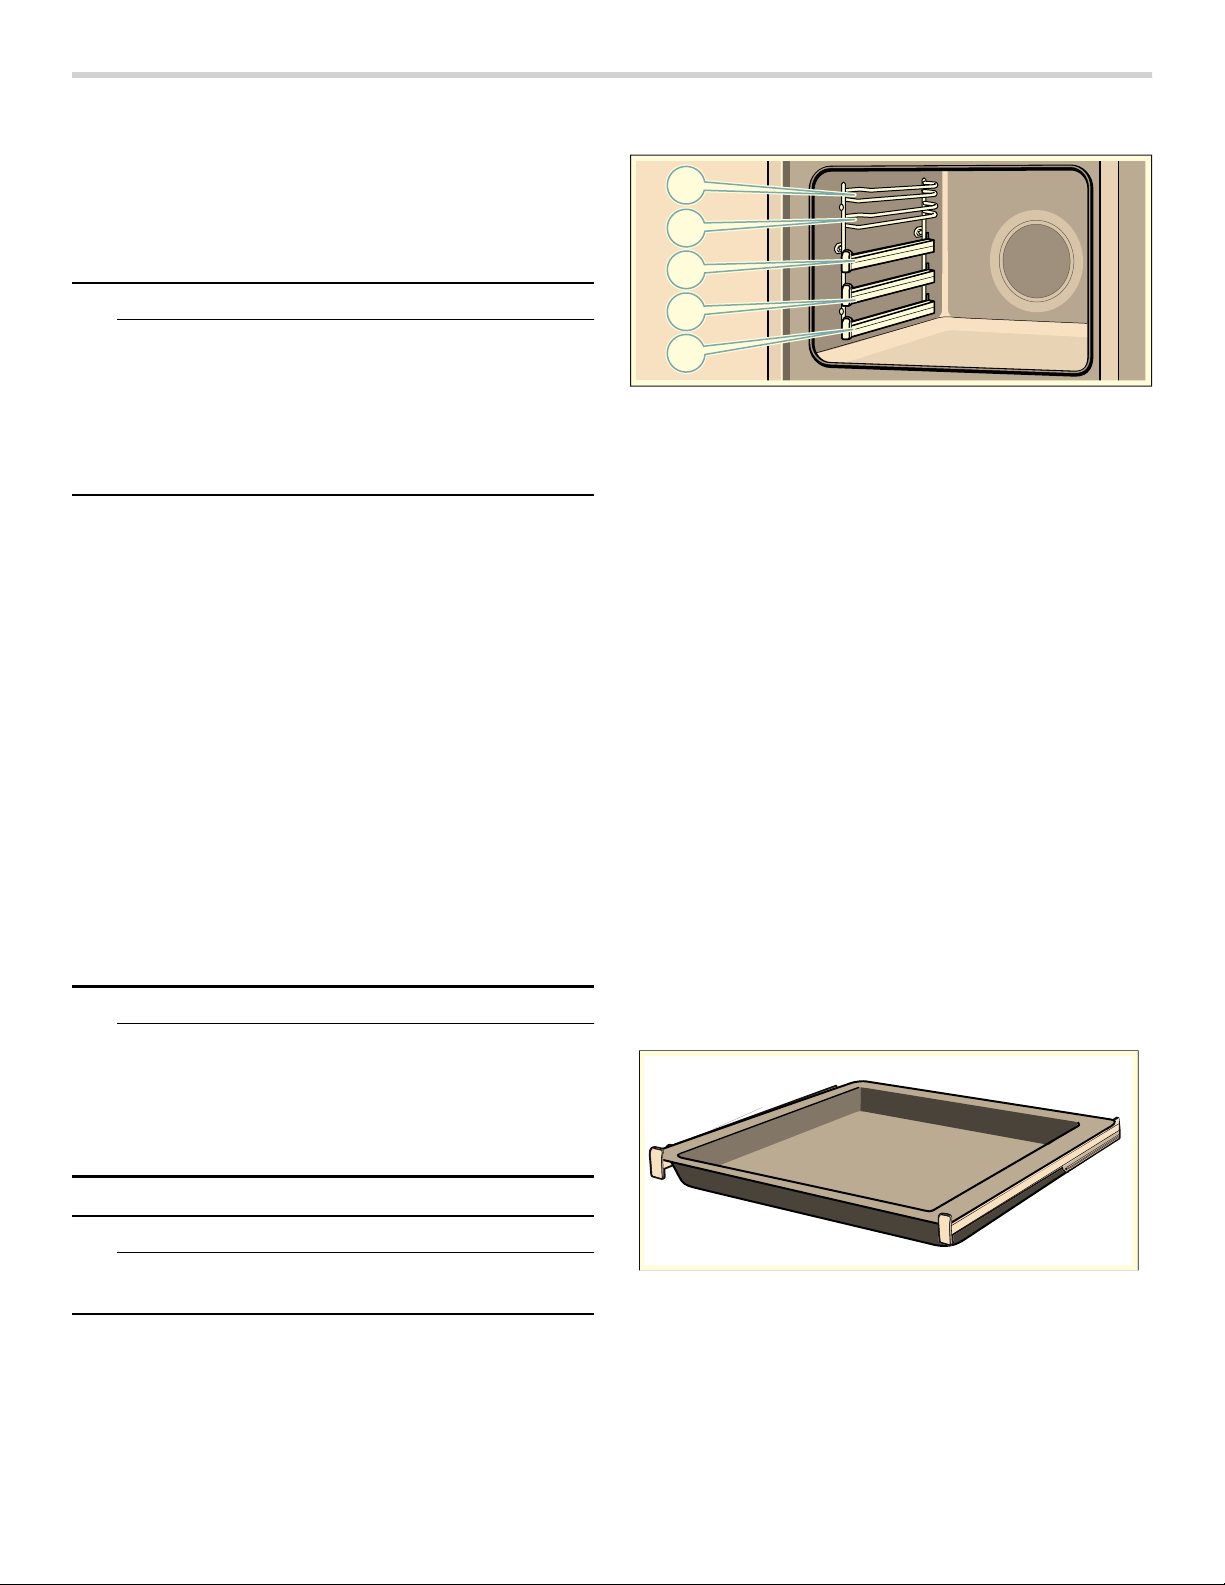
90
Commande de vapeur
Il est possible de cuire les aliments très doucement à la
vapeur. Dans certains modes de cuisson, vous pouvez
préparer des aliments à l’aide de la valeur. De plus, les
modes Apprêt, Décongélation et Réchaud sont offerts
avec le mode vapeur.
9 AVERTISSEMENT
RISQUE DE BRÛLURES
De la vapeur peut s’échapper quand vous ouvrez la
porte de l’appareil électroménager. Elle est invisible
à certaines températures. Ne vous tenez pas trop
près de l’appareil électroménager à l’ouverture de
sa porte. Faites preuve de prudence en ouvrant la
porte. Tenez les enfants éloignés.
Bruits
La pompe émet un bourdonnement en cours de
fonctionnement et après avoir été éteinte. Il s’agit d’un
bruit provenant de la fonction de test de la pompe. C’est
un bruit normal de fonctionnement. Vous entendrez
également ce bruit après le fonctionnement de modes
sans vapeur au moment d’éteindre le four. L’émission du
bruit est normale.
Insertion des accessoires
La cavité du four dispose de cinq positions de grilles,
numérotées du bas vers le haut.
Les grilles 1 à 3 sont dotées de guides de grille
télescopique.
Remarque : Placez toujours la poêle universelle sur la
grille 1 en mode de cuisson pleine vapeur. Elle sert à
empêcher la graisse de tomber et de brûler sur la sole
du four.
9 AVERTISSEMENT
RISQUE DE BRÛLURES
Les guides de la grille télescopique deviennent
chauds lorsque l’appareil électroménager est en
cours de fonctionnement. Faites preuve de
prudence pour éviter les brûlures lorsque vous les
retirez.
9 ATTENTION
N’insérez pas d’accessoires entre les grilles
accessoires, car elles pourraient basculer.
AVIS : Insérez toujours les accessoires complètement
dans la cavité du four sans toucher à la porte de
l’appareil électroménager pour éviter d’endommager le
panneau de verre.
Grilles aux positions 4 et 5 :
▯ Insérez toujours l’accessoire entre les deux tiges du
guide pour une position de grille donnée.
▯ Il est possible de tirer les accessoires environ jusqu’à
la moitié sans les faire basculer.
Remarque : Assurez-vous de toujours glisser
entièrement les accessoires dans la cavité du four dans
la bonne direction. Pour de plus amples renseignements,
observez les diagrammes des sections qui suivent.
Guides de la grille télescopique :
▯ Vous pouvez utiliser les guides de la grille
télescopique pour tirer des accessoires un peu plus
loin.
▯ Assurez-vous que l’accessoire est positionné de façon
équilibrée sur les guides de la grille télescopique.
L’accessoire doit être déposé sur les guides de la
grille télescopique entre les encoches avant et arrière.
Exemple sur la photo : poêle universelle
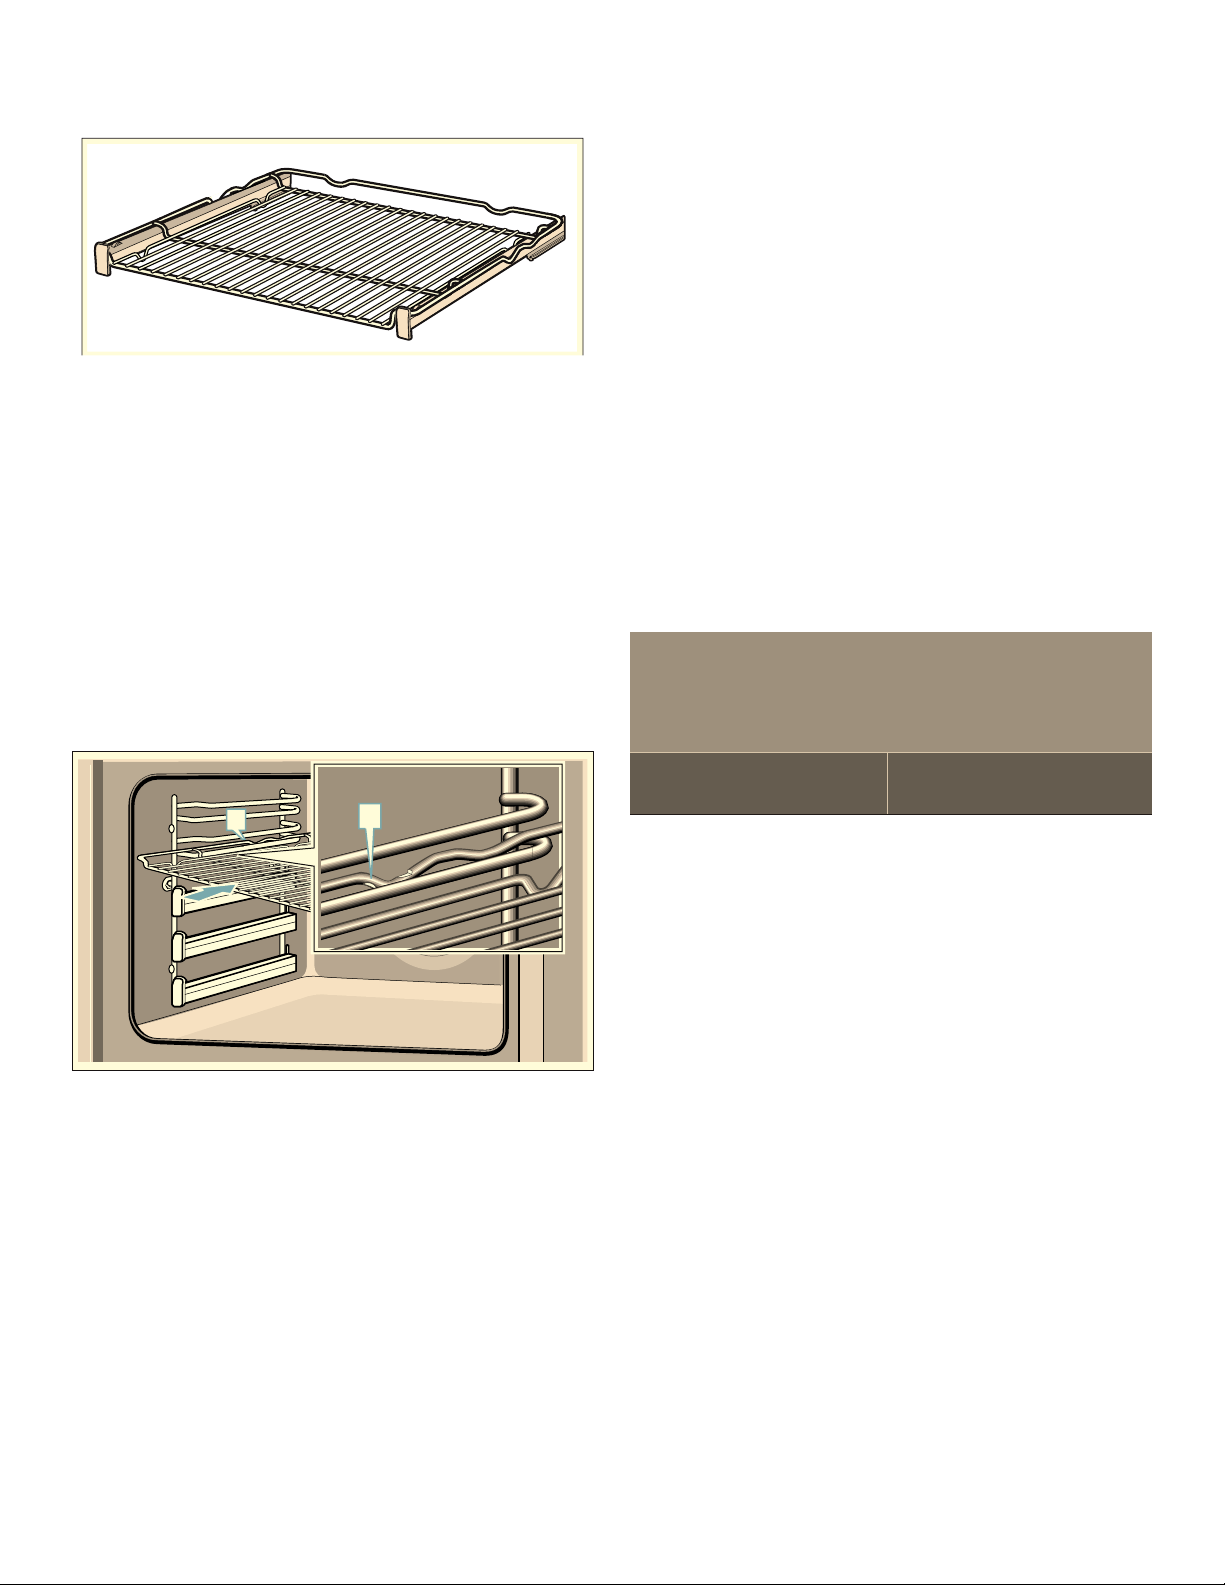
91
Exemple sur la photo : grille
▯ Pour retirer l’accessoire, tirez jusqu’à ce que les
guides de la grille télescopique bloquent le
déplacement. Tenez l’accessoire des deux côtés et
soulevez-le.
Système de butée
Il est possible de tirer les accessoires environ jusqu’à la
moitié jusqu’à ce qu’ils se verrouillent en position. Le
système de butée empêche les accessoires de basculer
lorsqu’ils sont avancés. Pour que le système
antibasculement fonctionnement correctement, il faut
bien insérer les accessoires dans la cavité du four.
En insérant la grille, vérifiez que la butée d’arrêt ‚ est à
l’arrière, orientée vers le bas. La section ouverte doit faire
face à la porte de l’appareil électroménager avec le
rebord incurvé orienté vers le bas ¾.
Cuisson à la vapeur
Lors de l’utilisation du mode vapeur, la vapeur chaude
enveloppe les aliments et, par conséquent, empêche la
perte des nutriments des aliments. La forme, la couleur
et l’arôme typique des plats sont conservés avec cette
méthode de préparation. Avec la vapeur, les saveurs
demeurent intactes même en cuisinant tout un repas en
même temps.
Remarque : Le fonctionnement du mode vapeur est
interrompu si le réservoir d’eau se vide. Remplissez le
réservoir d’eau. Après la réinsertion du réservoir, la
cuisson à la vapeur reprend son cours.
Le four offre cinq modes pour la cuisson à vapeur :
▯ Vapeur ‹
▯ Convection à vapeur §
▯ Levée de pâte Œ
▯ Décongeler “
▯ Réchauffer ¨
Réglage
Exemple : Réglez le mode de cuisson à la vapeur
‹ à
212 °F (100 °C) pour 20 minutes.
1.
Remplissez le réservoir d’eau.
Remarque : Passez en mode Vapeur uniquement
après le refroidissement complet de la cavité du four
(température ambiante).
2.
Effleurez la touche tactile ON l OFF.
3.
Glissez vers la gauche ou la droite pour sélectionner
« Vapeur ‹ ».
4.
Effleurez le champ tactile de la température.
5.
Glissez vers la gauche ou la droite pour sélectionner
la température requise.
6.
Effleurez le champ + de la minuterie.
7.
Glissez vers la gauche ou la droite pour sélectionner
la durée requise.
8.
Effleurez la touche tactile START l STOP.
L’appareil électroménager lance la commande.
Dès que le temps de cuisson est écoulé, un signal
sonore retentit et l’appareil électroménager arrête de
fonctionner automatiquement. Effleurez la touche tactile
TIMERS pour interrompre le signal sonore.
Annulation
Effleurez la touche tactile START l STOP pour annuler la
commande à l’appareil électroménager.
Remarque : Dans un four double, si les deux cavités
fonctionnent, il faut choisir celle qui sera modifiée.
Quitter
Effleurez la touche tactile ON l OFF pour éteindre
l’appareil électroménager.
D
D
9DSHXU
¯
PLQV
°
6DEEDW
°
<RPâ7RY
µ
*ULO
±
*ULOjFRQY
~
3L]]D

92
Cuisson à l’aide de vapeur
Lors de la cuisson à l’aide de vapeur, celle-ci est injectée
dans la cavité du four à divers intervalles et à différentes
intensités, pour de meilleurs résultats de cuisson.
Vos aliments :
▯ deviennent croustillants à l’extérieur;
▯ présentent une surface brillante;
▯ sont juteux et tendres à l’intérieur; et
▯ ne perdent qu’un minimum de volume.
Vous réglez le mode de cuisson et l’intensité de vapeur
voulus. Utilisez les renseignements du tableau pour
sélectionner un mode de cuisson et une intensité de
vapeur convenables. Sélectionnez un programme parmi
les programmes Vapeur offerts qui satisfont à vos
besoins en matière de cuisson.
Intensité de la vapeur
Différents niveaux d’intensité sont offerts lorsque vous
ajoutez de la vapeur :
▯ faible
▯ moyenne
▯ élevée
Modes de cuisson convenables
Vous pouvez ajouter de la vapeur aux modes de cuisson
ci-dessous :
▯ Convection réelle ‚
▯ Cuisson par convection ¶
▯ Cuisson ƒ
▯ Convection rapide ÷
▯ Rôtissage par convection û
▯ Rôti ü
Démarrer
1.
Remplissez le réservoir d’eau.
Remarque : Passez au réglage d’Ajout de vapeur
uniquement après le refroidissement complet de la
cavité du four (température ambiante).
2.
Effleurez la touche tactile ON l OFF.
3.
Réglez le mode de cuisson et la température.
4.
Effleurez la touche tactile ADD STEAM pour utiliser la
vapeur.
5.
À l’écran, glissez vers la gauche ou la droite pour
sélectionner l’intensité de la vapeur.
6.
Effleurez le symbole 8 pour activer le réglage.
7.
Effleurez la touche tactile START l STOP.
L’appareil électroménager lance la commande.
Remarque : Si le réservoir d’eau se vide au cours d’une
utilisation avec vapeur, l’écran affiche un message vous
demandant de le remplir.
Annulation de l’ajout de vapeur
1.
Effleurez la touche tactile ADD STEAM pour annuler
l’ajout de vapeur tôt dans le processus.
2.
Effleurez l’intensité de la vapeur dans le coin inférieur
droit de l’écran.
3.
Glissez vers la gauche ou la droite pour sélectionner
« Arrêt » (Off).
4.
Effleurez le symbole 8 pour activer le réglage.
Remarque : Le cuisson se poursuit sans l’ajout de
vapeur.
Annulation
Effleurez la touche tactile START l STOP pour annuler la
commande à l’appareil électroménager.
Remarque : Dans un four double, si les deux cavités
fonctionnent, il faut choisir celle qui sera modifiée.
Quitter
Effleurez la touche tactile ON l OFF pour éteindre
l’appareil électroménager.
Levée de Pâte
La pâte fermentera beaucoup plus rapidement en mode
« Levée de pâte Œ » qu’à la température ambiante, sans
sécher.
Utilisez les renseignements des tableaux qui se
retrouvent à Utilisation des tableaux de cuisson et Guide
d’entretien, pour sélectionner le bon niveau.
Remarque : La commande s’interrompt si le réservoir
d’eau se vide en mode Levée de pâte. Remplissez le
réservoir d’eau.
Démarrer
1.
Remplissez le réservoir d’eau.
Remarque : Passez au réglage Apprêt uniquement
après le refroidissement complet de la cavité du four
(température ambiante).
2.
Effleurez la touche tactile ON l OFF.
3.
Glissez vers la gauche ou la droite pour sélectionner
« Levée de pâte ».
4.
Effleurez « 1 » dans le champ tactile inférieur.
5.
Glissez vers la gauche ou la droite pour sélectionner
le réglage requis.
6.
Effleurez le symbole 8 pour activer le réglage.
7.
Effleurez « + » dans le champ tactile inférieur.
8.
Glissez vers la gauche ou la droite pour sélectionner
la durée requise.
&RQYHFWLRQUpHOOH
³
eOHYpH
Ü

93
9.
Effleurez le symbole 8 pour activer le réglage.
10.
Effleurez la touche tactile START l STOP.
L’appareil électroménager lance la commande.
Dès que le temps de cuisson est écoulé, un signal
sonore retentit et l’appareil électroménager arrête de
fonctionner automatiquement. Effleurez la touche tactile
TIMERS pour interrompre le signal sonore.
Annulation
Effleurez la touche tactile START l STOP pour annuler la
commande à l’appareil électroménager.
Remarque : Dans un four double, si les deux cavités
fonctionnent, il faut choisir celle qui sera modifiée.
Quitter
Effleurez la touche tactile ON l OFF pour éteindre
l’appareil électroménager.
Décongeler
Utilisez le mode de cuisson « Décongeler “ » pour
décongeler les produits surgelés.
Remarque : La commande s’interrompt si le réservoir
d’eau se vide en mode Décongeler. Remplissez le
réservoir d’eau. Après la réinsertion du réservoir, le
mode Décongélation reprend son cours.
Démarrer
1.
Remplissez le réservoir d’eau.
Remarque : Passez au réglage Décongélation
uniquement après le refroidissement complet de la
cavité du four (température ambiante).
2.
Effleurez la touche tactile ON l OFF.
3.
Glissez vers la gauche ou la droite pour sélectionner
« Décongeler “ ».
4.
Effleurez la température sur la ligne inférieure.
5.
Glissez vers la gauche ou la droite pour sélectionner
la température requise.
6.
Effleurez l’icône 8 pour activer le réglage.
7.
Effleurez « + » dans le champ tactile inférieur.
8.
Glissez vers la gauche ou la droite pour sélectionner
la durée requise.
9.
Effleurez l’icône 8 pour activer le réglage.
10.
Effleurez la touche tactile START l STOP.
L’appareil électroménager lance la commande.
Dès que le temps de cuisson est écoulé, un signal
sonore retentit et l’appareil électroménager arrête de
fonctionner automatiquement. Effleurez la touche tactile
TIMERS pour interrompre le signal sonore.
Annulation
Effleurez la touche tactile START l STOP pour annuler la
commande à l’appareil électroménager.
Remarque : Dans un four double, si les deux cavités
fonctionnent, il faut choisir celle qui sera modifiée.
Quitter
Effleurez la touche tactile ON l OFF pour éteindre
l’appareil électroménager.
Réchauffage
Vous pouvez réchauffer délicatement des aliments déjà
cuits ou redonner aux produits boulangers un peu de
croustillant en utilisant le mode de cuisson
« Réchauffage ¨ ». La vapeur est automatiquement
lancée.
Remarque : La commande s’interrompt si le réservoir
d’eau se vide en mode Réchauffage. Remplissez le
réservoir d’eau. Après la réinsertion du réservoir, le
mode Réchaud reprend son cours.
Démarrer
1.
Remplissez le réservoir d’eau.
Remarque : Passez au réglage Réchauffer
uniquement après le refroidissement complet de la
cavité du four (température ambiante).
2.
Effleurez la touche tactile ON l OFF.
3.
Glissez vers la gauche ou la droite pour sélectionner
« Réchauffer ¨ ».
4.
Effleurez la température dans le champ tactile
inférieur.
5.
Glissez vers la gauche ou la droite pour sélectionner
la température requise.
6.
Effleurez l’icône 8 pour activer le réglage.
7.
Effleurez « + » dans le champ tactile inférieur.
8.
Glissez vers la gauche ou la droite pour sélectionner
la durée requise.
9.
Effleurez l’icône 8 pour activer le réglage.
10.
Effleurez la touche tactile START l STOP.
L’appareil électroménager lance la commande.
Dès que le temps de cuisson est écoulé, un signal
sonore retentit et l’appareil électroménager arrête de
fonctionner automatiquement. Effleurez la touche tactile
TIMERS pour interrompre le signal sonore.
Annulation
Effleurez la touche tactile START l STOP pour annuler la
commande à l’appareil électroménager.
Remarque : Dans un four double, si les deux cavités
fonctionnent, il faut choisir celle qui sera modifiée.
Quitter
Effleurez la touche tactile ON l OFF pour éteindre
l’appareil électroménager.
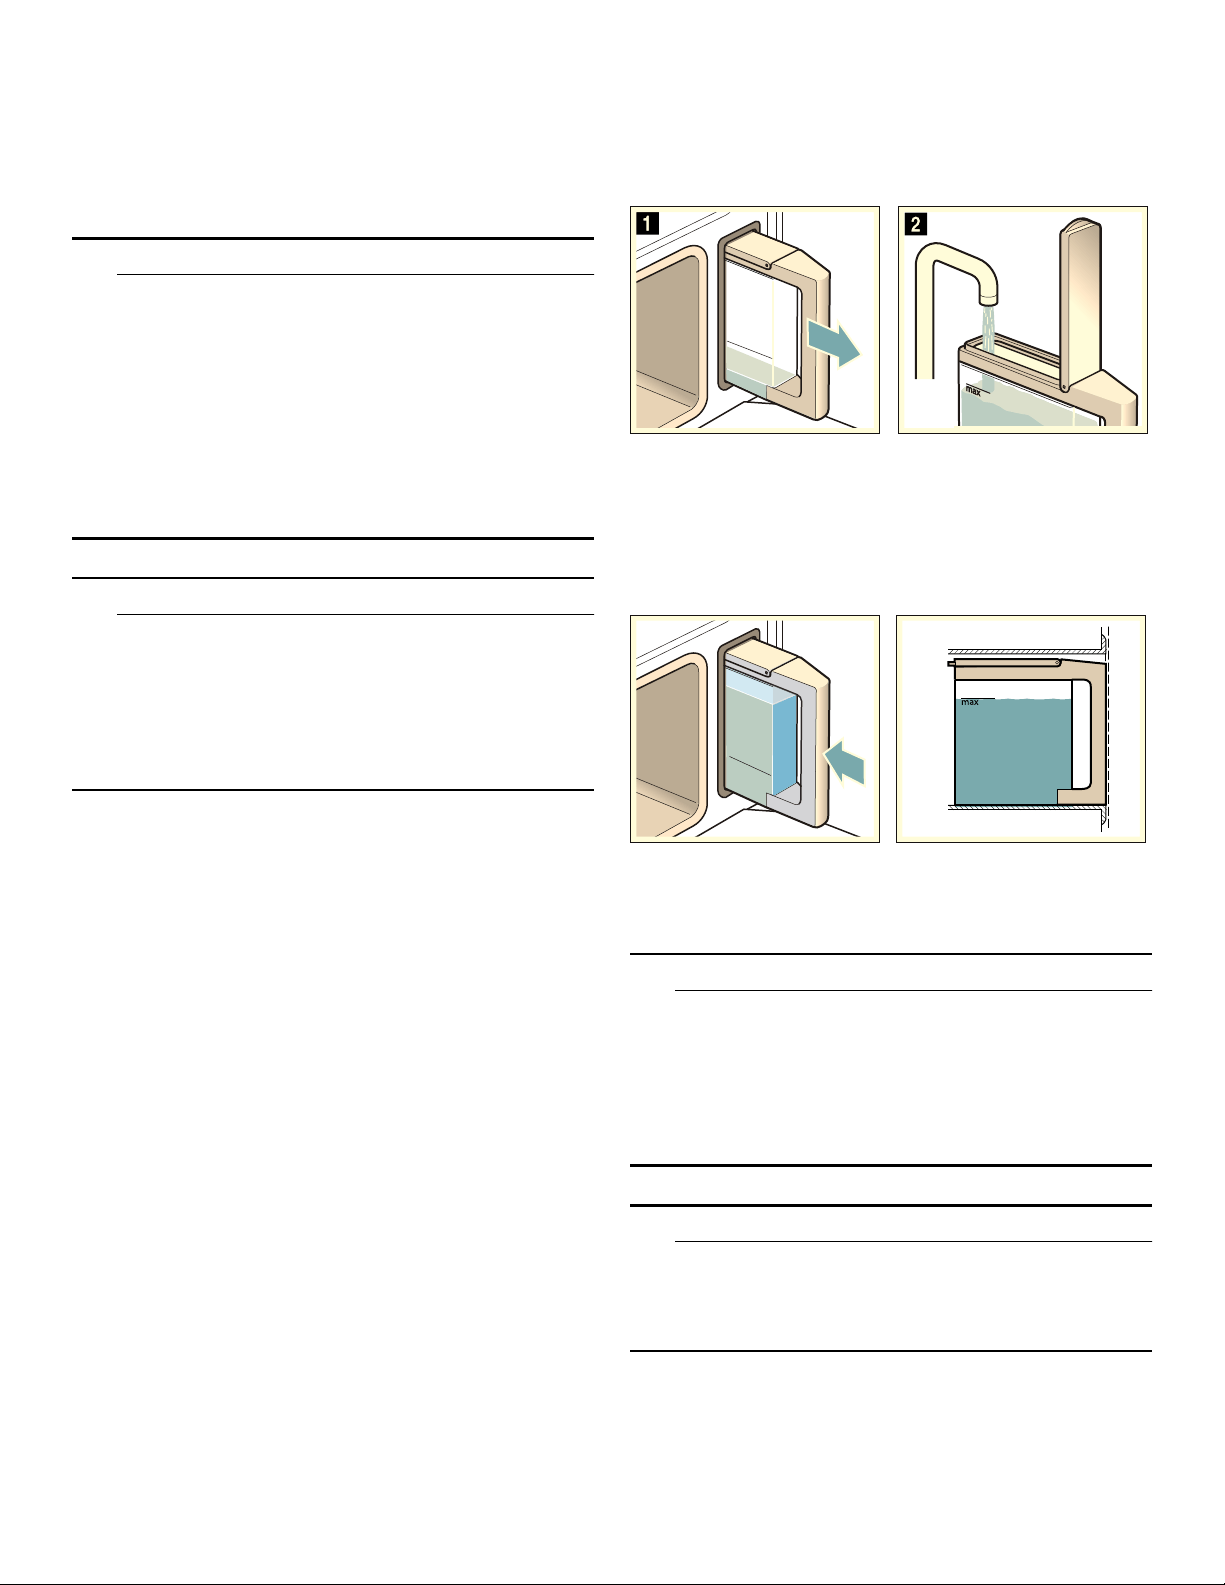
94
Remplissage du réservoir d’eau
Le réservoir d’eau se trouve du côté droit de la cavité du
four. Avant de redémarrer la cuisson avec de la vapeur,
remplissez le réservoir d’eau.
Assurez-vous du bon réglage de la plage de dureté de
l’eau.
9 AVERTISSEMENT
RISQUE DE BLESSURES ET D’INCENDIE
Remplissez uniquement le réservoir avec de l’eau
ou la solution de détartrage recommandée. Ne
versez aucun liquide inflammable (par ex., boissons
alcooliques) dans le réservoir d’eau. En raison des
surfaces chaudes, les vapeurs des liquides
inflammables peuvent prendre feu dans la cavité du
four (explosion). La porte de l’appareil
électroménager pourrait s’ouvrir soudainement. Des
flammes et de la vapeur chaude risqueraient de
s’échapper.
9 AVERTISSEMENT
RISQUE DE BRÛLURES
Le réservoir d’eau peut devenir chaud lors du
fonctionnement de l’appareil électroménager.
Attendez le refroidissement du réservoir d’eau après
le fonctionnement antérieur de l’appareil
électroménager. Retirez le réservoir d’eau de sa
niche.
AVIS : L’utilisation de liquides qui ne conviennent pas
risque d’endommager l’appareil électroménager.
N’utilisez pas d’eau distillée, d’eau du robinet très
chlorée (>4 mg/l) ou d’autres liquides.
Utilisez uniquement de l’eau adoucie fraîche et froide du
robinet ou de l’eau minérale plate.
Ne remplissez pas le réservoir d’eau au-delà de la ligne
maximale pour éviter un déversement d’eau à l’intérieur
du boîtier.
Remarques
▯ Si l’eau est très dure, nous vous recommandons
d’utiliser de l’eau adoucie.
▯ Si vous utilisez uniquement de l’eau adoucie, vous
pouvez régler la plage de dureté de l’eau à
« adoucie ».
▯ Si vous utilisez de l’eau minérale, réglez la plage de
dureté de l’eau à « 4 très dure ».
▯ Si vous utilisez de l’eau minérale, utilisez uniquement
de l’eau minérale plate.
1.
Ouvrez la porte de l’appareil électroménager.
2.
Retirez le réservoir d’eau du côté droit de la cavité du
four (figure
!).
3.
Remplissez le réservoir d’eau avec de l’eau froide
jusqu’à la marque « max » (figure ").
4.
Fermez bien le couvercle du réservoir jusqu’à ce qu’il
se verrouille.
5.
Insérez le réservoir d’eau remplie (figure #).
6.
Assurez-vous que le réservoir est entièrement enfoncé
dans sa niche. Il doit être de niveau avec la cavité du
réservoir (figure $).
7.
Fermez la porte de l’appareil électroménager.
Après chaque utilisation de la vapeur
9 AVERTISSEMENT
RISQUE DE BRÛLURES
De la vapeur peut s’échapper quand vous ouvrez la
porte de l’appareil électroménager. Elle est invisible
à certaines températures. Ne vous tenez pas trop
près de l’appareil électroménager à l’ouverture de
sa porte. Faites preuve de prudence en ouvrant la
porte. Tenez les enfants éloignés.
9 AVERTISSEMENT
RISQUE DE BRÛLURES
L’appareil électroménager devient chaud en cours
de fonctionnement. Laissez l’appareil
électroménager refroidir avant de le nettoyer.

95
AVIS : DOMMAGES À L’ÉMAIL : Ne lancez pas de
commandes alors qu’il y a encore de l’eau sur la sole de
la cavité du four. Avant de lancer la commande, essuyez
l’eau sur la sole de la cavité du four.
L’eau restante est pompée vers le réservoir d’eau après
chaque fonctionnement à la vapeur. Videz et essuyez le
réservoir d’eau. L’humidité demeure dans la cavité du
four. Pour sécher la cavité du four, vous pouvez utiliser le
mode de fonctionnement « Séchage ª » ou séchez-la à
la main.
Remarques
▯ Après avoir éteint l’appareil électroménager, l’écran
demeure allumé un moment afin de vous rappeler de
vider le réservoir d’eau.
▯ Éliminez les marques de tartre avec un chiffon
humecté de vinaigre, puis essuyez à l’eau propre et
séchez avec un chiffon doux.
Vidange du réservoir d’eau
AVIS :
▯ Ne séchez pas le réservoir d’eau dans la cavité
chaude du four. Cela l’endommagera.
▯ Ne nettoyez pas le réservoir d’eau au lave-vaisselle.
Cela l’endommagera.
1.
Ouvrez la porte de l’appareil électroménager.
2.
Retirez le réservoir d’eau.
3.
Videz-le, nettoyez le réservoir d’eau avec du détergent
puis rincez-le à fond à l’eau propre.
4.
Séchez toutes les pièces avec un chiffon doux.
5.
Frottez le joint du couvercle jusqu’à ce qu’il soit sec.
6.
Laissez sécher le réservoir avec le couvercle ouvert.
7.
Fermez le couvercle du réservoir d’eau et enfoncez-le.
8.
Insérez le réservoir d’eau et fermez la porte de
l’appareil électroménager.
Lancement du séchage
En mode séchage, la cavité du four est chauffée pour
faire évaporer l’humidité. À la fin du séchage, ouvrez la
porte de l’appareil électroménager pour laisser échapper
la vapeur.
1.
Laissez l’appareil électroménager refroidir.
2.
Délogez les plus gros morceaux de restants
d’aliments de la cavité du four immédiatement et
utilisez une éponge pour essuyer toute trace
d’humidité de la sole.
3.
Au besoin, effleurez la touche tactile ON l OFF pour
mettre l’appareil électroménager sous tension.
4.
Effleurez la touche tactile MENU pour afficher les
modes de fonctionnement.
5.
À l’écran tactile, glissez vers la gauche ou la droite
pour sélectionner « Séchage ª ».
6.
Effleurez le champ tactile inférieur.
La durée est affichée. Il est impossible de la modifier.
7.
Effleurez le champ tactile inférieur.
8.
Effleurez la touche tactile START l STOP.
La fonction de séchage est lancée et se termine
automatiquement en 10 minutes.
9.
Ouvrez la porte de l’appareil électroménager. Laissez-
la ouverte entre une et deux minutes pour laisser
l’humidité s’échapper de la cavité du four.
Séchage manuel de la cavité du four
1.
Laissez l’appareil électroménager refroidir.
2.
Retirez toute salissure de la cavité du four.
3.
Séchez la cavité du four avec une éponge.
4.
Laissez la porte de l’appareil électroménager ouverte
pendant une heure pour sécher complètement la
cavité du four.
Programmes à vapeur
Il est très facile de préparer des aliments avec les
différents programmes. Sélectionnez un programme
directement sur l’appareil électroménager ou par l’appli
Home Connect. Saisissez le poids ou la quantité
d’aliments. Le programme commence à fonctionner
automatiquement et vous serez avisé lorsque les
aliments auront fini de cuire.
Pour optimiser les résultats, la cavité du four ne doit pas
être trop chaude pour le type d’aliments sélectionnés. Si
la cavité est trop chaude, l’écran affichera un message.
Laisser la cavité du four refroidir avant de redémarrer
l’appareil.
9 AVERTISSEMENT
RISQUE D'ÉBOUILLANTEMENT
De la vapeur très chaude peut s'échapper à
l'ouverture de la porte. Selon sa température, la
vapeur peut être invisible. Ne pas se tenir trop près
de l'appareil en ouvrant la porte. Ouvrir avec
précaution la porte du four. Tenir les enfants à
distance.
Renseignements à propos des réglages
▯ Les résultats de cuisson dépendent de la qualité des
aliments et du type d’ustensiles de cuisson. Pour
optimiser le résultat de cuisson, utilisez uniquement
des aliments frais. Dans le cas des aliments surgelés,
utilisez uniquement des aliments qui sortent
directement du congélateur.
▯ Pour certains plats, vous devrez saisir le poids.
L’appareil électroménager décidera alors des
réglages de durée et de température pour vous.
Il est impossible de saisir un poids à l’extérieur de la
plage prévue.
▯ Pour les programmes de rôtissage avec sélection de
températures programmées utilisée par l’appareil
électroménager, les températures peuvent être aussi
élevées que 575 °F (300 °C). Par conséquent,
assurez-vous d’utiliser des ustensiles de cuisson
appropriés.

96
▯ Des recommandations sont fournies à propos des
ustensiles ou de la position de la grille à utiliser, ou de
l’ajout de liquide lors de la cuisson de viande. Au
cours de la cuisson, il faut retourner certains aliments
ou mélanger certains plats. Ces instructions
apparaissent à l’écran peu après le début de la
cuisson. Un signal sonore retentit pour vous avertir au
bon moment.
▯ Des renseignements concernant le bon type
d’ustensiles de cuisson à utiliser et des conseils et
astuces pour la préparation des aliments se retrouvent
dans la section Utilisation des tableaux de cuisson et
Guide d’entretien livré avec l’appareil électroménager.
Vous pouvez également effleurer la touche INFO sur le
panneau de commandes pour obtenir cette
information.
Sélection d’un plat
Le tableau qui suit présente les catégories d’aliments et
de plats offertes.
Réglage d’un programme
Vous trouverez un guide de toutes les étapes de
réglages pour l’aliment choisi.
1.
Effleurez la touche tactile ON l OFF pour mettre
l’appareil électroménager sous tension.
2.
Effleurez la touche tactile MENU.
3.
Glissez vers la gauche ou la droite pour sélectionner
« Programmes vapeur ».
4.
Effleurez la ligne du bas.
5.
Effleurez la catégorie requise.
6.
Glissez vers la gauche ou la droite pour sélectionner
le programme de cuisson à la vapeur requis.
7.
Effleurez le programme vapeur requis.
Les réglages pour le plat apparaissent à l’écran.
Remarque : Pour certains plats, vous pouvez
également afficher des notes, par exemple, à quel
niveau enfourner le plat et quel ustensile de cuisine
est recommandé. Pour ce faire, glissez vers la gauche
jusqu’à l’affichage de toutes les notes.
Catégories Plats
Réchaud Pizza mince, 1 mc
Pizza mince, 2 mcx
Pizza mince, 3 mcx
Pizza mince, 4 mcx
Pizza mince, 5 mcx
Pizza mince, 6 mcx
Pizza mince entière
Pizza épaisse, 1 mc
Pizza épaisse, 2 mcx
Pizza épaisse, 3 mcx
Pizza épaisse, 4 mcx
Pizza épaisse, 5 mcx
Pizza épaisse, 6 mcx
Pizza épaisse entière
Légumes Bouquets de chou-fleur étuvés
Haricots verts étuvés
Bouquets de brocoli étuvés
Asperges vertes étuvées
Choux de Bruxelles frais
Carottes en rondelles
Artichauts frais
Épinards frais étuvés
Pois mange-tout
Pommes de terre Pommes terre bouillies s/peau
Pommes de terre bouillies
Céréales et grains Couscous
Volaille Poulet entier, frais
Morceaux de poulet
Bœuf Surlonge, fraîche
Bœuf braisé, frais
Porc Rôti de longe, frais
Agneau Gigot d’agneau, frais
Poisson Poisson frais, entier
Filets de poisson, frais
Filets de poisson surgelés
Fruits de mer
Crevettes
Produits de
boulangerie et
pâtisseries, desserts
Compote de fruits
Pouding au riz
Pains Pain blanc
Pain multicéréales
Pain de seigle
Petits pains frais
Petits pains surgelés
Pain tressé
Galette
Décongélation Baies
Œufs Œufs durs 1 à 24
Œufs durs 25 à 36
Riz Riz basmati
Riz brun
Riz à grains longs
Risotto, riz arborio
Catégories Plats

97
8.
Certains programmes demandent le poids de
l’aliment. Appuyez sur Poids et faites défiler pour le
régler.
Touchez le bon paramètre et ajustez-le.
9.
Effleurez la touche tactile START l STOP pour lancer la
commande.
Le temps de cuisson estimé apparaît à l’écran.
Remarque : Pour certains programmes, le temps de
cuisson affiché peut changer au cours des premières
minutes, car le temps de chauffage varie en fonction
de la température des aliments et de l’eau, entre
autres choses.
Dès que le temps de cuisson est écoulé, un signal
sonore retentit et l’appareil électroménager arrête de
fonctionner automatiquement. Effleurez la touche tactile
TIMERS pour interrompre le signal sonore.
Certains programmes offrent la possibilité de poursuivre
la cuisson du plat.
Si vous êtes satisfait(e) des résultats de cuisson,
effleurez « Fin ».
Sinon, poursuivez la cuisson.
Poursuite de la cuisson
1.
Effleurez « Poursuivre la cuisson ».
2.
Au besoin, réglez l’appareil à la durée ou au réglage
recommandé.
3.
Effleurez la touche tactile START l STOP pour lancer la
commande « Poursuive la cuisson ».
Annulation
Effleurez la touche tactile START l STOP pour annuler la
commande à l’appareil électroménager.
Remarque : Dans un four double, si les deux cavités
fonctionnent, il faut choisir celle qui sera modifiée.
Quitter
Effleurez la touche tactile ON l OFF pour éteindre
l’appareil électroménager.
Nettoyage du four à vapeur
Avec un bon entretien et de bons nettoyages, le four
conservera son apparence et demeurera fonctionnel
pendant plusieurs années. Cette section expliquera les
bonnes directives d’entretien et de nettoyage du four à
vapeur.
Produits de nettoyage appropriés
Pour s’assurer de ne pas endommager les différentes
surfaces avec le mauvais produit de nettoyage, consultez
les renseignements fournis dans le tableau qui suit.
Selon le modèle de l’appareil électroménager, il est
possible que tous les éléments énumérés ne soient pas
offerts.
AVIS : Surface endommagée!
Ne pas utiliser
▯ de produits de nettoyage abrasifs ou puissants;
▯ de produits de nettoyage à contenu élevé en alcool;
▯ de tampons à récurer ou d’éponges de nettoyage
abrasifs;
▯ de nettoyeur haute-pression ou nettoyeur à vapeur; ou
▯ de produits nettoyants spéciaux pour nettoyer
l’appareil électroménager alors qu’il est chaud.
Lavez bien les éponges et les chiffons doux neufs avant
de les utiliser.
Conseil : Les produits de nettoyage et d’entretien
recommandés peuvent être achetés auprès du Service
après-vente. Respectez les directives de chacun des
fabricants.
9 AVERTISSEMENT
RISQUE DE BRÛLURES
L’appareil électroménager peut devenir très chaud.
Ne jamais toucher aux surfaces internes de la cavité
du four ni les éléments chauffants. Toujours laisser
l’appareil électroménager refroidir. Tenir les enfants
éloignés.
Remarques
▯ On peut remarquer de légères différences de couleur
à l’avant de l’appareil électroménager découlant de
l’utilisation de différents matériaux notamment du
verre, du plastique et du métal.
▯ Les ombrages sur les panneaux de la porte qui
ressemblent à des traînées sont provoqués par la
réfection de l’éclairage intérieur.
▯ L’émail est cuit à très hautes températures. Cela peut
entraîner de légères variations de couleur. Cela est
normal et ne nuit en rien au fonctionnement du four.
Guide de nettoyage
Pièce Recommandations
Plat à rôtir et
lèchefrite
Laver à l’eau chaude
savonneuse. Rincer à fond et
sécher ou frotter doucement
avec de la poudre à récurer ou
des tampons savonneux en
suivant les instructions. NE PAS
nettoyer le plat à rôtir et le
lèchefrite dans le four lorsqu’il
est en mode autonettoyage.
Grille plate Laver à l’eau chaude
savonneuse. Rincer à fond et
sécher ou frotter doucement
avec de la poudre à récurer ou
des tampons savonneux en
suivant les instructions. NE PAS
nettoyer la grille dans un four
autonettoyant.
Si les grilles plates sont net-
toyées dans le four en mode
autonettoyant, elles perdront de
leur finition brillante et seront
plus difficiles à faire glisser. Si
cela se produit, frotter les bords
de la grille d’une petite quantité
d’huile végétale. Puis, enlever
l’excédent.

98
Remarques
▯ On peut remarquer de légères différences de couleur
à l’avant de l’appareil électroménager découlant de
l’utilisation de différents matériaux notamment du
verre, du plastique et du métal.
▯ Les ombrages sur les panneaux de la porte qui
ressemblent à des traînées sont provoqués par la
réfection de l’éclairage intérieur.
▯ L’émail est cuit à très hautes températures. Cela peut
entraîner de légères variations de couleur. Cela est
normal et ne nuit en rien au fonctionnement du four.
Grille télescopique Laver avec de l’eau savonneuse.
Rincer à fond et sécher ou frotter
doucement avec de la poudre à
récurer ou des tampons
savonneux en suivant les
instructions. Éviter de mettre de
la poudre à récurer dans les
glissières télescopiques. Il peut
s’avérer nécessaire de lubrifier à
nouveau les glissières. Utiliser
uniquement des lubrifiants pour
haute température de qualité
alimentaire pour lubrifier les
glissières.
NE PAS nettoyer la grille dans un
four autonettoyant.
Guides
télescopiques
Eau chaude savonneuse :
Nettoyer avec un torchon à
vaisselle.
Ne pas enlever le lubrifiant des
glissières amovibles quand la
grille est avancée. Il est mieux de
nettoyer les guides quand ils
sont rétractés.
Ne pas mettre au lave-vaisselle.
Réservoir d’eau Eau chaude savonneuse :
Nettoyer avec un torchon à
vaisselle et rincer à fond pour
éliminer toute trace de détergent
résiduel.
Sécher à l’aide d’un chiffon doux.
Laisser sécher le réservoir avec
le couvercle ouvert.
Ne pas mettre au lave-vaisselle.
Joint d’étanchéité de
porte de silicone
Nettoyer à l’eau chaude
savonneuse.
Verre Laver avec de l’eau et du savon
ou avec un nettoyant pour vitres.
Utiliser les produits Fantastik®
ou Formula 409® pour enlever
les éclaboussures de graisses et
les taches tenaces.
Panneau de
commandes de
verre
Utiliser de l'eau savonneuse
tiède sur un torchon à vaisselle
ou un nettoyant pour vitre à
vaporiser directement sur un
papier absorbant.
Surfaces peintes Nettoyer à l’eau chaude
savonneuse ou appliquer les
produits Fantastik® ou
Formula 409® sur une éponge
propre ou du papier absorbant et
essuyer. Éviter les agents
nettoyants à base de poudre, les
tampons métalliques et les
produits à nettoyer le four.
Pièce Recommandations
Surfaces en
porcelaine (sole de
la cavité du four)
Essuyer immédiatement les
déversements acides comme le
jus de fruits, le lait et les tomates
avec un chiffon sec. Ne pas
utiliser d’éponge ou de chiffon
humide sur la porcelaine chaude.
Dès que la surface est froide,
nettoyer avec de l’eau chaude
savonneuse ou appliquer du
Bon-Ami® ou du Soft Scrub®
sur une éponge humide. Rincer
et sécher. Pour les taches
tenaces, utiliser des tampons
savonneux. Il est normal, qu’au fil
du temps, de fines lignes
apparaissent sur la porcelaine à
cause de la chaleur et des
salissures.
Surfaces en acier
inoxydable
Toujours essuyer ou frotter dans
la direction du poli. Nettoyer avec
une éponge savonneuse, puis
rincer et sécher ou essuyer avec
du Fantastik® ou du
Formula 409® vaporisé sur du
papier absorbant. Protéger et
polir en utilisant du Stainless
Steel Magic® et un chiffon doux.
Retirer les traces d’eau avec un
chiffon humecté de vinaigre
blanc. Utiliser Bar Keeper’s
Friend® pour éliminer les traces
d’échauffement.
Plastique et
commandes
Lorsque refroidis, nettoyer avec
de l’eau savonneuse, rincer et
sécher.
Sonde Essuyer à l’eau savonneuse. Ne
pas plonger dans l’eau. Ne pas
laver au lave-vaisselle.
Zones de texte
imprimé (mots et
chiffres)
Ne pas utiliser de nettoyants
abrasifs ou de solvants à base
de pétrole.
Pièce Recommandations

99
Surfaces de la cavité du four
Les surfaces légèrement texturées de la paroi arrière, du
haut et des parois latérales du four sont recouvertes d’un
revêtement Écolyse et ne doivent pas être nettoyées
avec des produits chimiques puissants.
La sole de la cavité du four est émaillée et lisse.
Le nettoyage est plus facile, car vous n’avez pas besoin
de nettoyer autour d’un élément chauffant exposé au
fond du four. L’élément inférieur dissimulé est protégé
des salissures et des éclaboussures. Les éclaboussures
sont faciles à essuyer.
Nettoyage de surfaces émaillées
Nettoyez la surface émaillée lisse avec un torchon à
vaisselle et de l’eau chaude savonneuse. Séchez-la
ensuite à l’aide d’un chiffon doux.
Ramollissez les résidus alimentaires cuits avec un
chiffon humide et de l’eau savonneuse. En cas de dépôts
alimentaires importants, utilisez un tampon très
savonneux.
Remarque : Les résidus alimentaires peuvent laisser
une marque blanchâtre. Ces marques sont inoffensives
et n’influencent pas le rendement. Au besoin, utilisez du
jus de citron pour éliminer ces résidus.
Nettoyage de l’appareil électroménager
Maintenez toujours l’appareil électroménager propre.
Retirez les aliments et les débris alimentaires
immédiatement pour éviter les accumulations de dépôts
tenaces.
▯ Nettoyez la cavité du four après chaque utilisation.
Cela empêchera les aliments et les débris alimentaires
de coller et de cuire.
▯ Retirez toujours immédiatement les particules de
tartre, de graisse, de fécule et d’albumine (par ex.,
blanc d’œuf).
▯ Utilisez les plats allant au four appropriés pour rôtir,
par exemple, un plat à rôtir.
▯ Pour les gâteaux ou les tartes qui risquent de se
renverser, déposez l’ustensile de cuisson sur une
plaque doublée d’une feuille d’aluminium et déposez-
la sur la grille.
Fonctions de nettoyage du four à vapeur
AVIS : N’utilisez pas de produits pour nettoyer le four
sur les surfaces autonettoyantes. Le produit risque
d’endommager les surfaces. Si par hasard le produit de
nettoyage atteint ces surfaces, retirez-le immédiatement
avec de l’eau et une éponge. Ne récurez pas la surface
et n’utilisez pas de produits de nettoyage abrasifs.
L’appareil électroménager est doté des fonctions
« Nettoyage écolytique », « Nettoyage facile » et
« Détartrage ». Les surfaces autonettoyantes de la cavité
du four utilisent la fonction de nettoyage « Nettoyage par
écolyse ». Utilisez la fonction « Nettoyage facile » pour
un nettoyage intermédiaire de la sole de la cavité du
four. Les aliments et les dégâts élémentaires sont
saturés de vapeur pour permettre de déloger les
salissures avec la fonction « Nettoyage facile ». Ils sont
alors plus faciles à dégager. Vous pouvez utiliser la
fonction « Détartrage » pour déloger le tartre de
l’évaporateur.
Nettoyage Écolyse
Certaines surfaces de la cavité du four sont nettoyées
avec le mode Nettoyage Écolyse.
Ce mode nettoie en permanence. Les panneaux latéraux,
le panneau du haut et la paroi arrière sont revêtus d’une
matière céramique mate et poreuse connue sous le nom
de revêtement écolytique.
Au fil du temps, le revêtement absorbe et dégrade les
éclaboussures provenant de la cuisson, du rôtissage et
du grillage dans le four.
Si ces surfaces ne se nettoient pas elles-même de façon
adéquate et que vous voyez apparaître des taches
sombres, on les peut rafraîchir en utilisant le mode de
Nettoyage Écolyse qui contribue à nettoyer le revêtement
écolytique en faisant fonctionner l’appareil à une
température très élevée pour accélérer le processus.
Remarque : En cours de fonctionnement normal,
l’appareil électroménager enregistre le nombre
d’utilisation et indique quand il est temps de procéder à
un nettoyage. La recommandation est affichée jusqu’à la
fin du mode Nettoyage Écolyse.
Il est possible d’endommager les surfaces si on
n’exécute pas cette fonction de nettoyage.
Si l’appareil électroménager se salit très rapidement ou
si vous remarquez des taches sombres sur la paroi
arrière, n’attendez pas la recommandation de nettoyage
de l’appareil électroménager. Plus l’appareil
électroménager est nettoyé souvent, plus longtemps les
surfaces poreuses retiendront leur caractéristique de
nettoyage. Il est facile de nettoyer l’appareil
électroménager à tout moment avec la fonction
Nettoyage Écolyse.
Essuyer tout grand déversement dans le four avant de
lancer la fonction de Nettoyage par écolyse.
Ne pas nettoyer de pièces ou d'accessoires dans le four
auto-nettoyant.
Avant le nettoyage par écolyse
Retirez les accessoires, les rails, les grilles et les plats
allant au four de la cavité du four.
Nettoyage de la sole du four et de la partie interne de la
porte de l’appareil électroménager
Délogez les plus gros dégâts alimentaires du fond du
four, de la partie interne la porte et de l’ampoule
intérieure de l’appareil électroménager. Autrement, des
taches apparaîtront qui seront impossibles à nettoyer.
AVIS : N’utilisez pas de produits pour nettoyer le four
sur les surfaces écolises. Le produit risque
d’endommager les surfaces. Si par hasard le produit de
nettoyage atteint ces surfaces, retirez-le immédiatement
avec de l’eau et une éponge. Ne récurez pas la surface
et n’utilisez pas de produits de nettoyage abrasifs.
Démarrer
Avant de régler la fonction nettoyage, assurez-vous
d’avoir respecté toutes les directives de préparation.
Le nettoyage prend une heure. Il est impossible de
modifier la durée.
1.
Effleurez la touche tactile ON l OFF.
2.
Effleurez la touche tactile MENU.

100
3.
Glissez vers la gauche ou la droite pour sélectionner
« Nettoyage par écolyse
™ ».
4.
Effleurez la ligne du bas.
L’écran affiche la durée de nettoyage par écolyse.
5.
Effleurez la ligne du bas.
6.
Effleurez la touche tactile START l STOP.
L’appareil électroménager lance le nettoyage par
écolyse. Le temps restant apparaît à l’écran.
Maintenez la cuisine aérée lors de l’exécution de la
fonction de nettoyage.
Dès la fin de l’aide au nettoyage, un signal sonore
retentit et l’appareil électroménager arrête
automatiquement la fonction en cours.
À la fin de la fonction Nettoyage
Une fois la cavité du four refroidie, essuyez-la au besoin
avec un chiffon humide.
Remarque : Il est possible d’apercevoir des tâches
rougeâtres sur les surfaces lorsque le four est en cours
de fonctionnement et que la fonction Nettoyage est
active. Il ne s’agit pas de taches de rouille, mais plutôt de
résidus alimentaires. Elles ne sont pas dangereuses pour
votre santé et ne limitent pas la capacité de nettoyage
des surfaces autonettoyantes.
Nettoyage facile
La fonction Nettoyage facile facilite le nettoyage de la
sole du four. Les aliments et les dégâts alimentaires sont
détrempés en vaporisant de l’eau de vinaigre. Il est alors
plus facile de les retirer.
9 AVERTISSEMENT
RISQUE DE BRÛLURES
De l’eau dans la cavité du four chaude peut générer
de la vapeur chaude. Ne jamais verser d’eau dans
la cavité d’un four chaud.
Réglage
La fonction « Nettoyage facile š » peut seulement être
lancée lorsque la cavité du four est froide (température
ambiante) avec la porte de l’appareil électroménager
fermée.
N’ouvrez pas la porte de l’appareil électroménager au
cours de cette opération. L’ouverture de la porte
interrompra la fonction « Nettoyage facile š ».
1.
Retirez les accessoires et les grilles de la cavité du
four.
2.
Effleurez la touche tactile MARCHE l ARRÊT
(ON l OFF).
3.
Effleurez la touche tactile MENU.
4.
Glissez vers la gauche ou la droite pour sélectionner
« Nettoyage facile š ».
5.
Effleurez la ligne du bas.
6.
Effleurez la touche tactile DÉMARRAGE l ARRÊT
(START l STOP).
L’appareil électroménager lance le nettoyage facile. Le
temps restant apparaît à l’écran.
Quitter
Dès la fin de la fonction de nettoyage, un signal sonore
retentit et l’appareil électroménager arrête
automatiquement l’opération.
Dès l’ouverture de la porte de l’appareil électroménager,
l’éclairage intérieur s’allume pour que vous puissiez
rincer plus facilement la cavité du four. Il faut retirer
rapidement l’eau restante dans la cavité du four. Ne
laissez pas l’eau restante dans la cavité du four pour une
période prolongée (par exemple, toute la nuit). Il ne faut
pas utiliser l’appareil électroménager lorsque la cavité du
four est encore humide ou mouillée.
Nettoyage subséquent
1.
Ouvrez la porte de l’appareil électroménager et retirez
l’eau restante avec un chiffon absorbant.
2.
Nettoyez les surfaces lisses de la cavité du four avec
un torchon à vaisselle ou une brosse à soies douces.
Les résidus tenaces peuvent être éliminés avec un
tampon à récurer doux.
3.
Éliminez le tartre avec un chiffon humecté de vinaigre.
Puis rincez à l’eau propre et essuyez avec un chiffon
doux (y compris sous le joint de la porte).
4.
Utilisez la touche tactile ON l OFF pour éteindre
l’appareil électroménager.
5.
Laissez la porte de l’appareil électroménager
entrouverte à la position d’arrêt (environ 30 degrés),
pendant environ une heure pour permettre aux
surfaces émaillées de la cavité du four de bien sécher.
Sinon, vous pouvez également lancer la fonction
Séchage pour la cavité du four.
Exécution de la fonction de séchage de la cavité du
four
1.
Effleurez la touche tactile MARCHE l ARRÊT
(ON l OFF).
2.
Effleurez la touche tactile MENU.
3.
Glissez vers la gauche ou la droite pour sélectionner
« Séchage ª ».
4.
Effleurez la ligne du bas.
5.
Effleurez la touche tactile DÉMARRAGE l ARRÊT
(START l STOP).
L’appareil électroménager lance la commande de
séchage. Le temps restant apparaît à l’écran.
Dès la fin du séchage, un signal sonore retentit et
l’appareil électroménager s’arrête automatiquement.
Élimination des dépôts alimentaires importants
Vous disposez de plusieurs options pour éliminer les
dépôts alimentaires particulièrement tenaces.
▯ Laissez l’eau de vinaigre faire effet quelques temps
avant d’amorcer le Nettoyage facile.
▯ Humectez les aliments et les dégâts alimentaires avec
de l’eau de vinaigre sur les surfaces lisses du four
avant de lancer Nettoyage facile.
▯ Une fois la cavité du four refroidie, répétez la fonction
Nettoyage facile.

101
Détartrage
Il faut détartrer régulièrement l’appareil électroménager
pour assurer son bon fonctionnement.
Le programme de détartrage comporte plusieurs étapes.
Pour des raisons hygiéniques, le programme de
détartrage doit se poursuivre jusqu’à la fin pour que
l’appareil électroménager soit de nouveau prêt à
fonctionner. En tout, le nettoyage prend entre 70 et
90 minutes environ.
▯ Détartrage (entre 55 et 70 minutes env.)
▯ Premier cycle de rinçage (entre 6 et 9 minutes env.)
▯ Deuxième cycle de rinçage (entre 6 et 9 minutes env.)
En cas d’interruption du détartrage (en raison par
exemple d’une panne de courant ou de la mise hors
tension de l’appareil), le programme vous invite à rincer
l’appareil électroménager deux fois après sa remise en
fonction. Il est impossible d’utiliser l’appareil
électroménager avant la fin du deuxième cycle de
rinçage.
La fréquence de détartrage de l’appareil électroménager
varie en fonction de la dureté de l’eau utilisée. Lorsque
vous êtes près de la fin du décompte ou qui vous reste
moins de cinq fonctionnements à vapeur, un message
apparaît à l’écran pour vous rappeler de le détartrer.
Après la mise sous tension de l’appareil électroménager,
le nombre de fonctionnements restant est affiché. Vous
aurez alors suffisamment de temps pour préparer le
détartrage.
Démarrer
AVIS
▯ Pour le programme de détartrage, utilisez uniquement
le produit de détartrage recommandé par Thermador.
D’autres produits de détartrage risquent
d’endommager l’appareil électroménager.
Numéro de commande de l’agent de détartrage :
10008170
▯ Si vous avez utilisé un fonctionnement à vapeur
immédiatement avant le détartrage, vous devez
d’abord éteindre l’appareil électroménager afin de
faire pomper l’eau résiduelle à l’extérieur du système
d’évaporation.
▯ Solution de détartrage : Évitez tout contact entre les
produits chimiques de détartrage intacts ou la solution
prête et le panneau de commandes ou toutes autres
surface de l’appareil électroménager. Un contact
prolongé peut endommager les surfaces. Retirez
immédiatement toute trace d’agent de détartrage en
rinçant avec l’eau du robinet.
1.
Effleurez la touche tactile MARCHE l ARRÊT
(ON l OFF).
2.
Effleurez la touche tactile MENU.
3.
Faites défiler vers la gauche ou la droite pour
sélectionner « Détratrer , ».
4.
Effleurez « Continuer ».
L’écran affiche la durée du programme de détartrage.
Il est impossible de la modifier.
5.
Effleurez de nouveau « Continuer ».
6.
Retirez le réservoir d’eau et remplissez-le avec la
solution de détartrage.
7.
Mélangez 32 oz liquides (950 ml) d’eau avec une
demi-bouteille de solution de détartrage (près de
200 ml).
8.
Une fois le réservoir rempli de solution de détartrage,
réinsérez-le complètement.
9.
Respectez les directives à l’écran.
L’appareil électroménager sera maintenant détartré.
L’écran affiche le décompte. Un signal sonore retentit
pour indiquer la fin du programme de détartrage.
Premier cycle de rinçage
1.
Un message apparaît à l’écran vous demandant
d’ouvrir la porte de l’appareil électroménager. Retirez
le réservoir d’eau et rincez-le complètement.
Remplissez-le d’eau fraîche puis réinsérez le réservoir.
2.
Fermez la porte de l’appareil électroménager.
Dès la fermeture de la porte, le premier rinçage se
déclenche automatiquement. À la fin, un signal sonore
retentit et un message apparaît à l’écran vous
demandant de passer à la prochaine étape.
Deuxième cycle de rinçage
1.
Un message apparaît à l’écran vous demandant
d’ouvrir la porte de l’appareil électroménager. Retirez
le réservoir d’eau et rincez-le complètement.
Remplissez-le d’eau fraîche puis réinsérez le réservoir.
2.
Fermez la porte de l’appareil électroménager.
Dès la fermeture de la porte, le deuxième rinçage se
déclenche automatiquement. À la fin, un signal sonore
retentit et un message apparaît à l’écran vous
demandant de passer à la prochaine étape.
Finalisation du détartrage
1.
Ouvrez la porte de l’appareil électroménager.
2.
Videz le réservoir d’eau, rincez complètement, séchez
et réinsérez le réservoir.
3.
Le détartrage est terminé et l’appareil électroménager
est de nouveau prêt à être utilisé.
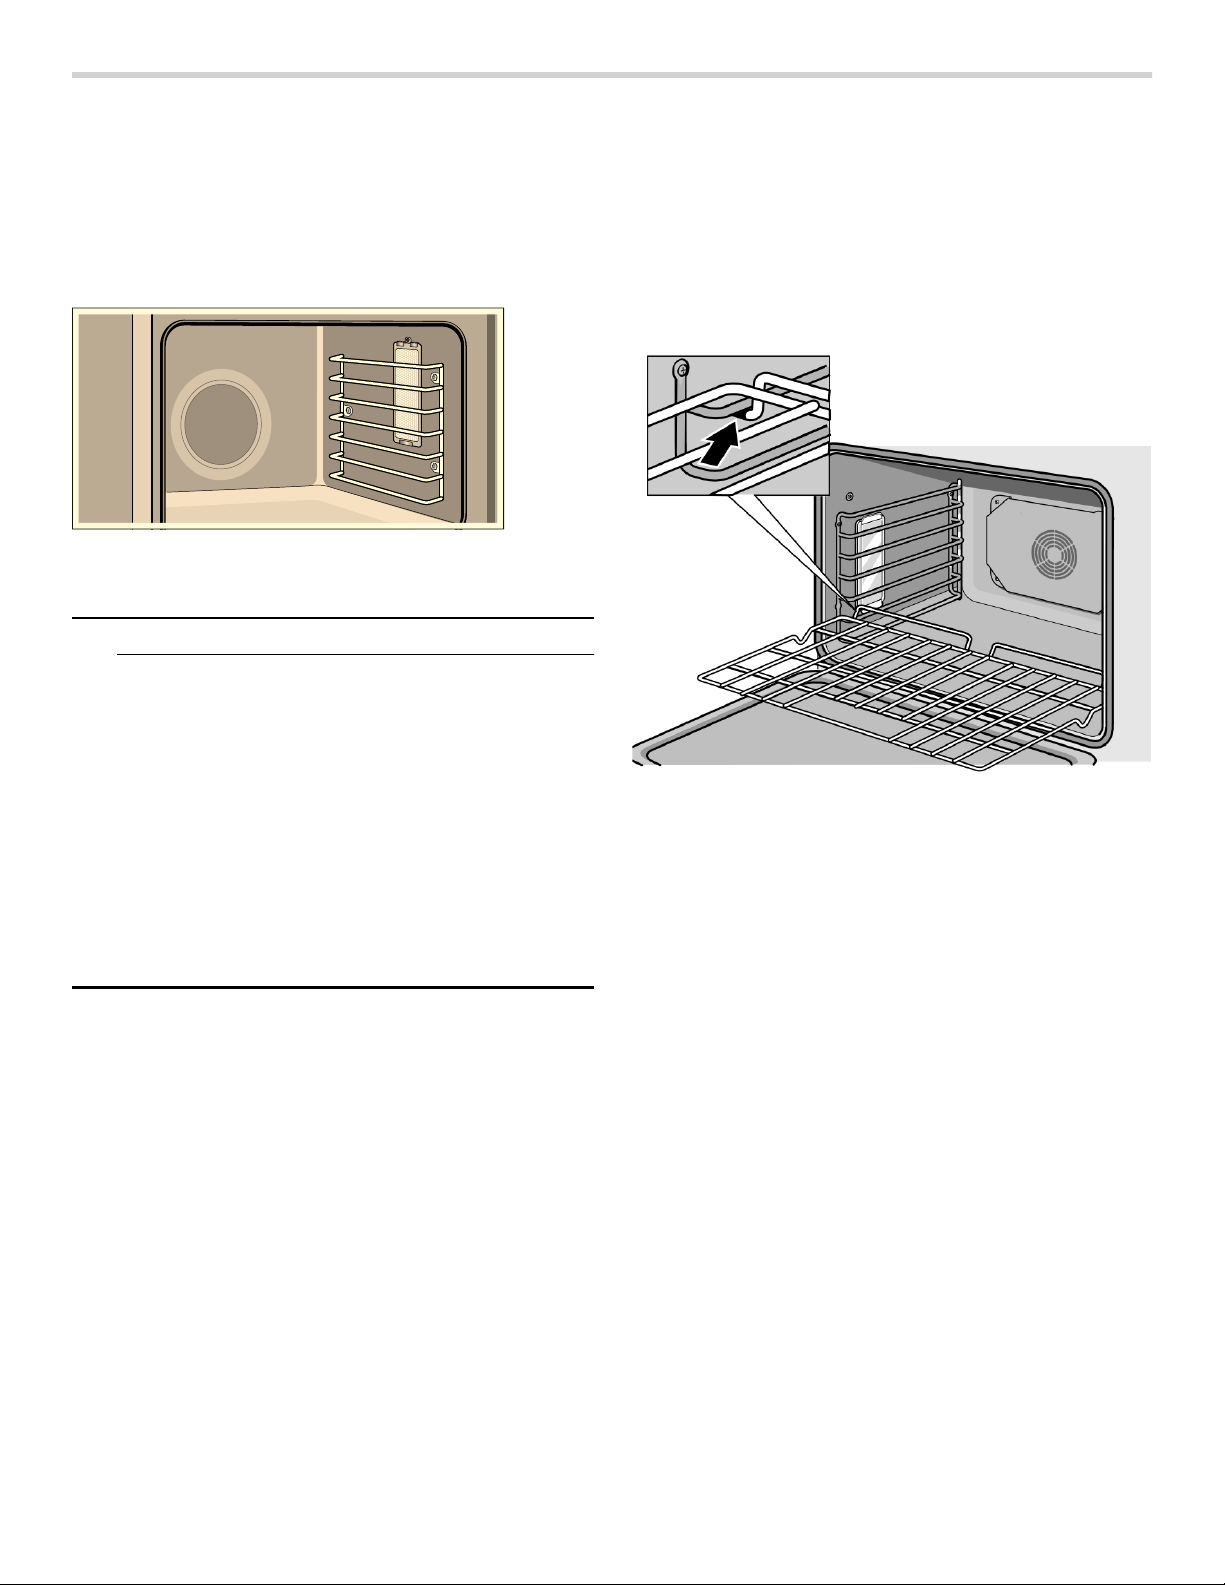
102
Fonctionnement du four conventionnel
Positions des grilles
Vous disposez de sept positions. La première position
est au bas du four. Dans l’ensemble du manuel, on fait
référence aux positions des grilles pour optimiser le
rendement de cuisson.
Mise en place de la grille
9 ATTENTION
▯ Pour éviter les brûlures, placer les grilles dans la
position désirée avant de mettre le four en
marche. Toujours utiliser des gants isolants
lorsque le four est chaud. Si vous devez déplacer
les grilles lorsque le four est chaud, ne pas
laisser les gants isolants entrer en contact avec
les élément chauffants.
▯ Agir avec prudence en retirant les grilles de la
position la plus basse pour éviter d'entrer en
contact avec la porte du four chaude.
▯ Pour éviter toute blessure ou endommagement
de l'appareil, s'assurer que les grilles sont
installées conformément à la notice d'installation
et non à l'envers ou sens dessus dessous.
Grille plate
La grille est conçue avec une butée afin qu'elle ne sorte
pas complètement du four et ne s'incline pas.
Mise ne place de la grille dans le four :
1.
Saisir fermement la grille par les côtés.
2.
Installer la grille (voir illustration).
3.
Incliner la grille vers le haut pour mettre la butée dans
le guide.
4.
Amener la grille en position horizontale et pousser
jusqu'au fond.
La grille doit être droite, à plat et ne doit pas dévier.
Retrait de la grille :
1.
Saisir fermement la grille par les côtés et tirer vers soi.
2.
Lorsque la butée est atteinte, incliner vers le haut et
tirer complètement vers soi.
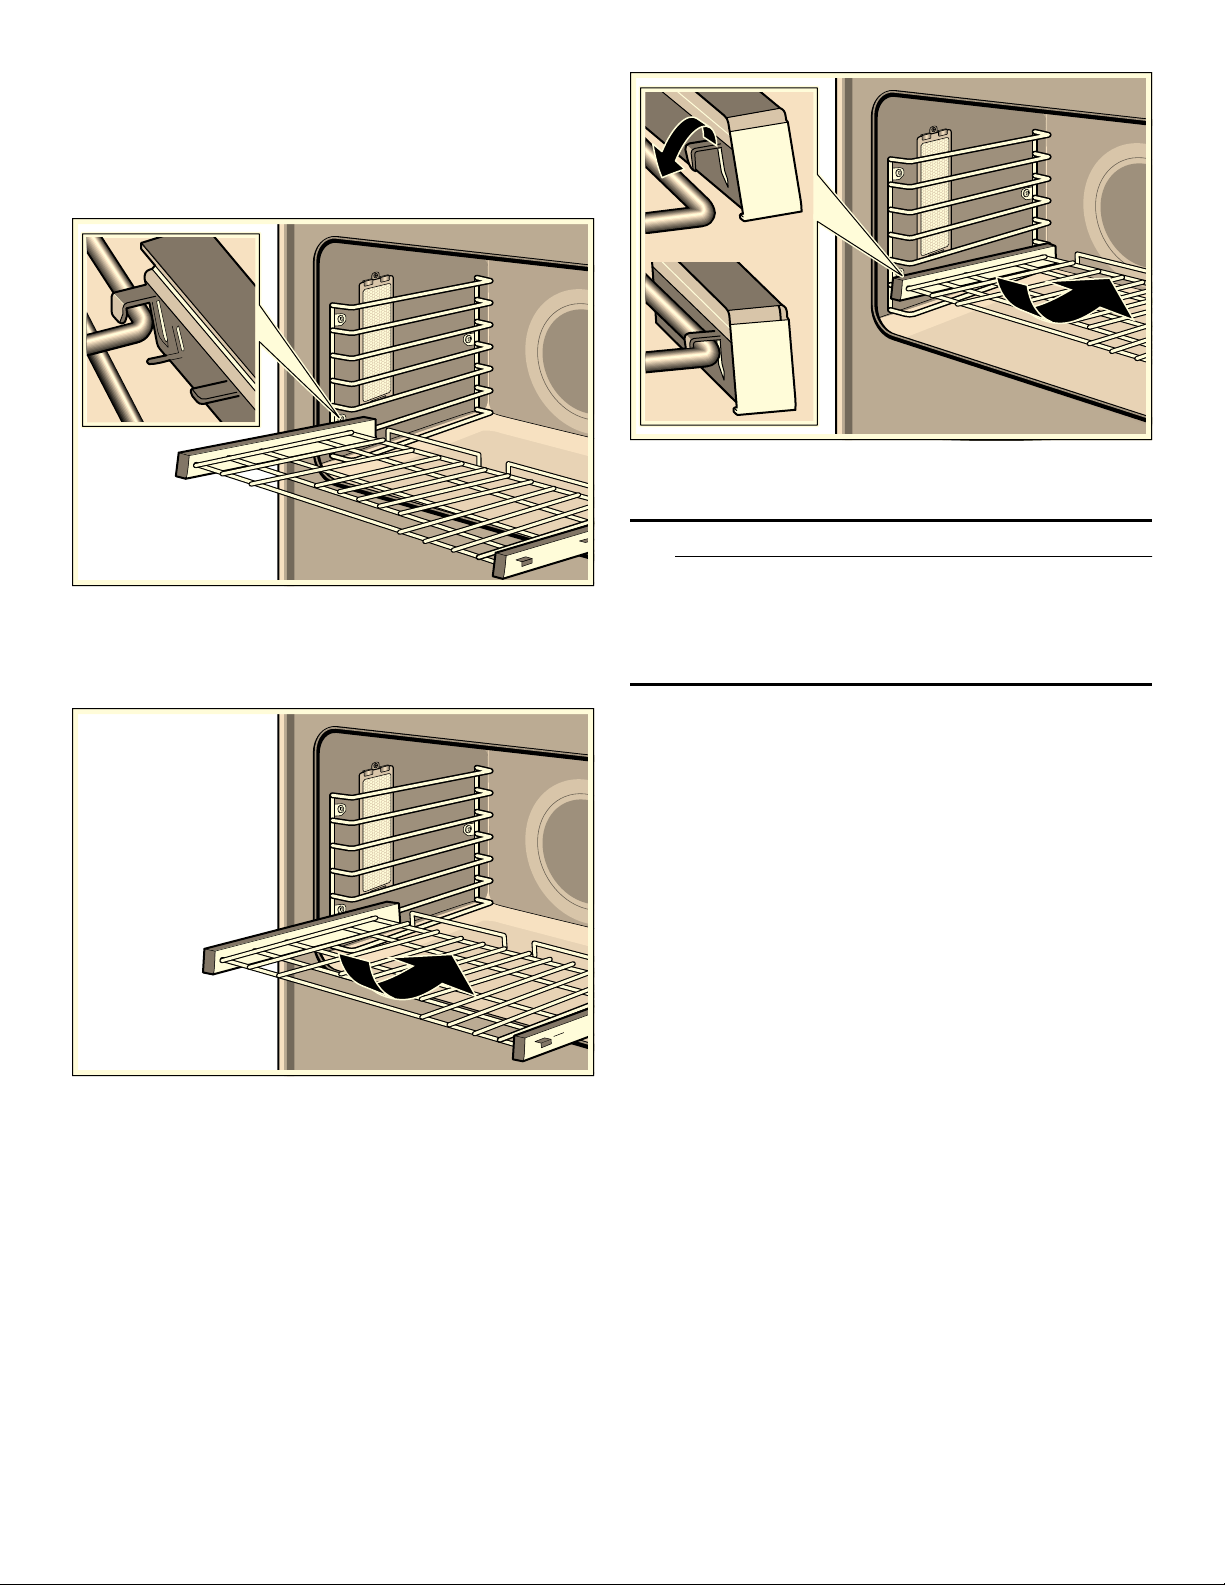
103
Grille télescopique
Pour insérer la grille télescopique dans le four :
1.
Inclinez légèrement la grille.
2.
Insérez les crochets arrière dans les équerres de
fixation accessoires.
3.
Remettez la grille à l’horizontale pour permettre à la
deuxième languette de reposer contre la glissière.
4.
Poussez la grille jusqu’à ce qu’elle soit de niveau avec
les crochets avant.
5.
Levez la grille pour verrouiller la dernière languette en
position.
6.
Enfoncez complètement la grille.
7.
Insérez les crochets avant dans les équerres de
fixation accessoires.
Il est très important de s’assurer que la grille est bien
installée (observez l’image agrandie).
9 ATTENTION
Pour éviter toute possibilité de blessures ou de
dommages à l’appareil électroménager, assurez-
vous que la grille télescopique est installée
exactement suivant les instructions de montage et
non à l'envers ou sens dessus dessous.
Tournebroche
Le mode tournebroche utilise la chaleur diffusée par
l’élément supérieur. Les aliments tournent lentement sur
une broche au centre du four. Ils reçoivent la chaleur
uniformément sur tous les côtés.
Le mode tournebroche convient très bien à la cuisson de
pièces de viandes importantes (par exemple, un poulet
entier, une dinde ou un gros rôti). Il permet de sceller la
saveur et le jus tout en cuisant la viande sans ajout de
matières grasses ou de liquides.
▯ Le poids maximum permis pour l’utilisation du
tournebroche est de 12 lb (6 kg).
▯ Utilisez une sonde thermométrique pour vérifier la
température interne de la viande.
▯ Les températures du four permises varient entre
175 °F et 550 °F (80 °C et 290 °C).

104
Montage du rôtisserie :
1.
Insérez à moitié la grille du rôtisserie dans le four au
niveau 5.
2.
Coulissez l’attache gauche sur la broche et serrez la
vis.
3.
Glissez la viande ou la volaille à rôtir sur la broche et
serrez la vis.
4.
Coulissez l’attache droite sur la broche et serrez la vis.
5.
Vérifiez l’équilibre de l’aliment sur la broche en la
tournant dans la paume de vos mains. La cuisson d’un
aliment mal équilibré sur la broche ne sera pas
uniforme.
6.
Placez la broche du rôtisserie sur la grille.
7.
Insérez la grille de la broche dans le four et insérez
l’arbre d’entraînement dans l’orifice de la paroi arrière
du four.
8.
Au besoin, tournez légèrement la broche pour bien
l’insérer dans l’orifice.
9.
Insérez la grille plate au niveau 1 et le plat à rôtir pour
recueillir la graisse.
Brider la volaille pour la rôtisserie
1.
Glissez une attache sur la broche, les dents pointant
vers l’extrémité de la broche. Serrez légèrement la vis
pour l’empêcher de glisser.
2.
Insérez la broche dans la volaille et fixez avec
l’attache.
3.
Coupez 24 po (61 cm) de corde de cuisine. Déposez
la corde sous la volaille, poitrine vers le haut, en
gardant les deux bouts égaux de chaque côté.
4.
Enroulez les extrémités de la corde autour des ailes.
Ramenez bien la pointe des ailes en serrant les
cordes sur le haut. Faites un nœud. Ne coupez pas la
corde restante.
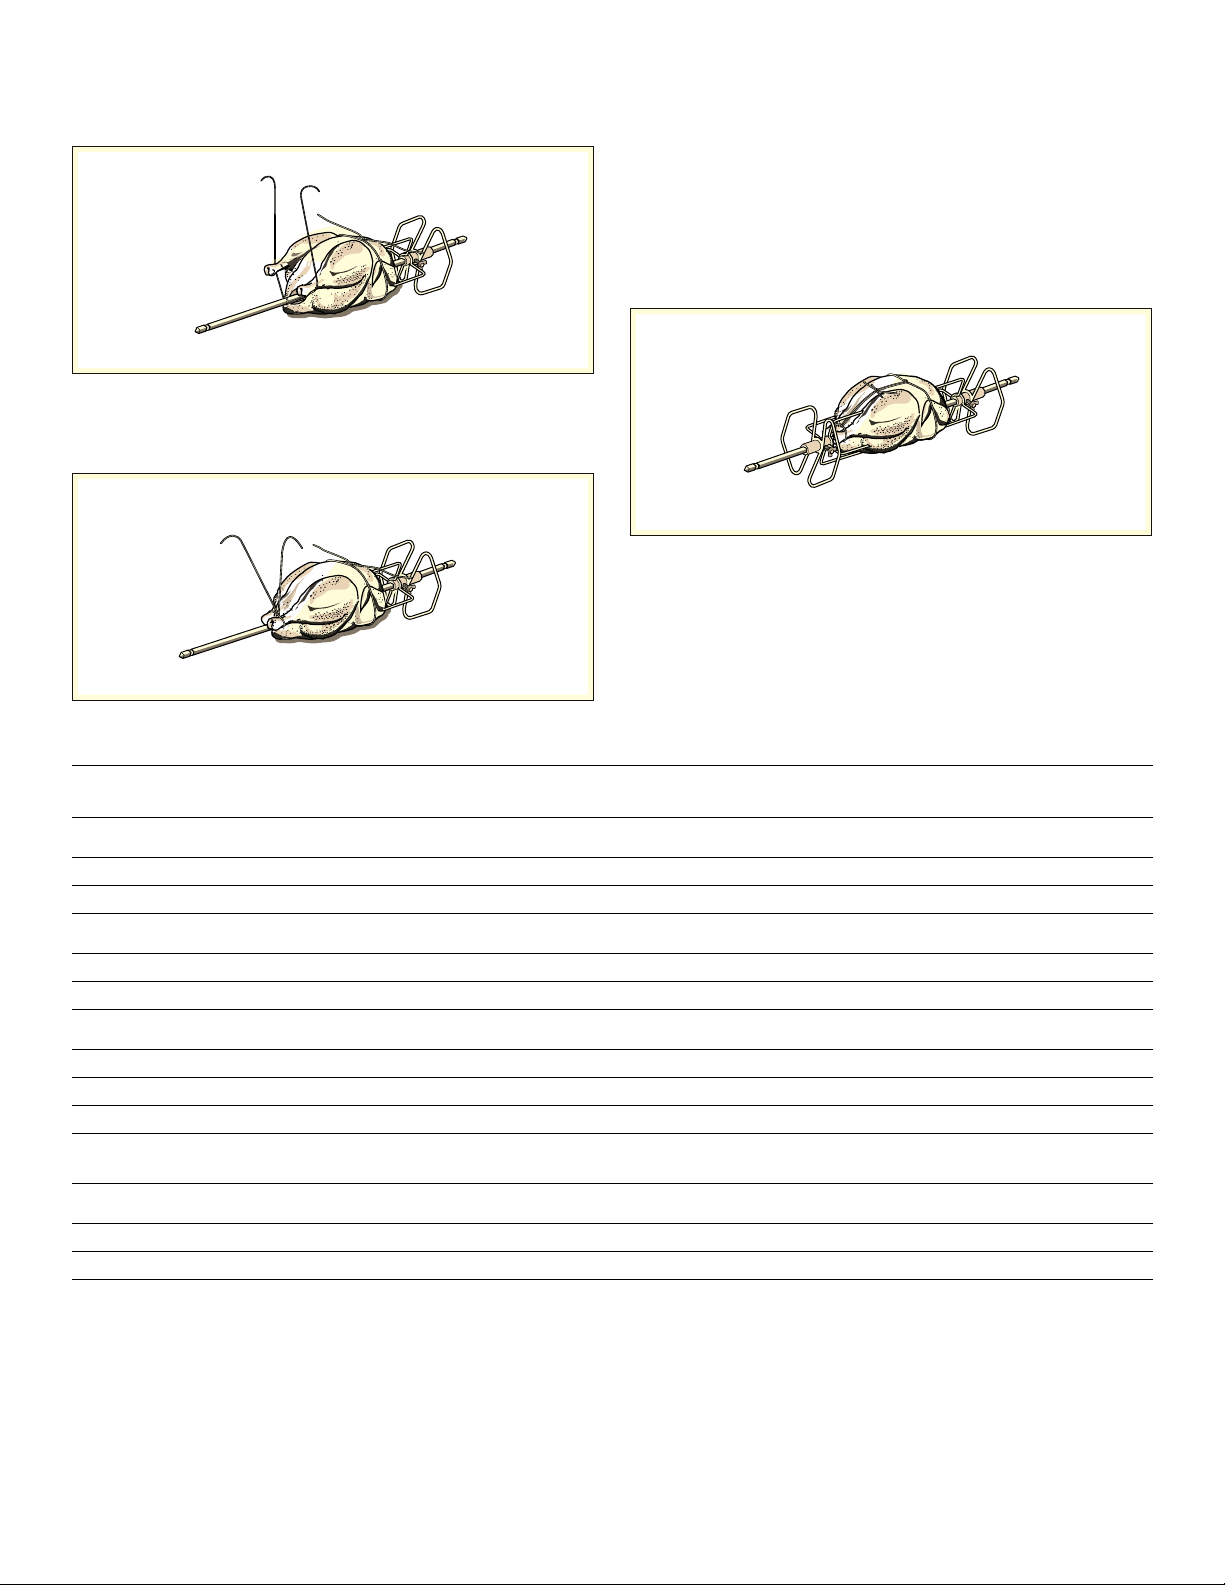
105
5.
Coupez un autre bout de corde de cuisine de 24 po
(61 cm) et déposez-la sur le dos. Enroulez la corde
autour de la queue puis de la broche. Serrez bien.
6.
Amenez les pattes vers l’avant. Croisez-les sur le
dessus de la broche. Enroulez avec la corde et faites
un nœud.
7.
Reliez la corde des pattes à la corde restante des
ailes. Faites un nœud. Glissez l’autre attache et
enfoncez les dents dans les pilons de la volaille pour
les fixer solidement.
8.
Vérifiez l’équilibre tournant la broche dans la paume
de vos mains. La volaille ne devrait pas tourner sur la
broche ni être lâche à un endroit quelconque. Si la
volaille glisse, bridez-la de nouveau. La cuisson d’une
volaille mal équilibrée sur la broche ne sera pas
uniforme.
Démarrer
Sélectionnez le mode Rôtisserie. La température par
défaut est de 400 °F (200 °C). Glissez vers la gauche
ou la droite pour ajuster la température et effleurez
START (Démarrer).
Tableau de cuisson á la Rôtisserie
Nettoyage du four conventionnel
Avec un bon entretien et de bons nettoyages, l’appareil
électroménager conservera son apparence et demeurera
fonctionnel pendant plusieurs années. Vous trouverez ici
les directives d’entretien et de nettoyage du four
conventionnel.
Produits de nettoyage appropriés
Pour s’assurer de ne pas endommager les différentes
surfaces avec le mauvais produit de nettoyage, consultez
les renseignements fournis dans le tableau qui suit.
Selon le modèle de l’appareil électroménager, il est
possible que tous les éléments énumérés ne soient pas
offerts.
Met Poids (lb) Temp. en °F (°C) Temps
(min. par lb)
Temp. interne
°F (°C)
Bœuf
Rosbif de faux-filet, rosé 3 à 5,5 400° (200°) 17 à 23 145° (65°)
Rosbif de faux-filet, à point 3 à 5,5 400° (200°) 18 à 27 160° (70°)
Porc
Longe de porc, désossée 1,5 à 4 400° (200°) 20 à 26 160° (70°)
Longe de porc, désossée 1,5 à 4 400° (200°) 16 à 24 145° (65°)
Volaille
Poulet entier 4 à 8 450° (230°) 12 à 17 180° (80°)
Dinde, entière 10 à 12 400° (200°) 10 à 12 180° (80°)
Poitrine de dinde 4 à 7 400° (200°) 16 à 19 170° (75°)
4 poulets de Cornouaille 1,5 chacune 450° (230°) 60 à 70 min. au
total
180° (80°)
Agneau
Gigot désossé, à point 4 à 6 400° (200°) 20 à 23 160° (70°)
Gigot désossé, bien cuit 4 à 6 400° (200°) 27 à 29 170° (75°)

106
AVIS : Surface endommagée!
Ne pas utiliser
▯ de produits de nettoyage abrasifs ou puissants;
▯ de produits de nettoyage à contenu élevé en alcool;
▯ de tampons à récurer ou d’éponges de nettoyage
abrasifs;
▯ de nettoyeur haute-pression ou nettoyeur à vapeur; ou
▯ de produits nettoyants spéciaux pour nettoyer
l’appareil électroménager alors qu’il est chaud.
Lavez bien les éponges et les chiffons doux neufs avant
de les utiliser.
Conseil : Les produits de nettoyage et d’entretien
recommandés peuvent être achetés auprès du Service
après-vente. Respectez les directives de chacun des
fabricants.
9 AVERTISSEMENT
RISQUE DE BRÛLURES
L’appareil électroménager peut devenir très chaud.
Ne jamais toucher aux surfaces internes de la cavité
du four ni les éléments chauffants. Toujours laisser
l’appareil électroménager refroidir. Tenir les enfants
éloignés.
Guide de nettoyage
Pièce Recommandations
Plat à rôtir et
lèchefrite
Laver à l’eau chaude
savonneuse. Rincer à fond et
sécher ou frotter doucement
avec de la poudre à récurer ou
des tampons savonneux en
suivant les instructions. NE PAS
nettoyer le plat à rôtir et le
lèchefrite dans le four lorsqu’il
est en mode autonettoyage.
Grille plate Laver à l’eau chaude
savonneuse. Rincer à fond et
sécher ou frotter doucement
avec de la poudre à récurer ou
des tampons savonneux en
suivant les instructions. NE PAS
nettoyer la grille dans le four
autonettoyant.
Si les grilles plates sont net-
toyées dans le four en mode
autonettoyant, elles perdront de
leur finition brillante et seront
plus difficiles à faire glisser. Si
cela se produit, frotter les bords
de la grille d’une petite quantité
d’huile végétale. Puis, enlever
l’excédent.
Grille télescopique Laver avec de l’eau savonneuse.
Rincer à fond et sécher ou frotter
doucement avec de la poudre à
récurer ou des tampons
savonneux en suivant les
instructions. Éviter de mettre de
la poudre à récurer dans les
glissières télescopiques. Il peut
s’avérer nécessaire de lubrifier à
nouveau les glissières. Utiliser
uniquement des lubrifiants pour
haute température de qualité
alimentaire pour lubrifier les
glissières.
NE PAS nettoyer la grille dans le
four autonettoyant. Si la grille
télescopique est nettoyée dans
le four pendant le mode
autonettoyage, elle perdra sa
finition lustrée et sera plus
difficile à faire glisser.
Joint en fibre de
verre
NE PAS NETTOYER LE JOINT.
Verre Laver avec de l’eau et du savon
ou avec un nettoyant pour vitres.
Utiliser les produits Fantastik®
ou Formula 409® pour enlever
les éclaboussures de graisses et
les taches tenaces.
Panneau de
commandes de
verre
Utiliser de l'eau savonneuse
tiède sur un torchon à vaisselle
ou un nettoyant pour vitre à
vaporiser directement sur un
papier absorbant.
Surfaces peintes Nettoyer à l’eau chaude
savonneuse ou appliquer les
produits Fantastik® ou
Formula 409® sur une éponge
propre ou du papier absorbant et
essuyer. Éviter les agents
nettoyants à base de poudre, les
tampons métalliques et les
produits à nettoyer le four.
Surfaces en
porcelaine
Essuyer immédiatement les
déversements acides comme le
jus de fruits, le lait et les tomates
avec un chiffon sec. Ne pas
utiliser d’éponge ou de chiffon
humide sur la porcelaine chaude.
Dès que la surface est froide,
nettoyer avec de l’eau chaude
savonneuse ou appliquer du
Bon-Ami® ou du Soft Scrub®
sur une éponge humide. Rincer
et sécher. Pour les taches
tenaces, utiliser des tampons
savonneux. Il est normal, qu’au fil
du temps, de fines lignes
apparaissent sur la porcelaine à
cause de la chaleur et des
salissures.
Pièce Recommandations

107
Remarques
▯ On peut remarquer de légères différences de couleur
à l’avant de l’appareil électroménager découlant de
l’utilisation de différents matériaux notamment du
verre, du plastique et du métal.
▯ Les ombrages sur les panneaux de la porte qui
ressemblent à des traînées sont provoqués par la
réfection de l’éclairage intérieur.
▯ L’émail est cuit à très hautes températures. Cela peut
entraîner de légères variations de couleur. Cela est
normal et ne nuit en rien au fonctionnement du four.
Surfaces de la cavité du four
La sole de la cavité du four est émaillée et lisse.
Le nettoyage est plus facile, car vous n’avez pas besoin
de nettoyer autour d’un élément chauffant exposé au
fond du four. L’élément inférieur dissimulé est protégé
des salissures et des éclaboussures. Les éclaboussures
sont faciles à essuyer.
Nettoyage de surfaces émaillées
Nettoyez la surface émaillée lisse avec un torchon à
vaisselle et de l’eau chaude savonneuse. Séchez-la
ensuite à l’aide d’un chiffon doux.
Ramollissez les résidus alimentaires cuits avec un
chiffon humide et de l’eau savonneuse. En cas de dépôts
alimentaires importants, utilisez un tampon très
savonneux.
Remarque : Les résidus alimentaires peuvent laisser
une marque blanchâtre. Ces marques sont inoffensives
et n’influencent pas le rendement. Au besoin, utilisez du
jus de citron pour éliminer ces résidus.
Nettoyage de l’appareil électroménager
Maintenez toujours l’appareil électroménager propre.
Retirez les aliments et les débris alimentaires
immédiatement pour éviter les accumulations de dépôts
tenaces.
▯ Nettoyez la cavité du four après chaque utilisation.
Cela empêchera les aliments et les débris alimentaires
de coller et de cuire.
▯ Retirez toujours immédiatement les particules de
tartre, de graisse, de fécule et d’albumine (par ex.,
blanc d’œuf).
▯ Utilisez les plats allant au four appropriés pour rôtir,
par exemple, un plat à rôtir.
▯ Pour les gâteaux ou les tartes qui risquent de se
renverser, déposez l’ustensile de cuisson sur une
plaque doublée d’une feuille d’aluminium et déposez-
la sur la grille.
Nettoyage facile
La fonction Nettoyage facile facilite le nettoyage de la
sole du four. Les aliments et les dégâts alimentaires sont
détrempés en vaporisant de l’eau de vinaigre. Il est alors
plus facile de les retirer.
9 AVERTISSEMENT
RISQUE DE BRÛLURES
De l’eau dans la cavité du four chaude peut générer
de la vapeur chaude. Ne jamais verser d’eau dans
la cavité d’un four chaud.
Réglage
La fonction « Nettoyage facile š » peut seulement être
lancée lorsque la cavité du four est froide (température
ambiante) avec la porte de l’appareil électroménager
fermée.
N’ouvrez pas la porte de l’appareil électroménager au
cours de cette opération. L’ouverture de la porte
interrompra la fonction « Nettoyage facile š ».
1.
Laissez la grille au niveau 3 et retirez tous les
accessoires et toutes les autres grilles de la cavité du
four.
2.
Mélangez deux tasses d’eau et
1/
2
tasse de vinaigre.
Placez sur le plateau du gril, sur la grille du niveau 3.
3.
Effleurez la touche tactile ON l OFF.
4.
Effleurez la touche tactile MENU.
5.
Glissez vers la gauche ou la droite pour sélectionner
« Nettoyage facile š ».
6.
Effleurez la ligne du bas.
7.
Effleurez la touche tactile START l STOP.
L’appareil électroménager lance la fonction Nettoyage
facile. Le temps restant apparaît à l’écran.
Surfaces en acier
inoxydable
Toujours essuyer ou frotter dans
la direction du poli. Nettoyer avec
une éponge savonneuse, puis
rincer et sécher ou essuyer avec
du Fantastik® ou du
Formula 409® vaporisé sur du
papier absorbant. Protéger et
polir en utilisant du Stainless
Steel Magic® et un chiffon doux.
Retirer les traces d’eau avec un
chiffon humecté de vinaigre
blanc.
Le chlore ou les composés
chlorés contenus dans certains
produits nettoyants peuvent
oxyder l’acier inoxydable.
Vérifier les ingrédients sur
l'étiquette avant d’utiliser le
produit.
Plastique et
commandes
Lorsque refroidis, nettoyer avec
de l’eau savonneuse, rincer et
sécher.
Sonde Essuyer à l’eau savonneuse. Ne
pas plonger dans l’eau. Ne pas
laver au lave-vaisselle.
Zones imprimées
(mots et numéros)
Ne pas utiliser de nettoyants
abrasifs ou de solvants à base
de pétrole.
Pièce Recommandations

108
Quitter
Dès la fin de la fonction de nettoyage, un signal sonore
retentit et l’appareil électroménager arrête
automatiquement l’opération.
Dès l’ouverture de la porte de l’appareil électroménager,
l’éclairage intérieur s’allume pour que vous puissiez
rincer plus facilement la cavité du four. Il faut retirer
rapidement l’eau restante dans la cavité du four. Ne
laissez pas l’eau restante dans la cavité du four pour une
période prolongée (par exemple, toute la nuit). Il ne faut
pas utiliser l’appareil électroménager lorsque la cavité du
four est encore humide ou mouillée.
Nettoyage subséquent
1.
Ouvrez la porte de l’appareil électroménager et retirez
l’eau restante avec un chiffon absorbant.
2.
Nettoyez les surfaces lisses de la cavité du four avec
un torchon à vaisselle ou une brosse à soies douces.
Les résidus tenaces peuvent être éliminés avec un
tampon à récurer doux.
3.
Éliminez le tartre avec un chiffon humecté de vinaigre.
Puis rincez à l’eau propre et essuyez avec un chiffon
doux.
4.
Utilisez la touche tactile ON l OFF pour éteindre
l’appareil électroménager.
5.
Laissez la porte de l’appareil électroménager
entrouverte à la position d’arrêt (environ 30 degrés),
pendant environ une heure pour permettre à la surface
émaillée de sécher entièrement.
Élimination des dépôts alimentaires importants
Vous disposez de plusieurs options pour éliminer les
dépôts alimentaires particulièrement tenaces.
▯ Laissez l’eau de vinaigre faire effet quelques temps
avant d’amorcer le Nettoyage facile.
▯ Humectez les aliments et les dégâts alimentaires avec
de l’eau de vinaigre sur les surfaces lisses du four
avant de lancer Nettoyage facile.
▯ Une fois la cavité du four refroidie, répétez la fonction
Nettoyage facile.
Nettoyage Auto
Lors de mode Nettoyage Auto, le four est chauffé à une
température très élevée. Les débris alimentaires après
avoir rôti, grillé ou cuit sont brûlés. Vous n’avez qu’à
essuyer les cendres de la cavité du four après qu’elle ait
refroidi.
9 AVERTISSEMENT
LORS DE L’UTILISATION DE LA FONCTIONNALITÉ
AUTONETTOYAGE
▯ De faibles quantités de monoxyde de carbone
peuvent se dégager lors de l’élimination des
salissures pendant le cycle d’autonettoyage et
l’isolant en fibre de verre peut émettre de très
faibles quantités de formaldéhyde pendant les
quelques premiers cycles autonettoyants. Pour
minimiser l’exposition à ces substances,
s’assurez d’avoir une bonne ventilation en
laissant une fenêtre ouverte, ou utiliser un
ventilateur ou une hotte d’aération.
▯ Ne bloquez pas les évents du four pendant le
cycle d’autonettoyage. Faites toujours fonctionner
l’appareil en suivant les consignes du présent
guide de l’utilisateur.
▯ Lors de l’utilisation de la fonctionnalité
autonettoyage, vérifiez que la porte est verrouillée
et ne s’ouvre pas. Si la porte de ne se verrouille
pas, ne lancez pas l’autonettoyage.
Communiquez avec le service après-vente.
▯ L’appareil électroménager peut devenir très
chaud au cours de l’autonettoyage. N’accrochez
jamais d’objets inflammables, comme des
torchons à vaisselle, à la poignée de la porte.
Maintenez la zone devant l’appareil
électroménager dégagée. Tenez les enfants
éloignés.
▯ La très haute température au cours de
l’autonettoyage détruit les revêtements
antiadhésifs des plateaux et des moules et cela
génère des gaz toxiques. Ne laissez jamais
quoique ce soit dans le four au cours de
l’autonettoyage.
AVIS : Ne nettoyez pas les pièces ou accessoires avec
la fonctionnalité autonettoyante.
Préparation de la fonctionnalité Nettoyage Auto par
pyrolyse
9 ATTENTION
Risque d’incendie! Les restants d’aliments, la
graisse et les jus de viande risquent de prendre feu.
Essuyer le compartiment de cuisson avec un chiffon
humide.
▯ Retirez les plus importants dégâts alimentaires du
four.
▯ Nettoyez manuellement les joints et l’intérieur de la
porte ainsi que le panneau de verre. Ces sections ne
se nettoient pas au cours du cycle Nettoyage Auto par
pyrolyse.
▯ Dégagez toutes pièces lâches de l’intérieur du
compartiment de cuisson. Assurez-vous que le
compartiment de cuisson est entièrement vide.
▯ Fermez la porte du four.

109
Réglage
La fonction « Nettoyage Auto ˜ » peut seulement être
lancée lorsque la cavité du four est froide (température
ambiante) avec la porte de l’appareil électroménager
fermée.
Pour votre sécurité, la porte de l’appareil électroménager
est verrouillée au cours de cette opération.
Selon le degré de saleté, vous avez le choix entre
trois niveaux différents de puissance pour le cycle
d’autonettoyage :
1.
Retirez les accessoires de la cavité du four.
2.
Effleurez la touche tactile ON l OFF.
3.
Effleurez la touche tactile MENU.
4.
Glissez vers la gauche ou la droite pour sélectionner
« Nettoyage Auto ˜ ».
5.
Sélectionnez une puissance de nettoyage.
6.
Effleurez « Continuer ».
7.
Confirmez que vous avez retiré les souillures
importantes et les accessoires de la cavité du four.
8.
Effleurez la touche tactile START l STOP.
Le verrouillage de la porte est automatiquement activé.
Le programme d’autonettoyage est lancé.
Remarque : À la fin du cycle d’autonettoyage, le four
bloquera tout autre cycle d’autonettoyage pendant
24 heures. Pour le four double, si une cavité a effectué
un autonettoyage, le cycle d’autonettoyage des deux
cavités sera bloqué pendant 24 heures.
Autonettoyage terminé
À la fin du programme d’autonettoyage, un signal sonore
retentit et l’appareil électroménager mets
automatiquement fin à la commande.
L’appareil électroménager demeure verrouillé au cours
de la période de refroidissement. Une fois la cavité du
four refroidie, le verrouillage sera débloqué.
Avec un chiffon humide, essuyez le restant de cendres
de la cavité du four.
Éviter ces produits nettoyants
Ne pas utiliser les produits nettoyants commerciaux tels
que Easy Off®. Ils risquent d'abîmer le fini ou les pièces
du four.
Ne pas utiliser moyen de tampons à récurer ou de
produits de nettoyage abrasifs.
Dépannage
Il est souvent facile d’expliquer les défaillances. Veuillez
consulter le tableau ci-dessous et essayez de corriger
vous-même la défaillance avant d’appeler le service
après-vente.
9 AVERTISSEMENT
RISQUE DE CHOC ÉLECTRIQUE
Les réparations non conformes sont sources de
danger. Les réparations et le remplacement des
câbles endommagés doivent être confiés
exclusivement à des techniciens de S.A.V. formés
par nous. Si l'appareil est défectueux, débrancher la
fiche d'alimentation secteur ou désactiver le coupe-
circuit ou le fusible sur le tableau électrique.
Appeler le S.A.V.
9 AVERTISSEMENT
RISQUE DE CHOC ÉLECTRIQUE
▯ Les travaux sur les appareils électroniques
doivent être exécutés par un centre de
réparations autorisé.
▯ Toujours débrancher l’appareil électroménager
du réseau électrique pour effectuer des travaux
dans la section électronique. Désactiver le
disjoncteur ou retirer le fusible du boîtier de
fusibles domestique.
Niveau de
puissance
Durée (exclut la période de
refroidissement)
élevée 3 heures
moyenne 2 ½ heures
faible 2 heures

110
Tableau de dépannage
Problème de four Causes possibles et solutions suggérées
La porte du four est verrouillée et refuse de s’ouvrir,
même après le refroidissement.
Mettre le four hors circuit au disjoncteur et attendre
cinq minutes. Remettre le disjoncteur en circuit. Le four
devrait se réinitialiser et être fonctionnel.
Le four ne chauffe pas. Vérifier le disjoncteur ou le boîtier à fusibles de la résidence.
S’assurer que l’alimentation électrique du four est adéquate.
S’assurer que la température du four a été sélectionnée.
Le fonctionnement à la vapeur ou le détartrage ne
s’amorce pas ou ne se poursuit pas.
Le réservoir d’eau est vide ou le fonctionnement est verrouillé
en raison du processus de détartrage. Remplissez le
réservoir d’eau et poursuivez le processus de détartrage.
Un message apparaît à l’écran indiquant que la
température est trop élevée après avoir régler un
mode de fonctionnement.
L’appareil électroménager n’a pas suffisamment refroidi. Le
laisser refroidir et reprendre le mode de fonctionnement.
L’appareil électroménager vous invitera à passer au
rinçage.
L’appareil électroménager a été débranché de la prise
électrique ou a été éteint au cours du processus de
détartrage. À la remise sous tension de l’appareil
électroménager, rincez-le à deux reprises.
La température du four est trop chaude ou trop froide. Le thermostat du four doit être ajusté. Voir « Température
compensée du four ». dans la section « Réglages de
l’utilisateur ».
L’éclairage du four fonctionne mal. Remplacer l’ampoule ou la remettre en place si elle a du jeu
ou si elle est grillée. Toucher l’ampoule avec les doigts peut
la faire griller.
L’éclairage refuse de s’éteindre. Vérifier s’il y a obstruction de la porte du four. Vérifier si la
charnière est tordue.
Impossible de retirer la lentille de la lampe. Il peut y avoir une accumulation de saleté autour de la lentille.
Essuyez la surface du couvercle de la lentille avec un chiffon
propre et sec avant d'essayer de l'enlever.
La fonctionnalité d’autonettoyage du four ne
fonctionne pas correctement.
Laisser refroidir le four avant d’exécuter le cycle
d’autonettoyage. Toujours essuyer les saletés et les
déversements importants avant d’exécuter le cycle
d’autonettoyage. Si le four est très sale, le programmer pour
la durée d’autonettoyage maximum.
L’horloge et la minuterie fonctionnent mal. S’assurer que l’alimentation électrique du four est adéquate.
« E » et un numéro s’affichent à l’écran et la
commande émet un signal sonore.
Il s’agit d’un code d’erreur. Respecter les directives à l’écran.
Si le code ne s’éteint pas et qu’aucune directive n’apparaît à
l’écran, effleurer INFO pour afficher plus d’informations (le
cas échéant) et éteindre le signal sonore. Si le code d’erreur
est toujours affiché, inscrire le code de défaillance, éteindre
le four et communiquer avec le service après-vente.
Une forte odeur se dégage du four neuf lorsqu’il est
mis sous tension.
Cela est normal pour un four neuf et disparaîtra après
quelques utilisations. Actionner le cycle d’autonettoyage
éliminera aussi l’odeur plus rapidement.
Le panneau de commande ne répond pas lorsqu’une
touche est activée.
S’assurer que la surface est propre. Toucher le centre du
pavé tactile. Utiliser le plat du doigt.
Le ventilateur fonctionne pendant des modes qui
n’utilisent pas la convection.
Sur certains modèles, le ventilateur à convection fonctionne
pendant que le four préchauffe en mode de cuisson. Cela est
normal.
De l’air chaud ou de la vapeur s’échappe de l’évent du
four.
Il est normal de voir ou de sentir de la vapeur ou de l’air
chaud s’échapper de l’évent du four. Ne pas obstruer l’évent.
Le ventilateur de refroidissement fonctionne même si
le four est éteint.
Cela est normal. Le ventilateur de refroidissement peut
encore fonctionner, même après avoir éteint le four, jusqu’au
refroidissement suffisant du four.
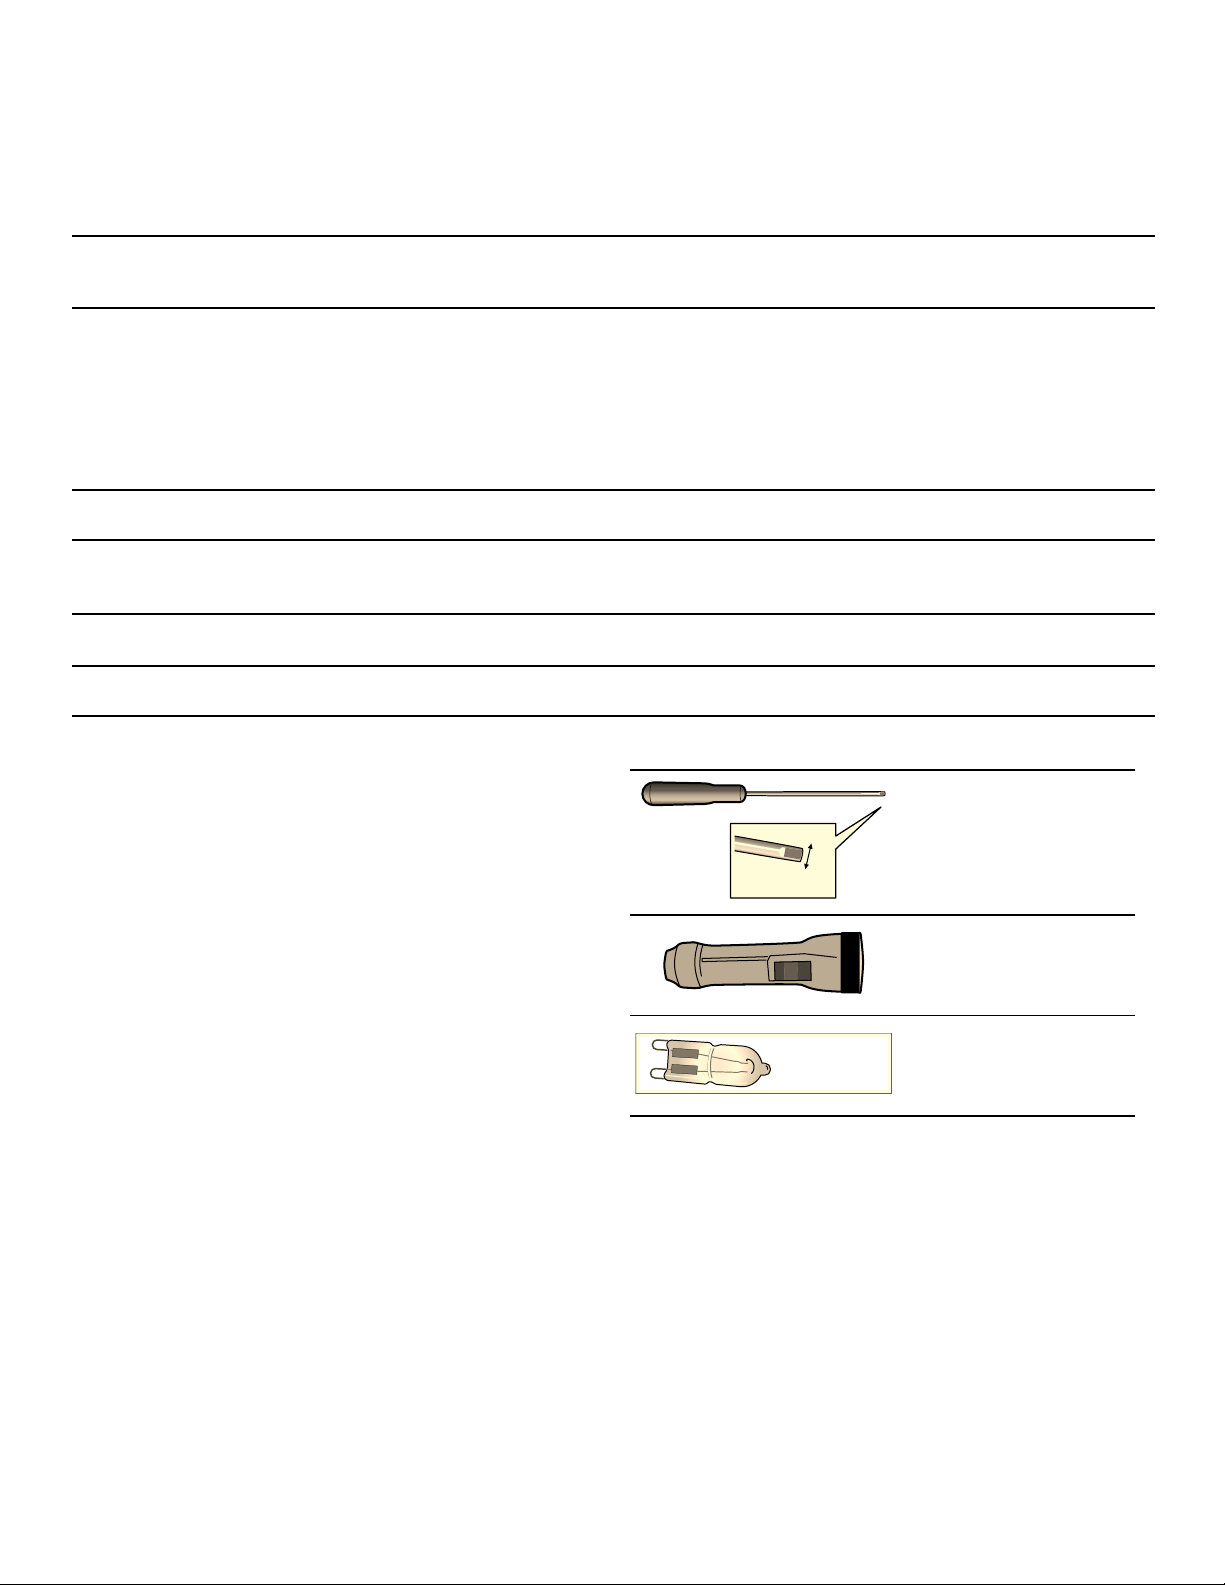
111
Temps de fonctionnement maximum
excédé
L’appareil électroménager s’éteint automatiquement si
aucune durée n’a été réglée et que les réglages n’ont
pas été modifiées depuis 24 heures.
Le temps de cuisson actuel, jusqu’à l’arrêt automatique
de l’opération, varie selon les réglages sélectionnés.
Un message apparaît à l’écran indiquant l’arrêt
automatique du fonctionnement de l’appareil
électroménager. Par la suite, le fonctionnement s’arrête.
Éteignez d’abord l’appareil électroménager pour le
réutiliser. Pour le redémarrer, réglez la commande
voulue.
Éclairage de four
Ampoules de la cavité du four à vapeur
Pour illuminer l’intérieur de la cavité du four à vapeur,
l’appareil électroménager dispose d’une ampoule à DEL
longue durée ou de plusieurs ampoules.
Toutefois, si une ampoule à DEL ou son couvercle venait
à faire défaut, communiquez avec le Service après-vente.
Il est impossible de retirer le couvercle de l’ampoule.
Ampoules pour cavité du four conventionnel
Remplacement de l’ampoule halogène de la paroi
latérale du four :
La porte du four se ferme plus rapidement ou
lentement que d’habitude.
Les charnières de la porte à fermeture amortie renferme un
fluide amortisseur influencé par les températures. Dans un
environnement froid, la porte du four se ferme plus lentement
qu’elle ne le ferait dans un environnement chaud. Un
environnement plus chaud que normal, comme en cours de
cuisson, peut entraîner une fermeture légèrement plus rapide
de la porte du four.
L’appareil électroménager vous invite à détartrer,
même si le compteur n’est pas apparu à l’écran au
préalable.
La plage de la dureté de l’eau réglée est trop faible. Vérifiez a
plage de la dureté de l’eau et ajustez au besoin. Procédez au
détartrage.
Le message « Remplir le réservoir d’eau » apparaît
même si le réservoir est plein.
Assurez-vous que le réservoir d’eau est complètement
enfoncé dans sa niche. Le réservoir pourrait éventuellement
être endommagé suite à une chute. En raison de l’impact, les
composants à l’intérieur du réservoir d’eau se sont dégagés
et le réservoir fuit. Si ce message apparaît toujours et que ni
l’un ou l’autre de ces problèmes sont la source, il faudra
peut-être installer un capteur neuf. Communiquez avec le
Service après-vente.
Beaucoup de vapeur est produite lors de la cuisson à
la vapeur.
L’appareil électroménager est en cours d’étalonnage
automatique. Il s’agit d’une action normale.
Impossible de mettre l’appareil électroménager sous
tension ou impossible de le faire fonctionner. Le
symbole ‚ apparaît à l’écran.
Le verrouillage du panneau est activé. Appuyer et maintenir
la touche tactile TIMERS enfoncée jusqu’à la disparition du
symbole ‚.
L’électroménager ne chauffe pas. 6 apparaît à
l’écran.
Le mode démo est activé dans les réglages de base.
Désactiver mode démo dans les réglages du menu.
On entend un claquement en cours de cuisson. Effet de la chaleur et du froid avec les aliments, provoqués
par la vapeur.
Outils requis
Tournevis à lame plate
étroite (extrémité d’au
plus de 1/5 po [5 mm]
pour pénétrer la fente).
Lampe de poche (pour
visualiser les trous
d’insertion des broches
de l’ampoule).
Ampoule halogène G-9
èɊȯPP
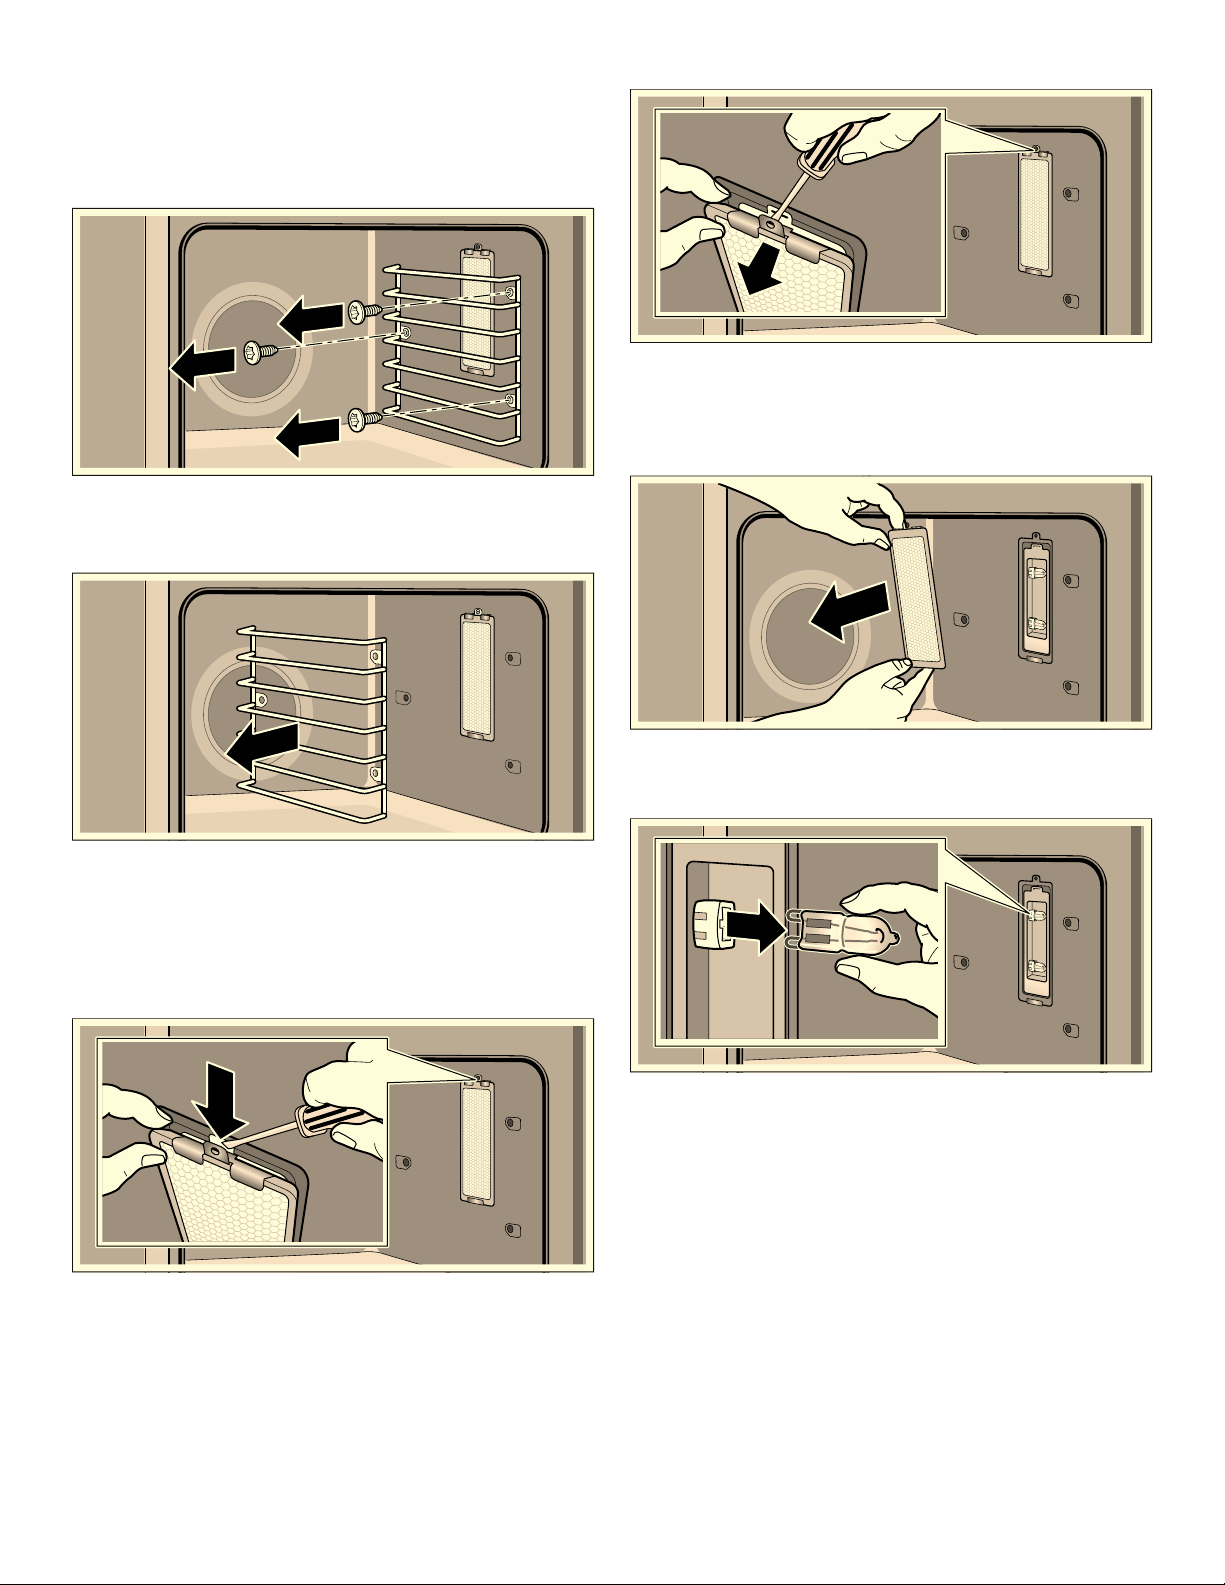
112
1.
Coupez l’alimentation du four au tableau de
distribution principal (boîte à fusibles ou boîtier de
disjoncteurs).
2.
Retirez les trois vis qui retiennent la grille en position
dans la cavité du four.
3.
Retirez la grille du four pour accéder au boîtier de
l’ampoule.
4.
Retirez la vis du haut du boîtier de l’ampoule.
5.
Insérez l’extrémité du tournevis à lame plate étroite à
un angle de 40 degrés entre les clips de métal. La
lame du tournevis doit être en mesure de passer entre
les clips de métal pour atteindre le loquet interne.
6.
Enfoncez la lame du tournevis pour dégager loquet de
la fente dans le boîtier de l’ampoule. Soulever
délicatement la lentille en éloignant la poignée du
tournevis de la paroi du four.
7.
Soutenez le couvercle (lentille) de verre pour
l’empêcher de tomber. Elle devrait se détacher
facilement. Ne essayez pas de le décoller de force.
8.
Retirez l’ampoule halogène de sa douille.
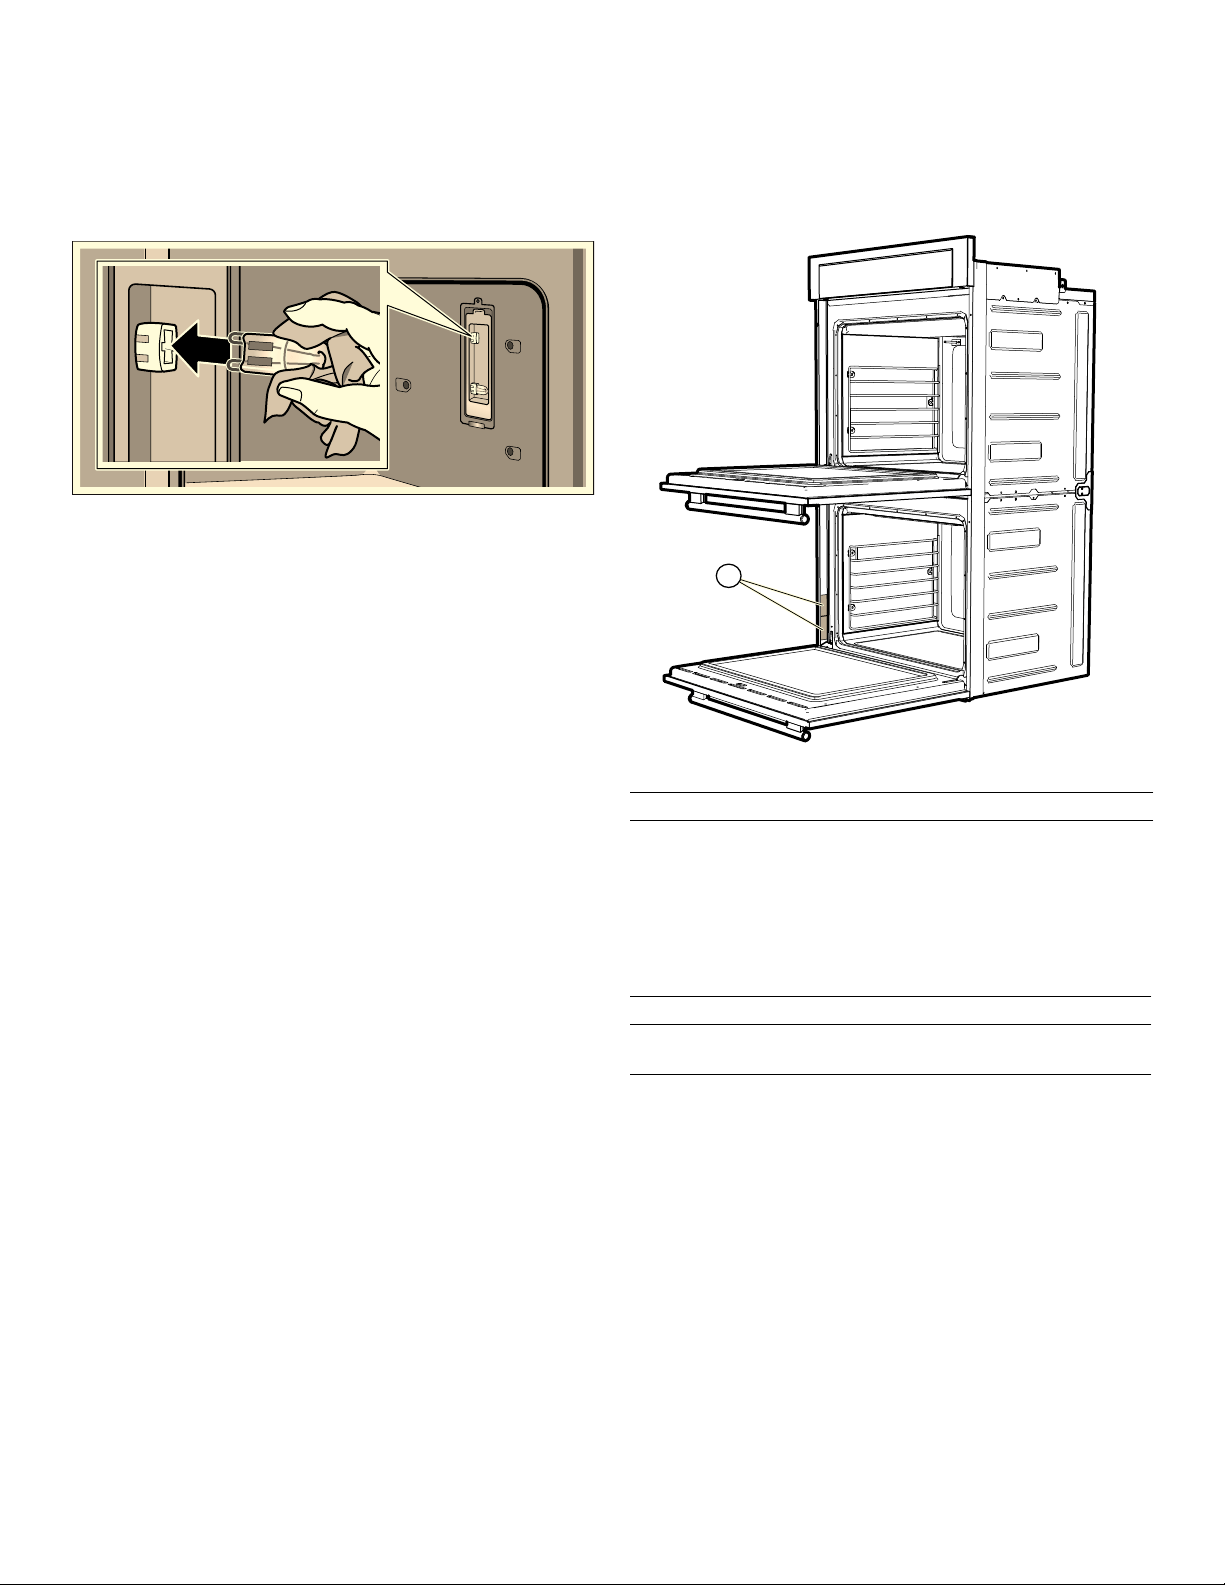
113
9.
Remplacez l’ampoule halogène. Saisissez l’ampoule
neuve avec un chiffon propre et sec. Alignez les
broches de l’ampoule avec les trous de la douille et
enfoncez-les.
Remarque : Un contact direct avec les doigts sur
l’ampoule peut entraîner une défaillance précoce.
10.
Remettez le couvercle de verre en place en l’insérant
sur les brides de fixation. Appuyez sur l’extrémité la
plus proche de vous pour l’enfoncer sur le boîtier
jusqu’à ce que le couvercle s’enclenche. Insérez la vis
dans le couvercle de verre et serrez.
11.
Remettez la grille du four.
12.
Remettez l’alimentation du four au tableau de
distribution principal (boîte à fusibles ou boîtier de
disjoncteurs).
Plaque signalétique du produit
La plaque signalétique comporte le numéro de modèle
et le numéro FD (numéro de production/code unique
d’identification) du four. L’image ci-dessous illustre
l’emplacement de la plaque signalétique.
Emplacement de la plaque signalétique
Numéro de modèle et numéro FD
Le numéro de modèle et le numéro FD de l’appareil
électroménager figurent sur la plaque signalétique.
Prenez ces numéros en note dans l’espace ci-dessous
pour économiser du temps, au cas où l’appareil
électroménager aurait besoin de réparations.
Conservez votre facture ou votre contrat aux fins de
validation de garantie si jamais vous avez besoin d’une
réparation.
Comment obtenir des services de
dépannage ou des pièces
Pour contacter un technicien de dépannage, voir les
coordonnées sur la couverture avant du manuel. Lorsque
vous téléphonez, soyez prêt à fournir les informations
imprimées sur la plaque signalétique de votre produit.
A Plaque signalétique
No de modèle No FD
Thermador
Soutien à la clientèle
800-735-4328
$

114
DÉCLARATION DE GARANTIE LIMITÉE DU PRODUIT
Couverture de la garantie limitée
La garantie limitée fournie par BSH Home Appliances
Corporation (« BSH ») dans la présente déclaration de
garantie limitée du produit s’applique seulement à
l’appareil électroménager THERMADOR
MD
(« Produit »)
qui vous a été vendu à titre de premier acheteur, en
autant que le produit ait été acheté :
▯ Pour votre utilisation normale, résidentielle (non
commerciale), et qu’en fait, en tout temps, a été utilisé
pour un usage domestique normal.
▯ Neuf au moment de la vente au détail (non en montre,
« tel quel » ou un modèle retourné antérieurement),
qu’il n’est pas destiné à la revente ni à un usage
commercial.
▯ Aux États-Unis ou au Canada et qu’il est demeuré en
tout temps dans le pays où l’appareil a été acheté.
Les garanties aux présentes s’appliquent à l’acheteur
original du Produit sous garantie et à tout propriétaire
successif du produit acheté pour une utilisation
résidentielle habituelle et la durée de la garantie.
BSH se réserve le droit d’exiger une preuve d’achat à
chaque réclamation au titre de la garantie afin de
confirmer que le produit relève du champ d’application
de la présente garantie limitée de produit.
Veuillez vous assurer de retourner la carte
d’enregistrement, quoiqu’elle n’est pas nécessaire, pour
la couverture par la garantie. C’est la meilleure façon
dont BSH peut vous aviser dans le cas peu probable
d’un avis de rappel ou de sécurité du produit.
Durée de la garantie
BSH garantit que le produit est exempt de défaut de
matériau et de fabrication pour une période de sept cent
trente (730) jours à compter de la date d’achat. La
période susmentionnée commence à partir de la date
d'achat et ne doit pas être retenue, retardée, prolongée
ou interrompue pour une raison quelconque.
Ce produit est également garanti comme étant exempt
de défaut esthétique au niveau du matériau et de la
fabrication (par ex. d’égratignures sur l’acier inoxydable,
d’imperfections au niveau de la peinture/porcelaine,
d’éclats, de bosses ou autres dommages à la finition du
produit), pour une période de soixante (60) jours à partir
de la date d’achat ou de la date limite pour une
construction neuve. La présente garantie esthétique
exclut les variations légères de couleur causées par les
différences inhérentes entre les sections peintes et les
sections en porcelaine, de même que les différences
causées par l'éclairage de la cuisine, l'emplacement du
produit et autres facteurs similaires. La présente
garantie esthétique exclut spécifiquement tous les
appareils en montre, de plancher, « tel quel » et remis à
neuf.
Réparation ou remplacement : votre
recours exclusif
Pendant ladite période de garantie, BSH, ou un de ses
centres de réparation autorisés, réparera le produit sans
frais (sous réserve de certaines limitations indiquées aux
présentes), si le produit présente un défaut de fabrication
ou de matériaux. Si des tentatives raisonnables pour
réparer le produit sont vaines, alors BSH remplacera le
produit (un modèle supérieur peut être disponible, à la
seule discrétion de BSH, moyennant des frais
supplémentaires). Toutes les pièces et les composants
enlevés demeurent la seule propriété de BSH. Toute
pièce et tout composant réparés doit être identique à la
pièce d’origine aux fins de la présente garantie et la
garantie ne sera pas prolongée en regard de telles
pièces. La seule responsabilité de BSH est de faire
réparer le produit défectueux, par un centre de
réparation autorisé pendant les heures d’affaires
normales. Pour la sécurité et éviter des dommages à la
propriété, BSH recommande fortement de ne pas
essayer de réparer le produit soi-même ou le faire
réparer par une personne non autorisée; BSH ne sera
pas tenu responsable de réparations ou de travail
effectués par un centre de réparation non autorisé. Si
vous choisissez de faire réparer l’appareil par une
personne autre qu’une personne autorisée, LA
PRÉSENTE GARANTIE EST AUTOMATIQUEMENT
NULLE ET NON AVENUE. Les centres de réparation
autorisés sont les personnes ou les entreprises qui ont
été spécialement formées sur les produits BSH et qui
possèdent, selon l’opinion de BSH, une réputation
supérieure pour le service à la clientèle et la capacité
technique (il est à noter qu’elles sont des entités
indépendantes et non des agents, partenaires, affiliés ou
représentants de BSH). Nonobstant ce qui suit, BSH ne
sera pas tenu responsable d’aucune façon si le produit
est situé dans une région éloignée (supérieure à
100 miles d’un centre de réparation autorisé) ou n’est
pas accessible de façon raisonnable, dans un
environnement ou un local dangereux, menaçant ou
périlleux; dans une telle éventualité, à la demande du
consommateur, BSH pourrait payer les frais de main-
d’oeuvre et de pièces et expédier les pièces au centre
de réparation autorisé le plus près, mais le
consommateur serait entièrement responsable pour tous
les frais de déplacement et autres frais spéciaux
encourus par le centre de réparation, en autant qu’il
accepte la demande de réparation.
Produit hors garantie
BSH n’a aucun obligation, aux termes de la loi ou
autrement, d’offrir toute concession, incluant réparation,
prorata ou remplacement de produit, une fois la présente
garantie expirée.

115
Exclusions de garantie
La couverture de garantie décrite aux présentes exclut
tous les défauts ou dommages dont BSH n'est pas
directement responsable, y compris, sans pour autant s'y
limiter, l'un ou plusieurs des points suivants :
▯ Utilisation du produit autre qu’un usage normal,
habituel et de la façon destinée (incluant, sans s'y
limiter, toute forme d’utilisation commerciale,
d’utilisation ou de rangement d’un produit pour
l’intérieur à l’extérieur, d'utilisation du produit de
concert avec un transporteur aérien ou marin).
▯ Une faute intentionnelle d'un tiers, la négligence, la
mauvaise utilisation, l'utilisation abusive, des
accidents, le fonctionnement inadéquat, le manque
d'entretien, la mauvaise installation ou l’installation
négligente, la modification, le non respect des
instructions d'utilisation, la manipulation sans
précaution, les réparations non autorisées (y compris
les réparations effectuées par l'utilisateur ou l'étude du
fonctionnement interne de l’appareil électroménager
par celui-ci).
▯ Réglage, modification ou altération de tout type.
▯ Manquement à se conformer aux normes, codes,
réglementation ou lois applicables fédérales,
provinciales, municipales ou électriques, de plomberie
et/ou du bâtiment du pays, incluant le manquement
d’installer le produit en stricte conformité avec les
codes et réglementations locaux du bâtiment et
d’incendie.
▯ Bris et usure ordinaires, déversements d’aliments ou
de liquides, accumulations de graisse ou autres
substances dans, sur ou autour du produit.
▯ Toute force ou tout facteur externe, élémentaire et/ou
environnemental, incluant sans limitation, la pluie, le
vent, le sable, les inondations, les incendies, les
coulées de boue, le gel, l’humidité excessive ou
l’exposition prolongée à l’humidité, la foudre, la
surtension, aux problèmes de structure autour de
l’appareil électroménager et les désastres naturels.
En aucun cas, BSH ne peut être tenu responsable de
dommages survenus à la propriété, incluant les
armoires, les planchers, les plafonds et les autres objets
ou structures autour du produit. Sont également exclus
de la garantie les produits dont les numéros de série ont
été modifiés, effacés ou enlevés; les visites de service
pour enseigner le fonctionnement du produit ou les
visites où il n’y a aucun problème avec le produit; la
correction de problèmes d’installation (le consommateur
est seul responsable pour toute structure et tout réglage
du produit, incluant les connexions électriques, la
plomberie et les autres connexions nécessaires, pour
une fondation/plancher approprié, et pour toute
modification incluant, sans limitation, les armoires, les
murs, les planchers, les tablettes, etc.) et le
réenclenchement de disjoncteurs ou le remplacement de
fusibles.
DANS LA MESURE AUTORISÉE PAR LOI, LA PRÉSENTE
GARANTIE SPÉCIFIE LES SEULS RECOURS DONT
VOUS DISPOSEZ À L'ÉGARD DU PRODUIT, QUE LA
RÉCLAMATION SOIT FONDÉE SUR UN CONTRAT OU
DÉLIT (Y COMPRIS RESPONSABILITÉ ABSOLUE OU
NÉGLIGENCE) OU AUTRE. CETTE GARANTIE
REMPLACE TOUTE AUTRE GARANTIE, EXPRESSE OU
ÉCRITE. TOUTES GARANTIES IMPLICITES AUX TERMES
DE LA LOI, INCLUANT LES GARANTIES DE QUALITÉ
MARCHANDE OU D'APTITUDE À UN USAGE
PARTICULIER, OU AUTREMENT, SONT LIMITÉES DANS
LE TEMPS À LA DURÉE DE CETTE GARANTIE LIMITÉE.
LE FABRICANT NE SERA EN AUCUN CAS
RESPONSABLE DE DOMMAGES CONSÉCUTIFS,
SPÉCIAUX, ACCESSOIRES, INDIRECTS OU DE
« PERTES COMMERCIALES » ET/OU DE DOMMAGES
PUNITIFS, DE PERTES OU DE DÉPENSES, Y COMPRIS
SANS S'Y LIMITER, ABSENCE DU TRAVAIL, FRAIS
D'HÔTEL ET/OU FRAIS DE RESTAURANT, FRAIS DE
REMODELAGE EN EXCÉDENT DES DOMMAGES
DIRECTS QUI SONT DÉFINITIVEMENT CAUSÉS
EXCLUSIVEMENT PAR BSH, OU AUTREMENT. CETAINS
ÉTATS N'AUTORISENT PAS L'EXCLUSION OU LA
LIMITATION DE DOMMAGES ACCESSOIRES OU
CONSÉCUTIFS, ET CERTAINS ÉTATS N'AUTORISENT
PAS LA LIMITATION DE LA DURÉE DES GARANTIES
IMPLICITES, DONC LES LIMITES CI-DESSUS
POURRAIENT NE PAS S'APPLIQUER À VOUS. CETTE
GARANTIE VOUS DONNE DES DROITS
PRÉCIS RECONNUS PAR LA LOI ET VOUS POUVEZ
ÉGALEMENT AVOIR D'AUTRES DROITS QUI VARIENT
D'UN ÉTAT À L'AUTRE.
Aucune tentative de modifier, changer ou amender la
présente garantie ne peut être valide sans le
consentement écrit autorisé par un dirigeant de BSH.

116
Soutien THERMADOR®
Dépannage
Nous sommes conscients que vous avez investi des
sommes considérables dans votre cuisine. Nous nous
engageons à vous offrir, ainsi qu'à votre appareil, un
service de dépannage qui vous permettra de profiter de
votre cuisine pendant de nombreuses années.
N'hésitez pas à communiquer avec notre service à la
clientèle STAR® si vous avez des questions ou dans
l'éventualité peu probable où votre appareil
THERMADOR® nécessitait de l'entretien. Notre équipe
de dépannage se fera un plaisir de vous aider.
États-Unis
800-735-4328
www.thermador.com/support
Canada
800-735-4328
www.thermador.ca
Pièces et accessoires
Pour vous procurer des pièces, des filtres, du détartrant,
des produits nettoyants pour l'acier inoxydable et autres,
rendez-vous sur la boutique en ligne THERMADOR® ou
communiquez avec nous par téléphone.
États-Unis
http://store.thermador.com/us
Canada
▯ Si vous résidez dans les provinces de l'Atlantique, en
Ontario ou au Québec, communiquer avec :
Marcone
1.800-287-1627
▯ Si vous résidez dans un territoire, au Manitoba, en
Saskatchewan, en Alberta ou en Colombie-
Britannique, communiquer avec :
Reliable Parts
800-663-6060


1901 MAIN STREET, SUITE 600 IRVINE, CA 92614 // 1-800-735-4328 // WWW.THERMADOR.COM
© 2018 BSH HOME APPLIANCES CORPORATION
9001396410 fr-ca, en-us 980521
*9001396410*
