User manual Gas Range
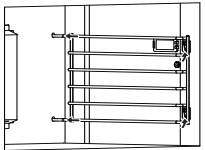
Description
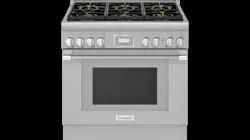
Appliance identification
Model shown is 48'' with griddle option (features will vary).
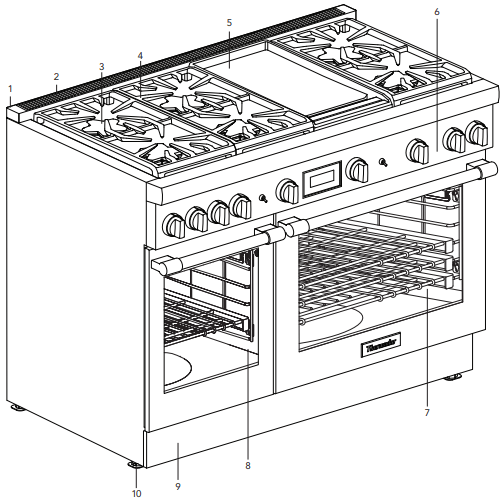
1 Island trim included or low backguard ordered separately (See the Installation Instructions concerning spacing behind the range when using the range with the island trim.)
2 Oven vent (DO NOT obstruct!)
3 STAR® burners
4 Burner grates
5 Griddle option (options will vary)
6 Control panel
7 Main oven
8 Secondary auxiliary oven (select models)
9 Kick panel
10 Range feet
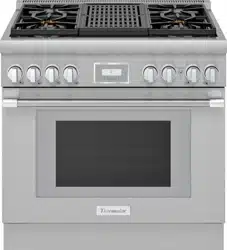
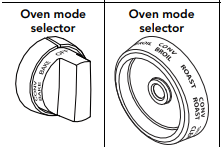
Control panel identification
NOTE: Not all knobs, modes, and features are available to all models.


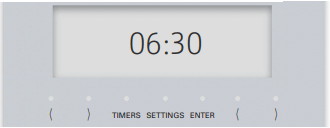
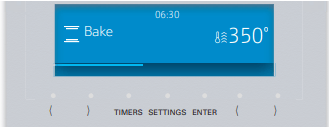
1 Digital display screen
2 Left navigation buttons
3 Access multiple timers
4 Access user settings
5 Confirm an entry
6 Right navigation buttons
Oven interior identification
Dual fuel oven(s) interior
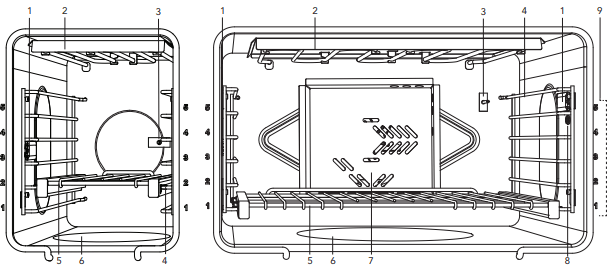
1 Oven interior light
2 Broil element
3 Oven thermostat
4 Rack guides
5 Oven racks
6 Bake element (hidden)
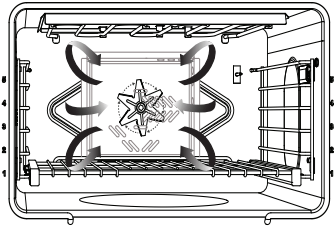
7 Convection fan cover
8 Meat probe outlet
9 Rack positions
Gas oven(s) interior
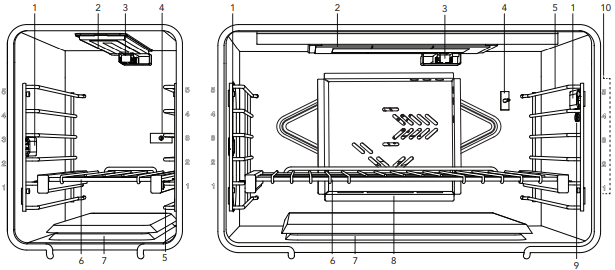
1 Oven interior light
2 Infrared broil burner
3 Broil igniter
4 Oven thermostat
5 Rack guides
6 Oven racks
7 Bake burner (hidden)
8 Convection fan cover
9 Meat probe outlet
10 Rack positions
Before you begin
Getting started
Due to our continuous improvement activities in design and quality improvements, some images may not be representative of the final product.
Data rating label
- Record the model and serial number.
- The model and serial number must be provided when calling customer support for assistance.
- Register your BSH product to ensure timely service and access to your product related information. For product registration information see “Before calling for service”.
Surface burners
- Ensure that the burner caps are correctly seated on the burner bases of the range's cooktop (see page 18).
- Turn on each burner to check for proper flame color (see “Flame description” on page 20 for details).
Oven racks
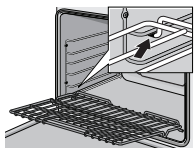
To install rack guides
- Push the two rails in the holes in the back of the oven cavity.
- Slide the guide's key slots over the shoulder bolts.
- At the front of the oven cavity press down on the front of rack guide to clear the heads of the two shoulder bolts.
To install Full Access® racks
1. Hold the rack on a slight angle and place the safety hooks under the front of the rack guides.
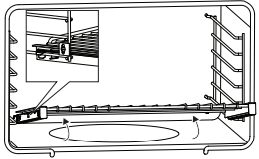
2. Push the rack into the oven, lifting the rack stops over the front of the rack guides.
3. Hold the rack straight.
4. Push the rack in completely.
5. Engage the rack’s front hooks on the rack guides.

IMPORTANT: When placing the gliding rack in the oven, make sure the front supports on the rack guides rest in the large slots at the front corners of the rack. This is necessary to keep the rack in the correct position while fully inserted into the oven.
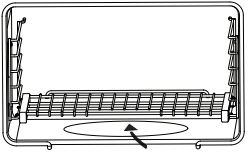
To install flat racks
1. Grasp rack firmly on both sides and insert rack.
2. Tilt rack up to allow stop into rack guide.
ExtraLow® burners
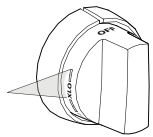
The drawing shows that the control knob has an additional range after the XLO setting. When the knob is set within this range, the flame cycles off and on.
By varying the length of time the flame is off and on, the heat is reduced even further to cook delicate foods. For example, these very low settings are suitable for simmering and poaching, melting chocolate and butter, holding cooked foods at temperatures without scorching or burning, etc.
Operation of the ExtraLow® burners
- XLO, the very lowest setting, is achieved by cycling the flame on for approximately 10 seconds and off for 50 seconds of each minute.
- When the knob is set just below the XLO setting, the flame will cycle on for approximately 50 seconds and off for 10 seconds of each minute.
- To vary the amount of low heat to suit the food and quantity, the control can be set anywhere within the XLO range marked on the knob.
ExtraLow® techniques
- To maintain a low or simmer heat, bring food to a rolling boil. Stir well, then cover the pan and lower the heat to a setting just below XLO.
- If a large pan is used, the simmer action may occur mainly in the center of the pan. To equalize the temperature throughout the food, stir the food around the outer edges of the pan into the food in the center.
- It is normal to stir food occasionally while simmering. This is especially important when simmering for several hours, such as for a homemade spaghetti sauce or beans.
- If the setting is too low to hold a simmer, bring the food back to a boil before re-setting to a higher heat.
POWERBOOST® (select models)
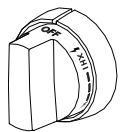
The POWERBOOST, or XHI, offers the convenience to quickly boil water, sear steaks, stir-fry vegetables, etc. Use of the LO and XLO remains the same as the other XLO knobs.
Using the oven
Initial start-up
Start-up settings
The settings may be accessed at any time by pressing SETTINGS while the appliance is in standby mode. All oven knobs must be turned to OFF to access the settings.
1. Connect the appliance to the power supply.

2. Select a setting with the left ( or ).
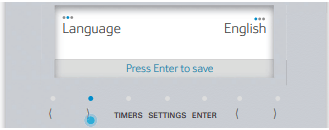
3. Change the setting parameter with the right ( or ).
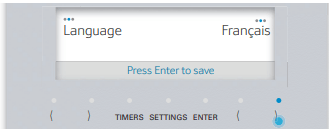
4. Press ENTER to confirm the selection or SETTINGS to discard the changes.
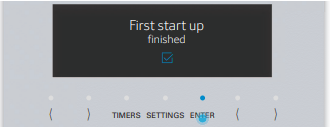
– The screen changes to standby mode.
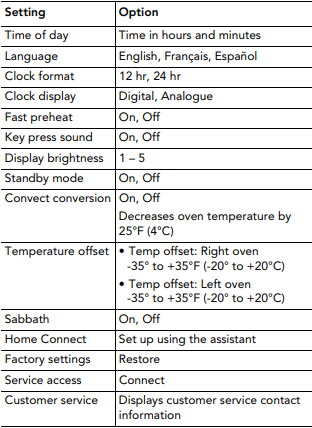
Available settings
Setting the oven(s)
Setting the cooking mode and temperature
1. Place rack in desired rack position and shut the door.
2. Turn the MODE knob to BAKE, for example.

3. Turn the TEMPERATURE knob.
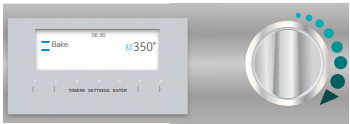
– The preheating bar moves to the right as the oven heats up.
4. Place food inside the oven after the oven has preheated.
 Kitchen timer
About the kitchen timer
- The kitchen timer can be set for up to 24 hours.
- It can be used despite whether the range is in operation and independently of all other functions.
- The appliance does not switch on and off automatically.
To set the kitchen timer
- Press TIMERS.
- Press the left ( or ) and select KITCHEN TIMER.
- Press the right ( or ) to set your desired time and press ENTER.
- A beep sounds when the timer ends. Press ENTER to terminate the beep and timer.
To change a running timer
- Press TIMERS.
- Press the right ( or ) to set your desired time and press ENTER.
 Oven timer
About the oven timer
After the set time has elapsed, the appliance switches off automatically when the desired cooking time is complete.
To set the oven timer
- Turn the MODE knob to BAKE, for example.
- Turn the TEMPERATURE knob to 350°F, for example.
- Press TIMERS.
- Press the left ( or ) and select OVEN TIMER.
- Press the right ( or ) to set your desired time and press ENTER.
- A beep sounds when the timer ends. Press ENTER to terminate the beep and timer.
To change a running timer
- Press TIMERS.
- Press the right ( or ) to set your desired time and press ENTER.
 End timer
About the end timer
You can delay the cooking time end to a later time. Example: it is 4:00 PM. The dish requires a cooking time of 40 minutes. You want it to be ready at 5:30. Enter the cooking time and delay the cooking time end until 5:30. The appliance starts automatically at 4:50 and switches off at 5:30.
Bear in mind that food which spoils easily should not be left in the oven for too long.
To set the end timer
- Set the desired cooking mode and oven temperature.
- Press TIMERS.
- Press the left ( or ) and select OVEN TIMER.
- Press the right ( or ) to set the oven time.
- Press the left ( or ) and select END TIME.
- Press the right ( or ) to set the end time and press ENTER.
- After confirming the end time the waiting time notification appears. After the waiting period the oven starts heating.
 Fast preheat
About fast preheat
- With fast preheat, you can shorten the preheat time required for some heating modes. Fast preheat is generally recommended for frozen convenience foods, casseroles, or other foods that require longer baking times. This mode is not recommended for baked goods.
- The unit will continue to run the fast preheat indefinitely until the user manually changes it, or until the unit loses power, in which case fast preheat will need to be reset.
- Fast preheat will also be activated for the secondary oven on 48'' models.
- Fast preheat is available for the bake, convection bake, roast, and convection roast modes.
- To achieve an even cooking result, do not place your food into the oven until fast preheating is complete.
To set the fast preheat
- Begin from the STANDBY mode and select SETTINGS.
- Press the left ( or ) to scroll to FAST PREHEAT.
- Press the right ( or ) and select ON and then press ENTER.
 Panel lock
About the panel lock
- The panel lock is a child safety mechanism to prevent children from accidentally turning on the oven or changing an oven setting.
- Panel lock can only be activated in standby.
To set the panel lock
1. Press and hold TIMERS for four seconds.
- The panel lock symbol and PANEL LOCKED will appear in the display.
2. To deactivate the panel lock, press and hold the TIMERS button for four seconds.
- The icon in the display will disappear.
Convection conversion
About the convection conversion
- To convert most baked items for use with convection bake and true convection (cookies, cakes, pies, etc.), the oven temperature often needs to be decreased by 25°F. The convection conversion setting reduces the temperature you enter for you automatically.
- The unit will continue to run the convection conversion value indefinitely until the user manually changes it, or until the unit loses power, in which case convection conversion will need to be reset.
- Convection conversion is available for the convection bake and true convection modes only.
- For meats and poultry, the temperature should not be reduced. The same temperature recommended in recipes and cooking charts for meats and poultry should be used.
To set the convection conversion
1. Begin from the STANDBY mode and select SETTINGS.
2. Press the left ( or ) to scroll to CONVECT CONVERSION.
3. Press the right ( or ) and select ON. 4. Press ENTER.
5. Turn the mode knob to CONV BAKE and the TEMPERATURE knob to the recipe temperature.
- The oven automatically reduces the input temperature by 25°F (10 °C) to the correct temperature.
6. Allow oven to preheat and place food inside.
Fine tuning the oven
About offset
The offset feature allows the cook to further fine-tune their cooking parameters to their own personal optimal settings by allowing them to adjust the temperature offset of the oven by +/-35°F in increments of 5°F. This feature is useful if you find that food is consistently either too brown or too light for your tastes.
- The offset feature is available for all modes except self-clean.
- By default, the temperature is set at 0°.
- The unit will continue to run the input offset value indefinitely until the user manually changes it, or until the unit loses power, in which case offset will need to be reset.
To set offset
- Begin from the STANDBY mode and select SETTINGS.
- Press the left ( or ) to scroll TEMP OFFSET: RIGHT/ LEFT OVEN.
- Press the right ( or ) to set the temperature.
- Press ENTER.
 Meat probe
About the meat probe
The probe allows you more control over how your foods are cooked by automatically disabling the specified cooking mode when a dish's desired temperature, defined by the cook, has been reached. The probe expresses the current temperature of the meat as it cooks.
The following are the heating modes that work with the temperature probe:
- Bake
- Convection bake
- Roast
- Convection roast
The temperature probe will not work with the oven timer or with the end timer.
IMPORTANT:
- To avoid damaging your probe, DO NOT pull on the cable when trying to remove it from a dish.
- DO NOT use tongs or other instruments to pry on the probe when removing it or to ‘hammer’ the probe into a food dish.
- To prevent possible burns, wait until the oven has cooled before trying to remove the probe from the outlet.
- DO NOT store the probe inside the oven.
For best results
- To avoid damaging the probe, ensure that the meat is fully defrosted before inserting the probe.
- Insert the probe until its tip is rested in the center of the thickest, meatiest portion of the meat. Ensure that the probe does not touch bone, fat, or gristle.
- For poultry, the meat probe should be inserted into the interior thigh muscle.
- The probe should not touch any part of the cooking dish or parts of the oven, as this will affect the accuracy of the results.
To program the meat probe
1. Insert the plug end into the probe outlet in the oven wall and insert probe end into the meat.
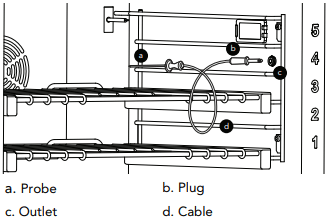
2. Close the oven door.
3. Turn the MODE and TEMPERATURE knobs to your desired settings.
4. Press the right ( or ) to the desired internal temperature.
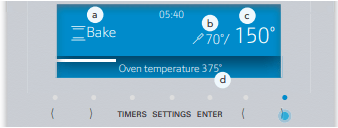
a. Cooking mode
b. Set shut-off temp
c. Current probe temp
d. Set oven temp
- The oven display indicates the current temperature of the meat as it cooks.
- The progress bar moves to the right as the internal cooking temperatures increase. When the probe temperature reaches the desired set temperature, the cooking mode will be finished and will beep to indicate that the cooking process has concluded.
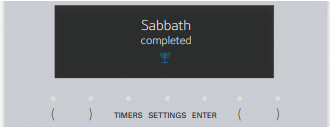
 Sabbath
The Sabbath mode complies with the standards set forth by Star K. Please know that there are restrictions for the use of cooking appliances on the Sabbath and Holidays. Also note that when the Sabbath and a Holiday coincide, the Sabbath laws prevail. If you are unfamiliar with the laws of keeping food warm on the Sabbath, or cooking on the Holidays, please contact your Rabbi or refer to the Star K website.
You may operate this appliance on the Jewish Sabbath or the Jewish Holidays if used in accordance with the following knowledge:
About Sabbath mode – using the rangetop
- The STAR burners with the XLO® feature are controlled electronically. Therefore, when Sabbath mode is initiated, the STAR burners with the XLO feature are deactivated to ensure compliance.
- The standard gas burners without the XLO feature remain fully functional.
- The griddle and/or the grill are fully functional during Sabbath mode. However, to ensure compliance, they should not be operated.
- Gas STAR burners remain on during a power failure.
- The STAR burners are equipped with a re-ignition feature. The igniter will automatically re-light the STAR burner if the flame is blown out.
- During Yom Tov, a gas flame may not be ignited or turned off. However, the flame may be raised and lowered to adjust the temperature as required for cooking.
- During Sabbath, a gas flame may not be ignited, adjusted, or turned off. You may use a blech to conceal the flame, the lights, and the controls. DO NOT cover vent openings.
- When using a blech, use only one STAR burner at the lowest setting. Using multiple STAR burners may cause overheating, combustion issues, or damage to the appliance.
About Sabbath mode – using the oven(s)
- The oven maintains a constant temperature between 150°F and 475°F (66°C and 246°C) with the bake mode.
- Cooked dishes are kept warm for a minimum time of 30 minutes up to a maximum time of 74 hours without needing to switch the appliance on or off.
- All food should be placed in the oven before the Sabbath begins, since none may be placed in the oven during the Sabbath. Please note that easily perishable foodstuffs must not be left in the oven for too long.
- The oven temperature should not be turned on, adjusted, or turned off while observing Sabbath.
- The secondary oven is not operational during Sabbath mode.
- On the Sabbath, in lieu of a blech, the oven controls should be covered. Be careful not to cover vent openings.
- The oven lamp(s) is disabled in Sabbath mode to prevent any action from occurring if the oven door is opened.
- The oven door may only be opened once on the Sabbath to remove all food and then closed.
- The oven door may be opened and closed at any time as often as desired during Holidays.
- The temperature may be adjusted for cooking purposes during Holidays. (There is a delay between the request and implementation).
Sabbath mode power outage note
If a power outage occurs while the oven is in Sabbath mode, the unit will exit out of Sabbath mode when power is restored. The oven will return to the off state even if it was in the middle of a bake cycle when the power outage occurred.
To set Sabbath on models with a digital display
1. Begin from the STANDBY mode and select SETTINGS.
2. Press the left ( or ) to scroll to SABBATH.
3. Press the right ( or ) and select ON and then press ENTER.
- Steps 1 through 3 are only necessary for the first time use of Sabbath or if the appliance’s settings are factory reset.
4. Turn the mode knob to BAKE.
5. Turn the temperature knob to the desired temp.
6. Press TIMERS.
7. Press the left ( or ) to scroll to SABBATH TIMER.
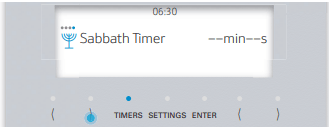
8. Press the right ( or ) and enter the DURATION TIME in 30 minute increments.
9. Press ENTER.
- A delay notification appears.
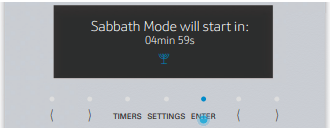
- During this five minute pause, the user can adjust the parameters. After the countdown the oven starts heating and all buttons are disabled.
10. After the Sabbath timer has completed, turn all knobs to OFF.
To cancel Sabbath
1. Turn all knobs to OFF to cancel the operation.
To set extended bake on 30'' models without a digital display
1. Turn the mode knob to EXTEND BAKE.
2. Turn the temperature knob to desired temp.
To cancel Sabbath
1. Turn all knobs to OFF to cancel the operation.
 Remote start
To set remote start
1. Place the food in the oven and then close the door.
2. Turn the mode knob to REMOTE START.
- DO NOT rotate the temperature knob to any setting (leave in the off position).
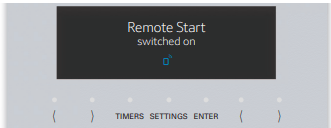
- The displays turns to the standby screen and appears in the display.
3. Continue with the Home Connect app installed on your mobile device.
 Convection broil
About convection broil
Convection broil is similar to broil. It combines intense heat from the upper element with heat circulated by a convection fan.
Convection broil mode is well suited for cooking thick, tender cuts of meat, poultry, and fish. Convection broil is not recommended for browning breads, casseroles and other foods. Always use convection broil with the door closed.
In addition to the benefits of standard broiling, convection broiling is faster.
Tips:
- Preheat oven 3-4 minutes. Do not preheat for more than 5 minutes.
- Meat should be at least 1½'' thick. Use the broil pan and grid included with your oven.
- Do not cover the broil grid with foil. It is designed to drain fats and oils away from the cooking surface to prevent smoking and spattering.
- Turn meats (other than fish) once during the recommended cook time.
 Convection bake
About convection bake
Convection bake is similar to bake. Heat comes from the lower heating element. The main difference in convection baking is that the heat is circulated throughout the appliance by the convection fan.
Tips:
- To convert most recipes for baked items (cookies, cakes, pies, etc.); reduce the oven temperature by 25°F.
- For meats and poultry, the temperature should not be reduced. The same temperature recommended in recipes and cooking charts for meats and poultry should be used.
- Low, shallow bakeware should be used with convection cooking. This allows the heated air to circulate around the food.
- When baking on more than one rack, cookie sheets should not be staggered; round cake pans should be staggered.
- Any food cooked uncovered will brown evenly and form a nice crust. Foods in covered dishes (casseroles, pot roast) or delicate custards do not benefit from convection cooking.
- For small items such as cookies, check to see if they are done one to two minutes before the recipe time. For larger baked items such as cakes, check five to six minutes before the time indicated on the recipe.
- Large meat or poultry items may cook up to 30 minutes less than the suggested time so check them so they will not be over baked.
 Convection roast
About convection roast
Convection roast uses heat from the top and bottom elements as well as heat circulated by the convection fan.
The convection roast mode is well suited for preparing tender cuts of meat and poultry. The benefits of convection roast mode include:
- As much as 25% faster cooking than non-convection modes.
- Rich, golden browning.
Tips:
- Use the same temperature as indicated in the recipe.
- Check doneness early, since roasting time may decrease.
- Do not cover meat or use cooking bags.
- Use the broil pan and grid provided with the oven for roasting. A shallow, uncovered pan can also be used.
- Use a meat thermometer to determine the internal temperature of the meat.
- If the meat is browned to your liking, but is not yet done, a small strip of foil can be placed over the meat to prevent over-browning.
- Let meat stand covered with foil 10-15 minutes after removing it from the oven.
 Keep warm
About keep warm
- The warm mode will keep hot, cooked foods at serving temperature. ALWAYS start with hot food. DO NOT use this mode to heat cold food other than for crisping crackers, chips, and dry cereal.
- Serving dishes, plates, and cups may be kept warm with this mode.
- Food should be at serving temperature (above 140°F / 60°C) before being placed in the oven.
- Food may be kept hot in its cooking container or transferred to a heat-safe serving dish.
- Aluminum foil may be used to cover food. Use only heat-safe dishes.
- DO NOT open the oven door unnecessarily. Opening the door will reduce the temperature of the oven.
- When keeping cooked food warm, allow time for the oven to preheat before placing the item in the oven.
To set the keep warm mode
- Turn the mode knob to KEEP WARM.
- Turn the oven temperature knob to 150°F.
- Place warmed dish in the oven and close the door.
Care and maintenance
Brand names
- The use of brand names is intended only to indicate a type of cleaner. This does not constitute an endorsement.
- The omission of any brand name cleaner does not imply its adequacy or inadequacy.
- Many products are regional in distribution and can be found in local markets.
- It is imperative that all cleaning products be used in strict accordance with the instructions on its package.
About self-clean
- The self-cleaning mode of your new range features pyrolytic self-cleaning. When set to the self-clean mode, the oven reaches a high temperature, approximately 850°F (454°C), that burns off the food soil.
- When the oven is set for self clean, the standard rangetop burners and the electric griddle and grill may be used. The burners having the ExtraLow® feature cannot be used.
- It is common to see smoke and/or flames during the clean cycle, depending on the content and amount of soil remaining in the oven. If a flame persists, turn off the oven and allow it to cool before opening the door to wipe up the excessive food soil.
- At the end of the clean cycle, some gray ash or burned residue may remain inside the oven. This is a mineral deposit that does not burn or melt. The amount of ash depends on how heavily soiled the oven was before it was cleaned. When the oven is cold, it is easily removed using a damp paper towel, sponge, or cloth.
 Self-clean
Self-cleaning (select models)
To set self-clean on 30'' dual fuel Harmony series models
- Remove all utensils, racks, and rack guides. Ensure the oven door is shut.
- Turn the mode knob to SELF CLEAN.
- Turn the temperature knob to CLEAN.
- Self-clean duration is 2 hours.
To set self-clean on dual fuel models with a display
- Remove all utensils, racks, and rack guides. Ensure the oven door is shut.
- Turn the mode knob to SELF CLEAN and the temperature knob to CLEAN.
3. Press the right ) to set the desired clean level and press ENTER.
| Soil level |
Duration (excluding cool off) |
| Low |
1 ½ hours |
| High |
3 hours |
4. After the information text, press ENTER.
 NOTE: The door closing process takes approximately 20 seconds to complete, at which time the door becomes locked. Check to make certain the door is locked.
At the end of the clean cycle
CAUTION The interior of the oven will still be at baking temperatures when the automatic lock cycles to its open position and the oven door can be opened.
The door latch will open automatically when the oven is below 500°F (260°C) and the automatic Door Lock completes its 20 second cycle to the open position.
1. Turn the mode knob to OFF.
2. Turn the temperature knob to OFF.
To set end time of self-clean
1. Remove all utensils, racks, and rack guides. Ensure the oven door is shut.
2. Turn the mode knob to SELF CLEAN.
3. Press the right ( or ) to set the desired clean level and press ENTER.
4. Press TIMERS, press the left ( or ), and select END TIMER.
5. Press the right ( or ) to set the END TIMER, and press ENTER.
6. After the information text, press ENTER.
NOTES:
- After self-clean completes its cycle, the self-clean function will be prevented from running again for a period of 24 hours.
- If the user tries to enable a self-clean function in an oven where the self-clean function has been restricted, the oven lights will blink on and off in 2- second intervals to indicate to the user that the function is not available. User must turn the knobs to OFF to cease the blinking lights.
Appliance cleaning tips
- The porcelain enamel finish is acid resistant, but not acid proof. Acidic foods, such as citrus juices, tomatoes, rhubarb, vinegar, alcohol or milk, should be wiped up and not allowed to bake onto the porcelain during the next use.
- The heating elements in the oven do not require cleaning. The elements burn themselves clean when the oven is in use.
When cleaning this appliance
- Use the mildest cleaning procedure that will do the job efficiently and effectively. Some cleaners of the same type are harsher than others. Try on a small inconspicuous area first.
- Always rub metal finishes in the direction of the polish lines for maximum effectiveness and to avoid marring the surface.
- Use only clean soft cloths, sponges, paper towels, fibrous brushes, plastic, non-metal or steel wool soap pads for cleaning and scouring, as recommended on the chart.
- Most exterior parts of this appliance can be cleaned with hot sudsy water (except the various items specifically identified otherwise). When rinsing is required, rinse thoroughly.
- Always wipe dry immediately to avoid water marks.
- DO NOT USE CHLORINE BASED CLEANERS.
Do-it-yourself maintenance
Oven light bulb replacement
Replace only with a recommended light bulb designed for appliance oven use. DO NOT use a standard household light bulb in any oven. Call Thermador Customer Care Center at 1-800-735-4328 or your nearest Thermador dealer to determine the proper replacement bulb for your range. You will need to know your range’s model number and serial number.
To replace the light bulb
Use only 10W, 12V G4 light bulbs. Use a clean, dry cloth to handle halogen light bulbs. This will increase the life of the bulb.
1. Turn off circuit breaker.
2. Remove the oven racks.
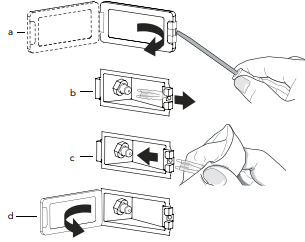
3. Slide the tip of a flat blade screw driver between the holder clip and the lamp housing (figure, a).
4. Support the glass lens cover with fingers along the bottom edge to prevent the cover from falling to the bottom of the oven. Gently twist the flat blade screw driver to loosen the glass lens cover.
5. Remove the glass lens cover.
6. Remove the bulb by grasping and sliding the bulb straight back until the two prongs have cleared the ceramic holder (figure, b).
7. DO NOT touch the glass of the new replacement bulb with your fingers. It may cause the bulb to fail when it first lights. Grasp the replacement bulb with a clean dry cloth. Locate the two prongs in the ceramic holder, gently poking until the two prongs locate in the ceramic socket.
8. Press down to seat the bulb (figure, c).
9. Slide the protective lens into the holder clip and push the other end until the fixing clip snaps back into the housing (figure, d).
10. Turn on circuit breaker.
Before calling for service
Before calling for service, check the following to avoid unnecessary service charges.
Troubleshooting
| Symptom |
Possible cause |
Remedy |
| Intermittent igniter sparking |
• Ceramic igniter is wet or dirty.
• Burner ports are clogged.
|
• Carefully dry or clean igniter.
• Clean ports on burner cap with a wire, a needle or straightened paper clip.
|
| More than four clicks of igniter before lighting |
• Improper fit of burner cap onto burner base. |
• Align burner cap properly on burner base. |
| Constant igniter sparking |
• Range is not properly grounded.
• Electrical power supply is incorrectly polarized.
|
• Refer to the Installation Instructions. Have a qualified electrician ground the range properly. |
| Igniters sparking but no flame ignition. |
• Gas supply valve is in “OFF” position. |
• Restore gas supply to the unit. |
| Range will not operate (lights, oven, and surface burners will not come on) |
• No power to the unit.
• Oven is in Sabbath mode.
|
• Check for open circuit breaker.
• Check that power supply line connection is connected to the proper voltage.
• Verify that the oven is not in sabbath mode. See the ''Using the oven'' section of the Use and Care Guide.
|
| Oven operates on bake but fails to operate on timed bake |
• Timer improperly set. |
• Set timer as outlined in the Use and Care Guide. |
| Oven light fails to come on. |
• Oven light burned out. |
• Replace the oven light as outlined in the Use and Care Guide. |
| Door will not open. |
• Oven is still in self-clean mode. |
• If oven is hot, door latch will release when safe temperature is reached. |
| Foods in oven are not cooking sufficiently. |
• Rack position is incorrect.
• Improper cookware.
• Oven door may not be sealing properly.
• Appliance not level.
|
• See the ''Using the oven'' section of the Use and Care Guide.
• Refer to ''Cookware recommendations'' in the Use and Care Guide.
• Clean the oven door gasket. Replace if worn.
• Refer to the Installation Instructions for instructions on how to level the appliance.
|
| Hot air is coming from the appliance. |
• It is normal for the cooling process to push heated air out into the room when the oven is on.
• During different modes the fan speed will increase and decrease.
|
• This is normal. |