THERMADOR.COM
Use and care
GUIDE
Professional Series Pro Harmony
®
Ranges

THERMADOR.COM
Use and care
GUIDE
Professional Series Pro Harmony
®
Ranges
Models |
Modèles |
Modelos:
PRD304WHC/U
PRD305WHC/U
PRD364WDHC/U
PRD364WLHU
PRD366WHC/U
PRD484WCHU
PRD486WDHC/U
PRD486WLHU
PRG304WH
PRG305WH
PRG364WDH
PRG364WLH
PRG366WH
PRG486WDH
PRG486WLH
Table of contents (English) ................................................................ 4
Table de matières (Français)............................................................ 58
Índice de materias (Español).......................................................... 120

Page. 2
Home Connect
TM
user’s information
Wi-Fi
®
module
FCC/IC statements
Model: COM2
FCC ID: 2AHES-COM2
IC: 21152-COM2
The Home Connect module is a communication
device designed to provide communication between
appliances and smart devices.
This module is integrated at the factory, under direct control of BSH Home
Appliances Corporation, and is not user serviceable or upgradable.
At least 20 cm separation distance should be maintained from device to user.
FCC COMPLIANCE STATEMENT
CAUTION: Changes or modifications not expressly approved could void your authority to use
this equipment.
This device complies with Part 15 of the FCC Rules. Operation to the following two conditions:
(1) This device may not cause harmful interference, and (2) This device must accept any
interference received, including interference that may cause undesired operation.
INDUSTRY CANADA STATEMENT
This device complies with Industry Canada licence-exempt RSS standard(s). Operation is
subject to the following two conditions: (1) this device may not cause interference, and (2) this
device must accept any interference, including interference that may cause undesired
operation of the device.
Operation in the band 5150-5250 MHz is only for indoor use to reduce the potential for harmful
interference to co-channel mobile satellite systems.
Le présent appareil est conforme aux CNR d’Industrie Canada applicables aux appareils radio
exempts de licence. L’exploitation est autorisée aux deux conditions suivantes : (1) l’appareil
ne doit pas produire de brouillage, et (2) l’utilisateur de l’appareil doit accepter tout brouillage
radioélectrique subi, même si le brouillage est susceptible d’en compromettre le
fonctionnement.
Le fonctionnement dans la plage de 5150 à 5250 MHz est uniquement pour une utilisation intérieure afin
de réduire le potentiel d’interférences nuisibles aux systèmes de satellites mobiles sur les canaux.

Page. 3
Congratulations!
Congratulations on your recent
Thermador purchase! Whether you are a
dedicated chef or simply a connoisseur of
the art of cooking, owning a Thermador
kitchen is the ultimate expression of
personal style, good taste and an
appreciation for the complete culinary
experience. Our award-winning products
have been empowering culinary
enthusiasts for more than eleven
decades.
Before you begin using your new
Thermador product, please take a
moment to review the Use and Care
Guide. You will find the answers to all of
your questions as well as some very
important safety information. Pay special
attention to the Important Safety
Instructions located at the beginning of
the manual. Your Thermador product is
ready and waiting to be used for your
next gourmet creation!
Our products are handcrafted with the
highest quality authentic materials to
ensure years of reliable service. In the
unlikely event that you have a service
question, please have your model and
serial numbers of your product available
(see the “Before calling for service”
section for location).
We realize that you have made a
considerable investment in your kitchen.
Please feel free to share your Thermador
kitchen photos and remodeling stories
with us. Follow us on Twitter or post your
kitchen photos on Facebook. We would
love to hear from you!
Thermador wishes you many years of
creative cooking.
Félicitations!
Félicitations pour votre récent achat
Thermador! Que vous soyez un chef
enthousiaste ou un simple connaisseur de
l’art culinaire, le fait de posséder une
cuisine Thermador représente
l’expression ultime de votre style
personnel, de votre bon goût et de votre
intérêt à vivre une expérience culinaire
complète. Nos produits primés
permettent à des adeptes de la bonne
bouffe d’atteindre de nouveaux sommets
depuis plus de onze décennies.
Avant de commencer à utiliser votre
nouveau produit Thermador, veuillez
prendre un moment pour examiner ce
guide d’utilisation et d’entretien. Vous
trouverez des réponses à toutes vos
questions ainsi que quelques
renseignements essentiels en matière de
sécurité. Portez une attention particulière
aux Instructions de sécurité importantes
se trouvant au début du guide. Votre
produit Thermador est prêt et n’attend
plus que vous l’utilisiez pour votre
prochaine création gastronomique!
Nos produits sont fabriqués à la main
avec des matériaux authentiques de
haute qualité afin d’assurer des années
de service fiable. Dans l’éventualité
improbable où vous auriez une question
relativement à l’entretien, veuillez avoir à
la portée de la main le numéro de série et
de modèle de votre produit (reportez
vous “Avant d’appeler le service
technique”).
Nous savons bien que vous avez investi
une somme considérable dans votre
cuisine. N’hésitez pas à partager avec
nous les photos de votre cuisine
Thermador et les anecdotes relatives au
remodelage de votre cuisine. Suivez-nous
sur Twitter ou affichez des photos de
votre cuisine sur Facebook. Nous serions
ravis d’avoir de vos nouvelles!
Thermador vous souhaite de nombreuses
années de gastronomie créative.
¡Enhorabuena
¡Enhorabuena por la reciente compra de
su Thermador! Que Usted sea un gran
jefe de cocina o un simple aficionado del
arte culinario, el hecho de poseer una
cocina Thermador es la última expresión
de su estilo personal, de su buen gusto y
de su apreciación de una experiencia
culinaria completa. Nuestros premiados
productos permiten al entusiasta de la
cocina explorar este mundo desde hace
más de once décadas.
Antes de comenzar a utilizar sur nuevo
producto Thermador, tómese un
momento para echar un vistazo a este
manual de uso y mantenimiento.
Encontrará respuestas a todas sus
preguntas además de informaciones
esenciales en materia de seguridad.
Ponga especial atención a las
Instrucciones de seguridad importantes,
situadas al principio del manual. ¡Su
producto Thermador está listo y solo
espera a que Usted lo use para su
próxima creación gastronómica!
Nuestros productos se fabrican a mano
con materiales auténticos de alta calidad
a fin de garantizar años de servicio fiable.
En el caso improbable en que Usted
tenga una pregunta relativa al
mantenimiento, tenga a mano el número
de serie y el modelo de su producto
(consulte “Antes de Solicitar Servicio”).
Nos damos cuenta de que Usted invirtió
una suma considerable en su cocina. No
dude en compartir con nosotros las fotos
de su cocina Thermador y anécdotas
acerca de la reforma de su cocina.
Síganos en Twitter o publique fotos de su
cocina en Facebook. ¡Estaremos
encantados de tener noticias suyas!
¡Thermador le desea varios años de
gastronomía creativa!
Page. 4
This Thermador
®
appliance is made by
BSH Home Appliances Corporation
1901 Main Street, Suite 600
Irvine, CA 92614
Questions?
1-800-735-4328
www.thermador.com
We look forward to hearing from you!
Table of
CONTENTS
Safety ...................................................................................... 5
Important safety instructions........................................... 5
Description ............................................................................. 11
Appliance identification .................................................. 11
Before you begin ................................................................... 16
Getting started ............................................................... 16
Using the rangetop................................................................. 18
Sealed STAR
®
burners .................................................... 18
ExtraLow
®
burners ......................................................... 19
Electric griddle ................................................................ 25
Electric grill...................................................................... 28
Using the oven........................................................................ 31
Symbols and descriptions................................................ 31
Initial start-up................................................................... 32
Setting the oven(s)........................................................... 33
Timers
..................................................... 33
Fast preheat .............................................................. 34
Panel lock .................................................................. 34
Convection conversion
................................................... 35
Fine tuning the oven........................................................ 35
Meat probe ................................................................ 35
Sabbath and extended bake ..................................... 36
Remote start .............................................................. 38
Getting the most out of your appliance ................................. 39
Oven rack positions......................................................... 39
Bake ........................................................................... 39
Broil ........................................................................... 40
Convection broil ........................................................ 41
Convection bake ........................................................ 41
True Convection ........................................................ 43
Proof .......................................................................... 43
Roast .......................................................................... 43
Convection roast ....................................................... 44
Keep warm ................................................................. 44
Setting up Home Connect
TM
.................................................. 45
Setup ............................................................................... 45
Care and maintenance ........................................................... 47
Self-clean (some models) ........................................... 47
Appliance cleaning tips ...................................................48
Do-it-yourself maintenance ....................................................53
Oven light bulb replacement ..........................................53
Before calling for service ........................................................54
Troubleshooting ..............................................................54
Service information .........................................................55
Remote costumer service connection ........................55
Product registration.........................................................55
Statement of limited product warranty ..................................56
Support, accessories, and parts.................................back page
Safety
DEFINITIONS
9 WARNING
This indicates that death or serious injuries may occur as a
result of non-observance of this warning.
9 CAUTION
This indicates that minor or moderate injuries may occur as a
result of non-observance of this warning.
NOTICE: This indicates that damage to the appliance or
property may occur as a result of non-compliance with this
advisory.
Note: This alerts you to important information and/or tips.
Page. 5
Safety
9 IMPORTANT SAFETY INSTRUCTIONS
READ AND SAVE THESE INSTRUCTIONS
Please read carefully
Installer: Please leave this guide with this unit for the
owner.
Owner: Please retain this guide for future reference. Use
the appliance only for its intended purpose as described
in this manual.
WARNING
When properly cared for, your new appliance has been
designed to be safe and reliable. Read all instructions
carefully before use. These precautions will reduce the risk
of burns, electric shock, fire, and injury to persons. When
using kitchen appliances, basic safety precautions must be
followed, including these in the following pages.
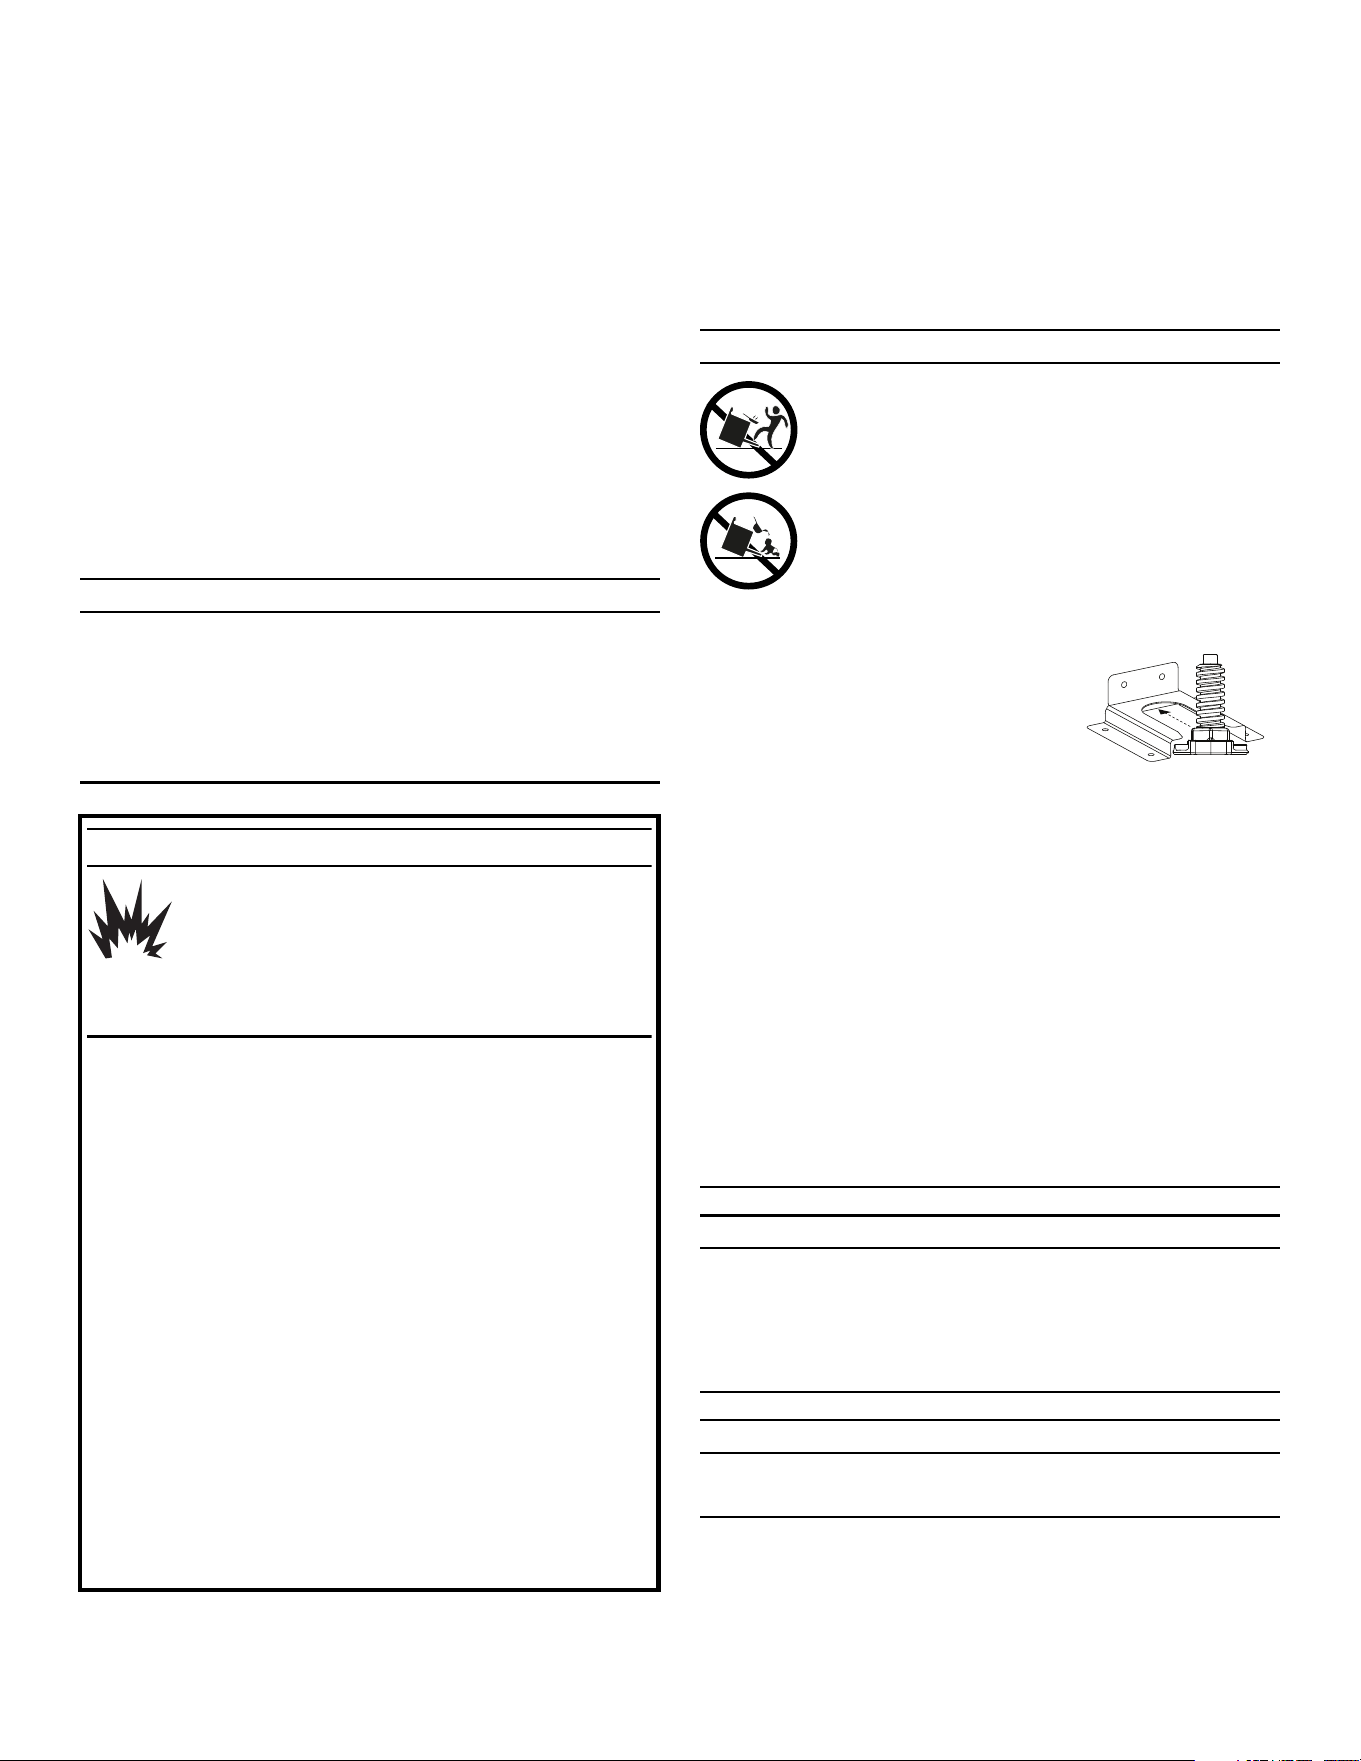
WARNING
DANGER OF TIPPING
• All ranges can tip and injury can result. To
prevent accidental tipping of the range,
attach it to the floor, wall, or cabinet by
installing the anti-tip bracket supplied.
• A child or adult can tip the range over and
be killed or seriously injured. Verify that the
anti-tip bracket is securely installed. Ensure
the anti-tip bracket is engaged when the
range is moved.
• DO NOT operate the range
without the anti-tip bracket in
place. Failure to follow the
instructions in this manual can
result in death or serious burns to
children and adults.
• If the range is pulled away from the wall for cleaning,
service, or any other reason, ensure that the anti-tip
bracket is properly reengaged when the range is
pushed back against the wall. In the event of
abnormal usage (such as a person standing, sitting, or
leaning on an open door), failure to take this
precaution can result in tipping of the range. Personal
injury might result from spilled hot liquids or from the
range itself.
• Check for proper installation and use of anti-tip
bracket. Carefully tip range forward pulling from the
back to ensure that the anti-tip bracket engages the
range and prevents tip-over. Range should not move
more than 1'' (2.5 cm).
WARNING
Improper installation, adjustment, alteration, service or
maintenance can cause injury or property damage. Refer
to this manual. For assistance or additional information
consult a qualified installer, service agency, manufacturer
or the gas supplier.
WARNING
To provide proper ventilation of the range DO NOT
remove range feet.
WARNING
If the information in this manual is
not followed exactly, a fire or
explosion may result causing
property damage, personal injury or
death.
-- DO NOT store or use gasoline or other
flammable vapors and liquids in the
vicinity of this or any other appliance.
-- WHAT TO DO IF YOU SMELL GAS
• DO NOT try to light any appliance.
• DO NOT touch any electrical switch.
• DO NOT use any phone in your
building.
• Immediately call your gas supplier
from a neighbor’s phone. Follow the
gas supplier’s instructions.
• If you cannot reach your gas supplier,
call the fire department.
-- Installation and service must be
performed by a qualified installer, service
agency or the gas supplier.

Page. 6
9 IMPORTANT SAFETY INSTRUCTIONS
READ AND SAVE THESE INSTRUCTIONS
WARNING
Before servicing or cleaning the unit, switch power off at
service panel and lock service panel. This will prevent
power from being switched on accidentally. When the
service panel cannot be locked, securely fasten a
prominent warning device, such as a tag to the service
panel.
Gas type verification
Natural gas – 7 in. water column (17.4 mb) min., 14 in.
(34.9 mb) maximum
Propane gas – 11 in. water column (27.4 mb) min., 14 in.
(34.9 mb) maximum
Verify the type of gas supplied to the location. Ensure that
the appliance is connected to the type of gas for which it
is certified. Refer to the data rating label.
WARNING
If a gas conversion kit is used, the kit shall be installed by
qualified technician in accordance with the manufacturer’s
instructions and all applicable codes and requirements of
the authority having jurisdiction. If the information in the
instructions is not followed exactly, a fire, explosion or
production of carbon monoxide may result causing
property damage, personal injury or loss of life. The
qualified technician is responsible for the proper
installation of the kit. The installation is not proper and
complete until the operation of the converted appliance is
checked as specified in the manufacturer’s instructions
supplied with the kit.
CAUTION
When connecting the unit to propane gas, make certain
the propane gas tank is equipped with its own high-
pressure regulator in addition to the pressure regulator
supplied with the appliance. The maximum gas pressure
to this appliance must not exceed 14.0'' water column
(34.9 mb) from the propane gas tank to the pressure
regulator.
For Massachusetts installations:
1. Installation must be performed by a qualified or
licensed contractor, plumber or gas fitter qualified or
licensed by the state, province or region where this
appliance is being installed.
2. Shut-off valve must be a “T” handle gas cock.
3. Flexible gas connector must not be longer than 36''
(914 mm).
Ensure proper installation and servicing. Follow the
Installation Instructions provided with this product. Have
the appliance installed and electrically grounded by a
qualified technician.
In the event a burner goes out and gas escapes, open a
window or a door. DO NOT attempt to use the appliance
until the gas has had time to dissipate. Wait at least 5
minutes before using the appliance.
DO NOT repair or replace any part of the appliance unless
specifically recommended in this manual. All servicing
should be referred to an authorized servicer.
Electrical requirements
WARNING
IN CASE OF AN ELECTRICAL FAILURE
If for any reason a gas control knob is turned
ON and there is no electrical power to operate
the electronic igniters on the burners, turn OFF
the gas control knob and wait 5 minutes for the
gas to dissipate before lighting the burner
manually.
To light the burners manually, carefully hold a lighted
match to the burner ports and turn the gas control knob
to HI
. During a power failure, you can use the standard
burners, but each must be lit with a match.
DO NOT attempt to light the XLO
®
burners manually.
These burners are equipped with the ExtraLow
®
feature
and cannot be lit manually.
The appliance must be electrically grounded in
accordance with local codes or, in the absence of local
codes, with the National Electrical Code, NFPA 70 or the
Canadian Electric Code, CSA C22.1-02.
WARNING
Never Operate the Top Surface Cooking Section of this
Appliance Unattended
• Failure to follow this warning statement could result
in fire, explosion, or burn hazard that could cause
property damage, personal injury, or death.
• If a fire should occur, keep away from the appliance
and immediately call your fire department. DO NOT
ATTEMPT TO EXTINGUISH AN OIL/GREASE FIRE
WITH WATER.

Page. 7
9 IMPORTANT SAFETY INSTRUCTIONS
READ AND SAVE THESE INSTRUCTIONS
It is the personal responsibility and obligation of you, the
user, to have this appliance connected to the electrical
power supply by a qualified electrician, in accordance with
the National Electrical Code and/or applicable local codes
and ordinances.
Service should only be done by an authorized servicer.
Always disconnect the electrical plug from the wall
receptacle before servicing this unit.
See the Installation Instructions for electrical requirements
and grounding instructions.
Have the installer show you where the electric circuit
breaker and the gas supply shut off valve are located so
you know how and where to turn off the gas and electricity
to the appliance.
Installation and maintenance must be carried out correctly.
Follow the instructions in the Installation Instructions
supplied with the product. Make sure that a qualified
electrician installs and performs grounding of the
appliance.
This appliance complies with the following Safety
Codes and Standards:
• UL 858, The Standard for the Safety of Household
Electric Ranges
• ANSI Z21.1, The American National Standard for
Household Cooking Gas Appliances
• CAN1-1.1-M81, Domestic Gas Ranges
• CSA C22.2 No. 61, Household Cooking Ranges
Installation must conform with local codes or, in the
absence of local codes, with the National Fuel Gas Code,
ANSI Z223.1/NFPA 54 or, in Canada, the Natural Gas and
Propane Installation Code, CSA B149.1.
Installation of appliances designed for manufactured
(mobile) home installation must conform with the
Manufactured Home Construction and Safety Standard,
Title 24 CFR, Part 3280 [formerly the Federal Standard for
Mobile Home Construction and Safety, Title 24, HUD (Part
280)] or with local codes where applicable.
Installation of appliances designed for recreational park
trailers must conform with state or other codes or, in the
absence of such codes, with the Standard for Recreational
Park Trailers, ANSI A119.5.
Clearances from non-combustible materials are not part of
the ANSI Z21.1 scope and are not certified by
CSA. Clearances under 6 inches should be approved by
the local codes and/or by the local authority having
jurisdiction.
It is the responsibility of the owner and the installer to
determine if additional requirements and/or standards
apply to specific installations.
The maximum depth of cabinets installed above cooking
surface must be 13'' (330 mm).
Child safety
WARNING
DO NOT store items of interest to children above or at the
back of the appliance. If children should climb onto the
appliance to reach these items, they could be seriously
injured.
When children become old enough to use the appliance,
it is the responsibility of the parents or guardians to ensure
that they are instructed in safe operation of the appliance
by qualified persons.
DO NOT allow anyone to climb, stand, lean, sit, or hang
on any part of an appliance. This can damage the
appliance, and the unit may tip over, potentially causing
severe injury.
DO NOT allow children to use this appliance unless
closely supervised by an adult.
Children and pets should not be left alone or unattended
in the area where the appliance is in use. They should
never be allowed to play in its vicinity, whether or not the
appliance is in use.
Proposition 65 Warning
This product may contain a chemical known to the State of
California, which can cause cancer or reproductive harm.
Therefore, the packaging of your product may bear the
following label as required by California:
State of California Proposition 65 Warning:
: WARNING
Cancer and Reproductive Harm -
www.P65Warnings.ca.gov

Page. 8
9 IMPORTANT SAFETY INSTRUCTIONS
READ AND SAVE THESE INSTRUCTIONS
General safety
WARNING
To reduce the risk of injury to persons, in the event of a
range top grease fire, observe the following:
• Smother flames with a close-fitting lid, cookie sheet,
or other metal tray, then turn off the gas burner or the
electric element. Be careful to prevent burns. If the
flames do not go out immediately, evacuate and call
the fire department.
• Never pick up a flaming pan. You may be burned.
• DO NOT use water, including wet dish cloths or
towels, to extinguish flames – a violent steam
explosion will result.
• Use an extinguisher ONLY if:
• You know you have a class ABC extinguisher and
you already know how to operate it.
• The fire is small and contained in the area where it
started.
• The fire department is being called.
• You can fight the fire with your back to an exit.
WARNING
To eliminate risk of burns or fire caused by reaching over
heated surface units, cabinet storage located above the
surface units should be avoided.
WARNING
TO REDUCE THE RISK OF A GREASE FIRE
• Never leave surface units unattended at high settings.
Boilovers cause smoking and greasy spillovers that
may ignite. Heat oils slowly on low or medium
settings.
• Always turn hood ON when cooking at high heat or
when flambéing food (i.e. Crepes Suzette, Cherries
Jubilee, Peppercorn Beef Flambé).
• Clean hood filters frequently. Grease should not be
allowed to accumulate on fan or filter.
• Use proper pan size. Always use cookware
appropriate for the size of the appliance burner.
NEVER use any part of the appliance for storage.
Flammable materials can catch fire and plastic items may
melt or ignite. DO NOT hang articles from any part of the
appliance. Some fabrics are quite flammable and may
catch on fire.
If the appliance is near a window, be certain the curtains
do not blow over or near the appliance burners; they
could catch on fire.
ALWAYS have a working smoke detector near the kitchen.
In the event that personal clothing or hair catches fire,
drop and roll immediately to extinguish flames.
Have an appropriate fire extinguisher available nearby,
highly visible, and easily accessible near the cooking
appliance.
Smother flames from food fires, other than grease fires,
with baking soda. Never use water on cooking fires.
Whenever possible, do not operate the ventilation system
during a fire. However, DO NOT reach through fire to turn
it off.
NEVER let clothing, potholders, or other flammable
materials come in contact with or too close to any burner
or burner grate until it has cooled. Fabric may ignite and
result in personal injury.
Use only dry potholders: moist or damp potholders on hot
surfaces may cause burns from steam. DO NOT use a
towel or other bulky cloth in place of potholders. DO NOT
let potholders touch hot burners or burner grates.
For personal safety, wear proper apparel. Loose fitting
garments or hanging sleeves should never be worn while
using this appliance. Some synthetic fabrics are highly
flammable and should not be worn while cooking.
DO NOT use aluminum foil to line any part of the
appliance. Use of a foil liner could result in a shock or fire
hazard, or the obstruction of the flow of combustion and
ventilation air. Foil is an excellent heat insulator and heat
will be trapped beneath it. This will upset the cooking
performance and can damage the finish of the appliance.
WARNING
The appliance is for cooking. Based on safety
considerations, never use the appliance to warm or heat a
room. Doing so may result in carbon monoxide poisoning
and overheating of the unit. Also, such use can damage
the appliance parts.
When using the appliance: DO NOT TOUCH THE
BURNER GRATES OR THE IMMEDIATE SURROUNDING
AREA. Areas adjacent to the burners may become hot
enough to cause burns.
Page. 9
9 IMPORTANT SAFETY INSTRUCTIONS
READ AND SAVE THESE INSTRUCTIONS
Never leave the appliance unattended when using high
flame settings. Boil overs cause smoking and greasy
spillovers that may ignite. Also, if the burner flames and
igniter are smothered with spillage, unburned gas will
escape into the room. See page 5 regarding gas leaks.
Only certain types of glass, heatproof glass-ceramic,
ceramic, earthenware, or other glazed cookware are
suitable for cooking on the burners. This type of cookware
may break with sudden temperature changes. Use only on
low or medium heat settings according to the utensil
manufacturer’s directions.
DO NOT heat or warm unopened food containers. Build-
up of pressure may cause the container to burst and cause
injury.
WARNING
During cooking, set the burner control so that the flame
heats only the bottom of the pan and does not extend
beyond the bottom of the pan. This instruction is based on
safety considerations.
Use caution to ensure that drafts like those from forced air
vents or fans do not blow flammable material toward the
flames or push the flames so that they extend beyond the
edges of the pot.
Always use pots and pans that have flat bottoms large
enough to cover the burner. The use of undersized pots
and pans could expose a portion of the flame and may
result in ignition of clothing.
WARNING
Avoid using high flame setting with a pan larger than the
grate or with one that spans more than one burner, such
as a griddle, for prolonged periods of time. This can result
in poor combustion that generates harmful by-products.
DO NOT use pots or pans on the grill plate accessory
(purchased separately). Bakeware, such as large casserole
pans, cookie sheets, etc., should never be used on the
accessory.
DO NOT use flammable cleaners to clean the appliance.
Remove the optional cutting board or griddle cover
accessory, which is stored on top of the griddle plate,
before operating the griddle or any adjacent burners.
GREASE IS FLAMMABLE. Let hot grease cool before
attempting to handle it. Avoid letting grease deposits
collect. Clean after each use.
For proper lighting and performance of the burners, keep
the igniter ports clean. It is necessary to clean the ports
when there is a boil over or when the burner does not light
even though the electronic igniters activate.
Clean the appliance with caution. Avoid steam burns; DO
NOT use a wet sponge or cloth to clean the appliance
while it is hot. Some cleaners produce noxious fumes if
applied to a hot surface. Follow directions provided by the
cleaner manufacturer.
WARNING
After a spill or boil over, turn off the burner and using
caution due to possible hot surfaces, clean around the
burner and burner ports. After cleaning, check for proper
operation.
Be sure all controls are turned off and the appliance is cool
before using any type of aerosol cleaner on or around the
appliance. The chemical that produces the spraying action
could, in the presence of heat, ignite or cause metal parts
to corrode.
WARNING
DO NOT block or obstruct the flow of air
through the ventilation openings. The vent is
located at the back of the appliance. The
vent needs to be unobstructed and open to
provide necessary airflow that is important
for proper performance.
DO NOT touch vent area while the appliance is on and for
several minutes after the appliance is off. Some parts of
the vent and surrounding areas become hot enough to
cause burns. Allow appliance sufficient time to cool before
touching or cleaning vent areas.
DO NOT position plastic or other heat-sensitive items on
or near the vent. These items could melt or ignite.
DO NOT obstruct the flow of combustion or ventilation
air.
DO NOT use the grill plate accessory for cooking
excessively fatty meats or products which promote flare-
ups.
When cooking fatty or oily foods on burners, the grill, or
the griddle, adjacent gas burners can ignite airborne
fumes. Use caution to avoid burns.
To avoid a fire hazard, grease accumulation must be
prevented by frequently cleaning the ventilation hood and
filters.

Page. 10
9 IMPORTANT SAFETY INSTRUCTIONS
READ AND SAVE THESE INSTRUCTIONS
In case of fire or when intentionally “flaming” liquor or
other spirits on the appliance, follow manufacturer’s
instructions. Use caution when cooking foods with high
alcohol content (e.g. rum, brandy, bourbon). Alcohol
evaporates at high temperatures. There is a risk of burning
as the alcohol vapors may catch fire. Use only small
quantities of alcohol in foods.
DO NOT store or use corrosive chemicals, vapors,
flammables, or nonfood products in or near this appliance.
It is specifically designed for use when heating or cooking
food. The use of corrosive chemicals while heating or
cleaning will damage the appliance and could result in
injury.
WARNING
DO NOT leave food or cooking utensils, etc, in oven
during the self-cleaning mode of operation. Before self-
cleaning the oven (select models), remove the broiler pan,
oven racks, and any other utensils, and excess spillage.
WARNING
This appliance should not be installed with a ventilation
system that directs air in a downward direction toward the
appliance. This type of ventilation system may cause
ignition and combustion problems with the appliance
resulting in personal injury, property damage, or
unintended operation. Ventilating systems that direct the
air upwards do not have any restriction.
An air curtain or other overhead range hood, which
operates by blowing a downward airflow onto a range,
shall not be used in conjunction with a gas range unless
the hood and range have been designed and tested in
accordance with the Standard for Domestic Gas Ranges,
ANSI Z21.1 • CSA 1.1, and listed by an independent
testing laboratory for combination use.
IMPORTANT: There is a possibility to discolor the back
wall under certain cooking conditions.
DO NOT clean, rub, damage, move or remove the door
gasket. It is essential for a good seal during baking. If the
gasket becomes worn or excessively soiled with food
particles, replace gasket to assure a tight seal.
Protect the self-cleaning feature. Clean only those parts
indicated in this booklet. DO NOT use commercial oven
cleaners or oven liner protective coatings of any kind in or
around the self-cleaning oven.
Place oven racks in desired position while oven is cool. If a
rack must be moved while the oven is hot, do not let the
potholders contact the broiler element.
DO NOT TOUCH HEATING ELEMENTS OR INTERIOR
SURFACES OF OVEN – Heating elements may be hot
even though they are dark in color. Interior surfaces of an
oven become hot enough to cause burns. During and
after use, do not touch, or let clothing or other flammable
materials contact heating elements or interior surfaces of
oven until they have had sufficient time to cool. Other
surfaces of the appliance may become hot enough to
cause burns - among these surfaces are oven vent
openings and surfaces near these openings, oven doors,
and windows of oven doors.
WARNING
NEVER cover any slots, holes or passages in the oven
bottom or cover an entire rack with materials such as
aluminum foil. Doing so blocks air flow through the oven
and may cause carbon monoxide poisoning. Aluminum foil
linings may also trap heat, causing a fire hazard.
Use care when opening the oven door; let hot air or steam
escape before removing or replacing foods.
Please note that some pets or humans can be sensitive to
the odors created during the self-cleaning process
whether it is a manufacturing residue burn off or food. It is
recommended that those potentially affected be removed
from the kitchen area during the self-clean process.
Page. 11
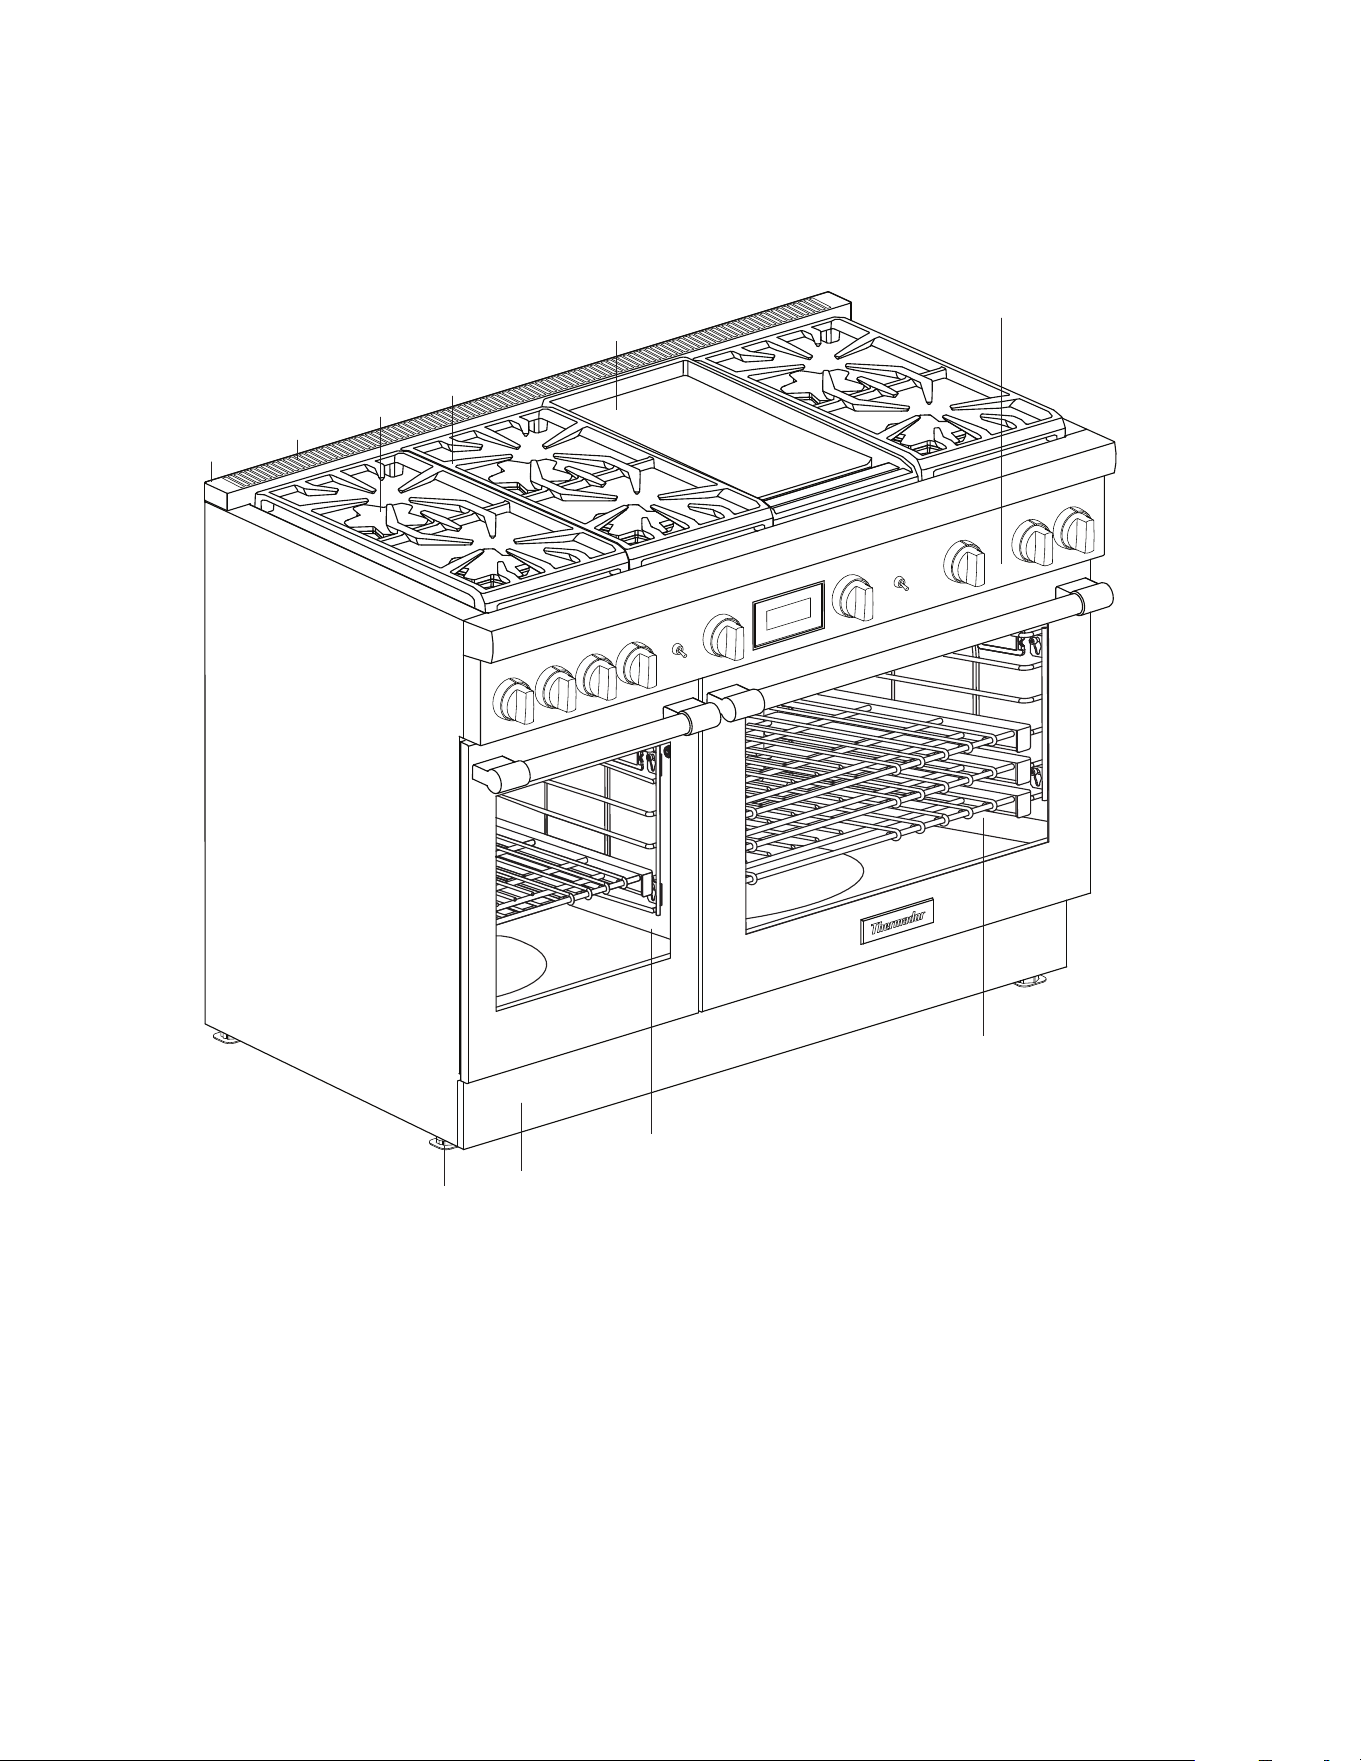
Description
Appliance identification
Model shown is 48'' with griddle option (features will vary).
1 Island trim included or low backguard ordered separately
(See the Installation Instructions concerning spacing behind the range when using the range with the island trim.)
2 Oven vent (DO NOT obstruct!)
3STAR
®
burners
4 Burner grates
5 Griddle option (options will vary)
6 Control panel
7 Main oven
8 Secondary auxiliary oven (select models)
9Kick panel
10 Range feet
1
2
3
4
6
5
8
9
7
10
Page. 12
Control panel identification
NOTE: Not all knobs, modes, and features are available to
all models.
ExtraLow
®
Standard Griddle Grill Oven temp selector Light switch
Oven mode
selector
Oven mode
selector
Oven digital display
1 Digital display screen
2 Left navigation buttons
3 Access multiple timers
4 Access user settings
5 Confirm an entry
6 Right navigation buttons
OFF
OFF
TIMERS SETTINGS ENTER
06:30
1
2 3 4 65

Page. 13
Top surface identification
Model 304
1 ExtraLow
®
burner Natural 15000, LP 12000 BTU
2 ExtraLow burner Natural 18000, LP 15000 BTU
3 Standard burner Natural 15000, LP 12000 BTU
4 Standard burner Natural 18000, LP 15000 BTU
Model 305
1 ExtraLow burner Natural 8000, LP 6000 BTU
2 ExtraLow burner Natural 18000, LP 15000 BTU
3 Standard burner Natural 10000, LP 9100 BTU
4 Standard burner Natural 8000, LP 6000 BTU
5 Standard burner Natural 15000, LP 12000 BTU
44
11
22
33
33
55
11
22
44
Model 364 with griddle
1 ExtraLow burner Natural 15000, LP 12000 BTU
2 ExtraLow burner Natural 18000, LP 15000 BTU
3 Griddle 1,630W
4 Standard burner Natural 15000, LP 12000 BTU
5 Standard burner Natural 18000, LP 15000 BTU
Model 366
1 ExtraLow burner Natural 15000, LP 12000 BTU
2 ExtraLow burner Natural 18000, LP 15000 BTU
3 Standard burner Natural 15000, LP 12000 BTU
4 Standard burner Natural 18000, LP 15000 BTU
5 Standard burner Natural 15000, LP 12000 BTU
6 Standard burner Natural 18000, LP 15000 BTU
33
55
11
22
44
33
44
66
11
22
55
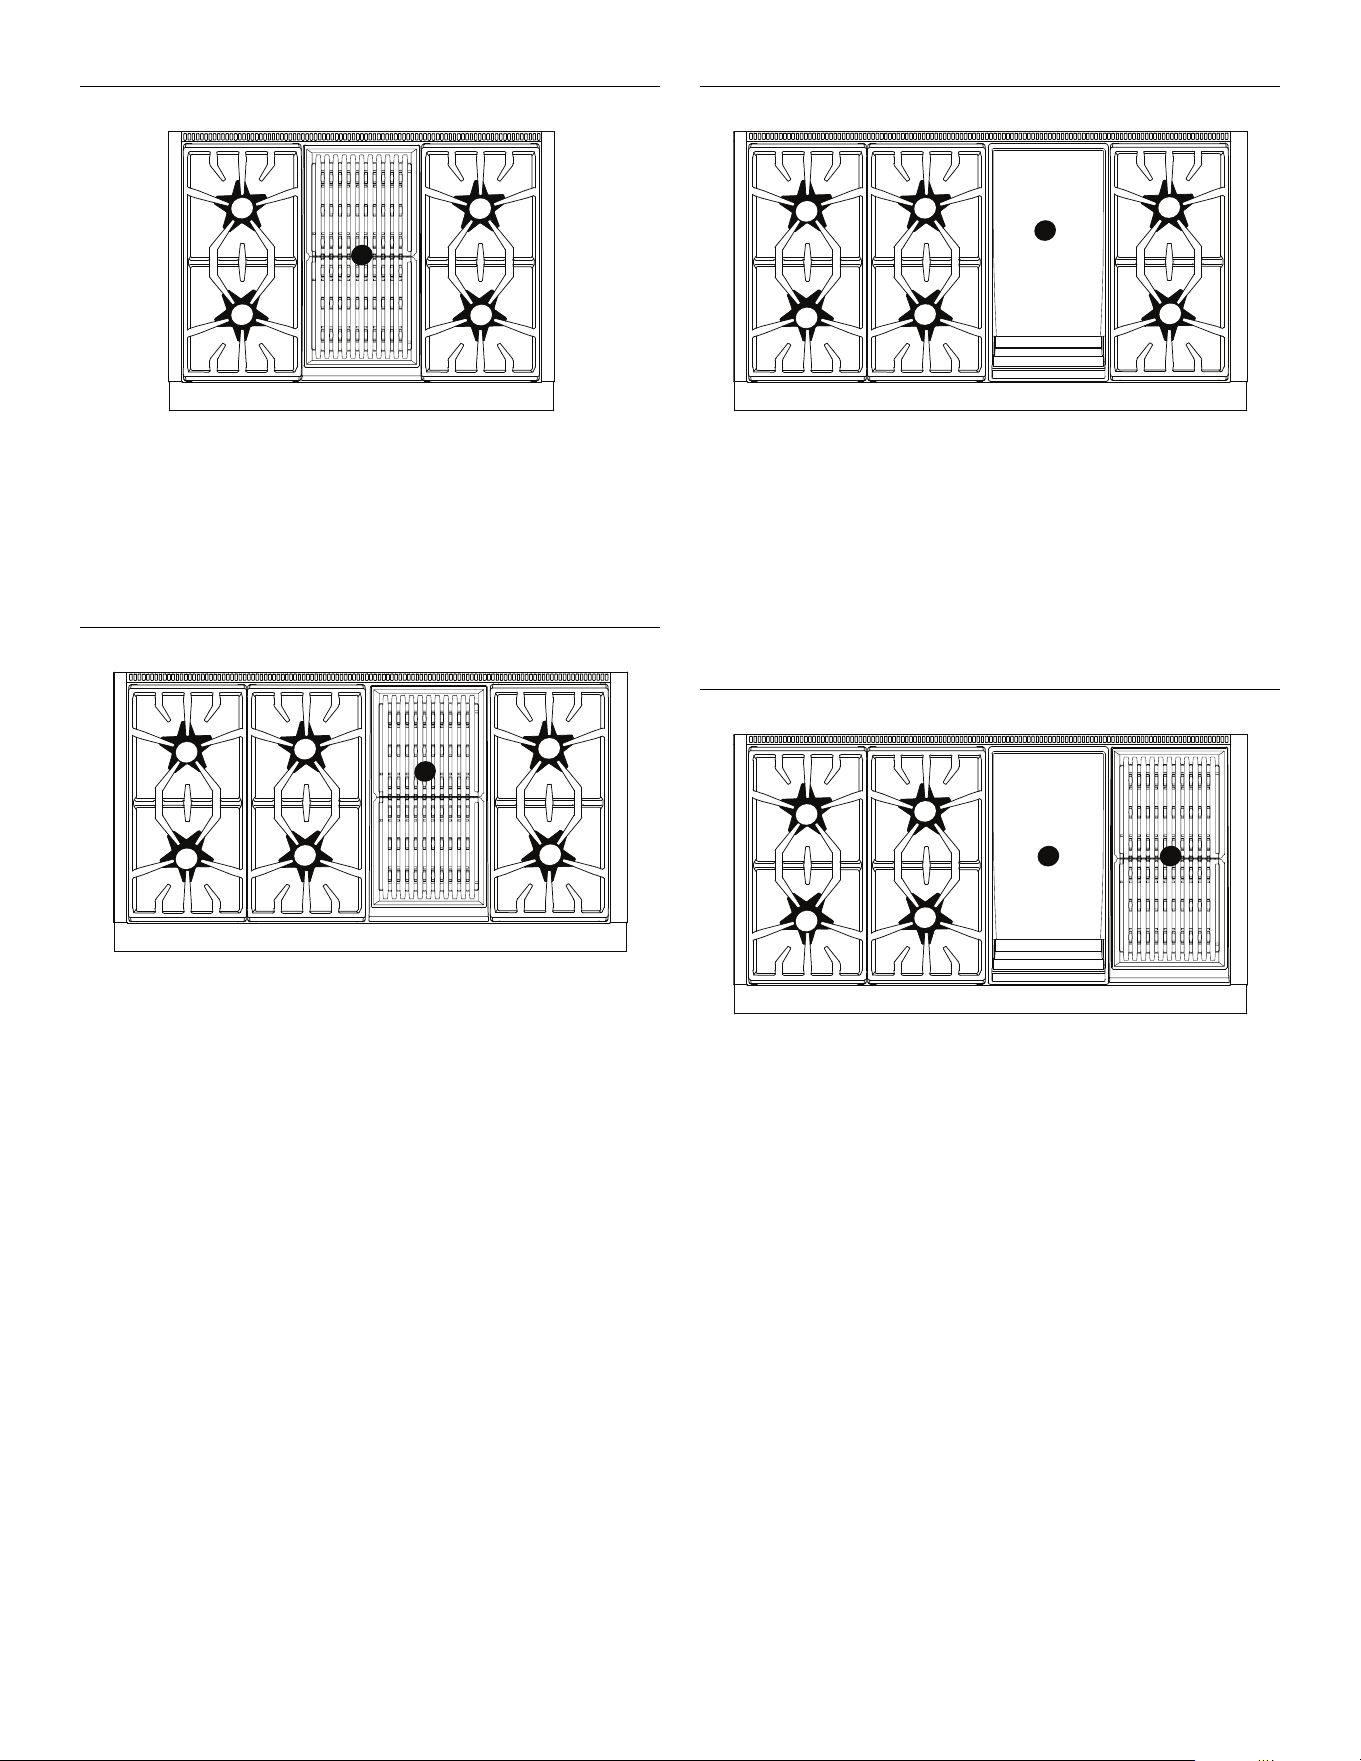
Page. 14
Model 364 with grill
1 ExtraLow
®
burner Natural 15000, LP 12000 BTU
2 ExtraLow burner Natural 18000, LP 15000 BTU
3 Grill 815W x 2
4 Standard burner Natural 15000, LP 12000 BTU
5 Standard burner Natural 18000, LP 15000 BTU
Model 486 with grill
1 ExtraLow burner Natural 15000, LP 12000 BTU
2 ExtraLow burner Natural 18000, LP 15000 BTU
3 Standard burner Natural 15000, LP 12000 BTU
4 Standard burner Natural 18000, LP 15000 BTU
5 Grill 815W x 2
6 Standard burner Natural 15000, LP 12000 BTU
7 Standard burner Natural 18000, LP 15000 BTU
33
55
11
22
44
33
44
77
11
22
66
55
Model 486 with griddle
1 ExtraLow burner Natural 15000, LP 12000 BTU
2 ExtraLow burner Natural 18000, LP 15000 BTU
3 Standard burner Natural 15000, LP 12000 BTU
4 Standard burner Natural 18000, LP 15000 BTU
5 Griddle 1,630W
6 Standard burner Natural 15000, LP 12000 BTU
7 Standard burner Natural 18000, LP 15000 BTU
Model 484 with griddle and grill
1 ExtraLow burner Natural 15000, LP 12000 BTU
2 ExtraLow burner Natural 18000, LP 15000 BTU
3 Standard burner Natural 15000, LP 12000 BTU
4 Standard burner Natural 18000, LP 15000 BTU
5 Griddle 1,630W
6 Grill 815W x 2
33
44
77
11
22
66
55
33
44
11
22
55
66
Page. 15
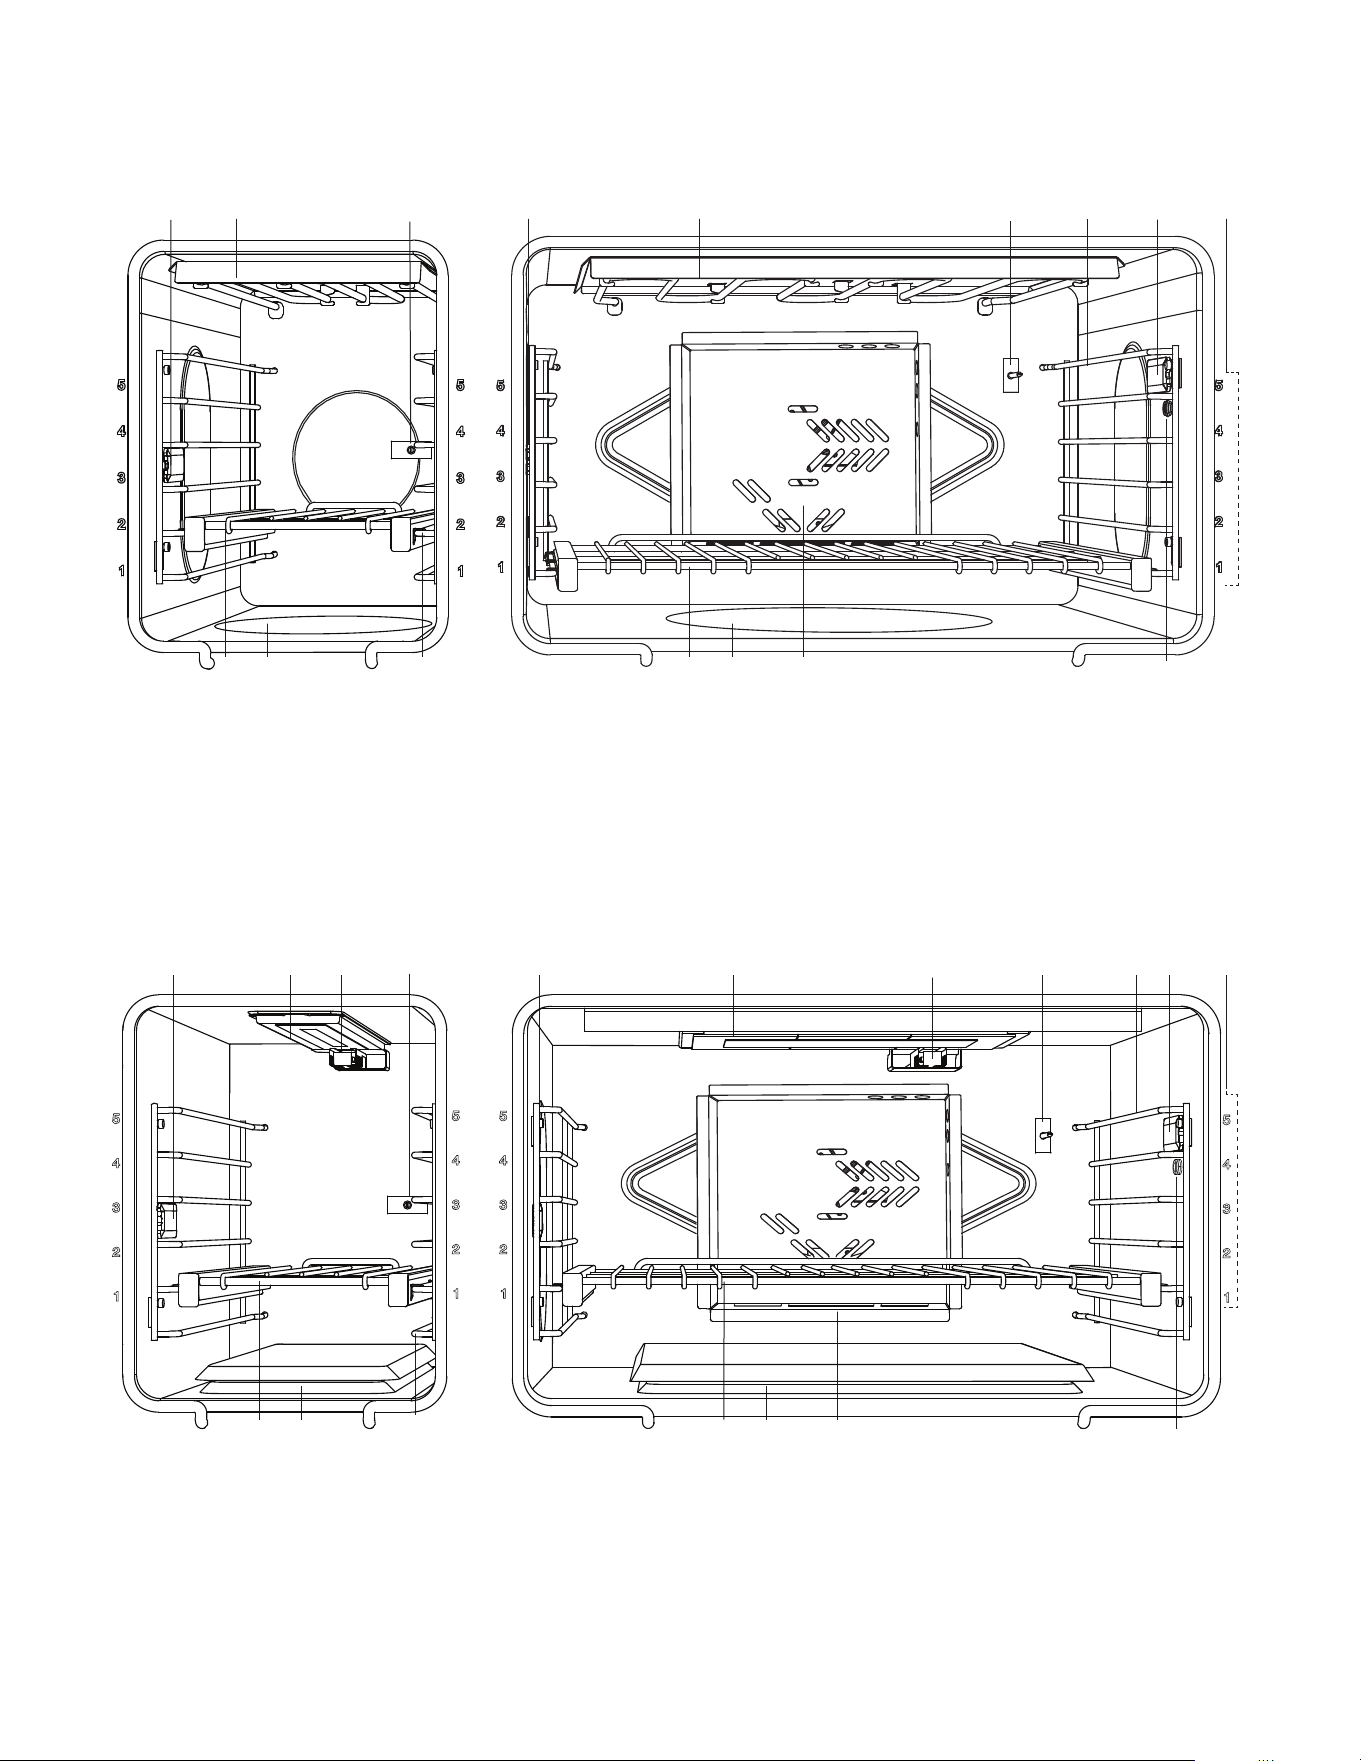
Oven interior identification
Dual fuel oven(s) interior
Gas oven(s) interior
1 Oven interior light
2 Broil element
3 Oven thermostat
4Rack guides
5 Oven racks
6 Bake element (hidden)
7 Convection fan cover
8 Meat probe outlet
9 Rack positions
1
2
3
5467
56 8
12
3
4
1
9
1 Oven interior light
2 Infrared broil burner
3 Broil igniter
4 Oven thermostat
5Rack guides
6 Oven racks
7 Bake burner (hidden)
8 Convection fan cover
9 Meat probe outlet
10 Rack positions
124
6
5
78
3
67
9
12 45
3
1 10
Page. 16
Before you begin
Getting started
Due to our continuous improvement activities in design
and quality improvements, some images may not be
representative of the final product.
Data rating label
• Record the model and serial number.
• The model and serial number must be provided when
calling customer support for assistance.
• Register your BSH product to ensure timely service
and access to your product related information. For
product registration information see “Before calling
for service”.
Surface burners
1. Ensure that the burner caps are correctly seated on
the burner bases of the range's cooktop (see
page 18).
2. Turn on each burner to check for proper flame color
(see “Flame description” on page 20 for details).
Oven racks
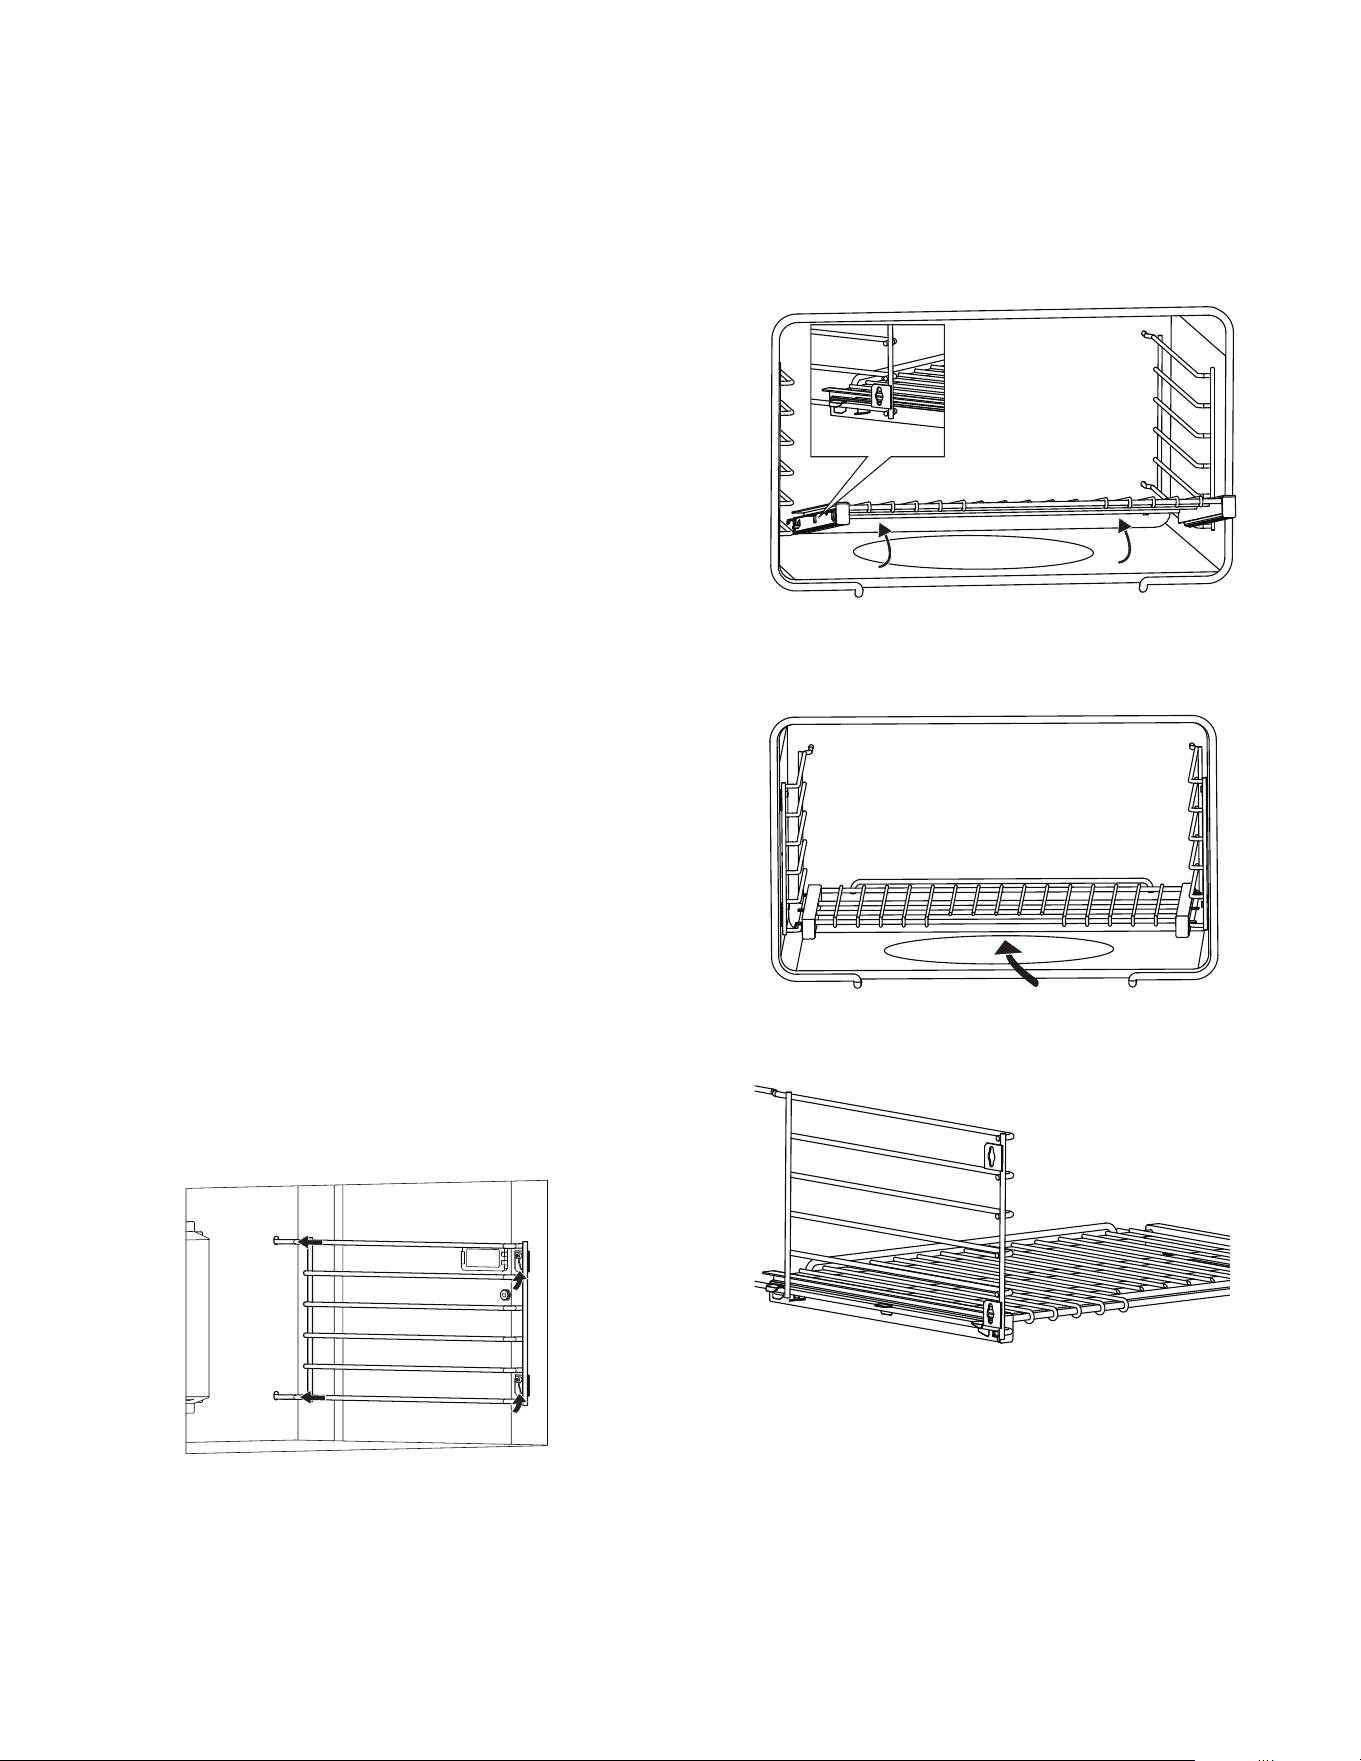
To install rack guides
1. Push the two rails in the holes in the back of the oven
cavity.
2. Slide the guide's key slots over the shoulder bolts.
3. At the front of the oven cavity press down on the front
of rack guide to clear the heads of the two shoulder
bolts.
To install Full Access
®
racks
1. Hold the rack on a slight angle and place the safety
hooks under the front of the rack guides.
2. Push the rack into the oven, lifting the rack stops
over the front of the rack guides.
3. Hold the rack straight.
4. Push the rack in completely.
5. Engage the rack’s front hooks on the rack guides.
IMPORTANT: When placing the gliding rack in the oven,
make sure the front supports on the rack guides rest in
the large slots at the front corners of the rack. This is
necessary to keep the rack in the correct position while
fully inserted into the oven.
Page. 17
To install flat racks
1. Grasp rack firmly on both sides and insert rack.
2. Tilt rack up to allow stop into rack guide.
Oven operation
9 WARNING
To help prevent burns, never remove or reposition the
oven racks while the oven is ON or while the oven is
cooling.
Positioning the oven racks
• The correct rack position depends on the recipe and
the cooking mode.
• The rack positions are numbered from the bottom of
the oven, like an elevator.
• Rack position 3 is the most frequently used position.
• Place rack(s) in the proper position before turning on
the oven.
Initial start-up
IMPORTANT: ALWAYS remove the oven racks before self-
cleaning the oven. If the gliding racks remain in the oven
during self-clean, lubricants in the glide mechanisms of
each rack will be lost and the finish will discolor.
The range occasionally has an odor or smoke when first
used. These odors or smoke comes from the burning off of
manufacturing residues and is typical of any new oven
regardless of manufacturer.
Before baking or broiling, the oven and broiler should be
turned on to burn off the manufacturing oils using one of
the two following methods:
1. Turn on kitchen ventilation (or if vent hood is a
recirculation type open a window).
2. Turn the oven on to 450ºF (230ºC) for 20 to 30
minutes; then turn the broiler to broil for the same
length of time.
or
1. Turn on kitchen ventilation (or if vent hood is a
recirculation type open a window).
2. Remove oven racks.
3. Set oven to self-clean (select models).
Automatic operation of the cooling fan
The cooling fan runs during all cooking modes. The fan
can be heard when it is running, and warm air may be felt
as it is released from the oven vent. The fan may also run
after the oven is off.
Oven vent
The oven vent is located at the back of the unit. Warm air
may be released from the vent before, during and after
cooking. It is normal to see steam escaping from the vent,
and condensation may collect in this area. This area may
be warm when the oven is in use. Do not block the vent,
since it is important for air circulation.
Convection fan
The convection fan operates during all convection modes.
When the oven is operating in a convection mode, the fan
turns off automatically when the door is opened. The
convection fan may also run during self-clean.
Page. 18
Using the rangetop
Sealed STAR
®
burners
9 WARNING
To prevent flare-ups and avoid the creation of harmful
by-products, do not use the rangetop without all
burner caps and all burner grates properly positioned.
9 WARNING
To prevent burns, do not touch burner caps or grates
while hot. Turn the rangetop off and allow the burners
to cool.
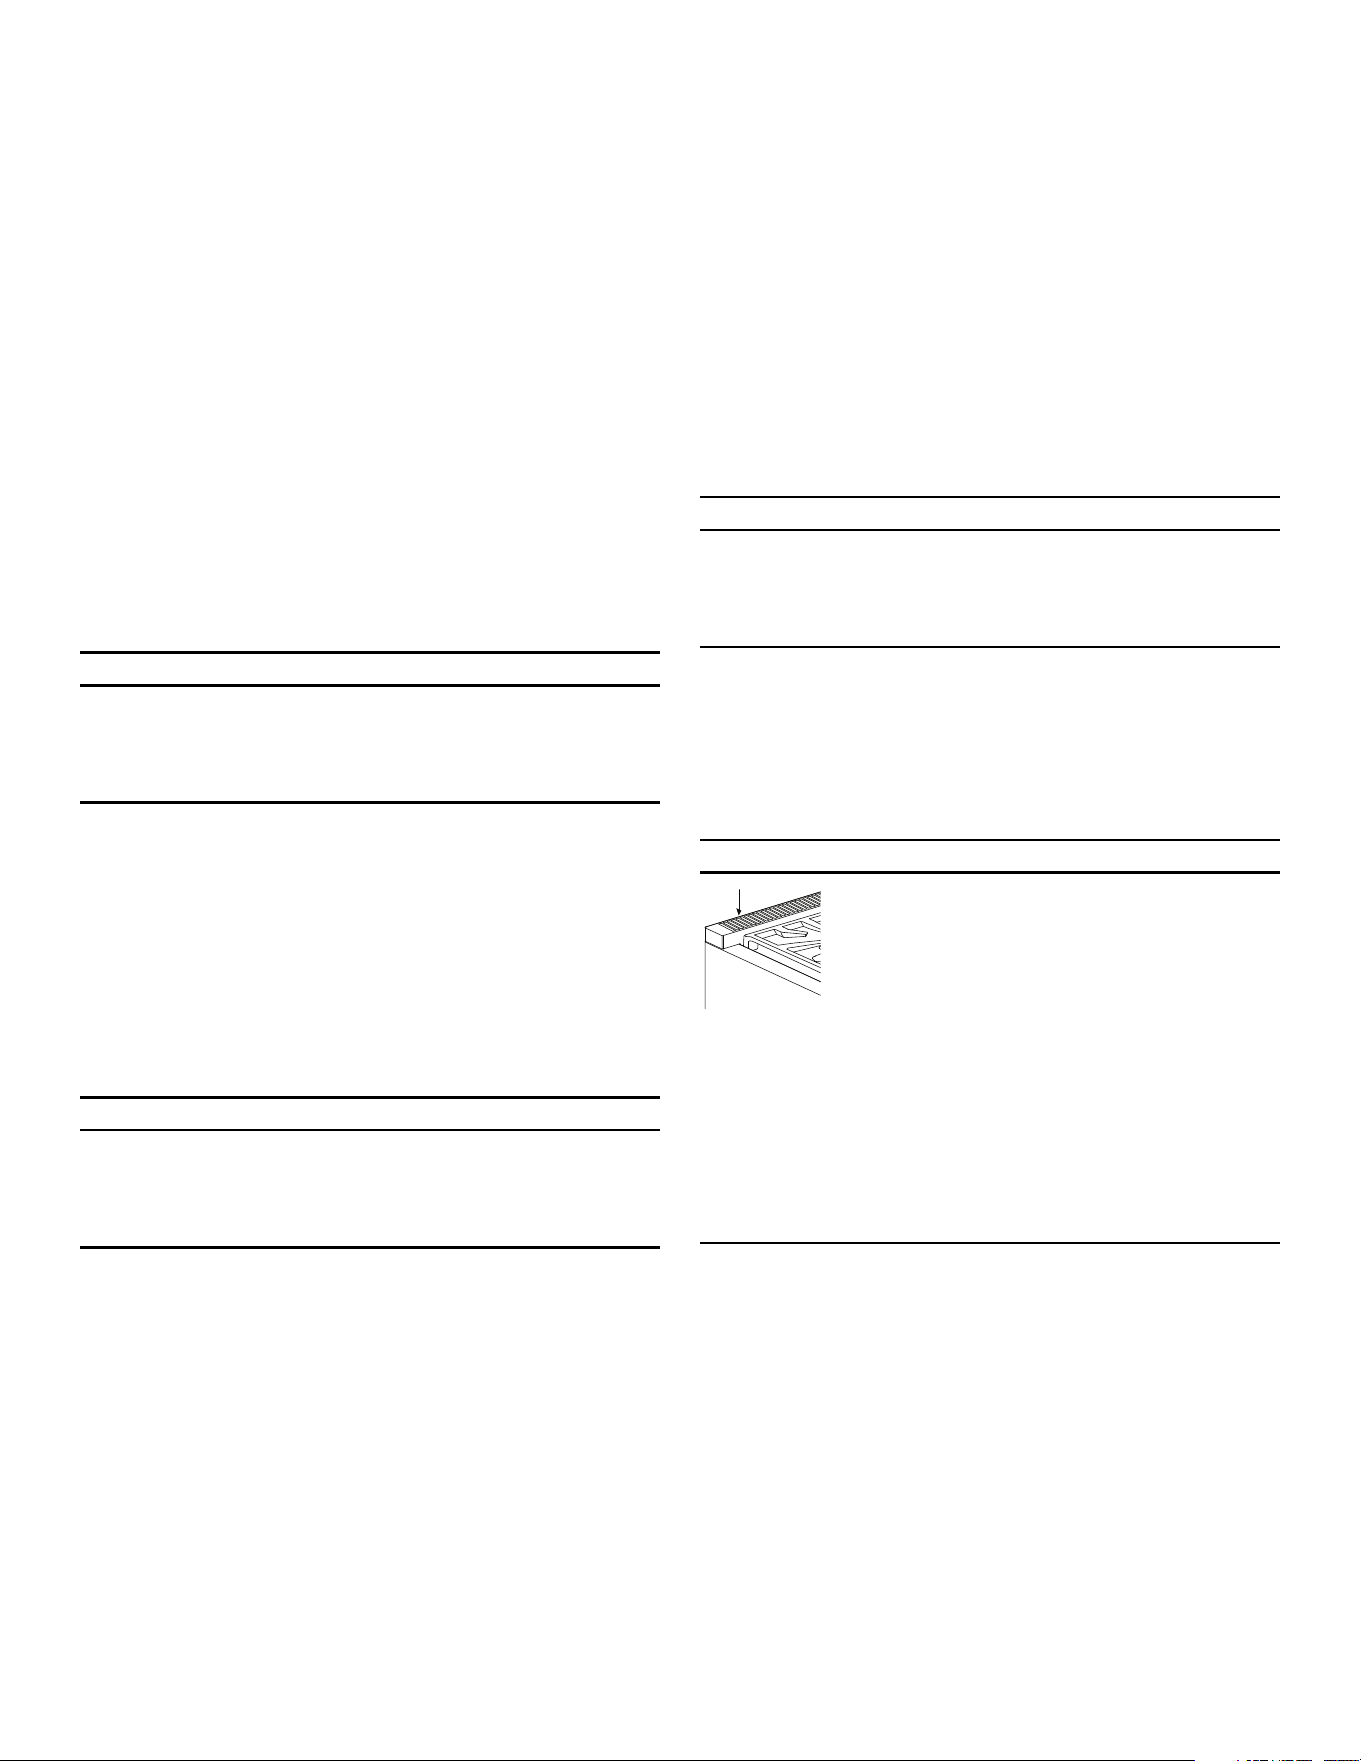
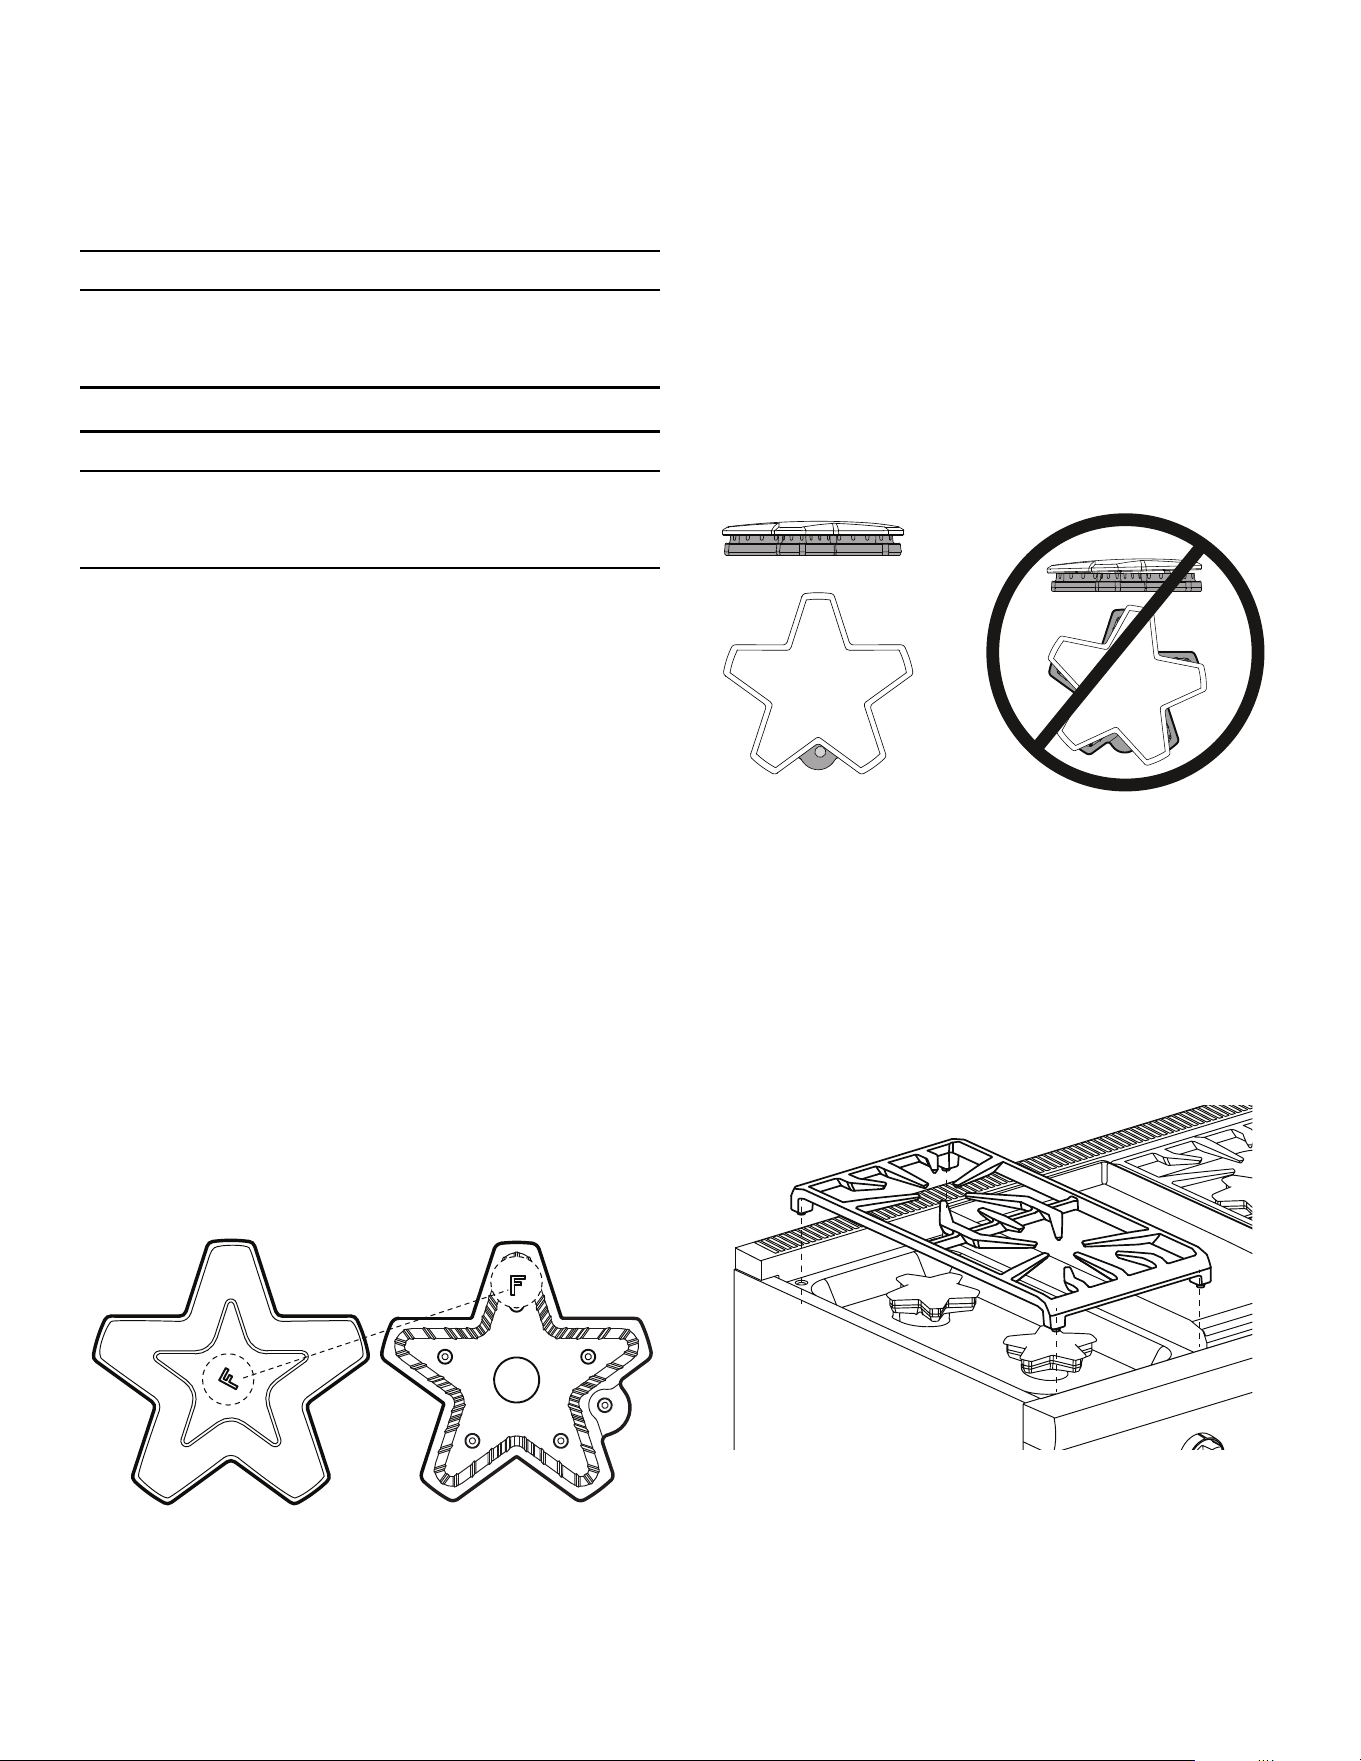
Burner cap placement
The burner caps must be properly placed on the burner
bases for the cooktop to function properly. If the burner
cap is not properly placed, one or more of the following
problems may occur:
• Burner flames are too high.
• Flames shoot out of burners.
• Burners do not ignite.
• Burner flames light unevenly.
• Burner emits gas odor.
Each cap has a letter (B, D, or F) cast in the underside of
the cap that corresponds to a letter (B, D, or F) cast in the
burner base that is attached to the appliance.
To place the burner caps
1. Place each burner cap on its correct burner base per
its corresponding letter designation.
2. Place burner cap gently on top of base so that the
prongs of the burner base fit snugly into the groove of
the burner cap.
Checking the burner cap placement
• Check each burner to make sure there is no gap
between the burner cap and burner base.
• You may gently try to move the burner caps from side
to side to check if the caps are properly placed on the
burner bases.
• When properly placed, each burner cap will rest flat
on top of its burner base, and completely cover the
star-shape of the burner base when viewed from the
top as shown below.
Burner grate placement
To install the burner grates
1. Place grates flat-side down and align into the
rangetop recess.
2. Grates should rest flush against each other and
against the sides of the recess.
Page. 19
Control knobs
The control knobs for two sealed gas burners, one in front
and one in the rear, are located directly in front of and
below the pair of burners on the control panel.
Operation of the burners
To turn on the burners
1. Press in on the knob and turn it counter-clockwise HI.
– The igniter for the selected burner clicks and
sparks.
– After burner ignition, the igniter stops clicking.
2. Rotate the knob to any flame setting between HI and
LO.
LED panel light (select models)
Positioned below the bullnose, the LED panel light
provides task lighting with a theatrical ambiance.
The panel light toggle switch on the control panel turns
the light on and off.
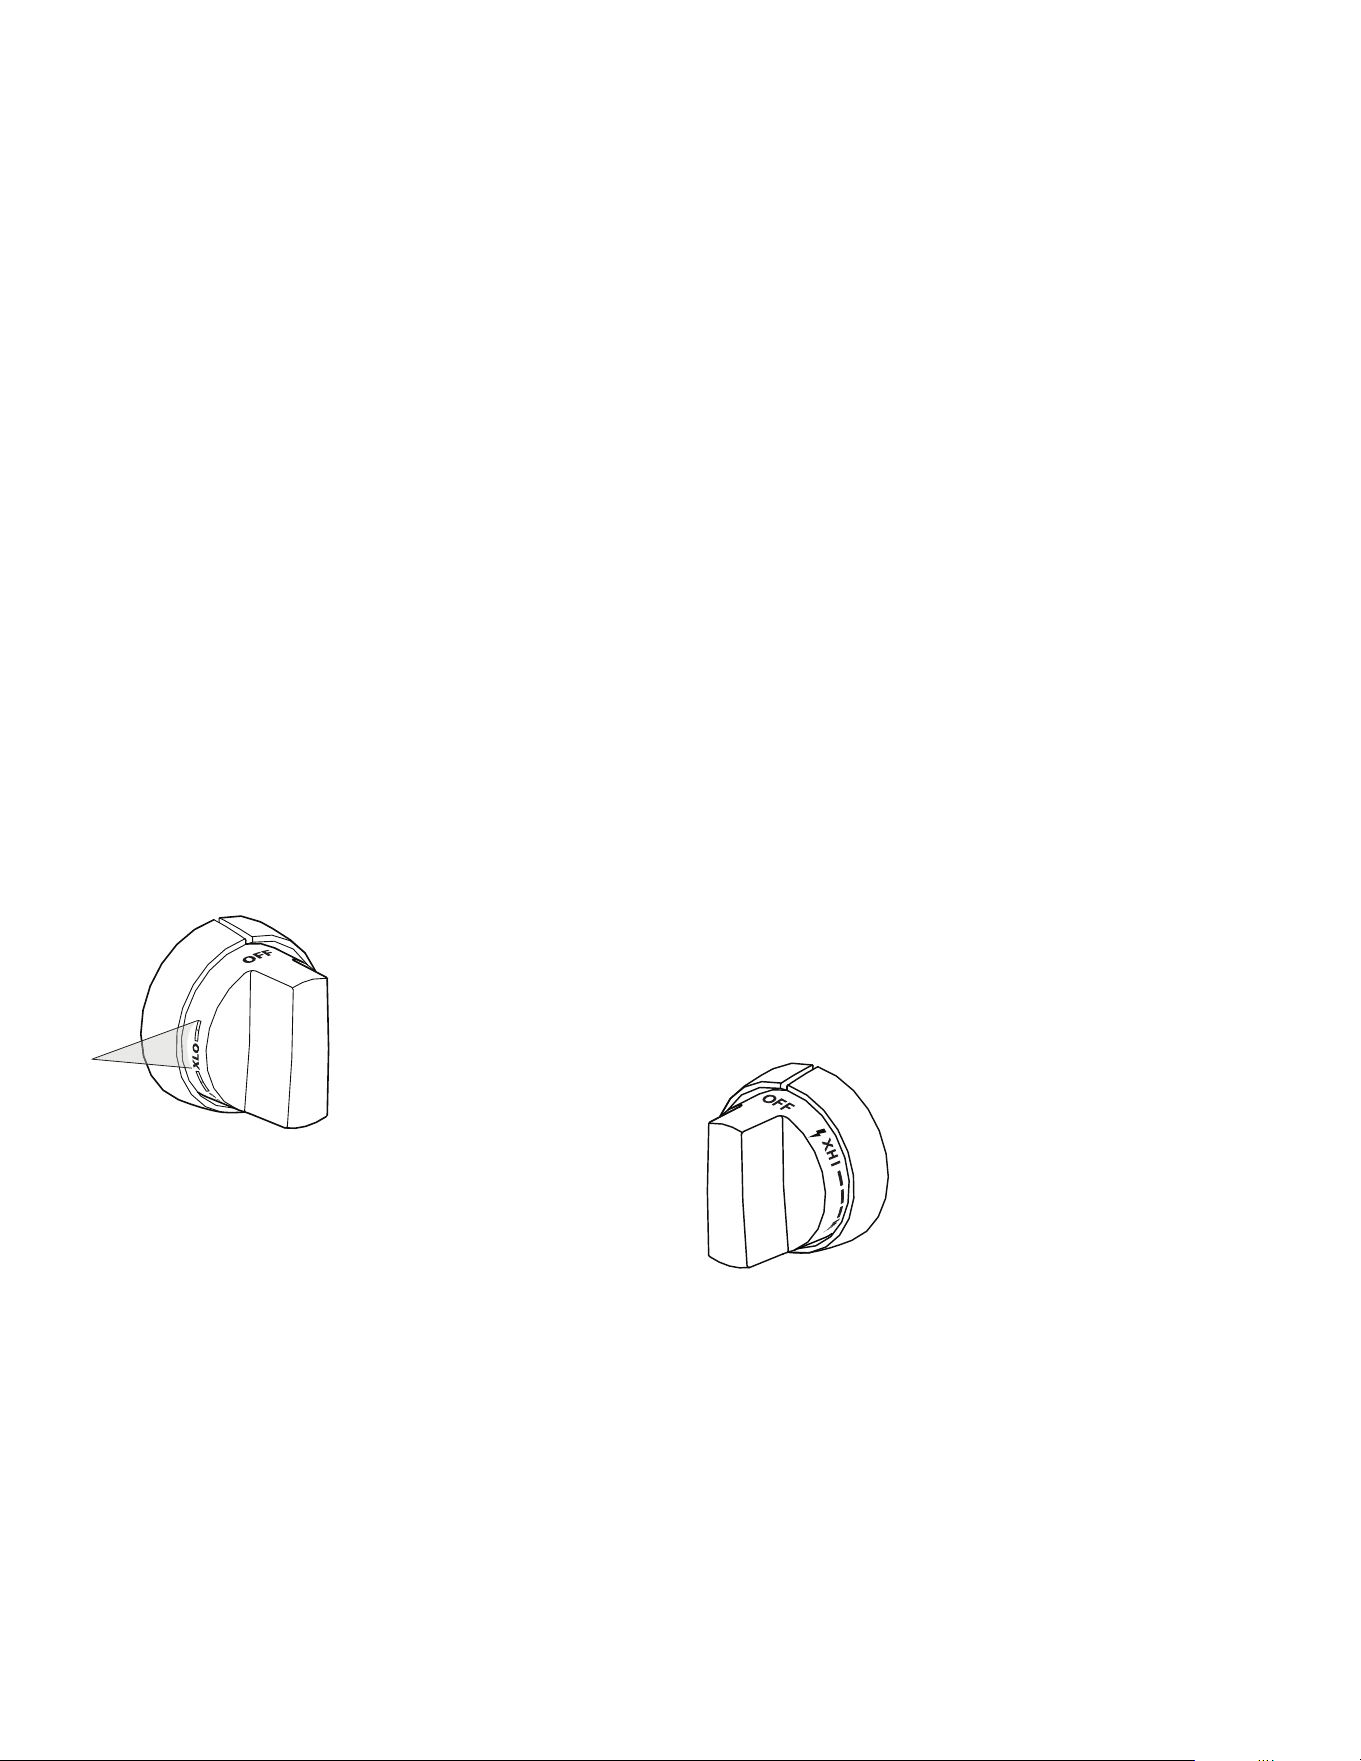
ExtraLow
®
burners
By varying the length of time the flame is off and on, the
heat is reduced even further to cook delicate foods. For
example, these very low settings are suitable for
simmering and poaching, melting chocolate and butter,
holding cooked foods at temperatures without scorching
or burning, etc.
Operation of the ExtraLow
®
burners
• XLO, the very lowest setting, is achieved by cycling
the flame on for approximately 10 seconds and off for
50 seconds of each minute.
• When the knob is set just below the XLO setting, the
flame will cycle on for approximately 50 seconds and
off for 10 seconds of each minute.
• To vary the amount of low heat to suit the food and
quantity, the control can be set anywhere within the
XLO range marked on the knob.
ExtraLow
®
techniques
• To maintain a low or simmer heat, bring food to a
rolling boil. Stir well, then cover the pan and lower the
heat to a setting just below XLO.
• If a large pan is used, the simmer action may occur
mainly in the center of the pan. To equalize the
temperature throughout the food, stir the food
around the outer edges of the pan into the food in the
center.
• It is normal to stir food occasionally while simmering.
This is especially important when simmering for
several hours, such as for a homemade spaghetti
sauce or beans.
• If the setting is too low to hold a simmer, bring the
food back to a boil before re-setting to a higher heat.
POWERBOOST
®
(select
models)
The drawing shows that the
control knob has an
additional range after the
XLO setting. When the knob
is set within this range, the
flame cycles off and on.
The POWERBOOST, or XHI, offers
the convenience to quickly boil
water, sear steaks, stir-fry
vegetables, etc. Use of the LO and
XLO remains the same as the
other XLO knobs.
Page. 20
Automatic re-ignition
9 CAUTION
DO NOT touch the burners when the igniters are
sparking.
Each burner has its own electronic igniter that sparks
when the burner is turned on. Each burner should light in
four seconds or less. If a burner does not light, check to
see that the cap is positioned correctly on the base.
If any one or more burners blow out, the electronic igniter
automatically activates to re-light the flame. Do not touch
the burners when the igniters are active.
IMPORTANT
• For proper combustion do not use the rangetop
without the burner grates in place.
• There is a slight sound associated with gas
combustion and ignition. This is a normal condition.
• On rangetops using propane gas (LP), a slight “pop”
sound may be heard at the burner ports a few seconds
after the burner has been turned off.
Power failure
9 WARNING
In the event of a power failure, turn all knobs to the
OFF position. Only the standard burners can be lit
manually.
• In the event of a power failure, only the standard
burners can be manually lit. It is necessary to light
each one individually.
• If the rangetop is being used when the power failure
occurs, turn all knobs to the OFF position.
• The standard burners can be lit by holding a match at
the ports and turning the control knob to the HI
position. Wait until the flame is burning all around the
burner cap before adjusting the flame to the desired
height.
• The burners with the ExtraLow
®
feature cannot be
used during a power failure. Be sure to turn them off.
• If a burner with ExtraLow is on when a power failure
occurs, it cannot be turned back on until the knob is
first turned off.
• If you smell gas, refer to safety precautions listed in
the Safety chapter.
Flame height
• The correct flame height depends on 1) size and
material of pan being used; 2) food being cooked; and
3) amount of liquid in the pan.
• Never extend the flame beyond the base of the pan.
• Use a low or medium flame for pan materials that
conduct the heat slowly, such as porcelain coated
steel or glass-ceramic.
Flame description
• If the flame is completely or mostly yellow, verify that
the regulator is set for the correct fuel. After
adjustment, retest.
• Some orange-colored streaking is normal during the
initial start-up.
• The burner flame color should be blue with no yellow
on the tips. It is not uncommon to see orange in the
flame color; this indicates the burning of airborne
impurities in the gas and will disappear with use.
• With propane (LP) gas, slight yellow tips on the
primary cone are normal.
• The flame should burn completely around the burner
cap. If it doesn’t, check that the cap is positioned
correctly on the base and that the ports are not
blocked.
• The flame should be stable with no excessive noise or
fluttering.
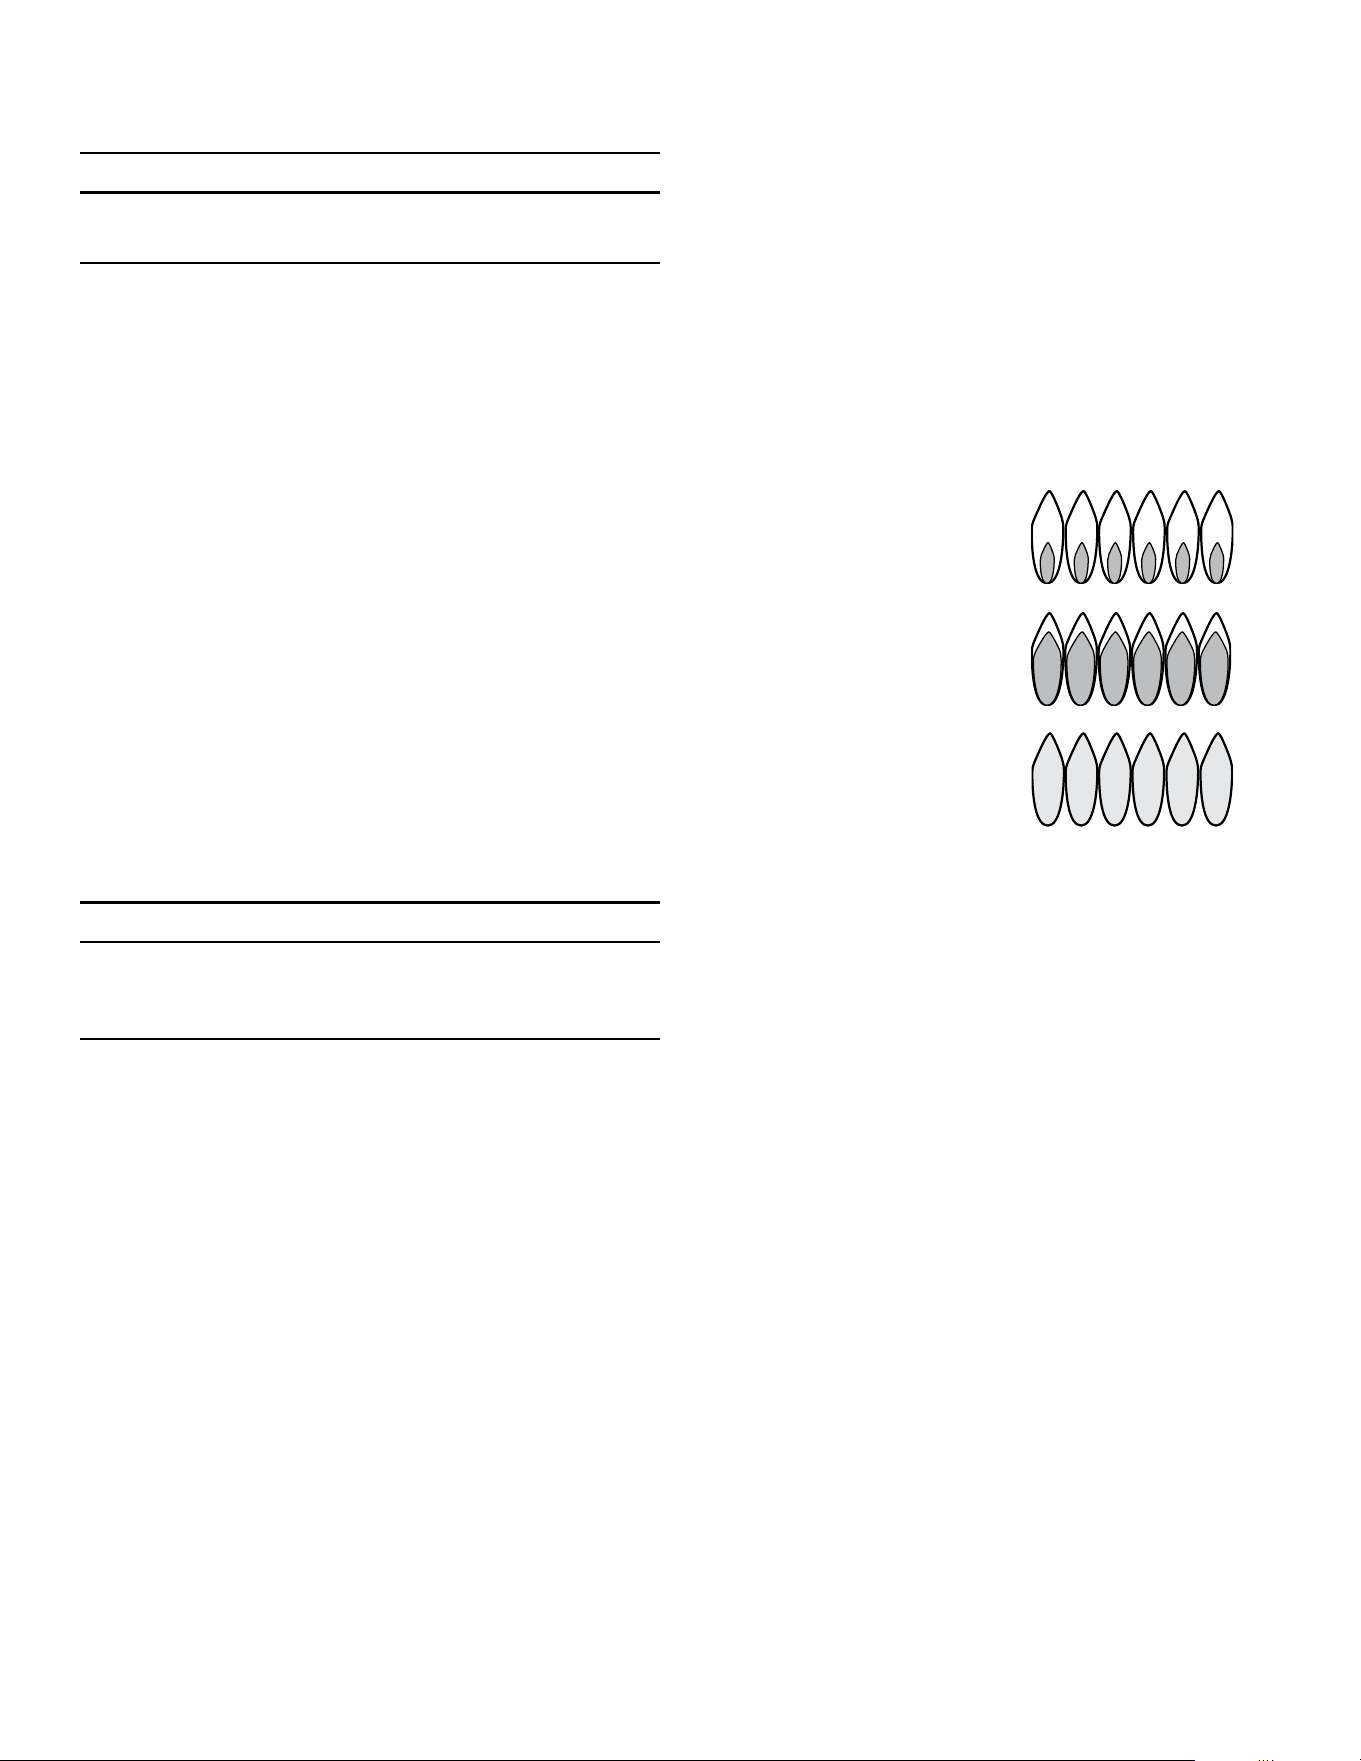
Flame characteristics
Yellow flames:
Further adjustment is
required.
Yellow tips on outer cones:
Normal for LP Gas
Soft blue flames:
Normal for natural gas
Page. 21
Cookware recommendations
9 WARNING
To avoid risk of serious injury, damage to appliance or
cookware, please observe the following:
• Bakeware, such as large casserole pans, cookie sheets,
etc. should never be used on the rangetop.
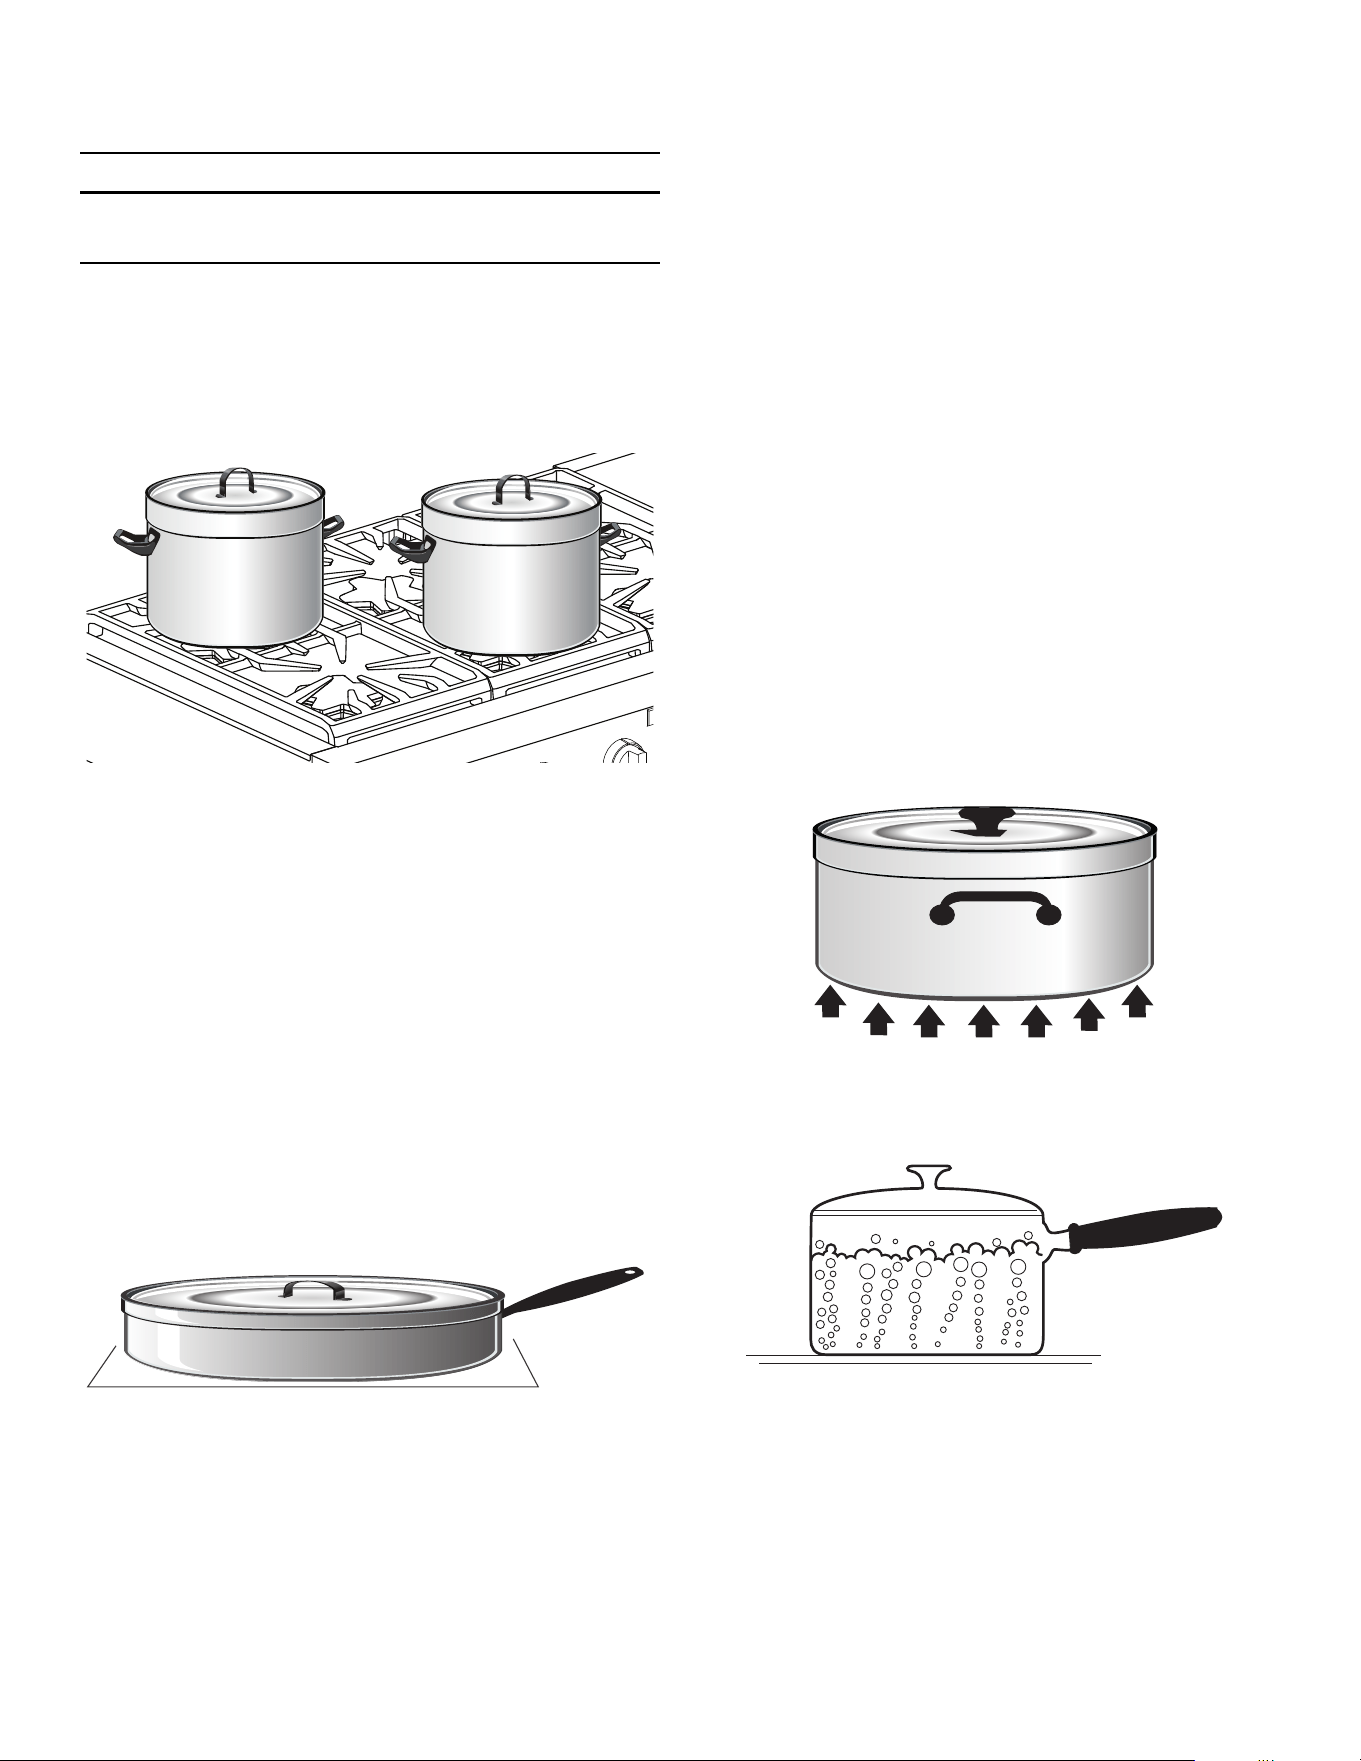
• Placement of large stock pots should be staggered
when used on the rangetop.
• Select the base diameter to match the diameter of the
flame. The diameter of the flame should be the same
size as the pan base or slightly smaller. Oversize or
under size pans sacrifice cooking performance. A 5½''
(140 mm) base size is generally the smallest
recommended.
• Avoid using high flame setting with a pan larger than
the grate or with one that spans more than one
burner, such as a griddle, for prolonged periods of
time. This can result in poor combustion that
generates harmful by-products.
• Balance is important for stability and even cooking.
The handle must not be heavier than the pan and tilt it
unevenly. A pan must sit level on the grate without
rocking or wobbling.
• Food packaged in aluminum foil should not be placed
directly on the burner grate. Aluminum foil can melt
during cooking.
• DO NOT let plastic, paper, or cloth come in contact
with a hot burner grate. They may melt or catch fire.
• Professional quality pans with metal handles are
recommended because plastic handles can melt or
blister if the flame extends up the side of the pan.
• All cookware should have these characteristics: good
heat conductivity, good balance, correctly sized base
diameter, a heavy, flat base, and a proper fitting lid.
• For best cooking results, the flame should be
contained under the bottom of the pan.
• Aluminum and copper are pan materials that conduct
the heat quickly and evenly. These metals are
sometimes attached to the base or in the core
between stainless steel.
• A heavy, flat base is more apt to remain flat when
heated. Pan bases that are warped, dented, ridged or
too lightweight will heat unevenly. Heat and cool pans
gradually to avoid sudden temperature changes which
tend to distort cookware. DO NOT add cold water to
a hot pan.
• A properly fitting lid will shorten cooking time and
make it possible to use lower heat settings.

Page. 22
Specialty cookware
Woks
• Either flat-based or round-bottom woks with the
accessory ring can be used on all models. Round
bottom woks must be used with a support ring.
• The wok pan and the porcelain-coated cast iron wok
support ring must be purchased separately.
Canners and stock pots
• Select one with a base diameter that extends no more
than 2'' (51 mm) beyond the grate.
Standard size water bath canner
• 21 to 22 quarts (19.95 to 20.9 liters), with an 11'' to
12'' base (279 – 305 mm) and a 9'' to 11'' depth
(229 – 279 mm).
Standard size pressure canner
• 8 to 22 quarts (7.6 to 20.9 liters), with an 8'' to 11''
base (203 – 279 mm) and a 6½'' to 12'' depth
(165 – 305 mm).
Canning tips
• A flat base pan is preferred to one with a concave,
convex or rippled base.
• When using two canners at the same time, use
staggered burners. DO NOT block air to the burners.
A flame needs the right amount of air for complete
combustion.
• Use a cover on the canner when bringing the contents
to a boil.
• Once the contents have reached a boil on HI, use the
lowest flame possible to maintain the boil or pressure.
• Canning produces a large amount of steam. Take
precautions to prevent burns.
Suggestions for using the surface burner
cooking recommendations
• Use the chart beginning on page 23 as a guide. The
settings you use will vary depending on the pans
selected and the starting temperature of the food.
• On the chart, the “Finish setting” has been separated
for the standard and ExtraLow
®
burners. There may or
may not be a change between the two burner
settings.
• The ExtraLow setting can be either a cooking or a
holding setting.
• Raise or lower the flame setting gradually. Allow time
for the pan and the food to adjust to the new setting.

Page. 23
Surface burner cooking recommendations
Food Start setting
Finish setting
standard burners
Finish setting XLO
®
burners
Beverages
Cocoa
MED – heat milk, cover LO – finish heating XLO – keep warm, cover
Breads
French toast, pancakes,
grilled sandwiches
MED – preheat skillet LO to MED – cook Same as for standard burners
Butter
Melting
LO – to start melting Allow 5 – 10 minutes to melt
Cereals
Cornmeal, grits,
oatmeal
HI – cover, bring water to a
boil, add cereal
LO to MED – finish
cooking according to
package directions
Same as for standard burners
XLO – to hold, cover
Chocolate
Melting
XLO – may be stirred to
hasten melting
XLO – allow 10 – 15 minutes to
melt
XLO – to hold
Desserts
Candy
LO to MED – cook following
recipe
LO to MED Same as for standard burners
Pudding and pie filling
mix
LO to MED LO
– cook
according to package
directions
LO Same as for standard burners
Pudding LO to MED LO – bring milk
to a boil
LO Same as for standard Burners
Eggs
Cooked in shell
MED HI – cover eggs with
water, add lid, bring to boil
Fried, scrambled LO to MED – melt butter,
add eggs
LO finish cooking Same as for standard burners
XLO – to hold for a short
period
Poached HI – bring water to the
boiling point, add eggs
LO to MED – finish heating Same as for standard burners
Meat, fish, poultry
bacon, sausage patties
MED HI – until meat starts
to sizzle
LO to MED – finish
cooking
Same as for standard burners
Braising: Swiss steak,
pot roast, stew meat
MED HI – melt fat, then
brown on MED HI, add
liquid, cover
XLO – Simmer until tender
Quick frying: Breakfast
steaks
MED HI – preheat skillet MED HI – fry quickly Same as for standard burners
Frying: Chicken MED HI – heat oil, then
brown on MED
LO – cover, finish cooking Same as for standard burners
Deep frying: Shrimp MED HI – heat oil MED to MED HI – to
maintain temperature
Same as for standard burners
Pan frying: Lamb chops,
thin steaks,
hamburgers, link
sausage
MED HI – preheat skillet MED – brown meat Same as for standard burners
XLO – to hold
Poaching: Chicken,
whole or pieces, fish
MED HI – Cover, bring
liquids to a boil
To finish cooking
Page. 24
Simmering: Stewed
chicken, corned beef,
tongue, etc.
HI – cover, bring liquid to a
boil
XLO – to simmer slowly
XLO – to hold, cover
Pastas
Macaroni, noodles,
spaghetti
HI – bring water to a boil,
add pasta
MED HI to HI – to maintain
a rolling boil
Same as for standard burners
Popcorn (use a heavy, flat
bottom pan)
HI – cover, heat until kernels
start to pop
MED HI – finish popping Same as for standard burners
Pressure cooker
Meat
MED HI to HI – build up
pressure
LO to MED – maintain
pressure
Same as for standard burners
Vegetables HI – build up pressure LO to MED – maintain
pressure
Same as for standard burners
Rice HI – cover, bring water and
rice to a boil
LO – to maintain Low Boil.
Cover and cook until water
is absorbed
Same as for standard burners
XLO – to hold, cover
Sauces
Tomato base
MED HI – cook meat/
vegetables, follow recipe
LO – to maintain simmer XLO – simmer to thicken sauce,
uncovered
White cream, béarnaise MED – melt fat, follow
recipe
LO – finish cooking XLO – to hold, cover
Hollandaise XLO XLO – to hold, lowest setting
for short period, stir frequently
Soups, stock HI – cover, bring liquid to a
boil
LO to maintain simmer Simmer XLO – to hold, cover
Vegetables
Fresh
HI – cover, bring water and
vegetables to a boil
LO to MED – cook 10
minutes, or until tender
Same as for standard burners
XLO – to hold, cover
Frozen HI – cover, bring water and
vegetables to a boil
LO to MED – cook
according to package
directions
Same as for standard burners
Deep frying HI – heat oil MED to MED HI – maintain
frying temperature
Same as for standard burners
In pouch HI – bring water and pouch
to a boil
LO to MED – cook
according to package
directions
Same as for standard burners
Sauté HI – heat oil or melt butter,
add vegetables
LO to MED – cook to
desired doneness
Same as for standard burners
Stir fry HI – heat oil, add
vegetables
HI to MED HI – finish
cooking
Same as for standard burners
Food Start setting
Finish setting
standard burners
Finish setting XLO
®
burners
Page. 25
Electric griddle
Description
9 CAUTION
The griddle element is hot after use. Allow sufficient
time for griddle components to cool before cleaning.
9 WARNING
To avoid risk of injury, never operate the griddle
without the griddle plate installed. Never use the
griddle in a manner that is not prescribed by the Use
and Care Guide.
NOTE: Not available on all models.
Griddle widths vary.
A maple chopping block and stainless steel cover are
available as accessories and are purchased separately. The
maple chopping block and stainless steel cover must be
removed before turning the griddle on.
The griddle plate must always be in place when the
griddle is turned on.
The griddle is electronically controlled with temperatures
marked on the knob from 150° – 500°F (66° – 260°C).
There are no fixed settings on the knob.
The 24'' griddle models have two heating elements that
can be regulated separately; one element for the left side
of the griddle and another for the right side. This allows
you to cook food with different temperature requirements
at the same time.
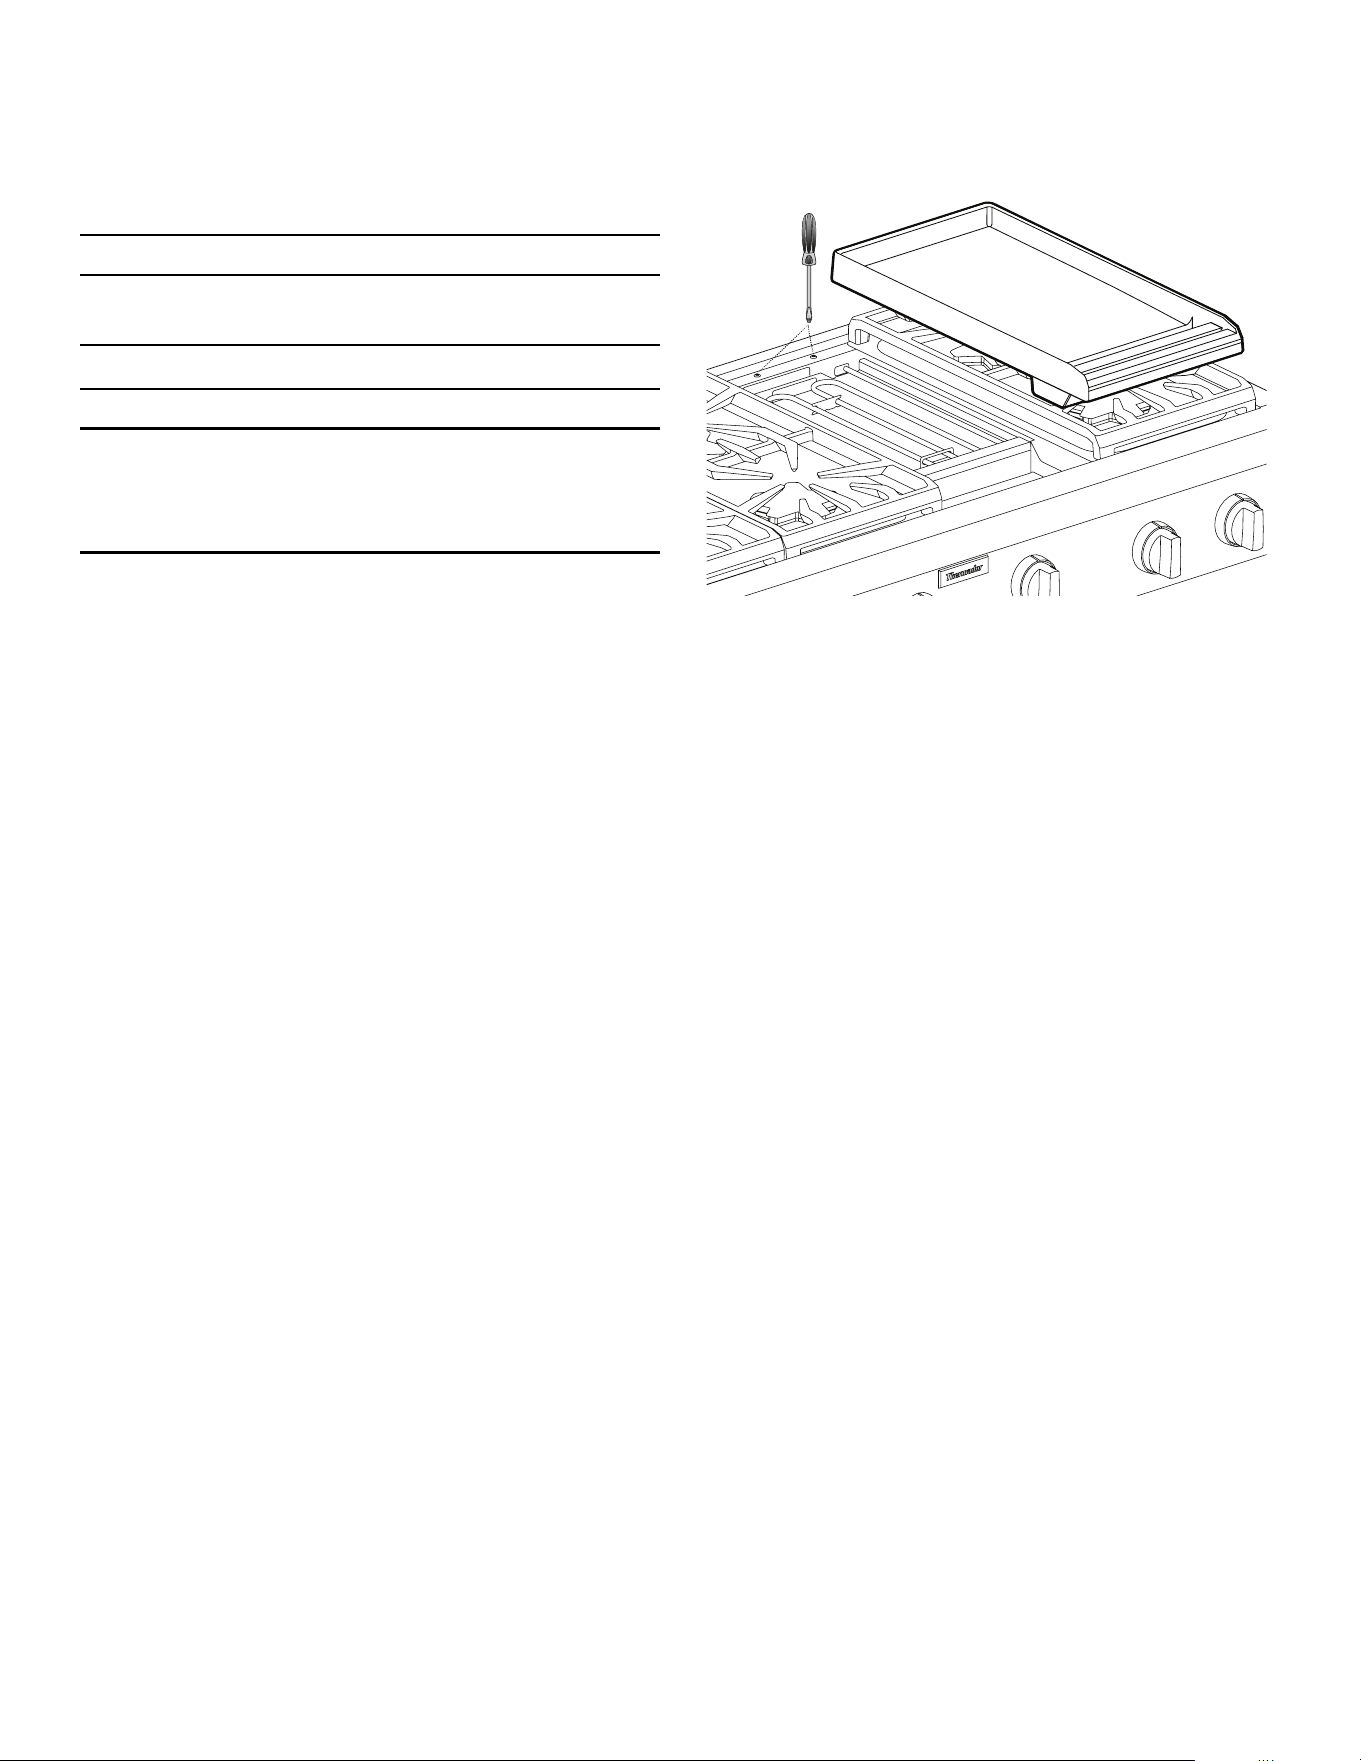
Preparing the griddle
To prepare the griddle
1. The griddle plate should be washed with warm soapy
water then rinsed with clear water prior to use.
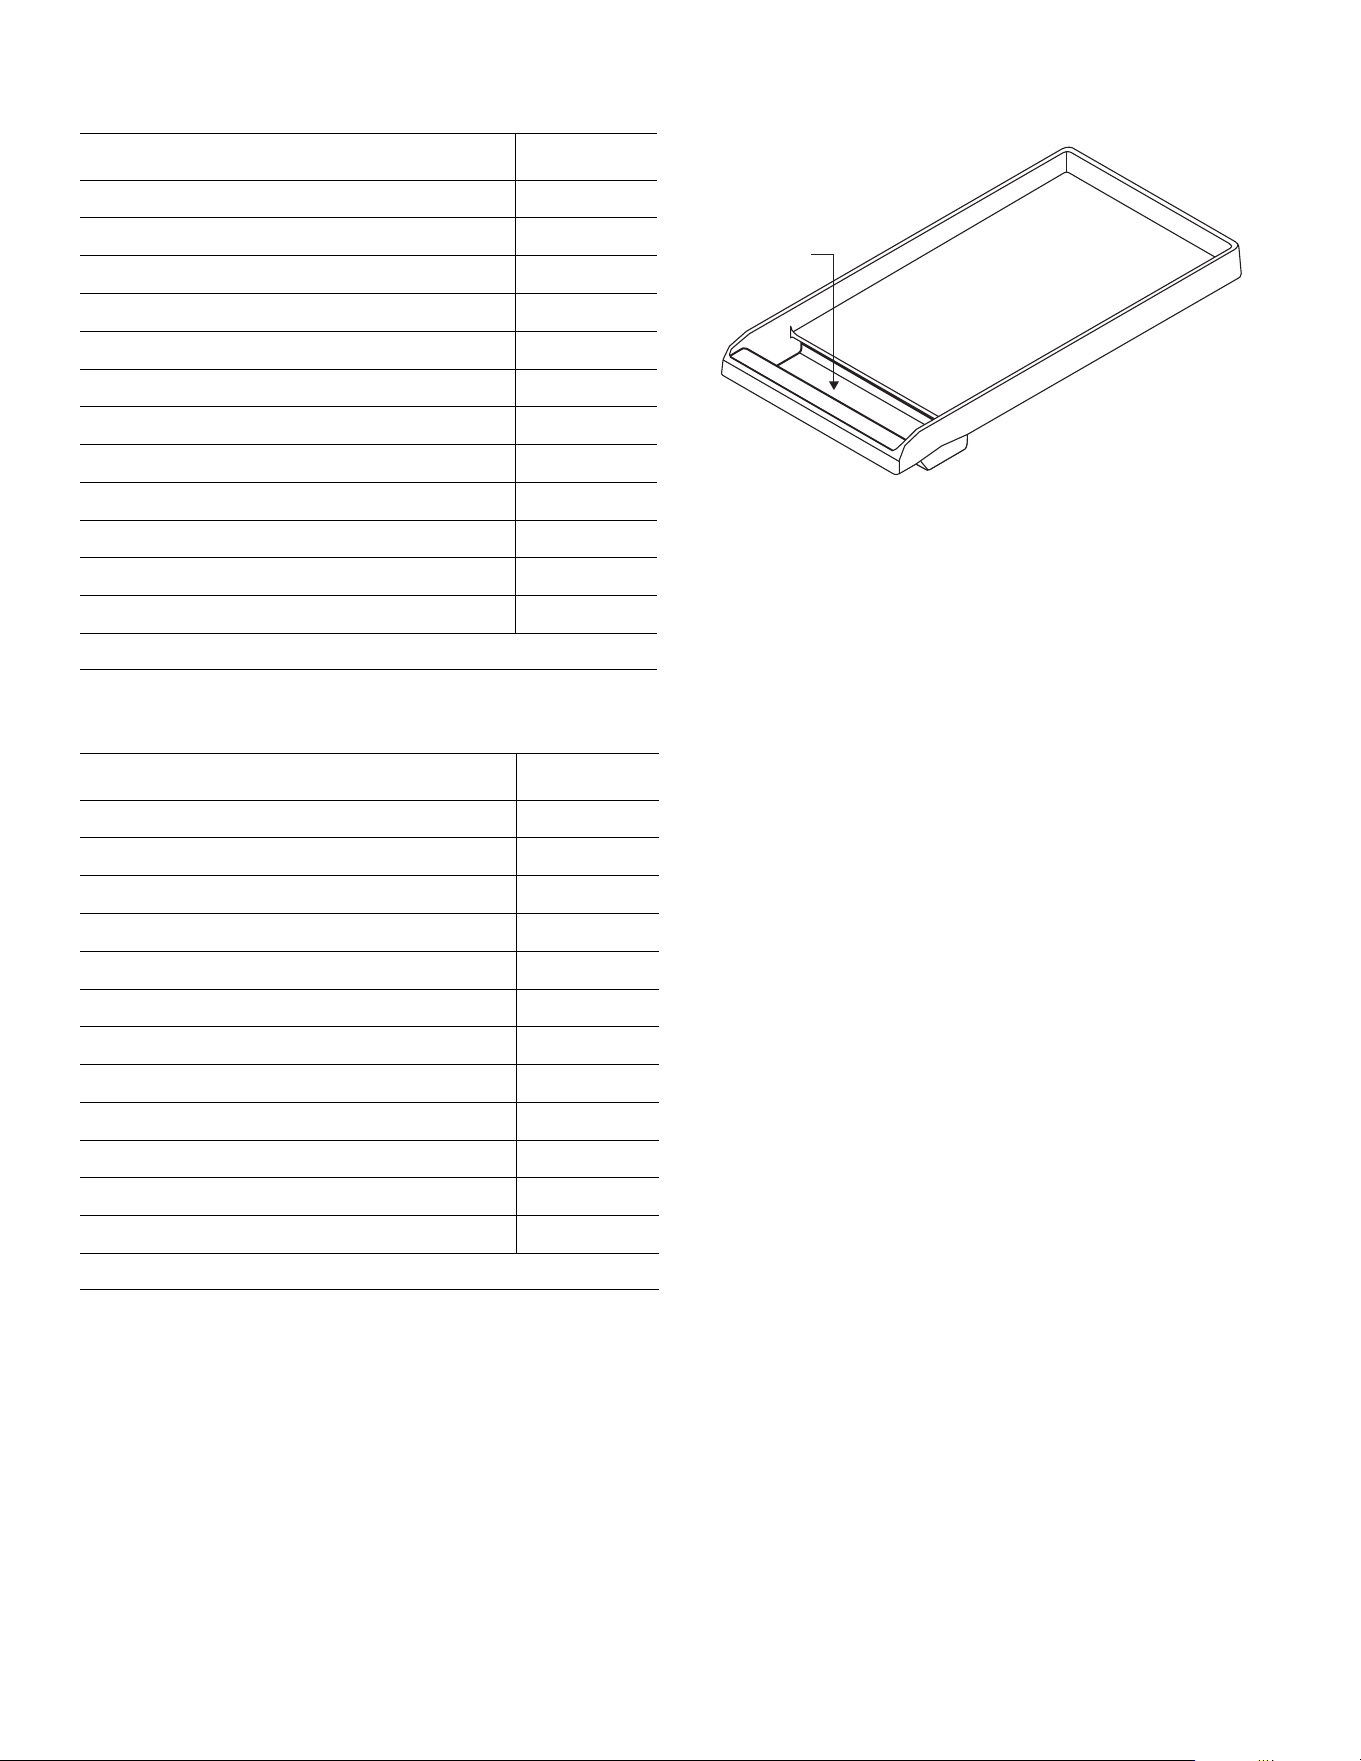
2. Check the griddle plate adjustment by pouring two
tablespoons of water on the back of the griddle plate.
-- The water should slowly roll into the grease tray.
3. If water does not flow to the front of the griddle,
move the griddle plate to the side.
4. Adjust the two screws under the back of the plate.
Start with one half turn counterclockwise of the screws
(below).
5. Further adjustment should be made by one-quarter
turn until water slowly flows into the grease tray.
The griddle may be used without any butter, margarine or
oil. However, a very small amount may be used to flavor
foods.
DO NOT use metal utensils on the griddle surface. Care
should be taken that the surface is not gouged when
utensils are used. DO NOT cut directly on the griddle
plate.
NOTICE: Performance may vary if there is an excessive
amount of airflow in the vicinity of the appliance. The
excessive airflow could be from an air-conditioning
register or ceiling fan blowing at the rangetop. This could
create longer than normal heat-up time, or it could cause
the temperature to be higher or lower than the knob
setting.
NOTE: Having a properly installed ventilation hood is not
considered a source of excessive airflow.
Cooking on the griddle
To cook on the griddle
1. Press and turn the knob clockwise to the appropriate
cooking temperature to preheat the griddle.
2. Preheat the griddle.
3. Add butter, margarine, oil or shortening if desired.
Use the lowest cooking temperature possible. Recipes
may need to be modified as the non-stick coating browns
and sears at lower temperatures.
Page. 26
12'' griddle cooking recommendations
24'' griddle cooking recommendations
Griddle grease tray
• Clean the tray after every use. When removing the
tray, use care when tipping it so that the contents do
not spill.
• The grease tray is dishwasher safe.
• After cooling, pour the grease into a grease-resistant
container for disposal.
Care and cleaning the griddle plate
• NEVER flood a hot griddle plate with cold water. This
can damage the griddle plate.
• DO NOT clean the griddle plate in a self-cleaning
oven.
• DO NOT heat cookware on the griddle surface.
• Care should be taken to avoid scratching or gouging
the surface.
• DO NOT cut food directly on the griddle plate.
• DO NOT use metal utensils.
• Use plastic or wood utensils to avoid scratching
the non-stick surface.
• The griddle plate is dishwasher safe, however, hand
washing the griddle plate is recommended.
Food * Setting
Eggs 325° – 350°F
Bacon, breakfast sausage 450° – 475°F
Toasted sandwiches 375° – 400°F
Boneless chicken breasts 425° – 450°F
Boneless pork chops, 1'' (25.4 mm) 425° – 450°F
Steaks, 1'' (25.4 mm) thick 450° – 475°F
Ground beef patties, 6 oz. 450° – 475°F
Ground turkey patties, 6 oz. 450° – 475°F
Hot dogs 350° – 375°F
Ham slices, ½'' (12.7 mm) thick 350° – 375°F
Pancakes, French toast 400° – 425°F
Potatoes, hashbrowns 400° – 425°F
* Level foods to a uniform thickness to ensure even cooking.
Food * Setting
Eggs 275° – 300°F
Bacon, breakfast sausage 400° – 450°F
Toasted sandwiches 350° – 375°F
Boneless chicken breasts 400° – 425°F
Boneless pork chops, 1'' (25.4 mm) 400° – 425°F
Steaks, 1'' (25.4 mm) 425° – 450°F
Ground beef patties, 6 oz. 400° – 425°F
Ground turkey patties, 6 oz. 400° – 425°F
Hot dogs 300° – 350°F
Ham slices, ½'' (12.7 mm) thick 350° – 375°F
Pancakes, French toast 350° – 375°F
Potatoes, hashbrowns 400° – 425°F
* Level foods to a uniform thickness to ensure even cooking.
Page. 27
Seasoning the griddle plate
If the griddle plate seems to lose its non-stick abilities over
time, the following instructions should help regain the
griddle’s non-stick properties. For optimal performance
and long life of your griddle plate, follow these simple
cleaning and seasoning instructions.
NOTE: 24'' griddles will not fit in the oven cavity for
seasoning. Therefore, care should be taken not to
overheat and damage their non-stick coatings while
preheating and cooking.
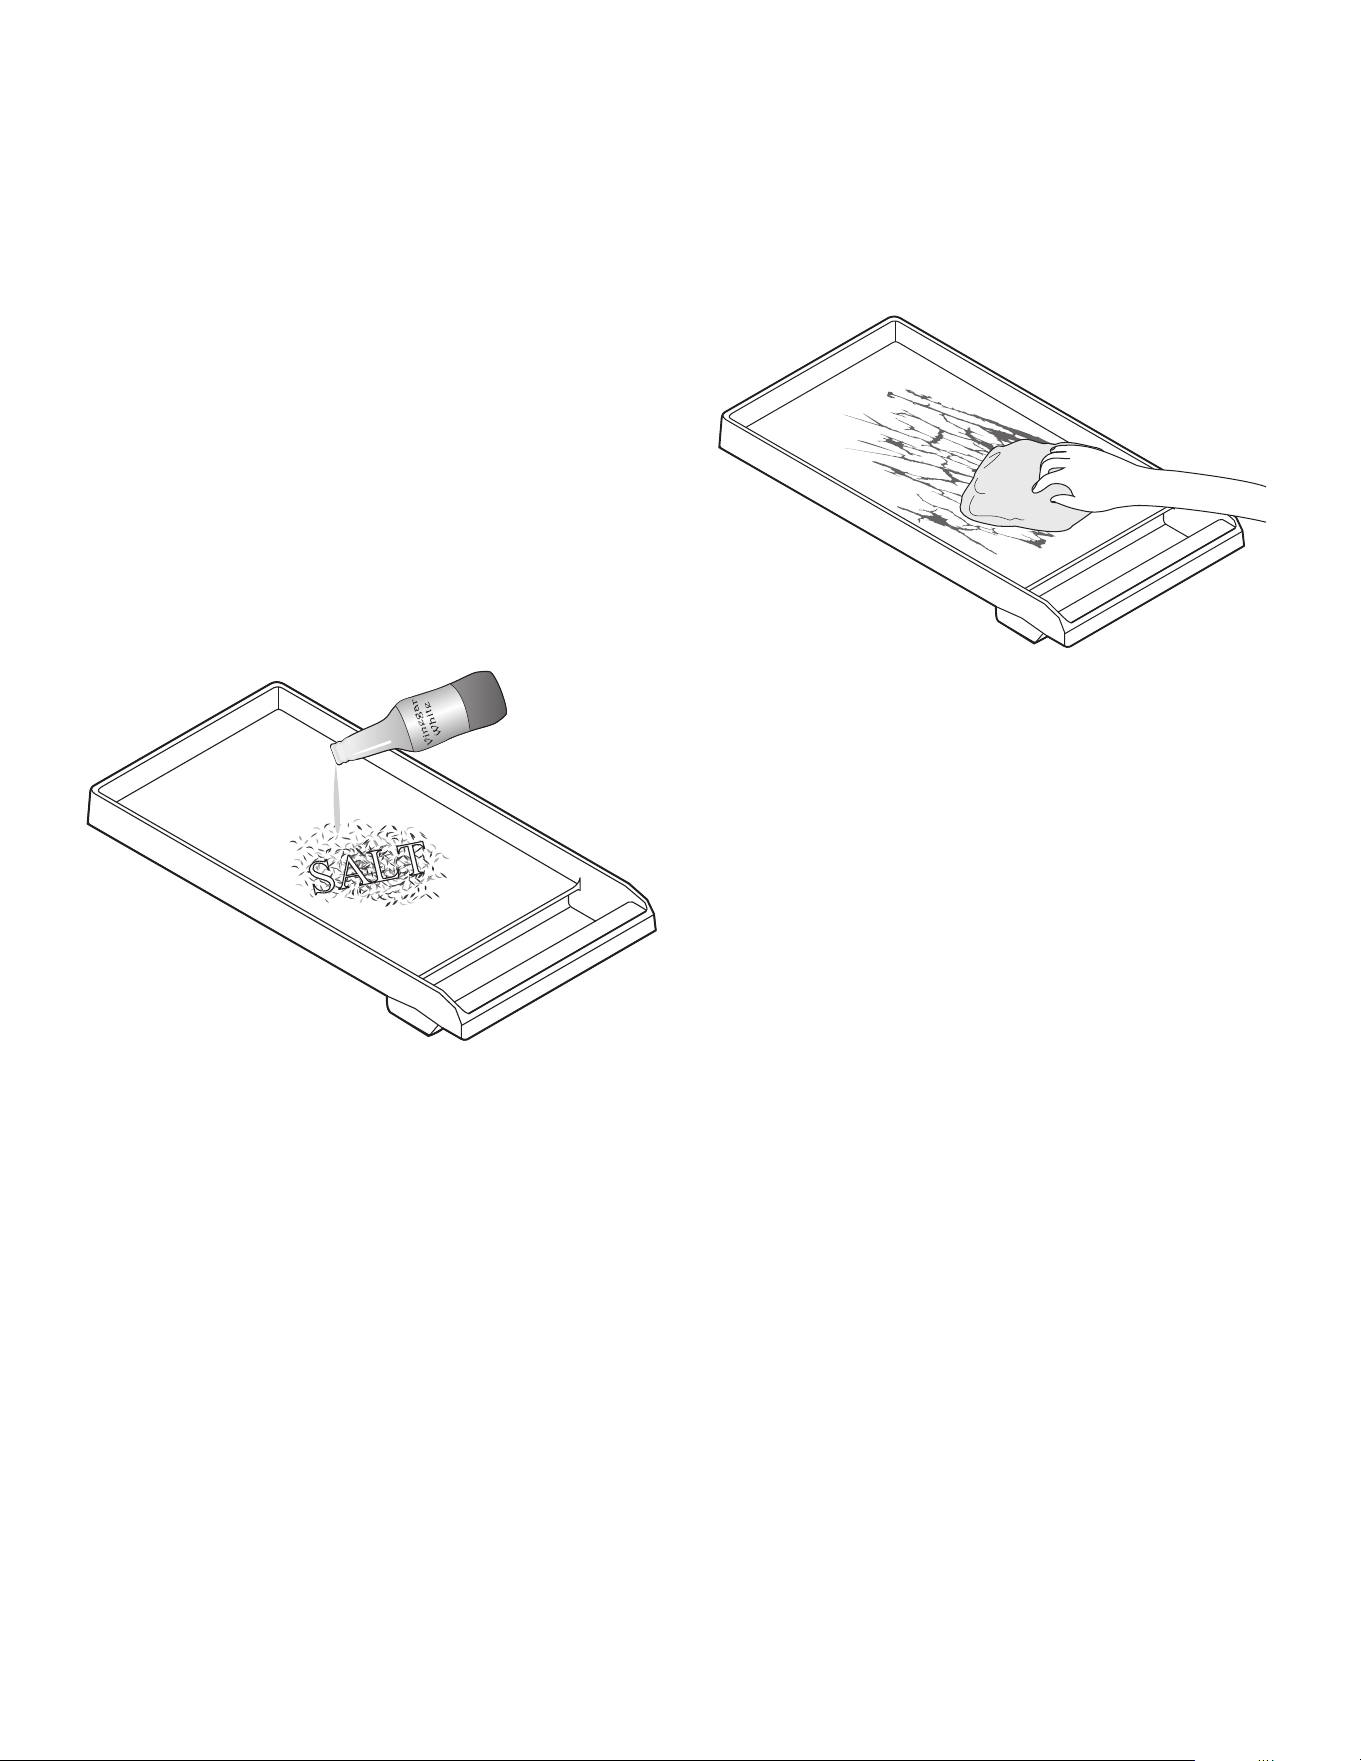
To prepare the griddle for seasoning
The griddle plate must be clean and all residue removed
before the griddle plate is seasoned.
1. Use a mixture of coarse salt and a small amount of
white vinegar to buff off any residue from the griddle
plate.
2. Rinse well with clean water.
3. Dry the griddle plate thoroughly.
To season the griddle
Seasoning is a process by which a layer of animal fat or
vegetable oil is applied and baked into the cookware. The
seasoning layer provides a non-stick surface for cooking.
1. Use a paper towel to apply a thin, even coating of
lard, shortening, or olive oil to the griddle surface.
2. Bake the griddle plate in a 350°F oven for 1 hour.
3. Remove the griddle plate from the oven and allow to
cool to room temperature.
4. Apply a second layer of fat or oil and bake at 350°F for
1 hour.
5. Repeat process at least one additional time – making
3 coats of oil or fat.
After seasoning
1. After cooking on your seasoned griddle, allow to cool
and wipe clean with a damp cloth. Allow to dry.
2. Add a thin coating of oil or fat before storing your
griddle in a cool, dry place.
3. Repeating this process will season the griddle and
maintain non-stick properties. Performance will
improve over time with more seasoning.
4. To strip the griddle to re-season, a mixture of salt and
vinegar should be used to remove any oil layers from
the previous seasoning process.
Page. 28
Electric grill
Description
9 WARNING
• To avoid risk of injury, NEVER operate grill without
the grates or griddle plate accessory installed.
• NEVER leave grill unattended while cooking.
• Observe caution with oils and fats. Overheated
oils and fats can easily cause fires.
• DO NOT use wood chips, lava rocks, or charcoal
briquettes. Only use recommended ceramic
briquettes (PABRICKBKN).
• DO NOT use dishes, pans, pots, or other
cookware on the grill.
• NEVER use aluminum foil to cover the grates or to
line the grill. It can damage the grill and cause a
fire hazard if heat is trapped under it.
• Check drip tray before each use. Too much grease
in the tray may cause a fire hazard.
• If flames appear, grease should be cleaned from
grates, drip tray, briquette basket and other
surfaces.
• Grease build up encourages flame and smoke
development while cooking.
• Ceramic briquettes must be replaced when they
begin to turn black. This means that they are
saturated with fat and may smoke heavily during
operation or the fat may catch fire.
NOTE: Not available on all models.
The built-in grill is made of restaurant-quality cast iron
grates. This produces a surface with even heat that is easy
to clean.
A non-stick cast iron griddle plate is available as an
accessory and may be purchased separately. See the
instructions that come with the griddle plate accessory for
more details.
Assembling the grill
To assemble the grill
1. Rotate heating elements (5) up and remove the
briquette basket (3) stored inside the grill housing (1).
2. Place the drip tray (2) in the bottom of the grill
housing (1). (Drip tray is packaged in the large
cardboard box that was on top of the appliance.)
Align the embosses of the drip tray (2) with the
depressions on the bottom of the grill housing (1).
3. Place the briquette basket (3) in the grill housing (1).
4. Arrange the ceramic briquettes (4) on the briquette
basket (3), in a single layer. The ceramic briquettes
should not contact the heating elements.
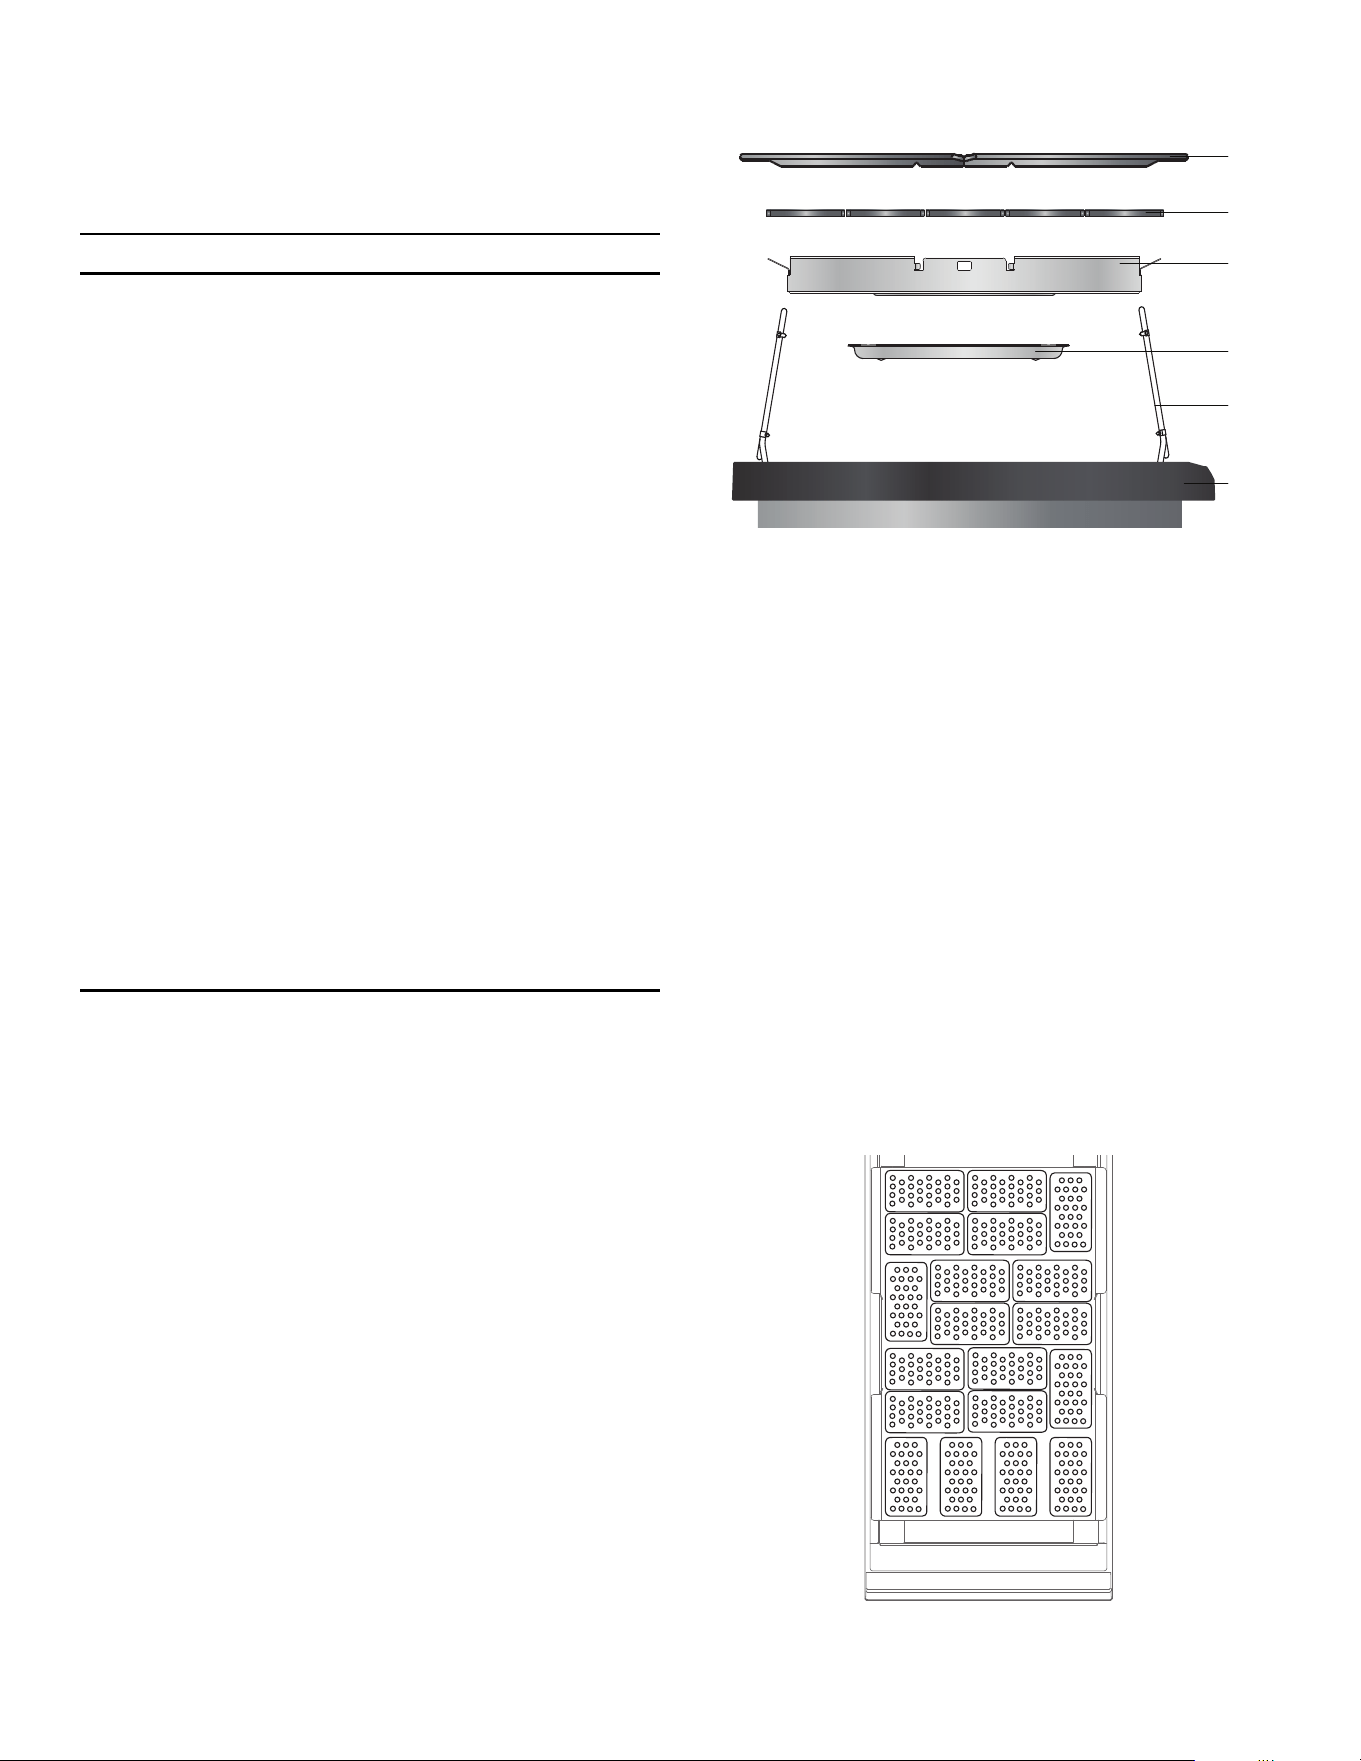
1 Grill housing
2 Drip tray
3 Briquette basket
4 Ceramic briquettes
5 Heating element (x2)
6 Grill grate (x2)
2
5
3
1
4
6

Page. 29
5. Fold both grill heating elements (5) down. The grill
heating elements must lie flat. Supports should rest
inside of side notches.
6. Install the grill grates (6). Ensure grates are seated
level inside the grill housing (1).
Operating the grill
9 WARNING
TO AVOID RISK OF BURNS:
• Use proper utensils with long handles that allow
the chef plenty of clearance from the heat and
potential flare ups.
• DO NOT wear loose clothing while cooking.
• Never leave grill unattended while cooking.
• After each use, remove grease buildup from the
grill surfaces and the trays below the grill to avoid
risk of fire. Ventilation hoods should also be
cleaned periodically as needed and as
recommended by the Use and Care Guide as well
as surrounding surfaces.
• Keep a fire extinguisher nearby and accessible.
9 CAUTION
Clean the grill after each use. Allow the appliance to
cool before cleaning.
IMPORTANT:
• If flames appear while grilling, turn off heat and
remove the food. Use caution to avoid any potential
injury while removing food.
• Often, such flames will extinguish themselves within a
few minutes once grease drippings have burned up.
DO NOT leave the grill unattended until all flames are
extinguished. If desired, flames can be extinguished
by generously shaking baking soda or salt over them
to smother the fire.
• If flames appear, ceramic briquettes should be
replaced and grease should be cleaned from grates,
grease tray, briquette basket, and other surfaces
before using the grill again. Built up grease which is
allowed to remain encourages flame and smoke
development while cooking.
• Moist food should be dried, before placing on grill.
• Marinated food may cause more smoke to be
produced!
• During grilling, dripping fat may flare up briefly.
To operate the grill
1. Start overhead ventilation system 10 minutes prior to
grilling to begin air movement.
2. The grill grates should be washed with warm soapy
water then rinsed with clear water prior to use.
3. Before turning on, make sure that there are ceramic
briquettes in the appliance and both grill grates are
correctly fitted.
4. Press and turn the knob to the desired temperature
setting.
• The two grill heating elements can be regulated
separately. This allows you to grill food with
different temperature requirements at the same
time, or you can use one area to grill and the
other to keep warm.
5. During the initial use, heat the grill for about 10
minutes to eliminate manufacturing residues and
smells.
6. For best results, allow the grill grates to preheat
before placing food on them.
Grilling tips
• The grill should be preheated a minimum of 10
minutes before cooking. Depending on browning
preference and the types of food being prepared, as
much as 15 minutes of preheat time may be required.
• Soak wooden skewers in water a minimum 20 minutes
before placing on the grill.
• Prior to grilling, you can coat the food with heat-
resistant oil (e.g. peanut oil) or marinate it. Make sure
not to use too much oil/marinade, as otherwise it may
catch fire and generate thick smoke.
• Lay the food directly on the grill grates. DO NOT use
aluminum foil or grill trays.
• Cured meat, such as ham or smoked pork chops, is
not suitable for grilling. Unhealthy chemical
compounds may form.
• To prevent flare-ups, remove excess fat from foods
prior to grilling.
• DO NOT use cleaners on the heating elements. Allow
grease to burn off the heating elements.
• To soak up fat on the grill plate, sprinkle coarse salt
onto the grilling surface after use.
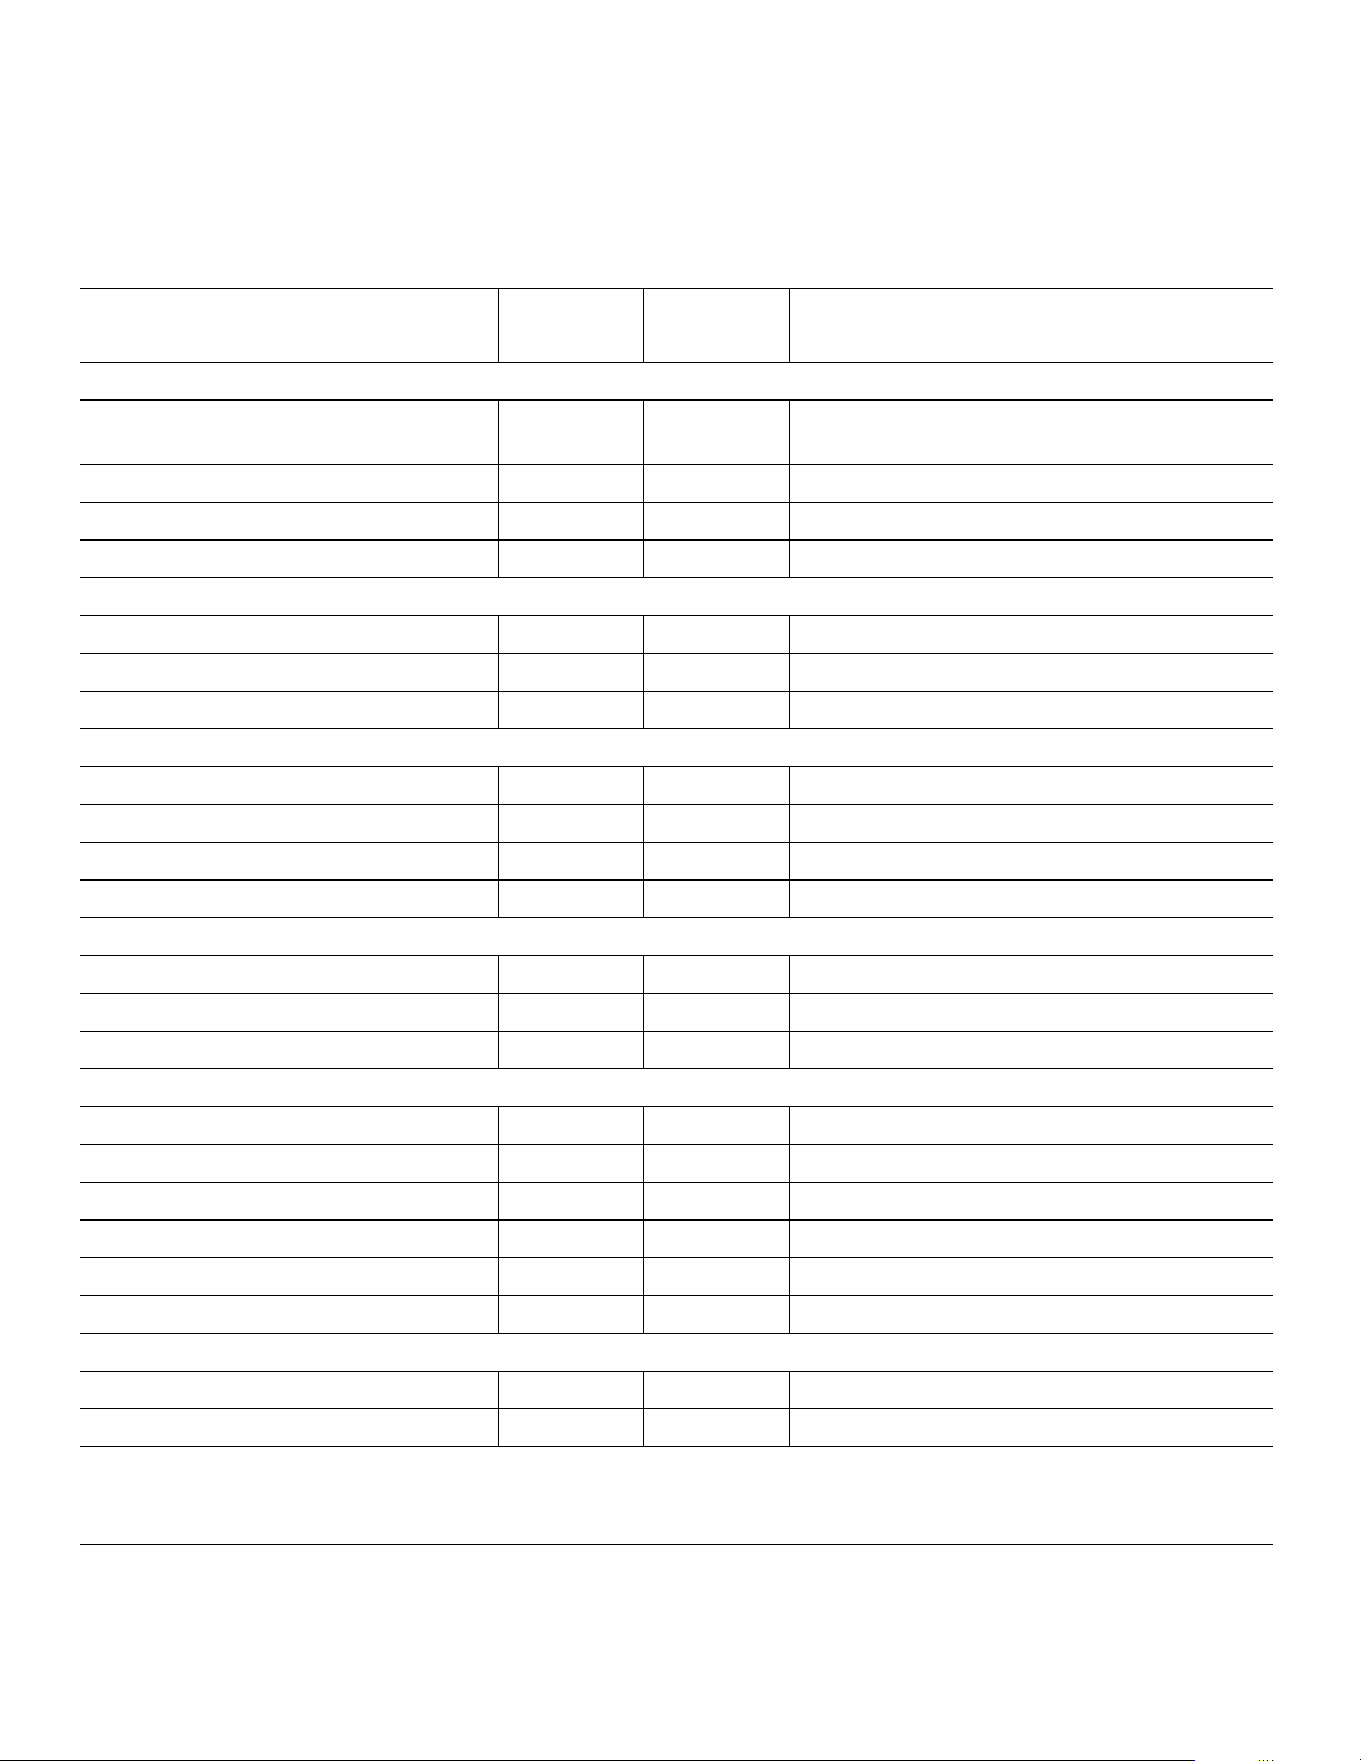
Page. 30
Grill cooking recommendations
IMPORTANT:
• GRILL SHOULD NOT BE OPERATED WITHOUT PROPER VENTILATION.
• Foods with excessive fat or grease should not be prepared on an indoor grill. Grilling foods with high fat content
(certain types of ground beef, sausage, etc) increases the chances of smoke and flames.
Food* Setting**
Cook time
(minutes)
Notes
Beef
Hamburgers, ¾'' (2 cm) (medium) High 12 – 14 Ready to turn once juices appear on the
surface.
T-Bone steak, 1½'' (4 cm) (medium) High 20 – 22 Remove excess fat.
Ribeye or sirloin, 1'' (3 cm) (medium) High 10 – 12 Remove excess fat.
Kebabs, steak (medium) High 24 – 28 Turn occasionally.
Pork
Pork chops, ¾'' (2 cm) High 16 – 20 Remove excess fat.
Sausages or bratwurst Med high 16 – 20 Pierce before grilling.
Hot dogs High 6 – 8 Place on grill horizontally.
Poultry
Legs and thighs Med high 34 – 38 Turn occasionally, remove excess skin.
Chicken wings, whole Med high 18 – 22 Turn occasionally.
Chicken breasts, ½'' (1 cm), boneless Med high 20 – 24 Pound to an even thickness before cooking.
Kebabs, chicken High 30 – 33 Turn occasionally.
Seafood
Fish steak, 2'' (6 cm) Med high 18 – 20 Brush with oil before grilling.
Fish fillet, ¾'' (2 cm) Med high 16 – 20 Brush with oil before grilling.
Shrimp skewers Med high 10 – 14 Turn occasionally.
Produce
Portobello mushrooms High 8 – 10 Brush with oil.
Bell peppers, quartered High 8 – 10 Turn occasionally.
Eggplant, sliced, ½'' (1 cm) High 8 – 10 Brush lightly with oil.
Tomatoes, halves High 8 – 10 Brush with oil.
Pineapple, sliced High 4 – 6 —
Peaches, halves High 4 – 6 —
Other
Hamburger or hot dog buns Med high 4 – 6 Brush with butter.
Tofu, extra firm, sliced Med high 8 – 12 Skewer for easier grilling.
* Level foods to a uniform thickness to ensure even cooking.
** The values in the settings table should only be regarded as guidelines, since more or less heat may be required
depending on the type and condition of the food.
Page. 31
Using the oven
Symbols and descriptions
Symbol/mode Definitions and recommendations
Electric
main
Gas
main
Electric
aux.
Gas
aux.
Bake Cooks with dry, heated air. Variety of foods, such as cakes,
cookies, pastries, quick breads, quiche and casseroles.
Conv bake Similar to bake, but air is circulated by a fan at the back of the
oven. Best for baked goods such as cakes, cornbread, pies,
quick breads, tarts, and yeast breads.
True conv Cooks with heat from a third element at the back of the oven.
The heat is circulated throughout the oven by the convection
fan. Well suited for cooking individual serving-sized foods
such as cookies and pastries.
Broil Uses intense heat radiated from the upper element. Use for
tender cuts of meat (1'' or less), poultry, browning bread and
casseroles.
Conv broil Combines intense heat from upper element with fan
circulation. Tender cuts of meat (more than 1''), poultry and
fish. Not for browning.
Proof Proof (raises) yeast dough and sourdough.
Roast Uses more intense heat from upper element, more browning
of exterior. Best suited for meats, poultry, less tender cuts of
meats and roasting vegetables.
Conv roast Uses lower and more intense heat from upper element than
convection bake with air circulated by a fan. Use for tender
cuts of meat and poultry and roasting vegetables. Meats are
more juicy and moist than results with roast mode.
Sabbath/
extend
bake
This cooking mode is for assisting the user for compliance to
Sabbath principles.
Keep warm Maintains a low temperature in order to keep food hot. Best
for baked goods such as cakes, cornbread, pies, quick breads,
tarts, and yeast breads.
Self-clean The oven reaches a high temperature to burn off food soil.
Remote
start*
Allows user to start, pause, and abort oven programs
remotely via the Home Connect
TM
app on a mobile device.
Fast
preheat*
Symbol displayed when fast preheating is activated.
Meat
probe*
Appears when a probe is detected.
Kitchen
timer*
The kitchen timer runs independently of the other appliance
functions.
Oven timer* Shows the amount of time that the oven mode will run before
turning off automatically.
End timer* Used when delaying the start of a timed oven mode. Shows
the time of day that the oven mode will automatically end.
Panel lock* Prevents the oven from being turned on or its settings from
being changed accidentally.
* Not available on 30 inch models.
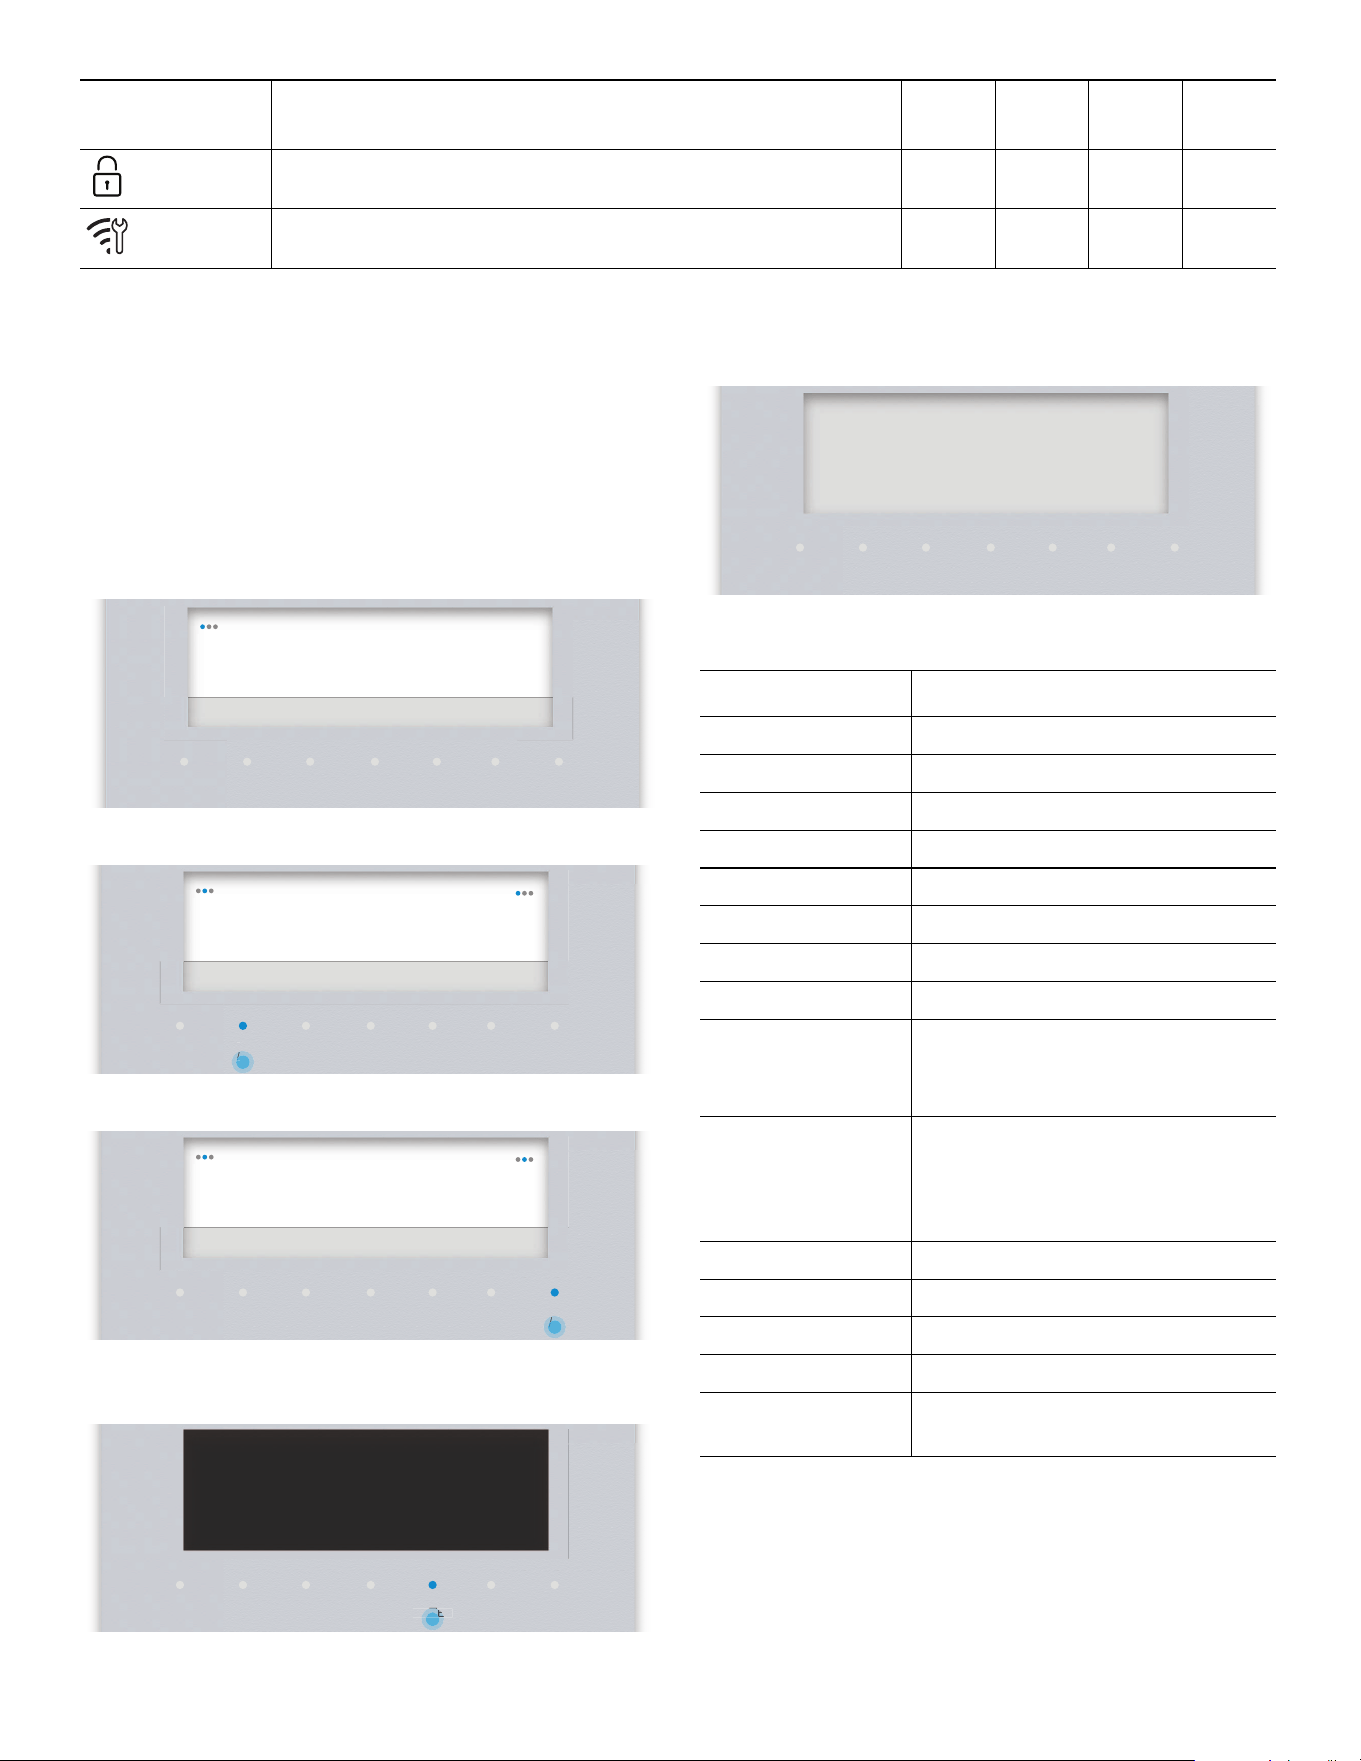
Page. 32
Initial start-up
Start-up settings
The settings may be accessed at any time by pressing
SETTINGS while the appliance is in standby mode. All
oven knobs must be turned to OFF to access the settings.
1. Connect the appliance to the power supply.
2. Select a setting with the left
( or ).
3. Change the setting parameter with the right ( or ).
4. Press ENTER to confirm the selection or SETTINGS to
discard the changes.
– The screen changes to standby mode.
Available settings
Door
locking*
Symbol is displayed during and after the self-clean mode
when the door is locked.
Remote
service*
Symbol is displayed if customer service is connected during
remote access.
* Not available on 30 inch models.
Symbol/mode Definitions and recommendations
Electric
main
Gas
main
Electric
aux.
Gas
aux.
TIMERS SETTINGS ENTER
06:30Time of Day
Press Enter to save
TIMERS SETTINGS ENTER
EnglishLanguage
Press Enter to save
TIMERS SETTINGS ENTER
FrançaisLanguage
Press Enter to save
TIMERS SETTINGS ENTER
finished
fi8d
First start up
NTE
NTE
Setting Option
Time of day Time in hours and minutes
Language English, Français, Español
Clock format 12 hr, 24 hr
Clock display Digital, Analogue
Fast preheat On, Off
Key press sound On, Off
Display brightness 1 – 5
Standby mode On, Off
Convect conversion On, Off
Decreases oven temperature by
25°F (4°C)
Temperature offset • Temp offset: Right oven
-35° to +35°F (-20° to +20°C)
• Temp offset: Left oven
-35° to +35°F (-20° to +20°C)
Sabbath On, Off
Home Connect Set up using the assistant
Factory settings Restore
Service access Connect
Customer service Displays customer service contact
information
TIMERS SETTINGS ENTER
06:30
Page. 33
Home Connect
TM
assistant
About Home Connect
The Home Connect wizard is a part of the initial
installation of the appliance on certain models. If the
Home Connect is not installed during the first start-up of
the appliance it may be accessed in the settings menu.
The Home Connect app must first be successfully installed
on a mobile device. See the section “Setting up Home
Connect™” on page 45 for full instructions on how to
install the Home Connect app.
Setting up Home Connect
You can start the Home Connect assistant to connect to
the Home Connect network and pair your mobile device.
1. Begin from the STANDBY mode and select
SETTINGS.
2. Press the left
( or ) to scroll to HOME CONNECT.
3. Press ENTER.
4. Follow the instructions on the display.
About data protection
When your appliance is connected for the first time to a
WLAN network, which is connected to the Internet, your
appliance transmits the following categories of data to the
Home Connect server (initial registration):
• Unique appliance identification (consisting of
appliance codes as well as the MAC address of the
installed Wi-Fi communication module).
• Security certificate of the Wi-Fi communication
module (to ensure a secure IT connection).
• The current software and hardware version of your
domestic appliance.
• Status of any previous resetting to factory settings.
Setting the oven(s)
Setting the cooking mode and temperature
1. Place rack in desired rack position and shut the door.
2. Turn the MODE knob to BAKE, for example.
3. Turn the TEMPERATURE knob.
– The preheating bar moves to the right as the oven
heats up.
4. Place food inside the oven after the oven has
preheated.
Kitchen timer
About the kitchen timer
• The kitchen timer can be set for up to 24 hours.
• It can be used despite whether the range is in
operation and independently of all other functions.
• The appliance does not switch on and off
automatically.
To set the kitchen timer
1. Press TIMERS.
2. Press the left
( or ) and select KITCHEN TIMER.
3. Press the right ( or ) to set your desired time and press
ENTER.
– A beep sounds when the timer ends. Press ENTER
to terminate the beep and timer.
To change a running timer
1. Press TIMERS.
2. Press the right
( or ) to set your desired time and press
ENTER.
TIMERS SETTINGS ENTER
Bake
06:30
°
— — —
TIMERS SETTINGS ENTER
Bake
06:30
°
350
°
TIMERS SETTINGS ENTER
Bake
06:30
°
350
°

Page. 34
Oven timer
About the oven timer
After the set time has elapsed, the appliance switches off
automatically when the desired cooking time is complete.
To set the oven timer
1. Turn the MODE knob to BAKE, for example.
2. Turn the TEMPERATURE knob to 350°F, for example.
3. Press TIMERS.
4. Press the left
( or ) and select OVEN TIMER.
5. Press the right ( or ) to set your desired time and press
ENTER.
– A beep sounds when the timer ends. Press ENTER
to terminate the beep and timer.
To change a running timer
1. Press TIMERS.
2. Press the right
( or ) to set your desired time and press
ENTER.
End timer
About the end timer
You can delay the cooking time end to a later time.
Example: it is 4:00 PM. The dish requires a cooking time of
40 minutes. You want it to be ready at 5:30. Enter the
cooking time and delay the cooking time end until 5:30.
The appliance starts automatically at 4:50 and switches off
at 5:30.
Bear in mind that food which spoils easily should not be
left in the oven for too long.
To set the end timer
1. Set the desired cooking mode and oven temperature.
2. Press TIMERS.
3. Press the left
( or ) and select OVEN TIMER.
4. Press the right ( or ) to set the oven time.
5. Press the left
( or ) and select END TIME.
6. Press the right ( or ) to set the end time and press
ENTER.
– After confirming the end time the waiting time
notification appears. After the waiting period the
oven starts heating.
Fast preheat
About fast preheat
• With fast preheat, you can shorten the preheat time
required for some heating modes. Fast preheat is
generally recommended for frozen convenience
foods, casseroles, or other foods that require longer
baking times. This mode is not recommended for
baked goods.
• The unit will continue to run the fast preheat
indefinitely until the user manually changes it, or until
the unit loses power, in which case fast preheat will
need to be reset.
• Fast preheat will also be activated for the secondary
oven on 48'' models.
• Fast preheat is available for the bake, convection
bake, roast, and convection roast modes.
• To achieve an even cooking result, do not place your
food into the oven until fast preheating is complete.
To set the fast preheat
1. Begin from the STANDBY mode and select
SETTINGS.
2. Press the left
( or ) to scroll to FAST PREHEAT.
3. Press the right ( or ) and select ON and then press
ENTER.
Panel lock
About the panel lock
• The panel lock is a child safety mechanism to prevent
children from accidentally turning on the oven or
changing an oven setting.
• Panel lock can only be activated in standby.
To set the panel lock
1. Press and hold TIMERS for four seconds.
– The panel lock symbol F and PANEL LOCKED
will appear in the display.
2. To deactivate the panel lock, press and hold the
TIMERS button for four seconds.
– The F icon in the display will disappear.

Page. 35
Convection conversion
About the convection conversion
• To convert most baked items for use with convection
bake and true convection (cookies, cakes, pies, etc.),
the oven temperature often needs to be decreased by
25°F. The convection conversion setting reduces the
temperature you enter for you automatically.
• The unit will continue to run the convection
conversion value indefinitely until the user manually
changes it, or until the unit loses power, in which case
convection conversion will need to be reset.
• Convection conversion is available for the convection
bake and true convection modes only.
• For meats and poultry, the temperature should not be
reduced. The same temperature recommended in
recipes and cooking charts for meats and poultry
should be used.
To set the convection conversion
1. Begin from the STANDBY mode and select
SETTINGS.
2. Press the left
( or ) to scroll to CONVECT
CONVERSION.
3. Press the right
( or ) and select ON.
4. Press ENTER.
5. Turn the mode knob to CONV BAKE and the
TEMPERATURE knob to the recipe temperature.
– The oven automatically reduces the input
temperature by 25°F (10 °C) to the correct
temperature.
6. Allow oven to preheat and place food inside.
Fine tuning the oven
About offset
The offset feature allows the cook to further fine-tune
their cooking parameters to their own personal optimal
settings by allowing them to adjust the temperature offset
of the oven by +/-35°F in increments of 5°F. This feature is
useful if you find that food is consistently either too brown
or too light for your tastes.
• The offset feature is available for all modes except
self-clean.
• By default, the temperature is set at 0°.
• The unit will continue to run the input offset value
indefinitely until the user manually changes it, or until
the unit loses power, in which case offset will need to
be reset.
To set offset
1. Begin from the STANDBY mode and select
SETTINGS.
2. Press the left
( or ) to scroll TEMP OFFSET: RIGHT/
LEFT OVEN.
3. Press the right
( or ) to set the temperature.
4. Press ENTER.
Meat probe
About the meat probe
The probe allows you more control over how your foods
are cooked by automatically disabling the specified
cooking mode when a dish's desired temperature, defined
by the cook, has been reached. The probe expresses the
current temperature of the meat as it cooks.
The following are the heating modes that work with the
temperature probe:
•Bake
• Convection bake
•Roast
• Convection roast
The temperature probe will not work with the oven timer
or with the end timer.
IMPORTANT:
• To avoid damaging your probe, DO NOT pull on the
cable when trying to remove it from a dish.
• DO NOT use tongs or other instruments to pry on the
probe when removing it or to ‘hammer’ the probe into
a food dish.
• To prevent possible burns, wait until the oven has
cooled before trying to remove the probe from the
outlet.
• DO NOT store the probe inside the oven.
For best results
• To avoid damaging the probe, ensure that the meat is
fully defrosted before inserting the probe.
• Insert the probe until its tip is rested in the center of
the thickest, meatiest portion of the meat. Ensure that
the probe does not touch bone, fat, or gristle.
• For poultry, the meat probe should be inserted into
the interior thigh muscle.
• The probe should not touch any part of the cooking
dish or parts of the oven, as this will affect the
accuracy of the results.
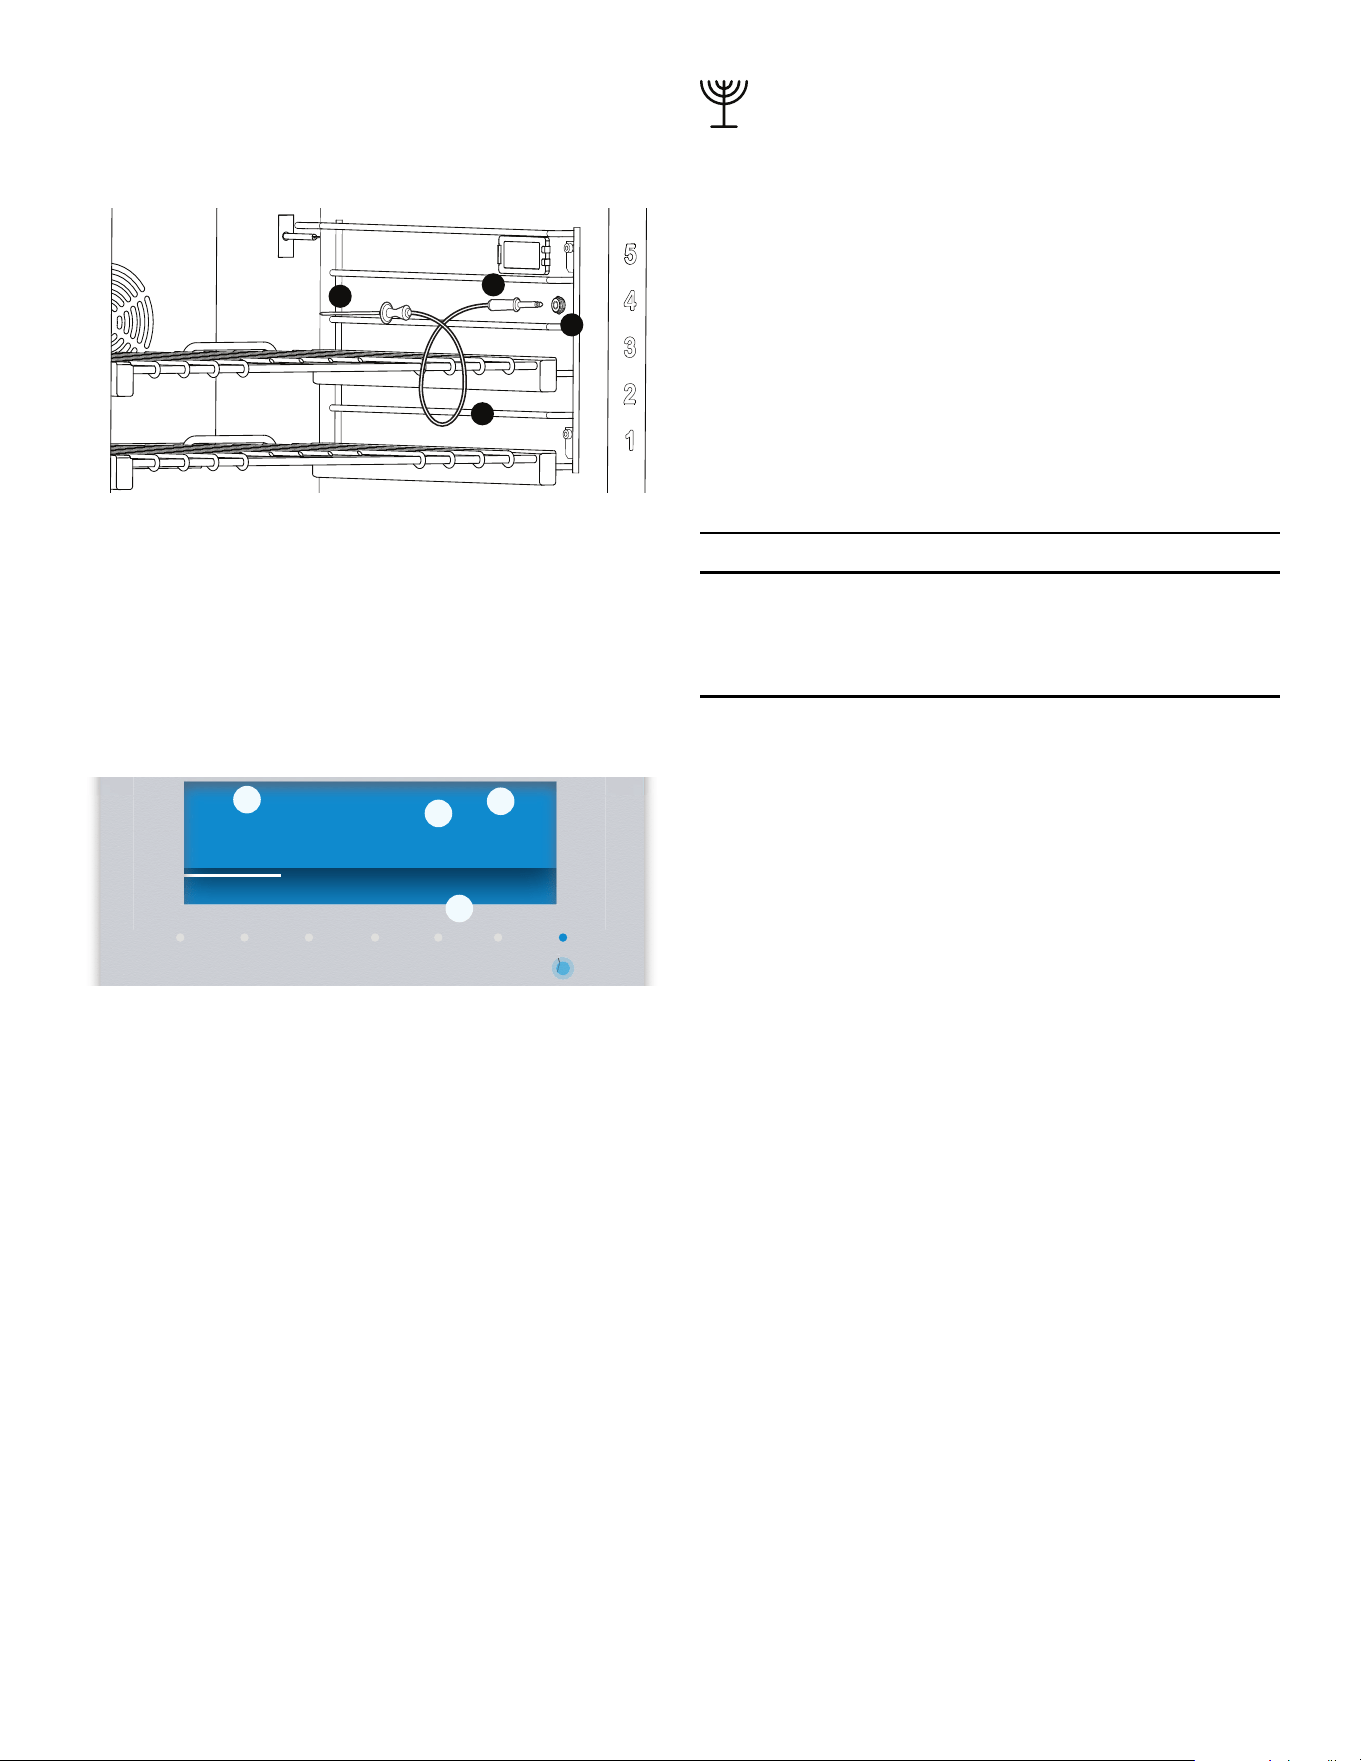
Page. 36
To program the meat probe
1. Insert the plug end into the probe outlet in the oven
wall and insert probe end into the meat.
2. Close the oven door.
3. Turn the MODE and TEMPERATURE knobs to your
desired settings.
4. Press the right
( or ) to the desired internal
temperature.
– The oven display indicates the current
temperature of the meat as it cooks.
– The progress bar moves to the right as the internal
cooking temperatures increase. When the probe
temperature reaches the desired set temperature,
the cooking mode will be finished and will beep to
indicate that the cooking process has concluded.
Sabbath
The Sabbath mode complies with the standards set forth
by Star K. Please know that there are restrictions for the
use of cooking appliances on the Sabbath and Holidays.
Also note that when the Sabbath and a Holiday coincide,
the Sabbath laws prevail. If you are unfamiliar with the
laws of keeping food warm on the Sabbath, or cooking on
the Holidays, please contact your Rabbi or refer to the
Star K website at www.star-k.org.
You may operate this appliance on the Jewish Sabbath or
the Jewish Holidays if used in accordance with the
following knowledge:
About Sabbath mode – using the rangetop
9 WARNING
When using a blech, use only one STAR
®
burner at the
lowest setting. Using multiple STAR burners might
cause overheating, combustion issues, or damage to
the appliance. DO NOT cover vent openings.
•The STAR
burners with the XLO
®
feature are
controlled electronically. Therefore, when Sabbath
mode is initiated, the STAR burners with the XLO
feature are deactivated to ensure compliance.
• The standard gas burners without the XLO feature
remain fully functional.
• The griddle and/or the grill are fully functional during
Sabbath mode. However, to ensure compliance, they
should not be operated.
• Gas STAR burners remain on during a power failure.
• The STAR burners are equipped with a re-ignition
feature. The igniter will automatically re-light the STAR
burner if the flame is blown out.
• During Yom Tov, a gas flame may not be ignited or
turned off. However, the flame may be raised and
lowered to adjust the temperature as required for
cooking.
• During Sabbath, a gas flame may not be ignited,
adjusted, or turned off. You may use a blech to
conceal the flame, the lights, and the controls. DO
NOT cover vent openings.
• When using a blech, use only one STAR burner at the
lowest setting. Using multiple STAR burners may
cause overheating, combustion issues, or damage to
the appliance.
a. Probe
b. Plug
c. Outlet d. Cable
a. Cooking mode c. Current probe temp
b. Set shut-off temp d. Set oven temp
a
b
c
d
TIMERS SETTINGS ENTER
Bake
05:40
Oven temperature 375°
°
150
70°/
ƒ
¥
a
b
c
d

Page. 37
About Sabbath mode – using the oven(s)
• The oven maintains a constant temperature between
150°F and 475°F (66°C and 246°C) with the bake
mode.
• Cooked dishes are kept warm for a minimum time of
30 minutes up to a maximum time of 74 hours without
needing to switch the appliance on or off.
• All food should be placed in the oven before the
Sabbath begins, since none may be placed in the oven
during the Sabbath. Please note that easily perishable
foodstuffs must not be left in the oven for too long.
• The oven temperature should not be turned on,
adjusted, or turned off while observing Sabbath.
• The secondary oven is not operational during Sabbath
mode.
• On the Sabbath, in lieu of a blech, the oven controls
should be covered. Be careful not to cover vent
openings.
• The oven lamp(s) is disabled in Sabbath mode to
prevent any action from occurring if the oven door is
opened.
• The oven door may only be opened once on the
Sabbath to remove all food and then closed.
• The oven door may be opened and closed at any time
as often as desired during Holidays.
• The temperature may be adjusted for cooking
purposes during Holidays. (There is a delay between
the request and implementation).
Sabbath mode power outage note
If a power outage occurs while the oven is in Sabbath
mode, the unit will exit out of Sabbath mode when power
is restored. The oven will return to the off state even if it
was in the middle of a bake cycle when the power outage
occurred.
To set Sabbath on models with a digital display
1. Begin from the STANDBY mode and select
SETTINGS.
2. Press the left
( or ) to scroll to SABBATH.
3. Press the right ( or ) and select ON and then press
ENTER.
– Steps 1 through 3 are only necessary for the first
time use of Sabbath or if the appliance’s settings
are factory reset.
4. Turn the mode knob to BAKE.
5. Turn the temperature knob to the desired temp.
6. Press TIMERS.
7. Press the left
( or ) to scroll to SABBATH TIMER.
8. Press the right ( or ) and enter the DURATION TIME in
30 minute increments.
9. Press ENTER.
– A delay notification appears.
– During this five minute pause, the user can adjust
the parameters. After the countdown the oven
starts heating and all buttons are disabled.
10. After the Sabbath timer has completed, turn all knobs
to OFF.
To cancel Sabbath
1. Turn all knobs to OFF to cancel the operation.
Sabbath – extended bake
To set extended bake on 30'' models without a digital
display
1. Turn the mode knob to EXTEND BAKE.
2. Turn the temperature knob to desired temp.
To cancel Sabbath
1. Turn all knobs to OFF to cancel the operation.
TIMERS SETTINGS ENTER
––min––sSabbath Timer
›
06:30
TIMERS SETTINGS ENTER
04min 59s
›
Sabbath Mode will start in:
NTE
NTE
TIMERS SETTINGS ENTER
completed
›
Sabbath

Page. 38
Remote start
9 WARNING
REMOTE OPERATION
Some models allow remote operation at any time. Do
not store any flammable materials or temperature
sensitive items inside, on top or near surface units of
the appliance.
About remote start
If you want to start an oven operation using your mobile
device, you must activate remote start.
Notes
• For some models a permanent remote start can be
activated via the Home Connect app. This function
allows a remote start of the available operating modes
without automatically deactivating remote start.
• Remote start allows you to start, pause, and abort
oven programs remotely via the Home Connect
TM
app
on a mobile device.
• The remote start can only be employed if the Home
Connect app has been successfully installed on a
mobile device. See the section “Setting up Home
Connect™” on page 45 for instructions on how to
install the Home Connect app.
• Some operating modes can only be started on the
oven itself.
• If the appliance is not connected to the home
network, the appliance functions in the same way as
an oven with no network connection and can still be
operated via the appliance.
• The availability of the Home Connect function
depends on the availability of Home Connect services
in your country. Home Connect services are not
available in every country. You can find more
information on this at www.home-connect.com
Remote start is automatically deactivated in the
following situations:
• The oven door is opened 15 minutes after remote
start is activated.
• The oven door is opened 15 minutes after the oven
operation has ended.
• 24 hours after remote start has been activated.
IMPORTANT:
• Ensure that you follow the safety instructions in this
instruction manual and that you comply with these
even when you are away from home and are operating
the appliance via the Home Connect app. You must
also follow the instructions in the Home Connect app.
• Operating the appliance directly from the appliance
always has priority. During this time, it is not possible
to operate the appliance using the Home Connect
app.
• We are constantly working to improve the Home
Connect app, which may lead to differences in the
setup steps. Please rely on the instructions in the
latest version of the Home Connect app to guide you
through the setup process.
To set remote start
1. Place the food in the oven and then close the door.
2. Turn the mode knob to REMOTE START.
– DO NOT rotate the temperature knob to any
setting (leave in the off position).
– The displays turns to the standby screen and
C
appears in the display.
3. Continue with the Home Connect app installed on
your mobile device.
TIMERS SETTINGS ENTER
switched on
F
Remote Start
TIMERS SETTINGS ENTER
06:30
F
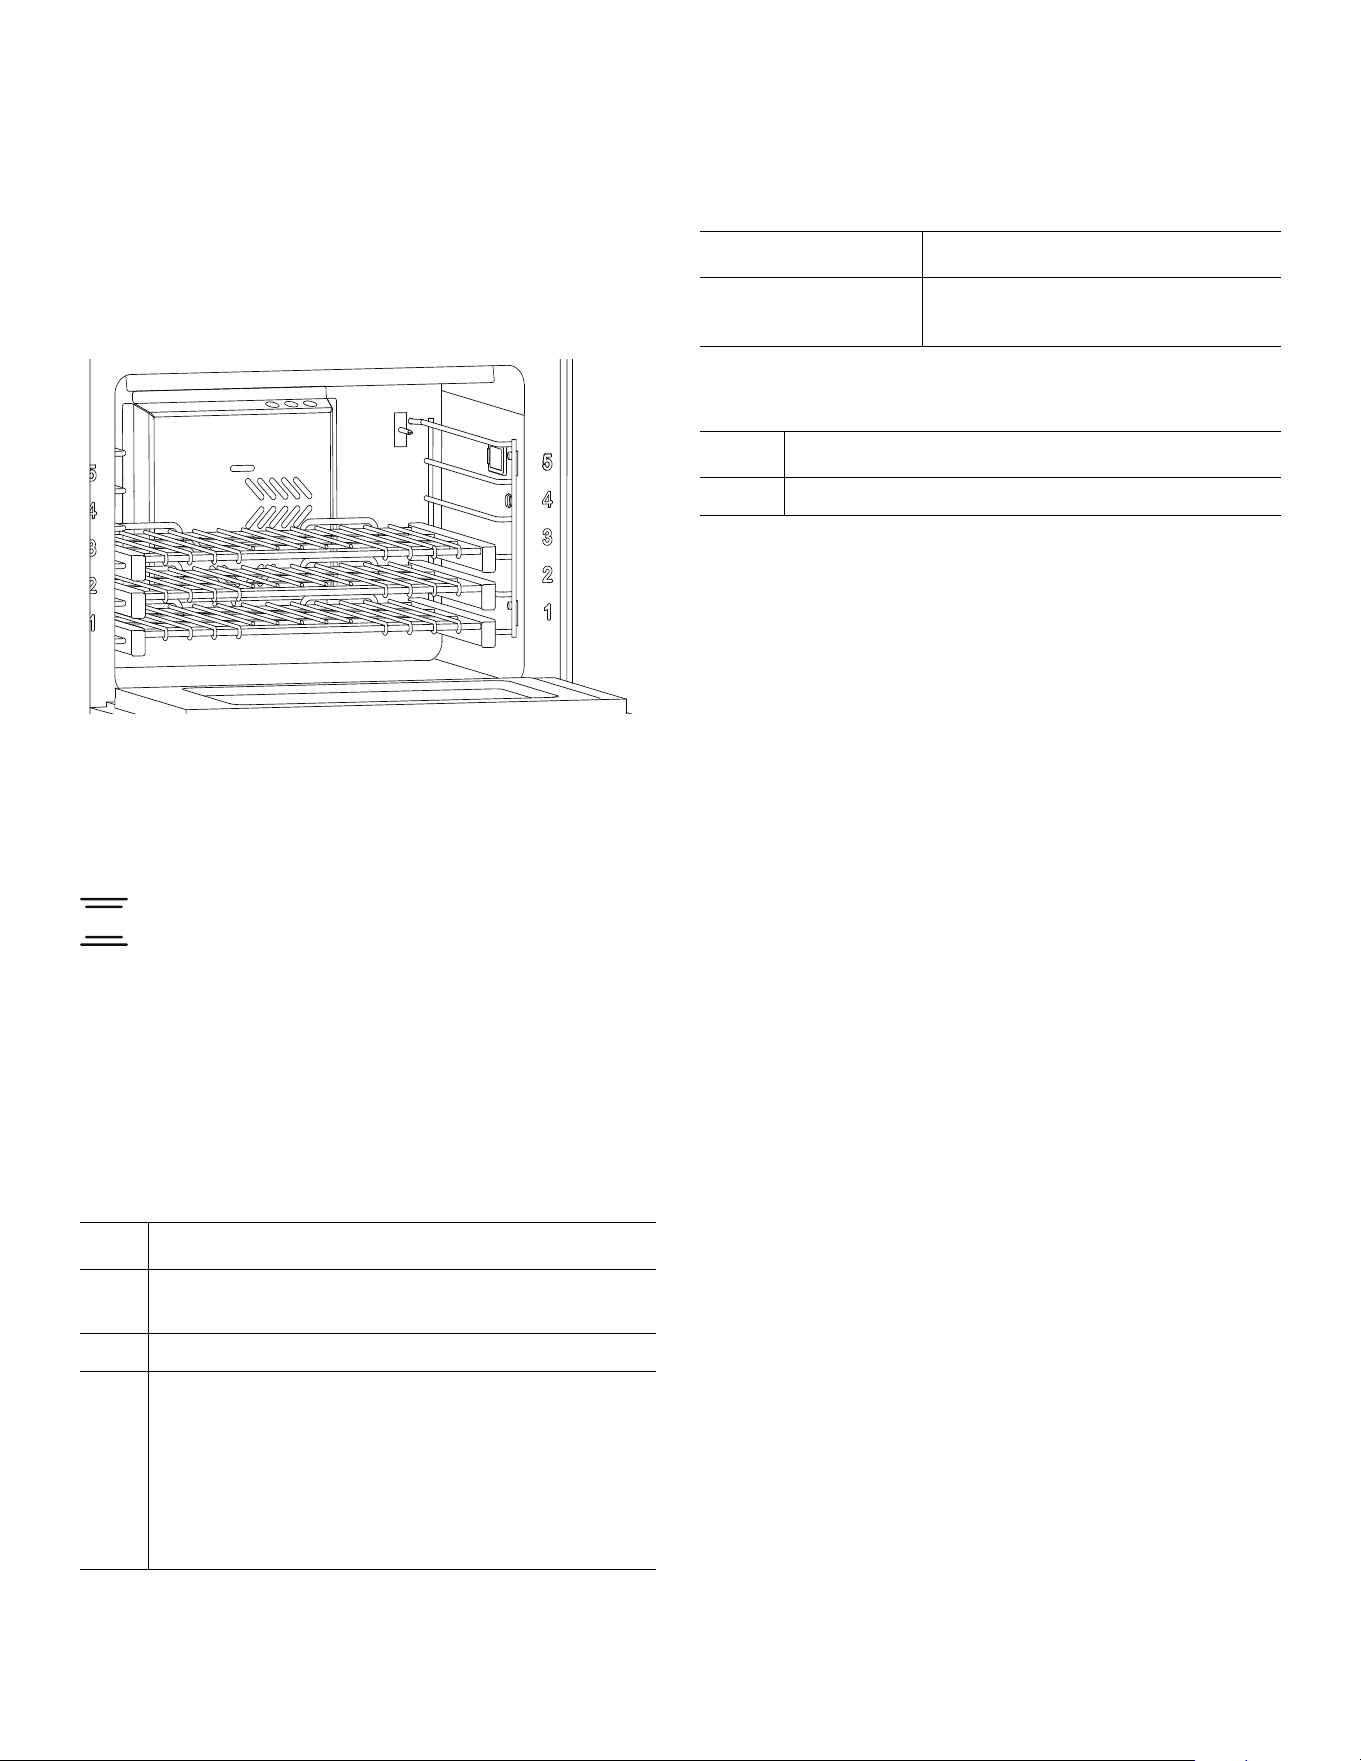
Page. 39
Getting the most out of your appliance
Oven rack positions
Rack level positions in the oven are numbered on the front
frame like an elevator. Number one level is the lowest and
number five level is at the top.
NOTE: Rack positions are general recommendations for
baking; however, if a recipe calls for a different rack
position than those given, then the recipe or package
directions should be followed.
Bake
About bake
Bake is cooking with dry, heated air. Both the upper and
lower elements cycle to maintain the oven temperature.
The bake mode can be used to prepare a variety of food
items, from pastries to casseroles. Refer to recipe or
package directions for oven temperature and baking time.
Main oven one rack baking
Main oven two rack baking
Secondary oven (48" models)
Main oven three rack baking
If three-rack baking is desired, the convection bake mode
is best.
Getting the best results
• Minimize opening the oven door(s).
• Use the rack position recommended by the recipe.
• Use the bakeware recommended in the recipe.
• Store the broiler pan(s) outside the oven. An extra pan
without food affects the browning and cooking.
• The type of pan used affects the browning:
• For tender, golden brown crusts, use light
non-stick/anodized or shiny metal pans.
• For brown crisp crusts, use dark non-stick/
anodized or dark, dull metal pans or glass
bakeware. These may require lowering the bake
temperature 25°F.
Preheating the oven
• Most cooking times in recipes are designed for a
preheated oven and require that the oven already be
at a certain temperature before cooking starts. Refer
to your recipe for preheating recommendations
.
• Preheating time depends on the temperature setting
and the number of racks in the oven.
Bakeware type
• Metal bakeware (with or without a non-stick finish),
heat-proof glass, glass-ceramic, pottery, or other
utensils are suitable for the oven.
• Suitable cookie sheets have a small lip on one side.
Heavy sheets or those with more than one side may
affect the baking time.
Level Bake mode
4 -- Best for individual baked goods such as
cookies, biscuits, pastries, etc.
3 -- Best used for most baked items.
2 -- If the item is tall, such as an angel food cake.
-- Pies are best baked on rack level 2 to make
certain the bottom of the crust is done
without over-browning the top.
-- When large pieces of meat or poultry are
roasted, such as a prime rib of beef or a
turkey.
Levels Bake mode
2 and 5 dual fuel
2 and 4 gas
-- Casserole dishes
Level Bake mode
1 -- Best used for most baked items.
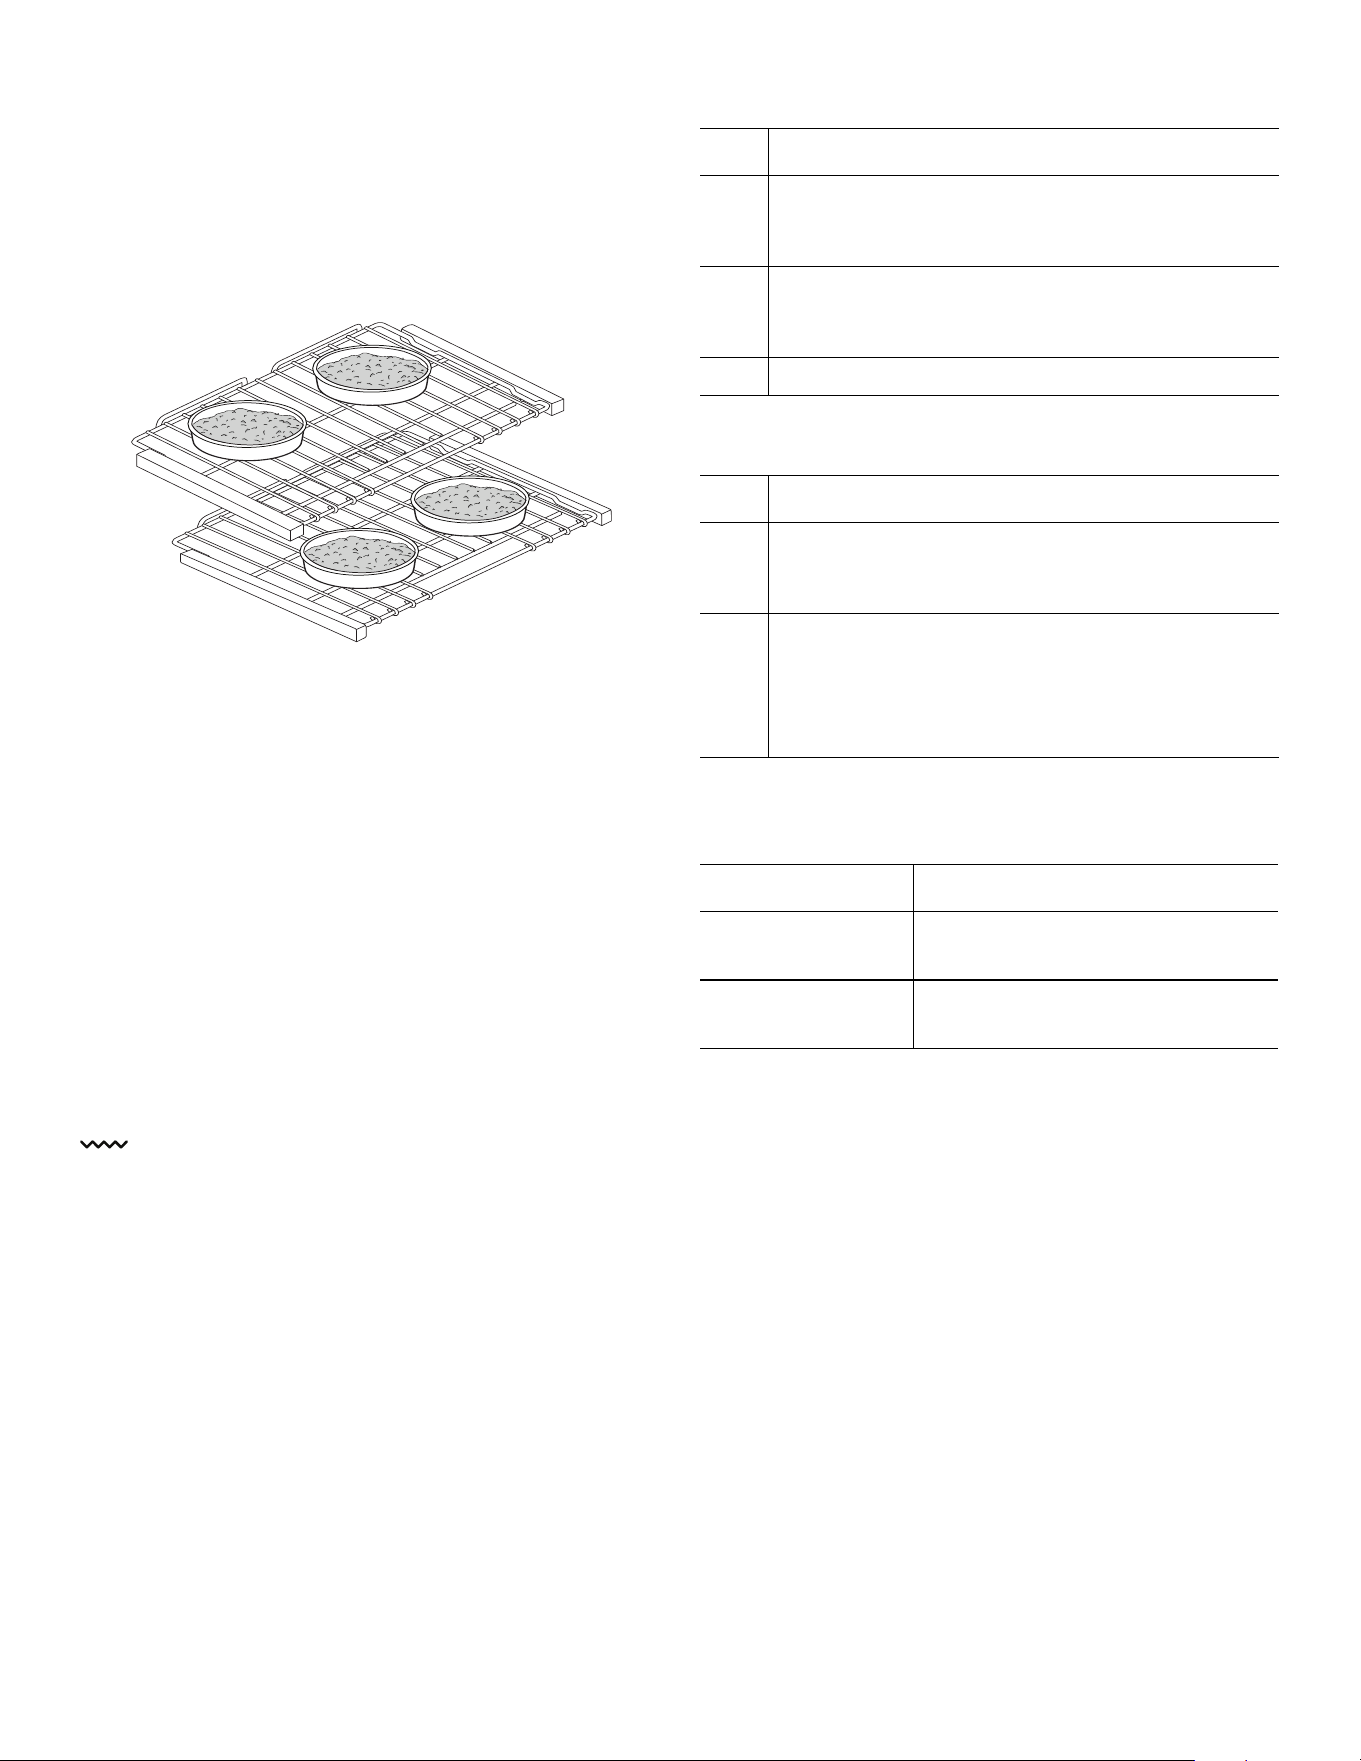
Page. 40
Pan placement
• Allow at least 1'' (25.4 mm) of space between the pans
and the oven walls so heat can circulate around each
pan.
• Stagger bakeware so that one is not directly above
another. Allow 1½'' (38 mm) above and below each
pan.
High altitude baking
When cooking at high altitudes, recipes and cooking times
will vary. For accurate information, write the Extension
Service, Colorado State University, Fort Collins, Colorado
80521. There may be a cost for the guides. Specify which
high altitude food preparation guide you prefer: general
information, cakes, cookies breads, etc.
Condensation
It is normal for a certain amount of moisture to evaporate
from the food during any cooking process. The amount
depends on the moisture content of the food. The
moisture will condense on any surface cooler than the
inside of the oven, such as the control panel.
Broil
About broil
Before turning on the oven, place the rack in the desired
position. After preheating the broiler, center the broil pan
under the broil element.
Only the upper element heats in the broil mode.
Successful broiling requires constant exposure to high,
intense heat.
Dual fuel main oven broil rack recommendations
Gas main oven broil rack recommendations
Secondary oven broil rack recommendations (48"
models only)
Getting the best broil results
Tips:
• Defrost food before broiling.
• Door is to be closed during broiling.
• It is recommended that you preheat the broil element
before starting to cook. Preheat for 5 minutes then
place food in the oven.
• Steaks should be more than 1'' (25.4 mm) thick if rare
meat is desired. Use convection broil if steaks are over
1½'' (38 mm) thick.
• Turn foods over only once, after half the total cooking
time. It is not necessary to turn very thin foods (ham
slices, fillets of fish, etc.). Liver slices must be turned
over regardless of thickness.
• Center foods directly under the broiling element for
best browning.
Level Dual fuel broil mode
5 -- Beef steaks, ground meat patties, ham steak
and lamb chops 1'' (25.4 mm) or less in
thickness. Also use when top browning foods.
4 -- Meat 1-1/8'' (29 mm) or more in thickness or
fish, poultry, pork chops and ham steaks 1''
(25.4 mm) or more in thickness.
3 -- Chicken quarters or halves.
Level Gas broil mode
4 -- Beef steaks, ground meat patties, ham steak
and lamb chops 1'' (25.4 mm) or less in
thickness.
3 -- Meat 1-1/8'' (29 mm) or more in thickness or
fish, poultry, pork chops and ham steaks 1''
(25.4 mm) or more in thickness. Use this rack
when broiling chicken quarters or halves. Also
use when top browning foods.
Levels Secondary broil mode
3, 4, or 5 – dual fuel
1, 3, or 4 – gas
-- Depending upon the type and
thickness of the food.
5 – dual fuel
3 – gas
-- Top browning of foods.
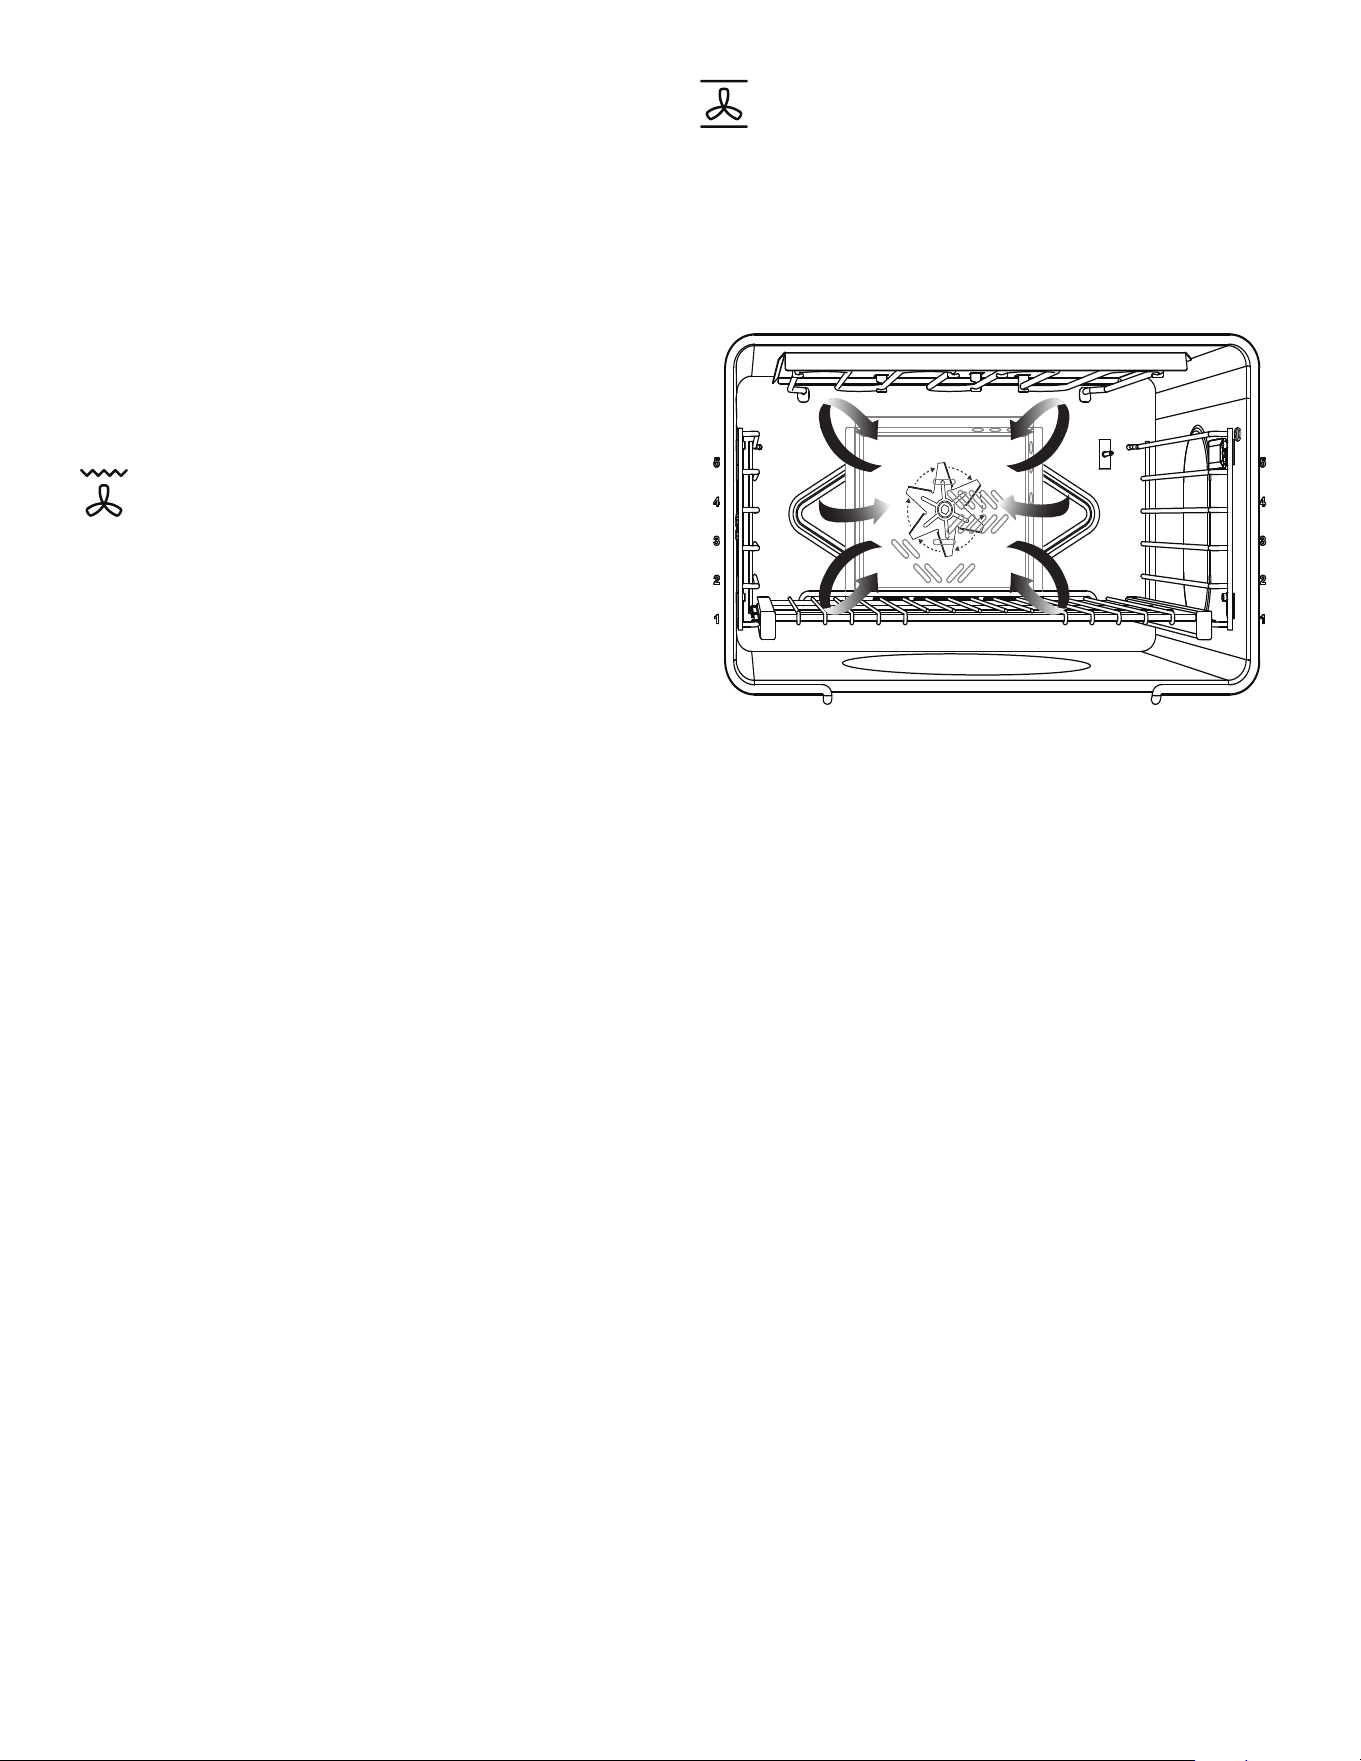
Page. 41
Utensils
• Your appliance comes with a large two-piece broiler
pan. The slotted grid allows drippings to flow into the
lower pan, away from the intense heat of the broil
element, minimizing spattering, smoking, and the
chance of a grease fire. DO NOT cover the slotted
grid (top) with aluminum foil.
• Use metal or glass-ceramic bakeware when top
browning casseroles, main dishes, or bread.
• DO NOT use heat-proof glass or pottery. This type of
glassware cannot withstand the intense heat of the
broil element.
Convection broil
About convection broil
Convection broil is similar to broil. It combines intense
heat from the upper element with heat circulated by a
convection fan.
Convection broil mode is well suited for cooking thick,
tender cuts of meat, poultry, and fish. Convection broil is
not recommended for browning breads, casseroles and
other foods. Always use convection broil with the door
closed.
In addition to the benefits of standard broiling, convection
broiling is faster.
Tips:
• Preheat oven 3-4 minutes. Do not preheat for more
than 5 minutes.
• Meat should be at least 1½'' thick. Use the broil pan
and grid included with your oven.
• Do not cover the broil grid with foil. It is designed to
drain fats and oils away from the cooking surface to
prevent smoking and spattering.
• Turn meats (other than fish) once during the
recommended cook time.
Convection bake
About convection bake
Convection bake is similar to bake. Heat comes from the
lower heating element. The main difference in convection
baking is that the heat is circulated throughout the
appliance by the convection fan.
Tips:
• To convert most recipes for baked items (cookies,
cakes, pies, etc.); reduce the oven temperature by
25°F.
• For meats and poultry, the temperature should not be
reduced. The same temperature recommended in
recipes and cooking charts for meats and poultry
should be used.
• Low, shallow bakeware should be used with
convection cooking. This allows the heated air to
circulate around the food.
• When baking on more than one rack, cookie sheets
should not be staggered; round cake pans should be
staggered.
• Any food cooked uncovered will brown evenly and
form a nice crust. Foods in covered dishes (casseroles,
pot roast) or delicate custards do not benefit from
convection cooking.
• For small items such as cookies, check to see if they
are done one to two minutes before the recipe time.
For larger baked items such as cakes, check five to six
minutes before the time indicated on the recipe.
• Large meat or poultry items may cook up to 30
minutes less than the suggested time so check them
so they will not be over baked.

Page. 42
One rack convection baking
Two rack convection baking
Three rack convection baking
Dehydrating foods with convection bake
Use the convection bake to dry and preserve fruits and
vegetables.
Tips:
• Drying times vary depending on the moisture and
sugar content of the food, the size of the pieces, the
amount being dried and the humidity in the air.
• Dry most fruits and vegetables at 150°F (66°C).
• Check food at the minimum drying time.
• It is best to use drying racks (not included) so that air
can flow around the food. Do not place food directly
on a baking sheet or pan. Food needs to be elevated
to ensure even drying.
• Multiple drying racks can be used simultaneously.
• Racks 2 and 4 or 1, 3 and 5 can be used for multiple
rack dehydrating. Use rack 3 if only dehydrating one
rack.
• Dehydrating meat is not recommended due to food
safety concerns.
• Consult a food preservation book, county Cooperative
Extension Office, or library for additional information.
Convection bake dehydration recommendations
Level Conv bake mode
3 or 4 -- When baking on one rack, best results are
obtained in the bake mode.
2 -- Roasting a turkey or a large piece of meat.
Levels Conv bake mode
2 and 4 dual fuel
Gas see note
-- Use for cakes. Cake pans should
be staggered.
-- Gas range rack levels for:
Cookies: 3 and 5
Cakes: 2 and 5
Levels Conv bake mode
1, 3, and 5
dual fuel
Gas see
note
-- When several sheets of cookies are to
be baked. Place the baking sheets
directly above each other on the
respective racks to allow air to flow
around the baking sheets.
-- Gas range rack levels for:
Cookies: 3, 4, and 5
Pastries and other baked goods: 1, 3,
and 5
Food Preparation
Approx.
time
(hrs)
Doneness
test
Apple, ¼''
slices
Dipped in ¼ cup
lemon juice and 2
cups water
8 – 15 Slightly
pliable
Bananas, ¼''
slices
Dipped in ¼ cup
lemon juice and 2
cups water
8 – 15 Slightly
pliable
Cherries Wash and towel
dry. For fresh
cherries, remove
pits
7 – 18 Pliable
leathery,
chewy
Orange peels Orange part of
skin thinly peeled
from oranges.
1 – 4 Dry and
brittle
Orange slices ¼'' slices of
orange
9 – 16 Skins are
dry and
brittle, fruit
is slightly
moist
Pineapple
rings
Towel dried 7 – 12 Soft and
pliable
Strawberries Wash and towel
dry. Sliced ½''
thick, skin down
on rack
9 – 17 Dry and
brittle
Peppers Wash and towel
dry. Remove
membrane of
peppers, 1''
coarsely chopped
pieces
13 – 17 Leathery
with no
moisture
inside
Mushrooms Wash and towel
dry. Cut thin slices,
1/8'' thick
5 – 12 Tough and
leathery,
dry
Tomatoes Wash and towel
dry. Cut thin slices,
1/8'' thick, drain
well
5 – 12 Dry, brick
red color
Page. 43
True convection
About true convection
True convection cooks with heat from a third element
behind the back wall of the oven. The heat is circulated
throughout the oven by the convection fan.
Tips:
• Reduce recipe temperature by 25°F.
• Place food in low-sided, uncovered pans such as
cookie sheets without sides.
• If baking more than one pan on a rack, allow at least
1'' to 1½'' of air space around the pan.
Proof
About proof
The proof feature maintains the warm, non-drafty
environment needed for proofing yeast leavened
products.
It is best to start with a cool oven when using the proofing
function.
To set the oven for proof
1. Allow dough to thaw if frozen.
2. Place dough in dish and loosely cover.
3. Use any rack level that accommodates the size of the
bowl or pan. Close the door.
4. Turn the mode knob to PROOF.
5. Turn the oven temperature knob to 150°F.
The ideal temperature for proofing will be maintained
until the mode knob is turned off. Dough has “proofed”
when it has doubled in size.
Do not open the oven door unnecessarily. Opening the
door will lower the temperature of the air in the oven and
lengthen the proofing time. Use the oven light to check
the rising of the dough.
Proofing time may be decreased when using the large
oven at the same time you are proofing. Check bread
product early to avoid over-proofing. If you are using the
large oven for extended periods of time we recommend,
for optimum results, that you complete the proofing
before using the large oven.
Roast
About roast
Roast uses both the upper and lower elements to maintain
the oven temperature. Roasting uses more intense heat
from the upper element than the lower element. This
results in more browning of the exterior while the inside
remains especially moist. Roast is best suited for large cuts
of meat and poultry.
Tips:
• Use a high-sided broil pan, or cover dish with a lid or
foil.
• Add liquids, such as water, juice, wine, bouillon or
stock for flavor and moisture.
• Roasting bags are suitable for use in this mode.
• When roasting whole chicken or turkey, tuck wings
behind back and loosely tie legs with kitchen string.
Roasting recommendations
Dual fuel levels True conv mode
4 and 5 -- Cookies
2, 3, and 4 -- Cookies
1, 3, and 5 -- Pastries and other baked goods
Size Time
Loaf, 1 lb (0.45 kg) 60 – 75 minutes
Rolls, 0.1 lb (0.05 kg) 30 – 45 minutes
Meat and poultry Temperature Level
Beef
Pot roast, 3 – 4 lbs.
Beef brisket
Beef chuck
Meatloaf
350°F (180°C)
350°F (180°C)
350°F (180°C)
350°F (180°C)
1
2
1
3
Poultry
Chicken, whole
Chicken, pieces
Turkey, whole
375°F (190°C)
375°F (190°C)
325°F (165°C)
2
2
2
Pork
Shoulder
Smoked ham, half
325°F (165°C)
325°F (165°C)
1
1

Page. 44
Convection roast
About convection roast
Convection roast uses heat from the top and bottom
elements as well as heat circulated by the convection fan.
The convection roast mode is well suited for preparing
tender cuts of meat and poultry. The benefits of
convection roast mode include:
• As much as 25% faster cooking than non-convection
modes.
• Rich, golden browning.
Tips:
• Use the same temperature as indicated in the recipe.
• Check doneness early, since roasting time may
decrease.
• Do not cover meat or use cooking bags.
• Use the broil pan and grid provided with the oven for
roasting. A shallow, uncovered pan can also be used.
• Use a meat thermometer to determine the internal
temperature of the meat.
• If the meat is browned to your liking, but is not yet
done, a small strip of foil can be placed over the meat
to prevent over-browning.
• Let meat stand covered with foil 10-15 minutes after
removing it from the oven.
Keep warm
About keep warm
• The warm mode will keep hot, cooked foods at
serving temperature. ALWAYS start with hot food. DO
NOT use this mode to heat cold food other than for
crisping crackers, chips, and dry cereal.
• Serving dishes, plates, and cups may be kept warm
with this mode.
• Food should be at serving temperature (above 140°F /
60°C) before being placed in the oven.
• Food may be kept hot in its cooking container or
transferred to a heat-safe serving dish.
• Aluminum foil may be used to cover food. Use only
heat-safe dishes.
• DO NOT open the oven door unnecessarily. Opening
the door will reduce the temperature of the oven.
• When keeping cooked food warm, allow time for the
oven to preheat before placing the item in the oven.
To set the keep warm mode
1. Turn the mode knob to KEEP WARM.
2. Turn the oven temperature knob to 150°F.
3. Place warmed dish in the oven and close the door.
Minimum internal cooking temperatures
The minimum internal temperatures that foods must reach
to be considered safe to eat, as determined by the U. S
Department of Agriculture Food Safety and Inspection
Service, are as follows:
Egg dishes, casseroles 160°F (72°C)
Leftovers 165°F (74°C)
Ground beef, veal, lamb, or pork 160°F (72°C)
Beef, veal, lamb roasts, steaks, or chops
Medium rare
Medium
Well done
145°F (63°C)
160°F (71°C)
170°F (77°C)
Pork roasts, steaks, or chops
Medium
Well done
160°F (72°C)
170°F (77°C)
Ham
Cook before eating
Fully cooked, to reheat
160°F (72°C)
140°F (60°C)
Poultry
Ground chicken, turkey
Whole chicken, turkey
Breasts, roasts
Thighs and wings
Stuffing (cooked alone or in bird)
165°F (74°C)
180°F (82°C)
170°F (77°C)
180°F (82°C)
165°F (74°C)

Page. 45
Setting up Home Connect™
With Home Connect™, the appliance is Wi-Fi capable and
can be remotely controlled using a mobile device (e.g.
tablet or smartphone). The Home Connect app offers
additional functions which are a perfect complement to
the networked appliance.
Home Connect does not work over Wi-Fi networks that
require browser registration, i.e. a user name and
password entered via a web browser.
You should have a stable wireless network with good
reception and access to the internet.
If the appliance is not connected to the WLAN network
(home network), it functions in the same way as a typical
appliance with no network connection and can be
operated as usual.
NOTE: Please ensure that you follow the safety
instructions given at the beginning of this instruction
manual and that these are also observed when operating
the appliance via the Home Connect app and when away
from home. Please also follow the instructions in the
Home Connect app.
NOTE: Operation on the appliance itself always takes
priority, and during this time it is not possible to operate
the appliance using the Home Connect app.
Setup
To implement settings via Home Connect you must have
installed the Home Connect app on a mobile device (e.g.
tablet or smartphone). Please observe the supplied Home
Connect documents that came with your appliance with
regard to this feature.
Follow the steps specified by the app to implement the
settings.
What do you need to connect your
appliance to Home Connect™?
1. Your appliance must be installed properly.
2. A smartphone or tablet equipped with the latest
version of iOS or Android operating system.
3. Your home appliance within the Wi-Fi signal of your
home network.
4. The name of your Wi-Fi network (SSID) and its
password (key).
IMPORTANT INFORMATION ABOUT DATA SECURITY:
The transfer of data is always encrypted. Home Connect
meets the highest security standards, which are
continuously reviewed. For further information visit
www.home-connect.com.
Information:
We are constantly working to improve the Home
Connect app, which may lead to differences in the
setup steps. Please rely on the instructions in the
latest version of the Home Connect app to guide you
through the setup process.
Step 1: Download the Home Connect app
and create a user account
1. Open the App Store (Apple
®
devices) or Google
Play™ store (Android™ devices) on your smartphone
or tablet.
2. Search for the HOME CONNECT app in the store's
search and install it.
3. Open the app and register to create a Home Connect
account.
4. Write down your Home Connect account credentials
(user account and password). You will need them later.
Save your Home Connect login details here:
Network name
(SSID):............................................................................
Password
(Key):..............................................................................
The app will guide you through the steps of adding
your appliance to Home Connect.
Step 2: Connect your appliance to your
home network
1. Your appliance must be installed properly.
2. Open your Home Connect app to add an appliance.
3. Please follow the directions in the app and refer to this
guide only when prompted by the app.

Page. 46
Step 2.1: Connect your appliance to your
home network with WPS
Please enter step 2.1 only when prompted to by the app.
The following steps describe operations at the appliance
itself.
1. Press SETTINGS and select HOME CONNECT.
2. Press ENTER.
-- A request to press the WPS button on the router
within 2 minutes appears in the display.
3. Press the WPS button on your router.
-- Please consult your router's manual to locate the
WPS button.
-- The app will get notified once your appliance has
been successfully connected to your Wi-Fi
network.
4. Press ENTER.
-- A message will appear in the display informing the
user if the network was connected successfully.
5. Press START PAIRING in the Home Connect app.
6. Follow the directions in the app.
Information:
If the connection could not be established within 5
minutes, make sure your appliance is within the range
of your Wi-Fi network.
Step 2.2: Connect your appliance to your
home network step-by-step
Please enter step 2.2 only when prompted by the app.
The following steps describe operations at the appliance
itself.
1. Select SETTINGS and scroll to HOME CONNECT.
2. Press ENTER.
– A request to press the WPS button on the router
within 2 minutes appears in the display.
3. Press ENTER.
4. Select CONNECT MANUALLY.
– Have your mobile device ready for manual
connection to network.
5. Press CONTINUE.
-- The appliance will open a temporary Wi-Fi
network called “HomeConnect” with the
password “HomeConnect” for 2 minutes.
-- The app provides your home Wi-Fi network name
(SSID) and its password via this temporary Wi-Fi
network to the appliance enabling the appliance
to connect to your home Wi-Fi network.
6. Follow the directions in the app.
Step 3: Connect your appliance to the
Home Connect™ app
Please enter step 3 only when prompted by the app. The
following steps describe operations at the appliance itself.
1. Launch the app on your mobile device and follow the
instructions in the app.
2. The login process is complete once PAIRING
SUCCESSFUL is shown on the oven display.
3. Follow the directions in the app.
You have successfully connected your appliance. You can
now benefit from all the advantages of the Home
Connect™ app!
Information:
If the connection could not be established within 5
minutes, make sure your appliance is within the range
of your Wi-Fi network.
Software update
Using the software update function, your appliance's
software can be updated (e.g. for the purpose of
optimization, troubleshooting or security updates). To do
this, you need to be a registered Home Connect™ user,
have installed the app on your mobile device, and be
connected to the Home Connect™ server.
As soon as a software update is available, you will be
informed through the Home Connect™ app and will be
able to start the software update via the app.
Once the update has been successfully downloaded, you
can start installing it via the Home Connect™ app if you
are on your local area network.
The Home Connect™ app will inform you once installation
is complete.
Notes:
• You can continue to use your appliance as normal
while updates are downloading.
• Depending on your personal settings in the app,
software updates can also be set to download
automatically.
• We recommend that you install security updates as
soon as possible.

Page. 47
Care and maintenance
9 WARNING
• Children should not be left alone or unattended in
an area where appliances are in use.
• During the self-clean cycle, exterior surfaces may
become hotter than usual. Parts of the appliance
may become potentially harmful to children, and
to persons who lack adult knowledge of
appliances and lack adult reactions to potentially
harmful conditions. Keep these individuals away
during self-clean and while the appliance is in use.
• The elimination of soil during self-cleaning may
facilitate the emission of small amounts of
chemicals or other substances that may be
harmful upon sufficient exposure. To minimize
exposure to these substances, provide good
ventilation with an open window, or use a
ventilation fan or hood.
• For the self-cleaning cycle of your range, remove
small animals and birds from the kitchen and
surrounding areas. Open a nearby window for
additional ventilation. During self-clean, fumes are
released that may be harmful.
Brand names
• The use of brand names is intended only to indicate a
type of cleaner. This does not constitute an
endorsement.
• The omission of any brand name cleaner does not
imply its adequacy or inadequacy.
• Many products are regional in distribution and can be
found in local markets.
• It is imperative that all cleaning products be used in
strict accordance with the instructions on its package.
About self-clean
• The self-cleaning mode of your new range features
pyrolytic self-cleaning. When set to the self-clean
mode, the oven reaches a high temperature,
approximately 850°F (454°C), that burns off the food
soil.
• When the oven is set for self clean, the standard
rangetop burners and the electric griddle and grill
may be used. The burners having the ExtraLow
®
feature cannot be used.
• It is common to see smoke and/or flames during the
clean cycle, depending on the content and amount of
soil remaining in the oven. If a flame persists, turn off
the oven and allow it to cool before opening the door
to wipe up the excessive food soil.
• At the end of the clean cycle, some gray ash or
burned residue may remain inside the oven. This is a
mineral deposit that does not burn or melt. The
amount of ash depends on how heavily soiled the
oven was before it was cleaned. When the oven is
cold, it is easily removed using a damp paper towel,
sponge, or cloth.
Before self-cleaning the oven
DO NOT USE OVEN CLEANERS – No commercial oven
cleaner or oven liner protective coating of any kind should
be used in or around any part of the oven.
To reduce flare ups and excess smoke wipe out puddles of
grease and any loose soil that can be easily removed.
Remove any soil that is outside the door seal area. This
appliance is designed to clean the oven interior and the
portion of the door that is inside the oven. The outer
edges of the door and the frame surrounding the front of
the oven are not in the cleaning zone. Wipe this area
clean.
BEFORE SETTING THE OVEN TO SELF-CLEAN
• Remove all utensils.
• Remove racks and rack guides.
• Clean the oven front frame and outer door edges.
• Wipe up large spillovers and grease.
• Be sure the light bulbs and glass covers are in place.
• Turn on the ventilator hood above the range and leave
it on until the oven has completed the self-clean cycle.
Self-clean
Self-cleaning (select models)
To set self-clean on 30'' dual fuel Harmony series
models
1. Remove all utensils, racks, and rack guides. Ensure the
oven door is shut.
2. Turn the mode knob to SELF CLEAN.
3. Turn the temperature knob to CLEAN.
– Self-clean duration is 2 hours.
To set self-clean on dual fuel models with a display
1. Remove all utensils, racks, and rack guides. Ensure the
oven door is shut.
2. Turn the mode knob to SELF CLEAN and the
temperature knob to CLEAN.
Page. 48
3. Press the right ) to set the desired clean level and
press ENTER.
4. After the information text, press ENTER.
NOTE: The door closing process takes
approximately 20 seconds to complete, at which
time the door becomes locked. Check to make
certain the door is locked.
At the end of the clean cycle
9 CAUTION
The interior of the oven will still be at baking
temperatures when the automatic lock cycles to its
open position and the oven door can be opened.
The door latch will open automatically when the oven is
below 500°F (260°C) and the automatic Door Lock
completes its 20 second cycle to the open position.
1. Turn the mode knob to OFF.
2. Turn the temperature knob to OFF.
To set end time of self-clean
1. Remove all utensils, racks, and rack guides. Ensure the
oven door is shut.
2. Turn the mode knob to SELF CLEAN.
3. Press the right
( or ) to set the desired clean level and
press ENTER.
4. Press TIMERS, press the left ( or ), and select END
TIMER.
5. Press the right
( or ) to set the END TIMER, and press
ENTER.
6. After the information text, press ENTER.
NOTES:
• After self-clean completes its cycle, the self-clean
function will be prevented from running again for a
period of 24 hours.
• If the user tries to enable a self-clean function in an
oven where the self-clean function has been
restricted, the oven lights will blink on and off in 2-
second intervals to indicate to the user that the
function is not available. User must turn the knobs to
OFF to cease the blinking lights.
Appliance cleaning tips
9 CAUTION
Avoid cleaning any part of the range while it is hot.
• The porcelain enamel finish is acid resistant, but not
acid proof. Acidic foods, such as citrus juices,
tomatoes, rhubarb, vinegar, alcohol or milk, should be
wiped up and not allowed to bake onto the porcelain
during the next use.
• The heating elements in the oven do not require
cleaning. The elements burn themselves clean when
the oven is in use.
When cleaning this appliance
• Use the mildest cleaning procedure that will do the
job efficiently and effectively. Some cleaners of the
same type are harsher than others. Try on a small
inconspicuous area first.
• Always rub metal finishes in the direction of the polish
lines for maximum effectiveness and to avoid marring
the surface.
• Use only clean soft cloths, sponges, paper towels,
fibrous brushes, plastic, non-metal or steel wool soap
pads for cleaning and scouring, as recommended on
the chart.
• Most exterior parts of this appliance can be cleaned
with hot sudsy water (except the various items
specifically identified otherwise). When rinsing is
required, rinse thoroughly.
• Always wipe dry immediately to avoid water marks.
• DO NOT USE CHLORINE BASED CLEANERS.
Soil level Duration (excluding cool off)
Low 1 ½ hours
High 3 hours

Page. 49
Cleaning recommendations
Part/material Cleaning notes
Burner base / brass
Burner cap / cast iron
• A stiff nylon bristle tooth brush can be used to clean port openings.
• After cleaning, make sure that the burner cap is correctly seated on the burner base.
• DO NOT scratch or gouge the port openings of burner cap.
• Suggested cleaners; rinse and dry immediately:
-- Hot water and detergent
-- Bon-ami
®
-- Barkeepers Friend
®
-- Wright's
®
All Purpose Brass Polish
-- Kleen King
®
Bezels and control
knobs / chrome, metal
• DO NOT soak knobs.
• DO NOT force knobs onto wrong valve shaft.
• Suggested cleaners; rinse and dry immediately:
-- Hot water and detergent
Broil pan / porcelain
enamel
• To loosen cooked on food, squirt with liquid detergent and cover with wet paper towels.
Allow to stand.
• Suggested cleaners; rinse and dry immediately:
-- Hot water and detergent
-- Vinegar and water
-- Dishwasher safe
-- Bar Keeper’s Friend
®
-- Soft Scrub
®
-- Bon-ami
®
-- Soap-filled fiber or steel wool pads
Ceramic briquettes,
briquette basket, and
grill drip tray
• Suggested cleaning for ceramic briquettes;
1) Gently place grease-saturated ceramic briquettes in a 6 quart or larger pot.
2) Fill the pot with clean water so that all ceramic briquettes are covered at least ½''
deep.
3) Bring the water to a steady boil. Once reaching a steady boil, continue to boil for 10
minutes.
4) Remove heat and allow ceramic briquettes to cool to a safe temperature.
5) Pour water off of ceramic briquettes and pat them dry on old towels or paper towels.
6) Allow ceramic briquettes to air dry for at least two hours. Some visible grease stains
may remain on briquettes after cleaning.
7) Reassemble clean, dry briquettes back into the grill before using the grill again.
• New ceramic briquettes can be purchased from the Thermador eShop (order number
PABRICKBKN). See the back cover for support information.
9 CAUTION:
Ceramic briquettes must be replaced when they begin to turn black. This means that
they are saturated with fat and may smoke heavily during operation or the fat may catch
fire.
• Suggested cleaners for basket and drip tray; rinse and dry immediately:
-- Hot water and detergent
-- Dishwasher safe
Door(s) / stainless steel • Use care to keep cleaners and water away from the door vents. If water or cleaners spill
into the vents, water may streak the glass inside.

Page. 50
Exterior finish / stainless
steel
• Stainless steel resists most food stains and pit marks providing the surface is kept clean
and protected. Never allow food stains or salt to remain on stainless steel for any length
of time.
• Wipe off any smoke residue that remains on the front frame with Fantastik
®
or Bar
Keeper’s Friend
®
cleaners. If stain remains, use a mild liquid cleanser. The amount of
smoke stain is directly related to the amount of food soil left in the oven at the time of
self-cleaning. Clean the oven often.
• Rub lightly in the direction of polish lines.
• Chlorine or chlorine compounds in some cleaners are corrosive to stainless steel. Check
ingredients on label.
• Suggested cleaners; rinse and dry immediately:
-- Hot water and detergent
-- Fantastik
®
-- Siege
®
Stainless Steel and Aluminum Cleaner
-- Kleen King
®
Stainless Steel Liquid Cleaner
-- Cleaner polish: Stainless Steel Magic
®
to protect the finish from staining and pitting;
enhances appearance.
-- Thermador Stainless Steel Conditioner (00576697)
-- For hard water spots use household vinegar.
• For heat discoloration; rinse and dry immediately:
-- Barkeepers Friend
®
-- Wright's
®
All Purpose Brass Polish
Grates / porcelain
enamel on cast iron
• The grates are heavy; use care when lifting. Place on a protected surface. DO NOT clean
grates in a self-cleaning oven.
• The rough texture of the grate can sometimes remove aluminum deposits from the
bottom of pans and fill in areas between the high spots on the surface of the grate. Use
special care when cooking with copper and aluminum pots and pans as this type of
cookware can sometimes leave metal deposits on the grates.
• Blisters/ crazing/ chips are common due to the extreme temperatures on grate fingers
and rapid temperature changes.
• Acidic and sugar-laden spills deteriorate the enamel. Remove soil immediately once the
grate has cooled.
• Abrasive cleaners, used too vigorously or too often can eventually mar the enamel.
• Suggested cleaners; rinse and dry immediately:
-- Hot water and detergent
-- Fantastik
®
-- Bon-ami
®
-- Soft Scrub
®
• Stubborn stains; rinse and dry immediately:
-- Soap-filled steel wool pad
-- Lestoil
®
-- Other degreaser
• Metal deposits:
-- Scotch Brite
TM
scrub sponge
-- Course steel wool pad
Part/material Cleaning notes

Page. 51
Griddle / aluminum with
non-stick coating
• NEVER flood a hot griddle with cold water. This can warp or crack the aluminum plate.
• DO NOT clean any part of the griddle in a self-cleaning oven.
• Wipe griddle surface with warm soapy water then rinse with warm water. Wipe dry with a
soft cloth.
• If food particles stick to the griddle plate, remove with a mild abrasive cleaner such as
Soft Scrub
®
.
• Suggested cleaners; rinse and dry immediately:
-- Hot water and detergent
-- Dishwasher safe
-- Soft Scrub
®
Griddle grease tray • Remove tray after grease has cooled. Be careful not to fill it so full that tipping to remove
it spills the grease. Discard grease into a grease resistant container for disposal.
• Clean the grease tray after each use.
• Suggested cleaners; rinse and dry immediately:
-- Hot water and detergent
-- Dishwasher safe
-- Soft Scrub
®
Grill grates / porcelain
enamel on cast iron
• Clean the grates after each use.
• Place the grill grate into a sink and pour boiling hot water over the grate. Lay a dish towel
on top of the grate and pour more hot water over the towel. Allow the water to soak into
the residue. Scrape away debris with a soap-filled scouring pad.
• Stubborn soil: Soft Scrub
®
.
• Suggested cleaners; rinse and dry immediately:
-- Hot water and detergent
-- Dishwasher safe
-- Soft Scrub
®
-- Soft brass wire brush for stubborn residues. Hard steel wire brushes could scratch the
porcelain grate coating and cause premature oxidation of the grate.
• Stubborn stains; rinse and dry immediately:
-- Soap-filled steel wool pad
-- Lestoil
®
-- Other degreaser
Igniters / ceramic • DO NOT use sharp tools to scrape the igniters. The igniters are fragile. If an igniter is
damaged, it may not light the burner.
• Suggested cleaners:
-- Cotton swab dampened with soapy water
-- Fantastik
®
Part/material Cleaning notes

Page. 52
Oven cavity / porcelain
enamel on steel
• Porcelain enamel is acid resistant, but not acid proof. Acid foods such as citrus juices,
tomatoes, rhubarb, vinegar, alcohol or milk, should be wiped up and not allowed to bake
onto the porcelain during the next use. Over a period of time, the porcelain may craze
(get fine hairlike lines), this will not affect oven performance.
• Apply cleaner to a damp sponge or cloth. Rub lightly. Rinse thoroughly and dry. If food
has burned onto the oven and is difficult to remove, the spots can be soaked with a cloth
saturated in a suggested cleaner. Close the door and allow it to soak until the food soil
can be easily removed with a damp soapy cloth or mild abrasive.
• Suggested cleaners; rinse and dry immediately:
-- Hot water and detergent
-- Bar Keeper’s Friend
®
-- Vinegar and water
-- Soft Scrub
®
-- Bon-ami
®
Oven racks and rack
guides
• Some commercial oven cleaners cause darkening and discoloration. Test the cleaner on a
small part of the rack and check for discoloration before cleaning the entire rack.
• Oven racks will discolor if left in oven during self clean.
• If the racks do not slide easily after being cleaned, dampen a paper towel with a small
amount of cooking oil and rub it lightly over the side rails.
• Suggested cleaners; rinse and dry immediately:
-- Hot water and detergent
-- Vinegar and water
-- Dishwasher safe
-- Bar Keeper’s Friend
®
-- Soft Scrub
®
-- Bon-ami
®
• Stubborn stains; rinse and dry immediately:
-- Soap-filled fiber or steel wool pad
Surface spill trays /
porcelain enamel
• The porcelain enamel finish is acid resistant, but not acid proof. Acidic foods, such as
citrus juices, tomatoes, rhubarb, vinegar, alcohol or milk, should be wiped up and not
allowed to bake onto the porcelain during the next use.
• If mild abrasive cleaners are used, rub lightly as these cleansers may scratch the finish.
• For burned on foods, soap filled fiber or steel wool pads may be used but care must be
taken as these may scratch the finish.
• Suggested cleaners; rinse and dry immediately:
-- Hot water and detergent
-- Soft Scrub
®
-- Bar Keeper’s Friend
®
-- Bon-ami
®
• Stubborn stains; rinse and dry immediately:
-- Soap-filled fiber or steel wool pad
Seal / door gasket • Spray on cleaner and blot dry with a cloth. DO NOT rub. Do not move, remove or
damage mesh.
• Suggested cleaners; rinse and dry immediately:
-- Hot water and detergent
-- Fantastik
®
Part/material Cleaning notes
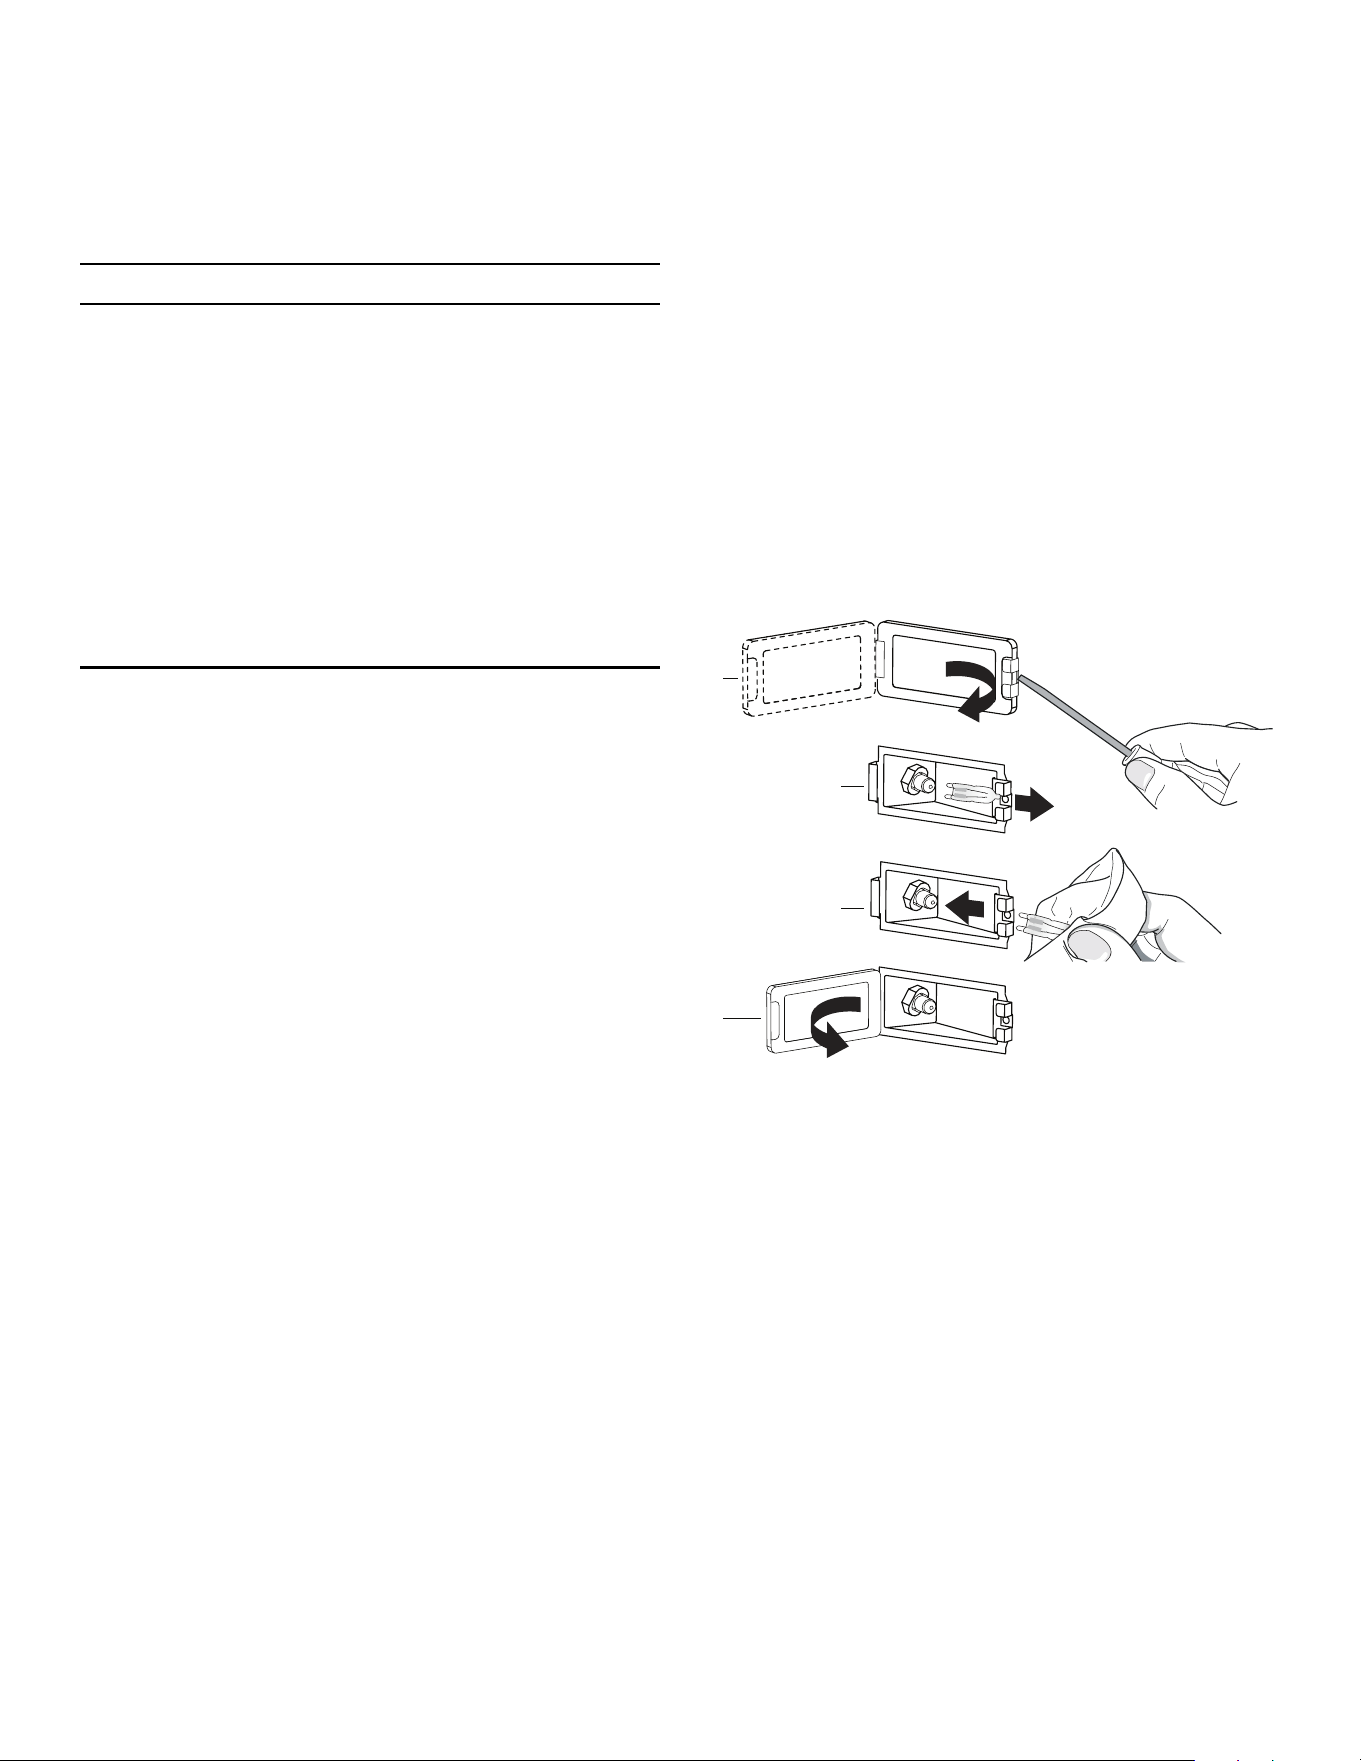
Page. 53
Do-it-yourself maintenance
Oven light bulb replacement
9 CAUTION
• Make sure the appliance and lights are cool and
power to the appliance has been turned off
before replacing the light bulb(s). Failure to do so
could result in electrical shock or burns.
• The covers must be in place when using the
appliance.
• The covers serve to protect the light bulb from
breaking.
• The covers are made of glass. Handle carefully to
avoid breaking. Broken glass could cause an
injury.
• The light socket is live when the door is open.
Replace only with a recommended light bulb designed for
appliance oven use. DO NOT use a standard household
light bulb in any oven. Call Thermador Customer Care
Center at 1-800-735-4328 or your nearest Thermador
dealer to determine the proper replacement bulb for your
range. You will need to know your range’s model number
and serial number.
To replace the light bulb
Use only 10W, 12V G4 light bulbs. Use a clean, dry cloth to
handle halogen light bulbs. This will increase the life of the
bulb.
1. Turn off circuit breaker.
2. Remove the oven racks.
3. Slide the tip of a flat blade screw driver between the
holder clip and the lamp housing (figure, a).
4. Support the glass lens cover with fingers along the
bottom edge to prevent the cover from falling to the
bottom of the oven. Gently twist the flat blade screw
driver to loosen the glass lens cover.
5. Remove the glass lens cover.
6. Remove the bulb by grasping and sliding the bulb
straight back until the two prongs have cleared the
ceramic holder (figure, b).
7. DO NOT touch the glass of the new replacement bulb
with your fingers. It may cause the bulb to fail when it
first lights. Grasp the replacement bulb with a clean
dry cloth. Locate the two prongs in the ceramic
holder, gently poking until the two prongs locate in
the ceramic socket.
8. Press down to seat the bulb (figure, c).
9. Slide the protective lens into the holder clip and push
the other end until the fixing clip snaps back into the
housing (figure, d).
10. Turn on circuit breaker.
a
b
c
d

Page. 54
Before calling for service
Before calling for service, check the following to avoid
unnecessary service charges.
Troubleshooting
Symptom Possible cause Remedy
Intermittent igniter sparking • Ceramic igniter is wet or dirty. • Carefully dry or clean igniter.
• Burner ports are clogged. • Clean ports on burner cap with a wire, a
needle or straightened paper clip.
More than four clicks of
igniter before lighting
• Improper fit of burner cap onto
burner base.
• Align burner cap properly on burner
base.
Constant igniter sparking • Range is not properly grounded.
• Electrical power supply is
incorrectly
polarized.
• Refer to the Installation Instructions.
Have a qualified electrician ground the
range properly.
Igniters sparking but no
flame ignition.
• Gas supply valve is in “OFF” position. • Restore gas supply to the unit.
Range will not operate
(lights, oven, and surface
burners will not come on)
• No power to the unit. • Check for open circuit breaker.
• Check that power supply line connection
is connected to the proper voltage.
• Oven is in Sabbath mode. • Verify that the oven is not in sabbath
mode. See the ''Using the oven'' section
of the Use and Care Guide.
Oven operates on bake but
fails to operate on timed
bake
• Timer improperly set. • Set timer as outlined in the Use and Care
Guide.
Oven light fails to come on. • Oven light burned out. • Replace the oven light as outlined in the
Use and Care Guide.
Door will not open. • Oven is still in self-clean mode. • If oven is hot, door latch will release
when safe temperature is reached.
Foods in oven are not
cooking sufficiently.
• Rack position is incorrect. • See the ''Using the oven'' section of the
Use and Care Guide.
• Improper cookware. • Refer to ''Cookware recommendations''
in the Use and Care Guide.
• Oven door may not be sealing
properly.
• Clean the oven door gasket. Replace if
worn.
• Appliance not level. • Refer to the Installation Instructions for
instructions on how to level the
appliance.
Hot air is coming from the
appliance.
• It is normal for the cooling process to
push heated air out into the room
when the oven is on.
• During different modes the fan
speed will increase and decrease.
• This is normal.
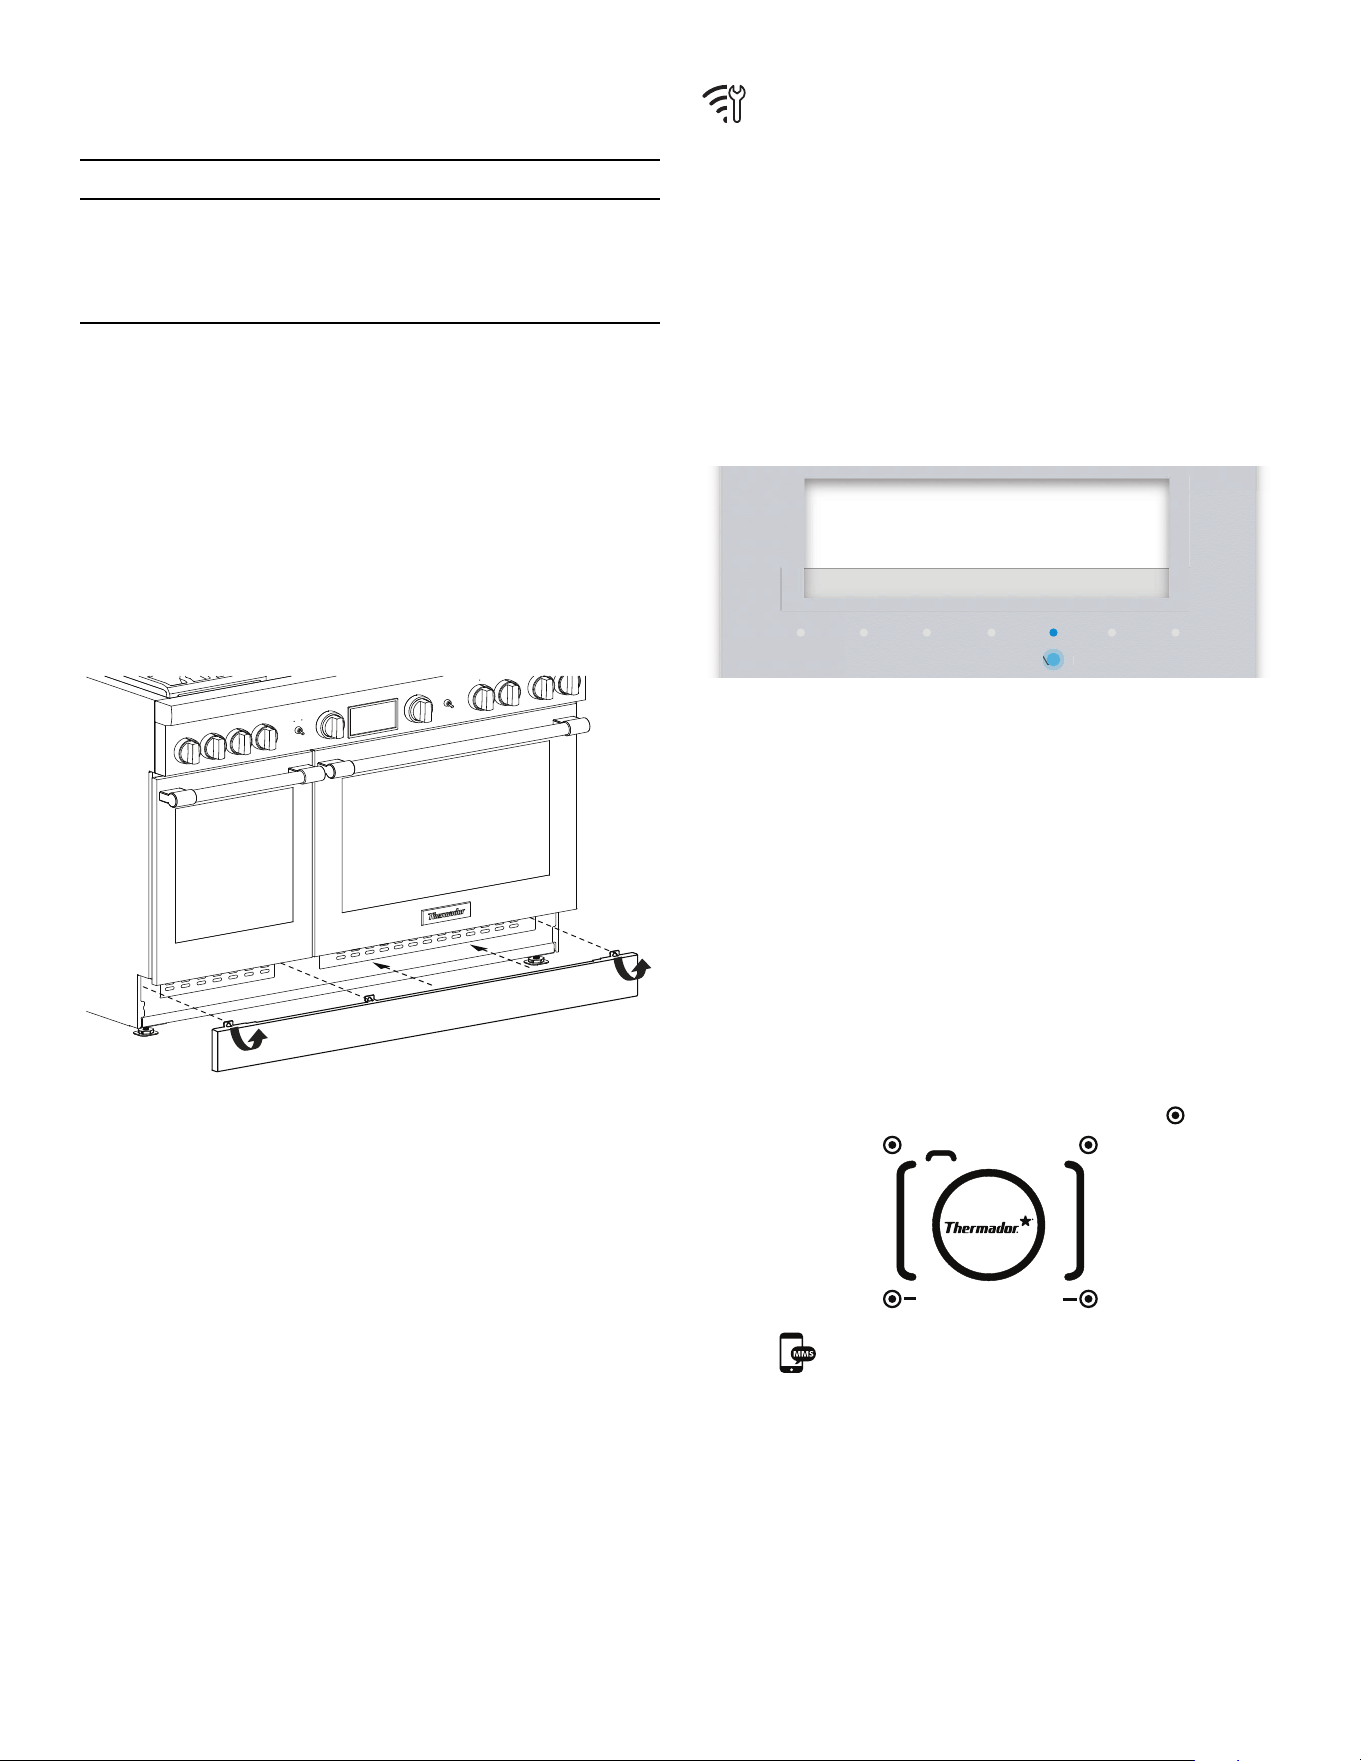
Page. 55
Service information
9 CAUTION
Before removing the toe kick panel, disconnect the
range from the electrical power supply. Reinstall the
toe kick panel before reconnecting the range to the
power supply and operating the range.
Electric wiring diagrams and schematics
The electric wiring diagrams and schematics are attached
behind the toe kick, and should not be removed except by
a service technician, then replaced after service.
Data rating label
The data rating label shows the model and serial number
of your appliance. The data rating label can be accessed
as shown below.
For handy reference, copy the information below from the
data rating label. Keep your invoice for warranty
validation.
Model number _____________________________________
Serial number______________________________________
Date of purchase___________________________________
Remote customer service
connection
It is possible for customer service to access the appliance
via the Home Connect
TM
connection in the event of an
error.
To grant customer service access to the appliance
1. Contact customer support (see back page). Follow the
instructions given to you by the technician.
– The display screen as customer support tries to
gain access to the appliance.
2. Press ENTER to allow the customer support access.
– Once connection is established the Wi-Fi icon is
shown in the status bar.
Product registration
Register your BSH product to ensure timely service and
access to your product related information.
You may register your product through one of the
following ways:
• Register with your phone (USA only).
1. Take a photo of the camera icon on the
registration card, including the points ( ).
2. Text the photo to 21432. (USA only, text and
data rates may apply.)
• Mail in the completed product registration card to the
address printed on the card.
• Register your product online at www.thermador.com.
• Call Thermador customer service at 1-800-735-4328.
TIMERS SETTINGS ENTER
Do you want to grant access to
customer service?
Allow with Enter
NTE
NTE
PHOTOREGISTER
SM
THERMADOR

Page. 56
Statement of limited product warranty
What this warranty covers and who it
applies to
The limited warranty provided by BSH Home Appliances
("Thermador") in this Statement of Limited Product
Warranty applies only to the Thermador appliance sold to
you, the first using purchaser, provided that the Product
was purchased:
• For your normal, household (non-commercial) use,
and has in fact at all times only been used for normal
household purposes.
• New at retail (not a display, “as is”, or previously
returned model), and not for resale, or commercial
use.
• Within the United States or Canada, and has at all
times remained within the country of original
purchase.
The warranties stated herein apply to the original
purchaser of the product warranted herein and to each
succeeding owner of the product purchased for ordinary
home use during the term of the warranty.
Please make sure to return your registration card; while
not necessary to effectuate warranty coverage, it is the
best way for Thermador to notify you in the unlikely event
of a safety notice or product recall.
How long the warranty lasts
Thermador warrants that the Product is free from defects
in materials and workmanship for a period of seven
hundred and thirty (730) days from the date of purchase.
The foregoing timeline begins to run upon the date of
purchase, and shall not be stalled, tolled, extended, or
suspended, for any reason whatsoever.
This Product is also warranted to be free from cosmetic
defects in material and workmanship (such as scratches of
stainless steel, paint/porcelain blemishes, chips, dents, or
other damage to the finish) of the Product, for a period of
sixty (60) days from the date of purchase or closing date
for new construction. This cosmetic
warranty excludes
slight color variations due to inherent differences in
painted and porcelain parts, as well as differences caused
by kitchen lighting, product location, or other similar
factors. This cosmetic
warranty specifically excludes any
display, floor, "As Is", or "B" stock appliances.
Repair/replace as your exclusive remedy
During this warranty period, Thermador or one of its
authorized service providers will repair your Product
without charge to you (subject to certain limitations stated
herein) if your Product proves to have been manufactured
with a defect in materials or workmanship. If reasonable
attempts to repair the Product have been made without
success, then Thermador will replace your Product
(upgraded models may be available to you, in
Thermador’s sole discretion, for an additional charge). All
removed parts and components shall become the
property of Thermador at its sole option. All replaced and/
or repaired parts shall assume the identity of the original
part for purposes of this warranty and this warranty shall
not be extended with respect to such parts.
Thermador's sole liability and responsibility hereunder is
to repair manufacturer-defective Product only, using a
Thermador authorized service provider during normal
business hours.
For safety and property damage concerns, Thermador
highly recommends that you do not attempt to repair the
Product yourself, or use an unauthorized servicer;
Thermador will have no responsibility or liability for repairs
or work performed by a non-authorized servicer. If you
choose to have someone other than an authorized service
provider work on your Product, THIS WARRANTY WILL
AUTOMATICALLY BECOME NULL AND VOID. Authorized
service providers are those persons or companies that
have been specially trained on Thermador products, and
who possess, in Thermador's opinion, a superior
reputation for customer service and technical ability (note
that they are independent entities and are not agents,
partners, affiliates or representatives of Thermador).
Notwithstanding the foregoing, Thermador will not incur
any liability, or have responsibility, for the Product if it is
located in a remote area (more than 100 miles from an
authorized service provider) or is reasonably inaccessible,
hazardous, threatening, or treacherous locale,
surroundings, or environment; in any such event, if you
request, Thermador would still pay for labor and parts and
ship the parts to the nearest authorized service provider,
but you would still be fully liable and responsible for any
travel time or other special charges by the service
company, assuming they agree to make the service call.

Page. 57
Out of warranty product
Thermador is under no obligation, at law or otherwise, to
provide you with any concessions, including repairs, pro-
rates, or Product replacement, once this warranty has
expired.
Warranty exclusions
The warranty coverage described herein excludes all
defects or damage that are not the direct fault of
Thermador, including without limitation, one or more of
the following:
• Use of the Product in anything other than its normal,
customary and intended manner (including without
limitation, any form of commercial use, use or storage
of an indoor product outdoors, use of the Product in
conjunction with air or water-going vessels).
• Any party's willful misconduct, negligence, misuse,
abuse, accidents, neglect, improper operation, failure
to maintain, improper or negligent installation,
tampering, failure to follow operating instructions,
mishandling, unauthorized service (including self-
performed “fixing” or exploration of the appliance's
internal workings).
• Adjustment, alteration or modification of any kind.
• A failure to comply with any applicable state, local,
city, or county electrical, plumbing and/or building
codes, regulations, or laws, including failure to install
the product in strict conformity with local fire and
building codes and regulations.
• Ordinary wear and tear, spills of food, liquid, grease
accumulations, or other substances that accumulate
on, in, or around the Product.
• Any external, elemental and/or environmental forces
and factors, including without limitation, rain, wind,
sand, floods, fires, mud slides, freezing temperatures,
excessive moisture or extended exposure to humidity,
lightning, power surges, structural failures surrounding
the appliance, and acts of God.
In no event shall Thermador have any liability or
responsibility whatsoever for damage to surrounding
property, including cabinetry, floors, ceilings, and other
structures or objects around the Product. Also excluded
from this warranty are products on which the serial
numbers have been altered, defaced, or removed; service
visits to teach you how to use the Product, or visits where
there is nothing wrong with the Product; correction of
installation problems (you are solely responsible for any
structure and setting for the Product, including all
electrical, plumbing or other connecting facilities, for
proper foundation/flooring, and for any alterations
including without limitation cabinetry, walls, floors,
shelving, etc.); and resetting of breakers or fuses.
TO THE EXTENT ALLOWED BY LAW, THIS WARRANTY
SETS OUT YOUR EXCLUSIVE REMEDIES WITH RESPECT
TO PRODUCT, WHETHER THE CLAIM ARISES IN
CONTRACT OR TORT (INCLUDING STRICT LIABILITY, OR
NEGLIGENCE) OR OTHERWISE. THIS WARRANTY IS IN
LIEU OF ALL OTHER WARRANTIES, WHETHER EXPRESS
OR IMPLIED. ANY WARRANTY IMPLIED BY LAW,
WHETHER FOR MERCHANTABILITY OR FITNESS FOR A
PARTICULAR PURPOSE, OR OTHERWISE, SHALL BE
EFFECTIVE ONLY FOR THE PERIOD THAT THIS EXPRESS
LIMITED WARRANTY IS EFFECTIVE. IN NO EVENT WILL
THE MANUFACTURER BE LIABLE FOR
CONSEQUENTIAL, SPECIAL, INCIDENTAL, INDIRECT,
“BUSINESS LOSS”, AND/OR PUNITIVE DAMAGES,
LOSSES, OR EXPENSES, INCLUDING WITHOUT
LIMITATION TIME AWAY FROM WORK, HOTELS AND/
OR RESTAURANT MEALS, REMODELLING EXPENSES IN
EXCESS OF DIRECT DAMAGES WHICH ARE
DEFINITIVELY CAUSED EXCLUSIVELY BY THERMADOR,
OR OTHERWISE. SOME STATES DO NOT ALLOW THE
EXCLUSION OR LIMITATION OF INCIDENTAL OR
CONSEQUENTIAL DAMAGES, AND SOME STATES DO
NOT ALLOW LIMITATIONS ON HOW LONG AN IMPLIED
WARRANTY LASTS, SO THE ABOVE LIMITATIONS MAY
NOT APPLY TO YOU. THIS WARRANTY GIVES YOU
SPECIFIC LEGAL RIGHTS, AND YOU MAY ALSO HAVE
OTHER RIGHTS WHICH VARY FROM STATE TO STATE.
No attempt to alter, modify or amend this warranty shall
be effective unless authorized in writing by an officer of
BSH.
Page. 58
Cet appareil électroménager de THERMADOR
TM
est fait par BSH Home Appliances LtD
6696 Financial Drive, Unit 3
Mississauga, ON L5N 7J6
Des questions?
1-800-735-4328
www.thermador.ca
Nous attendons de vos nouvelles!
Table des
MATIÈRES
Sécurité................................................................................... 59
Instructions importants de sécurité................................. 59
Description ............................................................................. 66
Identification de la cuisinière........................................... 66
Avant de commencer ............................................................. 71
Mise en route................................................................... 71
Utilisation de la table de cuisson ........................................... 73
Brûleurs STAR
®
scellés ................................................... 73
Brûleurs ExtraLow
®
........................................................ 74
Plaque chauffante électrique........................................... 80
Gril électrique.................................................................. 83
Utilisation du four .................................................................. 86
Symboles et descriptions................................................. 86
Configuration initiale....................................................... 88
Réglage du four............................................................... 89
Minuteries
............................................... 89
Préchauffage rapide .................................................. 90
Verrouillage du panneau ........................................... 90
Conversion convection.................................................... 91
Décalage de température ............................................... 91
Sonde thermique ....................................................... 91
Sabbat et cuisson prolongée ..................................... 92
Démarrage à distance ............................................... 94
Tirer le meilleur parti de l’appareil ......................................... 96
Position des grilles pour la cuisson.................................. 96
Cuisson ...................................................................... 96
Griller ......................................................................... 97
Gril à convection ........................................................ 98
Cuisson à convection ................................................. 98
Convection véritable ................................................. 100
Apprêt ....................................................................... 100
Rôtissage ................................................................... 101
Rôtissage par convection .......................................... 101
Garder-au-chaud ....................................................... 102
Home Connect
TM
................................................................... 103
Configuration................................................................... 103
Entretien et nettoyage............................................................ 106
Autonettoyage du four (certains modèles) ............... 107
Conseils de nettoyage ..................................................... 108
Entretien à faire soi-même ..................................................... 114
Changement de l’ampoule du four ................................ 114
Avant d’appeler le service technique ..................................... 115
Dépannage ...................................................................... 115
Information pour le service technique............................. 116
Enregistrement de produit .............................................. 116
Connexion pour réparation à distance ...................... 117
Énoncé de garantie limitée du produit................................... 118
Entretien, pièces, et accessoires ................................ page verso
Définitions de
SÉCURITÉ
9 AVERTISSEMENT
Ceci indique que le non respect de cet avertissement peut
entraîner des blessures graves, voire la mort.
9 ATTENTION
Ceci indique que le non respect de cet avertissement peut
entraîner des blessures légères ou modérées.
NOTICE : Ceci indique que la non-conformité à cet avis de
sécurité peut entraîner des dégâts à l'appareil ou à la propriété.
Note : Ceci vous avertit que d'importantes informations et/ou
conseils sont fournis.
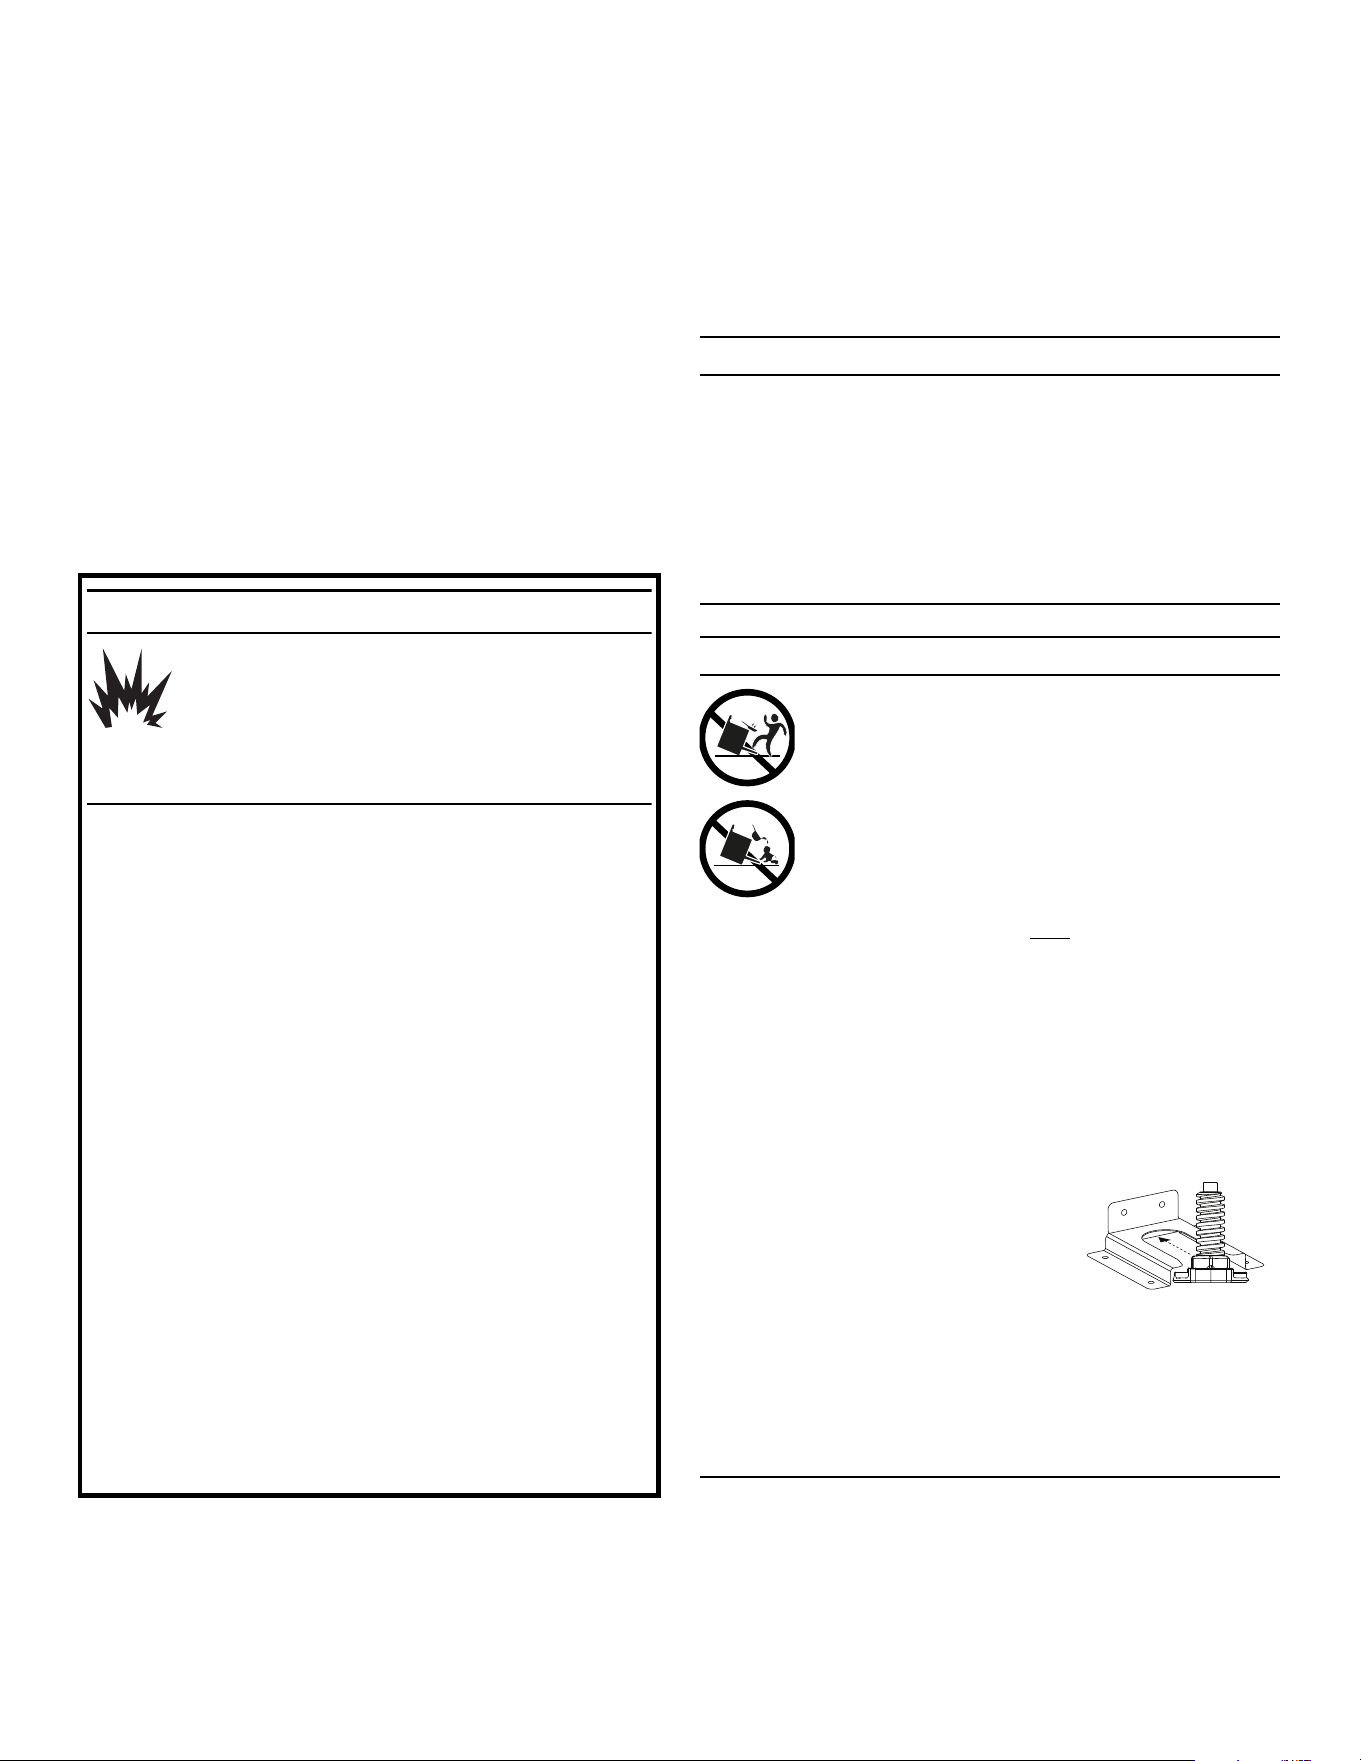
Page. 59
Sécurité
9 INSTRUCTIONS IMPORTANTS DE SÉCURITÉ
LIRE TOUTES LES INSTRUCTIONS AVANT DE PROCÉDER
Lisez attentivement
INSTALLATEUR : Veuillez laisser ces instructions
d’installation avec l’appareil pour le propriétaire.
PROPRIÉTAIRE : Veuillez conserver ces instructions pour
consultation ultérieure. Utiliser cet appareil uniquement
aux fins indiquées dans ce manuel.
AVERTISSEMENT
Correctement entretenu, votre électroménager neuf a été
conçu pour être sécuritaire et fiable. Lisez attentivement
toutes les instructions avant l’utilisation. Ces précautions
réduiront le risque de brûlure, d'électrocution, d’incendie
et de blessures corporelles. Lorsque vous utilisez des
appareils électroménagers de cuisine, il importe de suivre
des précautions de sécurité de base, y compris celles
indiquées dans les pages suivantes.
AVERTISSEMENT
DANGER DE BASCULEMENT
Toutes les cuisinières peuvent basculer et
causer une blessure. Pour éviter le basculement
accidentel de la cuisinière, fixez-la au sol au
moyen du dispositif anti-bascule fourni.
L’appareil risque de basculer si le dispositif
n’est pas installé conformément aux présentes
instructions. Pour toutes les cuisinières, un
dispositif anti-bascule doit
être installé
conformément aux présentes instructions.
Un enfant ou un adulte pourrait faire basculer l’appareil et
perdre la vie.
Ne faites pas fonctionner l’appareil si le support anti-
bascule n’est pas installé et qu’il ne retient pas l’appareil.
La non-observation de ces instructions peut entraîner la
mort ou causer de graves brûlures à des enfants ou des
adultes.
En déplaçant la cuisinière pour la
nettoyer, la réparer ou pour toute
autre raison, assurez-vous qu’elle
s’est bien enclenchée dans le
dispositif anti-bascule lorsque vous la
remettez en place. Autrement, si l’appareil est utilisé de
façon anormale (par exemple, si quelqu’un monte,
s’assoie ou s’appuie sur une porte ouverte), la cuisinière
risque de basculer. Le basculement de la cuisinière ou
d’un liquide chaud se trouvant sur la surface de cuisson
pourrait causer des blessures corporelles.
AVERTISSEMENT
L’information fournie dans le présent
manuel doit être très rigoureusement
respectée, sous peine d’incendie ou
d’explosion entraînant des
dommages, des blessures ou la mort.
-- Ne stockez pas et n’utilisez pas d’essence
ou autres ou la compagnie distributrice de
gaz.
-- SI VOUS SENTEZ UNE ODEUR DE GAZ :
• N’allumez aucun appareil.
• Ne touchez pas aux interrupteurs
électriques.
• N’utilisez pas les téléphones du
bâtiment.
• Appelez immédiatement votre
compagnie de gaz de chez un voisin.
Suivez les instructions de la
compagnie.
• Si vous n’arrivez pas à contacter la
compagnie de gaz, appelez les
pompiers.
-- L’installation et les réparations doivent
être réalisées par un installateur qualité,
un centre de réparation agréé ou la
compagnie de gaz.

Page. 60
9 INSTRUCTIONS IMPORTANTS DE SÉCURITÉ
LIRE TOUTES LES INSTRUCTIONS AVANT DE PROCÉDER
AVERTISSEMENT
Tout installation, ajustement, modification, entretien ou
nettoyage inadéquat peut causer des blessures ou des
dommages matériels. Consultez le présent manuel. Pour
obtenir de l’assistance ou des renseignements
supplémentaires, consultez un installateur qualifié, un
centre de réparation, le fabricant (ou le détaillant) ou une
société gazière.
AVERTISSEMENT
Pour assurer une bonne ventilation de la cuisinière
n’enlevez PAS les pattes de la cuisinière.
AVERTISSEMENT
Avant de procéder au nettoyage ou à l’entretien de
l’appareil, éteignez l’alimentation du panneau électrique
et bloquez le dispositif de déconnexion pour éviter que
l’alimentation électrique ne soit accidentellement
rallumée. Si le dispositif de sectionnement d’électricité ne
peut être bloqué, attachez un avertissement (comme une
étiquette) bien en vue sur le tableau électrique.
Vérification du type de gaz
Gaz naturel — 7 po (17,4 mb) min. à 14 po (34,9 mb) max.
de colonne d’eau
Gaz propane — 11 po (27,4 mb) min. à 14 po (34,9 mb)
max. de colonne d’eau
Vérifiez le type de gaz fourni à votre emplacement.
Assurez-vous que l’appareil est raccordé au type de gaz
pour lequel il est certifié. Reportez-vous à l’étiquette de
données.
AVERTISSEMENT
Si un kit de conversion au gaz est utilisé, cette trousse de
conversion doit être installée par une agence de
réparation qualifiée en conformité aux directives du
fabricant et de tous les autres codes et exigences en
vigueur de l'autorité ayant juridiction. Si les directives ne
sont pas suivies à la lettre, il y a un risque d'incendie,
d'explosion ou de génération de monoxyde de carbone
pouvant entraîner des dommages matériaux, des
blessures ou une perte de vie. L'agence de réparation
qualifiée est responsable de la bonne installation de cette
trousse. L'installation n'est pas jugée terminée jusqu'à ce
que l'on ait testé l'appareil converti comme précisé dans
les directives du fabricant fournies avec la trousse.
ATTENTION
Lorsque vous branchez l’appareil au gaz propane, assurez-
vous que le réservoir de gaz propane est muni de son
propre mécanisme régulateur à haute pression en plus du
régulateur à haute pression fourni avec l’appareil. La
pression de gaz maximale ne devrait pas excéder 14,0
pouces de colonne d’eau (34,9 Mb) entre le réservoir de
gaz propane et le régulateur à haute pression.
Pour les installations au Massachusetts
1. L’installation doit être réalisée par un entrepreneur
qualifié ou accrédité, un plombier ou un installateur
de gaz qualifié ou autorisée par l’État, la province ou
la région dans laquelle cet appareil est installé.
2. La vanne d’arrêt de gaz doit être pourvue d’une poi-
gnée en « T ».
3. La longueur du tuyau de gaz ne doit pas excéder
36 po (914 mm).
S’assurer que l’installation et l’entretien sont effectués
correctement. Suivre les instructions du Manuel
d’installation accompagnant ce produit. Confier
l’installation et la mise à la terre électrique de l’appareil à
un technicien qualifié.
Si le brûleur fuit et que du gaz s’en échappe, ouvrez une
fenêtre ou une porte. NE tentez PAS d’utiliser l’appareil
avant que le gaz ait eu le temps de se dissiper. Attendez
au moins 5 minutes avant d’utiliser l’appareil.
NE PAS réparer ni remplacer toute pièce de l’appareil à
moins que cela ne soit spécifiquement recommandé par
ce manuel. Toute réparation doit être effectuée par un
technicien qualifié.
AVERTISSEMENT
Ne Jamais Faire Fonctionner La Surface De La Table De
Cuisson De Cet Appareil Sans Surveillance.
• Le non-respect de cet avertissement pourrait
entraîner un risque d'incendie, d'explosion ou de
brûlure qui pourrait provoquer des dommages
matériels, des blessures ou un décès.
• En cas d'incendie, se tenir à l'écart de l'appareil et
appeler immédiatement les pompiers. NE PAS
ESSAYER D'ÉTEINDRE UN INCENDIE DE GRAISSE
OU D'HUILE AVEC DE L'EAU.
Page. 61
9 INSTRUCTIONS IMPORTANTS DE SÉCURITÉ
LIRE TOUTES LES INSTRUCTIONS AVANT DE PROCÉDER
Exigences électriques
AVERTISSEMENT
EN CAS DE PANNE ÉLECTRIQUE
Si, pour une raison quelconque, un bouton de
commande de gaz est allumé et qu’il n’y a pas
d’électricité pour actionner les allumeurs
électroniques des brûleurs, mettez le bouton à
OFF et attendez 5 minutes pour permettre au
gaz de se dissiper avant d’allumer
manuellement les brûleurs.
Pour allumer manuellement les brûleurs, tenez une
allumette allumée près des ports d’un brûleur puis tournez
le bouton de commande à HI. Vous pouvez utiliser les
brûleurs standards pendant une panne d’électricité, mais
vous devez les allumer avec une allumette.
NE tentez PAS d’allumer manuellement les brûleurs XLO.
Ces brûleurs sont dotés de la fonction Extralow
®
et ne
peuvent être allumés manuellement.
L'électroménager doit être mis à la terre en conformité
aux codes locaux, ou en l’absence de tels codes, au
National Electric Code ANSI/NFPA 70 ou, au Canada, au
code canadien de l’électricité CSA C22.1-02.
Débranchez toujours la fiche électrique de la prise murale
avant de procéder à l’entretien de l’appareil.
Consultez les exigences d’alimentation électrique et de
mise à la terre dans les Instructions d’Installation.
Demandez à l’installateur de vous montrer où se trouvent
le disjoncteur et la vanne d’arrêt de gaz pour savoir où et
comment couper l’alimentation électrique et
l’approvisionnement en gaz de l’appareil.
L’installation et l’entretien doivent être correctement
effectués. Suivez les instructions du Instructions
d’Installation fourni avec le produit. Assurez-vous qu’un
électricien qualifié installe et effectue la mise à la terre de
l’appareil.
Cet appareil est conforme à une ou plusieurs des
normes et codes de sécurité :
• La norme américaine UL858 régissant les cuisinières
électriques domestiques.
• La norme américaine ANSI Z21.1 régissant les
appareils électroménagers à gaz.
• La norme canadienne CAN/CGA1.1-M81 régissant les
cuisinières à gaz domestiques.
• La norme canadienne CAN/CSA-22.2 No. 61 régissant
les cuisinières domestiques.
L’installation doit être conforme aux codes locaux ou, en
l’absence de tels codes, au National Fuel Gas Code ANSI
Z223.1/NFPA 54 ou, au Canada, au code national CSA
B149.1 d’installation du gaz naturel et du propane.
Installation dans une maison préfabriquée (mobile) :
L’installation doit être conforme au Manufactured Home
Construction and Safety Standard, Titre 24 CFR, Partie
3280 (anciennement le Federal Standard for Mobile Home
Construction and Safety, Titre 24, HUD/Partie 280) ou,
lorsque cette norme n’est pas applicable, au Standard for
Manufactured Home Installations, ANSI/NCSBCS A225.1,
ou aux codes locaux, là où il y a lieu.
Installation dans une caravane de parc : L’installation doit
être conforme aux codes de l’État ou aux autres codes ou,
en l’absence de tels codes, au Standard for Recreational
Park Trailers, ANSI A119.5.
Il incombe au propriétaire et à l’installateur de déterminer
si des exigences ou des normes additionnelles
s’appliquent spécifiquement à l’installation.
Les espaces libres pour les matières non combustibles ne
font pas partie de la norme ANSI Z21.1 et ne sont pas
mentionnés par la CSA. Un dégagement de moins de 152
mm (6 po) doit être conforme aux codes locaux et/ou par
les autorités locales ayant juridiction.
La profondeur maximale de l’armoire installée au-dessus
de la table de cuisson est de 13 po (33 cm).
Sécurité des enfants
Lorsque les enfants sont assez âgés pour utiliser l’appareil,
il est de la responsabilité des parents ou des tuteurs de
veiller à ce que des personnes qualifiées leur enseignent
des pratiques sécuritaires.
AVERTISSEMENT
NE rangez PAS d’objets attirant l’attention d’enfants au-
dessus ou derrière l’appareil. Ils risqueraient d’y monter
pour s’en emparer et pourraient se blesser gravement.

Page. 62
9 INSTRUCTIONS IMPORTANTS DE SÉCURITÉ
LIRE TOUTES LES INSTRUCTIONS AVANT DE PROCÉDER
NE permettez PAS que quiconque grimpe, se mette
debout, s’assoit ou se pende à une pièce de l’appareil.
Cela pourrait endommager l’appareil et il pourrait
basculer, infligeant possiblement de graves blessures.
NE permettez PAS à des enfants d’utiliser l’appareil à
moins qu’ils ne soient surveillés de près par un adulte.
Les enfants et les animaux ne devraient pas être laissés
seuls ou sans surveillance dans la salle où l’appareil est en
cours d’utilisation. Ils ne devraient jamais avoir
l’autorisation de jouer près de l’appareil, qu’il soit en
cours d’utilisation ou non.
Générales de sécurité
AVERTISSEMENT
Pour éliminer le risque de brûlure ou d'incendie lorsque
vous étirez au-dessus des surfaces chauffantes de
l'électroménager, il faut éviter d'installer des armoires de
rangement au-dessus de la surface de l'électroménager.
AVERTISSEMENT
Pour réduire les risques de blessure lors d’un feu de
friture, observez les consignes suivantes :
• Étouffez les flammes avec un couvercle, une plaque à
biscuits ou un plateau de métal et éteignez ensuite le
brûleur ou l’élément. Prenez garde aux risques de
brûlure. Si les flammes ne disparaissent pas
immédiatement, évacuez les lieux et appelez le
service d’incendie.
• Ne prenez jamais un poêlon en feu – Vous pourriez
vous brûler.
• N’UTILISEZ PAS D’EAU ou un linge à vaisselle mouillé
– une violente explosion de vapeur s’ensuivra.
• Utilisez un extincteur seulement si :
• Vous savez que vous possédez un extincteur de
classe ABC et vous savez vous en servir.
• Le feu est faible et ne s’est pas répandu depuis
son point d’origine.
• Vous avez appelé le service d’incendie.
• Vous pouvez sortir facilement de l’endroit où vous
combattez le feu.
Avertissement issu de la proposition 65 :
Ce produit pourrait contenir un produit chimique reconnu
par l'État de la Californie comme cancérigène ou ayant
des effets nocifs sur la reproduction. Par conséquent,
l’emballage de votre produit pourrait porter l’étiquette
suivante, comme requis par la Californie :
AVERTISSEMENT
POUR RÉDUIRE LES RISQUES DE FEU DE FRITURE
• Ne laissez jamais l’appareil sans surveillance lors de
son utilisation à haute température. Les
débordements par bouillonnement causent de la
fumée et les déversements de graisse qui peuvent
prendre feu. Faites chauffer l’huile à des températures
basses ou moyennes.
• Allumez toujours la hotte lorsque vous cuisinez à
haute température ou que vous faites flamber des
aliments (c.-à-d. crêpes Suzette, cerises jubilé, bœuf
flambé au poivre).
• Nettoyez fréquemment les ventilateurs. Ne laissez pas
la graisse s’accumuler sur les ventilateurs ou les filtres.
• Utilisez des poêlons aux dimensions adéquates.
Utilisez toujours une batterie de cuisine
correspondant aux dimensions de l’élément ou du
brûleur.
N’utilisez JAMAIS la appareil comme espace de
rangement. Les matières inflammables pourraient prendre
feu et les objets en plastique pourraient fondre ou
prendre feu. N’accrochez rien sur l’appareil. Certains
tissus peuvent facilement s’enflammer.
Si la appareil est placée près d’une fenêtre, assurez-vous
que les courants d’air ne peuvent pas pousser les rideaux
jusqu’au-dessus ou à proximité des brûleurs; ils pourraient
s’enflammer.
Assurez-vous qu’il y a TOUJOURS un détecteur de fumée
fonctionnel près de la cuisine. Si vos vêtements ou vos
cheveux prennent feu, jetez-vous immédiatement par
terre et roulez pour éteindre les flammes.
AVERTISSEMENT ISSU DE LA PROPOSITION 65 DE
L’ÉTAT DE LA CALIFORNIE :
: AVERTISSEMENT
Cancér et dommages à la reproduction –
www.P65Warnings.ca.gov.

Page. 63
9 INSTRUCTIONS IMPORTANTS DE SÉCURITÉ
LIRE TOUTES LES INSTRUCTIONS AVANT DE PROCÉDER
Ayez un extincteur approprié à portée de la main, visible
et facile d’accès, tout près de l’appareil de cuisson.
Étouffez les flammes provenant d’aliments en feu, autre
que les feux de friture, avec du bicarbonate de soude.
N’utilisez jamais de l’eau pour éteindre des aliments en
feu.
Dans la mesure du possible, ne faites pas fonctionner le
système de ventilation lorsqu’il y a un feu. Cependant, ne
tentez pas de l’éteindre en passant votre main dans le feu.
Les vêtements, poignées, mitaines ou toute autre matière
inflammable ne doivent JAMAIS toucher ni être placés à
proximité des brûleurs ou des grilles des brûleurs avant
que ceux-ci n’aient eu le temps de refroidir. Les tissus
pourraient prendre feu et provoquer des blessures.
N’utilisez que des poignées et mitaines sèches : la vapeur
qui se dégage de poignées et de mitaines mouillées ou
humides posées sur des surfaces chaudes peut provoquer
des blessures. N’utilisez PAS de serviettes ni de chiffons
volumineux au lieu de poignées et de mitaines. Ne laissez
pas de poignées ou de mitaines en contact avec des
grilles ou des brûleurs chauds.
Pour votre sécurité, lorsque vous utilisez l’appareil, portez
des vêtements adéquats et évitez ceux qui sont amples et
qui ont des manches tombantes. Certains tissus
synthétiques sont hautement inflammables. Vous ne
devriez pas en porter lorsque vous cuisinez.
N’enveloppez aucune pièce de l’appareil dans du papier
d’aluminium. L’utilisation de revêtement en aluminium
pourrait causer une décharge électrique ou un incendie,
ou encore obstruer la circulation d’air de la combustion et
de l’aération. Le papier d’aluminium est un excellent
isolateur et il retient la chaleur. Son utilisation aura une
incidence sur la cuisson et pourrait endommager le fini de
l’appareil.
Quand vous utilisez la table de cuisson : NE TOUCHEZ
PAS LES GRILLES DES BRÛLEURS OU LES ZONES
ADJACENTES. Les zones entourant les brûleurs peuvent
devenir assez chaudes pour causer des brûlures.
AVERTISSEMENT
L’appareil sert à cuisiner. N’utilisez jamais l’appareil pour
chauffer une pièce. Ceci peut causer un empoisonnement
au monoxyde de carbone et surchauffer l’appareil en plus
d’en endommager certaines pièces.
Ne laissez jamais l’appareil sans surveillance quand vous
utilisez une flamme intense. Les débordements produisent
de la fumée et des éclaboussures de graisse qui peuvent
s’enflammer. Par ailleurs, si la flamme d’un brûleur
s’éteint, du gaz s’échappera dans la pièce.
Seuls certains types de casseroles en verre, en
vitrocéramique résistant à la chaleur, en céramique, en
terre cuite ou en céramique vitrifiée peuvent être utilisés
sur les brûleurs de la table de cuisson. Ce type de
récipients peut se casser lors de changements de
température brusques. N’utilisez que des réglages de
flamme bas ou moyen et respectez les directives du
fabricant.
Ne faites pas chauffer de récipients fermés. La pression
s’accumulant dans le récipient pourrait le faire éclater et
provoquer des blessures.
AVERTISSEMENT
Lorsque vous cuisinez, réglez les brûleurs de façon à ce
que la flamme ne chauffe que le fond du récipient sans
déborder sur les côtés. Cette instruction est basée sur des
considérations de sécurité.
Soyez prudent et assurez-vous que les courants provenant
de grilles d’aération ou de ventilateurs ne soufflent pas de
matière inflammable vers les flammes ou ne poussent pas
les flammes sur les côtés de la casserole ou du poêlon.
Utilisez toujours des casseroles et poêlons à fond plat et
suffisamment larges pour couvrir le brûleur. L’utilisation de
casseroles trop petites pourrait exposer une partie de la
flamme et enflammer des vêtements.
N’utilisez PAS de casseroles ou de poêlons sur l’accessoire
du gril (vendu séparément). Vous ne devriez jamais utiliser
de grandes casseroles, de plaques à biscuits, etc. sur
l’appareil.
AVERTISSEMENT
Évitez d’utiliser une flamme forte de façon prolongée avec
un récipient plus grand que la grille ou couvrant plusieurs
brûleurs, comme une plaque. Cela peut nuire à la
combustion et produire des émanations dangereuses.
N’utilisez PAS de produits nettoyants inflammables pour
nettoyer l’appareil.

Page. 64
9 INSTRUCTIONS IMPORTANTS DE SÉCURITÉ
LIRE TOUTES LES INSTRUCTIONS AVANT DE PROCÉDER
Avant d’utiliser la plaque chauffante ou les brûleurs à
proximité, enlevez la planche à découper optionnelle ou
l’accessoire de recouvrement de la plaque.
LA GRAISSE EST INFLAMMABLE. Laissez la graisse
chaude refroidir avant d’essayer de la manipuler. Évitez de
laisser de la graisse s’accumuler. Nettoyez après chaque
utilisation.
Pour que les brûleurs s’allument et fonctionnent
correctement, les orifices d’allumage doivent être gardés
propres. Il faut les nettoyer après un débordement ou
lorsque le brûleur ne s’allume pas même si le système
d’allumage électronique s’actionne.
Nettoyez l’appareil avec soin. Faites attention de ne pas
vous brûler avec la vapeur. N’utilisez PAS d’éponge ou de
chiffon mouillé pour nettoyer l’appareil quand elle est
chaude. Certains produits nettoyants dégagent des
vapeurs toxiques s’ils sont appliqués sur une surface
chaude. Suivez les indications fournies par le fabricant du
produit nettoyant.
AVERTISSEMENT
Après un renversement ou une éclaboussure, éteignez le
brûleur et nettoyez le pourtour et les orifices avec soin.
Assurez-vous du bon fonctionnement de l’appareil après
le nettoyage.
AVERTISSEMENT
NE bloquez PAS et n’obstruez PAS les
ouvertures du trou d’aération. Le trou
d’aération est situé à l’arrière de l’appareil. Il
doit être dégagé et ouvert pour fournir la
circulation d’air nécessaire au bon
fonctionnement de l’appareil.
NE touche PAS la zone entourant le trou d’aération
lorsque l’appareil est en marche ou plusieurs minutes
après son utilisation. Certaines pièces du trou d’aération
et de la zone l’entourant deviennent assez chaudes pour
causer des brûlures. Laissez passer assez de temps pour
que l’appareil ait le temps de refroidir avant de toucher ou
nettoyer le trou d’aération.
NE placez PAS d’objets de plastique ou d’autre matière
sensible à la chaleur sur le trou d’aération ou près de
celui-ci. Ils pourraient prendre feu.
Assurez-vous que tous les boutons sont hors circuit et de
l’appareil est froide avant d’utiliser un produit nettoyant
en aérosol sur celle-ci ou à proximité de celle-ci. Certains
produits chimiques vaporisés peuvent, en présence de
chaleur, prendre feu ou corroder les pièces métalliques.
N’obstruez PAS la circulation d’air de combustion ou
d’aération.
Toutes les réparations doivent être effectuées par des
techniciens agréés, qui devront débrancher l’alimentation
électrique de l’appareil avant de le réparer.
Lors de la cuisson d’aliments gras ou huileux, les brûleurs
à gaz adjacents peuvent mettre feu aux vapeurs
aéroportées. Soyez prudent pour éviter les brûlures.
Pour éviter tout risque d’incendie, nettoyez fréquemment
la hotte et les filtres afin d’empêcher les accumulations de
graisse.
En cas d’incendie ou si vous faites flamber
intentionnellement de l'alcool sur la table de cuisson,
suivez les instructions du fabricant. Faites preuve de
prudence lorsque vous cuisinez avec de l’alcool (ex. :
rhum, brandy, bourbon). L’alcool s’évapore à haute
température. Les vapeurs d’alcool peuvent s’enflammer et
présenter un risque de brûlure. Utilisez seulement une
petite quantité d’alcool avec les aliments.
NE rangez PAS ou n’utilisez pas de produits chimiques,
corrosifs, inflammables, non alimentaires près ou dans cet
appareil, lequel est spécifiquement conçu pour réchauffer
ou faire cuire des aliments. L’utilisation de produits
chimiques corrosifs pendant le réchauffage ou la cuisson
peut endommager l’appareil et causer des blessures.
AVERTISSEMENT
NE laissez PAS d’aliments ou d’ustensiles de cuisson, etc.,
dans le four au cours du processus d’autonettoyage.Avant
de passer à l’autonettoyage du four (certains modèles),
retirez le lèchefrite, les grilles du four et tout autre
ustensile ainsi que tous dégâts excessifs d’aliments.

Page. 65
9 INSTRUCTIONS IMPORTANTS DE SÉCURITÉ
LIRE TOUTES LES INSTRUCTIONS AVANT DE PROCÉDER
AVERTISSEMENT
Vous ne devriez pas installer cet appareil avec un système
de ventilation à aspiration descendante. Ce type de
système de ventilation peut présenter des risques
d’incendie et des problèmes de combustion et ainsi
entraîner des blessures corporelles, des dommages
matériels ou un fonctionnement involontaire. Aucune
restriction ne s’applique aux systèmes de ventilation à
aspiration ascendante.
Un rideau d’air ou une hotte au-dessus la cuisinière, dont
le débit d'air est orienté vers le bas en direction de la
cuisinière, ne peut pas être utilisé avec une cuisinière au
gaz à moins que la hotte et la cuisinière ne soient conçues
et testées en conformité à la norme ANSI Z21.1
• CSA 1.1, cuisinière à gaz domestiques, et classées par
un laboratoire d’essai indépendant pour une utilisation
conjuguée.
IMPORTANT : Il est possible que la paroi arrière se
décolore sous certaines conditions de cuisson.
ÉVITEZ de nettoyer, frotter, endommager, déplacer ou
retirer le joint d’étanchéité de la porte. Il est
indispensable, car il assure une bonne étanchéité durant la
cuisson. Si le joint d’étanchéité devient excessivement usé
ou souillé de particules d’aliments, remplacez-le pour
assurer une bonne étanchéité.
Protégez la fonction d’autonettoyage. Ne nettoyez que
les pièces indiquées dans ce livret. N’utilisez PAS de
produits nettoyants commerciaux pour le four ou de
pellicule de protection de four dans ou autour du four
autonettoyant.
Placez les grilles dans la position désirée avant de faire
chauffer le four. Si une grille doit être déplacée alors que
le four est chaud, ne pas laisser les poignées isolantes
entrer en contact avec les éléments chauffants.
NE JAMAIS TOUCHER AUX SURFACES INTERNES DE
LA CAVITÉ DU FOUR NI LES ÉLÉMENTS CHAUFFANTS
– Les éléments de surface peuvent être chauds, même s'ils
sont foncés. Les parois intérieures d’un four peuvent
devenir suffisamment chaudes pour provoquer des
brûlures. Les parois intérieures d’un four peuvent devenir
suffisamment chaudes pour provoquer des brûlures. Avant
et après l’utilisation, ne pas toucher les éléments
chauffants ou les surfaces intérieures du four et ne pas
mettre des vêtements, des poignées ou d’autres
matériaux inflammables en contact avec les éléments ou
ses surfaces tant qu’ils n’ont pas suffisamment refroidis.
Les autres surfaces de l’appareil peuvent devenir
suffisamment chaudes pour provoquer des brûlures. Parmi
ces surfaces, on notera les ouvertures d’évent, les surfaces
situées près de ces ouvertures et les portes de four.
AVERTISSEMENT
NE couvrez JAMAIS les fentes, les orifices ou les canaux
de la sole du four, ni ne couvrez toute une grille avec une
matière comme du papier d'aluminium. Une telle
couverture bloque le débit d'air dans le four et pourrait
entraîner une intoxication par monoxyde de carbone.
Utiliser une feuille de papier aluminium pourrait
également emprisonner la chaleur, entraînant un risque
d’incendie.
Faites preuve de prudence lorsque vous ouvrez la porte
du four. Laissez l’air chaud et la vapeur s’échapper avant
d’introduire ou de retirer des aliments.
Veuillez noter que les oiseaux de compagnie peuvent être
sensibles aux odeurs créées durant l’utilisation du four à
température élevée, qu’elles proviennent de la
combustion de résidus de fabrication ou d’aliments. Il est
donc recommandé de sortir les oiseaux de compagnie de
la cuisine.

Page. 66
Description
Identification de la cuisinière
Le modèle illustré est la cuisinière de 48" avec plaque chauffante (les modèles varient).
1 La garniture pour installation en îlot illustration ou le dosseret bas vendu séparément
(Toutefois, consultez l’avertissement concernant l’espace derrière la cuisinière lors de l’utilisation de la cuisinière
avec cet accessoire.)
2 Évent de four (N'obstruez pas l'entrée d'air!)
3STAR
®
brûleurs
4 Grilles de brûleurs
5 Plaque chauffante (les modèles varient)
6 Éclairage du panneau de commande
7Four principal
8 Four auxiliaire (les modèles varient)
9 Plaque d’habillage
10 Pieds de cuisinière
1
2
3
4
6
5
8
9
7
10
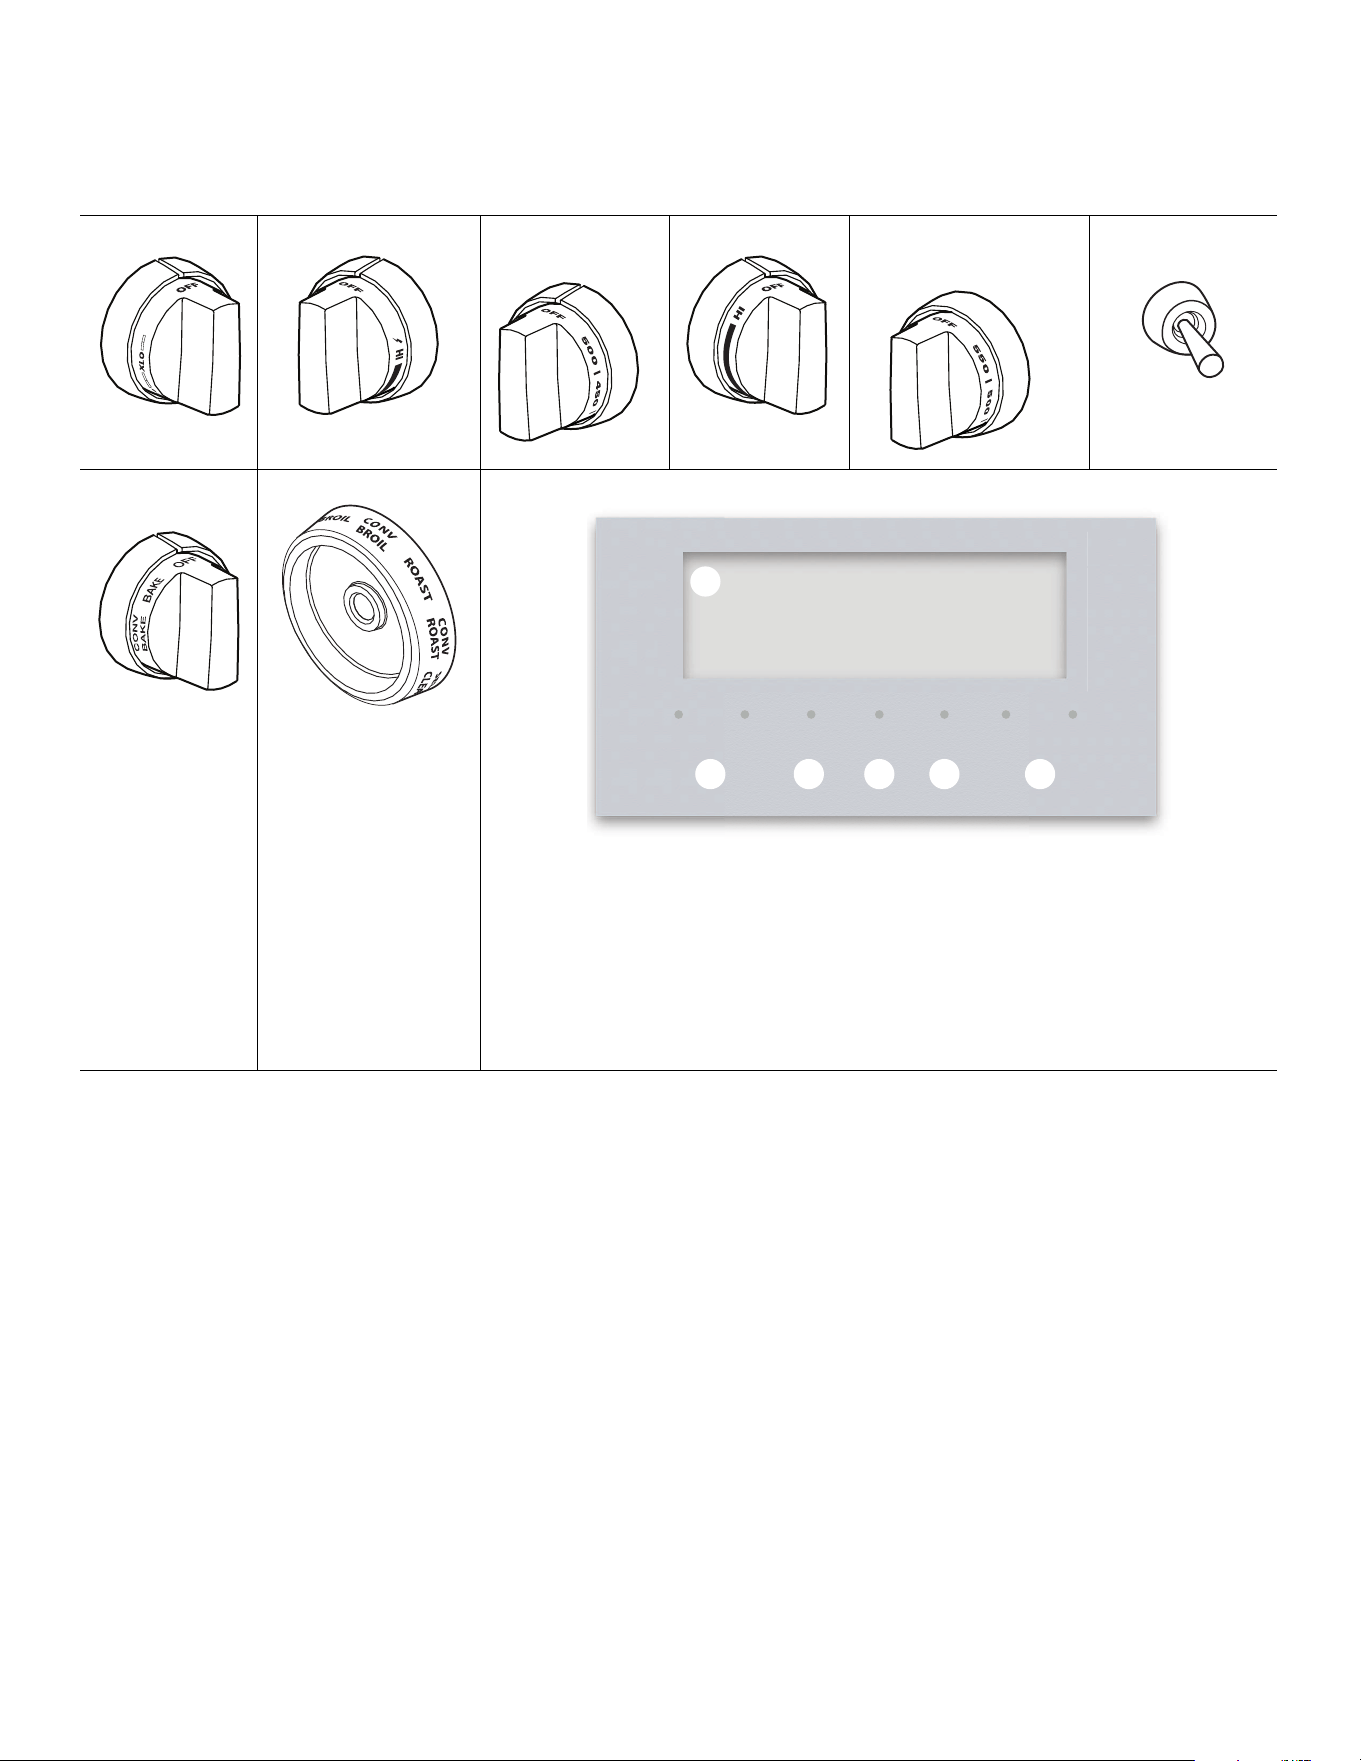
Page. 67
Description des tableaux de commande
REMARQUE : Les molettes, les boutons, les modes et les
fonctionnalités ne sont pas offerts sur tous les modèles.
ExtraLow
®
Standard Plaque
chauffante
Gril Sélecteur de
température du four
Interrupteur de
la lampe du four
Sélecteur de
mode
Sélecteur de mode Affichage digital
1 Écran numérique
2 Touches de navigation de gauche
3 Accès à plusieurs minuteries
4 Accès aux réglages de l’utilisateur
5Confirmation d’une saisie
6 Touches de navigation de droite
OFF
OFF
TIMERS SETTINGS ENTER
06:30
1
2 3 4 65
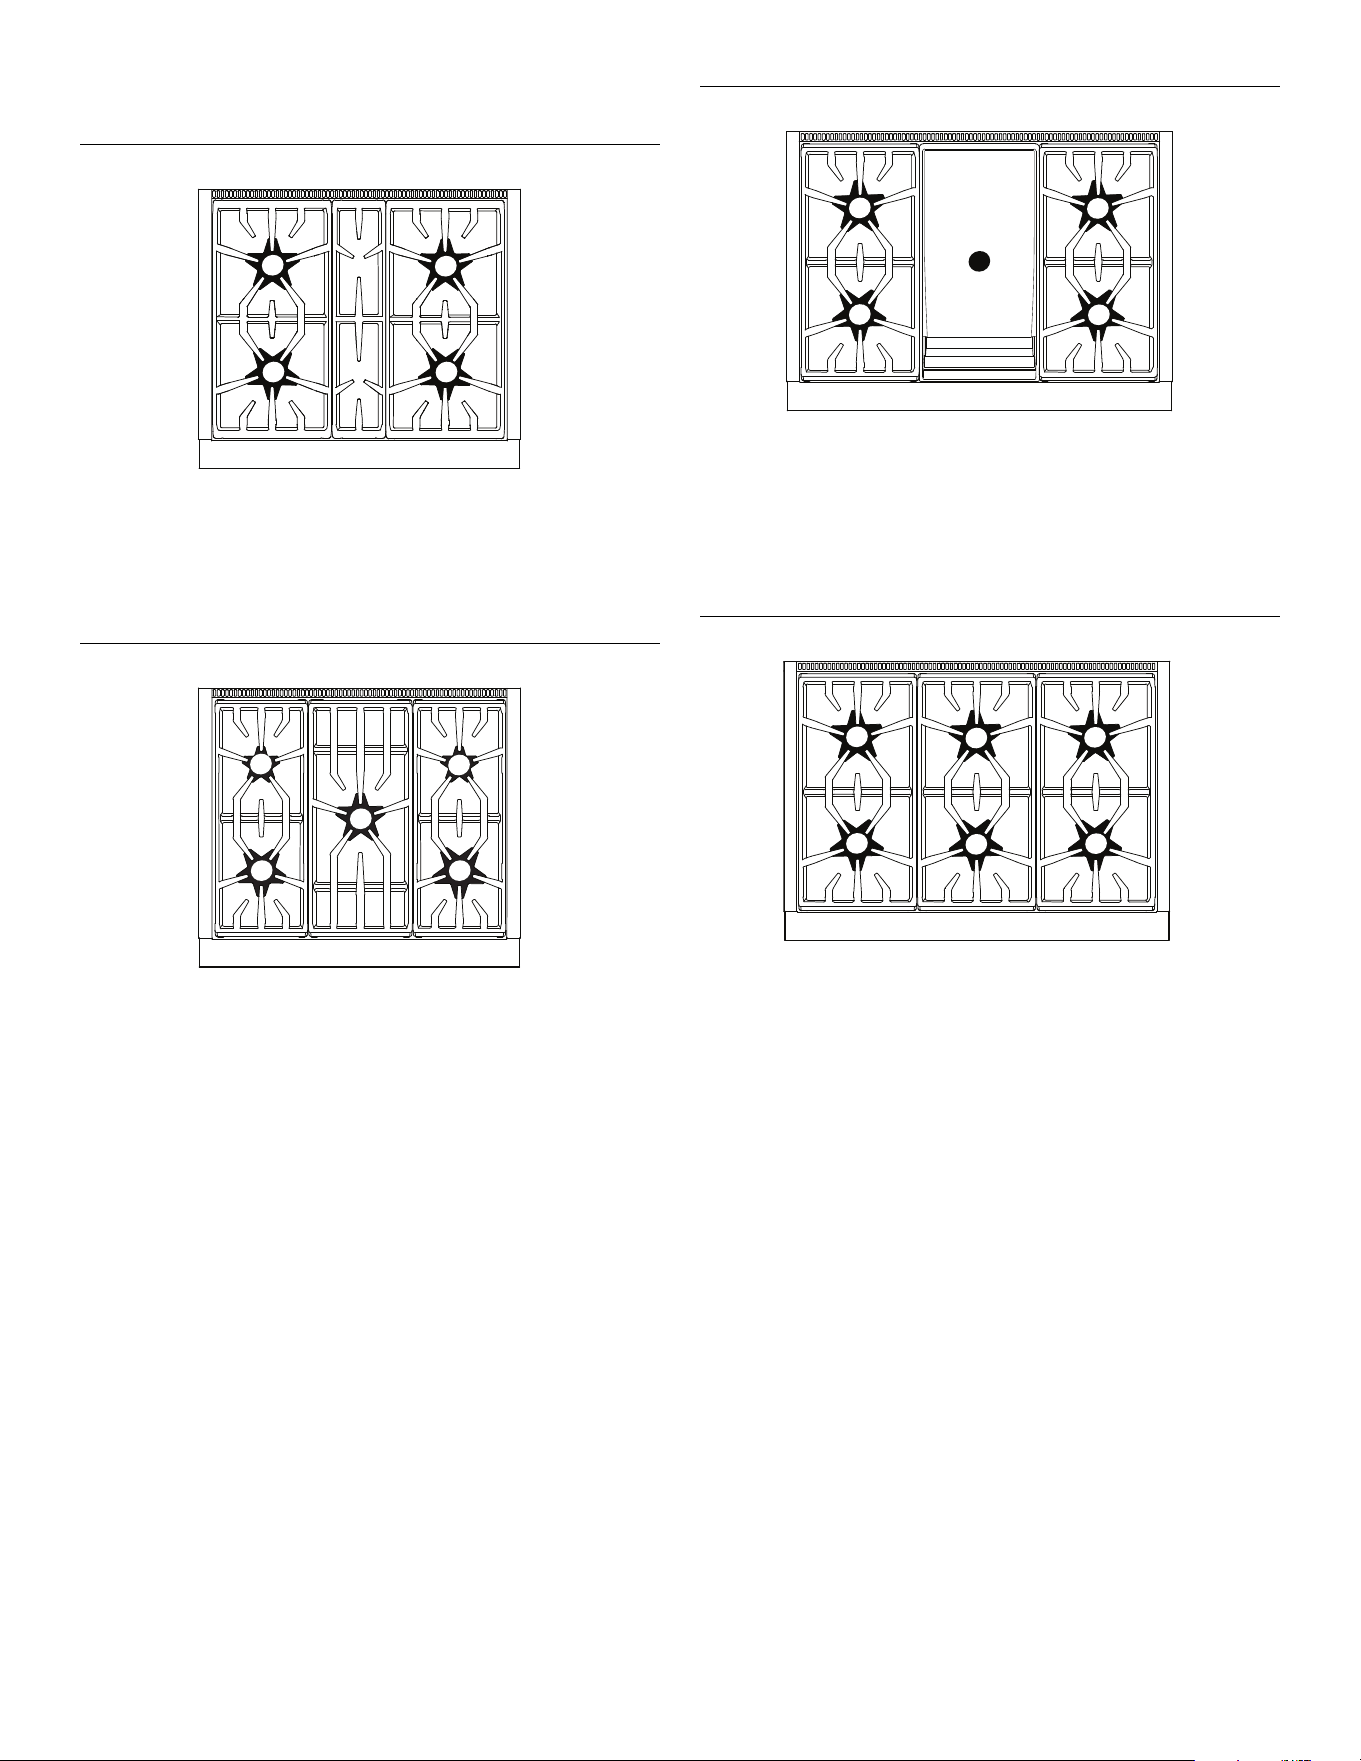
Page. 68
Identification de la surface supérieure
Modèle 304
1 Brûleur ExtraLow Naturel 15000, GPL 12000 BTU
2 Brûleur ExtraLow Naturel 18000, GPL 15000 BTU
3 Brûleur Standard Naturel 15000, GPL 12000 BTU
4 Brûleur Standard Naturel 18000, GPL 15000 BTU
Modèle 305
1 Brûleur ExtraLow Naturel 8000, GPL 6000 BTU
2 Brûleur ExtraLow Naturel 18000, GPL 15000 BTU
3 Brûleur Standard Naturel 10000, GPL 91000 BTU
4 Brûleur Standard Naturel 8000, GPL 6000 BTU
5 Brûleur Standard Naturel 15000, GPL 12000 BTU
44
11
22
33
33
55
11
22
44
Modèle 364 avec plaque chauffante
1 Brûleur ExtraLow Naturel 15000, GPL 12000 BTU
2 Brûleur ExtraLow Naturel 18000, GPL 15000 BTU
3 Plaque Chauffante 1630W
4 Brûleur Standard Naturel 15000, GPL 12000 BTU
5 Brûleur Standard Naturel 18000, GPL 15000 BTU
Modèle 366
1 Brûleur ExtraLow Naturel 15000, GPL 12000 BTU
2 Brûleur ExtraLow Naturel 18000, GPL 15000 BTU
3 Brûleur Standard Naturel 15000, GPL 12000 BTU
4 Brûleur Standard Naturel 18000, GPL 15000 BTU
5 Brûleur Standard Naturel 15000, GPL 12000 BTU
6 Brûleur Standard Naturel 18000, GPL 15000 BTU
33
55
11
22
44
33
44
66
11
22
55
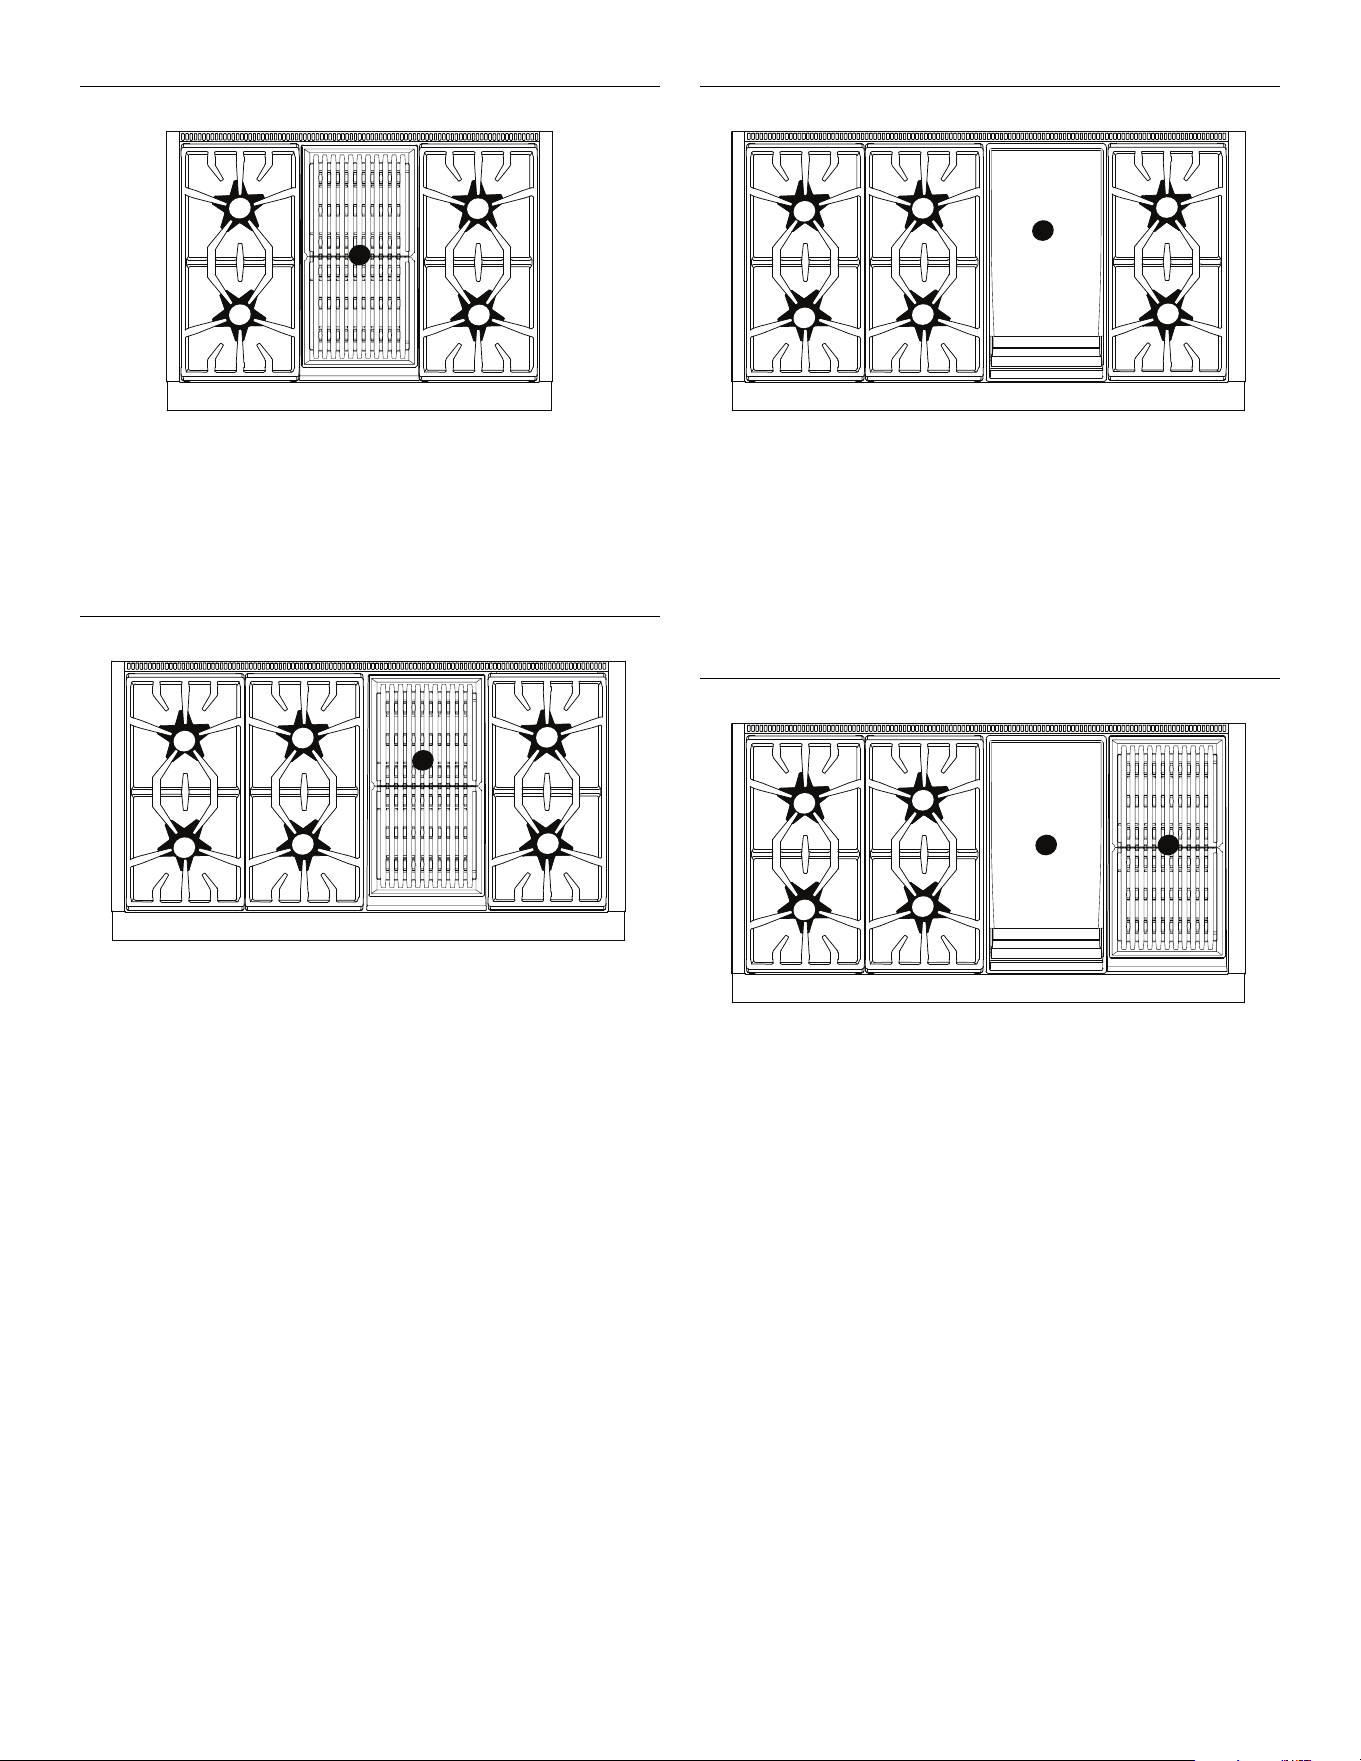
Page. 69
Modèle 364 avec gril
1 Brûleur ExtraLow Naturel 15000, GPL 12000 BTU
2 Brûleur ExtraLow Naturel 18000, GPL 15000 BTU
3 Gril 815W x 2
4 Brûleur Standard Naturel 15000, GPL 12000 BTU
5 Brûleur Standard Naturel 18000, GPL 15000 BTU
Modèle 486 avec gril
1 ExtraLow
®
brûleur Naturel 15000, GPL 12000 BTU
2 Brûleur ExtraLow Naturel 18000, GPL 15000 BTU
3 Brûleur Standard Naturel 15000, GPL 12000 BTU
4 Brûleur Standard Naturel 18000, GPL 15000 BTU
5 Gril 815W x 2
6 Brûleur Standard Naturel 15000, GPL 12000 BTU
7 Brûleur Standard Naturel 18000, GPL 15000 BTU
33
55
11
22
44
33
44
77
11
22
66
55
Modèle 486 avec plaque chauffante
1 Brûleur ExtraLow Naturel 15000, GPL 12000 BTU
2 Brûleur ExtraLow Naturel 18000, GPL 15000 BTU
3 Brûleur Standard Naturel 15000, GPL 12000 BTU
4 Brûleur Standard Naturel 18000, GPL 15000 BTU
5 Plaque Chauffante 1630W
6 Brûleur Standard Naturel 15000, GPL 12000 BTU
7 Brûleur Standard Naturel 18000, GPL 15000 BTU
Modèle 484 avec plaque chauffante et grill
1 Brûleur ExtraLow Naturel 15000, GPL 12000 BTU
2 Brûleur ExtraLow Naturel 18000, GPL 15000 BTU
3 Brûleur Standard Naturel 15000, GPL 12000 BTU
4 Brûleur Standard Naturel 18000, GPL 15000 BTU
5 Plaque Chauffante 1630W
6 Gril 815W x 2
33
44
77
11
22
66
55
33
44
11
22
55
66
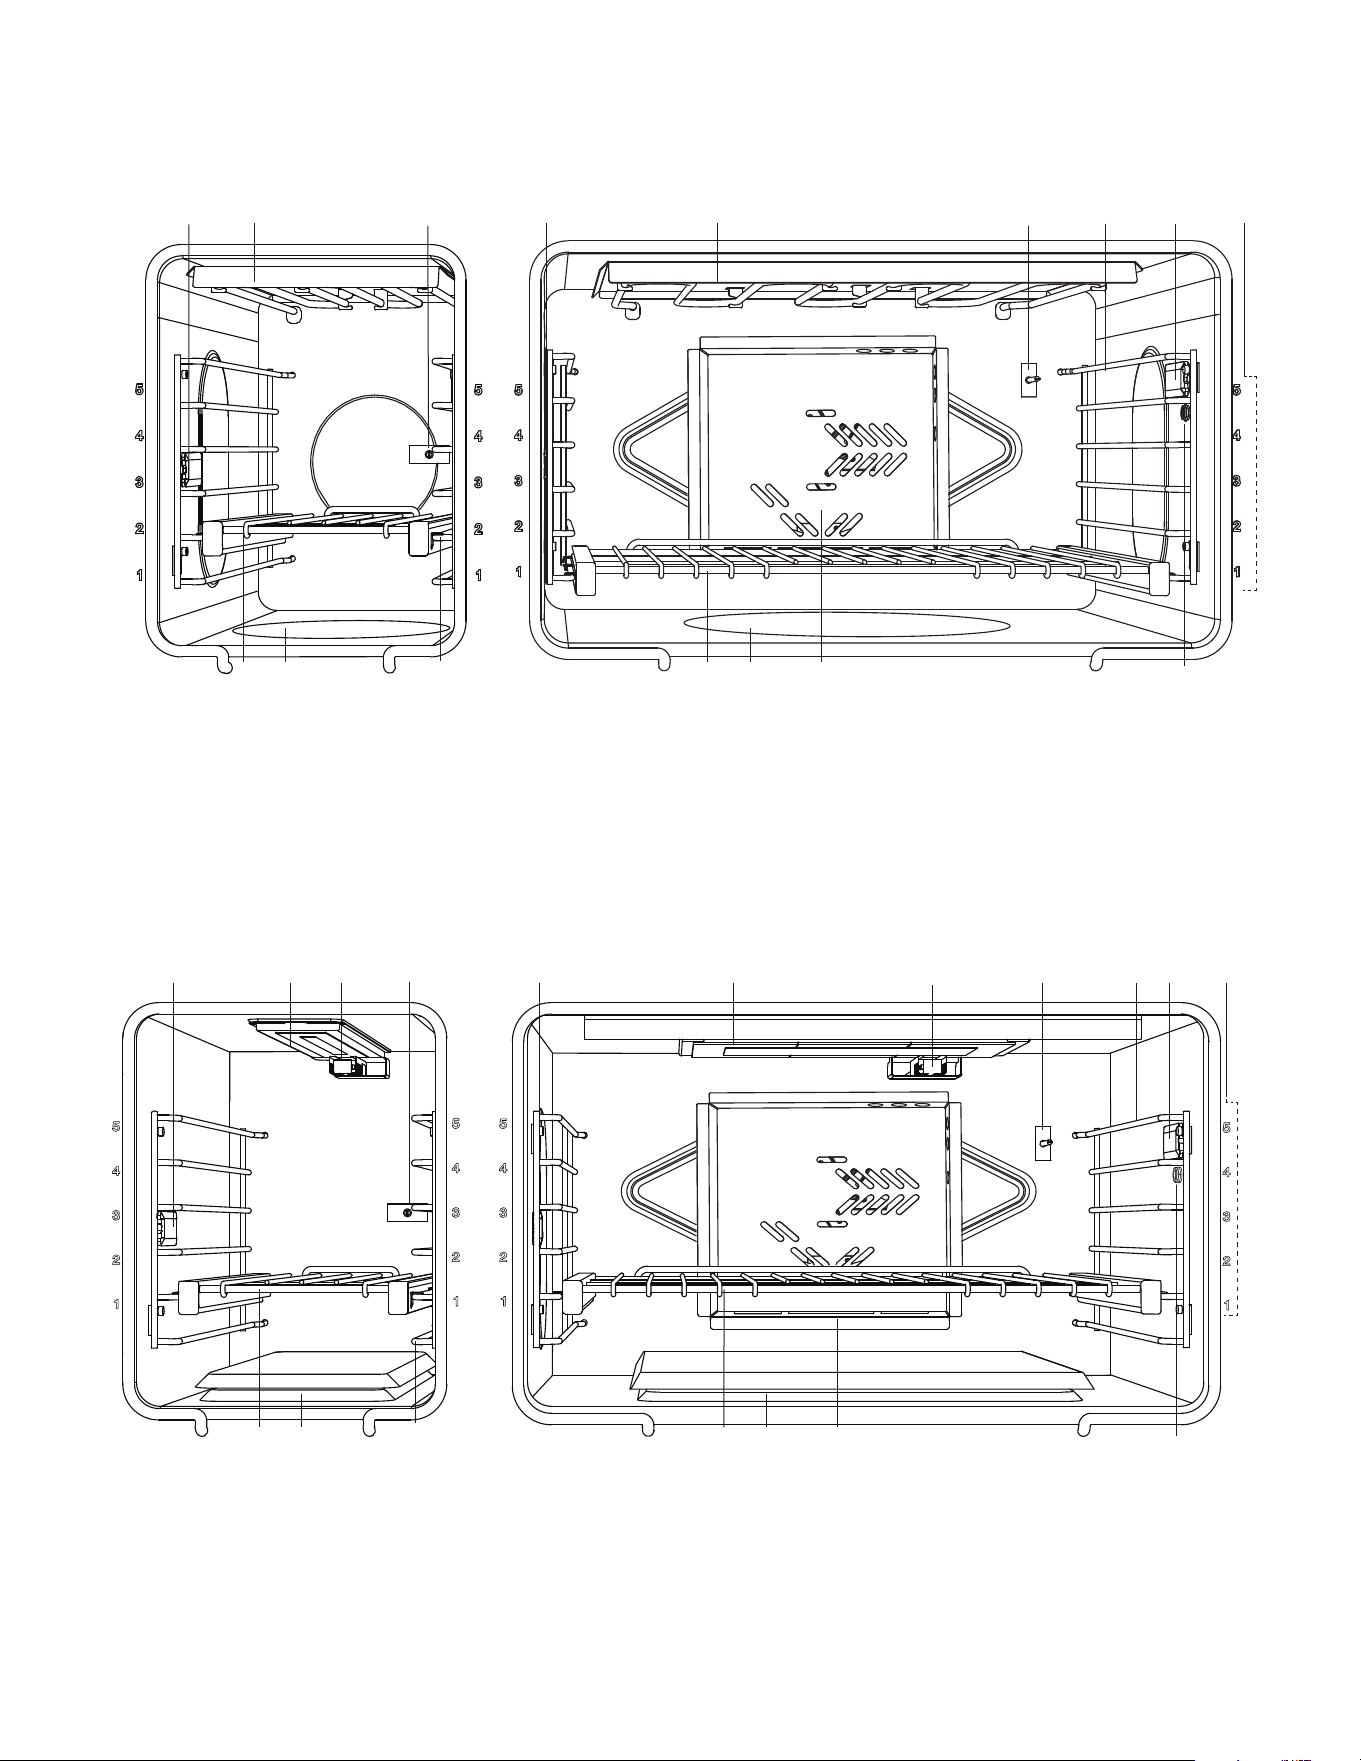
Page. 70
Description de l’intérieur des fours
Intérieur du four électrique
Intérieur du four à gaz
1 Lumière du four
2 Élément du grilloir
3 Capteur thermostat du four
4 Glissières des grilles
5 Grilles de four
6 Élément de cuisson (dissimulé)
7 Couvercle du ventilateur à convection
8 Prise pour sonde thermique
9 Positions des grilles
1
2
3
5467
56 8
12
3
4
1
9
1 Lumière du four
2 Brûleur infrarouge du grilloir
3 Allumeur du grilloir
4 Capteur thermostat du four
5 Glissières des grilles
6 Grilles de four
7 Brûleur de cuisson (dissimulé)
8 Couvercle du ventilateur à convection
9 Prise pour sonde thermique
10 Positions des grilles
124
6
5
78
3
67
9
12 45
3
1 10
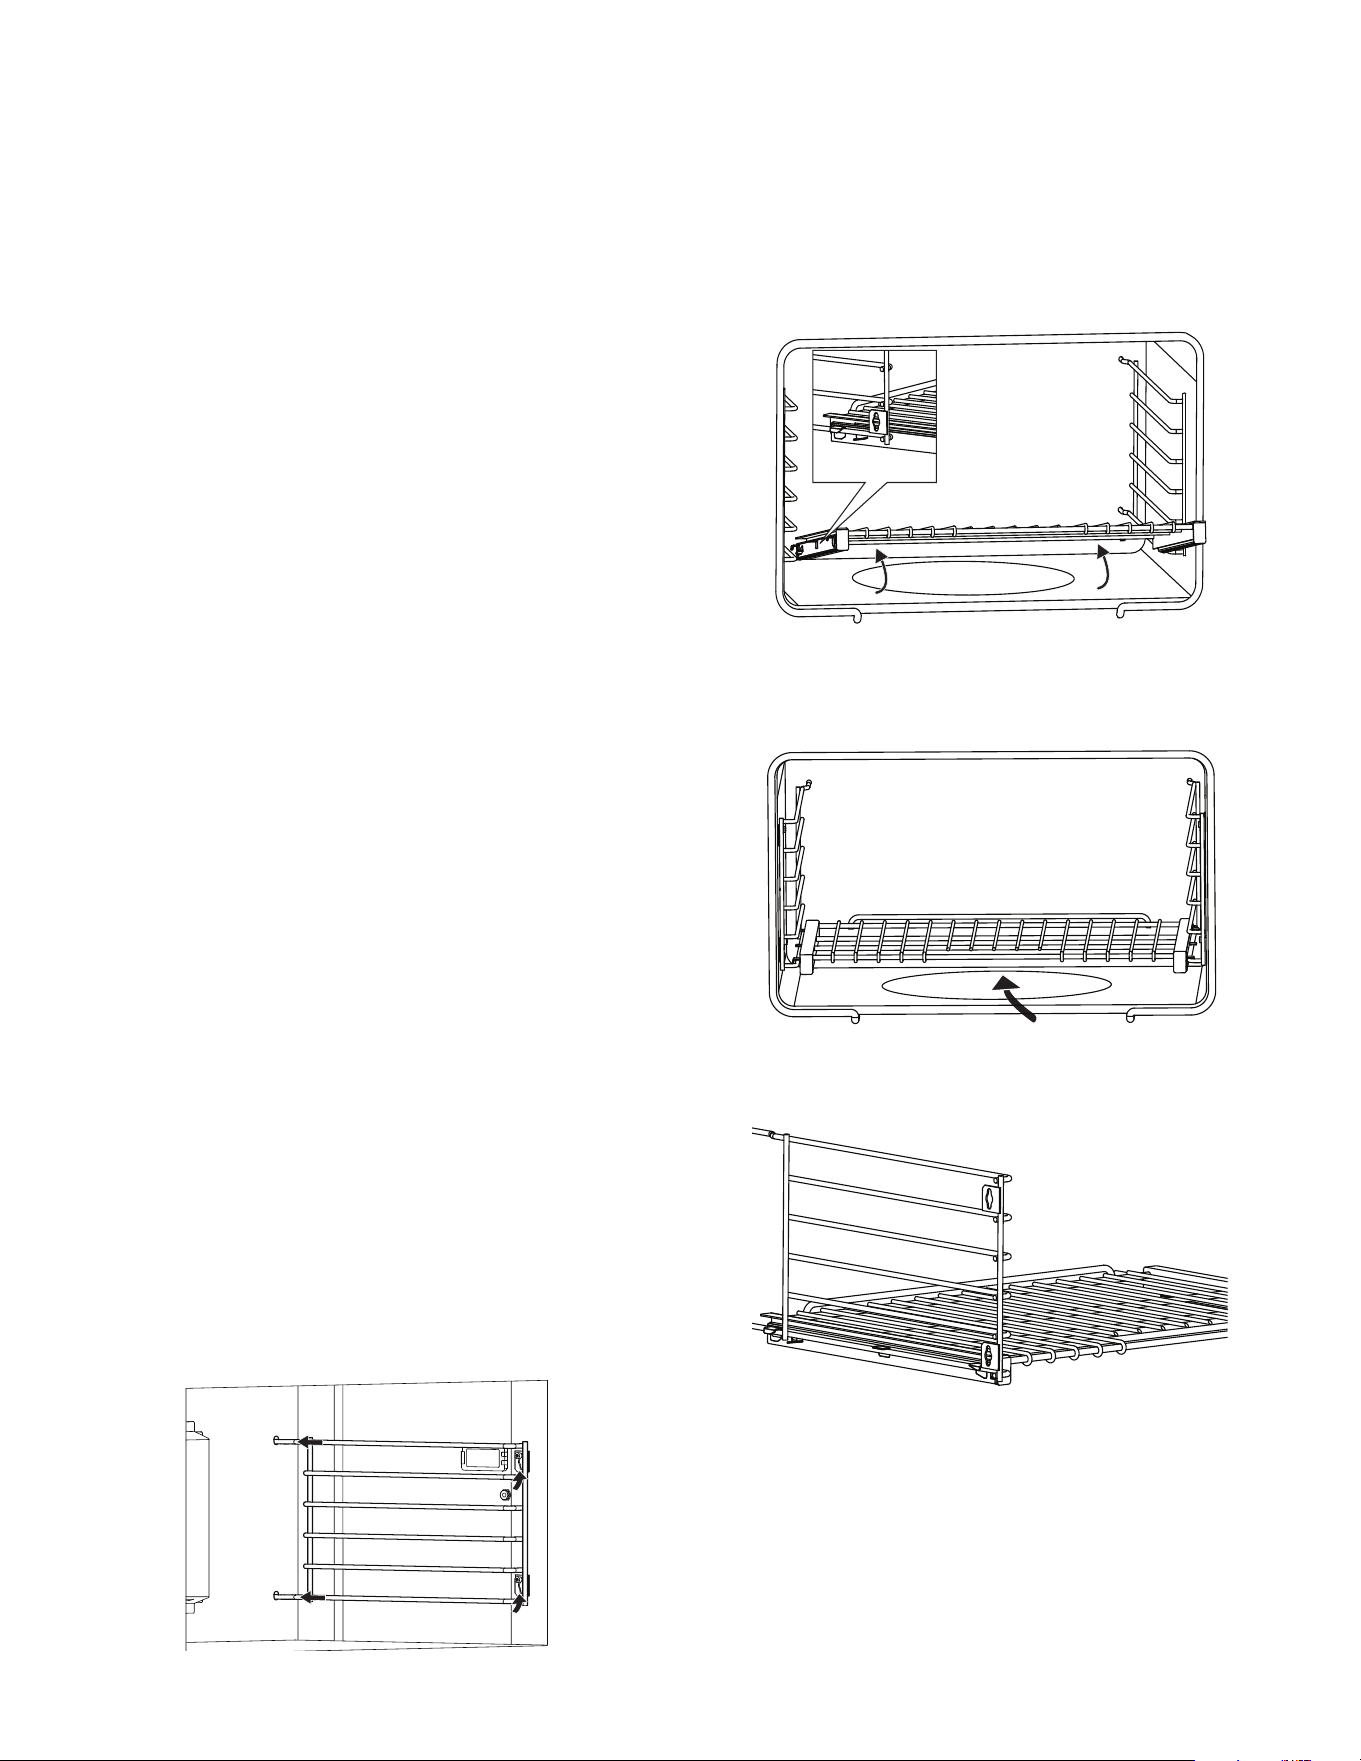
Page. 71
Avant de commencer
Mise en route
En raison de nos activités d'amélioration continue de la
conception et de la qualité, les images peuvent ne pas
être représentatives du produit final.
Plaque signalétique
• Notez les numéros de modèle et de série.
• La plaque de la fiche signalétique se trouve à la droite
de l’appareil, entre la cavité du four et le panneau
latéral.
• Vous pouvez utiliser ces renseignements lors de toutes
vos futures communications avec le service à la
clientèle. Pour plus d'informations sur
l'enregistrement du produit, voir “Avant d’appeler le
service technique”.
Brûleurs de surface
1. Assurez-vous que les chapeaux des brûleurs sont bien
posés sur leurs bases sur la table de cuisson
(“Vérification de la position des chapeaux des
brûleurs” à la page 73).
2. Allumez chaque brûleur pour vous assurer que la
flamme est d’une couleur adéquate. Consultez la
section « “Description de la flamme” à la page 75 »
pour plus de détails.
Grille plate
Retrait des guides pour le nettoyage
1. Soulevez le devant du guide pour libérer les têtes des
deux boulons à épaulement vers la partie avant de la
cavité du four.
2. Retirez la portion avant du guide en tirant les fentes
en forme de trou de clé par dessus les boulons
d'épaulement.
3. Sortez les deux rails des trous situés à l'arrière de la
cavité du four. Les guides sont conçus pour pouvoir
s'installer d'un côté ou d'un autre de la cavité du four.
Comment placer la grille Full Access
®
dans le four
1. Tenez la grille dans un angle légèrement ouvert.
Placez les crochets sous la partie avant des fentes des
glissières.
2. Poussez la grille dans le four en la soulevant par-
dessus les butées de sûreté situées à l'avant des
glissières.
3. Tenez la grille bien droite.
4. Poussez la grille jusqu'au fond.
5. Engagez les crochets avant de la grille dans les
glissières.
IMPORTANT : Lorsque vous installez la grille coulissante
dans le four, assurez-vous que les supports frontaux des
glissières de la grille reposent dans les larges fentes des
coins avant de la grille. Cela est nécessaire pour que la
grille demeure dans la bonne position lorsqu’elles se
trouvent totalement à l’intérieur du four.
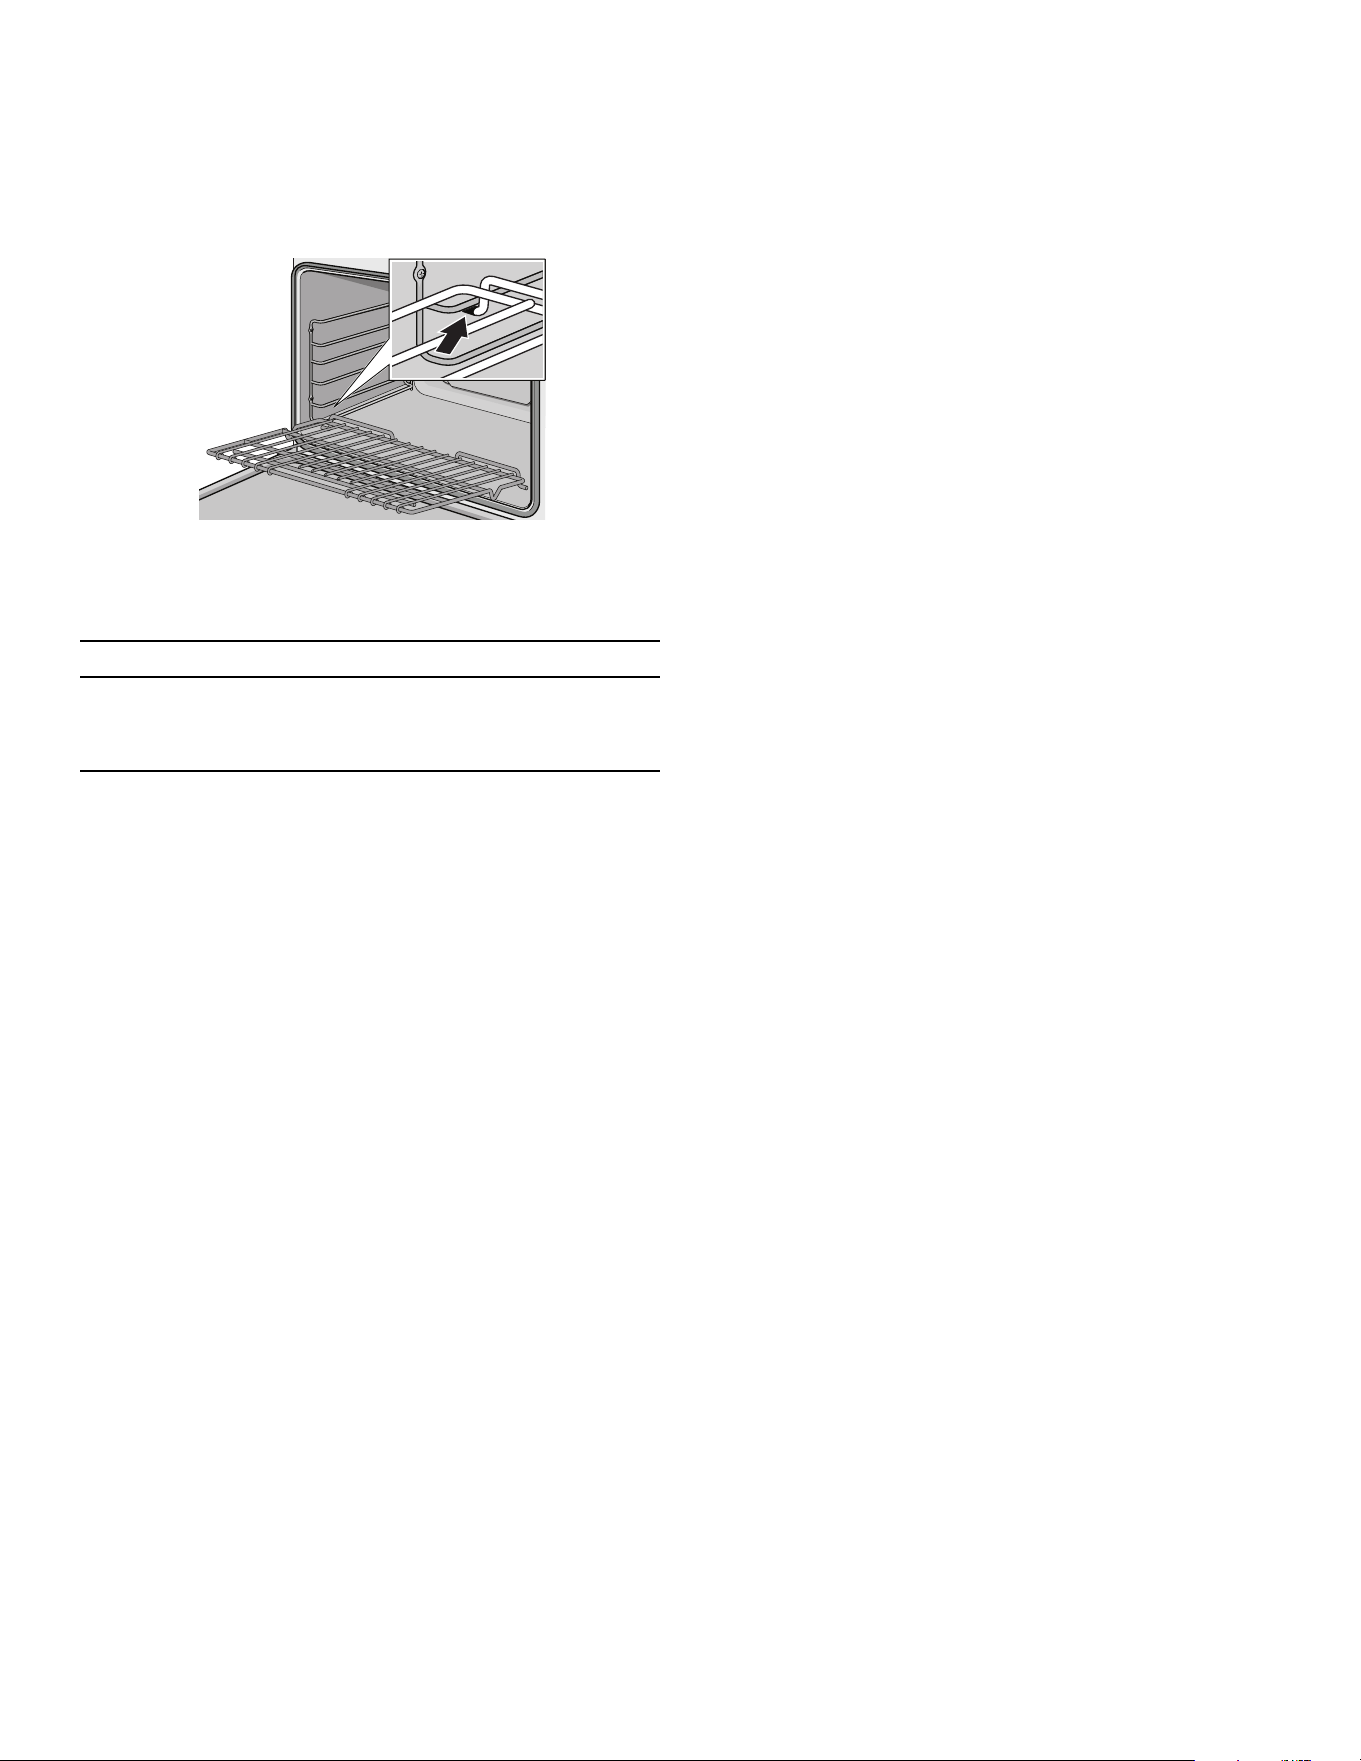
Page. 72
Mise en place de la grille plate dans le four
1. Saisir fermement la grille par les côtés.
2. Incliner la grille vers le haut pour mettre la butée dans
le guide.
Utilisation du four
9 AVERTISSEMENT
Pour prévenir les risques de brûlure, n’enlevez ou ne
déplacez JAMAIS les grilles lorsque le four est en
marche ou lorsqu’il refroidit.
Positionner les grilles du four
• Placez correctement les grilles dans le four. La position
adéquate des grilles dépend de la recette et du mode
de cuisson.
• Les positions des grilles dans le four sont numérotées
de bas en haut, comme un ascenseur.
• La position no 3 est la position la plus fréquemment
utilisée.
• Introduisez la ou les grilles à la position voulue avant
d’allumer le four.
Première utilisation
IMPORTANT : Enlevez toujours les grilles avant de
procéder à l’autonettoyage du four. Si les grilles
coulissantes restent dans le four pendant l’autonettoyage,
les lubrifiants du mécanisme de glissement de chaque
grille seront endommagés et le fini se décolorera.
Avant de faire cuire au four ou de rôtir, vous devriez
allumer le four et l’élément de voûte pour brûler les huiles
utilisées lors de la fabrication à l’aide de l’une des
méthodes suivantes :
1. Allumez le système de ventilation de la cuisine (ou une
fenêtre si votre hotte est munie d’un système de
recirculation d’air).
2. Allumez le four à 450 ºF (230 ºC) pendant 20 à 30
minutes. Réglez ensuite le four à BROIL pour la même
période.
ou
1. Mettez le système de ventilation de la cuisine en
marche (si la hotte utilisée fonctionne avec un système
de reprise d’air, ouvrez une fenêtre).
2. Enlevez les grilles du four.
3. Réglez le four au mode d’autonettoyage et laissez-le
terminer son cycle (modèles sélectionnés seulement).
Les cuisinières dégagent parfois une odeur particulière ou
de la fumée lors de la première utilisation. Ces odeurs ou
cette fumée proviennent des résidus de fabrication qui
brûlent, ce qui est caractéristique de toute nouvelle
cuisinière, indépendamment du fabricant.
Fonctionnement automatique du ventilateur de
refroidissement
Le ventilateur de refroidissement tourne pendant tous les
modes de cuisson. On peut l'entendre fonctionner et
sentir parfois de l'air chaud s'échapper de l'évent du four.
Le ventilateur peut également fonctionner une fois le four
éteint.
Évent du four
L'évent du four se trouve au bas de l'unité. De l'air chaud
peut s'échapper de l'évent avant, pendant et après la
cuisson. Il est normal de voir de la vapeur s'échapper de
l'évent et de la condensation peut se former à cet endroit.
Cette zone peut devenir très chaude pendant l'utilisation
du four. Ne pas obstruer l'évent car il est indispensable à
la bonne circulation de l'air.
Ventilateur à convection
Le ventilateur à convection fonctionne pendant tous les
modes de cuisson à convection. Lorsque le four est en
mode de cuisson par convection, le ventilateur s'arrête
automatiquement lorsque la porte est ouverte. Il
fonctionne également pendant l'autonettoyage.
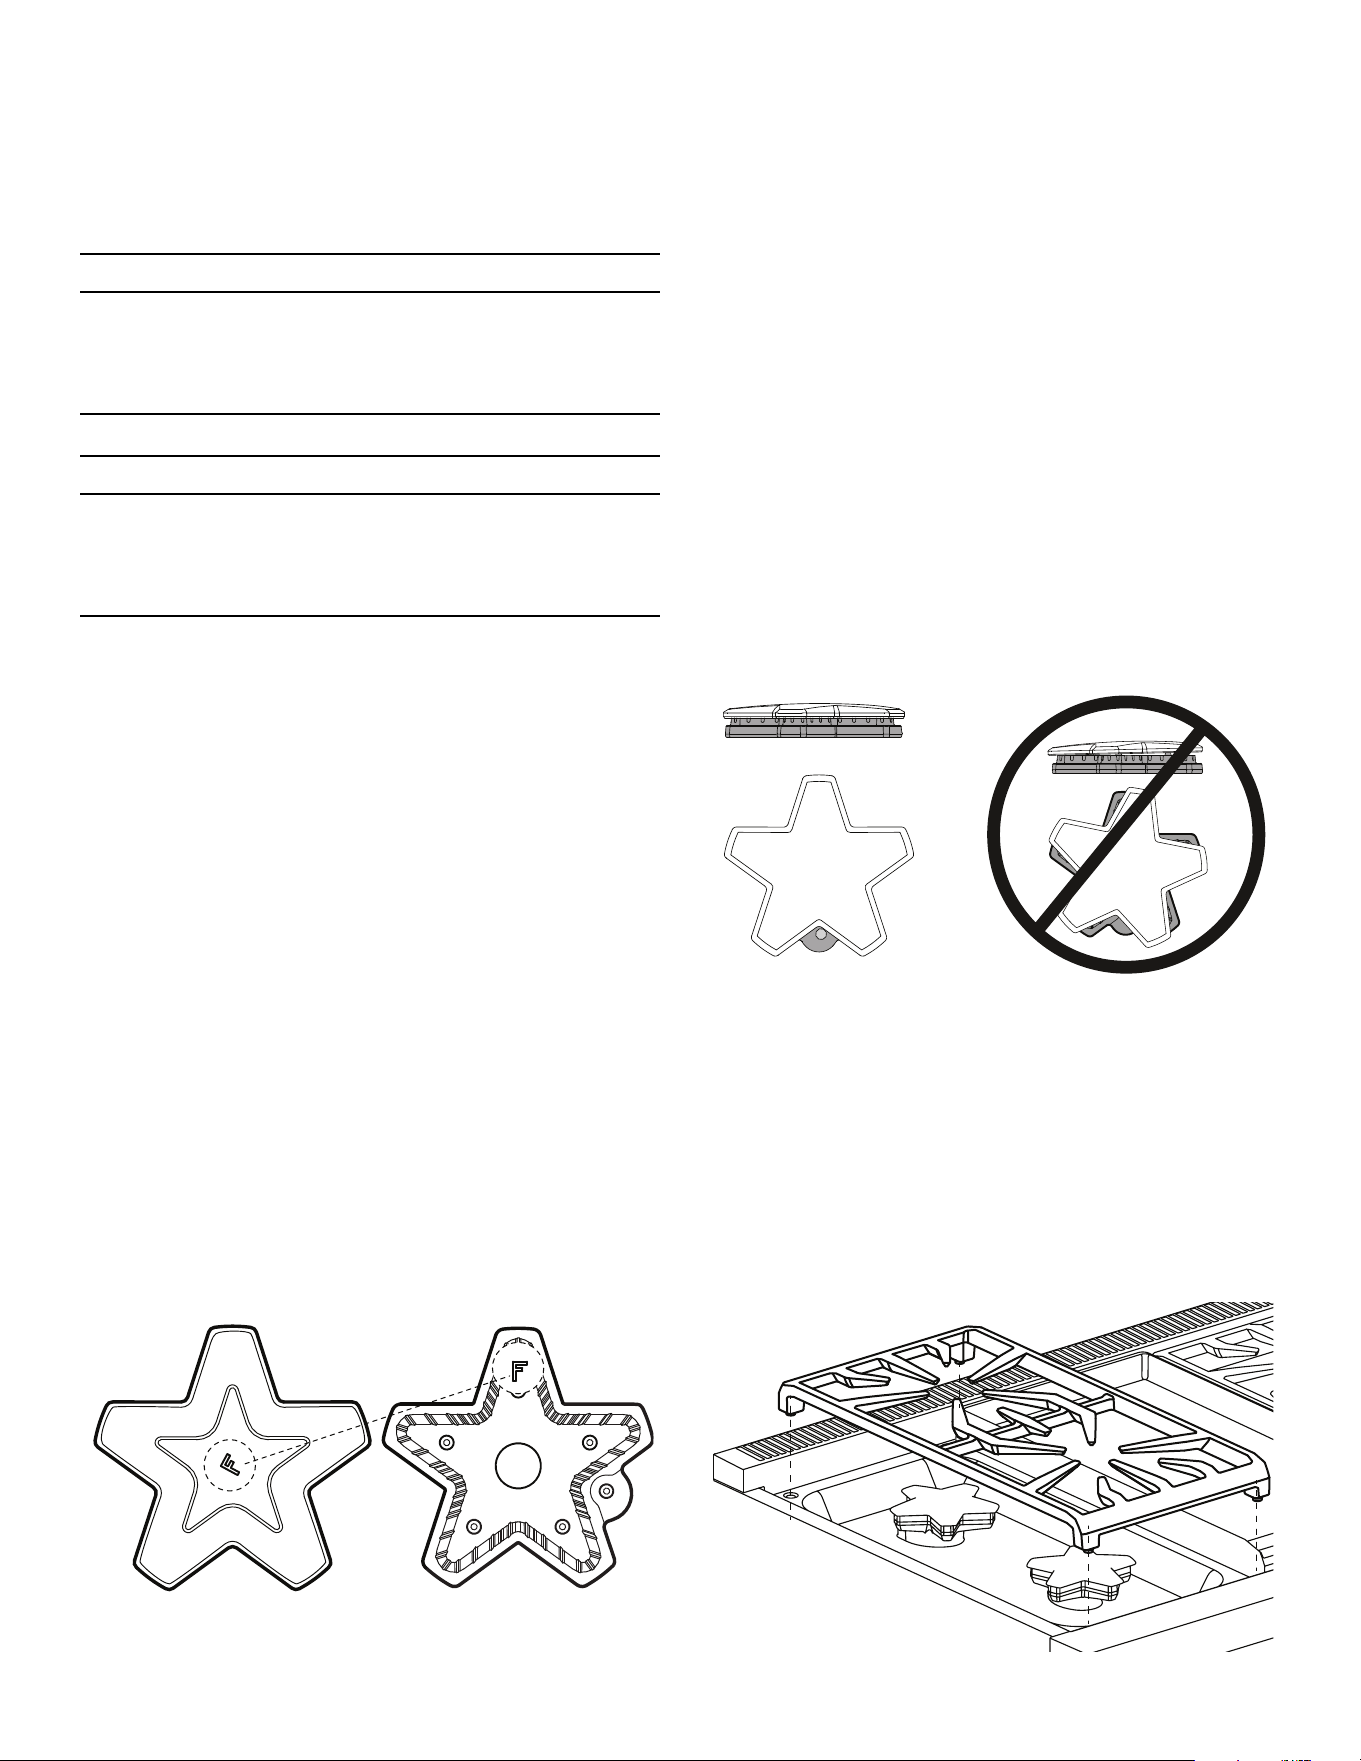
Page. 73
Utilisation de la table de cuisson
Brûleurs STAR
®
scellés
9 AVERTISSEMENT
Pour prévenir toute brûlure, éviter de toucher les
chapeaux et les grilles des brûleurs lorsqu’ils sont
chauds. Éteignez la table de cuisson et laissez les
brûleurs refroidir.
9 AVERTISSEMENT
Pour prévenir toute brûlure, éviter de toucher les
chapeaux et les grilles des brûleurs lorsqu’ils sont
chauds. Éteignez la table de cuisson et laissez les
brûleurs refroidir.
Mise en place des capuchons de brûleur
Pour assurer un fonctionnement approprié, les chapeaux
des brûleurs doivent être placés adéquatement sur leur
base. Si le chapeau n’est pas placé adéquatement, l’un ou
l’autre des problèmes suivants pourrait survenir :
• Les flammes du brûleur sont trop hautes.
• Des flammes excessives jaillissent du brûleur.
• Le brûleur ne s’allume pas.
• Les flammes du brûleur sont inégales.
• Le brûleur émet des odeurs.
Chaque capuchon comporte une lettre (B, D, ou F) coulée
dans la partie inférieure du capuchon correspondant à une
lettre (B, D, ou F) coulée dans la base du brûleur solidaire
de l'appareil.
Placez sur les chapeaux de brûleurs
1. Placer chaque capuchon de brûleur sur la base du
brûleur correspondant selon la lettre marquée sur
chacun d'eux.
2. Placer le capuchon de brûleur délicatement sur la
base de manière à ce que les pattes de la base du
brûleur s'ajustent parfaitement dans la fente du
capuchon de brûleur.
Vérification de la position des chapeaux des brûleurs
• Vérifiez chaque brûleur pour vous assurer qu’il n’y a
pas d’espace entre le chapeau et la base du brûleur.
Voir Figure pour des exemples de chapeau de brûleur
correctement ou incorrectement placés.
• Vous pouvez essayer de déplacer délicatement les
chapeaux des brûleurs latéralement pour vous assurer
qu’ils sont placés correctement sur leur base.
• Lorsqu’ils sont bien placés, les chapeaux des brûleurs
sont droits sur la base et couvrent complètement la
base du brûleur en forme d’étoile lorsque vous les
regardez d’en haut.
Positionnement des grilles des brûleurs
Pour installer les grilles des brûleurs
1. Positionnez-les avec le côté plat vers le bas et alignez-
les dans la partie enfoncée.
2. Les grilles doivent s’appuyer les unes contre les autres
et contre les côtés de la partie enfoncée.
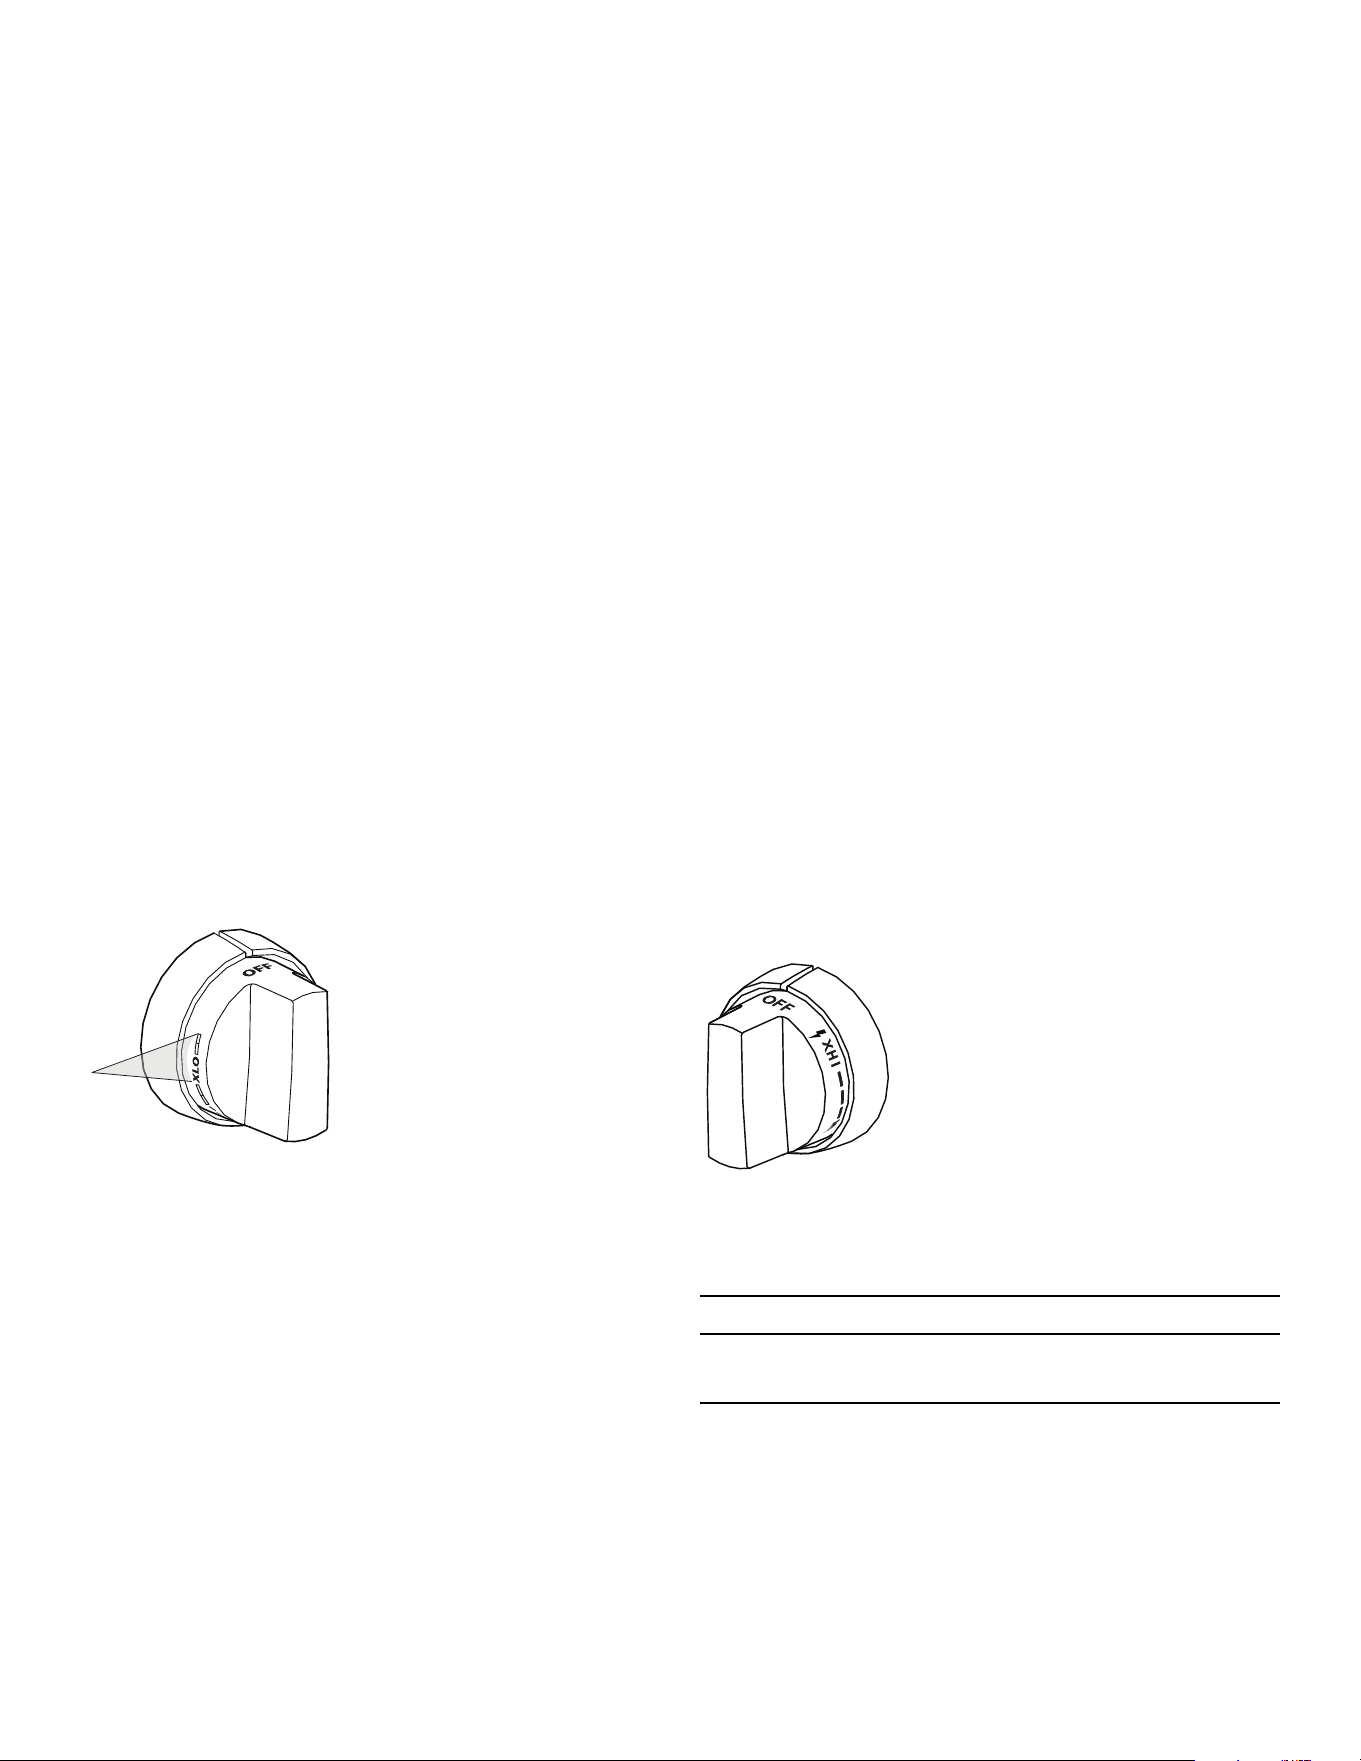
Page. 74
Boutons de commande
Le symbole au-dessus de chaque bouton identifie soit la
position du brûleur sur la surface de cuisson ou le contrôle
de la grille, selon le modèle.
Fonctionnement des brûleurs
1. Poussez sur le bouton et tournez-le dans le sens
antihoraire jusqu’au réglage HI.
– L’allumeur du brûleur sélectionné émet des
étincelles pour allumer le brûleur.
– Une fois le brûleur allumé, l’allumeur cesse
d’émettre des étincelles.
2. Tournez le bouton à n’importe quel réglage entre HI
et SIM.
Éclairage LED (modèles sélectionnés)
Positionné juste sous le chanfrein arrondi, le panneau
d'éclairage à DEL fournit un éclairage localisé pour une
ambiance théâtrale.
L'interrupteur à bascule du panneau d'éclairage situé sur
le panneau de commandes allume ou éteint les DEL.
Brûleurs ExtraLow
®
La modification des durées pendant lesquelles la flamme
reste allumée/éteinte permet de réduire davantage la
quantité de chaleur et de cuire des aliments délicats. Le
réglage très bas est utile pour faire mijoter, pocher, fondre
du chocolat et du beurre, maintenir la température des
plats préparés sans qu'ils roussissent ou brûlent, etc.
Fonctionnement du brûleur ExtraLow
®
• XLO, le réglage le plus bas, fonctionne par cycles
d’une minute avec alternance de flamme allumée
pendant environ 10 secondes suivies d’environ 50
secondes de flamme éteinte.
• Lorsque le bouton est réglé juste en dessous du
repère XLO, la flamme reste allumée pendant environ
50 secondes et s’éteint pendant environ 10 secondes.
• Pour faire varier la faible chaleur requise en fonction
de l’aliment et de la quantité, vous pouvez régler la
commande à n’importe quel point entre XLO sur le
bouton.
Techniques ExtraLow
®
• Pour maintenir une chaleur basse ou pour faire
mijoter, portez les aliments à ébullition. Remuez bien,
couvrez le récipient, puis baissez le réglage en plaçant
le bouton juste en dessous de XLO.
• Si vous utilisez un récipient surdimensionné, vos
aliments mijoteront principalement au centre de celui-
ci. Pour homogénéiser la température de l'ensemble,
remuez pour ramener les aliments se trouvant sur les
bords vers le centre.
• Quand un plat mijote, il est normal de le brasser de
temps à autre, surtout s'il doit mijoter pendant
plusieurs heures, comme dans le cas de haricots ou
d'une sauce à spaghetti maison.
• Il est normal de ne pas voir de bulles à la surface après
avoir remué les aliments.
• Il peut y avoir des bulles quand la flamme est allumée,
qui disparaissent quand elle est éteinte. Même quand
elle est éteinte, de la vapeur et un léger frémissement
seront perceptibles à la surface du liquide.
POWERBOOST
®
(modèles
sélectionnés)
Rallumage automatique
9 ATTENTION
Ne touchez pas les brûleurs pendant que les allumeurs
produisent des étincelles.
Chaque brûleur STAR comporte son propre allumeur
électronique qui produit des étincelles lorsque le bouton
est activé. Les brûleurs doivent s’allumer en 4 secondes ou
moins. Si le brûleur ne s’allume pas, assurez-vous que le
chapeau est correctement posé sur sa base.
Le dessin montre la gamme
supplémentaire de réglage
du bouton entre les repères
XLO. Lorsque le bouton est
placé sur cette gamme, la
flamme s’allume et s’éteint.
Le bouton de commande
POWERBOOST, ou XHI, est
pratique pour rapidement faire
bouillir de l’eau, saisir des steaks,
faire sauter des légumes, etc. Les
fonctions XLO s’utilisent de la
même manière que sur les autres
brûleurs.
Page. 75
Si un ou plusieurs brûleurs s’éteignent, l’allumeur
électronique produit automatiquement des étincelles
pour rallumer la flamme. Ne touchez pas aux brûleurs
pendant que les allumeurs produisent des étincelles.
IMPORTANT :
• Pour assurer une combustion adéquate, n'utilisez pas
la surface de cuisson si la grille des brûleurs n'est pas
en place.
• La combustion et l'allumage du brûleur produisent un
léger bruit. Cela est normal.
• Un bruit audible peut être entendu lorsque le brûleur
est mis hors circuit. Ce bruit peut être plus fort avec le
gaz LP que le gaz naturel. Ceci est normal.
Panne de courant
9 AVERTISSEMENT
En cas de panne de courant, mettez tous les boutons
à la position OFF. Seuls les brûleurs standards STAR
peuvent être allumés manuellement.
• En cas de panne de courant, seuls les brûleurs
standards peuvent être allumés manuellement.
Chacun d’eux doit être allumé individuellement.
• Si une panne de courant survient pendant que vous
utilisez la cuisinière, tournez tous les boutons à la
position OFF.
• Vous pouvez allumer les brûleurs STAR
®
standards en
approchant une allumette enflammée près des orifices
et en tournant le bouton à la position HI. Attendez
que la flamme soit allumée tout autour du chapeau du
brûleur avant de la régler à la hauteur voulue.
• N’essayez pas d’allumer les deux brûleurs XLO de
gauche et les deux brûleurs XLO de droite pendant
une panne de courant. Ces brûleurs sont munis de la
fonction ExtraLow et ne peuvent être allumés
manuellement.
• Si un brûleur ExtraLow est allumé pendant une panne
de courant, il ne peut être remis en circuit tant que le
bouton n’est pas réglé à la position OFF.
• La plaque chauffante et le gril ne peuvent être utilisés
pendant une panne de courant.
• Si vous détectez une odeur de gaz, consultez les
Instructions de Sécurité.
Hauteur de la flamme
• La hauteur correcte de la flamme dépend : (1) de la
taille et du matériau du récipient utilisé; (2) des
aliments à cuire; et (3) de la quantité de liquide dans le
récipient.
• La flamme ne doit pas dépasser les côtés de la base
du récipient.
• Utilisez une flamme basse ou moyenne pour les
récipients dont le matériau conduit lentement la
chaleur, comme l’acier émaillé ou la vitrocéramique.
Description de la flamme
Caractéristiques de la flamme
• Si la flamme est complètement ou presque jaune,
assurez-vous que le régulateur est réglé pour le
combustible approprié. Après le réglage, vérifiez de
nouveau.
• Des rayures de couleur orangée sont normales
pendant la mise en marche initiale.
• Laissez l'appareil fonctionner de 4 à 5 minutes et
évaluez de nouveau avant d'effectuer les réglages.
• La flamme des brûleurs doit être bleue sans pointe
jaune. Elle devient parfois partiellement orange : cela
indique que des impuretés flottant dans l’air sont en
train de se consumer. Elles disparaîtront avec l’usage.
• Avec le gaz propane, il est normal qu’il y ait un peu de
jaune dans le cône primaire.
• La flamme doit brûler tout autour du chapeau du
brûleur. Si ce n’est pas le cas, assurez-vous que le
chapeau est bien posé sur la base et que les orifices
ne sont pas bouchés.
• La flamme doit être stable, ne pas voltiger ni faire de
bruit excessif.
Flamme jaune :
Réglage nécessaire.
Pointe jaune sur cône
extérieur :
Normal pour gaz LP.
Flamme bleue :
Normal pour gaz naturel.
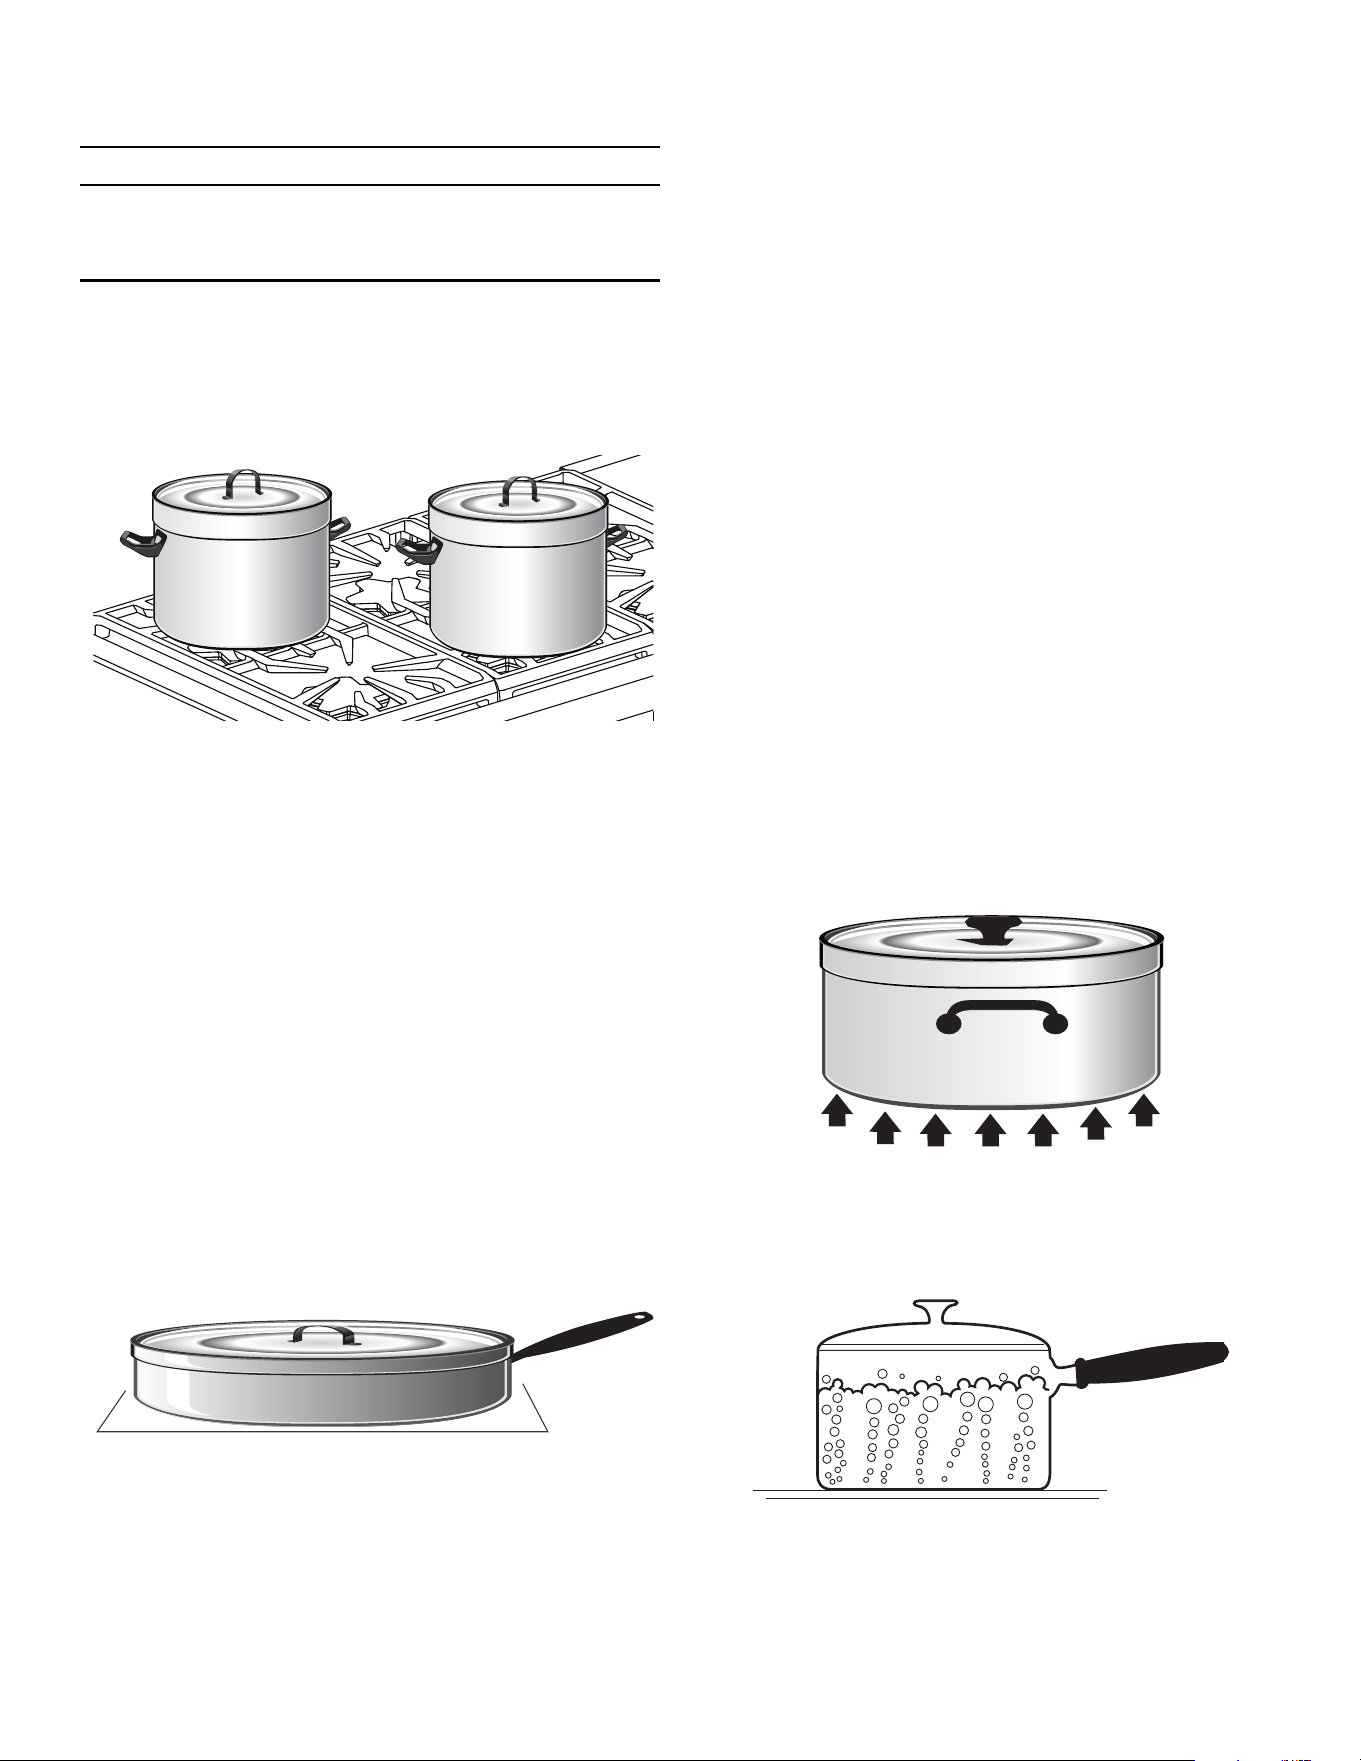
Page. 76
Récipients recommandés
9 MISE EN GARDE
Pour éviter tout risque de dommages sérieux à
l’appareil ou à un récipient, observez les consignes
suivantes:
• Les grands récipients, les plaques à biscuits, etc. ne
doivent pas être utilisés sur la surface de cuisson.
• Placez les grandes casseroles de façon décalée
lorsque vous utilisez la surface de cuisson.
• Choisissez une casserole dont la base correspond au
diamètre de la flamme. La flamme doit être égale ou
légèrement plus petite que la base du récipient. Des
récipients surdimensionnés ou sous-dimensionnés
nuisent aux résultats de la cuisson. Une base d’un
diamètre de 5½ po (14 cm) est généralement la plus
petite taille conseillée.
• Évitez d’utiliser un réglage de flamme intense lors de
l’utilisation d’un poêlon plus grand que la grille ou qui
occupe plus que l’espace d’un seul brûleur, comme
une plaque, pour de longues périodes. Cela peut
générer une mauvaise combustion et des vapeurs
nocives.
• L’assise du récipient est un facteur important de
stabilité et d’uniformité de la cuisson. La poignée ne
doit pas être plus lourde que le récipient, car celui-ci
pourrait pencher sur un côté. Le récipient doit reposer
bien à plat sur la grille sans se balancer ni être
instable.
• Les aliments enveloppés dans du papier aluminium ne
doivent pas être placés directement sur la grille du
brûleur, car l’aluminium peut fondre pendant la
cuisson.
• Ne laissez pas du plastique, du papier ou du tissu
entrer en contact avec une grille de brûleur chaude. Ils
pourraient fondre ou s'enflammer.
• Des récipients de qualité professionnelle à poignée
métallique sont recommandés, car les poignées en
plastique risquent de fondre ou de se déformer si la
flamme déborde du récipient. Des récipients de
qualité professionnelle sont en vente dans les
magasins de fournitures pour restaurant et dans les
boutiques gastronomiques.
• Tous les récipients utilisés doivent posséder les
caractéristiques suivantes : bonne conductivité de la
chaleur, bonne assise, dimensions adéquates du
diamètre de la base, base lourde et fond plat, et
couvercle bien adapté.
• Pour de meilleurs résultats de cuisson, la flamme ne
doit pas déborder du fond de la casserole.
• L’aluminium et le cuivre sont des matériaux qui
conduisent la chaleur rapidement et uniformément. Le
fond des récipients est souvent fabriqué avec ces
métaux. Ils peuvent également être insérés entre des
couches d’acier inoxydable.
• Un fond plat et lourd est plus stable lorsque chauffé.
Les casseroles déformées, légères et bosselées ne
permettent pas une cuisson uniforme. Chauffez et
refroidissez les casseroles graduellement pour éviter
les changements soudains de température, qui
peuvent déformer les casseroles. Ne mettez pas d’eau
froide dans une casserole chaude.
• Un couvercle adapté au diamètre d’un récipient
raccourcit le temps de cuisson et permet l’utilisation
de réglages plus bas.

Page. 77
Récipients pour spécialités
Woks
• Les woks à fond plat ou rond avec un anneau de
support peuvent être utilisés sur tous les modèles. Un
anneau de support doit être utilisé avec les woks à
fond rond.
• Le wok et l’anneau à wok en fonte revêtu d’une
couche de porcelaine sont vendus séparément.
Cocottes et marmites
• Choisissez une base dont le diamètre dépasse au
maximum de 2 po (51 mm) de la grille.
Bain-marie de dimensions standards
• 21 à 22 pintes (19,95 à 20,9 litres) avec une base de
11-12 po (279 à 305 mm) et une hauteur de 9 à 11 po
(229 à 279 mm).
Cocotte-minute de dimensions standards
• 8 à 22 pintes (7,6 à 20,9 litres) avec une base de 8 à
11 po (20,3 à 27,9 cm) et une hauteur de 6,5 à 12 po
(165 à 305 mm).
Conseils d’utilisation
• Il est préférable d’utiliser un récipient à fond plat
qu’un récipient à fond concave, convexe ou ondulé.
• Si vous utilisez deux cocottes en même temps, placez-
les sur des brûleurs décalés. Ne bloquez pas la
circulation d’air autour des brûleurs. La flamme a
besoin d’une certaine quantité d’air pour bien brûler.
• Mettez un couvercle sur la cocotte lorsque vous
portez son contenu à ébullition.
• Quand le contenu bout au réglage HI, baissez la
flamme le plus possible pour maintenir à ébullition ou
maintenir la pression.
• La cuisson à la cocotte produit de grandes quantités
de vapeur. Faites attention pour ne pas vous brûler.
Conseils de cuisson
• Consultez le tableau des page 78 pour vous guider.
Les réglages à utiliser varient selon l’ustensile choisi et
la température initiale des aliments.
• Dans le tableau, le « Réglage final » est séparé pour
les brûleurs standards et les brûleurs ExtraLow
®
.
Selon le cas, ce réglage sera identique ou différent.
• Le réglage ExtraLow des brûleurs peut être un
réglage de cuisson ou de maintien de température.
• Augmentez ou diminuez la flamme progressivement.
Laissez le temps au récipient et aux aliments de réagir
au nouveau réglage.
Page. 78
Conseils de cuisson – brûleurs de la table
de cuisson
Aliments Réglage initial
Réglage final –
brûleurs standards
Réglage final –
brûleurs XLO
Boissons
Cacao
MED – Chauffer le lait,
couvrir
LO – Finir de chauffer XLO – Maintenir au chaud, couvrir
Pain
Pain doré, crêpes,
sandwiches grillés
MED – Préchauffer le poêlon LO à MED – cuire Identique aux brûleurs standards
Beurre
À fondre
LO – pour commencer à faire
fondre
Laisser fondre
Céréales
Semoule de maïs,
gruau, avoine
HI – Couvrir, porter l’eau à
ébullition, ajouter les
céréales
LO à MED – terminer la
cuisson selon les
instructions sur
l’emballage.
XLO – Pour maintenir la
température, couvrir*
Chocolat
À fondre
XLO – peut être remué pour
faire fondre plus vite
XLO – Laisser fondre
XLO – Pour maintenir la température
Desserts
Bonbons
LO à MED – cuire selon la
recette
LO à MED Identique aux brûleurs standards
Pouding et
mélange pour
garniture à tarte
LO à MED LO – suivre les
indications sur l’emballage
LO Identique aux brûleurs standards
Pudding LO à MED LO – Faire bouillir
le lait
LO Identique aux brûleurs standards
Oeufs
À la coque
MED HI – couvrir les œufs
avec de l’eau, couvrir, porter
l’eau à ébullition
Frits, brouillés LO à MED – Faire fondre le
beurre, ajouter les œufs
LO – pour terminer la
cuisson
Identique aux brûleurs standards
Pochés HI – Porter à ébullition,
ajouter les œufs
LO à MED – pour
terminer la cuisson
Identique aux brûleurs standards
Viande, poisson,
volailles
Bacon, saucisses,
galettes
HI – Jusqu’à ce que la viande
commence à grésiller
LO à MED – pour
terminer la cuisson
Identique aux brûleurs standards
Braiser : steak
suisse, rôti à la
cocotte, ragoût
MED HI – Faire fondre la
graisse, faire revenir à
MED HI à HI, ajouter du
liquide, couvrir
XLO Laisser mijoter jusqu’à ce que la
viande soit tendre
Grillade rapide au
poêlon; steaks
pour déjeuner
MED HI– préchauffer le
poêlon
MED à MED HI – frire
rapidement au poêlon
Identique aux brûleurs standards
Friture : poulet MED HI – Faire chauffer
l’huile puis faire dorer à MED
LO – couvrir pour
terminer la cuisson
Identique aux brûleurs standards
Grande friture :
crevettes
MED HI – Faire chauffer
l’huile
MED à MED HI – pour
maintenir la température
Identique aux brûleurs standards
Page. 79
Grillade au
poêlon :
côtelettes
d’agneau, steaks
minces,
hamburgers,
saucisses en
chapelet
MED HI – Préchauffer le
poêlon
MED – pour brunir la
viande
Identique aux brûleurs standards
XLO – pour maintenir
Pocher : poulet,
entier ou
morceaux, poisson
MED HI – Couvrir, porter à
ébullition
Pour terminer la cuisson
Faire mijoter :
poulet à
l’étouffée, corned-
beef, langue, etc.
HI – Couvrir, porter à
ébullition
XLO - Pour mijoter lentement
XLO - Pour maintenir la chaleur,
couvrir
Pâtes
Macaronis,
nouilles,
spaghettis
HI – Porter l’eau à ébullition,
ajouter les pâtes
MED à HI – pour
maintenir à ébullition
Identique aux brûleurs standards
Cocotte-minute
Viande
MED HI à HI – faire monter la
pression
LO à MED – maintenir la
pression
Identique aux brûleurs standards
Légumes HI – faire monter la pression MED LO à MED –
maintenir la pression
Identique aux brûleurs standards
Riz HI – Couvrir, porter l’eau et le
riz à ébullition.
Réduire la chaleur à SIM.
Couvrir et faire cuire
jusqu’à ce que l’eau soit
absorbée
Faire cuire selon les instructions du
sachet
XLO – Pour maintenir la
chaleur, couvrir
Sauces
Sauce tomate
MED HI – cuire la viande/les
légumes selon la recette
LO pour faire mijoter XLO – laisser mijoter sans couvercle
pour que la sauce épaississe
Sauce blanche, à
la crème,
béarnaise
MED – Faire fondre la
graisse, suivre la recette
LO – pour terminer la
cuisson
XLO – Pour maintenir la
chaleur, couvrir
Hollandaise XLO XLO – Pour maintenir la
chaleur, réglage le plus bas
Soupes, bouillons HI – Couvrir, porter à
ébullition
LO pour faire mijoter Mijoter à XLO – Pour maintenir la
chaleur, couvrir
Légumes
Frais
HI – Couvrir, porter l’eau et
les légumes à ébullition
LO à MED – faire cuire
jusqu’à ce qu’ils soient
tendres
Identique aux brûleurs standards
XLO – pour maintenir la
chaleur, couvrir
Congelés HI – Couvrir, porter l’eau et
les légumes à ébullition
LO à MED – faire cuire
selon les instructions du
paquet
Identique aux brûleurs standards
Grande friture HI – Faire chauffer l’huile MED à MED HI – pour
conserver la température
de friture
Identique aux brûleurs standards
Sautés MED HI – Faire chauffer
l’huile ou faire fondre le
beurre, ajouter les légumes
LO à MED – laisser cuire
jusqu’au point de
cuisson désiré
Identique aux brûleurs standards
R
evenus à la poêle HI – Faire chauffer l’huile,
ajouter les légumes
HI à HI – pour terminer la
cuisson
Identique aux brûleurs standards
Aliments Réglage initial
Réglage final –
brûleurs standards
Réglage final –
brûleurs XLO
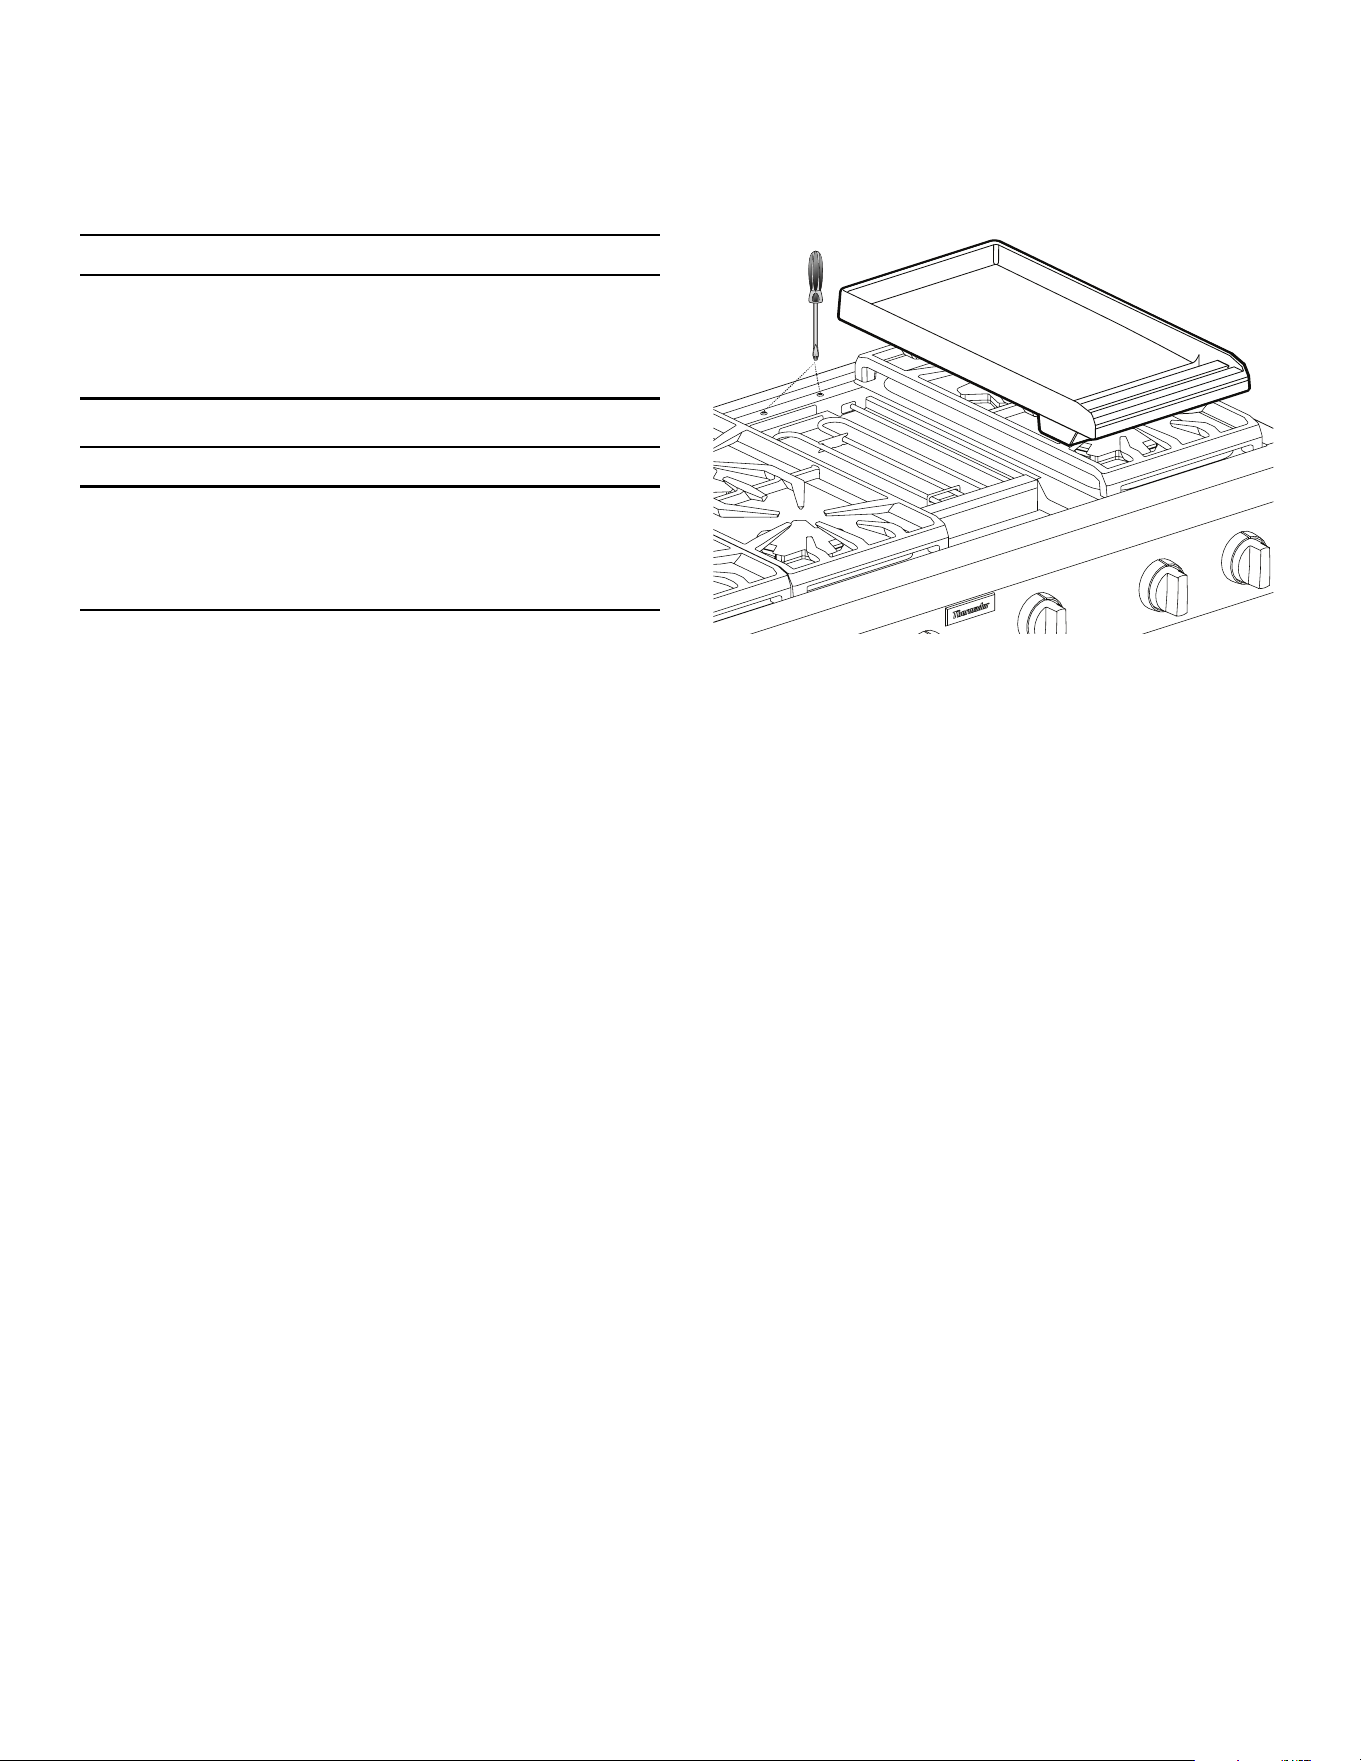
Page. 80
Plaque chauffante électrique
Description
9 AVERTISSEMENT
L’élément de la plaque chauffante reste chaud après
utilisation. Prévoyez suffisamment de temps pour que
tous ses composants refroidissent avant de les
nettoyer.
9 MISE EN GARDE
Pour éviter tout risque de blessure, n’utilisez jamais la
plaque chauffante sans sa plaque. N’utilisez jamais la
plaque chauffante d’une manière non indiquée dans le
guide d'utilisation et d'entretien.
NOTE : Seulement sur certains modèles.
Les largeurs de la plaque varient.
Une planche à découper en érable, un couvercle en acier
inoxydable sont disponibles comme accessoires et
peuvent être achetés séparément. La planche à découper
et le couvercle doivent être enlevés avant d’utiliser la
plaque chauffante.
Le plateau (ou le gril) doit toujours être en place lors de
l’utilisation de la plaque chauffante.
La plaque chauffante est ajustée électroniquement aux
températures indiquées sur les boutons, de 150°F à 500°F
(66°C à 260°C).
Les modèles de 61 cm (24 po) disposent de deux
résistances chauffantes avec commande indépendante.
Cette fonction permet de cuire simultanément des
aliments à différentes températures.
Préparation de la plaque
Préparer la de la plaque
1. Avant d’être utilisée, la plaque chauffante doit être
lavée à l’eau chaude savonneuse, puis rincée à l’eau
claire.
2. Assurez-vous que la plaque chauffante est bien
ajustée en versant deux cuillerées d’eau à l’arrière de
la plaque.
• L’eau devrait lentement couler vers les collecteurs
de graisse.
3. Déplacer de la plaque chauffante sur le côté.
4. Ajustez les deux vis situées sous la plaque, à l’arrière
de celle-ci. Commencez par dévisser les vis d’un demi-
tour.
5. Les ajustements subséquents devraient se faire par
quart de tour jusqu’à ce que l’eau coule dans les
collecteurs de graisse.
La plaque peut être utilisée sans beurre, margarine ou
huile. Toutefois, une petite quantité peut être utilisée pour
donner du goût aux aliments.
N'utilisez PAS des ustensiles métalliques sur la surface de
la plaque chauffante. Prenez garde de ne pas
endommager la surface avec les ustensiles. Ne coupez pas
directement d’aliments sur la plaque chauffante.
AVIS : Le rendement de la plaque chauffante ou du gril
peut varier si la circulation d’air près de l’appareil est trop
élevée. Une circulation d’air excessive pourrait provenir
d’un ventilateur de plafond ou d’un appareil de
climatisation soufflant sur la surface de cuisson. Cela
pourrait prolonger le temps d’échauffement ou faire en
sorte que la température de la plaque chauffante ne
corresponde pas à ce que le réglage des boutons de
commande indique.
NOTE : Une hotte dûment installée n’est pas considérée
comme une source de circulation d’air excessive.
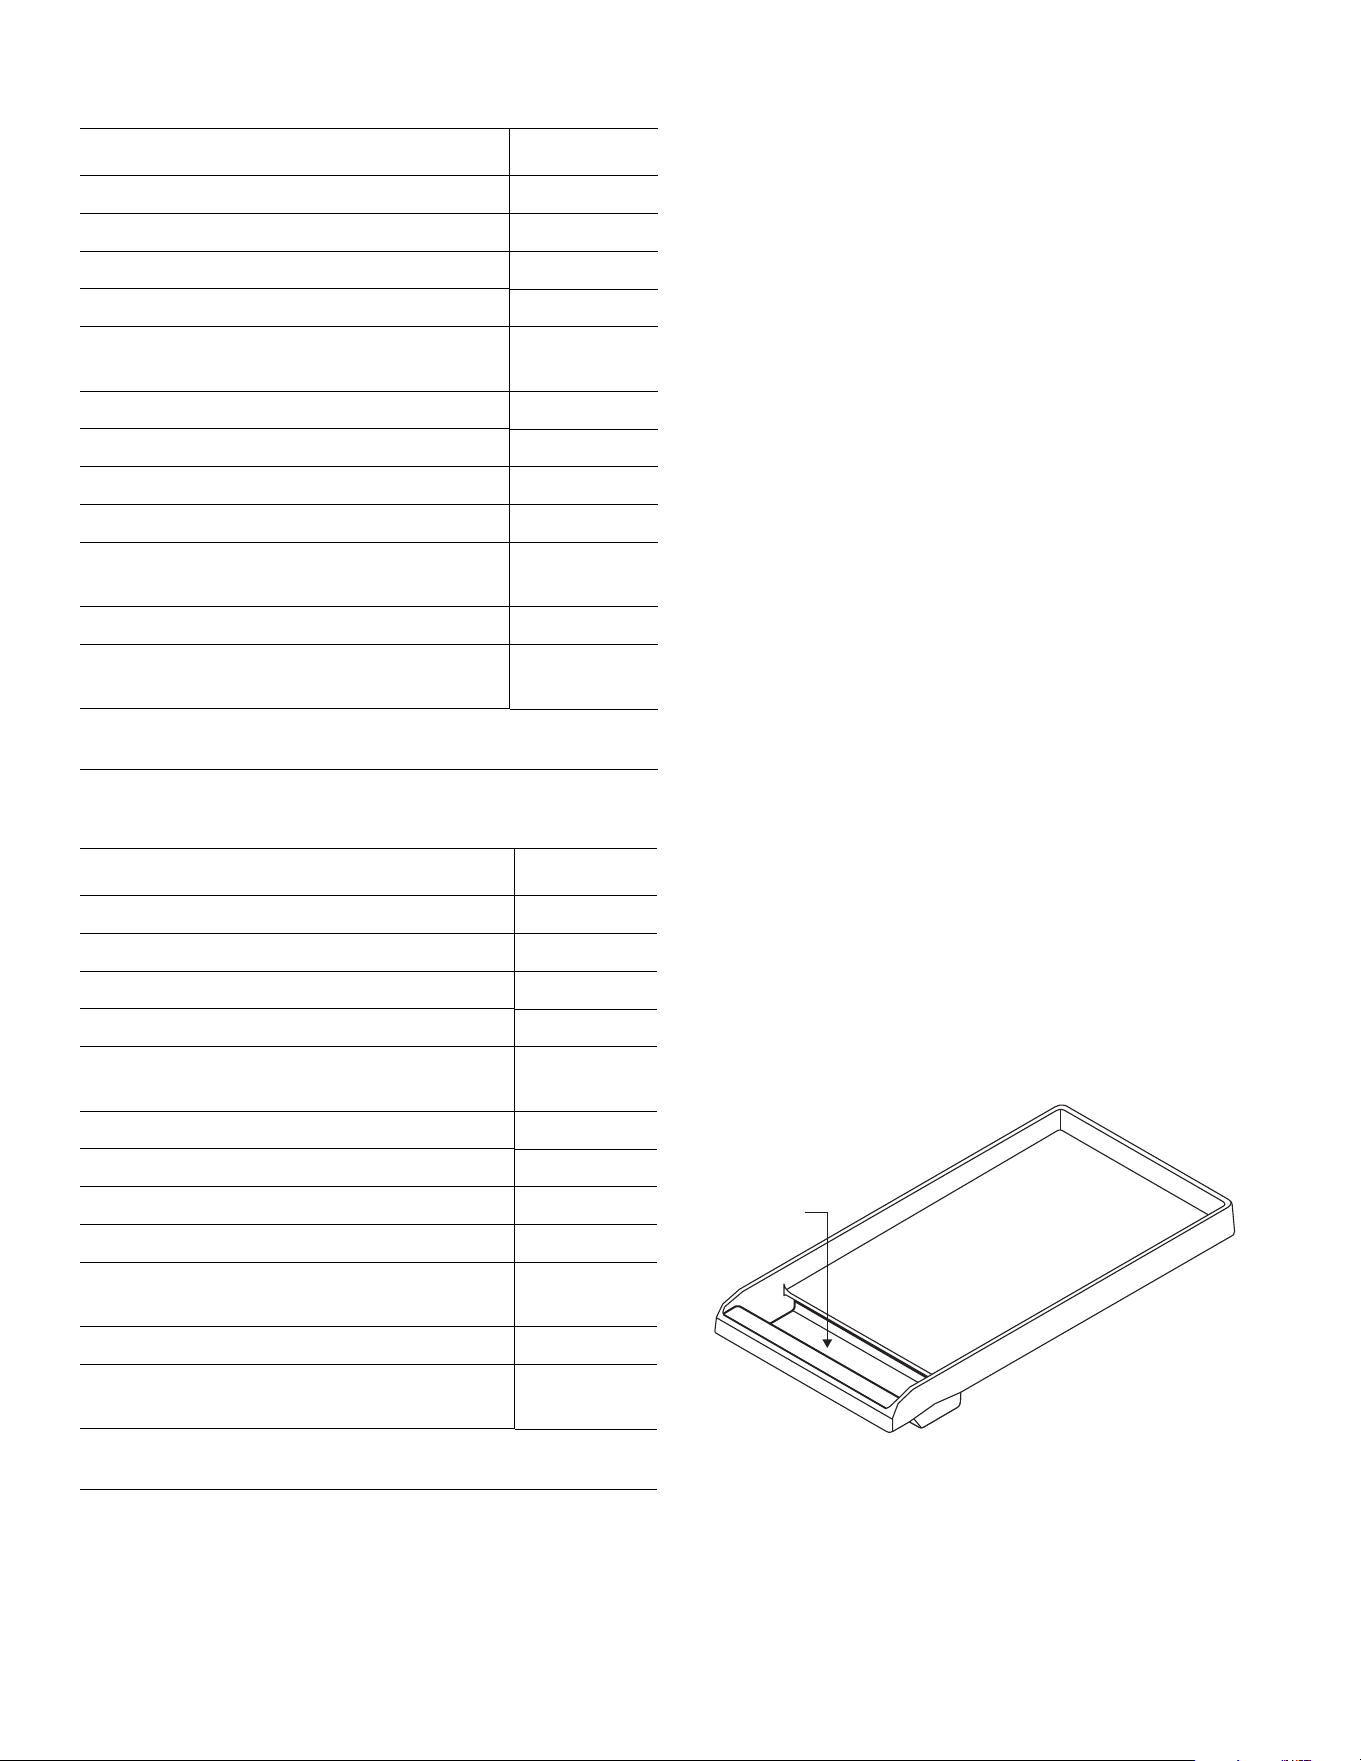
Page. 81
Conseils de cuisson 12'' plaque chauffante
Conseils de cuisson 24'' plaque chauffante
Cuisson sur la plaque chauffante
1. Tournez le bouton à la température de cuisson
appropriée pour préchauffer la plaque chauffante.
2. Préchauffez le plaque chauffante.
3. Ajoutez du beurre, de la margarine, de l’huile ou de la
graisse végétale, si désiré.
Utilisez le réglage de température le plus bas possible.
Vous pourriez avoir à modifier les recettes, car le
revêtement antiadhérent brunit et saisit les aliments à de
basses températures.
Recommandations pour le nettoyage
• N’immergez JAMAIS une plaque chauffante chaude
dans l’eau froide. La plaque d’aluminium pourrait
gondoler ou se fissurer.
•Ne faites PAS chauffer d'ustensiles de cuisson sur la
plaque à griller.
•
Ne nettoyez
AUCUNE
partie du gril ou de la plaque
chauffante dans le four en mode autonettoyage
.
• Prenez garde de ne pas endommager la surface avec
les ustensiles.
• Ne coupez pas directement d’aliments sur la
plaque chauffante.
• Ne pas utiliser des ustensiles en métal.
• Utilisez des ustensiles de plastique ou de bois
pour éviter d'égratigner la surface antiadhérente.
• Vous pouvez laver la plaque chauffante au lave-
vaisselle. Cependant, nous recommandons de la laver
à la main.
Plateau à graisse de la plaque chauffante
Aliment Réglage
Œufs 325° – 350°F
Bacon, saucisses à déjeuner 450° – 475°F
Sandwichs grillés 375° – 400°F
Poitrines de poulet désossées 425° – 450°F
Côtelettes de porc désossées de 1 po
(25,4 mm) d’épaisseur
425° – 450°F
Steaks de 1 po (25,4 mm) d’épaisseur 450° – 475°F
Boulettes de bœuf haché de 6 onces 450° – 475°F
Boulettes de dinde hachée, 6 onces 450° – 475°F
Hot Dogs 350° – 375°F
Tranches de jambon de 1/2 po (12,7 mm)
d’épaisseur
350° – 375°F
Crêpes, pain doré 400° – 425°F
Pommes de terre, pommes de terre
rissolées
400° – 425°F
* Pour garantir une cuisson uniforme, assurez-vous que
l'épaisseur des aliments est uniforme.
Aliment Réglage
Œufs 275° – 300°F
Bacon, saucisses à déjeuner 400° – 450°F
Sandwichs grillés 350° – 375°F
Poitrines de poulet désossées 400° – 425°F
Côtelettes de porc désossées de 1 po
(25,4 mm) d’épaisseur
400° – 425°F
Steaks de 1 po (25,4 mm) d’épaisseur 425° – 450°F
Boulettes de bœuf haché de 6 onces 400° – 425°F
Boulettes de dinde hachée, 6 onces 400° – 425°F
Hot Dogs 300° – 350°F
Tranches de jambon de 1/2 po (12,7 mm)
d’épaisseur
350° – 375°F
Crêpes, pain doré 350° – 375°F
Pommes de terre, pommes de terre
rissolées
400° – 425°F
* Pour garantir une cuisson uniforme, assurez-vous que
l'épaisseur des aliments est uniforme.

Page. 82
• Nettoyez le plateau à graisse après chaque utilisation.
Lorsque vous le retirez en l’inclinant, faites attention
pour ne pas que son contenu se déverse.
• Le plateau de la plaque chauffante et son plateau à
graisse sont lavables au lave-vaisselle.
• Lorsqu’elle a refroidi, versez la graisse dans un
contenant résistant à la graisse avant de la jeter.
Instructions de graissage de la plaque
chauffante
Si la plaque chauffante perd ses propriétés antiadhérentes
au fil du temps, suivez les instructions suivantes pour les
lui redonner. Pour assurer le rendement optimal et la
longévité de votre plaque chauffante, suivez ces
instructions simples de nettoyage et de graissage.
REMARQUE : Les plaques à frire de 24 po (61 cm) sont
trop grandes pour procéder à un conditionnement dans la
cavité du four. Par conséquent, prenez soin de ne pas
surchauffer le four ni d'endommager les revêtements anti-
adhésifs lors du préchauffage du four et de la cuisson.
Préparation de la plaque chauffante pour le graissage
La plaque chauffante doit être propre et tous les résidus
doivent être enlevés avant de procéder au graissage.
1. Utilisez un mélange de gros sel avec un peu de
vinaigre blanc pour déloger les résidus de la plaque
chauffante.
2. Rincez en profondeur avec de l’eau claire.
3. Séchez totalement la plaque chauffante.
Graissage de la plaque chauffante
Le graissage est un processus par lequel une couche de
graisse animale ou d’huile végétale est appliquée et cuite
sur un ustensile de cuisson. La couche d’huile fournit une
surface antiadhérente.
1. Utilisez un essuie-tout pour appliquer une couche
mince et uniforme de lard, de Crisco
®
, ou d’huile
d’olive sur la surface de la plaque chauffante.
2. Faites cuire la plaque chauffante à 350 °F pendant une
heure.
3. Retirez la plaque chauffante du four et laissez-la
refroidir à la température ambiante.
4. Appliquez une deuxième couche de graisse ou d’huile
et faites cuire la plaque chauffante à 350 °F pendant
une autre heure.
5. Répétez le processus au moins une autre fois pour un
total de trois couches d’huile ou de graisse.
Après le graissage
1. Après avoir fait cuire votre plaque chauffante, laissez-
la refroidir et nettoyez-la avec un chiffon humide.
Laissez-la sécher.
2. Ajoutez une mince couche d’huile ou de graisse avant
d’entreposer la plaque chauffante dans un endroit
frais et sec.
3. Ce processus redonnera à la plaque chauffante ses
propriétés antiadhérente. Le rendement de la plaque
chauffante s’améliorera avec d’autres graissages.
4. Pour dégraisser la plaque chauffante avant de
procéder à son graissage, utilisez un mélange de sel
et de vinaigre.
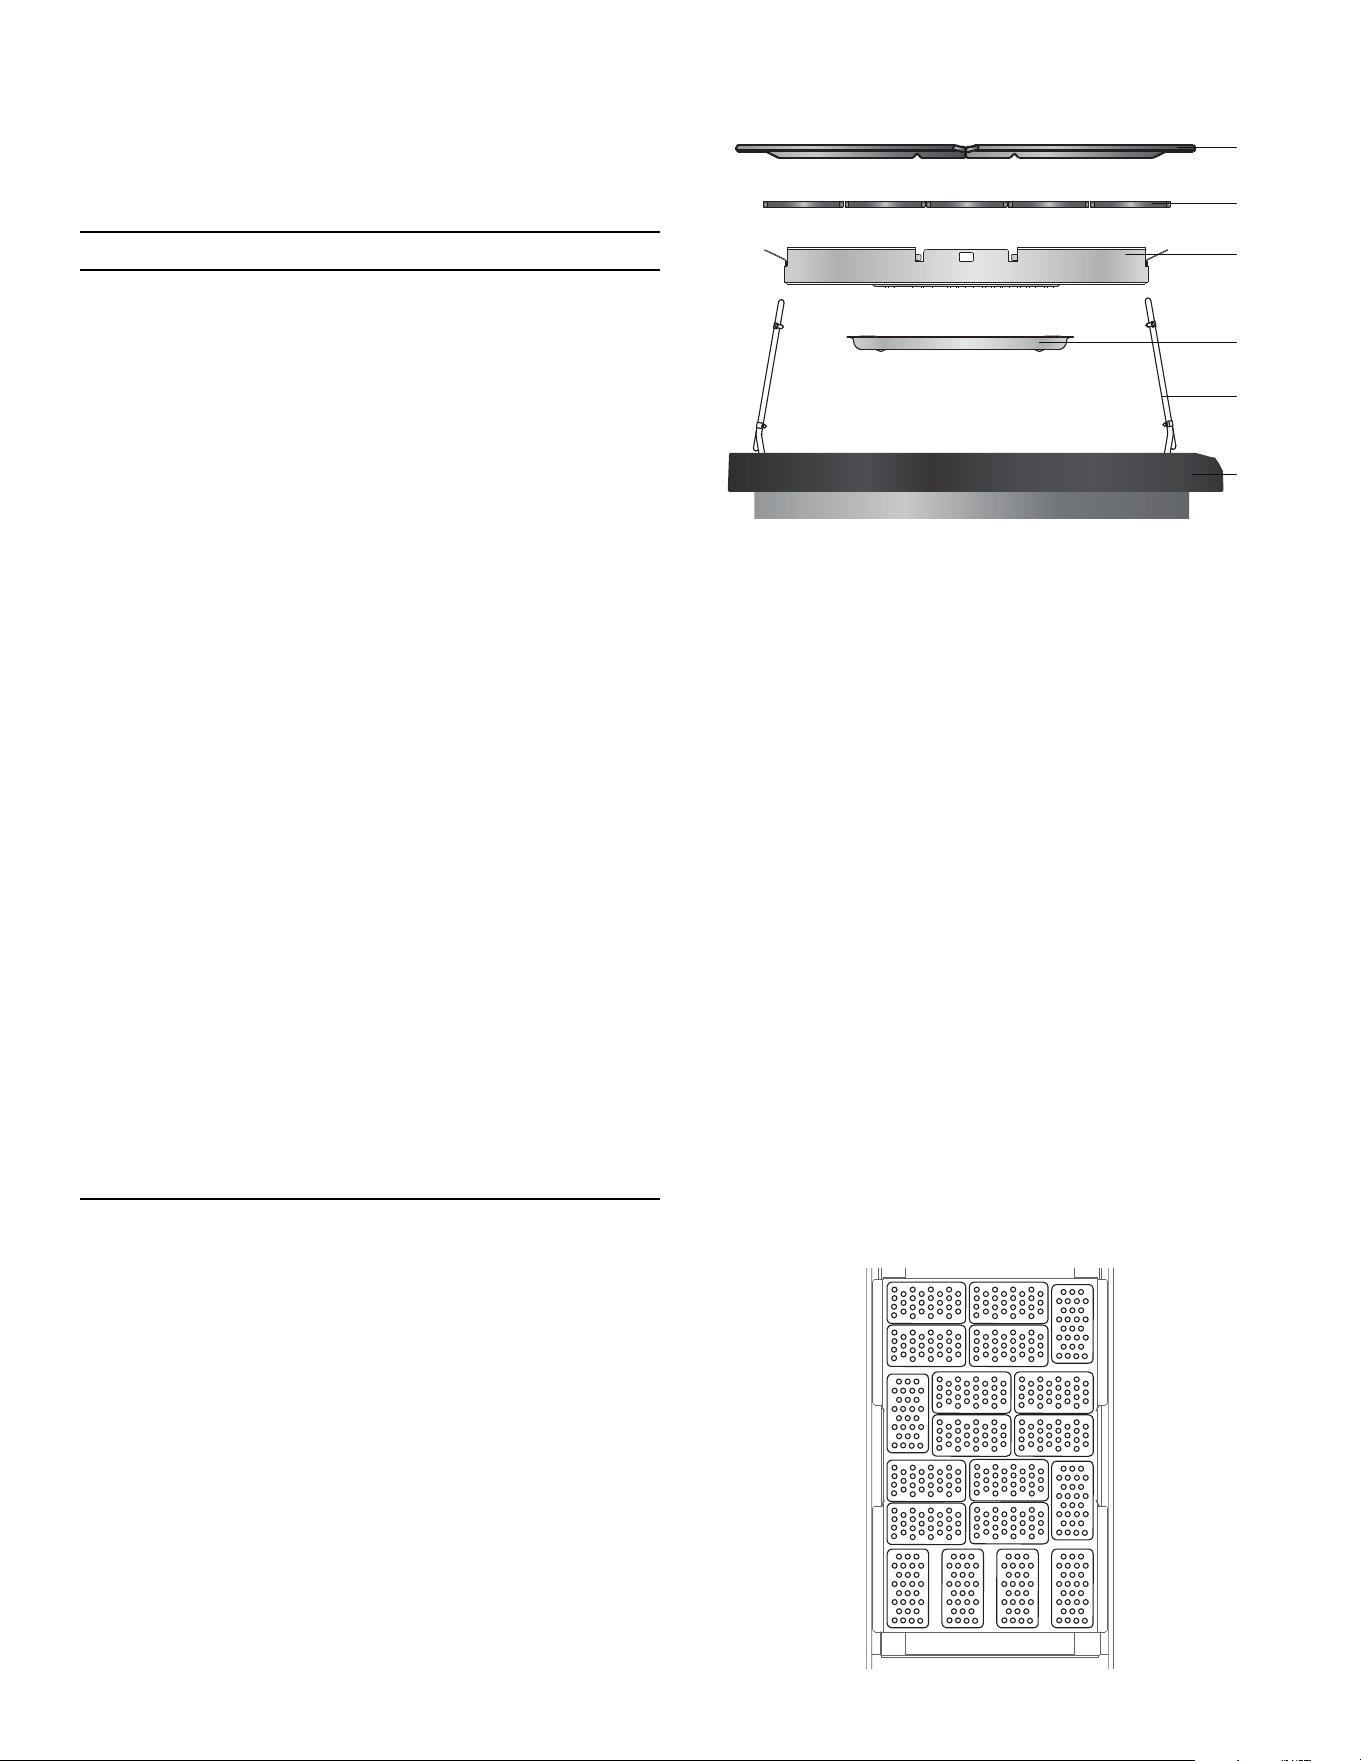
Page. 83
Gril électrique
Description
9 AVERTISSEMENT
• Pour éviter tout risque de blessure, ne faites
JAMAIS fonctionner le gril s'il n'y a pas de grilles
ou de plaque chauffante installées.
• Ne laissez JAMAIS le gril sans surveillance lorsque
vous cuisinez.
• Faites attention lorsque vous utilisez de l'huile et
de la graisse. Lorsqu'ils sont surchauffés, les huiles
et la graisse peuvent provoquer des incendies.
• N'utilisez PAS de copeaux de bois, pierres de lave,
ou de briquettes de charbon. N'utilisez que les
briquettes de céramique (PABRICKBKN)
recommandées.
• N'utilisez PAS de plats, casseroles, poêlons ou
autre ustensile sur le gril.
• N'utilisez jamais du papier d'aluminium pour
couvrir les grilles ou envelopper le gril. Vous
pourriez endommager le gril et causer un incendie
si de la chaleur reste emprisonnée.
• Vérifiez le plateau à graisse avant chaque
utilisation. Une trop grande quantité de graisse
dans le plateau peut causer un risque d'incendie.
• Si des flammes apparaissent, nettoyez le gras
accumulé sur les grilles, le plateau à graisse, le
panier des briquettes de céramique et les autres
surfaces.
• L'accumulation de graisse favorise la formation de
flammes et de fumée pendant la cuisson.
• Vous devez remplacer les briquettes de céramique
lorsqu'elles sont noires, ce qui signifie qu'elles sont
saturées de gras. Elles peuvent alors générer
beaucoup de fumée ou prendre feu pendant le
fonctionnement de l'appareil.
NOTE : Seulement sur certains modèles.
Les grilles du gril encastrable sont faites de fonte de
qualité professionnelle. Ce métal fait en sorte que les
grilles répartissent uniformément la chaleur et sont faciles
à nettoyer.
Il est possible d'installer une plaque chauffante de fonte
antiadhérente, vendue séparément. Consultez les
instructions de l'accessoire de la plaque chauffante pour
obtenir plus de détails.
Assemblage du gril
Pour l'assemblage
1. Effectuez la rotation des éléments (5) et enlevez le
briquettes de céramique (3) se trouvant à l'intérieur du
boîtier du gril (1).
2. Installez le plateau à graisse (2) sous le boîtier du gril
(1). (Le plateau à graisse est emballé dans la grande
boîte en carton qui se trouvait sur le dessus de la
cuisinière.) Alignez les saillies du plateau à graisse (2)
avec les cavités situées sous le boîtier (1).
3. Mettez le briquettes de céramique (4) dans le boîtier
du gril (1).
4. Disposez les briquettes de céramique (4) dans le
panier à briquettes (3), en une seule couche, de façon
à ce que chacune d'elles touche les autres briquettes
adjacentes. Les briquettes de céramique ne doivent
pas entrer en contact avec les éléments chauffants.
1 Boîtier du gril
2 Plateau à graisse
3 Panier des briquettes de céramique
4 Briquettes de céramique
5 Éléments (x2)
6 Grilles du gril (x2)
2
5
3
1
4
6

Page. 84
5. Rabattez les deux éléments chauffants du gril vers le
bas (5). Les éléments chauffants du gril doivent être à
plat. Les supports doivent reposer à l'intérieur des
crans latéraux.
6. Installez les grilles du gril (6). Assurez-vous que les
grilles sont installées de niveau dans le boîtier du gril
(1).
IMPORTANT :
• Si des flammes se forment pendant l’utilisation du gril,
éteignez l’appareil et retirez les aliments. Prenez
garde de ne pas vous blesser lorsque vous retirez les
aliments.
• Souvent, les flammes s’éteignent d’elles-mêmes en
quelques minutes une fois que les accumulations de
graisse se sont consumées. Ne laissez pas le gril sans
surveillance avant que les flammes ne se soient
éteintes. Vous pouvez étouffer les flammes en les
saupoudrant d’une généreuse couche de bicarbonate
de soude ou de sel.
• Si des flammes se forment, vous devriez remplacer les
pierres à lave ou les briquettes de céramique et
nettoyer le gras accumulé sur les grilles, le plateau à
graisse, le panier briquettes de céramique et les
autres surfaces avant d’utiliser à nouveau le gril. Les
accumulations de graisse favorisent la formation de
flammes et de fumée pendant la cuisson.
• Séchez les aliments humides avant de les mettre sur le
gril.
• Plus un aliment est humide, plus il est susceptible de
produire de la fumée.
• Lorsque vous utilisez le gril, la graisse qui s’échappe
des aliments peut s’enflammer brièvement.
9 AVERTISSEMENT
POUR ÉVITER TOUT RISQUE DE BRÛLURE :
• Utilisez les ustensiles appropriés avec de longues
poignées qui vous permettent de manier les
aliments loin de la chaleur et des flammes.
• NE portez PAS de vêtements amples lorsque vous
cuisinez.
• Ne laissez jamais le gril sans surveillance lorsque
vous cuisinez.
• Après chaque utilisation, enlevez les
accumulations de graisse sur la surface du gril et
dans les plateaux à graisse pour réduire les
risques d’incendie. Vous devriez également
nettoyer régulièrement la hotte et les surfaces
adjacentes au gril selon les recommandations du
manuel d’utilisation.
• Gardez un extincteur à portée de la main.
Fonctionnement du gril
1. Avant d'allumer l'appareil, assurez-vous qu'il y a des
briquettes de céramique l'appareil et que les deux
grilles du gril sont correctement installées.
2. Appuyez sur le bouton de réglage de température et
tournez-le à la température souhaitée.
• Les deux éléments chauffants du gril peuvent être
ajustés séparément. Cela vous permet de faire
griller des aliments à deux températures
différentes en même temps. Aussi, vous pouvez
utiliser une partie pour faire griller les aliments et
l'autre partie pour les garder chauds.
3. Lors de la première utilisation, faites chauffer le gril
pendant environ dix minutes pour éliminer les résidus
de fabrication et libérer les mauvaises odeurs.
4. Pour obtenir de meilleurs résultats, préchauffez le gril
avant de faire cuire des aliments.
9 ATTENTION
Nettoyez le gril après chaque utilisation. Laissez à
l'appareil le temps de refroidir avant de le nettoyer.
Conseils de grillade
• Préchauffez toujours le gril. Lorsque vous cuisinez à la
puissance maximale, préchauffez le gril à HIGH
pendant dix minutes. Lorsque vous cuisinez à intensité
moyenne, préchauffez le gril à HIGH pendant cinq
minutes, puis réduisez la température une fois que les
aliments sont sur le gril.
• Faites tremper les brochettes de bois dans de l'eau
pendant au moins 20 minutes avant de les mettre sur
le gril.
• Avant de faire griller des aliments, vous pouvez les
badigeonner d'huile résistant à la chaleur (comme de
l'huile d'arachides) ou les faire mariner. Assurez-vous
de ne pas utiliser trop d'huile ou de marinade, sans
quoi les aliments pourraient prendre feu et produire
beaucoup de fumée.
• Déposez les aliments directement sur les grilles du
gril. N'utilisez pas de papier d'aluminium ou de
plateaux.
• La viande salaisonnée, comme le jambon ou les
côtelettes de porc fumées, n'est pas faite pour être
grillée. Des composés chimiques mauvais pour la
santé peuvent se former lors de leur cuisson sur le gril.
• Pour éviter que les aliments ne s'enflamment, enlevez
l'excédent de gras avant de les faire griller.
• N'utilisez PAS de produits nettoyants sur les éléments.
S'il y a de la graisse sur les éléments, laissez-leur le
temps de brûler.
• Pour absorber le gras de la plaque chauffante,
saupoudrez-la avec du gros sel après chaque
utilisation.

Page. 85
Recommandations pour la cuisson sur le gril
IMPORTANT :
• VOUS NE DEVRIEZ PAS UTILISER LE GRIL SANS UNE VENTILATION ADÉQUATE.
• Vous ne devriez pas préparer d’aliments à forte teneur en gras sur un gril intérieur. Le fait de faire griller des aliments
à forte teneur en gras (comme certains types de bœuf haché, saucisses, etc.) augmente les possibilités de formation
de fumées et de flammes.
Aliment* Réglage**
Temps de
cuisson
(minutes)
Notes
Bœuf
Hamburgers, ¾'' (2 cm) (à point) Feu vif 12 – 14 Tourner une fois que du jus apparaît à la
surface.
Steak d'aloyau, 1½'' (4 cm) (à point) Feu vif 20 – 22 Enlever l'excédent de graisse.
Faux-filet ou surlonge, 1" (3 cm) (à
point)
Feu vif 10 – 12 Enlever l'excédent de graisse.
Brochettes, steak (à point) Feu vif 24 – 28 Tourner de temps en temps.
Porc
Côtelettes de porc, ¾'' (2 cm) Feu vif 16 – 20 Enlever l'excédent de graisse.
Saucisses ou Bratwurst Feu moyen 16 – 20 Percer avant de griller.
Hot Dogs Feu vif 6 – 8 Placer horizontalement sur le gril.
Volaille
Cuisses et pilons Feu moyen 34 – 38 Tourner de temps en temps, enlever l'excédent
de peau.
Ailes de poulet, entières Feu moyen 18 – 22 Tourner de temps en temps.
Poitrines de poulet sans os, ½'' (1 cm) Feu moyen 20 – 24 Couper en filets de la même épaisseur avant de
faire cuire.
Brochettes, poulet Feu vif 30 – 33 Tourner de temps en temps.
Fruits de mer
Darnes, 2" (6 cm) Feu moyen 18 – 20 Badigeonner d'huile avant de faire griller.
Filets de poisson, ¾'' (2 cm) Feu moyen 16 – 20 Badigeonner d'huile avant de faire griller.
Brochettes de crevettes Feu moyen 10 – 14 Tourner de temps en temps.
Fruits et légumes frais
Champignons portobello Feu vif 8 – 10 Badigeonner d’huile.
Poivrons, quartiers Feu vif 8 – 10 Tourner de temps en temps.
Aubergine en tranches, ½'' (1 cm) Feu vif 8 – 10 Badigeonner avec un peu d’huile.
Tomates, coupées en deux Feu vif 8 – 10 Badigeonner d’huile.
Ananas en tranches Feu vif 4 – 6 —
Pêches, coupées en deux Feu vif 4 – 6 —
Autre
Pains à hot dog ou hamburger Feu moyen 4 – 6 Badigeonner de beurre.
Tofu ferme en tranches Feu moyen 8 – 12 Mettre en brochette pour une grillade facile.
* Pour une cuisson uniforme, veuillez bien répartir les aliments sur la surface de cuisson.
** Les réglages apparaissant dans le tableau ne devraient être considérés que comme des lignes directrices puisque la quantité de
chaleur requise peut varier selon le type et l'état des aliments.
Page. 86
Utilisation du four
Symboles et descriptions du
four
Symbole/Mode Définitions et recommandations
Élec-
trique
princi-
pale
Princi-
pal
gazier
Élec-
trique
secon-
daire
Gazier
secon-
daire
Cuisson Cuit les aliments avec de l’air chaud et sec. Différents
types d’aliments comme des gâteaux, des biscuits, des
pâtisseries, des pains éclair, des quiches et des
casseroles.
Cuisson conv. Semblable au mode Cuisson, mais un ventilateur à
l’arrière du four fait circuler l’air. Idéal pour les produits
boulangers comme les gâteaux, les pains de maïs, les
tartes, les pains éclair, les tourtes et les pains à la
levure.
Conv. vérit. Utilise la chaleur diffusée par un troisième élément
situé à l’arrière du four. La chaleur circule à l'intérieur
du four grâce au ventilateur à convection. Convient
tout particulièrement aux aliments en portions
individuelles comme les biscuits et les pâtisseries.
Gril Utilise la chaleur intense diffusée par l’élément
supérieur. Pour des pièces tendres et épaisses de
viande (1 po/2,5 cm ou moins) ou de volaille; faire
dorer le pain et les casseroles.
Gril ê conv. Allie la chaleur intense diffusée par l’élément supérieur
à l'air chaud qui circule sous l'action d'un ventilateur.
Pour des pièces tendres de viande (plus de 1 po/
2,5 cm), de volaille et de poisson. Ne convient pas au
brunissage.
Apprêt Fait lever la pâte levée et le pain au levain.
Rôtir Utilise davantage la chaleur intense diffusée par
l’élément supérieur, brunissage plus intense de
l’extérieur du mets. Idéal pour la viande, la volaille, les
morceaux moins tendres de viande et les légumes
rôtis.
Rôtir conv. Allie la chaleur de la sole et la chaleur plus intense
diffusée par l'élément supérieur (que celle de la
cuisson avec convection) à l'air chaud qui circule sous
l'action d'un ventilateur. Pour les morceaux tendres de
viande et de volaille et les légumes rôtis. La viande est
plus tendre et juteuse qu’en mode rôtir.
Sabbath/cuisson
prolongée
Ce mode de cuisson aide l’utilisateur à se conformer
aux principes du Sabbath.
Garder chaud* Maintien une faible température pour maintenir les
aliments chauds. Idéal pour les produits boulangers
comme les gâteaux, les pains de maïs, les tartes, les
pains éclair, les tourtes et les pains à la levure.
Autonettoyage Le four atteint une température très élevée d’environ
850 °F (454 °C) pour brûler les débris alimentaires.
* Non offert sur les modèles de 30 po (76 cm).

Page. 87
Démarrage à
distance*
La fonction permet à l’utilisateur de démarrer, faire une
pause et mettre fin à des programmes du four, et ce à
distance par l’appli Home Connect.
Préchauffage
rapide *
Ce symbole s’affiche lorsque le four est en mode
préchauffage.
Sonde
thermométrique*
S’affiche à la détection d’une sonde.
Minuterie de
cuisine*
La minuterie de cuisine fonctionne de façon
indépendante des autres fonctionnalités de l’appareil
électroménager.
Temps de cuisson* Affiche le temps restant du fonctionnement du four
avant qu’il ne s’arrête automatiquement.
Heure de fin * S’utilise lorsque le démarrage programme du four est
reporté. Affiche l’heure du jour à laquelle le four
s’éteindra automatiquement.
Verrouillage du
panneau
Empêche toute mis sous tension du four ou bloque
toute modification accidentelle des réglages.
Verrouillage de
porte *
Symbole affiché au cours du mode d’autonettoyage et
après celui-ci alors que la porte est verrouillée.
Réparations à
distance*
Ce symbole est affiché lorsque le service après-vente
est connecté pour un accès à distance.
* Non offert sur les modèles de 30 po (76 cm).
Symbole/Mode Définitions et recommandations
Élec-
trique
princi-
pale
Princi-
pal
gazier
Élec-
trique
secon-
daire
Gazier
secon-
daire
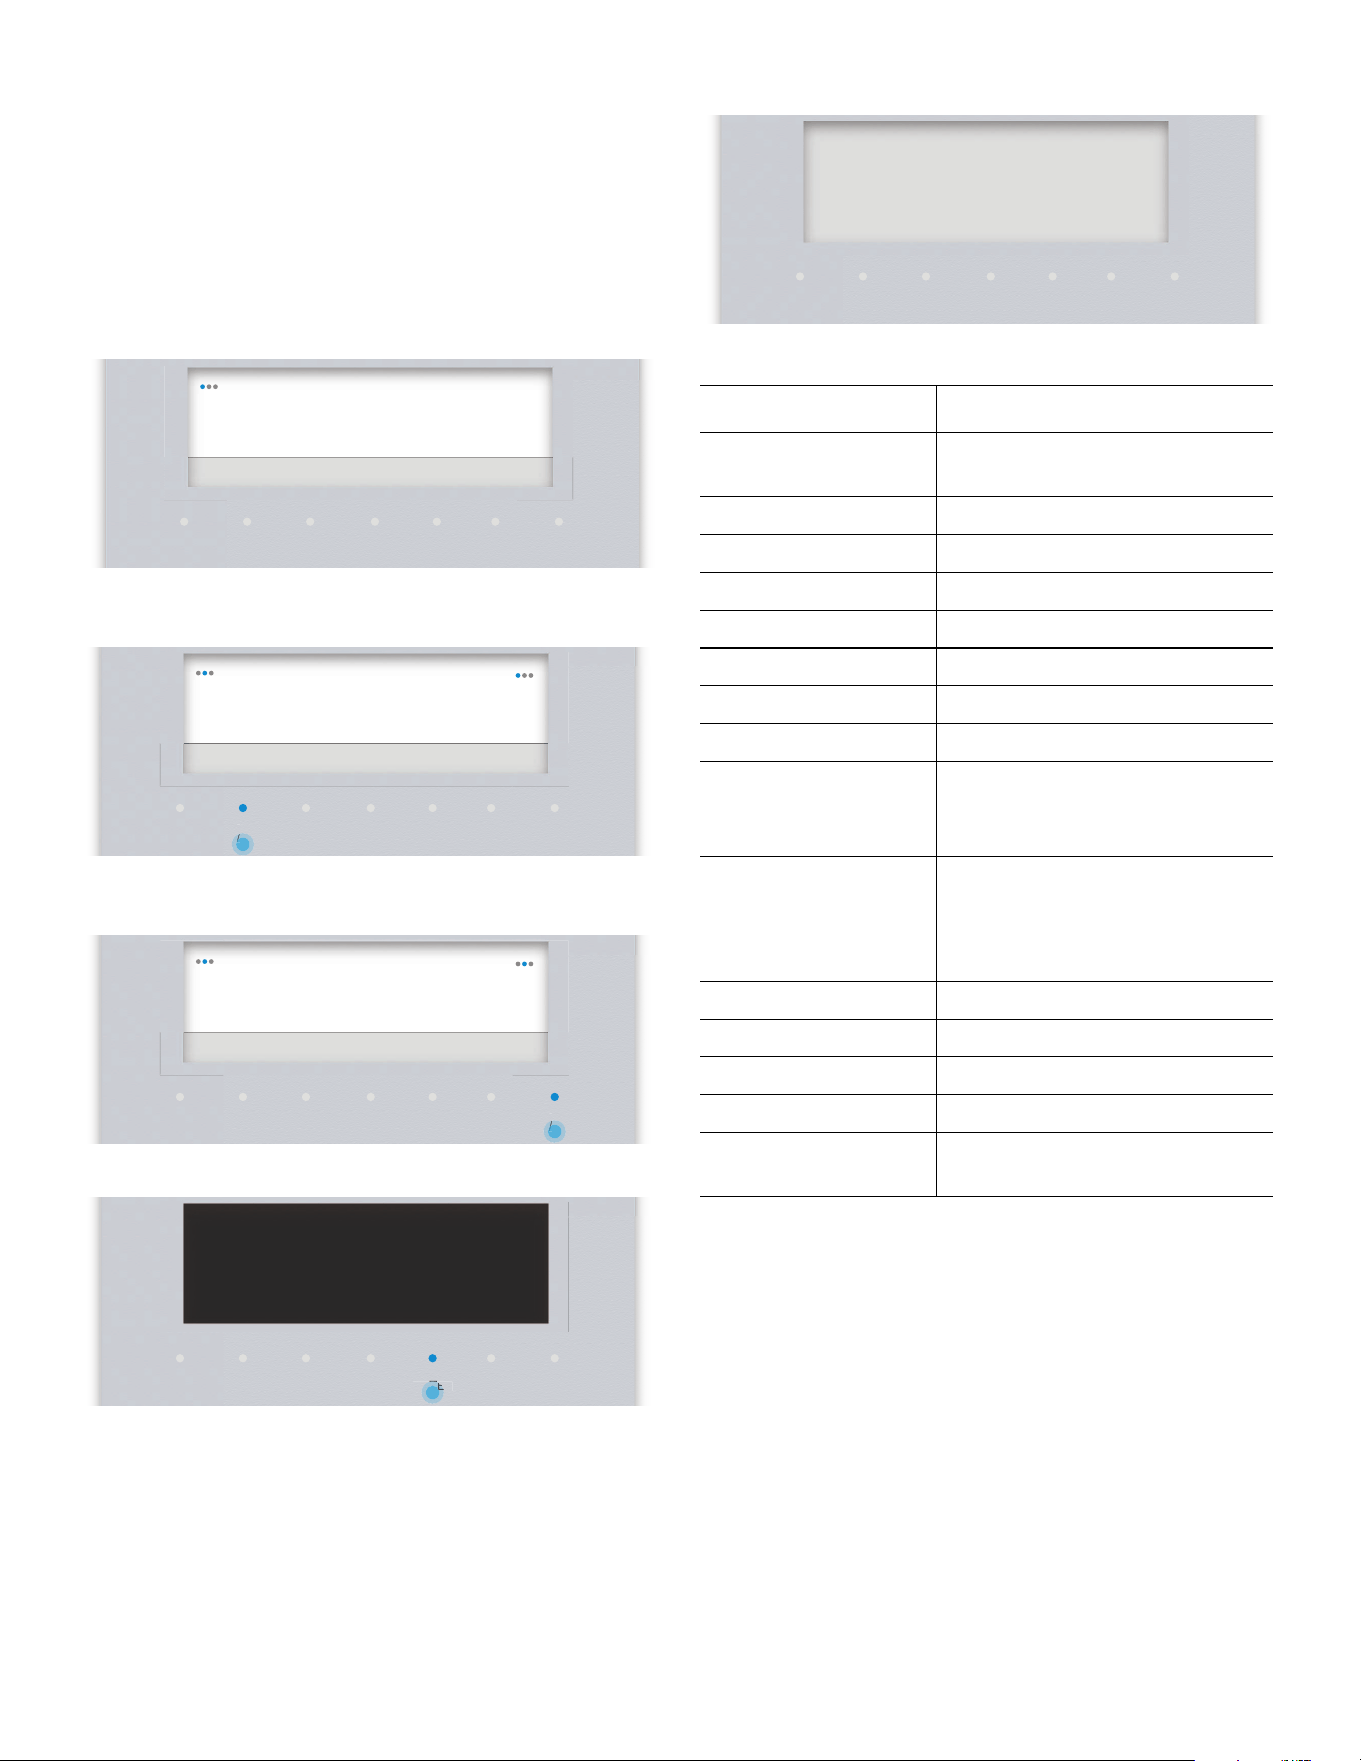
Page. 88
Configuration initiale
Paramètres de démarrage
Vous pouvez accéder aux réglages à tout moment un
appuyant sur RÉGLAGES (SETTINGS) alors que l’appareil
électroménager est en mode Veille.
1. Raccordez l’appareil électroménager à l’alimentation
secteur.
2. Sélectionnez le paramètre voulu avec les gauche
( ou
).
3. Modifiez le paramètre de réglage avec les droite
( ou
).
4. Effleurez ENTRÉE (ENTER).
– L’écran passe en mode Veille.
Réglages offerts
Assistant Home Connect
À propos de Home Connect
Pour certains modèles, l’assistant Home Connect fait
partie de l’installation initiale de l’appareil
électroménager. Si on saute l’installation de
Home Connect au cours du premier démarrage de
l’appareil électroménager, on peut y accéder par le menu
des réglages.
Il faut d’abord réussir l’installation de l’application
Home Connect sur un appareil mobile. Consultez la
section “Configuration de Home Connect™” à la
page 103 pour connaître l’ensemble des directives
d’installation de l’application Home Connect.
TIMERS SETTINGS ENTER
06:30Time of Day
Press Enter to save
TIMERS SETTINGS ENTER
EnglishLanguage
Press Enter to save
TIMERS SETTINGS ENTER
FrançaisLanguage
Press Enter to save
TIMERS SETTINGS ENTER
finished
fi8d
First start up
NTE
NTE
Réglage Option
Heure Temps donnée en heures et en
minutes
Langue English, Français, Español
Format de l’heure 12 h, 24 h
Affichage de l’heure Numérique, analogue
Préchauffage rapide Marche/arrêt
Son des touches Marche/arrêt
Luminosité de l’écran 1 – 5
Mode veille Marche/arrêt
Conversion de la
convection
Marche/arrêt
Réduit la température du four
de 25 °F (4 °C)
Écart de température • Écart temp. : four de droite
de -35 à +35 °F (-20/+20 °C)
• Écart temp. : four de gauche
de -35 à +35 °F (-20/+20 °C)
Sabbat Marche/arrêt
Home Connect Configuration avec l'assistant
Réglages usine Restauration
Accès pour service Connexion
Service après-vente Affiche les coordonnées du
Service après-vente
TIMERS SETTINGS ENTER
06:30

Page. 89
Configuration de Home Connect
Vous pouvez démarrer l’assistant Home Connect pour
établir la connexion au réseau Home Connect et appairer
l’appareil mobile.
1. Commencez à partir du mode VEILLE (STANDBY) et
sélectionnez RÉGLAGES (SETTINGS).
2. Appuyez sur la gauche
( ou ) pour et sélectionnez
HOME CONNECT.
3. Appuyez sur ENTRÉE (ENTER).
4. Suivre les instructions de l'afficheur.
Protection des données
Les catégories suivantes de données sont transmises au
serveur Home Connect lors de la première connexion de
l'appareil électroménager à un réseau local (WLAN)
communicant avec Internet (première inscription) :
• Identifiant unique de l'appareil électroménager
(composé des codes de l'appareil de même que
l'adresse MAC du module de communication Wi-Fi
installé).
• Le certificat de sécurité du module de communication
Wi-Fi (pour assurer une connexion informatique
sécurisée).
• Les versions actuelles du logiciel et du matériel
informatique de l'appareil électroménager.
• L'état de toute réinitialisation antérieure des
préréglages faits en usine.
Réglage du four
Mode de cuisson et température
1. Insérez la grille au niveau désiré et fermez la porte.
2. Tournez le bouton mode à CUISSON (BAKE), par
exemple.
3. Tournez le bouton de TEMPÉRATURE du four.
– La barre de préchauffage se déplace vers la
droite.
4. Une fois le four chaud, insérez les aliments dans la
cavité.
Kitchen timer (minuterie
cuisine)
À propos la minuterie de cuisine
• La minuterie peut être réglée jusqu’à 24 heures.
• Elle peut être utilisée même si la cuisinière est en
marche et est indépendante de toutes les autres
fonctions.
• L’appareil électroménager ne s’allume pas et ne
s’éteint pas automatiquement.
Pour régler la minuterie de cuisine
1. Effleurez MINUTERIES (TIMERS).
2. Appuyez de gauche (ou) pour sélectionnez
MINUTERIE CUISINE (KITCHEN TIMER).
3. Appuyez de droite (ou) pour sélectionner la durée
souhaitée et effleurez ENTRÉE (ENTER).
– Un signal sonore retentit à la fin du temps écoulé.
Appuyez sur ENTRÉE (ENTER) pour interrompre
la sonnerie et la minuterie.
Modification d’une minuterie en cours de
fonctionnement :
1. Effleurez MINUTERIES (TIMERS).
2. Appuyez de droite (ou) pour sélectionner la durée
souhaitée et effleurez ENTRÉE (ENTER).
Oven timer (minuterie de
four)
À propos la minuterie de four
La minuterie du four sert à éteindre mécaniquement le
four lorsque le temps de cuisson désiré est complété.
TIMERS SETTINGS ENTER
Bake
06:30
°
— — —
TIMERS SETTINGS ENTER
Bake
06:30
°
350
°
TIMERS SETTINGS ENTER
Bake
06:30
°
350
°

Page. 90
Pour régler la minuterie du four
1. Tournez le bouton sélecteur de mode à CUISSON
(BAKE), par exemple.
2. Tourner le bouton de mode de cuisson et celui de la
TEMPÉRATURE du four à 350°F, par exemple.
3. Effleurez MINUTERIES (TIMERS).
4. Appuyez de gauche (ou) pour sélectionnez
MINUTERIE DE FOUR (OVEN TIMER).
5. Appuyez de droite (ou) pour sélectionner la durée
souhaitée et effleurez ENTRÉE (ENTER).
– Un signal sonore retentit à la fin du temps écoulé.
Appuyez sur ENTRÉE (ENTER) pour interrompre
la sonnerie et la minuterie.
Modification d’une minuterie en cours de
fonctionnement :
1. Effleurez MINUTERIES (TIMERS).
2. Appuyez de droite (ou) pour sélectionner la durée
souhaitée.
3. Effleurez ENTRÉE (ENTER).
End timer (fin de la
minuterie)
Vous pouvez reporter le temps de cuisson à une heure
ultérieure. Par exemple : il est 16 h. Le plat doit cuire
pendant 40 minutes. Vous voulez qu’il soit prêt à 17 h 30.
Saisissez la durée du temps de cuisson et reportez l’heure
de fin jusqu’à 17 h 30. L’appareil électroménager se met
en marche automatiquement à 16 h 50 et s’éteint de lui-
même à 17 h 30.
Rappelez-vous de ne pas laisser des aliments qui ne se
conservent pas très bien dans le four pour des périodes
prolongées.
Réglage de l’heure de fin :
1. Réglez le mode de cuisson désiré ainsi que la
température du four.
2. Appuyez MINUTERIES (TIMERS).
3. Appuyez de gauche (ou) pour sélectionnez
MINUTERIE DE FOUR (OVEN TIMER).
4. Appuyez de droite (ou) pour sélectionnez pour régler
l'heure du four.
5. Appuyez de gauche (ou) pour sélectionnez l’HEURE
DE FIN (END TIME).
6. Appuyez de droite (ou) pour sélectionnez pour régler
l’heure de fin (end time) et effleurez ENTRÉE
(ENTER).
– Après la confirmation de l’heure de fin, l’avis de
temps d’attente s’affiche à l’écran. Après la
période d’attente, le four commence à chauffer.
Fast preheat (préchauffage
rapide)
Préchauffage rapide
• Pour certains modes de cuisson, vous pouvez réduire
la durée du temps de préchauffage en appuyant sur
Préchauffage rapide. Le préchauffage rapide est
habituellement recommandé pour les plats préparés
surgelés, en casserole ou tout autre aliment qui
demande des temps de cuisson prolongés. Ce mode
de cuisson n'est pas recommandé pour les produits de
boulangerie.
• L'appareil continuera de fonctionner en mode
Préchauffage rapide sans interruption jusqu'à un
changement manuel de l'utilisateur ou lors d'une
coupure de courant; dans ce cas, il faut réinitialiser le
préchauffage rapide.
• Il est également possible d'activer le préchauffage
rapide du deuxième four dans les modèles de 48 po
(122 cm).
• Le préchauffage rapide est offert pour les modes
Cuisson, Cuisson à convection, Rôtissage et Rôtissage
par convection.
• Pour un résultat de cuisson uniforme, ne déposez pas
les aliments dans le four avant la fin du Préchauffage
rapide.
Pour régler le préchauffage rapide
1. Commencez à partir du mode VEILLE (STANDBY) et
sélectionnez RÉGLAGES (SETTINGS).
2. Appuyez sur la gauche
( ou ) pour et sélectionnez
PRÉCHAUFFAGE RAPIDE (FAST PREHEAT).
3. Appuyez sur ENTRÉE (ENTER).
Panel lock (verrouillage
panneau commande)
À propos du verrouillage panneau commande
• Le dispositif de verrouillage du tableau de commande
est un mécanisme de sécurité pour enfants afin
d'éviter que ces derniers n'allument le four par
mégarde ou qu'ils n'en modifient les paramètres.
• Le verrouillage du bandeau de commande ne peut
être activé qu'en mode de veille.

Page. 91
Activer et désactiver le dispositif de verrouillage du
tableau de commande
1. Appuyez et maintenez la MINUTERIES (TIMERS)
touche enfoncée pendant 4 secondes.
– Le symbole de verrouillage du panneau F et
PANEL LOCKED (PANNEAU VERROUILLÉ)
s’afficheront à l’écran, deux signaux sonores
retentiront.
2. Pour désactiver le verrouillage du panneau, appuyez
et maintenez la MINUTERIES (TIMERS) touche
enfoncée pendant 4 secondes.
–Le symbole F de la clé sur l'affichage disparaîtra.
Conversion de convection
Conversion convection
• Pour préparer la plupart des aliments cuits au four
avec utilisation des modes Cuisson par convection et
Convection véritable (biscuits, gâteaux, tartes, etc.), il
faut souvent réduire la température du four de 25 F (5
C). Le réglage Conversion Convection réduit
automatiquement la température saisie.
• L'appareil continuera d'utiliser la valeur de Conversion
convection sans interruption jusqu'à un changement
manuel de l'utilisateur ou lors d'une coupure de
courant; dans ce cas, il faut réinitialiser la Conversion
convection.
• La Conversion convection est uniquement offerte
pour les modes Cuisson à convection et Convection
véritable.
• Il ne faut pas réduire la température pour les viandes
et la volaille. Il faudrait respecter les températures
recommandées dans les recettes et les tableaux de
cuisson pour les viandes et la volaille.
Pour la conversion de convection
1. Commencez à partir du mode VEILLE (STANDBY) et
sélectionnez RÉGLAGES (SETTINGS).
2. Appuyez sur la gauche
( ou ) pour sélectionnez
CONVERSION DE CONVECTION (CONVECT
CONVERSION).
3. Appuyez de droite
( ou ) et sélectionnez ACTIVÉE
(ON).
4. Appuyez sur ENTER.
5. Tourner le bouton de mode de cuisson à CONV BAKE
(Cuisson par convection) et celui de la température à
la TEMPÉRATURE indiquée dans la recette.
– Les commandes du four calculent
automatiquement la bonne température pour ces
modes automatiques en réduisant la température
saisie de 25 °F (5 °C).
6. Laissez au four le temps de préchauffer puis enfournez
les aliments.
Réglage précis du four
(décalage de température)
À propos du décalage de température
Elle donne à l’utilisateur la possibilité d’ajuster les
paramètres de cuisson selon les réglages personnels qu’il
désire obtenir en lui permettant de décaler la température
du four de +/- 35°F, à coup de 5°F par rapport à ce
qu’indique le tableau de commande. Cette fonction est
utile si vous trouvez que les aliments sont continuellement
trop brunis ou trop pâles à votre goût.
• La fonction de décalage est disponible à tous les
modes, sauf pour l’autonettoyage.
• Par défaut, la température est ajustée à 0°.
• L’appareil continuera d’appliquer la valeur de
décalage entrée indéfiniment jusqu’à ce que
l’utilisateur choisisse de la modifier ou jusqu’à ce qu’il
manque d’électricité. La fonction de décalage de
température devra alors être réinitialisée.
Pour régler offset
1. Commencez à partir du mode VEILLE (STANDBY) et
sélectionnez RÉGLAGES (SETTINGS).
2. Appuyez sur la gauche
( ou ) pour sélectionnez ÉCART
TEMP. : FOUR DE DROITE/GAUCHE (TEMP OFFSET:
RIGHT/LEFT OVEN).
3. Appuyez de droite
( ou ) pour réglez la température.
4. Appuyez sur ENTRÉE (ENTER).
Sonde thermométrique
À propos de la sonde thermique
La sonde thermique vous permet de mieux contrôler la
façon dont vos aliments sont cuits en annulant
automatiquement le mode de cuisson choisi lorsque la
température désirée d’un plat, déterminée par
l’utilisateur, est atteinte. La sonde donne la température
actuelle de la viande à mesure qu’elle cuit.
Vous trouverez ci-dessous les modes de cuisson qui
fonctionnent avec la sonde thermométrique :
• Cuisson
• Cuisson à convection
• Rôtissage
• Rôtisserie à convection
La sonde thermométrique ne fonctionnera pas avec la
programmation de la minuterie de four ou de l’heure de
fin.
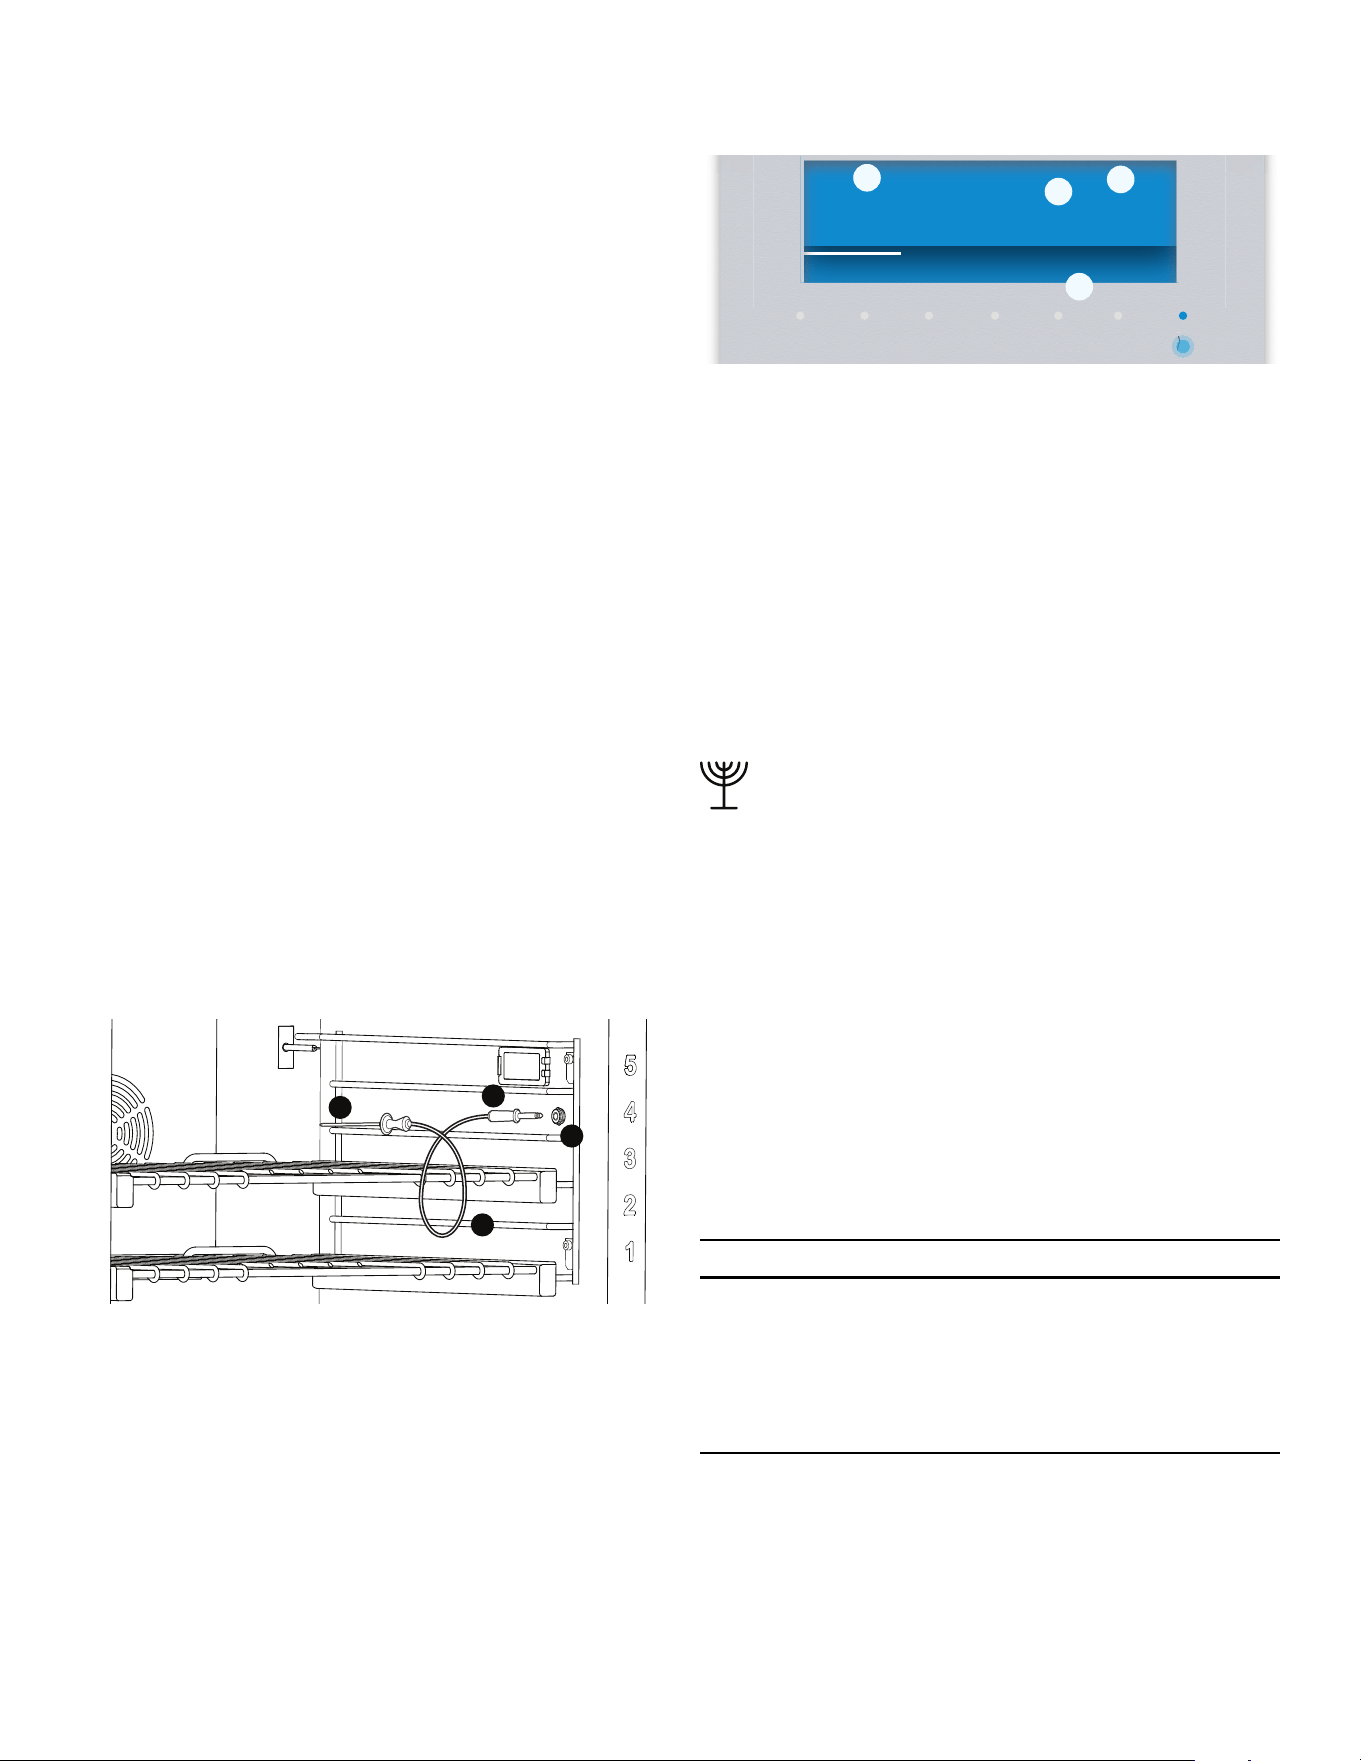
Page. 92
IMPORTANT
• Pour éviter d’endommager la sonde, ne tirez PAS sur
le câble lorsqu’il est temps de la retirer de l’aliment
cuit.
• N’utilisez PAS de pinces ou autres instruments
pour serrer la sonde lorsqu’il faut la retirer ou pour
l’enfoncer dans l’aliment.
• Pour prévenir les brûlures, attendez que le four soit
refroidi avant de débrancher la sonde.
• Ne rangez PAS la sonde dans le four.
Pour de meilleurs résultats
• Insérez la sonde jusqu’à ce que sa pointe se trouve au
centre de la portion la plus épaisse de la viande.
Veillez à ce que la sonde ne touche pas un os, du gras
ou du cartilage.
• Pour la volaille, insérez la sonde à l’intérieur du muscle
d’une cuisse.
• Pour éviter d’endommager la sonde, assurez-vous que
la viande est totalement dégelée avant de l’y insérer.
• Insérez la sonde jusqu’à ce que sa pointe repose au
centre de la portion la plus épaisse et la plus riche de
la viande. Assurez-vous que la sonde ne touche pas à
un os, à du gras ou à du cartilage.
• La sonde ne doit pas toucher le plat de cuisson ou des
parties du four, car cela affectera l’exactitude des
résultats.
Programmation de la sonde thermique
1. Insérez le bout de la fiche dans la prise et insérez la
pointe de la sonde dans la viande.
2. Fermez la porte du four.
3. Réglez le mode de cuisson désiré ainsi que la
température du four.
4. Appuyez de droite (ou) pour accroître la température
interne souhaitée.
– L’écran du four affiche la température actuelle de
la viande en cours de cuisson.
– Lorsque la température actuelle de la sonde
atteint la température programmée souhaitée, la
cuisson cessera et la fin du temps de cuisson
retentira pour indiquer que le processus est
terminé.
Sabbath (Sabbat)
Le mode Sabbat est conforme aux normes établies par
Star K. Sachez qu'il existe des restrictions d'utilisation des
appareils de cuisson le jour du Sabbat et lors des Fêtes.
Veuillez remarquer que lorsque les deux coïncident, les
lois régissant le Sabbat prévalent. Si vous n'êtes pas
familier avec les lois concernant le maintien au chaud des
aliments le jour du Sabbat ou de la cuisson durant les
Fêtes, veuillez communiquer avec le rabbin ou consultez
le site Web de Star K au www.start-k.org.
Vous pouvez faire fonctionner cet appareil
électroménager le jour du sabbat juif ou lors des fêtes
juives si vous respectez les préceptes qui suivent :
Mode Sabbat : utilisation de la table de cuisson
9 AVERTISSEMENT
Lorsque vous utilisez une plaque, faites fonctionner un
seul brûleur STAR
®
au réglage le plus faible.
L'utilisation de plusieurs brûleurs STAR peut entraîner
une surchauffe ou des problèmes de combustion ou
endommager l'appareil électroménager. NE PAS
couvrir les orifices d'évacuation.
• Les brûleurs STAR dotés de la fonction XLO
®
sont
commandés électroniquement. Par conséquent,
lorsque le mode Sabbat est activé, les brûleurs STAR
dotés de la fonction XLO sont désactivés pour assurer
le respect des préceptes.
a. Sonde b. Fiche
c. Prise d. Câble
a
b
c
d
a. Mode de cuisson b. Température actuelle de
la sonde thermométrique
c. Réglage de la
température de coupure
d. Réglage de la
température du four
TIMERS SETTINGS ENTER
Bake
05:40
Oven temperature 375°
°
150
70°/
ƒ
¥
a
b
c
d

Page. 93
• Les brûleurs au gaz STAR standards sans XLO
demeurent entièrement fonctionnels.
• Le module de cuisson par induction, la plaque et/ou le
gril sont entièrement fonctionnels en mode Sabbat.
Toutefois, pour assurer le respect des préceptes, ils ne
doivent pas être actionnés.
• Les brûleurs au gaz STAR standards demeurent
allumés au cours d'une panne électrique.
• Les brûleurs STAR sont dotés d'une fonction de ré-
allumage. Si la flamme est éteinte, l'allumeur
rallumera automatiquement le brûleur STAR.
• Au cours du Yom Tov, il ne faut pas rallumer ou
éteindre la flamme d'un brûleur au gaz. Toutefois, il
est possible de hausser la flamme ou de la rabaisser
pour ajuster la chaleur diffusée, nécessaire à la
cuisson.
• Au cours du Sabbat, il ne faut pas allumer, ajuster ou
éteindre la flamme d'un brûleur au gaz. Vous pouvez
utilisez une plaque pour masquer la flamme, les
éclairages et les commandes. NE PAS couvrir les
orifices d'évacuation.
Mode Sabbat : utilisation du ou des fours
• Le four maintient une température uniforme entre
150 °F et 475 °F (66 °C et 246 °C) en mode Cuisson.
• Les aliments cuits sont maintenus au chaud pour une
période minimum de 30 minutes jusqu'à un maximum
de 74 heures sans devoir éteindre ou allumer
l'appareil électroménager.
• Tous les aliments doivent être déposés dans le four
avant le début du Sabbat, car on ne peut le faire au
cours du Sabbat. Veuillez remarquer que les aliments
facilement périssables ne devraient pas être laissés
dans le four trop longtemps.
• Le four secondaire ne fonctionne pas en mode
Sabbat.
• Lors du Sabbat, il ne faut pas actionner ou éteindre le
four ni ajuster la température.
• Lors du Sabbat, au lieu d'utiliser une plaque, les
commandes du four devraient être couverts. Soyez
attentifs et ne couvrez pas les orifices d'évacuation.
• La ou les ampoules de l'éclairage du four sont
désactivées en mode Sabbat pour prévenir tout
allumage inopportun à l'ouverture de la porte du four.
• On peut ouvrir la porte du four une seule fois le jour
du Sabbat pour retirer tous les aliments, puis refermez
la porte.
• La porte du four peut être ouverte et fermée à tout
moment et aussi souvent que nécessaire lors des
Fêtes.
• Il est possible d'ajuster la température de cuisson lors
des Fêtes. (Il y aura un délai entre la commande et
l'activation).
Note à propos des pannes électrique en mode Sabbat
Lors d'une panne électrique avec le four en mode Sabbat,
l'appareil sera hors mode au retour de l'alimentation
électrique. Le four s'éteindra même s'il était au milieu
d'un cycle de cuisson lors de la panne électrique.
Réglage du mode Sabbat sur le four principal
1. Commencez à partir du mode Sabbat et sélectionnez
SETTINGS (Réglages) à l'écran du four principal.
2. Effleurez la gauche
( ou ) pour défiler jusqu'au mode
SABBAT.
3. Effleurez la droite
( ou ) et sélectionnez ON (marche)
puis effleurez ENTER (entrée).
– Les étapes 1 à 3 sont uniquement nécessaires lors
de la première utilisation du mode Sabbat ou si
l'appareil électroménager a été réinitialisé en
usine.
4. Tournez la molette de commande du four principal à
BAKE (cuisson) puis la molette de température à la
température désirée.
5. Effleurez TIMERS (minuteurs) à l'écran du four
principal.
6. Effleurez la gauche
( ou ) pour défiler jusqu'à
SABBATH TIMER (minuteur sabbat).
7. Effleurez la droite
( ou ) et saisissez la durée
(DURATION TIME) par incréments de 30 minutes.
8. Effleurez ENTER (entrée).
– Un avis de temporisation apparaît.
– Au cours de cette pause de cinq minutes,
l'util
isateur peut régler les paramètres. Après le
décompte, le four démarre et toutes les
commandes sont désactivées.
– Il est possible de démarrer le four secondaire à
n'importe quel mode de cuisson pour lancer le
mode Sabbat au cours de la pause de
cinq minutes.
TIMERS SETTINGS ENTER
––min––sSabbath Timer
›
06:30
TIMERS SETTINGS ENTER
04min 59s
›
Sabbath Mode will start in:
NTE
NTE

Page. 94
9. À la fin du décompte du minuteur Sabbat,
repositionnez toutes les molettes à OFF (éteint).
Annulation du mode Sabbat
1. Pour annuler la programmation, positionnez toutes les
molettes à OFF (éteint).
Réglage du mode Sabbat sur le four secondaire
1. Commencez à partir du mode Sabbat et sélectionnez
SETTINGS (Réglages) à l'écran du four principal.
2. Effleurez la gauche
( ou ) pour défiler jusqu'au mode
SABBAT.
3. Effleurez la droite
( ou ) et sélectionnez ON (marche)
puis effleurez ENTER (entrée).
– Les étapes 1 à 3 sont uniquement nécessaires lors
de la première utilisation du mode Sabbat ou si
l'appareil électroménager a été réinitialisé en
usine.
4. Tournez la molette du four secondaire à BAKE
(cuisson) et la molette de la température à la
température désirée.
5. Effleurez TIMERS (minuteurs) à l'écran du four
secondaire.
6. Effleurez la gauche
( ou ) pour défiler jusqu'à
SABBATH TIMER (minuteur sabbat).
7. Effleurez la droite
( ou ) et saisissez la durée
(DURATION TIME) par incréments de 30 minutes.
8. Effleurez ENTER (entrée).
– Au cours de la pause de cinq minutes, l'utilisateur
peut régler les paramètres. Après le décompte, le
four démarre et toutes les commandes sont
désactivées.
Annulation du mode Sabbat
1. Pour annuler la programmation, positionnez toutes les
molettes à OFF (éteint).
Sabbat – cuisson prolongée
Réglage de la cuisson prolongée sur les modèles sans
écran numérique
1. Sélectionnez le mode CUISSON PROLONGÉE
(EXTENDED BAKE) avec le bouton Sélecteur de
mode.
2. Tournez le sélecteur de température pour régler la
TEMPÉRATURE DU FOUR.
Remote start (démarrage à
distance)
9 AVERTISSEMENT
FONCTIONNEMENT À DISTANCE
On peut configurer cet appareil électroménager pour
le télécommander à tout moment. Ne pas ranger de
matières inflammables ou d'articles sensibles à la
chaleur à l'intérieur, sur le dessus ou près de la surface
de l'appareil.
À propos démarrage à distance
Vous devez activer le démarrage à distance pour lancer
une commande de four avec l’appareil mobile.
Remarques
• Pour certains modèles, il est possible d'activer un
démarrage à distance permanent avec l'appli Home
Connect. Cette fonctionnalité permet de démarrer à
distance un des modes de fonctionnement
disponibles sans désactiver automatiquement le
démarrage à distance.
• Tourner le bouton de mode à démarrage à distance
(remote start) permet à l’utilisateur de démarrer, faire
une pause et mettre fin à des programmes du four, et
ce, à distance par l’appli Home Connect sur un
appareil mobile.
• Le champ « Démarrage à distance » est visible
uniquement après la réussite de la connexion à Home
Connect. Consultez la section « Home Connect™ »
pour connaître les directives d’installation de
l’application Home Connect.
• Certaines commandes se lancent uniquement sur le
four.
• Si l’appareil électroménager n’est pas connecté au
réseau domestique, il fonctionne de la même façon
qu’un four normal sans connexion réseautique et peut
toujours être commandé par l’écran.
• La disponibilité de la fonction Home Connect dépend
de l’offre des services Home Connect dans votre pays.
Home Les services Home Connect ne sont pas offerts
dans tous les pays. Pour de plus amples
renseignements, veuillez consulter : www.home-
connect.com.
Le démarrage à distance est automatiquement
désactivé dans les situations suivantes :
• La porte du four est ouverte 15 minutes après
l’activation du démarrage à distance.
• La porte du four est ouverte 15 minutes après la fin du
fonctionnement du four.
• Vingt-quatre heures après l’activation du démarrage à
distance.
TIMERS SETTINGS ENTER
completed
›
Sabbath

Page. 95
IMPORTANT :
• Assurez-vous de respecter les directives de sécurité
décrites au présent mode d’emploi et que ces
directives sont aussi respectées lors de la
télécommande de l’appareil électroménager par
l’appli Home Connect quand vous êtes absent de la
maison. Veuillez également respecter les directives de
l'application Home Connect.
• Les commandes données directement depuis
l’appareil électroménager ont toujours préséance sur
les autres. Au cours de cette période, il est impossible
de faire fonctionner l’appareil électroménager par
l’appli Home Connect.
• Nous travaillons sans relâche pour améliorer
l’application Home Connect. Les étapes de
configuration peuvent varier légèrement. Veuillez
suivre les directives de la dernière version de
l’application Home Connect pour vous guider lors du
processus de configuration.
Configuration du démarrage à distance
1. Placez les aliments dans la cavité du four et fermez la
porte.
2. Tournez le sélecteur de mode du four à DÉMARRAGE
À DISTANCE (REMOTE START).
– NE PAS tourner le bouton du sélecteur de
température à tout autre réglage (laissez à la
position ARRÊT [OFF]).
– L’écran passera en mode veille et «
C » est
affiché.
3. Poursuivez avec l’appli Home Connect installé sur
l’appareil mobile.
TIMERS SETTINGS ENTER
switched on
F
Remote Start
TIMERS SETTINGS ENTER
06:30
F
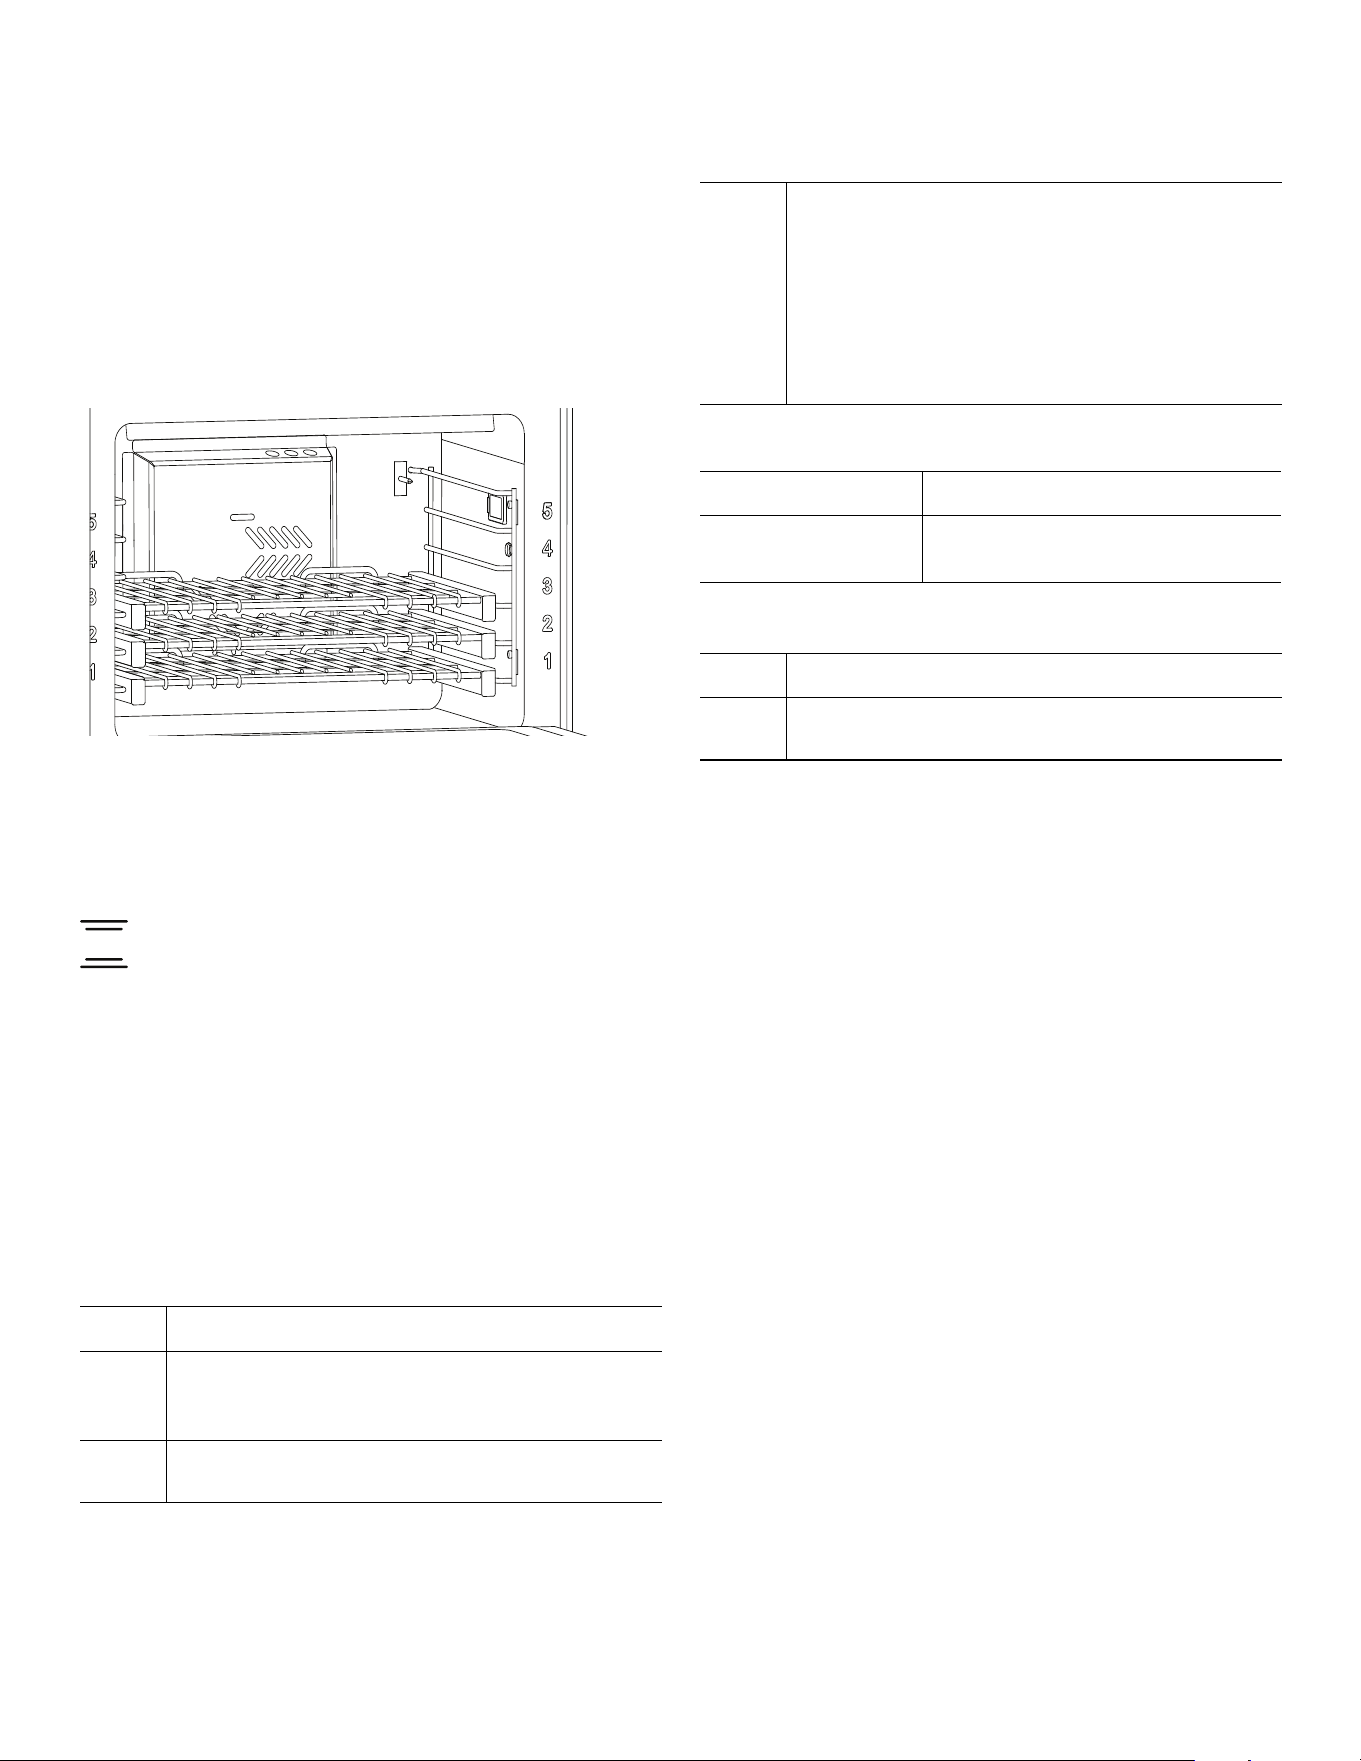
Page. 96
Tirer le meilleur parti de l’appareil
Position des grilles pour la
cuisson
Les positions des grilles de four sont numérotées comme
un ascenseur. Le numéro un est la position la plus basse et
le numéro cinq est celle la plus haute.
NOTE : Les recommandations relatives à la position des
grilles s’appliquent à la cuisson au four; toutefois, si une
recette suggère une position de grille différente, vous
devriez suivre la recette ou les instructions de l’emballage.
Bake (Cuisson)
À propos de la cuisson
Le mode Cuisson revient à faire cuire avec de l'air chaud
et sec. Les éléments supérieur et inférieur chauffent à
intervalles réguliers pour maintenir la température du four.
Le mode Cuisson peut être utilisé pour préparer toute
sorte d'aliments, depuis les pâtisseries jusqu'aux plats en
casserole. Consulter les conseils de préparation de la
recette ou de l'emballage pour connaître les températures
et les temps de cuisson.
Cuisson avec une seule grille – four principal
Cuisson avec deux grilles – principal du four
Four auxiliaire (modèle de 48 po)
Cuisson avec trois grilles dans le four principal
Pour la cuisson avec trois grilles, le mode convection bake
(cuisson par convection) doit être utilisé.
Optimisation des résultats
• Réduisez au maximum le temps d’ouverture de la
porte.
• Utilisez le récipient recommandé dans la recette.
• Sortez la ou les lèchefrites du four. Une lèchefrite sans
aliments nuira au dorage et à la cuisson.
• Le dorage dépend du type d’ustensile utilisé :
• Pour obtenir des croûtes tendres et légèrement
dorées, utilisez des ustensiles antiadhésifs,
anodisés ou en métal brillant.
• Pour des croûtes croustillantes plus dorées,
utilisez des ustensiles métalliques antiadhésifs,
anodisés ou noirs étamés ou encore en verre
convenant aux fours. Vous pourriez avoir à
diminuer la température de cuisson de 25°F.
Préchauffer le four
• Plats en métal (avec ou sans revêtement antiadhésif),
verre résistant à la chaleur, vitrocéramique, terre cuite
ou autres récipients allant au four.
• Les plaques à biscuits adaptées ont un petit rebord
d'un seul côté. Les tôles épaisses ou celles qui ont
plus d'un côté peuvent modifier le temps de cuisson.
Niveau Mode cuisson
4 -- Convient tout particulièrement aux aliments
en portions individuelles comme les biscuits
et les pâtisseries.
3 -- Les meilleurs résultats s’obtiennent avec la
position de grille numéro 3.
2 -- Si l'aliment occupe beaucoup de place,
comme un gâteau des anges.
-- Les tartes cuisent mieux à la position 2. Le
fond de la pâté devient ainsi croustillant sans
que le dessus de la tarte ne soit trop doré.
-- Pour faire rôtir de gros morceaux de viande
ou de volaille, comme une côte de bœuf ou
une dinde.
Niveau Mode cuisson or cuisson conv
2 et 5 mixtes
2 et 4 gaz
-- Casserole
Niveau Mode cuisson
1 -- Les meilleurs résultats s’obtiennent avec la
position de grille numéro 1.
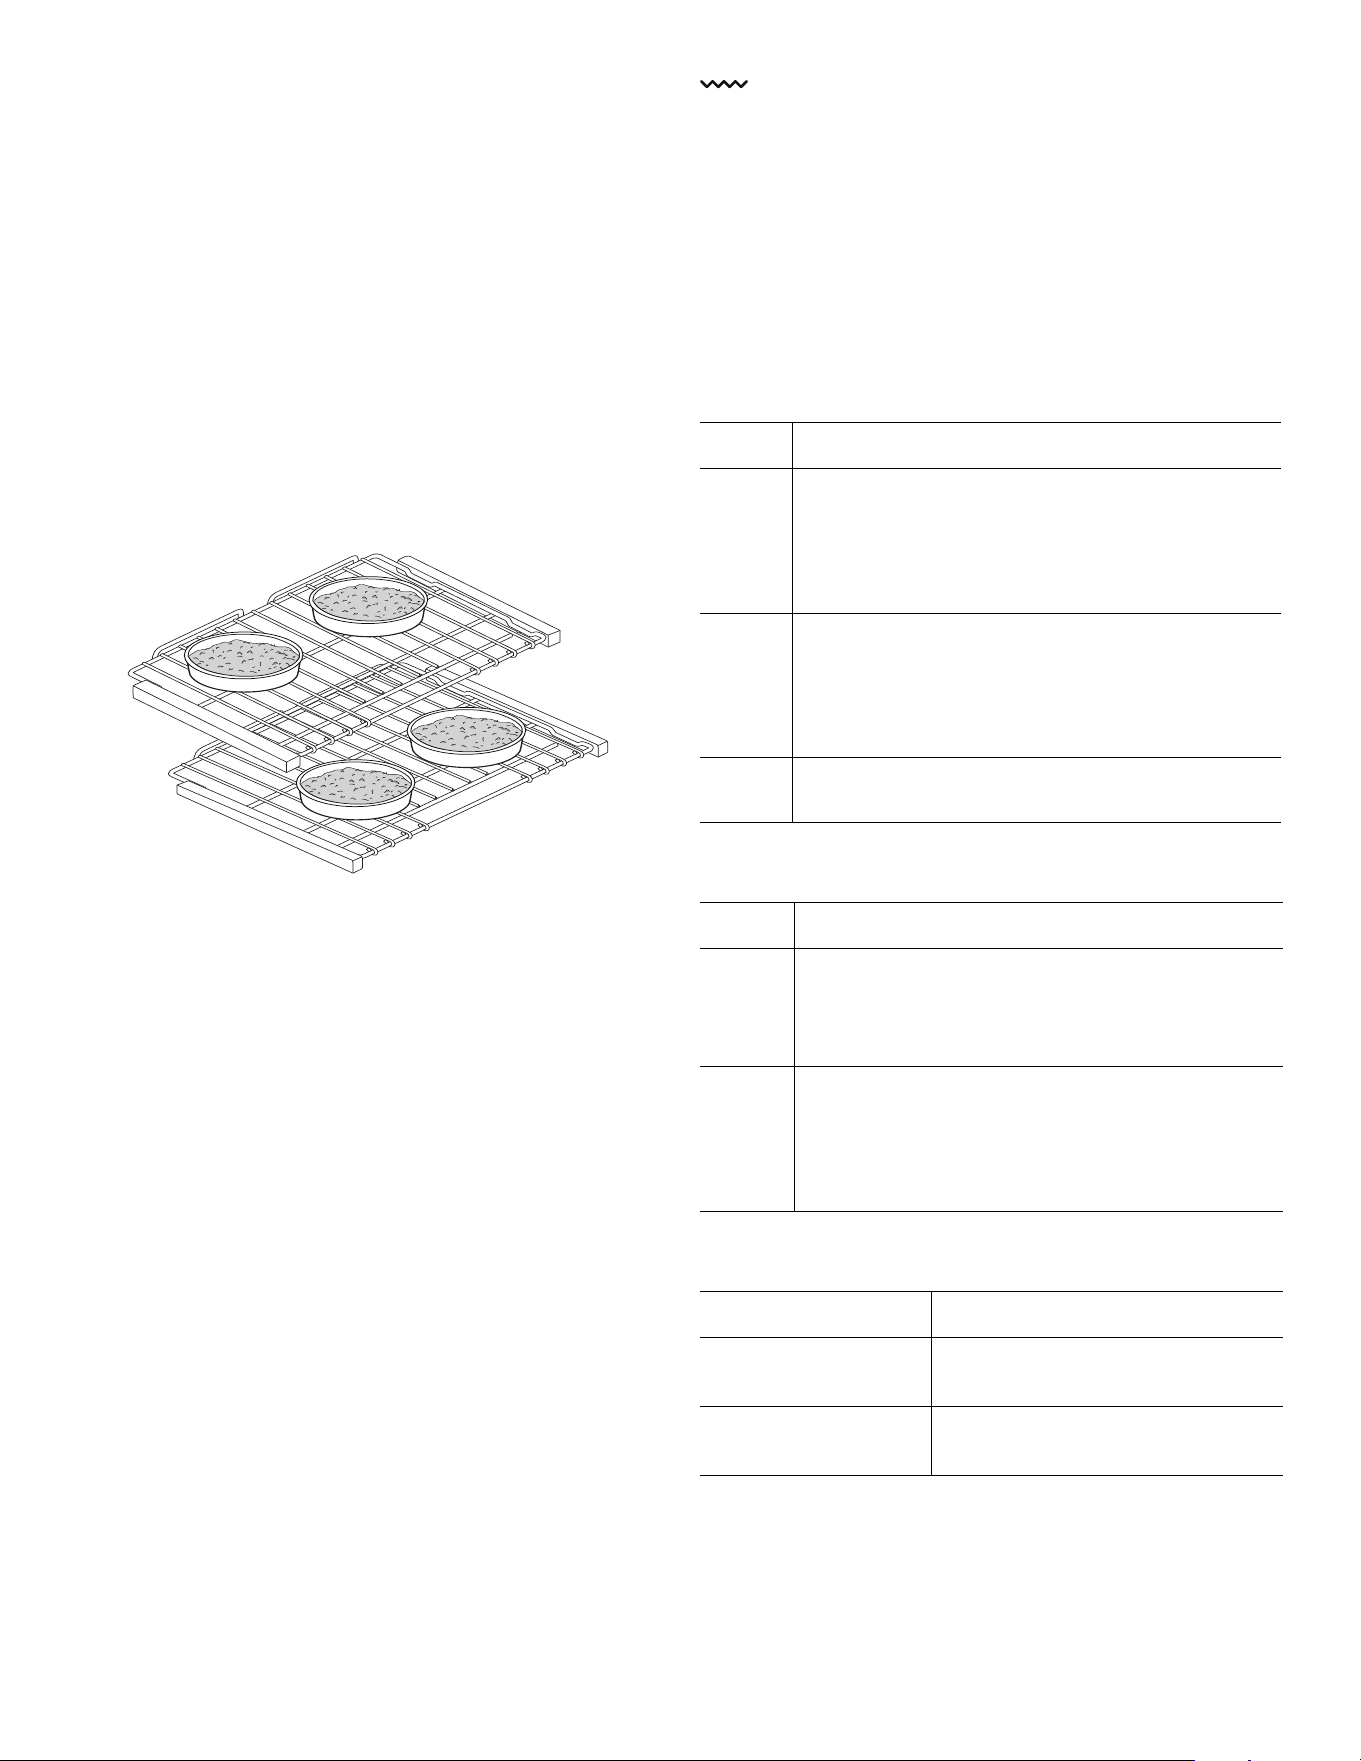
Page. 97
Plats pour le four
• Plats en métal (avec ou sans revêtement antiadhésif),
verre résistant à la chaleur, vitrocéramique, terre cuite
ou autres récipients allant au four.
• Les plaques à biscuits adaptées ont un petit rebord
d'un seul côté. Les tôles épaisses ou celles qui ont
plus d'un côté peuvent modifier le temps de cuisson.
Placement des plats
• Laissez un espace d’au moins 25.4 mm (1 po) entre les
plats et les parois du four pour que la chaleur puisse
circuler.
• Espacez les plats de sorte qu'ils ne se trouvent pas
l'un au-dessus de l'autre. Laissez 38 mm (1½ po) au-
dessus et en dessous de chaque plat.
Cuisson à haute altitude
Pour la cuisson à haute altitude, en mode cuisson ou
cuisson à convection, les recettes et les durées de cuisson
varient. Pour une information précise, écrivez à Extension
Service, Colorado State University, Fort Collins, Colorato
80521. Vous pourriez avoir à payer des frais pour obtenir
les bulletins. Précisez le type d’information désiré (ex. :
gâteaux, biscuits, pains, etc).
Condensation
Il est normal de voir une certaine quantité de vapeur d'eau
s'échapper des aliments lors de la cuisson. La quantité
dépend de la teneur en humidité de l'aliment. L'humidité
peut se condenser sur n'importe quelle surface plus froide
que la cavité du four, comme par exemple sur le bandeau
de commande.
Broil (griller)
À propos du gril
Avant d’allumer le four, placez la grille à la position
désirée. Centrez la lèchefrite sous le brûleur du grilloir.
Seul l’élément supérieur passe en mode gril (broil). Bien
griller ou brunir les aliments demande une exposition
constante à une chaleur intense élevée.
Four principal de cuisinière mixte
Four principal au gaz
Four auxiliaire (modèle de 48 po)
Niveau Mode gril - cuisinière mixte
5 -- Réglez à cette position pour griller des
steaks, des galettes de viande, du steak de
jambon et des côtelettes d'agneau de 1 po
(26 mm) ou moins d'épaisseur, ou pour
brunir des aliments.
4 -- Réglez à cette position pour griller des
pièces de viande de 1-1/8 po ou plus
d'épaisseur, du poisson, de la volaille, des
côtelettes de porc, du steak de jambon de 1
po (26 mm) ou plus d'épaisseur.
3 -- Réglez à cette position pour griller des
morceaux de poulet ou des demi-poulets.
Niveau Mode gril - cuisinière au gaz
4 -- Réglez à cette position pour griller des
steaks, des galettes de viande, du steak de
jambon et des côtelettes d'agneau de 1 po
(26 mm) ou moins d'épaisseur.
3 -- Réglez à cette position pour griller des
pièces de viande de 1-1/8 po ou plus
d'épaisseur, du poisson, de la volaille, des
côtelettes de porc, du steak de jambon de 1
po (26 mm) ou plus d'épaisseur.
Niveau Mode gril - four auxiliaire
3, 4, ou 5 – mixtes
1, 3, ou 4 – gaz
-- Dépend de type d'aliment et
de son épaisseur.
5 – mixtes
3 – gaz
-- Utilisez-la également pour faire
dorer le dessus des aliments.
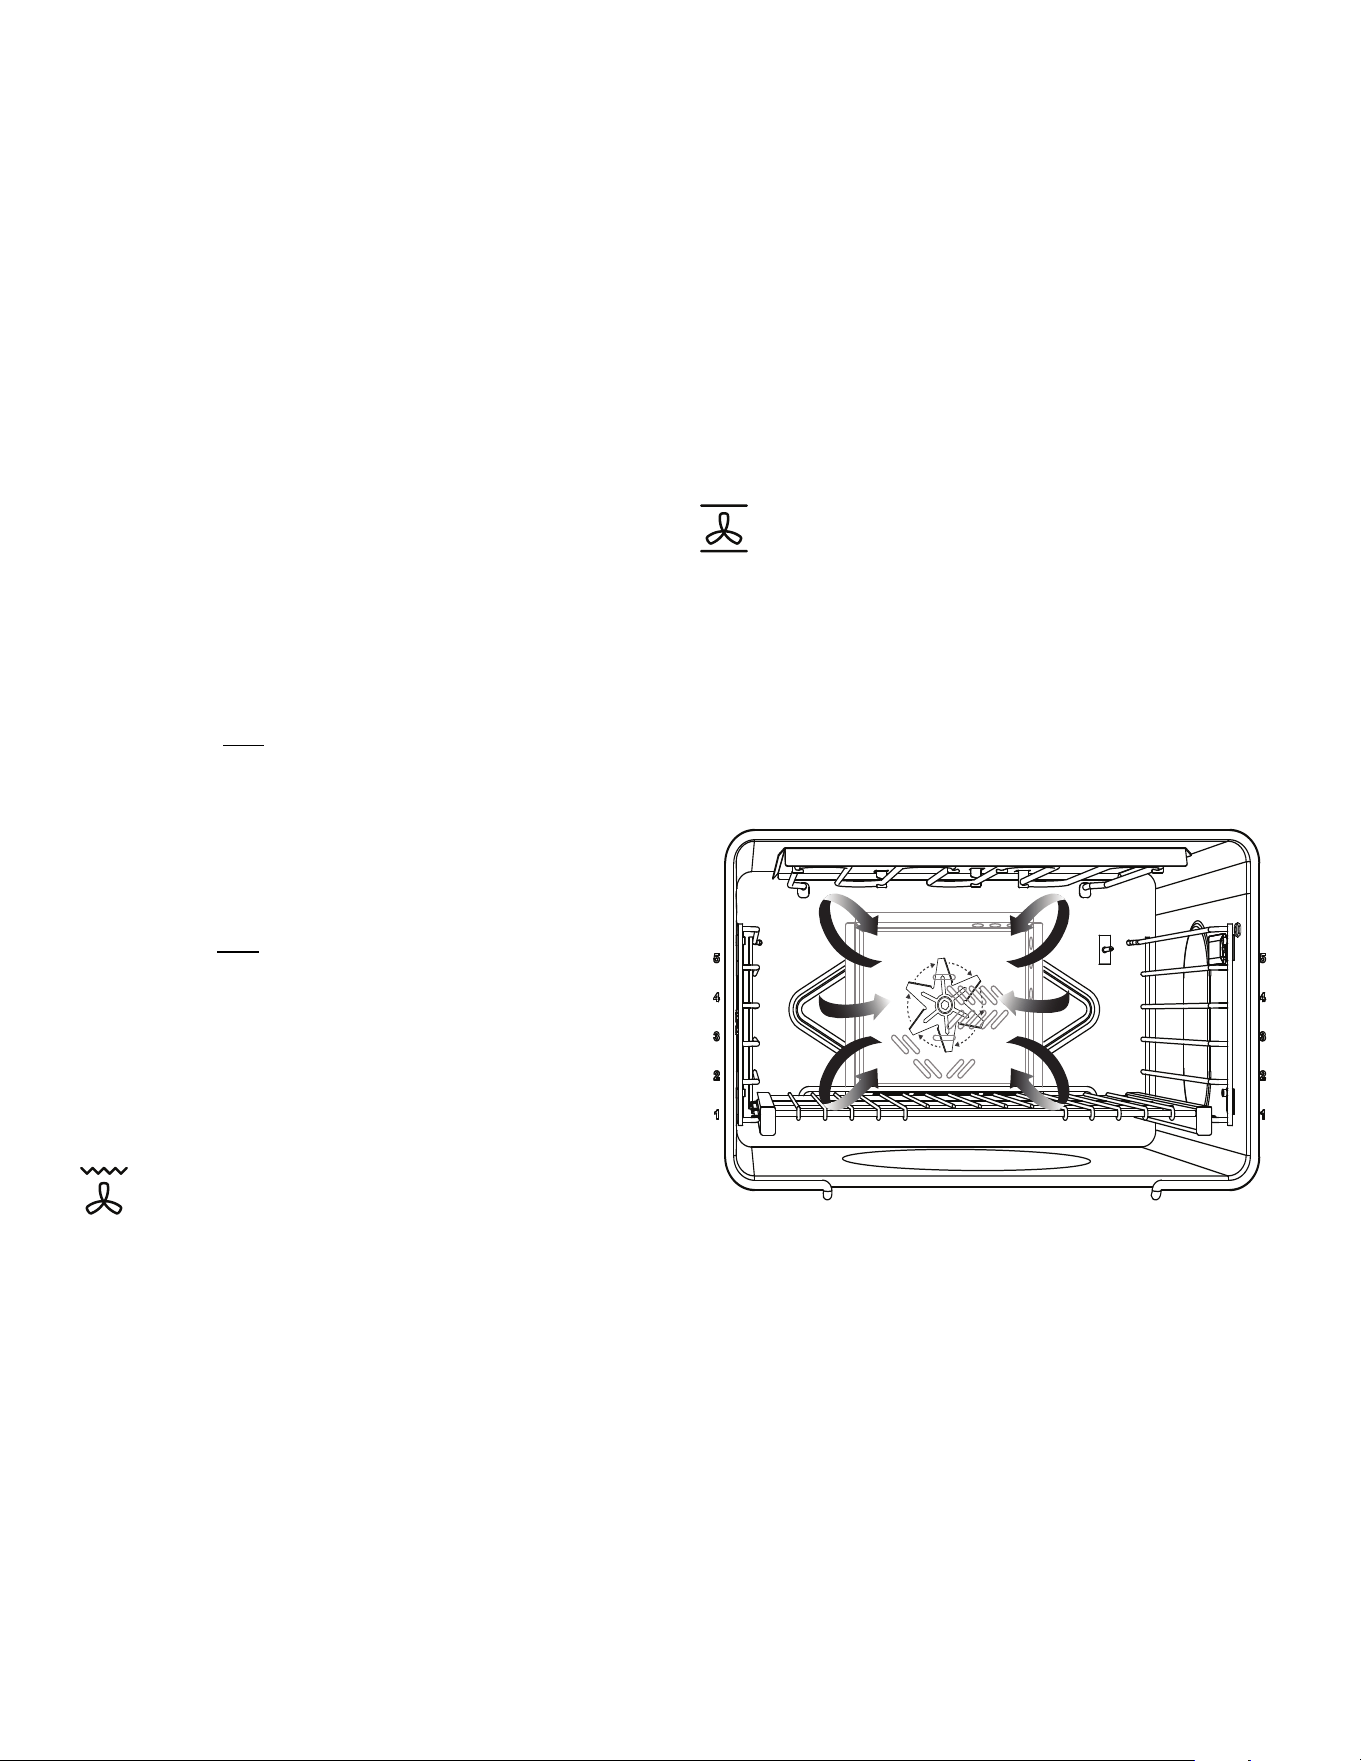
Page. 98
Pour obtenir les meilleurs résultats
Conseils :
• Décongelez les aliments avant de les faire griller.
• Assurez-vous que la porte du four est fermée pendant
la grillade.
• Il est recommandé de préchauffer l’élément du grilloir
avant de commencer à cuisiner. Fait es préchauffer
pendant 5 minutes, puis placez le plat dans le four.
• Pour obtenir un point de cuisson saignant, les steaks
doivent avoir une épaisseur d’au moins 25 mm (1 po).
• Ne retournez les aliments qu’une fois, au milieu du
temps total de cuisson. Il n’est pas nécessaire de
retourner les morceaux très fins (tranches de jambon,
filets de poisson, etc). Les tranches de foie doivent
être retournées indépendamment de leur épaisseur.
• Placez les aliments directement sous l’élément du
grilloir pour qu’ils soient bien dorés.
Ustensiles
• La lèchefrite de deux pièces en porcelaine émaillée
avec une grille est incluse avec la cuisinière. NE
recouvrez PAS
la grille quadrillée (dessus) avec du
papier d’aluminium.
• La petite lèchefrite de deux pièces en porcelaine est
conçue pour être utilisée dans le four secondaire des
modèles de 48 pouces.
• Utilisez des plats en métal ou en vitrocéramique pour
faire gratiner les ragoûts, les plats ou le pain.
• N’utilisez PAS
de plats en verre résistant à la chaleur
ou en terre cuite. Ce type de plats ne résistera pas à
l’intense chaleur du grilloir à gaz.
NOTE:
Il est impossible d’utiliser simultanément le mode
BAKE et le grilloir. Quand l’un d’eux est en marche, l’autre
ne peut pas être allumé.
Convection broil (gril à
convection)
À propos du gril à convection
Seuls les brûleurs de voûte chauffent au mode grilloir.
Pour être réussie, une grillade doit être exposée
constamment à une chaleur intense.
Le mode Gril Convection est bien adapté à la cuisson des
coupes de viande épaisses et tendres, de la volaille et du
poisson. Le mode Gril Convection n'est pas recommandé
pour le brunissage des pains, des plats en casserole et
autres aliments. Utiliser toujours le mode gril convection
avec la porte fermée.
Conseils :
• Préchauffer le four pendant 3 à 4 minutes. Ne pas
préchauffer le four au-delà de 5 minutes.
• Le steak et les côtelettes doivent avoir au moins 1 po
(2,5 cm) d'épaisseur. Pour le rôtissage, utiliser un plat
à rôtir et une lèchefrite ou un plat profond doté d'une
plaque-gril en métal.
• Ne pas recouvrir le gril-lèchefrite de papier
d'aluminium. Il a été conçu pour faciliter l'écoulement
des matières grasses sans contact avec la surface et
éviter le dégagement de fumée et les éclaboussures.
• Tourner les viandes (autres que le poisson) une fois
pendant la durée de cuisson.
Convection bake (cuisson à
convection)
À propos cuisson à convection
Le mode cuisson par convection est similaire au mode
cuisson. La chaleur provient des éléments chauffants
supérieur et inférieur. La principale différence est que la
chaleur circule à l'intérieur de la cavité du four grâce au
ventilateur à convection.
Conseils :
• Quand vous utilisez la cuisson par convection,
réduisez la température recommandée dans la recette
de 14°C (25°F), bien que vous n'ayez pas à réduire la
température lorsque vous faites cuire de la viande ou
de la volaille.
• Lorsque vous faites rôtir des viandes, vérifiez la
température intérieure avant d'enfourner votre plat
pour ajuster le temps de cuisson recommandé dans la
recette et éviter qu'il ne soit trop cuit.
• Les casseroles en aluminium offrent les meilleurs
résultats de brunissage.

Page. 99
• Les plaques à biscuits à un ou deux côtés donnent les
meilleurs résultats. Il est aussi possible d’utiliser des
demi-plaques de type commercial en aluminium, mais
cela augmente le temps de cuisson.
• Pour un meilleur brunissage, certains ustensiles,
comme les plaques à biscuits, les moules à gâteau
roulé et les plats rectangulaires doivent être placés sur
la largeur de la grille avec les côtés plus courts à
droite et à gauche. Ceci permet à l’air de circuler
librement.
• Au moment de faire cuire avec plus d’une grille, les
plaques à biscuit ne doivent pas être décalées,
contrairement aux moules à gâteau ronds.
• Il faut normalement de 10 à 20% moins de temps pour
faire rôtir de gros morceaux de viande. Vérifiez la
cuisson plus tôt.
Cuisson à une grille
Cuisson à deux grilles
Cuisson à trois grilles
Séchage d'aliments avec le mode de
cuisson à convection
Utilisez le mode de cuisson à convection pour sécher et
conserver des fruits et légumes.
Conseils :
• Le temps de cuisson varie en fonction du degré
d'humidité et du contenu en sucre des aliments, de la
taille des pièces, de la quantité d'aliments à sécher et
du taux d'humidité de l'air.
• Faites sécher la plupart des fruits et légumes à 150°F
(66°C).
• Vérifiez les aliments une fois que le temps de séchage
minimum s'est écoulé.
• Il vaut mieux utiliser les grilles de séchage (non inclus)
pour que l'air puisse circuler autour des aliments. Ne
placez pas les aliments directement sur une tôle à
biscuits ou une plaque. Les aliments doivent être assez
hauts dans le four pour sécher uniformément.
• Vous pouvez utiliser simultanément plusieurs grilles de
séchage.
• Pour sécher plusieurs grilles d'aliments en même
temps, vous pouvez placer les grilles aux niveaux 2 et
4, ou 1, 3 et 5. Pour une seule grille, utilisez seulement
le niveau 3.
• Pour des questions de salubrité alimentaire, il n'est
pas recommandé de faire sécher de la viande.
• Consultez un livre de conservation d'aliments, un
bureau régional de salubrité alimentaire ou des
ouvrages disponibles en bibliothèque pour obtenir de
plus amples renseignements.
Recommandations :
Niveau Mode cuisson à convection
3 ou 4 -- Pour la cuisson avec une grille, de meilleurs
résultats sont obtenus en mode cuisson.
2 -- Pour faire rôtir une dinde ou une grosse pièce
de viande.
Niveau Mode cuisson à convection
2 et 4
mixtes
Gaz
voir la
note
-- Ce mode convient pour les gâteaux.
-- Niveaux de grille des cuisinières à gaz pour :
Biscuits : 3 et 5
Gâteaux : 2 et 5
Niveau Mode cuisson à convection
1, 3, et 5 –
mixtes
Gaz voir la
note
-- Lorsque vous devez faire cuire plusieurs
plaques à biscuits, placez-les
directement les unes au-dessus des
autres sur leur grille respective pour
laisser l'air circuler.
-- Niveaux de grille des cuisinières à gaz
pour :
Biscuits : 3, 4, et 5
Autres aliments: 1, 3, et 5
Aliment Préparation
Temps
(H)
Vérification
de la
tendreté
Pommes,
¼''
tranches
Trempez les
morceaux dans ¼
de tasse de jus de
citron et 2 tasses
d’eau.
8 – 15 Légèrement
flexibles
Bananes,
¼''
tranches
Trempez les
morceaux dans ¼
de tasse de jus de
citron et 2 tasses
d’eau.
8 – 15 Légèrement
flexibles
Cerises Nettoyez et séchez
avec un linge.
Dénoyautez les
cerises fraîches.
7 – 18 Parcheminée
s et molles
Pelures
d’orange
Coupez de fines
pelures de la peau
des oranges.
1 – 4 Sèches et
cassantes
Page. 100
True convection
(convection véritable)
À propos du convection véritable
Le mode Convection véritable utilise la chaleur diffusée
par un troisième élément situé derrière la paroi arrière du
four. La chaleur circule à l'intérieur du four grâce au
ventilateur à convection.
Conseils :
• Réduire la température du four indiquée dans la
recette de 25° F (3,9 °C).
• Placer les aliments dans des plats peu profonds, non
couverts, telles des plaques à biscuit sans rebords.
• Si plus d'un plat cuit sur une grille, laisser environ 1 –
1,5 po (2 cm – 2,5 cm) d'espace entre les plats.
Proof (apprêt)
À propos du apprêt
La fonction d’apprêt permet de maintenir l’environnement
chaud et sans courants d’air nécessaire pour le levage de
produits panifiés. La température d’apprêt est ajustée à
100°F (38°C).
Il vaut mieux utiliser la fonction Apprêt lorsque le four est
froid.
Comment ajuster le four à la fonction d’apprêt
1. Laissez à la pâte le temps de dégeler si elle est gelée.
2. Mettez la pâte dans un plat dans le four et couvrez
partiellement.
3. Utilisez n’importe quelle position de grille qui
correspond aux dimensions du bol ou du moule.
Fermez la porte.
4. Placez le sélecteur de mode à PROOF.
5. Tournez le bouton de température du four à la
position 150ºF.
La température idéale de levage sera maintenue jusqu’à
ce que le sélecteur de mode soit mis hors circuit. La
fermentation de la pâte est terminée lorsqu’elle a doublé
de taille.
N’ouvrez pas la porte inutilement pour éviter que la
température du four ne diminue, ce qui allongera le temps
requis pour le levage. Utilisez plutôt la lumière du four
pour voir où en est le levage de la pâte.Le temps de
levage peut être réduit lorsque le four principal est utilisé
en même temps. Vérifiez l’état du produit panifié pour
éviter un levage excessif.
Pour obtenir des résultats optimaux, nous vous
conseillons, si vous utilisez le four principal durant de
longues périodes, de procéder au levage avant d’utiliser
le four principal.
Tranches
d’orange
Tranches d’un quart
de pouce (1/4 po).
9 – 16 Peau sèche
et cassante,
fruit
légèrement
humide.
Tranches
d’ananas
en
conserve
Séchez avec un
linge.
8 – 13 Tranches
molles et
flexibles.
Tranches
d’ananas
frais
Séchez avec un
linge.
7 – 12 Tranches
molles et
flexibles.
Fraises Nettoyez et séchez
avec un linge.
Coupez des
tranches d’un demi-
pouce d’épaisseur
(1/2 po). Placez-les
la peau contre la
grille.
9 – 17 Sèches et
cassantes
Poivrons Nettoyez et séchez
avec un linge.
Enlevez la peau.
Coupez
grossièrement des
morceaux d’environ
un pouce.
13 –
17
Parcheminés,
sans
humidité à
l’intérieur.
Champign
ons
Nettoyez et séchez
avec un linge.
Coupez de fines
tranches de 1/8 de
pouce.
5 – 12 Durs et
parcheminés,
secs.
Tomates Nettoyez et séchez
avec un linge.
Coupez de fines
tranches de 1/8 de
pouce en prenant
soin de bien les
évider.
5 – 12 Sèches.
Couleur de
brique
rouge.
Niveau mixtes Convection véritable mode
4 et 5 Biscuits
2, 3, et 4 Biscuits
1, 3, et 5 Pâtisseries et autres produits de
boulangerie
Grosseur Temps
Miches, 1 lb (0.45 kg) 60 – 75 minutes
Petits pains, 0.1 lb (0.05 kg) 30 – 45 minutes

Page. 101
Roast (rôtissage)
À propos du rôtissage
La température de la fonction rôtissage est plus élevée
que la cuisson au four traditionnelle. Cette température
sert pour rôtir de façon traditionnelle, lorsque de la
graisse de cuisson est désirée, ou pour rôtir avec un plat
couvert.
Conseils avec le mode rôtissage
• Le mode rôtissage est excellent pour les viandes ou
les volailles plus tendres, lorsque la viande est braisée
et qu’un plat fermé est utilisé.
• Ajoutez du liquide, comme de l’eau, du jus, du vin, du
bouillon ou du fond de sauce pour des plats plus
savoureux et plus juteux.
• Vous pouvez utiliser un sac brunisseur avec ce mode.
• Lorsque vous faites rôtir un poulet entier ou une dinde
entière, repliez les ailes vers l’arrière et attachez les
cuisses avec une ficelle à cuisson.
Recommandations pour le rôtissage
Convection roast (rôtissage
par convection)
À propos du rôtissage par convection
Le mode rôtissage convection utilise la chaleur diffusée
par les éléments supérieur et inférieur ainsi que la chaleur
qui circule dans la cavité grâce au ventilateur à convection.
Le mode rôtissage convection est bien adapté à la
préparation des coupes de viande tendres et de la volaille.
Les avantages du mode Rôtissage Convection
comprennent :
• Une cuisson jusqu'à 25% plus rapide que les modes
n'utilisant pas la Cuisson par Convection.
• Un brunissage riche, doré.
Conseils :
• Utiliser la température exacte indiquée sur la recette.
• Vérifier la cuisson au début car la durée de rôtissage
peut être écourtée.
• Pour des exemples, consulter le tableau de cuisson de
la viande/volaille.
• Utiliser un plat à rôtir avec une grille et une lèchefrite
ou un plat peu profond, à découvert, doté d'une grille
pour le rôtissage.
• Utiliser un thermomètre à viande pour déterminer la
température interne de celle-ci.
• Si la viande est dorée à souhait, mais qu'elle n'a pas
fini de cuire, vous pouvez la couvrir de papier
d'aluminium pour qu'elle ne dore pas trop.
• Une fois la viande sortie du four, la couvrir avec du
papier d'aluminium et laisser reposer de 10 à 15
minutes.
Viande et volaille Température Position
Bœuf
Braisé, 3-4 libres
Pointe de poitrine
Bloc d’épaule
Pain de viande
350°F (180°C)
350°F (180°C)
350°F (180°C)
350°F (180°C)
1
2
1
3
Volaille
Poulet, entier
Poulet, morceaux
Dinde, entière
375°F (190°C)
375°F (190°C)
325°F (165°C)
2
2
2
Porc
Épaule
Demi-jambon fumé
325°F (165°C)
325°F (165°C)
1
1

Page. 102
Keep warm (garder-au-
chaud)
À propos du garder-au-chaud
• Cette fonction conserve la température nécessaire
pour garder les plats cuisinés à la température de
service. Commencez toujours avec des aliments
chauds. N’utilisez PAS ce mode pour réchauffer des
aliments froids autres que des craquelins, des
croustilles et des céréales sèches.
• Dans ce mode, il est possible de maintenir au chaud
les plats préparés, les assiettes et les tasses.
• Les mets devraient être à la température de service
(supérieure à 140 °F [60 °C]) avant d'être placés dans
le four.
• Il est possible de maintenir les aliments au chaud dans
le plat de cuisson ou de les transférer dans un plat de
service résistant la chaleur.
• Il est possible de couvrir le plat de papier
d'aluminium. N'utiliser que de la vaisselle résistante à
la chaleur.
• N'ouvrez PAS la porte du four inutilement. Vous
réduirez ainsi la température du four.
• Pour maintenir les aliments cuits au chaud, laissez le
temps au four de préchauffer avant d'enfourner les
plats.
Réglage de la fonction chaud
1. Pour préchauffer le four, tournez le bouton du mode
de cuisson à CHAUD (KEEP WARM)
2. Tournez le bouton de température du four à la
position 150°F.
3. Placez le plat réchauffé dans le four et fermez la porte.
Les températures de cuisson internes recommandées
Les températures de cuisson internes recommandées
par le U.S. Department of Agriculture Food Safety and
Inspection Service, pour la consommation sécuritaire,
sont les suivantes :
Plats avec œufs, plats en cocotte 160°F (72°C)
Restes de table 165°F (74°C)
Porc, agneau, veau, bœuf hachée 160°F (72°C)
Bœuf, veau, rôtis d’agneau, steaks,
côtelettes
Mi-saignant
À point
Bien cuit
145°F (63°C)
160°F (71°C)
170°F (77°C)
Rôtis de porc, steaks, côtelettes
À point
Bien cuit
160°F (72°C)
170°F (77°C)
Jambon
Cuire avant consommation
Tout à fait cuit, réchauffé
160°F (72°C)
140°F (60°C)
Volaille
Dinde, poulet hachés
Dinde, poulet entiers
Poitrines, rôtis
Cuisses et ailes
Farces (cuite à part ou simultanément)
165°F (74°C)
180°F (82°C)
170°F (77°C)
180°F (82°C)
165°F (74°C)

Page. 103
Configuration de Home Connect™
L'appareil électroménager est entièrement automatique
et prend en charge le Wi-Fi. Il peut être télécommandé au
moyen d'un appareil mobile (par exemple, une tablette,
un téléphone intelligent). L'appli Home Connect™ offre
des fonctions supplémentaires qui complètent
parfaitement l'appareil électroménager en réseau.
Home Connect ne fonctionne pas sur des réseaux Wi-Fi
qui exigent l'enregistrement d’un navigateur notamment
en saisissant un nom d'utilisateur et un mot de passe par
un navigateur Web.
Vous devriez disposer d’un réseau sans fil stable ayant une
bonne réception et pouvant accéder à Internet.
Si l'appareil électroménager n'est pas connecté à un
réseau local sans fil (WLAN, réseau domestique), il
fonctionne de la même façon qu'une hotte typique sans
connexion réseautique et peut-être commandé comme
d'habitude par le panneau tactile.
REMARQUE : Veuillez vous assurer que vous respectez la
notice de sécurité décrite au début du présent manuel
d'instructions et que cette dernière sera aussi respectée
lors de la télécommande de l'appareil électroménager par
l’appli lorsque vous n'êtes pas la maison. Veuillez
également respecter les directives de l'appli Home
Connect.
REMARQUE : Le fonctionnement manuel de l'appareil
électroménager a toujours la priorité. À ce moment, il est
impossible de le faire fonctionner au moyen de l’appli
Home Connect.
Configuration
L'appli Home Connect doit être déjà installée et vous avez
déjà un compte Home Connect. Vous pouvez créer un
compte dans l'appli.
Respectez les étapes précisées par l’appli pour mettre en
œuvre les réglages.
Qu’avez-vous besoin pour connecter la
hotte à Home Connect™?
1. L’appareil électroménager doit être correctement
installé.
2. Un téléphone intelligent ou une tablette doté de la
dernière version du système d’exploitation iOS ou
Android.
3. L’appareil électroménager doit être à portée du signal
Wi-Fi du réseau domestique.
4. Vous devez disposer du nom du réseau Wi-Fi (SSID) et
de son mot de passe (clé).
PROTECTION DES DONNÉES ET SÉCURITÉ DE
L'INFORMATION :
Le transfert de données est toujours crypté. Home
Connect satisfait aux normes de sécurité les plus strictes,
qui font continuellement l'objet de révisions. Consultez
www.home-connect.com pour de plus amples
renseignements.
Renseignements :
Nous travaillons sans relâche pour améliorer l’appli
Home Connect. Les étapes de configuration
pourraient varier légèrement. Veillez à respecter les
directives de la dernière version de l’appli
Home Connect pour vous guider lors des étapes de
configuration.
Étape 1 : Téléchargement de l’appli
Home Connect et création d’un compte
utilisateur
1. Depuis le téléphone intelligent ou la tablette, ouvrez
l’App Store (appareils Apple
MC
) ou Google Play
MC
Store (appareils Android
MC
).
2. Recherchez l’appli HOME CONNECT dans le champ
de recherche de la boutique et installez-le.
3. Ouvrez l’appli et inscrivez-vous pour créer un compte
Home Connect.
4. Notez vos données de connexion Home Connect
(compte utilisateur et mot de passe); vous en aurez
besoin plus tard.
Conservez vos données de connexion Home Connect
ici :
Nom du réseau
(SSID) :...........................................................................
Mot de passe
(clé) :..............................................................................
L’appli vous informera des prochaines étapes pour
ajouter un appareil électroménager à Home Connect.

Page. 104
Étape 2 : Connexion de l’appareil au
réseau domestique
1. L’appareil électroménager doit être correctement
installé.
2. Ouvrez l’appli Home Connect pour ajouter un
appareil.
3. Veillez à respecter les directives de l’appli et consultez
le guide Home Connect uniquement sur invitation de
l’appli.
Étape 2.1 : Connexion de l’appareil
électroménager au réseau domestique
avec WPS
Passez à l’étape 2.1 uniquement si l’appli le demande. Les
étapes qui suivent décrivent des actions à effectuer
directement sur l’appareil électroménager.
1. Sélectionnez RÉGLAGES (SETTINGS) et sélectionner
HOME CONNECT.
2. Effleurez ENTER.
-- Une demande pour appuyer sur le bouton WPS
du routeur dans les deux (2) minutes s’affiche à
l’écran.
3. Appuyer sur le bouton WPS du routeur.
-- Veuillez consulter le manuel du routeur pour
localiser le bouton WPS.
-- L’appli est avisée dès la connexion réussie de
l’appareil électroménager au réseau Wi-Fi.
4. Effleurez ENTER.
-- Dès que l'appareil électroménager est
correctement connecté à votre réseau
domestique, un message le confirmant apparaît
sur l'affichage de l'appareil.
5. Appuyez sur LANCER L’APPAIRAGE (START
PAIRING) de l’application Home Connect.
6. Respectez les directives de l’appli.
INFORMATION :
Si la connexion n’a pas pu être établie dans les cinq
minutes, vérifiez l’appareil se trouve à portée du
réseau Wi-Fi.
Étape 2.2 : Connexion de l’appareil au
réseau domestique, étape par étape
Passez à l’étape 2.2 uniquement si l’appli le demande. Les
étapes qui suivent décrivent des actions à effectuer
directement sur l’appareil électroménager.
1. Sélectionnez le menu RÉGLAGES (SETTINGS) et
sélectionner HOME CONNECT.
2. Effleurez ENTER.
-- Une demande pour appuyer sur le bouton WPS
du routeur dans les deux (2) minutes s’affiche à
l’écran.
3. Effleurez ENTER.
4. Appuyez sur CONNEXION MANUELLE (CONNECT
MANUALLY).
-- Préparez votre appareil mobile à la connexion
réseau.
5. Effleurez CONTINUER.
-- Pendant deux minutes, l’appareil ouvrira un
réseau Wi-Fi temporaire dénommé
« HomeConnect » avec le mot de passe.
-- L’appli fournit un nom de réseau Wi-Fi (SSID) et un
mot de passe par l’entremise de ce réseau Wi-Fi
temporaire, ce qui permet à la hotte de se
connecter au réseau Wi-Fi domestique.
6. Respectez les directives de l’appli.
Étape 3 : Connexion de l’appareil à l’appli
Home Connect
Passez à l’étape 3 uniquement si l’appli le demande. Les
étapes qui suivent décrivent des actions à effectuer
directement sur l’appareil électroménager.
1. Lancez l’appli sur l’appareil mobile et respectez les
instructions de connexion affichées.
2. Le processus de connexion est terminé à l’affichage
de APPAIRAGE RÉUSSI (PAIRING SUCCESSFUL) à
l’écran.
3. Respectez les directives de l’appli.
La hotte est bien connectée. Vous pouvez désormais tirer
profit de tous les avantages de l’appli Home Connect!
INFORMATION :
Si la connexion n’a pas pu être établie dans les cinq
minutes, vérifiez l’appareil se trouve à portée du
réseau Wi-Fi.

Page. 105
Mise à jour du logiciel
Il est possible de mettre à jour le logiciel avec la
fonctionnalité à cet effet (par ex., mises à jour
d’optimisation, de dépannage ou de sécurité). Pour ce
faire, vous devez être inscrit comme utilisateur Home
Connect, disposer de l’appli sur votre appareil mobile et
avoir une connexion au serveur Home Connect.
Dès l’offre d’une mise à jour, l’appli Home Connect vous
en avise. Vous pourrez aussi l’utiliser pour télécharger
cette mise à jour.
Une fois le téléchargement réussi, installez la mise à jour
par les réglages de base du four ou l’appli Home Connect
si vous êtes sur le réseau domestique.
L’appli Home Connect vous avisera à la fin de l’installation.
Remarques :
• Vous pouvez utiliser de l'appareil comme d’habitude
au cours du téléchargement des mises à jour.
• Dans les réglages personnels de l’appli, il est
également possible d’automatiser les
téléchargements.
• Nous vous recommandons d’installer les mises à jour
de sécurité dès que possible.

Page. 106
Entretien et nettoyage
9 AVERTISSEMENT
• Ne laissez pas d’enfants seuls ou sans surveillance
dans un endroit où des électroménagers sont en
cours d’utilisation.
• Durant le cycle d’autonettoyage, les surfaces
extérieures de l’appareil peuvent devenir plus
chaudes que d’habitude. Certaines pièces de
l’appareil peuvent être dangereuses pour les
enfants et pour les personnes qui ne possèdent
pas les connaissances d’un adulte par rapport aux
électroménagers ou qui ne réagissent pas comme
un adulte devrait le faire dans une situation
potentiellement dangereuse. Ces personnes
devraient s’éloigner de l’appareil durant
l’autonettoyage ou lorsqu’il est en cours
d’utilisation.
• L’élimination de saletés durant le processus
d’autonettoyage peut favoriser l’émission de
petites quantités de produits chimiques ou
d’autres substances auxquelles une certaine
exposition pourrait être dangereuse. Pour
minimiser toute exposition à ces substances,
assurez-vous de bien aérer la pièce en ouvrant une
fenêtre ou en utilisant un ventilateur ou une hotte.
• La première fois que vous utilisez le cycle
d’autonettoyage de votre nouvelle cuisinière,
sortez les petits animaux et les oiseaux de la
cuisine et des endroits à proximité du four. Ouvrez
une fenêtre pour une meilleure aération.
Marques de produits
• Les marques de produits mentionnées ne servent qu’à
indiquer un type de produit nettoyant et non à en
faire la promotion.
• L’omission d’une marque ne signifie pas qu’elle
convient ou ne convient pas.
• De nombreux produits sont distribués régionalement
et il est possible de les trouver dans les marchés
locaux.
• Il est essentiel que les produits soient utilisés
conformément à leur mode d’emploi.
Concernant l'autonettoyage
• Le mode d’autonettoyage de votre nouvelle cuisinière
comprend une fonction d’autonettoyage pyrolitique.
Lorsque vous le mettez en mode clean, le four atteint
une température élevée, environ 850°F (454°C), qui
consument toutes les saletés du four.
• Lorsque le four est réglé à clean, vous pouvez utiliser
les brûleurs standards et la plaque chauffante
électrique de la surface de cuisson. Les brûleurs munis
de la fonction ExtraLow
mc
ne peuvent pas être utilisés.
• Il est commun de voir de la fumée ou des flammes
durant le cycle de nettoyage, selon le contenu et la
quantité de saletés qui se trouvent dans le four. Si une
flamme persiste, éteignez le four et laissez-le refroidir
avant d’ouvrir la porte pour enlever les saletés
excessives.
• À la fin du cycle de nettoyage, de la cendre grise ou
des résidus peuvent se trouver à l’intérieur du four. Il
s’agit de dépôts minéraux qui n’ont pas brûlé ou
fondu. La quantité de cendre dépend de la mesure
dans laquelle le four était sale avant d’être nettoyé.
Lorsque le four est froid, vous pouvez facilement
enlever ces cendres ou résidus avec un essuie-tout,
une éponge ou un chiffon humide.
Avant de procéder à l’autonettoyage du
four
Ne pas utiliser de produits nettoyants pour four : Ne
pas utiliser un produit nettoyant pour four commercial ou
un revêtement protecteur de cavité de four, peu importe
le type, à l’intérieur du four ou sur n’importe quelle autre
partie autour du four.
Essuyez les accumulations de graisse et toutes les saletés
faciles à enlever pour réduire les possibilités de
production de flammes ou de fumée. Enlevez les saletés
se trouvant à l’extérieur du joint d’étanchéité de la porte.
Cet appareil est conçu pour nettoyer l’intérieur du four et
la partie de la porte située à l’intérieur du four. Les parties
extérieures de la porte et le cadre entourant la partie
avant du four ne se trouvent pas dans la zone de
nettoyage. Nettoyez ces surfaces.
AVANT DE RÉGLER LE FOUR POUR
L’AUTONETTOYAGE
• Enlevez tous les ustensiles.
• Enlevez les grilles.
• Nettoyez le bâti avant du four et les côtés de la porte.
• Essuyez les éclaboussures et les accumulations de
graisse.
• Assurez-vous que les ampoules et les couvercles de
verre des lampes sont en place.
• Allumez la hotte au-dessus de la cuisinière et laissez-la
jusqu’à ce que le cycle d’autonettoyage du four soit
terminé.
Page. 107
Self-clean (autonettoyage)
Autonettoyage (modèles seulement)
Réglage du mode autonettoyant sur les modèles de 30
po (76 cm) de la série Harmony
1. Retirez tous les ustensiles de cuisine, les grilles et les
guides de grille. Assurez-vous que la porte du four est
fermée.
2. Sélectionnez NETTOYAGE (SELF CLEAN) avec
l’anneau de sélection de mode.
3. Placez le bouton de réglage de température à
NETTOYAGE (CLEAN).
– Durée du programme 2 heures.
Réglage du mode autonettoyant sur les modèles avec
écran
1. Retirez tous les ustensiles de cuisine, les grilles et les
guides de grille. Assurez-vous que la porte du four est
fermée.
2. Sélectionnez NETTOYAGE (SELF CLEAN) avec
l’anneau de sélection de mode.
3. Placez le bouton de réglage de température à
NETTOYAGE (CLEAN).
4. Tapotez droite
) de navigation pour sélectionner le
réglage souhaité de nettoyage et Tapotez ENTRÉE
(ENTER).
5. Tapotez ENTRÉE (ENTER) pour lancer l’autonet.
NOTE : Le processus de fermeture de porte
s'effectue en environ 20 secondes; à ce moment, la
porte se verrouille. Assurez-vous que la porte est
verrouillée.
À la fin de l'autonettoyage
Le loquet de la porte s'ouvrira automatiquement lorsque
la température sera sous les 500 °F (260 °C). Le ventilateur
de refroidissement s’éteint lorsque la température du four
est inférieure à 200°F (93°C).
1. Sélectionnez ARRÊT (OFF) avec le bouton sélecteur
de mode.
2. Tournez le bouton de température du four à la
position ARRÊT (OFF).
9 AVERTISSEMENT
L’intérieur du four sera toujours à une température de
cuisson lorsque le verrouillage automatique cessera et
qu’il sera possible d’ouvrir la porte du four.
Réglage de l’HEURE DE FIN de l’autonettoyage
1. Retirez tous les ustensiles de cuisine, les grilles et les
guides de grille. Assurez-vous que la porte du four est
fermée.
2. Sélectionnez NETTOYAGE (SELF CLEAN) avec le
bouton Sélecteur de mode.
3. Tournez le bouton du sélecteur de température à
NETTOYAGE (CLEAN).
4. Tapotez les touches de droite (et) de navigation pour
sélectionner le réglage souhaité de nettoyage.
5. Effleurez la touche MINUTERIES (TIMERS).
6. Sélectionnez l’HEURE DE FIN (END TIMER) avec les
touches de gauche (et) de navigation.
7. Réglez l’HEURE DE FIN (END TIMER) avec les
touches de droite (et) de navigation.
8. Tapotez ENTRÉE (ENTER) pour confirmer le choix.
– L’écran invitera l’utilisateur à déloger les salissures
alimentaires importantes ainsi qu’à retirer les
grilles et les accessoires.
9. Tapotez ENTRÉE (ENTER) pour lancer
l’autonettoyage.
– Après la confirmation de la période d’attente,
l’avis s’affiche à l’écran.
– Après la période d’attente, le four commence à
chauffer.
– L'écran vous informe de l’activation du
verrouillage de la porte.
– NE PAS égratigner ni abîmer les ouvertures de
port du capuchon du brûleur.
NOTES :
• Les fours sont programmés pour empêcher le
démarrage d’un second cycle d’autonettoyage
pendant 24 heures. Dès que l’autonettoyage est
terminé, toutes les fonctions sont disponibles.
• Si l'utilisateur tente de faire fonctionner
l'autonettoyage d'un four pour lequel cette fonction
est bloquée, les lumières du four clignotent à
intervalles de deux secondes pour indiquer que la
fonction n'est pas disponible. Il faut alors tourner les
boutons à OFF pour que les lumières cessent de
clignoter.
Niveau de
puissance
Durée (exclut la période de
refroidissement)
Faible 1 ½ heures
Élevée 3 heures

Page. 108
Conseils de nettoyage
9 ATTENTION
Évitez de nettoyer les pièces de la cuisinière
lorsqu'elles sont encore chaudes.
• Le fini en porcelaine émaillée résiste à l'acide, mais
n'est pas antiacide. Les aliments acides comme le jus
d'agrumes, de tomates, de rhubarbe, ou le vinaigre,
l'alcool et le lait doivent être essuyés. Vous ne devez
pas les laisser cuire sur la porcelaine pendant
l'utilisation de la cuisinière.
• Les éléments chauffants du four ne requièrent pas de
nettoyage. Les éléments se nettoient d'eux-mêmes
lors de l'utilisation de la cuisinière. Les deux éléments
sont branchés en permanence.
Pour nettoyer la cuisinière
• Utilisez la méthode de nettoyage la plus douce qui
fera le travail de façon efficace. Certains produits
d'entretien similaires sont plus rudes que d'autres.
Faites d'abord un essai sur une petite surface.
• Passez toujours les produits lustrant pour le métal
dans le sens des lignes de polissage pour obtenir une
efficacité maximum et éviter de rayer la surface.
• N'utilisez que des chiffons, éponges, serviettes en
papier, brosses douces et propres; tampons à récurer
savonneux de plastique, non métalliques, pour
nettoyer et gratter, comme recommandé dans le
tableau.
• Toutes les pièces de cet appareil peuvent être
nettoyées avec de l’eau chaude savonneuse. S’il est
nécessaire de rincer, rincez en profondeur.
• Essuyez toujours immédiatement pour éviter les traces
d’eau.
• N’UTILISEZ PAS DE PRODUITS NETTOYANTS À
BASE DE CHLORE.

Page. 109
Suggestions de nettoyage
Pièce/matériau Notes concernant le nettoyage
Couvercle en fonte et base
des brûleurs en laiton
• Brosse à dents à soies dures en nylon pour le nettoyage des orifices.
• Une fois le nettoyage terminé, veillez à ce que le couvercle du brûleur soit
correctement logé sur sa base.
• Ne frottez PAS et n’agrandissez pas les orifices du couvercle de brûleur.
• Produits nettoyants suggérés; rincez et séchez à fond :
-- Eau chaude savonneuse
-- Bon-ami
®
-- Barkeepers Friend
®
-- Wright's
®
All Purpose Brass Polish
-- Kleen King
®
Boutons de commande et
enjoliveurs / chrome, métal
• NE faites PAS tremper les boutons.
• NE forcez PAS les boutons sur une mauvaise tige de valve.
• Produits nettoyants suggérés :
-- Utilisez un coton-tige trempé dans l’eau
Plaque à fentes de la
lèchefrite / fond
porcelaine émaillée
• Pour déloger les aliments cuits, imprégnez-les de détergent liquide et recouvrez-les
avec un essuie-tout mouillé. Laissez reposer.
• Produits nettoyants suggérés; rincez et séchez à fond :
-- Eau chaude savonneuse
-- Vinaigre et eau
-- Mettez-le au lave-vaisselle
-- Bar Keeper’s Friend
®
-- Soft Scrub
®
-- Bon-ami
®
-- Tampons de fibre ou de laine d’acier imbibés de savon
Briquettes de céramique,
Briquettes de céramique,
et Plateau à graisse du gril
• Briquettes de céramique de nettoyage
1) Placez doucement les briquettes de céramique saturées de gras dans un grand
contenant de six litres ou plus.
2) Remplissez le contenant d'eau propre de façon à ce que les briquettes soient
couvertes par au moins un demi-pouce d'eau.
3) Portez l'eau à ébullition et laissez-la bouillir pendant 10 minutes.
4) Éteignez le feu et laissez l'eau refroidir jusqu'à une température sécuritaire.
5) Débarrassez-vous de l'eau et tapotez les briquettes avec de vieilles serviettes ou
des essuie-tout pour les sécher.
6) Laissez sécher les briquettes à l'air ambiant pendant au moins deux heures. Il se
peut qu'il y ait des taches de graisse permanentes sur les briquettes après le
nettoyage.
7) Remettez les briquettes propres et sèches dans le gril avant de le réutiliser.
• Vous pouvez vous procurer de nouvelles briquettes de céramique à la boutique
électronique de Thermador (numéro de commande : PABRICKBKN). Consultez le
verso pour obtenir des renseignements sur le soutien technique.
9 MISE EN GARDE :
Vous devez remplacer les briquettes de céramique lorsqu'elles sont noires, ce qui
signifie qu'elles sont saturées de gras. Elles peuvent alors générer beaucoup de
fumée ou prendre feu pendant le fonctionnement de l'appareil.
• Produits nettoyants recommandés pour le panier et le plateau à graisse; rincez et
séchez à fond :
-- Eau chaude savonneuse
-- Mettez-le au lave-vaisselle

Page. 110
Portes • Veillez à préserver les orifices d’aération des portes des nettoyeurs et de l’eau. Si l’un
ou l’autre était déversé dans un orifice d’aération, l’eau pourrait couler à l’intérieur et
marquer la vitre.
Joint / Joint d’étanchéité
de la porte
• Vaporisez le produit nettoyant et séchez-le avec un chiffon. Ne frottez PAS. N'enlevez
pas, ne déplacez pas et n'endommagez pas la maille.
• Produits nettoyants suggérés; rincez et séchez à fond :
-- Eau chaude savonneuse
-- Fantastik
®
Fini extérieur/protecteur
arrière
Acier inoxydable
• L’acier inoxydable résiste à la plupart des taches d’aliments et piqûres, pourvu que la
surface soit gardée propre et protégée. Ne jamais laisser des taches alimentaires ou
du sel sur de l'acier inoxydable, peu importe la durée de temps.
-- Essuyez tout résidu de fumée sur la façade du cadre avec du Fantastik
®
ou du Bar
Keeper
’
s Friend
®
. Si les taches persistent, utilisez un produit nettoyant liquide doux.
La tache de fumée est directement proportionnelle à la quantité de salissures
alimentaires qui restait dans le four au moment de l’autonettoyage. Nettoyez souvent
le four.
• Frottez légèrement dans le sens du poli.
• Le chlore ou les composés de chlore de certains produits nettoyants sont corrosifs
pour l’acier inoxydable. Vérifiez les ingrédients sur l’étiquette.
• Produits nettoyants suggérés; rincez et séchez à fond :
-- Eau chaude savonneuse
-- Fantastik
®
-- Siege
®
Stainless Steel and Aluminum Cleaner
-- Kleen King
®
Stainless Steel Liquid Cleaner
-- Poli de nettoyage : Stainless Steel Magic
mc
pour protéger le fini des taches et
piqûres ; améliore l’apparence.
-- Thermador Stainless Steel Conditioner (0057669)
-- Taches d’eau dure : Vinaigre.
• Décoloration due à la chaleur; rincez et séchez à fond :
-- Barkeepers Friend
®
-- Wright's
®
All Purpose Brass Polish
Pièce/matériau Notes concernant le nettoyage

Page. 111
Grilles / Porcelaine
émaillée sur fonte
• Les grilles sont lourdes ; soyez prudent lorsque vous les soulevez. Déposez-les sur une
surface protégée.
• Compte tenu de la texture rugueuse des grilles, des dépôts en aluminium du dessous
des poêlons peuvent parfois se détacher et remplir les espaces entre les rayures des
grilles. Faites attention lorsque vous cuisinez avec des poêlons et casseroles en laiton
et en aluminium, car ces types de plats peuvent parfois laisser des dépôts de métal sur
les grilles.
• Lors de températures extrêmes et de changements rapides de température, on
retrouve couramment des ampoules/craquelures/éclats sur les tiges des grilles.
• Les déversements acides et chargés en sucre détériorent l’émail. Éliminez-les sans
tarder.
• Les produits nettoyants abrasifs, utilisés trop vigoureusement ou trop souvent,
peuvent éventuellement rayer l’émail.
• Produits nettoyants suggérés; rincez et séchez à fond :
-- Eau chaude savonneuse
-- Fantastik
®
-- Bon-ami
®
-- Soft Scrub
®
• Abrasifs pour les taches tenaces; rincez et séchez à fond :
-- Tampon de laine d’acier savonneux
-- Lestoil
®
-- Autre produit dégraissant
• Dépôts de métal :
-- Éponge à récurer Scotch Brite
-- Laine d'acier
Plaque chauffante /
Aluminium avec
revêtement anti-adhésif
• N’immergez
JAMAIS
une plaque chauffante chaude dans l’eau froide. La plaque
d’aluminium pourrait gondoler ou se fissurer.
•
Ne nettoyez
AUCUNE
partie du gril ou de la plaque chauffante dans le four en mode
autonettoyage
.
• Essuyez la surface de la plaque chauffante à l’eau tiède savonneuse, puis rincez à l’eau
tiède. Essuyez avec un chiffon doux.
• Si des particules alimentaires collent à la plaque, éliminez-les à l’aide d’un nettoyant
abrasif doux comme Soft Scrub
mc
.
• Produits nettoyants suggérés; rincez et séchez à fond :
-- Eau chaude savonneuse
-- Mettez-le au lave-vaisselle
-- Soft Scrub
®
Plateau collecteur de
graisse de la plaque
chauffante
• Retirez le plateau collecteur de graisse et versez la graisse dans un contenant résistant
aux graisses pour mise au rebut. Lavez le plateau collecteur dans l’eau tiède
savonneuse ou mettez-le au lave-vaisselle.
• Videz le plateau collecteur de graisse après chaque utilisation.
• Produits nettoyants suggérés; rincez et séchez à fond :
-- Eau chaude savonneuse
-- Mettez-le au lave-vaisselle
-- Soft Scrub
®
Pièce/matériau Notes concernant le nettoyage

Page. 112
Grilles du gril / Porcelaine
émaillée sur fonte
• Nettoyez les grilles après chaque utilisation.
• Placez la grille du gril dans l’évier et versez de l’eau bouillante sur la grille. Mettez un
linge à vaisselle sur la grille et versez de l’eau bouillante sur le linge. Laissez tremper
les résidus. Grattez tous les débris avec un tampon à récurer savonneux.
• Abrasifs pour les taches tenaces : Soft Scrub
®
.
• Produits nettoyants suggérés; rincez et séchez à fond :
-- Eau chaude savonneuse
-- Mettez-le au lave-vaisselle
-- Soft Scrub
®
-- Brosse à fils en laiton doux pour les taches tenaces. Les brosses à fils de fer rigides
peuvent égratigner le recouvrement de porcelaine des grilles et causer leur
oxydation prématurée.
• Abrasifs pour les taches tenaces; rincez et séchez à fond :
-- Tampon de laine d’acier savonneux
-- Lestoil
®
-- Autre produit dégraissant
Allumeurs / Céramique • N’employez PAS d’outils pointus pour frotter les allumeurs. Les allumeurs sont
fragiles. Si l’un d’entre eux est endommagé, il se pourrait qu’il ne puisse allumer le
brûleur STAR.
• Produits nettoyants suggérés :
-- Utilisez un coton-tige trempé dans l’eau
-- Fantastik
®
Cavité / Porcelaine
émaillée sur acier
• Le fini de porcelaine émaillée résiste à l’acide, mais il n’est pas à l’épreuve de l’acide.
Les aliments acides, par exemple le jus de citron, la tomate, la rhubarbe, le vinaigre,
l’alcool et le lait, doivent être essuyés car il ne doivent pas cuire dans la porcelaine
durant la prochaine utilisation de la cuisinière. Après un certain temps, la porcelaine
peut se craqueler (présenter des lignes fines comme des cheveux). Cela n’affecte en
rien sa performance.
• Appliquez du produit nettoyant sur une éponge ou un chiffon humide. Frottez
doucement. Rincez en profondeur et séchez. Si des aliments ont brûlé sur le four et
qu'ils sont difficiles à nettoyer, vous pouvez les humidifier avec un chiffon imbibé du
produit suggéré. Fermez la porte et laissez tremper jusqu'à ce que vous puissiez
facilement enlever les résidus d'aliment avec un chiffon savonneux humide ou peu
abrasif.
• Produits nettoyants suggérés; rincez et séchez à fond :
-- Eau chaude savonneuse
-- Bar Keeper’s Friend
®
-- Vinaigre et eau
-- Soft Scrub
®
-- Bon-ami
®
Pièce/matériau Notes concernant le nettoyage

Page. 113
Grilles du four et glissières
des grilles
• Certains produits nettoyants commerciaux pour four peuvent noircir et décolorer la
surface. Avant de nettoyer la grille, testez le produit sur une petite portion de celle-ci
et assurez-vous qu'elle ne se décolore pas.
• Si les grilles ne glissent pas facilement en place après le nettoyage, versez un peu
d'huile à friture sur un essuie-tout et frottez doucement les glissières latérales.
• Si après le nettoyage une grille ne se glisse pas facilement, humectez un papier
absorbant avec une petite quantité d’huile de cuisson et frottez légèrement les rails
latéraux.
• Produits nettoyants suggérés; rincez et séchez à fond :
-- Eau chaude savonneuse
-- Vinaigre et eau
-- Mettez-le au lave-vaisselle
-- Bar Keeper’s Friend
®
-- Soft Scrub
®
-- Bon-ami
®
• Abrasifs pour les taches tenaces; rincez et séchez à fond :
-- Utilisez des tampons de fibre ou de laine d’acier imbibés de savon
Plateau collecteur de
surface /
Porcelaine émaillée
• Frottez délicatement car ces produits pourraient érafler le fini. Rincez à fond et
essuyez avec un chiffon doux.
• Pour les aliments carbonisés, utilisez des tampons de fibre ou de laine d’acier imbibés
de savon, tels que S.O.S.
mc
ou Brillo
mc
. Humidifiez le tampon et frottez délicatement.
Soyez prudent car les tampons peuvent érafler le fini. Rincez à fond et essuyez avec un
chiffon doux.
• Produits nettoyants suggérés; rincez et séchez à fond :
-- Eau chaude savonneuse
-- Soft Scrub
®
-- Bar Keeper’s Friend
®
-- Bon-ami
®
• Abrasifs pour les taches tenaces; rincez et séchez à fond :
-- Utilisez des tampons de fibre ou de laine d’acier imbibés de savon
Pièce/matériau Notes concernant le nettoyage
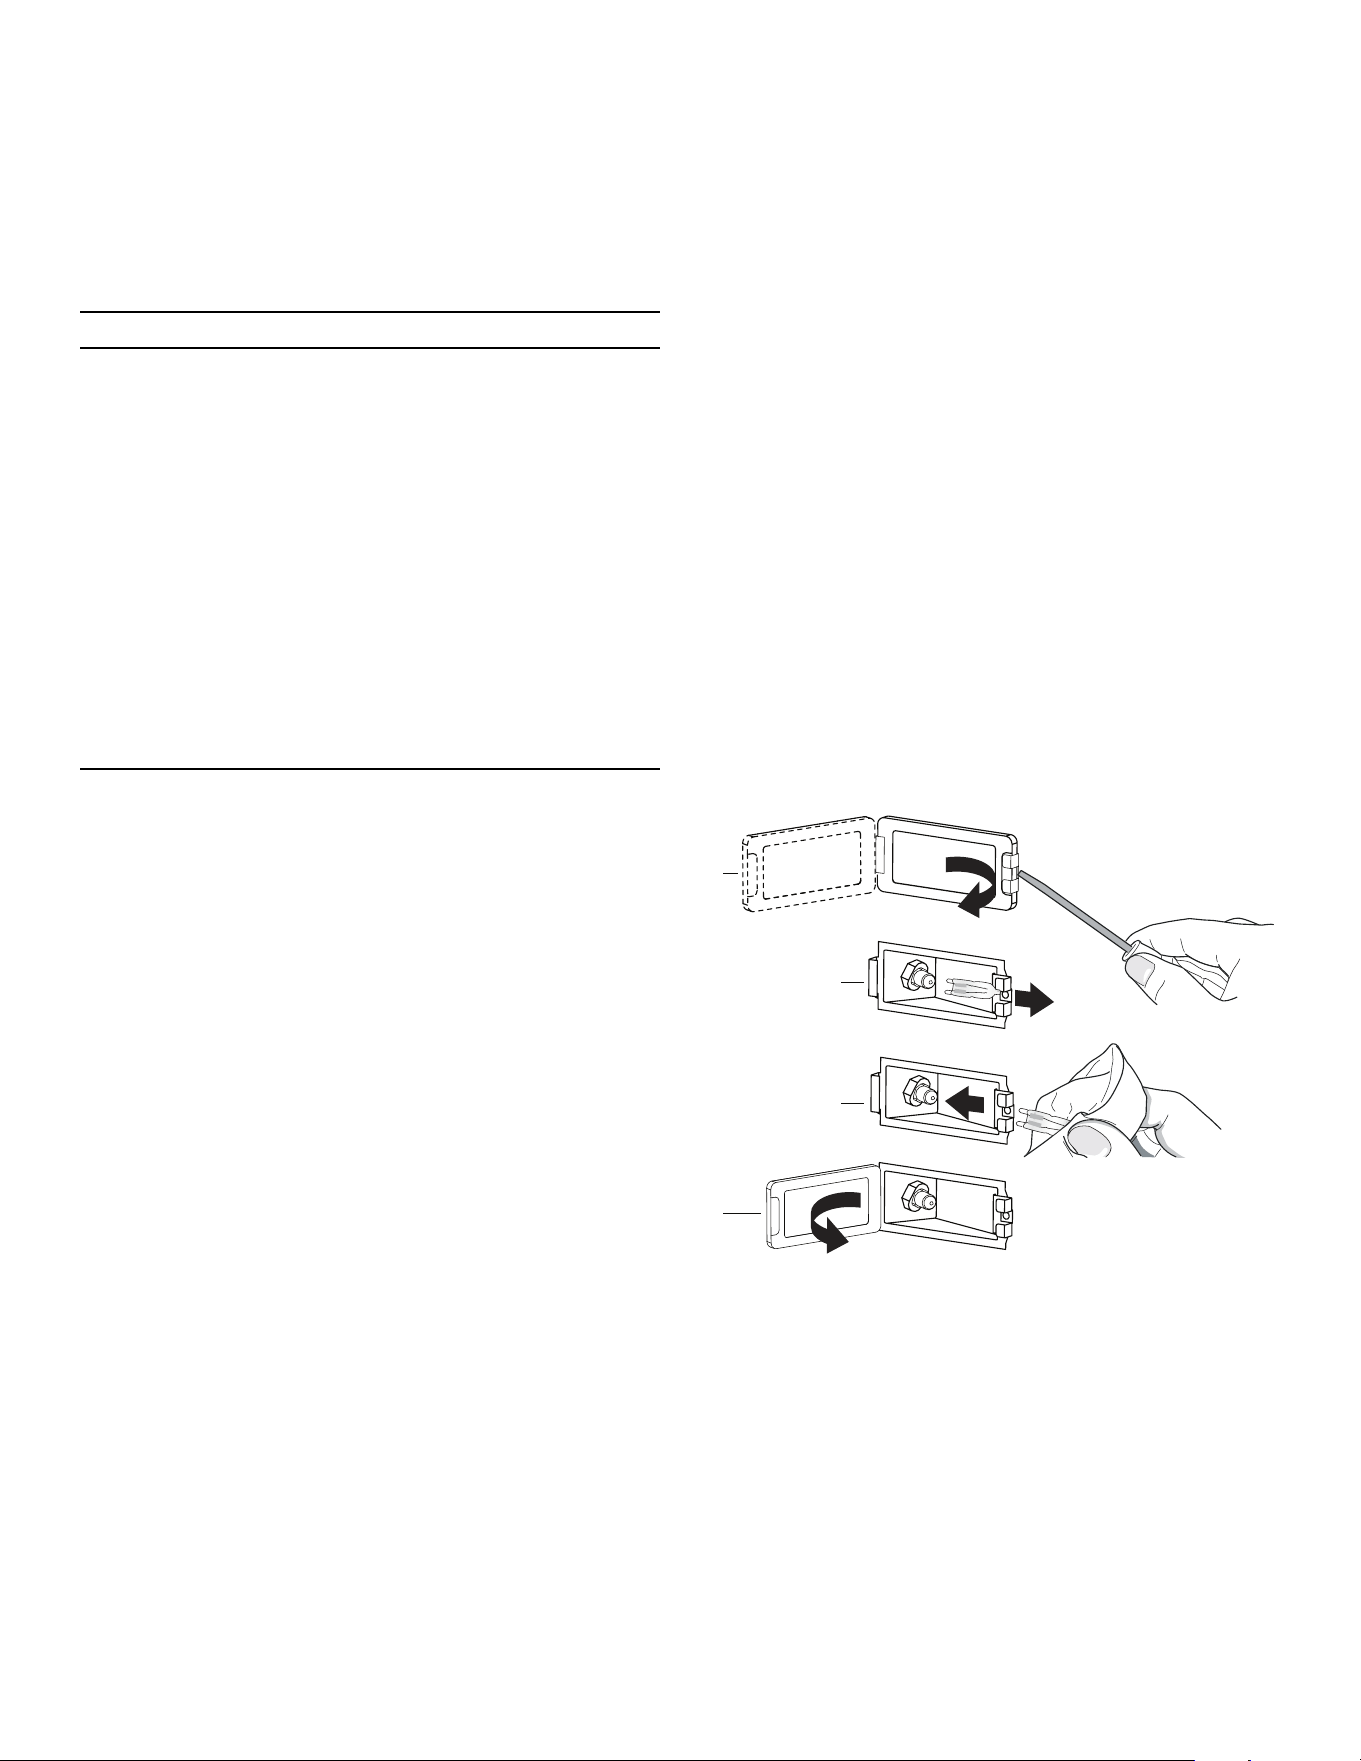
Page. 114
Entretien à faire soi-même
Changement de l’ampoule du
four
9 ATTENTION
• Assurez-vous que l’appareil et les lampes sont
froids et que l’alimentation de l’appareil est
coupée avant de remplacer les ampoules
électriques, sans quoi vous pourriez vous blesser
ou recevoir une décharge électrique.
• Les couvercles doivent être en place lorsque vous
utilisez l’appareil.
• Les couvercles servent à empêcher les ampoules
de se briser.
• Les couvercles sont faits de verre. Manipulez-les
avec soin pour éviter de les briser. Les éclats de
verre peuvent causer des blessures.
• La douille est sous tension lorsque la porte est
ouverte.
Remplacez l’ampoule exclusivement par une ampoule
recommandée pour cuisinière. N’UTILISEZ PAS une
ampoule standard à usage domestique dans le four.
Appelez le centre de service à la clientèle de Thermador
au 1-800-735-4328 ou le détaillant Thermador le plus près
de chez vous pour savoir quelles ampoules utiliser avec
votre cuisinière. Vous devrez connaître le numéro de série
de votre cuisinière.
Remplacement de l’ampoule
Utilisez seulement des ampoules halogènes à deux
broches de 10W, 12V G4. Utilisez un linge propre et sec
pour manipuler les ampoules halogènes. Cela augmentera
leur durée de vie.
1. Coupez l’alimentation du disjoncteur.
2. Enlevez les grilles du four.
3. Insérez la pointe d’un tournevis plat entre l’attache de
fixation et le boîtier de la lampe (figure, a).
4. Soutenez le couvercle de la lentille de verre avec deux
doigts le long du rebord inférieur pour empêcher qu’il
tombe sur le plancher du four. Tournez doucement le
tournevis plat pour détacher le couvercle de la lentille
de verre.
5. Enlevez le couvercle de la lentille de verre.
6. Retirez l’ampoule en la saisissant et la faisant glisser
vers l’arrière jusqu’à ce que les deux broches sortent
du support en céramique (figure, b).
7. Ne touchez pas au verre de la nouvelle ampoule de
remplacement avec vos doigts, sans quoi elle ne
fonctionnera pas lorsque vous l’allumerez. Prenez
l’ampoule de remplacement avec un linge sec et
propre. Localisez les deux fentes du support de
céramique en y poussant doucement les deux broches
de l’ampoule (figure, c).
8. Tirez vers le bas pour bien installer l’ampoule.
9. Faites glisser la lentille de protection dans l’attache du
support et poussez l’autre extrémité jusqu’à ce que
l’attache de fixation s’enclenche dans le boîtier
(figure, d).
10. Allumez l’alimentation du disjoncteur.
a
b
c
d

Page. 115
Avant d’appeler le service technique
Dépannage
Avant d’appeler le service technique, vérifiez les points
suivants afin d’éviter des frais inutiles.
Symptôme Cause probable Solution
Production intermittente
d’étincelles
• L’allumeur en céramique est mouillé ou
sale.
• Séchez ou nettoyez soigneusement
l’allumeur.
• Les orifices du brûleur sont bouchés. • Nettoyez les orifices de répartition de la
flamme à l’aide d’un fil métallique, d’une
aiguille ou d’un trombone déplié.
Plus de quatre déclics de
l'allumeur avant que la
flamme ne s'allume
• Le chapeau du brûleur est mal posé sur
sa base.
• Alignez bien le chapeau du brûleur sur la
base du brûleur.
Production constante
d’étincelles
• La mise à la terre de la cuisinière a été
mal faite.
• L’alimentation électrique est mal
polarisée.
• Consultez les Instructions d'installation.
Appelez un électricien qualifié pour qu'il
effectue une mise à la terre adéquate
pour la cuisinière.
Les dispositifs d’allumage
produisent des étincelles,
mais pas de flamme.
• La vanne de l’approvisionnement en gaz
est à la position « OFF ».
• Ouvrez la vanne d’approvisionnement en
gaz de l’appareil.
La cuisinière ne fonctionne
pas (les lumières, le four et
les brûleurs ne s’allument
pas)
• Pas d’alimentation électrique. • Assurez-vous que le disjoncteur est à la
bonne position.
• Assurez-vous que la tension de la ligne
d’alimentation électrique est adéquate.
• Le four est en mode Sabbat. • Assurez-vous que le four n’est pas en
mode Sabbat. Consultez la section
« Utilisation de la cuisinière » dans le
Guide d’utilisation et d’entretien.
L’ampoule du four ne
s’allume pas.
• L’ampoule est grillée. • Remplacez l’ampoule du four selon les
instructions fournies dans le Guide
d’utilisation et d’entretien.
La porte ne s’ouvre pas. • Le four est encore en mode
Autonettoyage.
• Si le four est chaud, le verrou de la porte
s’ouvrira lorsque le four atteindra une
température sécuritaire.
Les aliments ne cuisent pas
suffisamment dans le four.
• La grille ne se trouve pas à la bonne
position.
• Consultez la section « Utilisation de la
cuisinière » dans le Guide d’utilisation et
d’entretien.
• Le plat utilisé n’est pas adéquat. • Consultez la section « Récipients
recommandés » dans le Guide
d’utilisation et d’entretien.
• La porte du four n’est peut-être pas
bien scellée.
• Nettoyez le joint d’étanchéité de la porte
du four. Remplacez-le s’il est usé.
• L’appareil n’est pas de niveau. • Consultez le Manuel d’installation pour
obtenir des instructions sur le nivelage
de l’appareil.
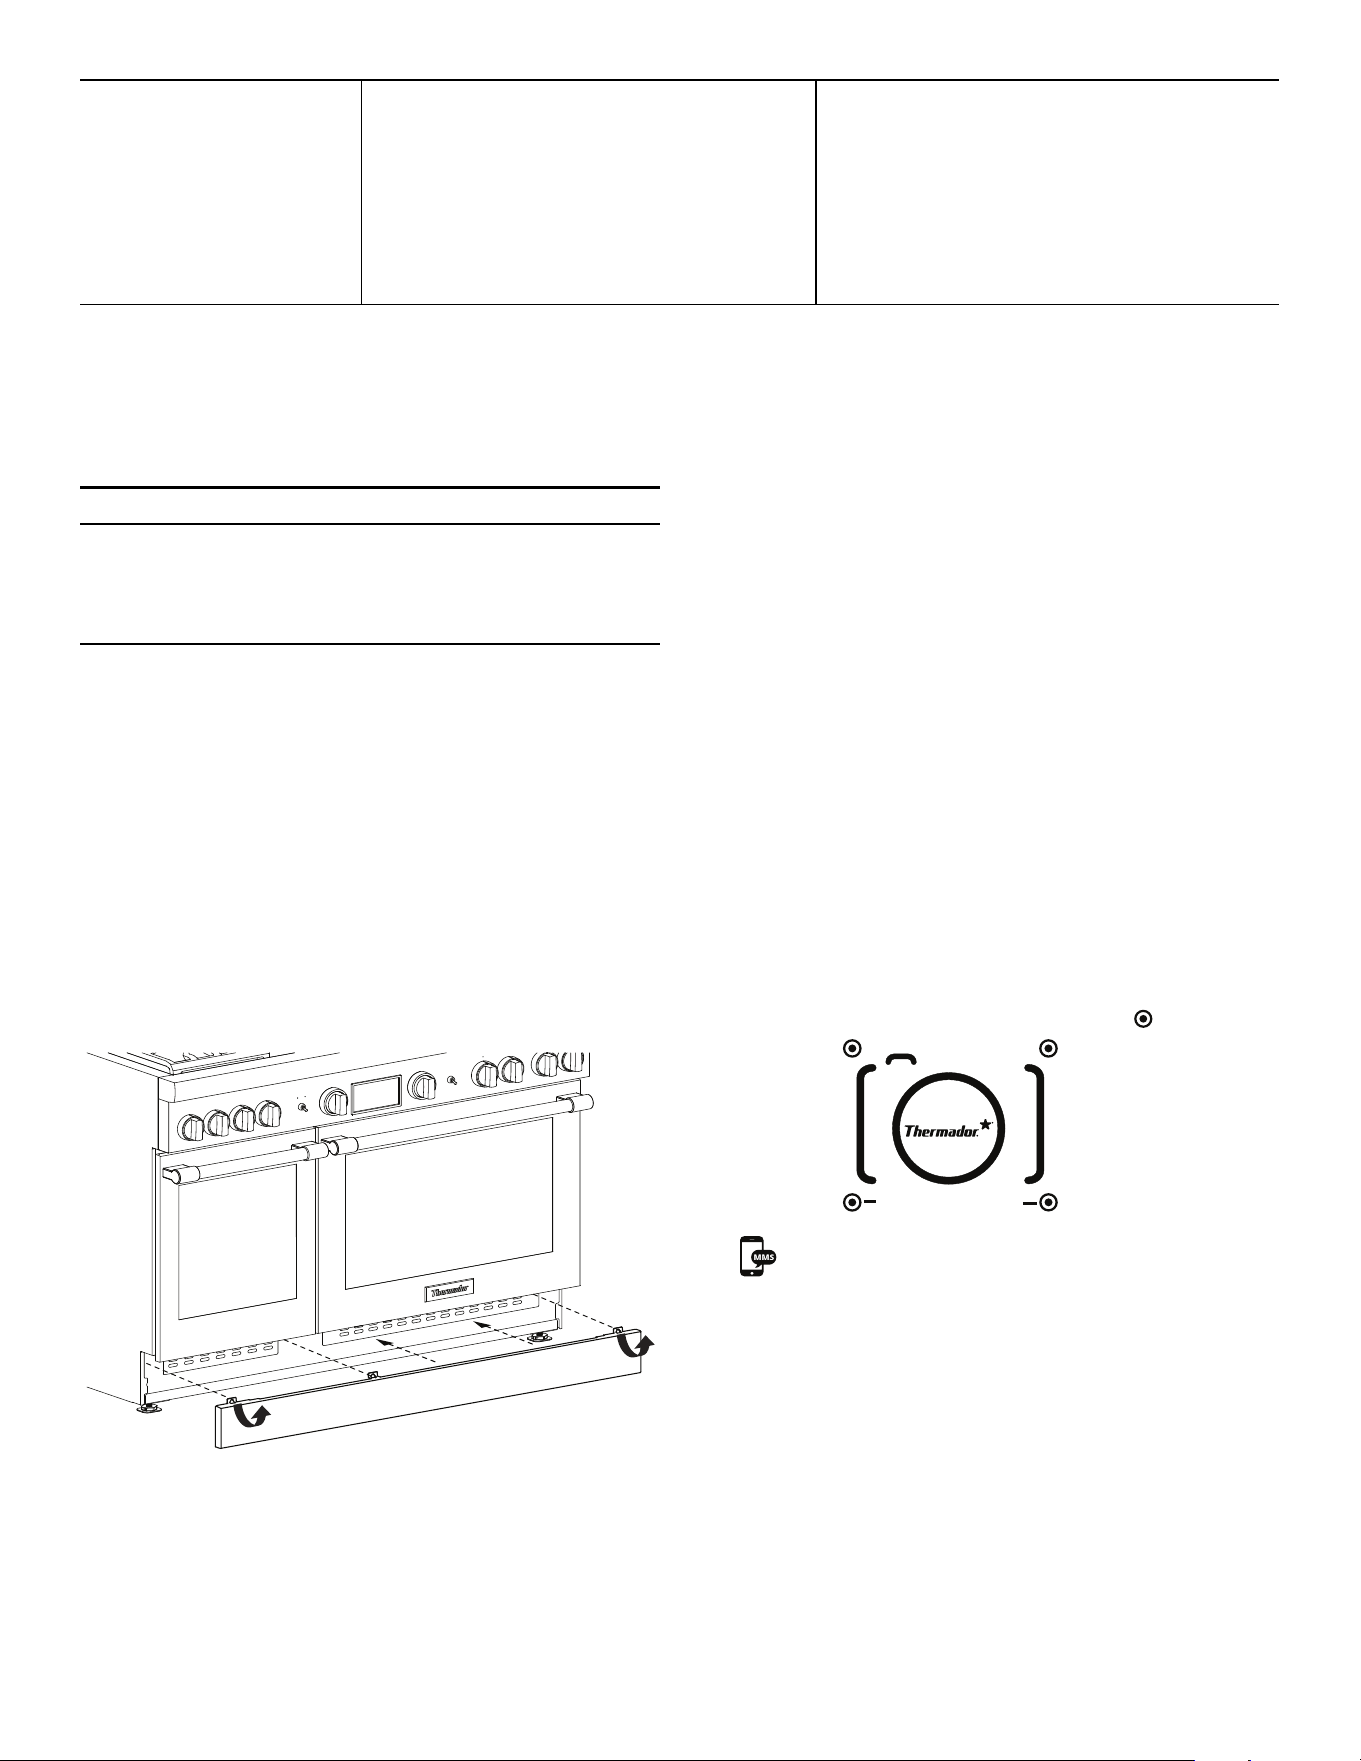
Page. 116
Information pour le service
technique
9 AVERTISSEMENT
Avant d’ôter la plaque d’habillage, débranchez
l’alimentation électrique de la cuisinière. Réinstallez la
plaque de base avant de rébrancher l’alimentation
électrique de la cuisinière et de l’utiliser.
Schémas de branchement
Les schémas de câblage électrique et les dessins placés
dans la zone de la base ne doivent pas être enlevés sauf
par un technicien de service. Remettez-les en place après
l’entretien.
Plaque signalétique
La plaque signalétique indique le modèle et le numéro de
série de votre cuisinière. Accédez à la plaque amovible en
retirant d’abord le panneau décoratif du piédestal,
comme illustré ci-dessous.
Afin de conserver ces données à portée de main, recopiez
ici les renseignements figurant sur la fiche signalétique.
Conservez votre facture pour que votre garantie soit
valide.
Numéro du modèle ______________________________
Numéro de série________________________________
Date d’achat____________________________________
Enregistrement de produit
Enregistrez votre appareil auprès de BSH afin de vous
assurer un service rapide et l’accès aux renseignements
qui concernent votre appareil.
Vous pouvez enregistrer votre appareil de l’une des façons
suivantes :
• Inscrivez-vous avec votre téléphone (aux É.-U.
seulement).
1. Prenez une photo de l’icône de la caméra sur la carte
d’enregistrement, y compris les points ( ).
2. Envoyez le message texte photo au 21432 (des
frais de messagerie texte et de données peuvent
s'appliquer.)
• Envoyez par la poste votre carte d’enregistrement
de produit Thermador complétée.
• Enregistrez votre produit en ligne à l’adresse
www.thermador.ca.
• Communiquez avec le service à la clientèle de
Thermador au numéro 1-800-735-4328.
L’appareil dégage de l’air
chaud.
• Il est normal que, durant le processus de
refroidissement, de l’air chaud soit
évacué dans la pièce lorsque le four est
allumé.
• Selon le mode utilisé, la vitesse du
ventilateur augmente ou diminue.
• Cela est normal.
Symptôme Cause probable Solution
PHOTOREGISTER
SM
THERMADOR
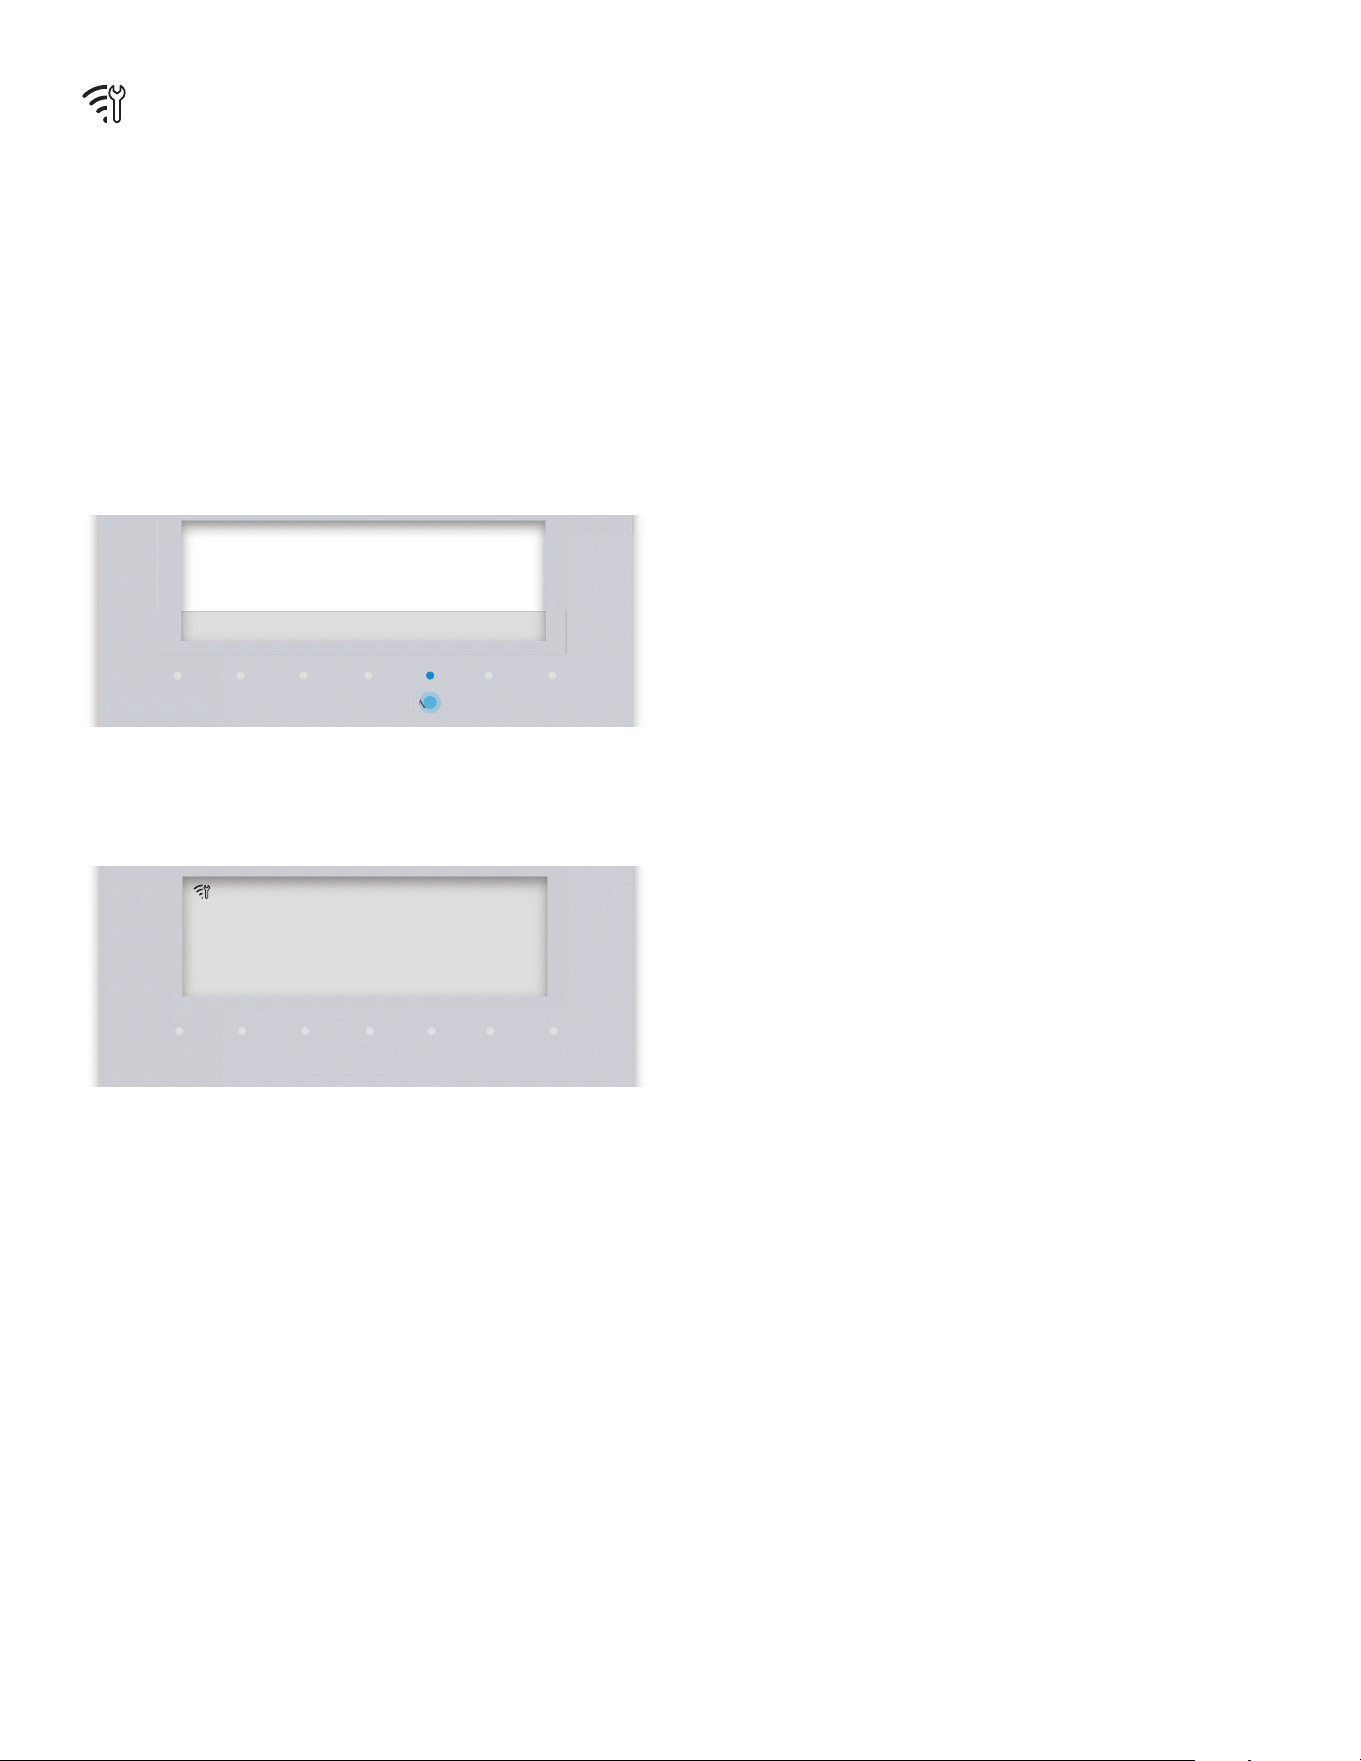
Page. 117
Connexion pour réparation
à distance
En cas d’erreur, le Service après-vente peut accéder à
l’appareil électroménager par la connexion
Home Connect
TM
.
Octroi de l’accès à l’appareil électroménager, au Service
après-vente :
1. Communiquez avec le service d’assistance technique
(consultez la dernière page). Respectez les directives
données par le technicien.
– L’écran affiche la tentative d’accès par l’assistance
technique :
2. Appuyez sur ENTRÉE (ENTER) pour octroyer l’accès
au service d’assistance technique.
3. Une fois la connexion établie, l’icône Wi-Fi
correspondante s’affiche à la barre d’état :
TIMERS SETTINGS ENTER
Do you want to grant access to
customer service?
Allow with Enter
NTE
NTE
TIMERS SETTINGS ENTER
06:30

Page. 118
Énoncé de garantie limitée du produit
Couverture de la garantie et à qui elle
s’applique
La garantie limitée offerte par BSH Home Appliances
Corporation ("Thermador") dans cet énoncé de garantie
limitée du produit ne s’applique qu’à l’appareil Thermador
qui vous a été vendu, à titre de premier acheteur, pourvu
que le produit ait été acheté :
• Pour une utilisation domestique normale (non
commerciale) et qu’il n’ait été utilisé qu’à des fins
domestiques normales.
• Neuf au détail (qu’il ne soit pas un modèle
précédemment retourné, un modèle « tel-quel » ou un
modèle de plancher) et non destiné à la revente ou à
un usage commercial.
• Aux États-Unis ou au Canada, et qu’il soit demeuré en
tout temps dans le pays de l’achat d’origine.
Les garanties aux présentes s’appliquent à l’acheteur
original du Produit sous garantie et à tout propriétaire
successif du produit acheté pour une utilisation
résidentielle habituelle et la durée de la garantie.
Veuillez vous assurer de retourner votre carte
d’enregistrement ; bien que ce ne soit pas indispensable à
la couverture de garantie. C’est toutefois le meilleur
moyen pour Thermador de communiquer avec vous, dans
le cas peu probable d’un rappel de produit ou d’un avis de
sécurité.
Durée de la garantie
Thermador garantit que le produit est exempt de
défectuosités autant dans les matériaux que dans la main-
d'oeuvre pour une période de sept cent trente (730) jours
à partir de la date d’achat. Cette période commence dès
la date de l’achat et ne peut pas être arrêtée, prolongée
ou suspendue pour quelque raison que ce soit.
Ce produit est également garanti comme étant exempt de
défaut esthétique
au niveau du matériau et de la
fabrication (par ex. d’égratignures sur l’acier inox,
d’imperfections au niveau de la peinture/porcelaine,
d’éclats, de bosses ou autres dommages à la finition du
produit), pour une période de soixante (60) jours à partir
de la date d’achat ou de la date d’achèvement pour une
nouvelle construction. La présente garantie esthétique
exclut les variations légères de couleur causées par les
différences inhérentes entre les sections peintes et les
sections en porcelaine, de même que les différences
causées par l'éclairage de la cuisine, l'emplacement du
produit et autres facteurs similaires. Cette garantie
cosmétique
exclut spécifiquement tous les appareils
d'exposition, de plancher, « tel quel » et remis à neuf.
Réparation ou remplacement comme
recours exclusif
Durant cette période de garantie, Thermador ou l’un de
ses fournisseurs de service autorisés réparera votre
appareil sans frais (sujet à certaines limitations établies
dans les présentes) s’il est prouvé qu’une défectuosité
dans les matériaux ou la main-d'oeuvre affecte le
fonctionnement de votre appareil. Si tous les efforts
entrepris pour réparer l’appareil ont échoués, Thermador
remplacera votre appareil (un modèle plus récent pourrait
vous être livré, à la seule discrétion de Thermador, pour
des frais additionnels). Toutes les pièces et composants
deviendront la propriété de Thermador. Toutes les pièces
remplacées et/ou réparées assumeront l’identité de la
pièce d’origine aux fins de cette garantie et cette garantie
ne sera pas prolongée suite au remplacement de ces
pièces. La seule responsabilité de Thermador telle que
décrite dans les présentes est de réparer un produit
défectueux à la fabrication, en mandatant un fournisseur
de service autorisé de Thermador durant les heures
d’affaire. Pour des raisons de sécurité et de dommages
aux biens, Thermador recommande de ne pas tenter de
réparer vous-même le produit ou d’employer un
fournisseur de services non autorisé. Thermador n’accepte
aucune responsabilité pour les réparations ou le travail
effectué par un fournisseur de service non autorisé. Si
vous acceptez qu’une personne autre qu’un fournisseur de
service autorisé travaille à réparer votre produit, CETTE
GARANTIE DEVIENDRA AUTOMATIQUEMENT NULLE ET
NON AVENUE. Les fournisseurs de service autorisé sont
les personnes morales ou sociétés spécialement formées
pour réparer les produits Thermador et qui possèdent,
selon Thermador, une réputation supérieure au niveau du
service à la clientèle et des compétences techniques
(notez qu’il s’agit d’entités indépendantes et non
d’agents, partenaires, sociétés affiliées ou représentants
de Thermador). En dépit des énoncés ci-dessus,
Thermador n’accepte aucune responsabilité pour
un appareil se trouvant dans une région éloignée (à plus
de 200 km d’un fournisseur de service autorisé), ou dans
un lieu ou un environnement inaccessible, dangereux,
menaçant ou hasardeux ; dans un tel cas, si vous le
demandez, Thermador paiera pour les pièces et la main
d'oeuvre, et expédiera le tout au fournisseur de service
autorisé le plus près. Vous serez toutefois entièrement
responsable des frais de déplacement ou autres frais
spéciaux engagés par la société de service, assumant
que cette dernière accepte d’effectuer la réparation.

Page. 119
Appareil hors garantie
Thermador n’est assujettie à aucune obligation, au titre de
la loi ou autrement, de vous offrir des concessions,
incluant les réparations, prorata ou remplacement de
produit une fois cette garantie expirée.
Exclusions de la garantie
La garantie décrite dans les présentes exclut toutes les
défectuosités ou dommages qui ne sont pas du fait direct
de Thermador, incluant, mais sans s’y limiter, un ou
plusieurs des éléments suivants :
• Utilisation du produit pour quelque raison autre que
son usage normal de la façon prévue (incluant mais
sans s’y limiter, toute forme d’usage commercial,
d’usage ou d’entreposage d’appareils pour l’intérieur
à l’extérieur, d’usage de l’appareil avec tout moyen
de transport maritime ou aérien).
• Toute conduite inappropriée, négligence, mauvais
usage, abus, accident, utilisation inadéquate, absence
d’entretien, installation inadéquate ou négligente,
modification, non-respect des instructions
d’utilisation, manutention inappropriée, réparations
non autorisées (incluant les réparations « maison » ou
l’exploration des mécanismes internes de l’appareil).
• L’ajustement, l’altération ou la modification de toute
forme que ce soit.
• Le non-respect des codes du bâtiment, règlements ou
lois de la ville, de la province ou du pays en matière
d’électricité, de plomberie, incluant une installation
non conforme aux règlements et codes du bâtiment
et des services d’incendie.
• L’usure normale, les déversements d’aliments ou de
liquides, les accumulations de graisse ou d’autres
substances qui s’accumulent sur, dans ou autour de
l’appareil.
• Toute force et facteur extérieur causé par les éléments
ou l’environnement, incluant, mais sans s’y limiter, la
pluie, le vent, le sable, les inondations, les coulées de
boue, les températures extrêmes, l’humidité excessive
ou l’exposition prolongée à l’humidité, la foudre, les
pannes de courant, les défaillances structurales autour
de l’appareil et les catastrophes naturelles.
En aucun cas Thermador ne peut être tenu responsable de
dommages aux biens environnants, incluant les armoires
de cuisine, les planchers, les plafonds et toute autre
structure ou objet entourant l’appareil. Également exclus
de cette garantie sont les appareils dont les numéros de
série ont été modifiés, effacés ou rendus illisibles ; les
visites de service visant à vous enseigner comment utiliser
l’appareil ou les visites qui ne révèlent aucune défaillance
à l’appareil ; la correction des problèmes d’installation
(vous êtes seul responsable de la mise en place de
l’appareil, notamment au niveau de l’électricité, de la
plomberie et des autres installations de raccordement,
des fondations et planchers et des modifications incluant,
mais sans s’y limiter, les armoires, les murs, les planchers,
les étagères, etc.) et le réenclenchement des disjoncteurs
ou le changement des fusibles.
SELON LES LIMITES PERMISES PAR LA LOI,
CETTE GARANTIE VOUS ACCORDE DES RECOURS
EXCLUSIFS RELATIVEMENT AU PRODUIT, QUE LA
RÉCLAMATION SURVIENNENT DE PAR LE CONTRAT OU
PAR DÉLIT CIVIL (INCLUANT LA RESPONSABILITÉ
STRICTE OU LA NÉGLIGENCE) OU DE TOUTE AUTRE
FAÇON. CETTE GARANTIE REMPLACE TOUTE AUTRE
GARANTIE, QU’ELLE SOIT EXPRESSE OU IMPLICITE.
TOUTE GARANTIE IMPLICITE EN VERTU DE LA LOI,
QU’ELLE CONCERNE LA QUALITÉ MARCHANDE OU
L’ADAPTATION À DES FINS PARTICULIÈRES, OU
AUTREMENT, NE SERA EN VIGUEUR QUE POUR
LA PÉRIODE PENDANT LAQUELLE LA GARANTIE
EXPRESSE LIMITÉE EST EN VIGUEUR. EN AUCUN CAS LE
FABRICANT NE PEUT ÊTRE TENU RESPON-SABLE DES
DOMMAGES INDIRECTS, PARTICULIERS, CONSÉCUTIFS,
DÉCOULANT D’UNE « PERTE COMMERCIALE » ET/OU
PUNITIFS, DES PERTES OU DÉPENSES, INCLUANT, MAIS
SANS S’Y LIMITER, LE TEMPS PASSÉ LOIN DU TRAVAIL,
LES HÔTELS ET/OU LES REPAS AU RESTAURANT, LES
FRAIS DE REMODELAGE QUI DÉPASSENT LES
DOMMAGES DIRECTS DÉFINITIVEMENT ET
EXCLUSIVEMENT CAUSÉS PAR THERMADOR OU
AUTREMENT. CERTAINS ÉTATS OU PROVINCES NE
PERMETTENT PAR L’EXCLUSION OU LA LIMITATION DES
DOMMAGES CORRÉLATIFS OU IMPRÉVUS ET CERTAINS
ÉTATS OU PROVINCES NE PERMETTENT PAS
D’ACCORDER UNE LIMITE DE DURÉE À LA GARANTIE
IMPLICITE. PAR CONSÉQUENT LES LIMITATIONS CI-
DESSUS POURRAIENT NE PAS S’APPLIQUER À VOUS.
CETTE GARANTIE VOUS ACCORDE DES DROITS
LÉGAUX SPÉCIFIQUES ET VOUS POURRIEZ ÉGALEMENT
DISPOSER D’AUTRES DROITS QUI VARIENT D’UN ÉTAT
À L’AUTRE ET D’UNE PROVINCE À L’AUTRE.
Aucune tentative de modifier ou d’amender cette garantie
ne sera considérée comme applicable à moins qu’elle n’ait
été autorisée par écrit par un responsable de BSH.

Página. 120
Este electrodoméstico de THERMADOR
®
está hecho por BSH Home Appliances Corporation
1901 Main Street, Suite 600
Irvine, CA 92614
¿Preguntas?
1-800-735-4328
www.thermador.com
¡Esperamos oír de usted!
Índice de
MATERIAS
Seguridad ............................................................................121
Instrucciones de seguridad importantes .....................121
Descripción .........................................................................128
Descripción de las estufas ...........................................128
Antes de comenzar..............................................................133
Cómo comenzar ...........................................................133
Usar la placa de cocción ......................................................135
Quemadores STAR
®
sellados ......................................135
Quemadores ExtraLow
®
...............................................136
Plancha eléctrica...........................................................142
Parrilla eléctrica ............................................................145
Usar el horno .......................................................................148
Símbolos y descripciones .............................................148
Inicio para poner en funcionamiento ...........................149
Ajustar el horno ............................................................150
Temporizadores ...................................151
Precalentamiento rápido ........................................152
Bloqueo de panel ...................................................152
Conversión automática a aire caliente .........................152
Ajuste preciso de la hornilla .........................................153
Sonda térmica .........................................................153
Hornear extend./sabbat .........................................154
Inicio remoto ..........................................................156
Sacar lo mejor del electrodoméstico...................................157
Posiciones de las rejillas para hornear..........................157
Hornear ...................................................................157
Grill .........................................................................158
Grill con convección ...............................................159
Hornear por convección .........................................159
Aire caliente verdadero ..........................................161
Preparación de masa ..............................................161
Asar .........................................................................162
Asar con aire caliente .............................................162
Caliente ..................................................................163
Configurar Home Connect
TM
..............................................164
Configurar.....................................................................164
Cuidado y mantenimiento ...................................................167
Autolimpieza de la hornilla (algunos modelos) ......168
Recomendaciones de limpieza .................................... 170
Mantenimiento hecho por usted mismo ............................ 174
Reemplazar una bombilla en la hornilla....................... 174
Antes de solicitar servicio ................................................... 175
Resolución de problemas ............................................ 175
Información para el servicio técnico ............................ 176
Conexión remota del servicio técnico ................... 176
Registro de productos ................................................. 176
Declaración de garantía limitada del producto .................. 177
Soporte, accesorios, y piezas ............................ última página
Definiciones de
SEGURIDAD
9 ADVERTENCIA
Esto indica que se pueden producir lesiones graves o la
muerte si no se cumple con esta advertencia.
9 PRECAUCIÓN
Esto indica que pueden producirse lesiones leves o
moderadas si no se cumple con esta advertencia.
NOTA: Esto indica que puede producirse un daño al
electrodoméstico o a la propiedad como resultado de la falta de
cumplimiento de este aviso.
Nota: Esto lo alerta sobre información y/o consejos importantes.
Página. 121
Seguridad
9 INSTRUCCIONES IMPORTANTES DE SEGURIDAD
LEA TODAS LAS INSTRUCCIONES ANTES DE CONTINUAR
Leer con atención
INSTALADOR: Deje esas instrucciones de instalación con
el aparato para el propietario.
PROPIETARIO: Guarde estas instrucciones para futuras
referencias. Utilice este aparato únicamente para el fin
para el cual fue diseñado, según se describe en este
manual.
ADVERTENCIA
Con un cuidado adecuado, su nuevo aparato ha sido
diseñado para ser seguro y fiable. Lea atentamente estas
instrucciones antes de usar el aparato para reducir el
riesgo de fuego, de descarga eléctrica o de lesiones.
Cuando use aparatos de cocina, se deben tener en cuenta
precauciones básicas, incluyendo las que aparecen en las
páginas siguientes.
ADVERTENCIA
RIESGO DE VUELCO DE LA ESTUFA
Un niño o un adulto podrían volcar el aparato
y perder la vida.
Asegúrese de que el dispositivo antivuelco
esté instalado adecuadamente y que su
soporte retenga la pata del aparato, conforme
a las instrucciones de instalación.
Asegúrese de que el dispositivo antivuelco retenga la pata
del aparato al reinstalarlo en su sitio.
No utilice el aparato si el dispositivo
antivuelco no está instalado y no
retiene el aparato.
El hecho de no leer las instrucciones
de este manual puede causar la
muerte o graves quemaduras a niños y adultos.
Cuando jale la estufa de la pared por motivos de limpieza,
servicio u otra razón, asegúrese de volver a insertar
correctamente el dispositivo antivuelco cuando empuje la
estufa contra la pared. Sino, en el caso de un uso poco
normal de la estufa (por ejemplo si alguien trepa, se
sienta o se apoya sobre una puerta abierta), ésta podría
volcarse. El hecho de ignorar esta precaución puede
causar el vuelco de la estufa, lo que podría causar lesiones
debido a líquidos calientes derramados o al peso mismo
de la estufa.
ADVERTENCIA
La falta de observar la información en
este manual puede causar un fuego o
una explosión, y como resultado
daños a la propiedad, lesiones o la
muerte.
-- No guarde o use materiales combustibles,
gasolina u otros vapores y líquidos
inflamables cerca de este o cualquier otro
aparato.
-- QUÉ HACER CUANDO HUELE A GAS
• No trate de encender ningún aparato.
• No toque ningún interruptor eléctrico.
• No use ningún teléfono en su edificio.
• Llame de inmediato a su proveedor de
gas desde el teléfono de algún vecino.
Siga las instrucciones de su proveedor
de gas.
• Cuando no pueda localizar a su
proveedor de gas, llame a los
bomberos.
-- Un instalador calificado, una agencia de
servicio autorizada o el proveedor de gas
debe realizar la instalación y el servicio.

Página. 122
9 INSTRUCCIONES IMPORTANTES DE SEGURIDAD
LEA TODAS LAS INSTRUCCIONES ANTES DE CONTINUAR
ADVERTENCIA
La instalación, el servicio técnico o el mantenimiento
incorrectos pueden causar lesiones o daños materiales.
Consultar este manual para recibir ayuda.La instalación y
el servicio deben ser llevados a cabo por un instalador
calificado, agencia de servicio o el proveedor de gas.
ADVERTENCIA
Para asegurar una ventilación adecuada, NO quite las
patas de la estufa.
ADVERTENCIA
Antes de realizar la instalación, desconectar la
alimentación eléctrica en el panel de servicio. Cuando el
panel de servicio no se puede bloquear, fije con
seguridad un dispositivo de advertencia prominente,
como una etiqueta en el panel de servicio.
Verificación del tipo de gas
Gas natural — 7 pulg. columna agua (17.4 mb) mín., 14
pulg. (34.9 mb) máximo
Gas propano — 11 pulg. columna agua (27.4 mb) mín., 14
pulg. (34.9 mb) máximo
Verifique el tipo de gas suministrado en la localidad.
Asegúrese de que el artefacto esté conectado al tipo de
gas para el que está certificado. Todos los modelos están
certificados para usarse con gas natural.
ADVERTENCIA
Si se usa un kit de conversión, deberá ser instalado por
una agencia de servicio calificada de acuerdo con las
instrucciones del fabricante y respetando todos los
requisitos y normas de la autoridad competente. Si la
información en estas instrucciones no se sigue con
exactitud, se puede producir un incendio, una explosión o
una emisión de monóxido de carbono, ocasionando
daños a la propiedad, lesiones a las personas o incluso la
muerte. La agencia de servicio calificada es responsable
de la instalación adecuada de este kit. La instalación no se
considerará correcta y completa hasta que se haya
comprobado el funcionamiento del electrodoméstico
adaptado del modo especificado en las instrucciones del
fabricante que se facilitan con el kit.
PRECAUCIÓN
Cuando conecta el aparato a gas propano, asegúrese de
que el tanque de gas propano venga con su propio
regulador de alta presión además del regulador de
presión que se incluye con la estufa. La máxima presión
de gas de este aparato no debe exceder 14.0 pulgadas
de columna de agua (34.9 mb) del tanque de gas propano
al regulador de presión.
Para instalaciones en Massachusetts
1. La instalación debe realizarse por un contratista, un
plomero o un técnico de gas cualificado o autorizado
por el estado, la provincia o región donde se está
instalando este aparato.
2. La válvula de cierre debe ser un grifo de gas en T.
3. El conducto flexible de gas no debe medir más de 36
pulg. (914 mm).
Garantice una instalación y servicio técnico adecuados.
Siga el Manual de instalación que se proporciona con este
producto. Llame a un técnico calificado para que instale y
conecte eléctricamente a tierra el aparato.
Asegúrese de que la instalación y el servicio sean
adecuados. Siga las instrucciones de instalación
suministradas con este producto. Pida a un técnico
calificado que instale y conecte a tierra la cocina.
Si uno de los quemadores se llega a apagar y hay escape
de gas, abra una puerta o ventana. NO intente usar la
cocina hasta que el gas se haya disipado. Espere al menos
5 minutos antes de utilizar la cocina.
ADVERTENCIA
Para asegurar una ventilación adecuada, NO quite las
patas de la estufa.
ADVERTENCIA
No Operar Nunca La Zona De Cocción De La Superficie.
• Si no se observa esta advertencia, se podría
producir una explosión o un riesgo de quemaduras
que podría dar lugar a daños materiales, personales
o incluso la muerte.
• Si ocurriera un incendio, mantenerse alejado del
aparato y ponerse en contacto de inmediato con los
bomberos. NO INTENTAR EXTINGUIR CON AGUA
UN INCENDIO CAUSADO POR ACEITE/GRASA.
Página. 123
9 INSTRUCCIONES IMPORTANTES DE SEGURIDAD
LEA TODAS LAS INSTRUCCIONES ANTES DE CONTINUAR
Requisitos eléctricos
ADVERTENCIA
EN CASO DE FALLO ELÉCTRICO
Si por algún motivo una perilla de gas está
prendida y no hay corriente eléctrica para
operar los encendedores eléctricos en los
quemadores de gas de la estufa, apague la
perilla de control y espere 5 minutos para que
se disipe el gas antes de prender el quemador
manualmente.
Para prender los quemadores manualmente, sostenga un
cerillo prendido cerca de los orificios del quemador y gire
la perilla de control de gas a HI. Durante un fallo de luz,
usted puede usar los quemadores estándares de la estufa,
pero los debe encender con un cerillo.
NO trate de encender los quemadores XLO
®
manualmente. Estos quemadores vienen equipados con la
opción ExtraLow
®
y no se pueden encender
manualmente.
El electrodoméstico debe conectarse a tierra conforme a
la normativa local o, en ausencia de esta, conforme a la
Código Eléctrico Nacional (última versión de la NFPA 70)
o, si se lleva a cabo en Canadá, al Código Eléctrico de
Canadá (CSA C22.1-02).
Es responsabilidad y obligación del usuario asegurarse de
que un electricista cualificado conecte este aparato a la
alimentación eléctrica conforme al código eléctrico
nacional y/o a los códigos y regulaciones locales vigentes.
Desenchufar o desconectar siempre el aparato de la red
eléctrica antes de realizar cualquier trabajo.
Consultar las instrucciones de instalación para obtener
información sobre los requisitos de conexión a tierra.
Pida al instalador que le muestre dónde se encuentra el
disyuntor eléctrico y la válvula de corte de gas de modo
que usted sepa dónde cortar el suministro de gas y
electricidad a la cocina.
Para obtener instrucciones de instalación completas,
consultar las instrucciones suministradas con la unidad el
aparato. Asegurarse de que el electrodoméstico sea
correctamente instalado y conectado a tierra por un
electricista calificado.
Este aparato cumple con una o más de las siguientes
normas:
• UL 858, norma de seguridad para estufas eléctricas
domésticas
• ANSI Z21.1, norma americana para aparatos
domésticos de gas
• CAN1-1.1-M81, estufas domésticas de gas
• CSA C22.2 No. 61, norma canadiense para estufas
domésticas
En la ausencia de códigos locales el aparato debe ser
instalado de acuerdo al Código Nacional de Gas
Combustible ANSI Z223.1/NFPA 54. En Canadá, la
instalación debe ser conforme al 1-B149.1.
La instalación de los electrodoméstico en casas rodantes
debe cumplir con la Norma de Construcción y Seguridad
de Casas Fabricadas, Título 24 CFR, Parte 3280
[denominada anteriormente Norma Federal para la
Construcción y Seguridad de Casas Rodantes, Título 24,
HUD (Parte 280), (para los Estados Unidos)
La instalación de los aparatos diseñados para remolques
de parques recreativos debe cumplir con los códigos
estatales o de otro tipo o, en ausencia de dichos códigos,
con el estándar para remolques recreativos de parque,
ANSI A119.5.
Es responsabilidad del propietario y del instalador
determinar si se aplican otros requisitos o normas en
instalaciones específicas.
Las separaciones de materiales no combustibles no son
parte del alcance ANSI Z21.1 y no están certificadas por
CSA. Las separaciones de menos de 6'' (152 mm) deben
ser aprobadas por los códigos locales y/o por la autoridad
local competente.
La profundidad máxima de un gabinete instalado por
encima de la placa de cocción es de 13” (33 cm).
Seguridad infantil
PRECAUCIÓN
Los artículos de interés para los niños no se deben
almacenar en el artefacto, en los gabinetes encima de
éste ni en el protector contra salpicaduras. Si los niños se
suben al artefacto para alcanzar estos artículos pueden
sufrir lesiones graves.

Página. 124
9 INSTRUCCIONES IMPORTANTES DE SEGURIDAD
LEA TODAS LAS INSTRUCCIONES ANTES DE CONTINUAR
Cuando los niños cuenten con edad suficiente para utilizar
el artefacto, es responsabilidad legal de los padres o
tutores legales asegurarse de que sean instruidos por
personas calificadas en cuanto al funcionamiento seguro
del artefacto.
NO permita que nadie se suba, se pare, se recueste, se
siente o se cuelgue de ninguna parte del artefacto. Esto
puede dañar el artefacto y la unidad puede volcarse
provocando lesiones graves.
NO permita que los niños utilicen este artefacto a menos
que sean supervisados de cerca por un adulto.
Los niños y las mascotas no deben estar solos o sin
supervisión en el área donde se esté utilizando el
artefacto. Tampoco se les debe permitir que jueguen
cerca de éste aun cuando no se esté usando.
Información de seguridad general
ADVERTENCIA
Para eliminar el riesgo de sufrir quemaduras o que se
produzca un incendio al alcanzar las unidades cuya
superficie esté caliente, se deberá evitar colocar
gabinetes de almacenamiento encima de las unidades de
la superficie.
ADVERTENCIA
PARA REDUCIR LOS RIESGOS DE LESIONES, EN CASO
DE INFLAMACIÓN DE GRASA, LEA LO SIGUIENTE:
• Sofoque las llamas con una tapa ajustada, una hoja u
otra bandeja metálica, luego apague el quemador de
gas o el fogón. Tenga cuidado de no quemarse. Si las
llamas no desaparecen enseguida, evacue la cocina y
llame el servicio de incendios.
• Nunca tome una sartén en llamas – Podría quemarse.
• NO USE AGUA o un trapo o una toalla mojada: se
producirá una explosión de vapor.
• Use un extintor sólo si:
• Sabe que tiene un extintor de tipo ABC y sabe
cómo usarlo.
• El fuego es pequeño y se limita al sitio donde
comenzó.
• Ya ha llamado al servicio de incendios.
• Puede luchar contra el fuego y tiene acceso a una
salida.
Advertencia en virtud de la Proposición
65:
Este producto puede contener un químico que el Estado
de California reconoce como potencialmente cancerígeno
o causante de daños reproductivos. Por tanto, su
producto debe llevar en su embalaje la siguiente etiqueta
de conformidad con la legislación de California:
ADVERTENCIA
PARA REDUCIR LOS RIESGOS DE INFLAMACIÓN DE LA
GRASA:
• Nunca deje de electrodoméstico sin atención cuando
cocine a fuego alto. Los derrames causan humo y la
grasa derramada puede arder. Caliente el aceite
lentamente, a fuego lento o medio.
• Encienda Siempre la campana cuando cocine a fuego
alto o flamee alimentos (p.e. crepes Suzette, cerezas
al jubileo, carne flameada a la pimienta).
• Limpie los ventiladores frecuentemente. No deje que
la grasa se acumule sobre los ventiladores o los filtros.
• Use ollas de tamaño adecuado. Siempre use utensilios
de cocina adecuados para el tamaño del fogón o del
quemador.
NUNCA utilice ninguna de las partes de la cocina o de los
hornos para almacenamiento. Los materiales inflamables
pueden prenderse fuego y los artículos de plástico
pueden derretirse o encenderse. NO cuelgue artículos en
ninguna parte del artefacto ni coloque nada frente a los
hornos. Algunos tejidos son bastante inflamables y
pueden prenderse fuego.
Si la cocina se encuentra cerca de una ventana, asegúrese
de que las cortinas no se muevan o estén cerca de los
quemadores de la cocina, ya que podrían incendiarse.
SIEMPRE tenga un detector de humo funcionando cerca
de la cocina. Si su ropa o cabello llega a prenderse fuego,
tírese de inmediato al piso y ruede para extinguir las
llamas.
Tenga a la mano un extinguidor de incendios, en un lugar
visible y accesible cerca del artefacto de cocina.
ADVERTENCIA EN VIRTUD DE LA PROPOSICIÓN 65
DEL ESTADO DE CALIFORNIA:
: ADVERTENCIA
Cáncer y daño reproductivo - www.P65Warnings.ca.gov

Página. 125
9 INSTRUCCIONES IMPORTANTES DE SEGURIDAD
LEA TODAS LAS INSTRUCCIONES ANTES DE CONTINUAR
Sofoque las llamas del fuego ocasionado por alimentos
que no sean grasa con bicarbonato de sodio. NUNCA
utilice agua para apagar el fuego ocasionado por cocinar.
NUNCA permita que la ropa, los agarradores de cocina u
otros materiales inflamables entren en contacto con o
estén demasiado cerca de un quemador infrarrojo, un
quemador superior o la rejilla de un quemador hasta que
se haya enfriado. Los tejidos se pueden prender fuego y
ocasionar una lesión.
Utilice solamente agarradores de cocina secos, los
mojados o húmedos sobre superficies calientes pueden
provocar quemaduras por vapor. NO utilice toallas u otro
tipo de telas gruesas en vez de agarradores de cocina. NO
permita que los agarradores de cocina toquen elementos
calientes, quemadores calientes o las rejillas de los
quemadores.
Por cuestiones de seguridad use ropa adecuada. No use
ropa holgada o mangas que cuelguen cuando use este
aparato. Algunas telas sintéticas son muy inflamables y no
deben usarse mientras cocina.
No use papel de aluminio para forrar ninguna parte en el
electrodoméstico. De lo contrario podría causar una
descarga eléctrica o un fuego, o se podría obstruir el flujo
del aire de combustión y de ventilación. El aluminio es un
excelente aislante térmico y retiene el calor. Su utilización
afectará a la cocción y podría dañar el acabado en el
electrodoméstico.
ADVERTENCIA
Este aparato sirve para cocinar. Nunca utilice esta unidad
como un calentador para calentar el cuarto. De lo
contrario podría sufrir una intoxicación por monóxido de
carbono, sobrecalentar el aparato y dañar piezas.
Cuando use de electrodoméstico: NO TOQUE LAS
REJILLAS DE LOS QUEMADORES O EL ÁREA
CERCANA. Las áreas cercanas a los quemadores pueden
calentarse lo suficiente como para causar quemaduras.
Nunca deje el aparato desatendido cuando cocine a altas
temperaturas. Los derrames causan humo y puede
inflamar la grasa derramada. Además, si se sofocan las
llamas de un quemador, se escapará gas a la habitación.
Use solamente ciertos tipos de utensilios de vidrio, vidrio
cerámico refractario, cerámica, barro u otros vidrios que
estén disponibles para cocinar con los quemadores en el
electrodoméstico. Este tipo de utensilio puede romperse
con cambios repentinos de temperatura. Utilice
solamente llama media o baja según las indicaciones del
fabricante del utensilio.
No caliente recipientes cerrados. La presión acumulada
puede causar que el contenedor explote y provocar
lesiones.
ADVERTENCIA
Al cocinar, ajuste los quemadores para que las llamas sólo
calienten el fondo de la olla sin extenderse más allá de la
base.
Tenga cuidado y asegúrese de que las corrientes de aire
producidas por aberturas de ventilación o ventiladores no
lleven material inflamable hacia las llamas ni empujen las
llamas de modo que éstas se extiendan más allá de los
bordes de la olla.
Siempre use ollas con un fondo plano suficientemente
grandes para cubrir el quemador. El uso de ollas muy
pequeñas podría dejar expuesta una parte de la llama y
podría resultar que la ropa arda.
ADVERTENCIA
Evite el uso de llamas altas con una olla más grande que la
rejilla o con una olla que abarque más de un quemador,
como una plancha, por periodos largos de tiempo. Esto
puede causar una mala combustión que genere derivados
nocivos.
NO use ollas o sartenes en la parrilla (vendida por
separado). Nunca se deben usar ollas grandes, las
bandejas para galletas, etc. en el electrodoméstico.
NO use detergentes inflamables para limpiar en el
electrodoméstico.
Quite la tabla de cortar opcional de la cubierta de la
plancha antes de utilizar la plancha o los quemadores
adyacentes.
LA GRASA ES INFLAMABLE. Permita que la grasa
caliente se enfríe antes de tratar de manipularla. Evite la
acumulación de depósitos de grasa. Limpie después de
cada uso.
Para que se enciendan y funcionen correctamente los
quemadores, mantenga limpios los orificios de los
encendedores. Límpielos cuando se derramen alimentos
hervidos o cuando el quemador no se encienda bien,
aunque funcione el sistema de encendido electrónico.
Página. 126
9 INSTRUCCIONES IMPORTANTES DE SEGURIDAD
LEA TODAS LAS INSTRUCCIONES ANTES DE CONTINUAR
Limpie el electrodoméstico cuidadosamente. Evite
quemaduras de vapor: NO use una esponja o un trapo
húmedo para limpiar el electrodoméstico cuando esté
caliente. Algunos detergentes producen vapores nocivos
cuando son aplicados a una superficie caliente. Siga las
indicaciones del fabricante del detergente.
ADVERTENCIA
Apague el quemador después de un derrame de
alimentos y limpie el área alrededor de los orificios de los
quemadores. Después de la limpieza, asegúrese de que
funcione normalmente.
Asegúrese de que todos los controles el electrodoméstico
estén apagados y esté fría antes de usar algún tipo de
detergente aerosol encima o alrededor el
electrodoméstico. Los químicos provocados por la acción
del spray podrían inflamarse o causar la corrosión de
partes metálicas en presencia de calor.
ADVERTENCIA
NO bloquee y obstruya las aberturas de la
rejilla de ventilación. La rejilla de ventilación
se sitúa detrás del aparato. La rejilla de
ventilación debe estar despejada y abierta
para permitir la circulación de aire necesaria
para el buen funcionamiento del aparato.
NO toque la zona de alrededor de la rejilla de ventilación
cuando esté funcionando el aparato ni durante varios
minutos después de la utilización del mismo. Algunas
piezas de la rejilla de ventilación y de la zona adyacente
llegan a estar suficientemente calientes como para
provocar quemaduras. Deje tiempo suficiente para que el
aparato pueda enfriarse antes de tocarlo o limpiarlo.
NO coloque objetos de plástico o de otras materias
sensibles al calor en le rejilla de ventilación o cerca de
ella. Podrían prender fuego.
NO obstruya el flujo del aire de combustión o de
ventilación.
Solamente técnicos autorizados deben dar servicio. Los
técnicos deben desconectar la fuente de alimentación
antes de dar servicio a esta unidad.
No deberían prepararse alimentos muy grasientos sobre
una parrilla interior. La cocción de alimentos grasientos
(como algunas variedades de carne picada o de
salchichas, etc.) aumenta las posibilidades de formación
de humo y llamas.
Al cocinar alimentos grasientos sobre los quemadores, la
parrilla o la plancha: los quemadores adyacentes pueden
arder y provocar humo. Tenga cuidado de no quemarse.
Para evitar el riesgo de incendio, limpie frecuentemente la
campana y sus filtros para impedir las acumulaciones de
grasa.
En caso de incendio, si flamea intencionalmente alcohol
en el electrodoméstico, siga las instrucciones del
fabricante. Tenga cuidado al cocinar con alcohol (ej.: ron,
brandy, bourbon). El alcohol se evapora a altas
temperaturas. Los vapores de alcohol pueden arder y
causar riesgo de quemadura. Sólo use pequeñas
cantidades de alcohol con los alimentos.
NO almacene o use químicos corrosivos, vapores,
productos inflamables o no alimenticios en o cerca de este
aparato. Este tipo de electrodoméstico está diseñada
específicamente para calentar o cocinar alimentos. El uso
de químicos corrosivos cuando caliente o limpie la placa
de cocción puede dañar el aparato y causar lesiones.
ADVERTENCIA
No se debería instalar este aparato con un sistema de
ventilación de corriente descendiente. Este tipo de
sistema de ventilación puede presentar riesgo de ignición
y problemas de combustión, provocando lesiones
corporales, daños materiales o un funcionamiento
involuntario. No se aplica ninguna restricción a los
sistemas de ventilación de corriente ascendiente.
No se debe usar una cortina de aire ni otra campana
extractora suspendida, que funcione soplando un flujo de
aire descendente sobre una estufa, no se debe de usar
conjuntamente con una estufa de gas, a no ser que la
campana extractora y la estufa se hayan diseñado y
probado de acuerdo con la norma para estufas de gas
domésticas Standard for Domestic Gas Ranges, ANSI
Z21.1 • CSA 1.1, y la haya catalogado un laboratorio de
pruebas independiente para el uso combinado.

Página. 127
9 INSTRUCCIONES IMPORTANTES DE SEGURIDAD
LEA TODAS LAS INSTRUCCIONES ANTES DE CONTINUAR
ADVERTENCIA
NO dejar alimentos, recipientes de cocina, etc. en el
horno durante el modo de funcionamiento Autolimpieza.
Antes de la autolimpieza del horno (modelos
seleccionados), retirar la fuente para asar al grill, las rejillas
del horno y cualquier otro recipiente, además de los
excesos de derrames.
IMPORTANTE: Existe la posibilidad de que la pared
trasera se decolore bajo ciertas condiciones de cocción.
NO limpie, frote, dañe, mueva o quite la junta de la
puerta. Esto es esencial para un sellado adecuado durante
el horneado. Si la junta se desgasta o se ensucia en exceso
con migas de comida, reemplácela para asegurar un
sellado hermético.
Preserve la función de autolimpieza. Limpie únicamente
aquellas piezas indicadas en este manual. NO utilice
limpiadores para hornos de uso comercial ni
recubrimientos de protección de ningún tipo para revestir
los hornos adentro o alrededor del horno de autolimpieza.
Siempre coloque los rejillas del horno en la posición
deseada mientras el horno está frío. Si necesita mover un
rejillas mientras el horno está caliente, no deje que los
agarradores toquen los elementos de calentamiento.
NO TOCAR NUNCA LAS SUPERFICIES INTERIORES
CALIENTES DEL HORNO O LAS RESISTENCIAS. – Las
unidades de la superficie pueden seguir calientes aunque
estén oscuras.Las superficies internas de un horno pueden
calentarse lo suficiente como para ocasionar quemaduras.
Durante el uso y después de este, no toque los elementos
de calentamiento ni las superficies internas del horno, ni
deje que su ropa, agarradores ni otros materiales
inflamables entren en contacto con estos hasta que haya
transcurrido el tiempo suficiente para que se enfríen.Otras
superficies del aparato pueden calentarse lo suficiente
como para ocasionar quemaduras. Tenga cuidado al abrir
las puertas de los hornos, permita que el aire caliente o
vapor salgan antes de retirar o colocar alimentos.Estas
superficies incluyen las aberturas de ventilación del horno,
las superficies cercanas a estas aberturas y las puertas del
horno.
ADVERTENCIA
No cubrir NUNCA ninguna ranura, agujero ni conducto de
la base del horno, ni tapar una rejilla completa con
materiales como, por ejemplo, papel de aluminio. Si se
hace, se bloqueará el flujo de aire del horno y se puede
ocasionar una intoxicación por monóxido de carbono.Los
revestimientos de papel de aluminio también pueden
atrapar el calor, provocando de esta forma un riesgo de
incendio. Previo a la autolimpieza de los hornos (modelos
selectos), retire la sartén para asar, las rejillas de los
hornos, el medidor de temperatura y cualquier otro
utensilio, así como el exceso de derrames.
Note que los pájaros domésticos pueden ser sensibles a
los olores creados durante la utilización de la hornilla a
temperaturas altas, que provengan de la combustión de
residuos de fabricación o de alimentos. Así, se
recomienda no dejar los pájaros domésticos en la cocina.
Página. 128
Descripción
Descripción de las estufas
El modelo mostrado es la placas de cocción de 48 pulg. con opción plancha (los modelos varían).
1 Moldura para isla ilustración o consola trasera baja vendida por separado
(Sin embargo, consulte la advertencia acerca del espacio detrás de la cocina cuando utiliza la estufa con este
accesorio.)
2 Ventilación del horno (No obstruir.)
3STAR quemadores
4 Rejillas
5 Plancha (parrilla también están disponibles pero no se muestran)
6 Cuadro de mandos
7 Hornilla principal
8 Hornilla secundaria (modelos de 48 pulg. sólo)
9 Patas de la estufa
10 Rodapié
1
2
3
4
6
5
8
9
7
10

Página. 129
Descripción de los tableros de control
NOTA: Todas las perillas, modos y funciones están
disponibles en todos los modelos.
ExtraLow
®
Estándar Plancha Parrilla Selector de
temperatura de la
hornilla
Interruptor de la
luz de la hornilla
Selector de
temperatura de la
hornilla mixta
Selector de
temperatura de la
hornilla mixtar
Pantalla digital del horno
1 Pantalla de visualización digital
2 Botones de navegación del lado izquierdo
3 Acceso múltiple de temporizadores
4 Acceso a los ajustes del usuario
5 Confirmar una entrada
6 Botones de navegación del lado derecho
OFF
OFF
TIMERS SETTINGS ENTER
06:30
1
2 3 4 65
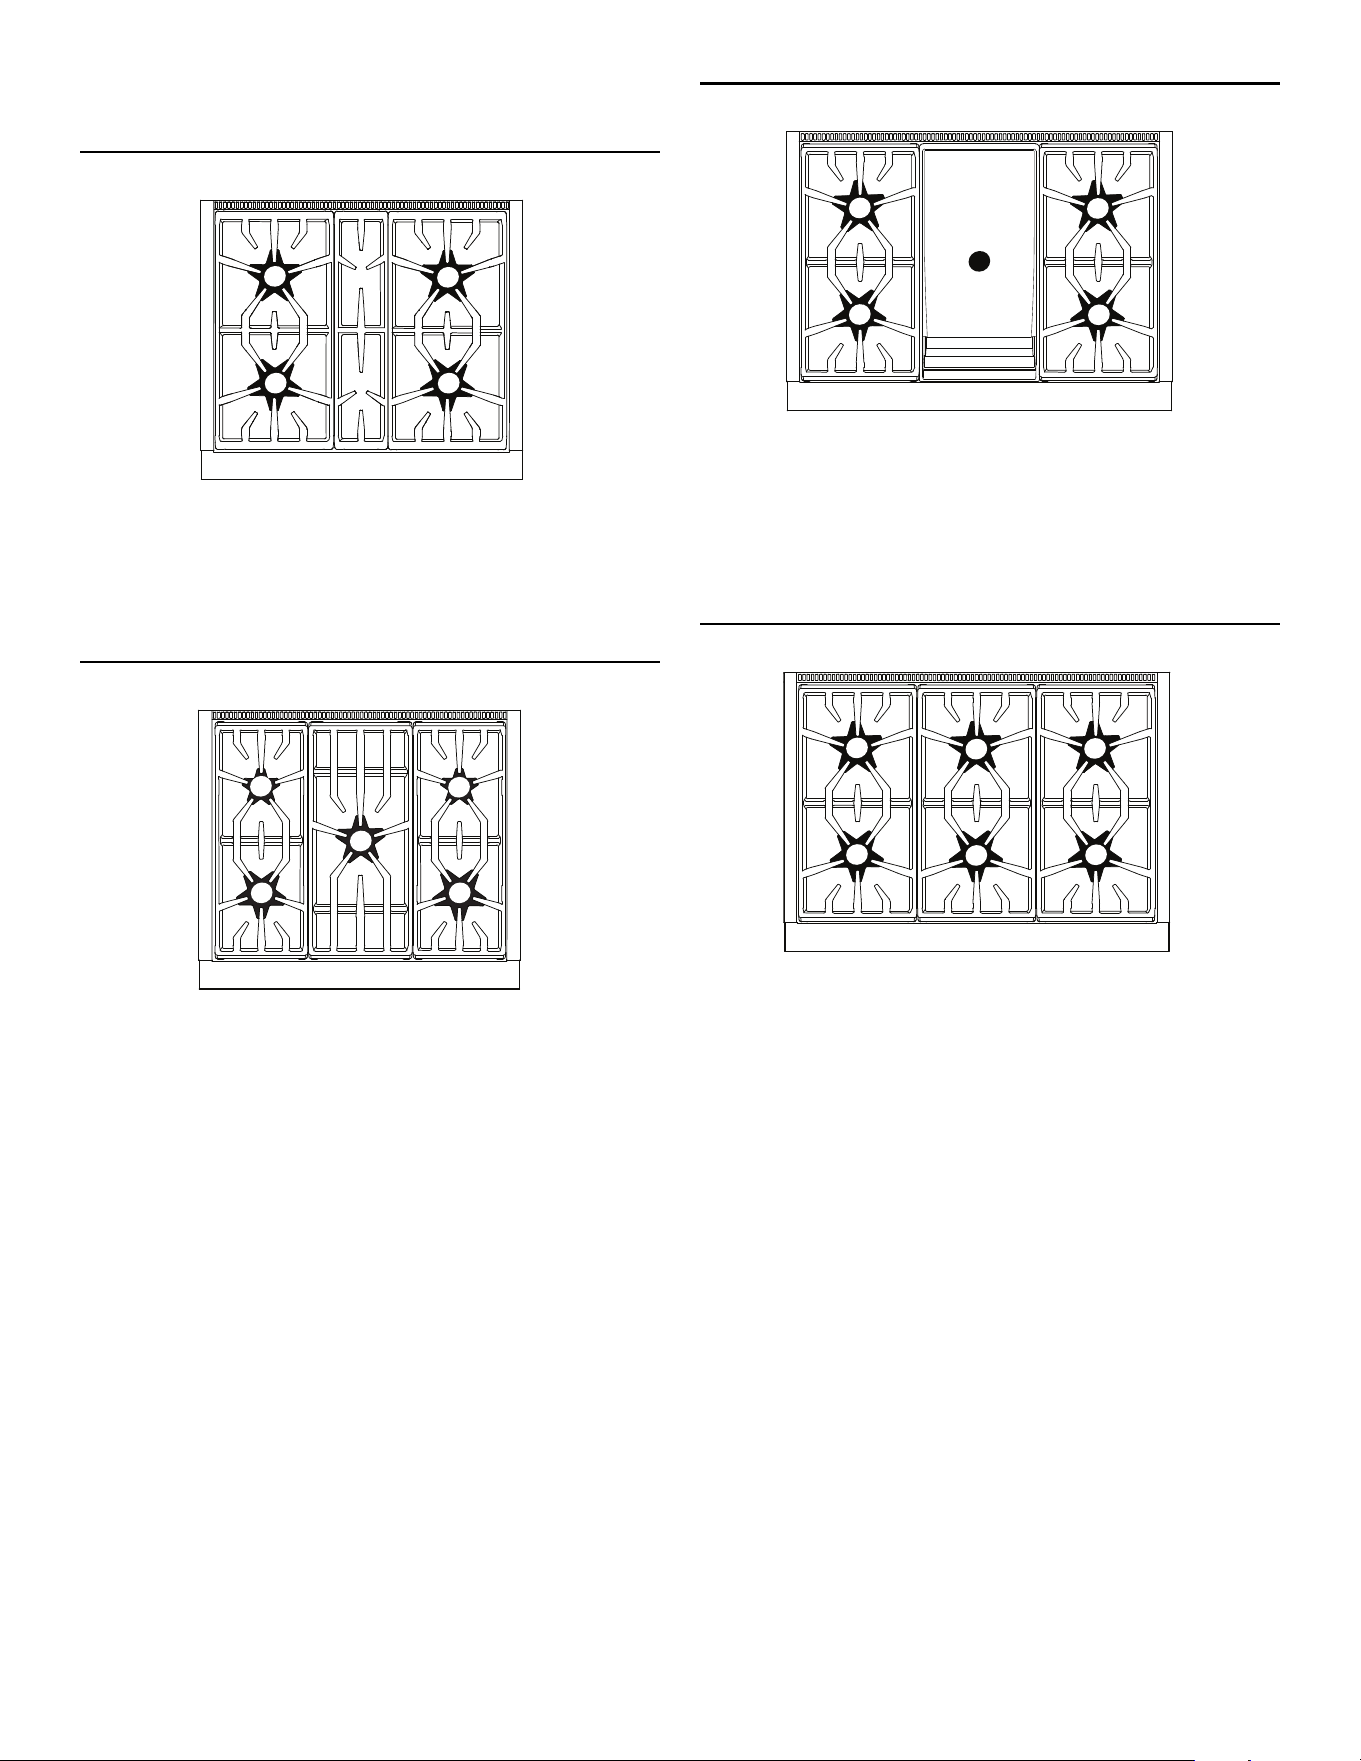
Página. 130
Identificación de superficie superior
Modelo 304
1 Quemador ExtraLow Natural 15000, LP 12000 BTU
2 Quemador ExtraLow Natural 18000, LP 15000 BTU
3 Quemador estándar Natural 15000, LP 12000 BTU
4 Quemador estándar Natural 18000, LP 15000 BTU
Modelo 305
1 Quemador ExtraLow Natural 8000, LP 6000 BTU
2 Quemador ExtraLow Natural 18000, LP 15000 BTU
3 Quemador estándar Natural 10000, LP 9100 BTU
4 Quemador estándar Natural 8000, LP 6000 BTU
5 Quemador estándar Natural 15000, LP 12000 BTU
44
11
22
33
33
55
11
22
44
Modelo 364 con plancha
1 Quemador ExtraLow Natural 15000, LP 12000 BTU
2 Quemador ExtraLow Natural 18000, LP 15000 BTU
3 Plancha 1,630W
4 Quemador estándar Natural 15000, LP 12000 BTU
5 Quemador estándar Natural 18000, LP 15000 BTU
Modelo 366
1 Quemador ExtraLow Natural 15000, LP 12000 BTU
2 Quemador ExtraLow Natural 18000, LP 15000 BTU
3 Quemador estándar Natural 15000, LP 12000 BTU
4 Quemador estándar Natural 18000, LP 15000 BTU
5 Quemador estándar Natural 15000, LP 12000 BTU
6 Quemador estándar Natural 18000, LP 15000 BTU
33
55
11
22
44
33
44
66
11
22
55
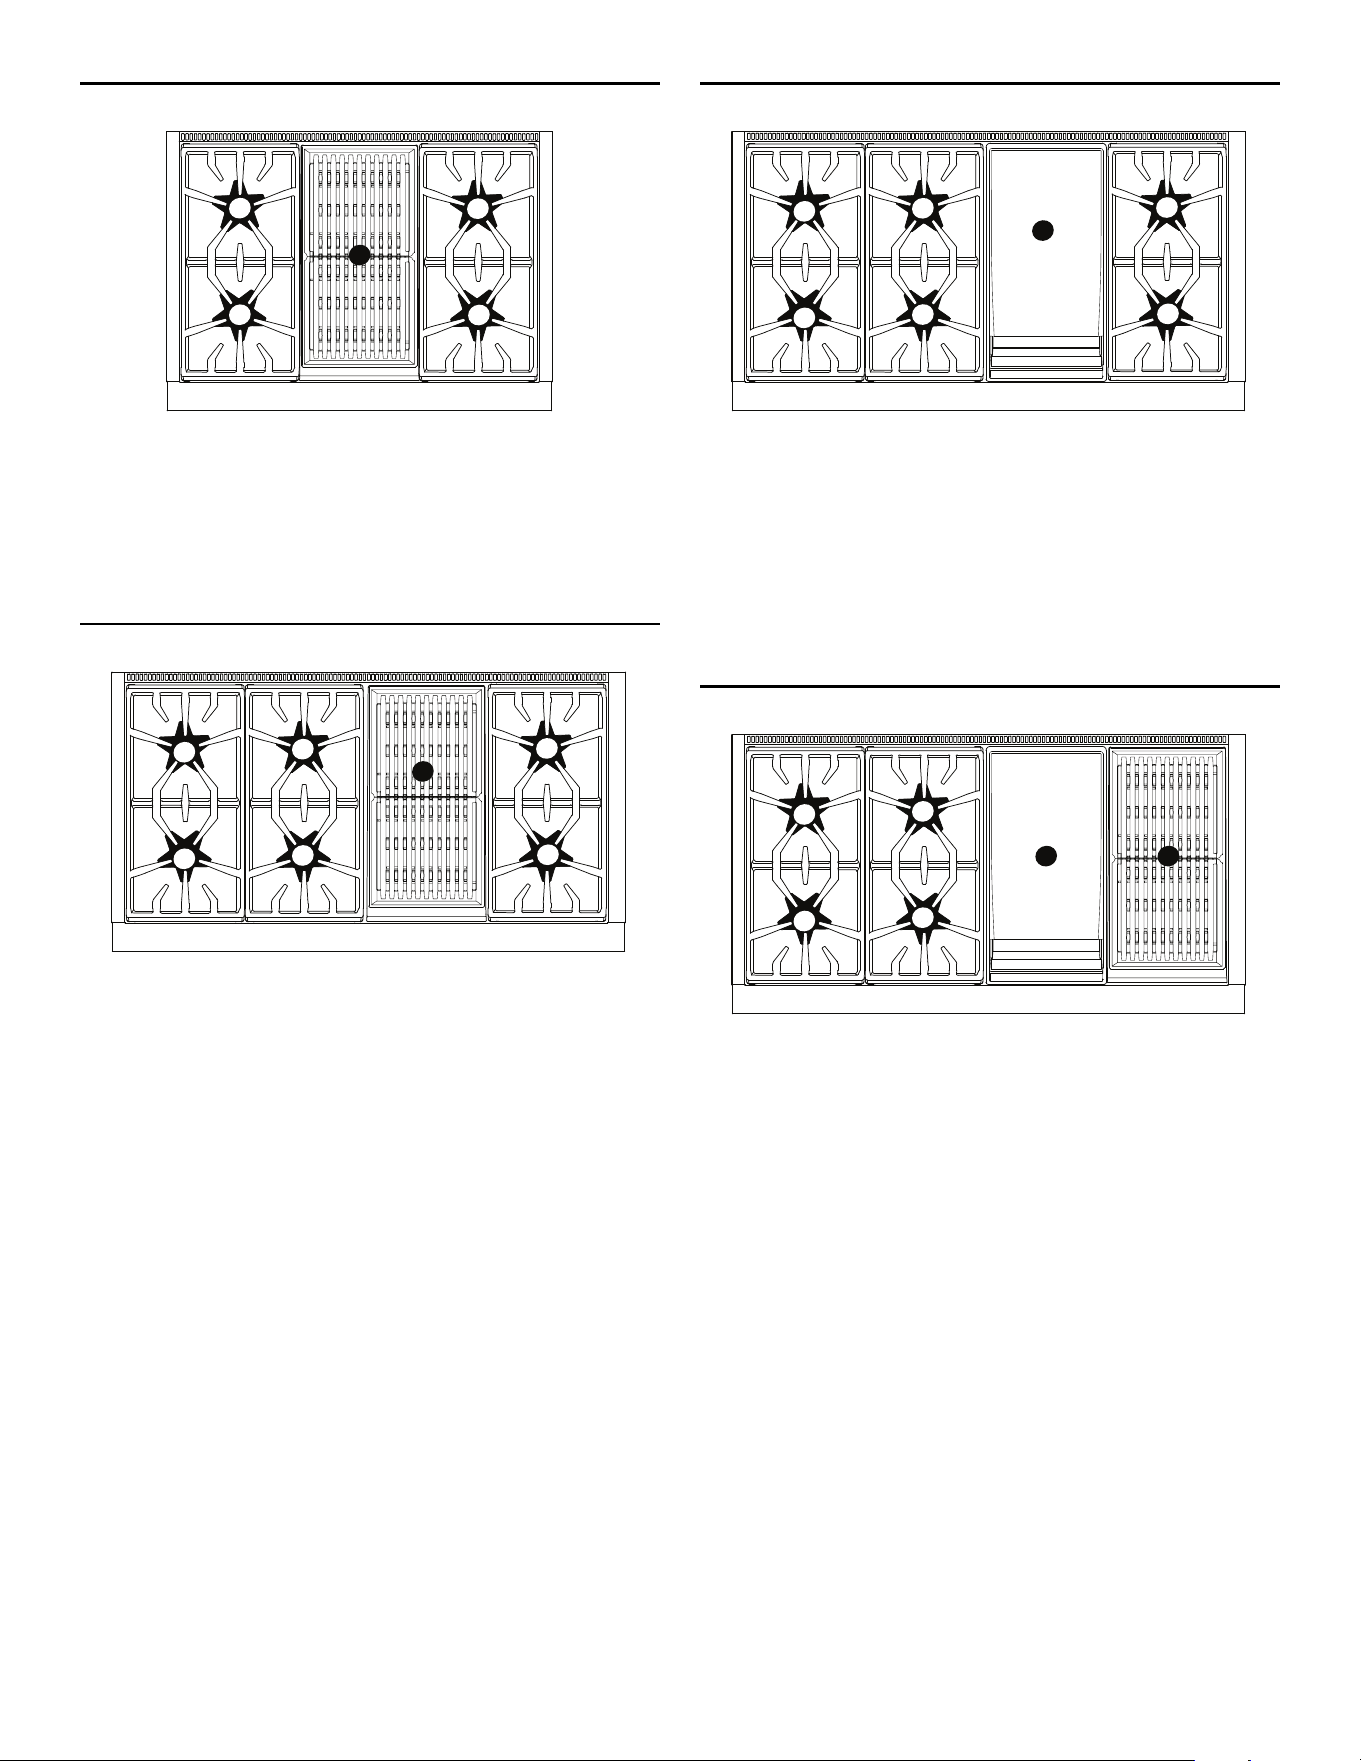
Página. 131
Modelo 364 con parrilla
1 Quemador ExtraLow Natural 15000, LP 12000 BTU
2 Quemador ExtraLow Natural 18000, LP 15000 BTU
3 Parrilla 815W x2
4 Quemador estándar Natural 15000, LP 12000 BTU
5 Quemador estándar Natural 18000, LP 15000 BTU
Modelo 486 con parrilla
1 Quemador ExtraLow Natural 15000, LP 12000 BTU
2 Quemador ExtraLow Natural 18000, LP 15000 BTU
3 Quemador estándar Natural 15000, LP 12000 BTU
4 Quemador estándar Natural 18000, LP 15000 BTU
5 Parrilla 815W x 2
6 Quemador estándar Natural 15000, LP 12000 BTU
7 Quemador estándar Natural 18000, LP 15000 BTU
33
55
11
22
44
33
44
77
11
22
66
55
Modelo 486 con plancha
1 Quemador ExtraLow Natural 15000, LP 12000 BTU
2 Quemador ExtraLow Natural 18000, LP 15000 BTU
3 Quemador estándar Natural 15000, LP 12000 BTU
4 Quemador estándar Natural 18000, LP 15000 BTU
5 Plancha 1,630W
6 Quemador estándar Natural 15000, LP 12000 BTU
7 Quemador estándar Natural 18000, LP 15000 BTU
Modelo 486 con plancha y parrilla
1 Quemador ExtraLow Natural 15000, LP 12000 BTU
2 Quemador ExtraLow Natural 18000, LP 15000 BTU
3 Quemador estándar Natural 15000, LP 12000 BTU
4 Quemador estándar Natural 18000, LP 15000 BTU
5 Plancha 1,630W
6 Parrilla 815W x2
33
44
77
11
22
66
55
33
44
11
22
55
66
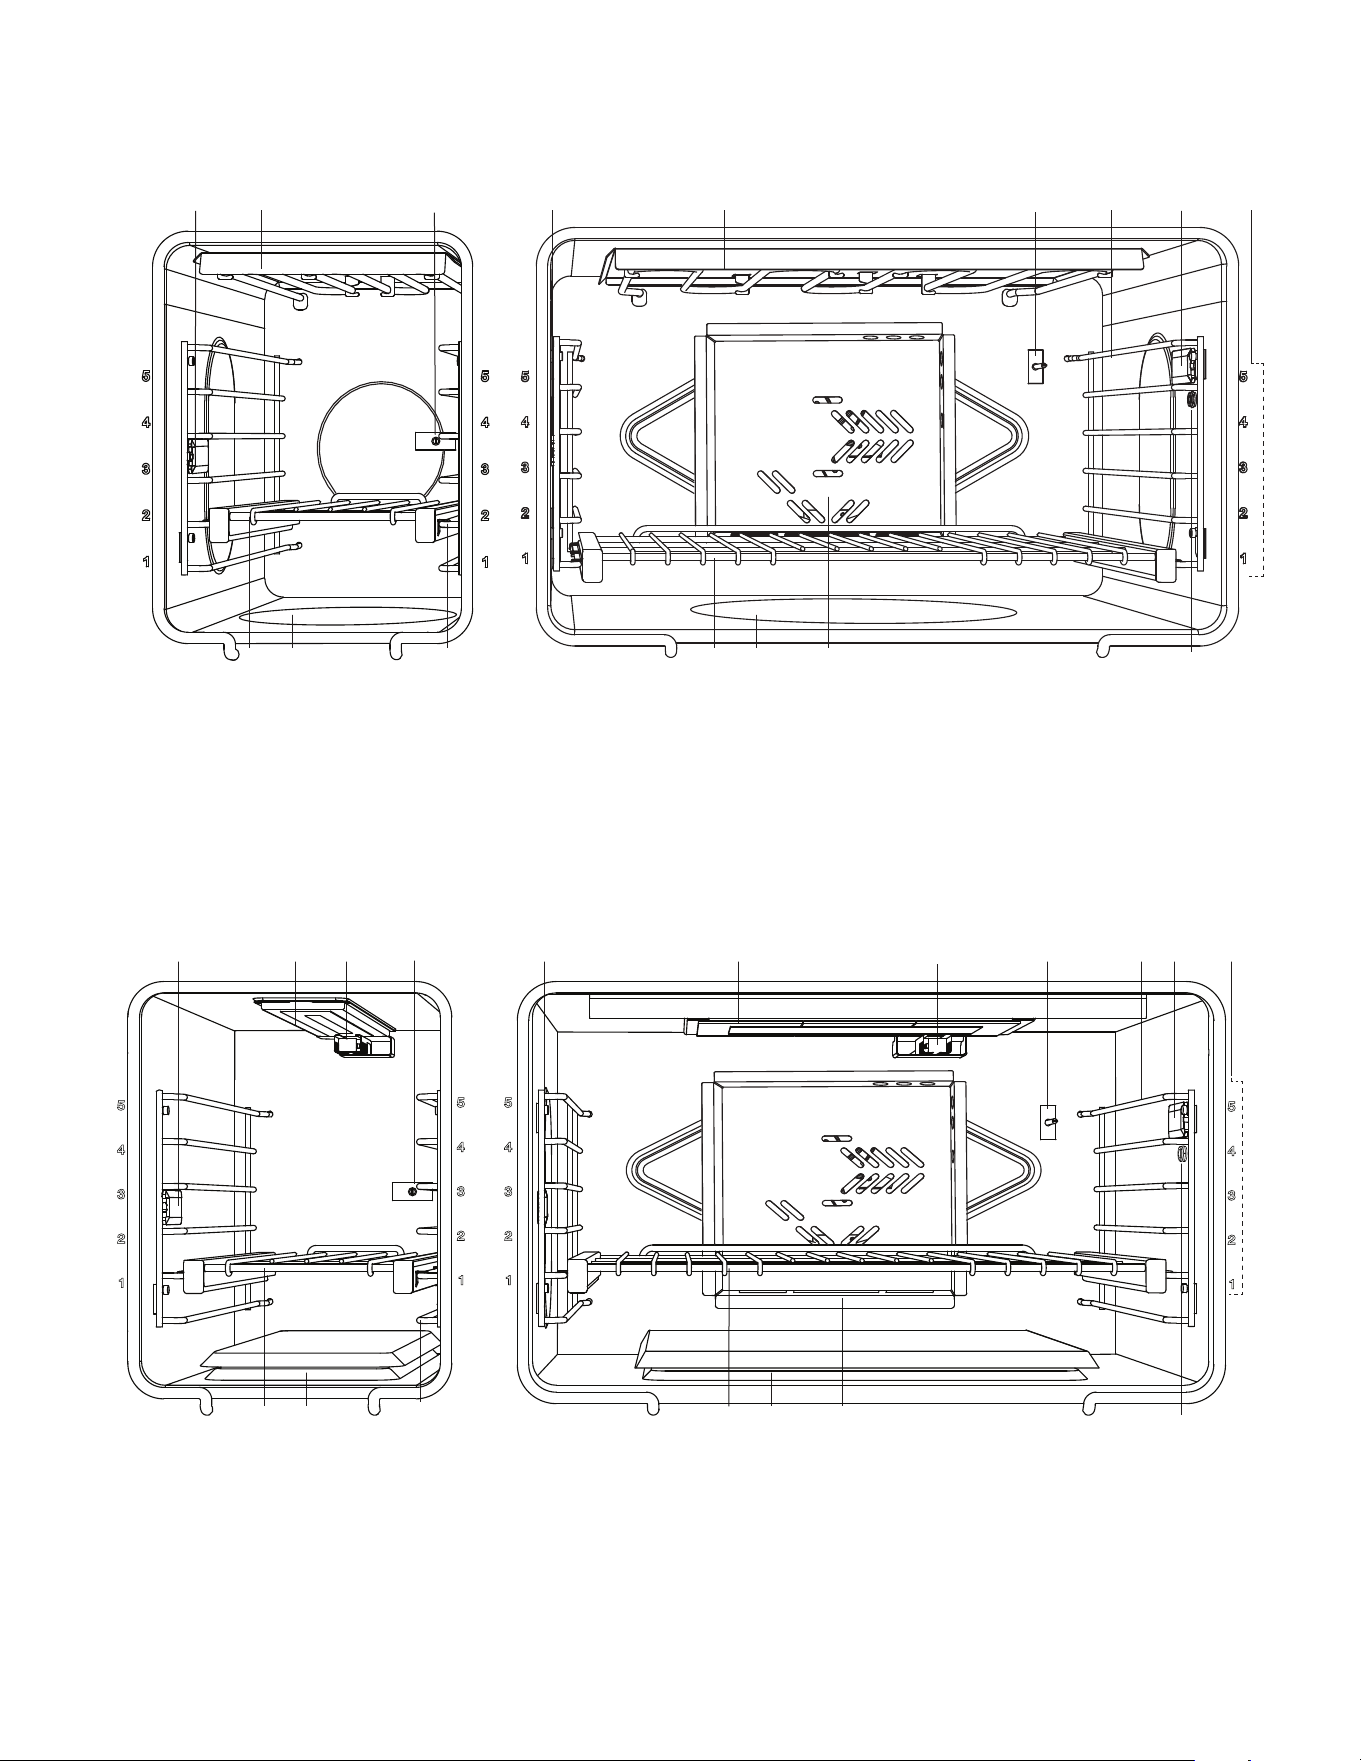
Página. 132
Identificación de interior de la hornilla
Interior del horno de eléctrico
Interior del horno de gas
1 Luz interior del horno
2 Elemento de asar
3 Termostato del horno
4 Guías para rejillas
5 Rejillas deslizantes del horno
6 Quemador de la hornilla (oculto)
7 Tapa del ventilador de convección
8 Salida de la sonda de temperatura
9 Posiciones de las rejillas
1
2
3
5467
56 8
12
3
4
1
9
1 Luz interior del horno
2 Quemador infrarrojos del grill
3 Encendedor del grill
4 Termostato del horno
5 Guías para rejillas
6 Rejillas deslizantes del horno
7 Quemador de la hornilla (oculto)
8 Tapa del ventilador de convección
9 Salida de la sonda de temperatura
10 Posiciones de las rejillas
124
6
5
78
3
67
9
12 45
3
1 10
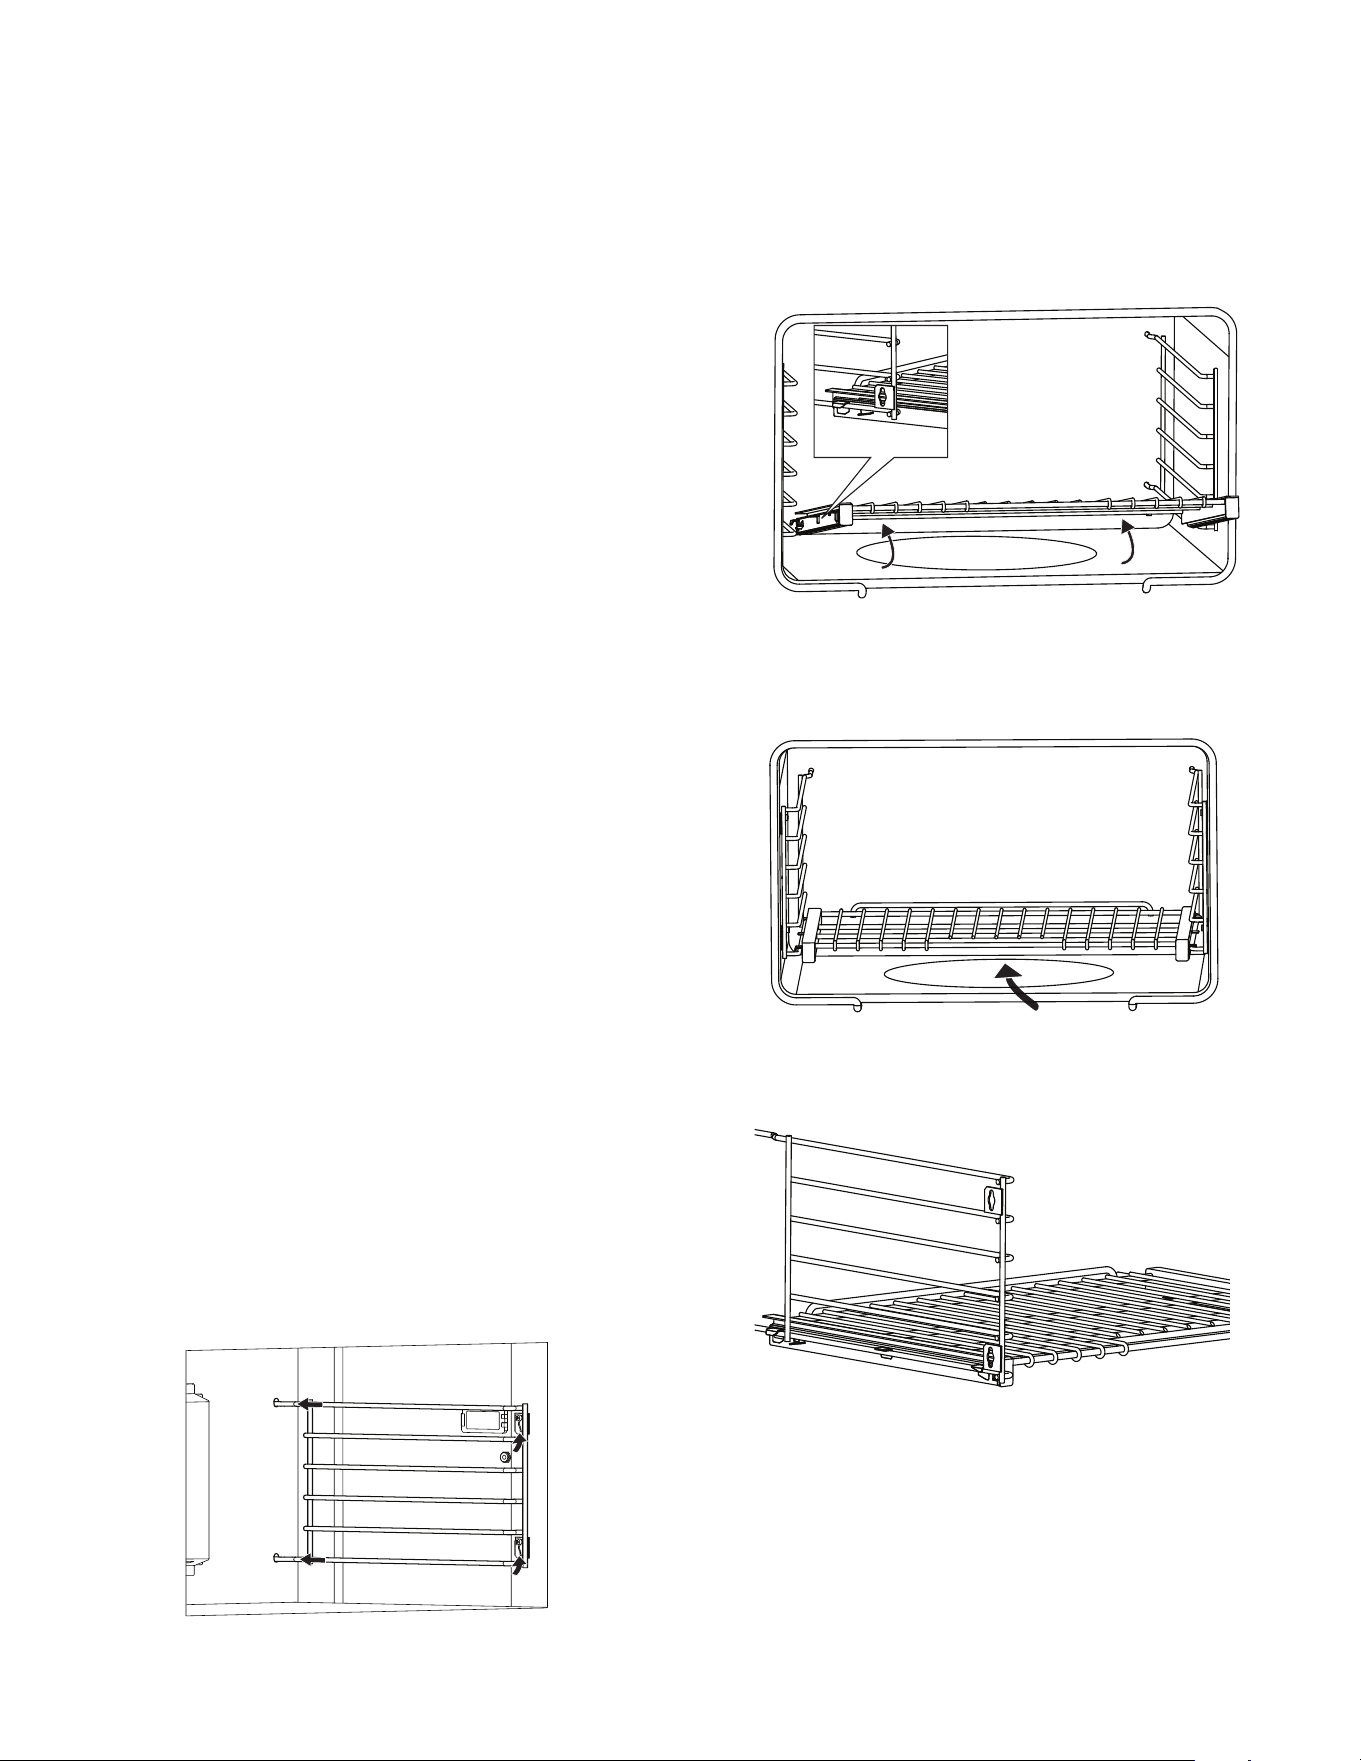
Página. 133
Antes de comenzar
Cómo comenzar
Debido a nuestras actividades de mejora continua en
mejoras de diseño y calidad, las imágenes pueden no ser
representativas del producto final.
Placa con información del aparato
• Anote el número de modelo y de serie en la
“Información para el servicio técnico”.
• Esta información puede ser utilizada en el futuro
cuando contacte a su proveedor de servicios o la
fábrica.
• Escriba esta información en la tarjeta de registro que
se incluye con este producto y luego envíela a la
dirección indicada.
Hornilla de superficie
1. Asegúrese de que las tapas de los quemadores estén
bien colocados en sus bases (“Verificación de la
posición de las tapas de los quemadores” en la
página 135).
2. Encienda cada quemador para asegurarse de que el
color de la llama es correcto. Consulte la sección
“Descripción de la llama” en la página 137 para
obtener más detalles.
Rejillas de la hornilla
Como colocar las rejillas en la hornilla
1. Levante la parte delantera de la guía de rejilla para
liberar las cabezas de los dos pernos de reborde en el
frente de la cavidad del horno.
2. Quite la parte delantera de la guía de rejilla jalando las
ranuras de la guía encima de los pernos de reborde.
3. Sacar los dos rieles de los orificios en la parte trasera
de la cavidad del horno.
Instalación de la rejilla de la hornilla
1. Sujete la rejilla en ángulo. Coloque los ganchos bajo
la parte delantera de las ranuras de las guías.
2. Empuje la rejilla sobre la hornilla, levantándola par
encima de los topes de seguridad situadas en la
parte delantera de las guías.
3. Sujete la rejilla recta.
4. Empuje la rejilla hasta el fondo.
5. Inserte los ganchos delanteros de la rejilla en las
ranuras.
IMPORTANTE:
Al instalar la rejilla corredera en la
hornilla, asegúrese de que los soportes frontales de las
ranuras descansen en las ranuras de las esquinas
delanteras de la rejilla. Esto es necesario para que la
rejilla se quede en la posición correcta cuando se
encuentra en el interior de la hornilla.
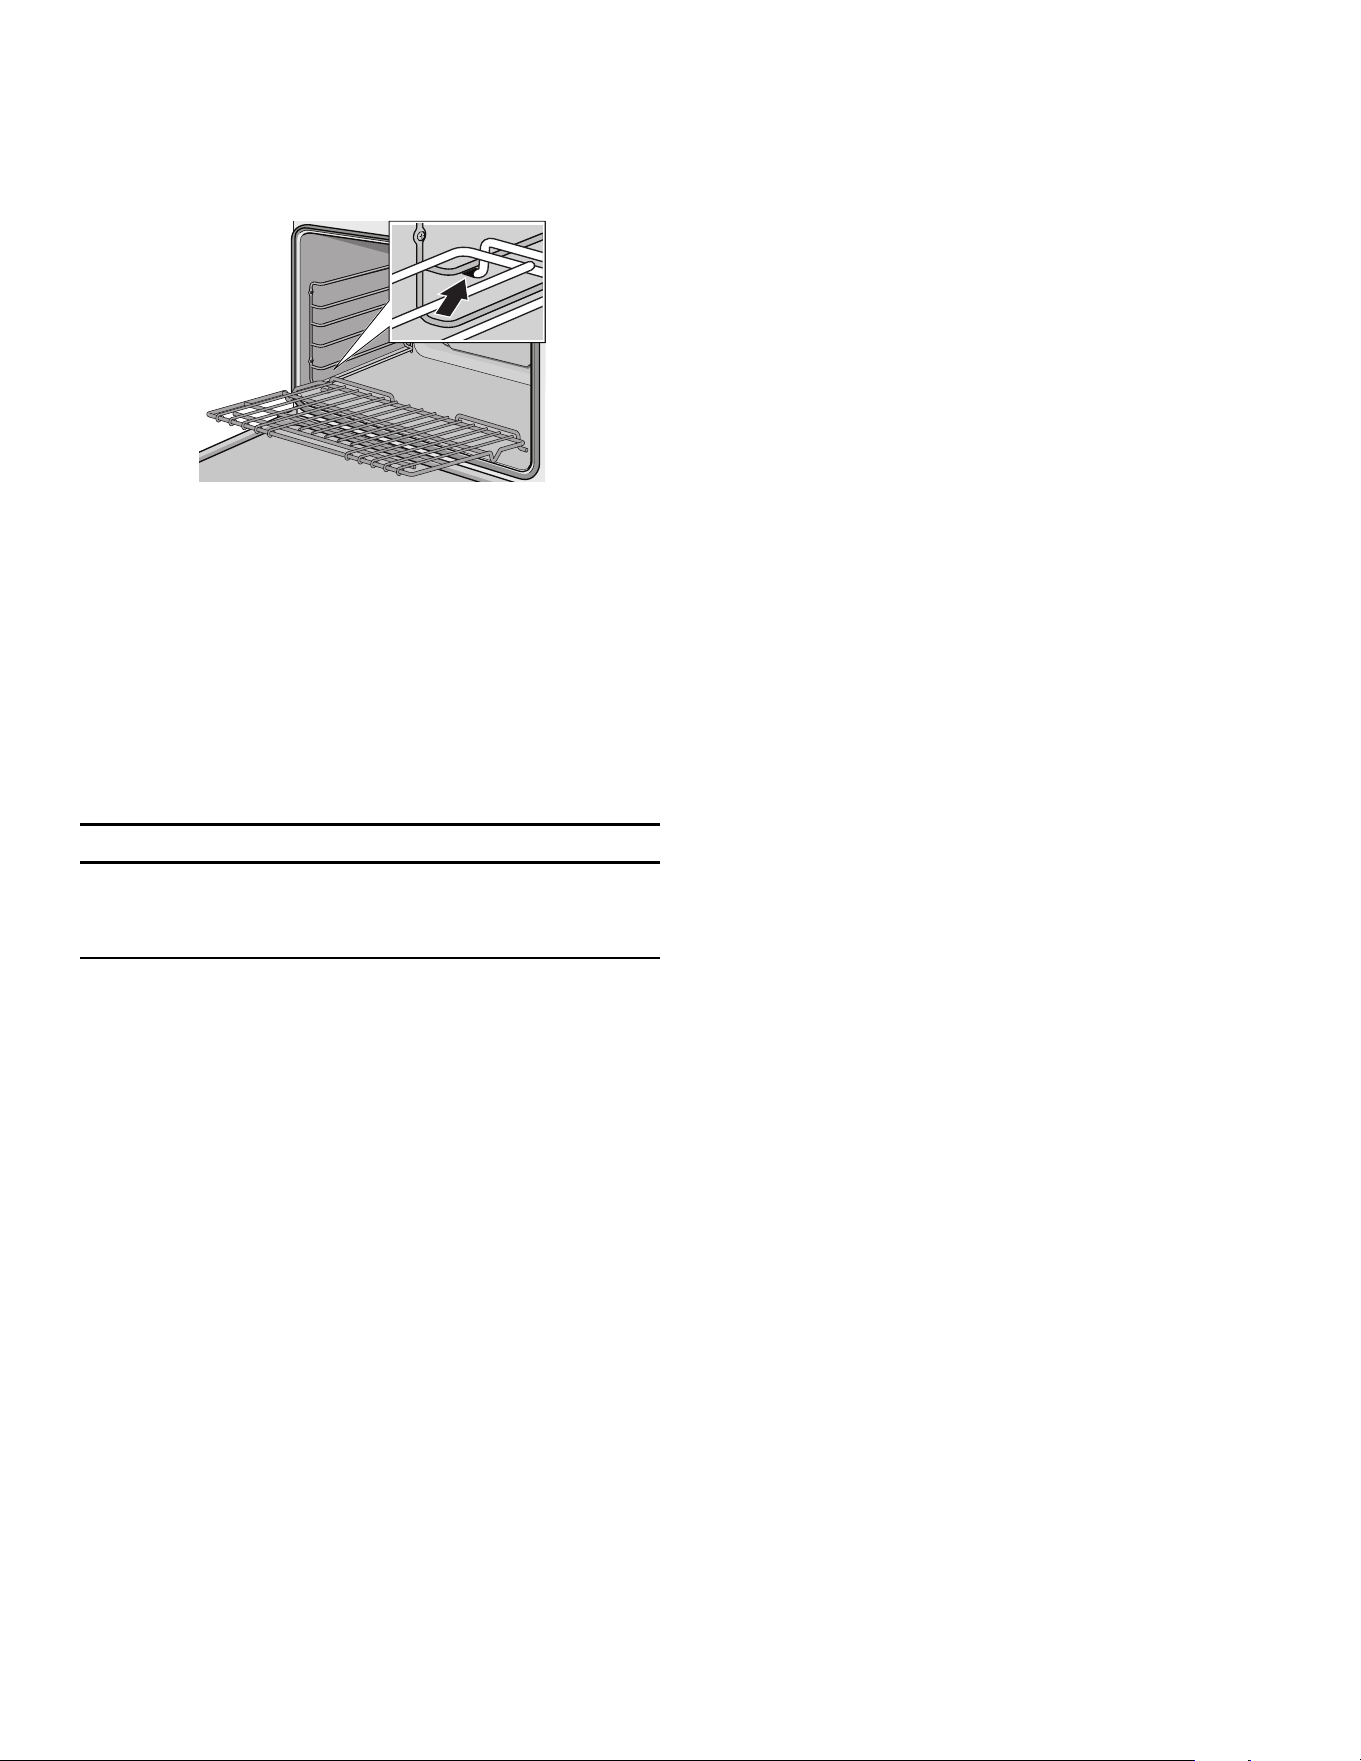
Página. 134
Introducir la rejilla plana en el horno
La rejilla está diseñada con un tope para que no se salga
por completo del horno y no se incline.
Operación del horno
9 ADVERTENCIA
Para prevenir los riesgos de quemaduras, no quite ni
desplace NUNCA las rejillas cuando esté encendida la
hornilla o se esté enfriando.
Posición de las rejillas de la hornilla
• La posición correcta de las rejillas depende de la
receta y del modo de cocinar.
• Las posiciones de rejillas están numeradas desde
abajo hacia arriba, igual que un elevador.
• La posición de rejilla 3 es la posición que se usa con
mayor frecuencia.
• Coloque la(s) rejilla(s) en la posición correcta antes de
encender la hornilla.
Configuración inicial
IMPORTANTE: Siempre quite las rejillas antes de
proceder a la autolimpieza de la hornilla. Si las rejillas
correderas se quedan en la hornilla durante la
autolimpieza, los lubrificantes del mecanismo de cada
rejilla se dañarán y el acabado se decolorará.
Antes de usar la hornilla o el grill, encienda la hornilla y el
grill para quemar los aceites de fabricación recurriendo a
uno de los métodos siguientes:
1. Encienda el sistema de ventilación (si la campana
usada funciona con un sistema de recuperación de
aire, abra una ventana).
2. Ajuste la hornilla a 450 °F (230 °C) y déjelo funcionar
durante 20-30 minutos. Luego, ajuste la estufa al
modo BROIL durante el mismo periodo.
o
1. Encienda el sistema de ventilación (si la campana
usada funciona con un sistema de recuperación de
aire, abra una ventana).
2. Quite las rejillas de la hornilla.
3. Ajuste la hornilla al modo de autolimpieza y dejen ter-
minar su ciclo (sólo estufas).
Las estufas emiten a veces olores particulares o humo
cuando se usan por primera vez. Esos olores o este humo
provienen de residuos de fabricación al ser quemados, lo
que es típico en una nueva placa de cocción, sin importar
el fabricante.
Operación automática del ventilador de enfriamiento
El ventilador de refrigeración funciona durante todos los
modos de cocción. El ventilador se puede escuchar
cuando está funcionando, y es posible que sienta que sale
aire caliente de la abertura de ventilación del horno. Es
posible que el ventilador funcione después de que el
horno esté apagado.
Abertura de ventilación del horno
La abertura de ventilación del horno está ubicada en la
base de la unidad. Es posible que salga aire tibio de la
abertura de ventilación antes, durante y después de la
cocción. Es normal que salga vapor de la abertura de
ventilación y que se acumule condensación en esta área.
Esta área puede estar tibia cuando el horno está en uso.
No bloquee la abertura de ventilación, dado que es
importante para que circule el aire.
Ventilador de convección
El ventilador de convección funciona durante todos los
modos por convección. Cuando el horno está funcionando
en un modo por convección, el ventilador se apaga
automáticamente cuando se abre la puerta. El ventilador
de convección también puede funcionar durante el
proceso de autolimpieza.
1. Tome la rejilla firmemente de ambos lados.
2. Introduzca la rejilla (vea la imagen).
3. Incline hacia arriba la rejilla para que se detenga al
insertarse en la guía de la rejilla.
4. Coloque la rejilla en posición horizontal y empuje el
resto hacia adentro hasta el tope. La rejilla debe
estar derecha y plana, no torcida.
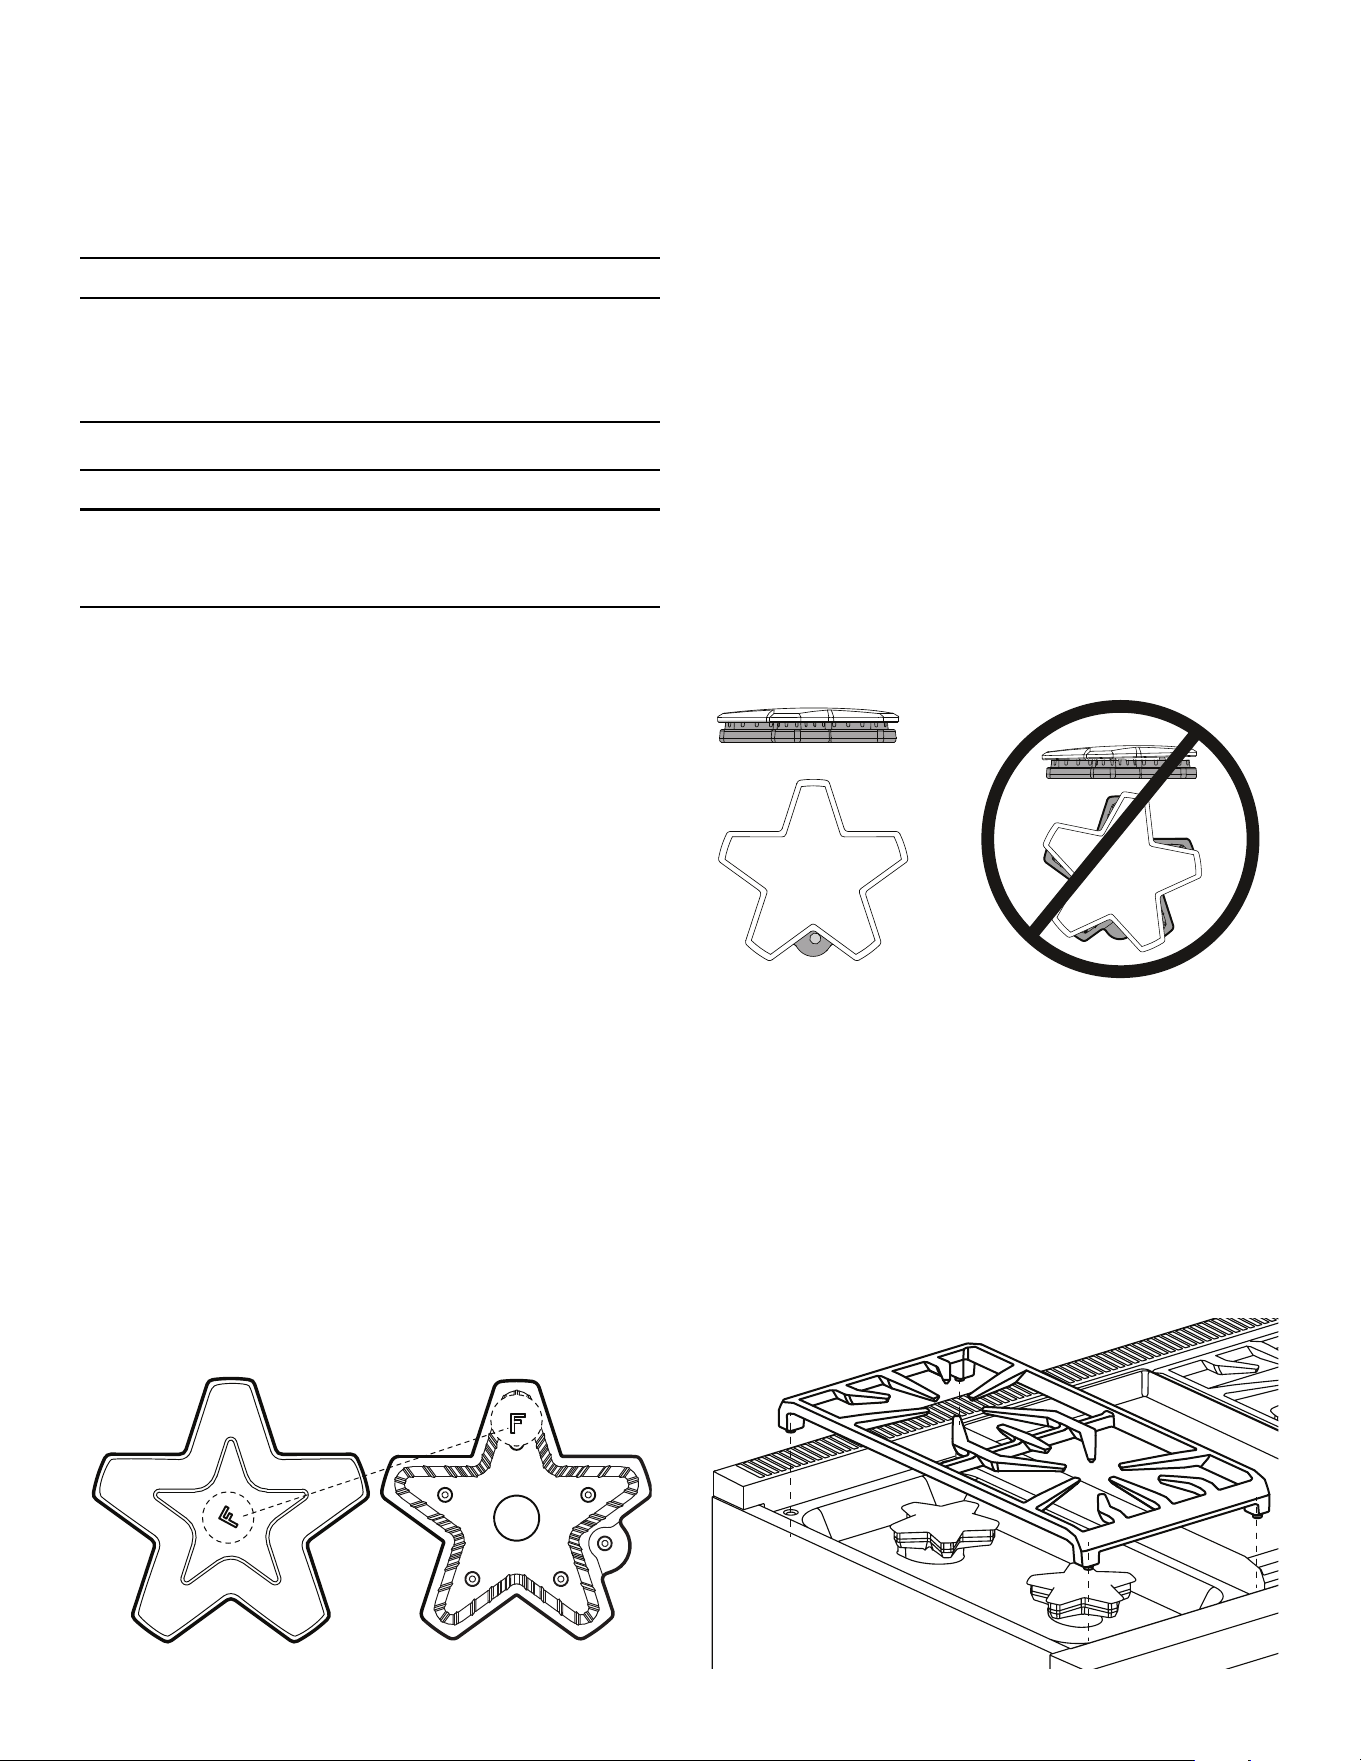
Página. 135
Usar la placa de cocción
Quemadores STAR
®
sellados
9 ADVERTENCIA
Para evitar que los productos se prendan fuego o que
se creen gases nocivos, no use la superficie de la
estufa si las tapas y las rejillas no están todas
colocadas correctamente.
9 ADVERTENCIA
Para prevenir quemaduras, evite tocar las tapas y las
rejillas de los quemadores cuando estén calientes.
Apague la estufa y deje los quemadores enfriarse.
Colocación de las tapas de los
quemadores
Para asegurar un funcionamiento correcto, se deben
colocar correctamente las tapas de los quemadores
STAR
®
sobre su base. Si la tapa no se coloca
correctamente, podría ocurrir uno de los siguientes
problemas:
• Las llamas del quemador son demasiado altas
• Llamas excesivas salen del quemador
• El quemador no se enciende
• Las llamas del quemador son irregulares
• El quemador desprende olores.
Cada tapa tiene una letra (B, D o F) grabada en la parte
inferior de la tapa que corresponde a una letra (B, D o F)
grabada en la base de la hornilla que está unida al
electrodoméstico.
Colocar las tapas de los quemadores
1. Coloque la tapa de cada hornilla en la base de la
hornilla correcta según la designación de letra
correspondiente.
2. Coloque la tapa de la hornilla suavemente sobre la
base, de modo que los dientes de la base de la
hornilla calcen bien en la ranura de la tapa de la
hornilla.
Verificación de la posición de las tapas de los
quemadores
• Compruebe cada quemador para asegurarse de que
no hay espacio entre la tapa y la base del quemador.
Vea Figura para ejemplos de tapa de quemador
instalada correcta e incorrectamente.
• Puede intentar mover con cuidado las tapas de los
quemadores lateralmente para asegurarse de que
estén colocadas correctamente en su base.
• Cuando es el caso, las tapas están rectas en la base y
cubren completamente. la base del quemador en
forma de estrella al mirarlas desde arriba.
Colocación de las rejillas de los
quemadores
Para instalar las rejillas de los quemadores
1. Colóquelas con el lado plano hacia abajo y alinéelas
en el hueco de la tabla de cocción.
2. Las rejillas tienen que apoyarse las unas sobre las otras
y descansar en los bordes del hueco.
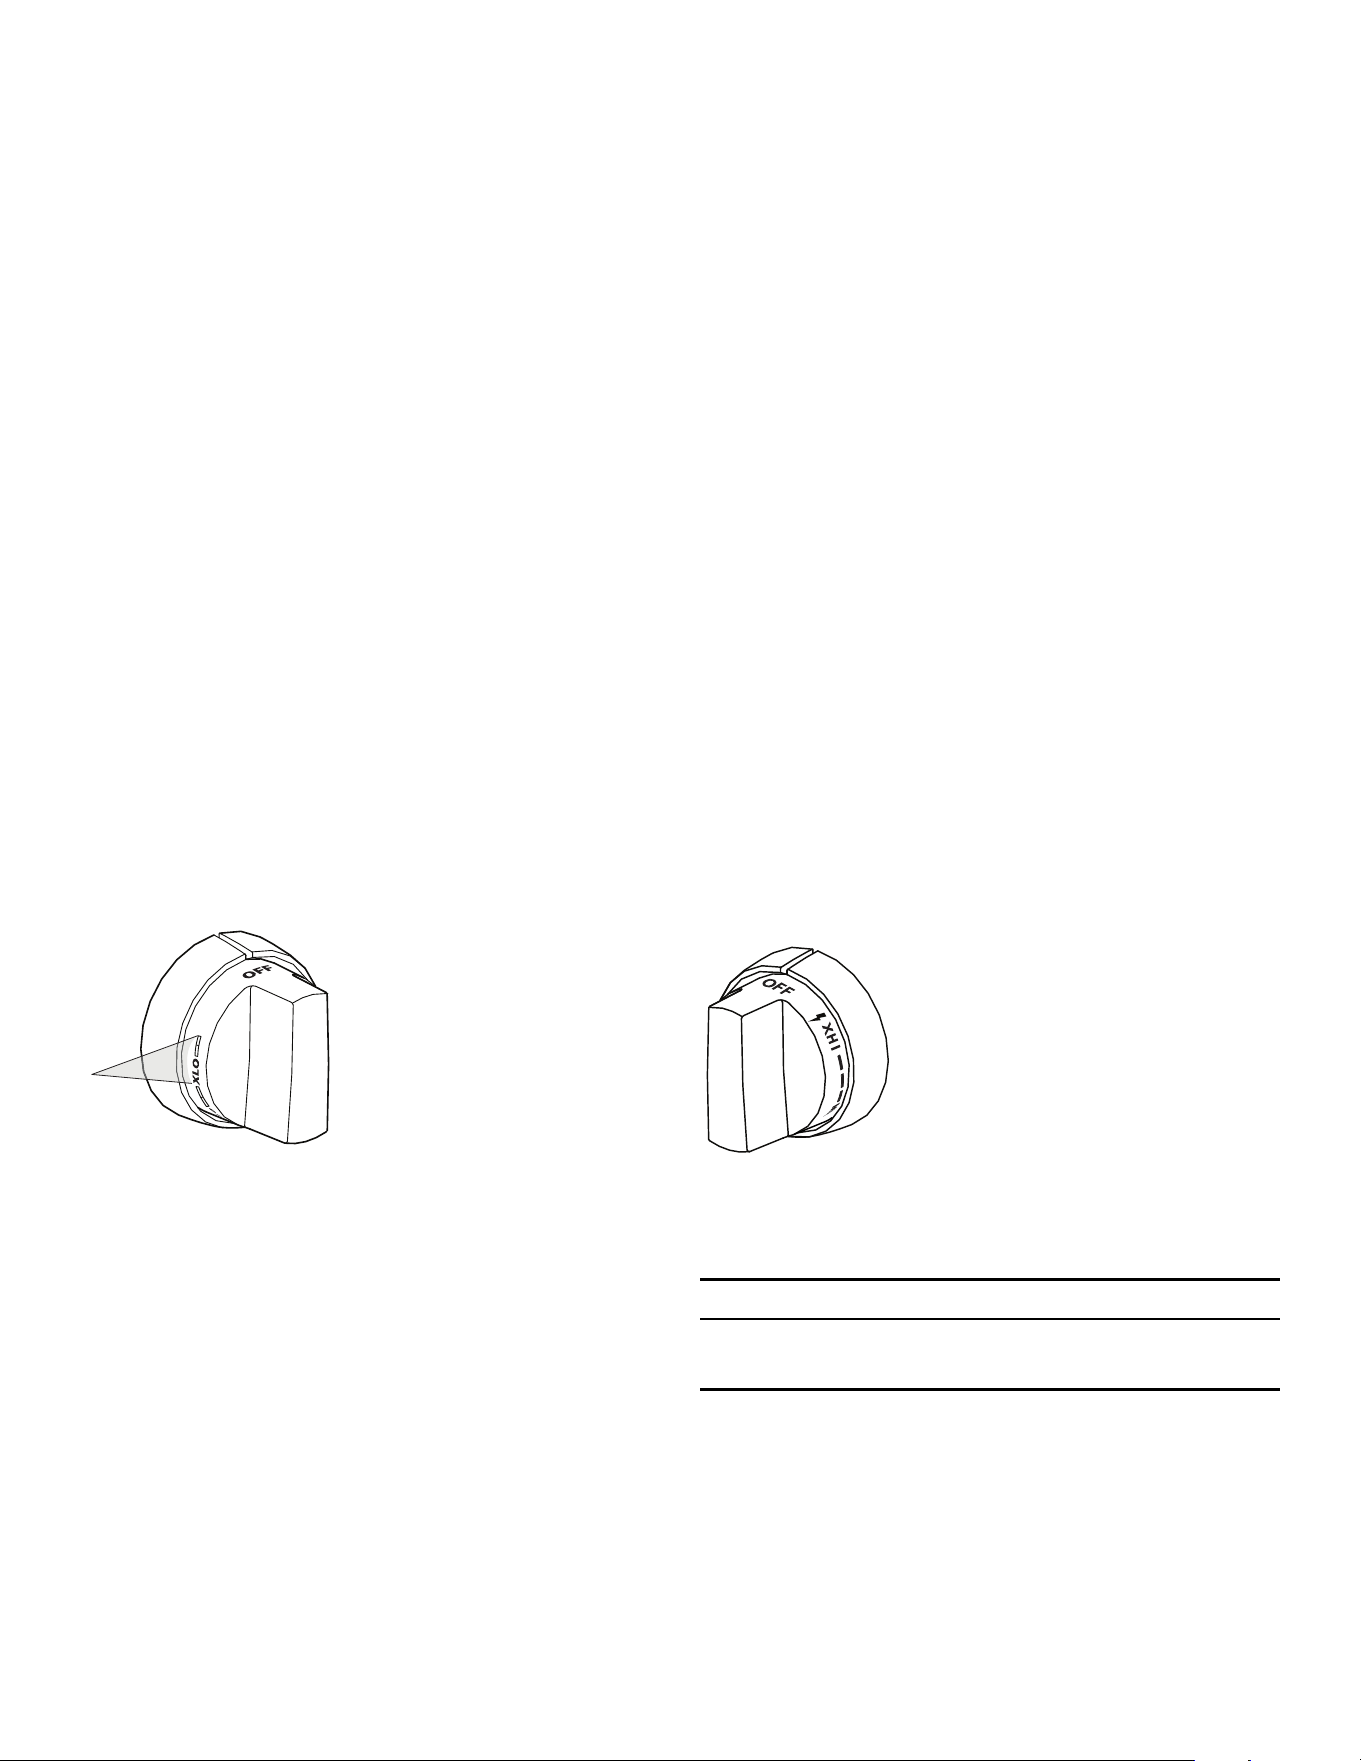
Página. 136
Perillas de control
Las perillas de control para dos quemadores sellados de
gas, uno en la parte delantera y uno en el fondo, se
encuentran directamente en frente de y debajo del par de
quemadores en el panel de control.
Operación de los quemadores
1. Oprima la perilla y gírela en sentido opuesto a las
agujas del reloj a la posición HI.
– El encendedor del quemador seleccionado hace
un chasquido y echa chispas.
– Después de encender la llama, el chasquido del
encendedor se detiene.
2. Gire la perilla a cualquier ajuste de la llama entre HI y
LO.
Luz de panel LED
Ubicado debajo del borde redondeado, la luz del panel
LED proporciona iluminación de la tarea con una ambiente
teatral.
El interruptor de balancín en el panel de control enciende
y apaga la luz.
Quemadores ExtraLow
®
Variando la duración de tiempo que se prende y apaga la
llama, se puede reducir el calor aún más para cocinar
alimentos delicados. Por ejemplo, estos ajustes de calor
muy bajo son apropiados para hervir a fuego lento y para
escalfar, derretir chocolate y mantequilla, mantener
calientes alimentos cocidos a temperaturas sin quemarlos,
etc.
Operación del quemador ExtraLow
• Se logra el ajuste más bajo de calor, XLO, al prender la
llama por aprox. 10 segundos y apagarla por 50
segundos de cada minuto.
• Cuando se ajusta la perilla justamente debajo de la
posición XLO, se prende la llama por aprox. 10
segundos y se apaga por 50 segundos de cada
minuto.
• Para variar la cantidad de bajo calor y para adecuarse
a los alimentos y las cantidades, se puede ajustar el
control en cualquier posición dentro del rango de XLO
marcado en la perilla.
Técnicas ExtraLow
• Para mantener un bajo calor, se debe calentar el
alimento hasta hervir. Revuelva bien, luego tape la olla
y baje el calor a un ajuste un poco abajo de XLO.
• Cuando se usa una olla extra grande, la acción de
hervir a fuego lento puede ocurrir principalmente en
el centro de la olla. Para igualar la temperatura en
todo el alimento, revuélvalo bien en los extremos
exteriores de la olla hacia el centro del alimento.
• Es normal revolver el alimento de vez en cuando
mientras lo hierve a fuego lento. Esto es muy
importante cuando lo hace por varias horas, como
para una salsa casera de espaguetis o frijoles.
• Es normal ver burbujas del fuego lento
inmediatamente después de revolver el alimento.
• Puede haber burbujas cuando la llama se prende y se
apaga en ciclos y ninguna burbuja cuando la llama
está apagada. Aún cuando la llama está apagada,
habrá vapor y una ligera agitación en la superficie del
líquido.
POWERBOOST
®
(modelos
seleccionar)
Reencendido automático
9 PRECAUCIÓN
No toque los quemadores cuando los encendedores
echan chispas.
Cada quemador tiene su propio encendedor electrónico
que echa chispas cuando se activa la perilla. Los
quemadores deben encenderse en 4 segundos o menos.
Si un quemador no se enciende, asegúrese de que la tapa
esté colocada correctamente sobre la base.
El dibujo muestra que la
perilla de control tiene un
rango adicional entre el
ajuste XLO. Cuando se ajusta
la perilla dentro de este
rango, la llama se prende y
se apaga.
La perilla de control
POWERBOOST, o XHI, es práctico
para hervir agua, cocinar filetes a
fuego vivo, saltear verduras, etc.
Las funciones XLO se usan de la
misma forma que con los demás
quemadores.
Página. 137
Si se apagan las llamas de uno o más quemadores, el
encendedor electrónico echa chispas automáticamente
para volver a encender la llama. No toque los quemadores
cuando los encendedores echen chispas.
IMPORTANTE:
• Para una combustión adecuada, no use la estufa sin
tener las rejillas de los quemadores en su lugar.
• Hay un ligero sonido asociado con la combustión de
gas y el encendido. Esto es normal.
• Con las placas de cocción alimentadas por propano,
es posible que oiga un chasquido a nivel de los
orificios de los quemadores unos segundos después
de apagarlos.
Apagón
9 ADVERTENCIA
En el caso de un apagón, se deben girar todas las
perillas a la posición OFF. Solamente se pueden
encender manualmente los quemadores estándares.
• Solamente en el caso de una falla de electricidad
pueden encenderse manualmente los quemadores
estándares. Es necesario encender cada uno
individualmente.
• Si se está usando la parrilla cuando se va la luz, gire
todas las perillas a la posición OFF (Apagado).
• Se pueden encender los quemadores estándar con un
cerillo prendido cerca de los puertos y girando la
perilla de control a la posición HI . Espere hasta que la
llama envuelva toda la tapa del quemador antes de
ajustar la llama a la altura deseada.
• No se puede usar el quemador ExtraLow durante una
falla de electricidad. Asegúrese de apagarlo.
• Si el quemador ExtraLow está prendido cuando se va
la luz, no se puede volver a prender hasta no apagar
primero la perilla.
• No se pueden usar la plancha durante una falla de luz.
• Si huele a gas, consulte las precauciones de seguridad
listadas dentro de la portada.
Altura de la llama
• La altura correcta de la llama depende de: 1) tamaño y
material de la olla utilizada; 2) alimento que se está
preparando; 3) cantidad de líquido en la olla.
• La llama nunca se debe extender más allá de la base
de la olla.
• Use una llama baja o mediana para ollas de materiales
que conduzcan el calor lentamente, como el acero
esmaltado o la vitrocerámica.
Descripción de la llama
• Si la flama es casi o completamente amarilla, verifique
que el regulador está establecido para el combustible
correcto. Posterior al ajuste, vuelva a probar.
• Se pueden producir algunas rayas anaranjadas en el
encendido inicial.
• Permita que la unidad trabaje durante 4-5 minutos y
vuelva a evaluar antes de realizar ajustes.
• La llama de los quemadores debe ser de color azul sin
puntas amarillas. A veces, toma parcialmente un color
naranja: esto indica que se están quemando
impurezas suspendidas en el aire. Desaparecerá con el
uso.
• Con gas propano (LP), es normal tener algunas puntas
de color amarillo en el cono principal.
• La llama debe quemar completamente alrededor de la
tapa del quemador. En caso contrario asegúrese de
que la tapa esté colocada correctamente sobre la
base y que los puertos no estén tapados.
• La llama debe estar estable sin ruido o flameado
excesivo.
Características de la llama
Flama amarilla:
Se requiere más ajuste.
Puntas amarillas sobre
conos:
Normal para Gas LP.
Flama azul suave:
Normal para Gas Natural.
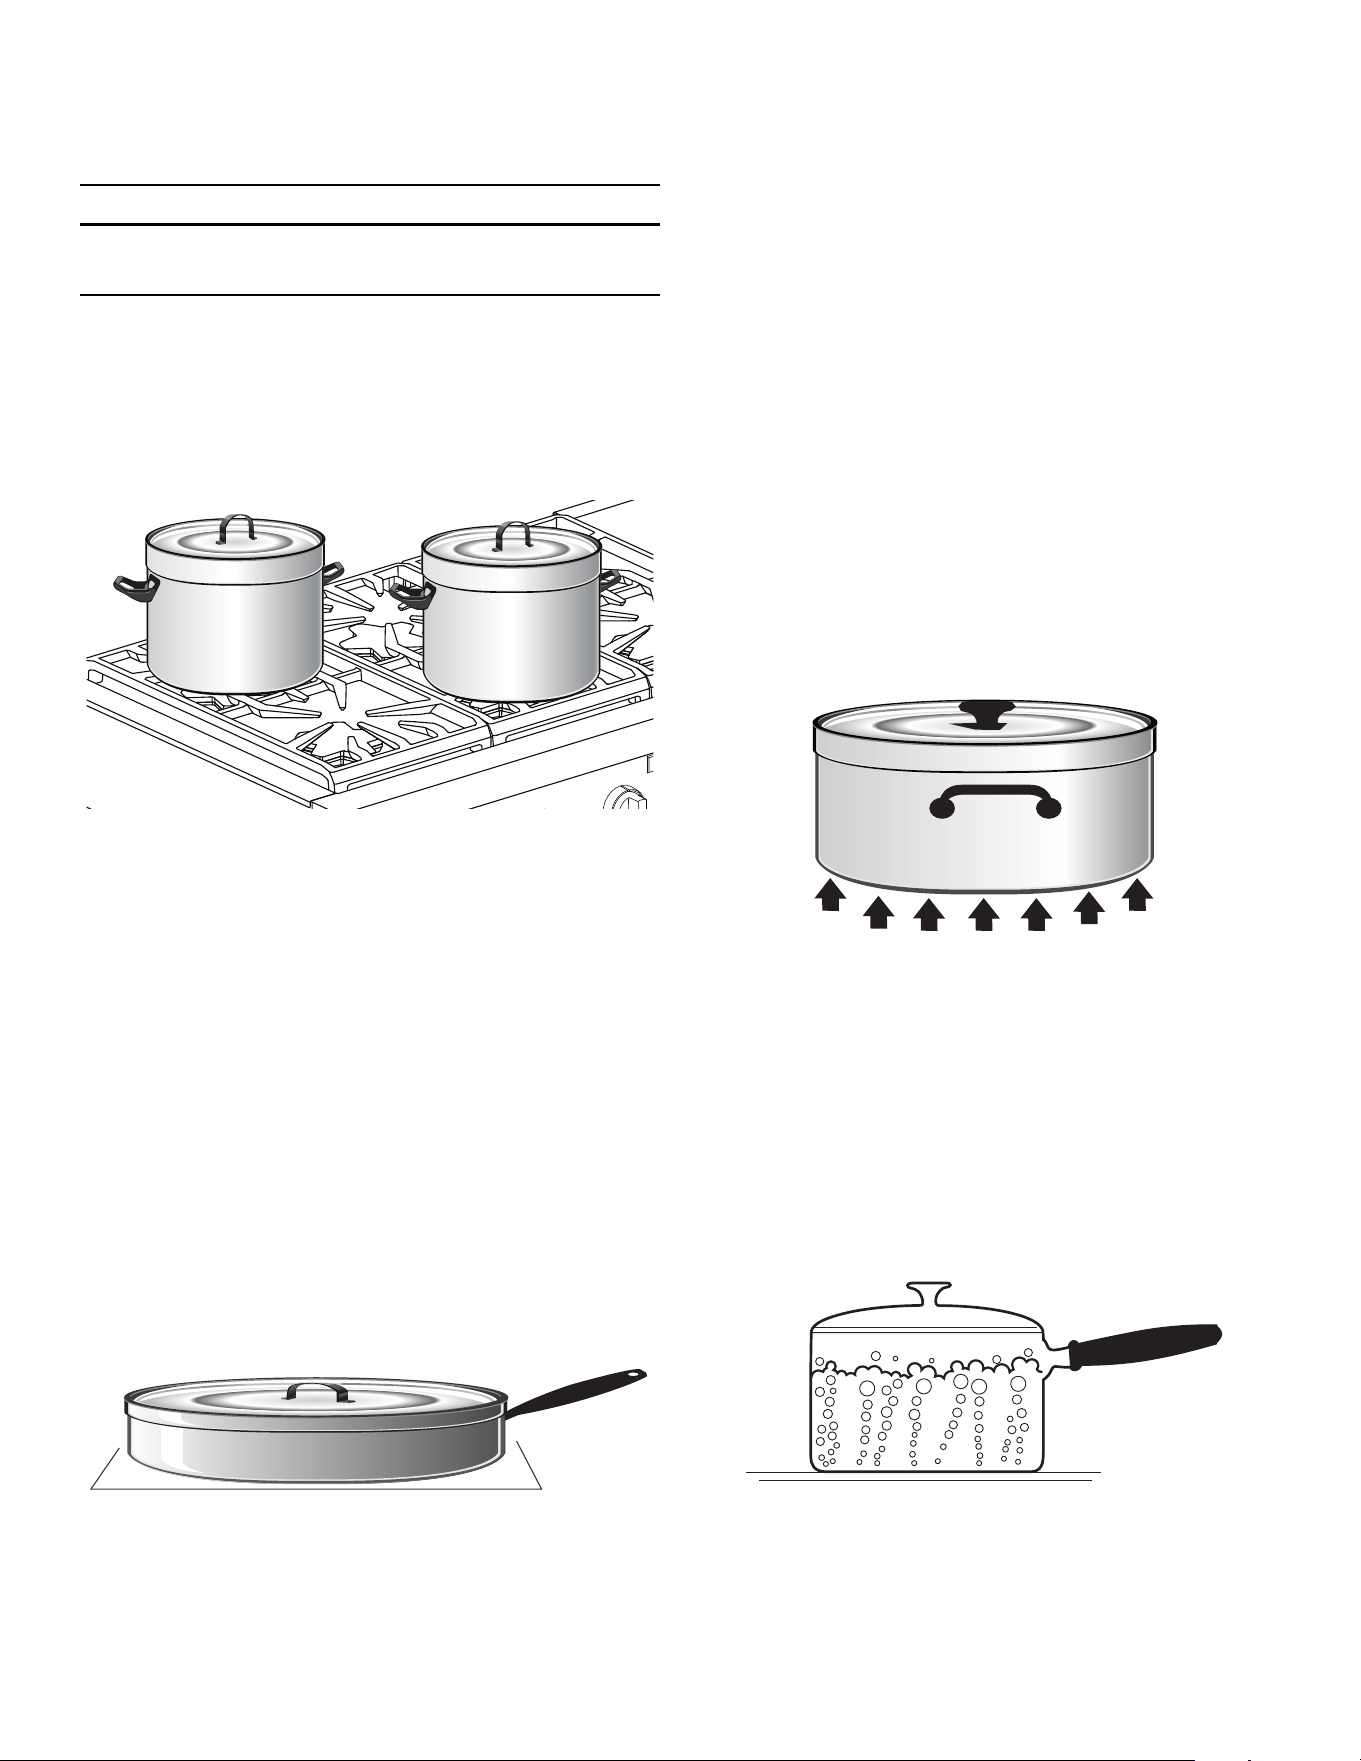
Página. 138
Recomendaciones para los utensilios de
cocina
9 PRECAUCIÓN
Para evitar dañar seriamente el aparato o las ollas, lea
las siguientes instrucciones:
• Nunca se deben usar grandes utensilios en la
superficie de la estufa, como cazuelas grandes,
bandejas para galletas, etc.
• Las ollas grandes para caldos deben colocarse en
forma escalonada cuando se usan en la estufa.
• Seleccione ollas cuyo diámetro coincida con el
diámetro de la llama. El diámetro de la llama debe ser
del mismo tamaño que la base de la olla o
ligeramente más pequeña. Ollas demasiado grandes
o pequeñas perjudican el rendimiento. Generalmente
un tamaño de olla de 5½ pulg. (140 mm) es el más
pequeño que se recomienda.
• Evite usar durante demasiado tiempo un ajuste de
llama intenso cuando utilice una olla cuyo diámetro
sea más grande que la rejilla o que ocupe el espacio
de más de un quemador, como una bandeja. Esto
puede generar una mala combustión y gases nocivos.
• La base de la olla es un factor importante para la
estabilidad y uniformidad de la cocción. El asa no
debe ser más pesada que la olla para que ésta no se
incline. La olla debe ponerse al ras sobre la rejilla sin
balancearse ni estar inestable.
• No se deben colocar alimentos envueltos en papel de
aluminio directamente sobre la rejilla del quemador. El
papel de aluminio puede derretirse durante la
cocción.
• No permita que artículos de plástico, papel o tela
entren en contacto con la rejilla caliente de un
quemador. Podrían derretirse o prender fuego.
• Recomendamos utilizar ollas de calidad profesional
con asas de metal porque las asas de plástico pueden
derretirse o bullir cuando la llama sube por el costado
de la olla.
• Se pueden encontrar ollas de calidad profesional en
tiendas de suministro para restaurantes y tiendas
especiales. Todos los utensilios de cocina deben tener
estas características: buena conductividad de calor,
buen balance de peso, diámetro de la base de tamaño
correcto, una base plana, pesada y una tapa que
cierre bien.
• Para lograr mejores resultados, se debe mantener la
llama bajo el fondo de la olla.
• El aluminio y el cobre son materiales de ollas que
conducen el calor de un modo rápido y uniforme.
Estos metales se encuentran a veces en la base de la
olla o entre les capas de acero inoxidable.
• Una base plana y pesada es estable cuando se
calienta. Bases de ollas deformadas, dentadas,
estriadas o muy ligeras se calientan de un modo poco
uniforme. Caliente y enfríe las ollas gradualmente
para evitar cambios repentinos de temperatura, lo
cual tiende a deformarlas. No ponga agua fría en una
olla caliente.
• Una tapa bien ajustada al diámetro de la olla acorta el
tiempo de cocción y permite cocinar a temperaturas
más bajas.

Página. 139
Utensilios especiales de cocina
Wok
• Se pueden usar tanto woks de base plana como
redonda con el anillo de soporte en todos los
modelos. Para los woks de base redonda se debe usar
un anillo de soporte. El wok y el anillo de soporte para
wok de hierro fundido esmaltado de porcelana se
venden por separado.
Olla grande para caldos y olla a presión
• Seleccione una con un diámetro de base que no salga
más de 2 pulgadas (51 mm) de la rejilla.
Baño María de dimensiones estándares
• 21 a 22 cuartos de galón (19,95 a 20,9 litros), con una
base de 11 a 12 pulg. (279 a 305 mm) y una altura de 9
a 11 pulg. (229 a 279 mm).
Olla a presión de tamaño estándar
• 8 a 22 cuartos de galón (7,6 a 20,9 litros), con una
base de 8 a 11 pulg. (203 a 279 mm) y una
profundidad de 6,5 a 12 pulg. (165 – 305 mm).
Consejos para usar ollas a presión
• Es preferible usar una base plana que una cóncava,
convexa o estriada.
• Cuando use dos ollas a presión al mismo tiempo, use
quemadores escalonados. No bloquee la circulación
de aire alrededor de los quemadores. Una llama
necesita el aire suficiente para que la combustión se
haga bien.
• Use una tapa sobre las ollas a presión cuando lleve el
contenido a ebullición.
• Una vez que el contenido haya hervido en la posición
HI, use la llama más baja posible para mantener la
ebullición o la presión.
• Las ollas a presión producen grandes cantidades de
vapor. Tenga cuidado para evitar quemaduras.
Sugerencias para utilizar los quemadores
recomendaciones para la cocción
• Consulte la tabla de las página 140. Los ajustes de
temperaturas varían dependiendo de las ollas
seleccionadas y de la temperatura inicial de los
alimentos.
• En la tabla se ha separado el "Ajuste final" para los
quemadores estándares y los quemadores ExtraLow
®
.
Según el caso, puede haber un cambio entre los
ajustes de los dos tipos de quemadores.
• El ajuste ExtraLow de los quemadores STAR
®
puede
servir para cocinar o para mantener alimentos
calientes.
• Suba o baje el ajuste de la llama gradualmente. Dé
tiempo para que la olla y el alimento se puedan
ajustar al nuevo ajuste de calor.

Página. 140
Recomendaciones de cocción con los
quemadores de la estufa
Alimento Ajuste inicial
Ajuste final –
quemador estándar
Ajuste final – quemador XLO
Bebidas
Cacao (Chocolate)
MED – calentar la leche,
cubrir
LO – terminar de calentar XLO – para mantener caliente,
tapar*
Panes
Pan Francés, crepas,
sándwich a la plancha
MED – precalentar la
sartén
LO a MED – cocinar Igual que el quemador estándar
Mantequilla
Derretir
LO – para empezar el
derretimiento
XLO – Para mantener la
temperatura*
Permitir que se derrita
Cereales
Harina de maíz,
sémola, avena
HI – tapar, hervir el agua,
agregar los cereales
LO a MED – terminar la
cocción según las
indicaciones en el
embalaje
XLO – mantener, tapar*
Chocolate
Derretir
XLO – se puede revolver
para acelerar el proceso
Usar XLO XLO – permitir que se derrita
XLO – mantener*
Postres
Caramelos
LO a MED – cocinar según
la receta
MED LO a MED Igual que el quemador estándar
Pudín y relleno para
tartas
LO a MED LO – cocinar
según las indicaciones
LO a MED Igual que el quemador estándar
Pudín LO a MED LO – hervir la
leche
LO Igual que el quemador estándar
Huevos
Cocidos con la cáscara
MED HI – tapar, hervir el
agua, agregar huevos,
tapar
Fritos, revueltos LO a MED – derretir mant.,
agr. huevos
LO – terminar la cocción Igual que el quemador estándar
Escalfados HI – hervir agua, agregar
huevos
MED a MED – terminar la
cocción
Igual que el quemador estándar
Carne, pescado, ave
tocino, salchichas
MED HI – hasta que la
carne empieza a
chisporrotear
MED a MED – terminar la
cocción
Igual que el quemador estándar
En su jugo: filete suizo,
estofado, guisar carne
MED HI – derretir grasa,
dorar en MED HI, agr.
líquido, tapar
XLO – Dejar a fuego lento hasta
que la carne está tierna
Fritura rápida: filetes
de desayuno
MED HI – precalentar
sartén
MED a MED HI – freír
rápidamente en la sartén
Igual que el quemador estándar
Fritura: pollo MED HI – calentar aceite,
dorar en MED
SIM – cubrir, terminar la
cocción
Igual que el quemador estándar
Fritura con aceite
abundante: camarones
MED HI – calentar aceite MED a MED HI – mantener
la temperatura
Igual que el quemador estándar
Fritura: chuletas de
cordero, filetes delg.,
hamburguesas.,
salchichas enteras
MED HI – precalentar
sartén
MED– dorar la carne Igual que el quemador estándar
*Se recomienda revolver los alimentos de vez en cuando.

Página. 141
Escalfado: pollo,
entero o piezas,
pescado
MED HI – tapar, hervir los
líquidos
Para terminar de cocinar
Hervido a fuego lento:
Pollo estofado, carne
curada, lengua, etc.
HI – tapar, hervir los
líquidos
Dejar a fuego lento
Pasta
Macarrones, fideos,
espaguetis
HI – hervir el agua, agregar
la pasta
MED a HI – para q siga
hirviendo
Igual que el quemador estándar
Olla de presión
Carne
MED HI a HI – aumentar
presión
LO a MED – mantener
presión
Igual que el quemador estándar
Verduras HI – aumentar presión MED LO a MED –
mantener presión
Igual que el quemador estándar
Arroz HI – cubrir, calentar el agua
y el arroz hasta que hierva
mantener hirviendo a SIM,
cubrir hasta que se
evapore el agua.
Cocinar según las indicaciones
del embalaje
XLO – mantener, tapar
Salsas
A base de tomate
MED HI – cocinar carne /
verduras, seguir la receta
LO para cocinar a fuego
lento
XLO – fuego lento para espesar
la salsa, destapado
Blanca, crema, bernesa MED– derretir la grasa,
seguir la receta
LO a MED LO – terminar la
cocción
XLO –mantener, tapar*
Holandesa XLO XLO – mantener el ajuste de calor
más bajo por un período corto,
revolver frecuentemente
Sopas, caldos HI – tapar, hervir el líquido LO para cocinar a fuego
lento
Fuego lento XLO – mantener,
tapar*
Verduras
Frescas
HI – tapar, hervir el agua y
las verduras
LO a MED – cocinar hasta
quedar suave
XLO – mantener, tapar
Congeladas HI – tapar, hervir el agua y
las verduras
LO a MED – cocinar según
las indicaciones del
embalaje
Igual que el quemador estándar
Fritura en aceite
abundante
HI – calentar aceite MED a MED HI – mantener
temperatura de fritura
Igual que el quemador estándar
Salteadas MED HI – calentar aceite o
derretir mantequilla y
agregar verduras
LO a MED – cocinar al
término deseado
Igual que el quemador estándar
Sofritas HI – calentar aceite,
agregar verduras
HI – terminar la cocción Igual que el quemador estándar
Alimento Ajuste inicial
Ajuste final –
quemador estándar
Ajuste final – quemador XLO
*Se recomienda revolver los alimentos de vez en cuando.
Página. 142
Plancha eléctrica
Descripción
9 PRECAUCIÓN
La plancha está caliente después de cada utilización.
Déjela enfriar completamente antes de limpiarla.
9 ADVERTENCIA
Para evitar lesionarse, no utilice nunca la plancha si la
bandeja o la parrilla no están instaladas. No utilice la
plancha de una forma distinta de lo que está indicado
en el manual de uso y cuidado.
NOTA: Solo en algunos modelos.
La plancha empotrada está hecha de aluminio de calidad
profesional con un acabado antiadherente. Esto crea una
superficie fácil de limpiar que conduce el calor
uniformemente.
Los anchos de la plancha varían.
Se venden por separado como accesorios: una tabla de
cortar de arce, una cubierta de acero inoxidable y una
bandeja con revestimiento de aluminio. La tabla de cortar
de arce y la cubierta en acero inoxidable están diseñadas
para encajar sobre la superficie de la plancha cuando no
se utiliza la plancha. La bandeja con revestimiento de
aluminio está diseñada para reemplazar a la plancha. Para
obtener más detalles, vea las instrucciones de los
accesorios de la plancha.
Antes de encender la plancha se deben quitar la tabla de
cortar de arce y la cubierta de acero inoxidable.
La bandeja de la plancha (o el accesorio de la parrilla)
siempre debe estar instalada cuando se usa la plancha.
La plancha se ajusta electrónicamente a las temperaturas
indicadas en las perillas, de 150°F a 500°F (66°C à
260°C).
Los modelos de 24" tienen dos elementos de calefacción
que se pueden regular en forma separada. Esto le permite
cocinar simultáneamente la comida con diferentes
requisitos de temperatura.
Preparación de la plancha
1. Antes de usarla, se debe lavar la bandeja de la
plancha con agua caliente jabonosa y luego
enjuagarla con agua limpia.
2. Si la estufa está equipada con una plancha eléctrica,
compruebe el ajuste de la tabla de la plancha
echando dos cucharadas de agua en la parte trasera
de la plancha.
• El agua debería correr lentamente hasta la
bandeja de grasa.
3. Quite la plancha.
4. Si no es el caso, ajuste los dos tornillos que están
debajo de la tabla. Empiece girando los tornillos de
una media vuelta en el sentido contrario a las agujas
del reloj.
5. Los ajustes siguientes se deben hacer por cuarto de
giro hasta que el agua corra lentamente hacia la ban-
deja para grasa.
Se puede usar la plancha sin mantequilla, margarina o
aceite, o se puede echar una cantidad pequeña para dar
sabor a los alimentos.
NO utilice utensilios metálicos en la plancha. Tenga
cuidado de no dañar la superficie. No corte alimentos
directamente sobre la plancha.
AVISO: El rendimiento de la plancha / estufa puede variar
si el flujo de aire alrededor del aparato es demasiado
elevado. El flujo de aire excesivo podría provenir de un
registro de aire acondicionado o de un ventilador de
techo que sopla hacia el aparato. Esto podría prolongar el
tiempo de calentamiento o provocar temperaturas en la
plancha/ estufa que no corresponden con el ajuste
indicado por los botones.
NOTA: Una campana adecuadamente instalada no se
considera como una fuente de flujo de aire excesiva.
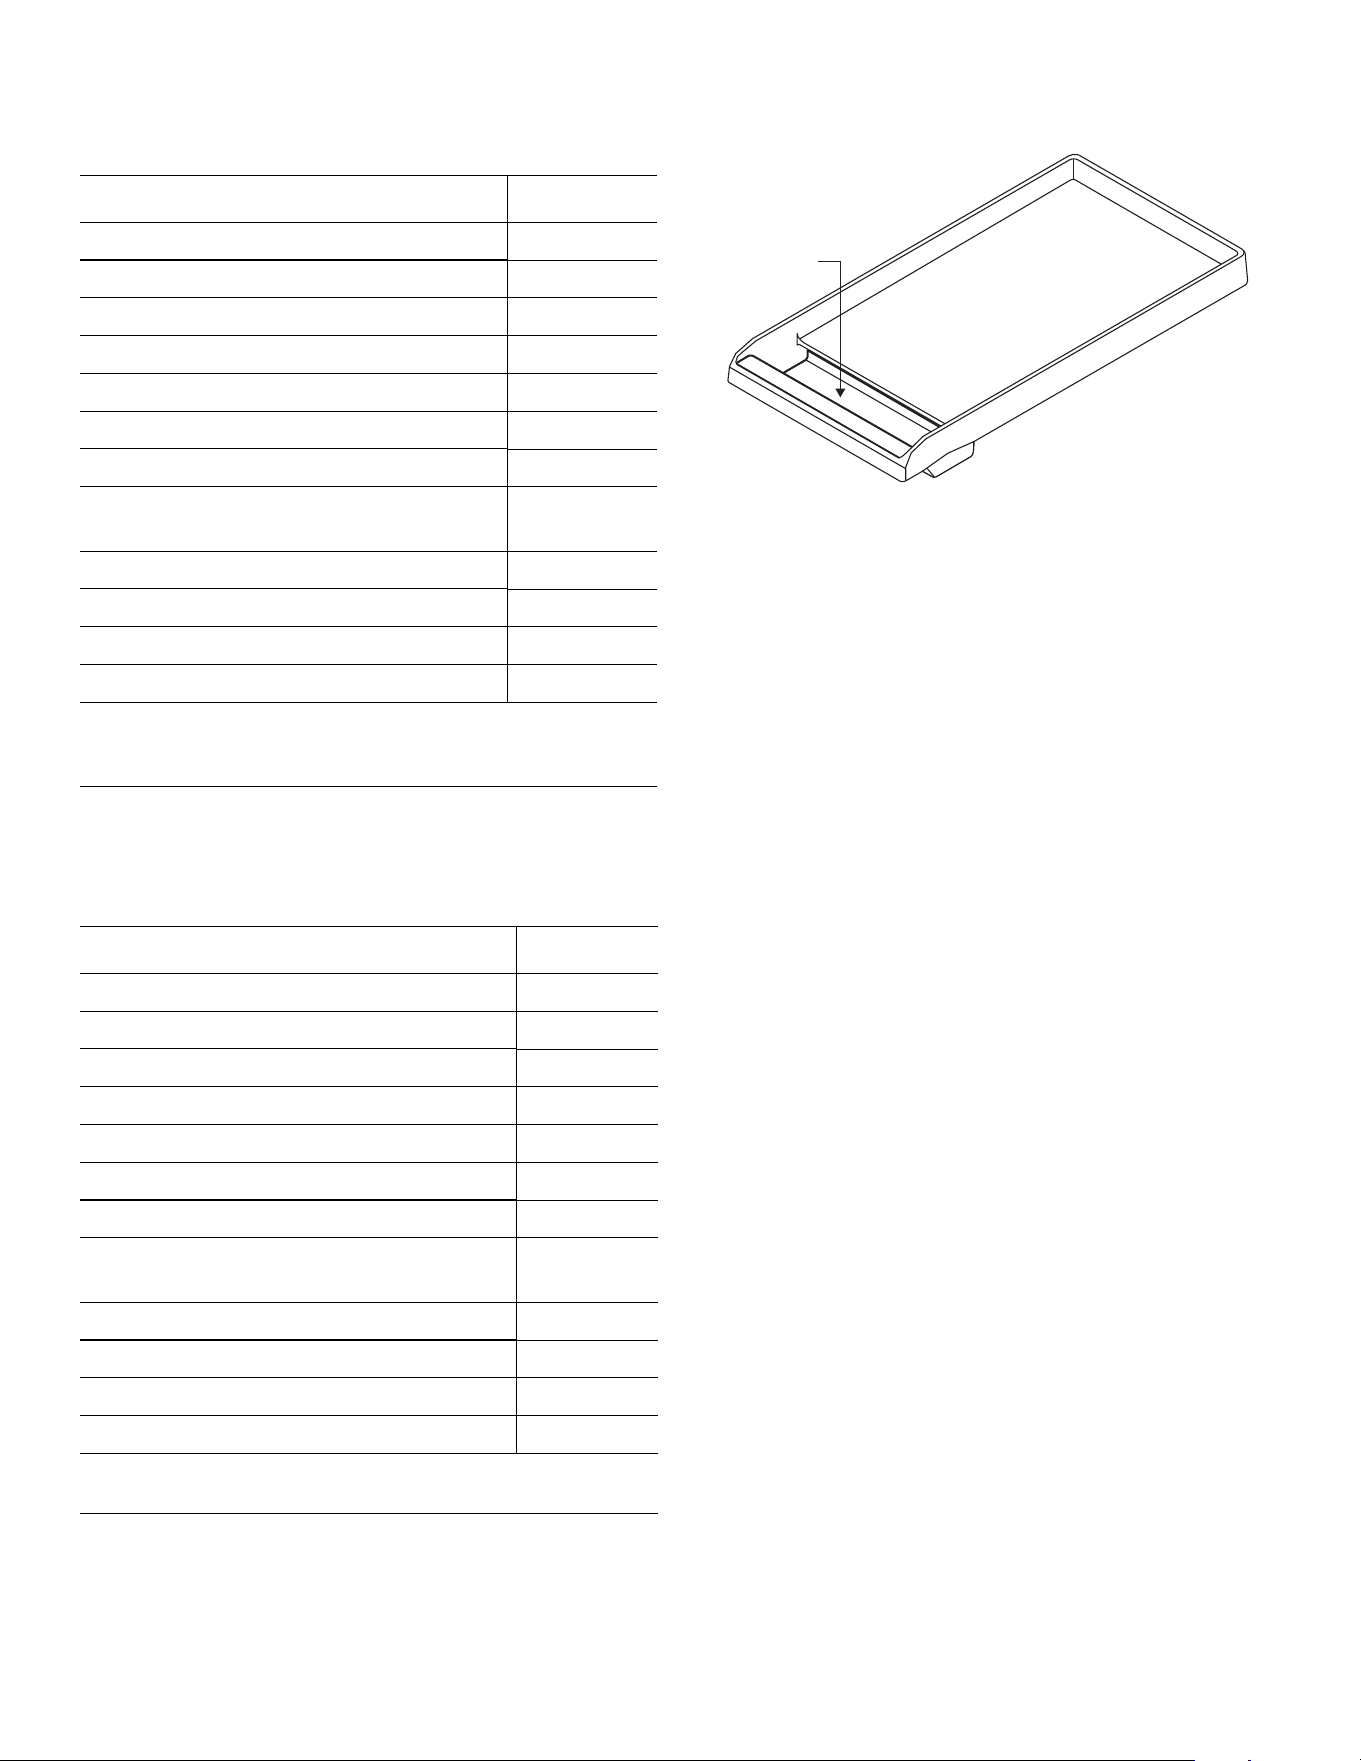
Página. 143
Recomendaciones para usar la 12''
plancha
Recomendaciones para usar la 24''
plancha
Bandeja de grasa de la plancha
• Limpie la bandeja después de cada uso. Al quitar la
bandeja, tenga cuidado para que no se derrame el
contenido.
• La placa y la bandeja de grasa de la plancha se
pueden lavar en el lavavajillas.
• Cuando se ha enfriado, ponga la grasa en un
recipiente resistente a la grasa antes de tirarlo.
Cocinar en la plancha
1. Oprima y gire la perilla en el sentido de las agujas del
reloj para obtener la temperatura deseada.
2. Gire la perilla a la temperatura de cocción apropiada
para precalentar la plancha.
3. Precaliéntela hasta que la luz de la plancha se apague.
4. Añada mantequilla, margarina, aceite o grasa vegetal
si lo desea.
Utilice el ajuste de temperatura más bajo. Es posible que
tenga que modificar las recetas ya que el revestimiento
antiadherente dora y chamusca los alimentos a bajas
temperaturas.
Recomendaciones de limpieza
• No vierta NUNCA agua fría sobre una plancha
caliente. Podría deformarse o agrietarse.
• NO calentar los utensilios de cocina en la superficie de
la plancha.
• NO limpie ninguna parte de la parrilla o la plancha en
un horno con autolimpieza.
Alimento Ajuste
Huevos 325° – 350°F
Tocino, salchichas de desayuno 450° – 475°F
Sándwich tostado 375° – 400°F
Pechuga pollo sin hueso 425° – 450°F
Chuletas de 1 pulg. (25,4 mm) 425° – 450°F
Filete de 1 pulg. (25,4 mm) 450° – 475°F
Carne molida (hamburguesas 6 onzas) 450° – 475°F
Albóndigas de carne de pavo picada, 6
onzas
450° – 475°F
Perritos calientes 350° – 375°F
Lonchas de jamón de 1/2 pulg. (12,7 mm) 350° – 375°F
Crepes, Pan Francés 400° – 425°F
Papas; papas doradas 400° – 425°F
* Para obtener una cocción uniforme, asegúrese de que los
alimentos sean más o menos igual de gruesos por todas
partes.
Alimento Ajuste
Huevos 275° – 300°F
Tocino, salchichas de desayuno 400° – 450°F
Sándwich tostado 350° – 375°F
Pechuga pollo sin hueso 400° – 425°F
Chuletas de 1 pulg. (25,4 mm) 400° – 425°F
Filete de 1 pulg. (25,4 mm) 425° – 450°F
Carne molida (hamburguesas 6 onzas) 400° – 425°F
Albóndigas de carne de pavo picada, 6
onzas
400° – 425°F
Perritos calientes 300° – 350°F
Lonchas de jamón de 1/2 pulg. (12,7 mm) 350° – 375°F
Crepes, Pan Francés 350° – 375°F
Papas; papas doradas 400° – 425°F
* Para obtener una cocción uniforme, asegúrese de que los
alimentos sean más o menos igual de gruesos por todas partes.
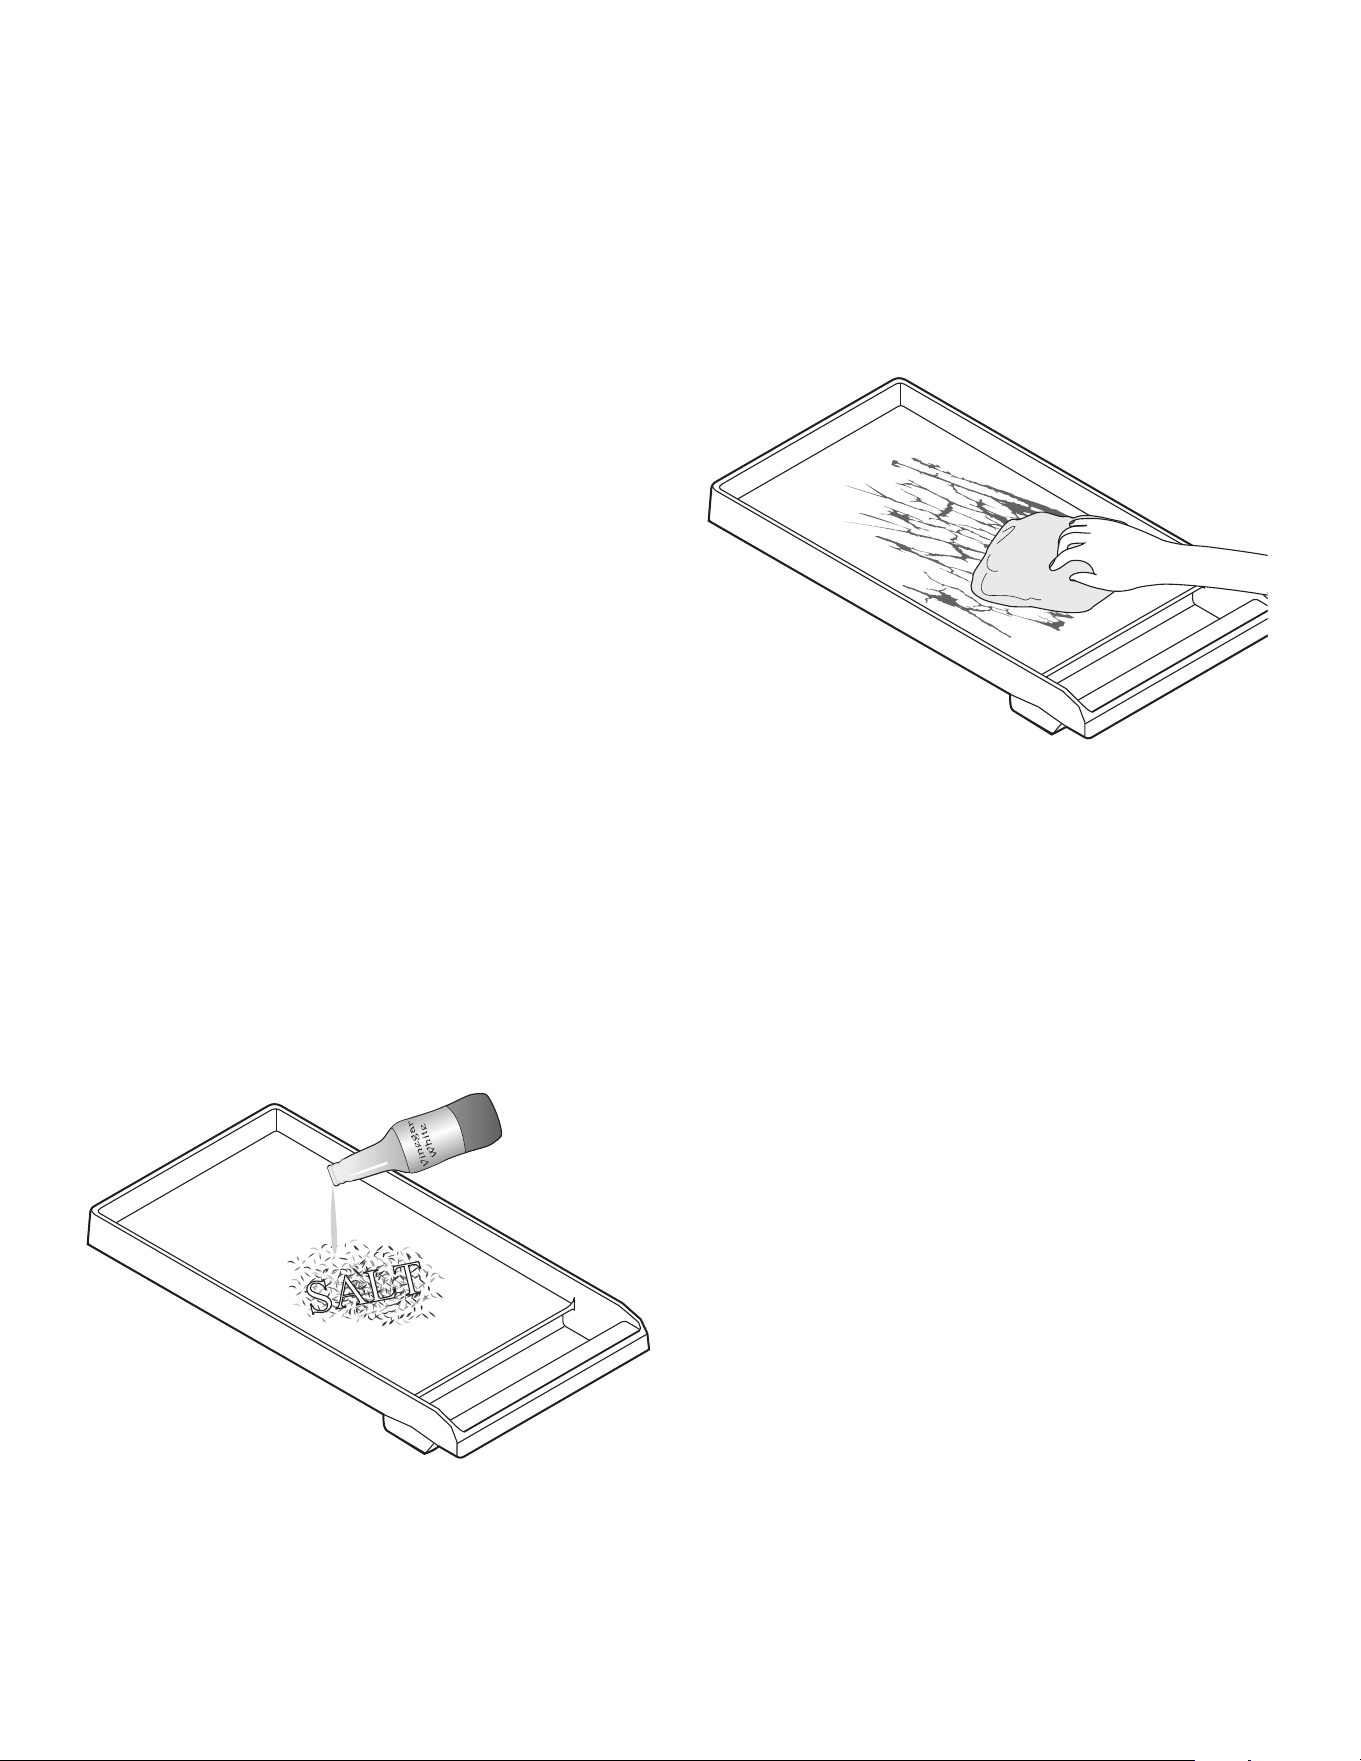
Página. 144
• Tenga cuidado de no dañar la superficie.
• No corte alimentos directamente sobre la
plancha.
• No utilice utensilios de metal.
• Utilice utensilios de plástico o madera para evitar
rayar la superficie antiadherente.
• Se puede lavar la plancha en el lavaplatos. Sin
embargo, recomendamos lavarla a mano.
Instrucciones de engrasado de
la placa de la plancha
Si la placa de la plancha parece perder sus propiedades
antiadherentes con el paso del tiempo, las instrucciones
siguientes deberían devolverle dichas propiedades. Para
asegurar el rendimiento óptimo de la placa de su plancha
y alargar su vida útil, siga estas sencillas instrucciones de
limpieza y engrasado.
NOTA: Las parrillas de 24'' no caben en la cavidad del
horno para añadir condimentos. Por lo tanto, se debe
tener cuidado de no sobrecalentar ni dañar sus
recubrimientos antiadherentes mientras se precalienta y
cocina.
Preparación de la plancha para el
engrasado
Se debe limpiar la placa de la plancha y quitar todos los
residuos antes de proceder al engrasado de la plancha.
1. Utilice una mezcla de sal gorda y de vinagre blanco
para quitar todos los residuos de la placa de la
plancha.
2. Enjuague bien con agua clara.
3. Seque la plancha.
Engrasado de la plancha
El engrasado es un proceso en el que se aplica y cuece
una capa de grasa animal o de aceite vegetal en un
instrumento de cocción. La capa de grasa proporciona una
superficie antiadherente para cocinar.
1. Utilice una servilleta de papel para aplicar un capa fina
y uniforme de manteca, Crisco
®
o aceite de oliva
sobre la superficie de la plancha.
2. Cueza la placa de la plancha en el horno a 350°F
durante una hora.
3. Saque la placa de la plancha del horno y déjela enfriar
a temperatura ambiente.
4. Aplique una segunda capa de grasa o aceite y cuézala
de nuevo a 350°F durante una hora.
5. Repita el proceso por lo menos otra vez hasta un total
de tres capas de grasa o aceite.
Después del engrasado
1. Después de cocer su plancha engrasada, déjela enfriar
y límpiela con un trapo húmedo. Déjela secar.
2. Añada una capa fina de aceite o grasa antes de
almacenarla en un lugar fresco y seco.
3. El hecho de repetir este proceso engrasará la plancha
y le ayudará a conservar sus propiedades
antiadherentes. El rendimiento mejorará con más
engrasados a lo largo del tiempo.
4. Para quitar las capas de aceite de la plancha antes de
volver a engrasarla, utilice una mezcla de sal y vinagre.
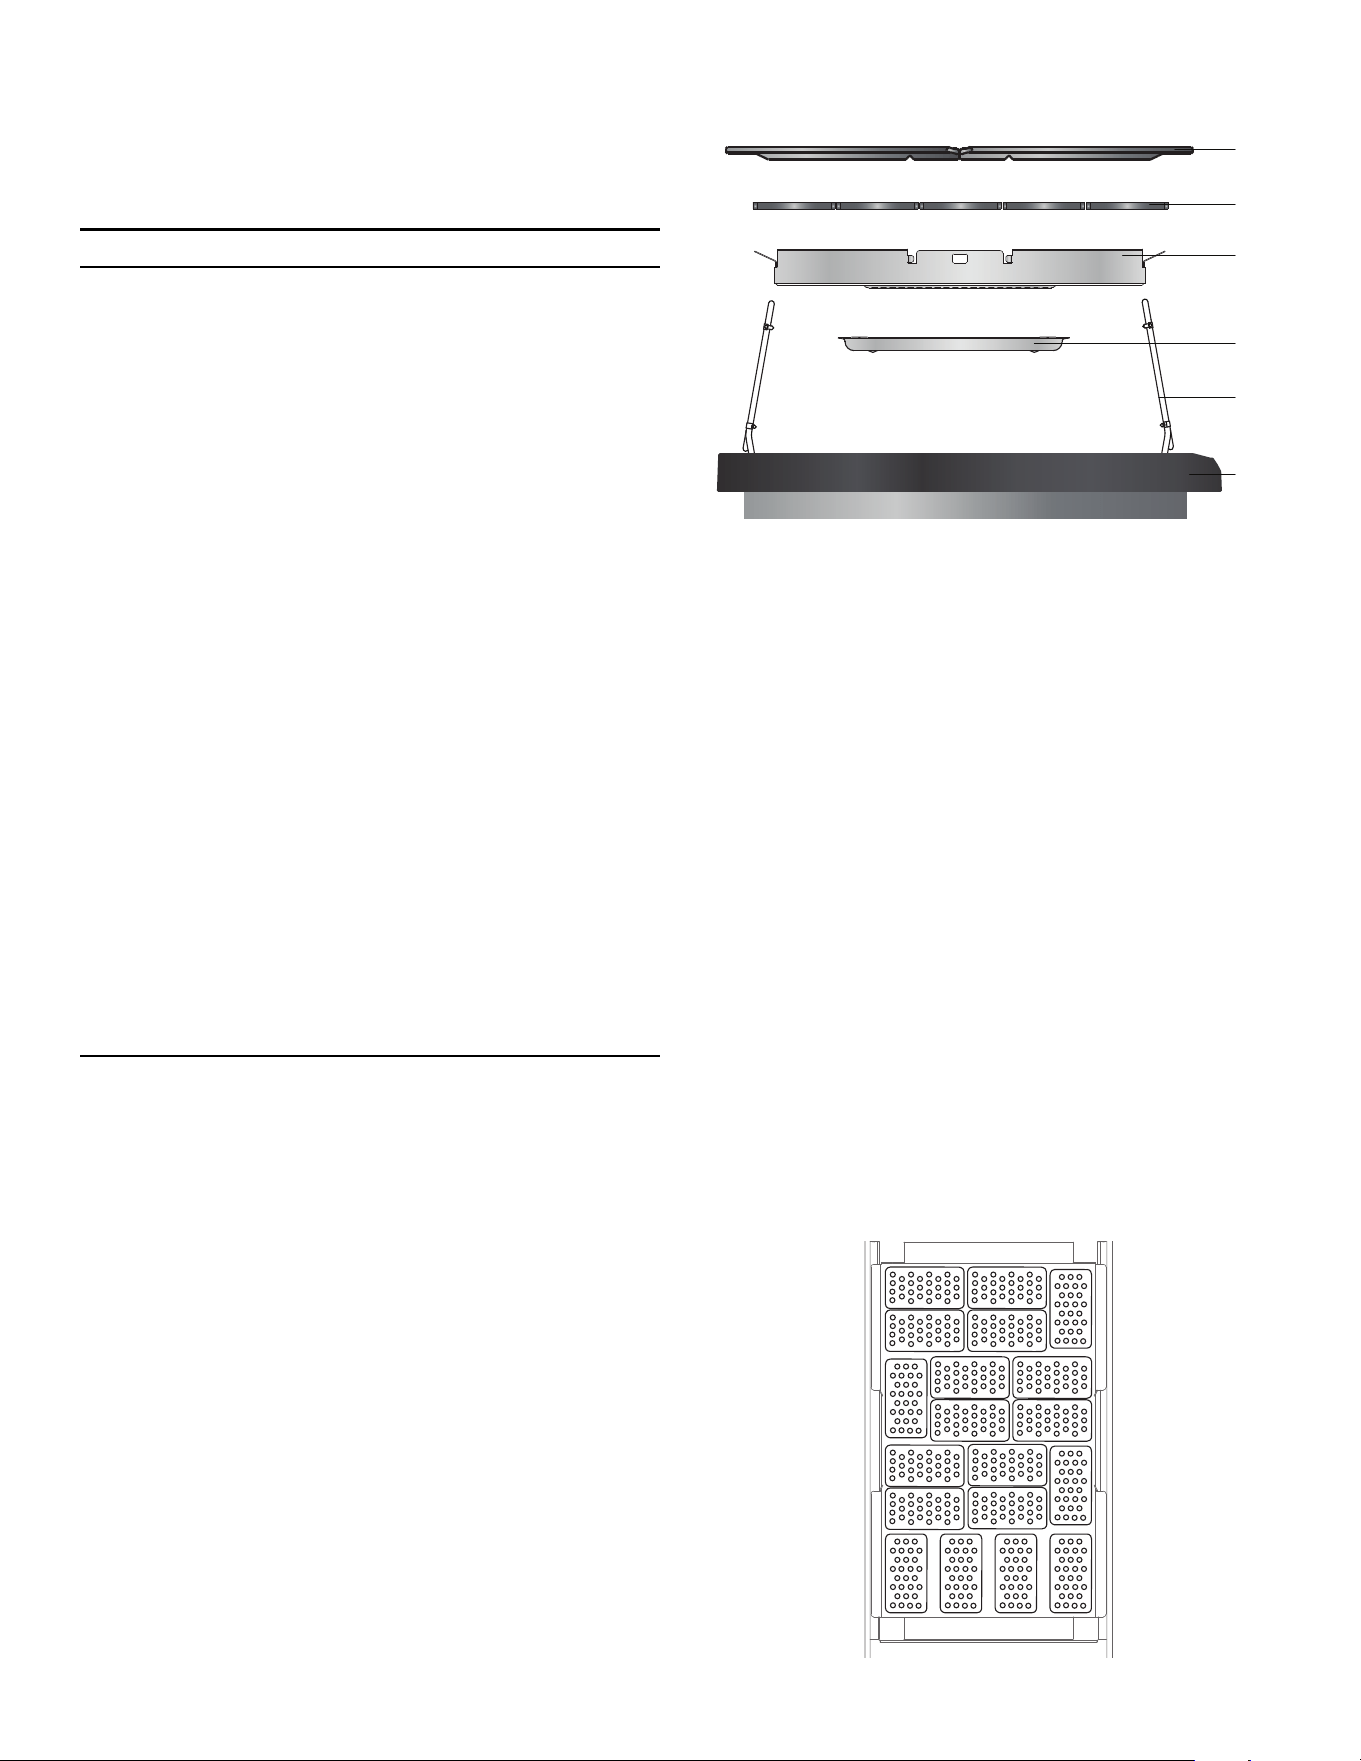
Página. 145
Parrilla eléctrica
Descripción
9 ADVERTENCIA
• Para evitar todo riesgo de lesión, NUNCA use la
parrilla si no hay rejillas o una plancha.
• NUNCA deje la parrilla sin atención mientras
cocine.
• Tenga cuidado con el aceite y la grasa. Los aceites
y grasas sobrecalentados pueden provocar
incendios.
• NO utilice virutas, piedras de lava, o briquetas de
carbón. Utilice sólo las briquetas de cerámica
(PABRICKBKN) recomendadas.
• NO utilice platos, cacerolas, sartenes u otros
utensilios sobre la parrilla.
• Nunca utilice papel de aluminio para forrar las
rejillas o la parrilla. Esto puede dañar la parrilla y
provocar un riesgo de incendio si el calor queda
atrapado debajo.
• Compruebe las bandejas de grasa antes de cada
utilización. La acumulación de mucha grasa puede
presentar un riesgo de incendio.
• Si se producen llamas, limpie la grasa acumulada
sobre las rejillas, la bandeja de grasa, la cesta de
briquetas de cerámica y las otras superficies.
• Las acumulaciones de grasa favorecen la
formación de llamas y de humo durante la
cocción.
• Se deben sustituir las briquetas de cerámica
cuando estén negras, lo que significa que están
saturadas de grasa y pueden producir mucho
humo o incluso prenderse.
NOTA: Solo en algunos modelos.
Las rejas de la parrilla empotrable están hechas de hierro
colado de calidad profesional. Este material da a las
rejillas una superficie que reparte uniformemente el calor
y que es fácil de limpiar.
Se puede instalar una plancha de hierro colado
antiadherente, vendida por separado. Consulte las
instrucciones del accesorio de la plancha para saber más
detalles.
Ensamblaje de la parrilla
Para montar la parrilla
1. Rote las resistencias (5) y quite la cesta de briquetas
de cerámica situada dentro de la caja de la parrilla (1).
2. Instale la bandeja para grasa (2) debajo de la caja de
la parrilla (1). (La bandeja de grasa está empaquetada
en la caja de cartón grande de la estufa.) Alinee los
salientes de la bandeja de grasa (2) con los huecos
situado debajo de la caja (1).
3. Ponga la cesta de briquetas de cerámica (3) en la caja
de la parrilla (1).
4. Coloque las briquetas de cerámica (4) en la cesta de
briquetas (3), en una sola capa, para que cada una
toque las briquetas adyacentes. Las briquetas de
cerámica no deben estar en contacto con los
elementos térmicos.
1. Caja de la parrilla
2. Bandeja para la grasa de la parrilla
3. Cesta de briquetas de cerámica
4. Briquetas de cerámica
5. Resistencias (x2)
6. Rejillas de la parrilla (x2)
2
5
3
1
4
6

Página. 146
5. Empuje hacia abajo las dos resistencias de la parrilla
(5). Las resistencias deben estar niveladas. Los
soportes deben descansar dentro de los pestillos
laterales.
6. Instale las rejillas de la parrilla (6). Asegúrese de que
las rejillas estén instaladas a nivel con la caja de la
parrilla (1).
Funcionamiento de la parrilla
IMPORTANTE:
• Si aparecen llamas mientras cocina con la parrilla,
apague el aparato y quite los alimentos. Tenga
cuidado de no lesionarse cuando quite los alimentos.
• A menudo, las llamas se apagan por sí solas al cabo
de unos minutos, una vez se han quemado las
acumulaciones de grasa. No deje la parrilla sin
supervisión antes de que se hayan apagado las llamas.
Se pueden sofocar las llamas espolvoreándolas con
una generosa capa de bicarbonato de sodio o sal.
• Si aparecen llamas, sustituya las briquetas de cerámica
y limpie las acumulaciones de grasa sobre las rejillas,
la bandeja de grasa, la cesta de briquetas de cerámica
y las otras superficies antes de volver a utilizar la
parrilla. Las acumulaciones de grasa sin limpiar
favorecen la formación de llamas y humo durante la
cocción.
• Seque los alimentos húmedos antes de colocarlos
sobre la parrilla.
• Cuanto más húmedo es un alimento, más humo es
susceptible de producir.
• Durante la utilización de la parrilla, las acumulaciones
de grasa pueden arder brevemente.
9 ADVERTENCIA
PARA EVITAR RIESGOS DE QUEMADURAS:
• Utilice utensilios apropiados con mangos largos
que le permitan manejar los alimentos evitando el
calor y las posibles llamas.
• NO lleve ropa suelta cuando cocine.
• Nunca deje la parrilla sin supervisión cuando
cocine.
• Después de cada utilización, quite las
acumulaciones de grasa de las superficies de la
parrilla y de las bandejas de grasa para evitar
riesgo de incendio. Debería limpiar
periódicamente la campana y las superficies
alrededor de la parrilla según las
recomendaciones del manual de uso.
• Tenga un extintor cerca y fácilmente accesible.
Funcionamiento de la parrilla
1. Antes de encender el aparato, asegúrese de que haya
briquetas de cerámica en el aparato y que las dos
rejillas de la parrilla estén instaladas correctamente.
2. Pulse la perilla de ajuste de temperatura y gírela.
• Las dos resistencias de la parrilla se pueden
ajustar por separado, lo que le permite preparar
alimentos a dos temperaturas distintas a la vez.
También, puede usar una parte para preparar
alimentos y la otra parte para mantenerlos
calientes.
3. Durante el primer uso, caliente la parrilla durante unos
diez minutos para eliminar los residuos y olores de
fabricación.
4. Para obtener mejores resultados, deje que las rejillas
se calienten antes de cocinar alimentos.
9 PRECAUCIÓN
Limpie la parrilla después de cada uso. Deje tiempo
suficiente para que el aparato pueda enfriarse antes
de limpiarlo.
Consejos para cocinar a la parrilla
• Siempre precaliente la parrilla. Para cocinar a potencia
máxima, precaliente la parrilla a HIGH durante diez
minutos. Para cocinar a potencia media, precaliente la
parrilla a HIGH durante cinco minutos, luego reduzca
la temperatura cuando los alimentos estén sobre la
parrilla.
• Remoje los palos de las brochetas en agua durante 20
minutos o más antes de ponerlos sobre la parrilla.
• Antes de cocinar alimentos a la parrilla, los puede
untar con aceite resistente al calor (como aceite de
cacahuetes) o adobarlos. Tenga cuidado de no usar
demasiado aceite o adobo; los alimentos podrían
prenderse o generar mucho humo.
• Ponga los alimentos directamente sobre las rejillas de
la parrilla. NO use papel de aluminio o bandejas.
• La carne curada, como el jamón o las chuletas de
cerdo ahumadas, no está hecha para ser cocida a la
parrilla y puede generar la formación de compuestos
químicos poco saludables.
• Para evitar que los alimentos se prendan, quite el
exceso de grasa antes de cocinarlos.
• NO utilice productos de limpieza sobre las
resistencias. Si hay grasa sobre las resistencias, deje el
fogón encendido para que se queme.
• Para absorber la grasa de las rejillas de la parrilla, eche
sal gorda después de cada uso.
Página. 147
Recomendaciones para cocinar con la parrilla
IMPORTANTE:
• NO SE DEBERÍA USAR LA PARRILLA SIN UNA VENTILACIÓN ADECUADA.
• No deberían prepararse alimentos muy grasientos sobre una parrilla interior. La cocción de alimentos grasientos
(como algunas variedades de carne picada o de salchichas, etc.) aumenta las posibilidades de formación de humo y
llamas.
Alimento* Ajuste** Minutos Notas
Buey
Hamburguesas, ¾'' (2 cm) (al punto) Alto 12 – 14 Dar la vuelta cuando el jugo aparece en la
superficie.
Solomillo, 1½'' (4 cm) (al punto) Alto 20 – 22 Quitar el exceso de grasa.
Solomillo bajo o lomo, 1" (3 cm) (al
punto)
Alto 10 – 12 Quitar el exceso de grasa.
Brochetas de bistec (al punto) Alto 24 – 28 Dar la vuelta de vez en cuando.
Cerdo
Chuletas de cerdo, ¾'' (2 cm) Alto 16 – 20 Quitar el exceso de grasa.
Salchichas o Bratwurst Medio alto 16 – 20 Perforar antes de cocinar.
Perritos calientes Alto 6 – 8 Colocar horizontalmente sobre la parrilla.
Aves de corral
Muslos Medio alto 34 – 38 Dar la vuelta de vez en cuando, quitar la piel
que sobra.
Alas de pollo, enteras Medio alto 18 – 22 Dar la vuelta de vez en cuando.
Pechugas de pollo sin hueso, ½''
(1 cm)
Medio alto 20 – 24 Cortar en filetes del mismo tamaño.
Brochetas, pollo Alto 30 – 33 Dar la vuelta de vez en cuando.
Marisco
Rodajas de pescado, 2'' (6 cm) Medio alto 18 – 20 Untar con aceite antes de cocinar.
Filete de pescado, ¾'' (2 cm) Medio alto 16 – 20 Untar con aceite antes de cocinar.
Brochetas de gambas Medio alto 10 – 14 Dar la vuelta de vez en cuando.
Fruta y verdura fresca
Champiñones portobello Alto 8 – 10 Untar con aceite antes.
Pimientos, cuartos Alto 8 – 10 Dar la vuelta de vez en cuando
Berenjenas, rodajas, ½'' (1 cm) Alto 8 – 10 Untar con un poco de aceite
Tomates, mitades Alto 8 – 10 Untar con aceite
Piña, rodajas Alto 4 – 6 —
Melocotones, mitades Alto 4 – 6 —
Otro
Panecillos de perrito caliente o
hamburguesa
Medio alto 4 – 6 Untar con mantequilla.
Tofu, extra firme, rebanado Medio alto 8 – 12 Para un cocción fácil, hacer brochetas.
* Para una cocción uniforme, distribuya los alimentos sobre la superficie.
** Los ajustes utilizados en la tabla deberían considerarse como referencia, ya que la cantidad de calor necesario puede variar según
el tipo y las condiciones de los alimentos.
Página. 148
Usar el horno
Símbolos y descripciones
Símbolo/modo Definiciones y recomendaciones
Eléctrico
principal
Gas
principal
Eléctrico
aux.
Gas
aux.
Hornear Cocina con aire caliente y seco. Variedad de
alimentos, por ejemplo, tartas, galletas, pastas,
panes rápidos, quiché y guisos.
Horn. aire cal. Similar a hornear, pero un ventilador situado en la
parte posterior del horno hace circular el aire.
Adecuado para alimentos horneados, por ejemplo,
tartas, pan de maíz, pasteles, panes rápidos,
tartaletas y panes de levadura.
Aire cal. real Cocina con calor de un tercer elemento calefactor
en la parte posterior del horno. Un ventilador de
aire caliente hace circular el calor por todo el horno.
Adecuado para cocinar alimentos individuales en
ración, por ejemplo, galletas y pasteles.
Grill Utiliza un calor intenso que sale del elemento
calefactor superior. Se usa para trozos tiernos de
carne de 1" (2.5 cm) o menos, aves de corral, pan
tostado y guisos.
Grill aire cal. Combina el calor intenso del elemento calefactor
superior con la circulación de aire del ventilador.
Trozos tiernos de carne de más de 1" (2.5 cm), aves
de corral y pescado. No utilizar para tostar.
Leudar Leudar (aumentos) masa con levadura y masa
madre.
Asar Utiliza un calor más intenso del elemento calefactor
superior, se tuesta más el exterior. Adecuado para
carnes, aves de corral, trozos menos tiernos de
carnes y para asar verduras.
Asar aire calie. Utiliza el elemento calefactor inferior y un calor más
intenso del elemento calefactor superior que
Hornear con aire caliente, con un ventilador que
hace circular el aire. Se usa para trozos tiernos de
carne, aves de corral y para asar verduras. Las carnes
quedan más jugosas y húmedas que con el modo
Asar.
Sabbat/hornear
extend
Este modo de cocción es para ayudar al usuario a
cumplir con los principios del Sabbat.
Conservar caliente Mantiene una temperatura baja para que los
alimentos sigan calientes. Adecuado para alimentos
horneados, por ejemplo, tartas, pan de maíz,
pasteles, panes rápidos, tartaletas y panes de
levadura.
Autolimpieza El horno alcanza una temperatura alta,
aproximadamente de 850 °F (454 °C), para quemar
los restos de alimentos.
Inicio remoto* Le permite al usuario iniciar, pausar y cancelar los
programas del horno de forma remota a través de la
aplicación Home Connect en su dispositivo móvil.
*No disponible en los modelos de 30 pulgadas.
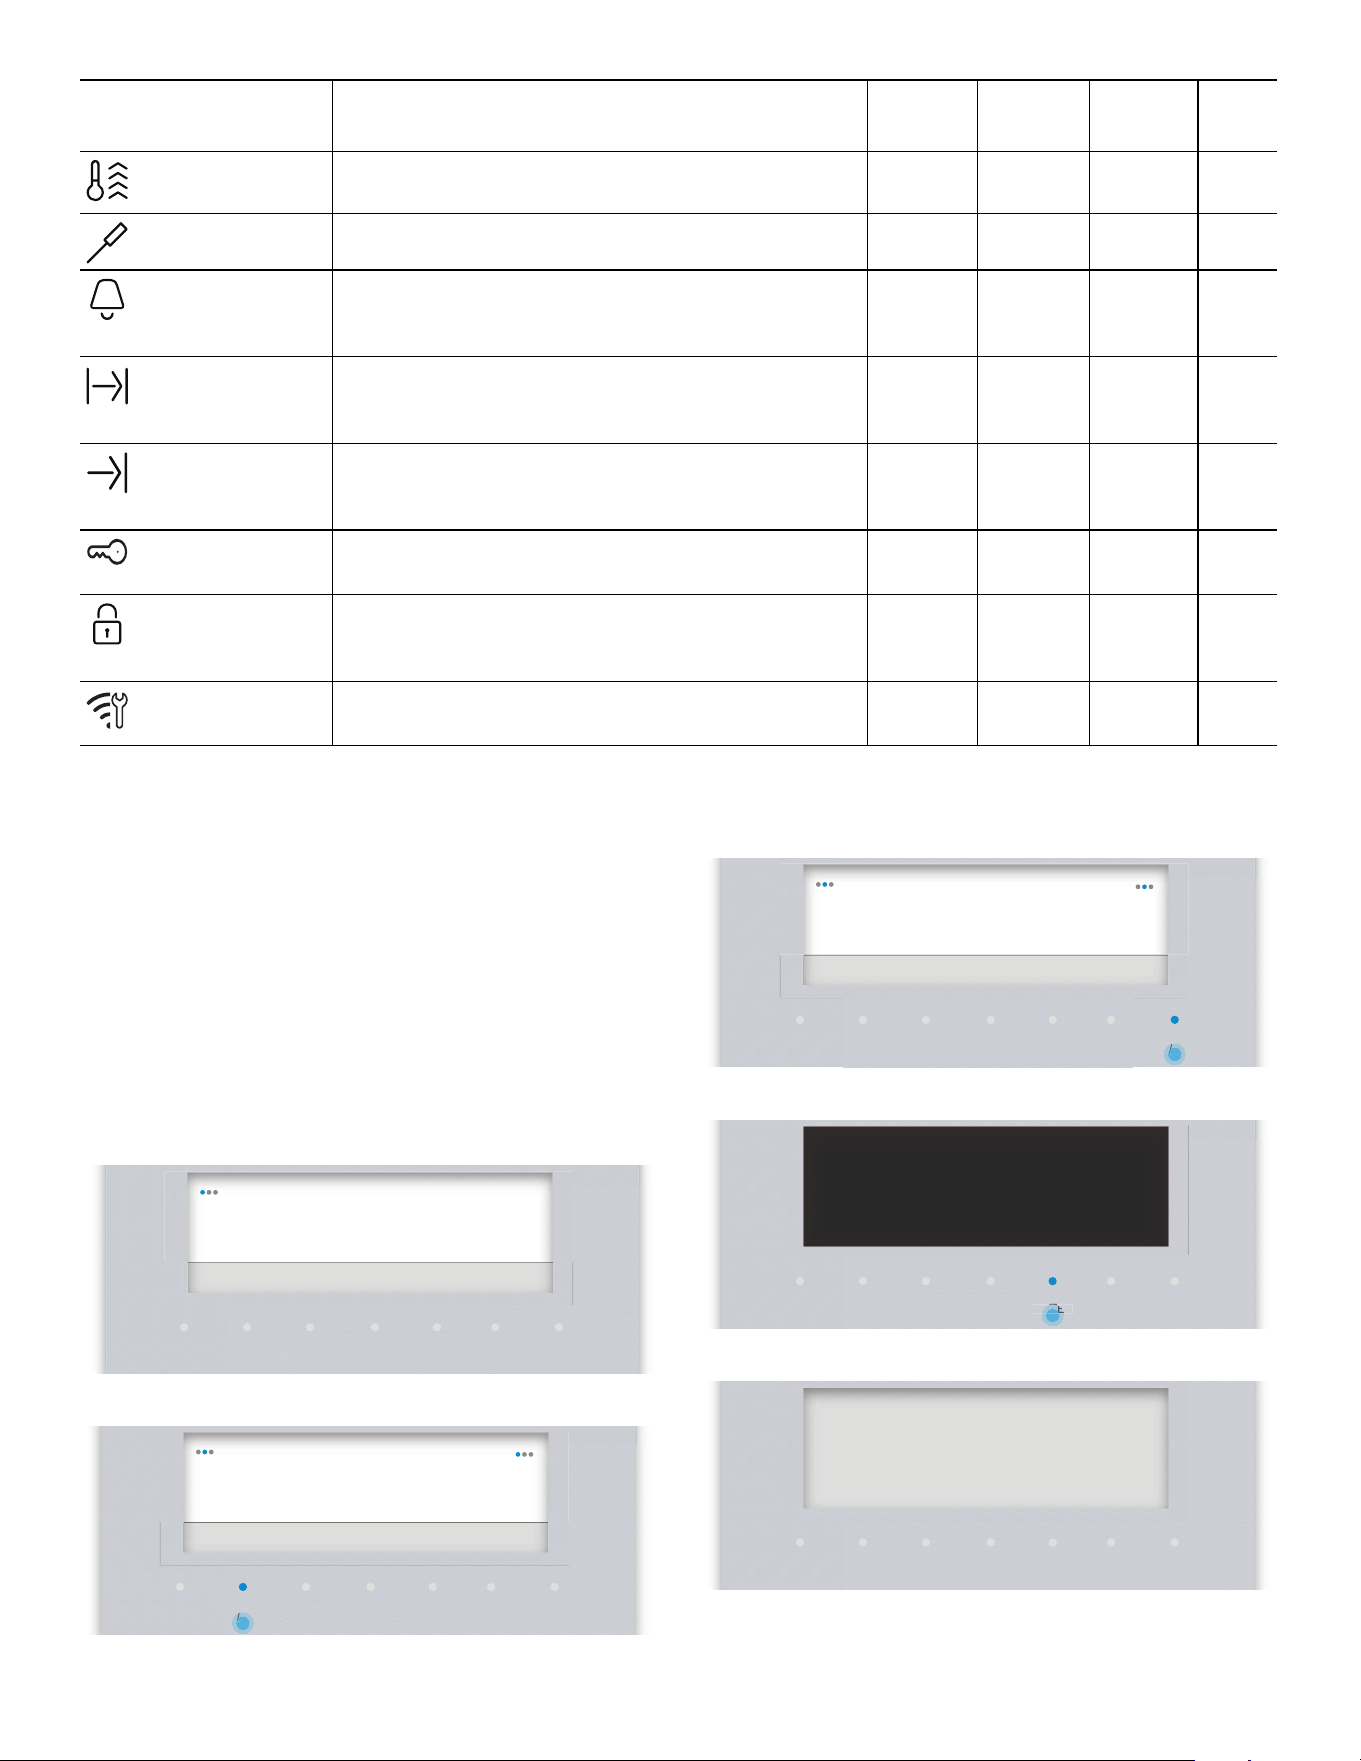
Página. 149
Inicio para poner en
funcionamiento
Iniciar ajustes básicos
Se puede acceder a los ajustes en cualquier momento;
para ello, presionar AJUSTES mientras el
electrodoméstico está en modo de espera. El aparato
debe estar apagado.
1. Conectar el electrodoméstico a la fuente de
alimentación.
2. Seleccione el ajuste con la izquierda
( o ).
3. Cambiar el parámetro ajustado con la derecho ( o ) .
4. Presionar ACEPTAR.
– La pantalla cambia al modo de espera.
Precalentamiento
rápido*
El símbolo se muestra cuando el horno se está
precalentando.
Sonda de temp.* Se muestra cuando se detecta la sonda.
Temporizador del
horno*
El temporizador de cocina funciona
independientemente de las demás funciones del
electrodoméstico.
Tiempo de
cocción*
Muestra la cantidad de tiempo que funcionará el
modo del horno antes de que se apague de forma
automática.
Hora de
finalización*
Se usa al retrasar el inicio de un modo del horno con
tiempo. Muestra la hora del día a la que finalizará el
modo del horno de forma automática.
Bloqueo del
panel*
Evita que el horno se encienda o se cambien los
ajustes accidentalmente
Cerradura de la
puerta*
El símbolo se muestra durante el modo de
autolimpieza y después, cuando la puerta está
bloqueada.
Servicio técnico
remoto*
Se muestra el símbolo si se conecta el servicio
técnico durante el acceso remoto.
*No disponible en los modelos de 30 pulgadas.
Símbolo/modo Definiciones y recomendaciones
Eléctrico
principal
Gas
principal
Eléctrico
aux.
Gas
aux.
TIMERS SETTINGS ENTER
06:30Time of Day
Press Enter to save
TIMERS SETTINGS ENTER
EnglishLanguage
Press Enter to save
TIMERS SETTINGS ENTER
FrançaisLanguage
Press Enter to save
TIMERS SETTINGS ENTER
finished
fi8d
First start up
NTE
NTE
TIMERS SETTINGS ENTER
06:30
Página. 150
Ajustes disponibles
Asistente Home Connect
Acerca de Home Connect
El asistente de instalación de Home Connect forma parte
de la instalación inicial del aparato en determinados
modelos. Si no se ha instalado Home Connect la primera
vez que se ha puesto en marcha el aparato, se puede
acceder a la aplicación en el menú settings (ajustes).
La aplicación Home Connect primero se tiene que instalar
correctamente en un dispositivo móvil. Consultar la
sección “Configurar Home Connect™” para ver
instrucciones completas sobre cómo instalar la aplicación
Home Connect.
Configuración de Home Connect
Se puede iniciar el asistente de Home Connect para
conectarse con la red Home Connect y emparejar el
dispositivo móvil.
1. Empezar desde el modo de espera y seleccionar
AJUSTES (SETTINGS).
2. Seleccione el ajuste con la izquierda
( o ) y
desplácese hasta HOME CONNECT.
3. Presionar ACEPTAR (ENTER).
4. Seguir las instrucciones en el display.
Protección de datos
Cuando su aparato se conecta por primera vez a una red
WLAN que está conectada a Internet, su aparato
transmite las siguientes categorías de datos al servidor
Home Connect (registro inicial):
• Identificación única del aparato (que consta de
códigos del aparato así como la dirección MAC del
módulo de comunicación Wi-Fi instalado).
• Certificado de seguridad del módulo de comunicación
Wi-Fi (para asegurar una conexión TI segura).
• La versión actual de software y hardware de su
aparato doméstico.
• Estado de cualquier ajuste previo a los ajustes de
fábrica.
Este registro inicial prepara las funciones de Home
Connect para su uso y solo es necesario cuando se desea
utilizar estas funciones Home Connect por primera vez.
Ajustar el horno
Modo de cocción y temperatura
1. Colocar la rejilla en la posición deseada y cerrar la
puerta.
2. Colocar la perilla modo en HORNEAR (BAKE), por
ejemplo.
Ajuste Opción
Hora Tiempo en horas y minutos
Idioma English, Français, Español
Formato horario 12 h, 24 h
Indicación de la
hora
Digital, analógica
Precalentamiento
rápido
Encendido, apagado
Tonos teclas Encendido, apagado
Brillo del display 1 – 5
Modo de espera Encendido, apagado
Conversión aire
caliente
Encendido, apagado
Hace descender la temperatura del
horno 4 °C (25° F)
Compensación
de temperatura
• Comp. temp.: horno derecho Ee
-35 a +35° F (de -20 a +20 °C)
• Comp. temp.: horno izquierdo Ee
-35 a +35° F (de -20 a +20 °C)
Sabbat Encendido, apagado
Home Connect Realizar ajustes con el asistente
Ajustes de fábrica Restablecer
Acceso serv.
técnico
Conectar
Servicio Técnico Muestra la información de contacto
del Servicio Técnico
TIMERS SETTINGS ENTER
Bake
06:30
°
— — —
Página. 151
3. Establecer la perilla de TEMPERATURA.
– La barra de precalentamiento se mueve a la
derecha.
4. Una vez que el horno esté precalentado, introducir los
alimentos.
Kitchen timer
(temporizador de cocina)
Sobre el temporizador de cocina
• El temporizador de cocina puede programarse hasta
24 horas.
• Se puede usar aunque la estufa esté funcionando y es
independiente de todas las demás funciones.
• El aparato no se enciende ni se apaga
automáticamente.
Ajustar el temporizador de cocina
1. Tocar TEMPORIZADORES (TIMERS).
2. Tocar el izquierdo
( o ) y seleccionar el
TEMPORIZADOR DE COCINA (KITCHEN TIMER).
3. Tocar el derecho ( o ) para seleccionar el tiempo
deseado y tocar INTRO (ENTER).
– Suena un bip cuando finaliza el temporizador.
Presionar ENTER para finalizar el bip y el
temporizador.
Cambiar un temporizador en marcha
1. Tocar TEMPORIZADORES (TIMERS).
2. Tocar el derecho
( o ) para seleccionar el tiempo
deseado y tocar INTRO (ENTER).
Oven timer (temporizador
del horno)
Sobre el temporizador del horno
El temporizador de la hornilla sirve para apagar
automáticamente la hornilla cuando el tiempo de cocción
se ha cumplido.
Para ajustar el temporizador del horno
1. Colocar la perilla del selector de modo en HORNEAR
(BAKE), por ejemplo.
2. Ajustar el mando de temperatura a 350 °F, por
ejemplo.
3. Tocar TEMPORIZADORES (TIMERS).
4. Tocar el izquierdo
( o ) y seleccionar el
TEMPORIZADOR DEL HORNO (OVEN TIMER).
5. Tocar el derecho
( o ) para seleccionar el tiempo
deseado y tocar INTRO (ENTER).
– Suena un bip cuando finaliza el temporizador.
Presionar INTRO (ENTER) para finalizar el bip y el
temporizador.
Cambiar un temporizador en marcha
1. Tocar TIMERS.
2. Tocar el derecho
( o ) para seleccionar el tiempo
deseado y tocar INTRO (ENTER).
End timer (finalización del
temporizador)
Se puede retrasar la finalización del tiempo de cocción
hasta una hora posterior. Por ejemplo, son las 4:00 p. m. El
plato necesita un tiempo de cocción de 40 minutos.
Quiere que esté listo a las 5:30. Introducir el tiempo de
cocción y retrasar su finalización hasta las 5:30. El
electrodoméstico se pone en marcha automáticamente a
las 4:50 y se apaga a las 5:30.
Tener en cuenta que los alimentos que se echan a perder
con facilidad no se deben dejar en el horno demasiado
tiempo.
Para ajustar la finalización del temporizador:
1. Ajustar el modo de cocción y la temperatura del
horno deseados.
2. Tocar TIMERS.
TIMERS SETTINGS ENTER
Bake
06:30
°
350
°
TIMERS SETTINGS ENTER
Bake
06:30
°
350
°

Página. 152
3. Tocar el izquierdo ( o ) y seleccionar el
TEMPORIZADOR DEL HORNO.
4. Tocar el derecho
( o ) para establecer la HORA DEL
HORNO.
5. Tocar el izquierdo ( o ) y seleccionar el para
seleccionar la HORA DE FINALIZACIÓN.
6. Tocar el derecho
( o ) para establecer la HORA DE
FINALIZACIÓN et tocar ACEPTAR.
– Después de confirmar la hora de finalización,
aparece la notificación de tiempo de espera.
Después del período de espera, el horno empieza
a calentarse.
Fast preheat
(precalentamiento rápido)
Acerca del precalentamiento rápido
• Con el «Precalentamiento rápido», se puede acortar el
tiempo de precalentamiento necesario para algunos
modos de calentamiento.
• El precalentamiento rápido se recomienda
generalmente para la comida preparada congelada,
guisados u otros alimentos que requieren tiempos de
cocción más prolongados. Este modo no se
recomienda para productos de panadería.
• La unidad continuará ejecutando el precalentamiento
rápido de forma indefinida hasta que el usuario lo
cambie manualmente o hasta que la unidad pierda
potencia, en cuyo caso será necesario resetear el
precalentamiento rápido.
• El precalentamiento rápido también se activará para
el horno secundario en los modelos de 48".
• El precalentamiento rápido está disponible para los
modos de horneado, horneado por convección,
rostizado y rostizado por convección.
• Para conseguir un resultado de la cocción uniforme,
no colocar los alimentos en el horno hasta que se
complete el precalentamiento rápido.
Para ajustar precalentamiento rápido
1. Empezar desde el modo de espera y seleccionar
AJUSTES (SETTINGS).
2. Seleccione el ajuste con la izquierda
( o ) y desplácese
hasta PRECALENTAMIENTO RÁPIDO (FAST
PREHEAT).
3. Oprimir el
( o ) izquierdo, seleccionar APAGADO
(ON) y presionar INTRO (ENTER).
Panel lock (bloqueo de
panel)
Sobre el bloqueo de panel
• El bloqueo de panel es un mecanismo de seguridad
para niños para impedir que enciendan el horno o
cambien su programación accidentalmente.
• El bloqueo del panel solo se puede activar en el modo
reposo.
Para activar el bloqueo de panel
1. Presione el botón TEMPORIZADORES (TIMERS)
durante 4 segundos.
– En la pantalla aparecerá el mensaje F y “Panel
locked” (panel bloqueado).
2. Para desactivar el bloqueo de panel, presione el
botón TEMPORIZADORES (TIMERS) durante 4
segundos.
–El mensaje y F de la pantalla desaparecerá.
Conversión automática a aire
caliente
Acerca de la conversión automática a aire caliente
• Para convertir la mayoría de los productos horneados
para usarlos con horneado por convección y
convección real (galletas, pasteles, pays, etc.), la
temperatura del horno a menudo debe reducirse en
25 °F. El ajuste de conversión automática a aire
caliente reduce automáticamente la temperatura
introducida.
• La unidad continuará ejecutando el valor de
conversión automática a aire caliente de forma
indefinida hasta que el usuario lo cambie
manualmente o hasta que la unidad pierda potencia,
en cuyo caso será necesario resetear la conversión
automática a aire caliente.
• La conversión automática a aire caliente está
disponible solamente para los modos “turbohornear
especial” y “convección real”.
• No se debe reducir la temperatura para carnes y aves.
Se debe usar la misma temperatura recomendada en
las recetas y tablas de cocción para carnes y aves.
Ajuste de la conversión automática a aire caliente
1. Comenzar desde el MODO DE ESPERA y seleccionar
AJUSTES.
2. Oprimir el
( o ) izquierdo para desplazarse a la
conversión automática a aire caliente.
3. Oprimir el
( o ) derecho y seleccionar ENCENDIDO.
4. Presionar INTRO (ENTER).
Página. 153
5. Girar la perilla de modo a HORNEADO CONV y la
perilla de TEMPERATURA a la temperatura de la
receta.
– El horno reduce automáticamente la entrada de
temperatura en 25 °F (10 °C) a la temperatura
correcta.
6. Permitir que el horno se precaliente y colocar la
comida dentro del mismo.
Ajuste preciso de la hornilla
(desfase de temperatura)
Sobre desfase de temperatura
Da al usuario la posibilidad de ajustar los parámetros de
cocción según los ajustes personalizados que desea
obtener, permitiéndose desfasar la temperatura de la
hornilla de +/- 35°F respecto a lo que indica el tablero de
control, 5°F a la vez. Esta función es útil si a Usted le
parece que los alimentos quedan siempre muy hechos o
crudos.
• La función de desfase está disponible en todos los
modos, menos para la autolimpieza.
• Por defecto, la temperatura está ajustada a 0°.
• El aparato seguirá aplicando el valor de desfase
introducido indefinidamente hasta que el usuario elija
modificarla o haya un apagón. Se deberá entonces
reinicializar la función de desfase de temperatura.
Ajuste de la compensación
1. Comenzar desde el MODO DE ESPERA y seleccionar
AJUSTES.
2. Oprimir el
( o ) izquierdo para desplazarse a
COMPENSACIÓN DE TEMPERATURA: HORNO
DER./IZQ.
3. Oprimir el
( o ) derecho para ajustar la temperatura.
4. Presionar ENTER.
Probe (sonda térmica)
Sobre el sonda térmica
La sonda térmica le permite controlar mejor la forma de
cocer los alimentos, anulando automáticamente el modo
de cocción elegido cuando la temperatura alcanza la
temperatura seleccionada. La sonda da la temperatura
actual de la carne según se va cociendo.
A continuación, se muestran los modos de calentamiento
que funcionan con la sonda de temperatura:
•Hornear
• Hornear con aire caliente
•Asar
• Asar con aire caliente
La sonda de temperatura no funcionará con el
temporizador del horno ni con la finalización del
temporizador.
IMPORTANTE:
• Para evitar dañar la sonda, no tire del cable al intentar
sacarla de un alimento.
• No use alicates u otras herramientas para tirar de la
sonda al sacarla, y no la inserte violentamente en un
alimento.
• Para evitar quemarse, espere a que se haya enfriado la
hornilla antes de desenchufar la sonda.
• No almacene la sonda en la hornilla.
Para obtener los mejores resultados:
• Para evitar dañar la sonda, asegúrese de que la carne
esté totalmente descongelada antes de insertar la
sonda.
• Inserte la sonda para que la punta esté en el centro de
la parte más gruesa de la carne. Asegúrese de que la
sonda no toque un hueso, grasa o cartílago.
• Para las aves de corral, hace falta insertar la sonda
dentro del músculo de un muslo.
• La sonda no debe tocar el plato o partes de la hornilla
ya que esto influirá en la exactitud de los resultados.
Programación de la sonda térmica
1. Conecte el extremo del enchufe en el enchufe de la
hornilla y inserte la punta de la sonda en la carne.
2. Cierre la puerta de la hornilla.
3. Ajustar el modo de calentamiento y la temperatura
con las perillas.
a. Sonda
b. Enchufe
c. Enchufe de la sonda térmica d. Cable
a
b
c
d
Página. 154
4. Pulsar las derecho ( o ) para introducir el ajuste de
temperatura deseado.
– La pantalla de visualización del horno muestra la
temperatura actual de la carne conforme se
cocina.
– Cuando la temperatura real de la sonda alcanza la
temperatura programada deseada, finalizará el
modo de cocción y el “final del temporizador de
horno” emitirá un bip para indicar que ha
concluido el proceso de cocción.
Sabbath (Sabbat)
El modo Sabbat cumple los estándares enunciados por
Star K. Debe saber que existen restricciones en el uso de
aparatos de cocina durante el Sabbat y las festividades.
Tenga en cuenta que si coinciden el Sabbat y una
festividad, prevalecen las leyes del Sabbat. Si le son ajenas
las leyes sobre la conservación de la comida caliente en el
Sabbat o la cocción durante las festividades, póngase en
contacto con su rabino o consulte el sitio web de Star K en
www.star-k.org.
Puede manejar este electrodoméstico durante el Sabbat
judío o una festividad judía si lo hace de acuerdo con la
siguiente información:
Sobre el modo Sabbat: uso de las parrillas de la estufa
9 ADVERTENCIA
Al utilizar una placa, utilizar únicamente una zona de
cocción STAR
®
al ajuste más bajo. El uso de varias
zonas de cocción STAR podría provocar
sobrecalentamiento, problemas de combustión o
daños en el aparato. NO tapar las aberturas de
ventilación.
• Las zonas de cocción STAR
con la característica XLO
®
se controlan de forma electrónica. Por lo tanto, al
iniciar el modo Sabbat, las zonas de cocción STAR con
la característica XLO se desactivan para garantizar un
uso conforme.
• Las zonas de cocción STAR estándar sin la
característica XLO siguen siendo manteniendo toda su
funcionalidad.
• El módulo de inducción, la plancha o la parrilla siguen
funcionando sin problemas durante el modo Sabbat.
Sin embargo, estos no deberían manejarse para así
garantizar un uso conforme.
• Las zonas de cocción a gas STAR estándar
permanecen encendidas durante una falla eléctrica.
• Las zonas de cocción STAR están equipadas con una
funcionalidad de reencendido. Si la llama se apaga, la
ignición volverá a encender la zona de cocción STAR
automáticamente.
• Durante el yom tov, no se puede encender ni apagar
llamas de gas. Sin embargo, sí se puede aumentar o
reducir la intensidad de la llama para ajustar la
temperatura en función de las necesidades de la
cocción.
• Durante el Sabbat, no se puede encender, ajustar ni
apagar llamas de gas. Puede utilizar una placa para
ocultar la llama, las luces y los controles. NO tapar las
aberturas de ventilación.
Sobre el modo Sabbat: uso del horno (de los hornos)
• El horno mantiene una temperatura constante entre
150 F y 475 F (66 C y 246 C) con el modo de
horneado.
• Los platos cocinados se conservan calientes durante
un tiempo mínimo de 30 minutos y hasta un tiempo
máximo de 74 horas sin necesidad de encender o
apagar el aparato.
• Toda comida debe introducirse en el horno antes del
comienzo del Sabbat, ya que esta no se puede colocar
en su interior en el transcurso del Sabbat. Tener en
cuenta que los alimentos fácilmente perecederos no
deben permanecer en el horno demasiado tiempo.
• La temperatura del horno no deberá activarse,
ajustarse ni desactivarse mientras se celebra el
Sabbat.
• El horno secundario no puede utilizarse durante el
modo Sabbat.
• Durante el Sabbat, debe taparse los controles del
horno en lugar de la placa. Tener la precaución de no
tapar las aberturas de ventilación.
• La lámpara o lámparas del horno están desactivadas
en el modo Sabbat para evitar que se produzca
cualquier cambio si se abre la puerta del horno.
• La puerta del horno solo se podrá abrir una vez
durante el Sabbat para retirar los alimentos y cerrarse
a continuación.
• La puerta del horno puede abrirse y cerrarse en
cualquier momento todas las veces que sean
necesarias en las demás festividades.
• Durante estas otras festividades, es posible ajustar la
temperatura para la cocción. (Existe un retardo entre
la solicitud y la respuesta).
a. Modo de cocción b. Temp. real de la sonda
c. Establecer temp. de
apagado
d. Establecer temp. del
horno
TIMERS SETTINGS ENTER
Bake
05:40
Oven temperature 375°
°
150
70°/
ƒ
¥
a
b
c
d

Página. 155
Nota sobre cortes eléctricos durante el uso del modo
Sabbat
Si se produce un corte eléctrico mientras el horno se
encuentra en el modo Sabbat, la unidad saldrá de este
modo al restablecerse la corriente. El horno volverá al
modo de espera incluso si se encontraba en pleno ciclo de
horneado al producirse el corte eléctrico.
Para ajustar el modo Sabbat en el horno principal
1. Comenzar desde el MODO DE ESPERA y seleccionar
AJUSTES en el panel indicador principal del horno.
2. Oprimir el
( o ) izquierdo para desplazarse a SABBAT.
3. Oprimir el ( o ) derecho y seleccionar ENCENDIDO y
luego presionar ENTER.
– Los pasos 1 a 3 solo son necesarios la primera vez
que se utiliza el Sabbat o si se han restablecido de
fábrica los ajustes del aparato.
4. Girar la perilla de modo del horno principal a
HORNEAR y girar la perilla de temperatura a la
temperatura deseada.
5. Oprimir RELOJES TEMPORIZADORES en el panel
indicador del horno principal.
6. Oprimir el
( o ) izquierdo para desplazarse a
TEMPORIZADOR SABBAT.
7. Oprimir el
( o ) derecho e introducir el TIEMPO DE
DURACIÓN en intervalos de 30 minutos.
8. Oprimir ENTER.
– Aparece una notificación de espera.
– Durante esta pausa de cinco minutos, el usuario
puede ajustar los parámetros. Al finalizar la cuenta
regresiva, el horno empieza a calentar y se
desactivan todos los botones.
– El horno secundario puede ajustarse a cualquier
modo de calentamiento para iniciar el Sabbat
durante la pausa de cinco minutos.
9. Una vez que el temporizador del Sabbat llega a cero,
girar todas las perillas a APAGADO.
Para cancelar el Sabbat
1. Girar todas las perillas a APAGADO para cancelar la
operación.
Para ajustar el Sabbat en el horno secundario
1. Comenzar desde el MODO DE ESPERA y seleccionar
AJUSTES en el panel indicador principal del horno.
2. Oprimir el
( o ) izquierdo para desplazarse a SABBAT.
3. Oprimir el ( o ) derecho y seleccionar ENCENDIDO y
luego presionar ENTER.
– Los pasos 1 a 3 solo son necesarios la primera vez
que se utiliza el Sabbat o si se han restablecido de
fábrica los ajustes del aparato.
4.
Girar la perilla de modo del horno secundario a
HORNEAR y girar la perilla de temperatura a la
temperatura deseada.
5. Oprimir RELOJES TEMPORIZADORES en el panel
indicador del horno secundario.
6. Oprimir el
( o ) izquierdo para desplazarse a
TEMPORIZADOR SABBAT.
7. Oprimir el
( o ) derecho e introducir el TIEMPO DE
DURACIÓN en intervalos de 30 minutos.
8. Oprimir ENTER.
– Durante la pausa de cinco minutos, el usuario
puede ajustar los parámetros. Al finalizar la cuenta
regresiva, el horno empieza a calentar y se
desactivan todos los botones.
Para cancelar el Sabbat
1. Girar todas las perillas a APAGADO para cancelar la
operación.
Sabbat – horneado extendido
Para ajustar el horneado extendido en modelos sin una
pantalla de visualización digital
1. Seleccionar el modo HORNEAR EXTEND. con la
perilla selectora de modo.
2. Establecer la temperatura del horno con la perilla de
TEMPERATURA.
TIMERS SETTINGS ENTER
––min––sSabbath Timer
›
06:30
TIMERS SETTINGS ENTER
04min 59s
›
Sabbath Mode will start in:
NTE
NTE
TIMERS SETTINGS ENTER
completed
›
Sabbath

Página. 156
Remote start (inicio
remoto)
9 ADVERTENCIA
MANEJO REMOTO
Algunos modelos permiten el funcionamiento a
control remoto en cualquier momento. No almacenar
materiales inflamables o sensibles a la temperatura en
su interior, en la parte superior o cerca de las unidades
de superficie del electrodoméstico.
Sobre el inicio remoto
Si se quiere iniciar el funcionamiento del horno con el
dispositivo móvil, se debe activar el inicio a control
remoto.
Notas:
• En algunos modelos puede activarse un inicio a
control remoto permanente a través de la aplicación
Home Connect. Esta función permite que se inicien a
control remoto los modos de funcionamiento
disponibles sin desactivar automáticamente el inicio a
control remoto.
• El inicio remoto le permite al usuario iniciar, pausar y
cancelar los programas del horno de forma remota a
través de la aplicación Home Connect
TM
en su
dispositivo móvil.
• El campo de texto «Inicio remoto» solo se ve si el
asistente de Home Connect se ha completado
correctamente. Consultar la sección «Home
Connect™» de las instrucciones para ver cómo
instalar la aplicación Home Connect.
• Algunos modos de funcionamiento solo se pueden
iniciar en el horno.
• Si el aparato no está conectado a la red de internet
doméstica, funcionará de la misma manera que un
horno sin conexión a la red y se puede seguir
manejando mediante la pantalla de visualización.
• La disponibilidad de la función Home Connect
depende de la disponibilidad de los servicios Home
Connect en su país. Los servicios Home Connect no
están disponibles en todos los países. Se puede
encontrar más información al respecto en www.home-
connect.com.
El inicio a distancia se desactiva de forma automática en
las siguientes situaciones:
• La puerta del horno se abre a los 15 minutos de
activar el inicio a distancia.
• La puerta del horno se abre a los 15 minutos de
finalizar el funcionamiento del horno.
• 24 horas después de haber activado el inicio a
distancia.
IMPORTANTE:
• Asegurarse de seguir las instrucciones de seguridad
de este manual de instrucciones y que estas también
se cumplen al manejar el aparato a través de la
aplicación Home Connect y cuando se esté fuera de
casa. Favor seguir las instrucciones de la aplicación
Home Connect.
• El manejo del electrodoméstico de forma directa
siempre tiene prioridad sobre el manejo desde la
aplicación. Durante este tiempo, no es posible
manejar el electrodoméstico utilizando la aplicación
Home Connect.
• Trabajamos continuamente para mejorar la aplicación
Home Connect, lo que puede generar diferencias en
los pasos para la configuración.Siga las instrucciones
de la última versión de la aplicación Home Connect
que le guiarán en el proceso de configuración.
Cómo configurar el inicio remoto
1. Coloque la comida en el horno y luego cierre la
puerta.
2. Girar el selector de modo del horno hasta REMOTE
START (INICIO REMOTO).
– NO girar la perilla selectora de temperatura a
ninguna posición (dejarla en la posición de
apagado).
– El panel indicador pasa a la indicación de modo
de espera y aparece
C en el panel indicador.
3. Continuar con la aplicación Home Connect instalada
en el dispositivo móvil.
TIMERS SETTINGS ENTER
switched on
F
Remote Start
TIMERS SETTINGS ENTER
06:30
F
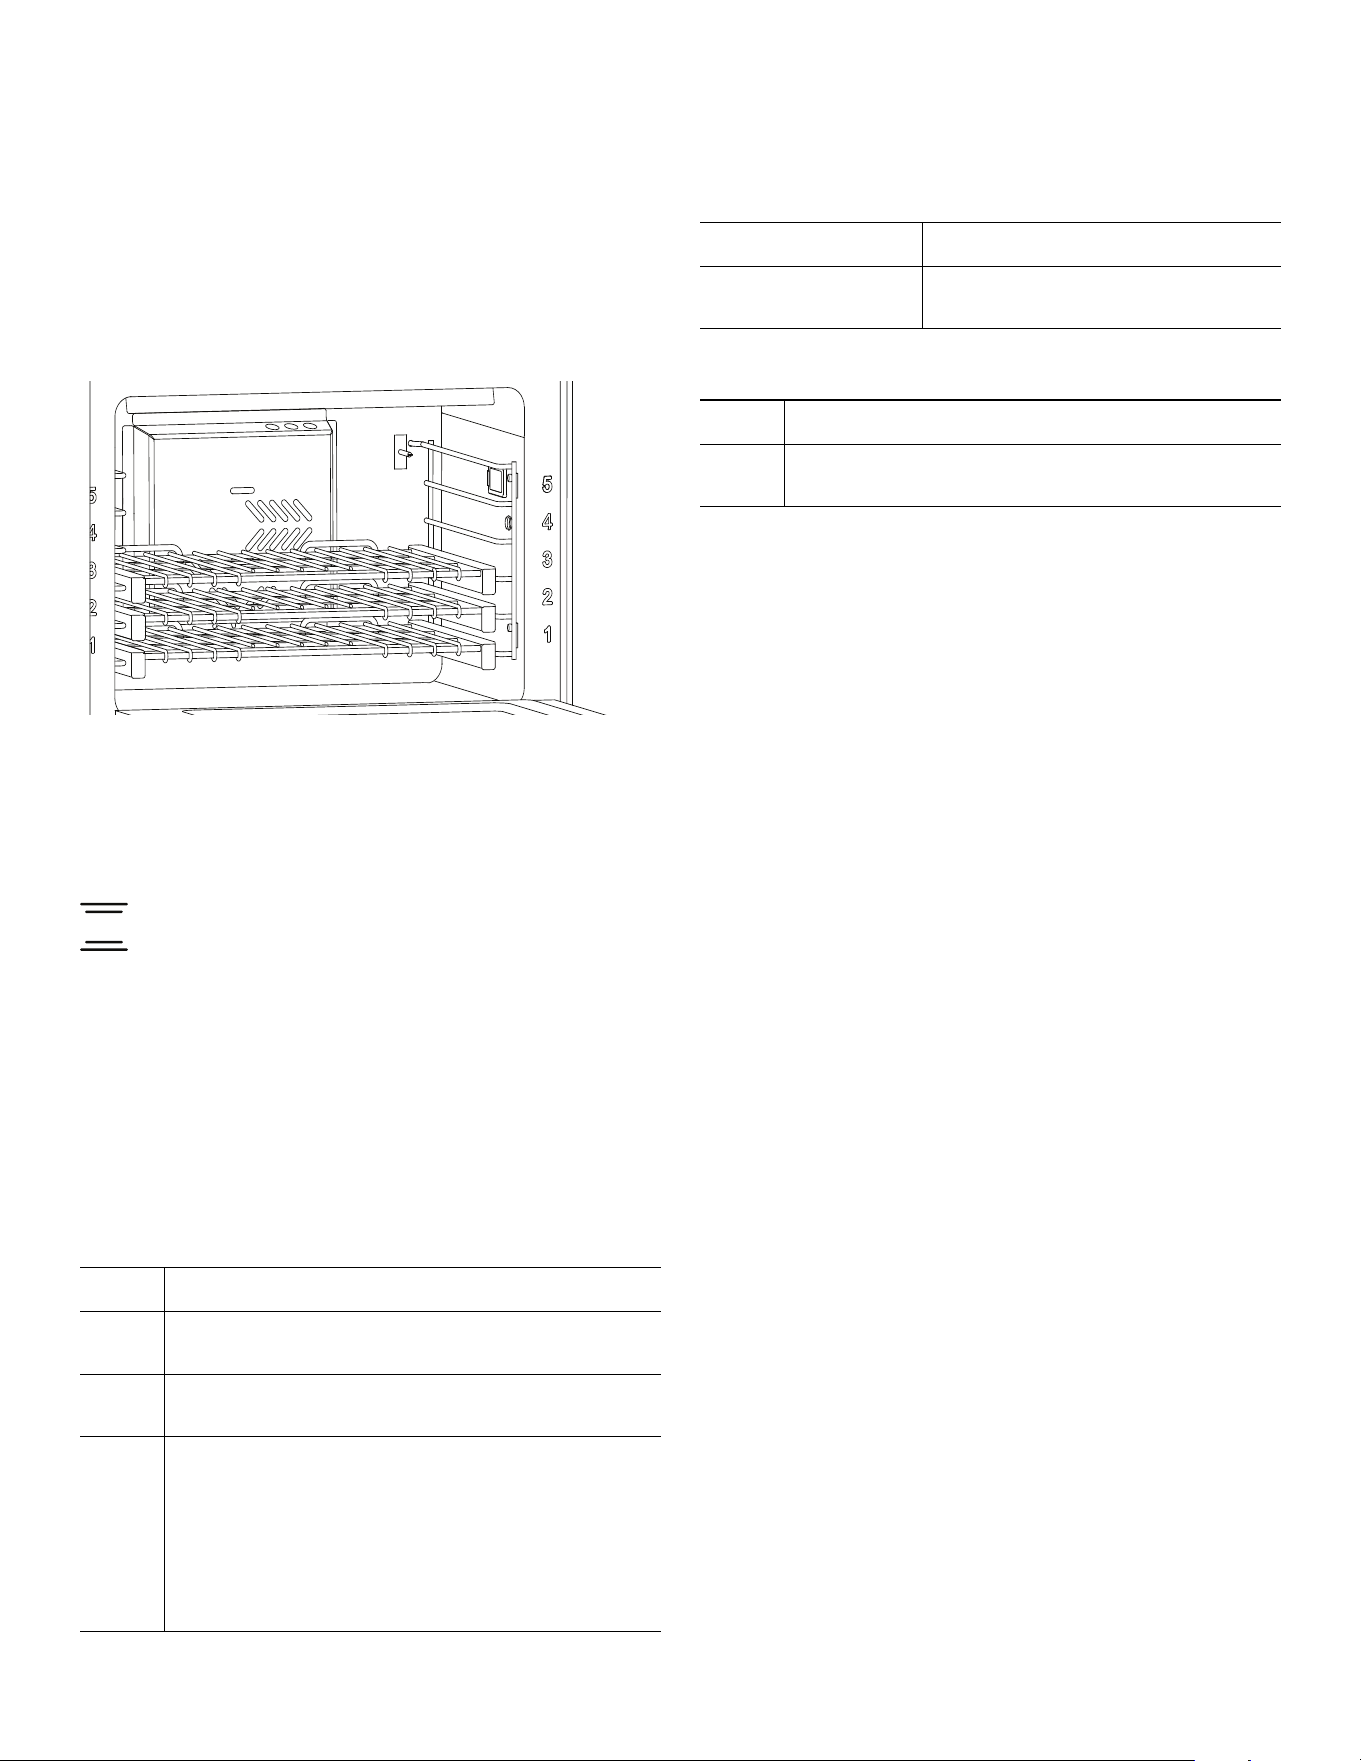
Página. 157
Sacar lo mejor del electrodoméstico
Posiciones de las rejillas para
hornear
Las posiciones de las rejillas en la hornilla están numeradas
como un elevador. La posición número uno es la más baja.
NOTA: Las recomendaciones relativas a la posición de las
rejillas se aplican a la cocción en la hornilla.Sin embargo, si
una receta sugiere una posición de rejilla distinta, se debe
seguir la receta o las instrucciones del paquete.
Bake (hornear)
Sobre hornear
Hornear es cocinar con aire seco calentado. Tanto los
elementos superiores e inferiores giran para mantener la
temperatura del horno. El modo hornear se puede utilizar
para preparar gran variedad de alimentos, desde galletas
a guisos. Consultar la receta o las instrucciones del envase
en lo que respecta a la temperatura del horno y el tiempo
de horneado.
Hornear con una rejilla, hornilla principal
Hornear con dos rejillas, hornilla principal
Hornilla secundaria (modelos de 48 pulg.)
Hornear con tres rejillas
Para hornear con tres rejillas, es preferible utilizar el modo
hornear por convección.
Para obtener mejores resultados
• Minimice la abertura de la puerta.
• Utilice la olla recomendada en la receta.
• Guarde la(s) bandeja(s) de asar fuera de la hornilla.
Una bandeja sin alimentos afecta al dorado y la
cocción.
• El tipo de utensilio utilizado afecta al dorado:
• Para una corteza suave y dorada, use utensilios
claros de teflón, antiadherentes o brillantes de
metal.
• Para una corteza dorada, crujiente use utensilios
oscuros de teflón, antiadherentes, de vidrio, u
oscuros sin brillo. Pueden requerir bajar la
temperatura de 25°F.
Precalentamiento de la hornilla
• La mayor parte de los tiempos de cocción en las
recetas están diseñados para una hornilla
precalentada y necesitan de la hornilla que haya
alcanzado una cierta temperatura antes de que se
empiece la cocción. Consulte su receta para conocer
las recomendaciones de precalentamiento.
• El tiempo de precalentamiento depende del ajuste de
temperatura y de la cantidad de rejillas colocadas en
la hornilla.
Tipos de platos para la hornilla
• Platos de metal (con o sin un acabado de teflón),
vidrio refractario, vitrocerámica, terracota u otros
utensilios que van con la hornilla.
• Las bandejas para galletas adaptadas para las hornillas
tienen un pequeño borde de un lado. El tiempo de
cocción puede estar afectado por las bandejas
pesadas o aquellas con más de un lado.
Nivel Modo hornear
4 -- Adecuado para cocinar alimentos individuales
en ración, por ejemplo, galletas y pasteles.
3 -- El modo hornear sirve para la mayoría de los
alimentos horneados.
2 -- Cuando el alimento está muy alto, como un
pastel tipo bizcocho.
-- Las tartas, para que la corteza esté bien
cocida sin que la parte superior esté
demasiado dorada.
-- Para asar piezas grandes de carne o pollo,
como una chuleta de res o un pavo.
Nivel Modo hornear o conv hornear
2 y 5 mixtas
2 y 4 gas
-- Platos horneados
Nivel Modo hornear
1 -- El modo hornear sirve para la mayoría de los
alimentos horneados.
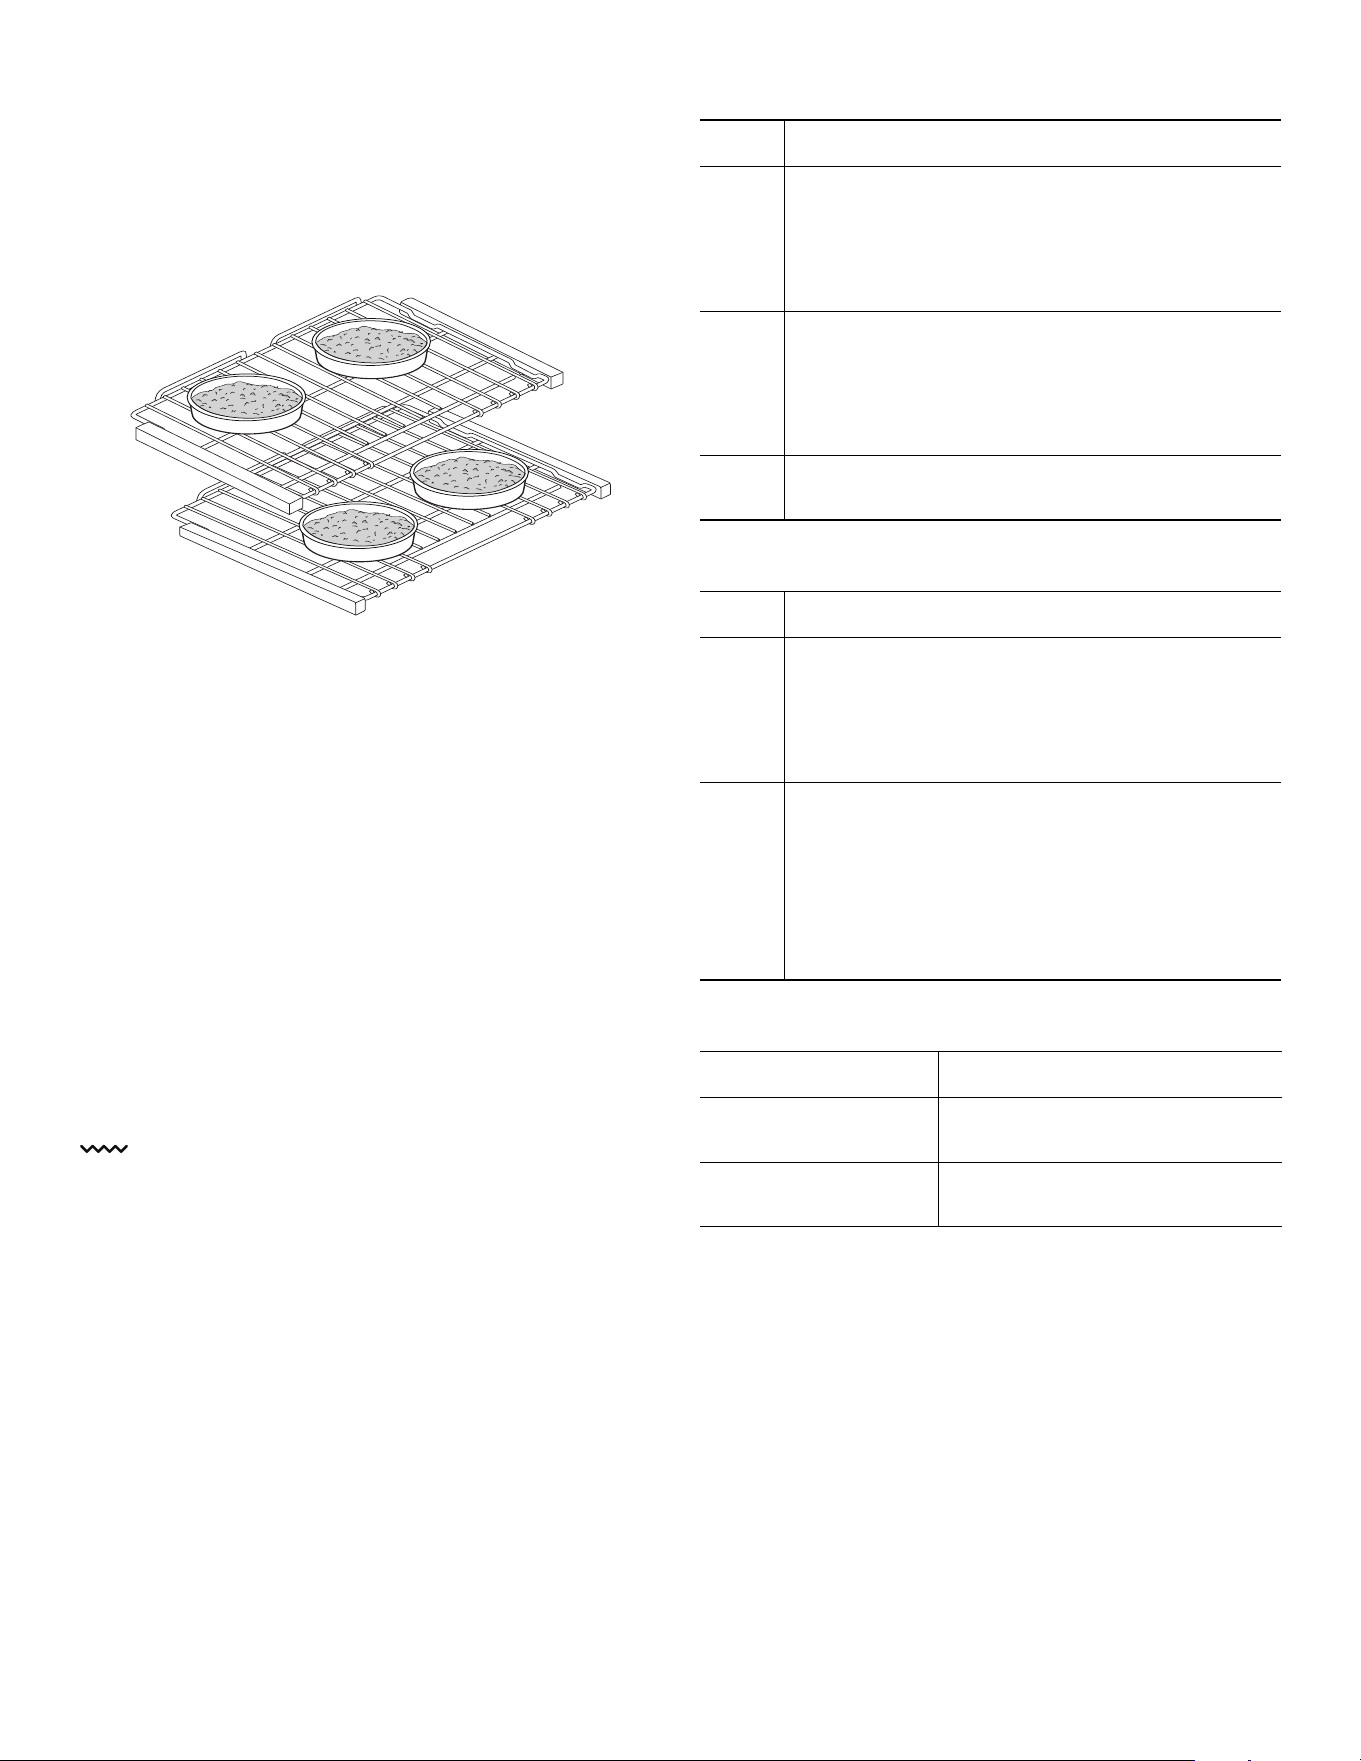
Página. 158
Colocación de los moldes
• Deje por lo menos 1 pulg. (25,4 mm) de espacio entre
las ollas y las paredes de la hornilla para que el calor
pueda circular alrededor de cada olla.
• Deje un espacio libre de 1,5 pulg. (38 mm) encima y
debajo de cada plato.
Hornear a gran altitud
Cuando hornee a grandes altitudes, las recetas y las
duraciones de cocción recomendadas pueden variar. Para
tener más información, escriba a Extension Service,
Colorado State University, Fort Collins, Colorado 80521.
Puede ser que tenga que pagar para obtener los
boletines. Especifique el tipo de información que desea
(ejemplo: pasteles, galletas, panes, etc.).
Condensación
Es normal que cierta cantidad de humedad se evapore de
los alimentos durante la cocción. La cantidad depende de
la humedad contenida en el alimento. La humedad se
condensa en superficies más frías que el interior de la
hornilla, como el tablero de control.
Broil (grill)
Sobre grill
Antes de prender el horno, coloque la rejilla y bandeja de
asar en la posición deseada. Después de precalentar el
asador, centre la bandeja debajo del elemento de asar.
Solamente el elemento superior se calienta en el modo de
grill. Un buen asado requiere de la exposición constante a
un fuerte calor intenso.
Hornilla principal de estufa mixta
Hornilla principal de estufa de gas
Hornilla segundaría (modelos de 48 pulg.)
Rejilla Modo grill - estufa mixta
5 -- Use esta posición de rejilla cuando gratine
filetes de res, hamburguesas de carne picada
y chuletas de cordero con un grosor de una
pulgada (25,4 mm) o menos. Además, use
esta posición para dorar alimentos.
4 -- Use esta posición de rejilla cuando ase carnes
con un grosor de 1-1/8 pulgada (29 mm) o
más, pescado, aves, chuletas de cerdo y
filetes de jamón con un grosor de una
pulgada (25,4 mm) o más.
3 -- Use esta posición de rejilla cuando gratine
pollo en cuartos o mitades.
Rejilla Modo grill - estufa de gas
4 -- Use esta posición de rejilla cuando gratine
filetes de res, hamburguesas de carne picada
y chuletas de cordero con un grosor de una
pulgada (25,4 mm) o menos. Además, use
esta posición para dorar alimentos.
3 -- Use esta posición de rejilla cuando ase carnes
con un grosor de 1-1/8 pulgada (29 mm) o
más, pescado, aves, chuletas de cerdo y
filetes de jamón con un grosor de una
pulgada (25,4 mm) o más. Use esta posición
de rejilla cuando gratine pollo en cuartos o
mitades.
Rejilla Segundaría grill modo
3, 4, o 5 – mixtas
1, 3, o 4 – gas
-- Según el tipo y el grosor del
alimento.
5 – mixtas
4 – gas
-- Puede servir para dorar
algunos alimentos.
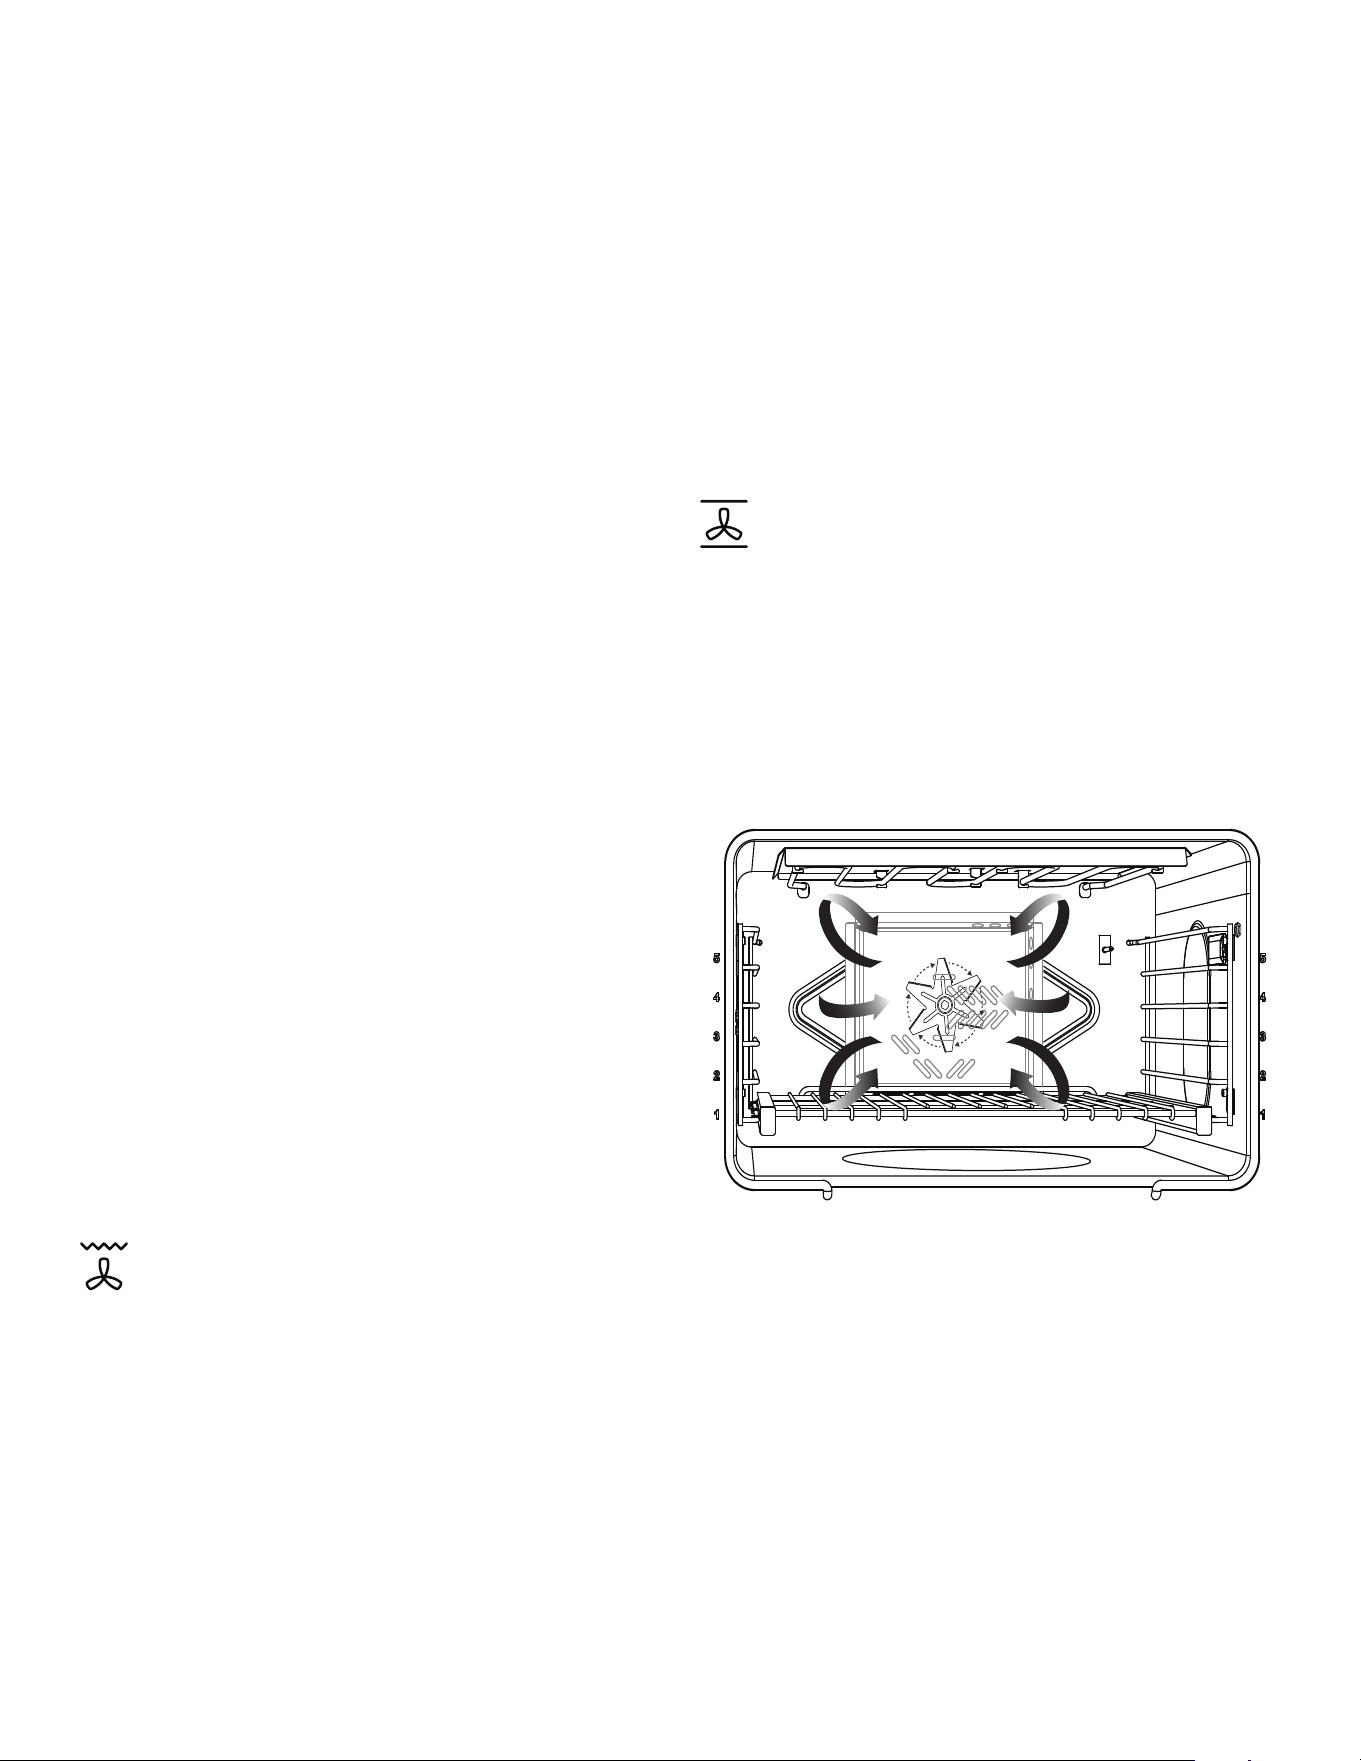
Página. 159
Para obtener los mejores resultados
Consejos:
• Se recomienda precalentar el quemador aparato del
grill antes de comenzar a cocinar. Precaliente el horno
durante tres minutos, luego coloque el plato en el
horno.
• Descongele los alimentos antes de gratinarlos.
• Asegúrese de que la puerta esté cerrada cuando use
el grill.
• Voltee los alimentos solamente una vez, a mitad del
tiempo de cocción. No es necesario voltear alimentos
muy finos (lonchas de jamón, filetes de pescado, etc.).
Se deben voltear las lonchas de hígado, no importa su
grosor.
• Use un temporizador. Ajústelo para el tiempo mínimo
de comprobación de la cocción.
• Centre los alimentos directamente debajo del
quemador del grill para que queden bien dorados.
Utensilios
• Su estufa viene con una bandeja grande de asar de
dos piezas. La grasa procedente de la cocción cae por
las ranuras de la parte superior a la parte inferior de la
bandeja, alejándose del calor intenso de los
quemadores de gratinar para minimizar las
salpicaduras y la formación de humo.
• Los modelos de 48 pulg. se venden con una pequeña
bandeja de asar de dos piezas de porcelana, para la
hornilla secundaria.
• Use moldes de metal o de vitrocerámica para dorar
guisos, platos principales o pan.
• NO use vidrio refractario o cerámica. Este tipo de
material no puede resistir el intenso calor del
quemador del grill.
NOTA: Es imposible usar la hornilla y el grill al mismo
tiempo. Cuando uno de los dos está prendido, no se
puede prender el otro.
Convection broil (grill con
convección)
Sobre grill con convección
Asar a la parrilla con aire caliente es similar a asar a la
parrilla. Combina el intenso calor del elemento superior
con el aire que hace circular un ventilador de aire caliente.
El modo asar a la parrilla con aire caliente se adapta a la
perfección para cocinar cortes tiernos y gruesos de carne,
aves y pescado. Asar a la parrilla con aire caliente no se
recomienda para dorar panes, guisos y otros tipos de
comida. Utilizar siempre asar a la parrilla con aire caliente
con la puerta cerrada.
Además de los beneficios de asar a la parrilla estándar,
asar a la parrilla con aire caliente es más rápido.
Consejos:
• Precalentar el horno 3–4 minutos. No precalentar el
horno durante más de 5 minutos.
• Los filetes y las chuletas deben tener al menos 1½'' de
grosor.
• No cubrir la parrilla para asar con papel aluminio. Está
diseñada para drenar grasas y aceites de la superficie
de cocción para evitar humos y salpicaduras.
• Voltear las carnes (el caso del pescado es diferente)
una vez durante el tiempo de cocción recomendado.
Convection bake (hornear
por convección)
Sobre hornear por convección
Hornear con aire caliente es parecido a hornear. El calor
proviene de los calefactores inferior y superior. La
principal diferencia en la cocción con aire caliente es que
un ventilador de aire caliente hace circular el calor por
todo el electrodoméstico.
Consejos:
• Para convertir la mayoría de las recetas (galletas,
pasteles, tartas, etc.) al modo de hornear por
convección, reduzca la temperatura de la hornilla de
25°F (14°C), menos para las carnes y las aves.
• En este caso, use la temperatura recomendada en las
recetas y tablas de cocinar para cocer carnes y aves.
• Los platos de aluminio dan los mejores resultados
para dorar.
• Las bandejas para galletas con solamente uno o dos
costados dan mejores resultados. Se pueden usar
bandejas comerciales de aluminio o utensilios
profesionales para hornear, pero la duración de
cocción aumenta.

Página. 160
• Para dorar mejor, se deben colocar algunos utensilios,
como las bandejas para galletas, los moldes para
brazos de gitano y pasteles rectangulares en la rejilla
con los costados más cortos en el lado derecho e
izquierdo. Esto permite al aire circular libremente.
• Cuando hornee en más de una rejilla, no se deben
escalonar las bandejas para galletas, al contrario de
los moldes redondos para pasteles.
• Normalmente, hace falta entre 10 y 20% menos
tiempo para asar un trozo grande de carne o de ave.
Compruebe la cocción más temprano.
Cocción con una rejilla
Cocción con dos rejillas
Cocción con tres rejillas
Cómo deshidratar alimentos con el modo
de cocción a convección
Utilice el modo de cocción a convección para deshidratar
y conservar fruta y verdura.
Consejos:
• El tiempo de cocción varía según el grado de
humedad y del contenido en azúcar de los alimentos,
del tamaño de los trozos, de la cantidad de alimentos
a deshidratar y de la humedad ambiente.
• Deshidrate la mayor parte de fruta y verdura a 150°F.
• Compruebe los alimentos cuando alcance el tiempo
mínimo de secado.
• Es recomendable utilizar las rejillas de secado (no
incluidas) para que el aire pueda circular alrededor de
los alimentos. No coloque los alimentos directamente
sobre una bandeja o placa de horno. Los alimentos
deben estar colocados bastante altos en el horno para
secarse uniformemente.
• Se pueden usar varias rejillas de secado
simultáneamente.
• Para secar a la vez varias rejillas con alimentos, se
pueden colocar las rejillas en los niveles 2 y 4, o 1, 3 y
5. Utilice únicamente el nivel 3 para una sola rejilla.
• Por cuestiones de salubridad, no se recomienda
deshidratar carne.
• Consulte un libro sobre conservación de alimentos,
una oficina regional de salubridad alimenticia o
documentación disponible en bibliotecas para
obtener más información.
Cómo deshidratar alimentos con el modo de cocción a
convección
Rejilla Hornear por convección modo
3 o 4 -- Cuando hornee en una sola rejilla, se
obtienen mejores resultados con el modo de
hornear.
2 -- Cuando asa pavo o un corte grande de carne,
se puede usar el horneado de convección.
Rejilla Hornear por convección modo
2 y 4
mixtas
gas vea
note
-- Cuando desea hornear varios guisados.
-- Niveles de rejillas de las estufas de gas para:
Galletas: 3 y 5
Bizcochos: 2 y 5
Rejilla Hornear por convección modo
1, 3, y 5
mixtas
gas vea
note
-- Cuando se utilizan varias placas de
hornear, se deben colocan unas sobre las
otras en su respectiva rejilla para dejar
que el aire circule alrededor.
-- Niveles de rejillas de las estufas de gas
para:
Galletas: 3, 4, y 5
Otros alimentos: 1, 3, y 5
Alimento Preparación
Aprox.
(horas)
Verificación
de la
terneza
Manzanas, ¼''
rebanadas
Moje los trozos
en una
disolución de ¼
de taza de zumo
de limón y 2
tazas de agua.
8 – 15 Ligeramente
flexibles
Plátanos, ¼''
rebanadas
Moje los trozos
en una
disolución de ¼
de taza de zumo
de limón y 2
tazas de agua.
8 – 15 Ligeramente
flexibles
Cerezas Limpie y seque
con un trapo.
Deshuese las
cerezas frescas.
7 – 18 Curtidas y
blandas
Pieles de
naranja
Corte pieles
finas de la
peladura de las
naranjas.
1 – 4 Secas y
quebradizas
Rodajas de
naranja
¼'' rebanadas 9 – 16 Piel seca y
quebradiza,
fruta
ligeramente
húmeda
Rodajas de
piña en
conserva
Seque con un
trapo.
8 – 13 Lonchas
blandas y
flexibles
Página. 161
True convection (aire
caliente verdadero)
Sobre aire caliente verdadero
La aire caliente verdadero con aire caliente cocina con el
calor procedente de un tercer elemento tras la pared
posterior del horno. Un ventilador de aire caliente hace
circular el calor por todo el horno.
Consejos:
• Reducir la temperatura de la receta en 25 ºF (13 ºC).
• Colocar la comida en moldes sin tapar y de bordes
bajos como las charolas para galletas sin laterales.
• Si se está horneando con más de un molde sobre la
rejilla, dejar al menos de 1'' a 1½'' (2.5-3.8 cm) de
espacio libre alrededor del molde.
Proof (preparación de
masa)
Sobre preparación de masa
La función de preparación de masa proporciona un
ambiente caliente y sin corrientes de aire necesario para la
preparación de productos derivados del pan. Es mejor
utilizar la función de fermentación cuando la hornilla está
fría.
Como ajustar a la función de preparación de la masa
1. Deje tiempo para que la masa se descongele cuando
está congelada.
2. Coloque la masa en un plato dentro de la hornilla y
cúbrala parcialmente.
3. Use cualquier posición de rejilla que corresponda a las
dimensiones del recipiente o del molde. Cierre la
puerta.
4. Gire el selector de modo a PROOF.
5. Colocar la perilla de temperatura del horno en la
posición 150°F.
La temperatura ideal para la preparación de la masa se
mantendrá hasta apagar el selector de modo. La
fermentación de la masa está terminada cuando ha
doblado su tamaño.
No abra la puerta inútilmente para evitar que disminuya la
temperatura de la hornilla, lo que aumentará el tiempo
necesario para la preparación de la masa. Use la luz de la
hornilla para ver la evolución de la masa.
Se puede reducir el tiempo de preparación de la masa
cuando se usa la hornilla principal al mismo tiempo.
Compruebe la masa para evitar dejarla demasiado tiempo
en la hornilla. Para obtener mejores resultados, le
aconsejamos, si usa la hornilla principal durante largos
periodos, que prepare la masa antes de usar la hornilla
principal.
Rodajas de
piña fresca
Seque con un
trapo.
7 – 12 Lonchas
blandas y
flexibles
Fresas Limpie y seque
con un trapo.
Corte rodajas de
media pulgada
(1/2 pulg.) de
espesor.
Coloque la piel
contra la rejilla.
9 – 17 Secas y
quebradizas
Pimientos
rojos
Limpie y seque
con un trapo.
Quite la piel.
Corte trozos de
una pulgada.
13 – 17 Curtidos, sin
humedad en
el interior
Champiñones Limpie y seque
con un trapo.
Corte rodajas
finas de 1/8 de
pulgada.
5 – 12 Duros y
curtidos,
secos.
Tomates Limpie y seque
con un trapo.
Corte rodajas
finas de 1/8 de
pulgada. Vacíe
bien.
5 – 12 Secos. Color
de ladrillo
rojo.
Mixtas rejilla True conv modo
4 y 5 Galletas
2, 3, y 4 Galletas
1, 3, y 5 Pasteles y otros productos horneados
Dimensión Tiempo
Hogaza, 1 lb (0.45 kg) 60 – 75 minutos
Bollos, 0.1 lb (0.05 kg) 30 – 45 minutos

Página. 162
Roast (asar)
Sobre asar
Asar utiliza tanto los elementos superiores e inferiores
para mantener la temperatura del horno. En el asado se
utiliza un calor más intenso desde el elemento superior
que desde el inferior. Esto se traduce en un mayor dorado
del exterior mientras el interior se mantiene
especialmente húmedo. Asar es más adecuado para
cortes grandes de carne y aves.
Consejos:
• Usar un molde para asar a la parrilla de laterales altos
o un molde para asar.
• Para aquellos cortes de carne menos tiernos, añadir
líquidos, tales como agua, zumos, vino, consomés o
caldos para más sabor y humedad.
• En este modo es adecuado usar bolsas de asar y usar
líquidos.
• Cuando se asa un pollo o un pavo entero, meter las
alas detrás de la espalda y atar holgadamente las
patas con hilo de cocinar.
Recomendaciones para gratinar
Convection roast (asar con
aire caliente)
Sobre asar por convección
Asar con aire caliente usa el calor de los elementos
superiores e inferiores así como el calor que hace circular
el ventilador de aire caliente.
El modo asar con aire caliente es adecuado para preparar
cortes de carne jugosos y aves. Las ventajas de asar con
aire caliente incluyen:
• Una cocción hasta un 25% más rápida que los modos
sin aire caliente.
• Un tostado dorado y apetitoso.
Consejos:
• Utilizar la misma temperatura que la indicada en la
receta.
• Comprobar la cocción al poco tiempo, ya que el
tiempo de asado puede reducirse.
• No cubrir la carne ni utilizar bolsas de cocción.
• Utilizar un molde para asar a la parrilla con una rejilla y
una parrilla o un molde poco profundo sin tapar con
una rejilla para asar.
• Utilizar un termómetro para carne para determinar la
temperatura interna de la misma.
• Si la carne está dorada al gusto, pero aún no está
cocida, se puede colocar papel aluminio sobre ella
para evitar que se dore en exceso.
• Dejar la carne cubierta con papel aluminio durante 10-
15 minutos tras retirarla del horno.
Carne roja y aves Temperatura Nivel
Res
Estofado de carne
Bistec de carne
Tirada de carne
pastel de carne
350°F (180°C)
350°F (180°C)
350°F (180°C)
350°F (180°C)
1
2
1
3
Aves
Pollo, entero
Pedazos de pollo
Turquía, todo
375°F (190°C)
375°F (190°C)
325°F (165°C)
2
2
2
Cerdo
Hombro
Jamón ahumado,
mitad
325°F (165°C)
325°F (165°C)
1
1

Página. 163
Keep warm (caliente)
Sobre caliente
• Esta función proporciona la temperatura adecuada
para mantener calientes platos preparados a una
temperatura de servicio. Use siempre esta función con
alimentos calientes. NO use este modo para calentar
alimentos fríos, a excepción de galletas crujientes,
patatas fritas y cereales secas.
• Puede guardar platos a temperatura de servicio con
este modo. No use el modo Caliente para cocer
alimentos.
• Antes de colocar los alimentos en la hornilla, deben
estar a una temperatura de servicio (más de 140°F /
60°C).
• Puede mantener alimentos calientes en la olla en la
que los preparó o servirlos en un plato de servicio
resistente al calor.
• Se puede usar papel de aluminio para cubrir los
alimentos. Use únicamente platos que resistan al calor.
• No abra la puerta de la hornilla inútilmente, reducirá la
temperatura de la hornilla. Temperaturas mínimas de
cocción interna
Para configurar la caliente
1. Elija el modo CALIENTE (KEEP WARM) con el anillo
de selección de modo.
2. Colocar la perilla de temperatura del horno en la
posición150°F.
3. Ponga el plato caliente en la hornilla. Cierre la puerta.
Mínimas temperaturas de cocción internas
recomendadas
Las temperaturas mínimas de cocción interna
consideradas como seguras para que se pueda comer un
alimento, tal y como lo estableció el U. S Department of
Agriculture Food Safety and Inspection Service, son las
siguientes:
Platos de huevo, cazuelas 160°F (72°C)
Sobras 165°F (74°C)
Carne de res molida fresca, ternera,
cordero, cerdo
160°F (72°C)
Carne de vaca, ternera, asados de
cordero, filetes, chuletas
Medianamente raro
Medio
Bien hecho
145°F (63°C)
160°F (71°C)
170°F (77°C)
Asados de cerdo frescos, filetes, chuletas
Medio
Bien hecho
160°F (72°C)
170°F (77°C)
Jamón
Cocinar antes de comer
Completamente cocinado, para
recalentar
160°F (72°C)
140°F (60°C)
Aves de corral
Pollo molido, pavo
Pollo entero, pavo
Pechos, asados
Muslos y alas
Relleno (cocinado solo o en ave)
165°F (74°C)
180°F (82°C)
170°F (77°C)
180°F (82°C)
165°F (74°C)

Página. 164
Configurar Home Connect™
Este aparato completamente automático es compatible
con Wi-Fi y se puede controlar remotamente utilizando un
dispositivo móvil (por ejemplo, tablet, smartphone). La
aplicación Home Connect ofrece funciones adicionales
que son un complemento perfecto para el aparato en red.
Home Connect no funciona a través de redes Wi-Fi que
requieran el registro del navegador, es decir, un nombre
de usuario y una contraseña introducidos a través de un
navegador.
Se debe tener una red inalámbrica estable con buena
recepción y acceso a Internet.
Si el aparato no está conectado a la red WLAN (red
doméstica), funciona de la misma manera que una
campana típica sin conexión a la red y puede funcionar
como de costumbre a través del Tocar panel de control.
NOTA: Asegurarse de seguir las instrucciones de
seguridad proporcionadas al principio de este manual de
instrucciones y que éstas también se observen al operar el
aparato a través de la aplicación Home Connect y cuando
se esté fuera de casa.
NOTA: El funcionamiento en el propio aparato siempre
tiene prioridad, y durante este tiempo no es posible
operar el aparato utilizando la aplicación Home Connect.
Configuración
Para implementar los ajustes a través de Home Connect,
se debe tener instalada y configurada la aplicación de
Home Connect en el dispositivo móvil. Prestar atención a
los documentos de Home Connect respecto a esto.
Seguir los pasos especificados por la aplicación para
implementar los ajustes.
¿Qué se necesita para conectar la
campana Home Connect™?
1. El aparato debe haberse instalado y conectado
correctamente.
2. Un smartphone o una tableta equipada con la última
versión del sistema operativo iOS o Android.
3. El electrodoméstico debe estar ubicado dentro de la
señal de Wi-Fi de su red doméstica de internet.
4. El nombre de su red Wi-Fi (SSID) y su contraseña (key).
SEGURIDAD DE LA INFORMACIÓN Y PROTECCIÓN DE
DATOS:
Home Connect cumple con los máximos estándares de
seguridad, que se revisan constantemente. Para obtener
más información, vaya a www.home-connect.com.
Información:
Trabajamos constantemente para mejorar la
aplicación Home Connect, por lo que podría haber
diferencias en los pasos de configuración. Seguir las
instrucciones de la última versión de la aplicación
Home Connect que le guían en el proceso de
configuración.
Paso 1: Descargar la aplicación Home
Connect y crear una cuenta de usuario
1. Abrir el App Store (dispositivos Apple
®
) o Google
Play™ Store (dispositivos Android™) en el teléfono
inteligente o la tableta.
2. Buscar la aplicación HOME CONNECT en el campo
de búsqueda de la tienda e instalarla.
3. Abrir la aplicación y registrarse para crear una cuenta
de Home Connect.
4. Anotar las credenciales de la cuenta de Home
Connect (cuenta de usuario y contraseña), porque se
necesitarán después.
Apuntar los datos de acceso a Home Connect aquí:
Nombre de red
(SSID):............................................................................
Contraseña
(clave):............................................................................
La aplicación le guiará por los pasos para añadir su
electrodoméstico a Home Connect.

Página. 165
Paso 2: Conectar el electrodoméstico a la
red de internet doméstica
1. El electrodoméstico debe estar correctamente
instalado.
2. Abrir la aplicación Home Connect para añadir un
electrodoméstico.
3. Seguir las indicaciones de la aplicación y consultar la
guía de Home Connect solamente cuando la
aplicación lo indique.
Paso 2.1: Conectar el electrodoméstico a
la red de internet doméstica con WPS
Acceder al Paso 2.1 solamente cuando la aplicación lo
indique. Los siguientes pasos describen operaciones que
se deben realizar en el propio electrodoméstico.
1. Seleccionar el menú AJUSTES del horno y seleccionar
HOME CONNECT.
2. Pulsar ENTER.
-- En el panel indicador aparece una petición para
presionar el botón WPS del router antes de que
transcurran 2 minutos.
3. Presionar el botón WPS en el router.
-- Consultar el manual del router para localizar el
botón WPS.
-- La aplicación recibirá una notificación cuando el
electrodoméstico se haya conectado
correctamente a la red Wi-Fi.
4. Pulsar ENTER.
-- En cuanto el electrodoméstico se conecte con
éxito a tu red doméstica, aparecerá un mensaje
de confirmación en la pantalla.
5. Presionar START PAIRING (iniciar emparejamiento) en
la aplicación Home Connect.
6. Seguir las indicaciones de la aplicación.
IMPORTANTE:
Si la conexión no se pudo establecer en 2 minutos,
asegúrate de que el electrodoméstico está dentro del
alcance de la red Wi-Fi.
Paso 2.2: Conectar el electrodoméstico a
la red de internet doméstica paso a paso
Acceder al Paso 2.2 solamente cuando la aplicación lo
indique. Los siguientes pasos describen operaciones que
se deben realizar en el propio electrodoméstico.
1. Seleccionar el menú AJUSTES del horno y seleccionar
HOME CONNECT.
2. Presionar INICIAR ASISTENTE.
3. Presionar CONTINUAR después de seguir las
instrucciones de la pantalla de visualización del horno.
4. Presionar CONECTAR MANUALMENTE.
5. Presionar INICIAR LA CONEXIÓN segurarse de que
el dispositivo móvil está cerca.
-- El electrodoméstico abrirá una red Wi-Fi temporal
denominada «HomeConnect» con la contraseña
«HomeConnect» durante 2 minutos.
-- La aplicación envía el nombre de la red Wi-Fi
doméstica (SSID) y la contraseña a través de esta
red Wi-Fi temporal a la campana extractora y de
este modo, le permite a la campana conectarse a
la red Wi-Fi doméstica.
6. Seguir las indicaciones de la aplicación.
Paso 3: Conectar el electrodoméstico a la
aplicación Home Connect™
Acceder al Paso 3 solamente cuando la aplicación lo
indique. Los siguientes pasos describen operaciones que
se deben realizar en el propio electrodoméstico.
1. Mantener presionado el botón CONNECT (Conectar)
hasta que parpadeen 0 y CONNECT (Conectar).
2. Seguir las indicaciones de la aplicación.
-- El proceso de registro ha finalizado una vez que
CONNECT (Conectar) deja de parpadear en la
campana extractora.
Se ha conectado correctamente la campana extractora.
¡Ahora puede beneficiarse de todas las ventajas de la
aplicación Home Connect™!
IMPORTANTE:
Si la conexión no se pudo establecer en 2 minutos,
asegúrate de que el electrodoméstico está dentro del
alcance de la red Wi-Fi.

Página. 166
Actualización de software
Mediante la función de actualización de software, se
puede actualizar el software (por ejemplo, para
optimizarlo, solucionar problemas o para recibir
actualizaciones de seguridad). Para ello, se debe ser
usuario registrado de Home Connect, tener instalada la
aplicación en el dispositivo móvil y estar conectado al
servidor de Home Connect.
Tan pronto como esté disponible una actualización de
software, se informará mediante la aplicación Home
Connect, desde donde también se podrá descargar esta
actualización.
Una vez que la actualización se haya descargado
correctamente, se puede empezar a instalarla mediante
los ajustes básicos del horno o la aplicación Home
Connect si se está en la red de área local.
La aplicación Home Connect enviará una notificación una
vez que la instalación se haya completado.
Notas:
• Se puede seguir utilizar el electrodoméstico como
siempre mientras se descargan las actualizaciones.
• En función de los ajustes personales de la aplicación,
también se pueden configurar las actualizaciones de
software para que se descarguen de forma
automática.
• Recomendamos que se instalen las actualizaciones de
seguridad lo antes posible.

Página. 167
Cuidado y mantenimiento
9 ADVERTENCIA
• No deje niños solos en un lugar donde se utilizan
electrodomésticos.
• Durante el ciclo de autolimpieza, las superficies
exteriores del aparato pueden estar más calientes
que de costumbre. Algunas piezas del aparato
pueden ser peligrosas para los niños y para las
personas que no tienen el conocimiento de un
adulto respecto a los electrodomésticos o que no
reaccionan como debería hacerlo un adulto en
una situación potencialmente peligrosa. Esas
personas deberían alejarse durante la
autolimpieza o la utilización del aparato.
• La eliminación de residuos durante el proceso de
autolimpieza puede favorecer la emisión de
pequeñas cantidades de productos químicos o de
otras sustancias que podrían ser peligrosas en
caso de una exposición suficientemente
prolongada. Para minimizar la exposición a dichas
sustancias, asegúrese de que la ventilación sea la
adecuada abriendo una ventana o utilizando un
ventilador o una campana extractora.
• Durante el primer ciclo de autolimpieza, retire
animales pequeños y pájaros de la cocina y de las
áreas cercanas. Abra una ventana cercana para
una ventilación adicional.
Nombres de marcas
• El uso de nombres de marcas sirve únicamente para
indicar un tipo de detergente y no constituye ninguna
promoción.
• La omisión de un nombre de marca no implica su
aptitud o insuficiencia.
• Muchos de los productos mencionados se pueden
encontrar en los mercados locales. Es imprescindible
usar todos los productos rigurosamente conforme a
las instrucciones del empaque.
• La siguiente tabla da indicaciones para limpiar la
estufa.
Sobre la autolimpieza
• El modo de autolimpieza de su nueva estufa incluye
una función de autolimpieza pirolítica. Cuando se
cambia al modo clean, la hornilla alcanza altas
temperaturas de aproximadamente 850°F (454°C) que
queman los restos de comida y de grasa.
• Cuando la hornilla está en el modo clean, puede
utilizar los quemadores estándares y la plancha. Los
quemadores que tienen la función ExtraLow
®
no se
pueden usar.
• Es normal ver humo y/o una llama ocasional durante el
ciclo de autolimpieza, dependiendo del contenido y
de la cantidad de suciedad que queda en la hornilla. Si
persiste una llama, apague la hornilla y deje que se
enfríe antes de abrir la puerta para limpiar los restos
de comida con un trapo.
• Al final del ciclo de autolimpieza, pueden quedar
algunos residuos quemados o cenizas dentro de la
hornilla. Se trata de restos minerales que no se
quemaron o derritieron. La cantidad de cenizas
depende de hasta qué punto estaba sucia la hornilla
antes de limpiarla. Es fácil quitar estos residuos, una
vez que la hornilla se ha enfriado, usando una toalla
de papel, una esponja o un trapo húmedo.
Antes de proceder a la autolimpieza de la
hornilla
No usar limpiadores de horno: no se debe usar ningún
limpiador comercial de horno ni ningún tipo de capa
protectora del revestimiento del horno dentro o alrededor
de ninguna parte del horno.
Quite las acumulaciones de grasa y todos los residuos
fáciles de limpiar que se encuentran en la hornilla y cerca
del cierre hermético de la puerta para reducir las
posibilidades de producción de llamas o de humo. Este
aparato está diseñado para limpiar el interior de la hornilla
y la parte de la puerta del interior de la hornilla. Los
bordes exteriores de la puerta no forman parte de la zona
de limpieza. Limpie esta área.
ANTES DE AJUSTAR LA HORNILLA AL MODO DE
AUTOLIMPIEZA
• Saque todos los utensilios de la hornilla.
• Saque las rejillas.
• Limpie el bastidor delantero de la hornilla y el exterior
de la puerta. Recoja los derrames y las acumulaciones
de grasa.
• Asegúrese de que las bombillas y las cubiertas de
lentes de las lámparas estén en su lugar.
• Encienda la campana y déjela encendida hasta que el
ciclo de autolimpieza de la hornilla acabe.
Página. 168
Self-clean (autolimpieza)
Autolimpieza (sólo en algunos modelos)
Para configurar la autolimpieza en modelos de la serie
Harmony de 30''
1. Saque todos los utensilios y rejillas de la hornilla.
Cierre la puerta del horno.
2. Seleccione SELF CLEAN con el anillo de selección de
modo.
3. Ponga la perilla de ajuste de la temperatura en
CLEAN.
-- Duración del programa 2 horas.
Para configurar la autolimpieza en los modelos con una
pantalla
1. Saque todos los utensilios y rejillas de la hornilla.
Cierre la puerta del horno.
2. Seleccione SELF CLEAN con el anillo de selección de
modo et ponga la perilla de ajuste de la temperatura
en CLEAN.
3. Tocar con un leve golpecito los botones de
navegación del lado derecho
( y ) para seleccionar el
nivel de limpieza deseado.
4. Después del texto de información, presione ENTER.
NOTA: El proceso del cierre de la puerta necesita
aproximadamente 20 segundos, después de los
cuales la puerta se bloquea. Asegúrese de que la
puerta esté bloqueada correctamente.
Al final del ciclo de autolimpieza
9 ADVERTENCIA
El interior de la hornilla sigue estando a temperaturas
de hornear cuando el bloqueo automático cambia a la
posición abierta, y se puede abrir la puerta de la
hornilla.
El pestillo de la puerta se abrirá automáticamente cuando
el horno baje de los 500 °F (260 °C) y la cerradura
automática de la puerta complete su ciclo de 20 segundos
hasta la posición de apertura.
1. Coloque la perilla del selector de modo en OFF
(apagado).
2. Colocar la perilla de temperatura del horno en la
posición OFF (apagado).
Ajustar el TIEMPO DE FINALIZACIÓN de la
autolimpieza
1. Retirar todos los recipientes, rejillas y guías de rejillas.
Asegurarse de que la puerta del horno está cerrada.
2. Coloque la perilla del selector de modo en SELF
CLEAN.
3. Pulsar el botón táctil derecho
( o ) para seleccionar el
nivel de limpieza deseado y pulsar ENTER.
4. Tocar el botón TIMERS, ulsar el botón táctil izquierda
( o ) y pulsar END TIMER.
5. Pulsar el botón táctil derecho ( o ) para seleccionar el
END TIMER deseado y pulsar ENTER.
6. Después del texto de información, presione ENTER.
NOTAS:
• Los hornos están programados para impedir la
iniciación de un segundo ciclo de autolimpieza
durante un período de 24 horas. Todas las otras
funciones están disponibles inmediatamente después
de terminar la autolimpieza.
• Si el usuario intenta utilizar el modo de autolimpieza
en una hornilla cuya función de autolimpieza se ha
bloqueado, las luces de la hornilla parpadearán a
intervalos de dos segundos para indicar que el modo
no está disponible. El usuario debe girar las perillas a
OFF para que las luces dejen de parpadear.
Nivel de
potencia
Duración (sin contar con el
enfriado)
Bajo 1 ½ horas
Alto 3 horas

Página. 169
Consejos de limpieza
9 ADVERTENCIA
Evite limpiar la estufa o sus piezas mientras estén
calientest.
• El acabado esmaltado de porcelana es resistente a
ácidos, pero no a prueba de ácidos. Los alimentos
ácidos, como los zumos cítricos, tomates, ruibarbo,
vinagre, alcohol o leche, deben limpiarse y no deben
hornearse en la porcelana durante el siguiente uso.
• No es necesario limpiar los quemadores infrarrojos de
la(s) hornilla(s). Se limpian solos cuando se usa la
hornilla.
Al limpiar la estufa
• Use la técnica de limpieza más suave pero que limpie
de manera eficaz. Algunos detergentes del mismo
tipo son más abrasivos que otros. Úselo primero en un
área pequeña.
• Siempre frote los acabados metálicos en la dirección
de las líneas de pulido para mayor efectividad y para
evitar dañar la superficie.
• Use solamente trapos limpios suaves, esponjas, toallas
de papel, cepillos fibrosos, esponjillas de plástico, no
metálicas, para limpiar y frotar, como se recomienda
en la tabla.
• Se pueden limpiar la mayoría de las partes de este
aparato con agua jabonosa caliente (menos cuando
hay indicaciones contrarias acerca de algunas piezas).
Cuando se necesite enjuagar, hágalo a fondo.
• Seque siempre de inmediato para evitar marcas de
agua.
• NO USE DETERGENTES A BASE DE CLORO.

Página. 170
Recomendaciones de limpieza
Parte / material Notas acerca de la limpieza
Base de quemador de
latón y tapa de hierro
fundido
• Cepillo dental de cerdas de nylon duras para limpiar los orificios.
• Después de limpiar, comprobar que la tapa de quemador queda bien colocada sobre la
base de quemador.
• NO raspar ni cortar los orificios de la cubierta del quemador.
• Limpiadores sugeridos; enjuagar y secar bien
-- Agua caliente y detergente
-- Bon-ami
®
-- Barkeepers Friend
®
-- Wright's
®
All Purpose Brass Polish
-- Kleen King
®
Perillas de control y
engastes / metal,
cromado
• NO sumergir las perillas.
• NO colocar las perillas en el eje de válvula erróneo.
• Limpiadores sugeridos; enjuagar y secar bien
-- Utilice un hisopo de algodón humedecido con agua
Bandeja de asar /
esmalte de porcelana
• Para soltar alimentos cocinados, echar un chorro de detergente líquido y cubrir con papel
absorbente húmedo.
• Limpiadores sugeridos; enjuagar y secar bien:
-- Agua caliente y detergente
-- Vinagre doméstico y agua
-- Póngala en el lavavajillas
-- Bar Keeper’s Friend
®
-- Soft Scrub
®
-- Bon-ami
®
-- Estropajo de lana de acero enjabonado
Puerta(s) / acero
inoxidable
• Mantenga los limpiadores y el agua lejos de las aberturas de la puerta. Si entra agua o
limpiador en las aberturas, el agua podría vetear el vidrio interior.
Plancha / aluminio con
revestimiento
antiadherente
• No vierta NUNCA agua fría sobre una plancha caliente. Podría deformarse o agrietarse.
• NO limpie ninguna parte de la parrilla o la plancha en un horno con autolimpieza.
• Limpie la superficie de la plancha con agua caliente jabonosa y enjuáguela con agua
caliente. Séquela con un paño suave.
• Si se adhieren partículas de comida en la placa de la plancha, elimínelas con un limpiador
abrasivo suave como Soft Scrub
®
.
• Limpiadores sugeridos; enjuagar y secar bien:
-- Agua caliente y detergente
-- Póngala en el lavavajillas
-- Soft Scrub
®
Página. 171
Briquetas de cerámica,
cesta de briquetas de
cerámica, y bandeja
para la grasa de la
parrilla
• Sugerencia de limpieza para las briquetas de cerámica;
1) Coloque cuidadosamente las briquetas de cerámica saturadas de grasa en un
recipiente grande de seis litros o más.
2) Rellene el recipiente con agua limpia para que las briquetas estén cubiertas por al
menos media pulgada de agua.
3) Lleve el agua a ebullición y déjela hervir durante 10 minutos.
4) Apague el fuego y deje que el agua se enfríe hasta una temperatura segura.
5) Tire el agua y seque las briquetas con un trapo viejo o servilletas de papel.
6) Deje que las briquetas se sequen al aire ambiente durante un mínimo de dos horas.
Es posible que las briquetas tengan manchas de grasa permanentes después de la
limpieza.
7) Vuelva a colocar las briquetas limpias y secas en la parrilla antes de volver a utilizarla.
• Puede comprar nuevas briquetas de cerámica en la tienda electrónica de Thermador
(número de pieza: PABRICKBKN). Consulte el dorso para obtener más información sobre
el soporte técnico.
9 PRECAUCIÓN:
Se deben sustituir las briquetas de cerámica cuando estén negras, lo que significa que
están saturadas de grasa y pueden producir mucho humo o incluso prenderse.
• Detergentes recomendados para la cesta y la bandeja de grasa; enjuagar y secar bien:
-- Agua caliente y detergente
-- Póngala en el lavavajillas
Acabado exterior /
acero inoxidable
• El acero inoxidable es resistente a la mayoría de manchas y marcas de comida, siempre
que se mantenga la superficie limpia y protegida.
• Limpie todos los residuos que queden en el bastidor delantero con Fantastik
®
o Bar
Keeper’s Friend
®
. Si algunas manchas persisten, use un detergente líquido suave. La
cantidad de manchas de humo está relacionada directamente a la cantidad de restos
alimenticios que se quedaron dentro de la hornilla en el momento de proceder a la
autolimpieza. Limpie la hornilla frecuentemente.
• Frótelo ligeramente en la dirección de las líneas de pulido.
• El cloro y los compuestos clorados de algunos limpiadores son corrosivos para el acero
inoxidable. Compruebe los ingredientes en la etiqueta.
• Limpiadores sugeridos; enjuagar y secar bien:
-- Agua caliente y detergente
-- Fantastik
®
-- Siege
®
Stainless Steel and Aluminum Cleaner
-- Kleen King
®
Stainless Steel Liquid Cleaner
-- Lustrador: Stainless Steel Magic
®
para proteger el acabado contra las manchas y
marcas; mejora el aspecto.
-- Thermador Stainless Steel Conditioner (0057669)
-- Manchas de agua difíciles: vinagre doméstico.
• Decoloración por calor; enjuagar y secar bien:
-- Barkeepers Friend
®
-- Wright's
®
All Purpose Brass Polish
Junta / junta de la
puerta
• Rocíelo y séquelo con un paño. No lo frote. No mueva, extraiga ni dañe la malla.
• Limpiadores sugeridos; enjuagar y secar bien:
-- Utilice un hisopo de algodón humedecido con agua
-- Fantastik
®
Parte / material Notas acerca de la limpieza

Página. 172
Rejillas / esmalte de
porcelana en hierro
fundido
• Las parrillas son pesadas; levántelas con cuidado. Colóquelas sobre una superficie
protegida.
• A veces, la textura áspera de las rejillas puede arrancar virutas de aluminio de la parte
inferior de las sartenes y rellenar los espacios entre las ranuras elevadas de la superficie
de las rejillas. Ponga especial atención cuando cocine con sartenes y ollas de latón y de
aluminio, ya que esos tipos de utensilios suelen dejar depósitos de metal sobre las rejillas.
• Las ampollas, grietas y descascarados son comunes debido a las temperaturas extremas
en las garras de la parrilla y los súbitos cambios de temperatura.
• Los productos muy acídicos o con mucha azúcar derramados deterioran el esmalte.
Elimine los restos inmediatamente.
• Los limpiadores abrasivos pueden deteriorar el esmalte si se utilizan con demasiada
frecuencia o vigor.
• Limpiadores sugeridos; enjuagar y secar bien:
-- Agua caliente y detergente
-- Fantastik
®
-- Bon-ami
®
-- Soft Scrub
®
• Manchas difíciles; enjuagar y secar bien:
-- Estropajo de lana de acero enjabonado
-- Lestoil
®
-- Otro desengrasante
• Depósitos de metal:
-- Estropajo de restregar Scotch Brite
®
-- Estropajo de acero
Bandeja de grasa de la
plancha
• Extraiga la bandeja cuando se haya enfriado la grasa. Procure que no se llene tanto que al
ladearla para extraerla se vierta la grasa.
• Limpie la bandeja para grasa después de cada uso.
• Limpiadores sugeridos; enjuagar y secar bien:
-- Agua caliente y detergente
-- Póngala en el lavavajillas
-- Soft Scrub
®
Rejillas de la parrilla /
esmalte de porcelana
en hierro fundido
• Limpie las rejillas después de cada uso.
• Coloque le rejilla de la parrilla en el fregadero y eche agua hirviendo sobre la rejilla.
Coloque un trapo de cocina sobre ella y eche más agua sobre el trapo. Deje que los
residuos se remojen. Rasque todos los residuos con un estropajo jabonoso.
• Manchas difíciles; Soft Scrub
®
.
• Limpiadores sugeridos; enjuagar y secar bien:
-- Agua caliente y detergente
-- Póngala en el lavavajillas
-- Soft Scrub
®
-- Cepillo con hilos de latón suaves para las manchas tenaces. Los cepillos de alambres
rígidos pueden arañar el revestimiento de porcelana de las rejillas y provocar que se
oxiden antes de tiempo.
• Manchas difíciles; enjuagar y secar bien:
-- Estropajo de lana de acero enjabonado
-- Lestoil
®
-- Otro desengrasante
Parte / material Notas acerca de la limpieza

Página. 173
Generadores de chispas
/ cerámica
• NO utilice utensilios afilados para raspar los generadores de chispas. Son frágiles. Si se
daña un generador de chispas, no podrá encender el quemador.
• Limpiadores sugeridos:
-- Utilice un hisopo de algodón humedecido con agua
-- Fantastik
®
Cavidad / esmalte de
porcelana o acero
• El esmalte de porcelana es resistente al ácido, pero no a prueba de todos los ácidos. Las
comidas ácidas, como los jugos de cítricos, tomates, ruibarbo, vinagre, alcohol y leche,
deben limpiarse y no dejar que se horneen sobre la porcelana durante el siguiente uso.
Con el paso del tiempo, la porcelana se puede agrietar (apareciendo líneas finas como un
cabello). Esto no afecta al rendimiento del horno.
• Aplique detergente sobre una esponja o un trapo húmedo. Frote despacio. Enjuague
bien y seque. Si se ha quemado algún alimento y ahora es difícil de limpiar, humedézcalos
con un trapo empapado con el detergente recomendado. Cierre la puerta y deje en
remojo hasta que pueda quitar fácilmente los residuos con un trapo jabonoso o
levemente abrasivo.
• Limpiadores sugeridos; enjuagar y secar bien:
-- Agua caliente y detergente
-- Bar Keeper’s Friend
®
-- Vinagre doméstico y agua
-- Soft Scrub
®
-- Bon-ami
®
Rejillas y guías de rejilla
del horno /
revestimiento
niquelado
• Algunos limpiadores comerciales para hornos ennegrecen y decoloran. Pruebe el
limpiador en una pequeña parte de la rejilla y compruebe si decolora antes de limpiar
toda la rejilla.
• Las rejillas de la hornilla se decolorarán si se quedan en la hornilla durante el proceso de
autolimpieza.
• Si las rejillas no se deslizan con suavidad una vez limpias, moje un papel absorbente con
aceite de cocina y frote ligeramente los rieles laterales.
• Limpiadores sugeridos; enjuagar y secar bien:
-- Agua caliente y detergente
-- Vinagre doméstico y agua
-- Póngala en el lavavajillas
-- Bar Keeper’s Friend
®
-- Soft Scrub
®
-- Bon-ami
®
• Manchas difíciles; enjuagar y secar bien:
-- Estropajo de lana de acero enjabonado
Bandejas de protección
de la superficie /
esmalte de porcelana
• Los alimentos ácidos, como los zumos cítricos, tomates, ruibarbo, vinagre, alcohol o
leche, deben limpiarse y no deben hornearse en la porcelana durante el siguiente uso.
• Si se usan productos de limpieza abrasivos suaves, frotar con cuidado, porque estos
productos pueden rayar el acabado.
• Para comidas quemadas, pueden usarse estropajos enjabonados o de lana de acero. Hay
que tener cuidado, ya que pueden rayar el acabado.
• Limpiadores sugeridos; enjuagar y secar bien:
-- Agua caliente y detergente
-- Soft Scrub
®
-- Bar Keeper’s Friend
®
-- Bon-ami
®
• Manchas difíciles; enjuagar y secar bien:
-- Estropajo de lana de acero enjabonado
Parte / material Notas acerca de la limpieza
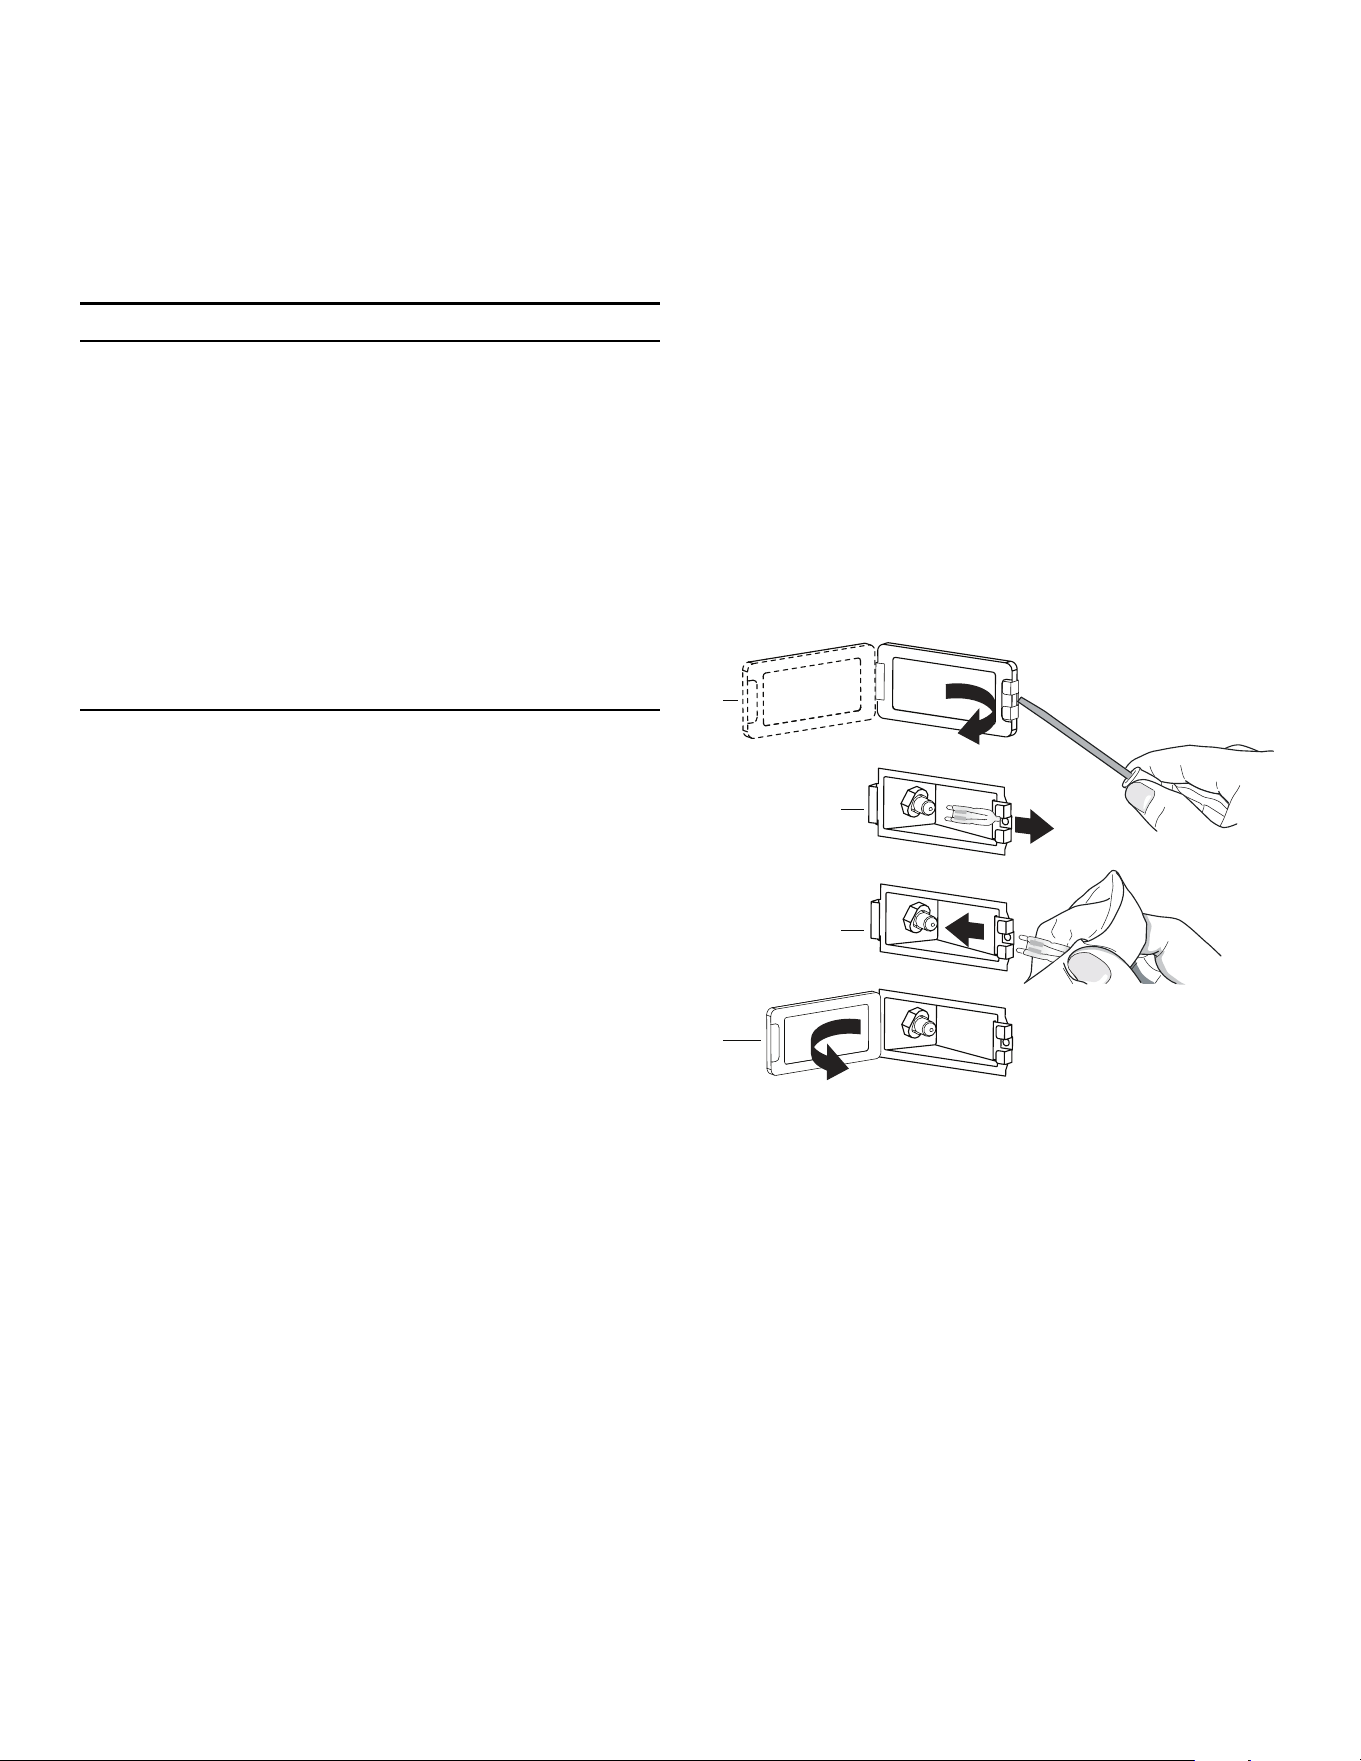
Página. 174
Mantenimiento hecho por usted mismo
Reemplazar una bombilla en la
hornilla
9 PRECAUCIÓN
• Asegúrese de que el aparato y las lámparas estén
fríos y corte la alimentación del aparato antes de
reemplazar las bombillas. De lo contrario, podría
lesionarse o recibir una descarga eléctrica.
• Las cubiertas deben estar en su sitio cuando se
usa el aparato.
• Las cubiertas a proteger las bombillas.
• Las cubiertas son de vidrio. Manipule las con
cuidado para evitar romperlas. Las astillas de
vidrio pueden causar lesiones.
• El casquillo está bajo tensión cuando la puerta
está abierta.
Reemplácela solamente con una bombilla diseñada para
hornillas. NO USE una bombilla estándar en la hornilla.
Póngase en contacto con atención al cliente de
Thermador en el 1-800-735-4328 o con la tienda
Thermador más cerca para obtener información sobre las
bombillas que tiene que utilizar con su estufa. Debe tener
el número de serie de su estufa.
Para reemplazar la bombilla
Utilice sólo bombillas halógenas de dos clavijas de 10W,
12V G4. Utilice un trapo seco y limpio para manipular las
bombillas halógenas. Ello alargarán la vida útil de las
bombillas.
1. Corte la alimentación del disyuntor.
2. Quite las rejillas de la hornilla.
3. Inserte un destornillador plano entre la atadura de fija-
ción y la caja protectora (Figura, A).
4. Sostenga la tapa de la lente de vidrio con dos dedos a
lo largo del borde inferior para impedir que caiga en
el piso de la hornilla. Gire con cuidado el destornilla-
dor para aflojar la tapa de la lente de vidrio.
5. Quite la tapa de la lente de vidrio.
6. Quite la bombilla cogiéndola y tirando de ella hacia
atrás hasta que las dos puntas salgan del soporte de
cerámica (Figura, B).
7. No toque el vidrio de la nueva bombilla con sus dedos
sino podría no funcionar cuando la encienda. Coja la
bombilla de reemplazo con un trapo limpio y seco.
Localice las dos ranuras del soporte de cerámica
empujando lentamente las dos puntas de la bombilla.
8. Tire hacia abajo para instalar la bombilla correcta-
mente (Figura, C).
9. Instale la lente de protección en la atadura del
soporte y empuje la otra extremidad hasta que la ata-
dura de fijación se enganche a la caja protectora
(Figura, D).
10. Vuelva a encender el disyuntor.
a
b
c
d

Página. 175
Antes de solicitar servicio
Antes de solicitar servicio, compruebe lo siguiente para
evitar cargos innecesarios de servicio.
Resolución de problemas
Síntoma Causa posible Remedio
Chispas intermitentes • Encendedor sucio o húmedo.
• Puertos del quemador tapados.
• Secar o limpiar bien el encendedor.
• Limpiar puertos de la tapa del quemador
con un alambre, una aguja o un clip
enderezado.
Más de cuatro chasquidos del
encendedor antes de prender
• La tapa del quemador no cabe en
la base del quemador.
• Alinear la tapa del quemador sobre la base
del quemador.
Chispas constantes • La toma de tierra de la estufa está
mal hecha.
• Alimentación eléctrica está mal
polarizada.
• Consultar instrucciones de instalación.
Contratar a un eléctrico cualificado para
realizar la toma de tierra.
Los encendedores producen
chispas, pero no se encienden
las llamas.
• La válvula del suministro de gas
está en la posición "OFF".
• Abra la válvula de suministro de gas del
aparato.
La estufa no funciona (las
luces, la hornilla y los
quemadores no se encienden)
• No hay alimentación eléctrica.
• La hornilla está en modo Sabbat.
• Asegúrese de que el automático esté en la
posición adecuada.
• Asegúrese de que el voltaje de la línea de
alimentación eléctrica sea el adecuado.
• Asegúrese de que la hornilla no esté en
modo Sabbat. Consulte la sección “Usar la
estufa” en el Manual de uso y cuidado.
La bombilla de la hornilla no
se enciende.
• La bombilla se ha fundido. • Reemplace la bombilla de la hornilla según
las instrucciones proporcionadas en el
Manual de uso y cuidado.
La puerta no se abre. • La hornilla aún está en el modo de
autolimpieza.
• Si la hornilla está caliente, el pestillo de la
puerta se abrirá sólo cuando la hornilla
alcance una temperatura segura.
Los alimentos no cuecen lo
suficiente en la hornilla.
• La rejilla no está en la posición
adecuada.
• El plato utilizado no es adecuado.
• Parece que la puerta de la hornilla
no está bien sellada.
• El aparato no está nivelado.
• Consulte la sección “Usar la estufa” en el
Manual de uso y cuidado.
• Consulte la sección “Recomendaciones
para los utensilios de cocina” en el Manual
de uso y cuidado.
• Limpie la junta de la puerta de la hornilla.
Reemplácelo si está gastado.
• Consulte el Manual de instalación para
obtener instrucciones de nivelación del
aparato.
Sale aire caliente del aparato. • Es normal, durante el proceso de
enfriamiento, que se evacue aire el
la habitación cuando está
encendida la estufa.
• Según el modo utilizado, la
velocidad del ventilador aumenta
y disminuye.
• Esto es normal.
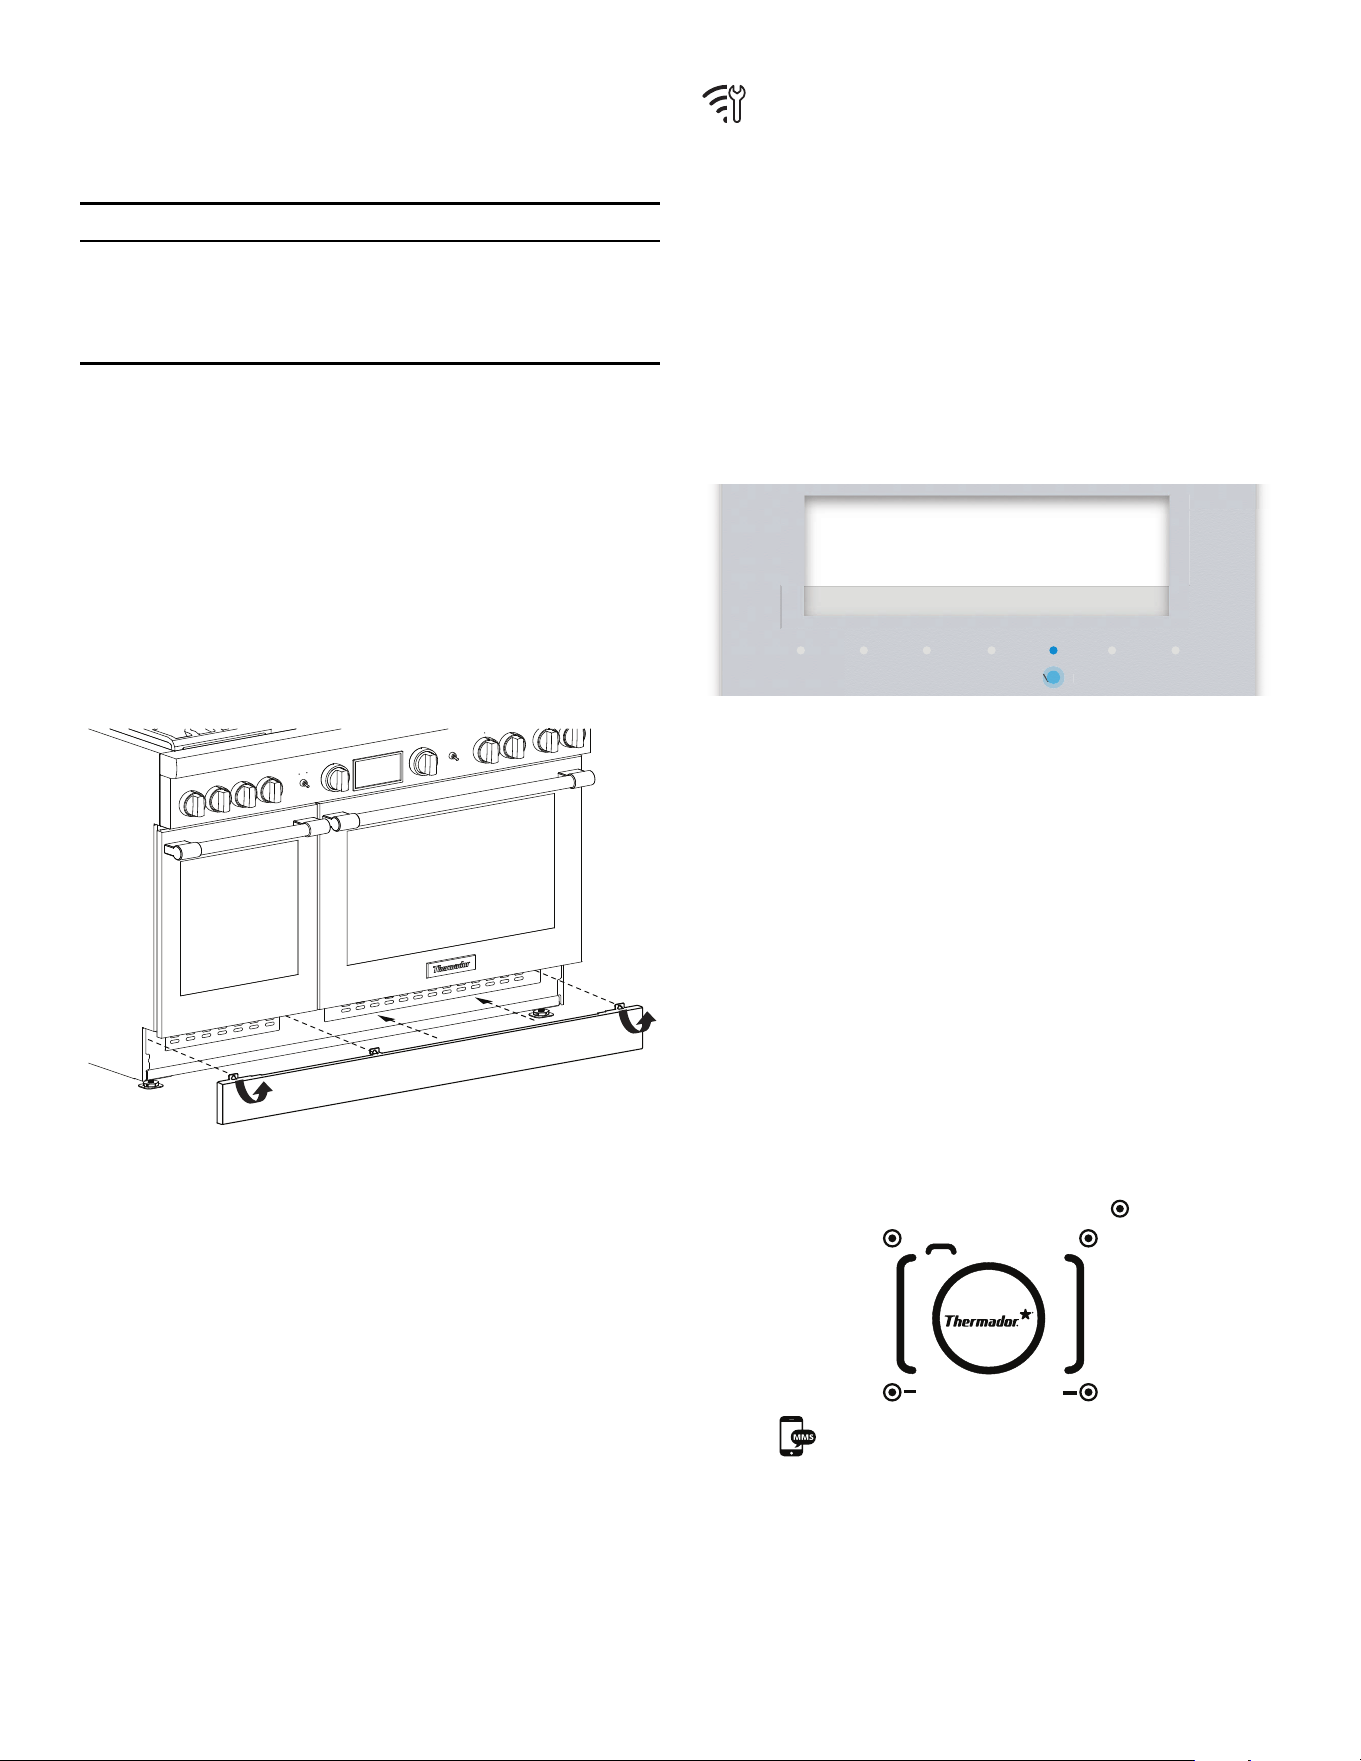
Página. 176
Información del servicio
técnico
9 PRECAUCIÓN
Antes de quitar el rodapié, desenchufe la estufa.
Reinstale el rodapié antes de conectar de nuevo el
aparato a la fuente de alimentación eléctrica y usar la
estufa.
Diagramas del cableado eléctrico
No se deben quitar los diagramas del cableado eléctrico
en el área para los pies excepto por un técnico de servicio.
Vuelva a ponerlos después del servicio.
Etiqueta de datos nominales
La placa con información del aparato muestra el número
de modelo y de serie de su estufa. La ubicación de esta
etiqueta se muestra en la siguiente imagen.
Para una consulta útil, anote aquí abajo la información de
la placa de señalización. Conserve su factura para que su
garantía sea válida.
Número de modelo__________________________________
Número de serie____________________________________
Fecha de compra____________________________________
Conexión remota del
servicio técnico
En caso de que ocurra un error, el servicio técnico tiene la
posibilidad de conectarse con el aparato a través de la
conexión Home Connect.
Para darle acceso al aparato al servicio técnico:
1. Ponerse en contacto con el servicio técnico (ver última
página). Seguir las instrucciones dadas por el técnico.
– El panel indicador cuando el servicio técnico
intenta obtener acceso al aparato.
2. Presionar ENTER para permitirle acceso al servicio
técnico.
– Una vez establecida la conexión, en la barra de
estado aparece el icono de Wi-Fi
correspondiente.
Registro de productos
Registre su producto para asegurarse de recibir un
servicio oportuno y de tener acceso a la información
relativa a su producto.
Puede registrar su producto de las siguientes formas:
• Regístrese con su teléfono (solo EE. UU.).
1. Tome una foto del ícono de la cámara en la tarjeta
de registro, incluidos los puntos ( ).
2. Envíe la foto al 21432. (Solo EE. UU.; pueden
aplicar tarifas de texto y datos).
• Enviar por correo la tarjeta de registro del producto
completada.
• Registrando su producto en línea
www.thermador.com.
• Llamando al teléfono de atención al cliente de
Thermador 1-800-735-4328.
TIMERS SETTINGS ENTER
Do you want to grant access to
customer service?
Allow with Enter
NTE
NTE
PHOTOREGISTER
SM
THERMADOR

Página. 177
Declaración de garantía limitada del producto
Cobertura de esta garantía y a quiénes se
aplica
La garantía limitada otorgada por BSH Home Appliances
Corporation (''Thermador'') en esta Declaración de
Garantía Limitada del Producto se aplica únicamente al
electrodoméstico Thermador vendido a usted, el primer
comprador usuario, siempre que el Producto haya sido
Comprado:
• Para uso doméstico (no comercial) normal y que haya
sido utilizado en todo momento únicamente para
fines domésticos normales.
• Nuevo en una tienda minorista (que no sea un
producto de exhibición, ni un producto vendido “en
las condiciones en que se encuentra” ni un modelo
devuelto anteriormente) y no esté destinado para
reventa ni uso comercial.
• Dentro de los Estados Unidos o Canadá, y
permanezca en todo momento dentro del país de
compra original.
La garantía descrita aquí es válida para el comprador
original del producto cubierto por esta garantía y para
todo usuario posterior del producto, adquirido para un
uso doméstico, durante el término de la garantía.
Asegúrese de devolver su tarjeta de registro; si bien no es
necesario para hacer efectiva la cobertura de la garantía,
es la mejor manera para que Thermador le notifique en el
caso poco probable de que se emita un aviso de
seguridad o se retire del mercado un producto.
Duración de la garantía
Thermador garantiza que el Producto no tiene defectos
de materiales ni de mano de obra durante un período de
setecientos treinta (730) días a partir de la fecha de
compra. El período precedente comienza a regir a partir
de la fecha de compra y no se interrumpirá, dejará sin
efecto, extenderá ni suspenderá por ningún motivo.
También se garantiza que este Producto no presenta
defectos estéticos en el material ni en la mano de obra
(como rayas en el acero inoxidable, imperfecciones en la
pintura/porcelana, astillas, abolladuras ni ningún otro
daño en el acabado del Producto) durante un período de
sesenta (60) días desde la fecha de compra o fecha de
cierre para una nueva construcción. Esta garantía estética
excluye las ligeras variaciones de color debidas a
diferencias inherentes en las piezas pintadas y de
porcelana, así como las diferencias causadas por la
iluminación de la cocina, la ubicación del producto u otros
factores similares. Esta garantía estética excluye de
manera específica cualquier producto de exhibición, de
exposición en tienda, un producto vendido «en las
condiciones en que se encuentra» o aparatos del stock
«B».
Reparación / reemplazo como único
recurso
Durante el período de esta garantía, Thermador o uno de
sus proveedores de servicio técnico autorizados reparará
su Producto sin cargo para usted (con sujeción a
determinadas limitaciones especificadas en el presente
documento) si se prueba que su Producto ha sido
fabricado con un defecto en los materiales o en la mano
de obra. Si se ha intentado de manera razonable reparar
el Producto sin éxito, Thermador reemplazará su Producto
(es posible que usted tenga disponibles modelos
mejorados, a entera discreción de Thermador, con un
cargo adicional). Todas las piezas y los componentes
extraídos serán propiedad de Thermador, a su entera
discreción. Todas las piezas reemplazadas o reparadas se
considerarán como la pieza original a los fines de esta
garantía, y esta garantía no será extensible a dichas
piezas.
En virtud del presente documento, la única y exclusiva
responsabilidad y obligación de Thermador es únicamente
reparar el Producto defectuoso de fábrica, a través de un
proveedor de servicio técnico autorizado por Thermador
durante el horario de oficina.
Por cuestiones de seguridad y daños materiales,
Thermador recomienda encarecidamente que no intente
reparar el Producto usted mismo ni usar un proveedor de
servicio técnico no autorizado; Thermador no será
responsable ni tendrá obligación alguna sobre las
reparaciones o trabajos realizados por un centro de
servicio técnico no autorizado. Si usted prefiere que una
persona que no sea proveedor de servicio técnico
autorizado trabaje en su Producto, ESTA GARANTÍA SE
ANULARÁ AUTOMÁTICAMENTE. Los proveedores de
servicio técnico autorizados son aquellas personas o
compañías que han sido especialmente capacitadas para
manejar los productos de Thermador y que tienen, según
el criterio de Thermador, una reputación superior de
servicio con el cliente y capacidad técnica (debe tener en
cuenta que son entidades independientes y no son
agentes, socios, afiliados ni representantes de
Thermador). Sin perjuicio de lo anterior, Thermador no
tendrá responsabilidad ni obligación alguna sobre el
Producto que se encuentre en un área remota (a más de
100 millas de un proveedor de servicio técnico autorizado)
o en un lugar, área circundante o entorno que no sea
accesible por medios razonables o que sea peligroso,
hostil o arriesgado; en cualquier caso, cuando lo solicite,
Thermador de todas maneras pagará por la mano de obra

Página. 178
y las piezas, y enviará las piezas al proveedor de servicio
técnico autorizado más cercano, pero usted seguirá
siendo totalmente responsable del tiempo de viaje y
demás cargas especiales de la compañía de servicio
técnico, suponiendo que acepte hacer la visita de servicio
técnico.
Producto fuera de garantía
Thermador no tiene obligación alguna, en virtud de la ley
o por otro motivo, de otorgarle ninguna concesión,
incluidos reparaciones, prorrateos o reemplazo del
Producto, con posterioridad al vencimiento de la garantía.
Exclusiones de la garantía
La cobertura de garantía descrita en el presente
documento excluye todos los defectos o daños que no
fueron provocados directamente por Thermador,
incluidos, entre otros, alguno de los siguientes:
• Uso del Producto de maneras distintas del uso normal,
habitual y previsto (incluidos, entre otros, cualquier
forma de uso comercial, uso o almacenamiento en
exteriores de un producto diseñado para interiores,
uso del Producto en aeronaves o embarcaciones).
• Conducta indebida, negligencia, uso indebido, abuso,
accidentes, descuido, operación inadecuada, omisión
de mantenimiento, instalación inadecuada o
negligente, alteración, omisión de seguir las
instrucciones de operación, manipulación inadecuada,
servicio técnico no autorizado (incluidos «arreglos» o
exploración de los mecanismos internos del aparato
realizados por uno mismo).
• Ajuste, alteración o modificación de cualquier tipo.
• Incumplimiento de los códigos, reglamentaciones o
leyes de electricidad, fontanería o construcciones
locales estatales, municipales o de condado, incluida
la omisión de instalar el producto cumpliendo
estrictamente con los códigos y las reglamentaciones
locales de construcción y protección contra incendios.
• Desgaste habitual, derrames de alimentos, líquidos,
acumulaciones de grasa u otras sustancias que se
acumulen sobre el Producto, dentro o alrededor de
este.
• Cualquier fuerza y factor externo, elemental y/o
ambiental, incluidos, entre otros, lluvia, viento, arena,
inundaciones, incendios, aludes de lodo,
temperaturas bajas extremas, humedad excesiva o
exposición prolongada a la humedad, rayos,
sobrecargas eléctricas, fallos estructurales alrededor
del aparato y caso fortuito.
También se excluyen de esta garantía productos en los
que los números de serie hayan sido alterados,
modificados o eliminados; visitas del servicio técnico para
enseñarle a usar el Producto o visitas en las que se
determine que no hay ningún problema con el Producto;
corrección de los problemas de instalación (usted es el
único responsable de cualquier estructura y soporte del
Producto, incluidas todas las instalaciones de electricidad
y fontanería o demás instalaciones de conexión, de la
correcta instalación en bases / pisos y de cualquier
alteración, incluidos, entre otros, gabinetes, paredes,
pisos, repisas, etc.); y el restablecimiento de disyuntores o
fusibles.
EN LA MEDIDA PERMITIDA POR LA LEY, ESTA
GARANTÍA ESTABLECE SUS RECURSOS EXCLUSIVOS
CON RESPECTO AL PRODUCTO,
INDEPENDIENTEMENTE DE QUE LA RECLAMACIÓN
SEA CONTRACTUAL O EXTRACONTRACTUAL
(INCLUIDA LA RESPONSABILIDAD OBJETIVA O LA
NEGLIGENCIA), O DE CUALQUIER OTRO MODO. ESTA
GARANTÍA REEMPLAZA TODAS LAS DEMÁS
GARANTÍAS EXPRESAS O IMPLÍCITAS. LAS GARANTÍAS
IMPLÍCITAS POR LEY, YA SEA DE COMERCIABILIDAD O
APTITUD PARA UN FIN ESPECÍFICO, O DE CUALQUIER
OTRO TIPO, TENDRÁN VIGENCIA ÚNICAMENTE
DURANTE EL PERÍODO DE VIGENCIA DE LA PRESENTE
GARANTÍA LIMITADA EXPRESA. EN NINGÚN CASO, EL
FABRICANTE SERÁ RESPONSABLE DE LOS DAÑOS
CONSECUENTES, ESPECIALES, INCIDENTALES,
INDIRECTOS, POR “PÉRDIDAS COMERCIALES” O
DAÑOS PUNITIVOS, PÉRDIDAS O GASTOS, INCLUIDOS,
ENTRE OTROS, TIEMPO FUERA DEL TRABAJO,
HOTELES O COMIDAS EN RESTAURANTES, GASTOS DE
REMODELACIÓN QUE SUPEREN LOS DAÑOS
DIRECTOS, QUE DEFINITIVAMENTE HAYAN SIDO
CAUSADOS DE MANERA EXCLUSIVA POR THERMADOR
O DE OTRO MODO. ALGUNOS ESTADOS NO
PERMITEN LA EXCLUSIÓN O LIMITACIÓN DE DAÑOS
INCIDENTALES O CONSECUENTES, Y ALGUNOS
ESTADOS NO PERMITEN LIMITACIONES CON
RESPECTO AL PLAZO DE VIGENCIA DE UNA GARANTÍA
IMPLÍCITA; POR LO TANTO, ES POSIBLE QUE LAS
LIMITACIONES ANTERIORES NO SE APLIQUEN A
USTED. ESTA GARANTÍA LE OTORGA DERECHOS
LEGALES ESPECÍFICOS, Y TAMBIÉN PUEDEN
CORRESPONDERLE OTROS DERECHOS QUE PUEDEN
VARIAR SEGÚN EL ESTADO.
Cualquier intento de alterar, modificar o enmendar la
presente garantía no tendrá vigencia, a menos que fuera
autorizado por escrito por un ejecutivo de BSH.

1901 MAIN STREET, SUITE 600, IRVINE, CA 92614 // 800-735-4328 // WWW.THERMADOR.COM
© 2018 BSH Home Appliances Corporation
8001146038, Rev. B
Support
Thank you for being a Thermador
customer!
Thermador is dedicated to
supporting you and your appliance
so you have many years of creative
cooking. Please don't hesitate to
contact us if you have any questions.
We're happy to help you with
cleaning and care instructions,
cooking tips, accessories,
troubleshooting, and more.
USA:
1-800-735-4328
thermador.com/customer-care
Canada:
1-800-735-4328
thermador.ca/support
Accessories and parts
Filters, Thermador cleaners,
teppanyaki pans, griddles,
replacement parts, and more can be
purchased in our online accessories
store.
USA:
store.thermador.com/us
Canada:
Filters, parts and accessories can be
purchased through our distributors.
Marcone: 1-800-287-1627
Reliable Parts: 1-800-663-6060
Soutien
Merci d'être un client Thermador!
Thermador s'engage à offrir tout le
tout le support dont vous et votre
appareil avez besoin afin que vous
puissiez en profiter pleinement.
N'hésitez pas à communiquer avec
nous pour toute question. Nous
serons heureux de vous aider avec
des directives concernant le
nettoyage et les soins, des conseils
de cuisson, des accessoires, le
dépannage et plus encore.
É.-U. :
1-800-735-4328
thermador.com/customer-care
Canada :
1-800-735-4328
thermador.ca/support
Accessoires et pièces
Vous trouverez dans notre magasin
d'accessoires en ligne des filtres, des
produits nettoyants Thermador, des
poêles teppanyaki, des plaques à
frire, des pièces de rechange et plus
encore.
É.-U. :
store.thermador.com/us
Canada :
Les filtres, pièces et accessoires
peuvent être achetés auprès de nos
distributeurs.
Marcone: 1-800-287-1627
Reliable Parts: 1-800-663-6060
Soporte
¡Gracias por ser un cliente
Thermador!
Thermador se dedica a apoyarlo a
usted y a su aparato para que tenga
muchos años para cocinar
creativamente. No dude en
contactarnos si tuviera preguntas.
Nos encantará ayudarlo con las
instrucciones de limpieza y cuidado,
consejos para cocinar, accesorios,
solución de problemas y más.
EEUU:
1-800-735-4328
thermador.com/customer-care
Canadá:
1-800-735-4328
thermador.ca/support
Accesorios y piezas
Los filtros, limpiadores Thermador,
sartenes de teppanyaki, planchas,
piezas de refacción y más se pueden
comprar en nuestra tienda de
accesorios en línea.
EEUU:
store.thermador.com/us
Canadá:
Los filtros, piezas y accesorios se
pueden comprar a través de nuestros
distribuidores.
Marcone: 1-800-287-1627
Reliable Parts: 1-800-663-6060