This section outlines and describes the features, indicators and controls of the appliance. You will also find information on the various functions of your appliance.
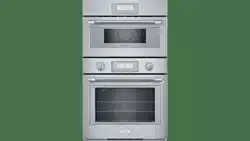
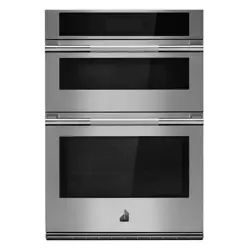
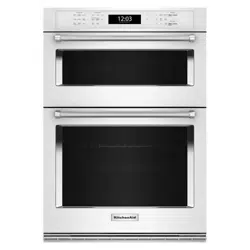
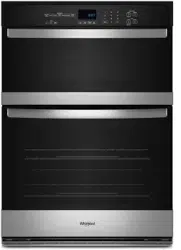
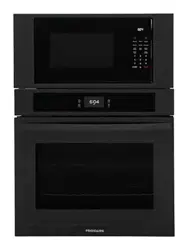
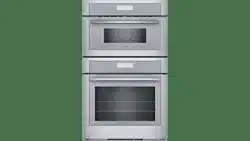
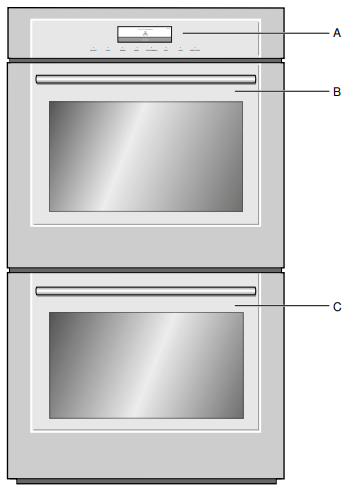
Note: Picture shows a double oven. Depending on the appliance model, individual details and colors may differ.
Oven Overview
A
Control panel and display
B
Upper oven cavity
C
Lower oven cavity
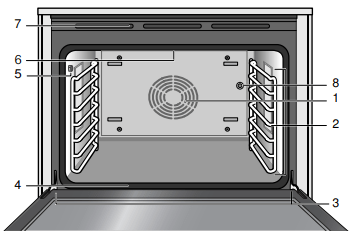
Oven Cavities
1
Convection system
2
Accessory racks
3
Door hinges
4
Door gasket
5
Meat probe socket
6
Broil element
7
Oven vents
8
Rotisserie socket
Oven Bottom
The oven bottom conceals the lower heating element. As a result the element is protected from damage and spills.
Tip: Do not place food directly on the oven bottom.
WARNING: Do not use aluminum foil or protective liners to line any part of the appliance, especially the oven bottom. Installation of these liners may result in a risk of electric shock or fire.
NOTICE: Do not place broil pan on the oven bottom to catch spills. Doing so will damage the oven bottom porcelain.
WARNING: NEVER cover any slots, holes or passages in the oven bottom or cover an entire rack with materials such as aluminum foil. Doing so blocks air flow through the oven. Aluminum foil linings may also trap heat, causing a fire hazard.
Oven Cavity Features
Oven Vent
The oven vent is located along the top and bottom of the unit. Warm air may be released from the vent before, during and after cooking. It is normal to see steam escaping from the vent and condensation may collect. This area may be warm when the oven is in use. Do not block the vent since it is important for air circulation.
Cooling Fan
The cooling fan runs based on the oven temperature. Warm air may be felt as it is released from the oven vents while the fan operates. The fan may also operate after the oven is off.
Convection Fan
The convection fan operates during all convection modes. When the oven is operating in a convection mode, the fan turns off automatically when the door is opened.
Oven Light
When you open the appliance door, the oven light turns on. If the door remains open for longer than 20 minutes, the lighting switches off again. To turn the light back on, touch the LIGHT button.
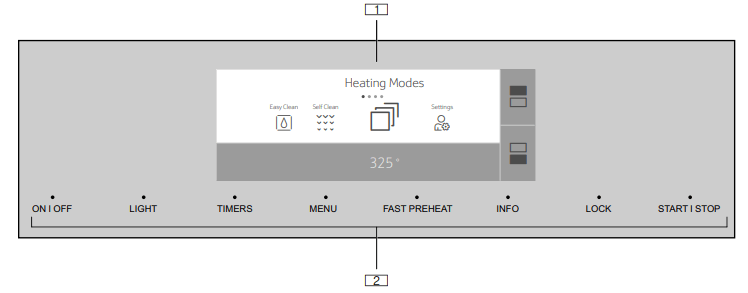
Control Panel
You can set your appliance's various functions on the control panel using the full touch color display. The full touch color display shows you the current settings. If you have purchased a triple oven model, which includes a warming drawer, the control panel of your oven will appear slightly different.
Where the LOCK button currently appears will be changed to DRAWER. This is the button used to operate the warming drawer from the control panel. The LOCK function is now turned on and off using the TIMERS button.
If you have purchased a combination oven model that includes a microwave oven, please consult the Use and Care Guide included with the microwave oven and make sure you read and understand all Important Safety Notes that are included.
Full touch color display
Touch buttons
Operating Controls
Use the controls to set your appliance simply and directly.
Touch Buttons
There are sensors under the touch buttons. Press on the words of the touch buttons to select a function. The available functions are indicated by a light above the respective touch button. Depending on the operation you are running, the number of available functions can change.
Touch button
Use
ON I OFF
Switches the appliance on or off
LIGHT
Switches the appliance light on or off
TIMERS
Sets the kitchen timer, or cooking time
MENU
Selects operating modes and settings
FAST PREHEAT
Activates/Deactivates fast preheating
INFO
Displays additional information
LOCK
Activates/Deactivates panel lock
START I STOP
Starts or pauses the operation
Full Touch Color Display
Use the full touch color display to navigate through the menus and select the settings. The feature that is active will be illuminated in blue.
Basic way of operating the display:
To select a feature/setting, touch the desired area on the display.
The touch screen also supports swiping to move left or right through the various settings.
In some instances you have further options to navigate through the menu:
For double ovens: Touch the symbol to select the upper oven cavity. Touch the symbol to select the lower oven cavity.
The settings you make afterwards will only affect the oven cavity you have selected.
Some operations allow returning to the prior screen by touching the symbol.
Some operations allow confirmation by touching the symbol.
Main Menu
Touch the MENU touch button to access the main menu.
Heating Modes Menu
Your appliance has multiple heating modes. After switching the appliance on, the Heating Modes menu is the default menu. The pre-selected mode is Convection
Bake. You may then choose your desired heating mode by scrolling left or right.
Heating Modes Menu Conventional Oven
General Tips-Conventional Oven
Pan Placement
Baking results are better if pans are placed in the center of the oven. If baking more than one pan on a rack, allow at least 1" to 1 ½ " of air space around the pan.
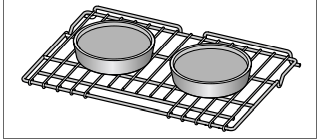
One Rack Baking
For best results when baking layer cakes on one rack, use Bake Mode. Place the cakes on rack 4 in the oven as shown below.
2 Cakes, Rack Level 4
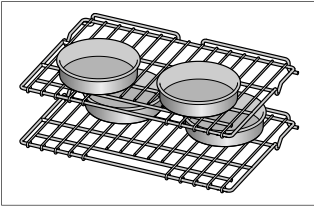
Multiple Rack Baking for Cakes
When baking four layer cakes at the same time, stagger pans on two racks so that one pan is not directly above the other. For best results use Bake mode. Place the cakes on racks 3 and 5, staggering the cakes in the oven as shown below.
4 Cakes, Rack Placement 3 and 5
For best results when baking cookies on multiple racks, use True Convection mode. Place cookies on racks 3 and 6.
Aluminum Foil
WARNING: Do not use aluminum foil or protective liners to line any part of the appliance, especially the oven bottom. Installing these liners may result in risk of electric shock or fire.
Preheating the Oven
Place oven racks in desired position before heating the oven.
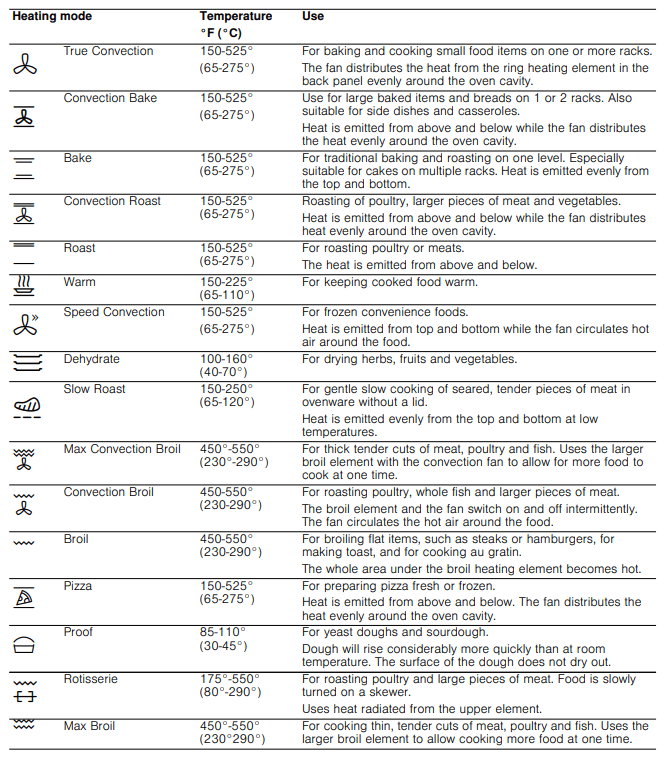
Preheat the oven when using the Bake, Convection Bake, True Convection, Pizza, Broil, Convection Broil, and Warm modes.
Preheat is not required for Speed Convection, Roast, Convection Roast, Proof, and Dehydrate modes.
Allow oven to preheat while preparing recipe ingredients or food items.
Setting a higher temperature does not shorten preheat time.
Once oven is preheated, open the oven door and place food in the oven as quickly as possible to minimize the loss of heat and reduction of oven temperature.
Use Fast Preheat to speed up preheating.
Preheat Reminders
The lower element is hidden under the oven bottom. It is normal that the preheat time is different than your previous oven that had an exposed element on the bottom.
Preheating is not necessary for meats, poultry, casseroles and Speed Convection mode.
Preheat time will be longer when the electrical supply to your house is less than 240 volts.
Increasing the oven temperature will require a longer preheat time. For example, the preheat time for 425° F is longer than the preheat time for 350° F.
When broiling, preheat the oven 3-4 minutes. Do not preheat for more than 5 minutes.
For Best Results
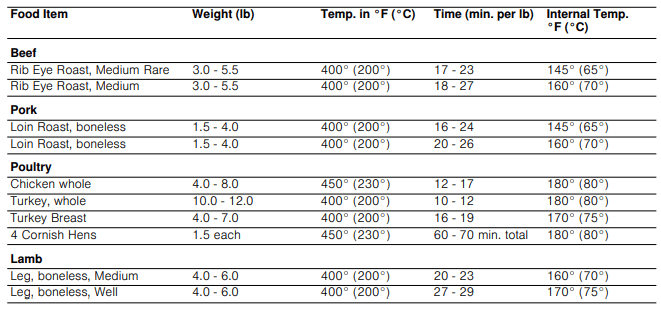
Use the cooking recommendation charts which can be found in the Cooking Charts Use and Care Guide.
Open the door as briefly as possible to avoid temperature reduction.
Use the interior oven light to view the food through the oven window rather than opening the door frequently.
Use the timer to keep track of cooking times.
Baking Pans and Dishes
Glass baking dishes absorb heat. Some cookware manufacturers recommend reducing the temperature 25° F when using this type of dish. Follow manufacturers’ recommendations.
Use pans that provide the desired browning. For tender, light, golden brown crusts, use light, anodized or shiny metal bakeware.
Dark, rough or dull pans (nonstick or anodized) will absorb heat and result in a browner, crisper crust. Some manufacturers recommend reducing the temperature 25° F when using this type of pan. Follow manufacturers’ recommendations.
Insulated cookie sheets or bakeware may increase the length of cooking time.
Do not set broil pans or any other heavy object on the open oven door.
Do not keep the empty broil pan in the oven during cooking as this changes cooking performance. Store the broil pan outside the oven.
Condensation
It is normal for certain amount of moisture to evaporate from the food during any cooking process. The amount depends on the moisture content of the food. The moisture may condense on any surface cooler than the inside of the oven, such as the control panel.
Before First Use
Before you can use your new appliance, you must enter certain settings. You must also clean the oven cavity and accessories.
Before Using the Appliance for the First Time
Appliance must be properly installed by a qualified technician before use.
Remove all packing materials from inside and outside the oven.
While cool, wipe with a clean, damp cloth and dry.
There may be a slight odor from your new appliance; this is normal and will disappear after a short time.
Optimum cooking results depend on proper cookware being used.
Read and understand all safety precautions and Use and Care Manual information.
Execute the following sections prior to operating:
Initial Use
As soon as the appliance is connected to the power supply, the first setting "Time of day" appears on the display.
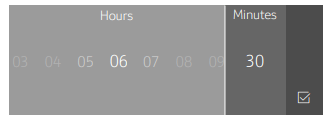
Setting the time of day
1. Touch the bottom line.
The time setting options are displayed
2. Touch the “Hours” touch field and swipe to the left or right to select the current hour.
3. Touch the "Minutes" touch field and swipe to the left or right to select the current minute.
4. Touch the symbol to apply the settings.
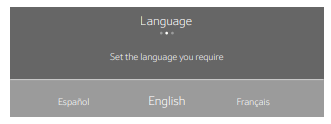
Setting the language
1. Touch the bottom line
2. Swipe to the left or right to select the required language.
3. Touch the top line.
Setting the Clock Display
Touch "Clock display".
Touch the bottom line.
Swipe to the left or right to select “digital” or “analogue”.
Touch the top line.
Setting up Home Connect
You can start the Home Connect assistant to connect to the Home Connect network and pair your mobile device.
Touch “Home Connect”.
Touch “Start assistant”.
Follow the instructions in the chapter “Home Connect”.~ "Home Connect" on page 30
Note: You can also activate this feature later in the “Settings” menu.~ "Adjust Basic Settings" on page 16
Notes
You can change these settings at any time in the basic settings.
After connecting the appliance to the power or following a power failure, the settings for initial use are shown in the display.
Cleaning the Accessories
Clean the accessories thoroughly using soapy water and a dish cloth or soft brush.
Adjust Basic Settings
You can adjust various settings of your appliance, to make using your appliance easy and convenient. If necessary, you can change these settings in the menu “Settings”.
Changing the Settings
Touch the ON l OFF touch button.
Touch the MENU touch button.
Swipe to the left or right to select "Settings ".
Touch “Continue”.
Swipe to the left or right to select the desired setting.
Touch the bottom touch field.
Swipe to the left or right to select the desired setting.
Touch the icon (where applicable) to apply the setting.
Touch the MENU touch button.
Touch "Save" to save the changes.
Available Settings
General Operation
You have already learned about the controls and how they work. Now we will explain how to apply settings on your appliance. You will learn about what happens when you switch the appliance on and off, and how to select the operating mode.
High Altitude Baking
When cooking at high altitudes, recipes and cooking times will vary.
Switching the Appliance On and Off
Touch the ON l OFF touch button to switch the appliance on or off.
On the display, you will see whether the residual heat in the oven cavity is still high after switching the appliance off. “Oven hot” is displayed in the left lower corner of the display.
Notes
Certain displays and notes, such as those relating to the residual heat in the oven cavity, remain visible on the display after the appliance has been switched off.
After device operation, the cooling fan may continue to operate until the oven cavity has cooled.
Switch off your appliance when you do not need to use it. If no settings are applied for a long time, the appliance switches itself off automatically.
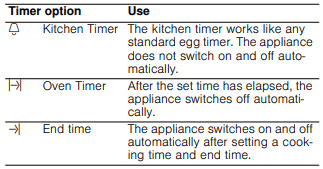
Timer Options
Your appliance will beep once your set time has elapsed.
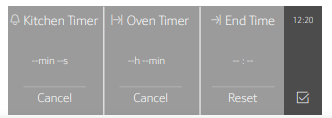
Displaying and hiding timer options
To display or hide the timer options, touch the TIMERS touch button.
Note: The timer options displayed are hidden automatically after a particular time. If you have already set a cooking time, this is automatically stored.
Oven Timer
You can set the cooking time for your meal on the appliance. This means that the oven will turn off after the oven timer is complete. This offers convenience for you so you do not need to interrupt other work to tend to your meal.
1. Touch the ON l OFF touch button.
2. Set the heating mode and temperature.
3. Touch the TIMERS touch button.
The timer options are shown on the display
4. Touch the Oven Timer” touch field.
5. Touch the required field and swipe to the left or right to set the oven timer.
You can set hours and minutes.
6. Touch the symbol.
The heating mode and the cook time are displayed.
7. Touch the START l STOP touch button.
The appliance starts heating and the cook timer begins to count down.
Note: When the set time has elapsed, a signal sounds. “Oven Timer completed” is displayed. The appliance ends the operation automatically. Touch the ON l OFF touch button to turn off the appliance.
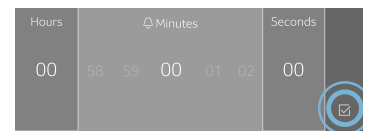
Kitchen Timer
The Kitchen Timer can be set when the appliance is switched on or off.
1. Touch the TIMERS touch button.
The kitchen timer is shown in the display.
If the appliance is switched on, first touch the field.
2. Swipe to the left or right to select the timer value. You can set hours, minutes and seconds.
3. Touch the icon.
The kitchen timer begins to count down.
The symbol and timer value are displayed in the top left corner of the display.
Note: When the set time has elapsed, a signal sounds. “Kitchen Timer completed” is displayed.
Delayed Operation - "End time"
The appliance switches on automatically, then off at the time preselected for the end of operation. To do this, you set the cooking time and specify the end of operation.
Delayed operation can only be used in combination with a heating mode.
Notes
Ensure that food is not left in the oven cavity for too long, as it may spoil.
The option to delay the start of operation is not available for every heating mode.
CAUTION: To maintain food safety, do not leave food in the oven for more than one hour before or after cooking.
Place the food onto the appropriate accessory in the oven cavity and close the appliance door.
Touch the ON l OFF touch button.
Set the heating mode.
Touch the TIMERS touch button. The timer options are shown in the display.
Select Oven Timer and set a cook time. Touch the icon.
Select TIMERS again and set End Time. Touch the icon.
Touch the START l STOP touch button.
The appliance waits until the appropriate time to start the operation.
As soon as the end time has been reached, an audible signal sounds and the appliance ends the operation automatically.
Checking, changing or deleting settings
1. Touch the TIMERS touch button.
The time-setting options are shown in the display.
2. Touch the required timer option.
3. Swipe to the left or right on the touch display to change the settings.
To delete a timer value, set “00:00“, or touch “Cancel”.
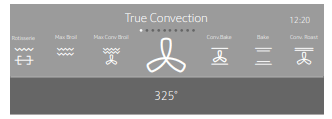
Setting a Heating Mode
Use the touch buttons and the touch fields on the touch screen to enter the different operating menus.
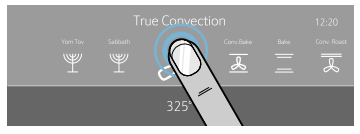
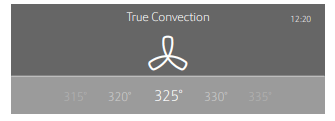
Example: True Convection with 325° F (160 °C)
1. Touch the ON l OFF touch button to switch on the appliance.
You go directly to the heating modes menu.
2. For double ovens, touch the symbol for the oven cavity you want to use:
- Upper oven cavity
- Lower oven cavtiy
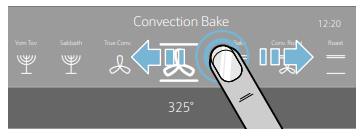
3. Swipe to the left in the top line of the display to select “True Convection”
4. Swipe to the left or right in the bottom line of the display to select the temperature.
5. Touch the START l STOP touch button to start the appliance operation.
The status bar appears in the display to indicate the preheating progress.
When the appliance has reached the set temperature, “Oven preheated” is displayed and an audible signal sounds. The oven continues cooking with the set temperature.
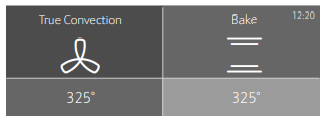
Double Ovens:
The settings for the two oven cavities are shown side by side on the display. The upper cavity is on the left, the lower cavity on the right side of the display
To adjust the settings, touch the field of the required oven cavity on the display.
Note: You can only set one oven at a time. The display icons for the upper and lower oven cavity light up in different colors:
Blue
The oven cavity is selected; you can set the oven
White
The oven cavity is operating
Grey
The oven cavity is inactive
Default Values
The appliance suggests a temperature or setting for each heating mode. You can accept this value or change it in the appropriate area.
Preheating Bar
As soon as a new heating mode is started, the preheating bar appears on the display. The preheating bar indicates the temperature increase in the oven cavity. When the oven is fully preheated, a sound signal will occur.
INFO Touch Button
If the INFO touch button lights up, important information regarding the mode you are using is available. This may include for example recommendations on suitable cookware or how to prepare food for a safe cooking result. When you touch the INFO touch button, the information is displayed for a few seconds.
To exit the INFO text immediately, touch the INFO touch button or the display.
Sounds
The appliance uses various sound signals during operation. A sound signal can be heard whenever you use a touch button or touch field, or when an operation is started or finished. You can adjust these sounds in the Settings menu. ~ "Adjust Basic Settings" on page 16
Changing or Cancelling the Appliance Operation
Note: In a double oven, if both cavities are operating, it is necessary to select the cavity in which you wish to make changes.
Changing the appliance operation
Use the START l STOP touch button to stop the operation.
Touch the area for the setting that should be changed.
Swipe to the left or right to change the setting.
Use the START l STOP touch button to start the changed operation.
Notes
If only adjusting temperature, the oven may restart automatically.
The cooling fan may continue to run while an operation is interrupted.
Cancelling the appliance operation
Press the START l STOP button to cancel the appliance operation.
Note: With double ovens, if both cavities are operating the cavity must be selected before pressing START|STOP.
Fast Preheat
With "Fast Preheat", you can shorten the preheat time required for some heating modes.
Fast Preheat is available for the following modes:
True Convection
Convection Bake
Bake
Roast
Convection Roast
To achieve an even cooking result, do not place your food or accessories into the oven cavity until “Fast Preheat” is complete.
Notes
If the FAST PREHEAT touch button is lit, the function can be activated.
To deactivate the function before it has finished, touch the FAST PREHEAT touch button.
Activating the "Fast Preheat" function
1. Set a heating mode and temperature.
2. Touch the START l STOP touch button to start the heating mode.
3. Touch the FAST PREHEAT touch button to activate the function.
The symbol appears on the display.
4. Once the set temperature has been reached, the "Fast Preheat" function switches itself off automatically. The symbol disappears from the display. Place the food in the oven cavity.
Panel Lock
Your appliance is equipped with a panel lock so that it cannot be switched on or a setting cannot be changed accidentally.
Activating and Deactivating
The appliance has to be turned off.
Touch and hold the LOCK touch button (or the TIMERS touch button if LOCK is not present) until "Panel Lock activated" is displayed. The lock is activated. The symbol is displayed in the top left corner of the display.
Touch and hold the LOCK touch button (or the TIMERS touch button if LOCK is not present) until "Panel Lock deactivated" is displayed. The lock is deactivated.
Note: If the unit has a warming drawer, the TIMERS touch button must be used.
Auto Convection Conversion
True Convection and Convection Bake modes require a 25° F (5 °C) reduction in temperature. Auto Convection Conversion reduces the temperature you enter automatically.
Enter the package or recipe temperature when setting the mode. The oven control calculates the correct temperature for these modes automatically by reducing the input temperature by 25° F (5 °C). This is then shown in the display.
To turn on this feature:
Go to Settings
Press the ON|OFF touch button to turn the oven on.
Press the MENU touch button.
Scroll over to Settings on the touch screen.
Select Conv. Conversion and press ON.
Exit Settings and select “Save” to save your settings.
Temperature Offset
This feature is useful if food is consistently either too brown or too light. The setting increases or decreases the set oven temperature according to the chosen value. The following heating modes support this functionality:
Bake
Convection Bake
Roast
Convection Roast
True Convection
Note: The oven is carefully calibrated to provide accurate results. This feature is useful if you prefer your foods darker or lighter.
Refer to the section entitled “Adjusting Basic Settings” to apply a temperature offset.
Note: For double ovens you can set a different temperature offset for each oven cavity
Meat Probe
Depending on the model, your oven comes with a singlepoint or a multi-point meat probe. This means that the probe measures the temperature either in one or in three different areas of your food ensuring the most accurate cooking results. Once the set temperature has been reached, the appliance automatically switches itself off.
Suitable Heating Modes
True Convection
Convection Bake
Bake
Convection Roast
Roast
Slow Roast
Notes
The meat probe measures the temperature on the inside of the food between 85° F (30 °C) and 210° F (99 °C).
Use only the meat probe supplied with your appliance. Additional or replacement meat probes can be ordered as a spare part from Customer Service.
After use, always remove the meat probe from the oven cavity. Never store it inside the oven cavity.
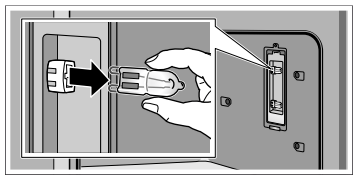
Inserting the Meat Probe into the Food
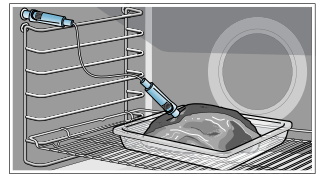
Before placing your food into the oven cavity, insert the meat probe into the food.
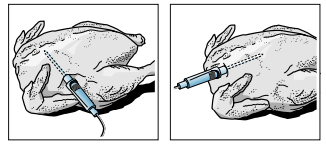
Depending on your oven model, the meat probe has one (single-point meat probe) or three (multi-point meat probe) measuring points. If you have a multi-point meat probe, ensure that the middle measuring point is inserted in the food.
Meat: For large pieces of meat, insert the meat probe at an angle from above as far as it will go into the meat. For relatively thin pieces of meat, insert the meat probe from the side at the thickest point.
Poultry: Insert the meat probe as far as it will go into the thickest point in the breast. Insert the meat probe into the poultry crosswise or lengthwise depending on its structure. Put the chicken in a roasting dish and place it on the wire rack.
Turning the food: If you wish to turn the food, do not unplug the meat probe from the oven. Once you have turned the food, check that the meat probe is correctly repositioned in the food.
If you unplug the meat probe from the oven, all settings will be reset and you will have to apply them again.
NOTICE: Ensure that the meat probe's cable does not become trapped.
To prevent the meat probe from being damaged by excessive heat, there must be a gap of at least an inch or more between the broil element and the meat probe. The meat may expand during the cooking process.
Setting and Starting Appliance Operation
WARNING: RISK OF BURNS
The oven interior and the meat probe become very hot. Use oven mitts to plug and unplug the meat probe.
WARNING: RISK OF ELECTRIC SHOCK
Use of a wrong meat probe can damage the insulation. Use only the meat probe intended for this appliance.
Notes
The set oven cavity temperature must be at least 50° F (10 °C) higher than the meat probe temperature.
To prevent the meat probe from being damaged, the oven cavity temperature must not be set higher than 480° F (250 °C).
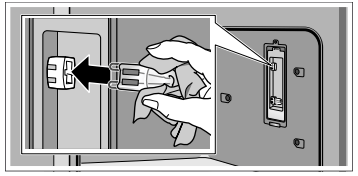
1. Insert the meat probe into the socket on the left-hand side of the oven cavity.
Note: The probe icon will appear on the oven display screen.
2. Close the appliance door.
NOTICE: When doing so, ensure that the meat probe’s cable is not trapped in the appliance door. It may be damaged.
3. Touch the ON l OFF touch button.
4. Set the heating mode.
Note: When the meat probe is plugged into the socket, you can only select a heating mode that is suitable to be used with the meat probe.
5. Touch the oven cavity temperature on the left in the bottom line.
6. Swipe to the left or right to select the required oven cavity temperature.
7. Touch the symbol to apply the setting.
8. Touch the core temperature on the right in the bottom line.
9. Swipe to the left or right to select the required core temperature.
10.Touch the START l STOP touch button. The appliance starts the operation.
Changing or Stopping the Appliance Operation
Changing: During appliance operation, you can change the oven cavity temperature and meat probe temperature.
Touch the oven cavity temperature or meat probe temperature.
Swipe to the left or right to change the temperature.
Touch the symbol to apply the setting.
Stopping: Once the set meat probe temperature has been reached, a signal sounds and the appliance stops the operation automatically.
Use the ON l OFF touch button to switch off the appliance.
Using an oven glove, unplug the meat probe from the socket.
Core Temperatures of Different Foods
Do not use frozen food. The figures in the table are given as a guide. They will depend on the quality and composition of the food.
You can find detailed information on heating modes and temperatures in the Use and Care Cooking Charts manual.
Food
Core temperature in °F (°C)
Poultry
170° (75°)
Pork*
145° (65°)
Pork
160° (70°)
Beef, medium rare
145° (65°)
Beef, medium
160° (70°)
Beef, well done
170° (75°)
Lamb
145° (65°)
Other: Heating/reheating food
150°-165° (65°-75°)
*allow for a three minute rest period.
Sabbath Mode
With the Sabbath mode, a cooking time of up to 74 hours can be set. You can keep the food in the oven cavity warm without having to switch the oven on or off.
Note: Sabbath mode has to be activated in the Basic Settings, to use this mode.
Note: If you have a double oven, you can set either the Yom Tov or Sabbath mode in both oven cavities at the same time. It is not possible to mix the two modes. The set time will run simultaneously for both oven cavities.
Starting
The oven is automatically in Bake mode. The temperature can be set between 100° F (40 °C) and 450° F (230 °C).
Touch the ON l OFF touch button.
Swipe to the left or right to select "Sabbath ".
Touch the temperature in the bottom line.
Swipe to the left or the right to select the required temperature.
Touch the icon to apply the setting.
Touch the cooking time + in the bottom line.
Swipe to the left or the right to select the required duration.
Touch the symbol to apply the setting.
Touch the START l STOP touch button.
“Sabbath Mode will start in 5min 00sec” appears on the display. After five minutes the appliance starts the operation. All controls apart from the ON l OFF and START|STOP touch buttons are deactivated. You can switch off the appliance at any time.
Notes
Once Sabbath mode has started, you can no longer change any settings using the START l STOP touch button.
The operation is not interrupted if you open the appliance door.
Once the Sabbath mode duration has elapsed, a signal sounds. The appliance stops heating. Use the ON l OFF touch button to switch off the appliance.
Cancelling
Touch the ON l OFF touch button to cancel the operation.
Yom Tov Mode
With the Yom Tov mode, you can set a cooking time of up to 74 hours, during which you can select from six cooking temperatures.
Note: Sabbath mode has to be activated in the Basic Settings, to use this mode.
Note: If you have a double oven, you can set either the Yom Tov or Sabbath mode in both oven cavities at the same time. It is not possible to mix the two modes. The set time will run simultaneously for both oven cavities.
Starting
The oven is automatically in Bake mode. The temperature can be set between 100° F (40 °C) and 450° F (230 °C).
Touch the ON l OFF touch button.
Swipe to the left or right to select "Yom Tov ".
Touch the temperature in the bottom touch field.
Swipe to the left or the right to select the required temperature.
Touch the icon to apply the setting.
Touch the cooking time in the bottom touch field.
Swipe to the left or the right to select the required duration.
Touch the icon to apply the setting.
Touch the START l STOP touch button.
“Yom Tov Mode will start in 5min 00sec” appears on the display. After five minutes the appliance starts the operation. All controls apart from the ON l OFF and START l STOP touch buttons are deactivated. You can switch off the appliance at any time.
Notes
Once Yom Tov mode has started, the temperature may be changed by pressing one of the six displayed temperatures. The display will not respond to this input, but the temperature will be adjusted in the cavity. The START l STOP touch button will not cancel the mode.
The operation is not interrupted if you open the appliance door.
Once the Yom Tov mode duration has elapsed, a signal sounds. The appliance stops heating up. Use the ON l OFF touch button to switch off the appliance.
Cancelling
Touch the ON l OFF touch button to cancel the operation.
Rack Positions
There are seven positions with position one starting at the bottom of the oven. Rack positions are called out throughout the manual to help optimize cooking performance
Inserting Racks
CAUTION
To avoid burns, place oven racks in desired positions before turning oven on. Always use oven mitts when the oven is warm. If a rack must be moved while the oven is hot, do not let oven mitts contact hot heating elements.
Use caution when removing oven racks from the lowest rack position to avoid contact with the hot oven door.
To avoid possible injury or damage to the appliance, ensure racks are installed exactly per installation instructions and not backwards or upside down.
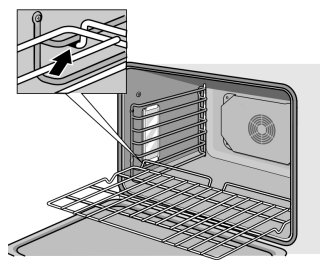
Flat Rack
The rack is designed with a stop so it will stop before coming completely out of the oven and not tilt.
To insert Flat Rack into Oven:
1. Grasp rack firmly on both sides.
2. Insert rack (see picture).
3. Tilt rack up to allow stop into rack guide.
4. Bring rack to a horizontal position and push the rest of the way in.
Rack should be straight and flat, not crooked.
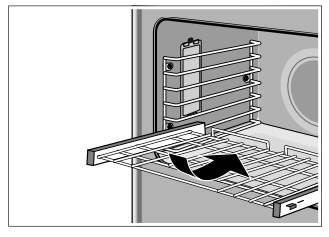
To remove Flat Rack from Oven:
1. Grasp rack firmly on both sides and pull rack toward you.
2. When the stop is reached, tilt rack up and pull the rest of the way out.
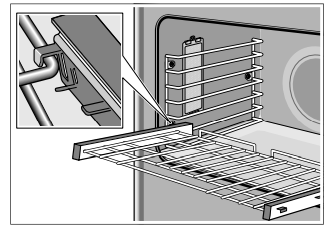
Telescopic Rack
To insert Telescopic Rack into Oven:
1. Hold the rack at a slight angle.
2. Engage the rear hooks in the accessory brackets.
3. Hold the rack straight to allow second tab to rest over rack guide.
4. Push the rack in until it is even with the front hooks.
5. Lift the rack up to lock the last hook into place.
6. Push the rack in completely.
7. Engage the rack’s front hooks in the accessory brackets.
This is very important to ensure that the rack is installed correctly (see the enlarged picture).
CAUTION: To avoid possible injury or damage to the appliance, ensure telescopic rack is installed exactly per installation instructions and not backwards or upside down.
Rotisserie
Rotisseries uses heat radiated from the upper element. Food is slowly turned on a skewer in the center of the oven. This allows food to receive equal heat on all sides. The Rotisserie mode is best suited for cooking large pieces of meat (for example a whole chicken, turkey or a large roast). This mode helps seal in flavor and juices while allowing the meat to be cooked without the addition of fats or liquids.
The maximum weight allowed for the rotisserie is 12 lb (6 kg).
Use a meat thermometer to check the internal temperature of the meat.
Allowable oven temperature is 175 - 550°F (80 - 290°C).
Note: For double ovens, only one oven cavity will be enabled for Rotisserie mode.
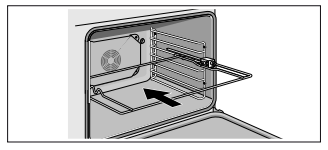
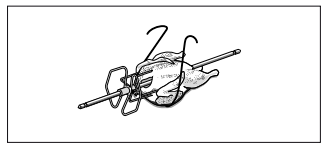
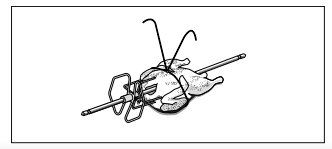
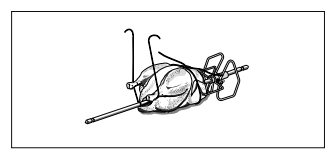
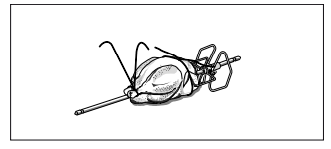
Assembling the Rotisserie:
1. Insert the rotisserie rack half way into the oven on rack position 5.
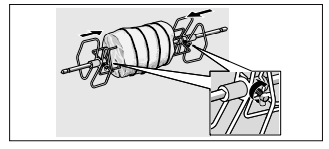
2. Slide the left fork into the skewer and tighten the screw.
3. Slide meat or poultry for roasting onto the skewer and tighten the screw.
4. Slide the right fork onto the skewer and tighten the screw.
5. Check the balance of the food on the skewer by rolling the skewer in the palms of your hands. Food that is not evenly balanced on the skewer will not cook evenly
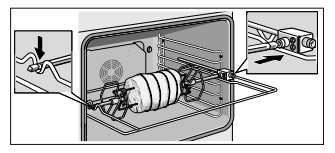
6. Place the rotisserie skewer onto the rack
7. Place the skewer rack into the oven and insert the drive shaft into the opening on the back oven wall.
8. If necessary, turn the rotisserie skewer slightly so that the drive shaft fits properly into the opening.
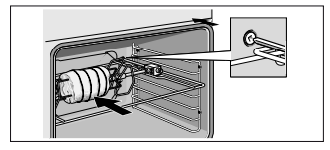
9. Insert flat rack on position 1 and insert broil pan to catch drippings.
Trussing Poultry for the Rotisserie
1. Slip one of the forks on the skewer with the tines pointing to the tip of the skewer. Loosely tighten the screw to keep it from slipping.
2. Insert the skewer through the poultry securing with the fork.
3. Cut 24" (61 cm) of kitchen string and lay it under the poultry, breast side up, with equal lengths of string on each side.
4. Wrap each end of the string around each of the wings; catch each wing tip as the string is brought tightly together at the top and knotted. Do not cut off the extra string.
5. Cut another 24" (61 cm) of string and lay it under the back. Wrap it around the tail and then around the skewer. Cinch tightly
6. Pull legs forward; cross them on top of the skewer, bring string around and tie a knot.
7. Connect the string holding the legs to the string holding the wings; then knot. Add the other fork and push tines into the drumsticks to secure.
8. Check the balance by rolling the skewer in your palms. Poultry should not rotate or be loose in any way. If so, redo the trussing. The poultry will not cook evenly if it is not balanced on the skewer.
Start
Select Rotisserie mode. The default temperature is 400°F (200°C). Swipe to the left or right to adjust temperature and press START.
Cooking Chart for Rotisserie
Warming Drawer Operation
Triple ovens include a warming drawer that is operated using the oven operating panel. These appliances will have a DRAWER touch button instead of the LOCK touch button.
The warming drawer will keep hot, cooked foods at serving temperature.
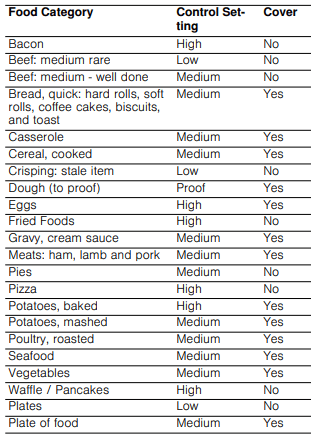
CAUTION: To maintain food safety, follow these guidelines:
i. DO NOT use the warming drawer to heat cold food (exception: it is safe to use the drawer to crisp crackers, chips or dry cereal and to warm plates.
j. Be sure to maintain proper food temperature. The USDA recommends holding hot food at 140°F or warmer.
k. DO NOT warm food for longer than one hour.
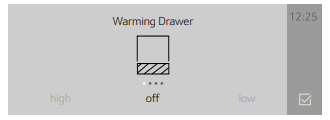
Setting the Warming Drawer
You can also use the warming drawer when the oven is in switched off.
1. Press the DRAWER touch button.
2. Touch the bottom line and swipe to the left or right to select the desired intensity.
Available settings are:
High
Medium
Low
Off
3. Touch the icon.
The warming drawer starts operating. If you do not touch the icon the warming drawer will start heating automatically after some time.
The warming drawer icon is displayed on the top left corner of the display as long as the warming drawer is running.
To cancel the warming drawer operation:
Press the DRAWER touch button.
Swipe right and select “off”.
Touch the icon.
Warming Empty Serving Bowls and Plates
Use only heat-safe dishes.
Warm on low setting for cooking containers.
Check dish temperature during warming period.
Place empty plates or dishes in a cold warming drawer. Do not preheat drawer prior to placing dishes.
Warming Drawer Charts
Note: Preheat all cookware prior to inserting into the warming drawer. If the cookware has previously been used to prepare a dish, then no preheating is necessary.
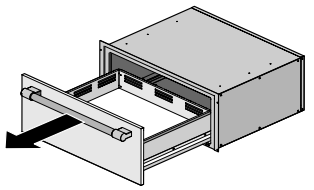
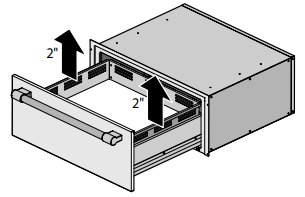
Remove Drawer Insert
Note: The pictures show a warming drawer model with handle. Depending on the appliance model, individual details may differ.
1. Open the drawer fully
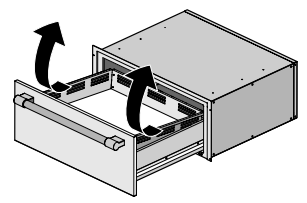
2. Grasp the overhanging flange of the insert about midway on each side of the drawer and lift it for approx. 2" (3 cm).
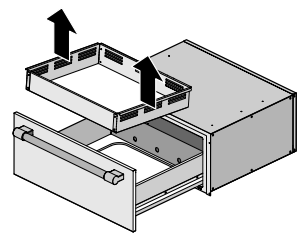
3. While holding the insert up rotate the front of the insert upward to clear the front inside of the drawer.
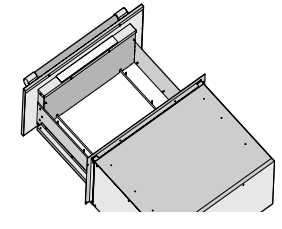
4. Once the insert has been removed it can be located to a more suitable location for cleaning using methods outlined in the chapter on Cleaning in this manual.
5. With the insert removed, the drawer base can be cleaned if necessary. Special care must be taken to prevent any damage to the now exposed heating element below the drawer insert. It is also not recommended to remove any more housing panels at this point.
If additional issues remain at this point, contact Customer Service.
WARNING: RISK OF BURNS
Do not operate the Warming Drawer without the insert. The heating elements will become very hot and might cause injury.
Cleaning Your Oven
With good care and cleaning, your appliance will retain its appearance and remain fully functioning for a long time to come. We will explain here how you should correctly care for and clean your oven.
Suitable Cleaning Agents
To ensure that the different surfaces are not damaged by using the wrong cleaning agent, follow the information in the following table. Depending on the appliance model, not all of the areas listed may be on/in your appliance.
NOTICE: Surface damage!
Do not use any
Harsh or abrasive cleaning agents
Cleaning agents with a high alcohol content
Hard scouring pads or abrasive cleaning sponges
High-pressure cleaners or steam cleaners
Special cleaners for cleaning the appliance while it is hot
Wash new soft sponges and cloths thoroughly before use.
Tip: Recommended cleaning and care products can be purchased through Customer Service. Observe the respective manufacturer's instructions.
WARNING: RISK OF BURNS
The appliance becomes very hot. Never touch the hot inside surfaces of the oven interior or heating elements. Always allow the appliance to cool down. Keep children away.
Cleaning Guide
Part
Recommendations
Broil Pan and Grid
Wash with hot soapy water. Rinse thoroughly and dry, or gently rub with cleansing powder or soap-filled pads as directed. DO NOT clean broil pan and grid in the self-cleaning oven.
Flat Rack
Wash with hot soapy water. Rinse thoroughly and dry, or gently rub with cleansing powder or soap-filled pads as directed. DO NOT clean the rack in the self-cleaning oven.
If the flat racks are cleaned in the oven during the self clean mode, they will lose their shiny finish and may not glide smoothly. If this happens, wipe the rack edges with a small amount of vegetable oil. Then wipe off excess.
Telescopic Rack
Wash with soapy water. Rinse thoroughly and dry, or gently rub with cleansing powder or soap-filled pads as directed. Avoid getting cleansing powder in the telescopic slides. Re-lubrication may become necessary. Use only high-temperature food-grade lubricants to re-lubricate slides. DO NOT clean the rack in the self-cleaning oven. If the telescopic rack is cleaned in the oven during the self clean mode it will lose its shiny finish and will not glide smoothly.
Fiberglass Gasket
DO NOT CLEAN GASKET.
Glass
Wash with soap and water or glass cleaner. Use Fantastik® or Formula 409® to remove grease spatters and stubborn stains.
Glass Control Panel
Use warm soapy water on a dish cloth or glass cleaner sprayed directly on a paper towel.
Painted Surfaces
Clean with hot soapy water or apply Fantastik® or Formula 409® to a clean sponge or paper towel and wipe clean. Avoid using powder cleaning agents, steel wool pads and oven cleaners
Porcelain Surfaces
Immediately wipe up acid spills like fruit juice, milk and tomatoes with a dry cloth. Do not use a moistened sponge/cloth on hot porcelain. When cool, clean with hot soapy water or apply Bon-Ami® or Soft Scrub® to a damp sponge. Rinse and dry. For stubborn stains, use soap-filled pads. It is normal for porcelain to show fine lines with age due to exposure to heat and food soil.
Stainless Steel Surfaces
Always wipe or rub in the direction of the grain. Clean with a soapy sponge, then rinse and dry, or wipe with Fantastik® or Formula 409® sprayed on a paper towel. Protect and polish with Stainless Steel Magic® and a soft cloth. Remove water spots with a cloth dampened with white vinegar.
Chlorine or chlorine compounds in some cleaners are corrosive to stainless steel. Check ingredients on label before using.
Plastic & Controls
When cool, clean with soapy water, rinse and dry.
Probe
Wipe with soapy water. Do not submerge. Do not wash in the dishwasher.
Printed areas (words & numbers)
Do not use abrasive cleaners or petroleum based solvents.
Warming drawer interior
Use dish detergent. Wash, rinse well and dry. For hard water spots or scale, use white vinegar. Apply with a sponge or cloth, rinse, and dry. Chlorine or chlorine compounds in some cleansers are corrosive to stainless steel. Check ingredients on label.
See chapter “Warming Drawer Operation” for instructions on how to remove the warming drawer insert.
Notes
Slight differences in color on the front of the appliance are caused by the use of different materials, such as glass, plastic and metal.
Shadows on the door panels, which look like streaks, are caused by reflections made by the interior lighting.
Enamel is baked on at very high temperatures. This can cause some slight color variation. This is normal and does not affect operation.
Surfaces in the Oven Cavity
The oven cavity bottom is enameled and has a smooth surface.
Cleaning the oven is easier because there is no cleaning around a coil element showing on the bottom of the oven. The hidden lower element is protected from food soils and spills. Wiping up excess spills is easy.
Cleaning Enamel Surfaces
Clean the smooth enamel surfaces with a dish cloth and hot soapy water. Dry with a soft cloth.
Soften baked-on food residues with a damp cloth and soapy water. If there are heavy food deposits use a soapfilled pad.
Note: Food residues can leave a white coating behind. These are harmless and do not affect performance. You can remove these residues using lemon juice if required.
Keeping the Appliance Clean
Always keep the appliance clean and remove food and food spills immediately so that stubborn deposits do not build up.
Clean the oven cavity after each use. This will ensure that food and food spills cannot be baked on.
Always remove flecks of limescale, grease, starch and albumin (e.g. egg white) immediately.
Use suitable ovenware for roasting, e.g. a roasting dish.
For cakes or pies that may spill over, place on baking sheet lined with aluminum foil and place on wire rack.
Easy Clean
The Easy Clean function makes it easier to clean the oven floor. Food and food spills are soaked beforehand by vaporizing the vinegar solution. It can then be removed more easily.
WARNING: RISK OF SCALDING
Hot steam can arise due to water in the hot oven cavity. Never pour water into the hot oven cavity.
Setting
The "Easy Clean " function can only be started once the oven cavity is cold (room temperature) and the appliance door is closed.
Do not open the appliance door during this operation. Doing this will interrupt the "Easy Clean " function.
Leave rack 3 and remove all other racks and accessories from the oven cavity.
Mix 2 cups water and 1/2 cup vinegar and place in broil pan tray on rack 3.
Touch the ON l OFF touch button.
Touch the MENU touch button.
Swipe to the left or right to select "Easy Clean ".
Touch the bottom line.
Touch the START l STOP touch button. The appliance starts the Easy Clean function. The remaining time appears on the display.
Exit
As soon as the cleaning function has run through, a signal sounds and the appliance ends the operation automatically.
As soon as you open the appliance door, the interior lighting is switched on so that you can rinse the oven cavity more easily. The remaining water in the oven cavity must be removed promptly. Do not leave the remaining water in the oven cavity for a long time (e.g. overnight). The appliance must not be operated when the oven cavity is still wet or damp.
Subsequent Cleaning
Open the appliance door and remove the remaining water with an absorbent sponge cloth.
Clean the smooth surfaces in the oven cavity with a dish cloth or a soft brush. Stubborn residues can be removed using a soft scouring pad.
Remove limescale with a cloth soaked in vinegar. Then wipe with clean water and rub dry with a soft cloth.
Use the ON l OFF touch button to switch off the appliance.
Leave the appliance door ajar in the stop position (approx. 30°) for approx. one hour to allow the enamel surfaces in the oven cavity to dry thoroughly
Removing Heavy Food Deposits
You have several options for removing particularly stubborn food deposits.
Leave the vinegar solution to work for some time before starting Easy Clean.
Rub vinegar solution onto the food and food spills on the smooth surfaces before starting Easy Clean.
Repeat the Easy Clean function after the oven cavity has cooled down.
Self Clean
During Self Clean, the oven is heated to a very high temperature. Remnants from roasting, broiling or baking are burned off and all you have to do is wipe the ash out of the oven cavity after the oven has cooled.
WARNING: WHEN USING THE SELF CLEAN FEATURE
During the elimination of soil during self-cleaning, small amounts of Carbon Monoxide can be created and the fiberglass insulation could give off very small amounts of formaldehyde during the first several cleaning cycles. To minimize exposure to these substances, provide good ventilation with an open window, or use a ventilation fan or hood.
Do not block the oven vent(s) during the Self Clean cycle. Always operate the unit according to the instructions in this User Guide.
When using the Self Clean feature, confirm that the door locks and will not open. If the door does not lock, do not run Self Clean. Contact Customer Service.
The appliance becomes very hot during Self Clean. Never hang flammable items such as dishcloths on the door handle. Keep the front of the appliance clear. Keep children away.
The high temperature during Self Clean destroys non-stick coatings on trays and molds and toxic gases are produced. Never leave anything in the oven during Self Clean.
NOTICE: Do not clean parts or accessories with the Self Clean feature.
Preparing the pyrolytic self-cleaning feature
CAUTION: Risk of fire! Loose food remnants, fat and meat juices may catch fire. Wipe the cooking compartment with a damp cloth.
Remove the worst food spills from the oven.
Clean the door seals, the inside of the door and the glass pane by hand as these parts are not cleaned during the pyrolytic self-cleaning cycle.
Remove any loose parts from inside the cooking compartment. Make sure that nothing is left inside the cooking compartment.
Close the oven door.
Setting
The "Self Clean " function can only be started once the oven cavity is cold (room temperature) and the appliance door is closed.
For your safety the appliance door is locked during this operation.
Depending on the degree of soiling you can select three different intensity levels for the Self Clean cycle:
Intensity level
Duration (excluding cool off)
high
3 hours
medium
2 ½ hours
low
2 hours
Remove the accessories from the oven cavity.
Touch the ON l OFF touch button.
Touch the MENU touch button.
Swipe to the left or right to select "Self Clean ".
Select a cleaning intensity.
Touch “Continue”.
Confirm that you have removed heavy soil and accessories from the oven cavity.
Touch the START l STOP touch button.
The door lock is activated automatically. The Self Clean program is started.
Note: After the completion of a Self Clean cycle, the oven will not allow you to start another Self Clean cycle for 24 hours. For a double oven, if one cavity runs Self Clean, neither cavity may operate a Self Clean cycle for 24 hours.
When Self Clean is Completed
When the Self Clean program has run through, a signal sounds and the appliance ends the operation automatically.
The appliance will remain locked while cooling off. Once the oven cavity has cooled off, the lock will be deactivated automatically.
Wipe out the remaining ash from the oven cavity with a damp cloth.
Avoid These Cleaners
Do not use commercial oven cleaners such as Easy Off®. They may damage the oven finish or parts. Never use scouring pads or abrasive cleaners.
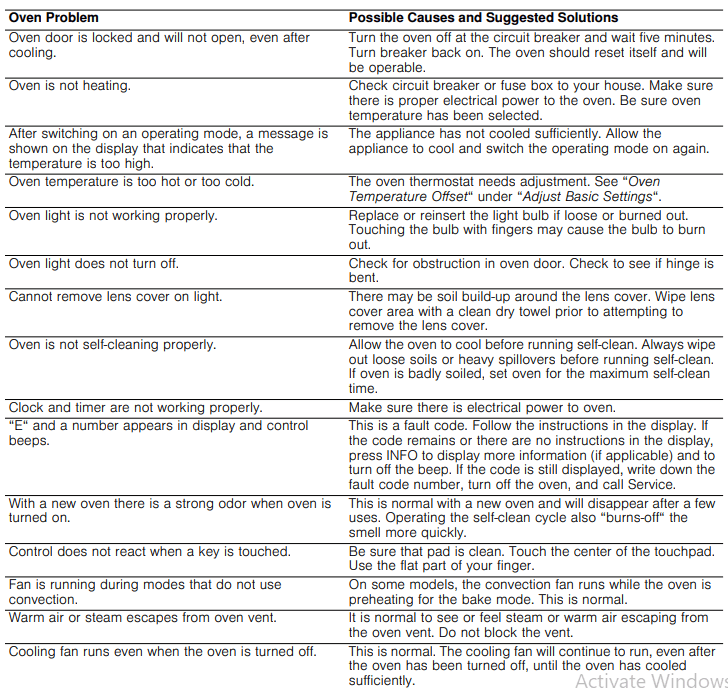
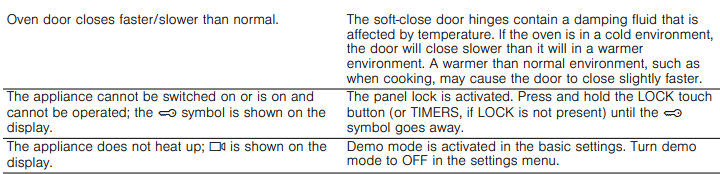
Service
Troubleshooting Chart
Maximum Operating Time Exceeded
Your appliance automatically ends the operation if no duration has been set and the setting has not been changed for 24 hours.
The actual cooking time until the operation is stopped automatically varies according to the selected settings.
A message appears on the display on the appliance to say that the operation is being ended automatically. Afterwards, the operation is stopped.
To use the appliance again, first switch it off. To switch the appliance back on set the required operation.
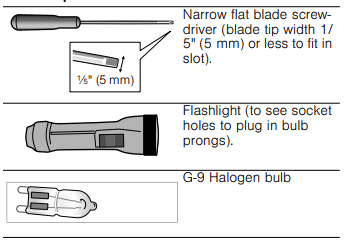
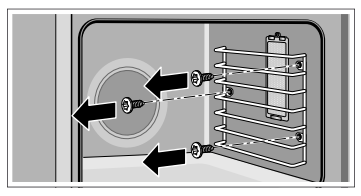
Oven Light
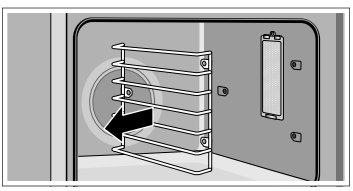
To replace the halogen bulb on the oven sidewall:
Tools required
1. Turn off power to the oven at the main power supply (fuse or breaker box). 2. Remove three screws from oven cavity holding the rack in place.
3. Remove oven rack to provide access to the bulb housing.
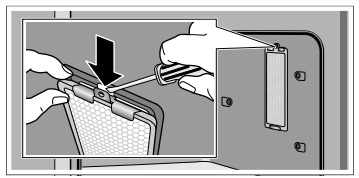
4. Remove screw from top of bulb housing.
5. Insert the tip of a narrow flat blade screwdriver between the metal clips at about a 40° angle. The screwdriver blade must be able to pass between the metal clips to reach the inner catch.
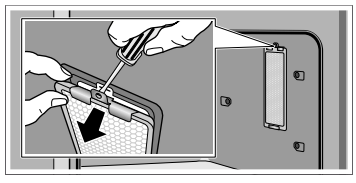
6. Push the screwdriver blade inward to disengage the catch from the slot in the bulb housing. Gently pry the lens off by moving the screwdriver handle away from the oven wall.
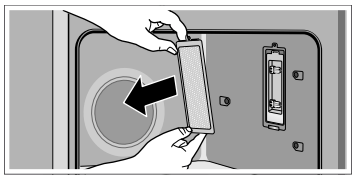
7. Support the glass lens cover to prevent it from falling.The lens should detach easily. Do not attempt to force it.
8. Pull the halogen bulb from its socket.
9. Replace the halogen bulb. Grasp the new bulb with a clean, dry cloth. Align the bulb prongs with the socket holes and press into place.
Note: Direct finger contact with the bulb may cause premature bulb failure.
10.Put the glass cover back on by inserting it into the mounting clip and pressing the end nearest you into the housing until it locks into place. Insert screw through glass cover and tighten.
11.Reinstall the oven rack.
12.Turn power back on at the main power supply (fuse or breaker box).
 symbol to select the upper oven cavity. Touch the
  symbol to select the lower oven cavity.
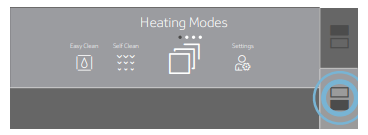
 symbol.
 symbol.

 symbol to apply the settings.
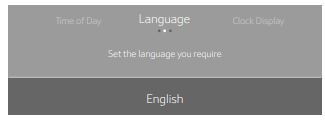
 ".
". icon (where applicable) to apply the setting.
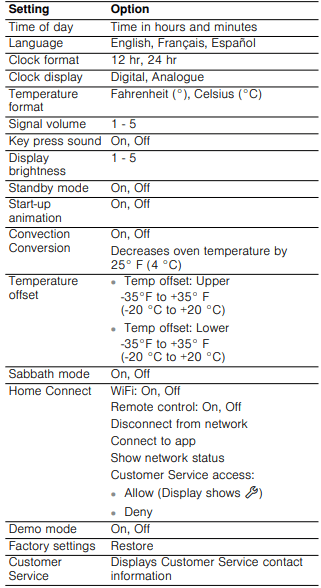
 Oven Timer” touch field.
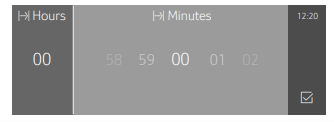
 symbol.
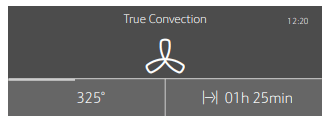
 field.
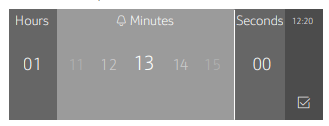
 icon.
icon. symbol and timer value are displayed in the top left corner of the display.
 icon.
icon. icon.
icon. - Upper oven cavity
 - Lower oven cavtiy

 and lower
  oven cavity light up in different colors:
 symbol appears on the display.
 symbol is displayed in the top left corner of the display.


 WARNING: RISK OF BURNS
 symbol to apply the setting.
 core temperature on the right in the bottom line.
 symbol to apply the setting.
 ".
". icon to apply the setting.
 ".
". icon to apply the setting.
 in the bottom touch field.
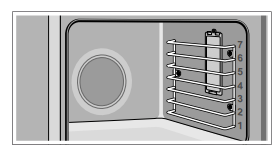


 " function can only be started once the oven cavity is cold (room temperature) and the appliance door is closed.
 " function can only be started once the oven cavity is cold (room temperature) and the appliance door is closed.