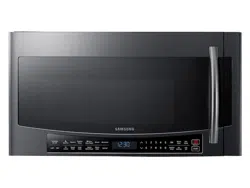
Setting up your new microwave oven
Setting up your microwave oven
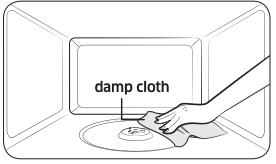
1. Open the door by pulling the handle on the right side of the door.
2. Wipe the inside of the oven with a damp cloth.
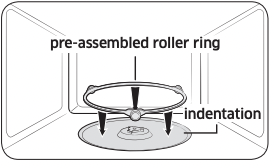
3. Install the pre-assembled ring into the indentation at the center of the microwave oven.
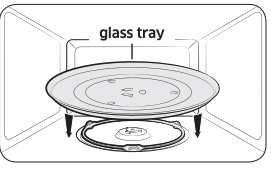
4. Place the glass tray securely in the center of the pre-assembled roller ring.
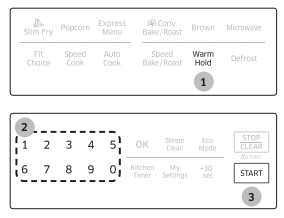
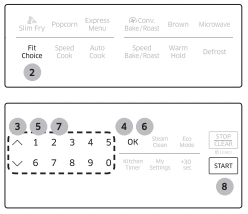
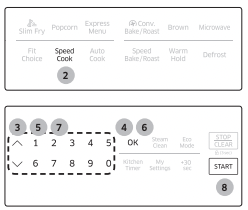
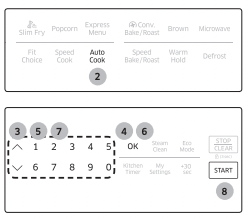
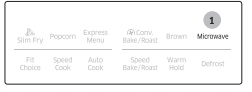
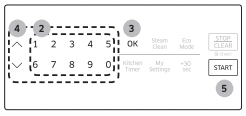
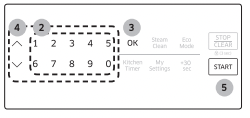
Checking the control panel

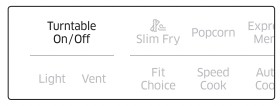
01 Turntable On/Off Button
02 Light Button (Hi/Low/Off)
03 Vent Button (3 Speed & On/Off)
04 Slim Fry Button
05 Fit Choice Button
06 Popcorn Button
07 Speed Cook Button
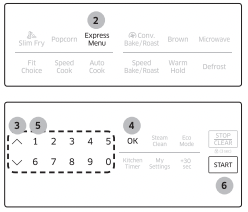
08 Express Menu Button
09 Auto Cook Button
10 Convection Bake/Roast Button
11 Speed Bake/Roast Button
12 Brown Button
13 Warm Hold Button
14 Microwave Button
15 Defrost Button
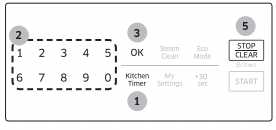
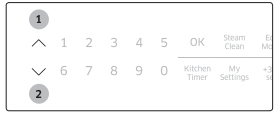
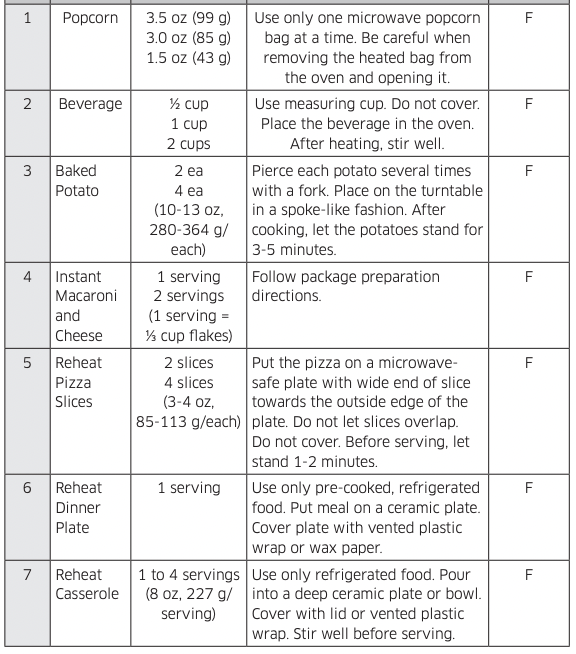
16 Up&Down Buttons
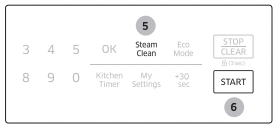
17 Numeric Buttons
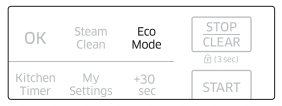
18 OK Button
19 Kitchen Timer Button
20 Steam Clean Button
21 My Settings Button
22 Eco Mode Button
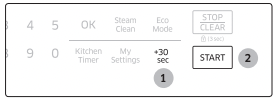
23 +30 sec Button
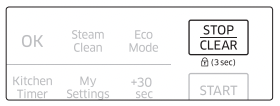
24 Stop/Clear Button
25 Start Button
Setting the time
Your microwave oven is equipped with a built-in clock. Set the clock when first installing your microwave oven and after a power failure. The time is displayed whenever the microwave oven is not being used.

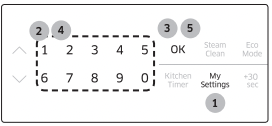
1. Press the My Settings button.
2. Press the 9 button.
3. Press the OK button.
4. Use the numeric buttons to enter the current time. You need to press at least three numbers to set the clock. For example, if the current time is 5:00, press 5, 0, 0. The display will show 5 : 00.
5. Press the OK button.
Using my setting feature
You can customize your new microwave oven to suit your preferences.
To customize:
1. Press the My Settings button.
2. Press one of the numeric buttons to select a function you want to customize.
3. Press the OK button.
4. Press one of the numeric buttons to select a function you want to customize.
5. Press the OK button.
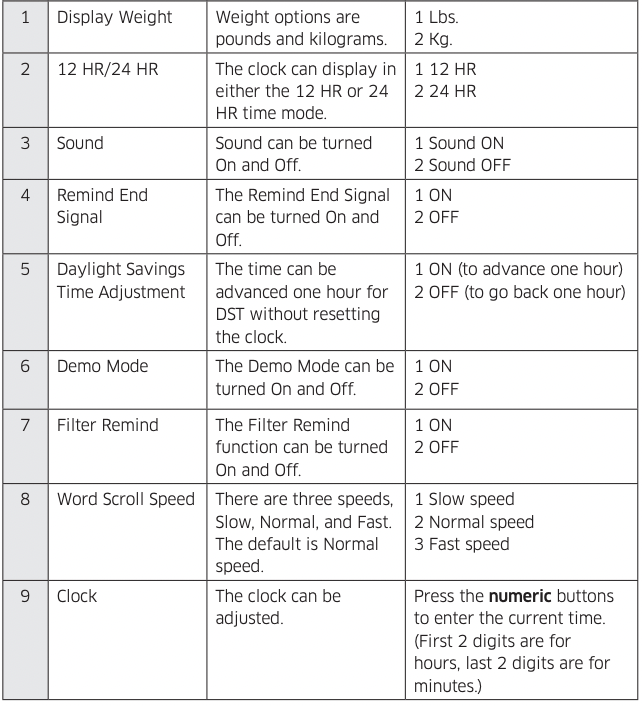
The functions, options, and corresponding numeric buttons are listed in the table below.
No. Function Description Options
 NOTE If you change your mind while adjusting a setting, press the STOP/CLEAR button to cancel, and then adjust the setting again.
NOTE If there is a power interruption, you will need to reset these options.
NOTE If the clock is set for standard time, the Daylight Savings Time Adjustment function allows you to change the time easily without needing to reset the clock. Daylight Saving Time begins for most of the United States at 2 a.m. on the first Sunday of April and reverts to Standard time at 2 a.m. on the last Sunday of October.
Filter Reminder
If the Filter Remind function is ON, the microwave will remind you to clean or replace the grease filter every four months. When it is time to clean or replace the grease filter, the microwave displays the “Filter” message to remind you to clean or replace the grease filter. To remove the message, press the number 0 when the microwave is in standby mode. If you don`t want to receive this message, set the Filter Remind function off in My settings.
Using your microwave oven
Using the stop/clear button
The STOP/CLEAR button allows you to clear instructions you have entered. It also allows you to pause the oven’s cooking cycle, so that you can check the food.
• To pause the oven during cooking, press the STOP/CLEAR button once. To restart, press the START button.
• To stop cooking, erase instructions, and return the oven display to the time of day, press the STOP/CLEAR button twice.
• To clear instructions you have just entered, press the STOP/CLEAR button once, and then re-enter the instructions.
• To cancel a timer setting, press the STOP/CLEAR button once.
Using the child lock
The Child Lock function allows you to lock all buttons except Eco Mode so that the microwave oven cannot be operated by children accidentally. The oven can be locked at any time.
Activating / Deactivating
If you want to activate or deactivate the child lock function, press the STOP/CLEAR button for 3 seconds. The display will show ‘CHILD LOCK ON’ or ‘CHILD LOCK OFF’ when the oven is locked or unlocked, and then redisplay the time.
Using the kitchen timer
Your microwave has a built-in timer function - the Kitchen Timer. Use the Kitchen Timer for timing up to 99 minutes, 99 seconds.
1. Press the Kitchen Timer button.
2. Use the numeric buttons to set the time you want the timer to run. (Max time 99 minutes, 99 seconds.)
3. Press the OK button.
4. The display counts down and beeps when the time has elapsed.
5. To cancel the timer setting : Press the STOP/CLEAR button once.
Using the microwave +30 sec. feature
This feature offers a convenient way to heat food in set time increments at the High power level (100 % power)
1. Press the +30 sec button for each additional 30 seconds you want the food to be cooked for. (For example, press the button twice to cook for one minute.)
2. Press the START button.
NOTE When the oven is operating, if you press the +30 sec button, the cooking time will be increased by 30 seconds.
Using the more/less feature
The More or Less feature allows you to adjust the pre-set cooking time. It works with 1 and 2 stage cooking, MW, Bake, Roast, Brown, Speed Bake/Roast, and Warm Hold buttons. Use the More or Less feature only after cooking has begun.
1. To ADD more time to a cooking procedure, press the More button. Each time you press the More button, the cooking time will be increased by 10 seconds.
2. To REDUCE the time of a cooking procedure, press the Less button. Each time you press the Less button, the cooking time will be decreased by 10 seconds.
Using the eco mode
Eco Mode reduces standby power usage. When you press the Eco Mode button once, the display will go out and the microwave shifts to a mode which minimizes power usage. To cancel the Eco Mode, press the Eco Mode button once again, or press any other button.
Using the steam clean feature
The steam provided by the steam clean system will soak the cavity surface. After using the steam clean function, you can easily clean the cavity of the oven.
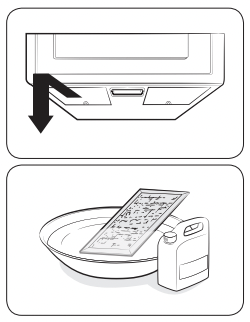
1. Open the door.
2. Carefully pour about 2fl.oz. of water into a wide plate.
3. Place the plate on the tray of the microwave oven.
4. Close the door.
5. Press the Steam Clean button.
6. Press the START button. Steam clean will operate for 6 minutes and 30 seconds. The length of time cannot be modified.
7. When the cleaning time is over, the oven will beep. Open the door.
8. Clean the cavity of the oven with a dry dishtowel. Remove the turntable and wipe under the rack with a piece of paper towel.
NOTE Use this function only after the oven has completely cooled.
NOTE Use normal tap water only. Do not use distilled water.
CAUTION The water in the oven will be very hot due to the steam cleaning function. Wipe up carefully
Turntable on/off feature
For best cooking results, leave the turntable on. However, for large dishes it can be turned off. Press the Turntable On/Off button to turn the turntable on or off.
CAUTION The turntable may become too hot to touch. Use pot holders to handle the turntable during and after cooking.
Turning on the light
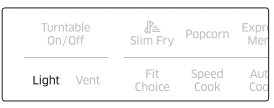
Press the Light button to turn the cooktop lamp on or off. Press the button once for high, twice for low, and three times to turn the cooktop lamp off.
Turning on the vent

The vent fan removes steam and other vapors that result from cooking on the rangetop below. Press the Vent button once for high fan speed, twice for medium fan speed, and three times for low fan speed. Press the Vent button four times to turn the fan off.
NOTE The exhaust fan’s speed will decrease when the oven’s cooking function is activated.
NOTE The Vent Fan protects the microwave from excess heat rising from the cooktop below it. It automatically turns on if it senses too much heat. If you have turned the fan on, you may find that you cannot turn it off. The fan will automatically turn off when the internal parts are cool. It may stay on for 30 minutes or more after the cooktop and microwave controls are turned off.
Using the warm hold feature
You can keep cooked food warm in your microwave oven for up to 99 minutes and 99 seconds.
1. Press the Warm Hold button.
2. Enter the warm hold time by pressing the numeric buttons. If you don`t set the time, your oven will maintain the Warm Hold function for 99 minutes.
3. Press the START button. NOTE Warm Hold operates for up to 99 minutes and 99 seconds.
NOTE Food that is cooked covered should also be covered during Warm Hold.
NOTE Pastry items (pies, turnovers, etc.) should be uncovered during Warm Hold.
NOTE Complete meals kept warm on a dinner plate can be covered during Warm Hold.
Below are the amounts of food we recommend you apply the Warm Hold function to by Food Type.
Food Type Recommended Quantity
Liquid 1-2 cups
Dry 5-10 oz.
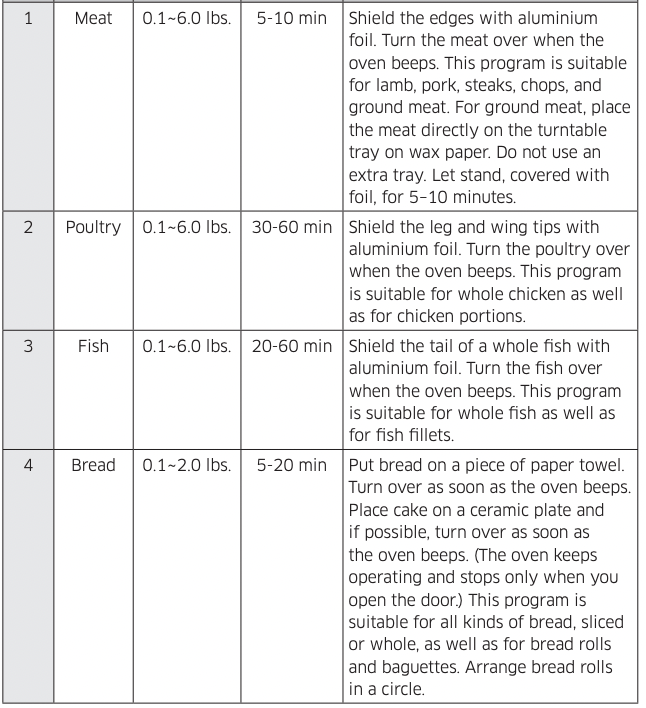
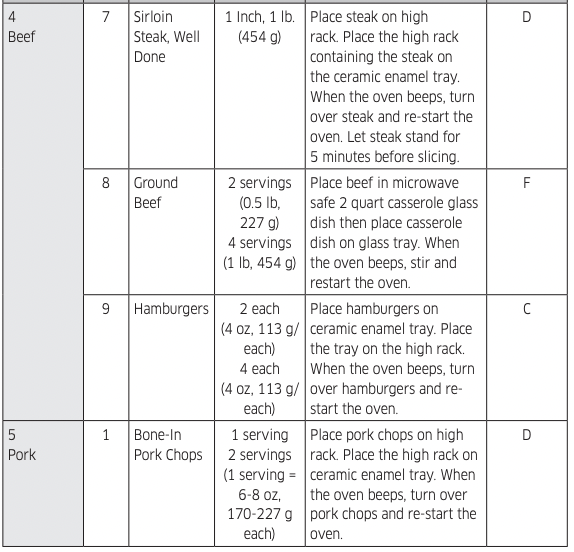
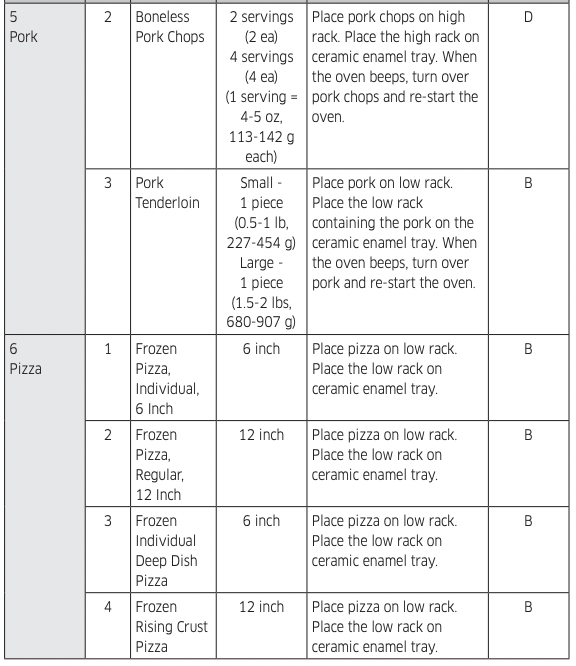
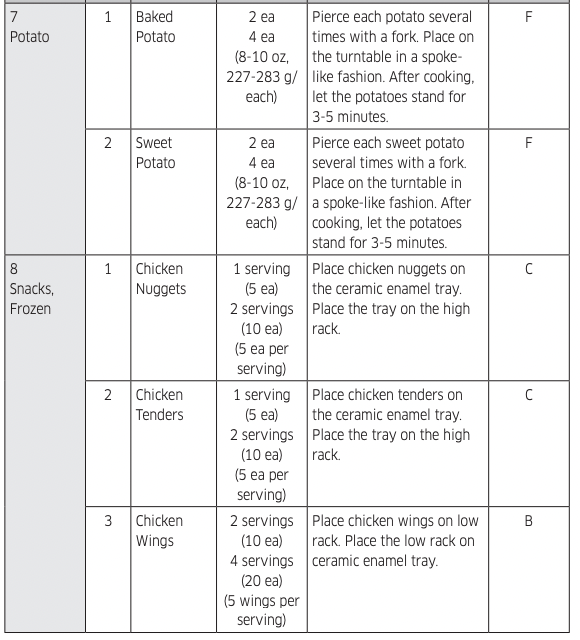
Using the defrost button
Remove all packaging material before defrosting. Place meat, poultry, fish, bread, etc. on a ceramic plate. General defrosting instructions:
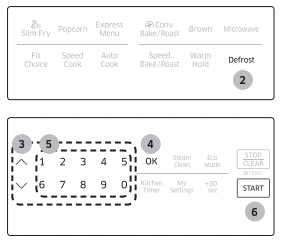
1. Place the food on the turntable (glass tray).
2. Press the Defrost button.
3. To select the number that corresponds to the food you want to defrost, press the Up&Down key or one of the numeric buttons. (Refer to the below table.)
4. Press the OK button.
5. Enter the weight of the food by pressing the numeric buttons. (Refer to the table below to see the weights you can enter.)
6. Press the START button. The microwave oven will automatically operate for the pre-programmed time.
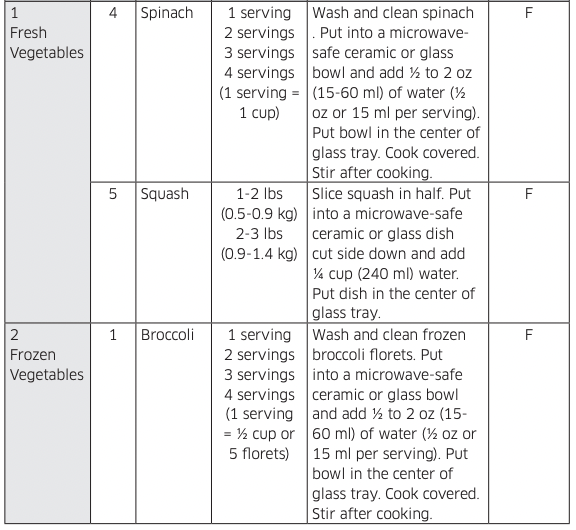
For specific instructions for different kinds of food, see the table below.
Cook No. Food Amount Standing Time Remark
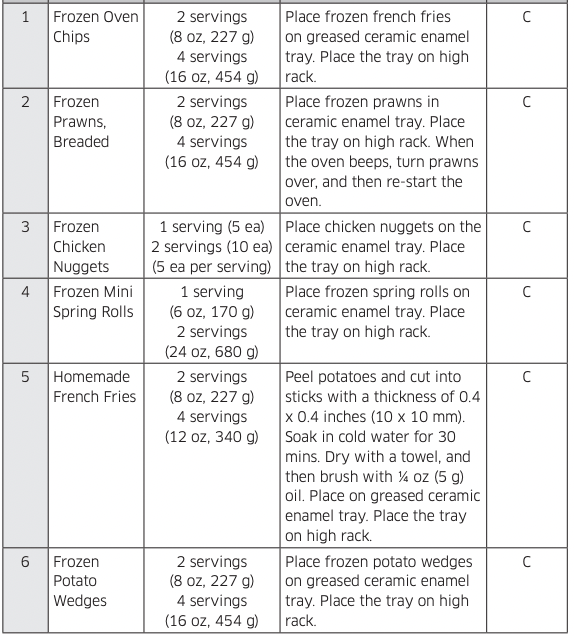
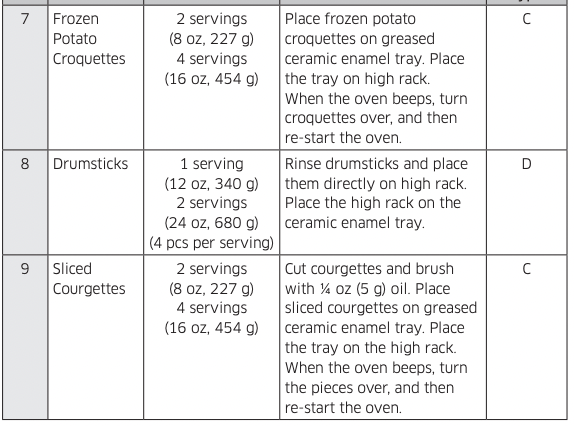
Using the slim fry button
The Slim Fry menu contains pre-set cooking programs for 9 different items. You do not need to set the cooking times or the power level.
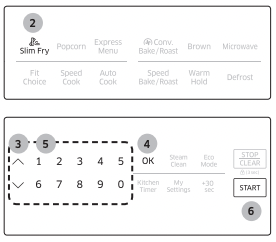
1. Place the food on the tray or the rack. (See Accessory Usage on page 18)
2. Press the Slim Fry button.
3. To select the number that corresponds to the food, press the Up&Down key or one of the numeric buttons. (Refer to the table on the next page.)
4. Press the OK button.
5. Enter the amount of food by pressing the Up&Down key or one of the numeric buttons. (Refer to the table on the next page.)
6. Press the START button. The microwave oven will automatically operate for the pre-programmed time.
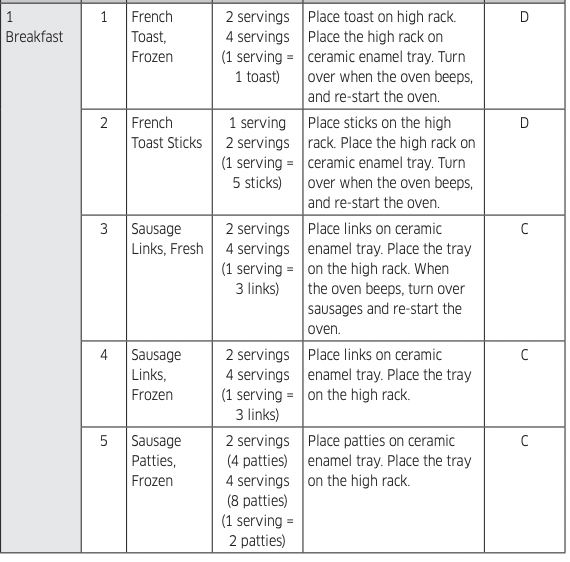
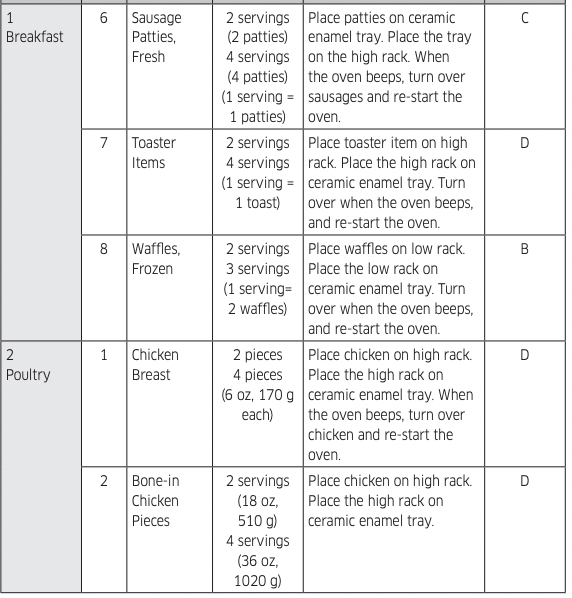
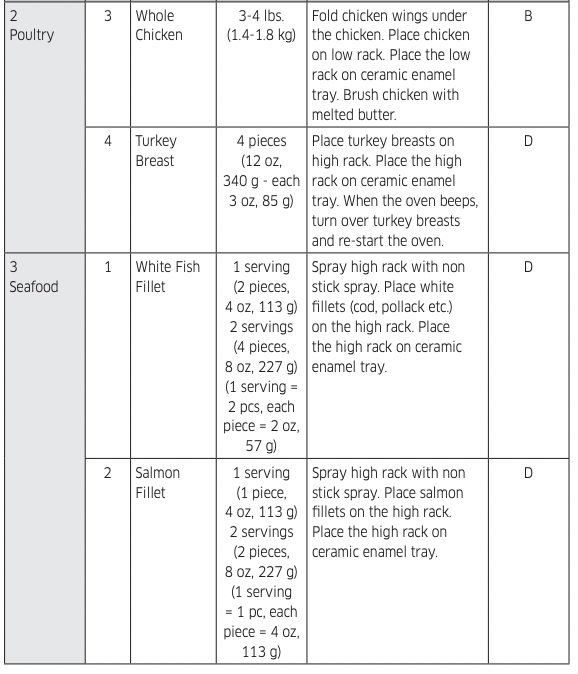
Cook No. Food. Amount Directions Accessory Type
Cook No. Food. Amount Directions Accessory Type
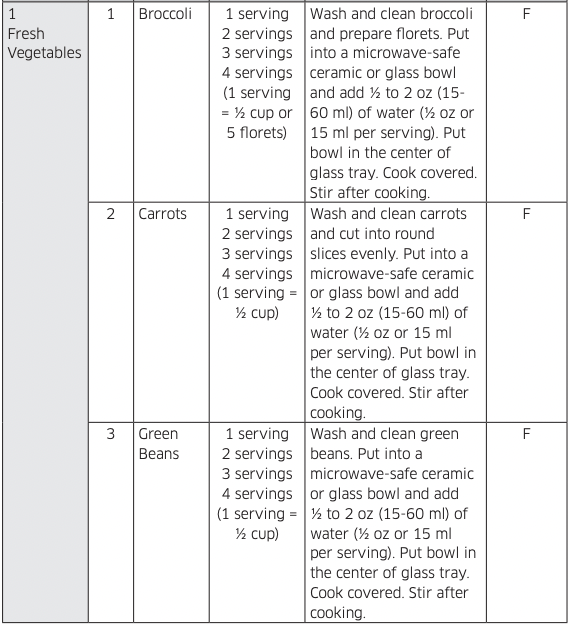
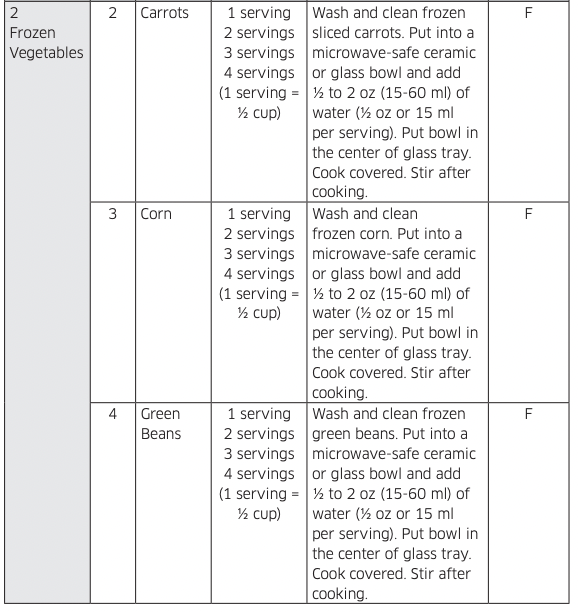
Using the fit choice button
The Fit Choice menu contains pre-set cooking programs for 30 different items. You do not need to set the cooking times or the power level.
1. Place the food on the tray or the rack. (See Accessory Usage on page 18)
2. Press the Fit Choice button.
3. To select the number that corresponds to the category, press the Up&Down key or one of the numeric buttons. (Refer to the table beginning on the next page.)
4. Press the OK button.
5. To select the number that corresponds to the food, press the Up&Down key or one of the numeric buttons. (Refer to the table beginning on the next page.) After selecting the food, if you do not need to set the amount, press the START button. If you need to set the amount, go to Step 6.
6. Press the OK button.
7. Enter the amount of food by pressing the Up&Down key or one of the numeric buttons. (Refer to the table beginning on the next page.) 8. Press the START button. The microwave oven will automatically operate for the pre-programmed time.
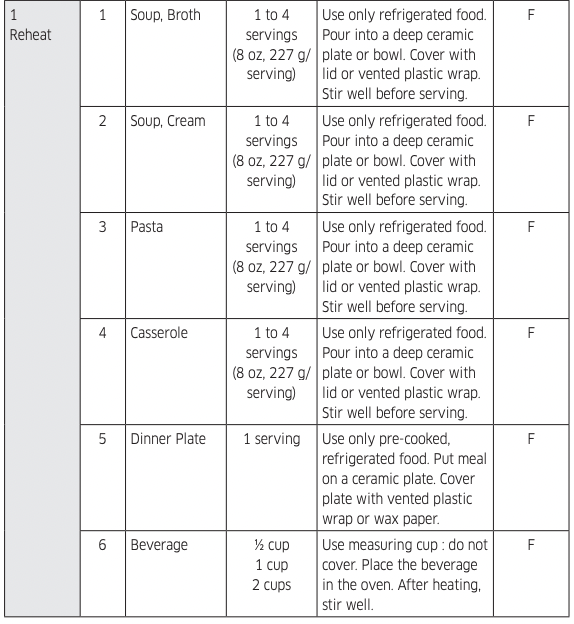
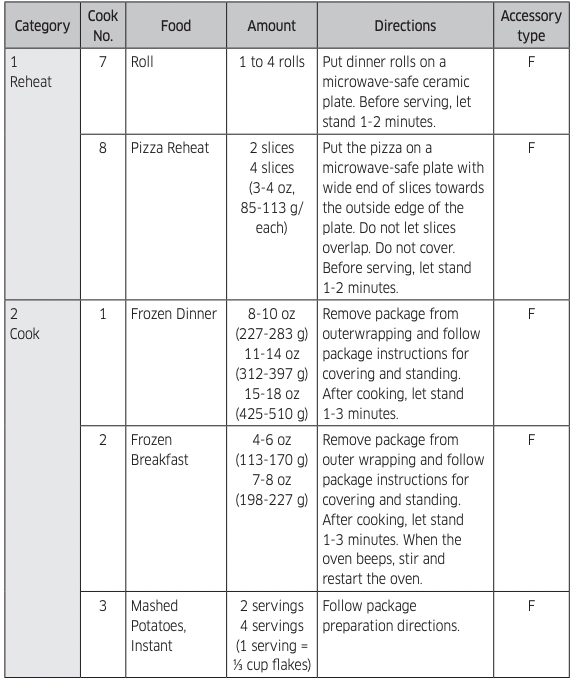
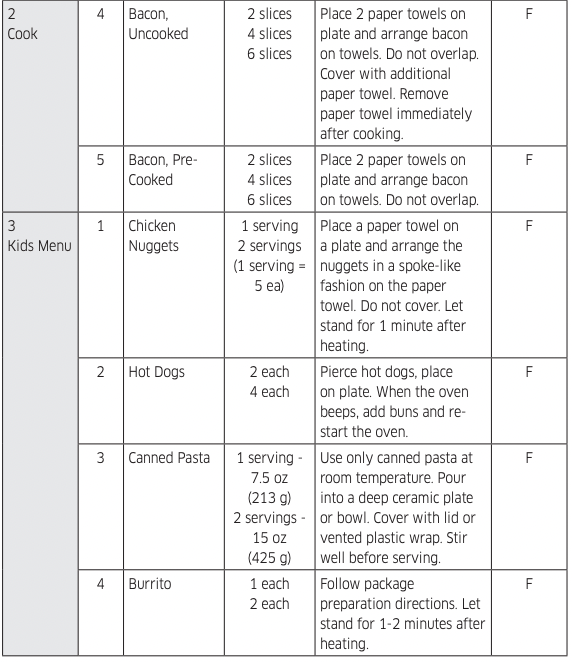
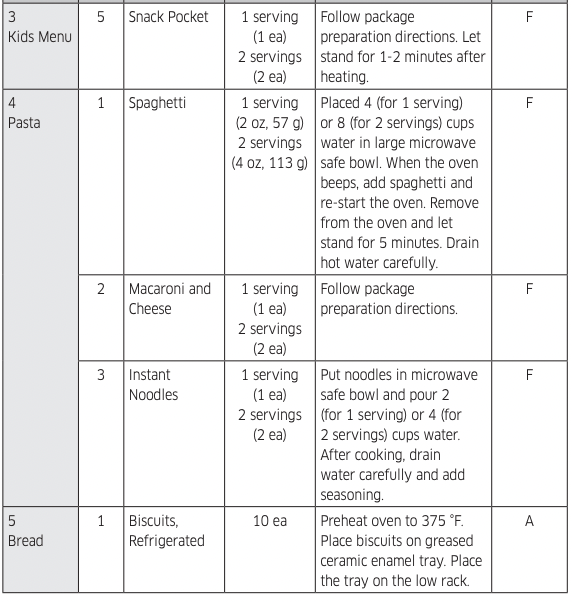
Category Cook No. Food Amount Directions Accessory Type
Category Cook No. Food Amount Directions Accessory Type
Category Cook No. Food Amount Directions Accessory Type
Using the popcorn button
You can cook the popcorn easily using Popcorn button. You do not need to set either the cooking times or the power level.
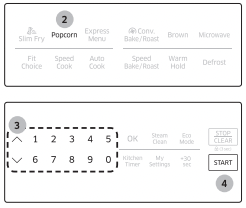
1. Put some food on the tray. (See Accessory Usage on page 18)
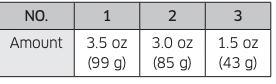
2. Press the Popcorn button.
3. Enter the amount of food by pressing the Up&Down key or one of the numeric buttons.
4. Press the START button. Then the microwave oven will automatically be operated for preprogrammed time.
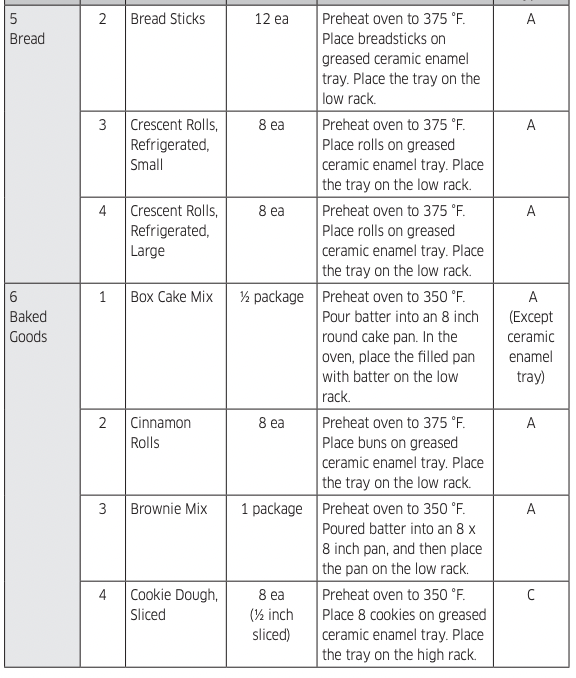
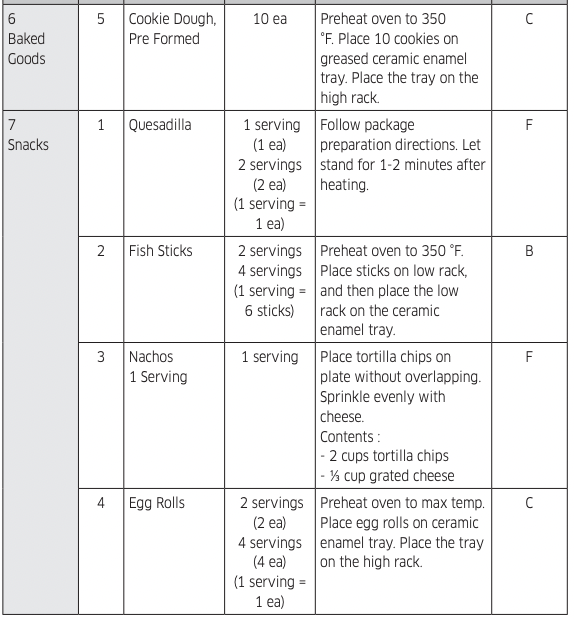
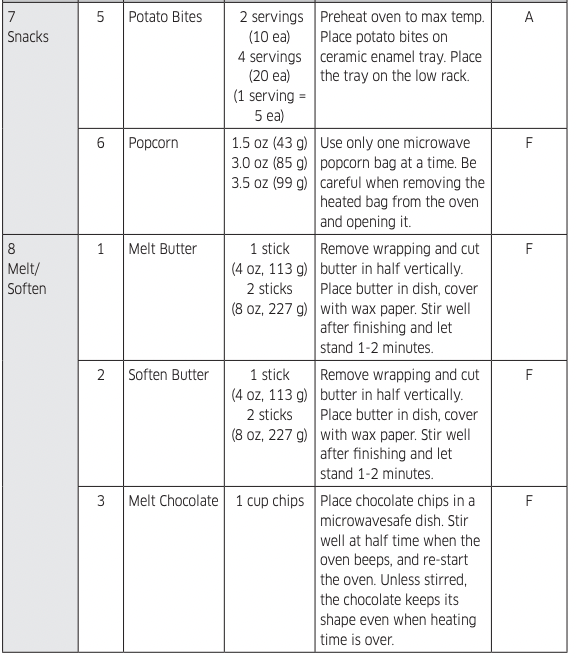
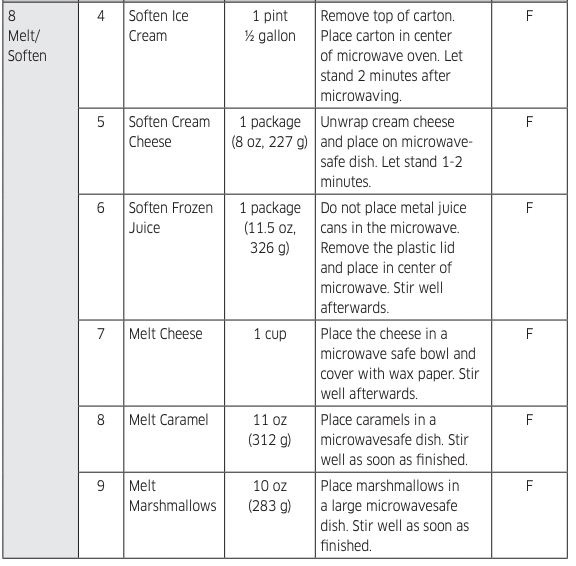
Using the speed cook button
The Speed Cook menu contains pre-set cooking programs for 41 different items. You do not need to set the cooking times or the power level.
1. Place the food on the tray or the rack. (See Accessory Usage on page 18)
2. Press the Speed Cook button.
3. To select the number that corresponds to the category, press the Up&Down key or one of the numeric buttons. (Refer to the table beginning on the next page.)
4. Press the OK button.
5. To select the number that corresponds to the food, press the Up&Down key or one of the numeric buttons. (Refer to the table beginning on the next page.) After selecting the food, if you do not need to set the amount, press the START button. If you need to set the amount, go to Step 6.
6. Press the OK button.
7. Enter the amount of food by pressing the Up&Down key or one of the numeric buttons. (Refer to the table beginning on the next page.)
8. Press the START button. The microwave will automatically operate for the preprogrammed time.
Category Cook No. Food Amount Directions Accessory type
Category Cook No. Food Amount Directions Accessory type
Category Cook No. Food Amount Directions Accessory type
Category Cook No. Food Amount Directions Accessory type

Category Cook No. Food Amount Directions Accessory type
Category Cook No. Food Amount Directions Accessory type
Category Cook No. Food Amount Directions Accessory type
Using the auto cook button
The Auto Cook menu contains pre-set cooking programs for 45 different items. You do not need to set the cooking times or the power level.
1. Place the food on the tray or the rack. (See Accessory Usage on page 18)
2. Press the Auto Cook button.
3. To select the number that corresponds to the category, press the Up&Down key or one of the numeric buttons. (Refer to the table that begins on the next page.)
4. Press the OK button.
5. To select the number that corresponds to the food, press the Up&Down key or one of the numeric buttons. (Refer to the table that begins on the next page.) After selecting the food, if you do not need to set the amount, press the START button. If you need to set the amount, go to Step 6.
6. Press the OK button.
7. Enter the amount of food by pressing the Up&Down key or one of the numeric buttons. (Refer to the table that begins on the next page.)
8. Press the START button. The microwave will automatically operate for the preprogrammed time.
Category Cook No. Food Amount Directions Accessory type
Category Cook No. Food Amount Directions Accessory type
Category Cook No. Food Amount Directions Accessory type
Category Cook No. Food Amount Directions Accessory type
Category Cook No. Food Amount Directions Accessory type
Category Cook No. Food Amount Directions Accessory type
Category Cook No. Food Amount Directions Accessory type
Category Cook No. Food Amount Directions Accessory type
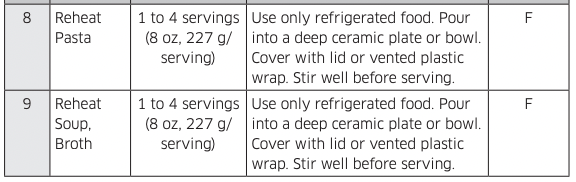
Using the express menu feature
This feature offers a convenient way to heat food that you cook frequently. You do not need to set either the cooking times or the power level.
1. Place the food on the turntable. (glass tray)
2. Press the Express Menu button.
3. To select the number that corresponds to the food, press the Up&Down key or one of the numeric buttons. (Refer to the table on the next page.) After selecting the food, if you do not need to set the amount, press the START button. If you need to set the amount, go to Step 4.
4. Press the OK button.
5. Enter the amount of food by pressing the Up&Down key or one of the numeric buttons. (Refer to the table on the next page.)
6. Press the START button. The microwave will automatically operate for the preprogrammed time.
Category Cook No. Food Amount Directions Accessory type
Category Cook No. Food Amount Directions Accessory type
Using the microwave setting cooking times & power levels
Your oven allows you to set two different cooking stages, each with its own time length and power level. The power level lets you control the heating intensity from Warm (1) to High (10).
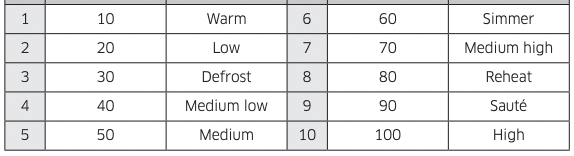
Power levels
The 10 power levels allow you to choose the optimal power level for your cooking needs.
No. Power Level Description. No. Power Level Description
One-stage cooking
For simple one-stage cooking, you only need to set the cooking time. The power level is automatically set to High. If you want to set the power level to any other level, press OK after entering the cooking time, and then use the numeric buttons to set the level.
1. Press the Microwave button. (You can skip this step and start at the next step.)
2. Use the numeric buttons to set a cooking time. You can enter a time from one second to 99 minutes and 99 seconds. To select a time greater than one minute, enter the seconds too. (For example, to set a cooking time of 20 minutes, enter 2, 0, 0, 0.) If you do not need to set the power level, just press the START button. The microwave will automatically operate at the High power level. If you want to change the power level, go to Step 3.
3. If you want to set the power level to a level other than High, press the OK button.
4. Press the Up&Down key or numeric buttons that corresponds to the power level you want to use.
5. Press the START button. If you want to add to or reduce the cooking time, use the Up&Down key. You can adjust the cooking time while the microwave oven is operating.
Multi-stage cooking (maximum of 2 stages)
Your oven allows you to set two different cooking stages, each with its own time length and power level. The power level lets you control the heating intensity from Warm to High. 1. Follow steps 1, 2, 3, and 4 from the “One-stage cooking” section. 2. Press the OK button to move to the second stage. 3. Follow steps 2, 3, 4, and 5 from the “One-stage cooking” section.
Cleaning and maintaining your microwave oven
Keeping your microwave oven clean improves its performance, wards off unnecessary repairs, and lengthens its life.
Cleaning the exterior
It’s best to clean spills on the outside of your microwave oven as they occur. Use a soft cloth and warm, soapy water. Rinse and dry.
 CAUTION
Do not get water into the vents. Never use abrasive products or chemical solvents such as ammonia or alcohol as they can damage the appearance of your microwave.
 WARNING
Unplug the microwave plug before cleaning.
Cleaning under your microwave oven
Regularly clean grease and dust from the bottom of your microwave using a solution of warm water and detergent.
Cleaning the control panel
Wipe with a damp cloth and dry thoroughly. Do not use cleaning sprays, large amounts of soap and water, abrasives, or sharp objects on the panel as it is easily damaged.
Cleaning the door and door seals
Always ensure that the door seals are clean and that the door closes properly. Take particular care when cleaning the door seals to ensure that no particles accumulate and prevent the door from closing correctly. Wash the glass door with very mild soap and water. Be sure to use a soft cloth to avoid scratching.
NOTE
If steam accumulates inside or outside the oven door, wipe with a soft cloth. Steam can accumulate when you operate the oven when humidity is high and in no way indicates microwave leakage.
Cleaning the interior
CAUTION
To avoid injury, ensure that the microwave oven has cooled down before cleaning it.
CAUTION
Remove the glass tray from the oven when cleaning the oven or tray. To prevent the tray from breaking, handle it with care and do not put it in water immediately after cooking. Wash the tray carefully in warm sudsy water or in the dishwasher. See the Steam Clean section on page 15.
Cleaning the turntable and roller rings
Clean the roller rings periodically and wash the turntable as required. The turntable can be washed safely in your dishwasher.
Storing and repairing your microwave oven
If you need to store your microwave oven for a short or extended period of time, choose a dust-free, dry location. Dust and dampness may adversely affect the functionality of the microwave parts.
WARNING
Do not repair, replace, or service any part of your microwave oven yourself. Allow only a qualified service technician to perform repairs. If the oven is faulty and needs servicing, or you are in doubt about its condition, unplug the oven from the power outlet and contact your nearest service center.
Do not use the oven if the microwave oven is damaged, in particular, if the door or door seals are damaged or the door does not close properly. This can be caused by a broken hinge, a worn out seal or distorted/bent casing.
Do not remove the oven from its casing. This microwave oven is for home use only and is not intended for commercial use.
Replacing the cooktop/night light
When replacing the cooktop/night light, make sure that you are wearing gloves to avoid injury from the heat of the bulb.
1. Unplug the oven or turn off the power at the main power supply.
2. Remove the screw from the light cover and lower the cover.
3. Replace the bulb with a 40 watt incandescent bulb.
4. Raise the light cover and re-insert the mounting screw.
5. Plug the oven in or turn on the power at the main power supply. Reset the clock.
Replacing the oven light
When replacing the oven light, make sure that you are wearing gloves to avoid injury from the heat of the bulb.
1. Unplug the oven or turn off the power at the main power supply.
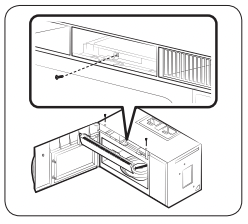
2. Open the door.
3. Remove the vent cover mounting screws (2 middle screws).
4. Slide the vent grille to the left, then pull it straight out.
5. Remove the charcoal filter, if present.
6. Remove the screw securing the lamp cover.
7. Remove the bulb by pulling it out gently.
8. Replace the bulb with a 20 watt halogen bulb.
9. Replace the bulb holder.
10. Replace the vent grille and re-insert the 2 screws.
11. Plug the oven in or turn on the power at the main power supply. Reset the clock.
Cleaning the grease filter
Your microwave oven has two metal reusable grease filters. The grease filters should be removed and cleaned at least once every four months or as required.
NOTE Your microwave oven has a filter reminder function. See page 13 for details.
WARNING To avoid risk of personal injury or property damage, do not operate the oven hood without the filters in place.
1. To remove the filter, slide it to the left (or right) using the tab.
2. Soak the grease filter in hot water and a mild detergent. Rinse well and shake to dry. Brushing the filter lightly can remove embedded dirt.
WARNING Do not use ammonia or put the grease filter in the microwave oven. The aluminum will darken.
3. To re-install the filter, slide it into the frame slot on the left (or right), and then push it upwards and to the right (or left) to lock it.
Replacing the charcoal filter
If your oven is vented to the inside, the charcoal filter should be replaced every 6 to 12 months and more often if necessary. The charcoal filter cannot be cleaned. To order a new charcoal filter, contact the Parts Department at 1-800-627-4368 or your Samsung dealer.
1. Unplug the oven or turn off the power at the main power supply.
2. Open the door.
3. Remove the vent grille mounting screws (2 middle screws).
4. Slide the vent grille to the left, then pull it straight out.
5. Push the hook and remove the old filter.
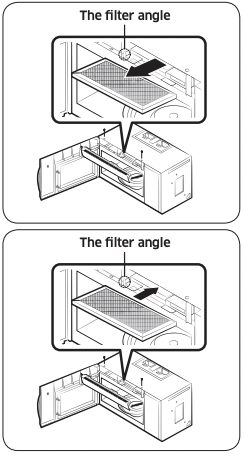
6. Slide a new charcoal filter into place. The filter should rest at the angle shown.
7. Replace the vent grille and 2 screws and close the door. Plug the oven in or turn on the power at the main power supply. Reset the clock.
Troubleshooting
Check points
If you encounter a problem with your oven, first check the table below and try the recommendations. If a problem persists, or if an information code keeps appearing on the display, contact a local Samsung service center.
General
The buttons cannot be pressed properly
Foreign matter may be caught between the buttons.
- Remove the foreign matter and try again.
For touch models: Moisture is on the exterior.
- Wipe the moisture from the exterior.
Child lock is activated.
The time is not displayed.
Power is not supplied.
- Make sure power is supplied. Confirm the microwave is plugged in. Check your fuses or circuit breakers.
The Eco (power-saving) function is set.
- Turn off the Eco function.
The oven does not work.
Power is not supplied.
- Make sure power is supplied. Confirm the microwave is plugged in. Check your fuses or circuit breakers.
The door is open.
- Close the door and try again.
The door open safety mechanisms are covered by foreign matter.
- Remove the foreign matter and try again.
The oven stops while in operation.
The user has opened the door to turn food over.
- After turning over the food, press the START button again to start operation.
The power turns off during operation.
The oven has been cooking for an extended period of time.
- After the oven has cooked for an extended period of time, let the oven cool.
The cooling fan is not working.
- Listen for the sound of the cooling fan.
Trying to operate the oven without food inside.
There is not enough ventilation space around the oven.
- There are intake/exhaust outlets on the front and rear of the oven for ventilation. Check the installation guide and make sure that the microwave is far enough away from walls and cabinets for proper ventilation.
Several appliances or devices are plugged into the same outlet.
- Unplug all other appliances or devices from the outlet.
There is no power to the oven.
Power is not supplied.
- Make sure power is supplied. Confirm the microwave is plugged in. Check your fuses or circuit breakers.
There is a popping sound during operation, and the oven doesn't work.
Cooking food in a sealed container or using a container with a a tight lid may cause popping sounds.
- Do not cook food in sealed containers or in containers with tight lids. Expanding steam from the cooking food can cause the containers to burst or the lids to pop off.
The oven exterior gets too hot during operation.
There is not enough ventilation space around the oven.
- There are intake/exhaust outlets on the front and rear of the oven for ventilation. Check the installation guide and make sure that the microwave is far enough away from walls and cabinets for proper ventilation.
Objects are on top of the oven.
- Remove all objects on the top of the oven.
The door cannot be opened properly.
Food residue is stuck between the door and oven interior.
- Clean the oven and then open the door.
The oven does not heat.
The oven may not work if too much food is being cooked or improper cookware is being used.
- To test the oven, put one cup of water in a microwavesafe container, put the container in the oven, and then run the microwave for 1-2 minutes to check whether the water is heated. If the water is heated, reduce the amount of food and start the function again. Use a cooking container with a flat bottom.
Heating is weak or slow.
The oven may not work if too much food is being cooked or improper cookware is being used.
- To test the oven, put one cup of water in a microwavesafe container, put the container in the oven, and then run the microwave for 1-2 minutes to check whether the water is heated. If the water is heated, reduce the amount of food and start the function again. Use a cooking container with a flat bottom.
The warm function does not work.
The oven may not work if too much food is being warmed or improper cookware is being used.
- To test the oven, put one cup of water in a microwavesafe container, put the container in the oven, and then run the microwave for 1-2 minutes to check whether the water is heated. If the water is heated, reduce the amount of food and start the function again. Use a cooking container with a flat bottom.
The thaw function does not work.
The oven may not work if too much food is being thawed or improper cookware is being used.
- To test the oven, put one cup of water in a microwavesafe container, put the container in the oven, and then run the microwave for 1-2 minutes to check whether the water is heated. If the water is heated, reduce the amount of food and start the function again. Use a cooking container with a flat bottom.
The interior light is dim or does not turn on.
The door has been left open for a long time.
- The interior light may automatically turn off when the Eco function operates. Close and reopen the door or press the STOP/CANCEL button.
The interior light is covered by foreign matter.
- Clean the inside of the oven and check again.
A beeping sound occurs during cooking.
If the Auto Cook function is being used, this beeping sound means it's time to turn over the food.
- After turning over the food, press the START button again to restart operation.
The oven is not level.
The oven is installed on an uneven surface.
- Make sure the oven is installed on flat, stable surface.
There are sparks during cooking.
Metal containers are used during cooking or thawing.
- Do not use metal containers.
When power is connected, the oven immediately starts to work.
The door is not properly closed.
- Close the door and check again.
There is electricity coming from the oven.
The power source or power outlet is not properly grounded.
- Make sure the power source and power outlet are properly grounded.
There is water dripping.
Water or steam may be generated by the cooking or defrosting process, depending on the food. This is not an oven malfunction.
- Let the oven cool and then wipe with a dry dish towel.
There is steam through a crack in the door.
Water or steam may be generated by the cooking or defrosting process, depending on the food. This is not an oven malfunction.
- Let the oven cool and then wipe with a dry dish towel.
There is water left in the oven.
Water or steam may be generated by the cooking or defrosting process, depending on the food. This is not an oven malfunction.
- Let the oven cool and then wipe with a dry dish towel.
The brightness inside the oven varies.
Brightness changes depending on power output changes according to function.
- Power output changes during cooking are not malfunctions. This is not an oven malfunction.
Cooking is finished, but the cooling fan is still running.
To ventilate the oven, the cooling fan continues to run for about 3 minutes after cooking is complete.
- This is not an oven malfunction.
Pressing the START button operates the oven.
This happens when the oven was not operating.
- The microwave oven is designed to start operating when you press the START button if it was not operating.
Turntable
While turning, the turntable comes out of place or stops turning.
There is no roller ring, or the roller ring is not properly in place.
- Install the roller ring and then try again.
The turn table drags while turning.
The roller ring is not properly in place, there is too much food, or the container is too large and touches the inside of the microwave.
- Adjust the amount of food. Do not use containers that are too large.
The turn table rattles while turning and is noisy.
Food residue is stuck to the bottom of the oven.
- Remove any food residue stuck to the bottom of the oven.
Grill
Smoke comes out during operation.
During initial operation, smoke may come from the heating elements when you first use the oven.
- This is not a malfunction. After you run the oven 2-3 times, it should stop.
Food is on the heating elements.
- Let the oven cool and then remove the food from the heating elements.
Food is too close to the grill.
- Put the food a suitable distance away while cooking.
Food is not properly prepared and/or arranged.
- Make sure food is properly prepared and arranged.
Oven
The oven does not heat.
The door is open. Close the door and try again.
- Smoke comes out during preheating.
During initial operation, smoke may come from the heating elements when you first use the oven.
- This is not a malfunction. After you run the oven 2-3 times, it should stop.
Food is on the heating elements.
- Let the oven cool and then remove the food from the heating elements.
There is a burning smell or a burnt plastic smell when using the oven.
Plastic or non-heat resistant cookware is used.
- Use glass cookware suitable for high temperatures.
There is a bad smell coming from inside the oven.
Food residue or plastic has melted and stuck to the interior.
- Use the steam function and then wipe the interior of the microwave with a dry cloth. You can put a measuring cup containing a cup of water and a lemon slice inside and run the oven to remove the odor more quickly.
The oven does not cook properly.
The oven door is frequently opened during cooking.
- Do not open the door frequently unless you are cooking things that need to be turned. If you open the door often, the interior temperature will be lowered and this may affect the results of your cooking.
The oven controls are not correctly set.
- Set the oven controls correctly and try again.
The grill or other accessories are not correctly inserted.
- Insert the accessories correctly.
The wrong type or size of cookware is used.
- Reset the oven controls or use suitable cookware with flat bottoms.
Information codes
If the oven fails to operate, you may see an information code on the display. Check the table below for the code, and then follow the directions.
C-20
The temperature sensor read the temperature incorrectly.
- Press the STOP/CANCEL button and operate again. If it appears again, turn off the microwave oven, let it sit for more than 30 seconds, and then try setting again. If this code re-appears, call your local SAMSUNG Customer Care Center.
C-21
Temperature sensor detects a higher temperature than the setting temperature.
- Turn off the microwave oven and let it cool, then try the setting again. If this code re-appears, call your local SAMSUNG Customer Care Center.
C-F0
The microwave has sensed an internal communications failure.
- Unplug the power cord of the oven, and contact a local SAMSUNG Customer Care Center.
C-A1
The oven has failed to sense the opening or closing of the damper for 1 minute.
C-D0
Control buttons are pressed over 10 seconds.
- Clean the keys and check if there is water on the surface around key. If it appears again, turn off the microwave oven, let it sit for more than 30 seconds, and then try setting again. If this code reappears, call your local SAMSUNG Customer Care Center.