Documents: Go to download!
- Owner's manual - (English, French, Spanish)
- Introducing your new oven
- Before you begin
- Operating the oven
- Maintaining your appliance
- Troubleshooting
Table of contents
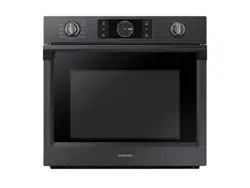
User manual Built-In Electric Wall Oven
Introducing your new oven
Overview
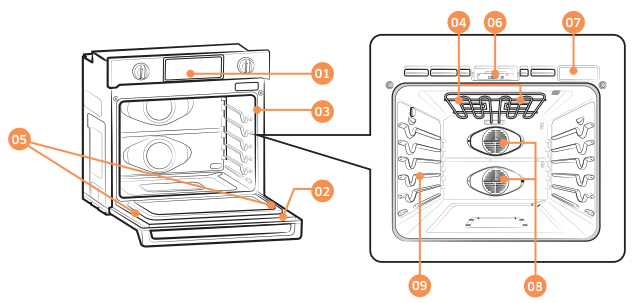
01 Oven control panel
02 Oven door
03 Oven gasket
04 Halogen lamp
* 05 Door LED light
See other models: NV51K7770DG/AA NV51K6650DS/AA NV51K6650SG/AA NV51K6650DG/AA NV51K6650SS/AA
06 Door latch
07 Water reservoir
08 Convection fan
09 Shelf position
What’s included with your oven
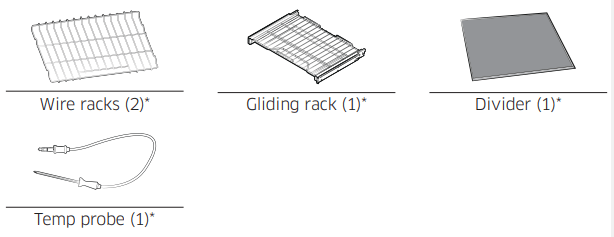
NOTE If you need an accessory marked with a *, you can buy it from the Samsung Contact Center (1-800-726-7864).
Before you begin
Clean the oven thoroughly before using it for the first time. Then, remove the accessories, set the oven to Bake, and then run the oven at 400 °F for 1 hour. There will be a distinctive odor. This is normal. Ensure your kitchen is well ventilated during this conditioning period.
Energy saving tips
• During cooking, the oven door should remain closed except when you turn food over. Do not open the door frequently during cooking to maintain the oven temperature and to save energy.
• If cooking time is more than 30 minutes, you can switch the oven off 5-10 minutes before the end of the cooking time to save energy. The residual heat will complete the cooking process.
• To save energy and reduce the time needed for re-heating the oven, plan oven use to avoid turning the oven off between cooking one item and the next.
• Whenever possible, cook more than one item at a time.
Water reservoir
The water reservoir is used for the Steam Bake, Steam Roast and Hybrid Clean functions and also to remove water scale that may form on the oven walls, especially after Steam Baking, Steam Roasting, and Hybrid cleaning. Fill it with water in advance of steam cooking or descaling.
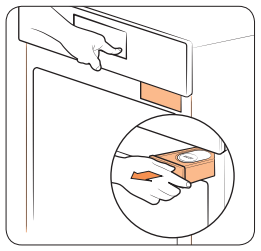
1. Locate the water reservoir. The water reservoir is on the right side of the oven, just above the oven opening. Touch Reservoir  on the control panel. The oven ejects the water reservoir. Grasp the front of the reservoir, and then slide it out to remove.
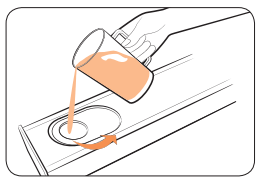
2. Open the reservoir cap, and then fill the reservoir with 22 oz (650ml) of drinkable water.
NOTE You can open the reservoir by removing the rubber cap or by removing the clear plastic top.
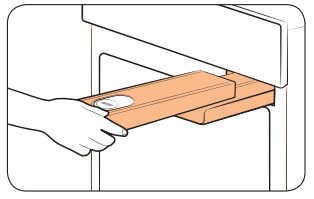
3. Replace the cap or the clear plastic top, and then slide the water reservoir back into the reservoir slot.
4. Push the reservoir in. There will be soft click when it is in place correctly. Touch Reservoir  . The oven retracts the water reservoir.
5. Close the oven door.
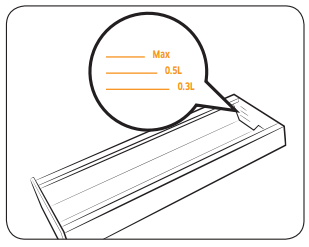
NOTE Do not exceed the max line
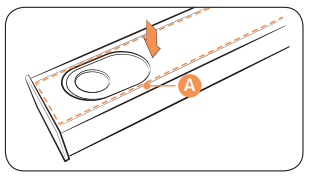
NOTE Make sure the cap and the upper portion of the water reservoir (labeled A) are closed before using the oven.
CAUTION The water reservoir becomes hot during cooking. Make sure you wear oven gloves to remove or refill the water reservoir.
Operating the oven
Control panel

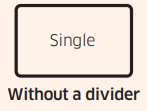
01 Mode knob: Use to select mode of single or twin oven.
• Single: Bake,  Broil, Bake (Convection Bake),
  Roast (Convection Roast), Steam Bake, Steam Roast, Keep Warm, Healthy Cook, Gourmet Cook, Smart Control, Clean.
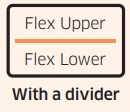
• FLEX Upper: Broil,  Bake (Convection Bake),
  Roast (Convection Roast), Steam Bake.
• FLEX Lower: Bake,  Bake (Convection Bake).
02 Temp knob: Use to set the temperature for the oven or the flex upper or lower compartments.
03 FLEX UPPER, FLEX LOWER: Use to display the Flex upper or Flex lower oven mode screen on the display. Touching here does not turn the ovens on or off. It only displays their current status.
04 Timer  : Use to display the set Timer screen.
05 Setting and Control Lockout  : Use to display the Setting screen. If you touch and hold this key for 3 senconds, all oven functions will be disabled.
06 Lamp : Use to turn the oven light on or off.
07 Reservoir  : Touch to open the water reservoir.
08 Display: Swipe to navigate through the menus and tap to select a desired setting.
NOTE If you tap or touch the display while wearing plastic or oven gloves, the display will not operate properly. Take the gloves off first, and then tap with a bare finger.
Display
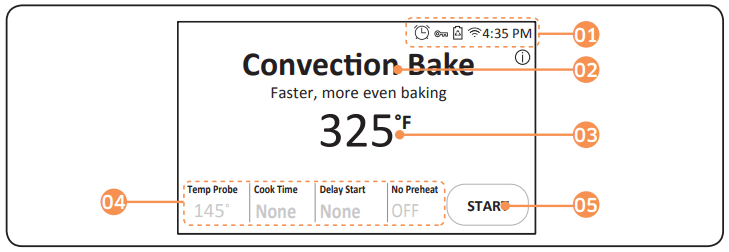
01 Indicator area
• Timer  : When the timer is set, the timer indicator is displayed. When more than 2 timers are set, the number of set timers is shown.
• Door lock ( ): Displayed when the oven door is locked.
• Wi-Fi ( ): Shows Wi-Fi signal strength in 5 steps.
• 12 hour energy saving ( ): Displayed when 12 hour energy saving is turned on.
• Current time: The current time is displayed.
02 Mode: The current or selected menu is displayed with a mode description.
03 Temperature: The current or selected temperature is displayed. When you tap
this area, the temperature adjustment screen is displayed.
04 Information area
• Temp Probe: The set temperature of the temp probe is displayed. When you tap this area, the Temp Probe screen is displayed.
• Cook Time: The cooking time is displayed. When you tap this area, the cooking time screen is displayed.
• Delay Start: The delay start time is displayed. When you tap this area, the Delay Start screen is displayed.
• No preheat: Indicates if the No Preheat feature is on or off. (Only displayed when you are using the Convection Bake or Convection Roast mode.)
• Steam: The steam level is displayed. When you tap this area, the steam level screen is displayed. (Only displayed when you are using the Steam Bake or Steam Roast mode.)
05 START: Tap to start the oven using the displayed settings.
Setting the temperature
This oven provides three methods to set the temperature.
Temperature knob
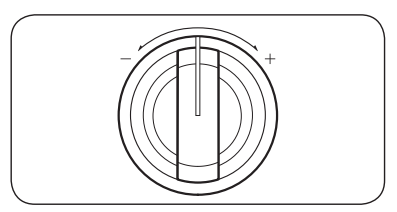
- Turn the Temperature knob clockwise (+) or counterclockwise (-) and then release. The temperature will rise or fall by 5 °F.
- To change the temperature quickly by more than 5 °F, turn and hold the knob at the + or - position.
Numeric pad
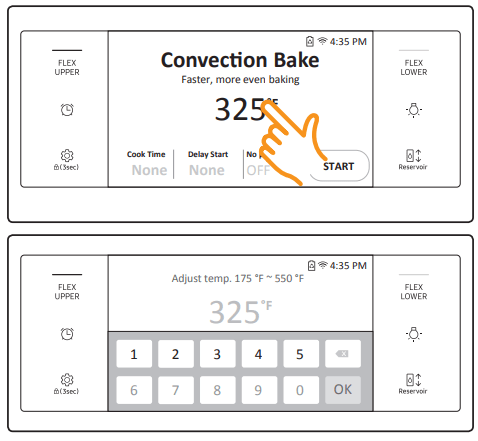
- Tap the temperature area to display the numeric pad.
- Tap the numbers in the numeric pad to set the temperature.
- Tap OK
Wheel picker
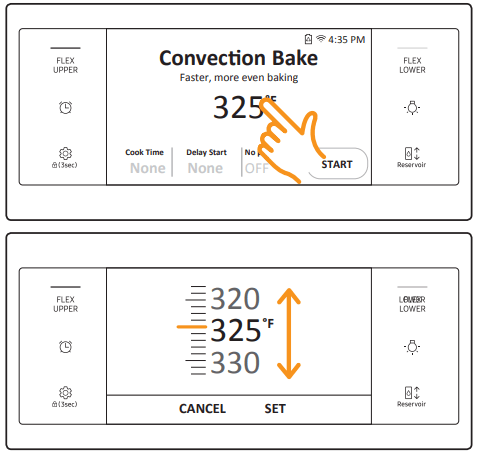
- Tap and hold the temperature area. The wheel picker appears.
- Set the temperature you want by flicking the wheel picker on the screen.
- Tap OK
Control Lockout
Control Lockout lets you lock the buttons on the touch pad so they cannot be activated accidently. Control Lock also locks the oven door so it cannot be opened. You can only activate Control Lockout when the oven is in standby mode.
How to activate the Control Lockout feature
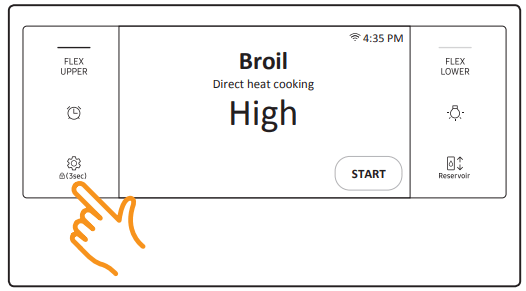
1. Cancel or turn off all functions.
2. Touch Control Lockout  for 3 seconds.
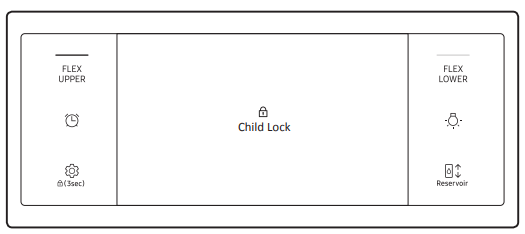
3. The display will change to the control lock screen and the control lock confirmation will appear at the bottom of the screen.
NOTE
• Control Lockout is available only when the oven temperature is under 400 °F.
• All other functions must be cancelled before you activate Control Lockout.
How to unlock the controls
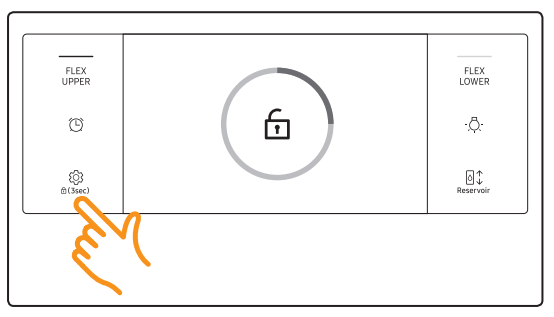
1. Touch Control Lockout  for 3 seconds. The control lock confirmation and the lock icon will disappear from the display.
NOTE It may take up to 10 seconds for the door to unlock.
Kitchen Timer
The kitchen timer serves as an extra timer that will beep when the set time has elapsed. It does not start or stop cooking functions. You can use the kitchen timer with any of the other oven functions.
How to set the timer
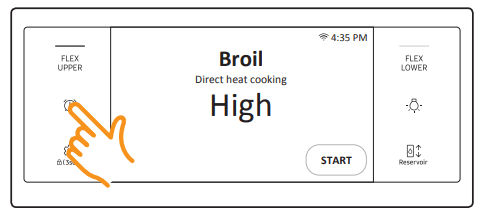
1. Touch Timer  . The display will be change to the timer screen.
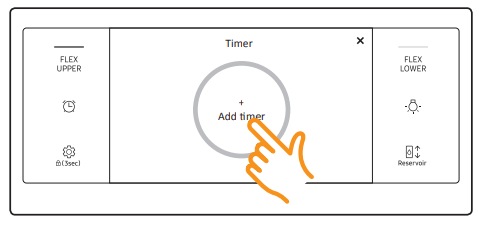
2. Tap + Add timer
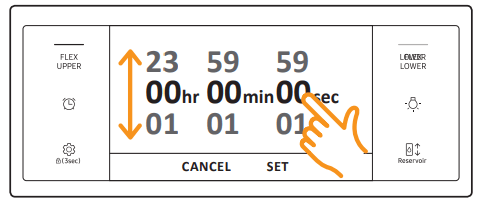
3. Flick screen or tap the time area to set time. (You can set the timer for any amount of time from 1 sec to 24 hr).
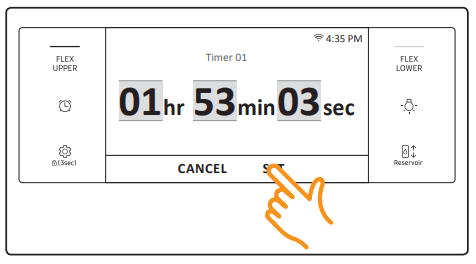
4. Tap SET. The timer is displayed on the screen.
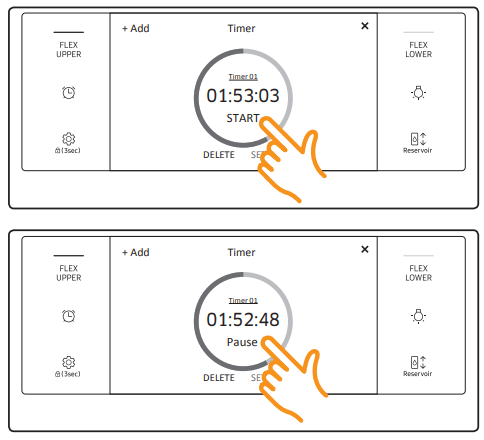
5. Tap START. When the set time has elapsed, the oven will beep and the display will show the Timer has finished. DELETE SET Timer Timer 01 01:52:48 Pause + Add
• You can pause, reset, or delete the timer at any time by touching the screen.
How to change timer name
You can change the timer name to identify what you are timing, for example, a chicken defrosting.
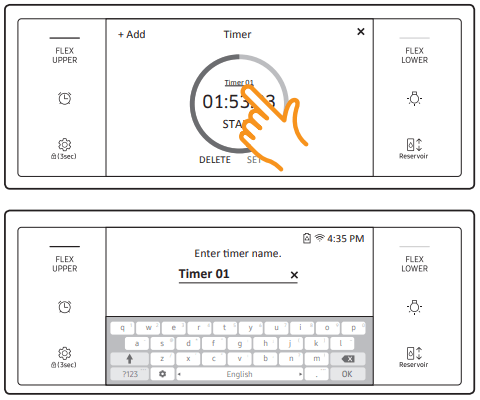
1. Tap the timer name area.
• The keyboard appears.
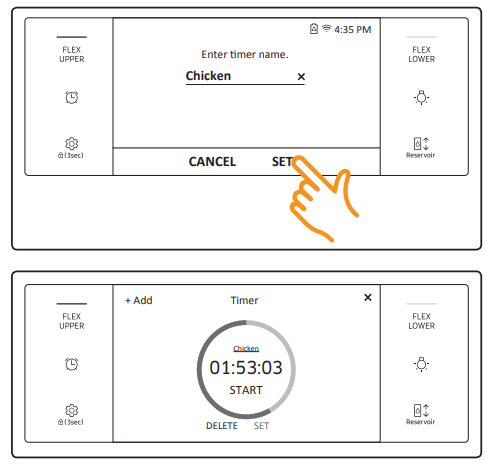
2. Enter the new timer name, and then tap SET.
• The display shows the changed timer name.
Timed cooking
In timed cooking mode, the oven turns on immediately and cooks for the length of time you select. At the end of the cooking time, the oven turns off automatically.
• You can use the timed cooking feature only with another cooking operation. (Bake, Convection Bake, Convection Roast, Steam Bake, Steam Roast, Convection Broil, Healthy Cook, Bread Proof).
How to set the oven for timed cooking
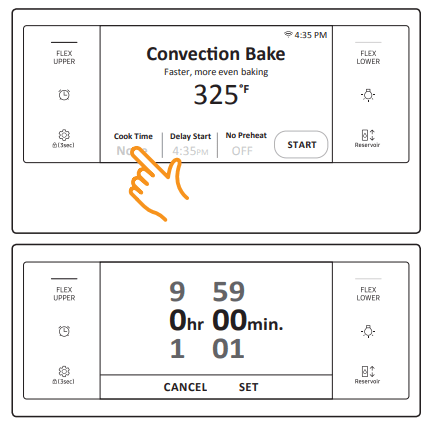
1. Turn Oven Mode knob to the cooking operation you want.
2. Tap Cook Time. The display will change to the cooking time screen.
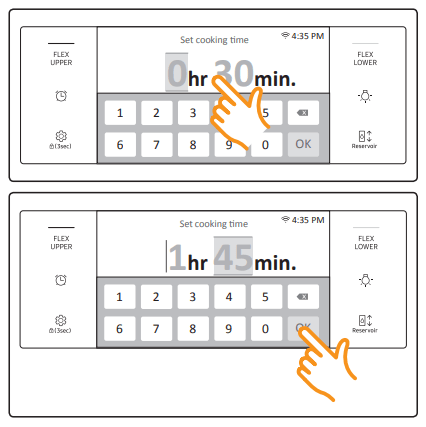
3. Flick the screen or tap the time area to set the cooking time. If you tap the time area, the numeric pad appears. Tap numbers in the numeric pad to set the cooking time. (You can set the cooking time for any amount of time from 1 minute to 9 hours and 59 minutes).
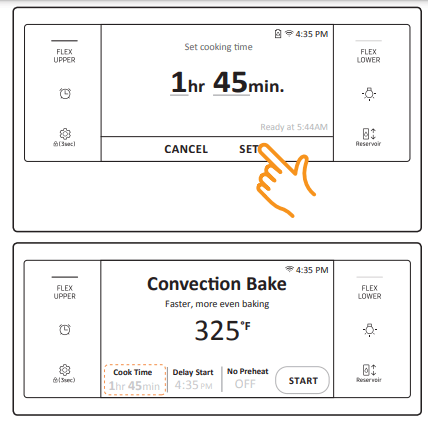
4. Tap SET. The cooking time screen closes. The cooking time is displayed in the Cook Time area on the screen.
5. You can cancel a cook time at any time by setting the Cook Time to 0 minutes.
NOTE See pages 31 through 33 for basic baking and broiling instructions.
CAUTION Use caution with the timed cooking or delay start features. You can use these features to cook cured or frozen meats and most fruits and vegetables. For food that can easily spoil, such as milk, eggs, and unfrozen or fresh fish, meat, or poultry, chill them in the refrigerator first. Even when chilled, they should not stand in the oven for more than 1 hour before cooking begins, and should be removed promptly when cooking is completed. Eating spoiled food can result in sickness from food poisoning.
Delay Start
In the delay timed cooking mode, the oven’s timer turns the oven on at a time you select in advance. You can have the oven turn off automatically after a set time has elapsed by setting the Timed Cooking function as well.
• You can use the delay start feature only with another cooking operation (Bake, Convection Bake, Convection Roast, Steam Bake, Steam Roast, Healthy Cook, Self Clean).
• You can set the oven for a delay start before setting other cooking operations.
• The clock must be set to the current time.
How to set the oven for delay timed cooking
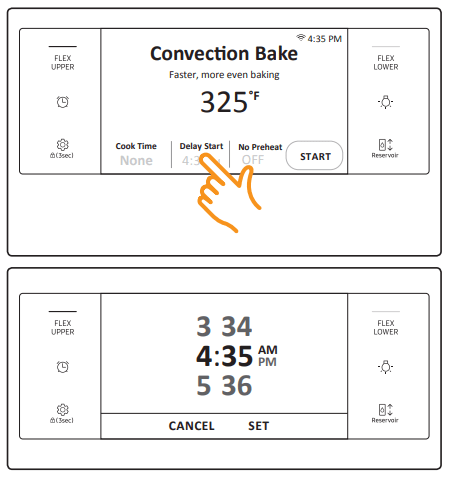
1. Position the oven rack(s) and place the food in the oven.
2. Turn the Oven Mode knob to the cooking operation you want.
3. Set the cooking time if you want the oven to turn off automatically after a set time. (See the Timed cooking section on page 24).
4. Tap Delay Start. The current time is displayed as the first entry.
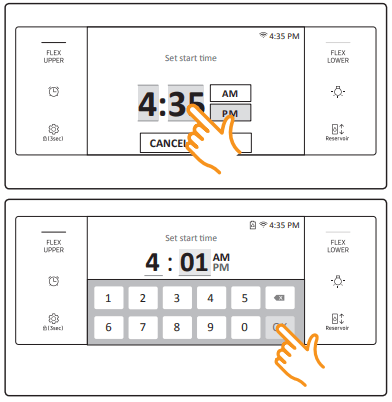
5. Flick the screen or tap the time area to set the start time. If you tap the time area, the numeric pad appears. Tap numbers in the numeric pad to set the time you want the oven to start.
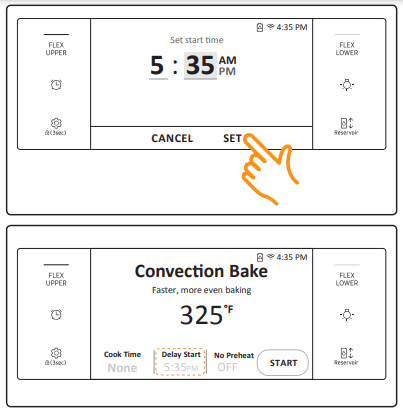
6. Tap SET. The Delay Start screen closes. The start time, and, if you set it, the cooking time, is displayed on the screen.
NOTE See pages 31 through 33 for basic baking and broiling instructions.
Using the Temp probe
For many foods, especially roasts and poultry (beef, chicken, turkey, pork, lamb, etc), measuring the internal temperature is the best way to determine if the food is properly cooked. The Temp probe lets you cook meat to the exact internal temperature you want, taking the guess work out of determining whether a piece of meat is done or not. This function can be used with Bake, Convection Bake, or Convection Roast.
After the internal temperature of the food reaches 100 °F, the increasing internal temperature will be shown in the display
How to use the Temp probe
1. Push the tip of the Temp probe into the meat as fully as possible, so that the tip is in the center of the meat.
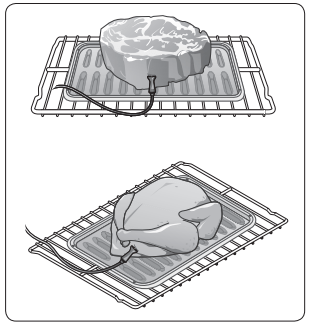
• Insert the probe completely into the meat as shown in the illustrations. It should not touch bone, fat, or gristle.
• If you do not fully insert the probe into the meat, the Temp Probe function will not work correctly because the probe will sense the oven temperature, not the temperature of the meat.
• For bone-in meats, insert the probe into the center of the lowest and thickest portion of the piece.
• For whole poultry (turkey, large chickens, etc.), insert the probe into the thickest part of the inner thigh, parallel to the leg.
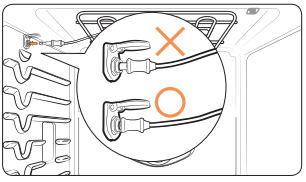
• If you activate the Keep Warm function to keep the meat warm after you have cooked it using the Temp Probe function, the meat’s internal temperature will exceed the temperature you want.
2. Insert the temp probe plug into the socket on the top side wall of the oven as far as it will go.
3. Turn the upper or lower oven mode knob to select the desired cooking mode (Bake, Convection Bake or Convection Roast). Set the cooking temperature. (See pages 21 and 31.)
4. Tap Temp Probe to set the desired internal temperature.
5. Set the desired internal temperature using the numeric pad.
| Available temperatures | 100 °F to 200 °F |
6. If you want to use the Cook time or Delay start, set each function.
7. Tap START.
8. When the desired internal temperature is reached, the function automatically stops and an alarm sounds.
A CAUTION
To protect the Temp probe’s tip, be careful not to insert the probe so that the tip protrudes through the surface of the meat. Make sure that the tip is in or near the center of the meat.
CAUTION
Do not store the probe in the oven.
Do not leave the probe inside the oven during a self-cleaing or broiling cycle. You can permanently damage the probe and it will no longer work.
To avoid breaking the probe’s tip, defrost your food completely.
Do not use tongs when inserting or removing the probe. Tongs can damage the probe.
Use the Temp probe for Temp Probe function cooking only. Do not use the Temp probe for any other purpose.
NOTE
If you remove the Temp probe while the Temp Probe function is operating or insert the Temp probe while baking or cooking normally, cooking will stop after 1 minute.
If you use the probe to cook frozen food, there are times when it cannot be detected. (The probe icon won't appear in the display.)
Oven functions
| Oven | Oven functions | ||
|
|
Single oven | Bake, Broil, Convection Bake, Convection Roast, Steam Bake, Steam Roast, Keep Warm, Healthy Cook, Gourmet Cook, Smart Control, Clean | |
|
|
*Twin oven | Upper | Broil, Convection Bake, Convection Roast, Steam Bake, Healthy Cook, Smart Control |
| Lower | Bake, Convection Bake, Healthy Cook, Smart Control | ||
Basic Baking and Broiling Instructions
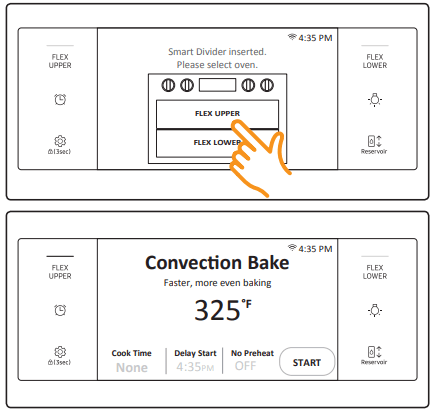
1. To use Twin Flex mode, insert the divider into the oven. See page 41 for details. If you are using single mode, skip this step and go to Step 2.
2. Turn the Oven Mode knob to select the desired cooking mode. If you inserted the divider, select FLEX UPPER or FLEX LOWER on the screen.
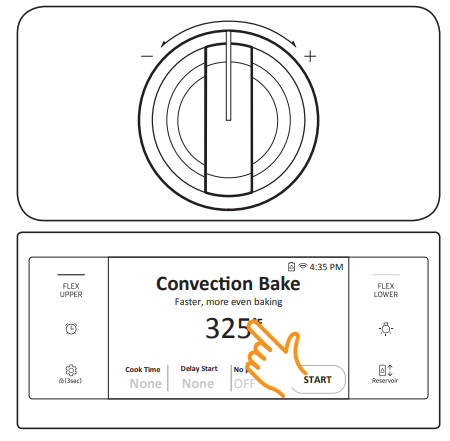
3. Set the temperature you want. (See the Setting the temperature section on page 21.)
• Broil mode can be set only Hi or Low.
• Keep Warm temperatures are fixed and cannot be changed.
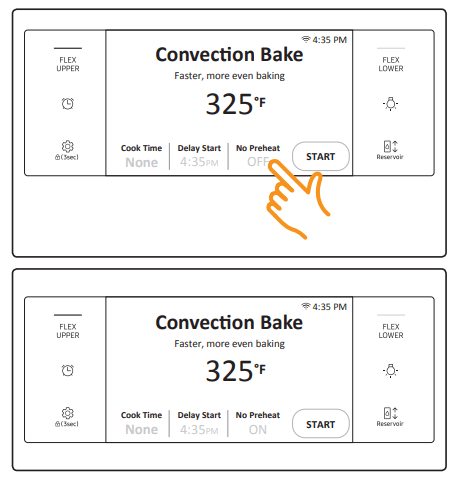
4. Follow the steps below to use the No Preheat feature, Steam Bake, or Steam Roast. If you are not using these features, skip these steps and go to Step 5 in the next column.
• No Preheat
a. If you are select Convection Bake or Convection Roast, the display will show the No preheat information. (The default is OFF).
b. Tap the No Preheat area. The No Preheat feature is activated and the display will show ON.
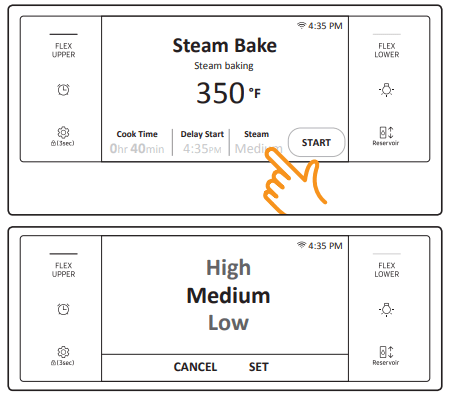
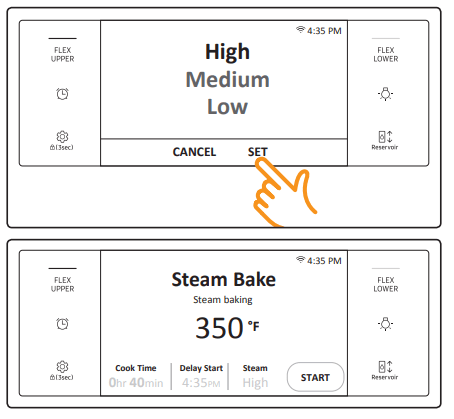
• Steam Bake, Steam Roast
a. If you selected Steam Bake or Steam Roast, the display will show the steam level information. (The default is Medium).
b. Tap the Steam area to adjust the steam level. The steam level adjustment screen appears. You can set the steam level to Low, Medium, or High.
c. Tap SET. The steam level adjustment screen closes and the steam level information is displayed on the screen.
Important: You must fill the water reservoir before you start steam cooking. See the Water reservoir section on page 19.
5. If you want to use the Cook Time, or Delay Start function, set each function now. See pages 24 and 25 for instructions.
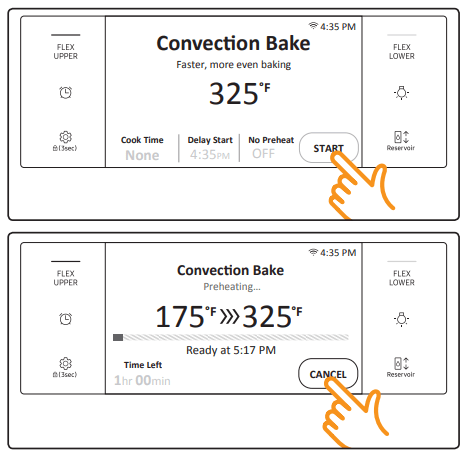
6. Tap START to begin cooking.
7. Tap CANCEL when cooking is done or if you want to cancel cooking.
How to adjust the temperature while cooking
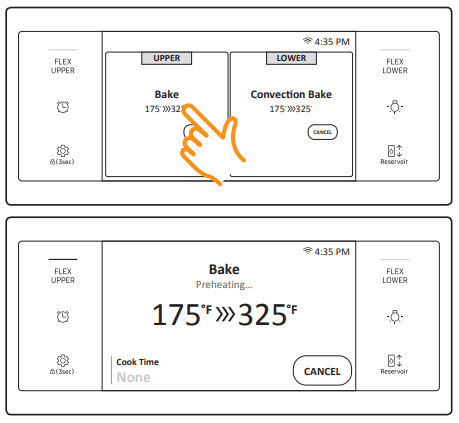
If you are using the oven in single mode, do one of the following:
• Use the oven temperature knob to adjust the temperature.
• Tap the temperature area, enter the new temperature using the numeric keypad, and then tap OK.
• Touch and hold the temperature area, flick the wheel picker to set the temperature, and then tap SET.
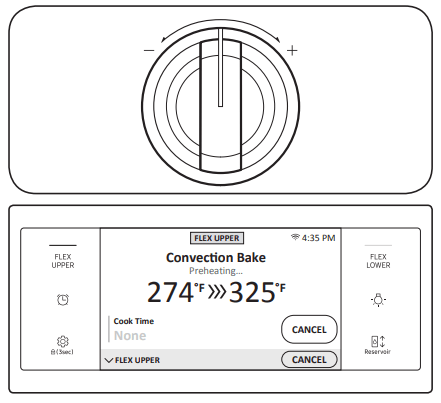
If you are using the oven in twin flex mode, tap FLEX UPPER or FLEX LOWER, and then do one of the following:
• Use the oven temperature knob to adjust the temperature.
• Tap the temperature area, enter the new temperature using the numeric keypad, and then tap OK.
• Touch and hold the temperature area, flick the wheel picker to set the temperature, and then tap SET.

• Place food in the oven after preheating if the recipe calls for it. Preheating is very important for good results when baking cakes, cookies, pastry, and breads. After the oven has reached the desired temperature, the oven will beep 6 times.
• The convection oven fan shuts off when the oven door is opened.
• DO NOT leave the door open for long periods of time while using convection cooking or you may shorten the life of the convection heating element.
Using the gourmet cook feature
For inexperienced cooks, the oven offers 10 gourmet auto cook features. Take advantage of this feature to save time or shorten your learning curve. The cooking time and temperature will be adjusted according to the selected recipe. You can download detailed recipes for each feature from the Samsung website.
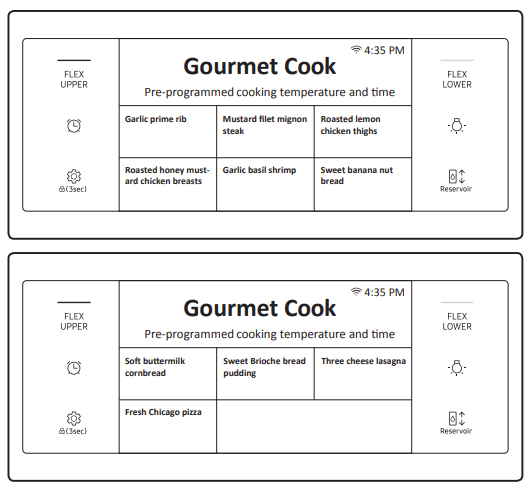
1. Turn the Mode knob to the Gourmet Cook mode. The display will show 10 auto cook features. (You can scroll down through the list.)
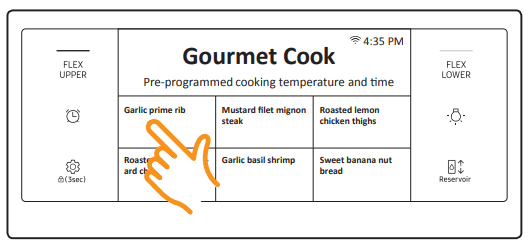
2. Tap the Gourmet Cook feature you want.
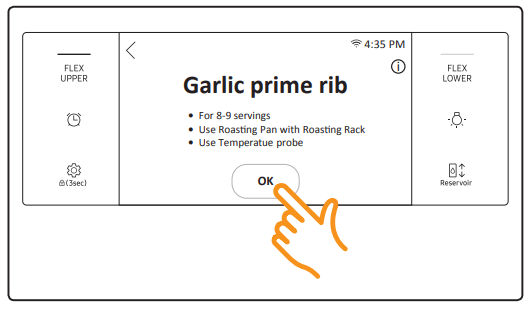
3. Follow the on-screen instructions.
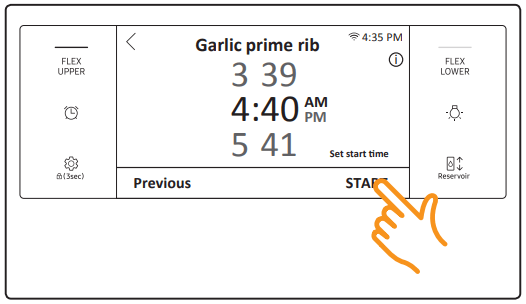
4. Tap START to start cooking.
Cooking tips in the gourmet cook mode
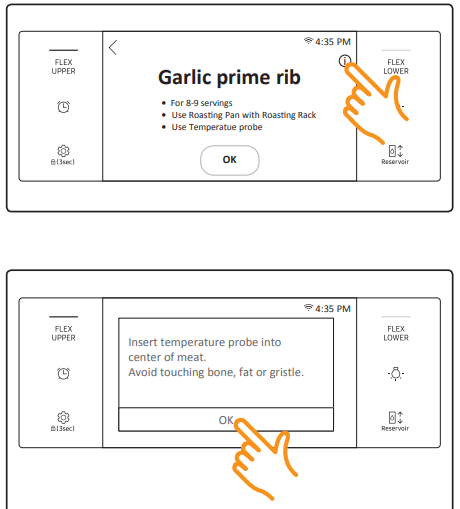
1. Tap  on the screen to see a cooking tip.
2. The display will show the cooking tip. You can see the cooking tip before you start cooking or while you are cooking.
To start the oven remotely
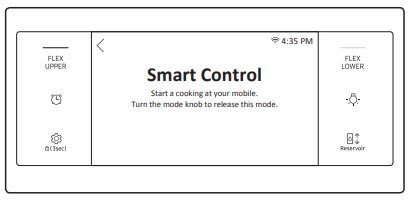
1. Turn the Mode knob to Smart Control. The oven can now be started and controlled remotely by a connected mobile device.
When Smart Control is on you can:
• Remotely change oven settings (mode, time, temperature) using your mobile device.
• Remotely start the oven.
• Remotely turn off the oven.
• Once cooking starts, you can change the cooking time and temperature remotely.
NOTE
Important: Self Clean mode cannot be started remotely.
NOTE
• Opening the oven door or turning the mode knob to other modes will deactivate Smart Control and prevent you from turning the oven on or controlling the oven remotely.
• If Smart Control is deactivated, you can still monitor the oven's status and turn the oven off.
• When oven cooking is finished or cancelled, Smart Control will be deactivated.
Using the oven racks
Upper and lower oven rack positions (single mode)
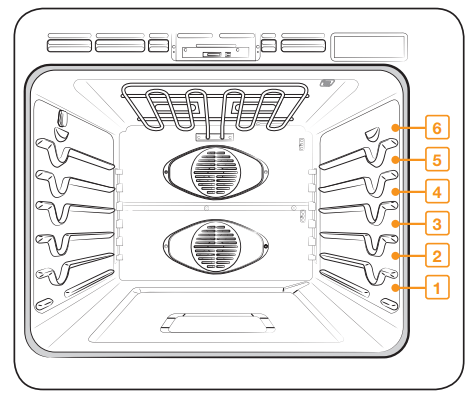
Recommended rack positions for cooking
|
TYPE OF FOOD |
RACK POSITION |
|
Broiling hamburgers |
6 |
|
Broiling meats or small cuts of poultry, fish |
4-6 |
|
Bundt cakes, pound cakes, frozen pies, casseroles |
4 or 3 |
|
Angel food cakes, small roasts |
2 |
|
Turkeys, large roasts, hams, fresh pizza |
1 |
• This table is for reference only.
Upper oven rack positions with divider (twin mode)
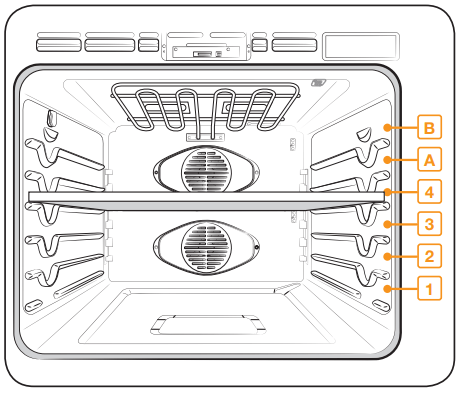
The upper compartment has 2 rack positions (A, B).
The lower compartment has 3 rack positions (1-3).
|
TYPE OF FOOD |
RACK POSITION |
|
|
Upper |
Lower |
|
|
Frozen pies |
A |
1 |
|
Angel food cakes |
- |
1 |
|
Bundt or pound cakes |
- |
1 |
|
Muffins, browines, cookies, cupcakes, layer cakes, Pies, Biscuits |
A |
1 |
|
Casseroles |
A |
1 |
|
Small roast, hams |
A |
1 |
|
Small turkeys, medium roasts |
- |
1 |
• This table is for reference only
Rack and Pan placement
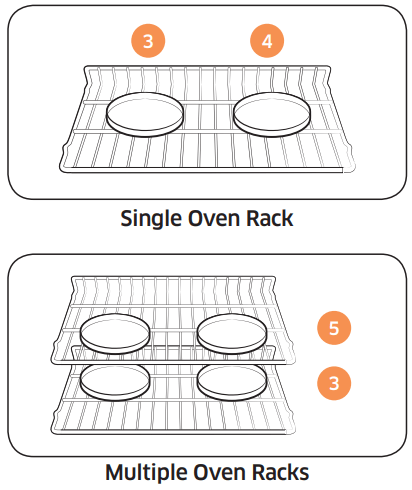
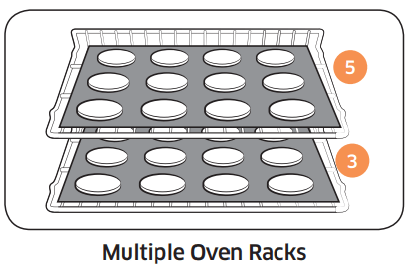
Centering baking pans in the oven as much as possible will produce better results. If baking with more than one pan, place the pans so each has at least l'to l’A" of air space around it.
When baking on a single oven rack, place the oven rack in position 3 or 4. See the figure on the left.
When baking cakes and cookies on multiple racks, place the oven racks in positions 3 and 5.

Before using the racks
Each rack has stops that need to be placed correctly on the supports. These stops will keep the rack from coming completely out.
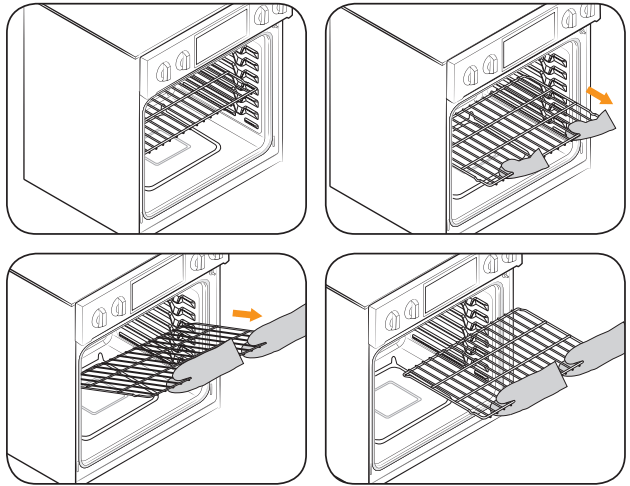
Removing the racks
- Pull the rack straight out until it stops.
- Lift up the front of the rack, and then pull it out.
Replacing the racks
- Place the end of the rack on the support.
- Tilt the front end up and push the rack in.
CAUTION
• Do not cover a rack with aluminum foil or place aluminum foil on the oven bottom. This will hamper heat circulation, resulting in poor baking, and may damage the oven bottom.
• Arrange the oven racks only when the oven is cool.
Maintaining your appliance
Care and cleaning of the oven
Cleaning painted parts and decorative trim
• For general cleaning, use a cloth with hot, soapy water.
• For more difficult residue and built-up grease, apply a liquid detergent directly onto the area and leave for 30 to 60 minutes. Wipe with a damp cloth and dry. Do not use abrasive cleaners on any oven surface. They can be scratched.
Cleaning stainless steel surfaces
1. Shake a bottle of Stainless Steel Appliance Cleaner or Polish well.
2. Place a small amount of stainless steel appliance cleaner or polish on a damp cloth or damp paper towel.
3. Clean a small area, rubbing with the grain of the stainless steel if applicable.
4. Dry and buff with a clean, dry paper towel or soft cloth.
5. Repeat as necessary.
NOTE
• Do not use a steel-wool pad. It will scratch the surface.
• If a mineral oil-based stainless steel appliance cleaner has been used before to clean the appliance, wash the surface with dishwashing liquid and water prior to using the Stainless Steel Appliance Cleaner or Polish.
Oven racks
• If the racks are left in the oven during a self-cleaning cycle, their color will turn slightly blue and the finish will be dull. After the self-cleaning cycle is complete and the oven has cooled, rub the sides of the racks with wax paper or a cloth containing a small amount of oil. This will help the racks glide more easily on their tracks.
• Gliding racks may be cleaned by hand with an abrasive cleaner or steel wool. During cleaning, be careful not to allow water or cleaner to enter the slides on the sides of rack.
NOTE
• Do not clean in a dishwasher.
• If the rack becomes hard to remove or replace, lightly wipe the oven rack guides with cooking oil. Do not wipe cooking oil on the slides.
• If the rack becomes difficult to slide, the rack may need to be lubricated using a graphite lubricant.
To lubricate the slides of the gliding rack
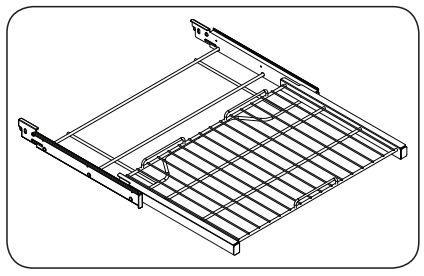
1. Remove the rack from the oven. See removing the gliding rack in the Using the gliding rack section on page 40.
2. Fully extend the rack on a table or countertop. Newspaper may be placed underneath the rack for easy cleanup.
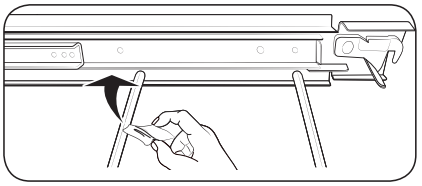
3. If there is debris in the slide tracks, wipe it away using a paper towel. (Any graphite lubricant wiped away must be replaced - See steps 4 through 7.
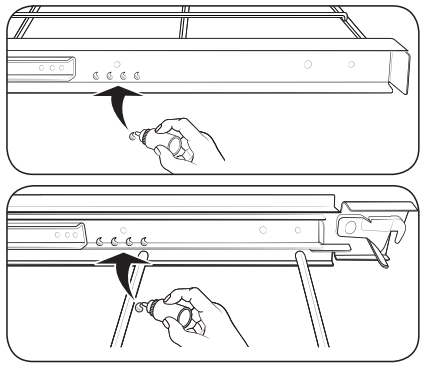
4. Shake the graphite lubricant before opening it. Starting with the left (front and back) slide mechanism of the rack, place four (4) small drops of lubricant on the two (2) bottom tracks of the slide close to the bearing carriers.
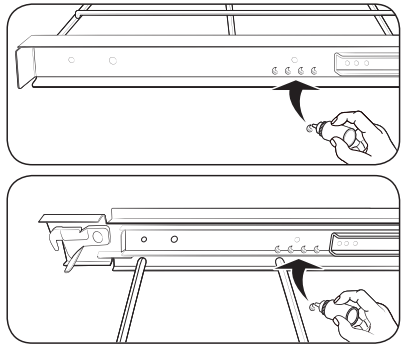
5. Repeat for the right (front and back) slide mechanism of the rack.
6. Open and close the rack several times to distribute the lubricant.
7. Replace the cap on the lubricant and shake it again. Turn the rack over and repeat steps 3, 4, 5, and 6.
8. Close the rack, turn the rack rightside-up, and then place in oven. See Installing the Gliding rack on page 40.
Oven door
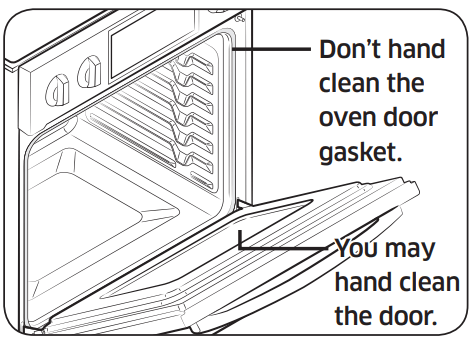
• Use soap and water to thoroughly clean the top, sides, and front of the oven door. Rinse well. You may use a glass cleaner on the outside glass of the oven door. DO NOT immerse the door in water. DO NOT spray or allow water or the glass cleaner to enter the door vents. DO NOT use oven cleaners, cleaning powders, or any harsh abrasive cleaning materials on the outside of the oven door.
• DO NOT clean the oven door gasket. The oven door gasket is made of a woven material which is essential for a good seal. Care should be taken not to rub, damage, or remove this gasket.
CAUTION
- The door is very heavy. Be careful when removing and lifting the door.
- Do not lift the door by the handle.
- Use two hands to remove an oven door. For double ovens, repeat the process for each door.
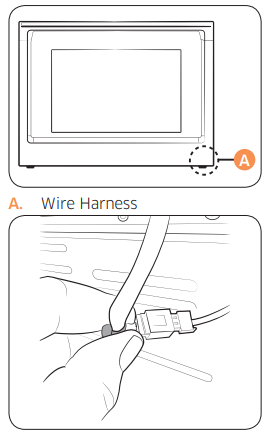
1. Prior to removing the oven door, prepare a surface where you will place it. This surface should be flat and covered with a soft blanket. You can also use the corner posts from your packaging material.
2. Disconnect the LED light's Wire Harness from the bottom right of the door.
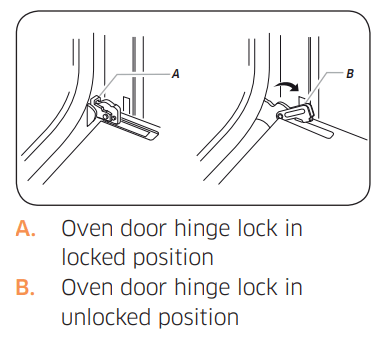
3. Open the oven door.
4. Locate the oven door hinge locks in both corners of the oven door, and then rotate the hinge locks toward the oven door to the unlocked position. If the door hinge lock is not rotated fully (see illustration B on the left for an example of full rotation), you will not be able to remove the door properly.
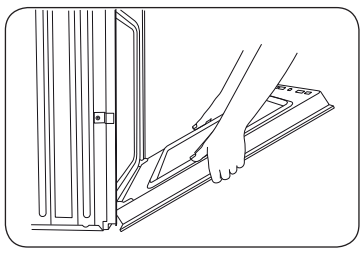
5. Partially close the door to engage the door latch locks. The door will stop at this point.
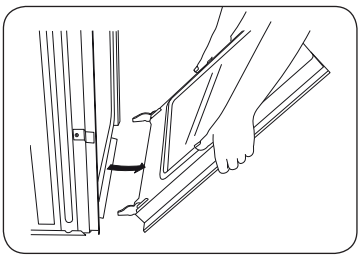
6. Using two hands, grasp the edges of the oven door. Lift and pull the oven door toward you and remove. You may need to gently shift the door from side to side as you pull.
7. Set the oven door aside on the prepared covered work surface with the oven door resting on its handle.
Replacing the oven doors
CAUTION
The door is very heavy. You may need help lifting the door high enough to slide it into the hinge slots. Do not lift the door by the handle.
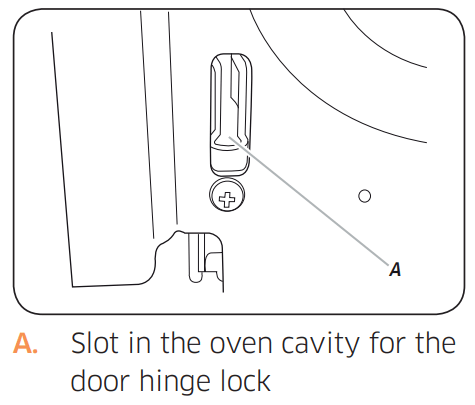
1. Using two hands, grasp the side edges of the door at the midpoint. Face the oven cavity.
2. Locate the slots on each side of the oven cavity for the door hinge locks.
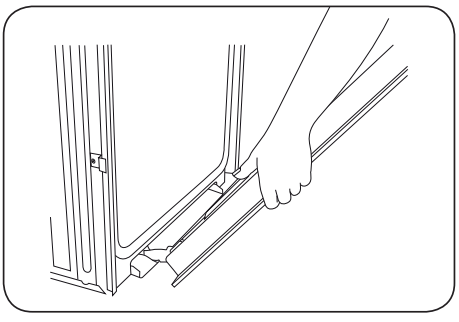
3. Hold the door at a 45° angle, and then align the door hinges with the slots in the lower front of the oven cavity. Slowly insert the door, making sure you maintain the 45° angle. You will know the door is engaged in the slot when you feel a slight drop.
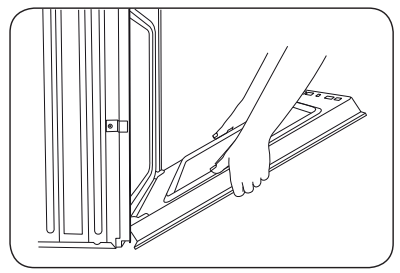
4. Lower the oven door to the fully open position. If the oven door does not open to a full 90°, repeat steps 1 through 3.
5. Locate the oven door hinge locks in the corners of the oven door, and rotate the hinge locks toward the oven cavity to the locked position. See Step 3 (illustration A) in the "Removing the oven doors" section for the proper locked position.
6. Close the oven door.
7. When the hinges are properly installed and the door is closed, there should be an even gap between the door and the control panel. If one side of the oven door is hanging lower than the other, the hinge on that side is not properly installed.
8. Reconnect the LED light's Wire Harness.
CAUTION After replacing the door, make sure to reconnect the wires. Push them inward to arrange them as they were before you removed the door. Wires that are not connected or arranged correctly can be caught in the door or damaged by heat
Changing the oven light
The oven light is a standard 40-watt appliance halogen bulb. It comes on when the oven door is open. When the oven door is closed, touch Lamp  to turn the light on or off. It will not work during a self-cleaning or Hybrid cleaning cycle.
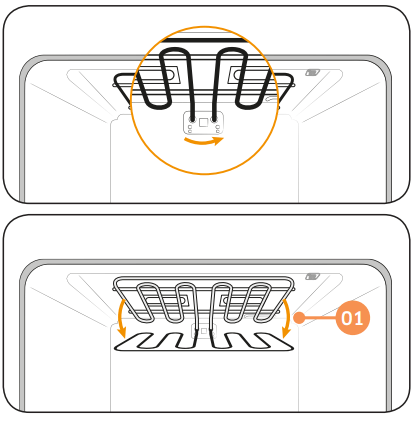
1. To change the halogen bulb, you must tilt the broil heater down. To do this, turn the circular nut on the support counterclockwise while holding the broil heater. The broil heater should loosen and tilt down.
Important: The broil heater is not a removable part. Do not force the broil heater down. Do not let it drop down.
2. Remove the glass cover.
3. Remove the halogen bulb cover.
4. Replace the halogen bulb.
5. When done, replace the glass cover, and then follow Step 1 above in the reverse order to return the broiler to its correct position.
CAUTION
Before changing your oven light, disconnect the electrical power to the oven at the main fuse or circuit breaker panel. Make sure the oven and the halogen bulb are cool.
Troubleshooting
Troubleshooting
Samsung works hard to ensure that you don’t have problems with your new electric oven. If you run into unexpected trouble, look first for a solution in the tables below. If you’re still having trouble after trying the suggested solution, call Samsung at 1-800-SAMSUNG (1-800-726-7864).
CONTROL DISPLAY
|
Problem |
Possible cause |
Solution |
|
The display goes blank. |
A fuse in your home may be blown or the circuit breaker tripped. |
Replace the fuse or reset the circuit breaker. |
|
The buttons cannot be pressed properly. |
• There is foreign matter caught between the buttons • Touch model: There is moisture on the exterior • The lock function is set |
• Remove the foreign matter and try again. • Remove the moisture and try again. • Check whether the lock function is set. |
OVEN
|
Problem |
Possible cause |
Solution |
|
The oven will not turn on. |
The oven is not completely plugged into the electrical outlet. |
Make sure the electrical plug is inserted into a live, properly grounded outlet. |
|
|
A fuse in your home may be blown or a circuit breaker may have tripped. |
Replace the fuse or reset the circuit breaker. |
|
|
The oven controls have been set improperly. |
See the Operating the oven section starting on page 20. |
|
|
The oven is too hot. |
Allow the oven to cool. |
|
|
Incomplete service wiring. |
Call for service. |
|
|
Power outage. |
Check to see if the house lights will turn on. If necessary, call your local electric company for service. |
|
The oven light will not turn on. |
The light is loose or defective. |
• Tighten or replace the lamp. • Call for service if the door light does not turn on. |
|
|
The switch operating the light is broken. |
Call for service. |
|
The oven smokes excessively during broiling. |
The oven controls have not been set properly. |
See the Operating the oven section starting on page 20. |
|
The meat has been placed too close to the element. |
Reposition the rack to provide proper clearance between the meat and the element. Preheat the broil element for searing. |
|
|
The meat has not been properly prepared. |
Remove excess fat from the meat. Cut away fatty edges that may curl, leaving the lean intact. |
|
|
Grease has built up on oven surfaces. |
Regular cleaning is necessary when broiling frequently. |
|
|
Food does not bake or roast properly. |
The oven controls have not been set correctly. |
See the Operating the oven section starting on page 20. |
|
The oven rack has been positioned incorrectly or is not level. |
See the Using the oven racks section on page 38. |
|
|
The oven thermistor needs to be adjusted. |
See Temp adjust in the Settings section on page 49. |
|
Food does not broil properly. |
The serving size may not be appropriate. |
Refer to the Broiling recommendation guide for serving sizes on page 30, and then try again. |
|
|
The rack has not been properly positioned. |
See the Broiling recommendation guide on page 30. |
|
|
The cookware is not suited for broiling. |
Use suitable cookware. |
|
|
In some areas, the power (voltage) may be low. |
• Preheat the broil element for 10 minutes. • See the broiling recommendation guide on page 29. |
|
The oven temperature is too hot or too cold. |
The oven thermistor needs to be adjusted. |
See Temp adjust in the Settings section on page 49. |
|
There is water dripping. |
You may see water or steam in some cases depending on |
Let the oven cool and then wipe with a dry dish towel. |
|
There is steam coming through the crack between the oven body and the door. |
the food you are cooking. This is not a product malfunction. |
|
|
Water remains in the oven. |
|
I can hear water boiling during steam cooking. |
Water is being heated by the steam heater.' |
This is not a product malfunction. |
|
The oven will not self-clean. |
The oven temperature is too high to start a self-clean operation. |
Allow the oven to cool and then reset the controls. |
|
The oven controls have been set incorrectly. |
See the Self Clean section on page 41. |
|
|
A self-cleaning cycle cannot be started if the oven lockout feature has been activated. |
Deactivate the oven lockout (see page 22). |
|
|
Excessive smoking during a self-cleaning cycle. |
There is excessive soiling in the oven. |
Press OFF. Open the windows to rid the room of smoke. Wait until the self-cleaning cycle is cancelled. Wipe up the excessive soil and then start the self-cleaning cycle again. |
|
The oven door will not open after a selfcleaning cycle. |
The oven is too hot. |
Allow the oven to cool. |
|
The oven is not clean after a self-cleaning cycle. |
The oven controls were not set correctly. |
See the Self Clean section on page 41. |
|
The oven was heavily soiled. |
Wipe up heavy spillovers before starting the selfcleaning cycle. Heavily soiled ovens may need to be self-cleaned again or for a longer period of time. |
|
Steam is coming out of the vent. |
When using the convection feature, it is normal to see steam coming out of the oven vent. |
This is normal operation and not a system failure. Use the oven as usual. |
|
As the number of racks or amount of food being cooked increases, the amount of visible steam will increase. |
||
|
A burning or oily odor is coming from the vent. |
This is normal for a new oven and will disappear in time. |
• To speed the process, set a self-cleaning cycle for a minimum of 3 hours. • See the Self Clean section on page 41. |
|
Strong odor. |
An odor coming from the insulation around the inside of the oven is normal for the first few times the oven is used. |
Operate the oven empty on the bake setting at 400 °F for 1 hour. |
|
Fan noise. |
A convection fan may automatically turn on and off. |
This is not a system failure but normal operation. |
|
The oven racks are difficult to slide. |
The shiny, silver-colored racks were cleaned in a selfcleaning cycle. |
Apply a small amount of vegetable oil to a paper towel, and then wipe the edges of the oven racks with the paper towel. |
|
The oven door is locked. |
The circuit breaker has been tripped or there was a power failure while the oven door was locked. |
Activate Control Lockout, and then unlock the control. See the Control Lockout section on page 22. |
Information codes
OVEN
|
Displayed Code |
Possible cause |
Solution |
|
C-d0 |
This code occurs if the control key is short for 1 minute. |
Clean the buttons and make sure there is no water on/ around them. Turn off the oven and try again. If the problem continues, contact a local Samsung service center. |
|
C-d1 |
This code occurs if the door lock is mispositioned. |
Press OFF, and then restart the oven. If the problem persists, disconnect all power to the oven for at least 30 seconds and then reconnect the power. If this does not solve the problem, call for service. |
|
C-F0 |
This code occurs if communication between the Main and Sub PBA is interrupted. |
|
|
C-F2 |
This code occurs if communication between the Main and Touch is interrupted. |
|
|
C-20 |
The oven sensor is open when the oven is operating. |
|
|
The oven sensor is short when the oven is operating. |
||
|
C-21 |
This code occurs if the internal temperature rises abnormally high. |
|
C-23 |
The temp probe sensor is short when the oven is operating. |
Press OFF, and then restart the oven. If the problem persists, disconnect all power to the oven for at least 30 seconds and then reconnect the power. If this does not solve the problem, call for service. |
|
C-30 |
The PCB sensor is open when the oven is operating. |
|
|
The PCB sensor is short when the oven is operating. |
||
|
C-31 |
This code occurs if the PCB temperature rises abnormally high. |
Call for service |
|
-dC- |
This code appears if the divider is inserted or removed while the oven is operating. |
Make sure the divider is inserted properly, and then restart the oven. If the problem persists, disconnect all power to the oven for at least 30 seconds and then reconnect the power. If this does not solve the problem, call for service. |
|
C-70 |
The steam sensor is open when the oven is operating |
Press OFF, and then restart the oven. If the problem presists, disconnect all power to the oven for at least 30 seconds and then reconnect the power. If does not solve the problem, call the service. |
|
The steam sensor is short when the oven is operating |
||
|
C-72 |
There are drain system-related problems. |
|
|
C-A2 |
The cooling motor is operating abnormally. |
Call for service. |
