Loading ...
Loading ...
Loading ...
20 21INSTALLING THE ELECTRIC ELEVATED COOKERTROUBLE SHOOTING
INSTALLING THE ELECTRIC ELEVATED COOKER
If you have a problem with your appliance check the following before you ring the service line.
PROBLEM WHAT TO DO
Operational problems
i.e. Oven, grill or hob
not working
Check the electricity is turned on
Check your fuses. If the fuse continues to blow, call the Service Centre
Check the circuit breaker
Ensure correct knob is turned
Gas only – Dry or clean ignition electrodes
Gas only – Make sure flame ports and ignition areas are clean and dry
Gas only – Check gas supply is on
Gas only – Ensure cap/crown correctly fitted
Replace or tighten light globes (where fitted)
Heat up problems
Oven not pre-heated – Pre-heat oven for 30 minutes
Check oven door is closed properly
Remove foil or trays from bottom of oven
Change set oven temperature
Preheat your oven/grill before you put the food in to be cooked
Unit smoking odours
New appliances can have an odour during first operation. It is recommended to ‘run
in’ the oven before you cook. Run the oven at 180ºC for two hours and ensure room
is well ventilated
For products with separate grill compartment, run the grill on for full for 15 minutes
with grill door open
Persistent gas smell – do not operate appliance. Call service 131349
Condensation NOTE: some
condensation is normal and is
to be expected during cooking
Reduce the amount of water used for cooking
Leave the door open after cooking if food remains in cooker for warming
Timer not audible Turn Timer knob past 15 minute mark then to the required number of minutes
Oven shelf tight Remove shelf and insert as per diagram
Oven or grill not working
(Electric cooker only)
Clock not set, refer to clock instructions
Oven not working Clock program set. Cancel program
Oven light not working Lamp blown or loose in socket. Replace or tighten globe
Electronic clock flashing
on display or off (Electric
cooker only)
Check household power supply, fuses and reset time of the day
Powerpoints not working (NZ
model Electric cooker only)
Check the fuse at rear and replace if blown
Gas oven burner uneven flame
This does not affect cooking results. From cold start the oven burner flame will be
higher on the left-hand side. After reaching the set temperature, the flame will then
be even.
TROUBLE SHOOTING
TIPS & INFORMATION
TIPS AND INFORMATION
When you need information, service or replacements
please quote:
1. Model Number.
2. Serial Number: You can find these on the data plate,
which can be seen when the oven door is open. If you
need more information, please contact the Customer
Care Centre on 1300 363 640 (Australia – Centre is
open 8.00am to 5.00pm Monday to Friday EST).
Or 09 573 2384 (New Zealand – Centre is open 8.00am
to 5.00pm Monday to Friday). Only authorised service
centres should carry out servicing. Otherwise warranty
may be void. If you have a warranty or spare parts
enquiry, you should call the numbers listed on the
back page.
Safety Warnings about installation
WARNING
WARNING
• The cooker MUST be installed and serviced by a
qualified technician.
• A Certificate of Compliance MUST be supplied to be
kept by the customer.
• The packing materials MUST be removed before you
install the cooker.
• You MUST follow the installation instructions in this
booklet.
• In order to avoid overheating, the cooker must not
be installed behind ta decorative door.
• The surrounding kitchen cabinets MUST be able
to withstand 85°C. Electrolux Products WILL
NOT accept responsibility for damage caused by
installation into kitchen cabinets which cannot
withstand 85°C.
• In order to avoid overheating of the cooker,
the cooker must not be installed behind a
decorative door
• The appliance MUST be installed using the flexible
hose supplied.
• The vents, openings and air spaces MUST NOT
be blocked.
• You MUST NOT pull the cooker by the door handles
or the splashback.
• The cooker MUST be checked every five years.
• The cooker MUST NOT be used as a space heater.
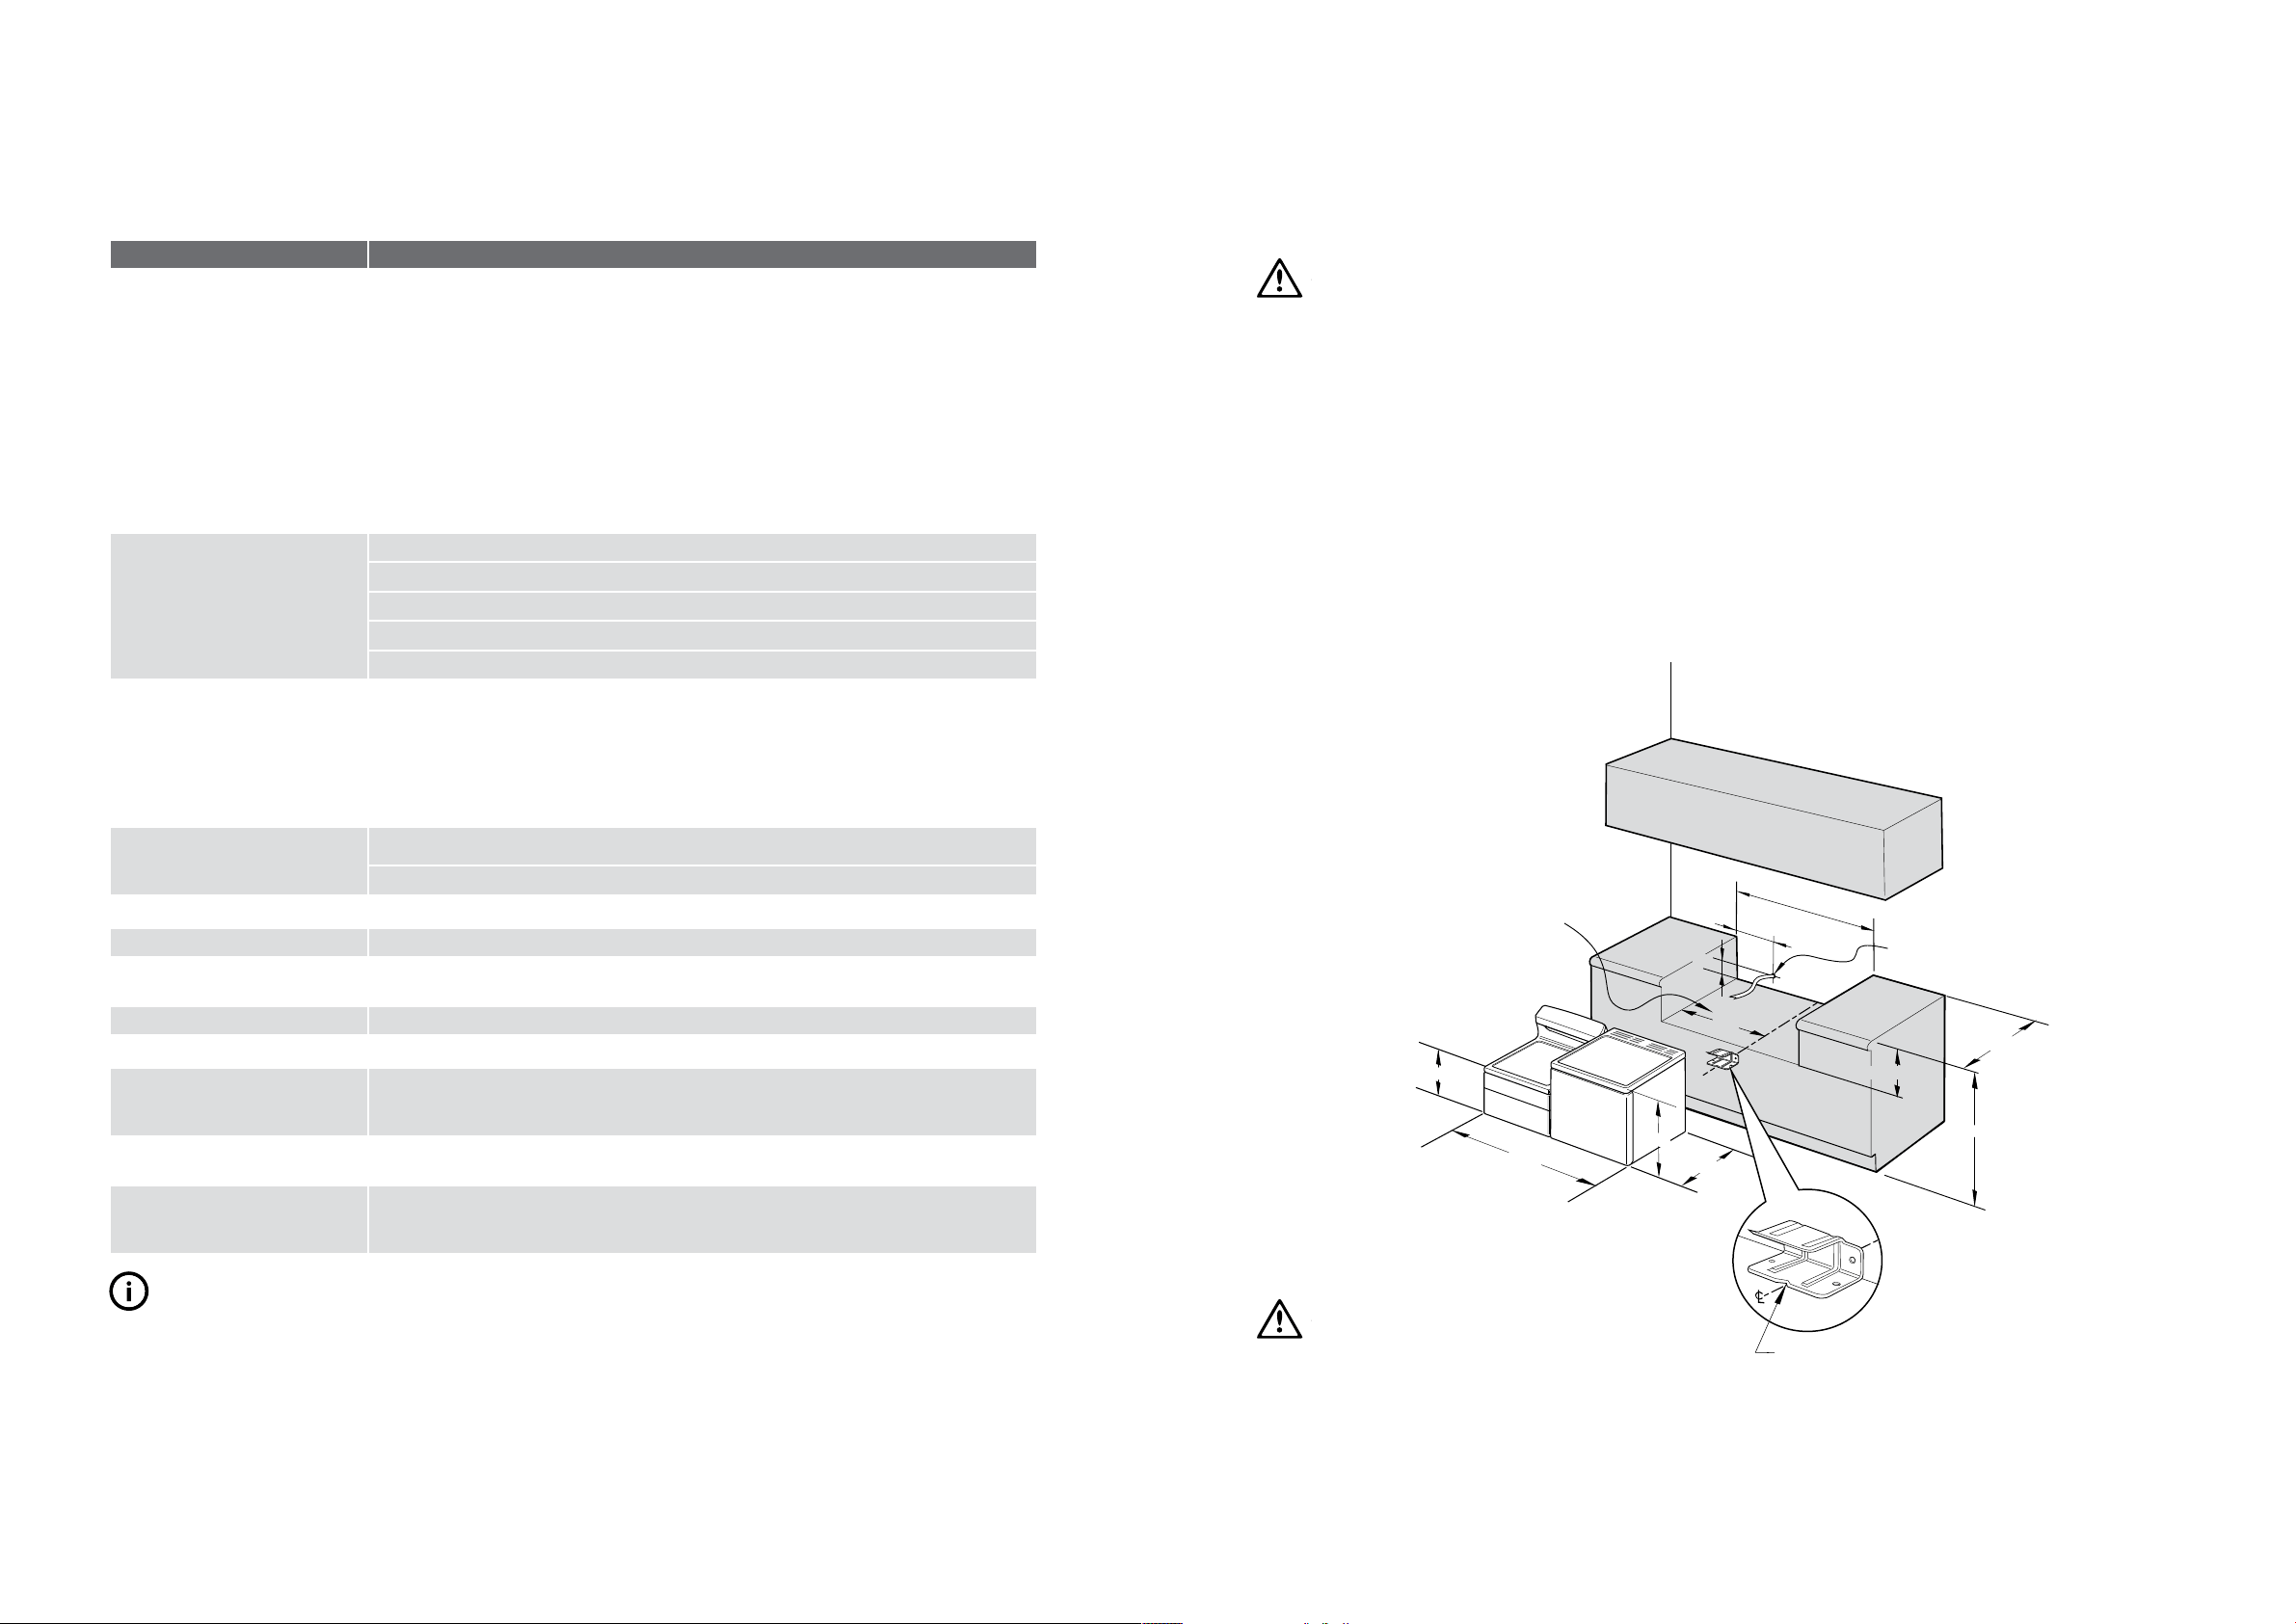
Locating the cooker
Study the diagrams below to be sure of the dimensions
required to locate the cooker safely.
Wiring connection
postion
320
1085
520
900
600
Locating V
1095 Minimum
740 L.H. Oven
200 R.H. Oven
620
300 Maximum
Dimension to centre
line of anti-tilt plate
60
762
WARNING
WARNING
In order to avoid accidental tipping of the appliance (for
example, by a child climbing onto the open oven door),
the anti-tilt plate MUST be installed.
Position the anti-tilt plate to the rear wall and 762mm
from the left side of the wall. Dimension to the “v”
at the front of the anti-tilt plate and then securely fix
-with fasteners.
Loading ...
Loading ...
Loading ...