Loading ...
Loading ...
Loading ...
English
8
WARNING
This equipment incorporates parts, such as snap switches,
receptacles, and the like that tend to produce arcs or sparks
and, therefore, when located in a garage, it should be in a room
or enclosure provided for the purpose, or should be 460 mm or
more above the oor.
WARNING
Do not attach any tools to the open end of the hose until start-
up has been completed. Attaching a tool prematurely could
result in accidental operation causing serious injury.
WARNING
Do not use in an environment that is dusty or otherwise
contaminated. Using the air compressor in this type of
environment may cause damage to the unit.
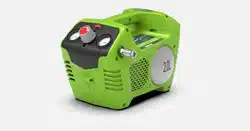
APPLICATIONS
Air compressors are utilized in a variety of air system
applications. Match hoses, connectors, air tools, and
accessories to the capabilities of the air compressor.
You may use this product for the purposes listed below:
• operating some air-powered tools
• operating air accessories such as air nozzles and
inators
• operates some air powered paint spraying products
TRANSPORTING THE AIR Compressor
To move the air compressor:
Ensure auto/off switch is in the off position (O) Grasp the
handle rmly with one hand.
AUTO/OFF
Turn the power switch to the auto position (I) to power the
compressor on. To turn the air compressor off, turn the power
switch to the off position (O).
NOTE: When the compressor is in the auto position (I), the air
compressor will automatically turn back on when the tank air
pressure drops below the preset pressure limit. It will also
shut off again when the max pressure is reached.
RESETTING THE AIR Compressor
When amperage into the air compressor exceeds the specied
amperage, the air compressor will automatically shut off.
1. Turn the air compressor off.
2. Allow unit to cool and to trigger reset.
NOTE: If the overload protector is actuated, the motor must be
allowed to cool down for 30 minutes.
3. Turn the air compressor on.
WARNING
Never exceed the pressure rating of the tool as recommended
by the manufacturer. When using this air compressor as an
ination device, always follow the maximum ination guidelines
stated by the manufacturer of the item being inated.
WARNING
Always ensure the switch is in the off position (O) and the
regulatory pressure gauge reads zero bar before changing air
tools or disconnecting the hose from the air outlet. Failure to do
so could result in possible serious personal injury.
CONNECTING/DISCONNECTING HOSES TO THE AIR
COMPRESSOR
When connecting a pneumatic air nailer or other air tool
always follow the manufacturer’s recommended start-up
procedure.
When connecting/disconnecting a hose to the air compressor
always do the following.
1. Ensure auto/off switch is in the off position (O)
2. Conrm that the outlet pressure is at zero bar by fully
turning the regulator knob counterclockwise to fully
reduce air pressure at the outlet.
NOTE: Turning the knob clockwise increases air
pressure at the outlet. Turning counterclockwise
reduces air pressure at the outlet.
3. Attach coiled air hose to coupler on the side of the air
compressor.
4.Turn power switch to the auto position (I).
5. Allow unit to reach max pressure as indicated on the
tank pressure gauge.
6. Set regulator to desired pressure by rotating pressure
regulator knob. The regulator pressure will appear on
the gauge marked as outlet.
To disconnect a coiled air hose:
1. Conrm that the outlet pressure is at zero bar.
2. When disconnecting a hose from quick coupler, always
rmly hold release end of hose.
3. Pull back on the release sleeve on the quick coupler.
4. With a rm grip, pull out the quick-connect air tting
that is attached to the quick coupler.
5. Attaching or disconnecting pneumatic tools from the
air compressor.
NOTE: Each tool is different. Refer to the instructions of
the manufacturer before operating a tool in the seated
position.
Loading ...
Loading ...
Loading ...