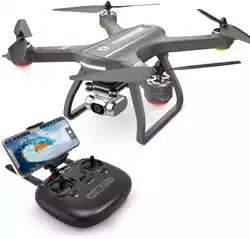
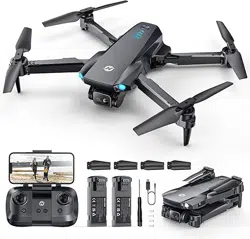
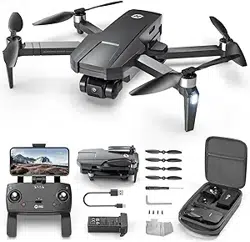
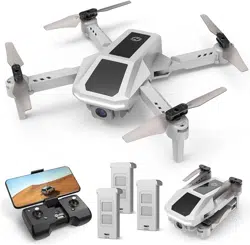
Instruction For Use Camera
MAINTENANCE
- Clean the product after each use with a clean, soft cloth.
- Avoid prolonged exposure to direct sunlight and avoid buildup of heat on the drone.
- This device is not waterproof and must not be submerged in water under any circumstance. Failure to maintain the device completely dry will result in the failure of the unit.
- Check the charging plug and other accessories for signs of darnage frequently. If any part of the device is damaged, refrain from flying until maintenance can be carried out.
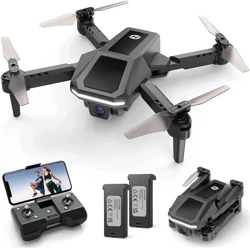
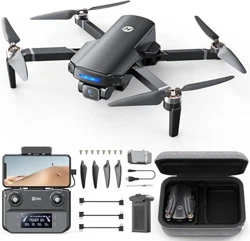
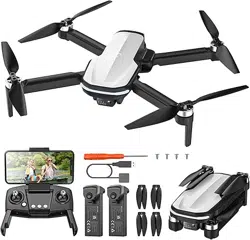
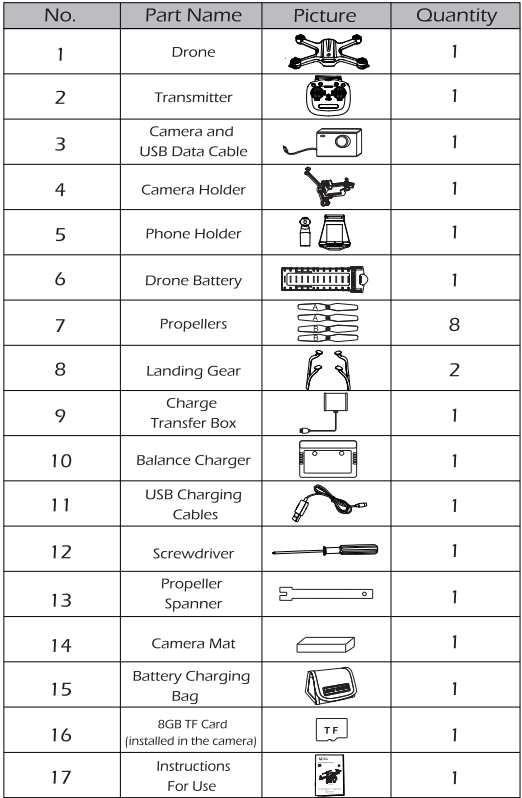
Package Contents
INSTALLATION
Phone Holder
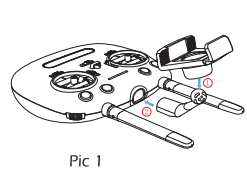

- As shown in picture. install the phone holder to the transmitter. (Pic 1)
- Press the buckle on the phone older to remove. (Pic 2)
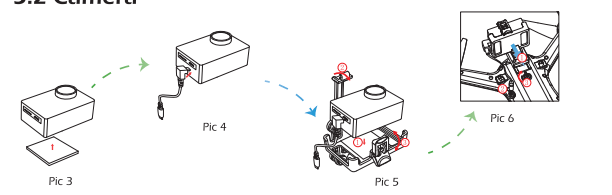
Camera
- Attach the camera mat to the back of the camera. (Pic 3)
- Connect the USB date cable to the camera. (Pic 4]
- Install the camera to camera holder and lock it. (Pic 5)
- Install the camera holder to the drone and connect the USB date cable to the drone and lock it. (Pic 6)
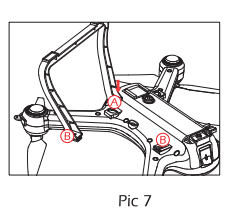
Landing Gear
- Make the “A side of the landing gear aim is inserted in the “A” hole on the drone. (Pic 7)
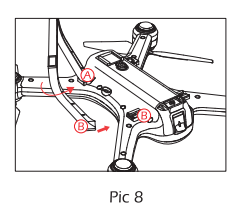
- Rotate the landing gear inward. then push the “B" side of landing gear into the “B" hole on the drone to complete instal lation. (Pic 8)
- Press the buckle on the side of the landing gear to remove. (Pic 9)

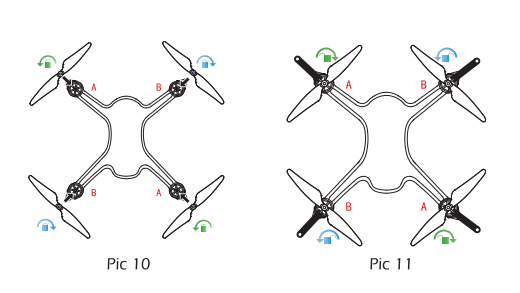
Propellers
- Installation: Install the propeller on the motor shaft according to the “ A/B" corresponding position and rotate to tighten the propeller according to the “Lock’ icon on the propeller. (Pic 10)
- Removal: Grip the brushless motor with propeller spanner too! rotate according the “unlock’ icon on the propeller to remove. (Pic 11)
DRONE’S DETAILS
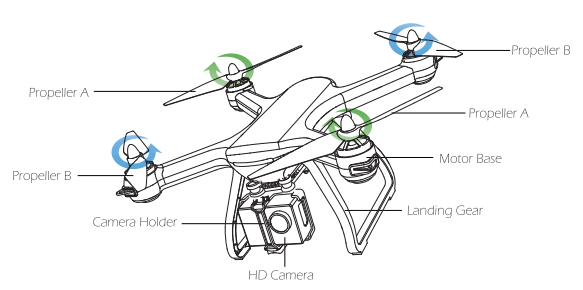
Transmitter Details
Transmitter Functions
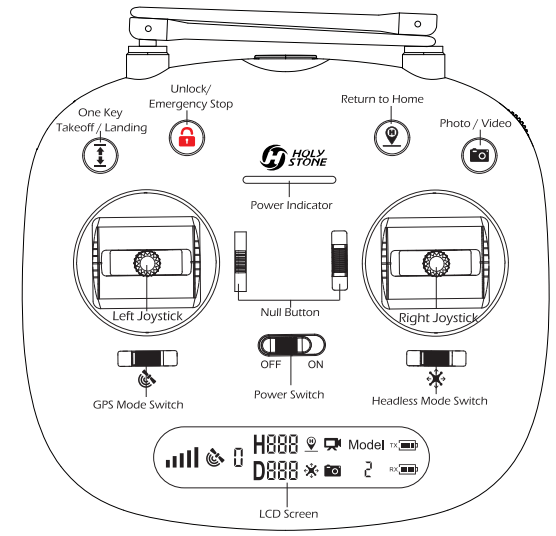
- One Key Take off / Landing: One button take off, ane button landing.
- Unlock / Emergency Stop:
- Click
 the motors rotate and the drone is unlocked.
- Hold the button 3 seconds for Emergency Stop.
- Return to Home: The Return to Home function brings the drone back to the last recorded Home Point.
- Photo / Video: Click
 to take a photo, hold the button for 2 seconds to take video.
- GPS Mode Switch: Turn on the transmitter. the default state is GPS mode. You can turn off the GPS by sliding the button. Check the icon ”
 “on the LCD screen to confirm GPS on or off.
- Headless Mode Switch: Turn on the transmitter, the default state is Non-headless mode. You can turn on the headless mode by sliding the button. Check the icon
 on the LCD screen to confirm headless mode on or off.
LCD screen Functions

Mode switch
Mode 2: (Left-hand throttle Mode 2 will be default setting)
Mode 1:
- Hold down the "
 " and then turn on the power switch
- Press the "
 " button 3 seconds enter Mode 1
Charging
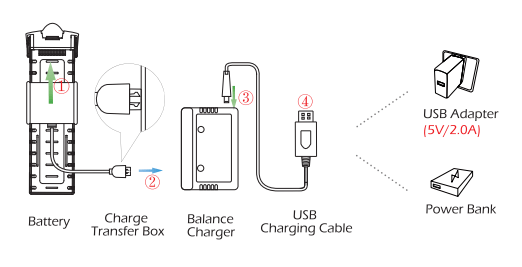
- Connect the Battery, Charge Transfer Box, Balance Charger and USB Charging Cable.
- Connect the USB Charging Cable to Power Bank or a USB Adapter (5V/2.0A for charge.
When the battery is charging, the green light will flash slowly and the red light will be on
When the battery is fully charged, the green light and red light will be on. Before charging, please check the contents of the “ Use of Battery” section of the “ Safety Guidelines” carefully!
Please insert the plug in the correct way. If it is inserted in reverse, the battery will not be able to be charged.
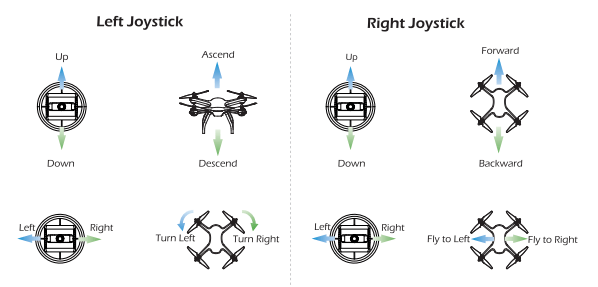
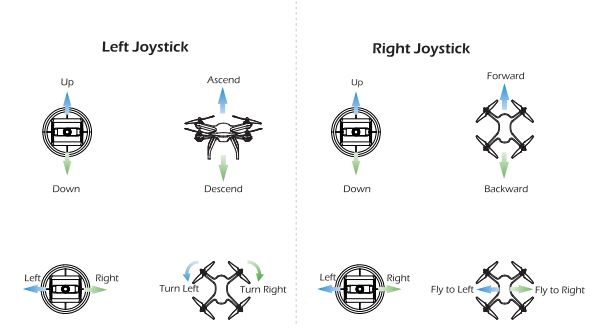
Operation Guide
All of the following operations on this manual under Mode 2
Download App

- Scan the QR code, connect to the App StoreTM or GoogleTM Play and download the "Ophelia GPS" application for free
Transmitter's Battery
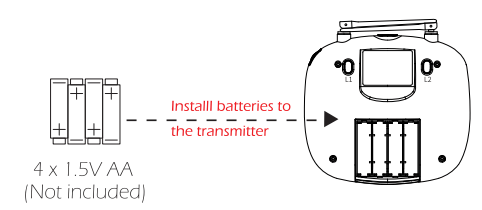
- Always pay close attention to battery polarity when installing the batteries to make sure they are fitted correctly
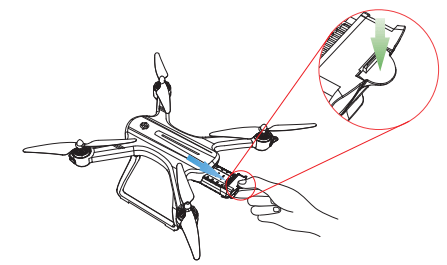
Drone's Battery
Installation
- Push the battery into the battery compartment, the yellow LED lights of the drone will flicker quickly.
- Make sure that you hear a click sound indicating the battery is firmly installed.
Battery Removal:
- Press the buckle on the back of the battery while pulling backwards to remove the battery.
Pairing
- Place the drone on a level surface with the head forward

- Hold the" " button and slide the power switch to tr e right to power on the transmitter
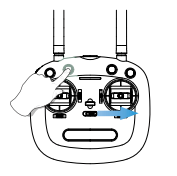
- The “
 ” icon on the transmitter LCD screen is full, the drone has pairing successfully.
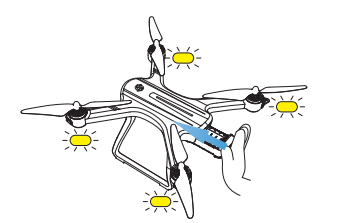
Initialization Detection
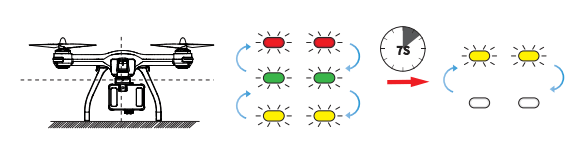
- Place the drone on the level surface and it will enter the “Initialization Detection’. The red, green and yellow LED lights of the drone will flicker alternately for about 7 seconds to complete the initial detection. At this time, the front and back yellow LED lights of the drone will flicker alternately. (If the transmitter is not turned on in time after the drone is turned on. the indicator light will turn yellow and flicker alternately.)
Calibrating the Gyro

- Push both of the joysticks down to the bottom left. the green LED light will flash. Once the front and back yellow LED lights of the drone flicker alternately. it means the calibration is completed.
Calibrating the Compass
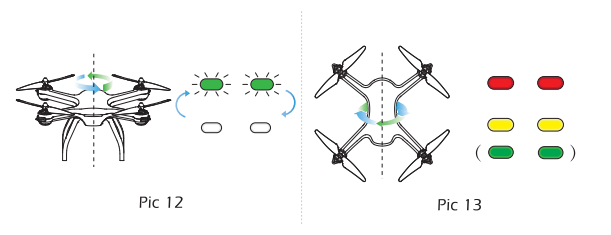
- Hold the drone horizontally and rotate the drone for about 3 circles. And the
 lights of the drone will flicker alternately. (Pic 12)
- Hold the drone vertically and rotate the drone for about 3 circles. The front
 lights and the rear
  light will turn to solid (Pic 13) (At this point. if the GPS receives a signal from 7 or more satellites, the indicator light of the drone will change to the front and in the rear.)
Using the Application
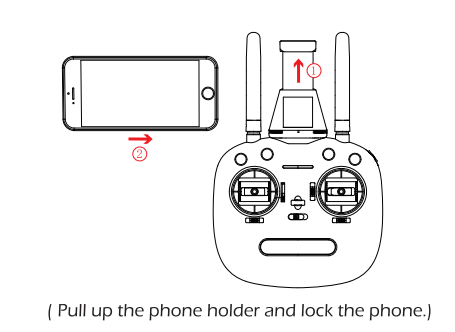
( Pull up the phone holder and lock the phone.)
Connect your smart phone to the Wi-Fi of the Drone and check the drone’s status on the “Ophelia GPS” App.
- On your smartphone. launch a search of the available Wi-Fi networks:
- Select the Wi-Fi network: HolyStoneFPV_*****
- Wait for your smartphone connect to the Wi-Fi network of the drone. This connection is generally represented by the Wi-Fi logo appearing on your smartphone’s screen
- Enter the Ophelia GPS application > The connection between your smartphone and the Drone is estab lished automatically.
Unlock
Unlock the drone:
After the Compass calibration is completed. unlock the drone to fly
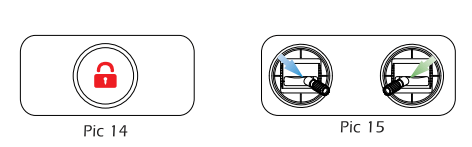
- Method 1: Press the Unlock button (Pic 14). The motors rotate and the drone is unlocked
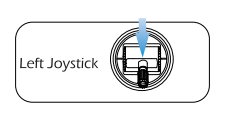
- Method 2: Push the left stick to lower right comer and the right stick to the lower left corner at the same time (Pic 15) to unlock the drone.
Tips: After unlocking the drone. the motor will automatically stop rotating if drone isn’t flown within 10 seconds.
Lock the drone:
- After the drone lands on the ground, pull down the throttle stick to the bottom position and hold for 3 seconds, the motor will stop immediately. The drone is now locked.
One Key Takeoff/ Landing
- After drone is unlocked, press the One Key Takeoff/ Landing button, the drone will automatically takeoff and hover at about 7~11 feet altitude.
- When the drone is flying, press the One Key Takeoff/ Landing button again, the drone will automatically land on the ground
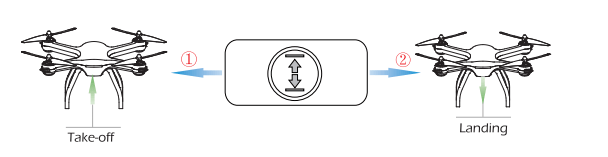
Tips: Before flying, make sure the GPS mode is turn on in case the drone is lost!
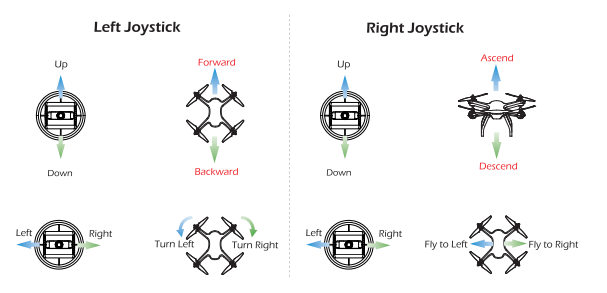
Flight Control
- Control the flight by using joysticks
FUNCTIONS DETAILS
Transmitter Calibration
- Transmitter calibration has been completed by default. It is not necessary to calibrate the joystick unless pilot has felt abnormal stick travel.
- Please do not power on your drone when calibrating the joystick for the transmitter.
1. Simultaneously hold the " slide the power switch to the right 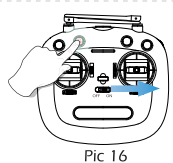
2. Press" " for 3 seconds. the transmitter send out 3 beeps. (Pic 17)
3. In a full circle, rotate both of left and right joysticks to any direction for 2 circles. (Pic 18) 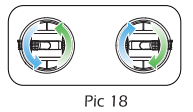 . Press for 3 seconds. the transmitter will beep 3 times. Transmitter calibration is now com pleted. (Pic 19)
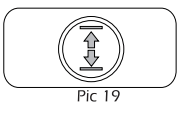
Headless Mode
- Slide the Headless Mode button, when the "
 " icon appears on the LCD screen, it means to enter the Headless Mode
- Slide the Headless Mode button again, when the " " icon on the LCD screen disappears, it means to exit the Headless Mode.
(Each time the transmitter is turned on. the Headless Mode is turned off by default.)
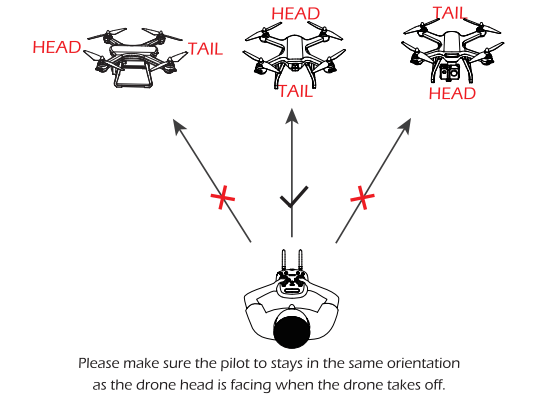
- Under Headless Mode, the forward direction is the direction that the head of drone faces when the drone takes off.
- In order to make sure the pilot can tell drone’s direction, we recommend that pilots to stay in the same orientation as the drone head faces when the drone is taking off.
- If so, when the pilot pushes the direction joystick forward/ backward, the drone will fly forward/ backward toward him/ her. If the pilot move the right stick left/ right. the drone will move left/ right relative to the pilot.
Return to Home(RTH)
- The Return to Home function brings the drone back to the last recorded Home Point.
- The Home Point is the location at which the drone takes off or during flight, the GPS receives a signal from 7 or more satellites for the first time, the current position of the drone will be recorded as the Home Point.
Smart RTH
- IF the GPS signal is available ( 7 or more satellites reception is recorded previously, press the drone will fly back to the Home Point.
- Exit the RTH mode by pressing the button again or push the Throttle Joystick
Failsafe RTH
- If the GPS signal is available (At least 7 satellites) and the home point is recorded previously. Failsafe Return will be triggered if the transmitter signal is lost for more than 6 seconds. The drone will automatically start the return procedure and it will fly back to the last recorded Home Point. You can exit “Failsafe RTH” mode by press the “Return to Home” button or push the Throttle Joystick if the transmitter signal is recovered
- During the Failsafe Return procedure. the drone can not avoid obstacles.
- The drone cannot Return-to-Home if the GPS signal is weak (satellites number is less than 7).
- If there is no GPS signal and transmitter signal lost for more than 6 seconds. the drone will not Return-to-Home but descend slowly until lands on the ground and locks the drone.
Low Voltage RTH
- When the drone'’s rear lights flash slowly, the"
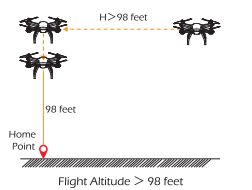
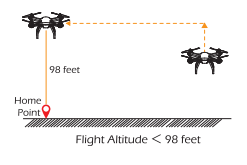
 " symbol is displayed on the screen of the transmitter, the First Low Voltage RTH will be triggered. And the drone will return automatically in the following two conditions: |At this time, the drone can only fly within a safe range of no more than 98 feet in height and no more than 328 feet in distance.)
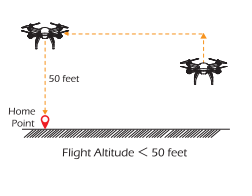
- When the filght altitude is higher: than 98 feet. the drone will fly back er above the Home Point then descend automatically to 98 feet high and exit Home the First Low Voltage RTH.
- When the filght altitude is lower than 98 feet, the drone will elevate auto matically to 98 feet high then fly back above the Home Point and exit the First Low Voltage RTH
- When the drone’s rear lights flash quickly, the "
 " symbol is displayed on the screen of the transmitter. and the transmitter sounds “Di. Di " At this moment. the Second Low Voltage RTH will be triggered
- When the filght altitude is higher than or equal to 50 feet, the drone will keep the current altitude and return above the Home Point then desend vertically.
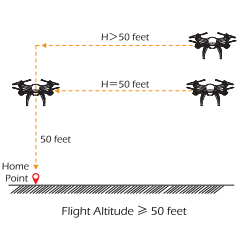
- When the filght altitude is lower than 50 feet, the drone will elevate auto matically to 50 feet high then fly back above the Home Point and desend vertically.
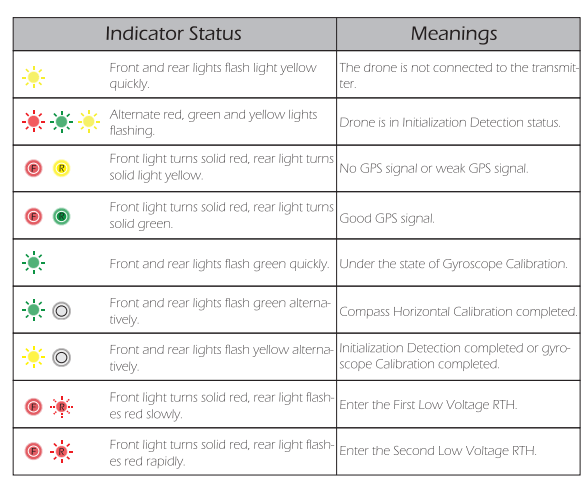
Drone Status Indicator
TROUBLE SHOOTING
1. When the drone is powered on, the indicator light keeps flashing rapidly.
- The drone is in the gyroscope calibration state. Please place the drone on an flat and level surface
2. The drone cannot hover after takeoff and tilts to one side.
- Place the drone on a fiat, level surface and repeat the gyro calibra tion.
3. The drone vibrated in flight.
- Deformed propeller, replace the new propeller.
4. The drone could not be unlocked and the rear light flashed.
- The drone battery voltage is too low. Please fully charge the battery.