SplashDrone 4
User Manual
Visit support.swellpro.com for the latest version of this manual and firmware updates
for your drone and accessories.
v2.3.2 – September 2022

©2023 SwellPro All Rights Reserved 2
Thank You
Thank you for purchasing the SplashDrone 4. We have designed and manufactured the
SplashDrone 4 to the highest quality standards.
Like any marine equipment, long-life and trouble-free operation rely on correct care and
maintenance. With proper care and maintenance, you should enjoy your drone for many
years. After flying in salt or contaminated water, always thoroughly rinse your
SplashDrone 4 in freshwater immediately after use or before salt and sediment can dry
inside moving parts.
It is important to familiarize yourself with the features of this unique drone by carefully
studying this manual and particularly the priority sections indicated in the Table of
Contents.
Visit www.swellpro.com for the latest manuals, software, and tips. Refer to the Version
Information section at the end of this manual, which details additions and corrections
to this manual.
Using this Manual
This document is designed to be printed or viewed on a computer or mobile device. If
used electronically, you can search directly for terms like "Propeller" to find references.
Additionally, you can click on any topic in the Table of Contents to navigate directly to
that topic.
FAQ
The user manual is the best companion while using the product. For the
specific problem using the product, the FAQ can be another great
resource for you to look at. Go to the SwellPro website, look for
support >product support > the product > FAQ to find the FAQ page.
support.swellpro.com
Video Tutorials
Visit and subscribe to the SwellPro YouTube channel for tutorial videos and product
information. Scan this QR code with your camera phone to go to our channel.
©2023 SwellPro All Rights Reserved 3
SwellPro Community
Join our exclusive SwellPro Community to post feedbacks and share your experience
with SwellPro products to other users like you.
https://support.swellpro.com/hc/en-us/community/topics
Social Media
Join our Facebook page to meet other people who share their adventures with
SwellPro. www.facebook.com/SwellPro/
Register Product Warranty
Please register your product to ensure warranty coverage.
www.swellpro.com > support > register your product
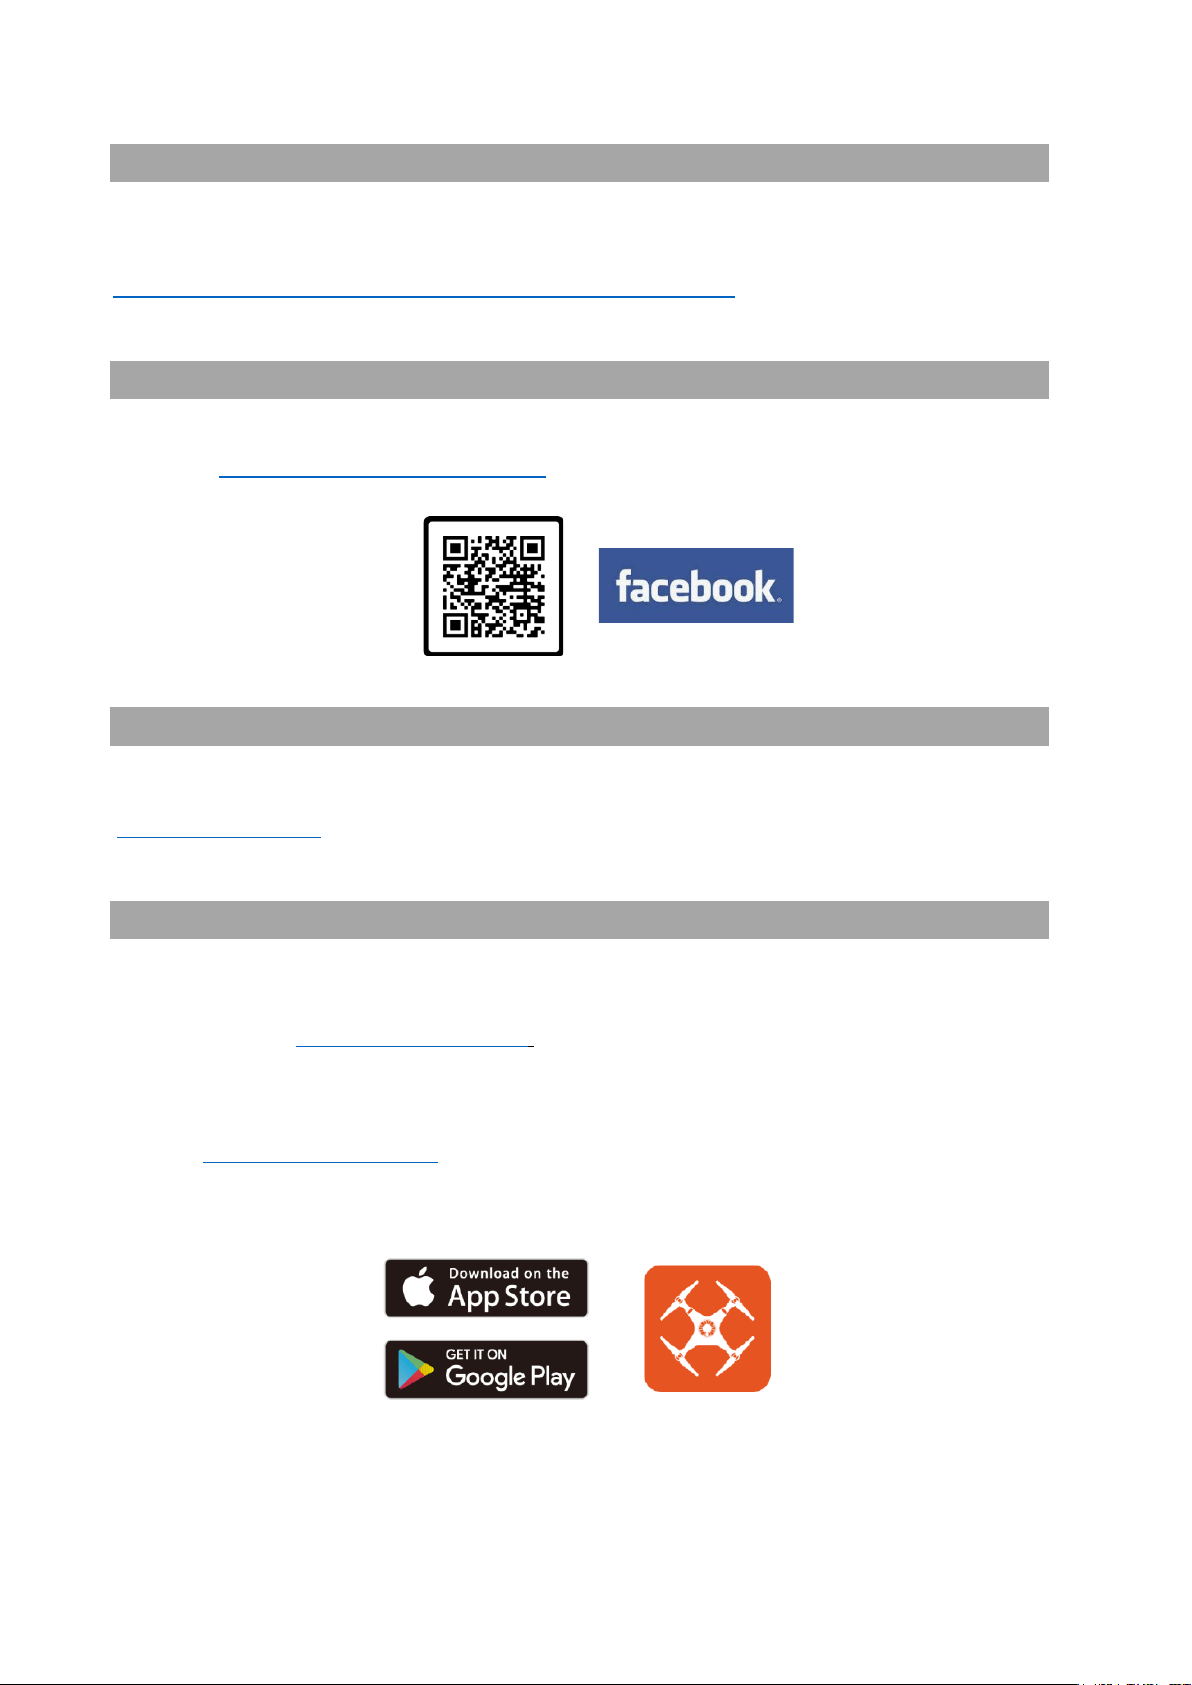
Download the SDFly App
Get the most from your SplashDrone 4 by flying with the SDFly App. It’s available on
both the App Store and Google Play store. You can also download the App on our
support website: support.swellpro.com .
There are 2 SDFly Apps, SDFly App and SDFly 2 App. Please use the SDFly App. ONLY use
SDFly 2 App if you want to use the MP1 Megaphone. To use the SDFly 2 App, you need to
update to a specific set of firmware, please contact us by submitting a request on our support
website: support.swellpro.com, we will guide you through the way and provide you the set of
firmware.

©2023 SwellPro All Rights Reserved 4
Contents
Thank You 2
Using this Manual 2
FAQ 2
Video Tutorials 2
SwellPro Community 3
Social Media 3
Register Product Warranty 3
Download the SDFly App 3
Contents 4
Product Overview 8
Aircraft Diagram 9
Remote Controller Diagram 10
Remote Controller Screen 11
Install the Aircraft 12
Install Propellers 12
Install the Intelligent Battery 13
Install the Camera/Accessories 14
Aircraft 15
Aircraft Status Indicator 15
Intelligent Battery 16
️ Battery Warning 18
Low Battery Warning 19
Aircraft Antenna 20
Antenna Position Error! Bookmark not defined.
Antenna Blind Spot 21
Strobe Light 22
Waterproof Barometric Membrane 22
Remote Controller 24
Using the Remote Controller 24

©2023 SwellPro All Rights Reserved 5
Power ON/OFF 24
Flight Mode Switch 24
Joystick Controls 24
Camera Control 25
Gimbal Control 25
Follow Me 26
Return to Home (RTH) 26
Smooth+ Controls 26
BOAT Button 27
Gimbal Button 27
Payload Button (Left) 28
Payload Button (Right) / Slow Mode 28
Remote Control Antenna 28
Optimal Signal Transmission 28
Patch Antenna 28
Attach Mobile Devices 30
Charging the Remote Controller 30
Pairing the Remote Controller 30
About Pairing 30
Identify SN Number 31
For SN number ending with V01 32
For SN number ending since V02 (V02, V03, V04 ... etc) 33
Remote Controller Rear Ports 34
Flight 35
Flight Safety and Environment 35
Flight Restrictions 36
Pre-Flight Checklist 36
Compass Calibration 37
Gyroscope Calibration 38
IMU Calibration 39
Basic Flight Steps 40
Starting/Stopping Motors (Arming the Drone) 41

©2023 SwellPro All Rights Reserved 6
Water Takeoff and Landing 42
Boat Takeoff and Landing 42
Power Flip 43
Flight Modes 43
Intelligent Follow 46
Smooth+ 47
Dynamic Return to Home (RTH) 47
Low Battery Auto Return to Home 48
Low Battery Auto Payload Release 49
SDFly App 50
Download SDFly 50
Connect SDFly 50
Use Mobile Data 50
Home Screen 51
Main Interface 52
Map Interface 53
Set the Wi-Fi Password 54
Set the Wi-Fi Password 54
Reset the Wi-Fi Password 54
Appendix 56
Specifications 56
Firmware Update 58
Flying Guide 58
Joystick Calibration 59
Warranty Information 60
Battery Care and Maintenance 60
Precautions for low-temperature use 61
Battery Charging 61
Battery Storage and Transportation 61
Battery Disposal 62
Maintenance 62


©2023 SwellPro All Rights Reserved 8
Product Overview
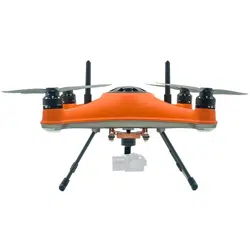
SplashDrone 4 is our 5th and the latest generation of waterproof drones, representing
SwellPro's 7 years of knowledge and understanding of drone waterproofing technology.
SplashDrone 4 is the all-new waterproof flight & float platform designed for
multipurpose operation in any harsh environment. With its modular payload system
design and our variety of payload choices, the SwellPro SD4 can quickly adapt to
different tasks in the field.

©2023 SwellPro All Rights Reserved 9
Aircraft Diagram
[01] Strobe Light
[02] CW (clockwise) Propeller
[03] Waterproof Motor
[04] Rear Arm Light
[05] CCW (Counter-clockwise) Propeller
[06] Landing Gear
[07] Antennas
[08] Battery Status Indicator
[09] Gimbal Camera Port
[10] Payload Release Port
[11] SDK Port
[12] USB Port and Pairing Button
[13] Power Button
[14] Battery Hatch
[15] Battery Hatch Lock
[16] Front Arm Light
[17] Compass Sensor
[18] GPS Cover

©2023 SwellPro All Rights Reserved 10
Remote Controller Diagram
[01] Automatic Landing Gear Toggle (Not
Applicable)
[02] Video Button
[03] Gimbal Pan/Tilt Roller
[04] Left Joystick (Throttle/Yaw)
[05] Follow Me Button
[06] Smooth+ Yaw Switch Button
[07] Smooth+ Yaw Knob
[08] Boat Mode Switch Button
[09] Left Payload Release Button
[10] Display Screen
[11] Charging Indicator
[12] Right Payload Release Button
Slow Mode
1
[13] Gimbal Mode Switch Button
[14] Smooth+ Roll Knob
[15] Smooth+ Roll Switch Button
[16] RTH Return Home Button
[17] Power Button
[18] Right Joystick (Pitch/Roll)
[19] Flight Mode Toggle
[20] Photo Button
[21] Gimbal Pitch Roller
[22] Antennas
[23] Phone/Tablet Mount Adjustment Knob
[24] Phone/Tablet Mount
1
For the SplashDrone 4 came out later in 2022, the Payload (Right) print changes to Slow Mode. Button
function stays the same. Check Remote Controller section for the button function.
©2023 SwellPro All Rights Reserved 11
[25] Serial Port
[26] Charging Port
[27] Pairing Button
[28] Micro USB Port
[29] Ethernet Port
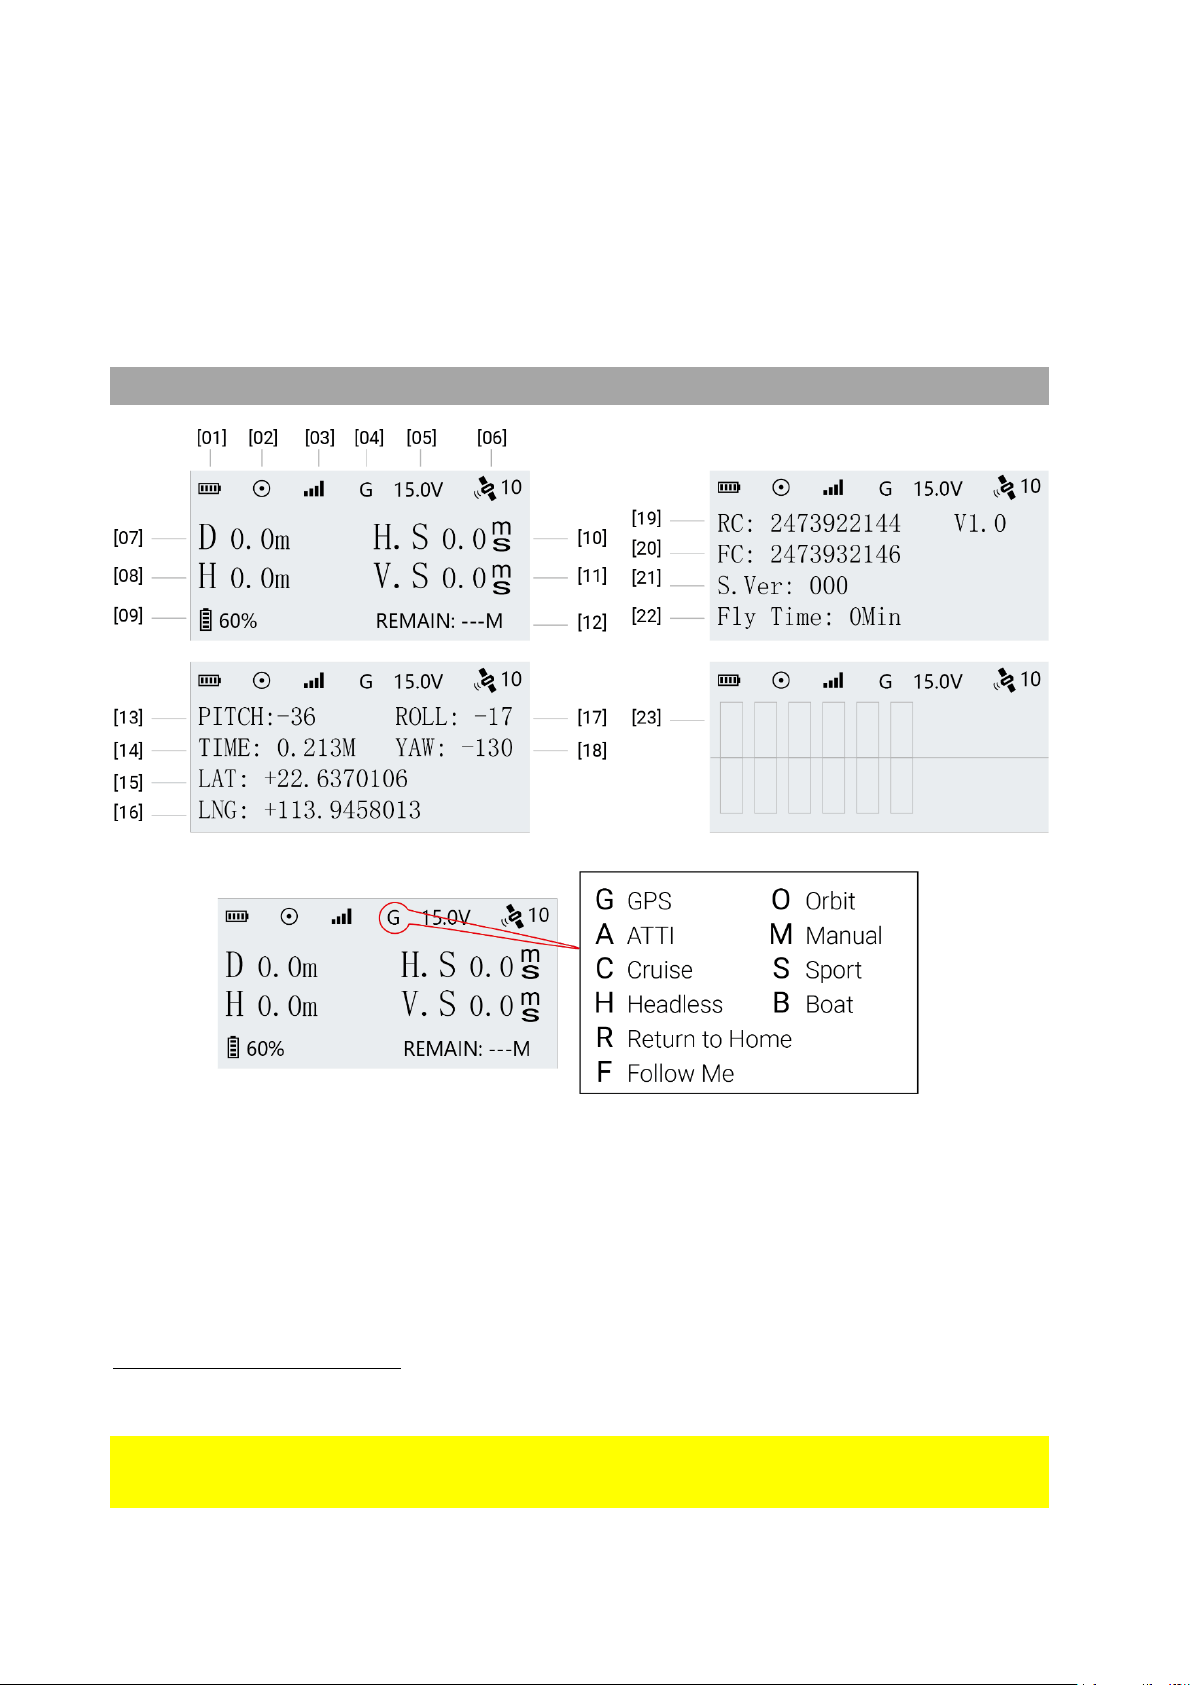
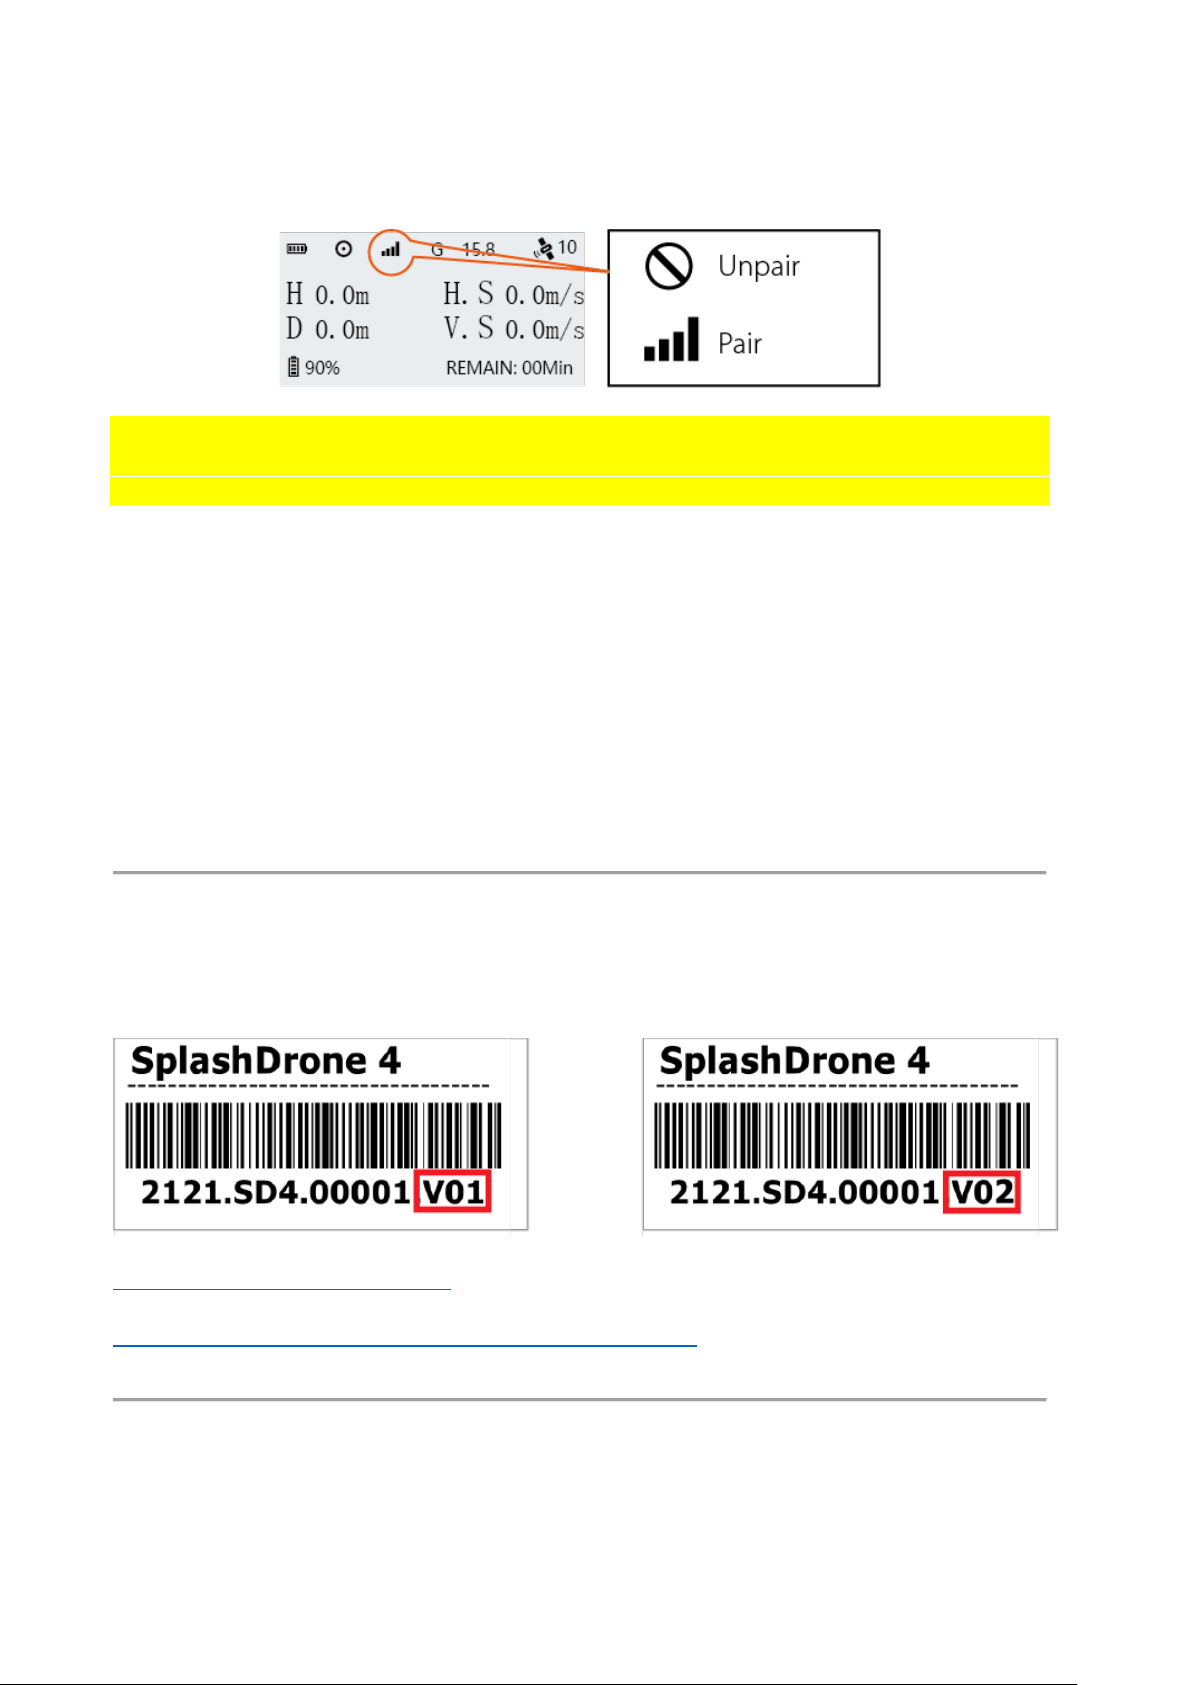
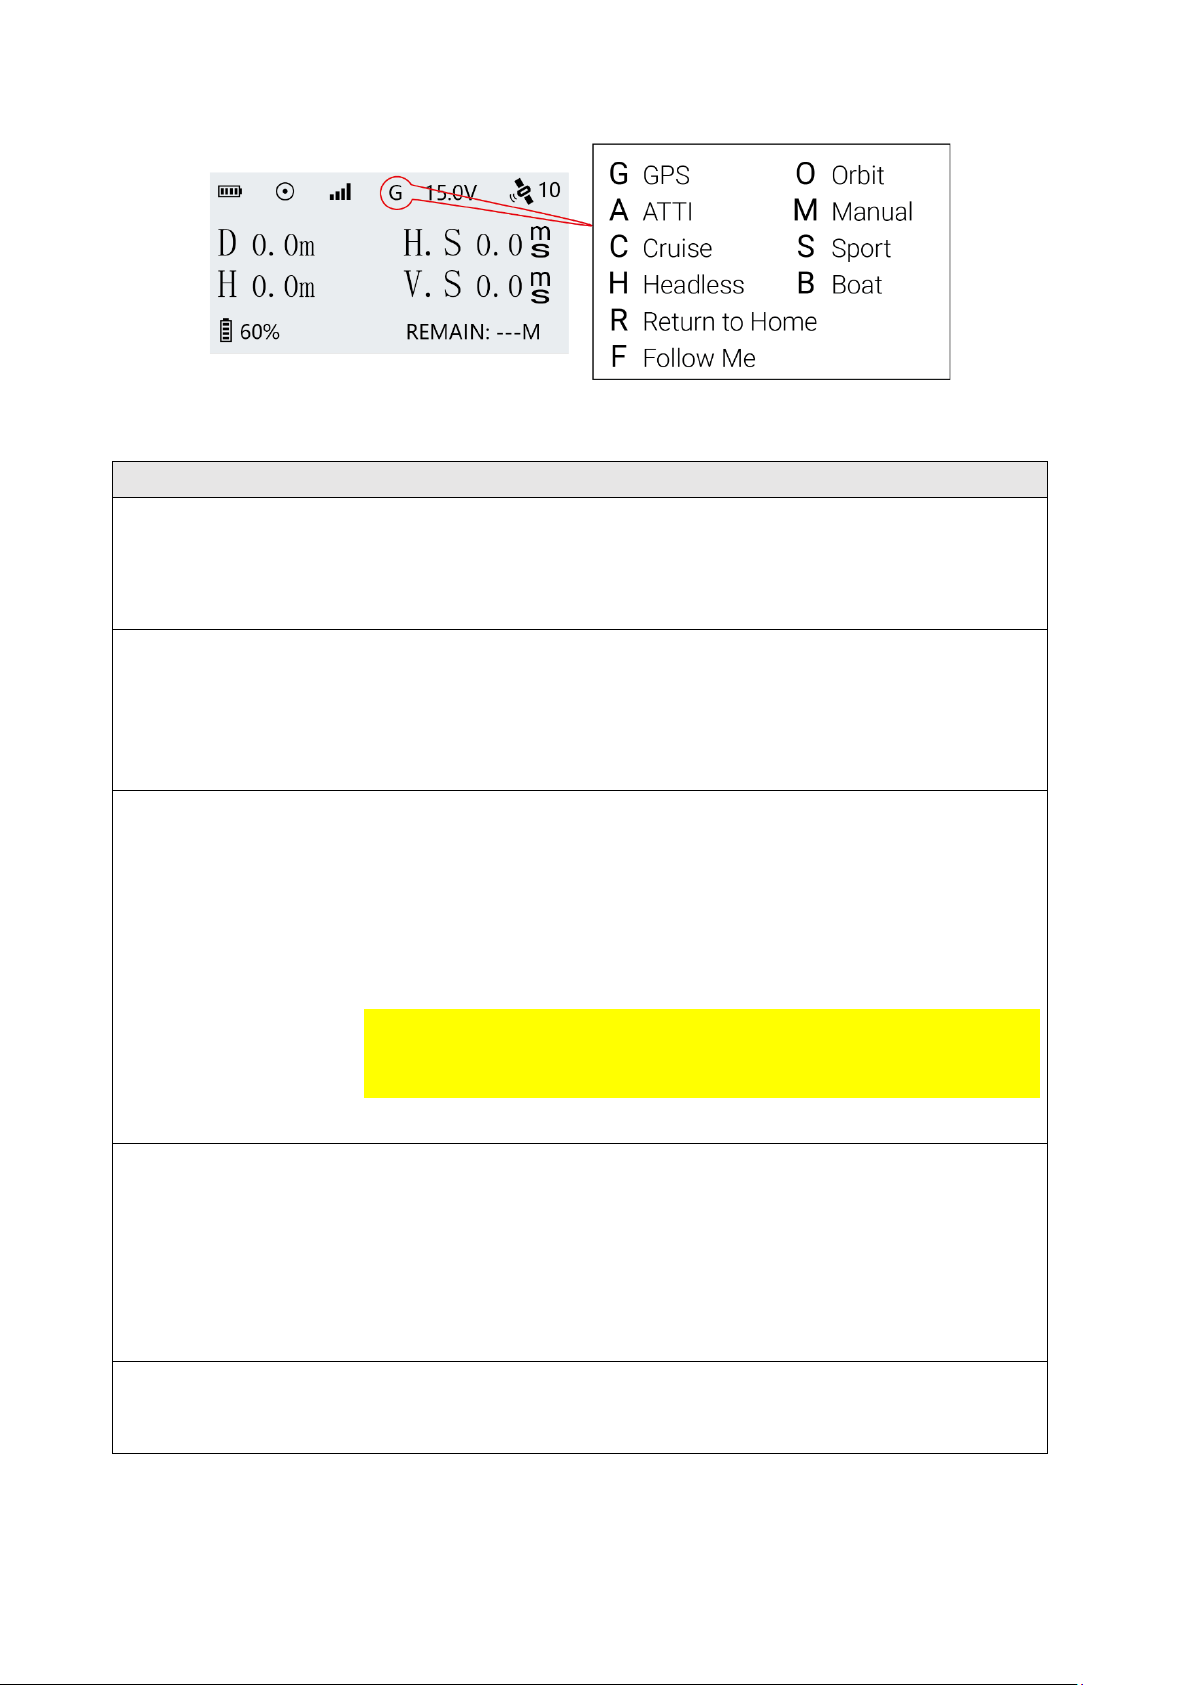
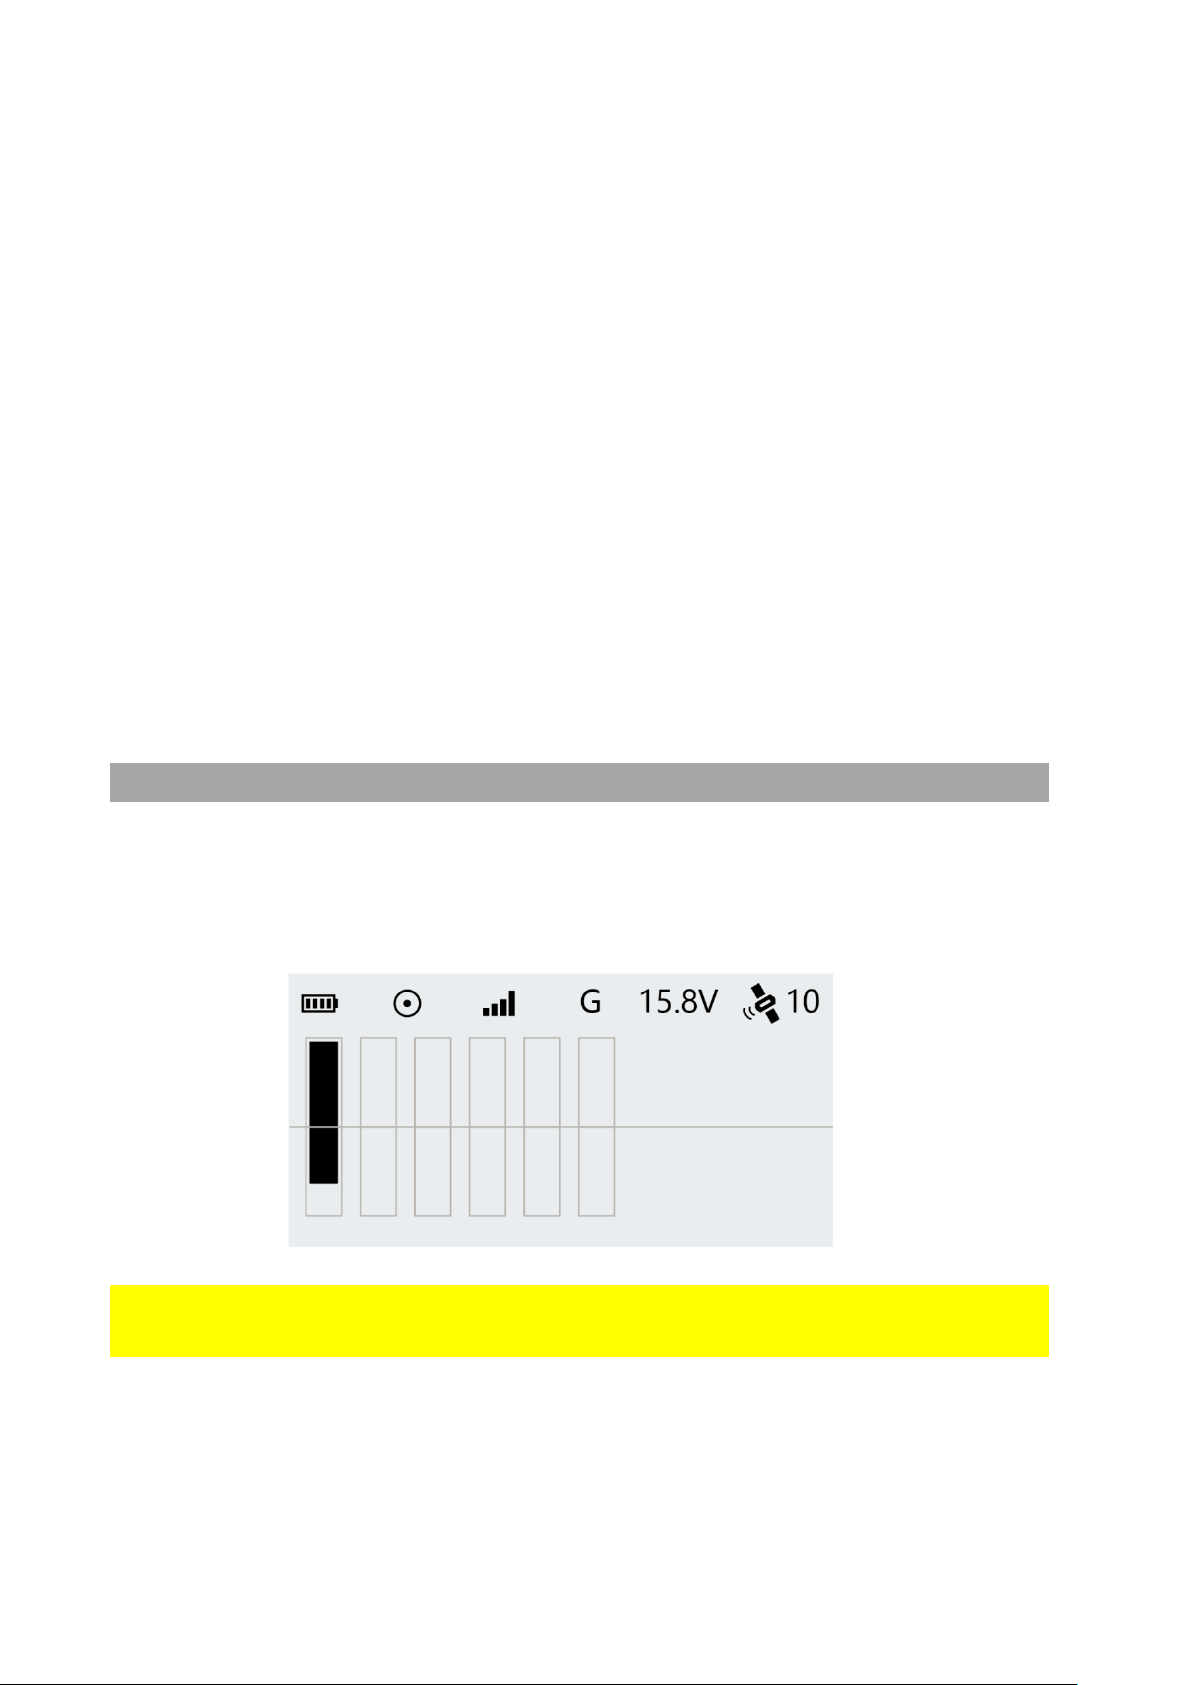
Remote Controller Screen
[01] Remote Controller Battery Level
[02] Remote Controller GPS Status
2
[03] Drone Signal Strength/Pairing Status
[04] Flight Mode
[05] Drone Battery Voltage (V)
[06] Aircraft GPS Location Accuracy
3
[07] Distance
[08] Height
[09] Drone Battery Level
[10] Horizontal Flight Speed
[11] Vertical Flight Speed
[12] Estimated Remaining Flight Time
2
The icon flashing indicates the remote controller does not receive the GPS signal. When it receive the
GPS signal, the icon will stop flashing.
3
Aircraft GPS Location Accuracy ranges from 1-10 with 10 being the highest accuracy.
A rating of 10 indicates a drone location accuracy <1m. 9=1.1 meters; 8=1.2 meters, 7=1.3 meters, 6=1.4
meters, 5=1.5 meters. In GPS mode, it is recommended to take off with at least 5.
©2023 SwellPro All Rights Reserved 12
[13] Pitch Angle
[14] Flight Time
[15] Drone Latitude
[16] Drone Longitude
4
[17] Roll Angle
[18] Yaw Angle
[19] Remote controller Serial Number & Firmware
Version
[20] Flight Controller Serial Number
[21] Flight Controller Firmware Version
[22] Total Flight Time
[23] Joystick and Control Input
Install the Aircraft
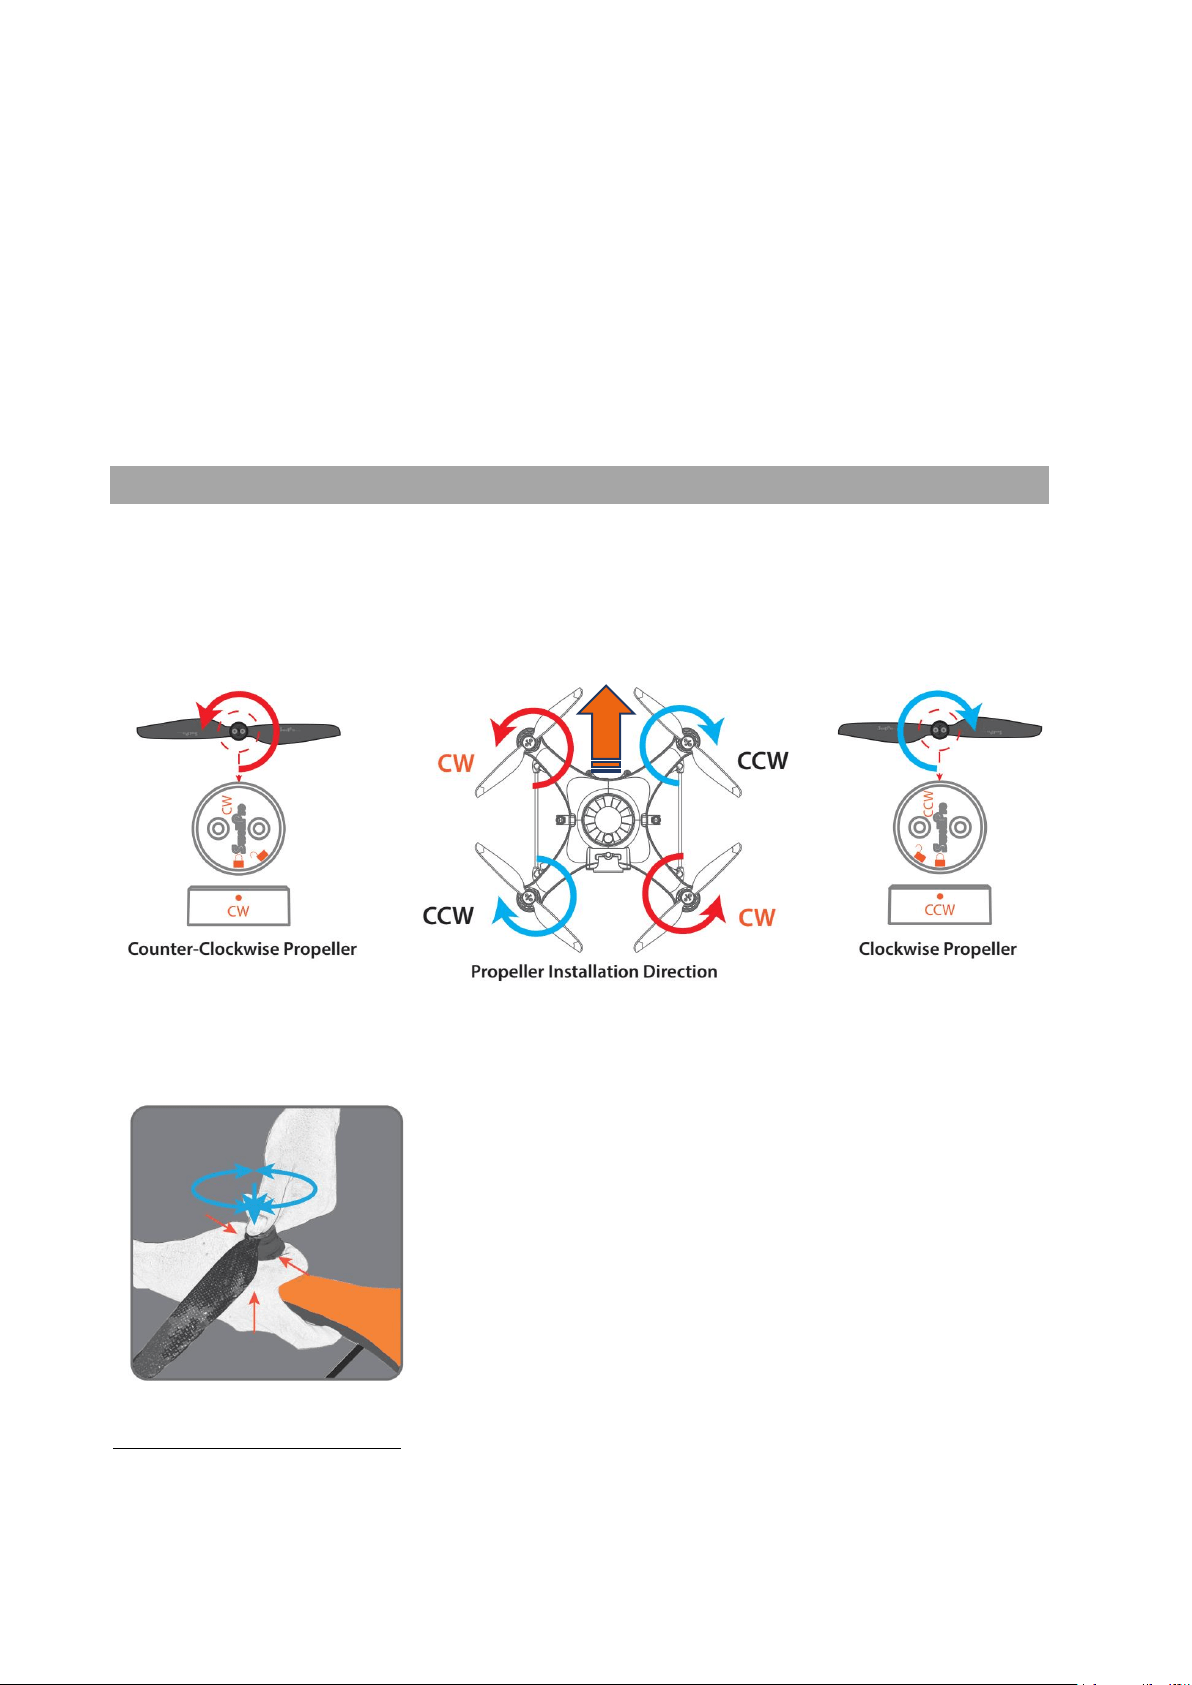
Install Propellers
The SplashDrone 4 has two pairs of propellers - two clockwise propellers and two
counter-clockwise propellers. The hub of each motor shows the type of propeller used
for that motor. Propellers should not be attached to the wrong motors.
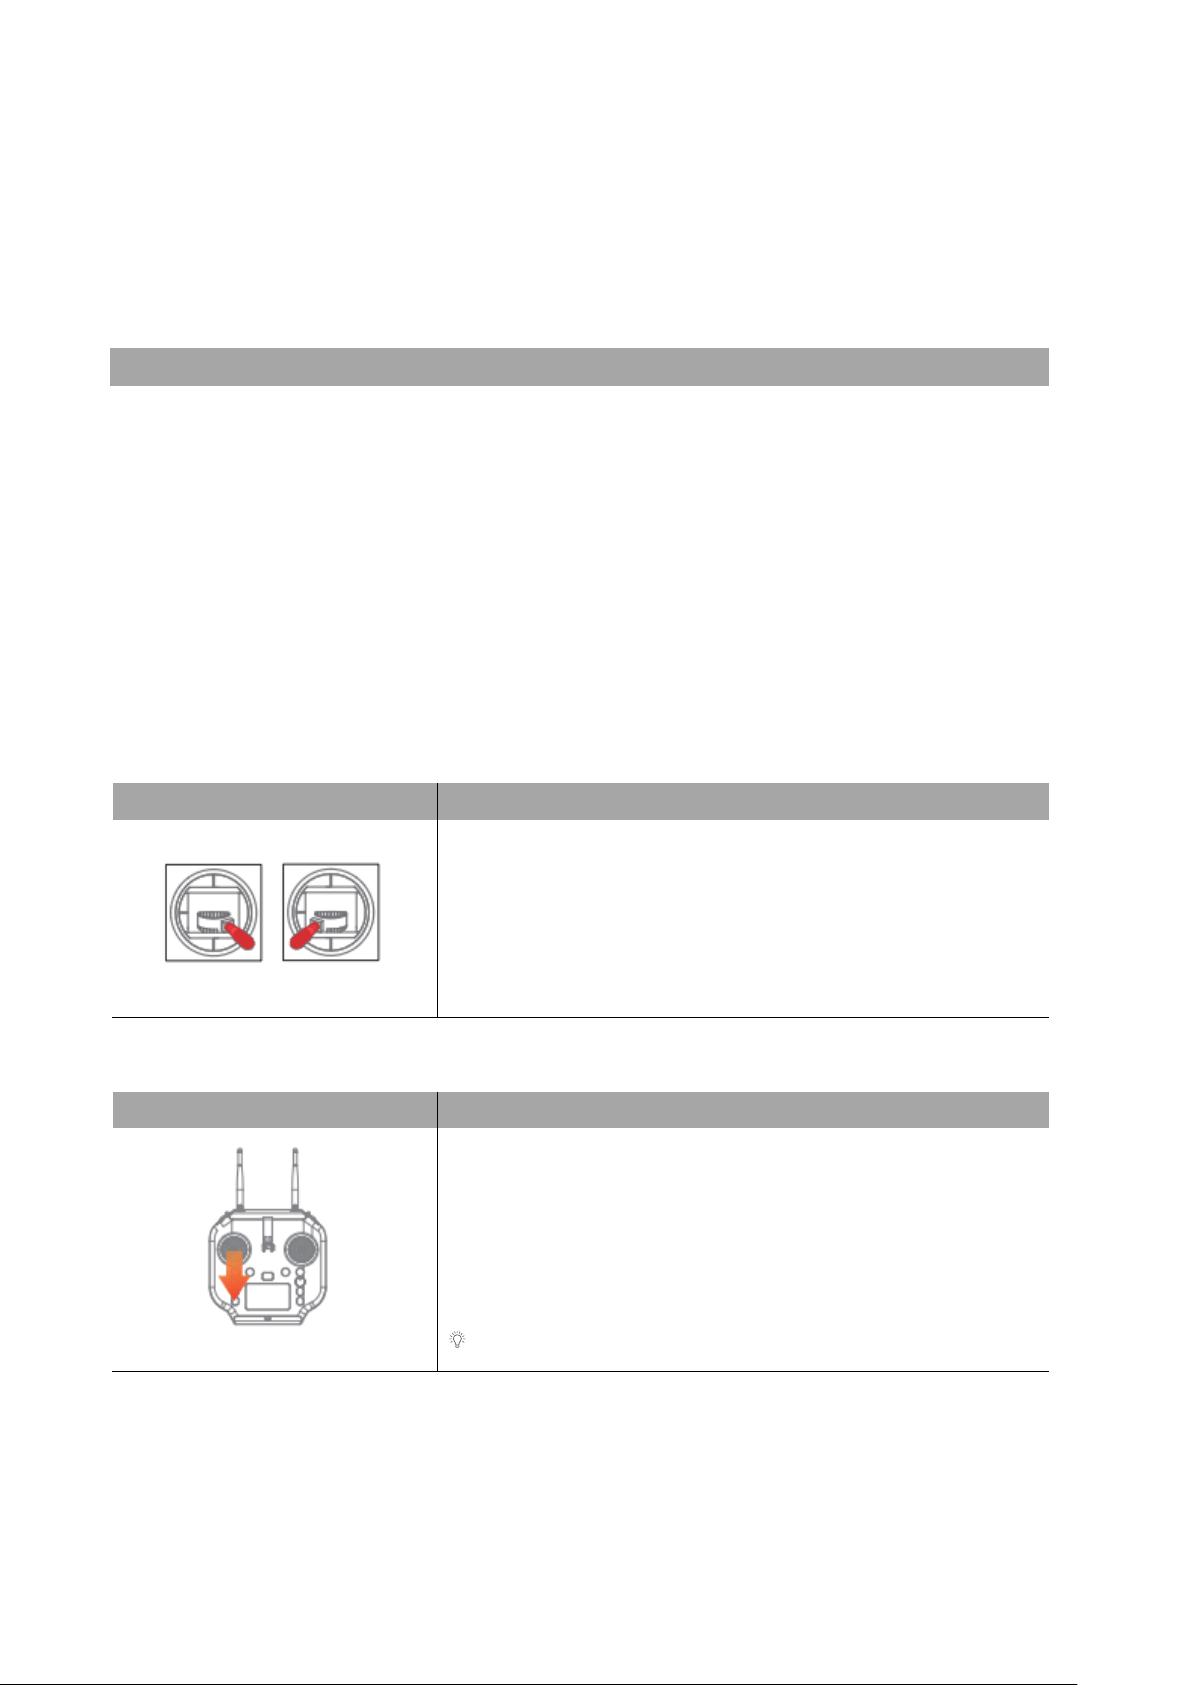
To install or remove propellers:
1. Check the propeller's marking (CW/CCW) to see if it
matches the motor. CCW propellers to CCW motors,
same for CW.
2. Place the propeller on the motor, rotate the propeller in
the hub for 1/8
th
of a turn until it engages.
3. Hold the arm of the aircraft tight with one of you hand.
4. Rotate the propellers in the direction indicated by the
lock signs with your other hand.
5. To remove the propeller, repeat steps 3&4.
4
If the signal to the drone is lost for any reason, the remote controller will display the last known location
of the drone.
©2023 SwellPro All Rights Reserved 13
Always place one hand under the motor to support it when installing or removing
propellers. Failure to provide this support could result in bending or breaking the
landing gear.
The propellers are sharp, please be careful to avoid injury.
Do not use broken propellers. Replace the propeller if there is any damage or wear to
the propeller.
Ensure there is no wabble on the propeller after you install. If you correctly install the
propeller, the propeller still wabbles, you might need to tighten the screws on the
propeller base.
Before each flight, please check that the propellers are smooth all over and are
correctly installed and securely fastened. Spin each propeller by hand to check that
the motors are free of sand or salt and spin freely.
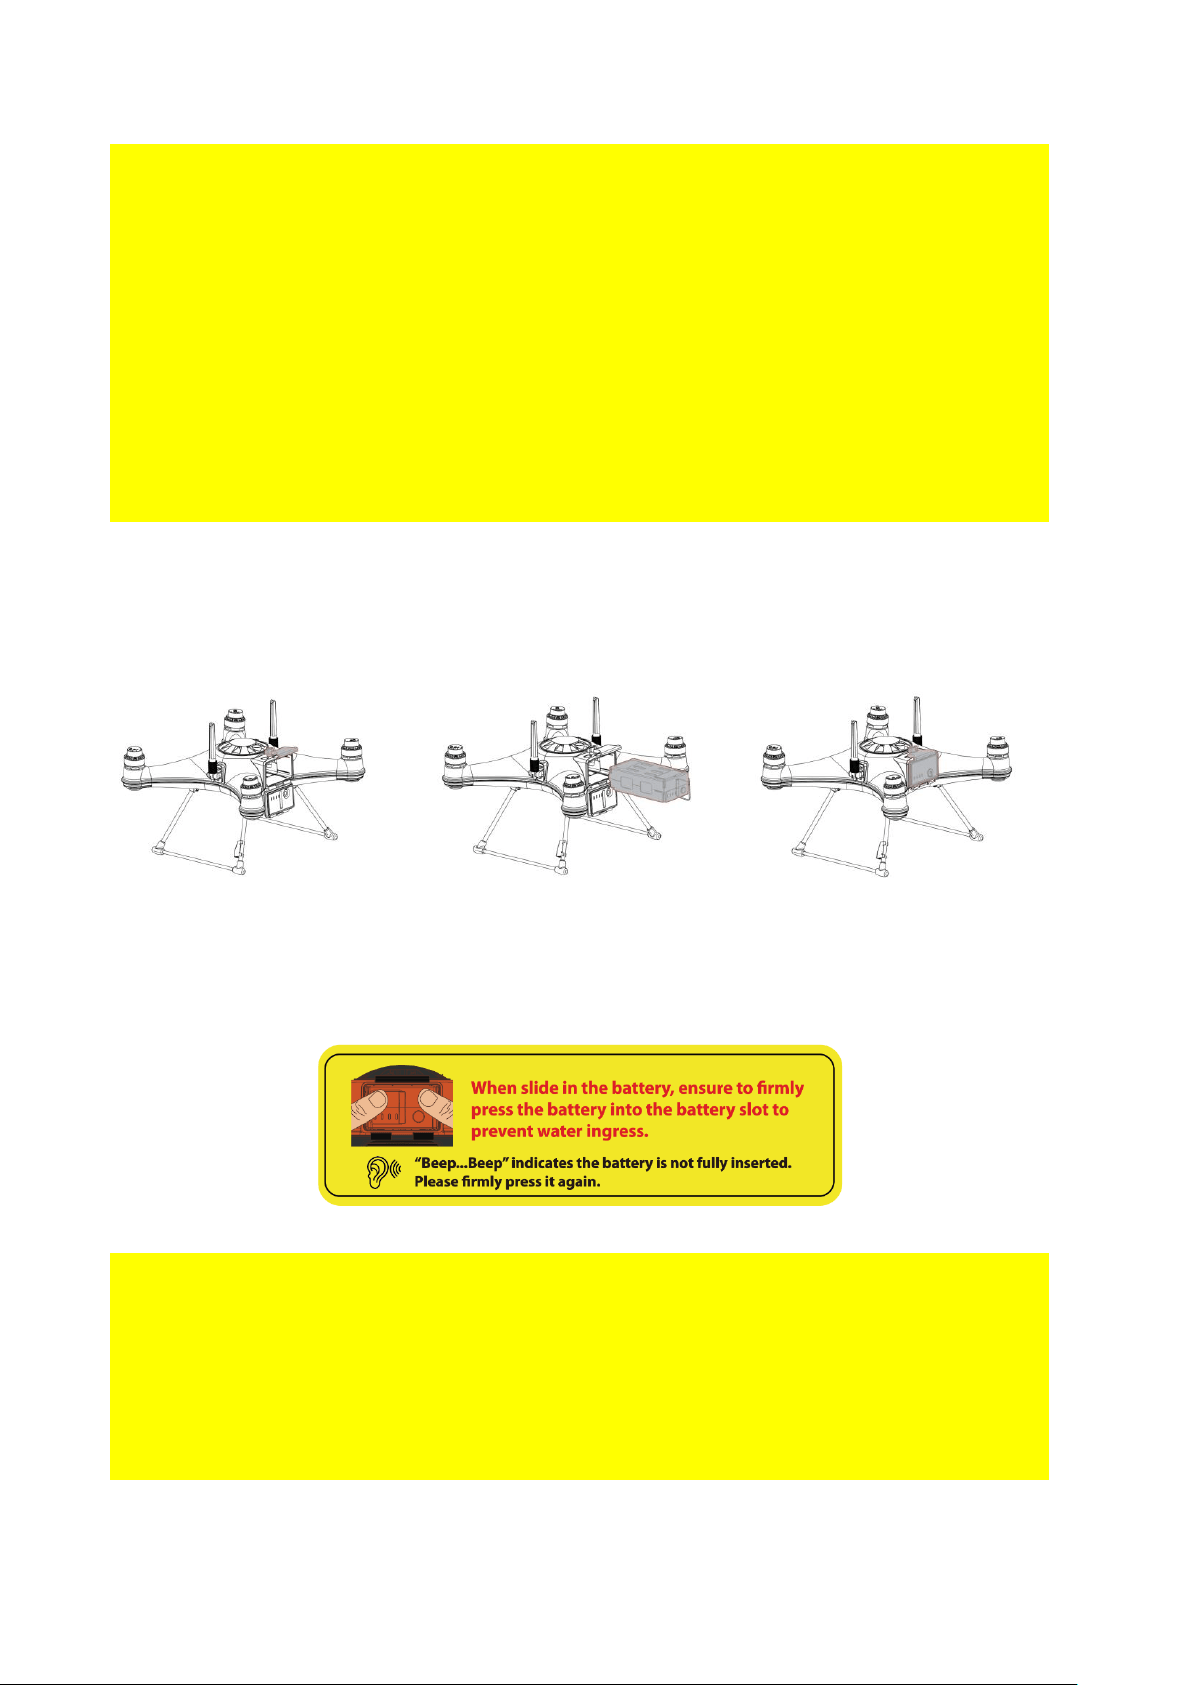
Install the Intelligent Battery
The Intelligent battery is quick and easy to change. Ensure the battery is OFF before
inserting or removing it from the drone.
1. Unlock and open the
waterproof hatch
2. Slide in the fully charged
intelligent battery and
push it firmly into the
battery slot.
3. Close the battery hatch.
Fasten the catch and then
lock the hatch.
⚠ Always check to ensure that the waterproof seal on the hatch door is clean and
lightly lubricated.
⚠The drone is no longer waterproof when the battery hatch is open. Do not allow water
or sand to enter the drone while the battery hatch is open.
⚠The Appendix of this manual contains additional warnings and precautions regarding
the batteries, safety, charging, and maintenance. Please familiarize yourself with all the
information.
©2023 SwellPro All Rights Reserved 14
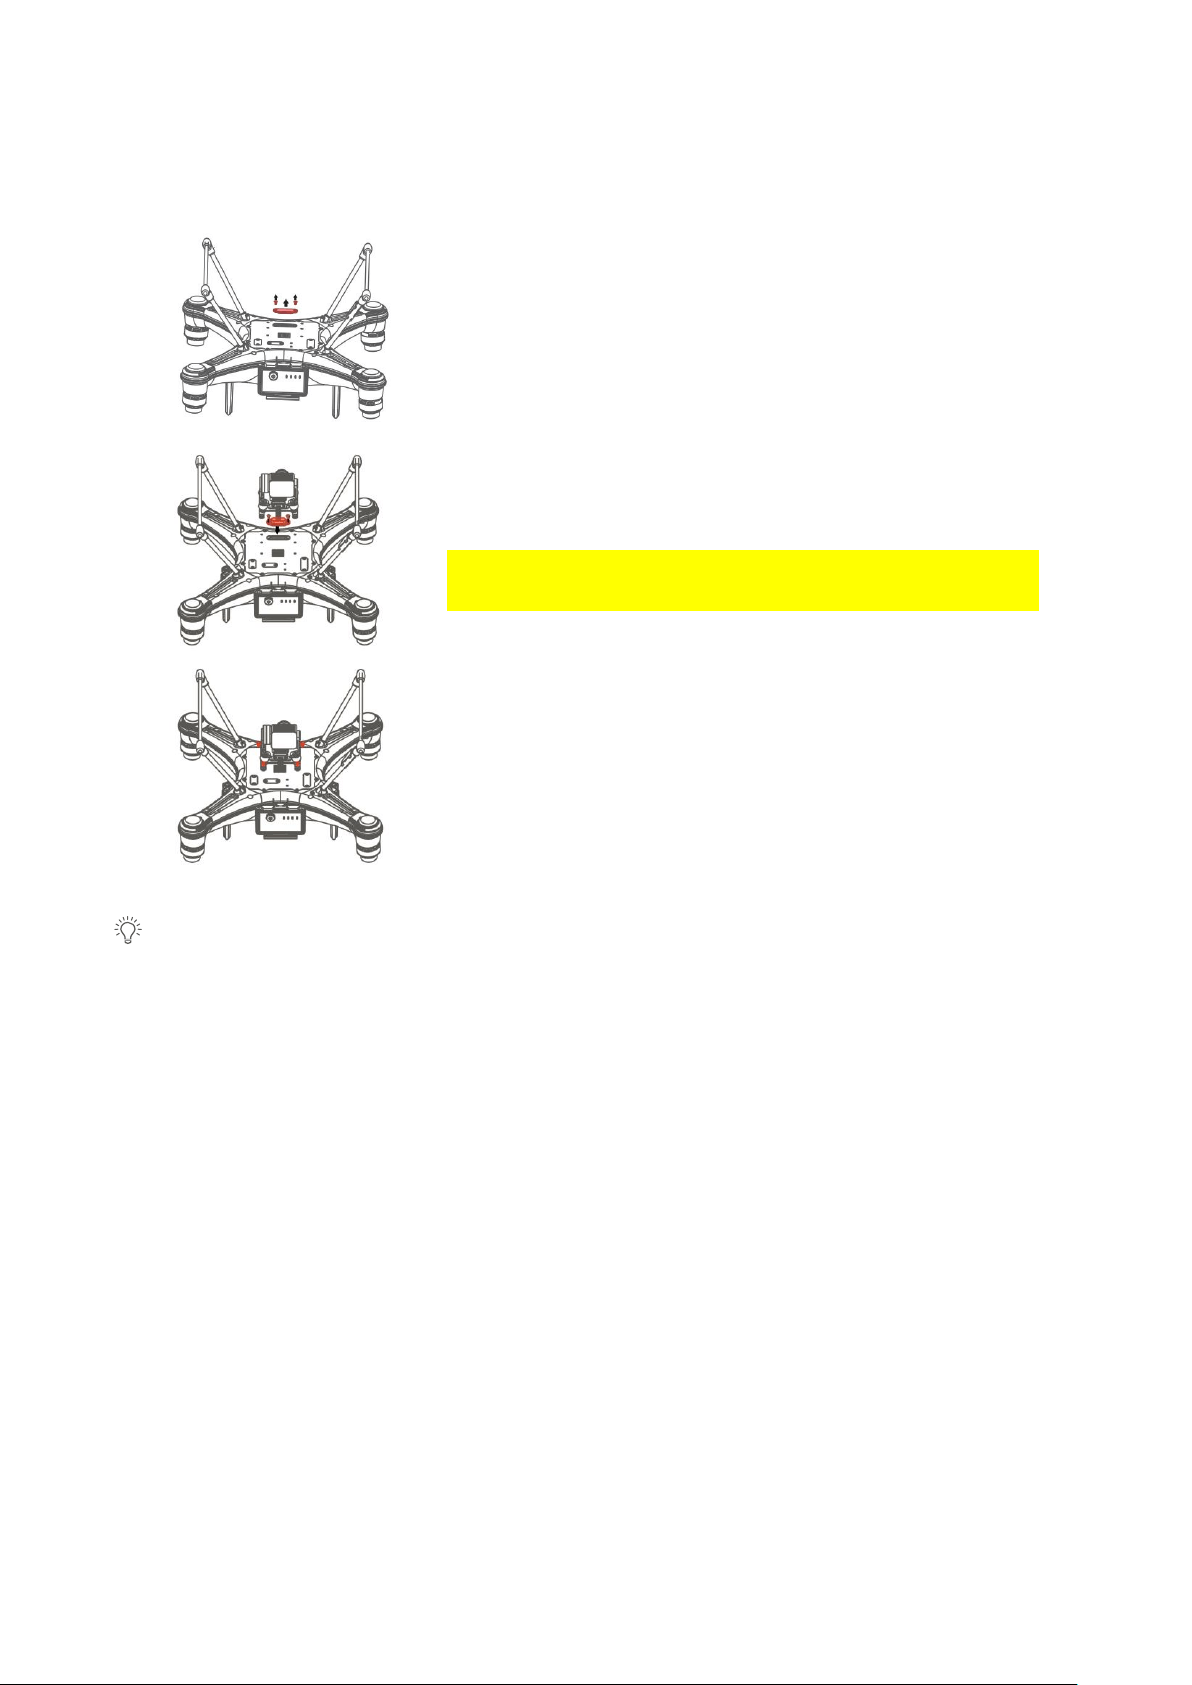
Install the Camera/Accessories
1. Unscrew and take off the gimbal port cover plate
using a hex screwdriver. (Equipped with SplashDrone
4)
2. Plug the gimbal connector into the drone's gimbal
port and screw it in place with a screwdriver.
Make sure the rubber ring is attached to the gimbal
connector before you screw the connector.
3. Align the holes on the base of the gimbal to the
bottom of the drone, screw in to mount the gimbal.
Make sure the camera is pointing to the front of the
drone.
Other accessories can be replaced or installed in the same way.
©2023 SwellPro All Rights Reserved 15
Aircraft
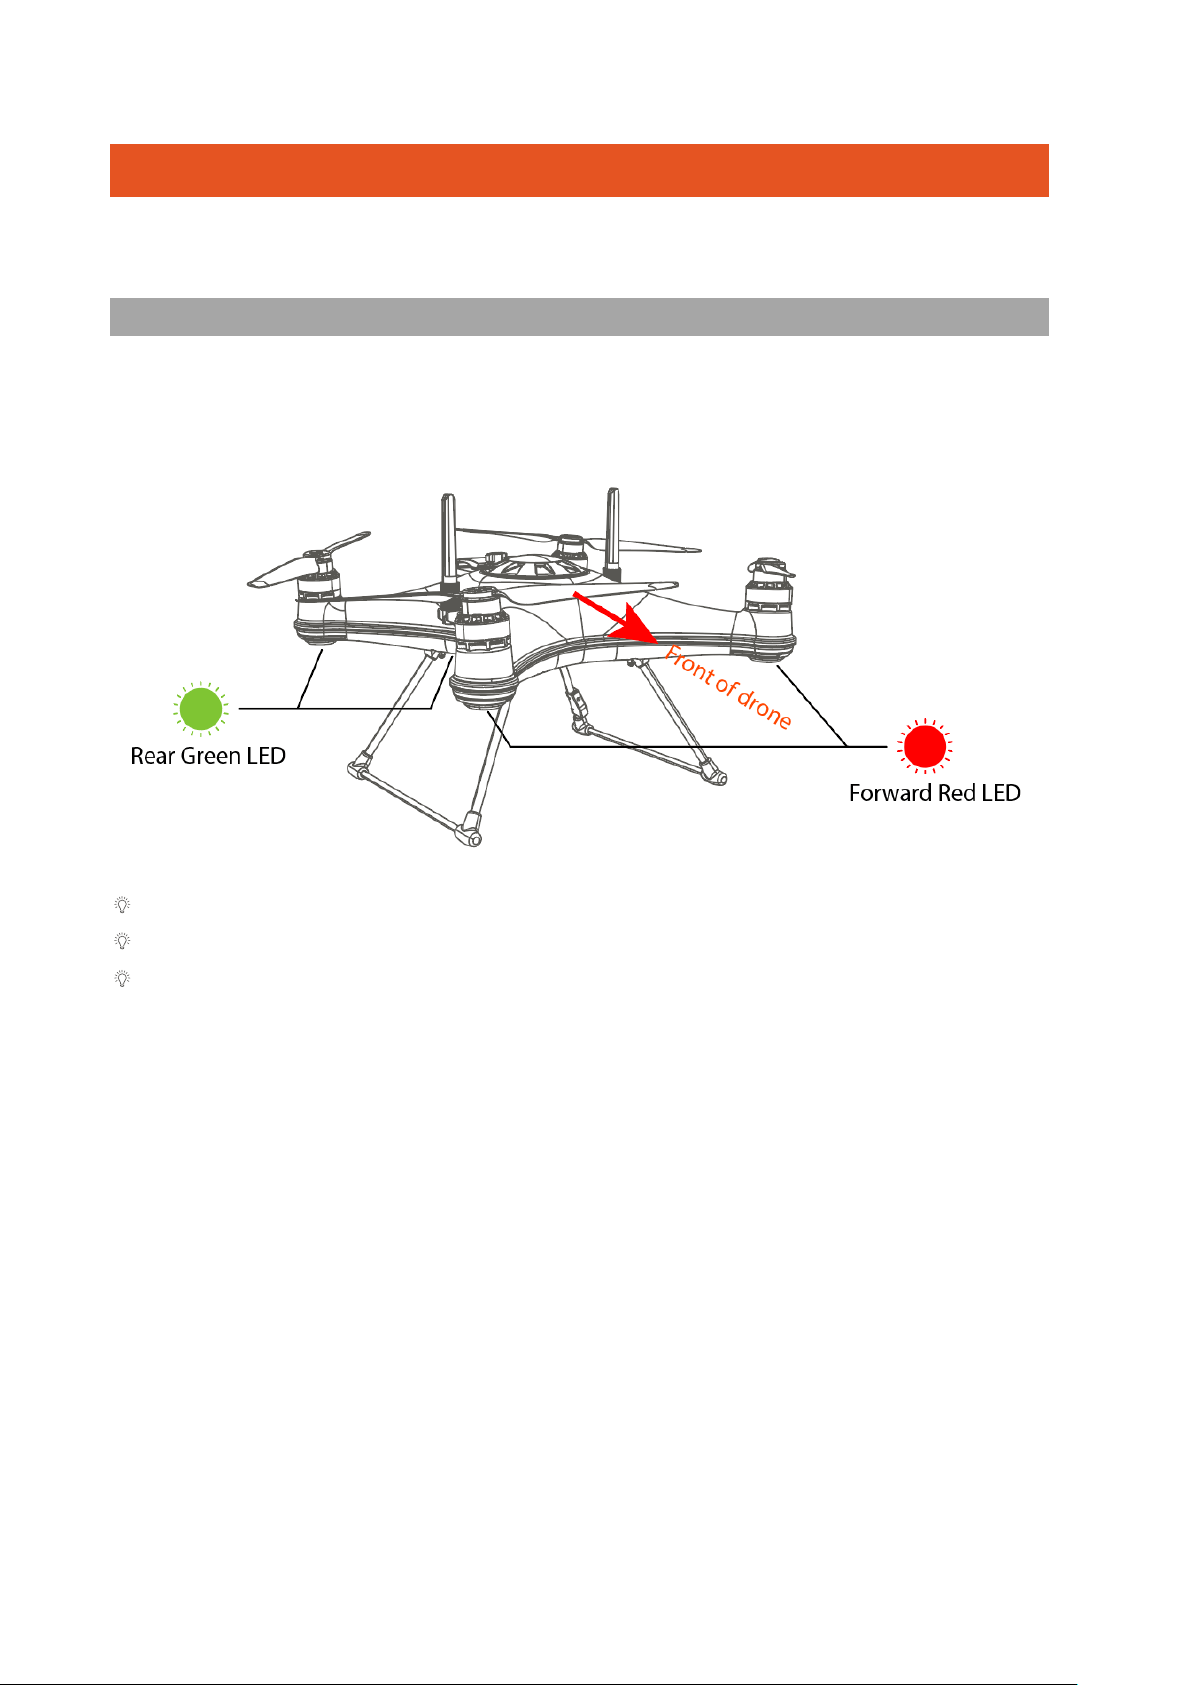
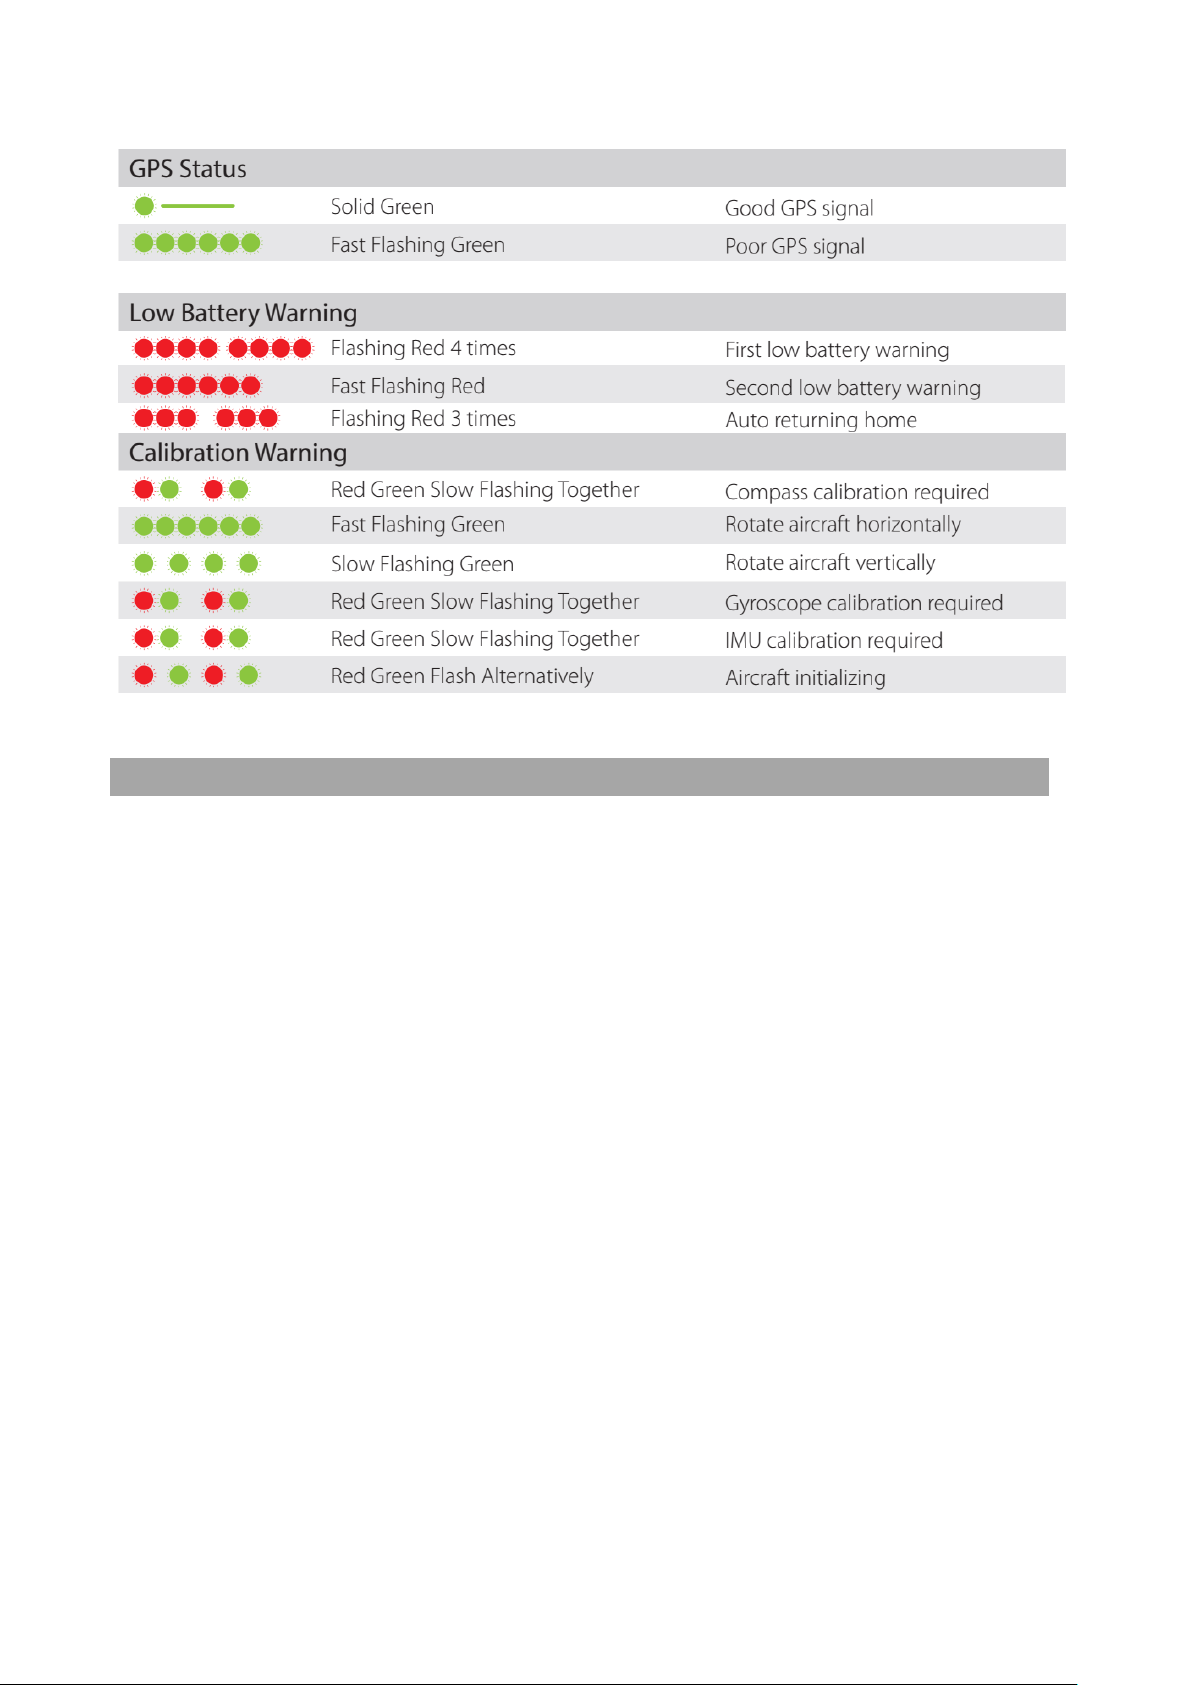
Aircraft Status Indicator
There are two types of aircraft status indicators:
1. Front status indicators (Red).
2. Rear status indicators (Green).
The red status indicators are used to identify the head of the drone.
All aircraft status indicators can be turned on or off on the App setting.
All the status indicator messages are going to prompt on the remote controller
screen.
©2023 SwellPro All Rights Reserved 16
Intelligent Battery
Each slide-in SplashDrone 4 battery has its battery management system, teamed with
high-performance 18650 lithium cells to provide up to 30 minutes of flight time.
The SplashDrone 4 intelligent battery provides:
• Real-time power monitoring and alerting
• Integrated balance charging to ensure battery health, safety, and long life by
constantly monitoring battery health, state-of-charge, and temperature.
• Fast, slide-in battery replacement. Integrated connectors allow for wire-free
installation and replacement.
• Battery charging and usage data logging to allow for better battery management
and event recording.
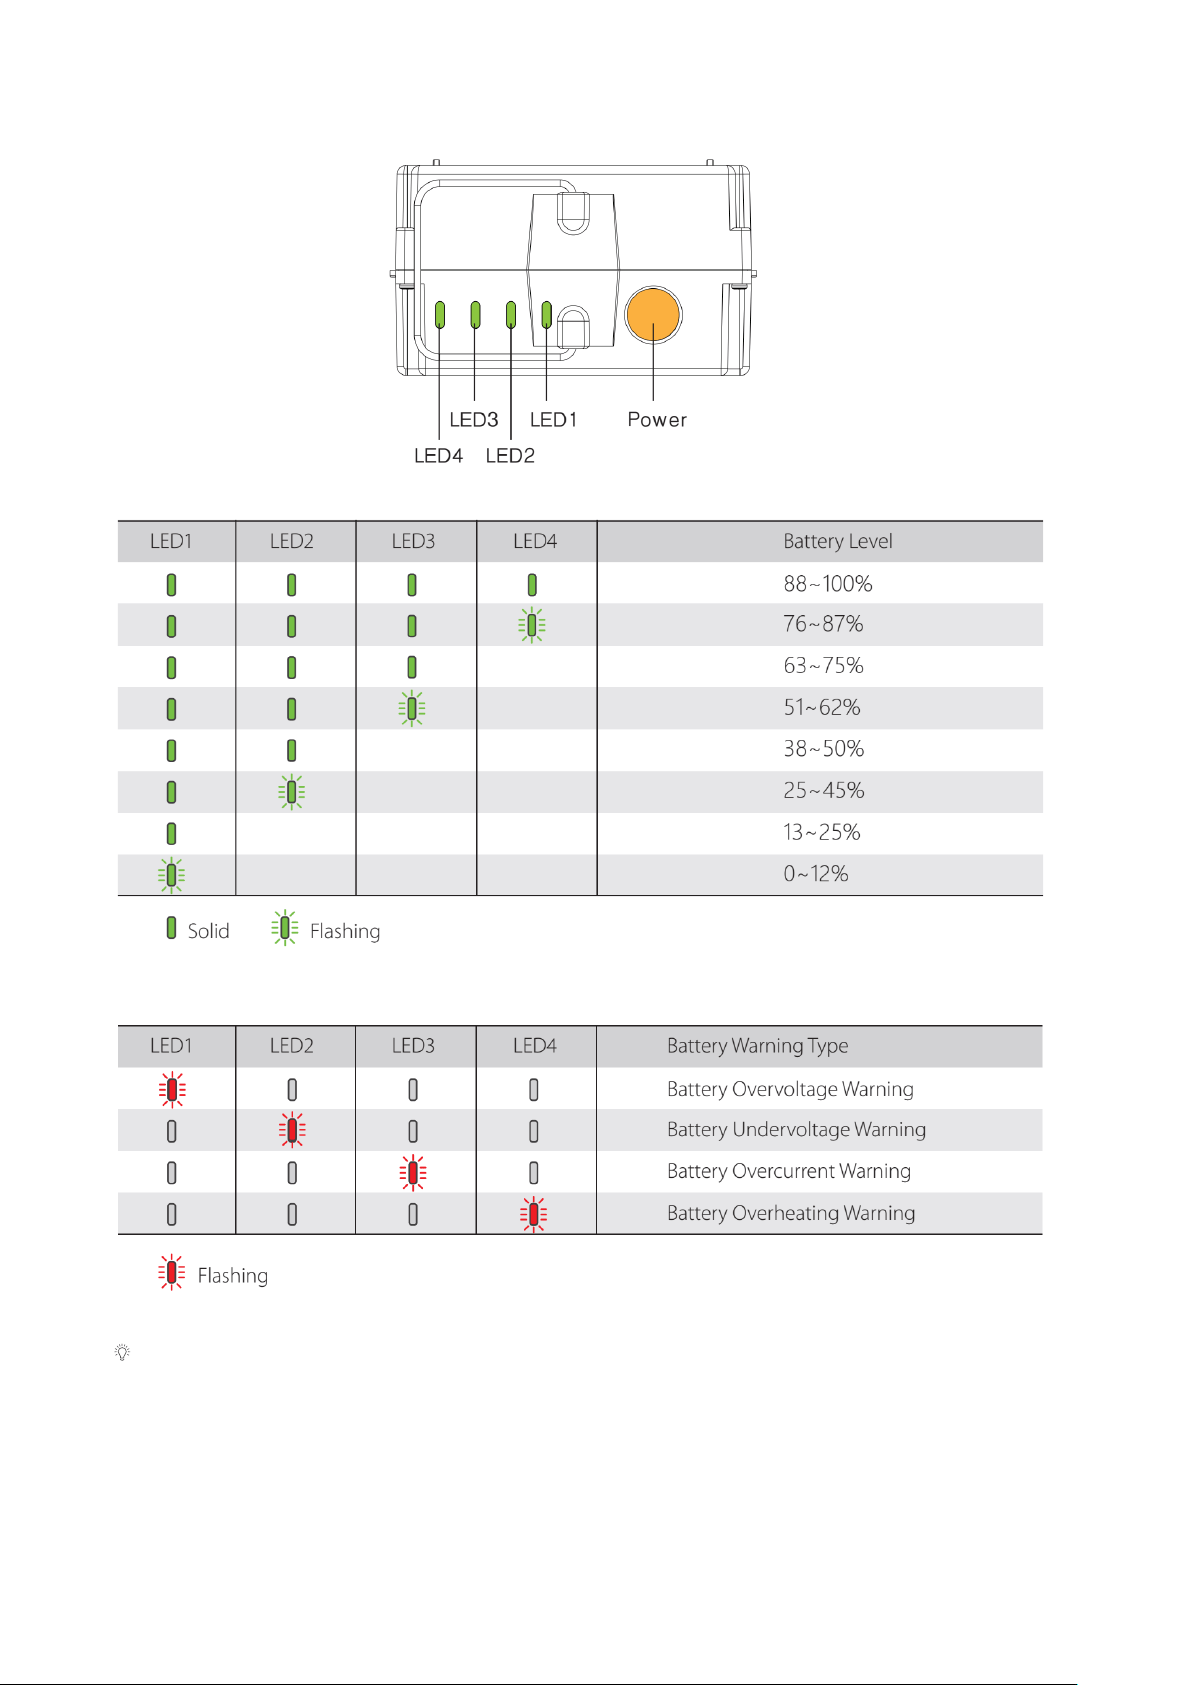
Battery Level
The battery level LEDs on the battery pack allow you to check the state of charge of the
battery quickly and accurately.
With the Battery turned OFF, short press the power button – the battery LEDs will
indicate the state of charge.
©2023 SwellPro All Rights Reserved 17
Battery Warning Signs
The battery LED might turn yellow when it reaches high current (during the flight or
take-off), which it’s normal.
Powering On/Off the Battery
©2023 SwellPro All Rights Reserved 18
Shortly press the power button once (battery will beep once), then long press the power
button for three seconds, battery will beep twice to indicate the battery is turned on.
Same for powering off the battery.
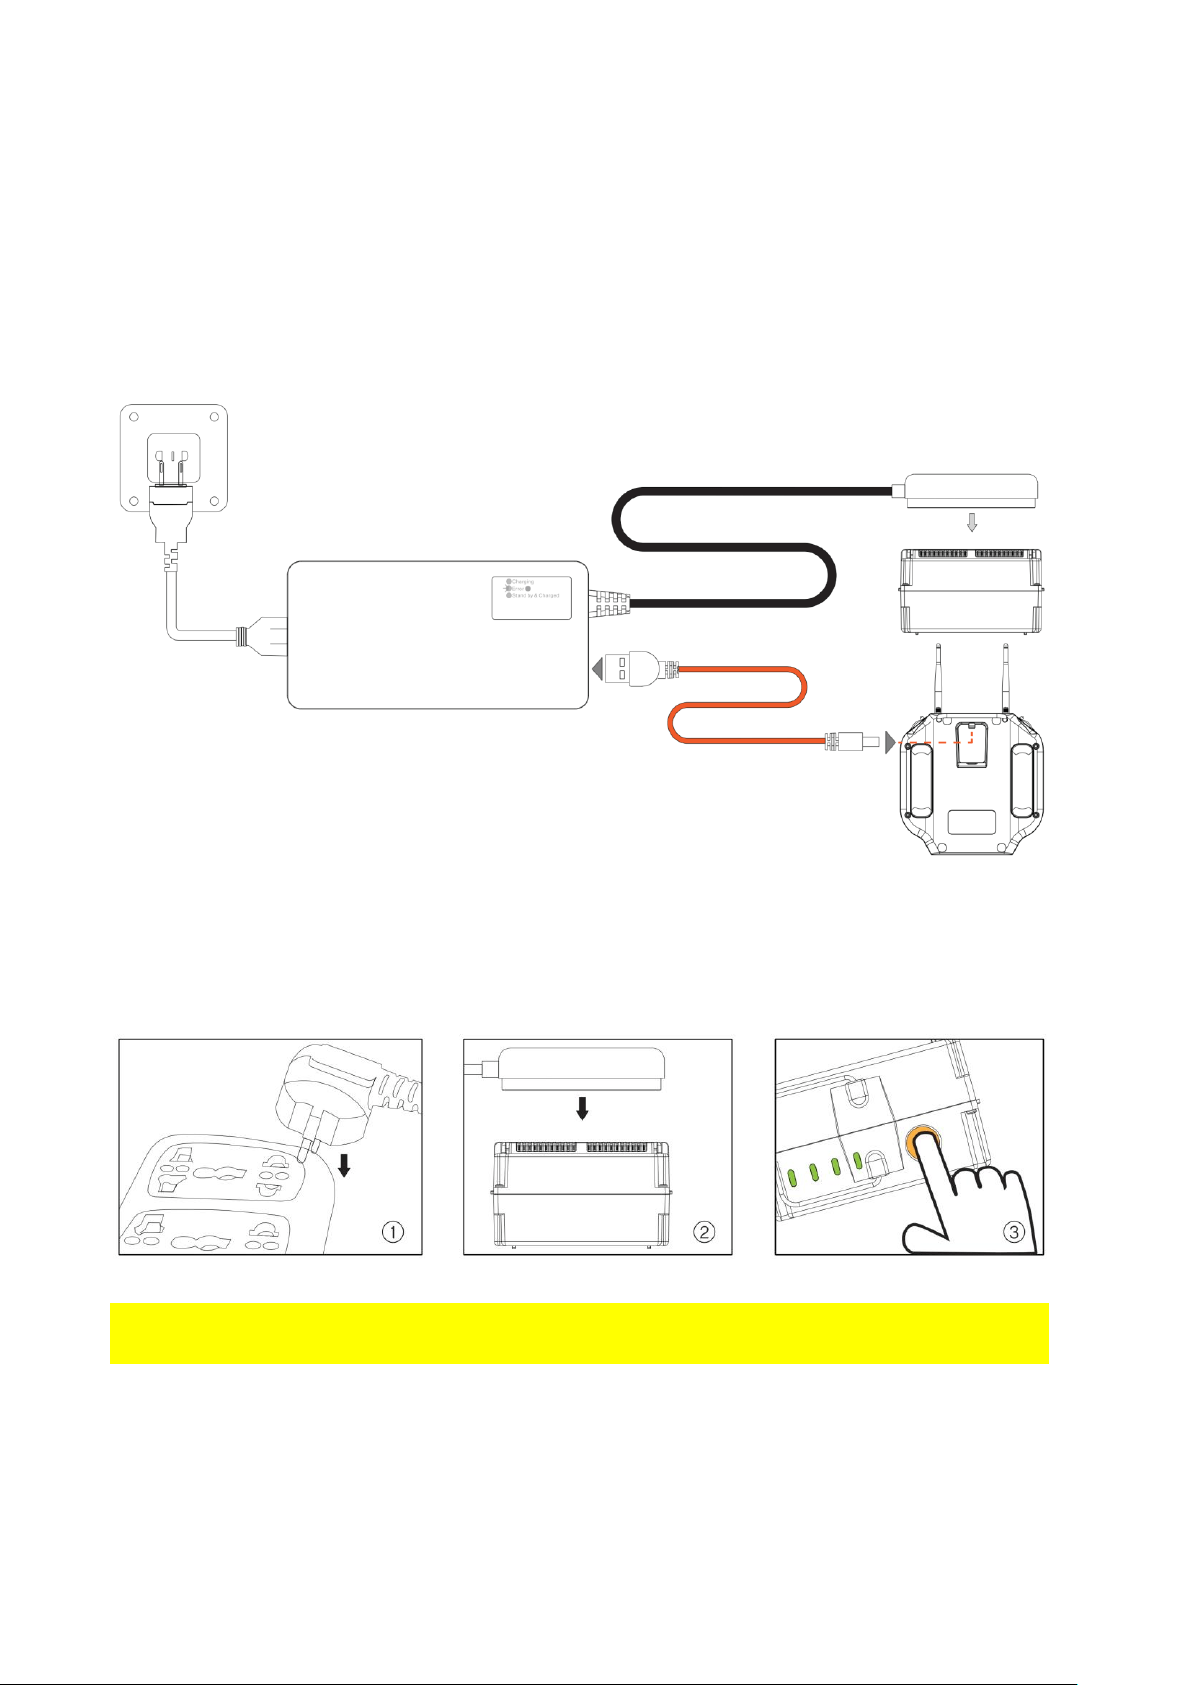
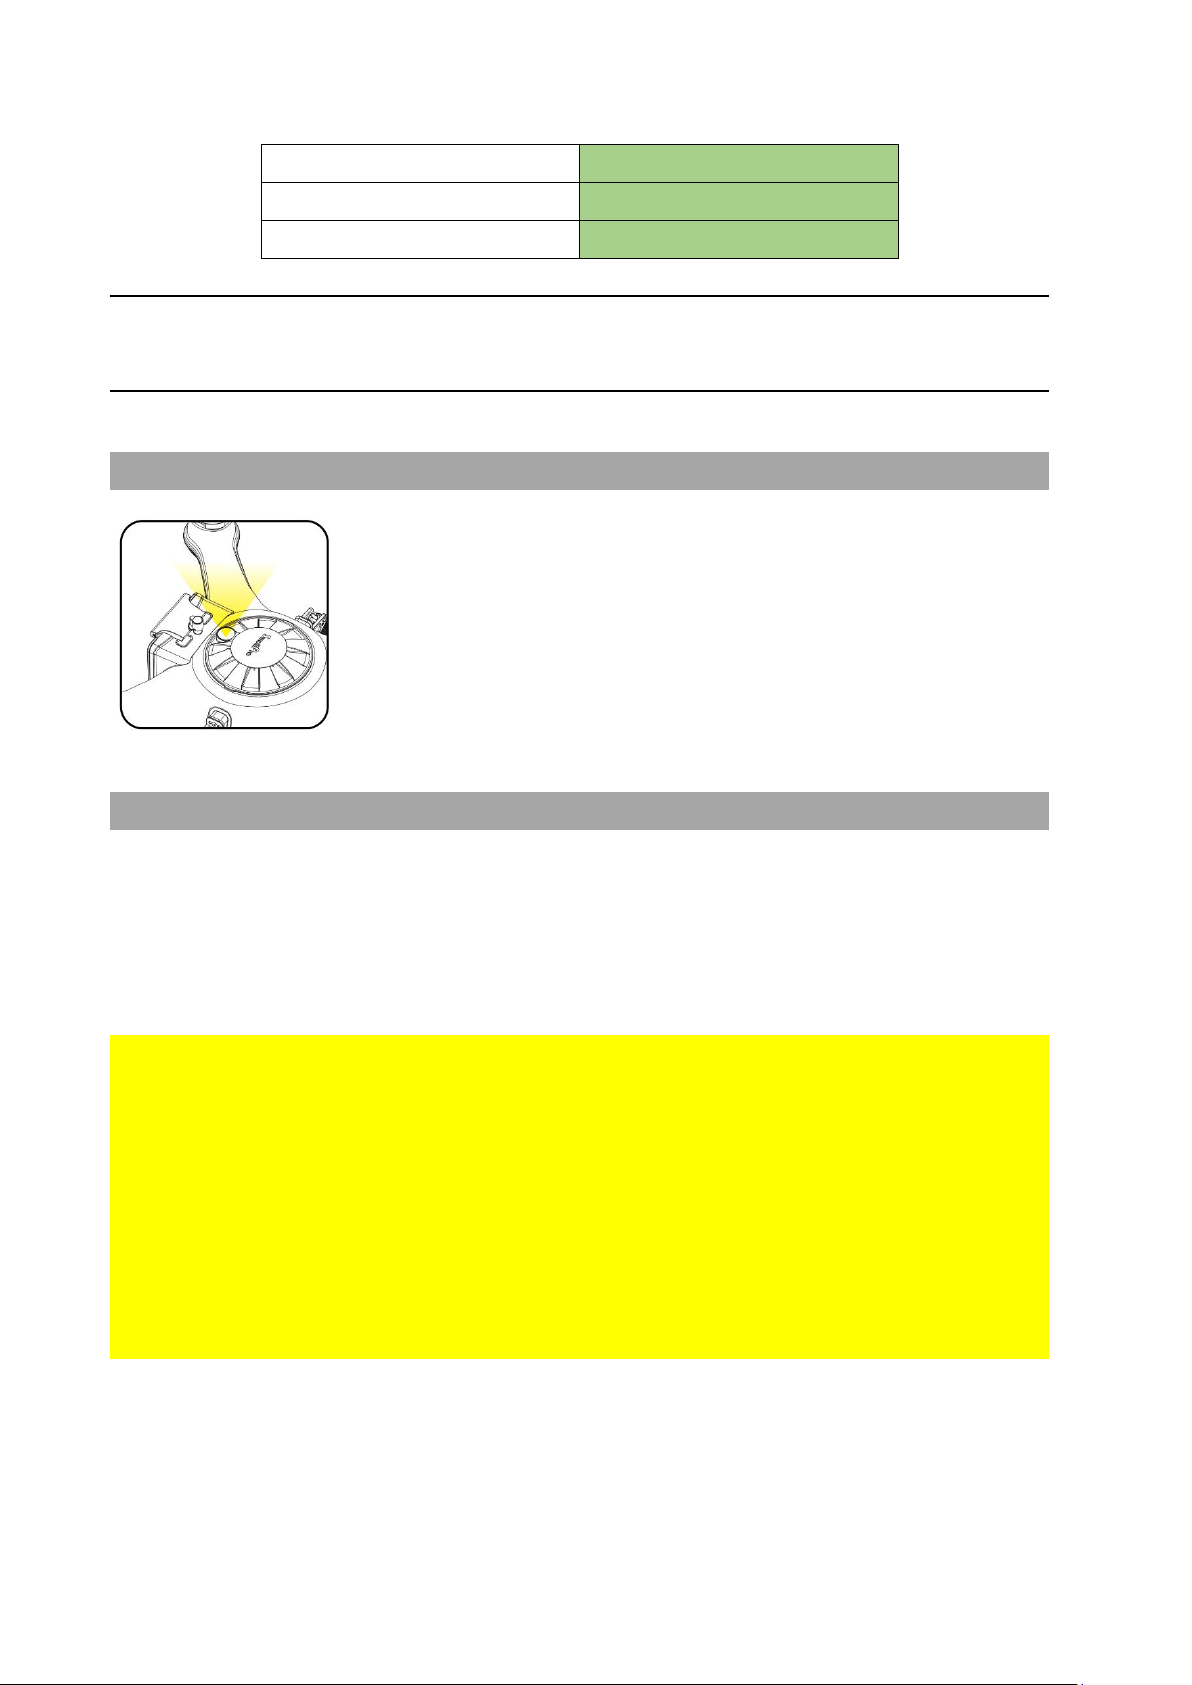
Charging the Batteries
Your SplashDrone 4 is shipped with partially charged batteries. Ensure the drone battery
and the remote controller battery are fully charged before use.
The drone and remote controller batteries can be charged simultaneously using the in-
the-box charger.
How to charge:
Refer to the above figures to charge the flight battery.
The battery needs to be powered on for charging. (Short press the power button
once, then long press the power button for three seconds.)
Battery Warning
©2023 SwellPro All Rights Reserved 19
• Keep battery slot AWAY FROM WATER. Store battery in a COOL, DRY place.
• Do not fly the drone with battery voltage below 12.0 volts.
• Long-term storage voltage: No less than 14.0 volts. Full power storage is the
best.
• For more battery care info, check Battery Care and Maintenance section on the
Appendix.
Failure to do so may result in battery catching fire. SwellPro is exempt from the user's
liabilities for damage(s) to person/s or property, or injuries incurred directly or indirectly
from the use of this product in this condition.
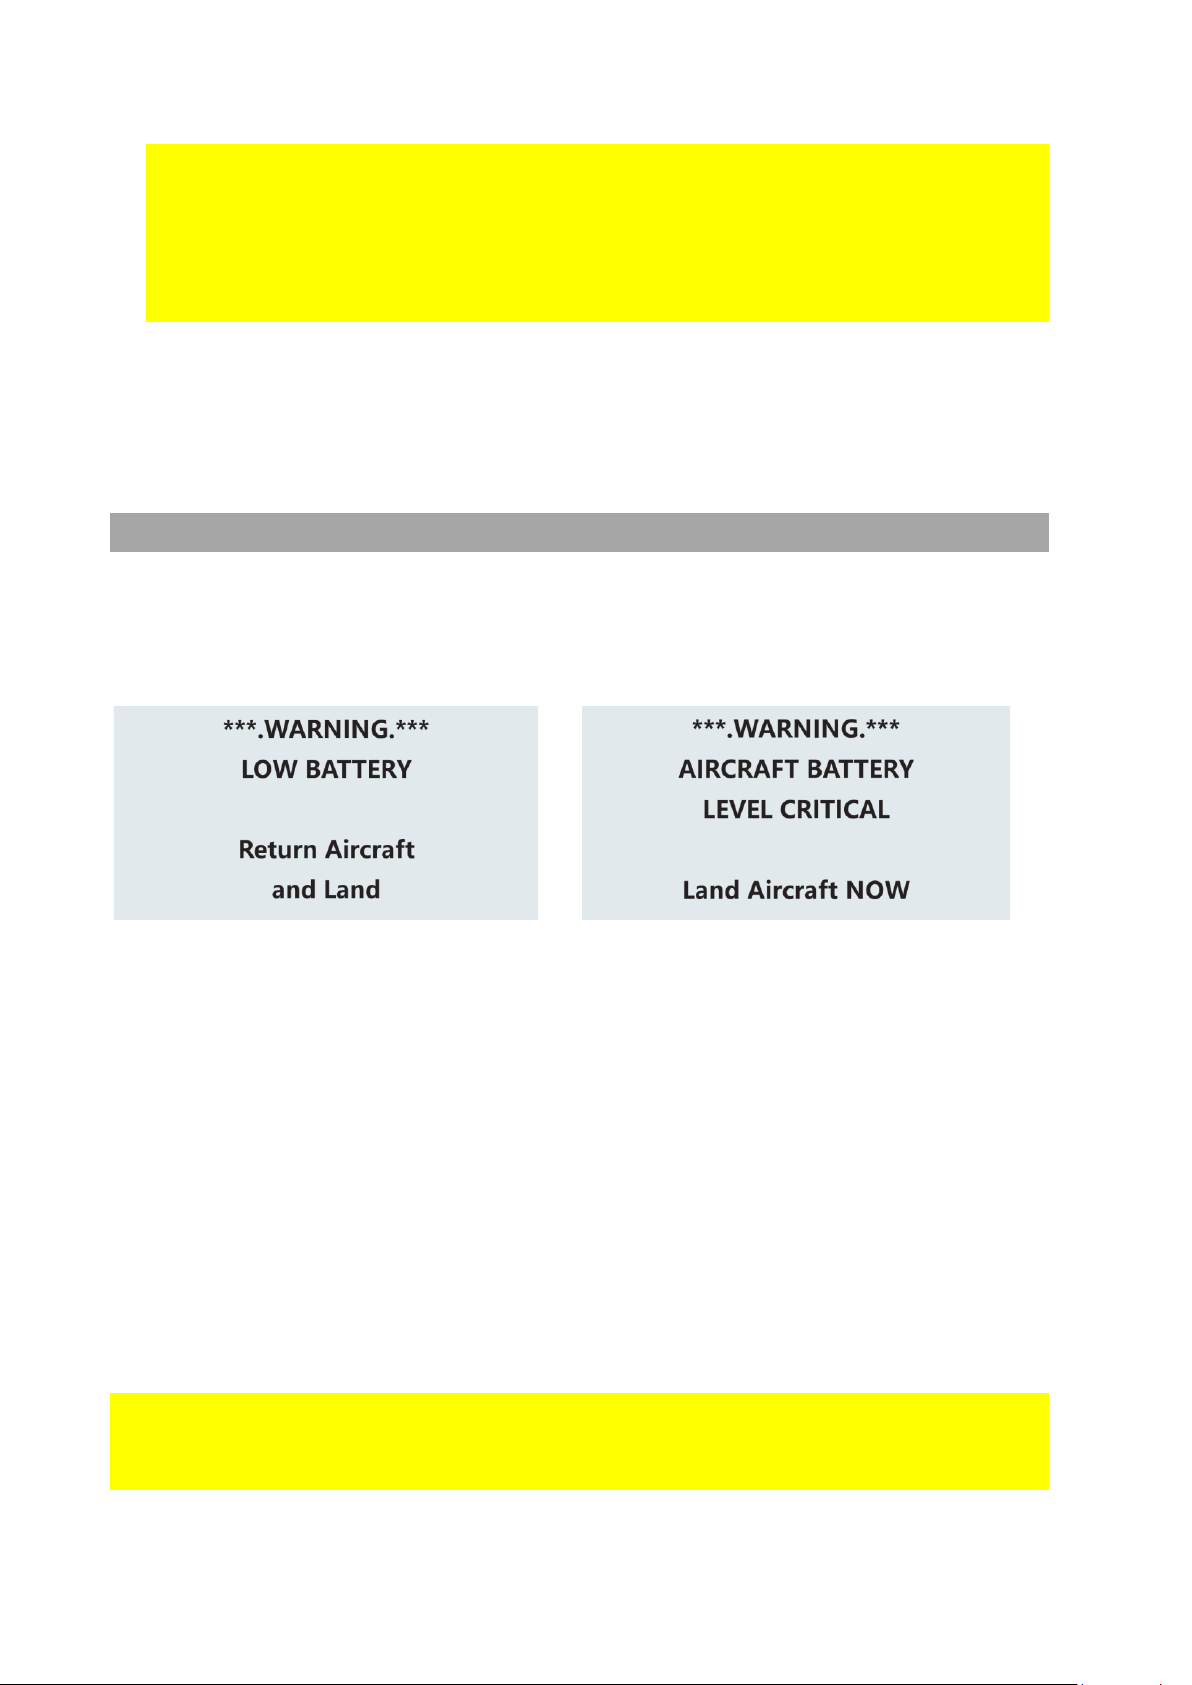
Low Battery Warning
The SplashDrone 4 has two low battery warnings to help the pilot manage the drone's
battery life. Each time a battery level alarm is activated, the remote controller will beep
and vibrate to alert the pilot.
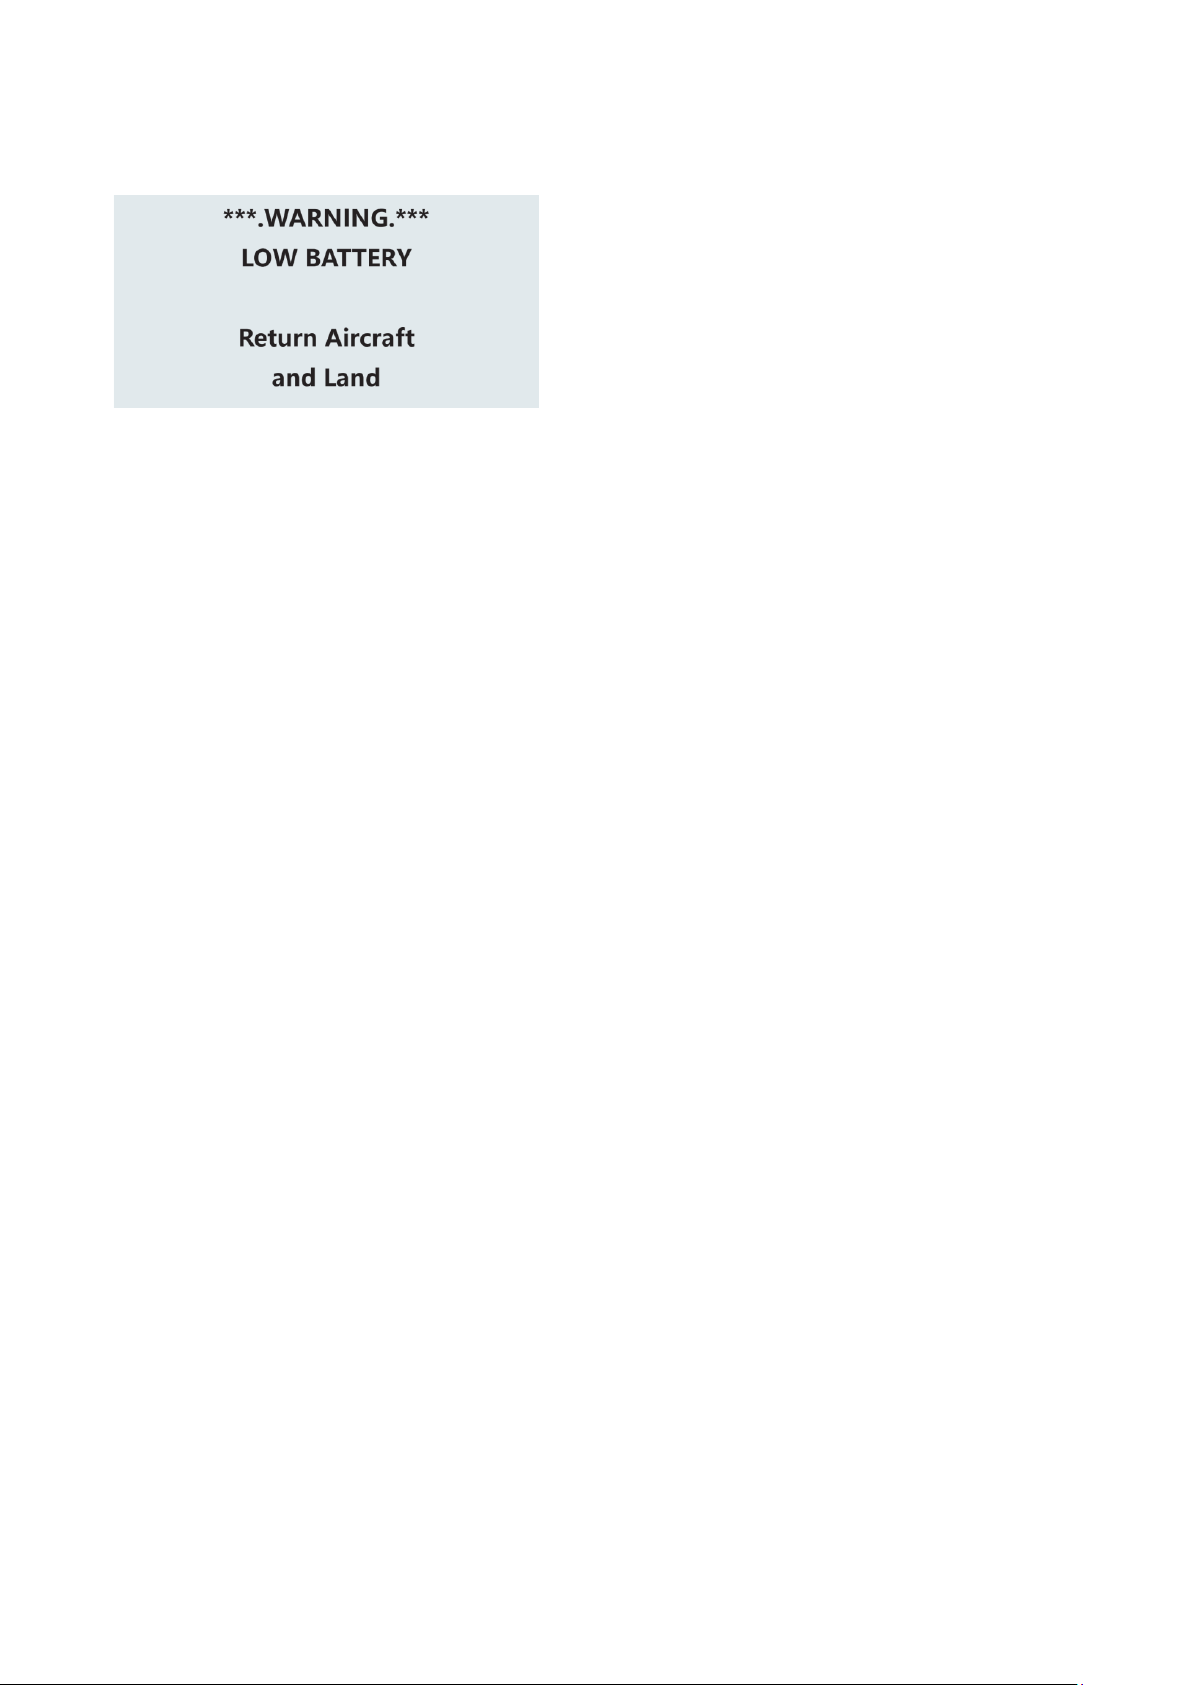
Level 1 alarm: The drone battery level has
reached 13.0 V. The remote controller
screen will prompt "LOW BATTERY;
Return Aircraft and Land". The front drone
status indicators will flash a pattern of 4
red lights. If low battery auto Return-to-
Home is turned on, the drone is going to
auto RTH after this low battery warning.
Level 2 alarm: The drone battery level has
reached 12.0 V. The remote controller
screen will prompt "AIRCRAFT BATTERY
LEVEL CRITICAL; Land Aircraft NOW".
After 10 seconds, the drone will initiate
an in-place auto-landing to protect the
drone and battery. The front aircraft
status indicators are going to flash red
constantly.
During auto-landing, you can control the joystick to overwrite the auto-landing and
regain control of the drone. However, flying the drone below 12V is highly dangerous
since the battery will not be able to maintain the flight and will result in the aircraft
crashing.
During the flight, it is important to constantly monitor the battery level as flying in
the conditions like strong wind and rapid movements and heavy load can deplete the
battery more rapidly.
©2023 SwellPro All Rights Reserved 20
It is dangerous to continue flying the drone below 12 V. This could result in damage
to the battery and the risk of the drone crashing.
Aircraft Antenna
The antennas of the aircraft can be oriented either upwards or downwards to maximize
reception in different situations. The SplashDrone 4 has an effective range of 5 km. Due
to the way radio frequency travel, when flying 0.5m above the water, the transmission
range reduces to 2.8 km. For the drone floating on the water surface, the transmission
range reduces to 500m.
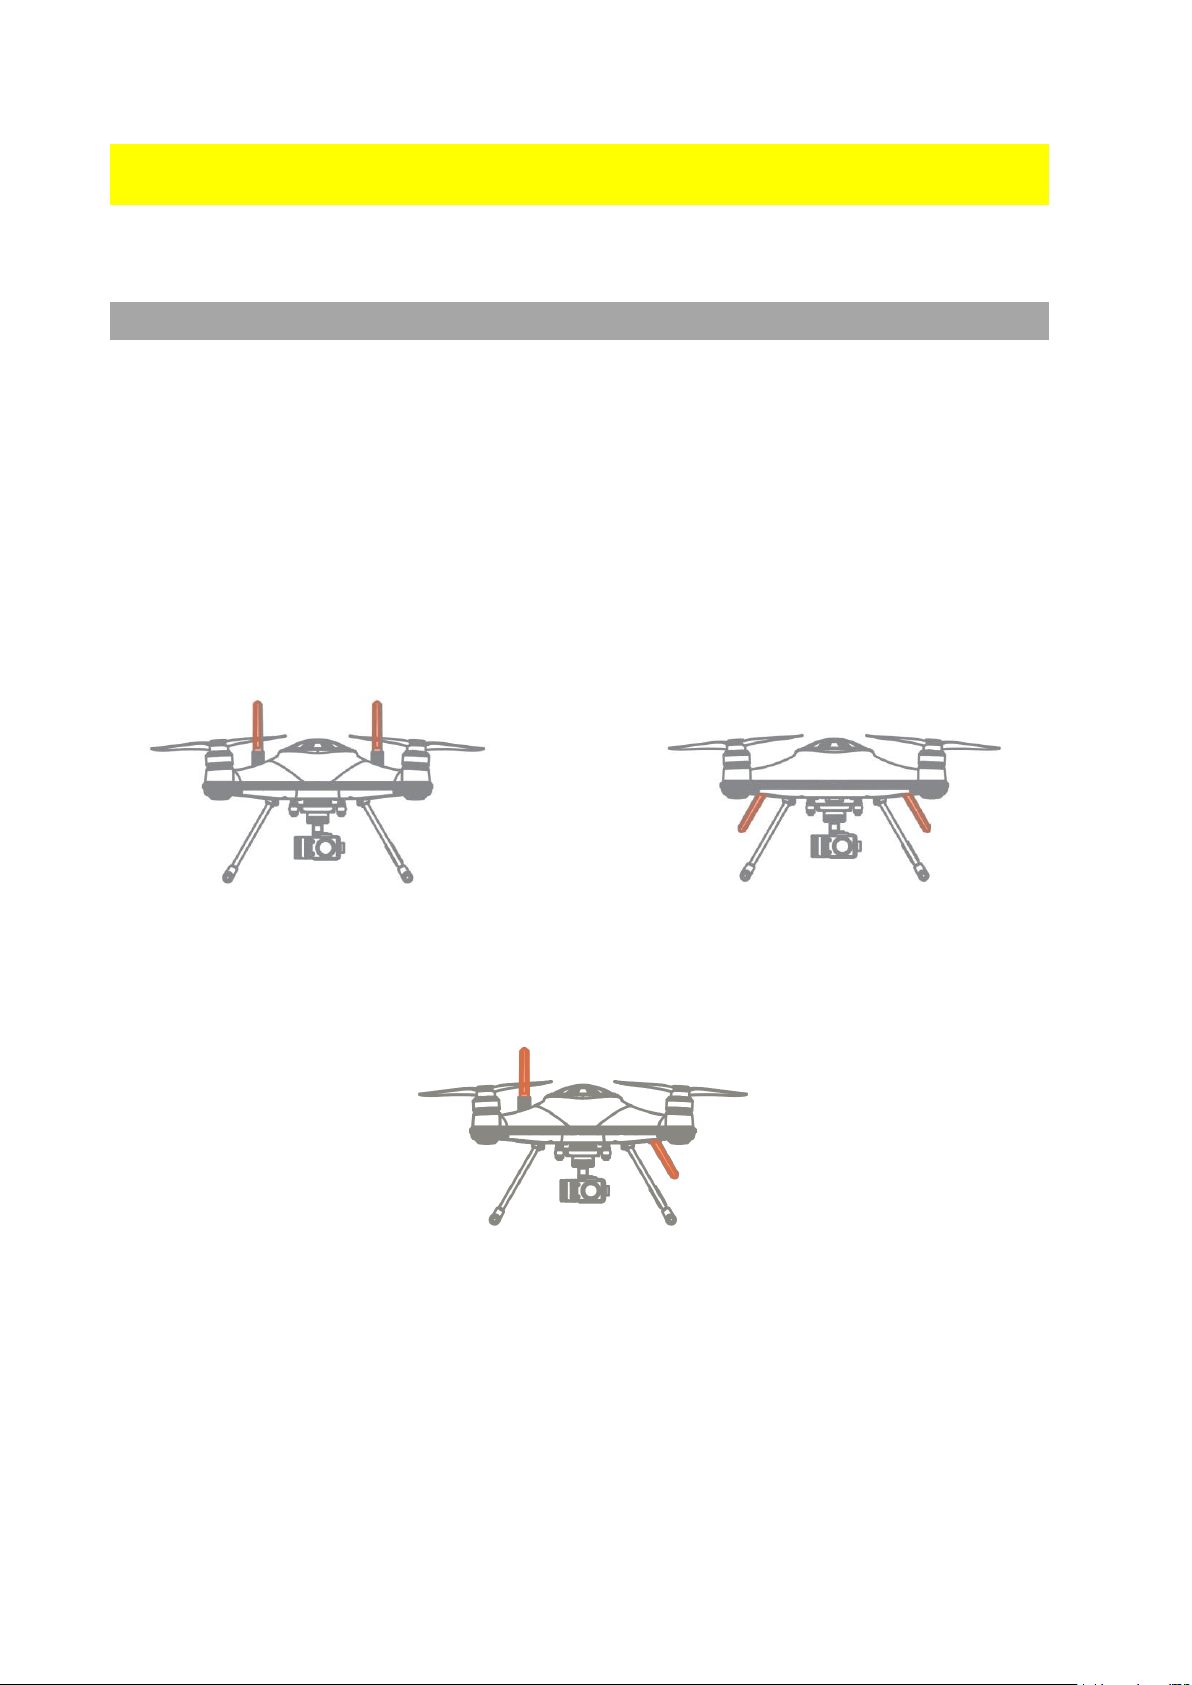
Antenna Orientation
Adjust the antennas' orientation to ensure a stable connection for your flight. To adjust
the antenna position: loosen the antenna nut, adjust the antenna position, and retighten
the nut.
Antenna oriented upward: Improves
reception when the aircraft is flying close to
the water surface.
Antenna oriented downwards: Improves
reception when the aircraft is flying at a high
altitude.
Antenna oriented upward and download: Ensure signal connection
when the aircraft roll over on water. Use this antenna orientation if
you need to land the aircraft on the water during the flight. Note: This
orientation decreases the connection range in both situations (flying
close to water or flying at a high altitude). It’s recommended to only
use this orientation when you need to land the aircraft on the water.
To adjust the antenna position: loosen the antenna nut, adjust the antenna position, and
retighten the nut.
©2023 SwellPro All Rights Reserved 21
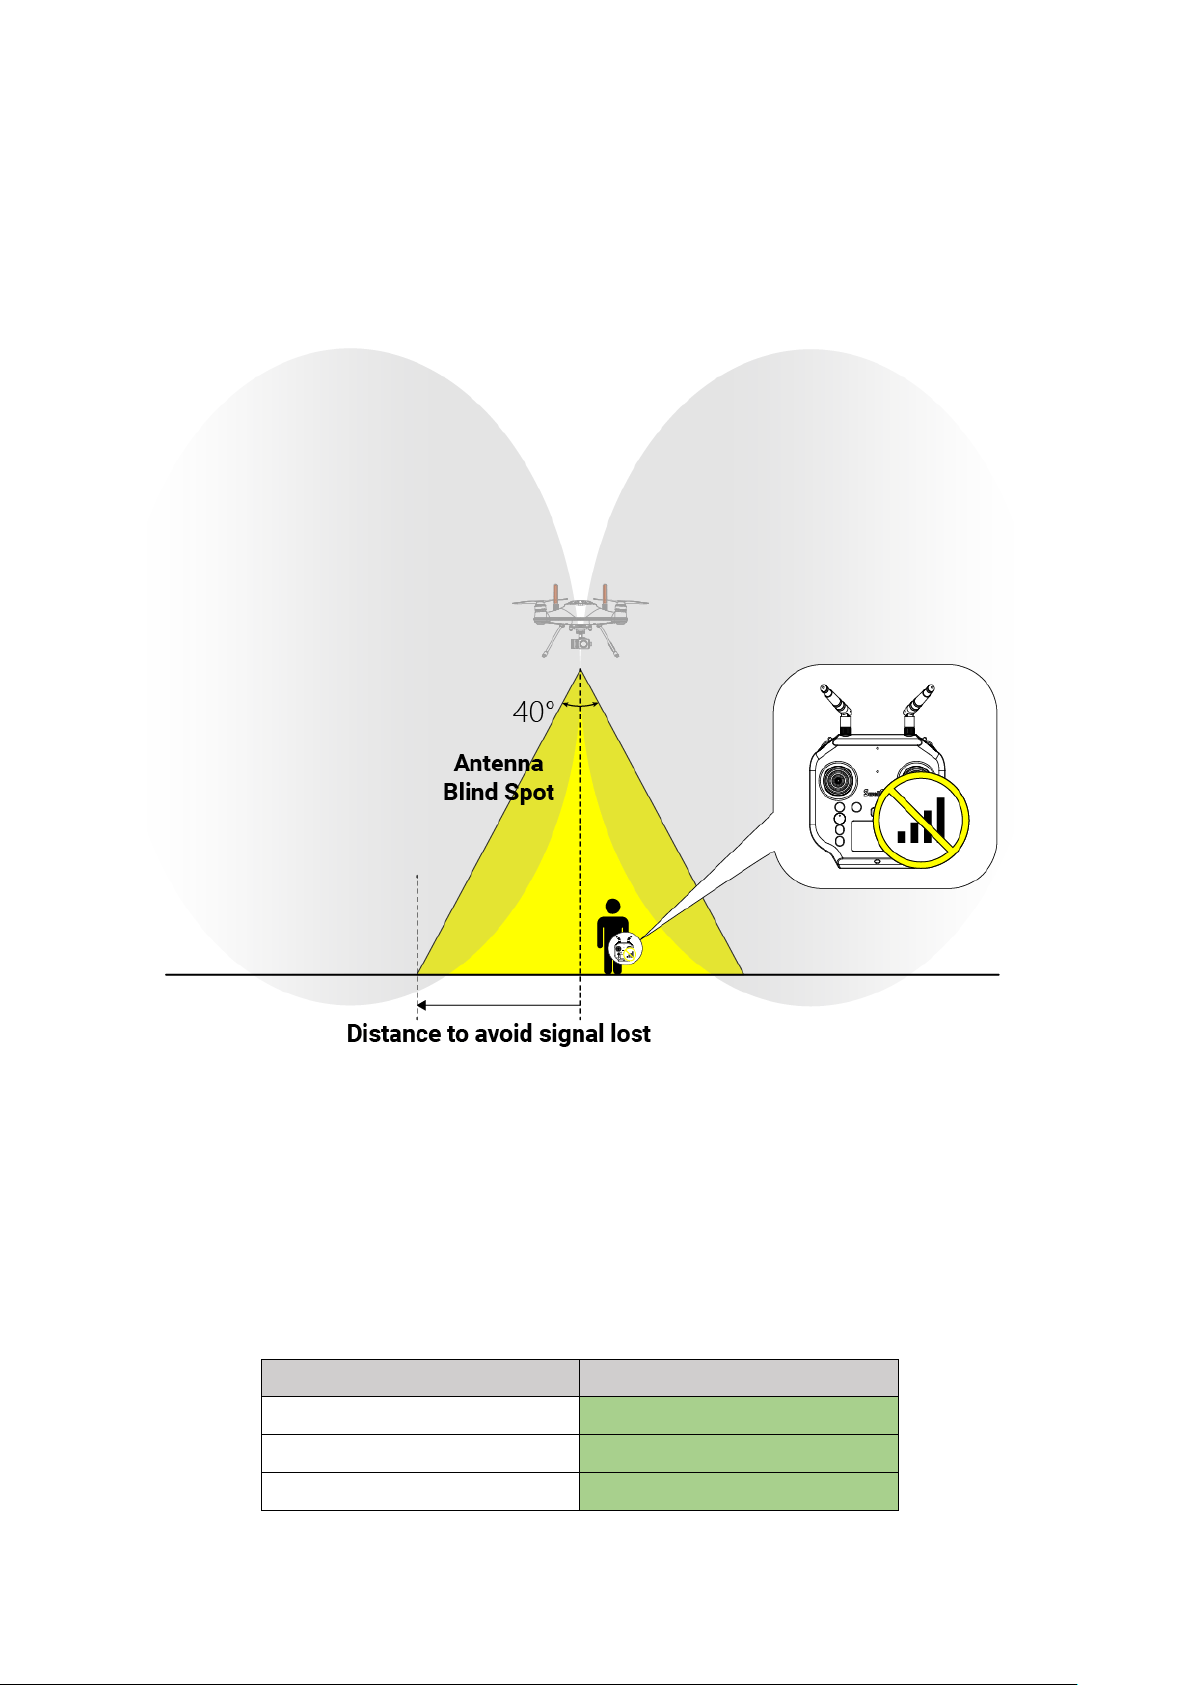
Antenna Blind Spot
Due to the nature of antenna radiation pattern, there is a blind spot about 40° under the
aircraft. When position under the blind spot area, the remote controller will experience
signal lost. If you encounter signal lost issue when you are near the aircraft, you might
be in the blind spot area.
Please avoid being in the blind spot zone to prevent the signal lost issue.
• During take-off, try to fly the aircraft away from you instead of quickly
ascending the aircraft into the overhead area near you.
• Same for Return-to-Home/Landing, land the aircraft at a safe distance before
you to avoid being in the blind spot area.
Here is the estimated safe distance from the aircraft to prevent signal lost due to
being in the blind spot area.
Aircraft Heigh
Safe Distance
10 m
4 m
30 m
11 m
50 m
18 m
©2023 SwellPro All Rights Reserved 22
80 m
30 m
100 m
37 m
120 m
44 m
If you want to estimate the safe distance, use this equation 𝒕𝒂𝒏(𝟐𝟎°) 𝒙 𝑯𝒆𝒊𝒈𝒉𝒕 to
calculate. (Height is the height of the aircraft, which can be obtained from the remote
controller or the App)
Strobe Light
The top of the aircraft is equipped with high-intensity strobe light,
which helps identify the drone's position to the pilot and other air
traffic. This meets the requirements of night flight regulations in
some countries and helps ensure flight safety at night. The
strobe can be activated and deactivated in the App (STB).
Waterproof Barometric Membrane
The waterproof barometric membrane is SwellPro's featured technology. It allows air to
pass through the internal chamber of the aircraft to ensure the barometer's proper
functioning yet keeps the water from getting in to ensure the SplashDrone 4's all
waterproof design. The waterproof barometric membrane is delicate yet an extremely
important part for proper flying and waterproofing. Therefore, you should pay special
attention to the proper use of waterproof barometric membrane during your operation.
• Always check the barometric membrane to ensure no damage being observed
before flying.
• Rinse the barometric membrane thoroughly with freshwater every time after flying.
• If you constantly fly your drone in the saltwater environment (sea), it is
recommended to change the barometric membrane once every 2 months, since the
salt particles can clog the tiny holes on the membrane.
• If the aircraft is not flying stably during hovering, or the aircraft is not flying
normally during ascend or descend, the barometric membrane might be damage.
Please replace the barometric membrane.
• If the barometric membrane is damaged or shows signs of wear and tear,
replacement of the waterproof barometric membrane is required.
To replace the barometric membrane:
1. Take out the top cover.
2. Peel off the old waterproof barometric membrane. Clean the surface barometric
vent and make sure there is no residue on the surface.
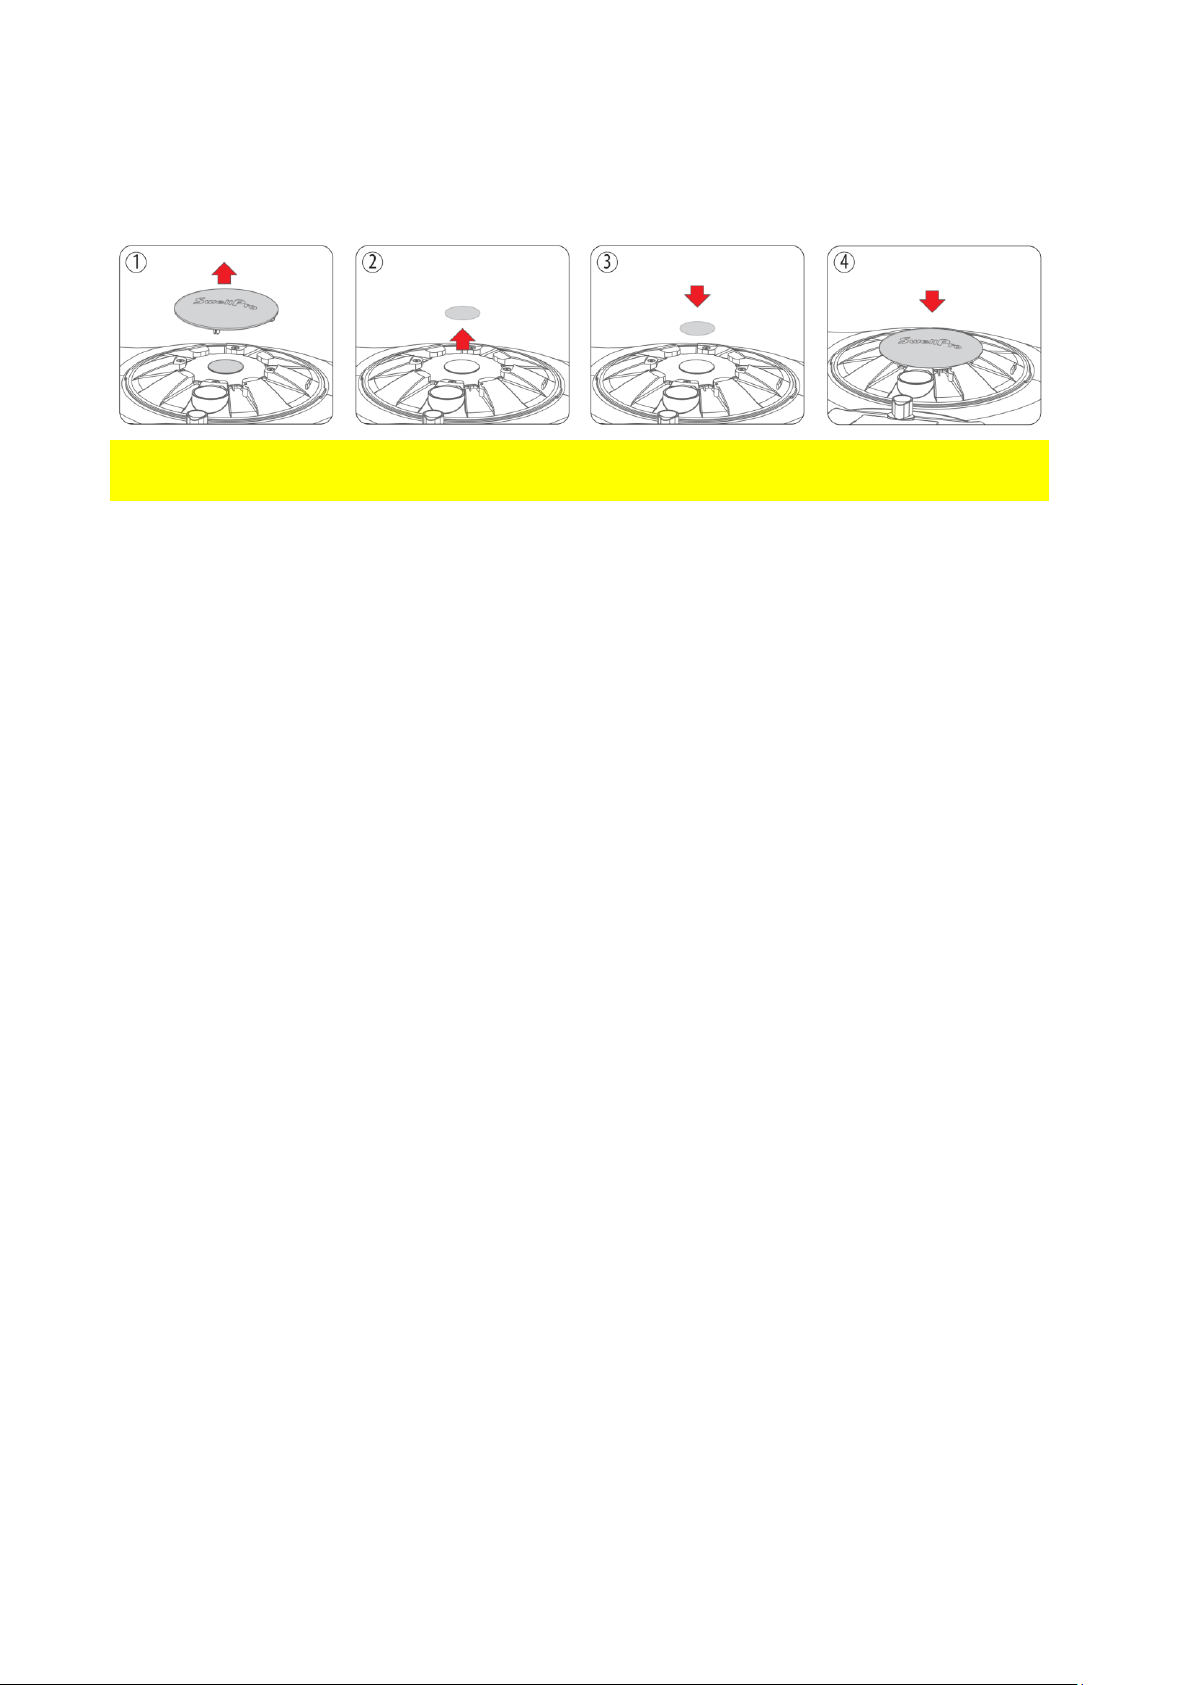
©2023 SwellPro All Rights Reserved 23
3. Remove the 3M paper from the waterproof barometric membrane and press it
firmly on the barometric vent to ensure a tight seal.
4. Put the top cover back.
⚠ Make sure there is a tight seal around the waterproof barometric membrane when
applying.

©2023 SwellPro All Rights Reserved 24
Remote Controller
Using the Remote Controller
⚠ Install the Remote controller antennas BEFORE using or turning the power on.
Failure to install the antennas before powering on the remote controller may cause
permanent damage to the remote controller.
Failure to install the antennas before using may cause antenna ports to oxidate.
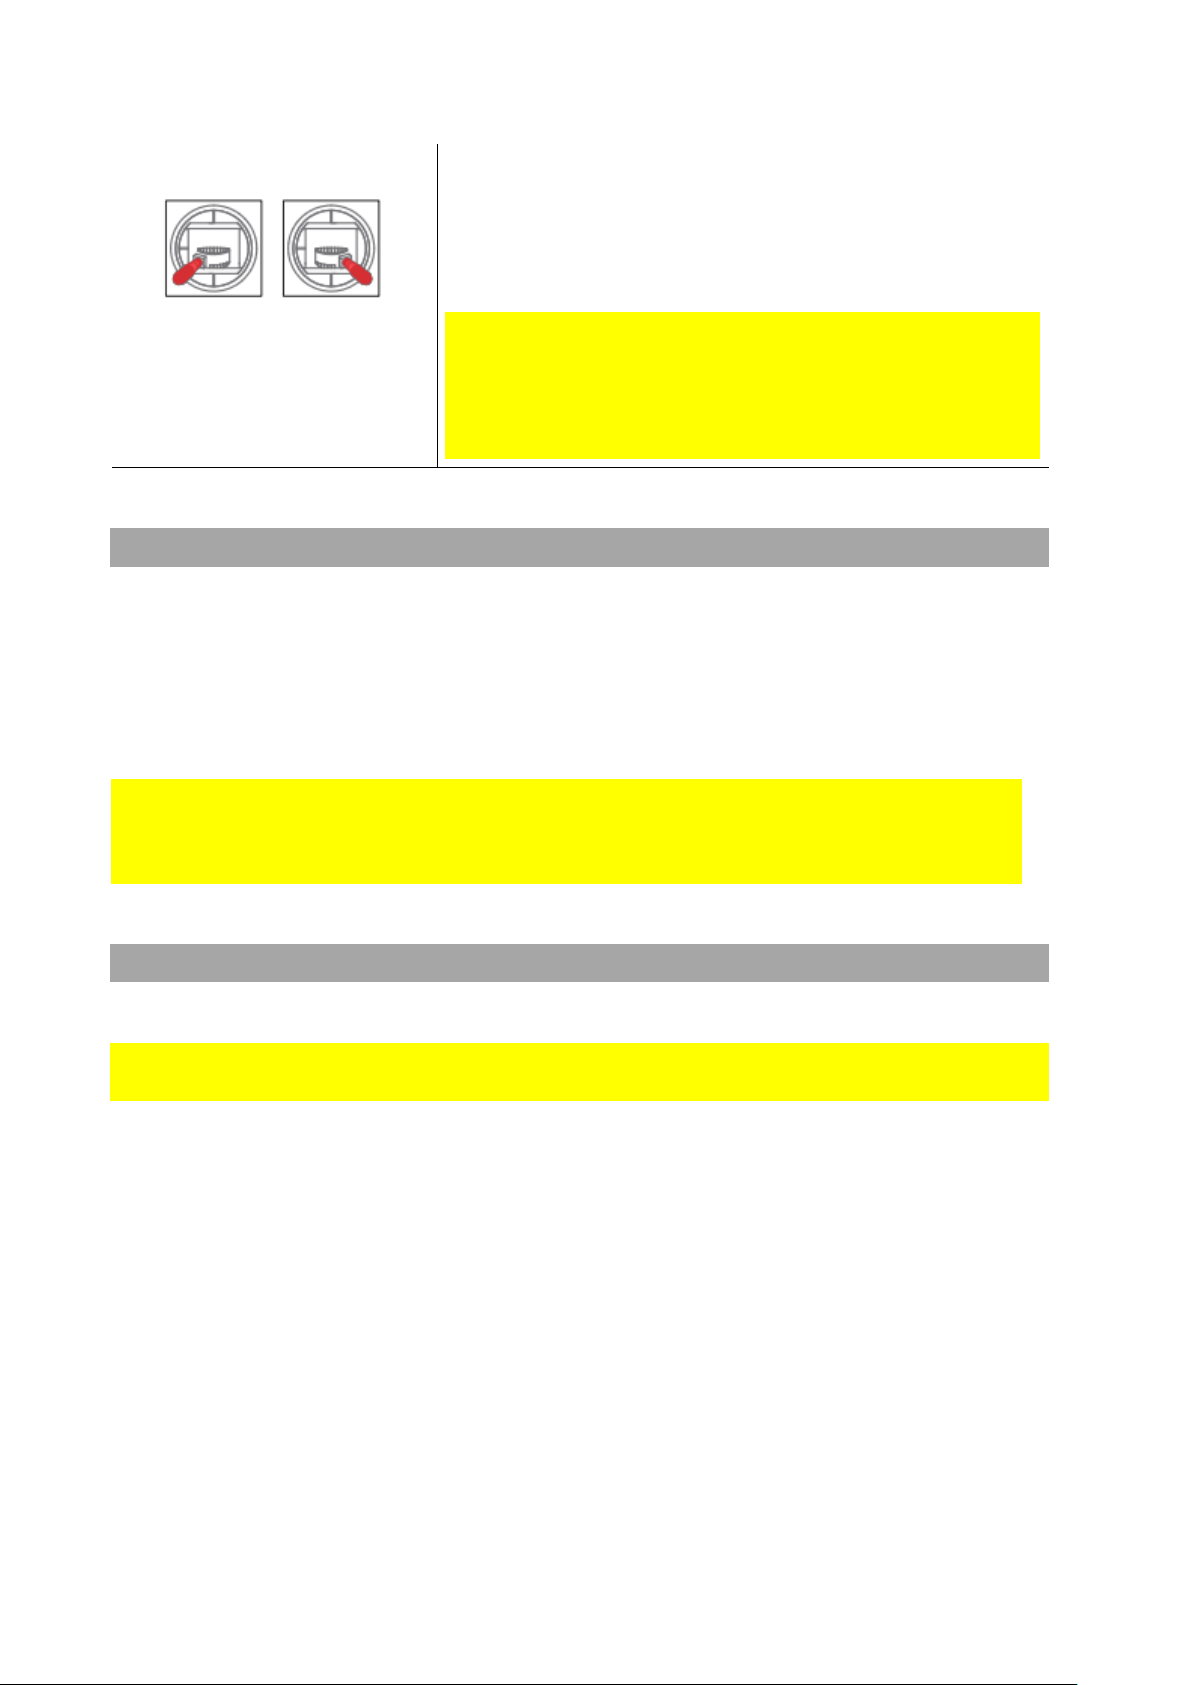
Power ON/OFF
1. Press and hold the Power switch for 3 seconds.
2. The Remote controller will power ON.
3. To turn OFF the Remote controller, return the Camera
Control switch to the Preview position to stop any
recording.
4. Press and hold the Power switch for 3 seconds.
The Remote controller will power OFF.
Flight Mode Switch
GPS: Sets the drone to GPS mode.
ATTI:Sets the drone to ATTI mode.
CUSTOM: Sets the drone to the user-selected flight
mode. This can be set in the App. The default flight
mode is Sport mode.
GEAR: Not currently supported.
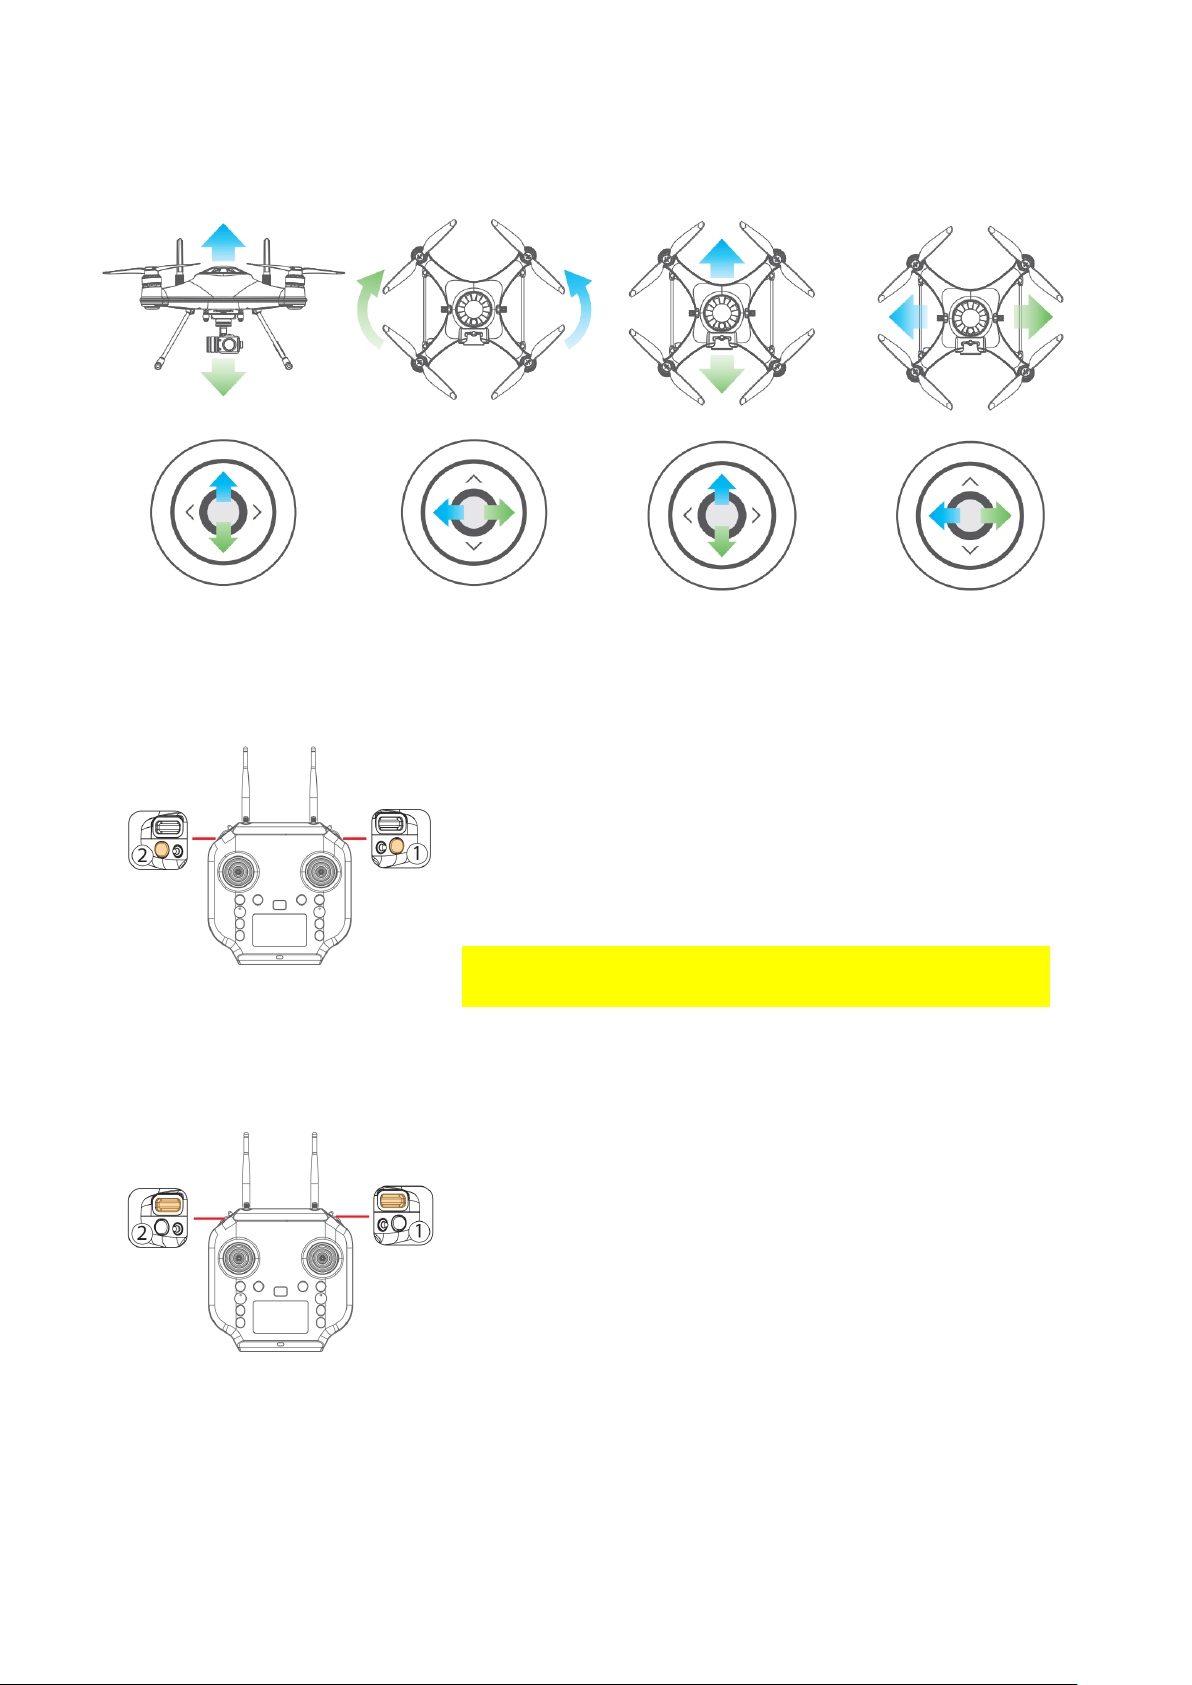
Joystick Controls
LEFT JOYSTICK controls Throttle & Yaw; RIGHT JOYSTICK controls Pitch & Roll. YAW
controls the direction; THROTTLE controls the ascend or descend of the drone; PITCH
controls the drone to fly forward or backward; ROLL controls the drone to fly left or right.
©2023 SwellPro All Rights Reserved 25
Left Joystick
Right Joystick
Throttle
Yaw
Pitch
Roll
Camera Control
Photo①: Press the photo button to capture photos.
Video②: Press the video button once to start video
recording. Press again to stop video recording and
save the video file.
⚠ It is important to stop video recording before
powering off the drone.
Gimbal Control
Tilt Control Roller①: Control the tilt angle of the
gimbal.
Pan Control Roller②: Control the direction of the
gimbal.
©2023 SwellPro All Rights Reserved 26
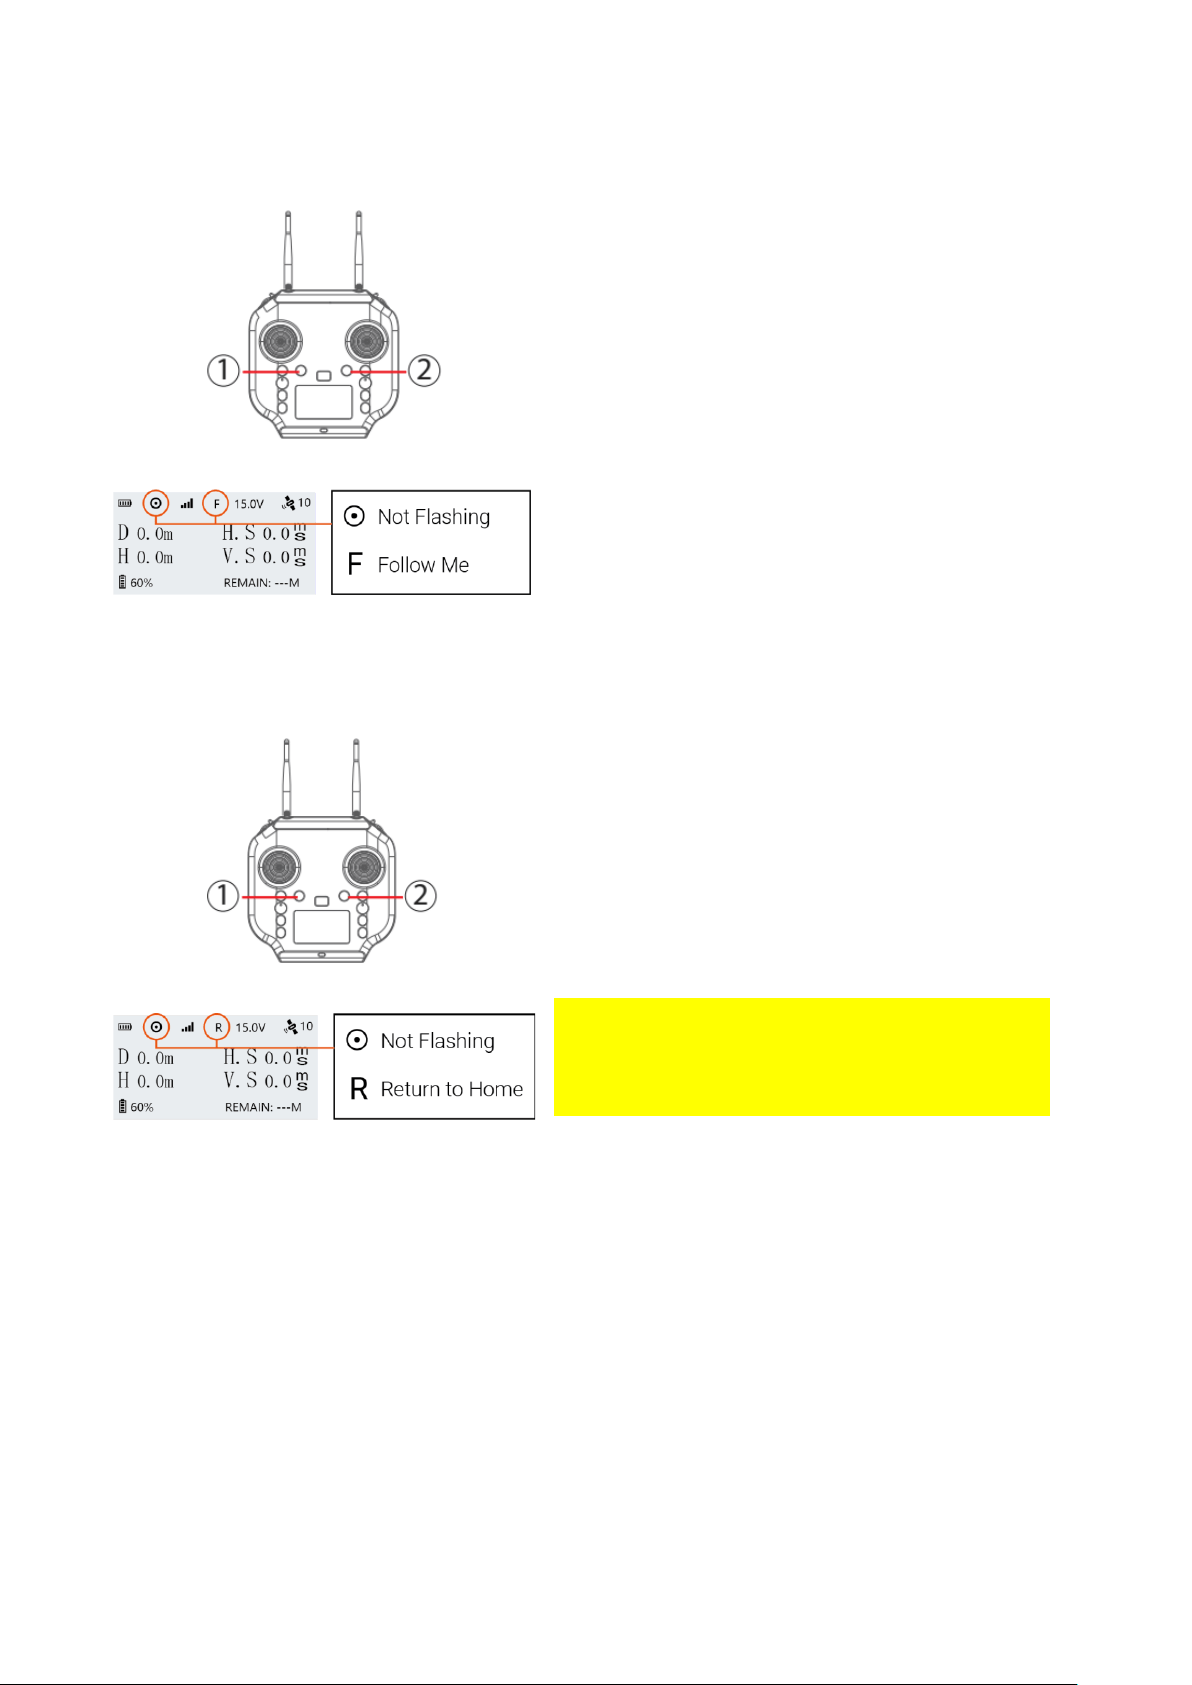
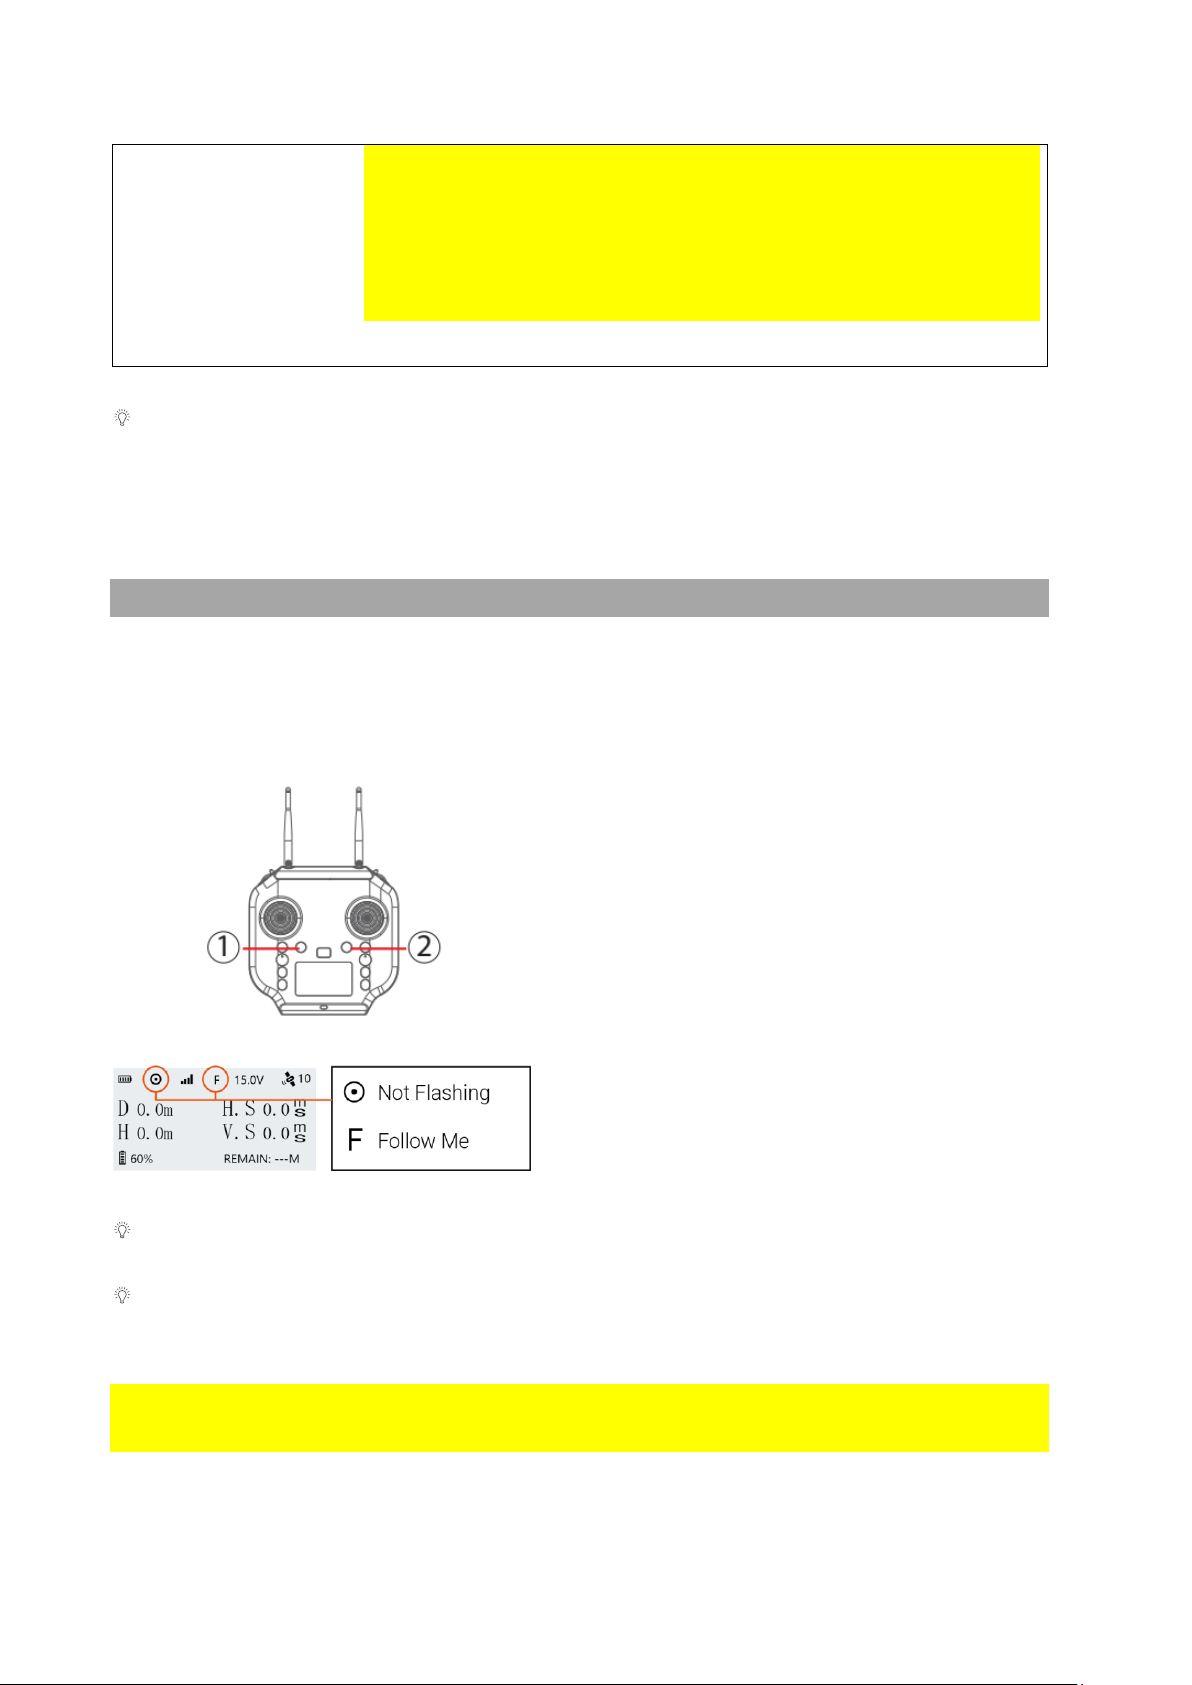
Follow Me
Start Follow Me: 1) Check that the remote
controller has a GPS signal by checking the
GPS status indicator on the screen.(The GPS
status icon is not flashing) 2) Press and hold
the Follow Me button ① to start Follow Me
mode. The remote controller will beep twice.
Stop Follow Me: Press and hold the "FOLLOW
ME" button again until the remote controller
beep once to indicate that Follow Me mode is
disengaged.
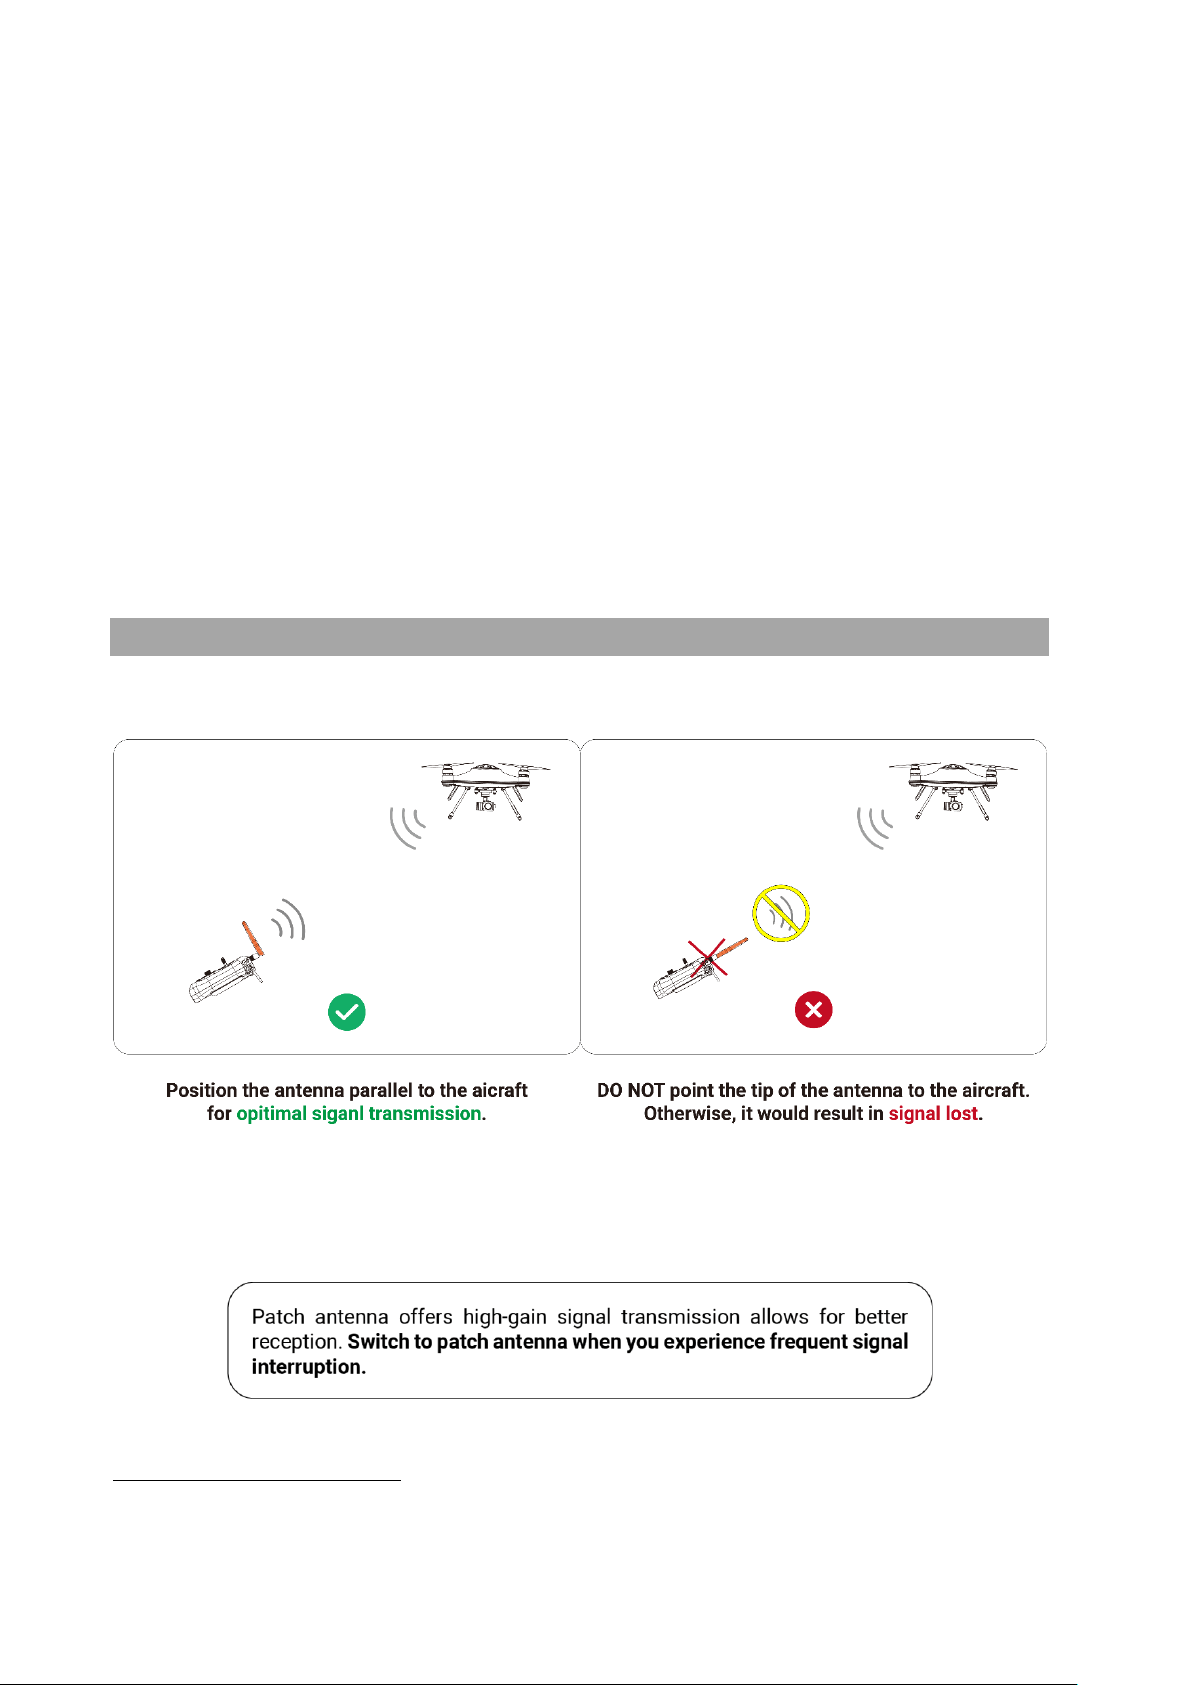
Return to Home (RTH)
Long press the Return Home button ②, the
remote controller will beep and vibrate twice
to indicate that the drone will initiate the
return to home process. The flight mode
indicator on the remote controller status bar
will change to the letter "R" to indicate the
drone is on the RTH process.
⚠ If aircraft set to return to remote controller,
ensure remote controller has good GPS signal
during the entire RTH process. (The GPS
status icon is not flashing)
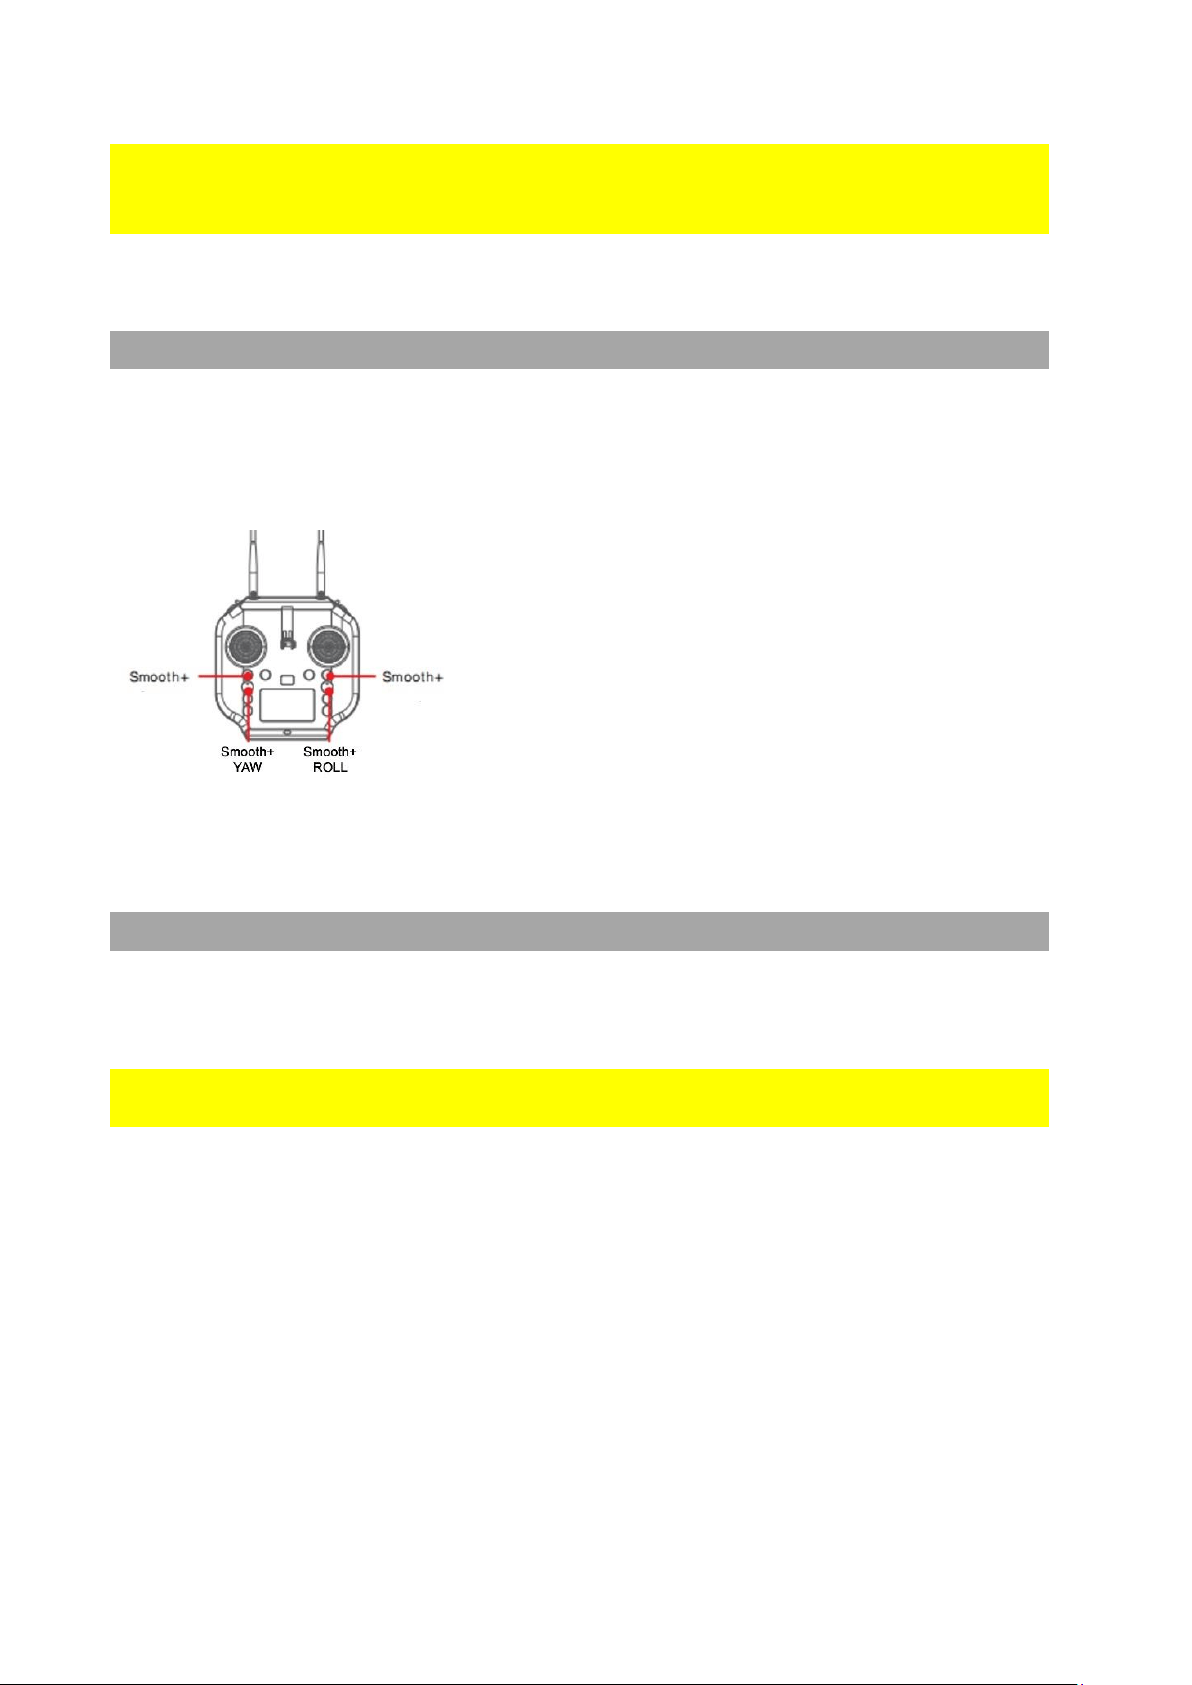
Smooth+ Controls
The patented "Smooth+" flight control allows the pilot to finely tune the Roll and Yaw of
SplashDrone 4. Smooth+ makes professional, steady flight control as easy as turning
the knobs.

©2023 SwellPro All Rights Reserved 27
To enter Smooth+ mode, simply press the
Smooth+ buttons. Note: Smooth+ knob need to
be in the center position in order to be turned on.
Press the left Smooth+ button to engage
Smooth+ YAW. The left joystick will now only
control the ascend/descend of the drone.
Press the right Smooth+ button to engage
Smooth+ ROLL. The right joystick will now only
control the pitch of the drone.
BOAT Button
In Boat mode, the SplashDrone 4 can effectively be controlled like a boat on the surface
of the water. With a maximum surface speed of 1m/s. BOAT mode should only be used
when the aircraft is equipped with the SwellPro Boat Mode Kit (BKT).
To enter the Boat mode:
1. Land or place the drone on the water.
2. For landing on the water, lock the drone.
3. Switch the drone to GPS or ATTI mode.
4. Arm the drone by using the inward gesture.
5. Press the BOAT button on the remote controller.
6. The drone now enters the Boat mode.
7. Press the BOAT button again to exit Boat mode. The drone can then take off
normally.
Gimbal Button
There are two gimbal modes: Follow mode and Lock mode. The default mode is Follow
mode.
Follow mode keeps the gimbal direction to the head of the drone.
Lock mode locks the gimbal position so the is not going to follow the direction of the
drone when the drone is turning.
Press the GIMBAL MODE button once to restore the central position.
Press the GIMBAL MODE for 3 seconds to switch gimbal modes.
Gimbal mode only works for GC3-S and GC3-T.
You can add an extension bar or gimbal overhead kit to take full advantage of gimbal
Follow mode and Lock mode.
©2023 SwellPro All Rights Reserved 28
Payload Button (Left)
Open: Press the PAYLOAD(Left) button once to open the payload release rod.
Close: Press it again to close the payload release rod.
Payload Button (Right) / Slow Mode
5
Press the right Payload (Right) / Slow Mode button 3 times to enter low-speed mode.
There is a low-speed mode embedded in all flight modes for a safer flight purpose. (For
example, when the drone is equipped with SwellPro Gimbal Extension Bar (GEB),
switching to low-speed mode allows the drone to fly more stable and safely.)
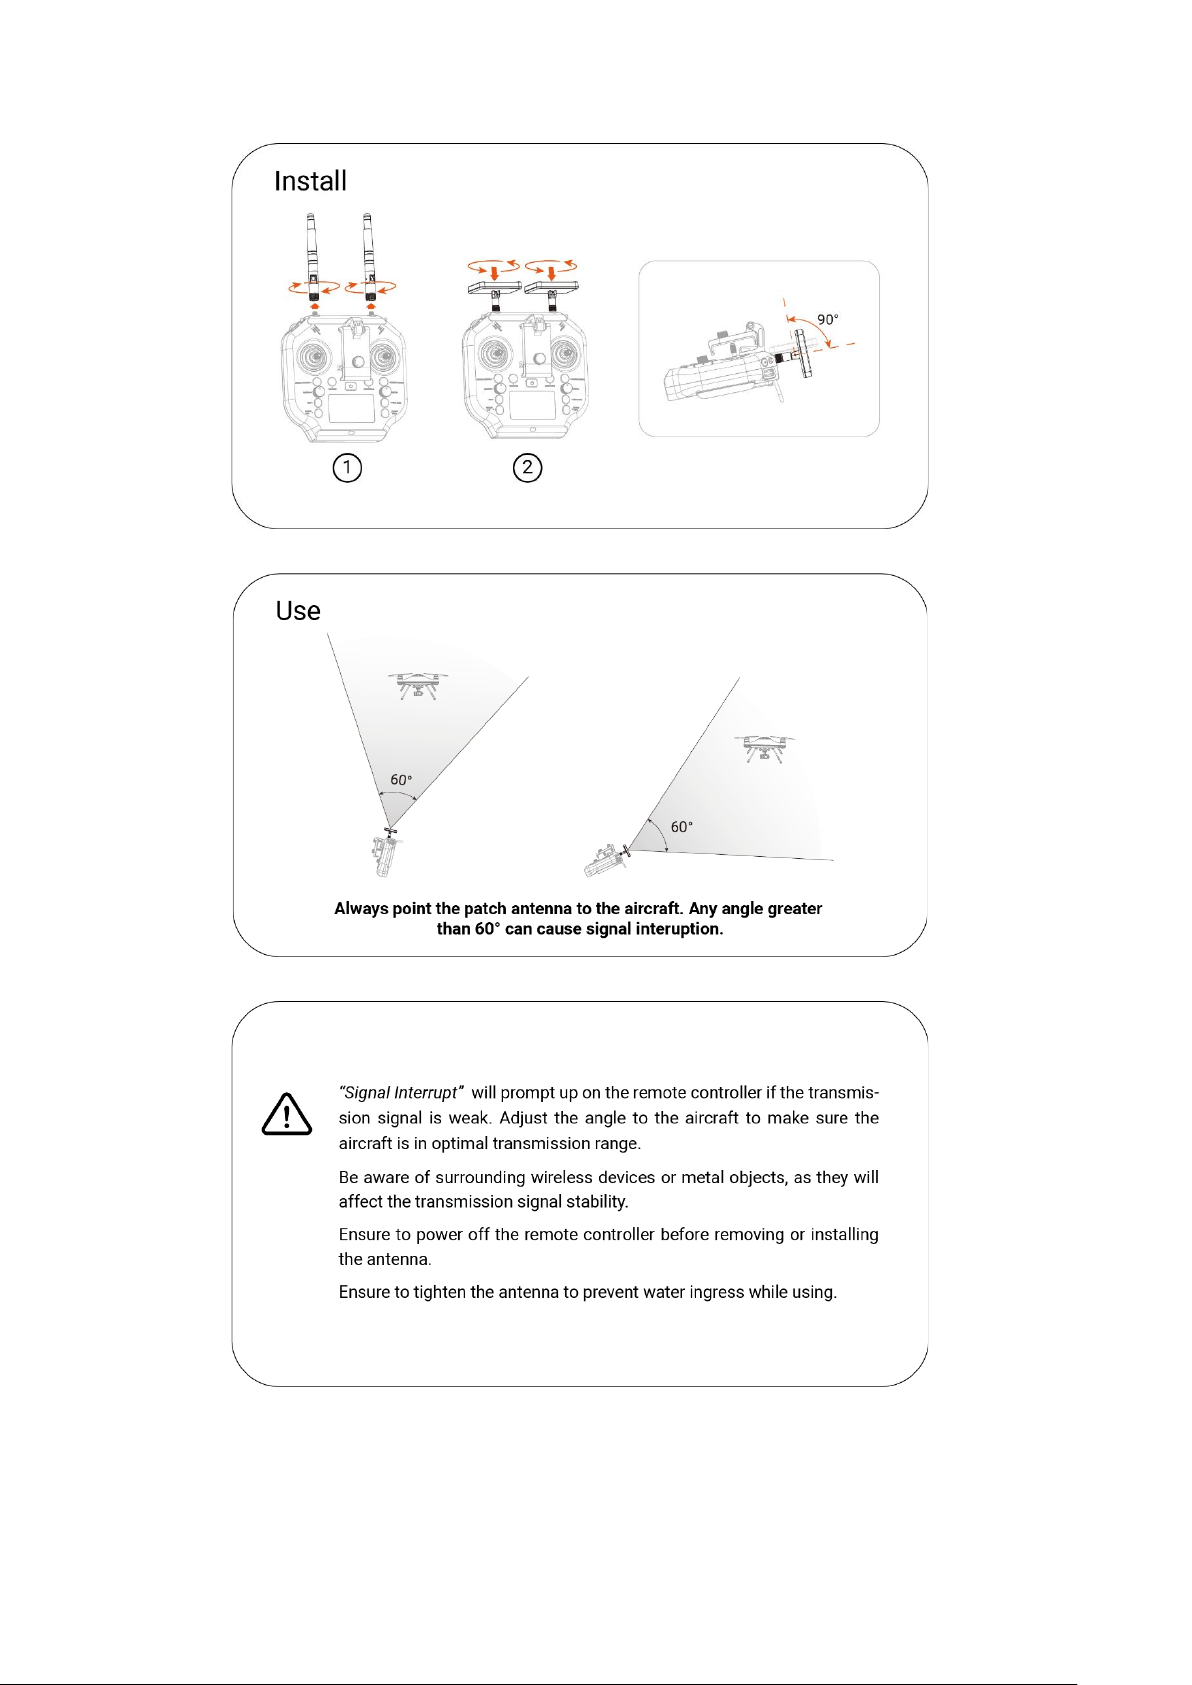
Remote Control Antenna
Optimal Signal Transmission
Patch Antenna
5
For the SplashDrone 4 came out later in 2022, the Payload (Right) print changes to Slow Mode. Button
function stays the same.
©2023 SwellPro All Rights Reserved 29

©2023 SwellPro All Rights Reserved 30
Attach Mobile Devices
To attach your mobile device to the remote controller:
Release the tightening knob behind the mobile device mount, then slide open the mount
to accommodate your device, retighten the knob to secure your mobile device.
There is a larger mobile device mount specific designed for the use of tablets. Visit
SwellPro website for more information.
Charging the Remote Controller
The remote controller can be charged from the in-the-box charger or a standard 5V USB
adapter. Recommend using 5V/2A USB adapter.
The LED light on the remote controller will turn red while charging. When the remote
controller is fully charged, the LED light will turn green.
Pairing the Remote Controller
About Pairing
The remote controller and the aircraft are paired at the factory before shipping. There is
NO NEED to pair them for your first use. After turning on, the aircraft and the remote
©2023 SwellPro All Rights Reserved 31
controller will pair in 2 minutes. It might take extra time to pair depending on the signal
interference of the environment.
ONLY pair the remote controller for the following condition: After turning on the
aircraft and the remote controller for more than 5 minutes, the remote controller signal
status bar still shows the Unpair sign.
To ensure the pairing process is successful:
• Please strictly follow the steps to pair.
• Please ensure that you are able to see the light indicator at the bottom of the
aircraft. If you can’t see the light indicator, please take off the bottom plate so
that you are able to see it.
• Please use a timer to count the time needed to press the pair button.
The pair button is delicate. Press the pair button gently to prevent unexpected
damage to the button.
Identify SN Number
Before pairing, look for the SN number inside the aircraft battery compartment:
For SN number ending with V01
For SN number ending since V02 (V02, V03, V04 ... etc)
©2023 SwellPro All Rights Reserved 32
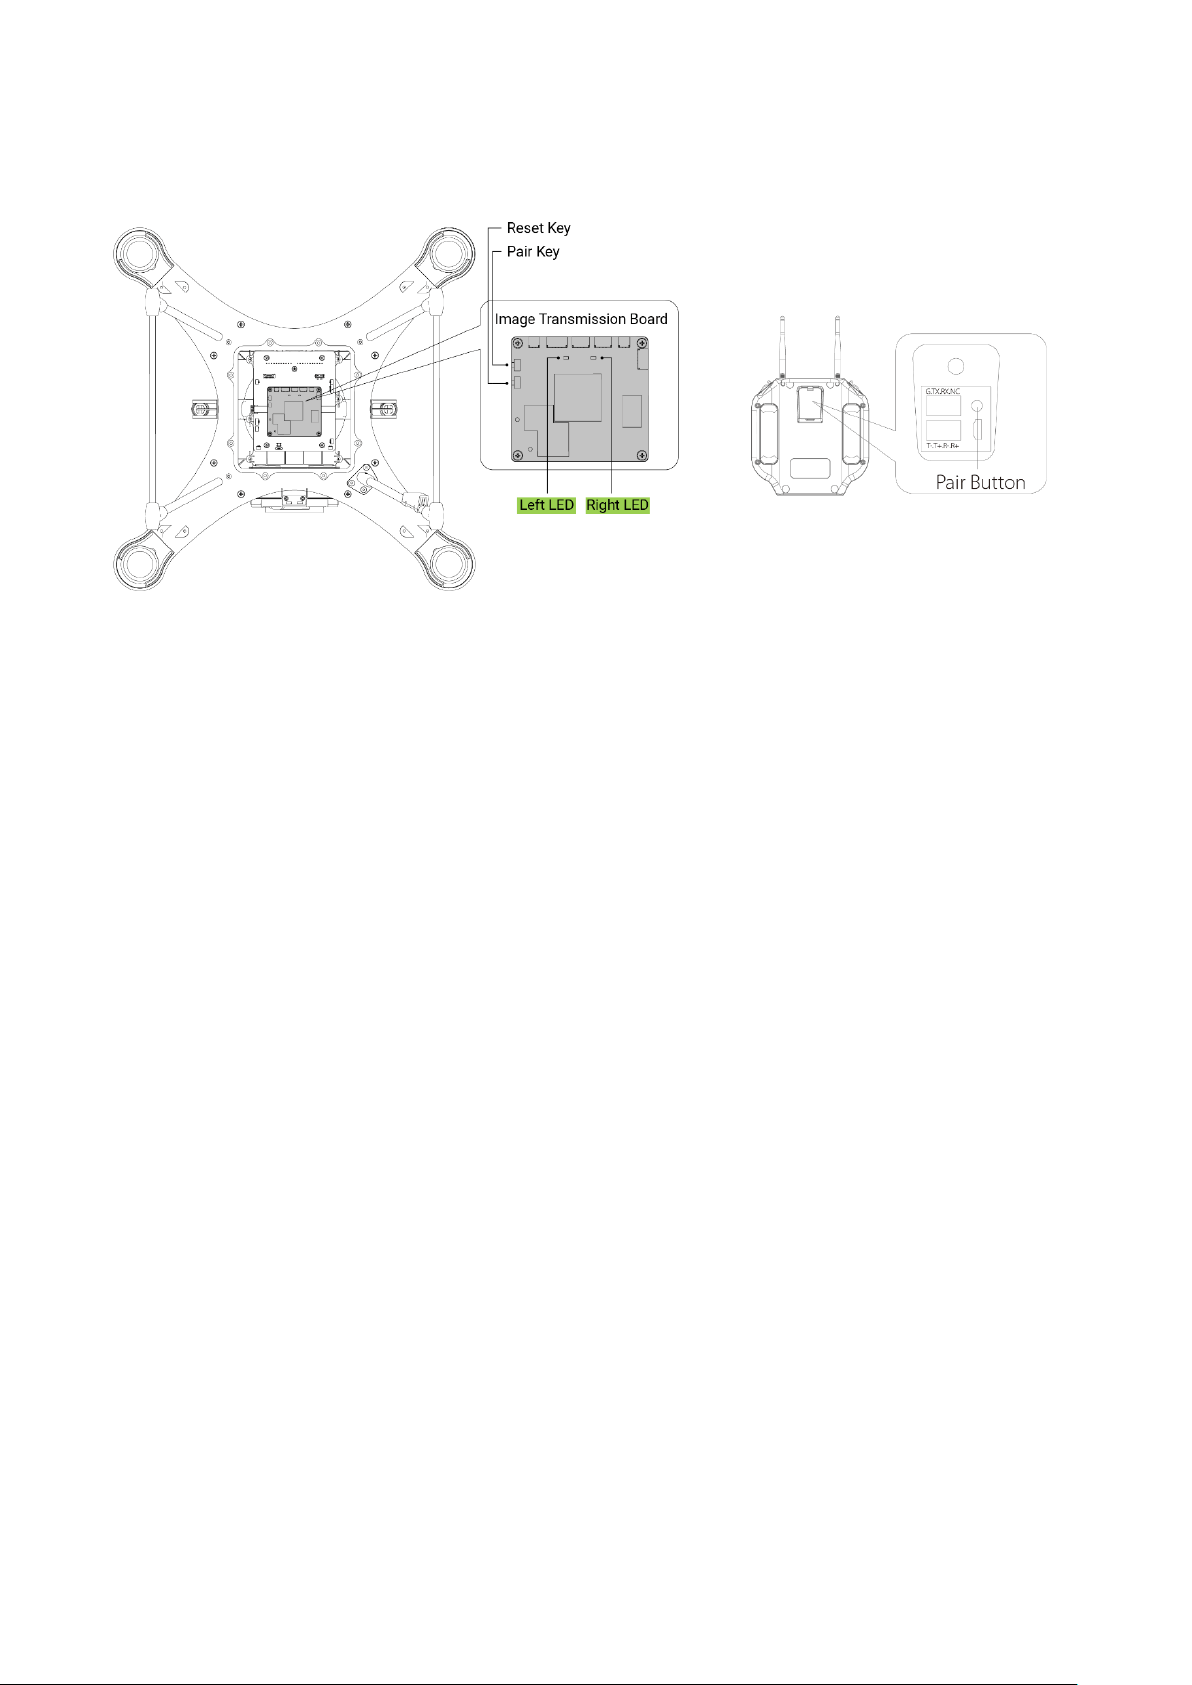
For SN number ending with V01
To pair
1. Turn over the aircraft and place it on the carrying case. Unscrew and take off the
bottom plate.
2. Turn on both the aircraft and remote control. Wait for 1 minute until the right LED
light turns from flashing to solid.
3. Long press the pair button for 10 seconds. (Do not press shorter than 10
seconds) The right LED will start flashing. *If the right LED does not flash, please
repeat the step until the right LED starts flashing.
4. Wait for 1 minute until both the left and right LED turn solid. The reset process is
complete.
5. Now, long press the aircraft’s pair button for 5-10 seconds. (Do not press shorter
than 5 seconds) The right LED will start flashing. *If the right LED does not flash,
please repeat the step until the right LED starts flashing.
6. Quick press the remote control’s pair button twice. Wait for 5 seconds. The left
and right LED will flash alternatively.
• *If the left and right LED do not flash alternatively in 10 seconds, please
repeat this step again until the left and right LED flash alternatively.
• *If the left LED does not flash and the right LED has already turned solid.
Please repeat the pairing process again from step 1.
7. The pairing process can take up to 3 minutes. When the pairing process is
complete, the right LED will turn from flashing to solid, and the left LED will stay
flashing. The remote controller will prompt “Aircraft initializing, please wait”.
8. Assemble the bottom plate back, turn over the aircraft and place it on a level
surface. The “Aircraft initializing, please wait” prompt will disappear in 30
seconds, and you are now ready to fly.
If the pairing process does not succeed, please try to pair them again from step 1.
©2023 SwellPro All Rights Reserved 33
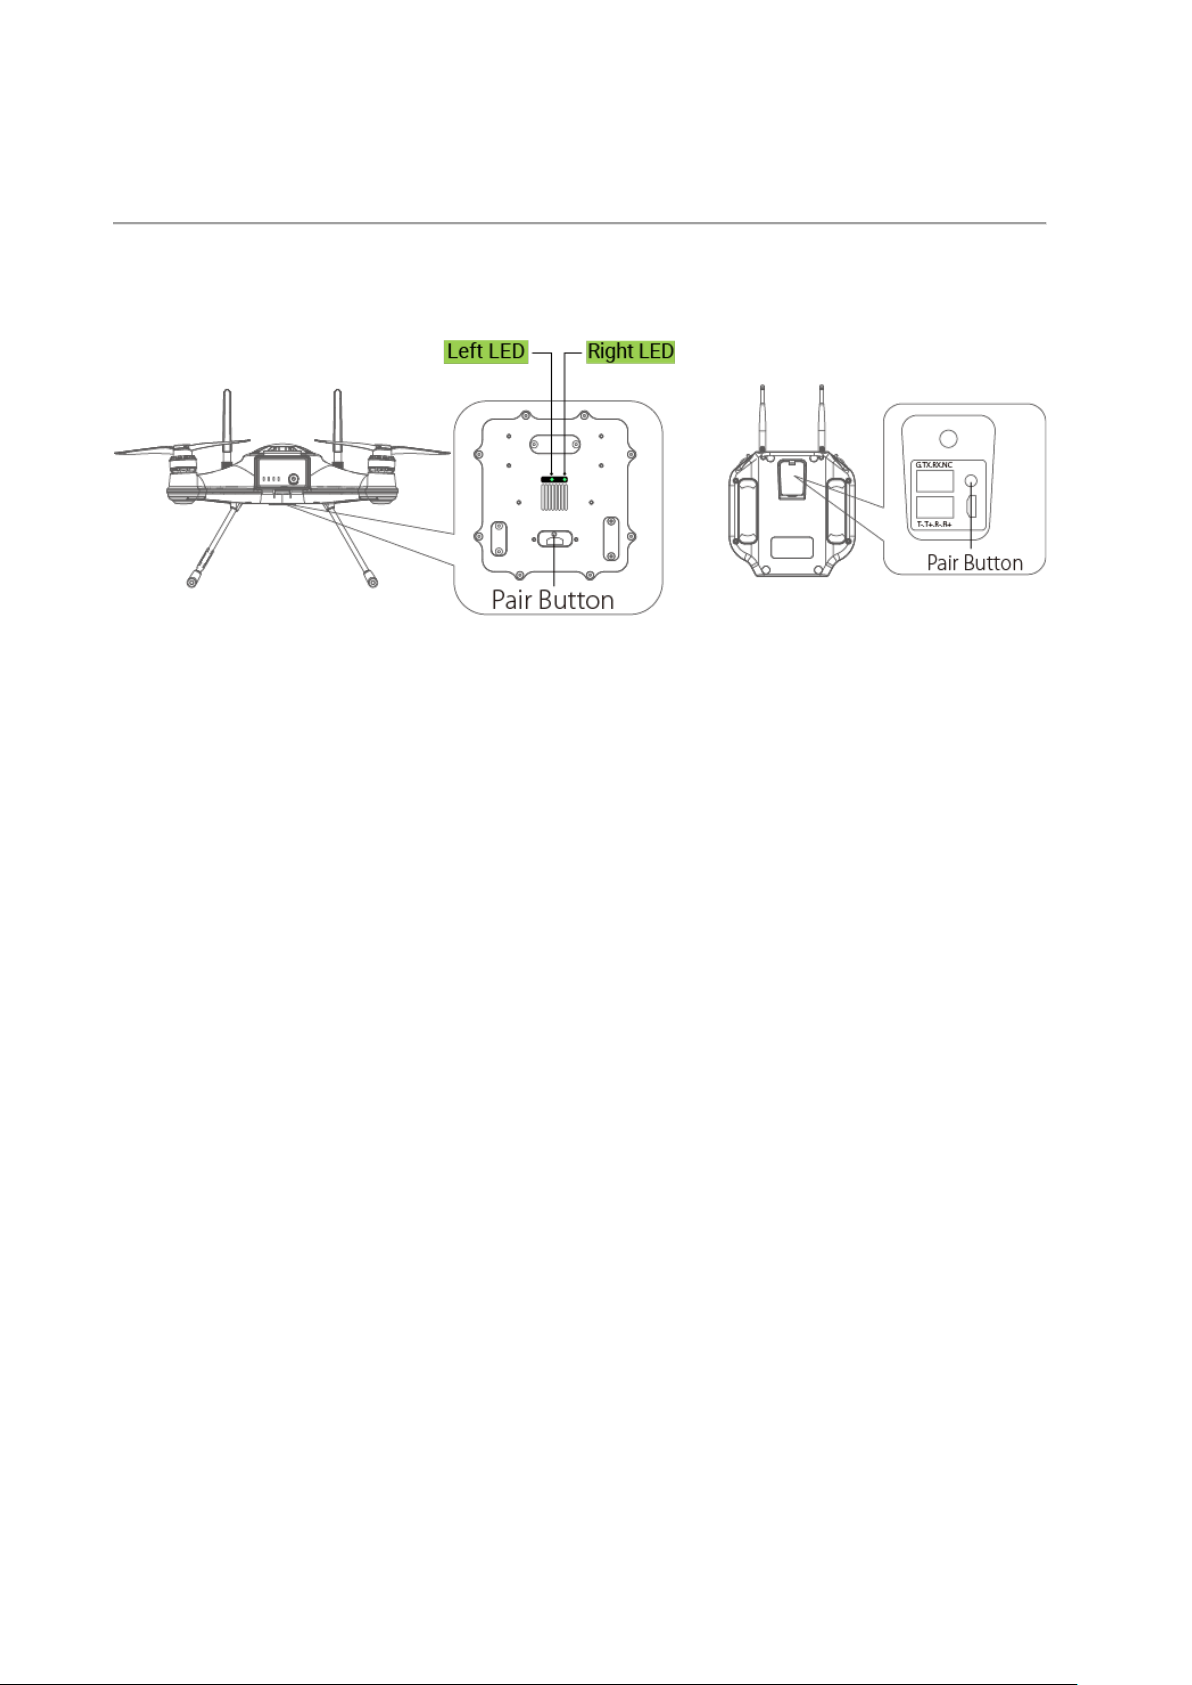
For SN number ending since V02 (V02, V03, V04 ... etc)
To pair
1. Turn over the aircraft and place it on the carrying case. Unscrew and take off the
"USB/Pairing Button" plate.
2. Turn on both the aircraft and remote control. Wait for 1 minute until the right LED
light turns from flashing to solid. *If the aircraft and remote control are turned
on beforehand, please restart both the aircraft and the remote controller.
3. Long press the pair button for 10 seconds. (Do not press shorter than 10
seconds) The right LED will start flashing. *If the right LED does not flash, please
repeat the step until the right LED starts flashing.
4. Wait for 1 minute until both the left and right LED turn solid. The reset process is
complete.
5. Now, long press the aircraft’s pair button for 3-5 seconds. (Do not exceed 5
seconds) The right LED will start flashing. *If the right LED does not flash, please
repeat the step until the right LED starts flashing.
6. Quick press the remote control’s pair button twice. The left and right LED will
flash alternatively.
• *If the left and right LED do not flash alternatively in 10 seconds, please
repeat this step again until the left and right LED flash alternatively.
• *If the left LED does not flash and the right LED has already turned solid.
Please repeat the pairing process again from step 1.
7. The pairing can take up to 3 minutes. When the pairing process is complete, the
right LED will turn from flashing to solid, and the left LED will stay flashing. The
remote controller will prompt “Aircraft initializing, please wait”.
8. Assemble the bottom plate back, turn over the aircraft and place it on a level
surface. The “Aircraft initializing, please wait” prompt will disappear in 30
seconds, and you are now ready to fly.
©2023 SwellPro All Rights Reserved 34
If the pairing process does not succeed, please try to pair it again from step 1.
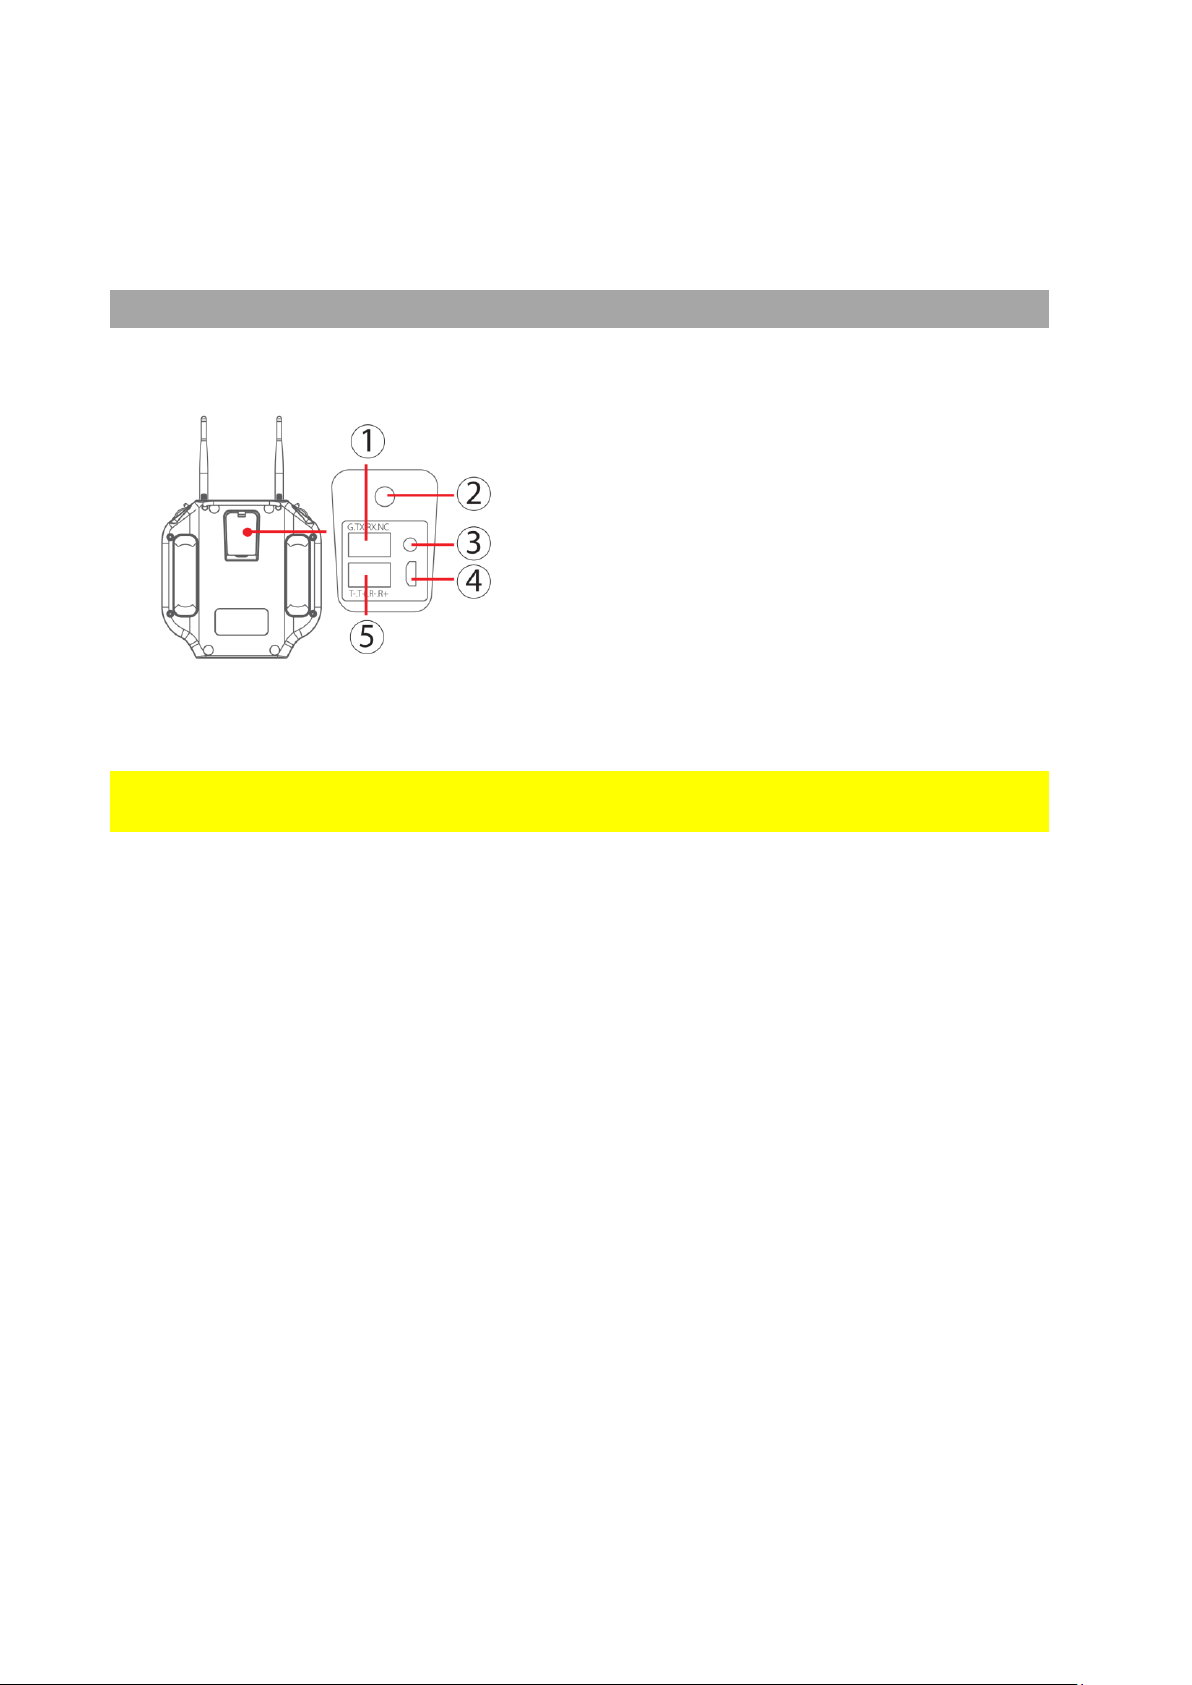
Remote Controller Rear Ports
① SDK Serial Port: access to flight control
data and transparent transmission.
② Charging Port: remote controller charging
port.
③ Pairing Button: used for aircraft and
remote controller pairing.
④ Micro USB: use for remote controller
firmware upgrade.
⑤ Ethernet Port: This supports the
development of computer ground station
software to control the aircraft and its
airborne equipment.
Ensure to tightly seal the rear rubber sealing before use to prevent water getting in
to the remote controller.

©2023 SwellPro All Rights Reserved 35
Flight
The drone relies on sensitive sensors to control flight positioning and stability. The
SplashDrone 4 is flight tested before shipment, however, an initial calibration of the
compass is required for your first use.
⚠Before operating the drone from a ship or other moving platform, ensure all necessary
calibrations have been completed before aboard, as some calibrations require a
completely stable platform.
Flight Safety and Environment
• Please make sure you have a comprehensive understanding of the SplashDrone 4,
and all the necessary measures required to implement a successful return home
function in the event of an emergency.
• If this is your first time flying a drone, please read this manual thoroughly and watch
the tutorial videos on our website support.swellpro.com, or our YouTube channels.
• We recommend taking professional training and guidance. When flying, choose an
Appropriate environment according to your skills. Check all calibrations and choose
a large open area to practice.
• It is strongly recommended that all drone pilots become familiar with flying in ATTI
mode in case of GPS or magnetic interference, which may result in malfunction
when flying on GPS mode.
• When experiencing GPS and magnetic interference during the flight, switch to ATTI
mode to gain full control and safely return the aircraft manually. Failure to do so and
result in aircraft crashing, the pilot takes the full responsibility.
• Please be well prepared before each flight, avoid any violent or excessive operations.
• Please maintain strict compliance with the local laws, any flying in NO-FLY ZONES is
prohibited.
• Any illegal & improper use or operation of this product is prohibited.
• Any invasion & violation of another person's right to privacy is not allowed. Before
using this product, it remains the duty of the drone pilot to comply with the local
laws regarding privacy protection.
• Any invasion or flying over another person/s property is not allowed, please agree
with any persons regarding any potential breach of privacy before the proposed
flight.
• DO NOT fly the SplashDrone 4 under the influence of alcohol, drugs, or any other
physical or mental impediment.
• Do not fly the drone with a malfunctioning remote controller.
• Please fly the drone away from crowds.
©2023 SwellPro All Rights Reserved 36
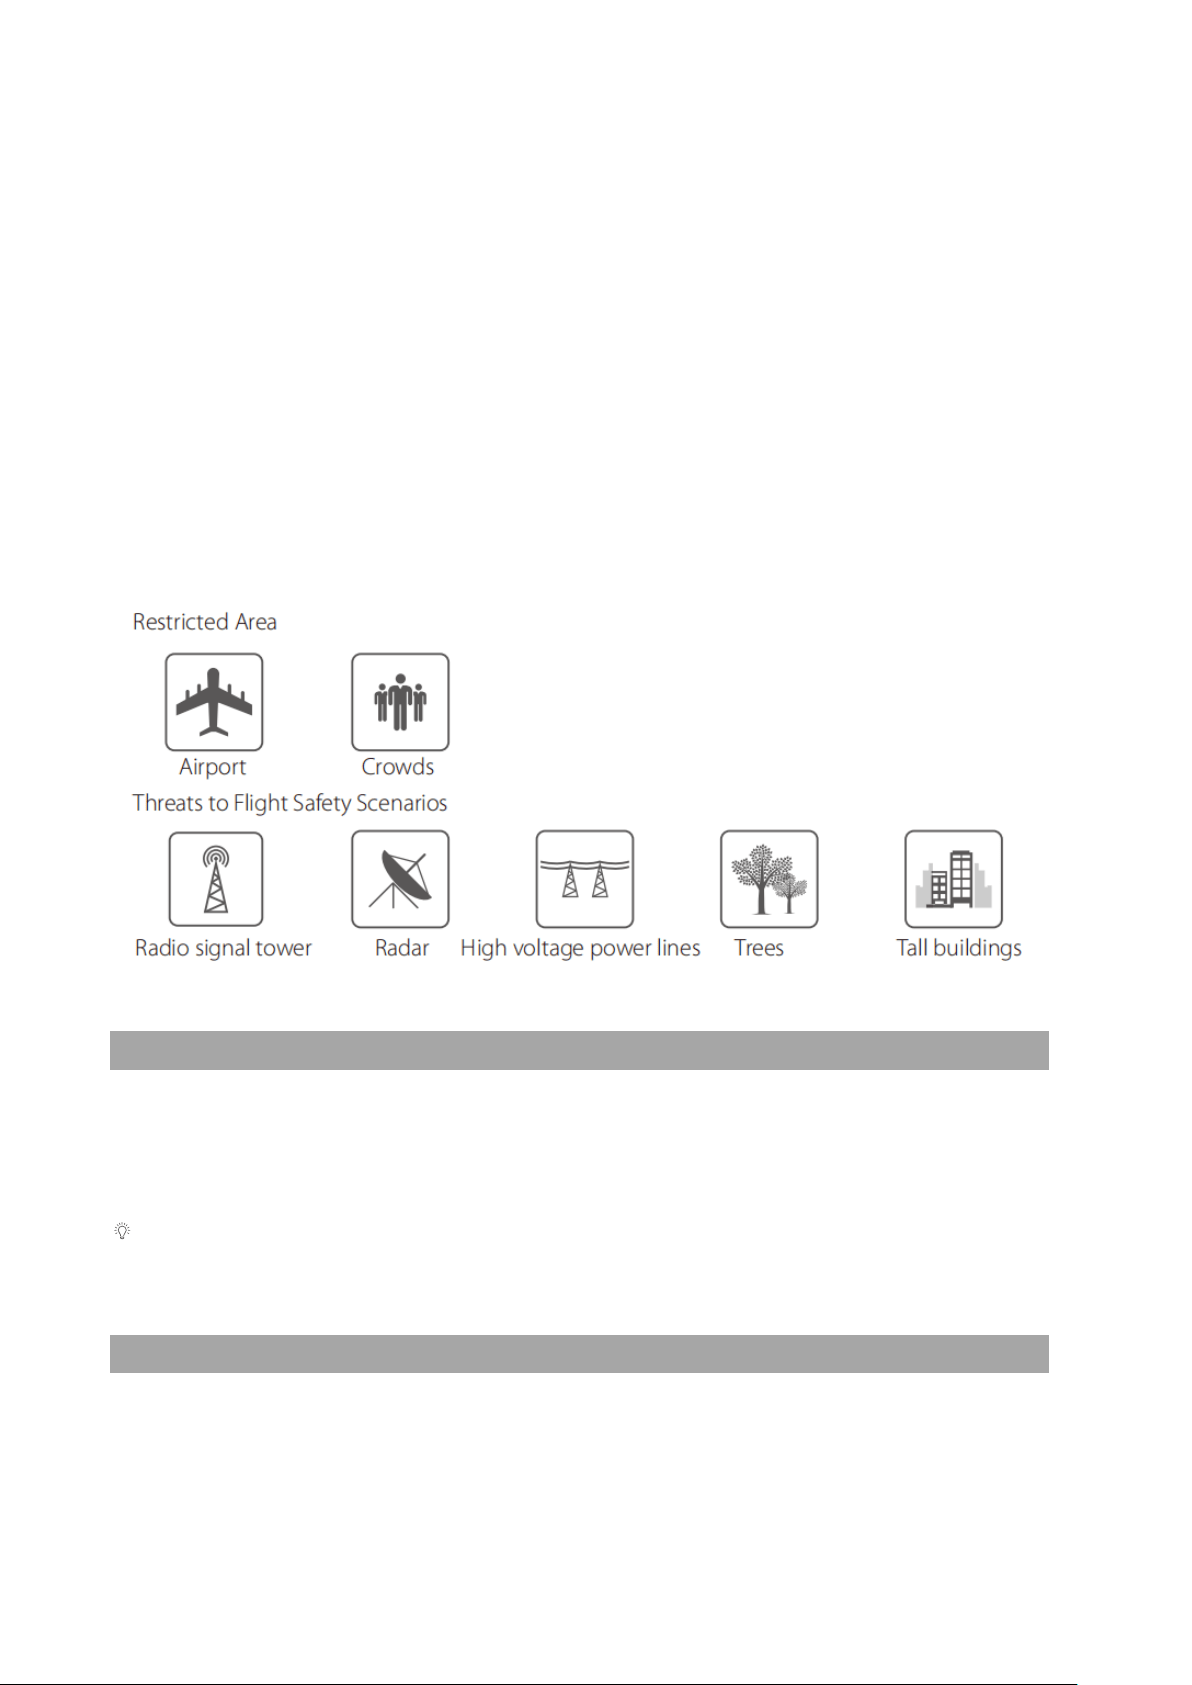
Flight environment requirement
• Always choose the open space as an ideal flying environment.
• Flying between or near tall buildings could adversely affect the functioning of the
compass and adversely affect or block GPS and transmission signals.
• During the flight, try to maintain the line of sight with the drone, keep away from
obstacles and people.
• Avoid flying near areas with high electromagnetic interference such as power lines
or signal towers to minimize the risk of interfering with the remote controller of the
drone.
• Fly below 4000 meters above sea level as environmental factors including air
density and wind shear reduce the performance of the aircraft and battery.
• Before flying in low temperatures, warm the battery to ~25℃ to maximize flight
time.
• Although the SplashDrone 4 is waterproof, do not fly in fog or strong wind
conditions. (For wind speed exceeding 14 m/s, or above Beaufort Force 6)
Flight Restrictions
According to provisions of the International Civil Aviation Organization and many
national air traffic regulations, drones must be operated in specified airspaces. By
default, the SplashDrone 4 is configured to not exceed an altitude of 120m the Home
Point altitude.
If you need to cancel the height limitation, please set the flight altitude to 0 on the
SDFly App.
Pre-Flight Checklist
• Intelligent batteries, remote controller, and your mobile devices are fully charged.
• Check all propellers are in good condition and correctly installed.

©2023 SwellPro All Rights Reserved 37
Ensure there is no wabble on the propeller after you install. If you correctly install
the propeller, the propeller still wabbles, you might need to tighten the screws on
the propeller base.
• Manually rotate the 4 motors to ensure they can spin smoothly.
• Make sure the waterproof barometric membrane is not damaged.
• Make sure all the connector sealings are tightly sealed with the rubber rings
attached, include the battery sealing, all the base connector ports. Make sure the
sealings are free of dirt, sand, and other debris.
• All the payload modules are tightly mounted to the aircraft.
• Micro SD card has been inserted and tightly sealed.
• SDFly App is successfully connected to the aircraft.
• Check the following flight data: flight battery> 16.0V; remote controller battery> 1
bar; Satellite > 5.
Compass Calibration
Compass calibration is necessary for any of the following situations:
• The drone is brand new.
• The drone has been repaired.
• The drone has been subjected to strong magnetic fields.
• The drone has been crashed or subjected to heavy shaking.
• The drone sways or drifts excessively during hovering in GPS mode.
• The drone is more than 100 km away from the last calibration location.
• The drone is not able to fly straight.
• The drone is flying to a certain direction when there is no input from the remote
controller.
• The remote controller screen prompts "WARNING Compass error Calibrate
Compass".
Compass Calibration Process:
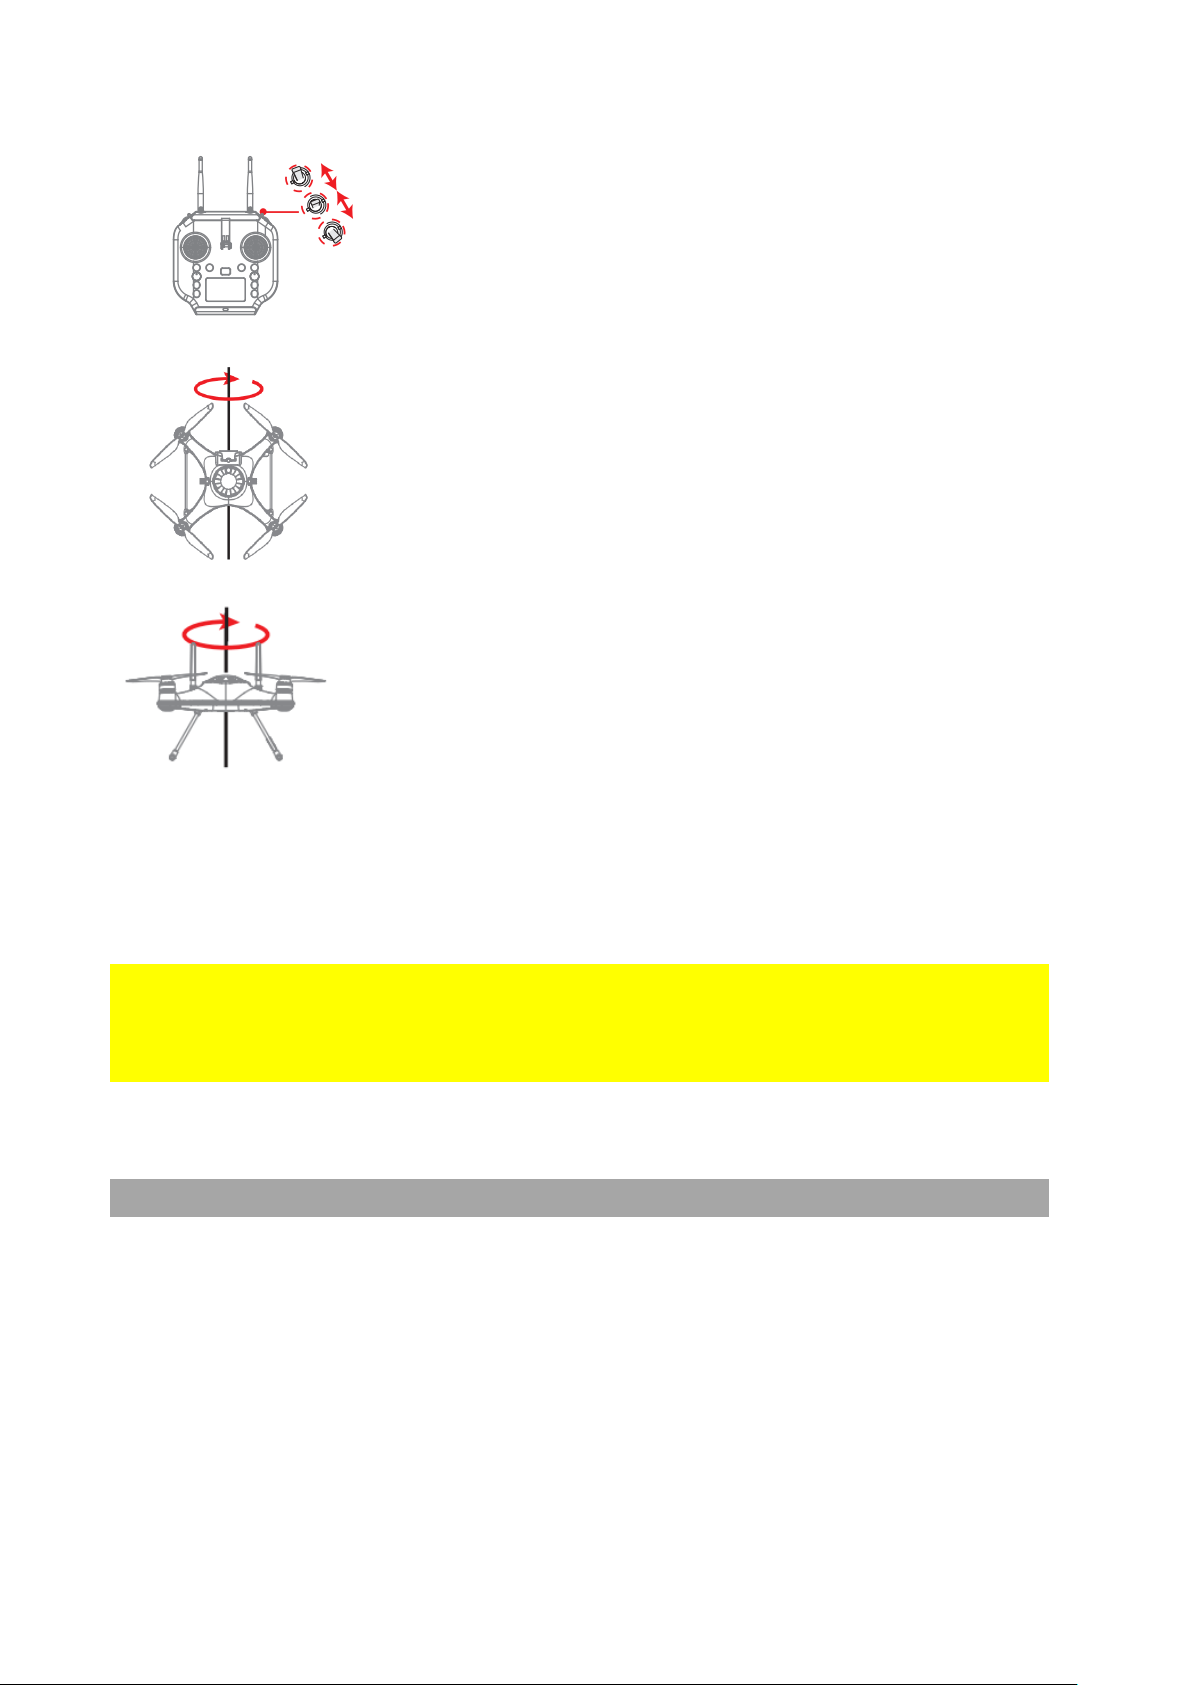
©2023 SwellPro All Rights Reserved 38
1. Place the drone on a level surface, power on the remote
controller then the drone. Wait for the aircraft to connect
to the remote controller.
2. After the connection finishes, fast switch the Flight Mode
toggle back and forth until the aircraft's rear status
indicators flash green, or the remote controller screen
prompts "Compass Calibration Rotate The Aircraft
Horizontally". The drone will now perform compass
calibration.
3. Pick up the aircraft and hold the drone horizontally and
rotate clockwise about 2~3 turns until the rear indicators
slowly flash green or the remote controller screen
prompts "Compass Calibration Rotate Aircraft NOSE
DOWN".
4. Hold the drone nose-down and rotate clockwise about
2~3 turns until the remote controller screen prompts
"Aircraft Initializing,Please Wait".
5. Place the drone on a level surface for 30 seconds. When
the prompt disappears, power off and restart the drone.
6. The compass calibration is complete.
⚠ 1) Compass calibration needs to be performed outdoors in an open area. 2) Remove
propellers before calibration. 3) Perform the calibration process away for sources of
magnetic fields, such as large metal structures, radio signal towers, power lines or
mobile phones, etc.
Gyroscope Calibration
The gyroscope provides stability data to the flight controller. If the gyroscope is not well
calibrated, the aircraft will tilt to one side when it takes off, and the tilted angle will
increase until the aircraft can no longer fly.
Process gyroscope calibration for the following situations:
• The drone trembles significantly during hovering in GPS mode.
• The drone's tilt range is too large during ascending in ATTI mode.
• The drone drifts during ascending or descending in GPS mode.
• The drone has been crashed or subjected to heavy shaking.
©2023 SwellPro All Rights Reserved 39
• The remote controller screen prompts "WARNING Gyroscope error Calibrate
Gyroscope".
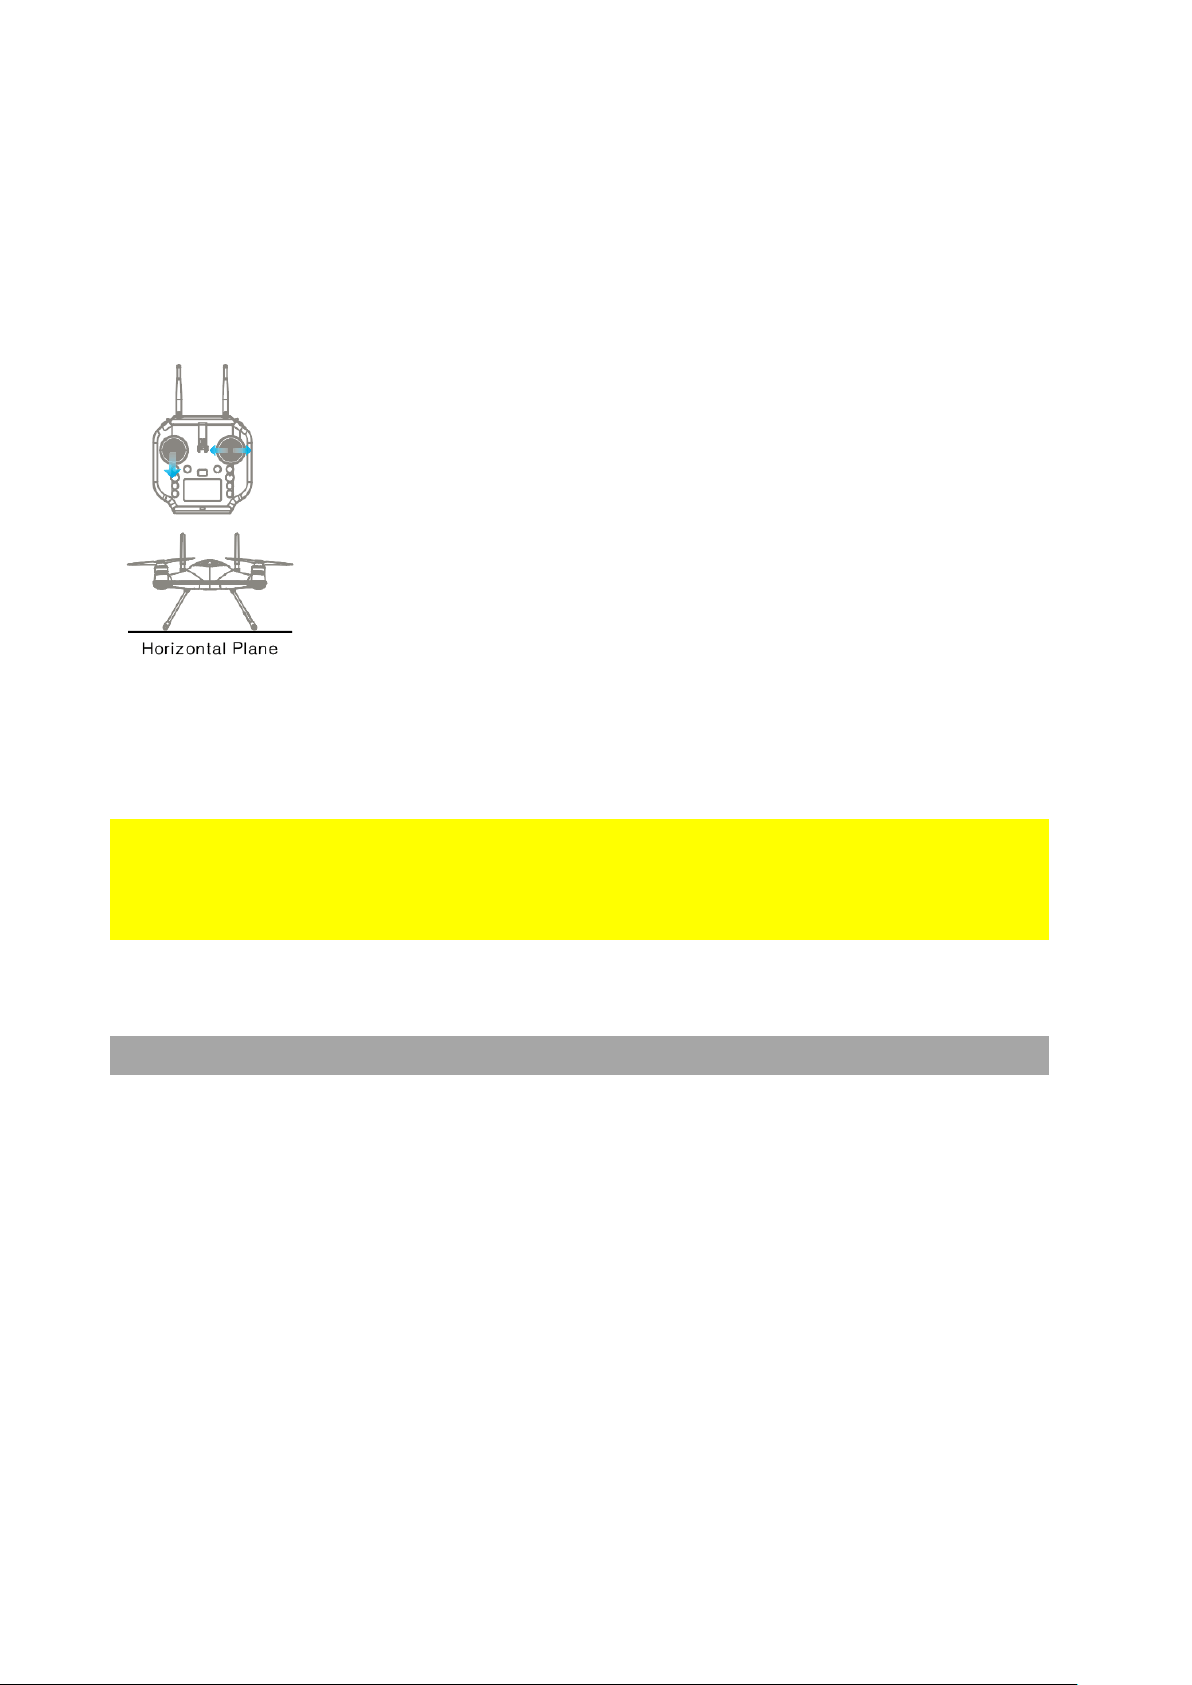
Gyroscope Calibration Process:
1. Place the drone on a level surface, power on the remote
controller, then the drone. Wait for the aircraft to connect to the
remote controller.
2. Hold the left joystick down to its lowest position, then quickly
move the right joystick left to right, back and forth, until the front
and rear status indicators flash alternately, or the remote
controller screen prompts "Aircraft Initializing,Please Wait". The
drone will now perform gyroscope calibration. Now release the
joysticks. This process will be completed in 20 seconds. Do not
move the drone during this process.
3. When the front status indicators turn soild red and the rear
status indicators turn solid green, or "Aircraft Initializing,Please
Wait" prompt disappears, power off and restart the drone.
Gyroscope calibration is complete.
⚠1) Never calibrate the gyroscope on a boat or other moving platforms. 2) When the
drone is floating on water, it may occasionally prompt gyroscope calibration, which is
normal and can be ignored. 3) If the calibration fails, the "Aircraft Initializing,Please
Wait" prompt will not disappear, please follow the steps, and try to calibrate again.
IMU Calibration
The Inertial Management Unit (IMU) provides the raw data of the aircraft's attitude in
space in nine dimensions. The IMU accelerometer sensor is critical to balance the
aircraft in flight.
Proceed IMU calibration for the following situations:
• The drone cannot arm (unlock) the motors after the compass calibration.
• The drone sways or drifts excessively during hovering in GPS mode.
• The drone has been crashed or subjected to heavy shaking.
• The remote controller screen prompts "WARNING IMU error - Calibrate IMU".
IMU Calibration Process
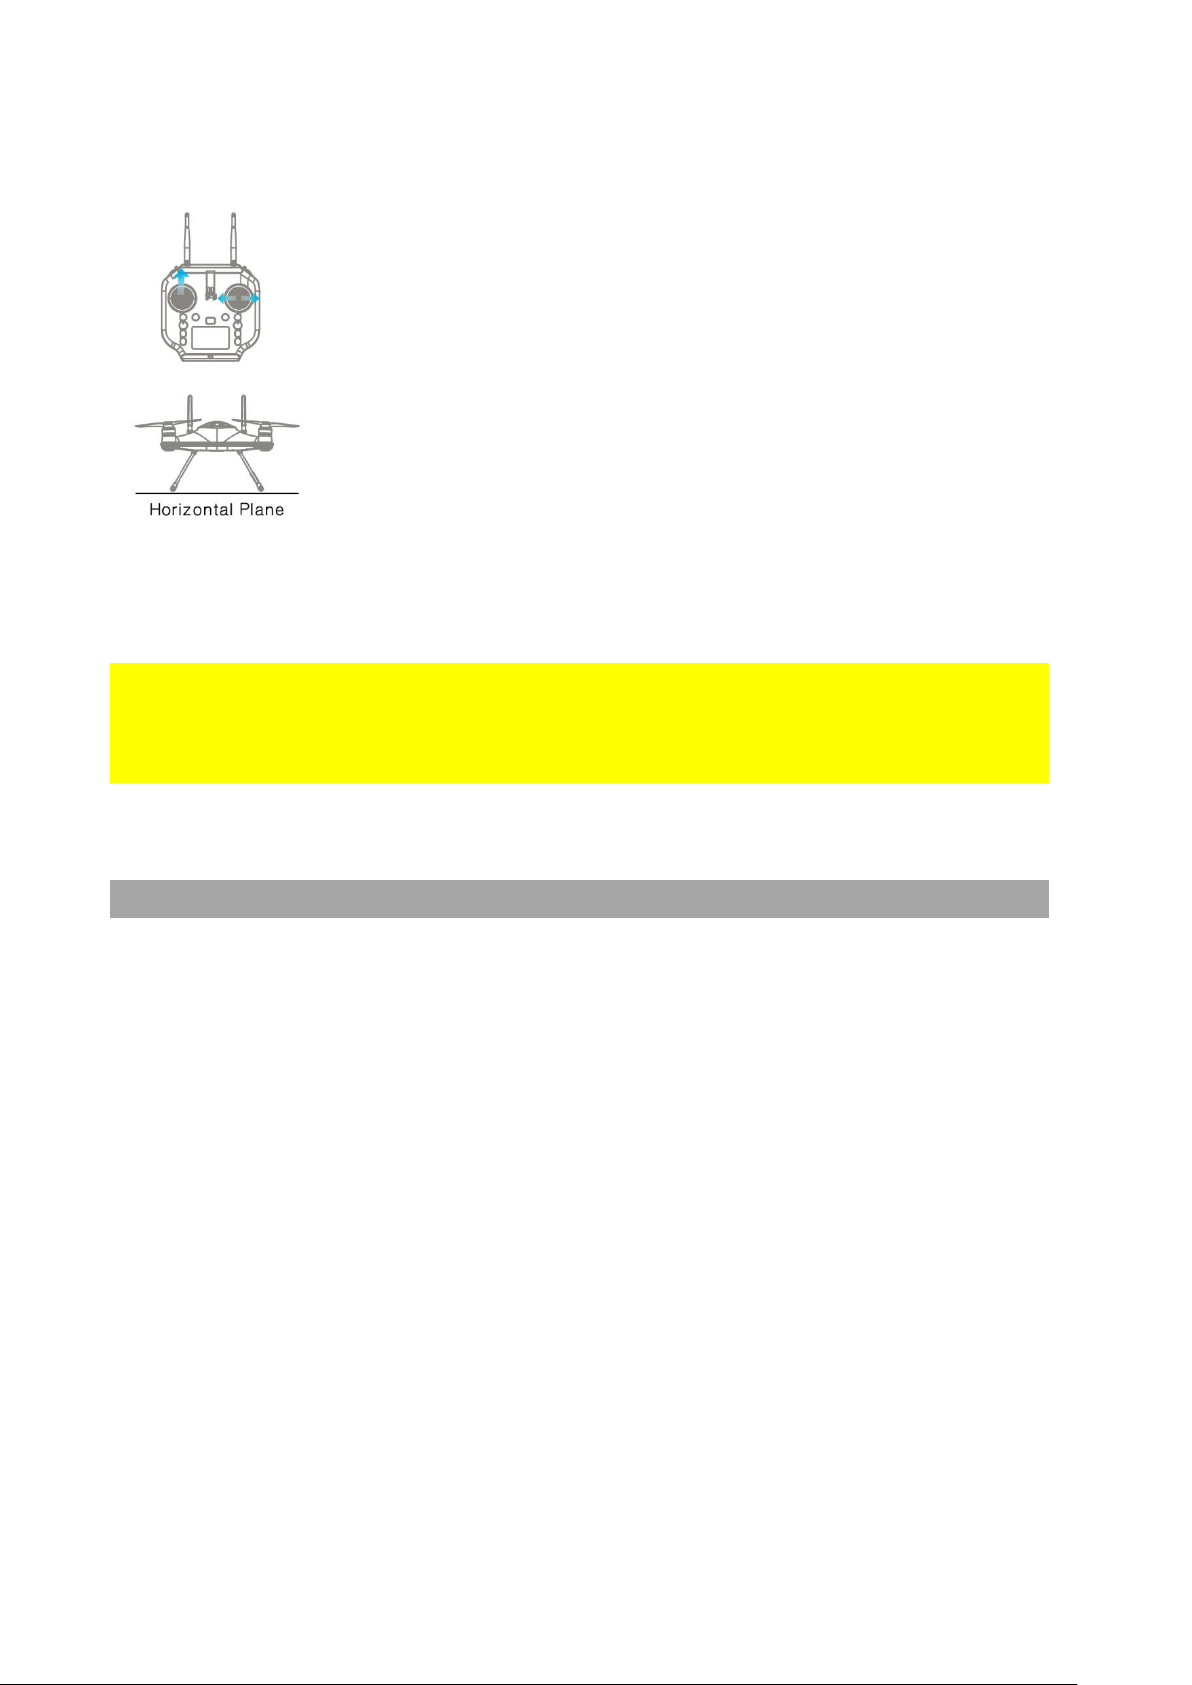
©2023 SwellPro All Rights Reserved 40
1. Place the drone on a level surface, power on the remote
controller, then the drone. Wait for the aircraft to connect to the
remote controller.
2. Hold the left joystick up to its highest position, then quickly
move the right joystick left to right, back and forth, until the front
and rear status indicators flash alternately, or the remote
controller screen prompts "Aircraft Initializing,Please Wait". The
drone will now perform IMU calibration. Now release the joysticks.
This process will be completed in 20 seconds. Do not move the
drone during this process.
3. When the front status indicators turn soild red and the rear
status indicators turn solid green, or "Aircraft Initializing,Please
Wait" prompt disappears, power off and restart the drone. IMU
calibration is complete.
⚠1) Never calibrate the IMU on a boat or other moving platforms. 2) When the drone is
floating on water, it may occasionally prompt IMU calibration, which is normal and can
be ignored. 3) If the calibration fails, the "Aircraft Initializing,Please Wait" prompt will
not disappear, please follow the steps, and try to calibrate again.
Basic Flight Steps
1. Check that the aircraft is correctly assembled.
2. The propellers are correctly mounted and secure.
3. The battery hatch is closed and locked.
4. The silicone plug on the back of the remote controller is closed.
5. The mobile device is securely mounted to the remote controller.
6. Place the aircraft on flat open ground or water.
7. Power on the remote controller, followed by the drone.
8. Connect the mobile phone to the remote controller Wi-Fi.
9. Open the App and wait for the camera image to Appear and the flight data display is
normal.
10. Check the following flight data: flight battery> 16.0V; remote controller battery> 1
bar; Satellite > 5.
11. For your safety, you should stand upwind and at least 3 meters away from the drone.
12. Novice pilots should always take off in GPS mode.
13. Arm the drone or use the auto take-off on the App.
14. Push the left(throttle) joystick up slowly, allowing the drone to take off smoothly.
Release the throttle when the drone is Approximately 1.5 m high. Allow the drone to
hover for a moment to ensure flight stability.
15. When you need to descend, gently pull down the left(throttle) joystick, allowing the
drone to descend and land on a flat surface or the water.
©2023 SwellPro All Rights Reserved 41
16. After landing, keep the left(throttle) joystick down to its lowest position for 3
seconds until the motors stop, or you can use the disarm joystick command to stop
the motors.
17. Stop video recording before shutting down the drone, otherwise, the video file may
be damaged.
Starting/Stopping Motors (Arming the Drone)
Before starting the drone, take the following precautions:
1. Place the aircraft in an open area 3 meters away from yourself and others. After the
aircraft is powered on, the system will conduct self-checking. After the self-checking is
completed, it will sound a confirmation tone.
2. Novice user should fly in GPS mode.
3. If the aircraft cannot be unlocked due to week GPS signal, switch to ATTI mode to
unlock the aircraft. However, it is not recommended for novice pilots to fly in this mode,
as the location of the drone is not fixed when flying in this mode.
4. In Custom mode, the motors cannot be unlocked in Cruise, Orbit, Headless mode.
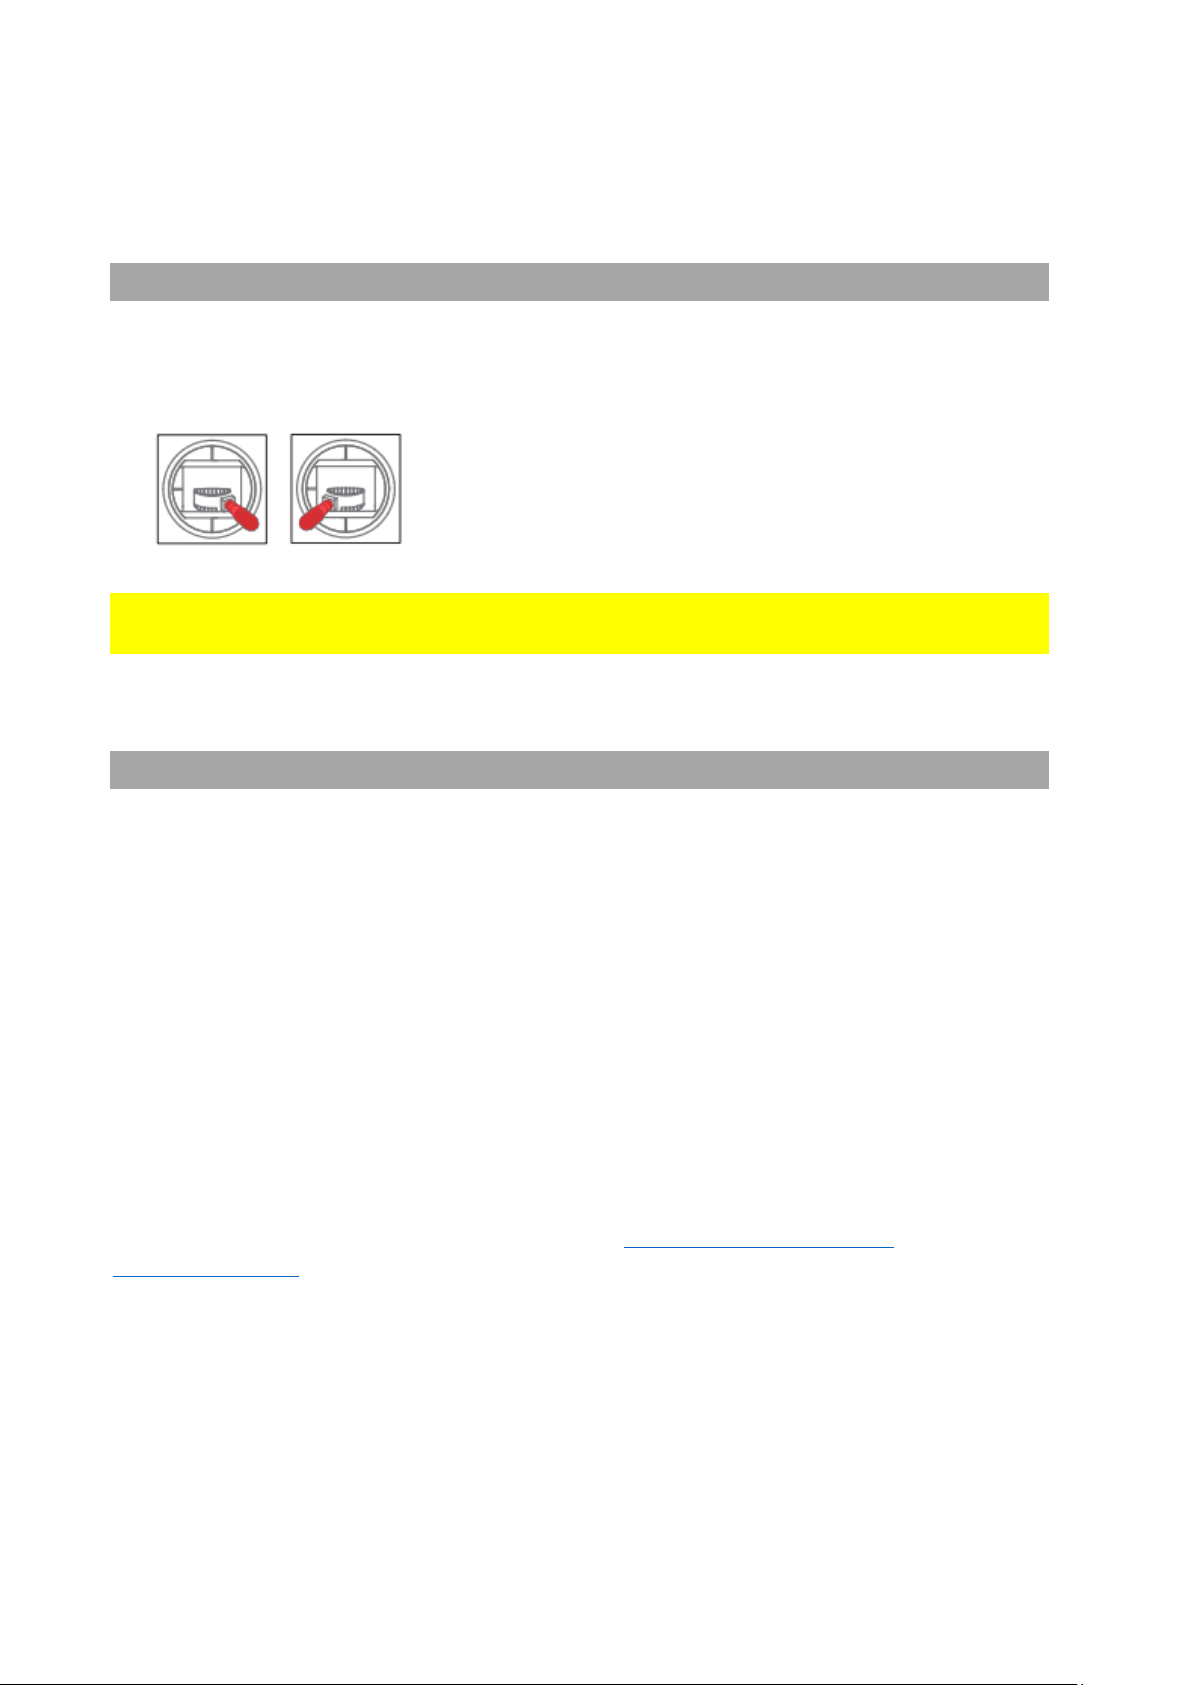
Starting (Arming) Motors
Remote controller operation
Description
Pull both the left and right joysticks simultaneously
down and inwards and maintain this position for 3
seconds. The motors will be unlocked and start
rotating.
Stopping Motors (Emergency Stop)
Remote controller operation
Description
Method 1: After the aircraft has landed on the ground
or water surface, pull the throttle to the lowest position,
and hold for 3 seconds. The motor will be lock and stop
rotating.
The recommended method for stopping motors.
©2023 SwellPro All Rights Reserved 42
Method 2: Pull both the left and the right joysticks
downwards and outwards. This method can be used as
an emergency stop.
Stopping the motors in flight may cause the drone
to crash and should only be carried out in an
emergency when stopping the motors will minimize
potential damage. (For example, there is a risk that the
drone may hit people or crowds)
Water Takeoff and Landing
1. When taking off from choppy water, ascend quickly from the surface to prevent the
drone from being affected by a passing wave.
2. When landing on water, descend vertically to the surface. If the drone lands with
horizontal speed, it may flip and be inverted. The flight controller will shut down the
motors if the drone becomes inverted on the water.
Do not leave the drone floating inverted for more than a few minutes. Flip the
drone using the Power-Flip command or recover the drone as soon as possible to
avoid water saturating the waterproof barometric membrane.
Boat Takeoff and Landing
When takeoff or landing from the boat/kayak, PAY EXTRA ATTENTION to the operation,
as it can be very difficult and dangerous to operate the aircraft.
• There should be enough space for the drone to take off or land on the boat.
• If there is not enough space on the boat, take off and land on the water can
otherwise be a safer, alternative option, as there is sufficient space for the drone to
operate.
• When the boat is rocking, the drone may not arm its motors in GPS mode. In this
case, carefully take-off in ATTI mode and then switch to GPS mode if the satellite
signal is back to.
• Always be aware of the direction of the wind relative to the boat for take-off and
landing. Stand in the upwind position relative to the aircraft to prevent the aircraft
from drifting toward you when take-off or landing in windy conditions.
• The Smooth+ controls are useful to finely control and balance the drone position
during this operation.
• For your safety, it is not recommended to launch or land the SplashDrone 4 from
your hands.
©2023 SwellPro All Rights Reserved 43
• After initiate return-to-home on the boat, always regain control and land manually
when the aircraft is approaching near you.
Power Flip
If the drone becomes inverted on the water, the Power-Flip feature enables the drone to
flip back to its upright position.
When the drone floating upside-down on the water, pull
both the left and right joysticks simultaneously down
and inwards and maintain the control until the drone
flip over to its upright position.
⚠ Power Flip feature is not applicable when the aircraft is equipped with the Boat Mode
Kit (BKT).
Flight Modes
There are 7 flight modes to configure on the SplashDrone 4 to accommodate the
different flight preferences and needs. They are GPS mode, ATTI mode, Sport mode,
Orbit mode, Cruise mode, Headless mode, Manual mode, and Boat mode.
For GPS mode and ATTI mode:
GPS mode and ATTI mode can be set by simply switch the flight mode toggle on the
remote controller.
For Sport mode, Orbit mode, Cruise mode, Headless mode, Manual mode:
Switch the flight mode toggle to Custom mode, then turn to the SDFly App and set the
flight mode among these 5 modes on the App flight mode section.
For Return to Home, Follow Me modes, refer to Dynamic Return to Home and
Intelligent Follow sections for detail info.
©2023 SwellPro All Rights Reserved 44
Flight Modes
Letter
Description
GPS
G
In GPS mode, the drone maintains a fixed position and height
while hovering (with no input from the remote controller). The
maximum flight speed is 10 m/s.
ATTI
A
In ATTI mode, the drone maintains a fixed height but not a
fixed position. Therefore, when there is no input to the remote
controller, the drone is going to drift with the wind while
maintaining its height. The maximum flight speed is 22 m/s.
Sport
S
In Sport mode, the drone is going to fly extremely fast and
responsively. When there is no input to the remote controller,
the drone is back to GPS mode which maintains its height and
position. It is great for extreme operation required for fast and
responsive flight. It also provides a fun and exciting flight
experience.
⚠ As the drone becomes extremely fast and responsive in
Sport mode, it is recommended to use for a more experienced
and skilled user.
Orbit
O
In Orbit mode, the drone is going to proceed to a circle flight
with a default 10m radius. The orbit radius can be set on the
remote controller or through the App. To set the orbit radius on
the remote controller, pull down the right joystick to increase
the radius, pull up the right joystick to decrease the radius. The
minimum radius is 10 m. The max radius can be set to 150 m.
Cruise
C
In Cruise mode, the drone is going to maintain the direction
and speed of your input after you release the remote controller.
©2023 SwellPro All Rights Reserved 45
Headless
H
In Headless mode, the head orientation of the drone is
dismissed. The drone can now move in the direction with
respect to your point of view. This makes controlling the drone
from afar more intuitive and makes manual return-to-home a
lot easier when you cannot see the head direction of the drone.
Manual
M
In Manual mode, the drone is NOT going to maintain its height
and position. The height, position, and speed of the drone need
to be controlled manually in this mode, but the drone is going
to maintain level during the flight.
⚠ This mode should ONLY be used for experienced and skilled
users. Please use with caution.
Boat
B
In Boat mode, the SplashDrone 4 can effectively be controlled
like a boat on the surface of the water. To move the drone
forward, pull the right joystick up. To move the drone's
direction left or right, pull the left joystick left or right to control.
The drone is not able to move backward in boat mode. The
drone's speed is limited to 1 m/s. In Boat mode, the App's
mission planning can be used normally: tap to fly, waypoints,
mapping, orbit.
To enter the Boat mode:
1. Land or place the drone on the water.
2. For landing on the water, lock the drone.
3. Switch the drone to GPS or ATTI mode.
4. Arm the drone by using the inward gesture.
5. Press the BOAT button on the remote controller.
6. The drone now enters the Boat mode.
7. Press the BOAT button again to exit Boat mode. The
drone can then take off normally.
Boat mode Application:
For underwater photography and underwater search, use
SwellPro gimbal cameras and an extension bar. For fish
searching, use SwellPro fish finder Dronar 01.
For overwater photography, use SwellPro gimbal cameras and
the Gimbal Overhead Kits.
⚠ Boat mode can ONLY be used when the drone equips with
SwellPro Boat Mode Kit (BKT). DO NOT use the Boat mode
without the floating foams. Using Boat mode on the water
without floating foams can result in serious damages to the
propellers and motors.
©2023 SwellPro All Rights Reserved 46
⚠ When using Boat mode on the water, be careful of the
landing gear and other attached accessories getting caught on
weed or other debris to prevent the drone from flying. Be aware
of the weeds and other debris to prevent the landing gear and
other attached accessories from getting caught by them,
which can cause the drone not to be able to move or take off.
There is a Slow mode embedded in all flight modes for a safer flight purpose. (For
example, when the drone is equipped with SwellPro Gimbal Extension Bar (GEB),
switching to Slow mode allows the drone to fly more stable and safely.) Press the
PAYLOAD(Right) / Slow Mode button 3 times to enter Slow mode.
Intelligent Follow
Thanks to the built-in GPS module on the remote controller. The drone can accurately
track the location of the remote controller. When Follow Me mode is turned on, the
drone will accurately track and follow the remote controller's position, you can still
adjust the aircraft direction, following distance, camera angle on the remote controller.
Start Follow Me: 1) Check that the remote
controller has a GPS signal by checking the
GPS status indicator on the screen.(The GPS
status icon is not flashing) 2) Press and hold
the Follow Me button ① to start Follow Me
mode. The remote controller will beep twice.
Stop Follow Me: Press and hold the "FOLLOW
ME" button again until the remote controller
beep once to indicate that Follow Me mode is
disengaged.
When the remote controller or the drone lost the GPS signal, Follow Me mode will
automatically be disengaged, and the drone will hover on a fixed position in the air.
When the remote controller and the drone lost connection, the remote controller will
beep and vibrate once, and the drone will initiate the return-to-home process.
⚠ Be aware of the drone's surrounding to prevent the drone from crashing into other
objects when using Follow Me mode.
©2023 SwellPro All Rights Reserved 47
⚠ Since the drone track the GPS location of the remote controller, keep the remote
controller in an open-air environment to prevent the built-in GPS from signal lost. (It is
not recommended to put the remote controller inside the car or kayak.)
Smooth+
The patented "Smooth+" flight control allows the pilot to finely tune the Roll and Yaw of
SplashDrone 4. Smooth+ makes professional, steady flight control as easy as turning
the knobs.
To enter Smooth+ mode, simply press the Smooth+
buttons.
Press the left Smooth+ button to engage Smooth+
YAW. The left joystick will now only control the
ascend/descend of the drone.
Press the right Smooth+ button to engage Smooth+
ROLL. The right joystick will now only control the pitch
of the drone.
Dynamic Return to Home (RTH)
The SplashDrone 4 constantly receives the GPS location of the remote controller,
allowing the aircraft to always return to the pilot even if they have moved from the
original take-off point.
The aircraft will always return to the remote controller location, not the take-off
location.
• If no GPS location is established by the remote controller, the drone would return to
the take-off point.
• If the remote controller lost the GPS signal during the RTH process, the drone would
return to the last known GPS location of the remote controller.
After the return function is activated either manually or automatically, the aircraft will fly
to the remote controller's location. Keep in mind that when the aircraft fly back within
the range of 30 meters from the remote controller, the aircraft will stop sensing the
remote controller's GPS location and return to the last recorded GPS location from the
remote controller. The aircraft is going to land on the remote controller's location.
To start Return-to-Home:
©2023 SwellPro All Rights Reserved 48
• Long press the Return Home button, the remote controller will beep and vibrate
twice to indicate that the drone starts the RTH process. The flight mode indicator on
the remote controller status bar will change to the letter "R" to indicate the drone is
in the RTH process.
• Return-to-Home can also be initiated on the App.
• The RTH height can be set on the App.
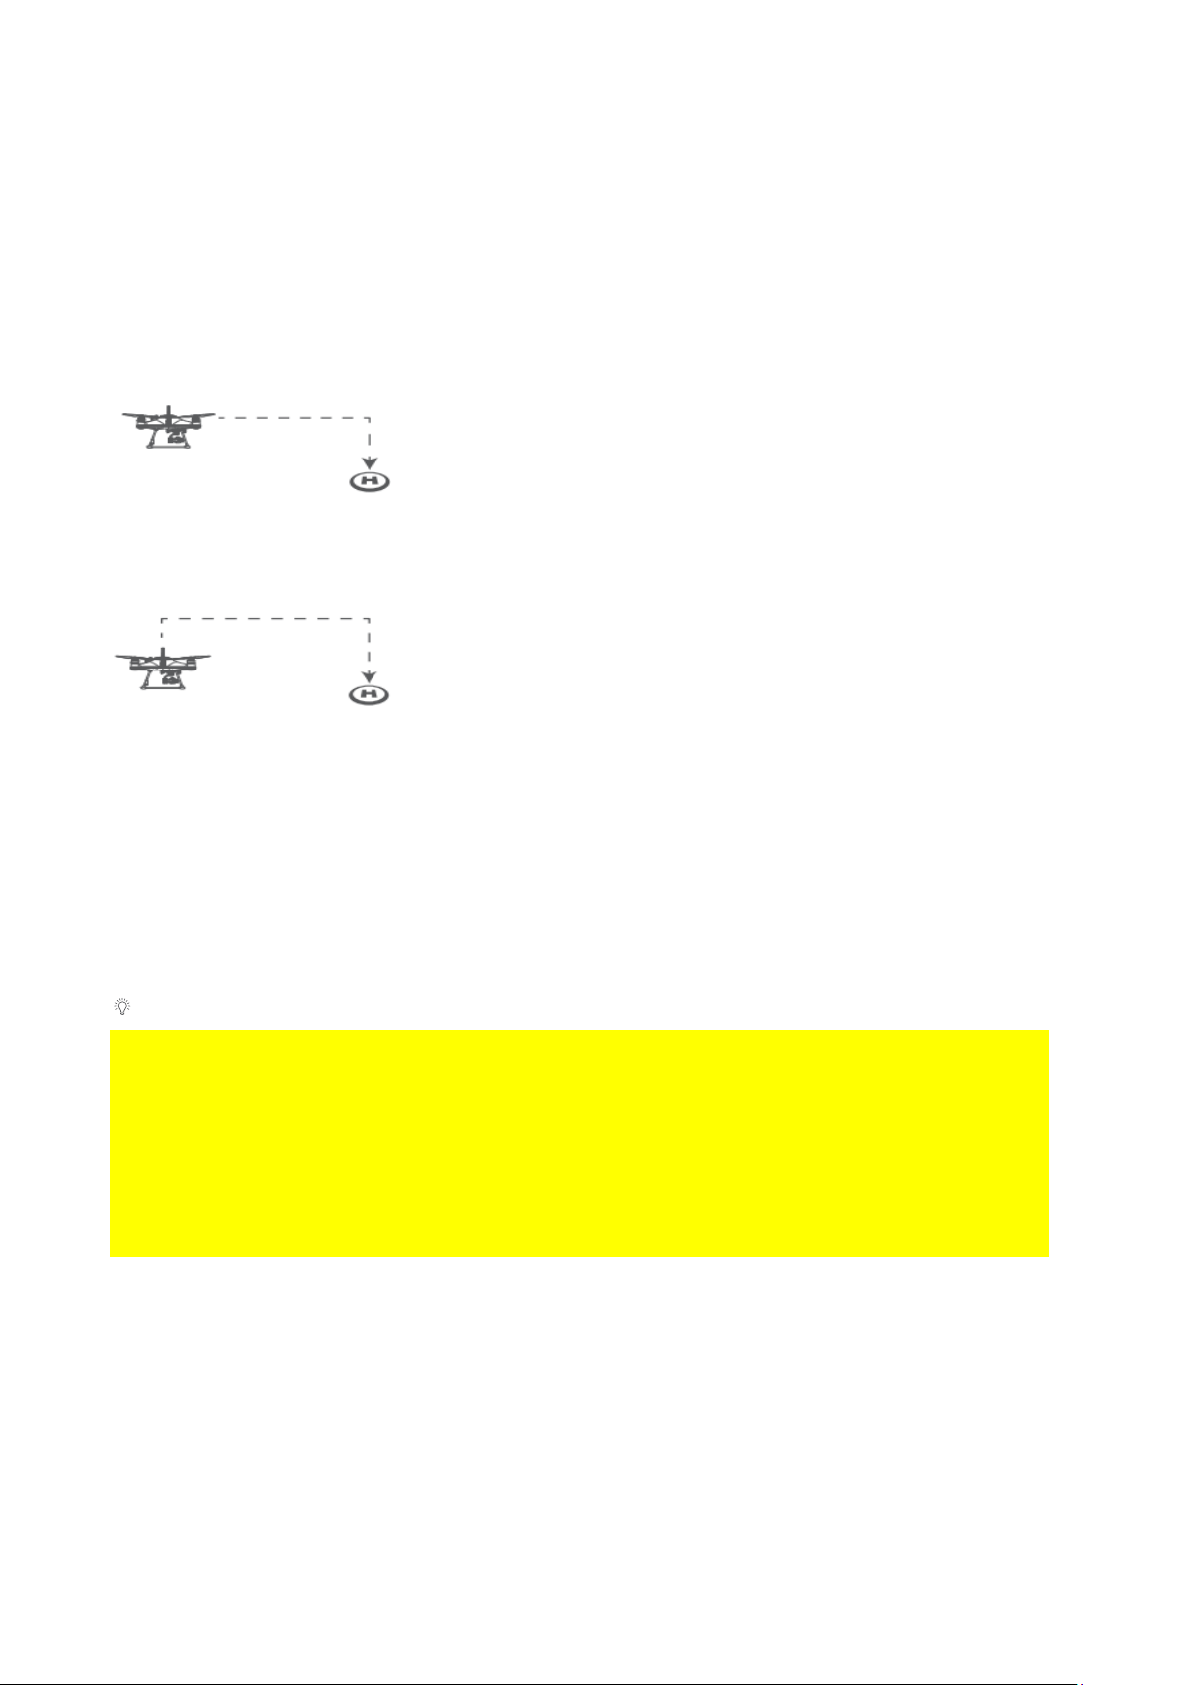
Return Home Process
If the aircraft's height is higher than Return-to-Home
Height, the drone will maintain its height and return to its
home point before landing.
If the aircraft's height is lower than Return-to-Home Height
and distance from Home Point > 15m, the drone will
ascend to Return-to-Home Height and then return to its
Home Point before landing.
During the return home process, the left and right joysticks of the remote controller can
be controlled to avoid obstacles or change the landing location. When you stop
controlling the joysticks, the aircraft will continue the RTH process. During the RTH
process, the Flight Mode toggle is disabled, but the control of attached accessories
such as the gimbal camera or payload release module still functions normally.
Return-to-Home Height can be set on the App.
⚠ If the aircraft's GPS signal is too weak (GPS signal shows 0), the aircraft is not able to
initiate RTH.
⚠ Keep your eyes on the aircraft during the RTH process, watch out for any obstacles
on the flight path.
⚠ If aircraft set to return to remote controller, ensure remote controller has good GPS
signal during the entire RTH process. (The remote controller GPS status icon is not
flashing)
Low Battery Auto Return to Home
Low battery auto Return-to-Home can be turned on or off through the App on your
preference. By default, low battery auto Return-to-Home is on.
Low battery auto RTH will initiate when the drone intelligent battery reaches Level 1 low
battery warning.
©2023 SwellPro All Rights Reserved 49
Level 1 alarm: The drone battery level has
reached 13.0 V. The remote controller
screen will prompt "LOW BATTERY; Return
Aircraft and Land". The front drone status
indicators will flash a pattern of 4 red
lights. If low battery auto Return-to-Home
is turned on, the drone is going to auto
RTH after this low battery warning.
Low Battery Auto Payload Release
Low battery auto payload release is used to increase the RTH possibility when the
drone is attached to a heavy load. Low battery auto payload release can be turned on or
off through the App on your preference. By default, the low battery auto payload release
is off.
When it is on, the low battery auto payload release will be initiate when the drone reach
level 1 low battery warning. On level 1 low battery warning, the drone will automatically
release the payload then initiate low battery auto Return-to-Home process.
©2023 SwellPro All Rights Reserved 50
SDFly App
SDFly is the whole new flight App designed by SwellPro. It marks the new era for
SwellPro. SDFly allows SwellPro pilots to do live HD viewing; adjust aircraft and camera
setting; proceed with mission planning (include waypoints and mapping); easily browse,
download, and share aerial footage. This App currently only supports the SplashDrone 4.
It works both on iOS and Android.
Download SDFly
SDFly can be downloaded on App Store or Google Play. To download the intall package,
go to support.swellpro.com and search for “SDFly App”.
Connect SDFly
After successfully installing the App, turn on the remote controller and then the drone.
Connect your mobile device to the remote controller's Wi-Fi hotspot named
SWP_Bxxxxx. The default password is "12345678".
After connecting the Wi-Fi, open the SDFly App. You can now log in to the drone.
SplashDrone 4 remote controller allows for up to 4 mobile devices to connect
simultaneously. Multiple people can operate the drone together. All the connected
devices can control the aircraft, but only the first connected device is able to show the
image transmission.
⚠ The Wi-Fi connection only supports 5G Wi-Fi (Wi-Fi 5 or Wi-Fi 6). Please use the
mobile device that supports 5G Wi-Fi in order to connect to the remote controller's
hotspot.
Use Mobile Data
Connecting the mobile device to the remote controller's Wi-Fi can cause the internet
connection to be interrupted.
For iPhone/iPad Users
Proceed to the following steps to use the mobile data while connecting to the remote
controller's Wi-Fi:
1. Go to the device's Wi-Fi setting. Look for the remote controller's Wi-Fi
(SWP_xxxxxx). Tap in the setting for the Wi-Fi.
2. Under IPV4 address, set "Configure IP" from automatic to manual mode.
3. Configure the manual IP: IP address to "192.168.2.110"; Subnet Mask to
"255.255.255.0".
4. Your iOS device is now able to use mobile data while connecting the remote
controller's Wi-Fi.
©2023 SwellPro All Rights Reserved 51
For Android Users
Turn on the Auto Switch to Mobile Data to allow the phone to use mobile data while
connecting to the remote controller. Go to Wi-Fi setting > Wi-Fi Preference > Auto
Switch to Mobile Data (names might vary depending on different types of phones, not
every phone has this function).
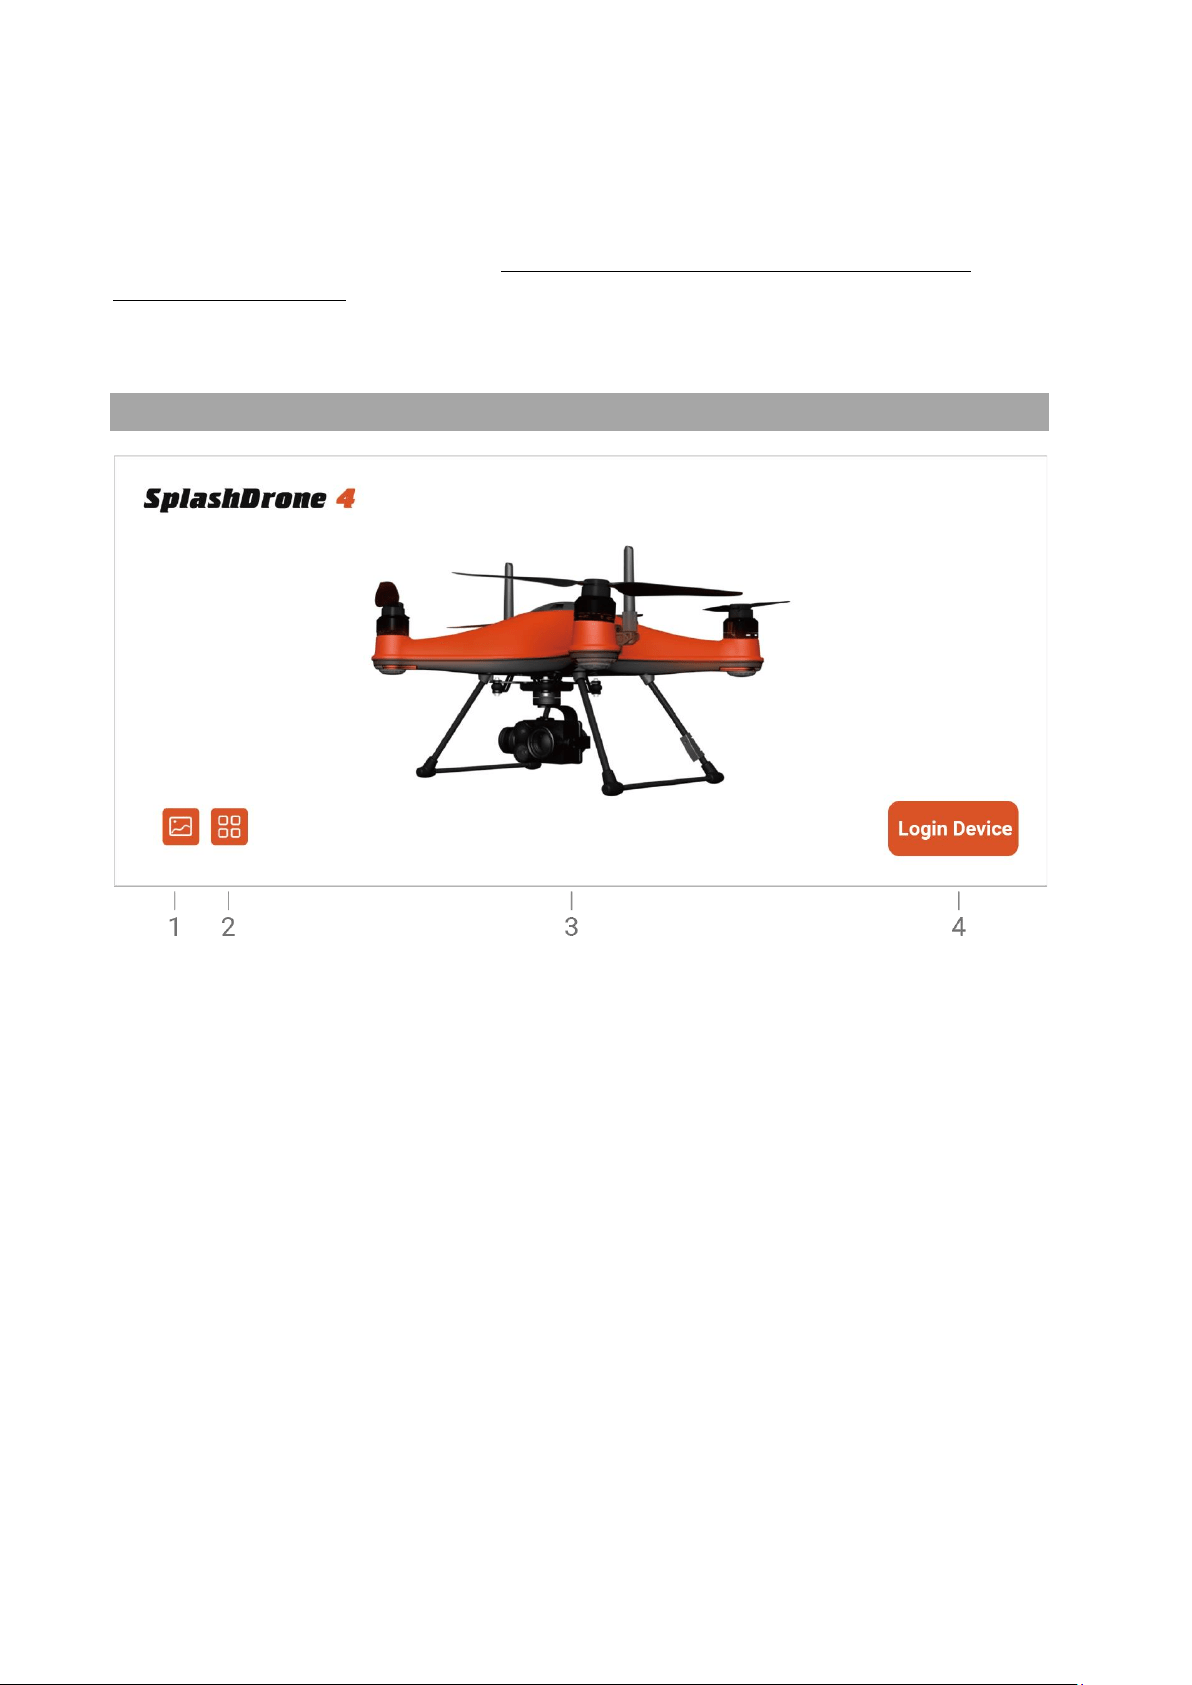
Home Screen
1. Gallery: Browse the photos/videos taken from the camera.
2. Info: Look for the info about SwellPro website, store, and contact information.
3. Connection Status:
Orange - connected to aircraft.
Gray - disconnected to aircraft.
4. Login: Tap to enter the main interface.
©2023 SwellPro All Rights Reserved 52
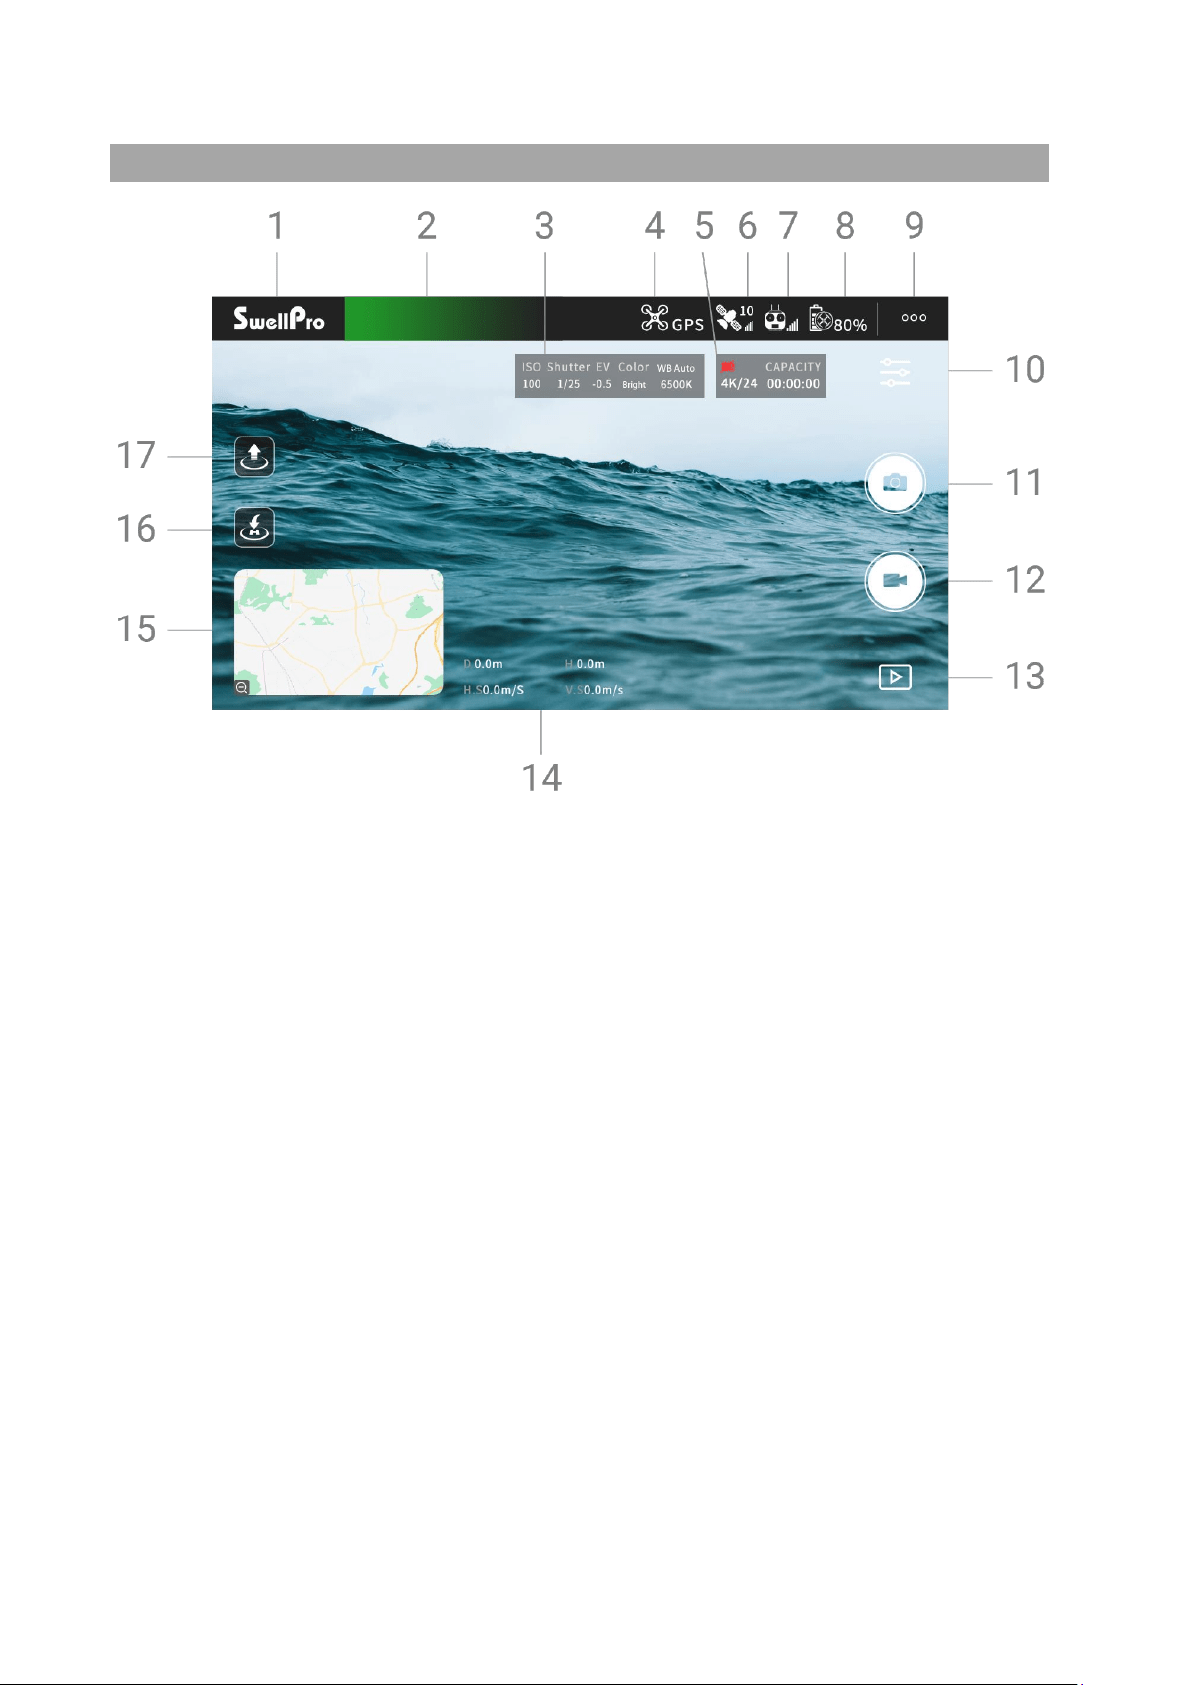
Main Interface
1. Home Screen: Return to the main interface.
2. Aircraft Status: Displays the status of the aircraft.
3. Camera Parameters: Current camera parameters.
4. Flight Mode: Current flight mode.
5. Memory card Information: Remain memory card capacity.
6. GPS Signal Level: GPS signal quality.
7. Remote Controller Signal Level: The signal quality between the remote controller
and the aircraft.
8. Aircraft Battery Level: Real-time display of the battery voltage.
9. Flight Settings: Set the drone flight settings and configure flight parameters.
10. Camera Settings: Set camera parameters and settings.
11. Photo: Take a photo.
12. Video: Start/stop video recording.
13. Playback: Browse photos and videos that have been taken.
14. Flight Parameters: D: Distance between the aircraft and the home point | H: Aircraft
height from Home Point | HS: Aircraft horizontal speed | VS: Aircraft vertical speed
©2023 SwellPro All Rights Reserved 53
15. Thumbnail map: Tap to quickly switch to the map interface.
16. Tap to return: Tap to start auto return to home (RTH).
17. Tap to take off: Tap to auto take off and hover at a height of 3 meters.
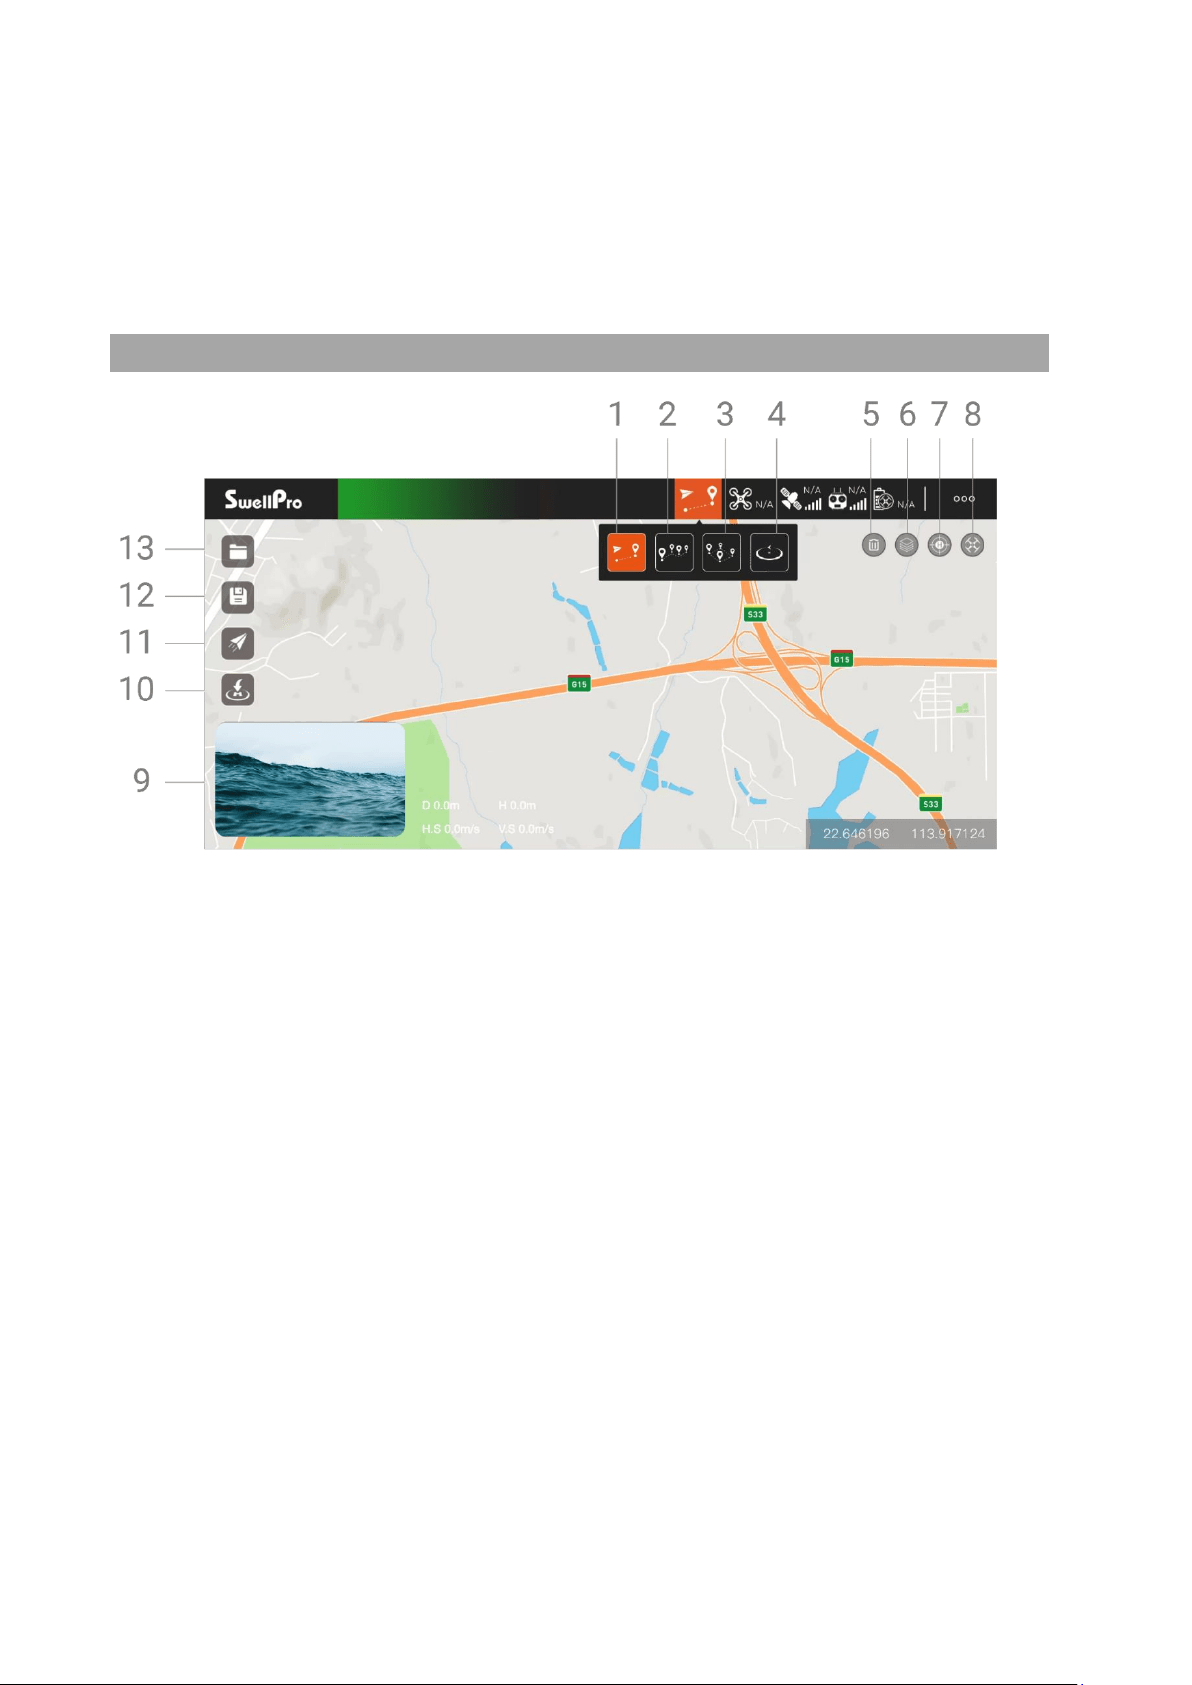
Map Interface
1. Tap to Fly
In GPS mode, tap where you want to fly to on the map and the SplashDrone 4 will
automatically fly to the location and hover. You can also manually enter longitude
and latitude as well as set altitude and speed.
2. Waypoints
Select several waypoints on the map, the SplashDrone 4 will fly in a route through
the series of waypoints. The height, speed, hover time can also be set for each
waypoint.
3. Mapping
Set an area boundary on the map, Mapping function will create a series of waypoints
forming grid-pattern routes on the map. The drone will then follow the route and
proceed with grid flight over the selected area. The spacing between routes, speed,
height can be set on the App. The number of waypoints that can be created for
Mapping is between 3 and 256. Mapping is useful for search and rescue, survey, and
inspection missions.
4. Orbit

©2023 SwellPro All Rights Reserved 54
Orbit combines orbit mode with Tap to Fly. Pilots can set a point on the map and its
radius. The drone will fly to the point and start orbiting. The orbit radius, speed, laps
can be set on the App.
5. Delete: Tap to delete the set point on the map.
6. Map Layer: Pilots can choose from 3 different map layers: Standard, Satellite, Dark.
7. Remote Controller Location: Tap to quickly identify the location of the remote
controller on the map.
8. Drone Location: Tap to quickly locate the position of the drone on the map.
9. Thumbnail Screen: Tap to switch between camera and map views.
10. Tap to return: Tap to start auto return to home (RTH).
11. Execute: Tap to excute mission planning (Tap to Flight, Waypoints, Mapping).
12. Save: Save the points set on the map for latter use (recurring tasks).
13. Route Saved: Access and perform the saved points.
Set the Wi-Fi Password
Set the Wi-Fi Password
To set the Wi-Fi password:
1. Connect the SDFly to the remote controller.
2. Login to the device.
3. Go to flight settings, showing as 3 dots on the top right of the interface.
4. Scroll to advanced settings and select "Set Wi-Fi Password".
5. Type the password you want and press "SAVE PASSWORD".
6. Re-connect the Wi-Fi.
Reset the Wi-Fi Password
To reset the Wi-Fi password:
1. Power on the remote controller.
2. Wait for 40 seconds for the MultiSync video transmission system to boot up.

©2023 SwellPro All Rights Reserved 55
3. Press the pairing button on the back of the remote controller 5 times.
4. Wait for another 20 seconds for the Wi-Fi password reset to finish. The Wi-Fi
password is restored to the default, 12345678.
After resetting the Wi-Fi password, re-pairing the remote controller and the aircraft is
REQUIRED. To re-pair, the remote controller, and the aircraft, check the pairing part
under the remote controller section.

©2023 SwellPro All Rights Reserved 56
Appendix
Specifications
Aircraft
Waterproof Rating:
IP67
Weight(include battery and
propellers):
2.18 kg
Axis Diameter:
450 mm
Max Ascend Speed:
4 m/s
Max Descend Speed:
4 m/s
Max Flight Speed:
22 m/s(ATTI), 10 m/s(GPS)
Max Tilt Angle:
ATTI: 25°; ATTI (slow mode): 12.5°
Max Altitude from Takeoff
Point:
120m (GPS) / ATTI - no limitation
Max Wind Speed Resistance:
72 km/h | 20 m/s | 39 knot
Max Flight Time:
30 mins (no wind & no load);
Hovering Precision:
±0.5 m (vertical); ±0.5 m (horizontal)
Max Flight Distance:
5.0 km
Max Payload Capacity:
2.0 kg (Include payload accessories)
Max Take-off Weight
4.18 kg
Flight Control:
Hawk
Digital Video Transmission:
MultiSync
Motor:
#3509 - 740Kv (special coated)
ESC:
40A (flux)
Propellers:
#1242 carbon fiber quick release propellers
Motors:
#3509 - 740Kv
Operating Frequency:
5180 - 5875 MHz
Transmitter Power (EIRP):
FCC/IC: ≤ 24 dBm
CE/SRRC/MIC: ≤ 20 dBm
Working Temperature:
-10℃ ~ 40℃
Satellite Positioning
Systems:
GPS/GLONASS
Pass-through Serial Port:
Connect to a third-party device and transfer the data of the
third-party device to the remote control

©2023 SwellPro All Rights Reserved 57
UART:
Allows for TTL serial port to TCP, with the baud rate of
115200
Wi-Fi Hotspot
IP: 192.168.1.101:2222
Power Input:
12V/2A | 5V/2A
Remote Controller (MRC)
Waterproof Rating:
IP66
Operating Frequency:
5180 - 5875 MHz
Transmitter Power (EIRP)
FCC/IC: ≤ 24 dBm
CE/SRRC/MIC: ≤ 20 dBm
Real-time Video
Transmission:
720P@30fps
Latency:
200 ms (It depends on the actual shooting environment and
mobile devices)
Battery:
2S 3000mAh
Working Time:
7 hours
Working Current/Voltage:
0.3A/7.4V
Ethernet Port:
IP: 192.168.2.220:2222
Wi-Fi Hotspot
IP: 192.168.2.220: 2020; Default password: 12345678
Mobile Device Mount:
Suitable for any size phones;
Tablets require a larger mount (sold separately)
Screen:
2.68 inch, 128x64
Working Temperature:
-10℃ - 40℃
Remote Charging time:
3 hours
Power Input:
5V/2A
Intelligent Battery (IB4)
Nominal Capacity:
6600mAh
Voltage:
14.8V
Type:
Intelligent 4S LiPo
Watt Hours:
97.68 Wh
Size:
153.6*82.4*48.3mm
Weight:
735 g (±5 g)
Working Temperature:
-10℃ - 40℃
Charging Time:
1.5 hour
Max Charging Power:
84 W
©2023 SwellPro All Rights Reserved 58
Charger
Input
100 – 240V, 50/60Hz
Output:
16.8V@Dynamic Current / [email protected]
Rated Power:
84.5 W
Mobile Device connection
Operation Frequency
5180 - 5875 MHz
Max Transmission Distance
(Unobstructed, free of
interference)
10 m
App
Mobile App Name
SDFly
Live View Quality
720p@30fps
Latency
< 250 ms (depending on environmental conditions and
mobile devices)
Firmware Update
For the best flight experience, please update the aircraft and the remote controller to
the latest firmware.
Flying Guide
• Many regulations require the pilot to fly a drone within line of sight. Take particular
care when flying a drone out of sight.
• Unless it is an emergency, NEVER Lock or STOP the motors in flight as this will
cause the drone to fall to the ground and crash.
• When the low battery level warning is activated, plan to return the drone and land
safely before the battery reaches a critical level.
• The Return Home function can be used to reorient the drone towards the Home
Point. By activating the Return Home function, the drone will rise to the return
altitude (20m) and then turn towards the Home Point before starting its return.
• If any obstacles are in the flight path of the drone during a Return Home process,
control should be regained by turning off the Return Home function.
• If you crash your drone, lock the motors to prevent damage to the motors and
propellers.
• Do not attempt to touch the motors, until the motors have stopped rotating
completely.
• When landing on water, avoid abrupt landings to avoid damage to the drone.
©2023 SwellPro All Rights Reserved 59
• When flying over water, avoid the drone dropping or crash into the water from a high
altitude as this could cause major damage to the drone.
• Do not expose the drone & battery to direct sunlight for long periods as this can
raise the internal temperature of the drone to well above the operating temperature
range.
• If the drone does not Appear to be responding to the remote controller, as usual,
switch the drone to ATTI flight mode and fly the drone to a safe landing location.
• The possible causes for the instability or loss of control of the drone could be poor
GPS signal, poor radio signal, or weak Earth magnetic field.
• If the drone Appears to be affected by magnetic interference, try the following
remedies.
• Re-calibrate both the compass and accelerometer on the SplashDrone 4.
• After completing the calibration, arm the drone motors to fly in GPS mode to verify
whether this phenomenon has been eliminated.
• If the abnormality remains the same, please re-locate to another place at least 5KM
away and re-calibrate the SplashDrone 4. Following the re-calibration, please test the
drone again.
• If the problem persists, please contact SwellPro or your local dealer for further
troubleshooting and solutions.
Joystick Calibration
Calibration of the joysticks is necessary if the third page of the remote controller screen
indicates that the control inputs are not centered when the joysticks are in their neutral
position.
To calibrate the joysticks, refer to the SwellProTools firmware update instructions.
It is necessary to calibrate the remote stick when changing the throttle mode.
Before calibration, make sure that all toggle switches are set to the top position.

©2023 SwellPro All Rights Reserved 60
Warranty Information
Please visit the SwellPro support website support.swellpro.com. Search "After-sales
Policy" for warranty information.
Battery Care and Maintenance
• Do not allow the batteries to come into contact with any kind of liquid.
• Do not drop the battery into the water.
• Do not leave batteries out in the rain, or near any sources of moisture. If the
inside of the battery comes into contact with water, chemical decomposition
may occur, potentially resulting in the battery catching on fire, and may even lead
to an explosion.
• Never use or charge swollen, leaky, or damaged batteries. If your batteries are
abnormal, please contact SwellPro or a SwellPro authorized dealer for further
assistance.
• The battery can be used in temperatures ranging from -10°C to 40°C. Using the
battery in environments above 60°C can lead to a fire or explosion. Using the
battery below -10°C can lead to permanent damage.
• Never disassemble, or penetrate the batteries with sharp objects, otherwise, this
may result in the battery catching fire, or even lead to an explosion.
• Electrolytes in the battery are highly corrosive. If any electrolytes make contact
with your skin or eyes, immediately wash the affected area with fresh running
water for at least 15 minutes, and then see a doctor immediately.
• If the battery falls into water, pick it up immediately and put it in a safe and open
area. Maintain a safe distance from the battery until it is completely dry. Never
use the battery again, and dispose of the battery properly as described in the
Battery Disposal section below.
• Do not heat batteries. A battery fire can be extinguished using sand, or a dry
powder fire extinguisher.
• Do not put batteries in a microwave oven, or a pressurized container.
• Do not put the loose battery cells onto any conductive surface, such as a metal
table.
• Do not put any conductive cables or metal objects together with batteries, where
they may short-circuit against each other.
• Do not drop or strike batteries.
• Do not place heavy objects on the batteries or the battery charger.
• Clean battery terminals with a clean, dry cloth. Failure to do so may result in poor
electrical contact, which could reduce the battery capacity, or damage the
charger.
• Do not continue to fly the drone after the low battery alarm has been activated;
this will result in over-discharging the battery, and potentially could damage the
battery cells.

©2023 SwellPro All Rights Reserved 61
Precautions for low-temperature use
• When the battery use in a low-temperature environment (-10°C to 5°C), the
battery capacity and flight time will be drastically reduced. It is recommended to
take off when the battery is fully charged. Please fully charge and keep the
battery warm before use.
• In a low-temperature environment, it is recommended to preheat the battery to
above 5°C before flying, and it is better to preheat to above 20°C.
• Before flying in a cold environment, insert the battery into the aircraft to warm up
for 1 to 2 minutes, and take off after the battery is fully warmed up.
Battery Charging
• Always use a SwellPro Approved charger to charge the battery of the drone, and
the radio controller. SwellPro takes no responsibility if the battery is charged
using a non-SwellPro charger.
• To avoid any potential accidents happening, please do not leave the battery
charging unattended.
• Do not charge the battery near flammable materials, or on flammable surfaces,
such as carpet or wood.
• Disconnect the charger when not in use.
• Do not clean the charger with denatured alcohol or other flammable solvents.
• Never use a damaged charger.
Battery Storage and Transportation
• If the drone is not being used for a long period of time, ensure to fully charge the
intelligent flight battery and remote controller for storage. To prevent the battery
from over-discharge, recharge the battery every 3 months.
• Do not leave both the intelligent flight battery and remote controller battery
unattended for an excessive period of time (longer than 3 months). As the
battery discharge over time, long storage time without recharge would result in
battery over-discharge and cause permanent damage to the battery.
• It is recommended to fully charge the battery before put into storage, as the
higher the battery level, the longer the battery can be stored.
• Keep batteries out of the reach of children and pets.
• Do not leave the battery near heat sources, such as a furnace, heater, or
exposure to strong direct sunshine, for example: in cars
• The ideal storage temperature is 20°C ~ 28°C.
• Keep the battery in a dry and ventilated environment
• Never drop the battery into the water, or store it in places where there is a
possibility of water leakage.
• Do not drop, strike, impale, pierce, or manually short-circuit the battery.
• Keep the battery away from metal objects, such as watches, jewelry, and hairpins.

©2023 SwellPro All Rights Reserved 62
Battery Disposal
• Dispose of the battery in specific recycling boxes only after a complete
discharge.
• DO NOT place the battery in regular trash containers. Strictly follow your local
regulations regarding the disposal and recycling of batteries.
Maintenance
• After flying over the sea, sand, or water, the SplashDrone 4 and modules must be
thoroughly washed with freshwater within 2 hours and dried - especially the
motors, gimbals, and camera.
• It is strongly advised to rinse the drone before any salt crystallizes.
• Motors are best rinsed by removing the propellers and immersing the motors
one at a time into a bucket of warm fresh water and arming the drone in ATTI
flight mode so the motors spin underwater.
• In the event of the SplashDrone 4 not being used for a long time, please store the
drone and the batteries in a dry, and ventilated environment at 20°C~28°C.
Refer to the Maintenance manual for more maintenance information.
Disclaimer and Warning
This product is not a toy and should only be operated by persons over the age of 18.
Please keep it out of reach of children and pay particular attention to the possible
scenarios of children unexpectedly Appearing during flight operations.
Be sure to read this document carefully before using the product, to fully understand
your legal rights, responsibilities, and safety instructions. Failure to do so may cause
property damage, accidents, and personal injury. Once this product is used, it is deemed
that you have understood, recognized, and have accepted all the terms and conditions
of this statement.
The user is responsible for all the consequences of his actions and the use of the
product. The user agrees to use the product for his sole & legal purpose and agrees
with the terms & conditions of this agreement, and other relevant policies & guidelines
that may be specified by SwellPro.
Under the maximum permitted by law and Approved circumstances, SwellPro accepts
no liability for any indirect, punitive, consequential, special, or criminal damages,
including the purchase cost, or loss of income due to the loss of use of the drone.
SwellPro is exempt from the user's liabilities for damage(s) to person/s or property, or
injuries incurred directly or indirectly from the use of this product in the following
conditions:
• Damage or injuries incurred when the user/s are under the influence of alcohol,
drugs, or medication.

©2023 SwellPro All Rights Reserved 63
• Any malfunction caused by operators' failure to follow the guidance of the manual to
assemble and set up or operate the drone as described and designed.
• Damage or injuries may occur due to failure to study the tutorial videos and the user
manual before flying the drone.
• Damage or injuries caused to a person/s or property due to failure in correctly
calibrating the drone as outlined in the manual before the flight.
• Damage or injuries incurred as a result of the use or installation of any unauthorized
third-party accessories or counterfeit parts - which were not provided and Approved
of by SwellPro.
• Damage or injuries as a result of flying the drone out of eyesight range, or more than
300m away from the controller.
• Damage or injuries caused by flying the drone in areas of magnetic fields & radio
interference.
• Damage or injuries caused by flying in a NO-FLY ZONE that is regulated by local
laws & rules.
• Damage or injuries including crashes, loss of control, or water ingress caused by
abusing or modifying the original drone structure,
• Damage or injuries caused by using broken & aging components.
• Damage or injuries caused by continuing to fly the drone even if the low battery
alarm is activated.
• Damage or injuries caused by failure to wash the components with fresh water after
flying over or near the sea & corrosive waters.
• Damage or injuries that have occurred when the drone has been subjected to the
following conditions or situations: collision, fire, explosion, floods, tsunamis, ice,
snow, avalanche, flooding, landslide, earthquake, etc.
• Damage or injuries incurred by intentionally dropping or crashing the SplashDrone
into the water from a high altitude, especially water ingress into the drone fuselage
and gimbal malfunction.
• Damage or injuries incurred by intentionally dropping or crashing the SplashDrone to
the ground or water from a high altitude, especially water leakage into the drone
fuselage and gimbal frame as a result of this collision.
• Damage due to not follow the maintenance manual properly.
• Damage caused by operating the product at a weight greater than the safe takeoff
weight, as specified by instruction manuals.
• For any reasons, the user cannot retrieve the drone for further diagnosis and
examination.
• The user is not able or unwilling to provide the flight log to SwellPro for diagnosis
and examination.
• Any attempt to modify flight log data noticed by SwellPro.
• Other Damage(s) or injuries that are not SwellPro's liability.
Version Information
SwellPro products are constantly improving, so as the product user manuals. It is
recommended to visit support.swellpro.com to check and download the latest user
manual.

©2023 SwellPro All Rights Reserved 64
Version
1.0 SplashDrone 4 User Manual 1.0 Edition
1.1 SplashDrone 4 User Manual 1.1 Edition
- Add Image Transmission reset guide.
- Add the use of mobile data in conjunction with Wi-Fi connection guide.
1.2 SplashDrone 4 User Manual 1.2 Edition
- Add install battery notice.
1.2.1 SplashDrone 4 User Manual 1.2.1 Edition
- Correct the remote controller charging state error.
1.2.2 SplashDrone 4 User Manual 1.2.2 Edition
- Revise the description on pair & reset instructions.
- Revise the battery notice.
2.0 SplashDrone 4 User Manual 2.0 Edition
- Add the Aircraft Antenna section and Remote Controller Antenna section.
2.0.1 SplashDrone 4 User Manual 2.0.1 Edition
- Add parts “When experiencing … full responsibility” in the Flight Safety and
Environment section.
- Add parts “Damage due to not following … the flight log to SwellPro for
diagnosis and examination.” in the Disclaimer and Warning section.
2.1 SplashDrone 4 User Manual 2.1 Edition
- Revise the pairing instruction under the Pairing Remote Controller section.
2.2 SplashDrone 4 User Manual 2.2 Edition
- Revise the pairing instruction under the Pairing Remote Controller section.
2.3 SplashDrone 4 User Manual 2.3 Edition
- Revise multiple sections of the user manual.
2.3.1 SplashDrone 4 User Manual 2.3.1 Edition
- Add propeller wabble notice on Install Propellers and Pre-Flight Checklist.
2.3.2 SplashDrone 4 User Manual 2.3.2 Edition
- Add the notice of SDFly 2 App on Download the SDFly App.
