User Manual
MAINTENANCE
- Clean the product after each use with a clean, soft cloth.
- Avoid prolonged exposure to direct sunlight and avoid buildup of heat on the drone.
- This device is not waterproof and must not be submerged in water under any circumstance. Failure to maintain the device completely dry will result in the failure of the unit
- Check the charging plug and other accessories for signs of damage frequently. If any part of the device is darnaged, refrain from flying until maintenance can be carried out.
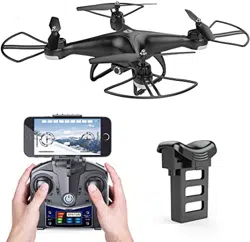
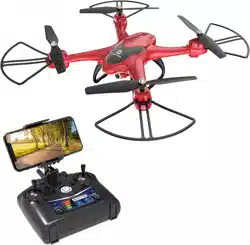
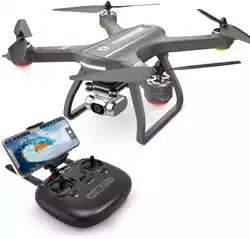
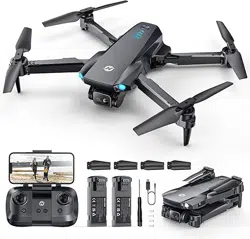
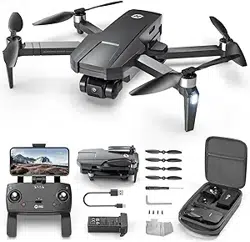
PACKAGE CONTENTS

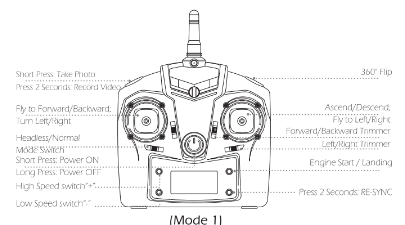
TRANSMITTER FUCTIONS
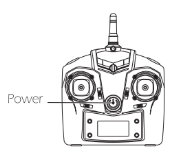
1. Power on the transmitter, Left hand throttle MODE 2 will be default setting (Recommend Model)
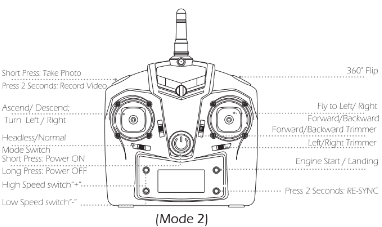
2. To enter MODE 1, power on the transmitter while holding the upper left button (Please do not release the upper, left button until the transmitter is powered on)
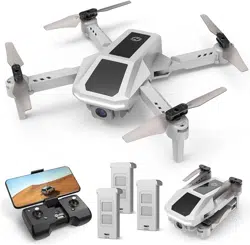
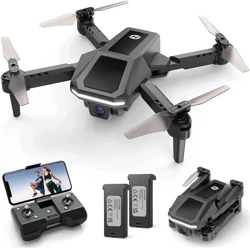
DRONE"S DETAILS
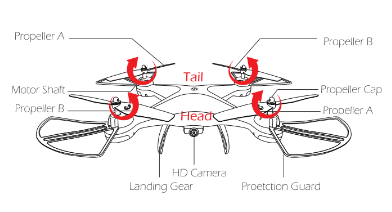
Please note that all propellers must be installed in the correct orientation (Pay attention to the letter "A" or "B" printed on each propeller when installing)
CHARGE THE BATTERY
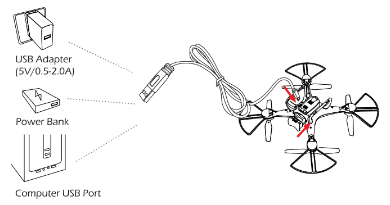
- Make sure the battery is connected to the drone, and insert the USB charging cable into USB adapter (5V/2A recommended).
- Connect the USB charging cable to the charging port on the drone. The indicator on the power switch will turn red when charging and turn off when the battery is fully charged.
- Charging time: about 120 minutes.
To ensure a safety and optimal flying, please read the informa- tion of "Use of Battery" on the "SAFETY GUIDELINES" and charge the batteries before flight.
INSTALLATION
1. Propeller:
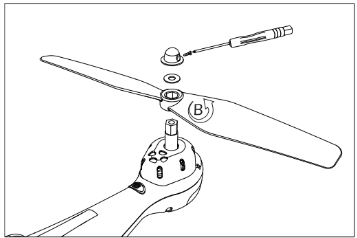
1. Unscrew the small screw on the propeller cap.*
2. Take the propeller cap, fixing ring and propeller out:
3. Attach the newpropeller.
4. Attach the fixing ring, propeller cap and screw back.
(When installing, pay attention to the letters "A" and "B" printed on the propeller, and make sure that the direction of arrow rota- tion above the propeller is the same as the arrow direction of rotation on the drone's wing!!)
2. Protection Guard:
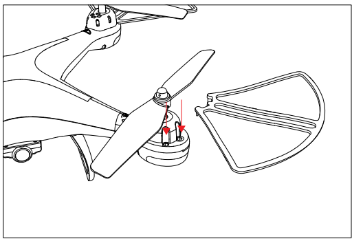
As shown in the figure above, please install the Propeller Guard on the motor base.
3. Landing Gear:
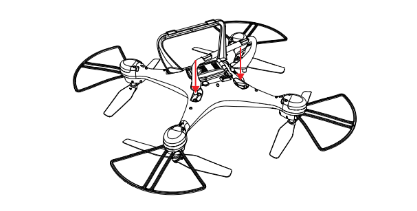
As shown in the figure above, please install the Landing Gear on the bottom of the drone.
4. Camera:
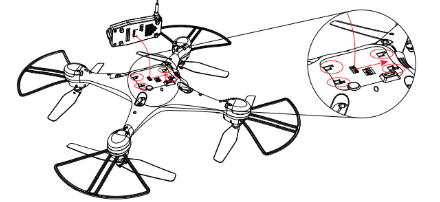
1. According to the above diagrams, please make sure that the camera is mounted on the four camera slots at the bottom of the fuselage, then pull the camera backward to lock it.
2. Push the camera forward to take it out.
5. Phone Hold:
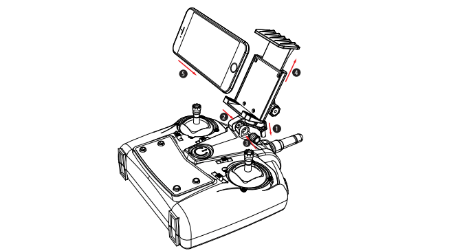
1. Install the phone hold to the transmitter and fix it with the big screw which comes with the drone.
2. Pull the phone hold up to adjust the width of the phone hold to fit the phone's size.
6. Drone Battery:
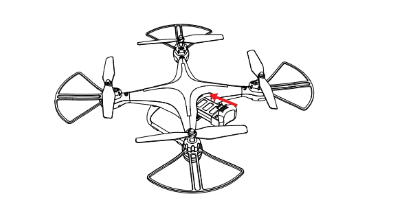
According to the above diagrams, push the battery forward to install the battery, and pull back to take it out.
7. Transmitter Battery:
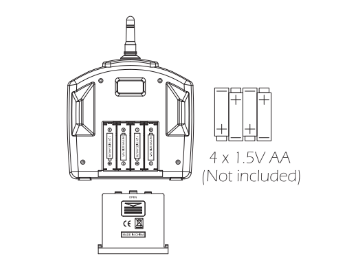
According to the above diagrams, Install 4 x 1.5V AA batteries to the battery compartment of the transmitter.
Note:
Always pay close attention to battery polarity when inserting any batteries to make sure they are fitted correctly.
FLIGHT OPERATION
Please Note, all of the following operations are taking Mode 2 for example.
1. Pair the Drone:
1. Power on the transmitter.
2. Power on the drone
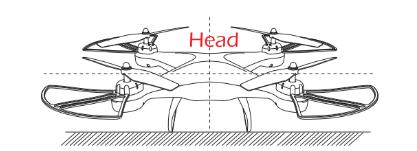
3. Place the drone on an flat and level surfate with the head forward and the tail towards the pilot.
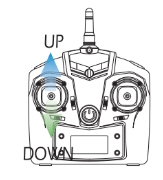
4. Push throttle joystick up then down to pair drone and transmitter. The LED indicator lights on the drone will flash slowly if the drone is paired successfully.
2. Calibrate the Gyro:
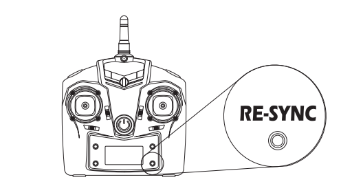
Press RE-SYNC button for 2 Seconds to calibrate the gyro of drone.
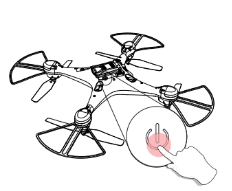
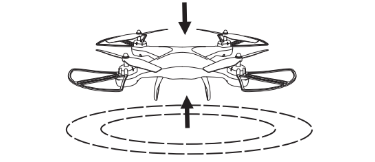
3. Engine Start/Landing:
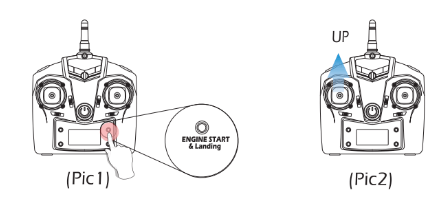
Press "Engine Start/Landing" button (Pic1), the propellers will start spinning at low speed Push the throttle joystick up (Slowly) to take off (Pic2). If you want to make drone land, press "Engine Start/Landing" button again, the drone will land slowly by itself until it touches the ground.
4. Manual Landing:
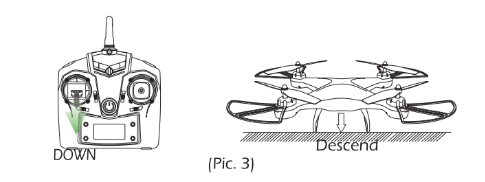
Push the throttle joystick down (slowly) until the drone touch the ground. Hold a few seconds to stop the motors
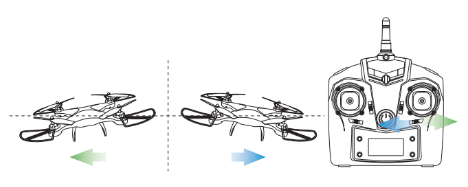
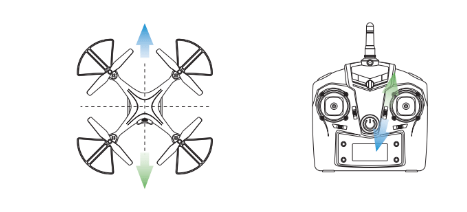
5. Flight Control:
Push the throttle joystick down (slowly) until the drone touch the ground. Hold a few seconds to stop the motors.
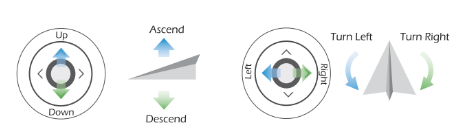
Throttle (Left) Joystick
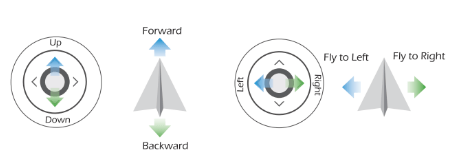
Direction (Right) Joystick
FUNCTIONS INTRODUCTION
1. Emergency Stop:
Only stop motors mid-flight in emergency situations when doing so can reduce the risk of damage or injury.
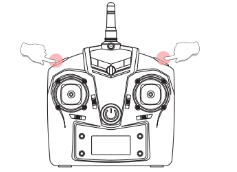
Press the UPPER LEFT(Photo Function) and UPPER RIGHT(Flip Function) buttons at the same time, the motors will stop immediately.
2. Speed Switch:
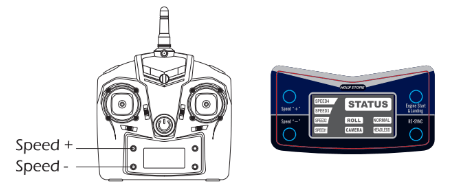
This drone comes with 5 speed levels (Low/Medium/High/Ex- pert/Racing) Press the "Speed+" or "Speed button on the transmit ter to switch the speed. The speed status will be shown on the LED display of transmitter
(The Medium Speed is default speed mode, and on Racing rate, the indicator light of "Speed 4" will keep flash)
3. Altitude Hold:
During flight, altitude hold function allows you to release the throttle joystick, and the drone will keep hovering at the current height.
4. 360 ° Flip:
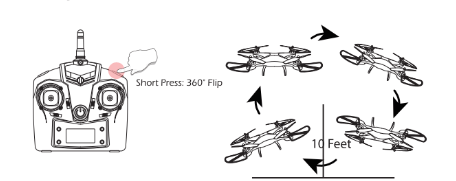
When you becoming familiar with all the functions of the drone, you can try this amazing flip mode. When you fly the drone at least 10 feet high, press the 360° flip button on the Upper Right of transmitter. then push the Right Joystick Forward/Backward or Left/Right, and the drone will do a flip towards the corresponding direction. If you are in Mode 1, push the Right Joystick Left/Right, or push the Left Joystick Forward/Backward, and the drone will do a flip towards the corresponding direction,
Caution: The drone will flip best when the battery is fully charged.
5. Headless Mode:
Do not use the Headless Mode until you totally comprehend the instruction for use. Flying in Headless Mode without sufficient experience might result in loss or damage of the device
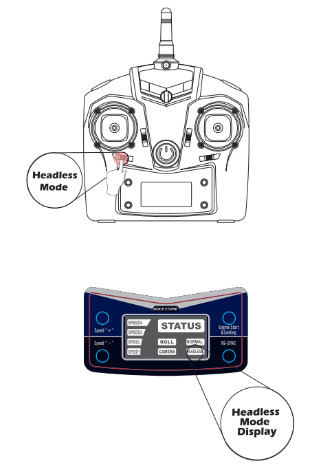
1. Press the Headless Mode button on the transmitter to enter Headless Mode, the "HEADLESS" mode status indicator lights on the transmitter will light up.
2. Press the Headless Mode button again to exit Headless Mode, and the "NORMAL" mode status indicator light on the transmitter will light up
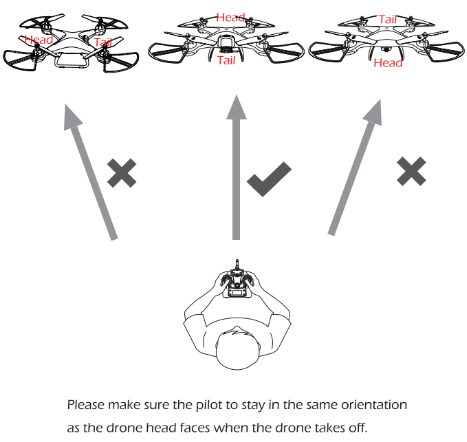
Under Headless Mode, the forward direction is the direction that the head of drone faces when the drone takes off in order to make sure the pilot can tell drone's direction, we recommend that pilots to stay in the same orientation as the drone head faces when the drone takes off if so, when the pilot pushes the direction joystick forward. the drone will fly forward if the pilot pushes the direction joystick backward, the drone will fy towards him/her. If the pilot move the right stick left/right, the drone will move left/right relative to you. It is very important inat dhe pilot stay in the same orientation as the drone head faces when the dreneukes off
6. Trimmer Function:
1. L/R Sideward Fly Trim: When the drone drift to the left or the right side, slide the trim button to the opposite direction to re-balance the drone.
2. F/B Sideward Fly Trim: When the drone drift to forward or backward, slide the trim button to the opposite direction to re-balance the drone
7. Drone Status Indicators:
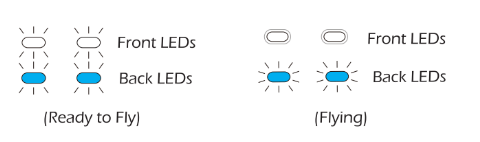
1. Fully charge the battery of the drone and pair the drone to the transmitter, the Back LED Indicators will turn Blue and the Front LED Indicators will turn white. When the four Breath Lights are on, it means that the drone is ready to fly. When flying, the Front White LED Lights will stay solid and the Back LED lights will blink constantly.

2. When the drone starts running low on battery, the four indicators on the drone will turn red and blink SLOWLY. This means you should fly the drone back and land it to charge the drone's battery.
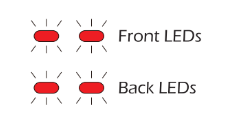
3. When the drone doesn't fly and the four red indicators blink QUICKLY, it means the drone is in a critical error state and needs to be paired again
APP FUNCTION
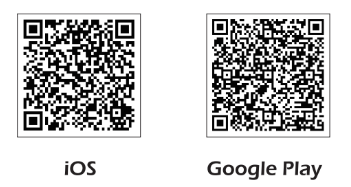
1. Download the APP
Connect to the App StoreTM or Google PlayTM and download the" HSS2 FPV" application for free. iOS
2. Wi-Fi Connection
Connect your smart phone to the Wi-Fi of the Drone and check the drone's status on the "HSS2 FPV" App.
1. Power on the Drone.
2. On your smart phone, launch a search of the available Wi-Fi networks: if you are using an iPhone or an iPad, select Settings > Wi-Fi; if you are using an Android smart phone, select Settings > Wireless and networks > Wi-Fi.
3. Select the Wi-Fi network: HolyStoneFPV_xxxxx
4. Wait for your smart phone connect to the Wi-Fi network of the drone.
(This connection is generally represented by the Wi-Fi logo appearing on your smart phone's screen.)
5. Enter the "HSS2 FPV" application
The connection between your smart phone and the Drone is established automatically
SPECIFICATION
Drone
Model: HS110D/HS200D
Weight: 148.1g/5.22oz
Max Flight Time: 10 minutes
WIFI Distance: 100 m (Outdoor And Unobstructed)
Motor Model: 8616
Hovering: Enabled
Operating Temperature Range: 32° to 104°F (0° to 40°C)
Dimensions: 320 x 320 x 92 mm 1-
TRANSMITTER
Operating Frequency: 2.4 GHz
Max Transmission Distance: 120 m (outdoors and unobstructed)
Operating Temperature Range: 32" to 104°F (0*40°C)
Battery: 4x1.5 V Alkaline batteries AA
Mobile Device Holder: Smart phones
FLIGHT BATTERY
Capacity: 1000 mAh
Voltage 37 V
Battery Type Li-Po
Energy: 3.70 Wh
Net Weight 30.1 g/106 oz
Charging Temperature Range: 4 to 1047 (5 to 40°C)
Charging Time 120 mins
APP/LIVE VIEW
Mobile App: HSS2 FPV
Max Wi-Fi Signal Distance: 60m
Live View Working Frequency: 2.4 GHz ISM
Live View Quality: 720P @ 20fps
Latency: Low Latency Video depend on conditions and mobile device)
Required Operating Systems: iOS 7.0 or later / Android 4.4 or later
Recommended Devices: 4.7" to 6.0" Smart phones
CAMERA
Lens: FOV 120° f/2.0
Still Photography Modes: Single Shot
Video Recording Modes: HD1280x720p
Max Video Bitrate: 25 Mbps
Supported File Systems. FAT32
Photo: JPEG
Video: AVI
Operating Temperature Range: 32 to 104°F (0 to 40°C)
USB CHARGING CABLE
Voltage: 5 V
Rated Power: ≤10 W
TROUBLESHOOTING
The indicator lights on the drone are blinking and the drone does not respond to the transmitter
1. Communication between the drone and transmitter is bad
- Place the drone on a level surface. and pair the drone again.
2. Battery power is low
The propellers spin but the drone is unable to take off
1. The propellers are assembled in wrong orientation
- Replace the propellers according to the instruction on page 9
2. The propolers are distarted
The drone shakes hardly
1. The propellers are cristorted
The trim buttons fail to keep the drone balanced
1. The propellers are distorted.
2. Motors doesn't work properly
The drone becomes out of control alter crashes
1. Gyro sensor loses is balance after crashing
Please do not hesitate to contact us if you need further support.