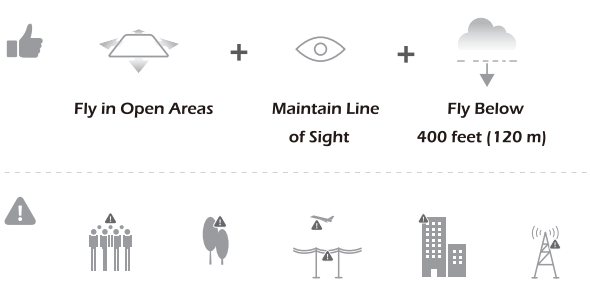
Avoid flying over or near obstacles, crowds, high voltage power lines, trees, airport or bodies of water.
DO NOT fly near strong electromagnetic sources such as power lines and base stations as it may affect the onboard compass.
USE OF BATTERY
Please ensure batteries are fitted in the correct orientation as shown in the instruction manual.
Avoid short circuits by fitting the batteries incorrectly, and do not crush or squeeze the batteries as this could carry the risk of an explosion.
Do not mix new and old batteries as this can lead to a poor performance of the product.
Dispose used batteries carefully, do not litter.
Please keep dead batteries away from heat and fire.
If the device is not going to be used for an extended period of time, remove batteries to prevent potential damage from battery leakage.
If the device is not going to be used for an extended period of time, remove batteries to prevent potential damage from battery leakage.
It is recommended to only use the USB charging cable that comes with the drone to charge the battery. ets.
Don't connect the battery directly to wall outlets or car cigarette-lighter sock-
Don't attempt to disassemble or modify the battery in any way.
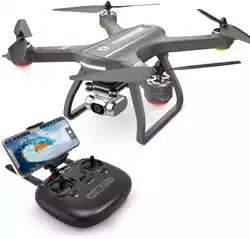
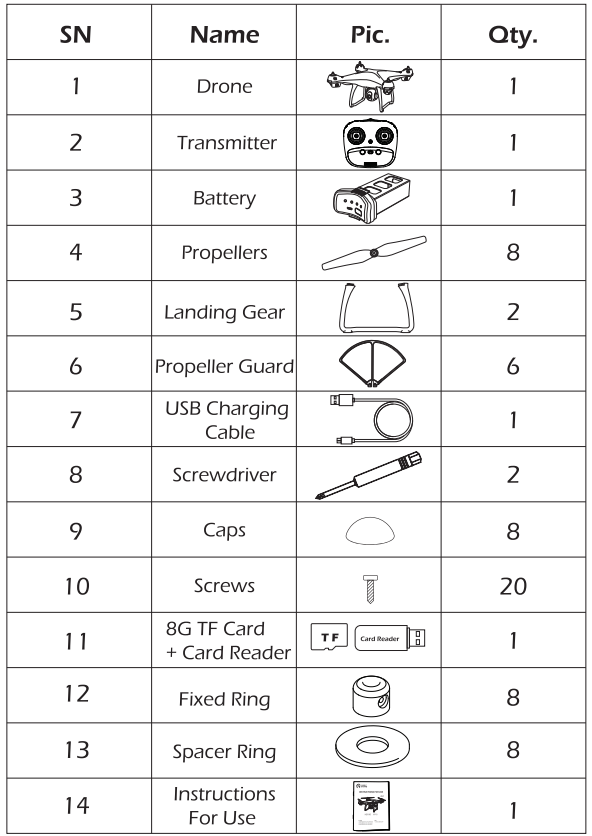
PARTS
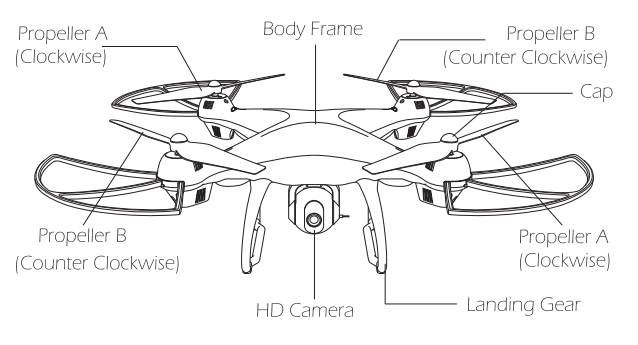
DETAILS
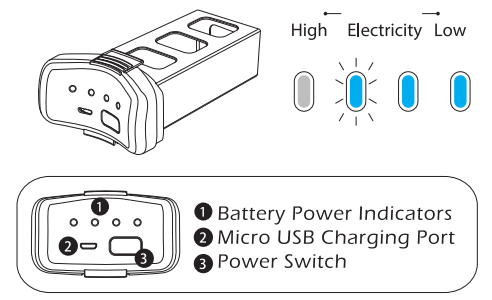
BATTERY
Press the Power Switch shortly to turn on; hold the Power Switch for 2 seconds to turn off.
Tips:
Once the battery is low, please fly the drone back as soon as possible. Otherwise, it may cause the drone loss.
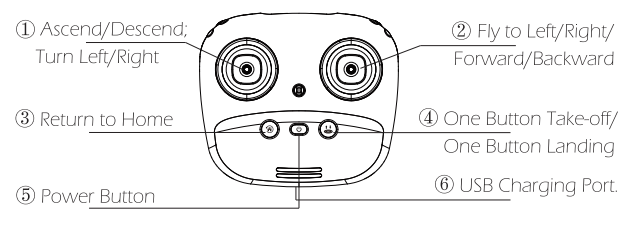
Transmitter Functions
MODE 2 Left hand throttle Mode 2 will be default setting.
MODE 1 Turn on the transmitter while holding the "Follow Me" button to enter Mode 1.
(Don't release the "Follow Me" button until the transmitter is powered on.)
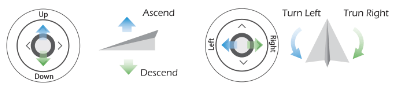
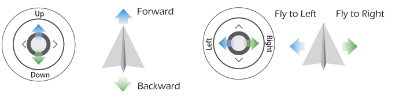
1. Throttle Joystick
2. Direction Joystick
3. Return To Home(RTH):
Smart RTH: Press this button and the drone will return to the vertical position of the TAKE OFF point which you set, then,land by itself slowly.
(This function can only work in GPS mode.)
4. One Button Take-off, One Button Landing.
Hold 2 seconds for EMERGENCY STOP.
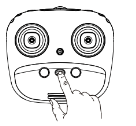
5. Power Button:
Press the Power Button shortly to turn on;
Hold the Power Button for 2 seconds to turn off.
6. USB Charging Port:
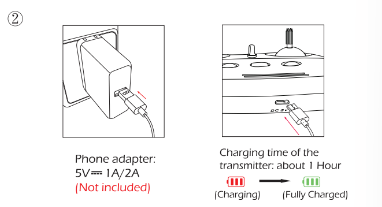
Charge the Transmitter when transmitter's battery level is low. Connect the USB port to computer or smartphone adapter with OUTPUT: DC 5V - 1A/2A
7. Speed Switch: Dial to the right to accelerate; Dial to the left to decelerate. If the speed status light on the transmitter is turn off means the drone is in low speed; if the light is turn on means the drone is in medium speed; and if the light is blink means the drone is in high speed. (Medium Speed is default setting!)
8. Follow Me: Click to enter Follow-me mode; Click again to cancel the Follow-Me mode. (For more details, please check page22#) Hold this button for 3 seconds to enter Trim mode. Click again to cancel Trim mode.
Note: No need to trim under the GPS Mode!
9. Headless Mode: Click to switch headless/normal mode. Hold the button for 3 seconds to exit the GPS MODE.
10. Gimbal Dial: Dial left/right to adjust the camera tilt up/down.
11. Take Photo: Click to take photo
12. Take Video: Click to take video
(Don't take photo while taking video, otherwise it will disturb the Video process.)
13. Phone Holder: Fits on all phones up to 7.5 cm wide.
14. Status LED
15. Speed Status
16. Photo/Video
17. RTH
18. Charging Indicator Light
19. Headless Mode
20. Follow-me
21. Trim LED
HOW TO USE
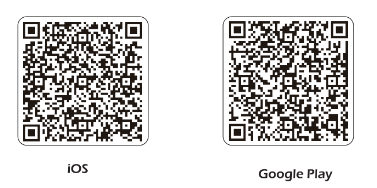
Download the APP
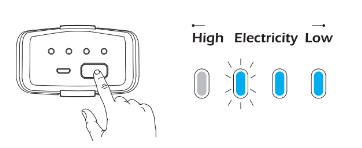
Check the Battery Level
Press the "Power Switch"button to turn on and check the battery level.
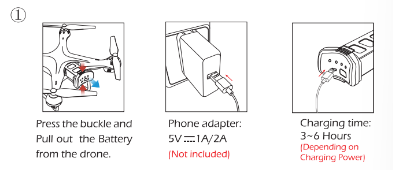
Charging the Battery and Transmitter
Connect the USB Charging Cable with the Battery, then, connect the USB Charging Cable to a computer or a USB adapter.
Connect the USB Charging Cable with the Transmitter, then, connect the USB Charging Cable to a computer or a USB adapter.
Tips:
When the transmitter is in low power, the "Battery Power Indica- tors" on the transmitter will blink constantly.
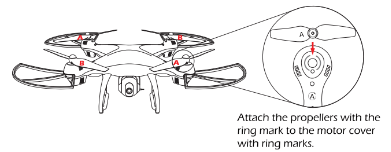
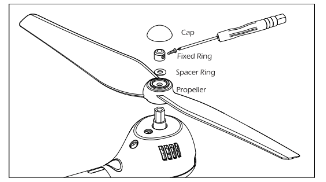
Assemble the Propeller
Please note that the letter "A" or "B" is printed on each propelier. Make sure all the propellers are attached in the correct motor position.
Remove Propeller Cap.
Unscrew the small screw.
Pull out the Fixed Ring and Spacer Ring, then pull out the propeller.
Attach the correct propeller.
Tips:
The propellers are stored underneath the foam box!
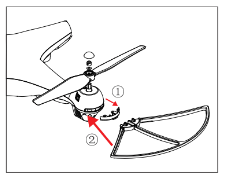
Assemble the Propeller Guard
To prevent accidents or injuries, we suggest the pilot to install the propeller guards.
Take out the Dust Cover from the motor cover.
Attach the Propeller Guard to the motor cover.
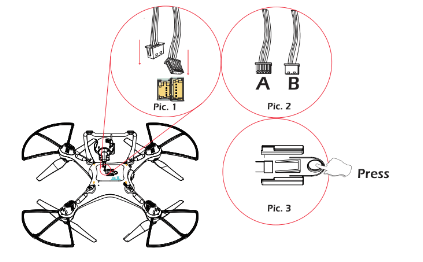
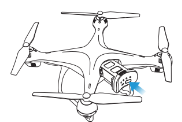
Assemble the Camera
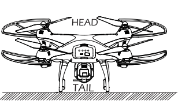
Plug the camera wires accordingly into the connection ports on the bottom of the drone. (Smaller wire should be connected to smaller ports while the Bigger wire connects to bigger port. (Pic 1) Wire connector has two sides A/B (Pic 2), A side of the smaller interface faces the drone's Head and A side of Bigger interface faces thedrone's Tail direction.
Push the camera into the camera installation track on the bottom of the drone.
Remove camera by pressing the camera lock on the bottom of the drone (Pic 3), and push the camera out to disconnect the camera wire from the port.
FLIGHT
All of the following operations are taking Mode 2 for example.
1. Pair the Drone
Power on the transmitter
Plug the battery into the drone and power on the drone.
Place the drone on a flat and dry surface and in an unobstructed and light area.
Push the left joystick up then down to pair with drone.
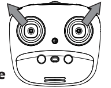
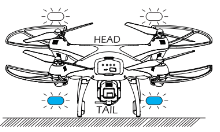
LED indicators on the drone will blink purple (Back) and pink (Front) when the drone is paired successfully.
Tips: Safe to Fly (GPS)
The Default GPS Mode is BEGINNER MODE, Under BEGINNER MODE:
1. Flight Distance is limited between 0-30 M/0-98.4 Feet.
2. Flight Altitude is limited between 0-30 M/0-98.4 Feet.
3. RTH Altitude is under 25 M/82 Feet.
You only can Turn-off the BEGINNER MODE to modify the parameters in the APP on your phone after you complete the Compass Calibration operations.
2. Compass Calibration
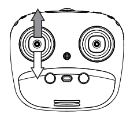
Compass Calibration Part 1
- Push Joysticks at 1 & 11 o'clock positions as shown by the picture above.
- Lights rapidly alter between Purple and Pink .
- App Drone Status: "Compass calibration".
Compass Calibration Part 2
Hold the drone horizontally, turn your body 360 degrees and the back lights will turn solid Purple.
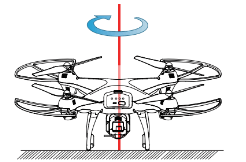
Compass Calibration Part 3
- Hold the drone vertically and spin your body 360 degrees. The front Pink lights and the rear Purple light will turn to solid.
Compass only need to calibrate when first fly the drone in a new area.
3. GPS Searching (DO NOT use GPS Mode indoor)
- Place the drone on a flat and dry surface and in an unobstructed and lit area.
- LED Flight Indicators will turn to blink Blue and White . This means the drone is searching the GPS Signal. This process can take a few minutes. App Drone Status: "Waiting for GPS signal".
Once the lights have turned all solid, GPS Mode is Ready (Drone can only take off when it is connected to GPS successfully).
Blue (back) and white (front) lights are all solid (no blinking).
App Drone Status: "Ready to fly".
ATTENTION:
If the LED Flight indicators keep blinking quickly, it indicates drone is searching for GPS signals.
If the drone keep blinking quickly after a few minutes, it indicates that the process has FAILED. Please taking the drone a meter or so from the ground,and repeat all the Compass Calibration operations until the process is successful. 3 If you fly indoors, please hold button for 3 second to exit GPS Mode, and the LED lights will blink slowly. You can fly this drone when you complete the Compass Calibration operations if you exit GPS mode.
4. Recalibrate Gyroscope
- Push the Joysticks at 11 & 1 o'clock positions as shown by the picture above.
- Lights will blink rapidly in both Blue and White
– App Drone Status: “Gyroscope is being calibrated" => "Gyroscope okay”.
Note: You can also calibrate the Drone if it does not stay on course correctly.
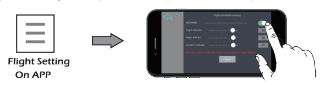
5 Using the Application
Connect your smart phone to the Wi-Fi of the drone and check the drone's status on the "HS GPS PRO" App.
Power on the Drone.
On your smartphone, launch a search of the available Wi-Fi networks: If you are using an iPhone or an iPad, select Settings>Wi-Fi; If you are using an Android smartphone, select Settings > Wireless and networks >Wi-Fi.
Select the Wi-Fi network: HolyStoneFPV_xxXXX
Wait for your smartphone connect to the Wi-Fi network of the drone. This connection is generally represented by the Wi-Fi logo appearing on your smartphone's screen.
Enter the HS GPS PRO application.
The connection between your smartphone and the drone is established automatically.
FLIGHT SAFETY
Fly in Open Areas: Always fly in locations that are clear of buildings, trees, power lines, and other obstacles. Do not fly above or near people or animals.
Maintain Control at All Times: Even when using autopilot functions such as Auto-Takeoff, Auto-Landing, and Return to
Home, always keep your hands on the Transmitter and maintain control of your drone when it is in flight.
Maintain Line of Sight: Keep your drone in sight at all times, and avoid flying behind buildings or other obstacles that may block your view.
Monitor Your Altitude: For the safety of full-sized drone and other air traffic, always fly at altitudes less than 400 feet (120 meters) above ground level, or in line with your local laws and regulations.
MAINTENANCE
Clean the product after each use with a clean, soft cloth.
Avoid prolonged exposure to direct sunlight and avoid buildup of heat on the drone.
This device is not waterproof and must not be submerged in water under any circumstance. Failure to maintain the device completely dry will result in the failure of the unit.
Check the charging plug and other accessories for signs of damage frequent- ly. If any part of the device is damaged, refrain from flying until maintenance can be carried out.
TROUBLESHOOTING
PROBLEM
REASONS
SOLUTIONS
Drone flashes and don't respond to the transmitter during operation.
1. Transmitter is not synced to the drone.
2. Insufficient battery power.
1. Refer to the Manual and re-sync the drone. 2. Recharge the battery.
The propellers spin, but the drone cannot take-off.
1. Insufficient battery power.
2. The propellers are installed in wrong orientation.
3. The propellers are distorted.
1. Recharge the battery.
2. Install the propellers in right orientation.
3. Replace the propellers.
The drone shakes heavily.
The propellers are distorted
Replace the propellers.
Drone cannot stay balanced in flight.
1. The propellers are distorted. 2. The motor doesn't work properly.
1. Replace the propellers.
2. Replace the motor.
Drone is unstable after crashing.
Four-axis acceleration sensor loses it's balance after crashing.


 Press the Power Button shortly to turn on;
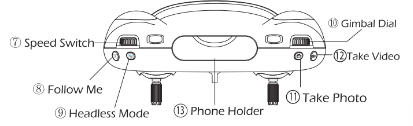
 to enter Follow-me mode; Click again to cancel the Follow-Me mode. (For more details, please check page22#) Hold this button for 3 seconds to enter Trim mode. Click again to cancel Trim mode.
 to switch headless/normal mode.
  to take photo
 to take video
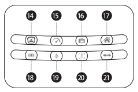
 and pink (Front)
  when the drone is paired successfully.
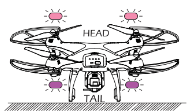
 .
.
 and White
  . This means the drone is searching the GPS Signal. This process can take a few minutes. App Drone Status: "Waiting for GPS signal".