Owner Manual Wireless Sound Bar
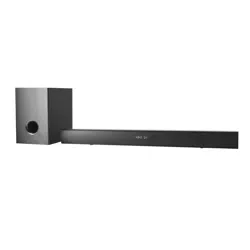
PACKAGE CONTENTS

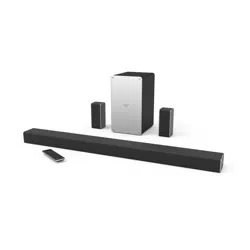
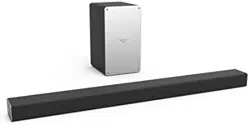
VIZIO SmartCast™ Sound Bar

Wireless Subwoofer
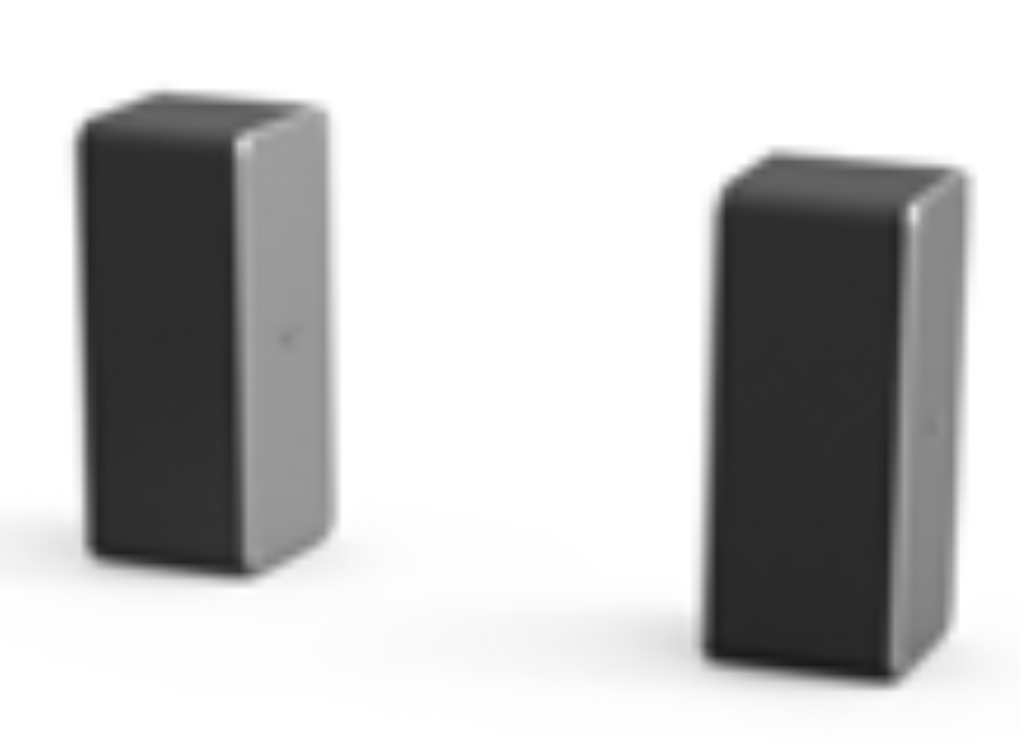
2 x Satellite Speakers

Remote Control with 2x AAA Batteries
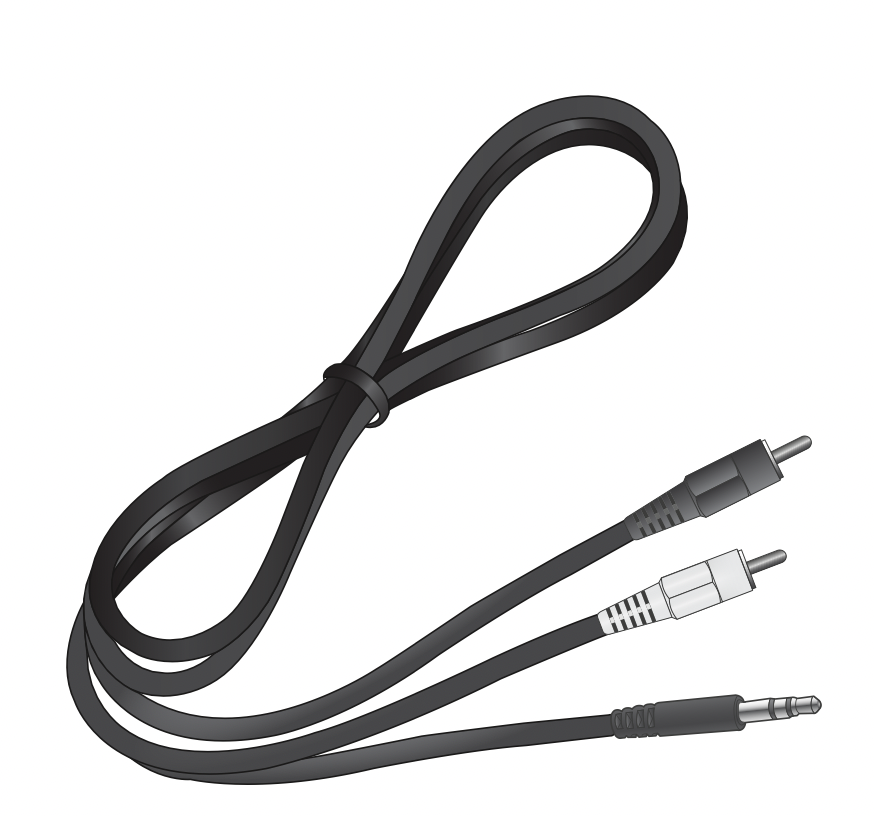
Stereo RCA to 3.5mm Audio Cable

3.5mm to 3.5mm Audio Cable
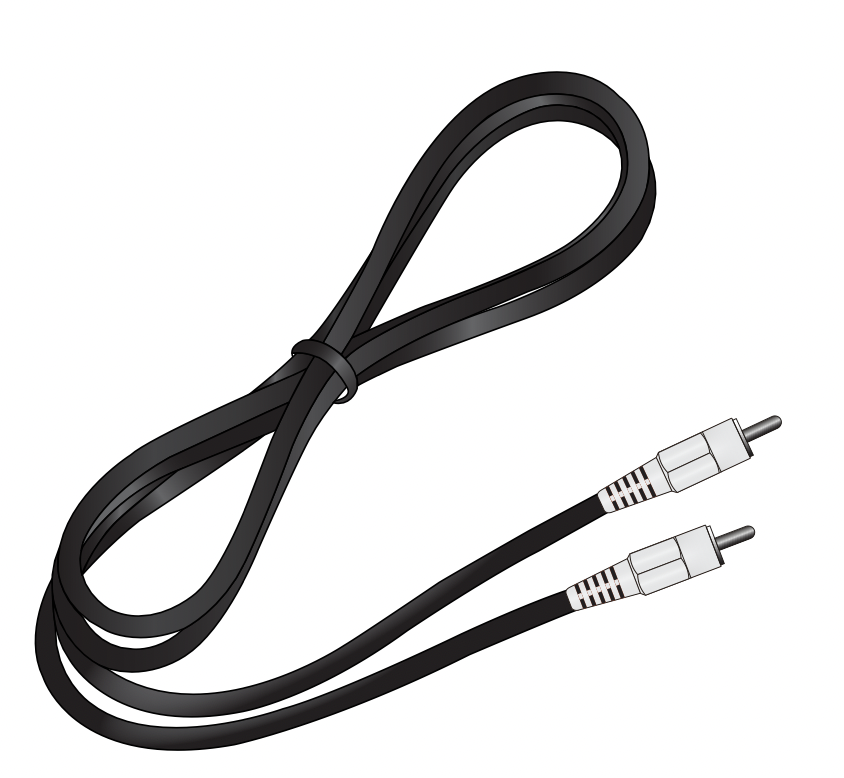
Coaxial Audio Cable

HDMI Cable

2 x Satellite Speaker Audio Cables
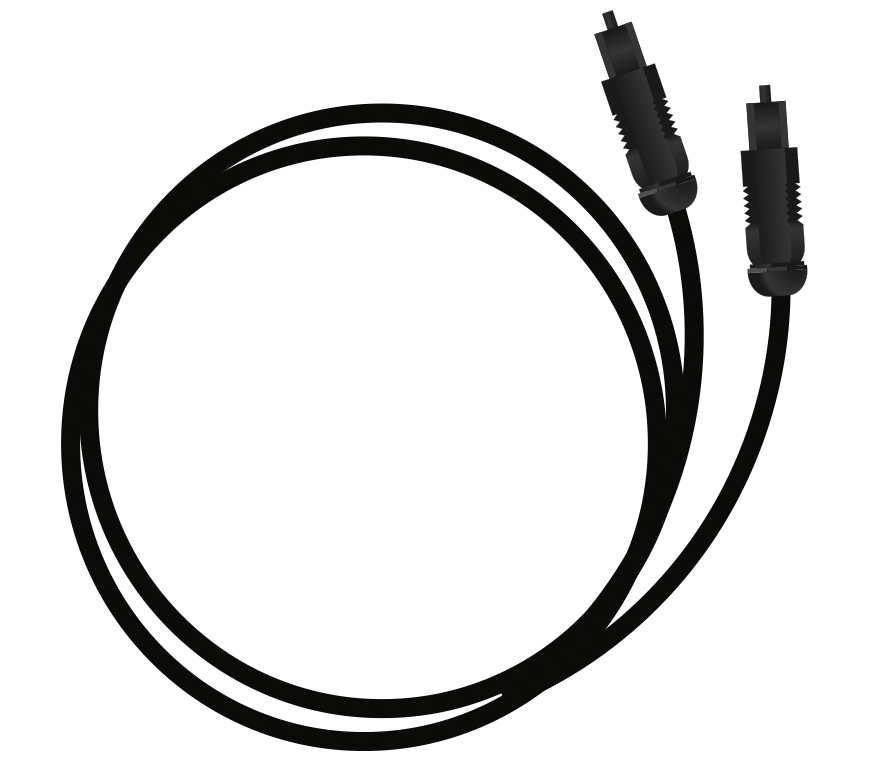
Digital Optical Cable

2 x Power Cables
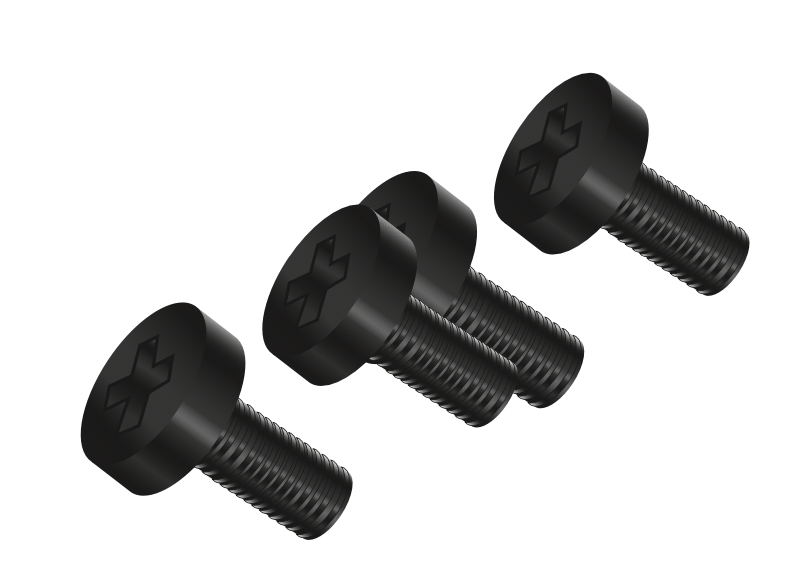
4 x Wall Mount Screws
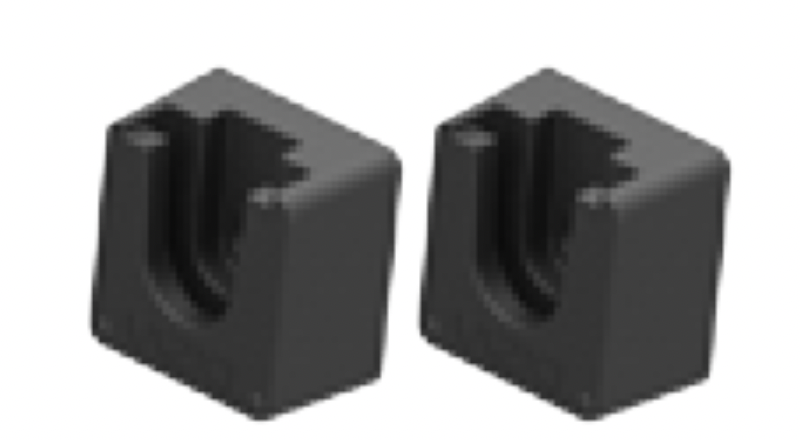
2 x Wall Mount Brackets (Satellite Speakers)
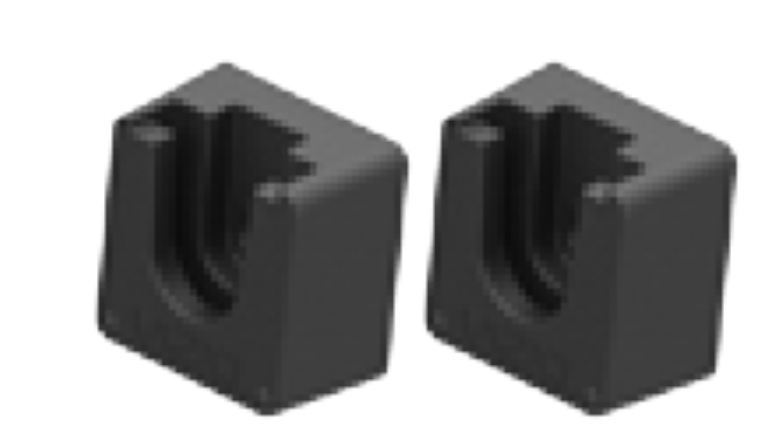
2 x Wall Mount Brackets (Sound Bar)
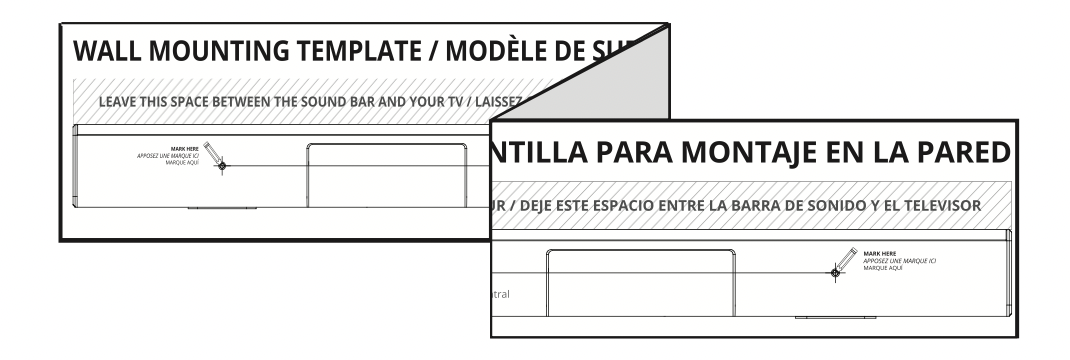
Wall Mount Template

Quick Start Guide
4 x Cable Ties
CONTROLS & CONNECTIONS
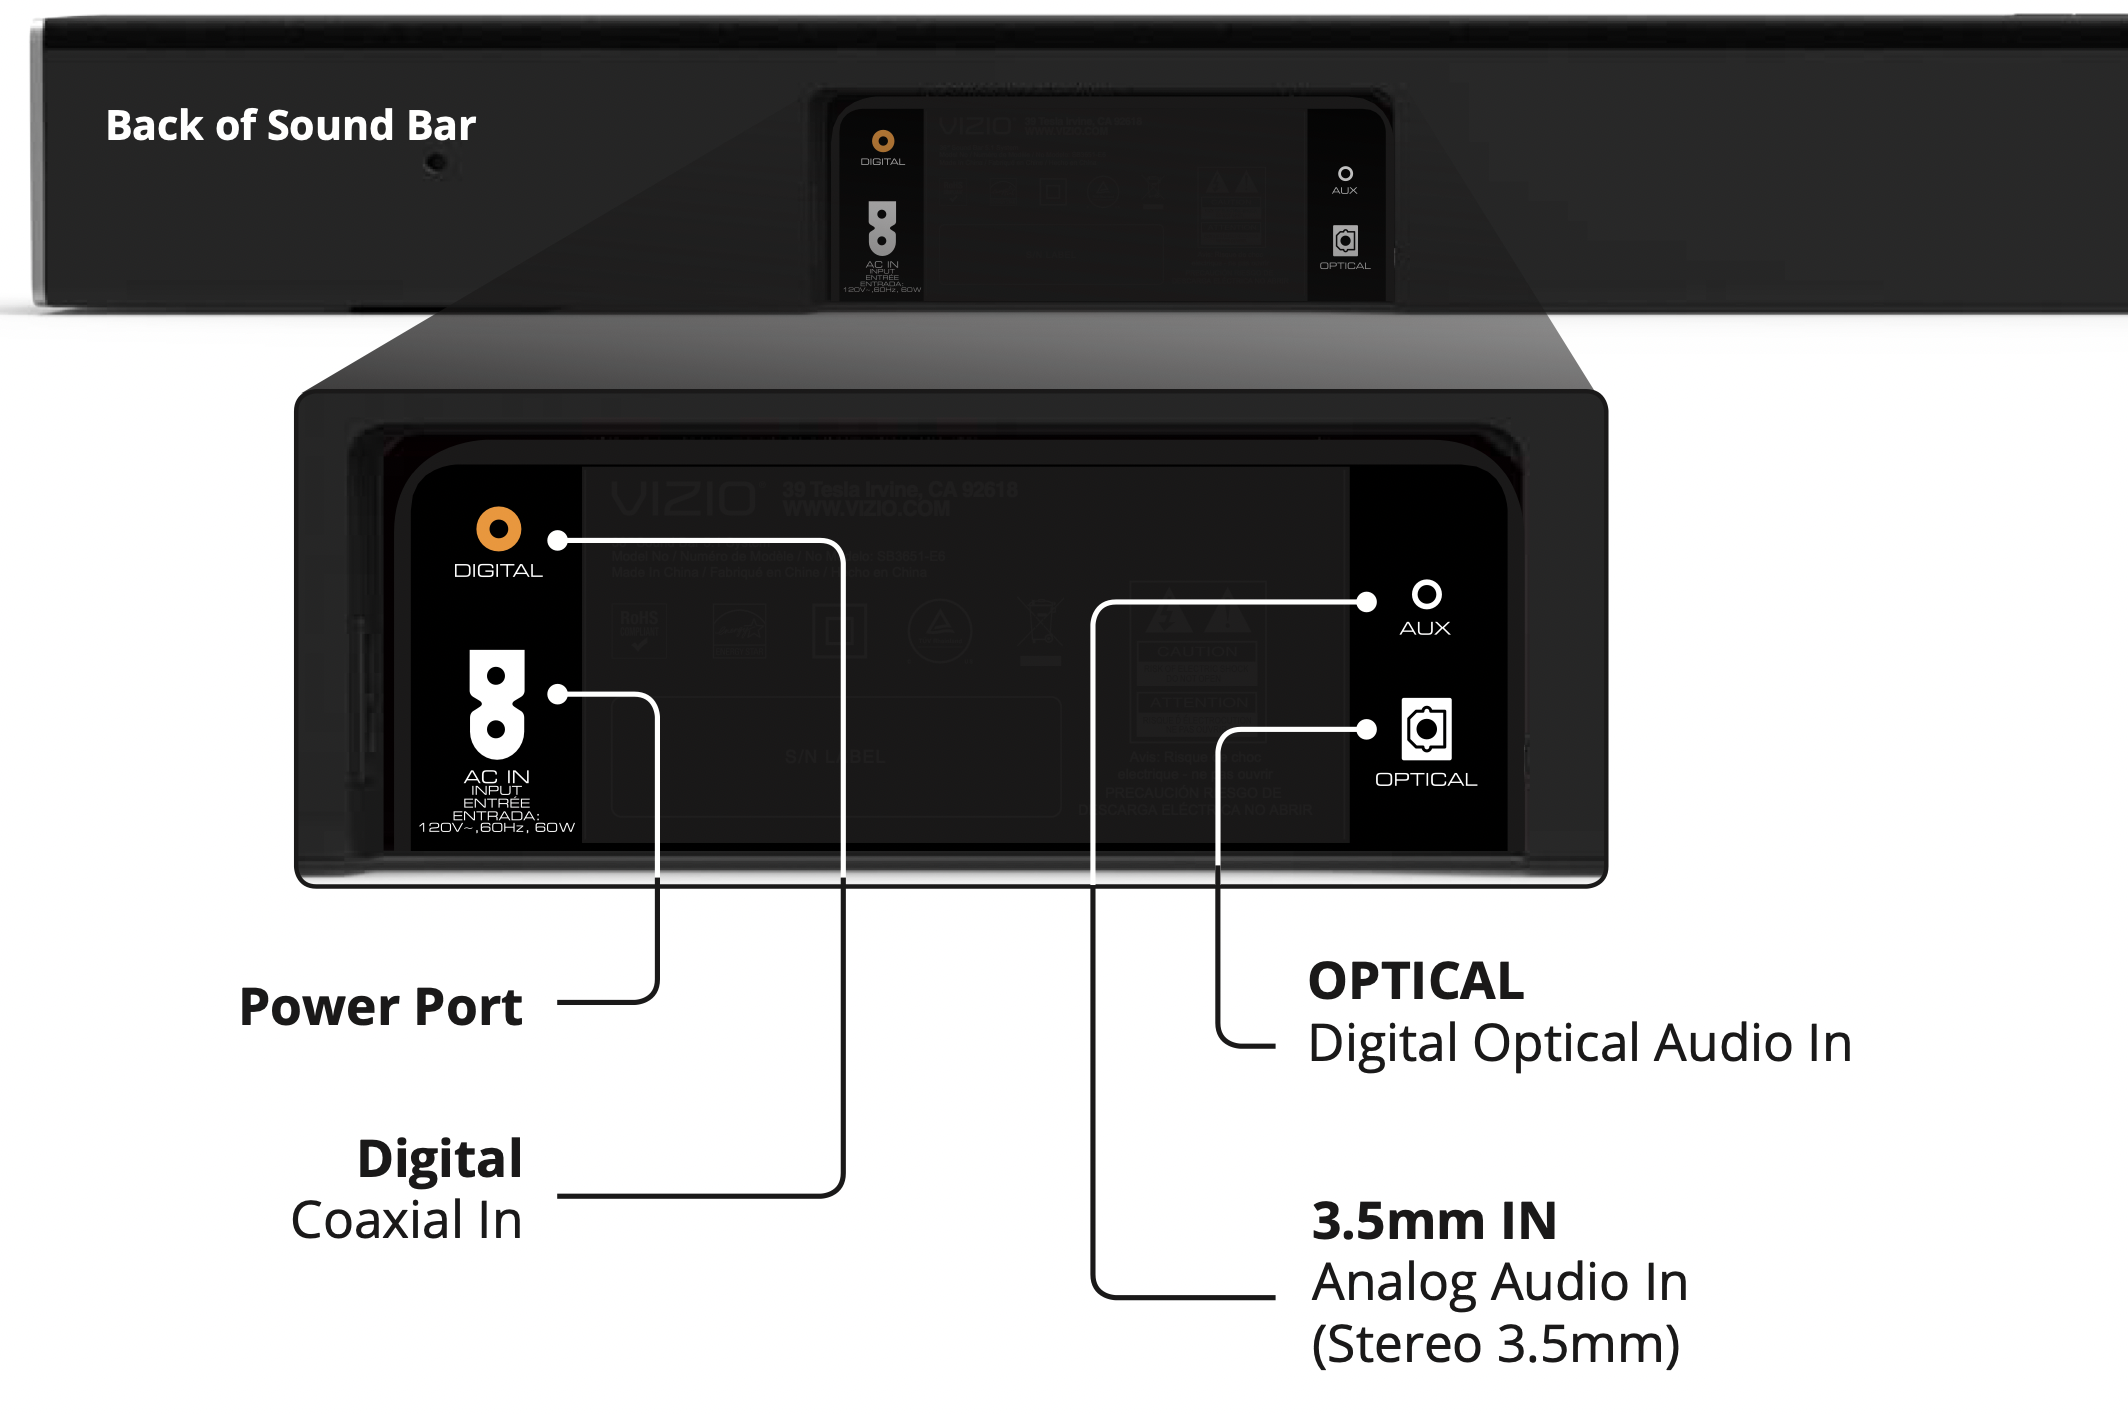
Back of Sound Bar

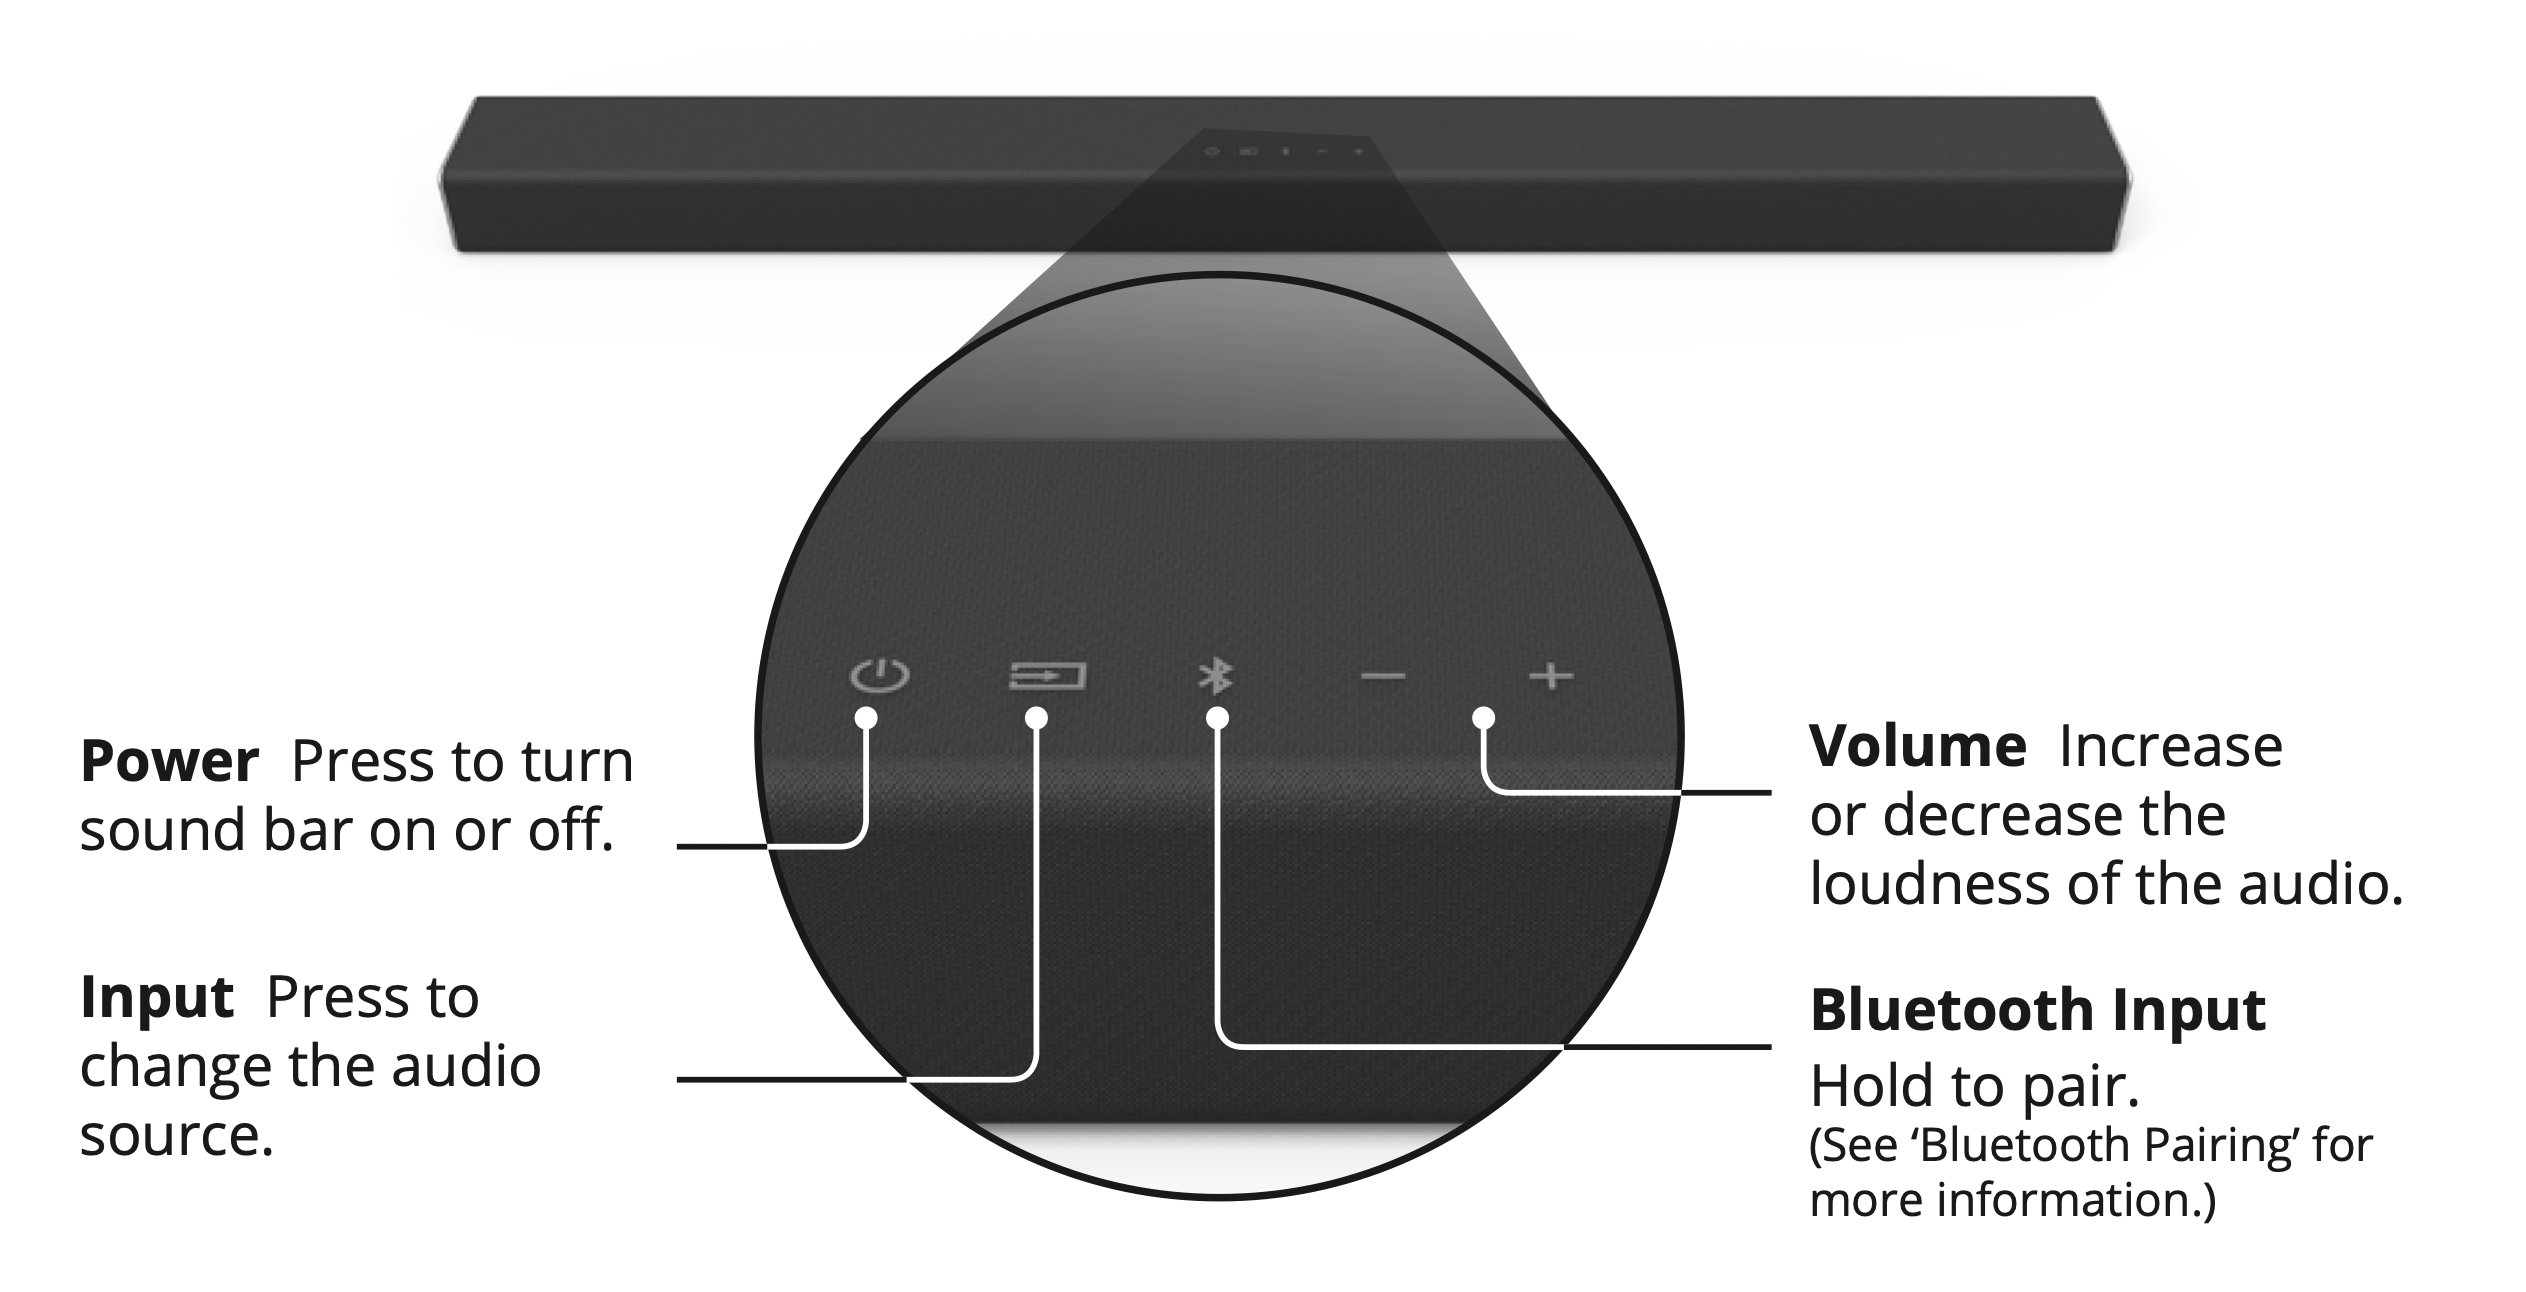
Top of Sound Bar
Back of Subwoofer

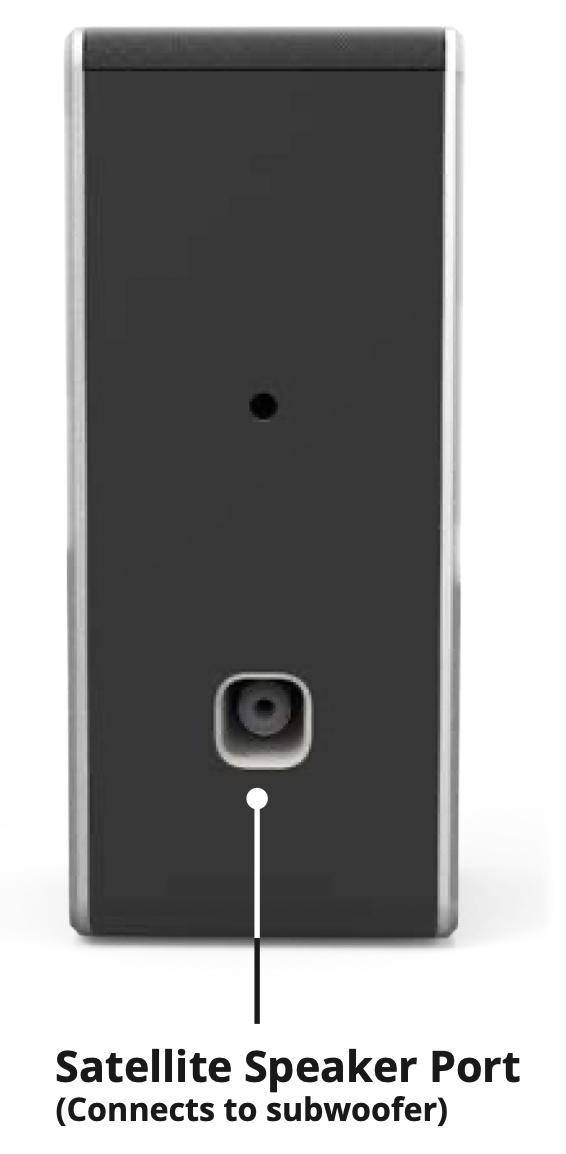
Back of Satellite Speaker
FIRST-TIME SETUP
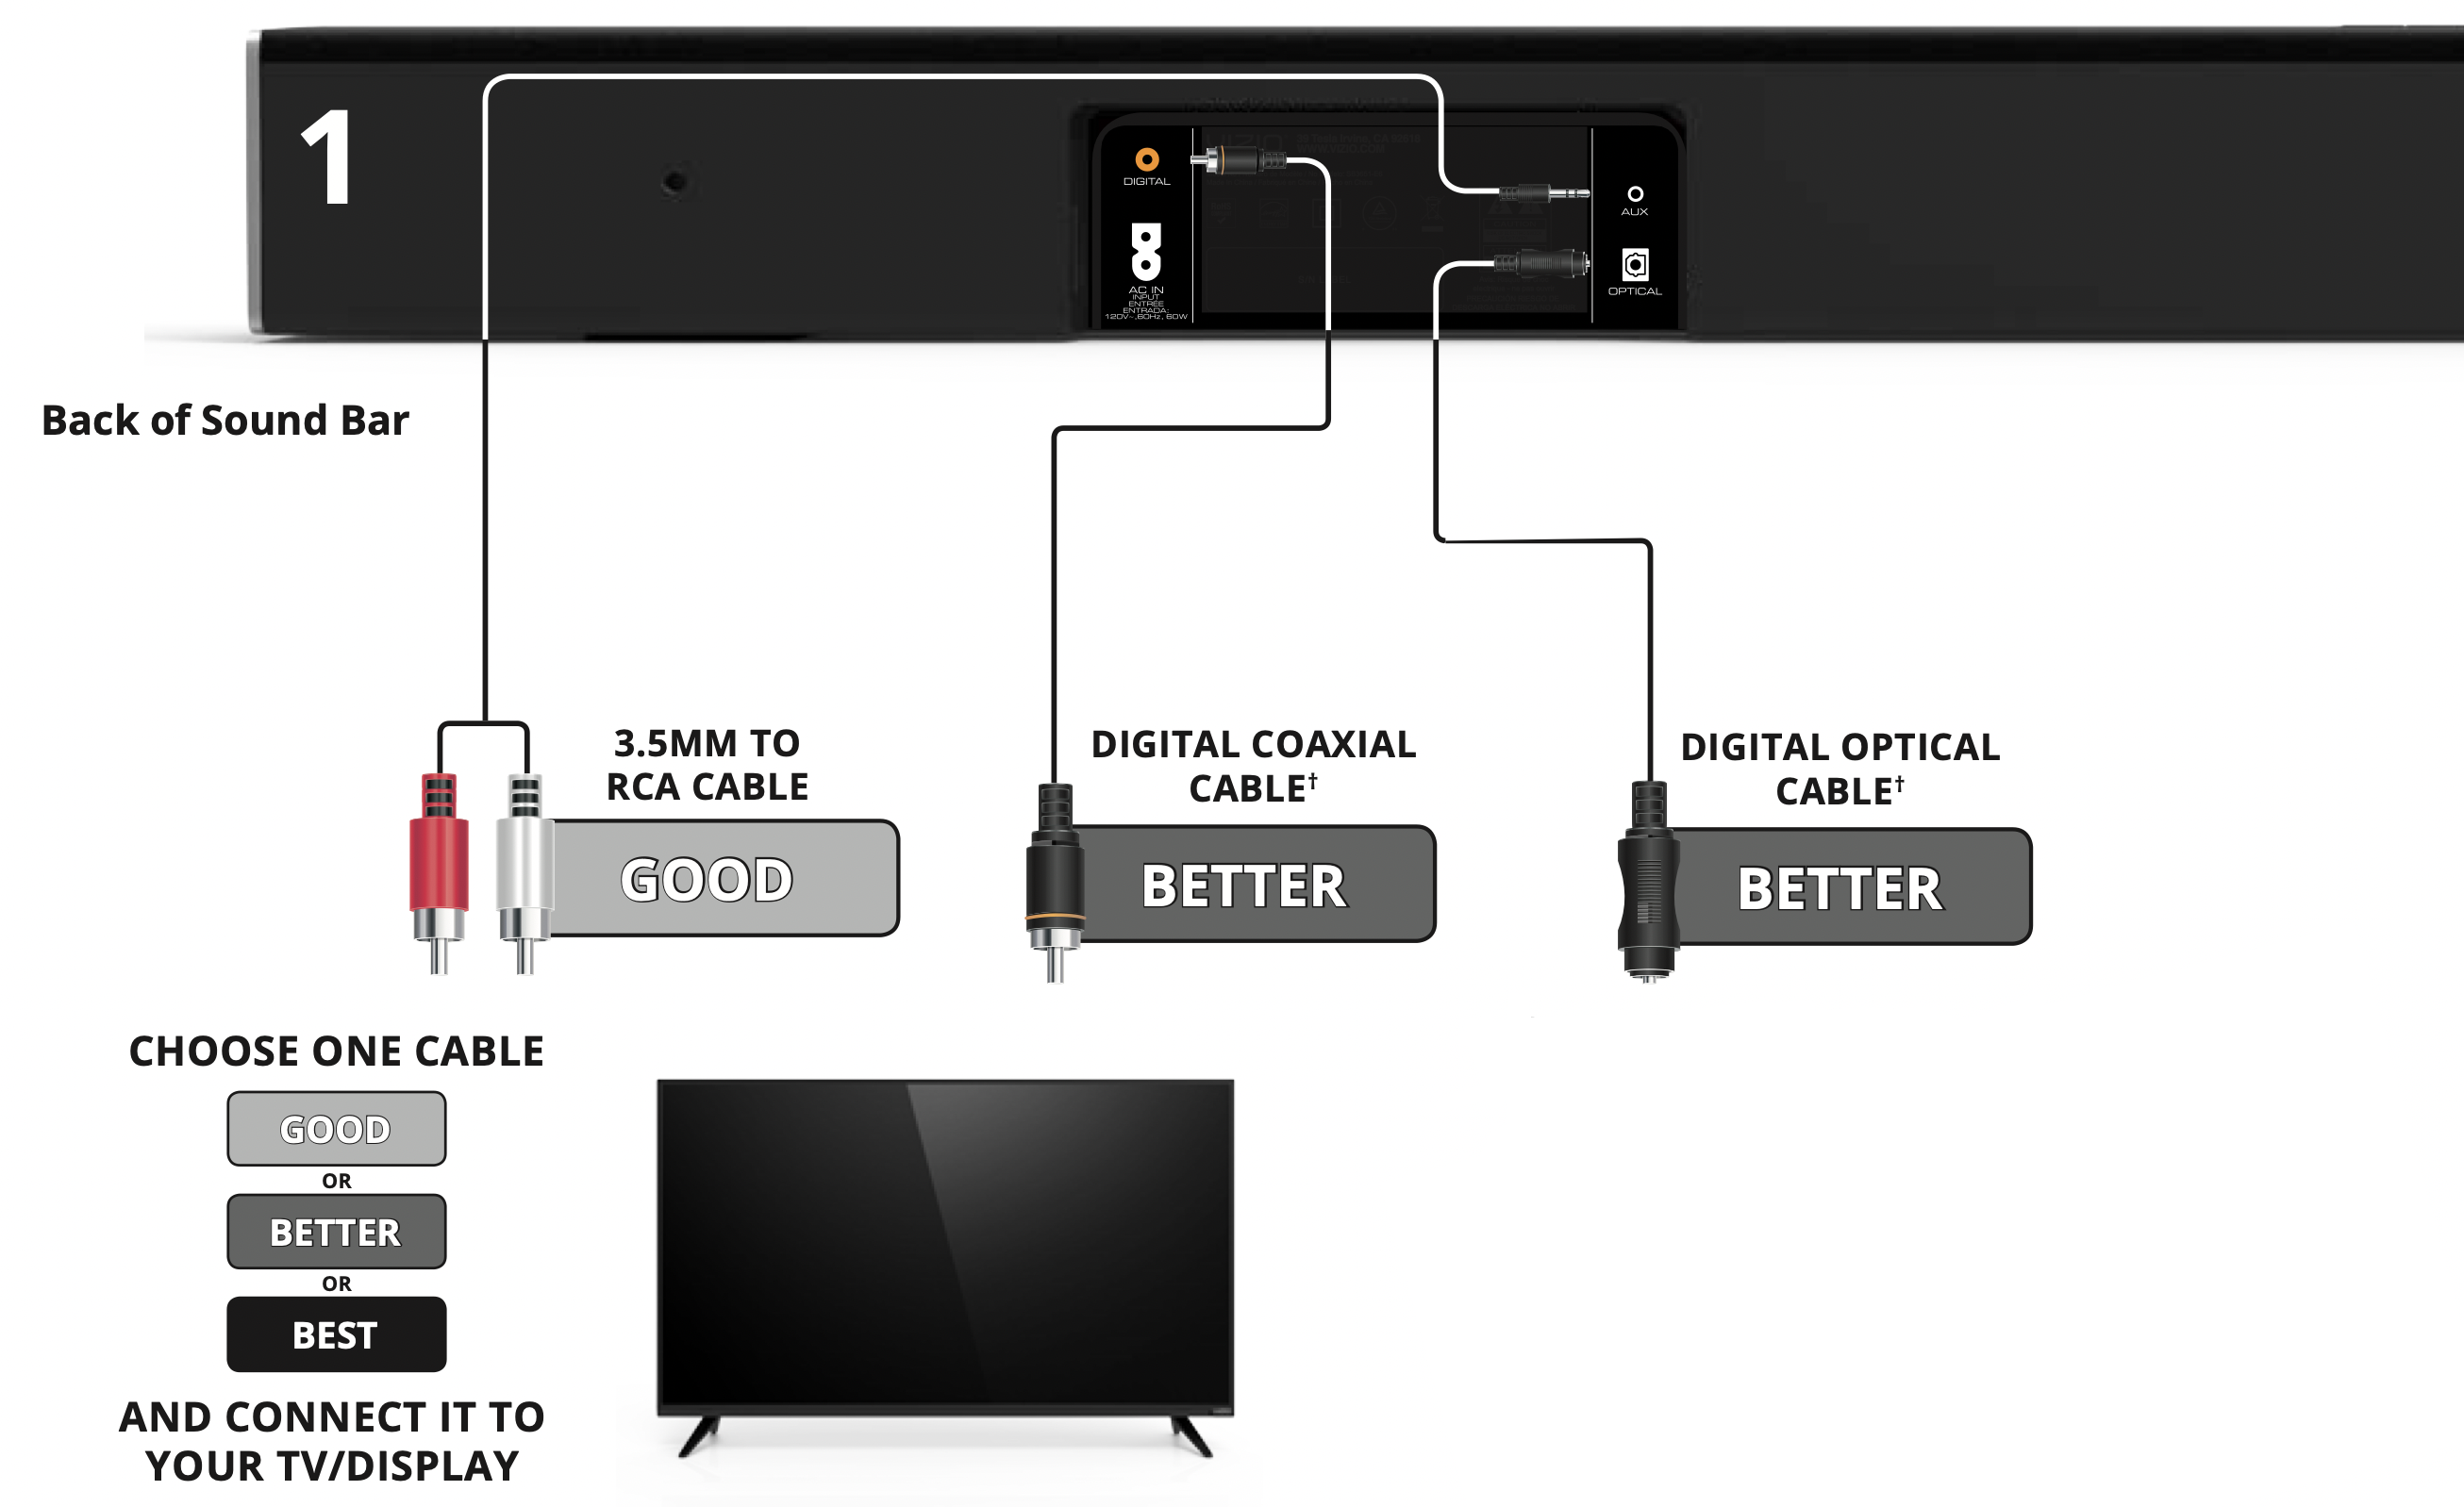
* Not all TVs/Displays have the audio outputs shown above. To connect the Sound Bar directly to your other devices (Blu-Ray player, game system, etc.) see your device’s user manual.
† When using either of the Digital Inputs, if there is no audio: (A) try setting the TV/Display output to PCM or (B) Connect directly to your Blu-ray/ other source, some TV/Display do not pass through digital audio.
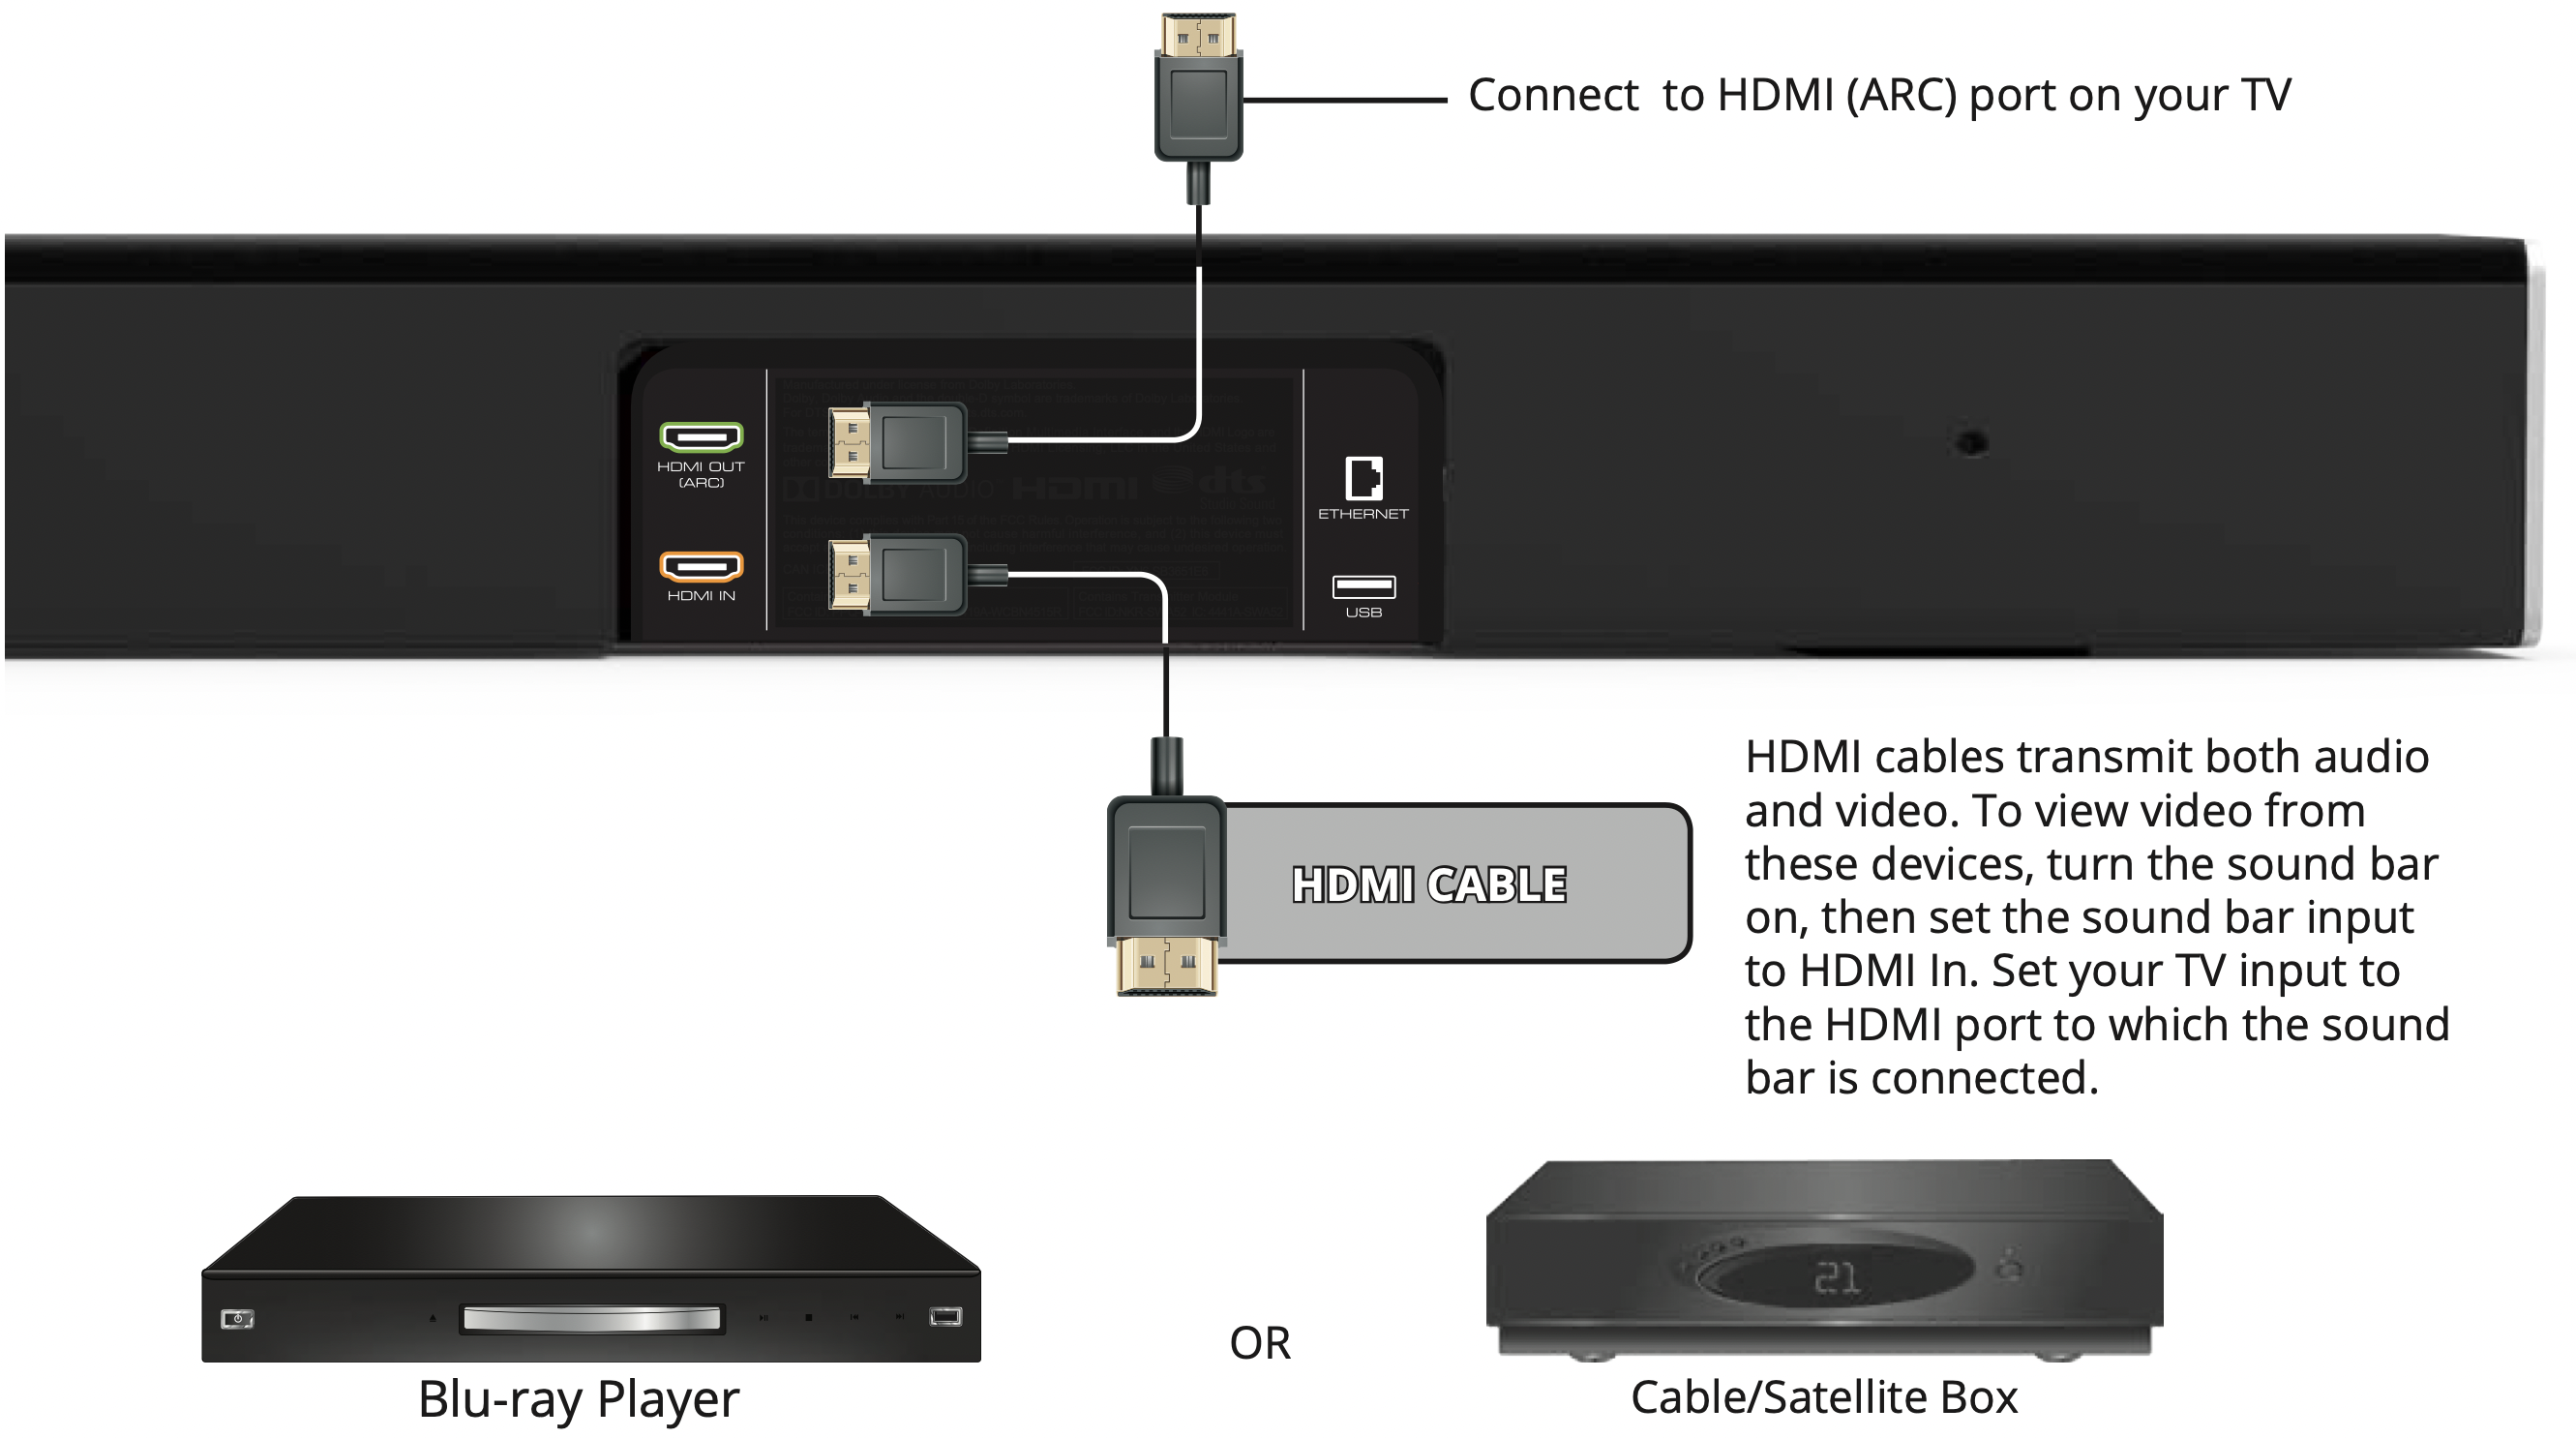
HDMI cables send Video (Out) and receive Audio from the TV/Display. See the Connecting with HDMI section for more information.
Connect the Sound Bar to your TV/Display* using one of the connection types to the left. Choose the best possible connection type. Be sure the TV/Display port is an audio output, not an audio input.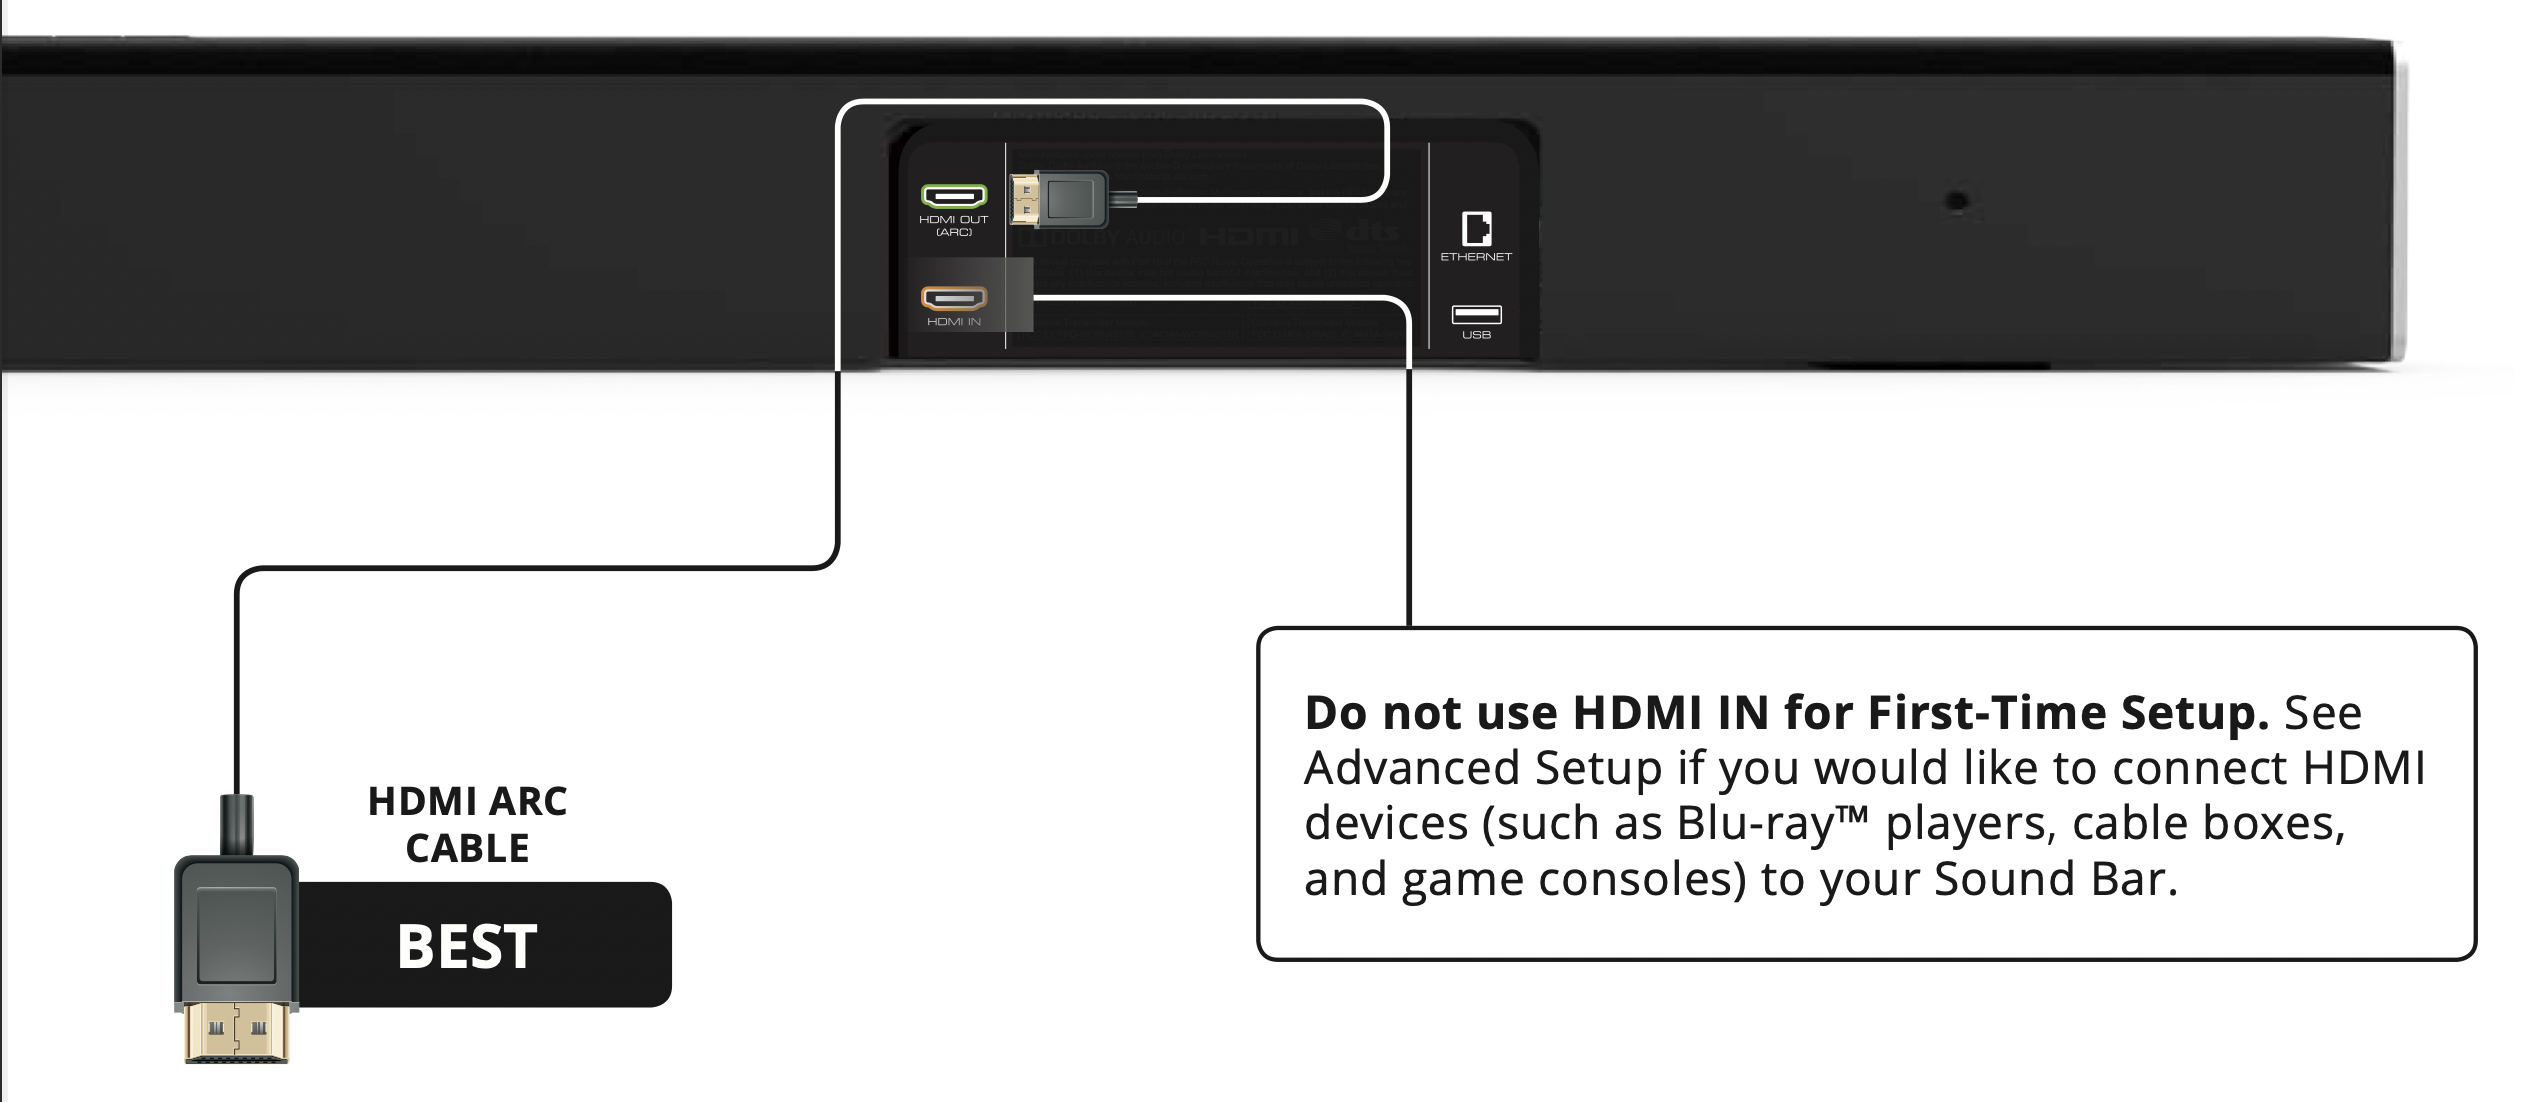
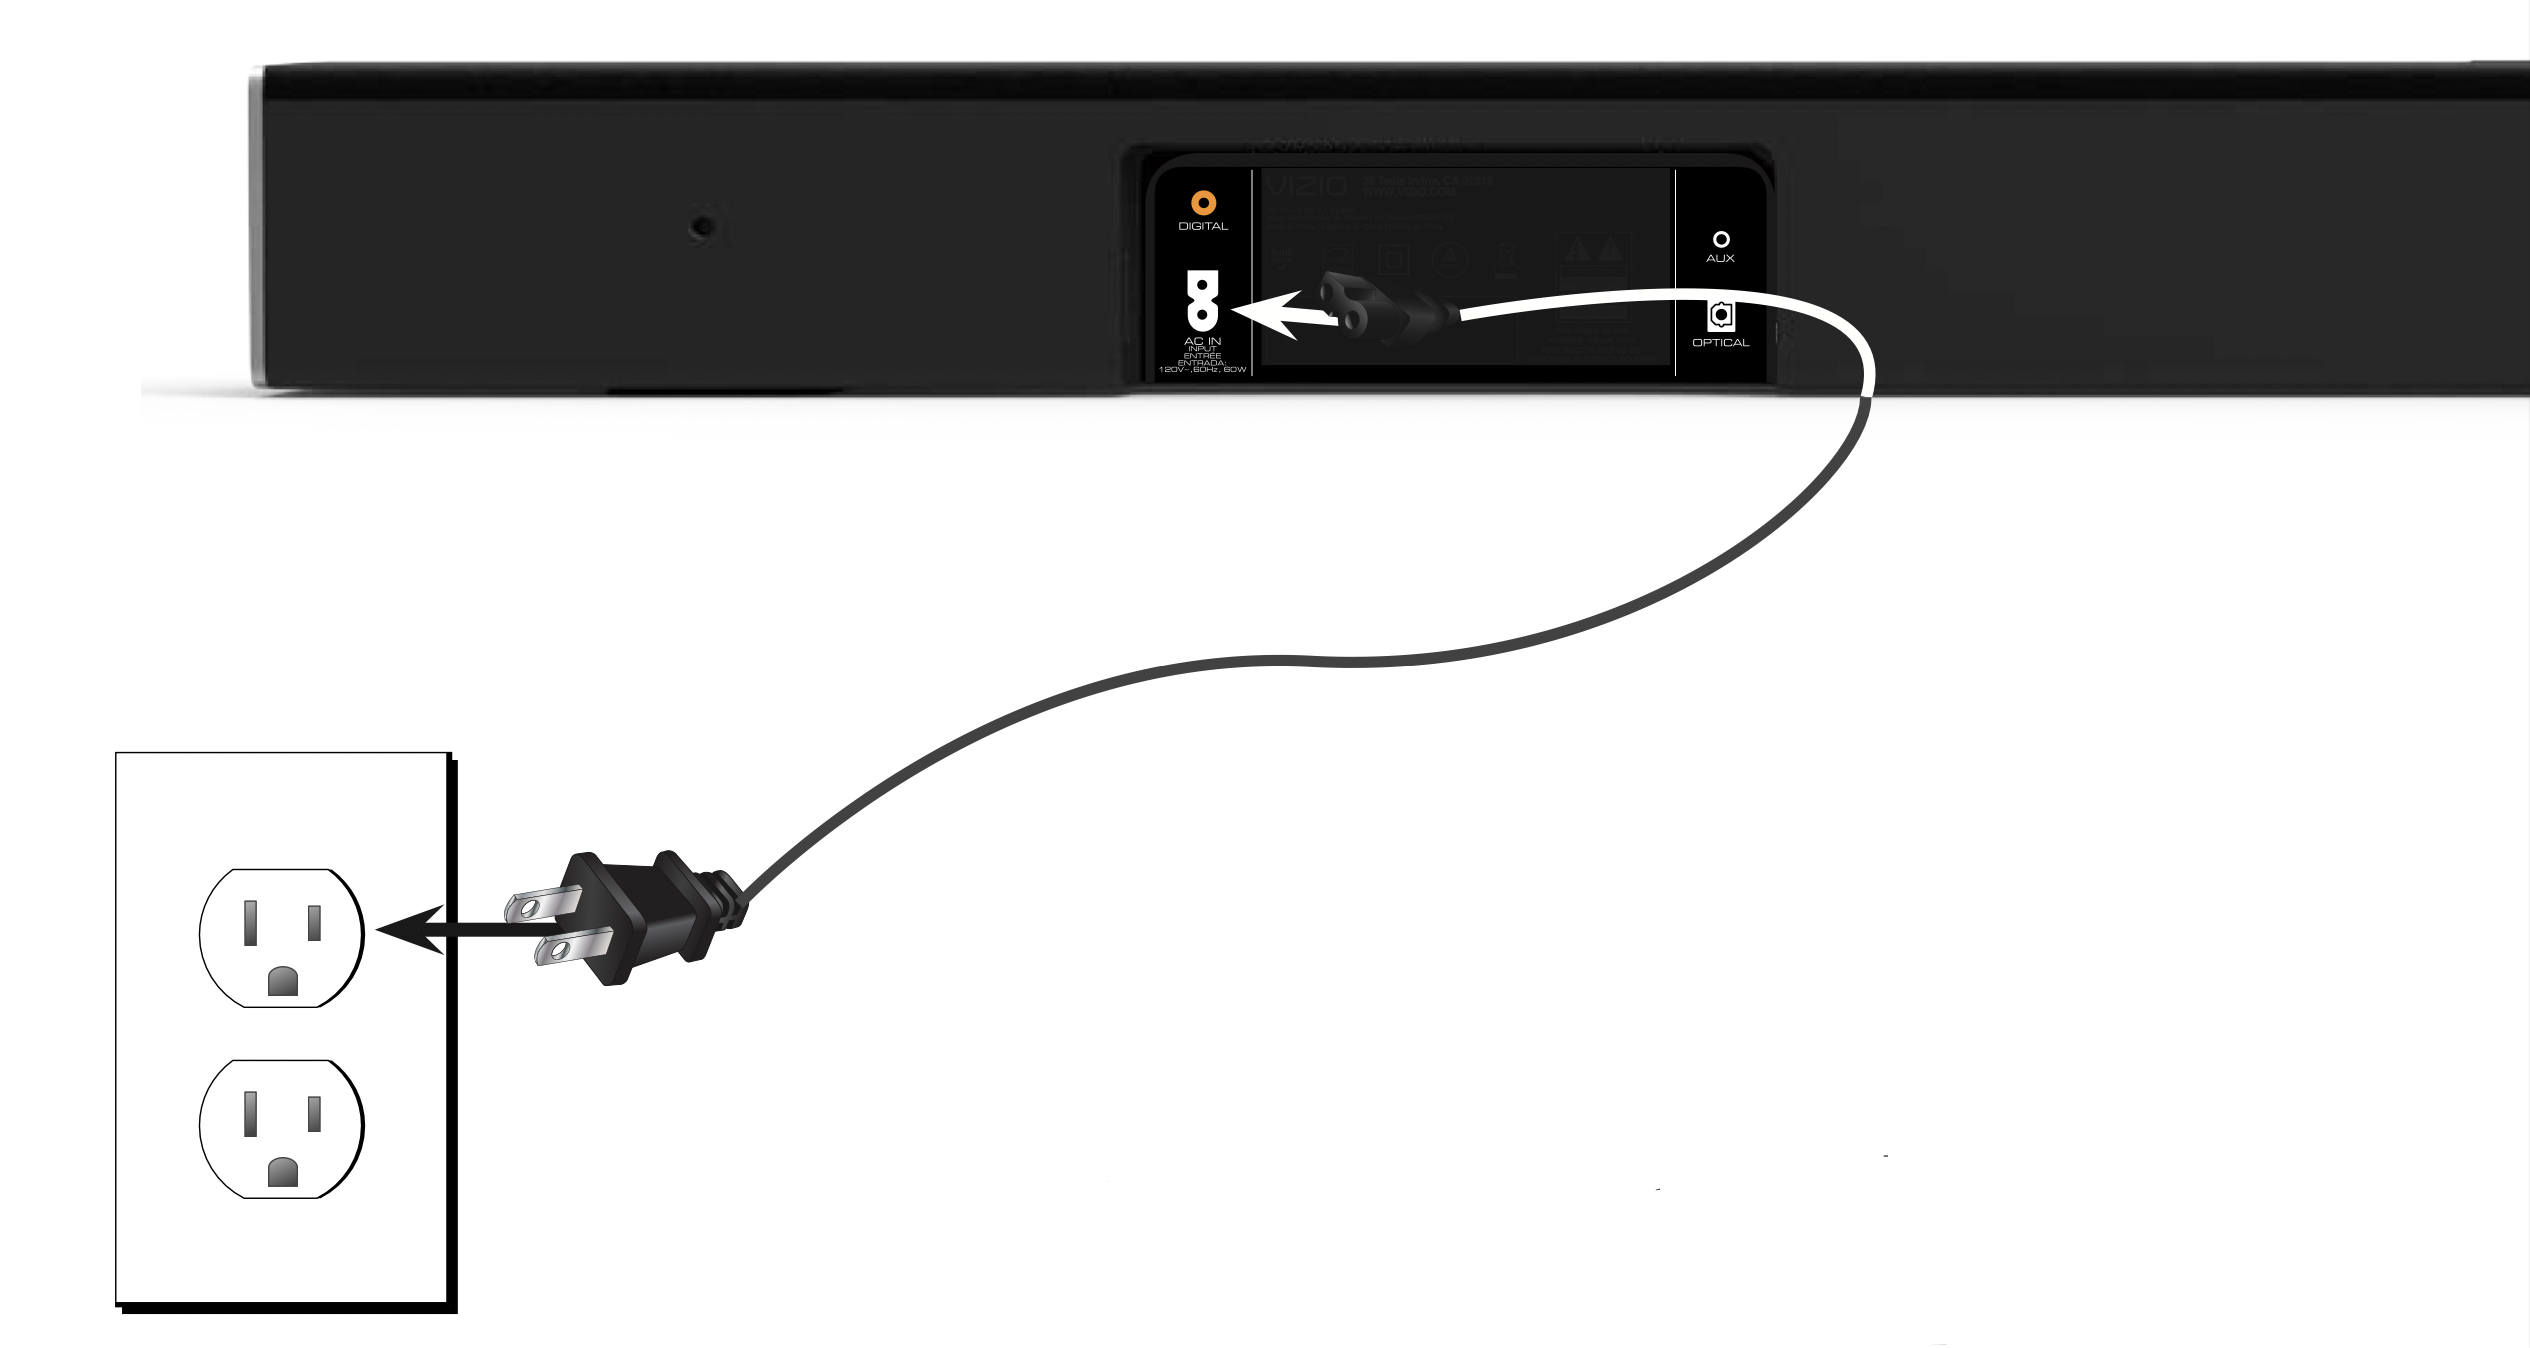
- Connect the power cable to the sound bar AC IN as shown.
Plug the power cable into an electrical outlet.
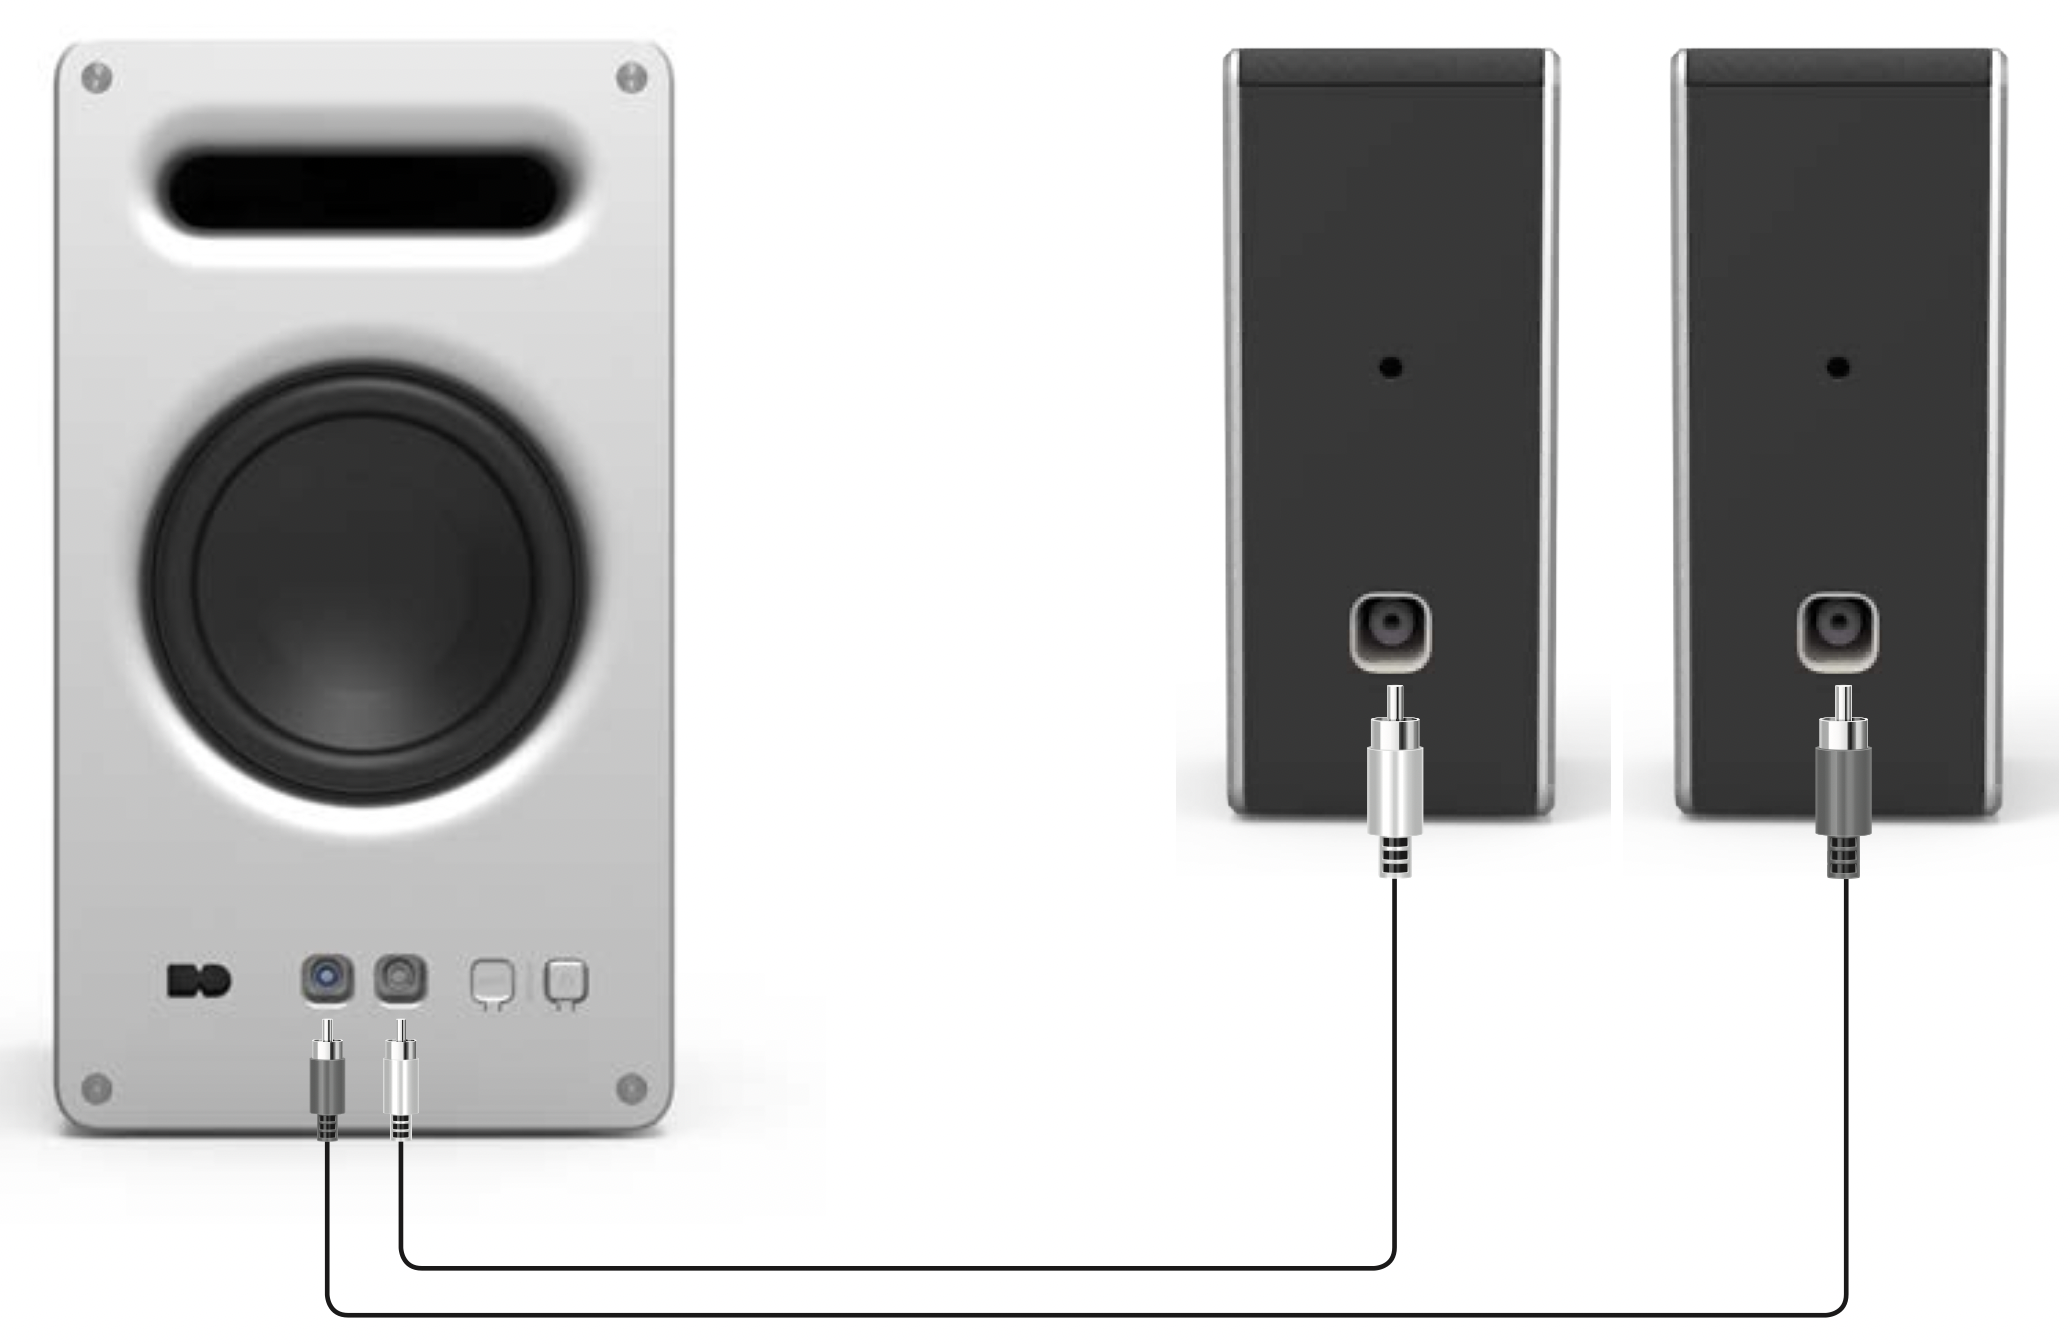
- Connect the satellite speakers to the subwoofer using the included satellite speaker audio cables.
Match the color coded speaker cable to the matching speaker port color. Blue for left surround and gray is for right surround.
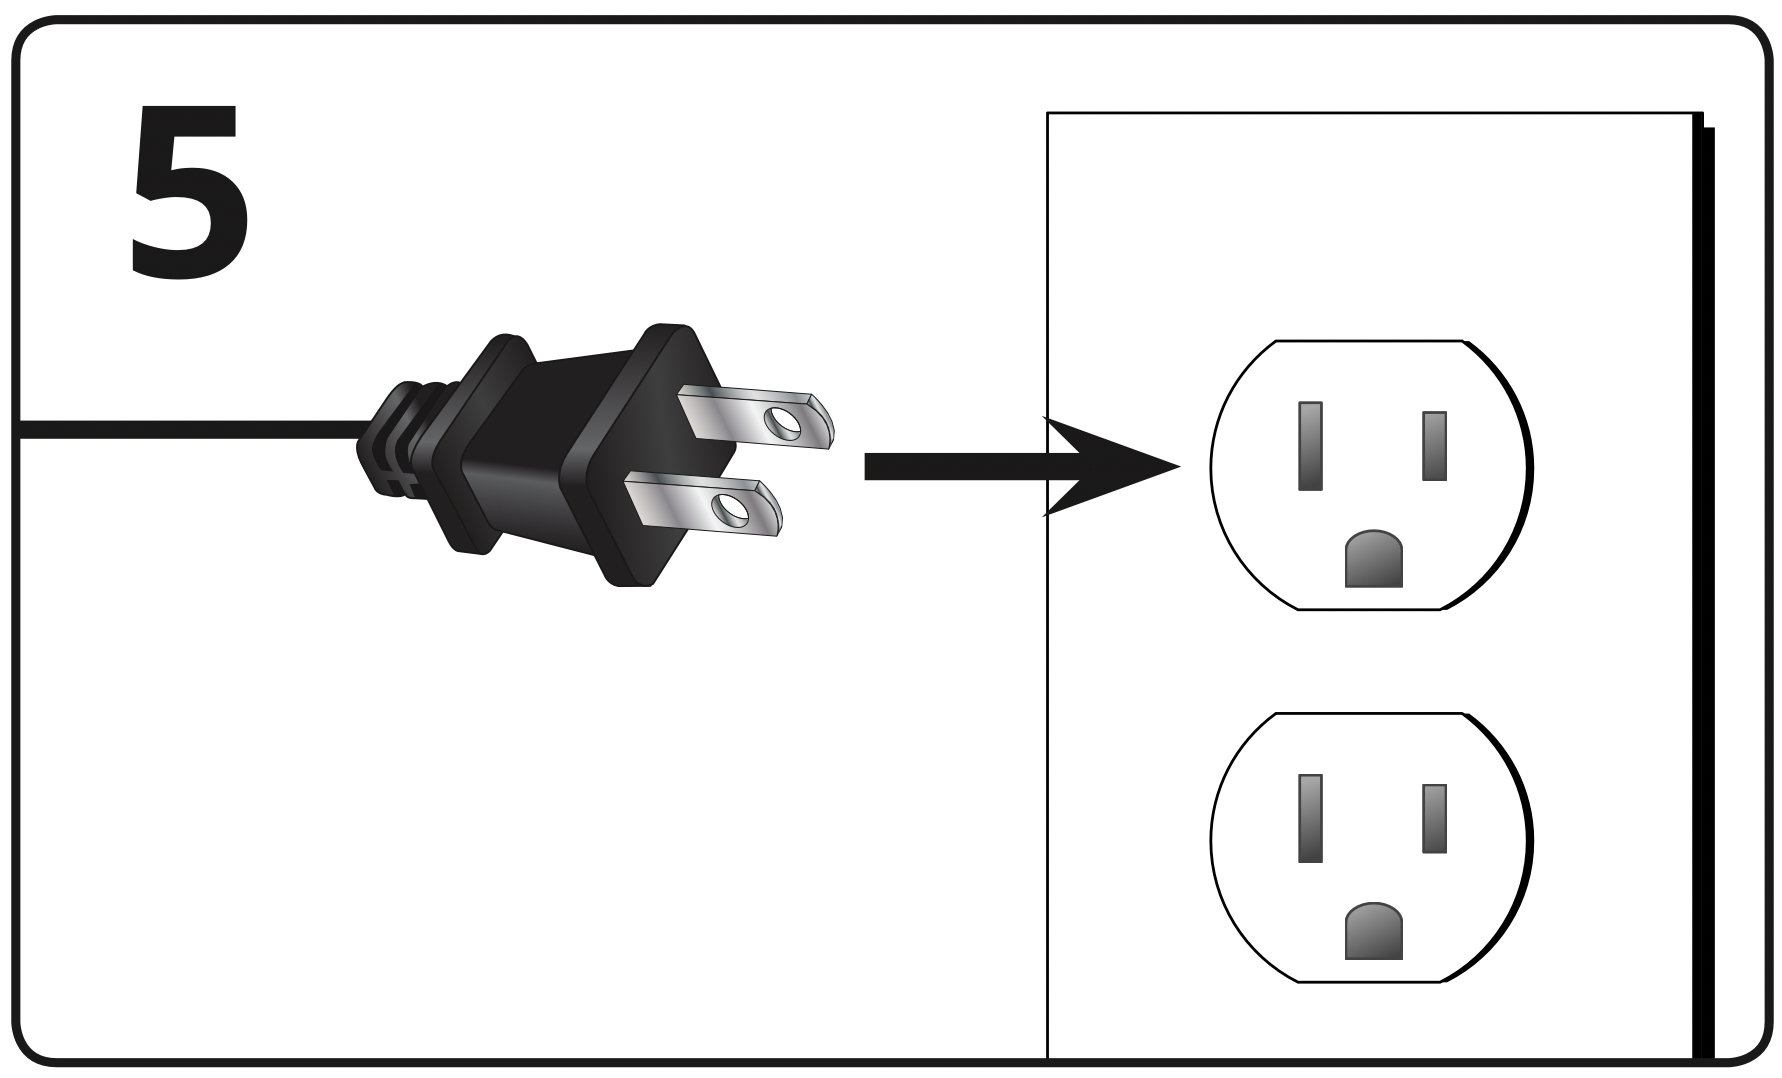
- Connect a power cable to the subwoofer.

- Plug the power cable into a power outlet.
- Press the power button to turn on the subwsoofer. The LED indicator will illuminate. The subwoofer should automatically power on when plugged in.

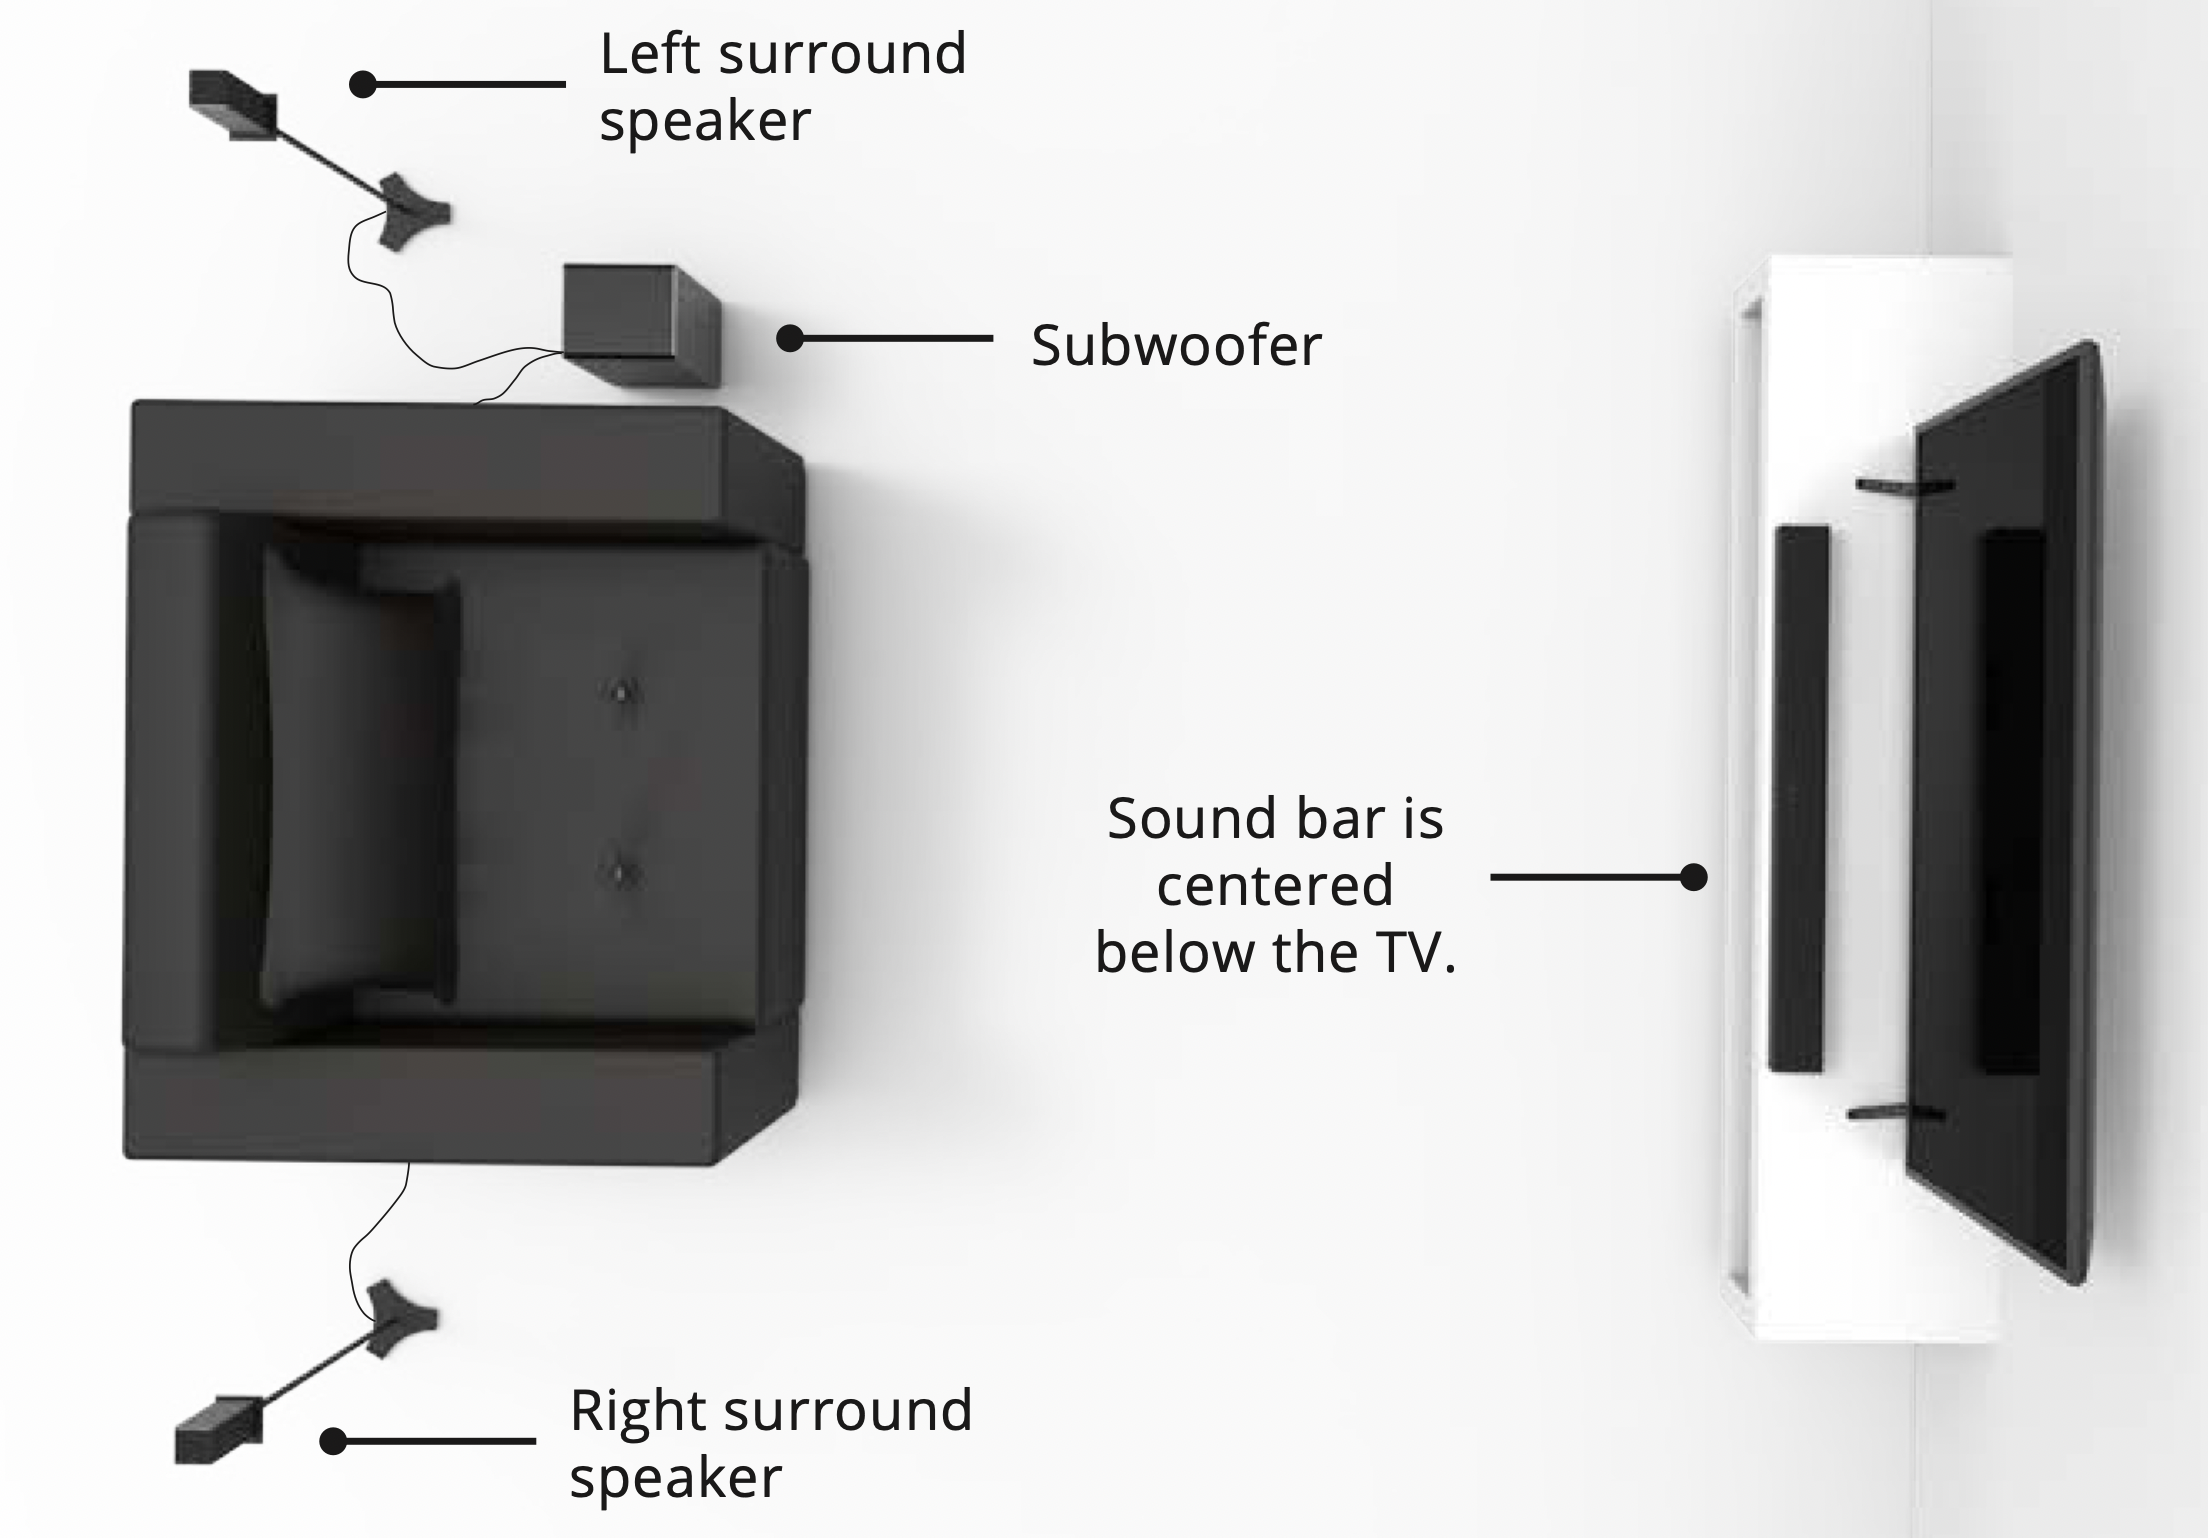
- For the best surround sound experience, position the sound bar, subwoofer, and satellite speakers as shown. The sound bar should be close to ear level.
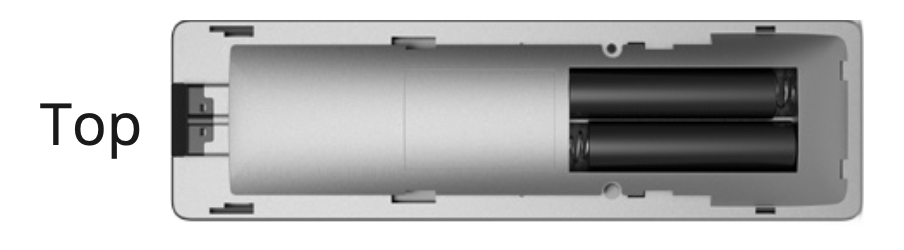
- Remove the battery cover by gently sliding it away from the remote.

- Insert the included batteries and gently slide the battery cover back into place.
- Turn on your TV and sound bar. The sound bar will automatically begin searching for an active input.*
The LED indicators on the front of the sound bar will begin cycling in pairs through inputs until an audio source is detected.**
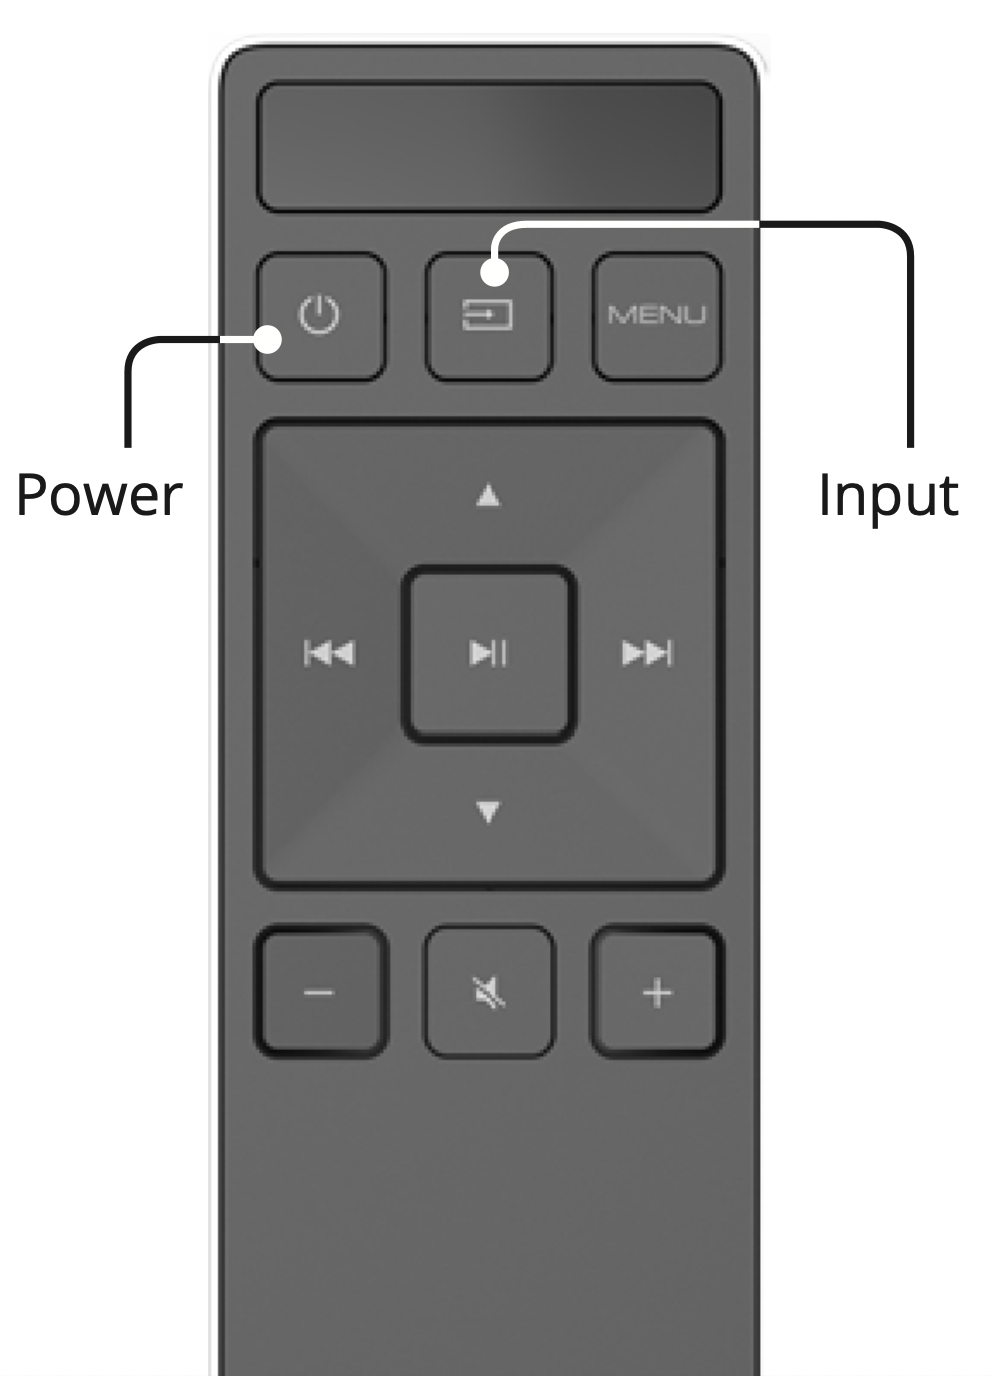
Tip: Pressing the INPUT button will stop the auto detect function.
You can press the INPUT button to switch between audio sources. For example, if you connected your TV to AUX, set the sound bar to AUX.
USING THE REMOTE

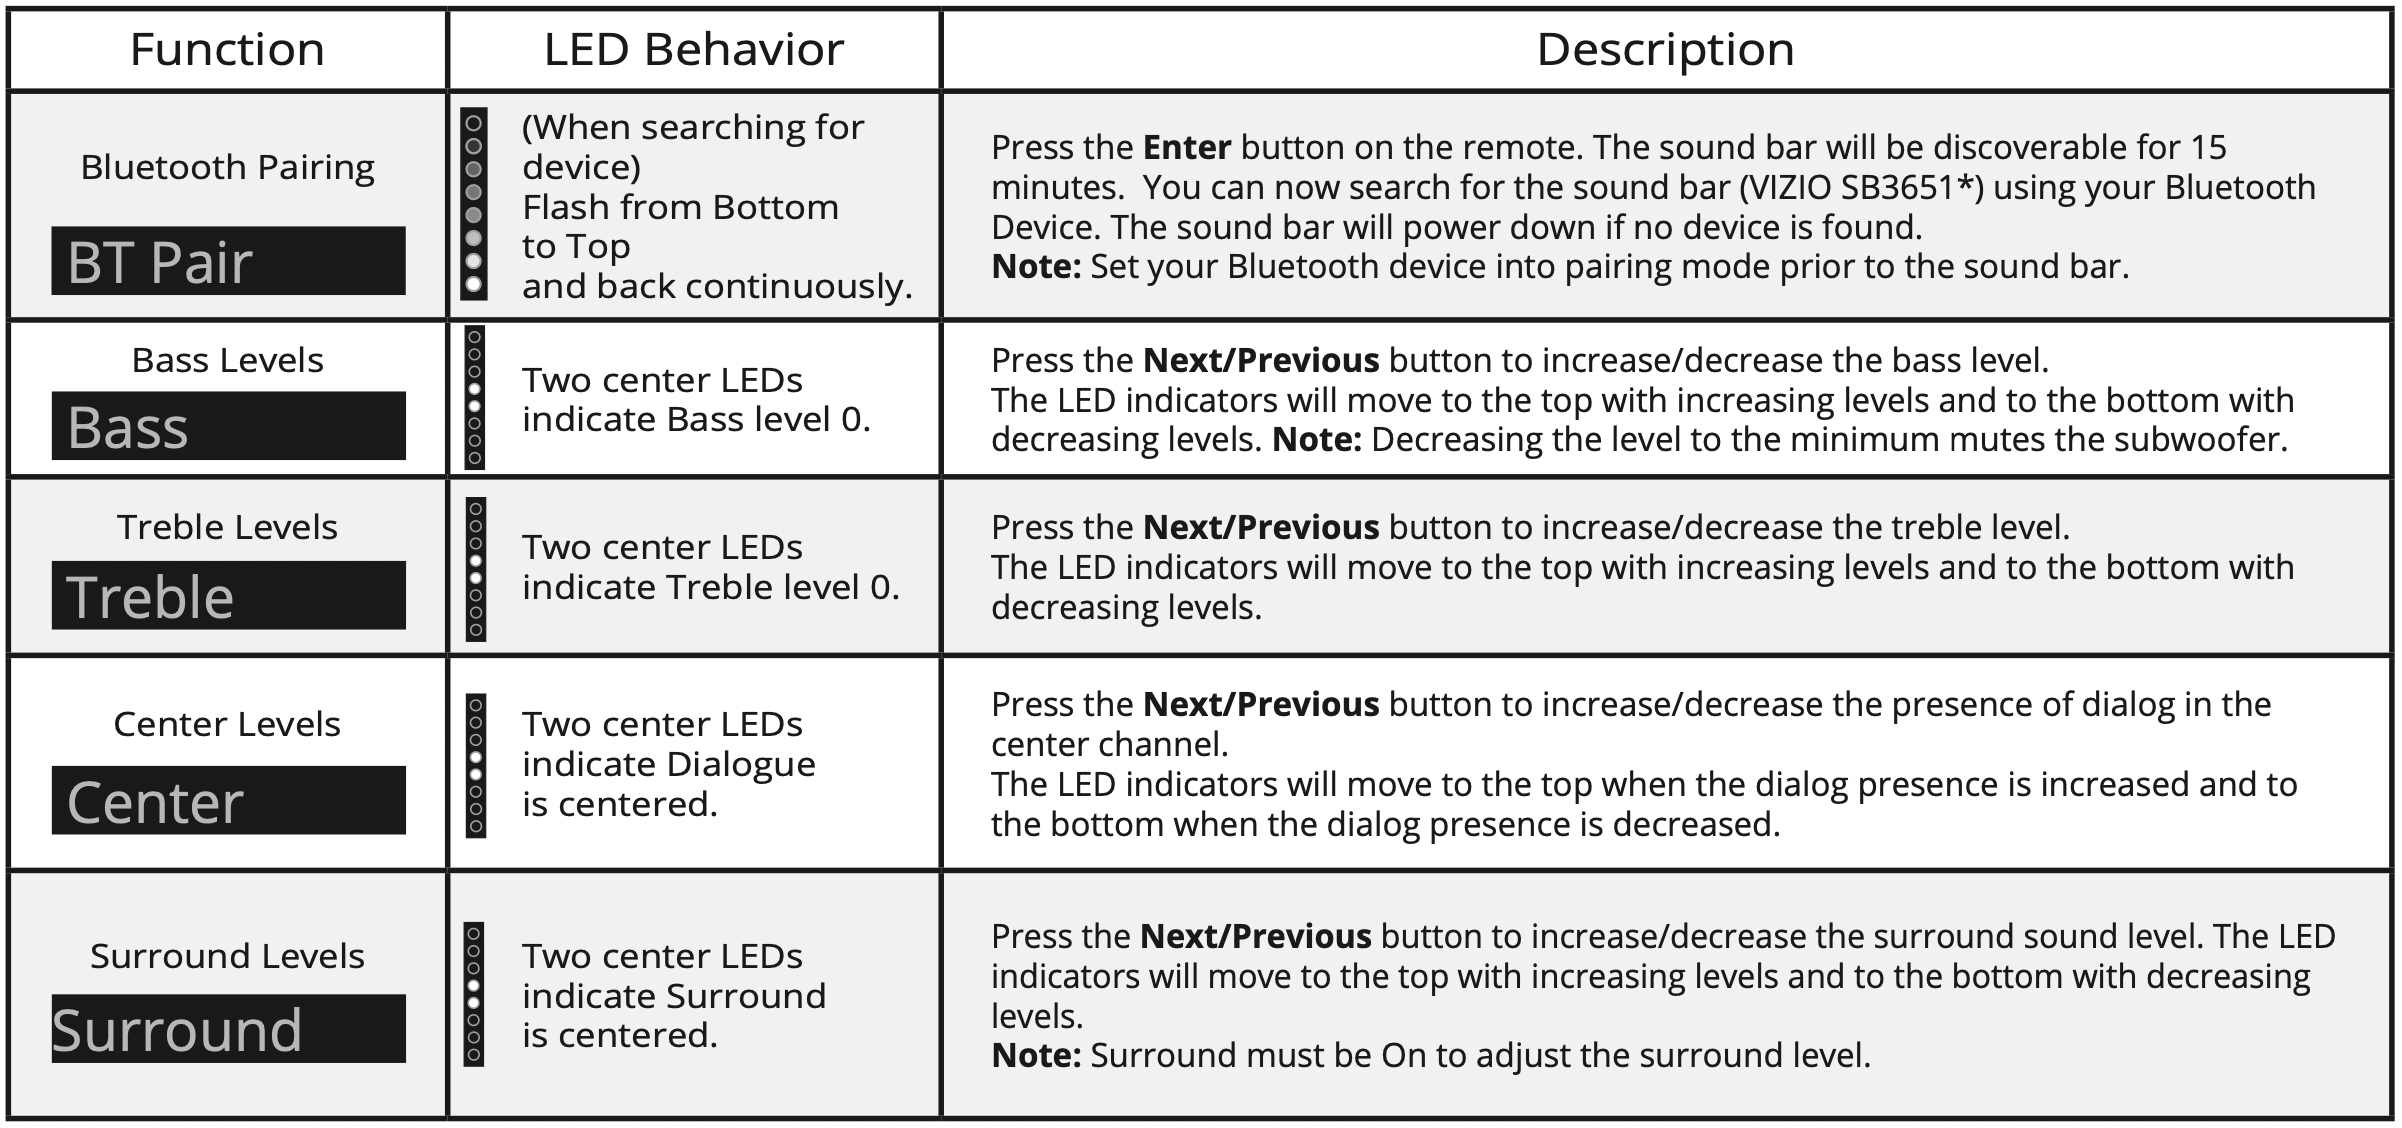
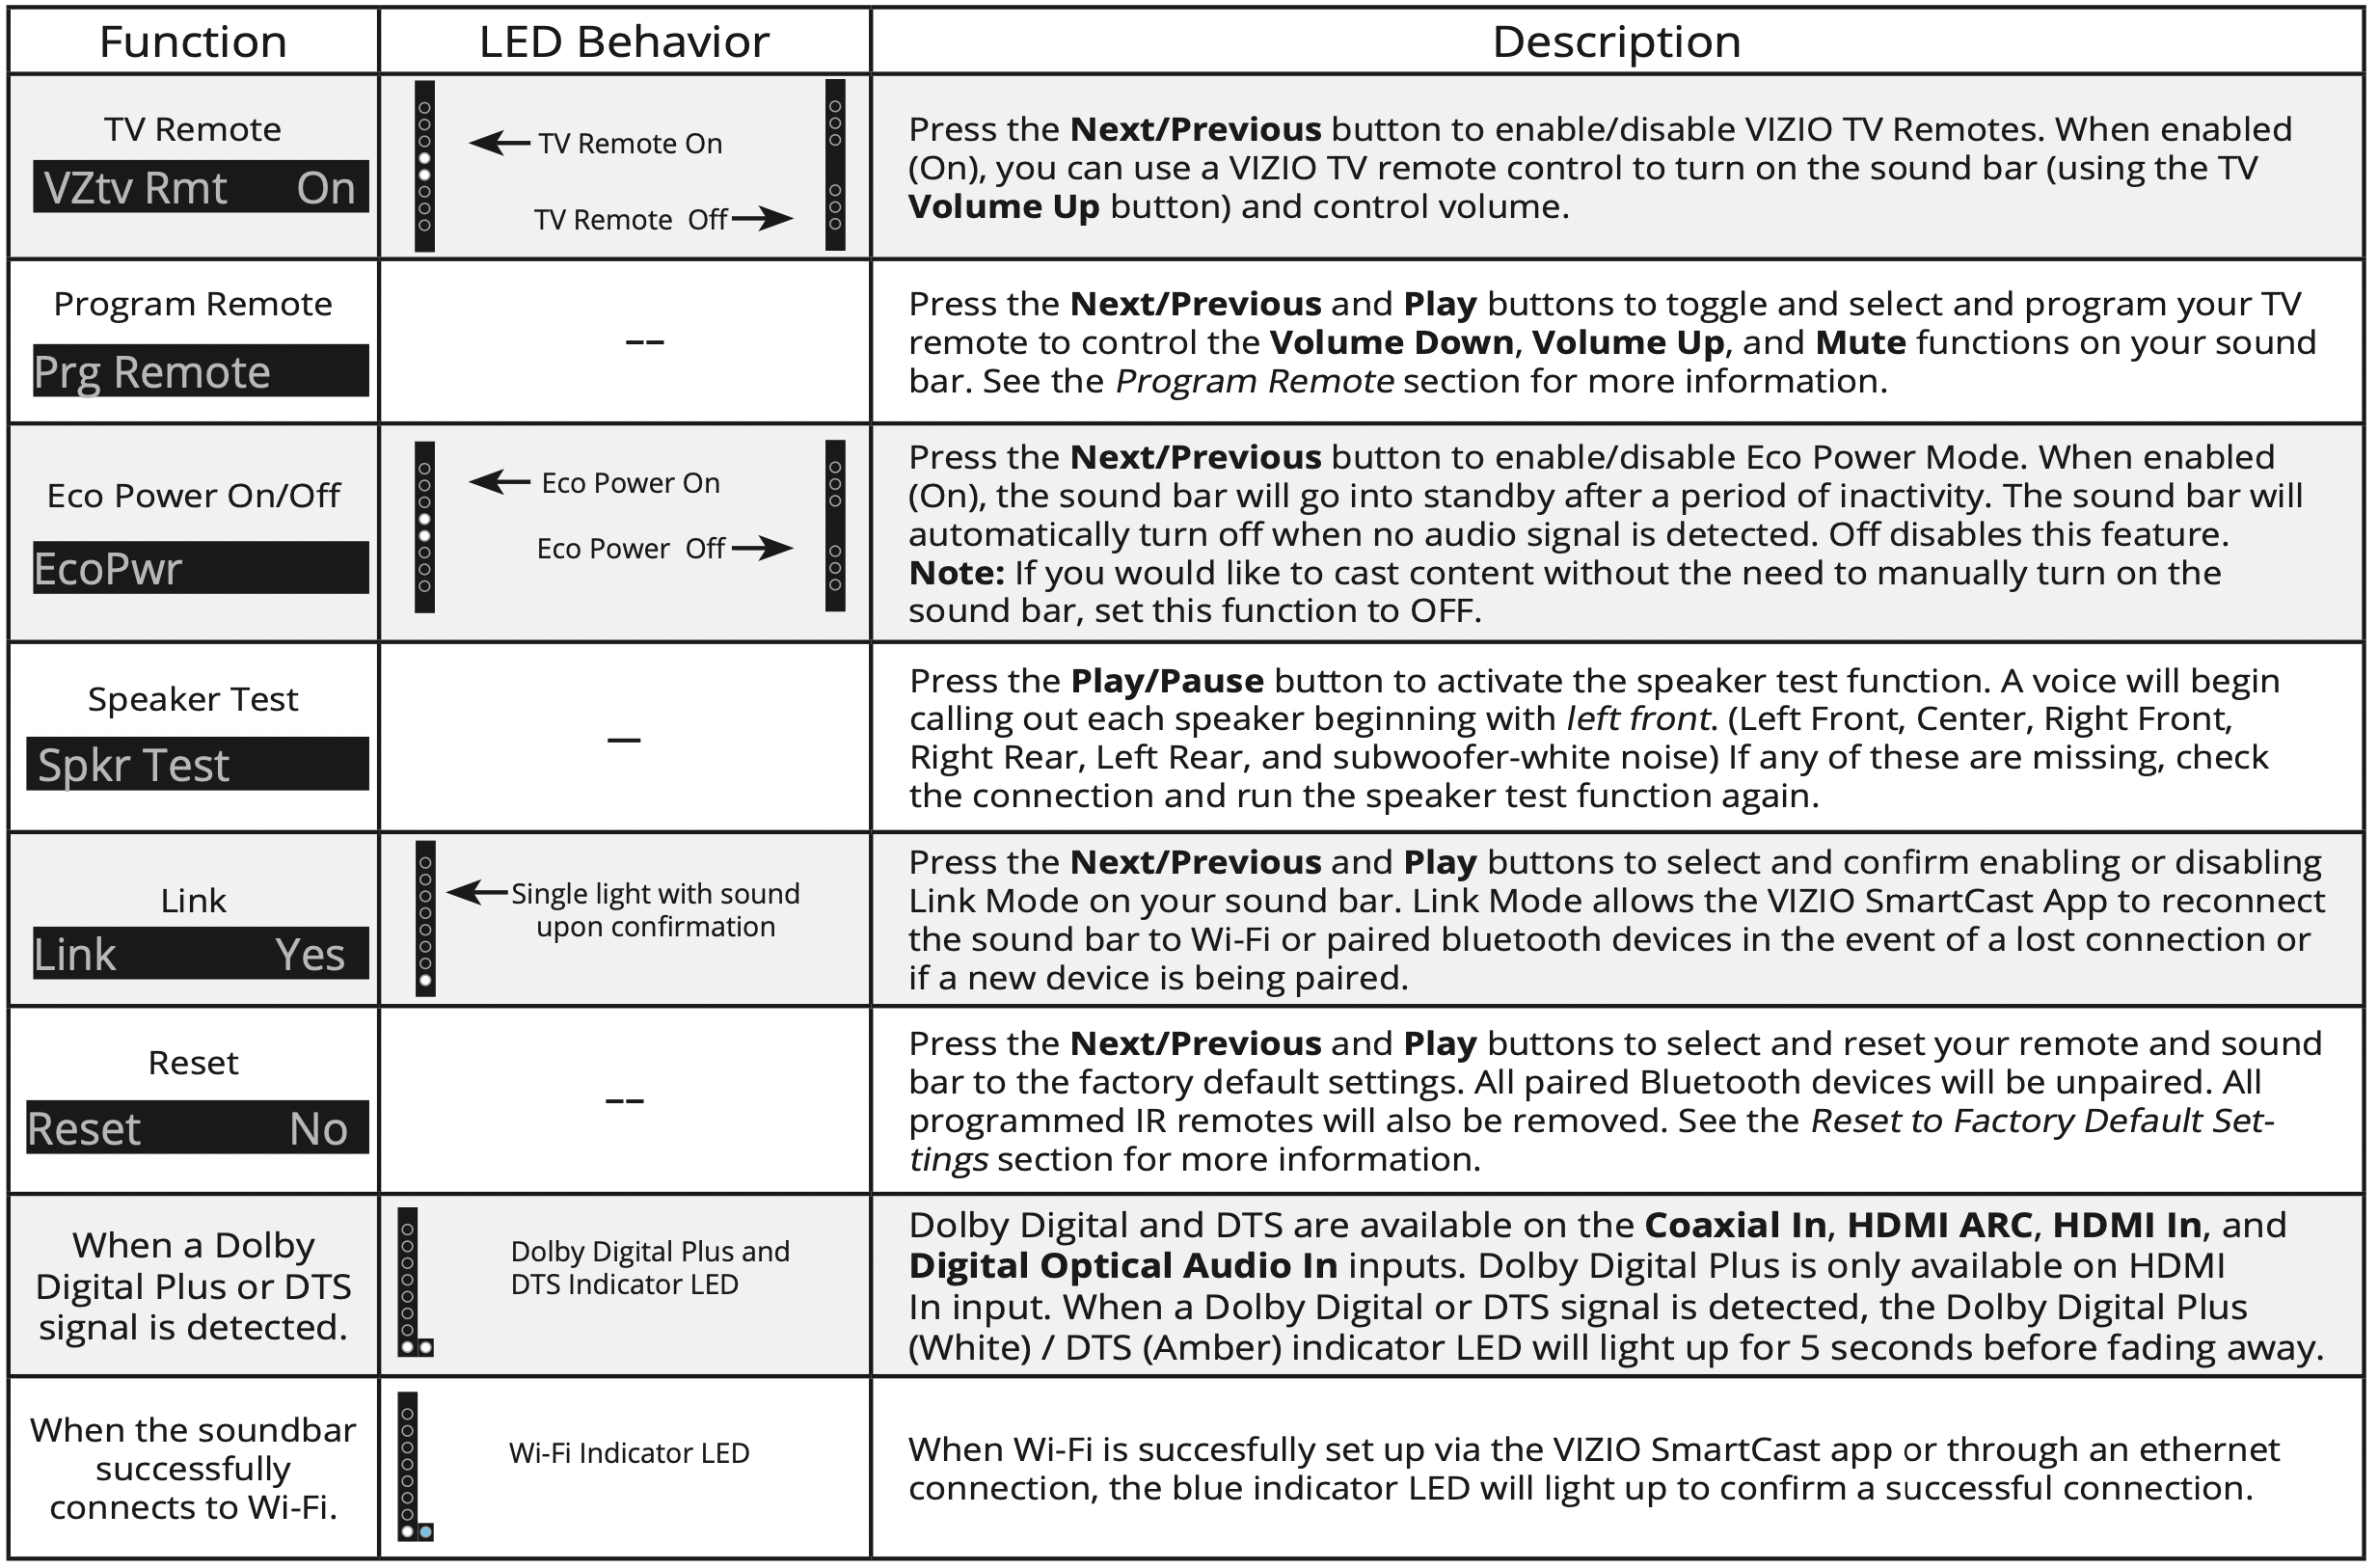
LED INDICATORS
Press the Menu button and use the Up/Down Arrow buttons on the remote to access the different functions and acoustic settings of the sound bar. Each function and setting will be displayed on the remote control’s LCD display. The LED Indicators will behave differently with each function.


USING YOUR TABLET OR SMARTPHONE AS A REMOTE
Download the VIZIO SmartCast app and turn your smartphone or tablet into a remote to control your sound bar system.
To use your smartphone or tablet as your VIZIO SmartCast Remote:
- Download the VIZIO SmartCast app on your compatible smartphone or tablet and follow the on-screen instructions to pair your device with a VIZIO SmartCast Sound Bar System.
Minimum Recommended Requirements.
Android™*
- Android 4.4 or higher**
- RAM: 1.5GB or more
- Storage: 8GB or more
- Networking: Wi-Fi
For a list of supported devices, see Google Play™ supported device article.
iOS*†
- iOS 9.0 or later
- Devices supported: iPhone, iPad
Tip: The VIZIO SmartCast app is available for download from the Google Play Store and Apple App Store.
PAIRING YOUR SMARTPHONE OR TABLET
To pair your smartphone or tablet with your VIZIO SmartCast Sound Bar for the first time:
- Install the VIZIO SmartCast app.
- Launch the VIZIO SmartCast app on your smartphone or tablet and ensure the Sound Bar is on.
- When prompted with Set up a New SmartCast Device window, select Setup to confirm.
Or
From the VIZIO SmartCast app, tap on the  button in the top left corner. The side menu is displayed. Tap Setup a new Device from the list of options.
iOS Device Pairing
After opening the VIZIO SmartCast™ App:
- Select Get Started.
- Hold your mobile device next to the front of your sound bar.
Follow the remaining steps to complete setup.
Android Device Pairing
After opening the VIZIO SmartCast™ App:
- Select Get Started and Select your preferred language.
- Look for your sound bar name, such as VIZIOCastAudioXXXX, on the list of discovered devices and tap to select.
Follow the remaining steps to complete setup.

HOW TO CAST AUDIO
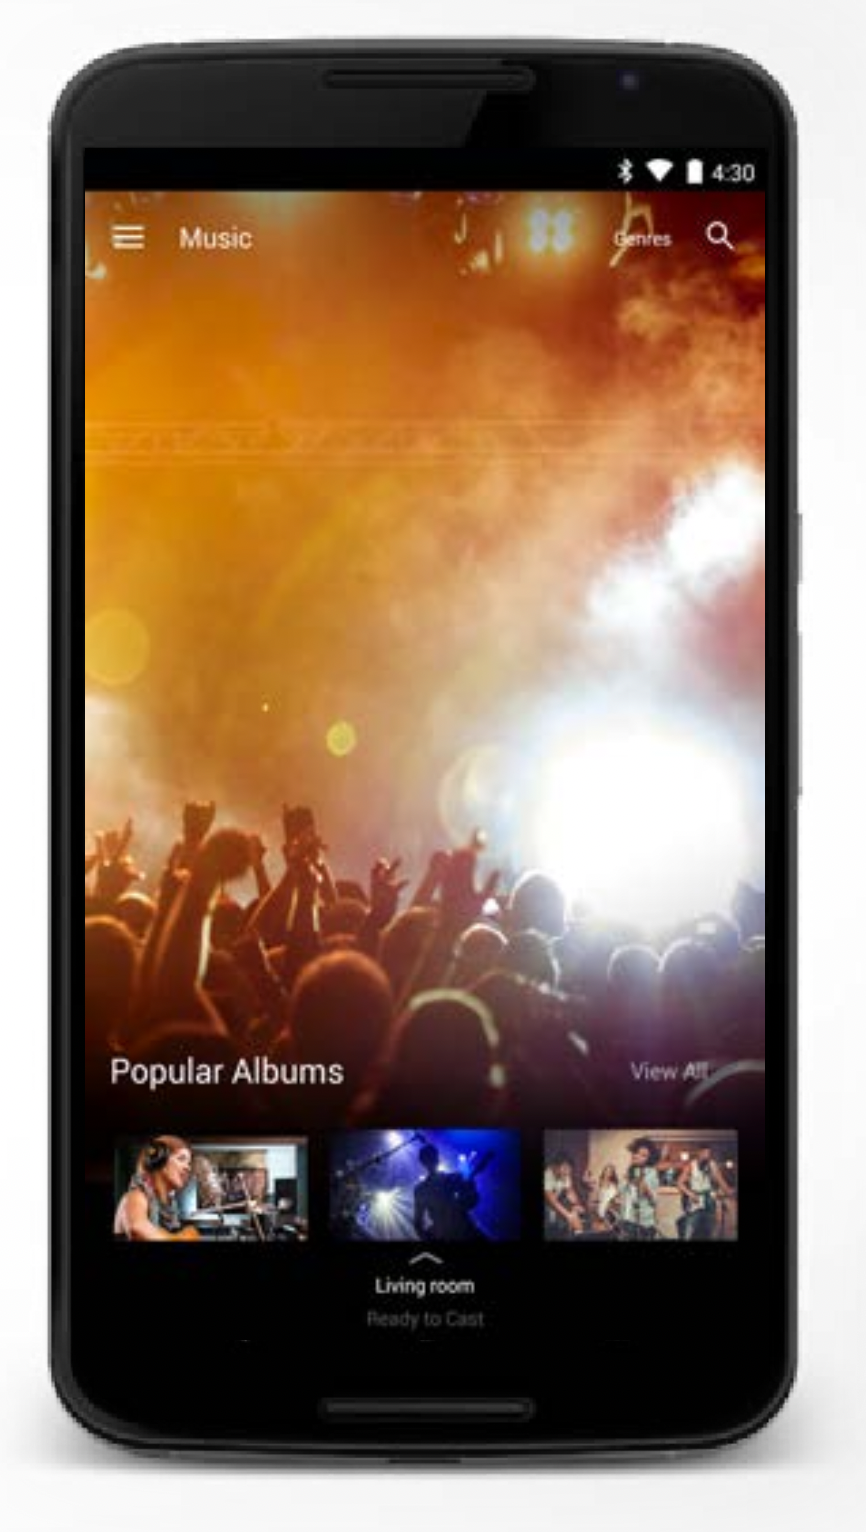
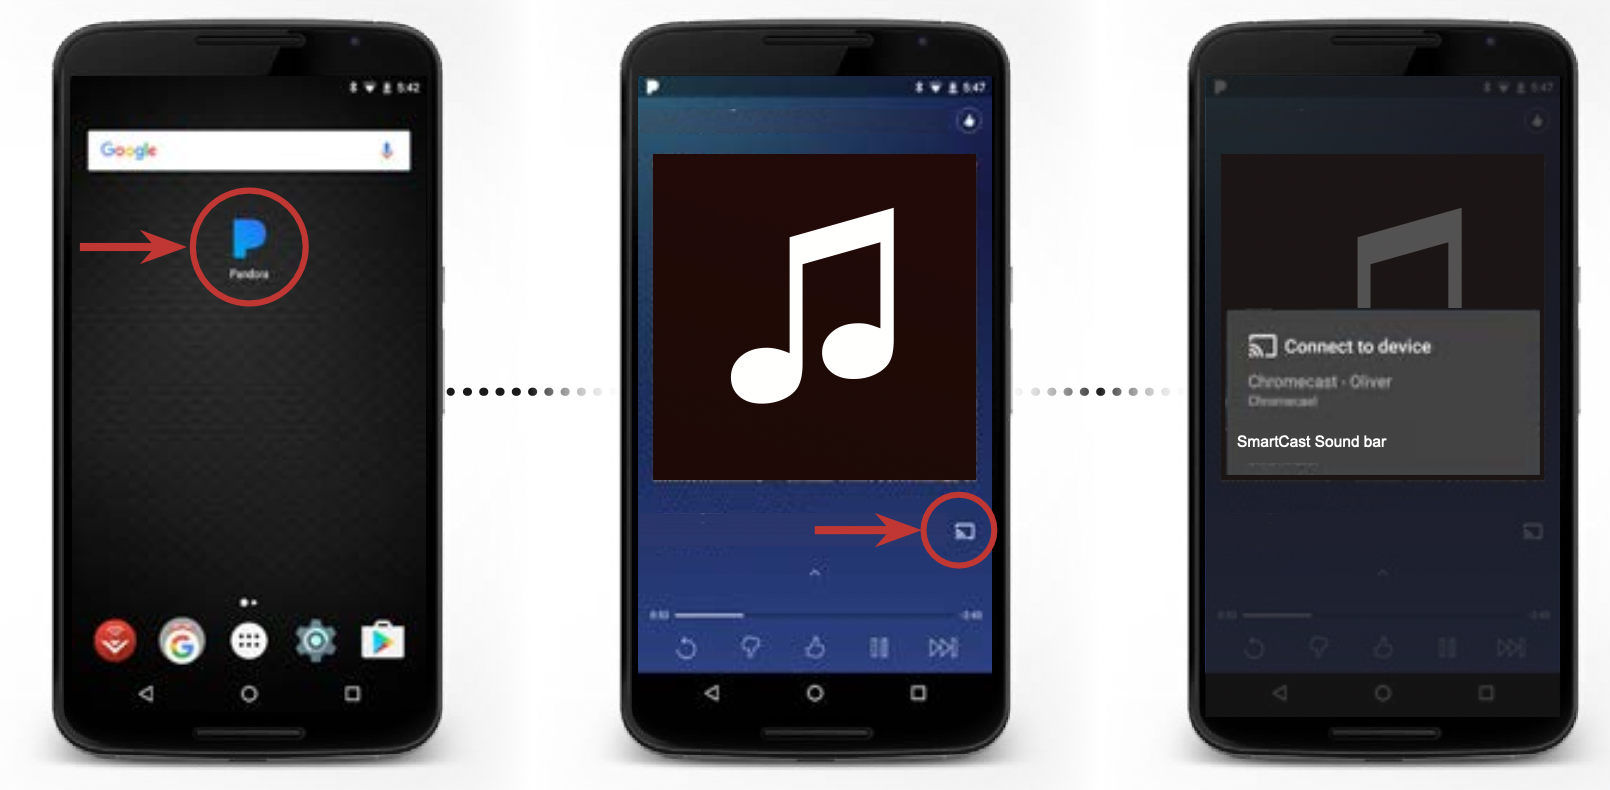
With Chromecast built-in, you can cast your favorite audio content from your device right to your sound bar. Streaming audio content to your sound bar is as simple as tapping an icon on your favorite app.
- Ensure your mobile device is on the same Wi-Fi network as your VIZIO SmartCast™ sound bar and open a Chromecast-enabled app, such as Pandora*.
- Choose something you want to listen to and tap the
 (Cast) button and select your sound bar.
- Press the play button to begin listening to your content.
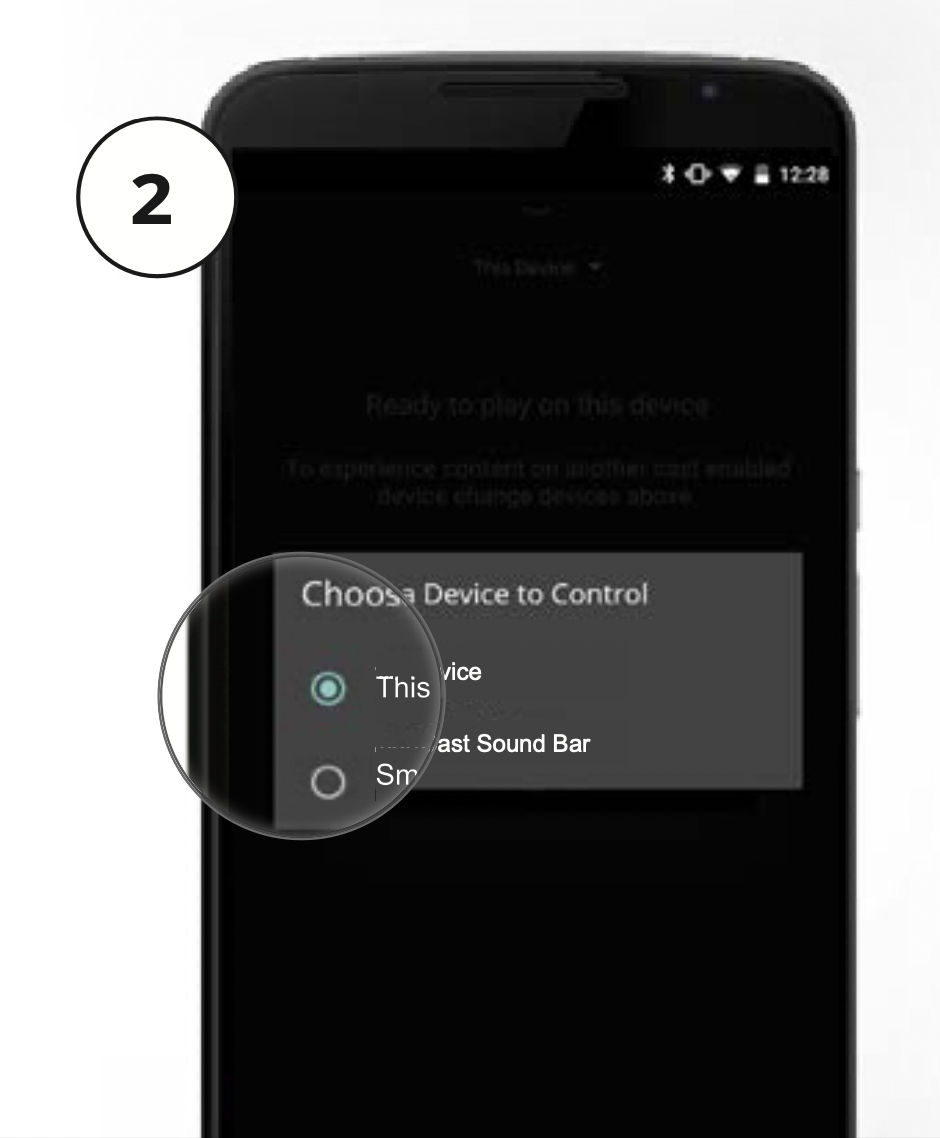
SELECTING A SMARTCAST DEVICE
You can pair your smartphone or tablet with multiple SmartCast devices, allowing you to seamlessly access and cast your content wherever you are.
To select a different SmartCast device:
- On the Home screen of the VIZIO SmartCast app, tap This Device to reveal a list of available devices.

- Tap to select a new device to control. Make sure the newly selected SmartCast device is turned on.
CREATING AN AUDIO GROUP
With Chromecast built-in, the multi-room playback capability allows you to create audio groups and cast different music or the same music to multiple sound bars at the same time. Prior to creating an audio group, ensure all devices were set up using the VIZIO SmartCast App and are powered on.
To create an audio group:
- Install and open the Google Home App.

- Tap the Devices icon
 to see a list of available audio devices and select a device. Tap the menu icon
  on the top right corner of the sound bar window.
- From the menu, select Create group. A list of all available sound bars appears.
- Check or uncheck the box next to each sound bar to add or remove it from the group. Name the group then tap Save Group to finalize.*


BLUETOOTH AUDIO PAIRING
To pair the sound bar with a Bluetooth device:
- Press and hold the Bluetooth button
 on the sound bar for five (5) seconds or select the BT Pair option from the display remote menu. When the sound bar is in Bluetooth Pairing Mode, the LED Indicators on the Display Panel on the front of the Sound Bar will light sequentially from bottom to top and back again.
Once the device is paired, the LED Indicators will stop flashing.
- You can now search for the sound bar (VIZIO SB3651*) using your Bluetooth device. For more information, refer to the user documentation that came with the device.
- Play audio from your Bluetooth device. Volume can be controlled on your source device and the sound bar.

USING BLUETOOTH MODE
Your sound bar supports music streaming from smartphones, tablets, and computers with Bluetooth capability. Device compatibility will vary, see your device’s documentation for more information. Once you have paired your source device to the sound bar, as long as you stay within range of the sound bar, your device should remain paired. If the input is changed, the Bluetooth device will disconnect. If the source is changed back to Bluetooth, any paired Bluetooth device will reconnect automatically.
Tip: Your sound bar is not equipped with a microphone, so it cannot operate as a hands-free device for a smartphone.
Maximizing Signal
A Bluetooth signal has a range of up to 30 feet. Keep in mind that Bluetooth is a compressed audio format, so streamed music may lose some integrity when compared to a wired connection.
Try the following if your sound quality is less than optimal:
- If you hear any break-up or disconnect while streaming music from your device, move the source device closer to the sound bar.
- Be sure that there are no solid obstructions in the line-of-sight between the sound bar and the source device.
- Other wireless devices can affect Bluetooth range, including wireless security cameras, wireless video baby monitors, cordless phones, and microwave ovens. Turning off or moving these devices may improve Bluetooth range.
Warning: Reduce the volume levels on your device and on the sound bar before pressing Play. High volume levels can damage your hearing.
ADVANCED SETUP

CONNECTING WITH HDMI
What is HDMI Audio Return Channel (ARC)?
Using HDMI ARC, your TV can send audio to the sound bar using an HDMI cable.
You will need to connect your sound bar to your TV’s HDMI ARC port using an HDMI cable that is ARC compatible.
To connect using HDMI*:
- Connect one end of the HDMI cable to the HDMI 1 (ARC) port on the back of your TV.
- Connect the other end to the HDMI OUT (ARC) port on your VIZIO Sound Bar.
- From the AUDIO menu on your TV, change the Digital Audio Setting to Dolby Digital or Bitstream.
- From the SYSTEM menu, enable CEC and ARC (SAC) † functions.
- From the CEC menu, select Device Discovery to register the sound bar with the TV.
Tip: If you want to use the volume buttons on the TV remote control to control the sound bar, enable System Audio Control from the CEC menu.
* The following steps are for use with a VIZIO TV, steps may differ by TV manufacturer. See your TV’s user manual for more information.
† CEC Function naming may differ by TV manufacturer. See your TV’s user manual for more information.
ADVANCED SETUP - HDMI
RE-LINKING THE SUBWOOFER WITH THE SOUND BAR
The subwoofer has already been paired with the sound bar by VIZIO. However, they may need to be re-linked if there is no sound coming from the subwoofer.

Tip: Turn off your TV speakers when programming your sound bar.
- First confirm that the power LED is illuminated. Press and hold the pairing button on the back of the subwoofer for 5 seconds. The LED on the back of the subwoofer will begin to blink.

- Press and hold the power button on the top of the sound bar for 5 seconds. The LED indicators on the front will flash 3 times. The subwoofer is now linked with the sound bar.

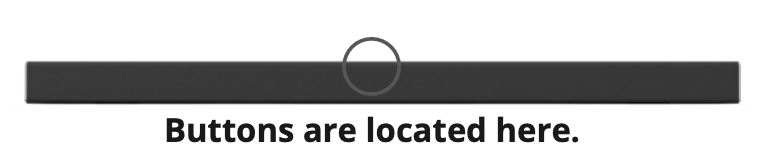
There are 3 functions that are triggered by 3 different button combinations on the sound bar.

PROGRAMMING THE SOUND BAR
You can program your sound bar to accept TV remote IR commands. Press the Menu button on the remote, then use the Up/Down buttons to navigate to Prg Remote. Use the Next/Previous buttons to toggle through Learn Vol -, Learn Vol +, and Learn Mute.
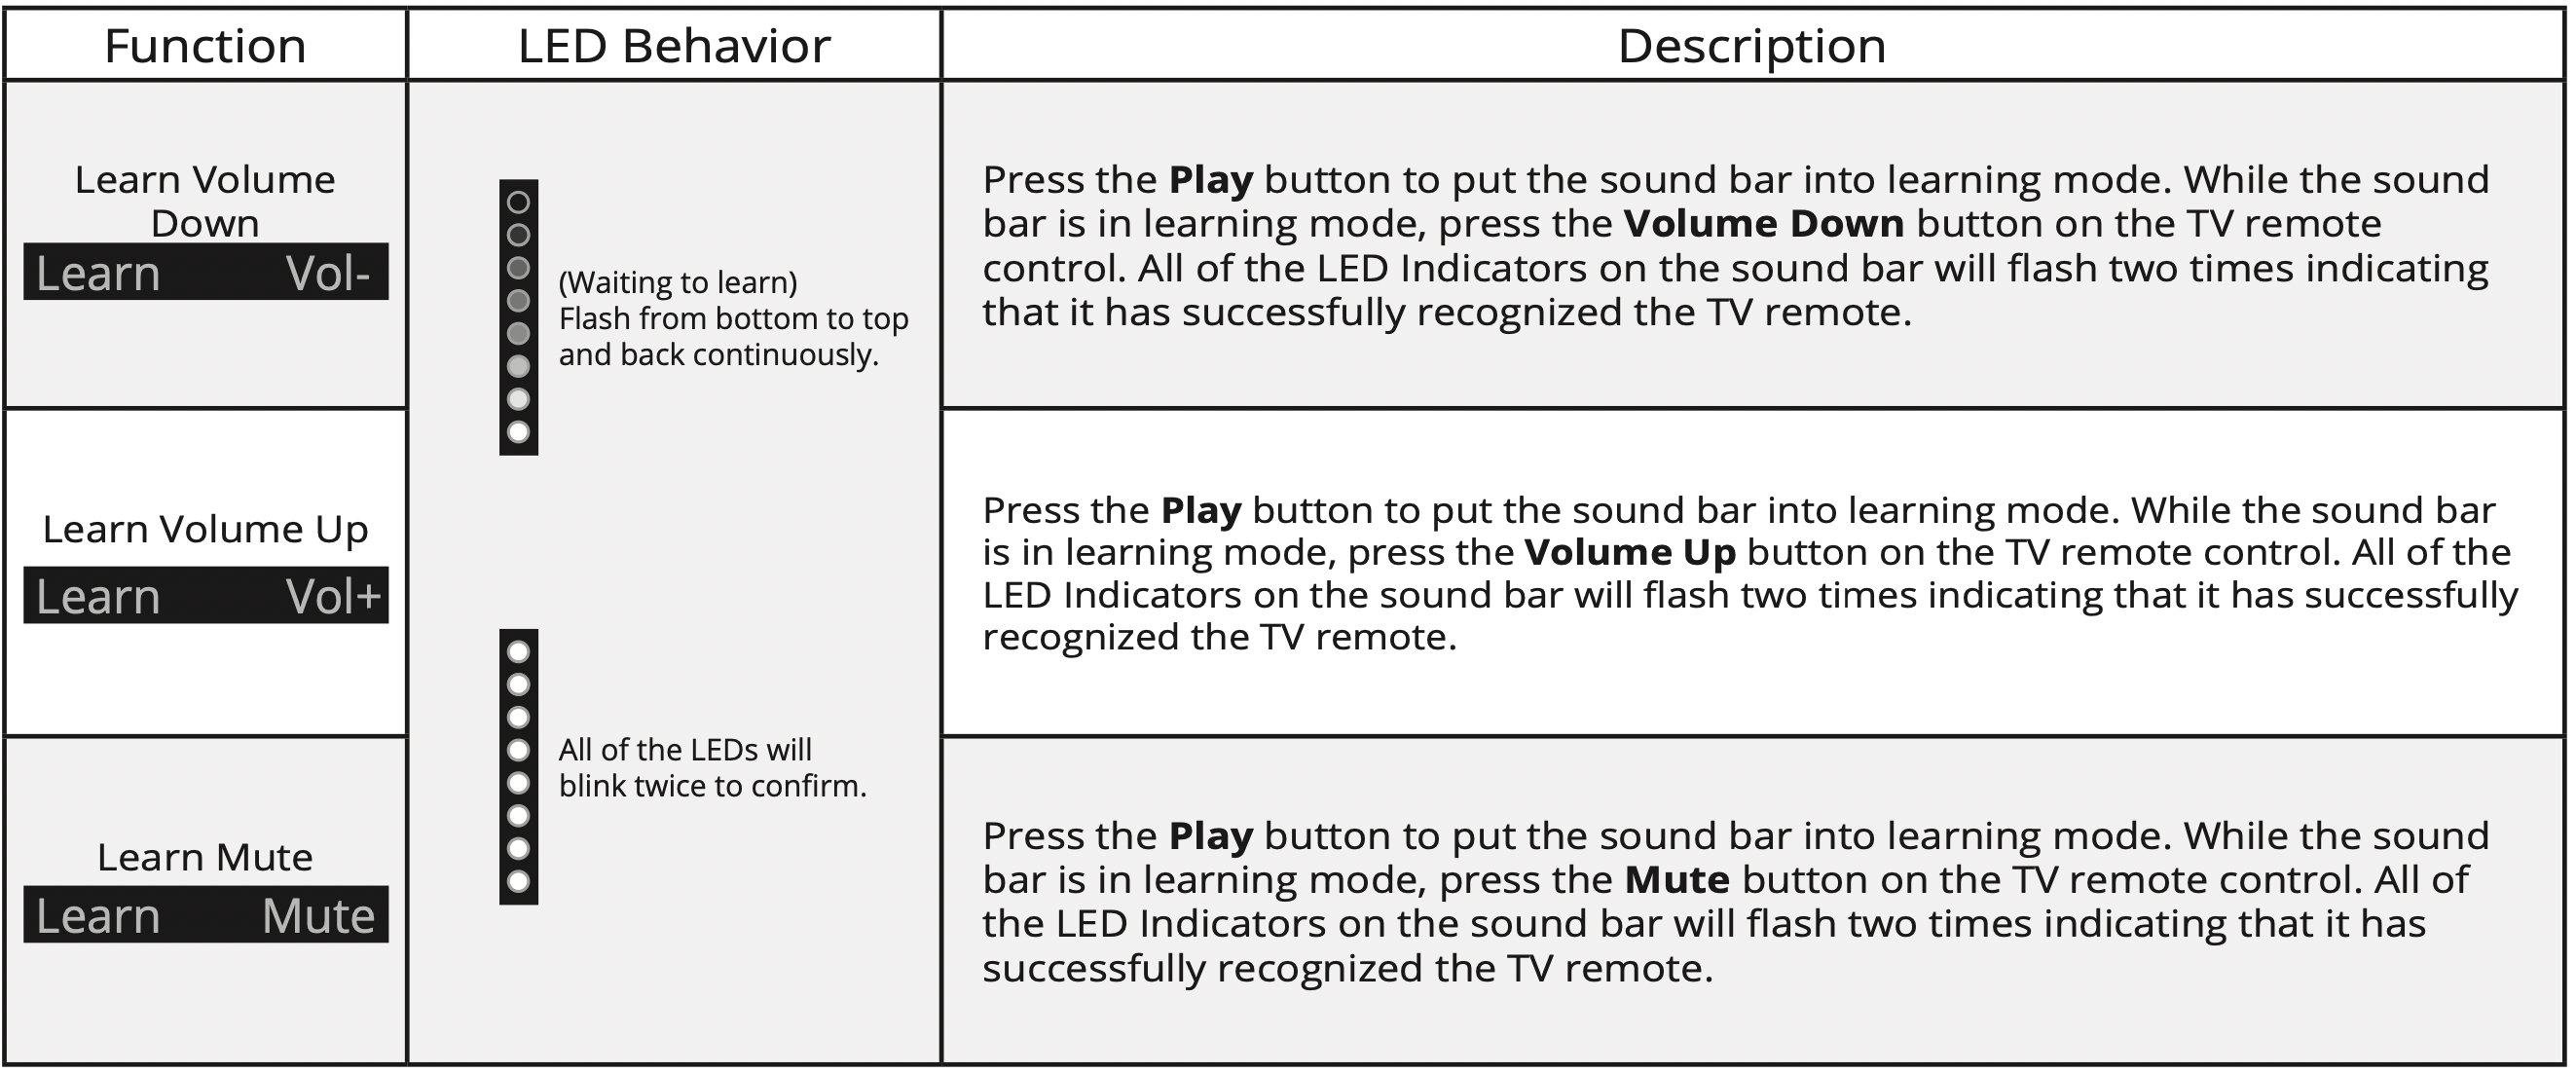
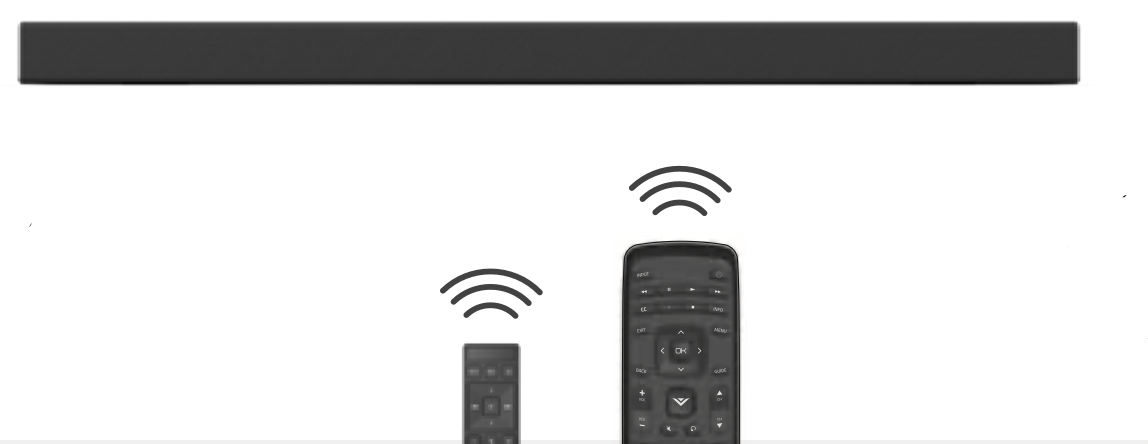
Tip: Turn off your TV speakers when programming your sound bar.
Point both the sound bar and TV remotes towards the front of the sound bar when programming.
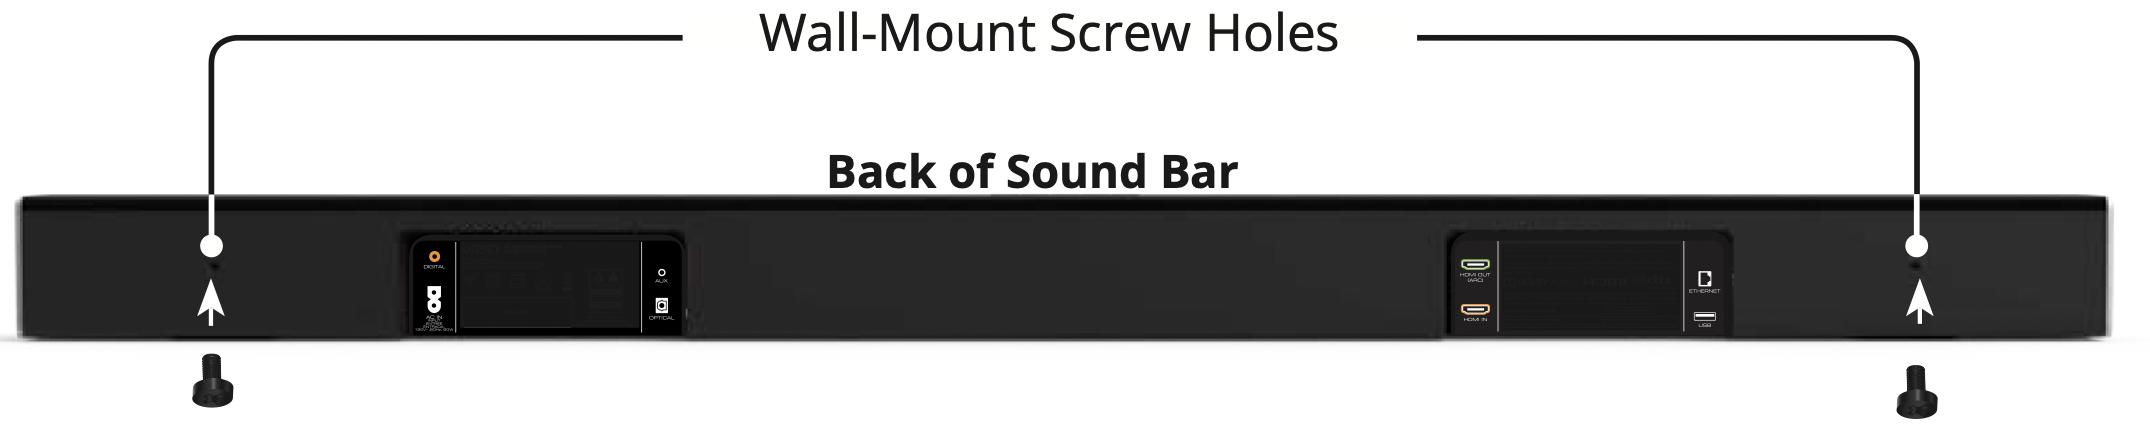
WALL-MOUNTING THE SOUND BAR
- Insert the two wall-mount screws into the wall-mount screw holes, and then tighten them with a Phillips screwdriver.
- Place the included wall mounting template against the wall under your TV. Mark the two bracket holes using a pencil.

- Be sure your screws are attached to wood studs, drywall anchors (for drywall), or concrete anchors (for brick/concrete walls).
Screws for attaching the brackets to the wall are not included. Choose the screw type and length appropriate to your home’s construction. If in doubt, consult a professional installer.

Warning: If you are unfamiliar with power tools or the layout of electrical wiring in the walls of your home, consult a professional installer.
* Do not use any of the included screws for the wall mount installation. These are not intended for mounting.
WALL-MOUNTING THE SATELLITE SPEAKERS
To wall-mount the satellite speakers:
- Attach the wall mount screw to the back of the satellite speaker.
- Secure the wall mount bracket to the wall.
Bracket screw is not included.
- Slide the speaker on to the wall bracket.
Ensure the wall mount screw is secured within the bracket grooves.

Be sure your screws are attached to wood studs or drywall anchors (for drywall) or concrete anchors (for brick/concrete walls). Wall mounting hardware is not included.
Warning: If you are unfamiliar with power tools or the layout of electrical wiring in the walls of your home, consult a professional installer.
HELP & TROUBLESHOOTING
| There is no power. |
- Press the POWER button on the remote control or on the top of your Sound Bar.
- Ensure the power cord is securely connected.
- Plug a different device into the electrical outlet to verify that the outlet is working correctly.
|
| There is no sound. |
- Increase the volume. Press Volume Up on the remote control or on the top of your Sound Bar.
- Press MUTE on the remote to ensure the Sound Bar is not muted.
- Press INPUT on the remote or on the top of your Sound Bar to select a different input source.
- When using either of the Digital Inputs, if there is no audio: (A) Try setting the TV output to PCM or (B) Connect directly to your Blu-ray/other source, some TVs do not pass through digital audio.
- On digital inputs, the input LEDs will flash rapidly if an unsupported format is present. Set the source to output PCM.
- Your TV may be set to variable audio output. Confirm that the audio output setting is set to FIXED or STANDARD, not VARIABLE. Consult your TV’s user manual for more detailed information.
- If using Bluetooth, ensure that the volume on your source device is turned up and that the device is not muted.
|
| I hear buzzing or humming. |
- Ensure all cables and wires are securely connected.
- Connect a different source device (TV, Blu-ray player, etc) to see if the buzzing persists. If it does not, the problem may be with the original device.
- Connect your device to a different input on the Sound Bar.
|
| The remote isn’t working. |
- Replace the remote batteries with new ones.
- Point the remote directly at the center of the Sound Bar when pressing a button.
- If using a Bluetooth connection, some of the buttons on the remote may not be supported by the streaming application. (e.g., Pandora doesn’t support the Back button.)
|