
Loading ...
Loading ...
Loading ...
8
English
FEATURES AND CONTROLS
WARNING: To reduce the risk of serious personal injury, turn tool off and remove the
battery pack before transporting, making any adjustments or removing/installing
attachments or accessories. An accidental start-up can causeinjury.
Use of CUTLINE LED Worklight System (Fig. A)
CAUTION: Do not stare into worklight. Serious eye injury couldresult.
nOTE: The battery must be charged and connected to the mitersaw.
The CUTLINE LED Worklight System can be turned on by the momentary switch
17
. The light
will automatically turn off within 20 seconds if the saw is not in use. The light is also activated
automatically every time the tool's main trigger
1
ispulled.
To cut through an existing pencil line on a piece of wood, turn on the CUTLINE worklight system
using the momentary switch
17
(not with the main trigger), then pull down on the operating
handle
2
to bring the saw blade close to the wood. The shadow of the blade will appear on the
wood. This shadow line represents the material that the blade will remove when performing
a cut. To correctly locate your cut to the pencil line, align the pencil line with the edge of the
blade’s shadow. Keep in mind that you may have to adjust the miter or bevel angles in order to
match the pencil lineexactly.
Your saw is equipped with a battery fault feature. The CUTLINE worklight begins to flash when
the battery is near the end of its useful charge, or when the battery is too hot. Charge the battery
prior to continuing cutting applications. Refer to Charging Procedure under Important Safety
Instructions for All Battery Packs for battery charginginstructions.
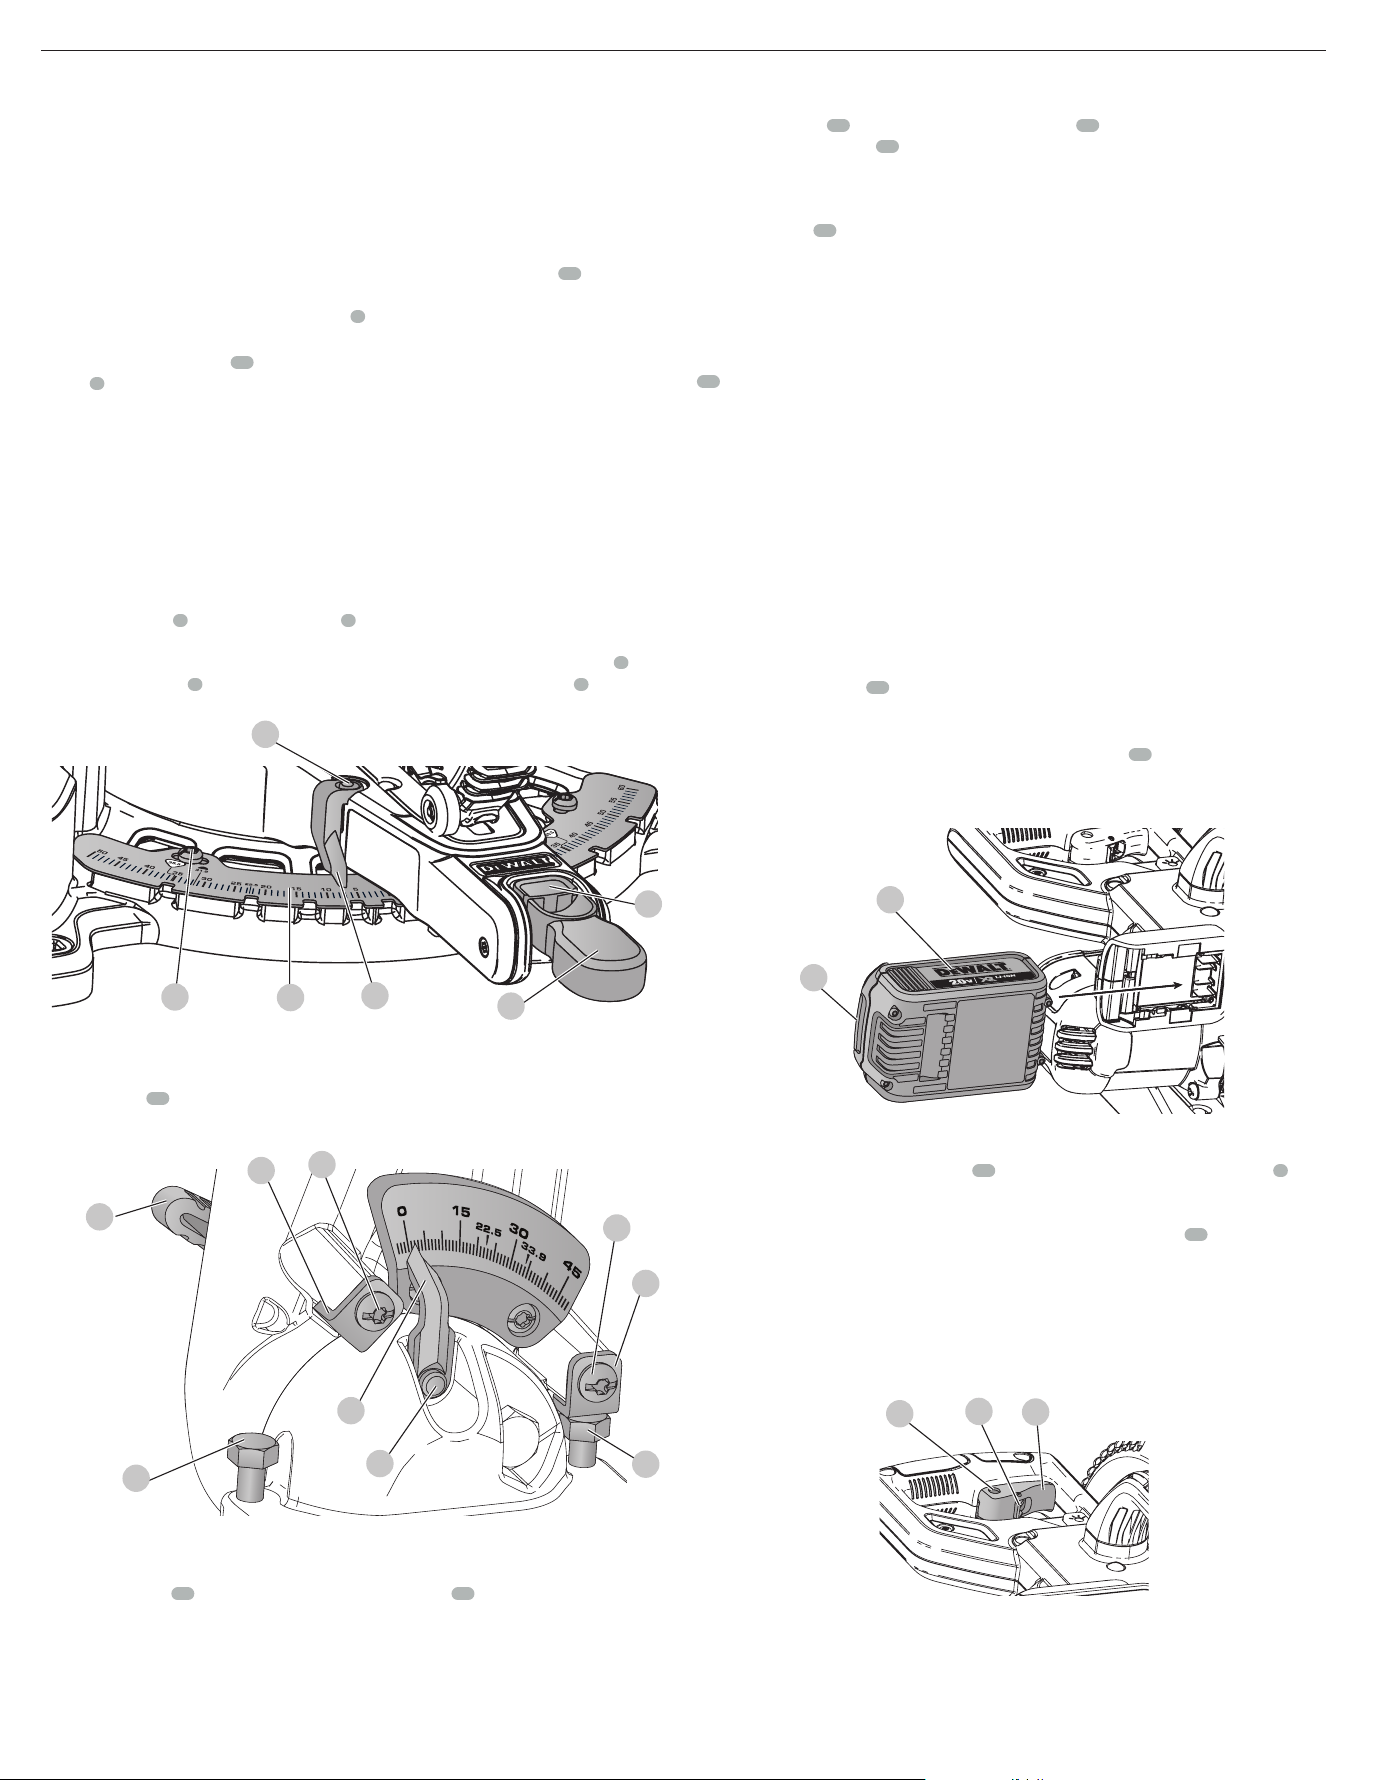
Miter Control (Fig. F)
The miter lock knob
5
and miter latch button
6
allow you to miter your saw to 48° right and 48°
left. The miter latch will automatically locate at 10˚, 15˚, 22.5˚, 31.62˚ and 45˚ both left and right.
To miter the saw, unlock the miter lock mechanism by pulling up on the miter lock knob
5
. Push
the miter latch button
6
down, and set the miter angle desired on the miter scale
8
. Lock the
miter lock knob by pushing itdown.
Fig. F
34
33
8
9
5
6
Bevel Lock Knob (Fig. A, G)
The bevel lock allows you to bevel the saw 48° to the left. To adjust the bevel setting, turn the
bevel lock knob
12
counterclockwise to loosen. To tighten, turn the bevel lock knobclockwise.
CAUTION: Pinch hazard. Be sure to tighten bevel lock knob before adjustingoverrides.
Fig. G
12
38
37
35
36
45
41
39
46
0° Bevel Stop Override (Fig. G)
The bevel stop override allows you to bevel the saw up to 3° to the right. Loosen the 0° bevel
stop override screw
35
until the 0° bevel stop override bracket
36
can freely rotate. Turn the 0°
bevel stop override bracket to allow the saw to rotate past the zero bevel position, then retighten
the overridescrew.
45º Bevel Stop Override (Fig. G)
The bevel stop override allows you to bevel the saw up to 48° to the left. Loosen the 45° bevel
stop override screw
37
until the 45° stop override bracket
38
can freely rotate. Turn the 45°
bevel stop override bracket
38
to allow the saw to rotate past the 45° bevel position, then
retighten the overridescrew.
Rail Lock Knob (Fig. A)
The rail lock knob
20
allows you to lock the saw head firmly to keep it from sliding on the rails.
This is necessary when making certain cuts or when transporting thesaw.
Lock Down Pin (Fig. A)
WARNING: The lock down pin should be used only when carrying or storing the saw. NEVER
use the lock down pin for any cuttingoperation.
To lock the saw head in the down position, push the saw head down, push the lock down pin
23
in and release the saw head. This will hold the saw head safely down for moving the saw
from place to place. To release, press the saw head down and pull the pinout.
OPERATION
WARNING: To reduce the risk of serious personal injury, turn tool off and remove the
battery pack before transporting, making any adjustments or removing/installing
attachments or accessories. An accidental start-up can causeinjury.
WARNING: Always use eye protection. All users and bystanders must wear eye protection
that conforms to ANSI Z87.1 (CAN/CSA Z94.3).
WARNING: To ensure the blade path is clear of obstructions, always make a dry run of the
cut without power before making any cuts on theworkpiece.
Installing and Removing the Battery Pack (Fig. H)
nOTE: For best results, make sure your battery pack is fullycharged.
To install the battery pack
16
into the tool handle, align the battery pack with the rails inside
the tool’s handle and slide it into the handle until the battery pack is firmly seated in the tool and
ensure that it does notdisengage.
To remove the battery pack from the tool, press the release button
40
and firmly pull the battery
pack out of the tool handle. Insert it into the charger as described in the charger section of
thismanual.
Fig. H
16
40
Trigger Switch (Fig. I)
To turn the saw on, push the lock-off lever
18
to the left, then depress the trigger switch
1
. The
saw will run while the switch is depressed. Allow the blade to spin up to full operating speed
before making the cut. To turn the saw off, release the switch. Allow the blade to stop before
raising the saw head. There is no provision for locking the switch on. A hole
42
is provided in the
trigger for insertion of a padlock to lock the switchoff.
Your saw is not equipped with an automatic electric blade brake, but the saw blade should stop
within 5 seconds of trigger release. This is not adjustable. If the stop time repeatedly exceeds 5
seconds, have the tool serviced by an authorized
DeWALT
servicecenter.
Always be sure the blade has stopped before removing it from thekerf.
Fig. I
1
18
42
Dust Extraction (Fig. A, J)
WARNING: To reduce the risk of serious personal injury, turn tool off and remove the
battery pack before transporting, making any adjustments or removing/installing
attachments or accessories. An accidental start-up can causeinjury.
Loading ...
Loading ...
Loading ...