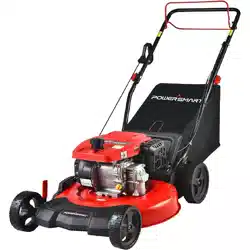
User manual Lawn Mower
KNOWING YOUR LAWN MOWER
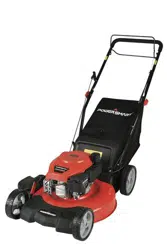
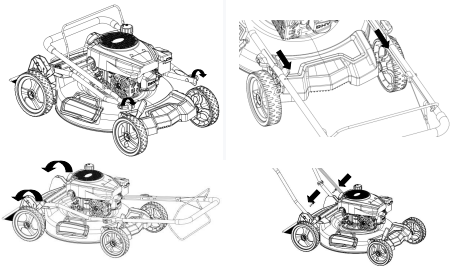
Please use the illustration below to familiarize yourself with the location and function of the components that control of your lawn mower.
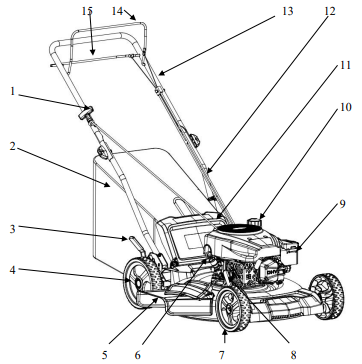
1 Recoil starter handle
2 Grass catcher
3 Cutting height adjustment lever
4 Rear wheel
5 Side discharge chute
6 Oil dipstick
7 Front wheel
8 Cutting height adjustment lever
9 Primer bulb
10 Fuel tank cap
11 Rear discharge door
12 Lower handle
13 Upper handle
14 Engine start/stop control
15 Drive control bar
LAWN MOWER PREPARATION
The following section describes steps necessary to prepare the lawn mower for use. If after reading this section, you are unsure about how to perform any of the steps please call (800) 791-9458 Mon-Fri 9-5 EST for customer service. Failure to perform these steps properly can damage the lawn mower or shorten its lifespan.
UNPACKING
Tools required (not included): #2PH screwdriver, utility knife.
Unpack the lawn mower and all its parts, and compare against the list below. Do not discard the carton or any packaging until the engine is completely assembled.
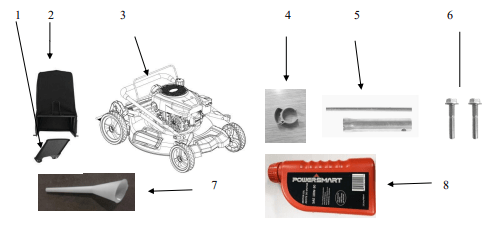
1 Side discharge chute
2 Grass catcher
3 Lawn mower with folding handle
4 Cable clip
5 Spark plug wrench
6 Flange bolts M6 (2)
7 Funnel
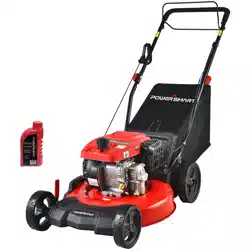
8 13.5oz 10W-30 Motor Oil
ATTACH LOWER & UPPER HANDLE
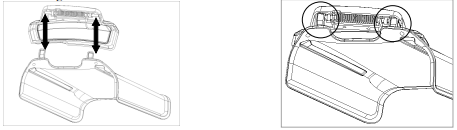
- Loosen two knobs and turn the folded upper tube to match the lower tube, and tighten the knob.
- Turn the lower tube to an angle that maches the base and tighten with two screws. (Two screws are in the accessories bag.)
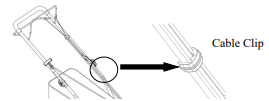
3. Lock the cable to the lower handle using cable clip.
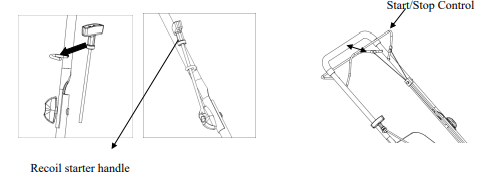
4. Insert the recoil starter handle cable into the hook provided on the upper handle. You must engage the start/stop control to release the recoil starter handle.
SIDE DISCHARGE CHUTE
To convert mower for side discharge, the grass catcher has been removed and that the rear discharge door is closed.
- Lift the spring-loaded discharge cover located on the side of the mower.
- Slide two hooks of the side discharge chute under the hinge pin and lower the spring on the side discharge cover.
Caution: Do not attempt to remove the permanently mounted spring loaded side discharge cover at any time.
GRASS CATCHER
Attach grass catcher
- Lift mower rear discharge door.
- Place grass catcher into the slots in the handle brackets.
- Release the rear discharge door so that it rests on the grass catcher.
ADJUSTING THE CUTTING HEIGHT
Warning! Cutting height adjustments should only be performed after the engine and blades have come to a complete stop!
It is always best to begin cutting your lawn with a higher deck height to prevent scalping your lawn.
The cutting height is adjusted with front and rear levers. Actuate the adjustment lever and pull it to the required position. Please make sure that the lever locks into same position.
OPERATION
GAS AND OIL FILL-UP
The engine comes shipped without oil or gasoline. Be sure to add oil and gasoline before starting the engine.
- Add oil before starting mower for the first time.
- Service the engine with gasoline as instructed.
Warning: Use extreme care when handling gasoline. Gasoline is extremely flammable and its vapors are explosive. Never fuel the machine indoors or while the engine is hot or running. Extinguish all cigarettes, cigars, pipes and other potential sources of ignition.
Engine Oil
Engine oil is a key factor in deciding the engines performance. Do not apply engine oil with additives or 2-stroke gasoline engine oil, because they haven’t enough lubrication, and may shorten the engines service life.
Check the engine with it stopped on a level ground.
Engine oil recommended: 10W-30
As viscosity varies with regions and temperatures, SF class oil is recommended.
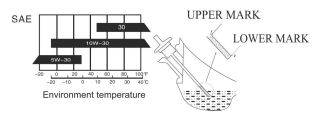
Check method
- Remove the dipstick and Clean it.
- Reinsert the dipstick into the oil filling hole, and insert it to the end.
- Check the oil level: If the oil level is too low, add the recommended engine oil and make sure the oil level between upper level(1) and lower level(2).
- Re-install the dipstick.
Adding Gasoline
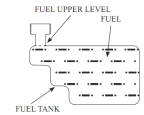
Remove the fuel tank cap and check fuel level.
If the level is too low, refuel the tank, remember adding fuel not over the fuel upper level.
Warning:
- Gasoline is extremely flammable and is explosive under certain conditions.
- Refueling in a well-ventilation area with the engine stopped. Do not smoke and allow flames or sparks in the area where gasoline is stored or where the fuel tank is refueled.
- Do not overfill the fuel tank (there should be no fuel in the filling neck). After refueling, make sure the fuel tank cap is set back securely.
- Be careful not to spill fuel when refueling. Spilled fuel or fuel vapor may ignite. If any fuel is spilled, make sure the area is dry before starting the engine.
- Avoid repeated or prolonged contact with skin or breathing of fuel vapor. Keep out of reach of children.
Use fresh (within 30 days from purchase), lead-free gasoline with a minimum of 87 octane rating. Do not mix oil with gasoline.
To add gasoline, follow these steps:
1. Make sure the lawn mower is on a level surface.
2. Unscrew fuel tank cap and set aside. NOTE: The fuel cap may be tight and hard to unscrew.
3. Slowly add unleaded gasoline to the fuel tank. Be careful not to overfill. The capacity of the fuel tank is 0.21gallons.
NOTE: Do not fill the fuel tank to the very top. Gasoline will expand and spill over during use even with the fuel cap in place.
4. Reinstall fuel cap and wipe clean any spilled gasoline with a dry cloth.
IMPORTANT:
- Never use an oil/gasoline mixture.
- Never use old gasoline.
- Avoid getting dirt or water into the fuel tank.
- Gasoline can age in the tank and make starting difficult. Never store lawn mower for extended periods of time with fuel in the tank or the carburetor.
ENGINE START/STOP CONTROL
This lawn mower comes equipped with an engine start/stop control to prevent unintentional starting and to ensure safe operation. Releasing this lever will quickly stop the blade in case of danger. The lever must be actuated before the lawn mower is started. When the engine start/stop lever is released, it must return to its initial position.
Before you start mowing, you should run through this process several times in order to ensure that the lever and actuator cables are working properly. Repeat the test several times after the engine has started up. When the engine start/stop Control is released, the engine must stop within a few seconds. If not, contact Customer Service.
Warning: The blade begins to rotate as soon as the engine is started.
START THE ENGINE
To start the engine, perform the following steps:
- Check the oil and fuel levels.
- Press the primer bulb 3 times.
- Engage the engine Start/Stop Control and simultaneously pull on the recoil starter. Pull on the recoil starter handle slowly until a slight resistance is felt, then pull quickly to start the engine. Return cord gently into the recoil starter. Never allow the cord to snap back.
- If engine fails to start, repeat step 3.
NOTE: After repeated failed attempts to start the engine, please consult the troubleshooting guide before attempting again. If problems persist, please call customer service.
NOTE: Don’t allow the starter grip to snap back against the engine. Return it gently to prevent damage to the starter.
STOP THE ENGINE
Release the engine start/stop control to stop the engine.
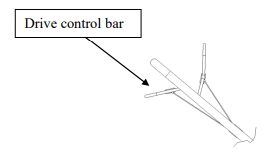
DRIVE CONTROL BAR
If you press drive control bar the clutch for the drive will be closed and the lawn mower will start to move with the engine running, Release the drive control bar in good time to stop the moving lawn mower. Practice starting and stopping before you use the mower for the first time until you are familiar with controlling the mower.
MOWING
The engine throttle on your mower has been preset to provide optimum bagging and mulching performance for years to come.
Only use a sharp blade that is in good condition. This will prevent the grass blades from becoming frayed and the lawn from turning yellow.
Mow in straight lines for a nice, clean look. The swaths should overlap each other by a few inches in order to avoid stripes.
It’s important to keep the underside of the mower deck clean and remove grass build-up. This buildup will decrease mulching quality, and make it harder for the equipment to bag the grass.
Always mow along inclines (not up and down). You can prevent the lawn mower from slipping down by holding a position at an angle upwards. Select the cutting height according to the length of the grass. If necessary, mow a number of times so that you never cut more than 2 inches of grass in one go.
Turn off the engine before doing any checks on the blade. Keep in mind that the blade continues to rotate for a few seconds after the engine has been turned off. Never attempt to manually stop the blade. Regularly check to see if the blade is securely attached, is in good condition and is sharp. If the contrary is the case, sharpen the blade or replace it. In the event that the blade strikes an object, immediately turn off the lawn mower and wait for the blade to come to a complete stop. Then inspect the condition of the blade and the blade mount. Replace any parts that are damaged.
USING AS SIDE DISCHARGE
You should close the rear cover with mulching adapter in order to use the side discharge.
- On the side of the mower, lift the side discharge cover.
- Slide two hooks of side discharge chute under hinge pin on the side discharge cover. Lower the side discharge cover.
Caution: Do not remove side discharge cover at any time.
USING AS A REAR BAGGER
To use the grass catcher to collect clippings while you are operating the mower.
- Attached grass catcher following instruction in the lawn mower preparation. Grass clippings will automatically collect in bag as you run the mower. Operate mower until grass catcher is full.
- Stop engine completely by releasing the engine start/stop lever. Make sure that the engine has come to a complete stop.
- Lift rear discharge door and pull grass catcher up and away from the mower to remove the grass catcher. Dispose of the grass clippings and reinstall the grass catcher when complete.
Warning: If you strike a foreign object, stop the engine. Remove spark plug wire, thoroughly inspect mower for any damage, and repair damage before restarting and operating. Excessive vibration of the mower during operation is an indication of damage. The mower should be promptly inspected and repaired.
MAINTENANCE
Proper routine maintenance of this mower will help prolong the life of the machine.
Always observe safety rules when performing any maintenance.
The warranty on this lawn mower does not cover items that have been subjected to operator abuse or negligence. To receive full valve from warranty, operator must maintain the lawn mower as instructed here.
Changing of engine-governed speed will void engine warranty.
All adjustments should be checked at least once each season.
Periodically check all fasteners and make sure these are tight.
Warning: Always stop engine, allow engine to cool, disconnect spark plug wire before performing any type of maintenance on your machine.
DECK CARE
It is important to clean underside of the mower deck after use to prevent the build-up of grass clippings or other debris. Follow steps below for proper cleaning.
- Allow the engine to run until it is out of fuel. Do not attempt to pour fuel from the engine.
- Disconnect spark plug wire.
- Slowly tip mower so that it rests on the housing.
- To prevent oil spills, always tip the mower so that the Air Filter is facing up.
- Hold mower firmly and scrape and clean the underside of the deck with a suitable tool.
- Gently lower the mower back on its wheels on the ground.
Warning: Never tip the mower more than 90° in any direction and do not leave the mower tipped for any length of time. Oil can drain into the upper part of the engine causing a starting problem.
MOWER BLADE
To ensure safe operation, have all blade sharpening, balancing and mounting work carried out by an authorized service center. To achieve optimal results, we recommend having the blade checked once a year.
If, in spite of all caution, the blade comes into contact with an obstacle, switch off the engine immediately and pull off the spark plug connector. Tilt the lawn mower to the rear and check the blade for damage. Always keep the side with the air cleaner facing up. Damaged or bent blades must be replaced. Never straighten a bent blade. Never work with bent or heavily worn blades as this will result in vibrations, causing further damage to the mower.
Warning: Risk of injury when working with a damaged blade.
CHECKING THE OIL
The oil capacity of the engine crankcase is 16.9 fl. oz.
Check the oil level of the engine according to the Recommended Maintenance Schedule.
The lawn mower should be checked before each use for proper oil level. This is a critical step for proper engine starting.
To check the oil level:
- Remove the distick and clean it.
- Reinsert the distick into the Oil filling hole without screwing it and check Oil lever.
- If the Oil lever is too low, add the recommended engine oil up to the oil upper lever.
- Reinstall oil dipstick.
CHANGING/ADDING OIL
Change the oil according to the Recommended Maintenance Schedule. Change the oil when the engine is warm. This will allow for complete drainage. Change oil more often if operating under heavy load or high ambient temperatures. It is also necessary to drain the oil from the crankcase if it has become contaminated with water or dirt. The oil capacity of the engine is 16.9 fl.oz. Add oil when the oil level is low. For proper type and weight of oil refer to “GAS AND OIL FILL-UP” portion of the “OPERATION” section.
To refill the crankcase with oil, follow these steps:
- Make sure the lawn mower is on a level surface. Tilting the lawn mower to assist in filling will cause oil to flow into engine areas and will cause damage. Keep lawn mower level!
- Remove the dipstick from the engine.
- Using a funnel or appropriate dispenser, add the correct amount of oil (16.9 fl.oz) into the crankcase.
- Reinstall dipstick.
NOTE: Never dispose of used motor oil in the trash or down a drain. Please call a local recycling center or auto garage to arrange oil disposal.
AIR CLEANER MAINTENANCE
Routine maintenance of the air cleaner helps maintain proper airflow to the carburetor. Occasionally check that the air cleaner is free of excessive dirt. Refer to Recommended Maintenance Schedule. For air cleaner detail:
- Open the air cleaner cover.
- Remove the sponge-like element from the casing.
- Wipe the dirt from inside the empty air cleaner casing.
- Wash the sponge-like element in household detergent and warm water. Small amount of oil in the element is normal and necessary for the engine to work properly.
- If necessary, replace the paper element.
- Reinstall the sponge-like element in the air cleaner casing and reinstall the cover.
CAUTION: running the engine with dirty, damaged or missing air cleaner element will cause the engine to wear out prematurely.
SPARK PLUG MAINTENANCE
The spark plug is important for proper engine operation. A good spark plug should be intact, free of deposits, and properly gapped. Refer to Recommended Maintenance Schedule. To inspect the spark plug:
- Remove spark plug boot. Be careful not to tear insulation or wire.
- Unscrew the spark plug from the engine using the spark plug wrench provided. There is limited space for the wrench to turn. Use both rows of holes in the spark plug wrench to gain leverage to loosen the plug.
- Visually inspect the spark plug for cracks or excessive electrode wear. Replace as necessary.
- Measure the plug gap with a wire gauge. The gap should be 0.7 to 0.8 mm (0.028-0.031 in).
- If re-using the spark plug, use a wire brush to clean any dirt from around the spark plug base then re-gap the spark plug.
- Screw the spark plug back into the spark plug hole using the spark plug wrench. Do not over-tighten spark plug. Recommended tightening of spark plug is ½ to ¾ of a turn after spark plug gasket contacts spark plug hole. Reinstall the spark plug boot.
MAINTENANCE SCHEDULE
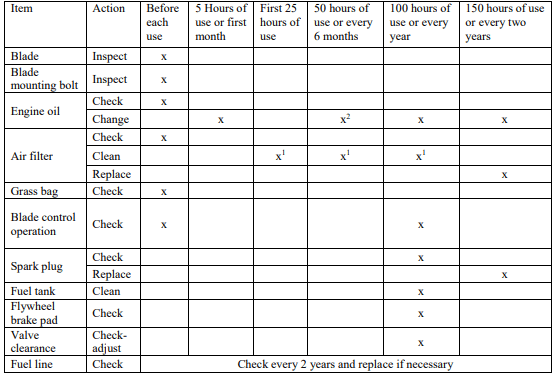
1. Service more frequently when used in dusty areas.
2.Change engine oil every 25 hours when used under heavy load or in high outside air temperatures.
STORAGE
CAUTION: Never place any type of storage cover or tarp on the MOWER while it is still hot.
If the MOWER is being stored for extended periods of time (30 days or more), drain fuel tank and carburetor bowl.
When storing the mower for extended periods of time:
- Start the engine and run it until the tank, carburetor bowl and fuel line are completely empty and the engine stalls.
- Change the oil after each season.
- Remove the spark plug. Use an oil-can to fill the cylinder with approx. 2 ml of oil. Slowly pull back the starter handle, which will bathe the cylinder wall with oil. Screw the spark plug back in.
- Clean the cooling fins of the cylinder and the housing.
- Be sure to clean the entire equipment to protect the paint.
- Store the equipment in a well-ventilated place.
NOTE: LIMITED WARRANTY does not cover fuel system damage or engine performance problems resulting from neglected storage preparation.
TROUBLESHOOTING
Engine fails to start
- Engine start/stop lever disengaged.
Engage engine start/stop lever.
- Spark plug wire disconnected.
Connect spark plug wire.
- Fuel tank empty or stale fuel.
Fill tank with clean, fresh gasoline.
Press primer bulb.
Clean, adjust gap, or replace.
Clean fuel line.
Wait a few minutes to restart, do not prime.
Engine runs erratic.
Connect and tighten spark plug wire.
- Blocked fuel line or stale fuel.
Clean fuel line. Fill tank with clean, fresh gasoline. Drain carburetor bowl.
- Water or dirt in fuel system.
Drain fuel tank. Refill with fresh fuel.
Clean or replace the filter.
Engine overheats.
Fill crankcase with proper oil.
Clean area around and on top of engine.
Idles poorly.
- Spark plug fouled, faulty, or gap too wide.
Reset gap or replace spark plug.
Clean or replace the filter.
Excessive vibration/noise
- Blade loose or unbalanced.
Tighten and balance blade.
Replace the blade.
Mower will not mulch grass.
Do not mow when grass is wet, wait until dry to cut.
Uneven cut.
Mow once at a high cutting height, then mow again at desired height or make a narrower cutting path.
Sharpen or replace blade.