IMPORTANT: This unit is shipped without gasoline or oil in the engine. Make sure to service engine with gasoline and oil as instructed in the Engine
Manual before starting or running the machine.
NOTE: Reference to right and left hand side of the Lawn Mower is observed from the operating position.
OPENING CARTON
1. Cut each corner of the carton vertically from top to bottom.
2. Remove all loose parts.
3. Remove loose packing material.
REMOVING UNIT FROM CARTON
1. Lift unit from the rear to detach it from underlying carton material and roll unit out of carton.
2. Check carton thoroughly for any other loose parts.
Loose parts in carton
• Upper Handle Knobs with bolts/washers (Qty. 2)
• Lower Handle Knobs with bolts/washers (Qty. 2)
• Cable Fasten Hook (Qty. 2)
• Side Discharge Cover
• Bottle of oil
• User Manual/Engine
Attach Handle
IMPORTANT: Do not crimp the cables when assembling the handle.
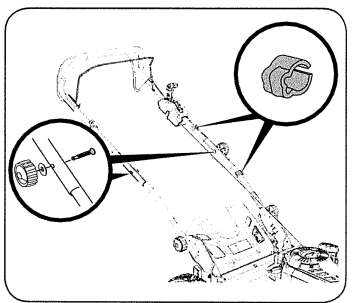
1. Stabilize the mower so it does not move. Attached the lower handles and secure them using the star knobs, washers, and carriage bolts (Figure 2).
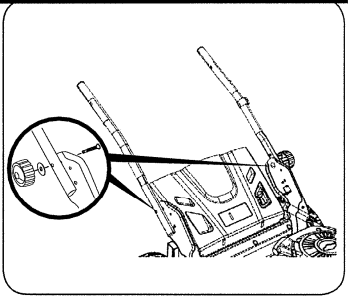
2. Attach the upper handle
a. Secure the upper handle using the star knobs, washers, and carriage bolts (Figure 3).
b. Use the cable clamps to secure the control cables to the upper and lower handles (Figure 3).
IMPORTANT: To reduce wear and allow for proper operation, make sure to leave some slack in the upper portion of the cable.
Figure 3
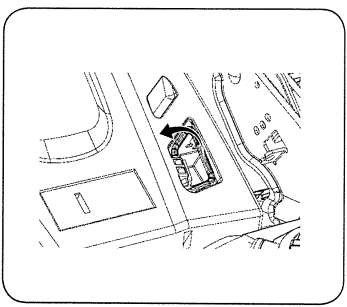
Attach Starter Rope
3. Position the starter rope.
a. Hold the blade control handle against the upper handle.
b. Slowly pull starter rope handle from engine and slip starter rope into the rope guide.
Figure 4
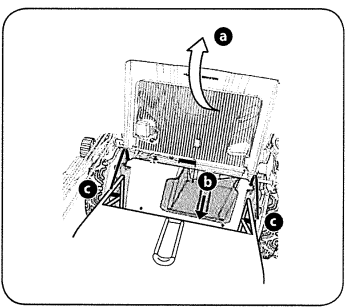
Attaching Grass Catcher
Follow steps below to attach the grass catcher:
a. Lift rear discharge door (Figure 5).
b. Remove the mulch plug (Figure 5).
c. Place grass catcher into the slots in the handle brackets (Figure 5). Let go of discharge door so that it rests on the grass catcher.
To remove grass catcher, lift rear discharge door on the mower. Lift grass catcher up and off the slots in the handle brackets. Release rear discharge door to allow it to close rear opening of mower.
Figure 5
Rear Discharge
Your mower is shipped as a mulcher. To convert to rear discharge, make sure the grass catcher is off, the mulching plug removed, and the mulching cover is closed (Figure 5 and Figure 7).
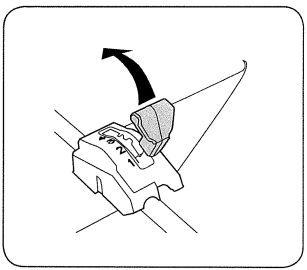
1. Slightly lift the rear discharge door.
2. Lift the rear discharge handle to extend it on the back side of the discharge door (Figure 6).
Figure 6
3. Lower the rear discharge door.
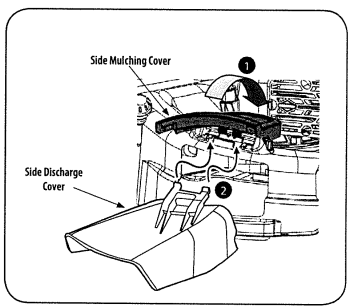
Attaching Side Discharge Cover
Your mower is shipped as a mulcher. To convert to side discharge, make sure the
grass catcher is off of the unit and the rear discharge door is closed.
1. On the side of the mower, lift the mulching cover (Figure 7).
2. Slide two hooks of side discharge cover under hinge pin on mulching cover assembly (Figure 7). Lower mulching cover. Do not remove side mulching cover at any time, even when you are not mulching.
Figure 7
ADJUSTMENTS
Handle Pitch
For convenience of operation, you can adjust the pitch of the handle as follows:
1. Remove star knobs and carriage bolts from the lower handle (Figure 8).
Figure 8
2. Position the handle in one of the two positions that is most comfortable.
3. Secure into position with star knobs and carriage bolts removed earlier.
Cutting Height
There is a cutting height adjustment lever located above the rear left wheel.
1. Pull the height adjustment lever outward towards wheel (unit will tend to fall when lever is moved outward). See Figure 9.
2. Move lever to desired position for a change in cutting height (Figure 9).
3. Release lever towards deck.
Figure 9
OPERATION
BLADE CONTROL
The blade control is attached to the upper handle of the mower. Depress and hold against the upper handle to operate the unit. Release it to stop the engine and blade.
WARNING
This blade control is a safety device. Never attempt to bypass its operation.
DRIVE CONTROL
The drive control is located on the upper handle and is used to engage the drive. Pushing the control forward will engage the drive. Once pressure is released from the control it will return to the neutral position and the drive will be disengaged.
CUTTING HEIGHT ADJUSTMENT LEVER
The cutting height adjustment lever is located above the right rear wheel. To adjust the cutting height, refer to the Assembly Section.
DECK WASH
Your mower's deck is equipped with a water port on its surface as part of its deck wash system. Use the deck wash to rinse grass clippings from the deck's underside.
MULCHING COVER
The mulching cover is used for mulching purposes. Instead of collecting the grass clippings in a grass catcher or using the side discharge chute, some mower models have the option of recirculating the clippings back to the lawn. This is called mulching.
SIDE DISCHARGE COVER
Your mower is shipped as a mulcher. To discharge the grass clippings to the side instead, follow the instructions in the Assembly section to attach the side discharge cover.
WARNING
Keep hands and feet away from the chute area on cutting deck. Refer to warning Ilabel on the unit.
RECOIL STARTER
The recoil starter is attached to the right upper handle. Stand behind the unit, depress and hold the blade control handle, then pull the recoil starter rope to start the unit.
WARNING
Make sure no one other than the operator is standing near the lawn mower while starting engine or operating mower. Never run engine indoors or in enclosed, poorly ventilated areas. Engine exhaust contains carbon monoxide, an odorless and deadly gas. Keep hands, feet, hair and loose clothing away from any moving parts on engine and lawn mower.
TO START ENGINE
1. Standing behind the mower, pull the blade control handle back against the upper handle (Figure 11).
2. While holding the blade control against the upper handle, grasp the recoil starter handle and pull rope out with a rapid, continuous, full arm stroke (Figure 11). Keeping a firm grip on the starter handle, let the rope rewind slowly. Repeat until engine starts. Let the rope rewind each time slowly.
Figure 11
WARNING
Keep a firm grip on the starter cord handle to prevent rapid retraction of starter |cord (kickback). Rapid retraction can pull hand and arm toward engine faster than you can let go, and result in broken bones, fractures, bruises or sprains.
TO STOP ENGINE
1. Release the blade control to stop the engine and blade.
WARNING
Wait for the blade to stop completely before performing any work on the mower.
USING YOUR LAWN MOWER
Be sure lawn is clear of stones, sticks, wire, or other objects which could damage lawn mower or engine. Such objects could be accidently thrown by the mower in any direction and cause serious personal injury to the operator and others.
WARNING
The operation of any lawn mower can result in foreign objects being thrown into the eyes, which can damage your eyes severely. Always wear safety glasses while operating the mower, or while performing any adjustments or repairs on it.
WARNING
If you strike a foreign object, stop the engine. Disconnect the spark plug wire, thoroughly inspect mower for any damage, and repair damage before restarting and operating. Extensive vibration of mower during operation is an indication of damage. The unit should be promptly inspected and repaired. Refer to the Engine Manual.
Using Your Lawn Mower
Be sure lawn is clear of stones, sticks, wire, or other objects which could damage lawn mower or engine. Such objects could be accidently thrown by the mower in any direction and cause serious personal injury to the operator and others.
1. Hold the blade control against the upper handle (Figure 11).
2. Start the engine (Figure 11).
3. Once the engine is running, pull and hold the drive control handle together with the blade control handle to propel the mower forward at the speed set on the speed control lever (Figure 11). Once pressure is released from the drive control it will return to the neutral position and the drive will be disengaged.
Using as Mulcher
For mulching grass, remove the grass catcher and side discharge chute from the mower. For effective mulching, do not cut wet grass. If the grass has been allowed to grow in excess of four inches, mulching is not recommended. Use the grass catcher to bag clippings instead.
Using Grass Catcher
You can use the grass catcher to collect clippings while you are operating the mower.
1. Attach grass catcher following instructions in the Assembly Section. Grass
clippings will automatically collect in bag as you run mower. Operate mower until grass bag is full.
2. Stop engine completely by releasing the blade control. Make sure that the unit
has come to a complete stop.
3. Lift discharge door and pull grass bag up and away from the mower to remove the bag. Dispose of the grass clippings and reinstall the bag when complete.
NOTE: Make sure to clean any excess grass from around the rear opening of the mower, especially between the transmission cover and sidewall on the left hand side and along the bottom, to ensure tight fit of bag onto mower.
Variable Drive Control
Ground speed varies with terrain, slope, grass height, etc. Increasing or decreasing the mower speed allows you to maintain the desired speed under changing mowing conditions. Four speeds are available, position 1 is slowest speed, position 4 is the fastest speed.
With the engine running and the blades rotating, set the drive control lever to position 1. Push the drive control handle forward to propel the mower. Ground speed will increase as the drive control lever is moved from position 1 to position 4 (Figure 12).
Release the drive control handle to disengage the drive when mowing around trees and obstacles. Push the mower around obstacles for better control.
Figure 12
SERVICE AND MAINTENANCE
DECK WASH
Your mower's deck is equipped with a water port on its surface as part of its deck wash system.
Use the deck wash to rinse grass clippings from the deck's underside and prevent the buildup of corrosive chemicals. Complete the following steps AFTER EACH MOWING:
1. Push the mower to a level, clear spot on your lawn, near enough for your garden hose to reach. Remove the grass bag if attached.
CAUTION
Make sure the discharge chute is directed AWAY from your house, garage, parked cars, etc.
2. Thread the hose coupler (user-supplied) onto the end of your garden hose.
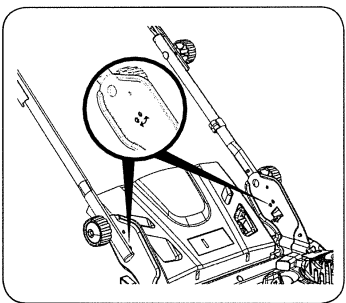
3. Attach the hose coupler to the water port on your deck's surface (Figure 13).
4. Turn the water on.
5. Start the engine as described in the Operation section.
6. Run the engine for a minimum of two minutes, allowing the underside of the cutting deck to thoroughly rinse.
7. Release blade control to stop the engine and blade.
8. Turn the water off and detach the hose coupler from the water port on your deck's surface.
After cleaning your deck, restart the mower. Keep the engine and blade running for a minimum of two minutes, allowing the underside of the cutting deck to thoroughly dry.
BLADE CARE
WARNING
When removing the cutting blade for sharpening or replacement, protect your [hands with a pair of heavy gloves or use a heavy rag to hold the blade.
Periodically inspect the blade adapter for cracks, especially if you strike a foreign object. Replace when necessary. Follow the steps below for blade service.
1. Disconnect spark plug boot from spark plug. Turn mower on its side making sure that the air filter and the carburetor are facing up.
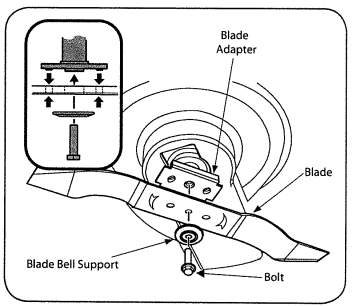
2. Remove the bolt and the blade bell support which hold the blade and the blade adapter to the engine crankshaft (Figure 14).
3. To be careful not to lose or remove self propel pulley and washers.
4. Remove blade from the adapter for testing balance. Balance the blade on a round shaft screwdriver to check. Remove metal from the heavy side until it balances evenly. When sharpening the blade, follow the original angle of grind. Grind each cutting edge equally to keep the blade balanced.
5. Lubricate the engine crankshaft and the inner surface of the blade adapter with light oil. Slide the blade adapter onto the engine crankshaft. Place the blade on the adapter such that the side of the blade marked "Bottom" (or with part number) faces the ground when the mower is in the operating position. Make sure that the blade is aligned and seated on the blade adapter flanges. See Figure 14 insert.
6. Place blade bell support on the blade. Align notches on the blade bell support with small holes in blade.
7. Replace hex bolt and tighten hex bolt to torque: 29.5-33.2 ft-lb (40-45 Nm) max.
WARNING
An unbalanced blade will cause excessive vibration when rotating at high speeds. It may cause damage to mower and could break causing personal injury.
Figure 13
Figure 14
TROUBLESHOOTING
Problem
Cause
Remedy
Engine Fails to start
1. Blade control disengaged.
2. Spark plug boot disconnected.
3. Fuel tank empty or stale fuel.
4. Engine not primed (If equipped with primer).
5. Faulty spark plug.
6. Engine flooded.
7. Blocked fuel line.
1. Engage blade control.
2. Connect wire to spark boot.
3. Fill tank with clean, fresh gasoline.
4. Prime engine as instructed in the Operation section.
5. Clean, adjust gap, or replace.
6. Wait a few minutes to restart.
7. Contact vour Briggs and Stratton dealer to clean the fuel line.
Engine runs erratic
1. Spark plug boot loose.
2. Stale fuel.
3. Vent in gas cap plugged.
4. Water or dirt in fuel system.
5. Dirty air cleaner.
6. Blocked fuel line.
1. Connect and tighten spark plug boot.
2. Fill tank with clean, fresh gasoline.
3. Clear vent.
4. Run engine until it stops from lack of fuel. Refill with fresh fuel.
5. Refer to Air Cleaner in Engine Maintenance section.
6. Contact vour Brings and Stratton dealer to clean the fuel line.
Engine overheats
1. Engine oil level low.
2. Air flow restricted.
1. Fill crankcase with proper oil.
2. Clean area around and on top of engine.
Occasional skips (hesitates)
1. Spark plug gap too close.
1. Adiust gap. Refer to Soark Plug in Engine Maintenance section.
Idles poorly
1. Spark plug fouled, faulty, or gap too wide.
2. Dirty air cleaner.
1. Reset gap or replace spark plug.
2. Refer to Air Cleaner in Engine Maintenance section.
Excessive vibration
1. Cutting blade loose or unbalanced.
2. Bent cutting blade.
1. Tighten blade and adapter. Balance blade.
2. Replace blade.
Mower will not mulch grass
1. Wet grass.
2. Excessively high grass.
3. Dull blade.
1. Do not mow when grass is wet; wait until later to cut.
2. Mow once at a high cutting height, then mow again at desired height or make a narrower cutting path.
3. Sharpen or replace blade.
Mower will not self propel
1. Belt not installed properly.
2. Debris clogging drive operation.
3. Damaged or worn belt.
4. Drive control out of adiustment.
1. Check belt for proper pulley installation and movement.
2. Stop engine, disconnect spark plug boot, and clean out debris.
3. Inspect and replace belt.
4. Adiust drive control. See Drive Adiustment in Service & Maintenance section.
High pullback effort
1. Pulling mower backwards before transmission disengages.
1. Allow the unit to roll forward slightly without the drive lever(s) engaged before pulling backwards.