

OPERATOR’S MANUAL
Model Y4GM A41 P000
WARNING!
Read this manual carefully before using your lawn mower
and keep it in a safe place for future reference.
Hotline:1300 418 640
Monday/Friday: 9.00am to 4.30pm
Saturday: 9.00am to 3.00pm
Email: [email protected]
PETROL LAWN MOWER
1

1
TABLE OF CONTENTS
DESCRIPTION OF PRODUCT PARTS 2
TECHNICAL SPECIFICATIONS 4
INTENDED USE 4
SAFETY INFORMATION 5
ASSEMBLY 9
ADJUSTMENT 13
OPERATION 14
MAINTENANCE AND STORAGE 17
TROUBLESHOOTING 21
WARRANTY 22
Y4GM A41 P000 Operating Manual
2
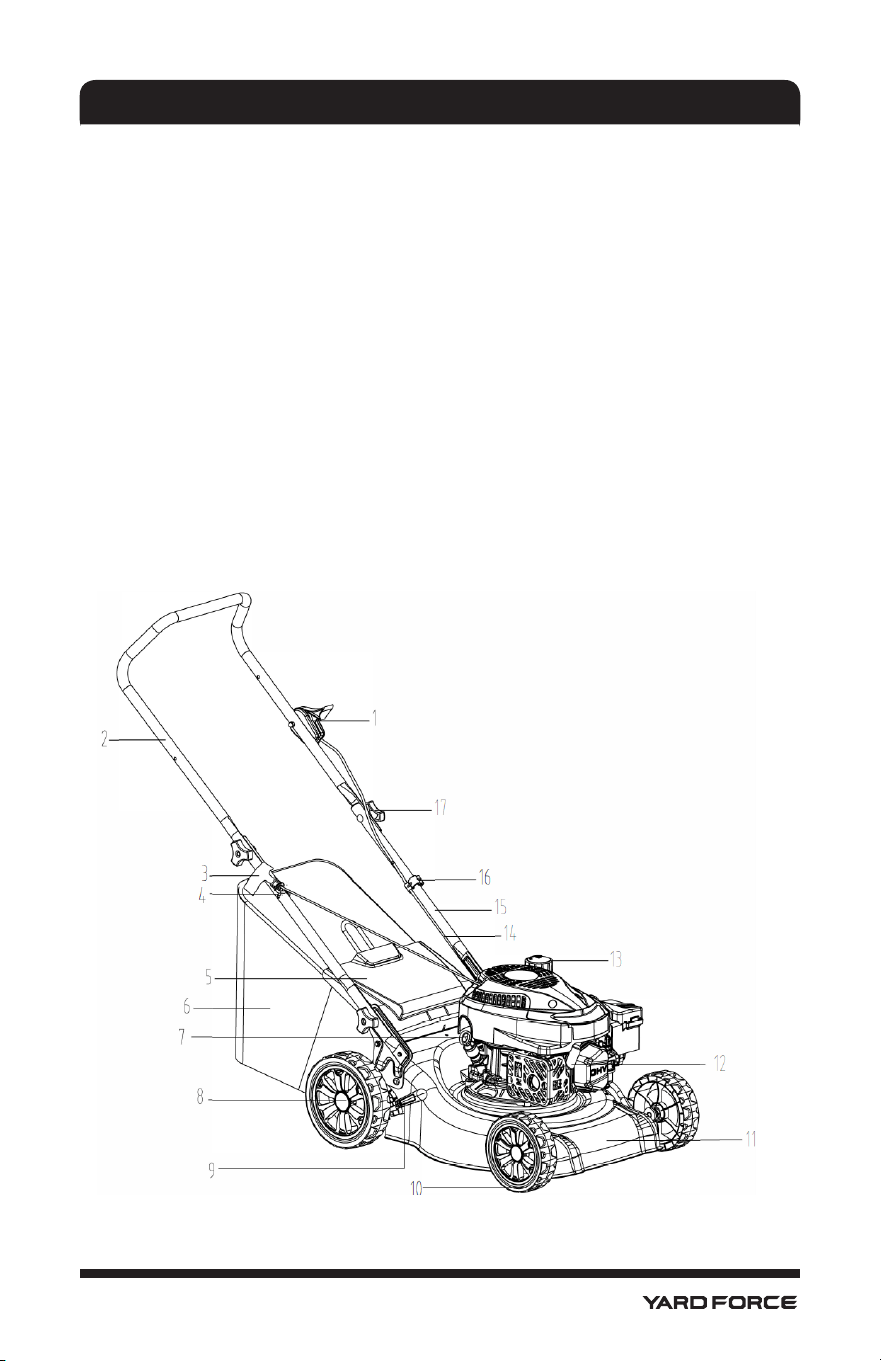
DESCRIPTION OF PRODUCT PARTS
As shown in Fig. 1
1. Throttle lever
2. Upper handle
3. Engine start handle
4. Rope guide
5. Rear ap
6. Grass catcher
7. Oil ller cap and dipstick
8. Rear wheel
9. Height adjusting handle
Fig. 1
10. Front wheel
11. Deck
12. Spark plug cap
13. Fuel tank cap
14. Throttle control cable
15. Lower handle
16. Cable clip
17. Fixing knob
3
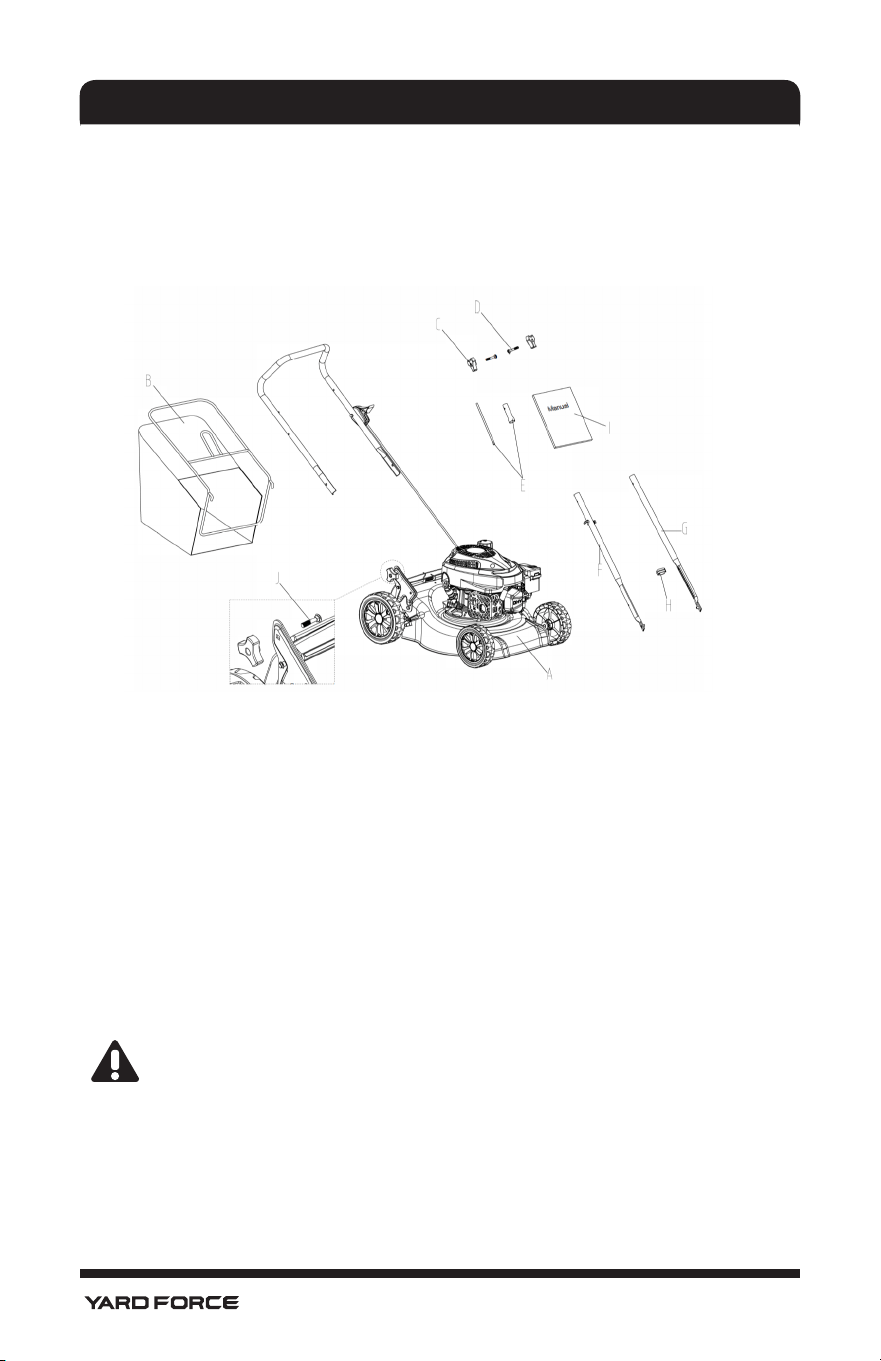
DESCRIPTION OF PRODUCT PARTS
Check the delivery parts
As shown in Fig. 2
Carefully remove the lawn mower from its packaging and check as the following parts are
complete:
A. Main mower deck (with upper handle) 1pc
B. Grass catcher assembly(fabric bag with metal frame) 1pc
C. Fixing knob with M8 nut 4pcs
D. Round head bolt M8x45mm 2pcs
E. spark plug spanner 1set
F. Lower handle with rope guide 1pc
G. Lower handle 1pc
H. Cable clip 1pc
I. Manual 1pc
J. Round head bolt M8x35mm 2pcs
WARNING: If any parts are damaged or missing, do not operate this tool until the
missing parts are replaced. Failure to heed this warning could result in serious
personal injury.
If any parts are missing or damaged, please contact Action Spares 1300 418
640.
Fig. 2

4
TECHNICAL SPECIFICATIONS
Engine type Single cylinder 4-stroke
Engine displacement
127.1cc
Nominal power:
2.0kW @3100rpm
Engine speed 3100rpm
Cutting width 39.4cm
Grass catcher capacity 45L
Ignition TCI
Fuel tank capacity
800ml
Oil tank capacity 400ml
Spark plug type
TORCH/F5RTC
Net weight
20kg
Fuel recommendations
Clean, fresh, unleaded gasoline.
A minimum of 87 octane/87 AKI (91 RON).
Gasoline with up to 10% ethanol (gasohol)
is acceptable.
NOTICE Do not use unapproved gasolines,
such as E15 and E85. Do not mix oil in
gasoline or modify the engine to run on alternate
fuels. Use of unapproved fuels will damage
the engine components, which will not be
covered under warranty.
Oil type
SAE 15W-40
INTENDED USE
This Petrol lawn mower has been designed for cutting lawn areas in private homes and
gardens.
This lawn mower must be used only for its intended purpose. Any other use is deemed
to be a case of misuse. The user/operator (not the manufacturer) will be liable for any
damage or injuries of any kind caused as a result.
Note: This lawn mower is designed for domestic use. It is not designed for or warranted
for use in commercial, trade or industrial applications.

5
SAFETY INFORMATION
Description of Symbols
Symbols are used in this manual to attract your attention to possible risks. These safety
symbols and their explanations must be fully understood. The warning themselves do not
prevent the risks and can not be a substitute for proper methods of avoiding accidents.
Warning symbols
WARING! To reduce the risk of injury all users must read the operator’s manual
before using the lawn mower.
This symbol, before a safety comment indicates a precaution, a warning or a
danger. Ignoring this warning can lead to an accident for yourself or for others.
To limit the risk of injury, re, or electrocution always follow the recommendations
indicated.
Debris can be thrown by the cutting blades
Keep bystanders away
Risk of injury from the cutting blades. Keep hands and feet clear.
Remove spark plug lead before maintenance.
Risk of re.
Never refuel while the engine is running.
WARNING ! Hot surface - burn hazard to hands.
Do not open or remove safety shields while engine is running.
Before every use check the engine oil level and fuel.
Always wear ear and eye protection when using the lawn mower.

6
SAFETY INFORMATION
Warning! The lawn mower exhaust gas contains toxic substances.
Do not run the engine in closed or poorly ventilated areas.
Throttle positions indicator STOP, SLOW and FAST.
Rated sound power level.
Australian Regulatory Compliance Mark.
Safety instructions
Training
1. Read the instructions carefully. Be familiar with the controls and the proper use of the
equipment;
2. Never allow children or people unfamiliar with these instructions to use the lawn mower.
Local regulations can restrict the age of the operator;
3. Never mow while people, especially children or pets are nearby;
4. Keep in mind that the operator or user is responsible for accidents or hazards occurring
to other people or their property.
Preparation
1. While mowing, always wear safety footwear and long trousers. Do not operate the
equipment when barefoot or wearing open sandals; The use of safety glasses and
hearing protection is also recommended.
2. Thoroughly inspect the area where the equipment is to be used and remove all objects
which can be thrown by the lawn mower;
3. Warning - petrol is highly ammable.
- Store fuel in containers specically designed for this purpose;
- Refuel outdoors only and do not smoke while refueling;
- Add fuel before starting the engine. Never remove the cap of the fuel tank or add
petrol while the engine is running or when the engine is hot;
- If petrol is spilled, do not attempt to start the engine but move the lawn mower away
from the area of spillage and avoid creating any source of ignition until petrol vapors
have dissipated;
- Replace all fuel tank and container caps securely;
4.
Before using, always visually inspect to see that the blades, blade bolts and cutter
assembly are not worn or damaged. Replace worn or damaged blades and bolts in
96
sets to preserve balance;

7
5. On multi-bladed lawn mowers, take care as rotating one blade can cause other blades
to rotate.
Operation
1. Do not operate the engine in a conned space where dangerous carbon monoxide
fumes can collect;
2. Mow only in daylight or in good articial light;
3. Avoid operating the equipment in wet grass, where possible;
4. Always be sure of your footing on slopes;
5. Walk, never run;
6. For wheeled rotary lawn mowers, mow across the face of slopes, never up and down;
7. Exercise extreme caution when changing direction on slopes;
8. Do not mow excessively steep slopes;
9. Use extreme caution when reversing or pulling the lawn mower towards you;
10. Stop the blade(s) if the lawn mower has to be tilted for transportation when crossing
surfaces other than grass, and when transporting the lawn mower to and from the
area to be mowed;
11. Never operate the lawn mower with defective guards, or without safety devices, for
example deectors and/or grass catchers, in place;
12. Do not change the engine governor settings or over speed the engine;
13. Disengage all blade and drive clutches before starting the engine;
14. Start the engine or switch on the motor carefully according to instructions and with
feet well away from the blade(s);
15. Do not tilt the lawn mower when starting the engine or switching on the motor, except
if the lawn mower has to be tilted for starting. In this case, do not tilt it more than
absolutely necessary and lift only the part which is away from the operator;
16. Do not start the engine when standing in front of the discharge chute;
17. Do not put hands or feet near or under rotating parts. Keep clear of the discharge
opening at all times;
18. Never pick up or carry a lawn mower while the engine is running;
19. Stop the engine and disconnect the spark plug wire , make sure that all moving parts
have come to a complete stop and, where a key is tted remove the key:
- Before clearing blockages or unclogging chute;
- Before checking, cleaning or working on the lawn mower;
- After striking a foreign object. Inspect the lawn mower for damage and make
repairs before restarting and operating the lawn mower;
- If lawn mower starts to vibrate abnormally (check immediately);
20. Stop the engine and disconnect the spark plug wire, make sure that all moving parts
SAFETY INFORMATION

8
have come to a complete stop and, where a key is tted remove the key:
- Whenever you leave the lawn mower;
- Before refueling;
21. Reduce the throttle setting during engine shut down and, if the engine is provided
with a shut-off valve, turn the fuel off at the conclusion of mowing;
22. Go slow when using a trailing seat.
Maintenance and storage
1. Keep all nuts, bolts and screws tight to be sure the equipment is in safe working
condition;
2. Never store the equipment with petrol in the tank inside a building where fumes can
reach an open ame or spark;
3. Allow the engine to cool before storing in any enclosure;
4. To reduce the re hazard, keep the engine, silencer and petrol storage area free of
grass, leaves, or excessive grease;
5. Check the grass catcher frequently for wear or deterioration;
6. Replace worn or damaged parts for safety;
7. If the fuel tank has to be drained, this should be done outdoors.
SAFETY INFORMATION
9
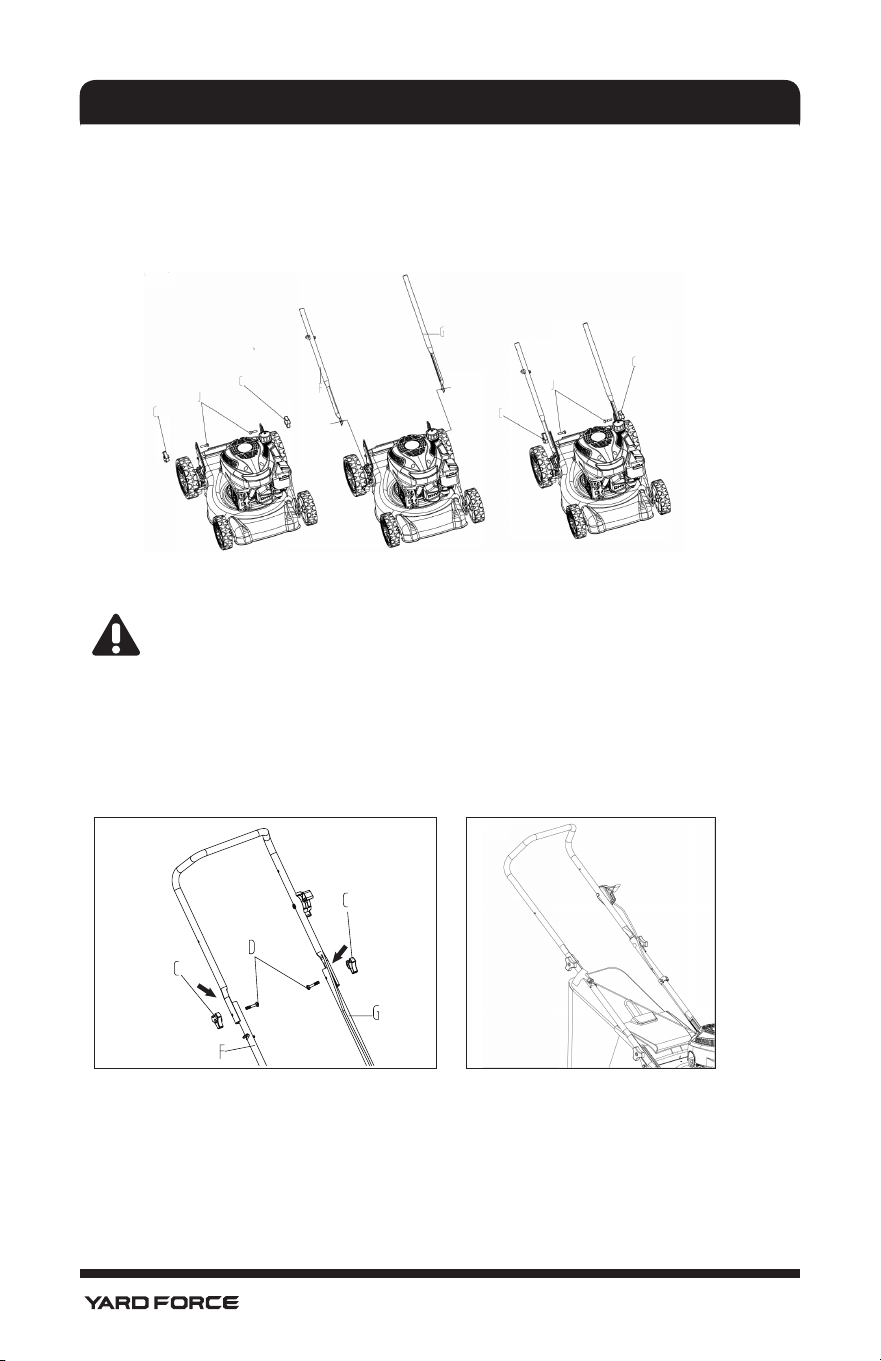
ASSEMBLY
Assembling the handle
As shown in Fig. 3-5
1. Remove the round head bolts (J) and xing knobs (C) from the lower handle brackets.
Attach the lower handles (F) and (G) onto the lower handle brackets with the round head
Fig. 4
bolt (J) and xing knob (C) and tighten.
NOTE: Make sure the rope guide is on the right handle when you stand behind
the mower.
2. Unfold the upper handle and x it into place by tighting the xing knobs (C) and cup
head square neck bolts (D).
Fig. 3
Fig. 5
10
ASSEMBLY
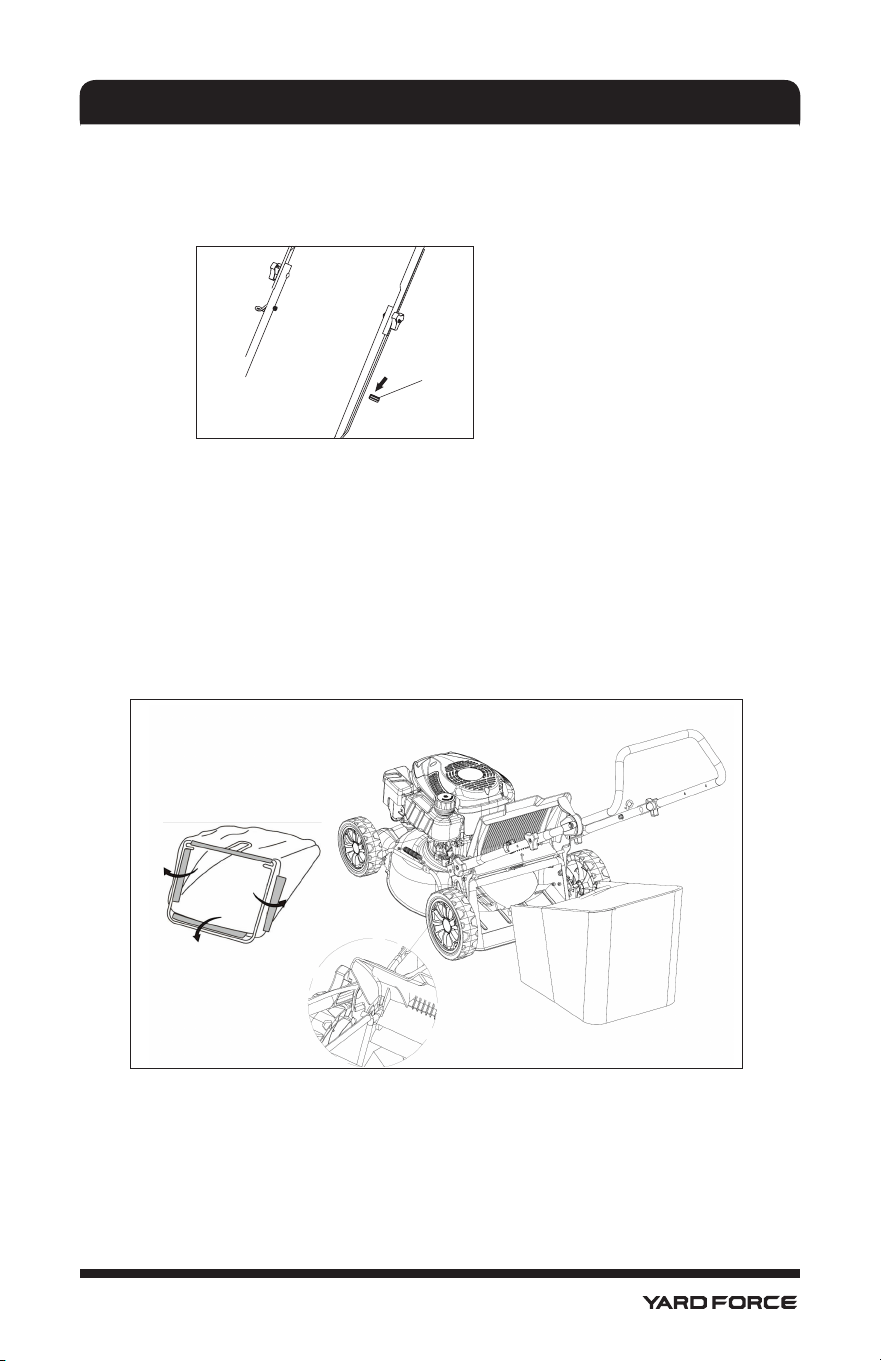
Tidy the cable throttle control
As shown in Fig. 6
Fix the cable throttle control cord to the handle with the cable clip (H).
Fig. 6
Attaching the grass catcher onto the mower
As shown in Fig. 7
1. Assemble the grass catcher cloth bag to the metal frame of the grass catcher with clips
on the bag.
2. Lift the rear ap with one hand and then hook the grass catcher to the rear of the lawn
mower.
3. Release the rear ap to secure the grass catcher in position.
Fig. 7
H
11
ASSEMBLY
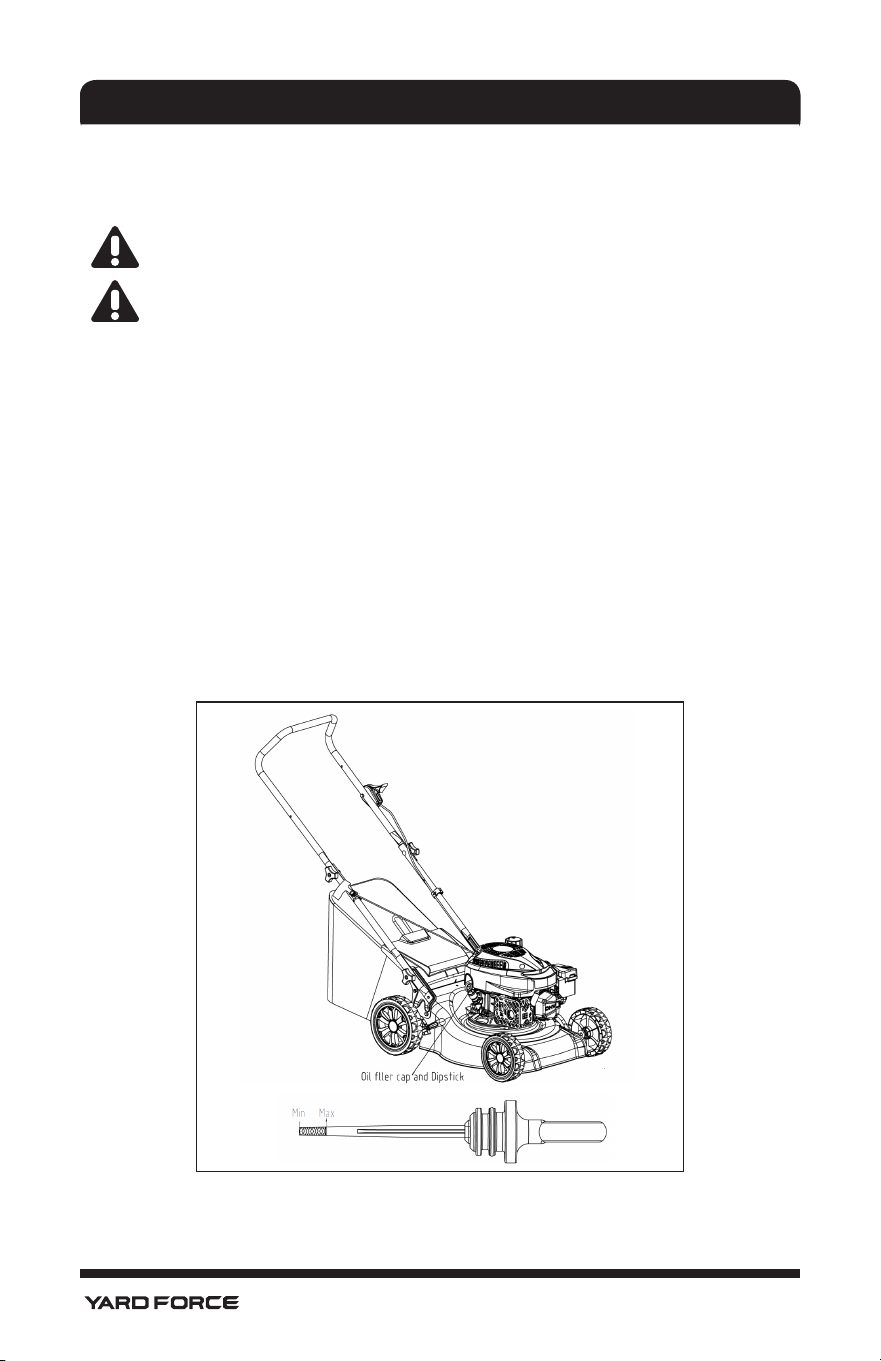
Checking the engine oil level and lling with engine oil
As shown in Fig. 8
WARNING! Fill up the mower with 0.5L 4-Stroke oil (we recommend Bynorm 4
stroke lawn mower oil) before you start the engine for the rst time. Failure to ll
the engine with oil will void your warranty.
WARNING! Check the engine oil level before you start the engine.
1. Place the mower on a flat and level surface. Clean the area around the oil filler cap.
2. Remove the oil filler cap/dipstick by rotating in an anti-clockwise direction.
3. Clean the oil dipstick with a clean cloth, cleaning away any oil on the dipstick.
4. For a new engine, add 0.4L 4-Stroke oil (we recommend Bynorm 4 stroke lawn mower
oil).
5. Re-insert the oil dipstick and secure the oil filler cap.
6. Remove the oil dipstick and check the oil level again. It should be at the top of the full
indicator on the dipstick.
7. If low, add oil slowly into the engine. Do not overfill. After adding oil, wait one minute
and then recheck the oil level.
8. Replace and tighten the oil filler cap/dipstick. Always ensure the oil filler cap is firmly
locked in place before the engine is started.
Fig. 8
12
ASSEMBLY
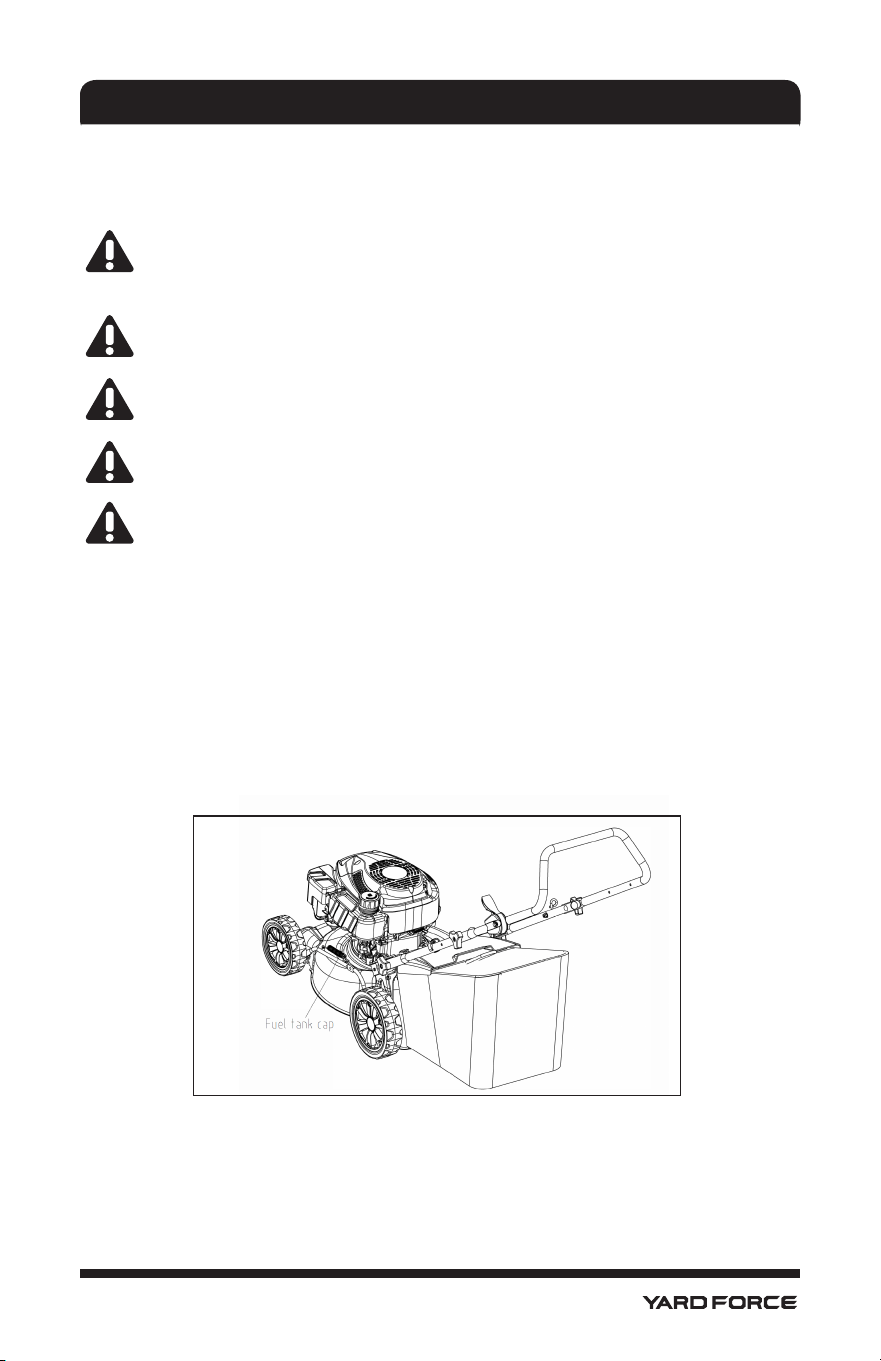
Filling with engine fuel
As shown in Fig. 9
CAUTION! USE FRESH UNLEADED FUEL (PETROL), 90 OCTANE OR BETTER –
Do NOT use E10 or Ethanol blends. Purchase fuel in quantities that can be used
within 30 days. Never mix oil with petrol.
WARNING! Do not ll the fuel tank over the bottom of the fuel tank's neck.
WARNING! Petrol is highly ammable and extreme precaution must be taken
when handling or working with it. Keep out of reach of children.
WARNING! Don’t smoke when handling the fuel.
WARNING! Refuel in a well-ventilated area with the engine stopped. Do not
smoke or allow ame or sparks in the area where the engine is refueled or where
petrol is stored. Avoid repeated or prolonged contact with skin or inhalation of the
vapour.
1. Clean the area around the fuel tank check the fuel level.
2. Rell the tank if the fuel level is low.
3. Refuel carefully to avoid overlling or spilling fuel. There should be no fuel in the tank
neck.
4. Clean up any overow or splashes of petrol before starting the engine.
5. Replace the fuel cap (nger tight) before starting the mower and wait 5 minutes for
excess fuel to evaporate
Fig. 9
13
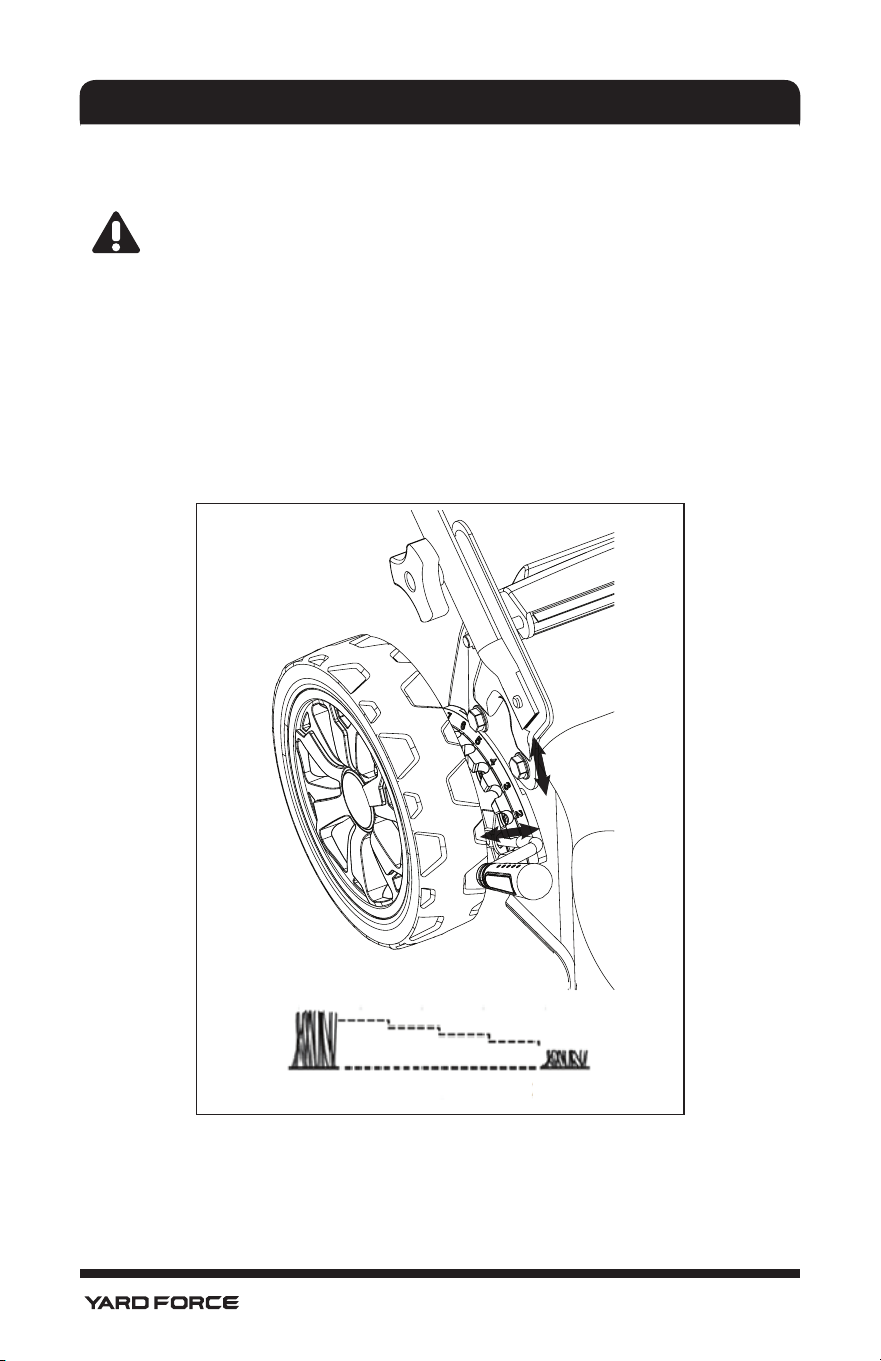
ADJUSTMENT
Setting the cutting height
As shown in Fig. 10
WARNING! Adjust the cutting height only when the engine is switched off and the
spark plug lead has been removed.
1. The cutting height is centrally adjusted with cutting height adjusting handle. Different
cutting heights can be selected.
2. Pull the adjusting handle out gently and select the desired cutting height.
3. Place the handle in the grove for the desired position and release.
The cutting height range is from 20mm to 75mm in seven steps.
Fig. 10
1
2
75mm 20mm
14
OPERATION
Start and stop the engine
WARNING! The blades begin to rotate as soon as the engine is started.
WARNING! Do not operate the lawn mower in enclosed or poorly ventilated areas
as the exhaust gas contains toxic gases.
Keep hands, feet, hair and clothing away from;
1. All moving parts of the lawn mower.
2. The exhaust and other parts of the engine become hot during use.
Make sure that the blades are securely fastened before starting the engine.
CAUTION! Before starting the engine make sure that the spark plug lead is
connected to the spark plug and the engine is lled with sufcient oil and petrol.
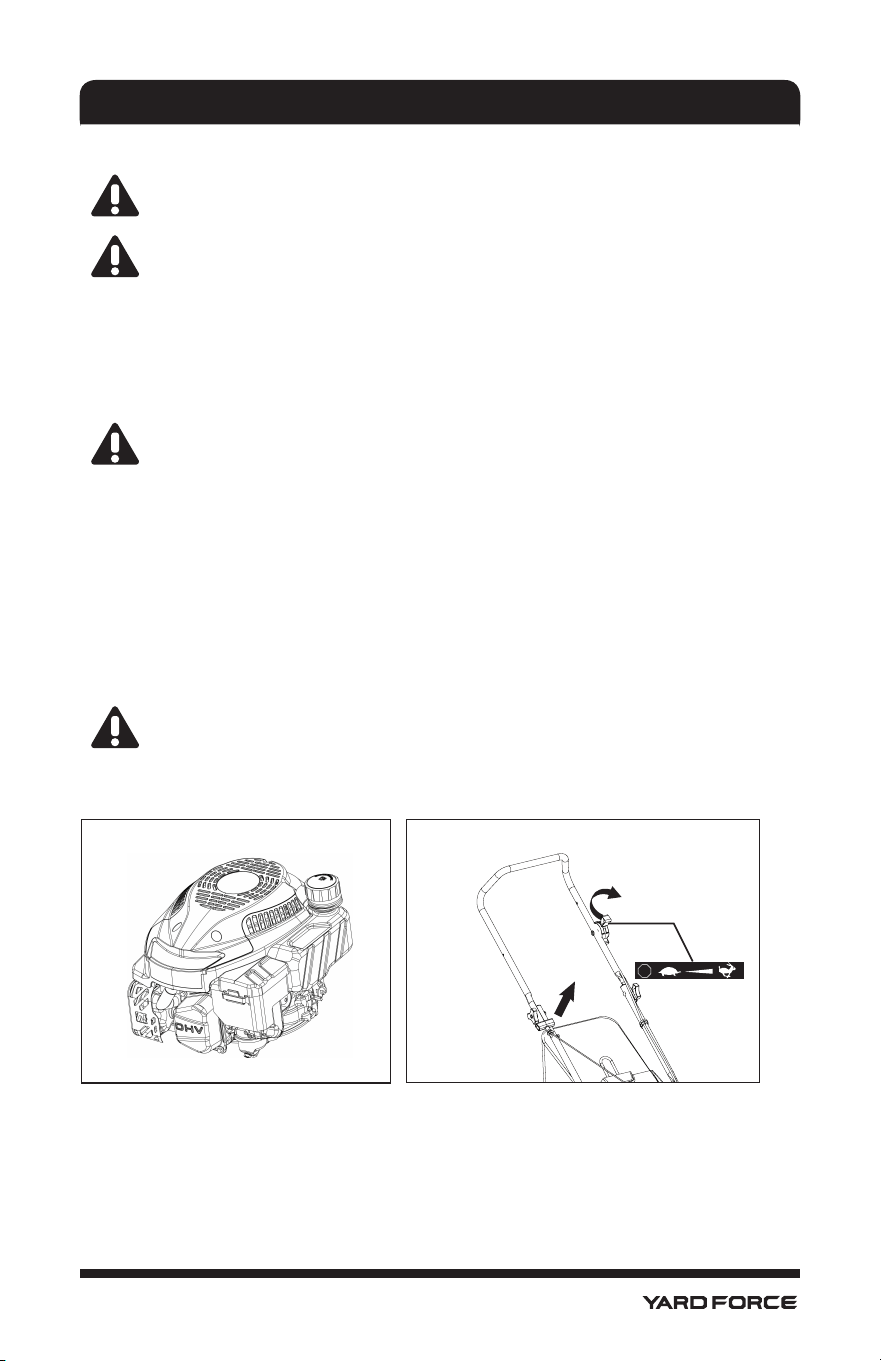
To start the engine
As shown in Fig. 11-12
1. Press the primer bulb 3~5 times.
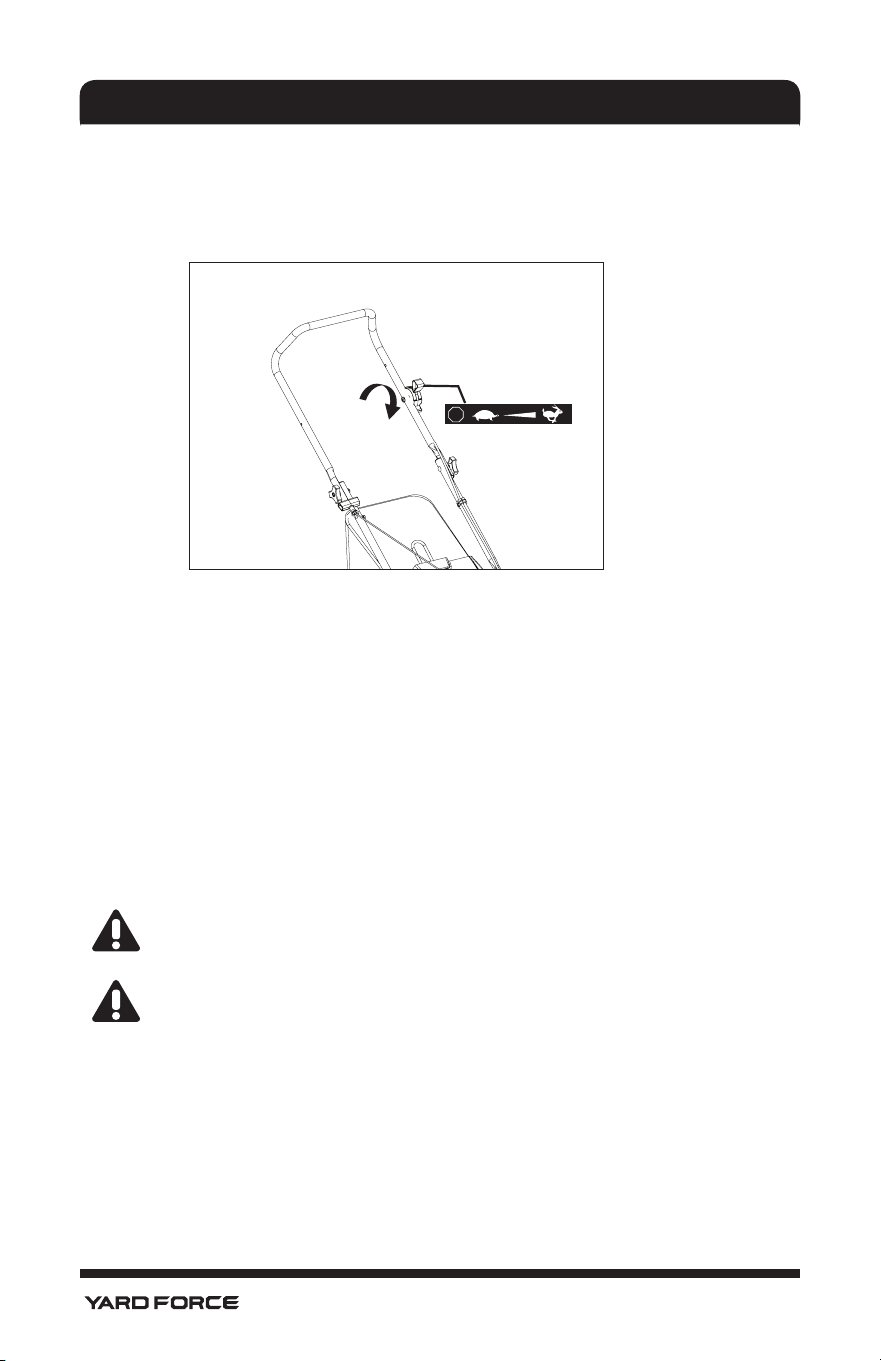
2. Move the throttle lever to the rabbit position.
3. Stand behind the mower. Pull the starter handle out approximate 10-15cm until you feel
a resistance and then start the engine with a sharp pull .
4. Once the engine is running, release the starter rope back to the rope guide gently.
NOTE! When mowing, you can also nish your job by moving the throttle lever
to the low speed position, to saving your petrol consumption, depend on the
condition of your lawn.
Fig. 11 Fig. 12
1
2
STOP
15
OPERATION
To clear a ooded engine
NOTE! If the engine won’t start after you have tried several times, the engine may be
ooded with excess fuel . Use following procedure to clear the engine.
1. Move the throttle lever to the stop position.
2. Remove the spark plug, dry it, wait 5 minutes and then reinstall it.
NOTE! Install the spark plug carefully by hand to avoid cross-threading. After the plug is
seated tighten 1/8 to 1/4 turn with a spark plug spanner to compress the washer.
3. Move the throttle lever to the rabbit position.
4. Repeat the starting procedure.
Mowing
WARNING! Always observe the strictest safety procedures when using the lawn
mower. Carefully read the safety instructions of this manual before using the lawn
mower.
WARNING! Never open the rear ap, remove or replace the grass catcher whist the
engine is running.
1. Select your required cutting height.
2. Start the engine and allow it to warm up. See “To start the engine”.
3. To start cutting the grass push the lawn mower using the upper handle.
Fig. 13
STOP
To stop the engine
As shown in Fig. 13
Move the throttle lever to the stop position.

16
OPERATION
Mowing guide
1. Walk, never run, be very careful when mowing uneven or rough ground.
2. Mow across slopes, never up and down.
3. Be careful when changing the direction of the mower on a slope.
4. Do not mow excessively steep slopes.
5. The best result will be achieved if the grass is dry. Wet grass will tend to clog the
blades and the grass collection system.
6. Grass grows at different rates at different times of the year. Never use the lowest
cutting height for the rst cut of the season or in drought conditions.
7. Only about one third of the grass height should be cut.
8. Do not remove grass debris from the mower casing or on the blade by hand or with
your feet. Instead use suitable tools such as a brush or broom.
Emptying the grass catcher
As soon as grass clippings start to trail behind the lawn mower, empty the grass catcher.
WARNING! Before removing the grass catcher, switch the engine OFF and wait
until the blades have come to a stop.
WARNING! If any grass clippings are caught in the discharge chute, on the
blades or under the deck, with the engine stopped clean them using a brush. Do
not remove grass clippings by hand or with your feet.
1. To remove the grass catcher, use one hand to lift up rear ap and the other to grab
onto the carry handle. The rear ap will close fully after removing the grass catcher.
2. Empty the grass clippings in the grass catcher and ret it.
17
MAINTENANCE AND STORAGE
Maintenance schedule
Performing routine maintenance correctly on your lawn mower will ensure you get years
of trouble free use.
The following maintenance schedule is recommended:
12 hours of use 24 hours of use 36 hours of use
Air lter clean Clean replace
Spark plug check clean replace
Engine oil Check Replace check
The Engine oil should be changed after the rst 8 hours.
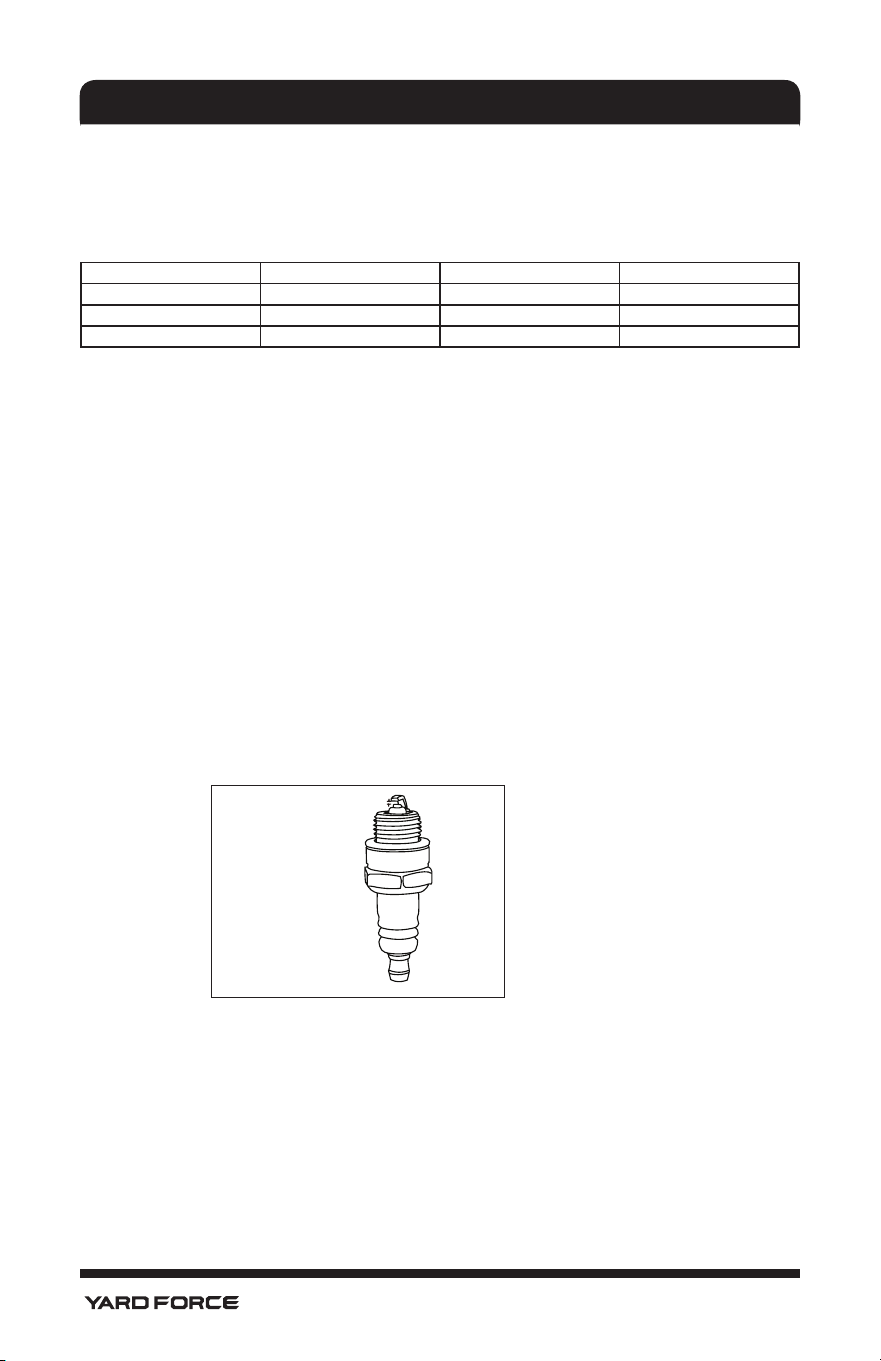
Maintenance of the spark plug
As shown in Fig. 14
1. Once the engine has cooled, disconnect the spark plug lead.
2. Remove the spark plug using a spark plug spanner
3. Clean the spark plug with a wire brush (not supplied ).
4. Using a feeler gauge set the gap to 0.7-
0.8mm.
5. Install the spark plug carefully by hand to avoid cross-threading.
6. After the plug is seated tighten 1/8 to 1/4 turn with a spark plug spanner to compress
the washer.
Fig. 14
0.7-0.8 mm
18
MAINTENANCE AND STORAGE
Fig. 15
Fig. 16
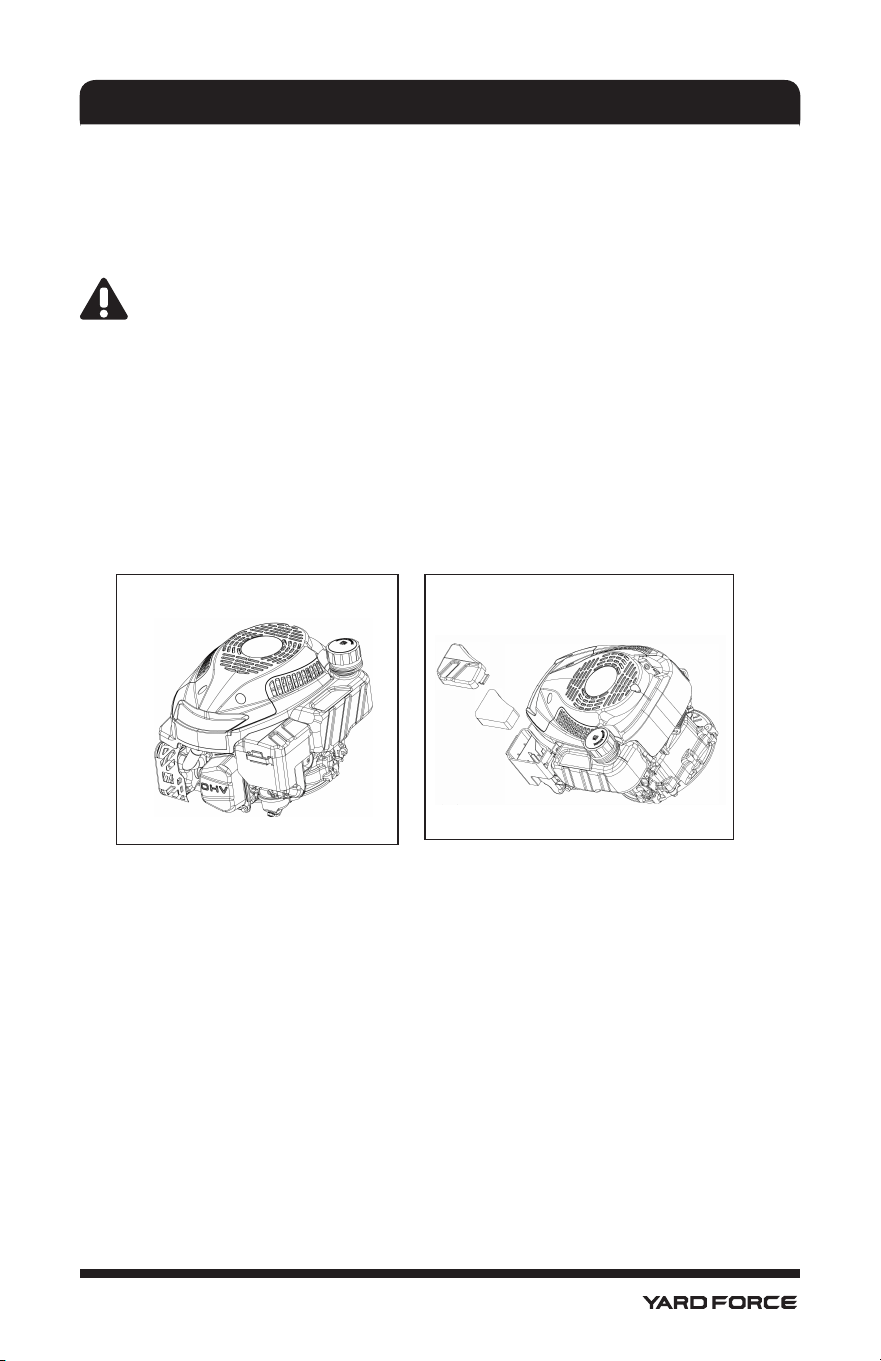
Maintenance of the air lter
As shown in Fig. 15-16
Ensure the air lter is clean and in good condition. A dirty air lter will restrict air ow to the
carburettor, reducing engine performance. If the mower is used in a dusty environment the
air lter should be checked frequently.
WARNING! Never run the engine without the air lter element installed.
1. Unclip and remove the cover.
2. Remove the air lter element.
3. Tap the air lter element several times on a hard surface to remove dirt. If the lter is
excessively dirty, replace with a new one.
Note! Never clean the air lter with petrol or inammable solvents. Clean the air lter
only with compressed air or by tapping it.
4. Install the air lter element.
5. Close the cover and clip it.
Changing the engine oil
1. Tilt the lawn mower towards the oil ller cap have a container ready to catch the oil.
2. Remove the ller cap and drain the oil into the container.
3. Once the oil has been emptied, wipe clean any spillages.
4. Rell with SAE30 oil. The oil level must be between the min and max marks on the
dipstick.
5. Ret the oil ller cap. See “Checking the engine oil level and lling with engine oil ”
6. Start the engine and allow it to run briey.
7. Stop the engine, wait one minute and check the oil level and top up if necessary.
19
MAINTENANCE AND STORAGE
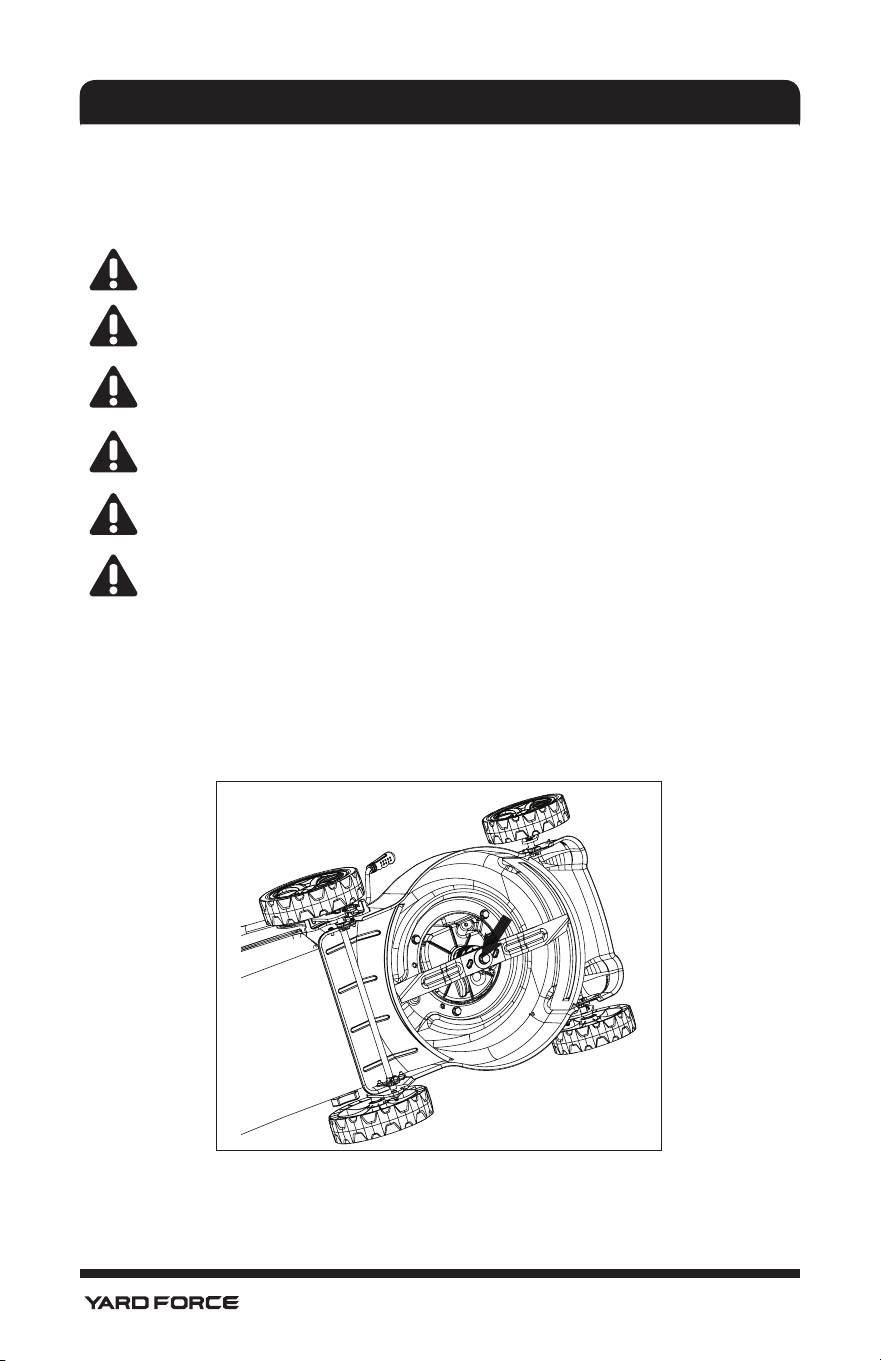
Replacing the blade bar
For safety reasons you should only ever have your blade bar sharpened, balanced and
mounted by an authorised service centre. For optimum results it is recommended that the
blade bar should be inspected once a year.
WARNING! Before you remove the grass catcher, stop the engine and wait until
the blade stops completely.
WARNING! You will need garden gloves (not provided) and a spanner wrench(not
provided) to remove the blade bar.
NOTE! Don’t invert the mower. Tip it slightly towards the rear side and reach under
the deck
WARNING! Always handle the blade with care, sharp edges could cause injury
USE GLOVES. Replace the blade after 50 hrs mowing or 2 yrs whichever is sooner
regardless of condition.
WARNING! If the blade is cracked or damaged replace it with a new one.
WARNING! Don’t hold the blade by hand directly.
Hold the blade bar and unscrew the blade bolt counterclockwise using a spanner wrench.
Remove the washer and the blade.
Fit a new blade bar or re-sharpen the blade bar, locate the blade bar on the two studs
on the blade an and then x the washer and bolts. Make sure the blade bar is correctly
located, and then rmly tighten the bolt with 45~50N·m. Do not over tighten.
Fig. 17

20
MAINTENANCE AND STORAGE
Storing the lawn mower for short periods
The lawn mower can be stored for short periods of time (less than 15 days) without
performing any storage maintenance. Before placing the lawn mower into storage always
carry out the following:
1. Allow the engine to fully cool.
2. Ensure the grass catcher is empty.
3. Clean all debris from under the mower deck.
4. Store the lawn mower on at and level surface.
5. Store in a safe place which is not accessible by children or people who are not familiar
with operation.
Storing the lawn mower for extended periods
If the lawn mower is to be placed in storage for more than 15 days, the following
procedure should be carried out. Otherwise, it may not start again.
WARNING! Do not empty the petrol tank in enclosed areas, near re or when
smoking. Petrol fumes can cause explosions and re.
1. Empty the petrol tank with a petrol suction pump if available.
2. Clean up and split fuel.
3. Start the engine and let it run until all remaining petrol has been used up.
4. While the engine is warm empty the oil and ll the engine with fresh oil.
5. Clean the cooling ns of the cylinder and the housing
6. Be sure to clean the entire lawn mower to protect the paint.
7. Store the lawn mower in a well-ventilated place.
Transport
1. Empty the petrol tank.
2. Always let the engine run until it has used up the remainder of petrol in the tank .
3. Empty the engine oil from the warm engine .
4. Disconnect the spark plug lead from the spark plug.
5. Use the original packaging to ship whenever possible.

21
TROUBLESHOOTING
Fault/malfunction Cause Remedy
Noisy while run-
ning, lawn mower
vibrates heavily
Screws are loose Check screws
Blade fasteners are loose Check blade fasteners
Blade is unbalanced Replace blade bar
Engine does not
start
Throttle lever at wrong
position
Move to the correct position
Spark plug is defective Replace spark plug
Cutting blade is worn or
damaged
Replace it by the customer
service center
Fuel tank is empty Rell with fuel
Spark plug may be ooded Remove spark plug and dry
Engine runs rough
Air lter is soiled Clean the air lter
Spark plug is soiled Clean the spark plug
Uneven mowing
results
Blade is blunt Sharpen the blade
Cutting height is too low Set correct height
Grass catcher
won't full ll
Blade is worn Replace the blade
Grass catcher is clogged Empty the grass catcher
Cutting height is inappro-
priate
Adjust the cutting height
The lawn / grass is wet Allow the lawn to dry
The discharge channel/
housing blocked
Clean the discharge channel/
housing
Underside of the mower
deck have been clogged
Clean the underside of the
mower deck

22
WARRANTY
WARRANTY
This product is covered by a 1 year parts and labour warrant against manufacturing
defects.
Our goods come with guarantees that cannot be excluded under the Australian Consumer
Law.
You are entitled to a replacement or refund for a major failure and for compensation for
any other reasonably foreseeable loss or damage. You are also entitled to have the goods
repaired or replaced if the goods fail to be of acceptable quality and the failure does not
amount to a major failure.
This warranty will not apply:
(i) where this product has been subjected to misuse, abuse, accident or want of care;
(ii) where this product has been used for a purpose for which it was not designed or is not
suited;
(iii) where the service of this product has been undertaken by a non-authorised person or
company or if non-approved parts have been used;
(iv) where this product has been used for industrial or commercial purposes . Should
service become necessary during the warranty period, the purchaser should contact
Action Spares on 1300 418 640.
In order to obtain warranty service, the purchaser must present the store receipt showing
the name of the retailer and the date of purchase.
The period of the warranty begins from the original date of purchase, notwithstanding any
subsequent repair or parts replacement.
Purchaser shall be responsible for all transport charges to and from the Authorised Service
Centre.
Damage in transit is not covered by this warranty. The purchaser should remove from the
product any liquids (if applicable) before sending the product for service or repair.
The product should be packed securely to prevent damage.
WARRANTY EXCLUSIONS
Wear parts or service related parts required when performing normal and regular
maintenance of this product are not covered by warranty unless it is found to be defective
by an Authorised Service Centre.
These include, but are not limited to: Spark Plugs, Carburettor Adjustments, Lubricants,
Engine Tune-ups, Filters.