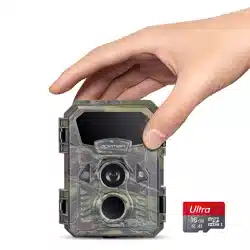
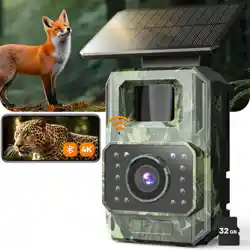
Apeman H55 - 20MP 1080P Trail Camera
Product's Documents
Below are documents related to this product, you can read online or download:
- Owner's manual - (English) Read Online | Download pdf
User manual Camera for Apeman H55
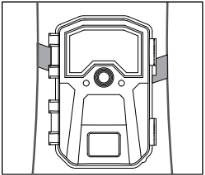
Front View
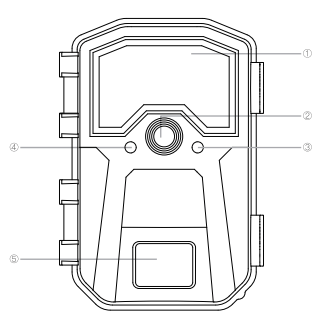
 Windows of LED Infrared Light
 Lens
Lens
 Work Indicator(Red LED)
 Motion Indicator(Blue LED)
 PIR Sensor
Back View
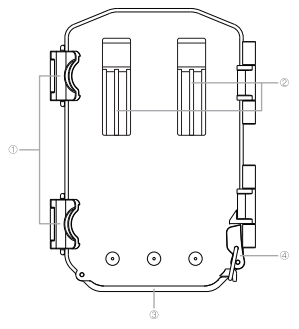
Latch
Buckles
Battery Case
Battery Case Lock
Inside View
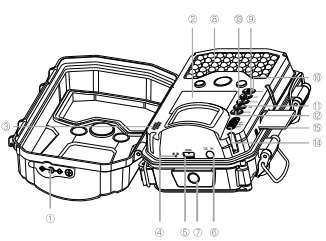
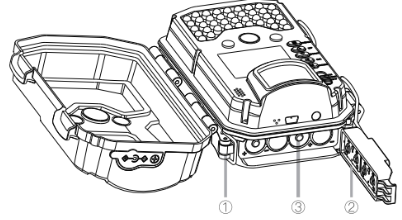
DC-IN Cover Plug
LCD Screen
Speaker
Microphone
USB Port
 DC-IN Port
 Tripod Socket
 LED Infrared Light
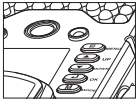
 UP Button
 Menu Button
 OK button
 Mode Button
 Down Button
 Power/ Mode Switch
 Memory Card Slot
Insert 8 AA batteries
Insert SD Card
Switch to Test
Press MENU button
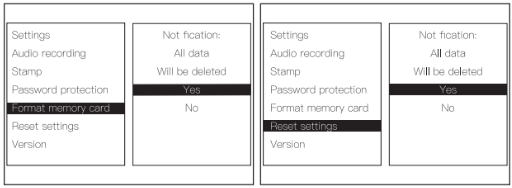
Format memory card
Reset Setting
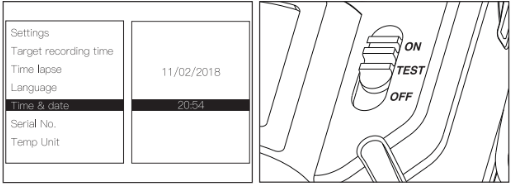
Set Time&date
Switch to ON
Before you begin learning how to use your Apeman Trail Camera, you will first need to install a set of batteries and insert a SD card. Please take the time to read the following directions and cautions:
Loading the batteries
Normal AA batteries
Battery Case
Lock Battery Door
Insert the battery in the direction shown in the pic.
After opening the battery case lock at the bottom left of the camera, you will see that the camera has eight battery slots. Install a full set of 8 AA batteries. Be sure to insert each battery with correct polarity.
Cautions:
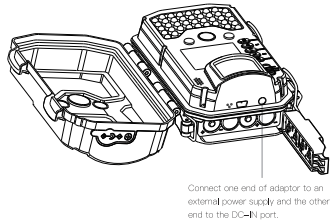
External Power Supply
Inserting the SD Card
Caution: Formatting the SD card by using the “Format" parameter before using it for the first time is recommended, especially when a card has been used in other devices.
Product Operation
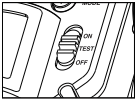
OFF/ON/TEST Mode
The Apeman trail camera has three basic operational modes: OFF/ON/TEST

OFF MODE
ON MODE
TEST MODE
TEST Information Screen
When power switch is at TEST position, there are three alternative preview mode shown in the built-in LCD screen: Manual Photo Mode, Manual Video Mode and Replay Mode, the corresponding icon shows on top left comer of the screen.
" "Represents "Manual Photo" mode
" "Represents "Manual Video” mode
" "Represents "Replay" mode
When the camera is switched to TEST mode (but the (MENU) key has not been pressed):
Manual Photo Mode

Still Photo Mode
Photo Resolution
Date&Time
Remaining Photo Capacity
SD Card Status
Temperature
Battery Level
Video Mode
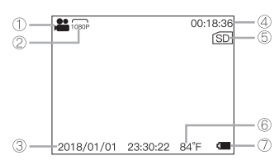
Still Photo Mode
Photo Resolution
Date&Time
Remaining Video Length
SD Card Status
Temperature
Battery Level
Menu Settings
This section explains how to set up and use the advanced functionality of Apeman trail camera.
Changing Parameter Settings Must be completed in TEST Mode!
Once in TEST mode, pressing the (MENU) button to enter the settings list ,the name of the parameter will be shown on the built-in LCD.
The Settings Menu – Parameters and Settings List (Bold=default)/Descriptions
Selects whether still photos or video clips are captured when the camera is triggered. Photo&Video mode combines both Photo and Video, so a still photo and a video clip are both captured for each trigger.
Selects resolution for still photos. Higher resolution provides more pixels, but creates larger files that take up more of the SD card capacity (fills up faster).
Selects how many photos are taken per trigger in Photo mode.
Selects video resolution. Higher resolution produces better quality videos, but creates larger files that take up more of the SD card capacity (fills up faster). Using high speed SD cards (SanDisk® SDHC class 6 or higher) is recommended if you will use higher video settings.
Specify the duration of a video recording when the camera is triggered automati cally. The recording period for videos is not limited in the TEST mode. To extend camera using life, we recommend to set a shorter video length.
Selects the length of time that the camera will "wait" until it responds to any additional triggers from the PIR after an animal is first detected and remains within the sensor's range. During this user set "ignore triggers" interval, the camera will not capture photos/videos. This prevents the card from filling up with too many redundant images.
Caution: PIR Interval have great influence on battery working time. The shorter the interval, the high frequency to capture target, but more power consump tion; The longer the interval, the lower frequency to capture the target and less power consumption.
Selects the sensitivity of the PIR sensor. The "High" setting will make the camera more sensitive to infrared (heat) and more easily triggered by motion, and the "Low" setting makes it less sensitive to heat and motion. The High setting can be useful when the ambient temperature is warm (making it more difficult for the sensor to detect animals), and the Low setting may help in cold weather if the camera is being triggered too often by anything warmer than the surroundings. The default "Middle" setting is for average or moderate conditions.
Set timer to “On” if camera should only be active within a certain time. Once "On" has been confirmed with the OK key, the start and end time can be set. If the start time is, for instance set to 18:35 and the end time is 8:25, the camera will be operational from 6:35pm of the current day until 8:25 am of the following day. The camera will not be triggered and will not take any photos when the time in not included in this period.
Turns Time Lapse recording mode on/off. When activated, this function forces the camera to take photos or videos even when it is not triggered by a nearby live target, useful for constant monitoring of an area that might be far away from the camera. This is also useful for observing cold blooded animals(e.g. snakes) or outdoor plants etc. As soon as the "On" setting has been confirmed by pressing the OK key, you could enter the interval time(15 seconds-30 minute) after which photos are to be taken.
Note: In this mode, the PIR function would stop working, and the camera would take photos in the setting interval time.
Select the desired menu language.
(1) Set time & date
Set the year, month and date (based on the date format you set), then the hour (based on the date format you set) and minute.
(2) Time format 24h; 12h
(3) Date format: dd/mm/yyyyy/mm/dd; mm/dd/yyyy
Set date format.
Allows the user to set a customer numbering for the camera. Useful for ID purposes when multiple cameras are setup, since each camera will imprint numbering on all photos (but not videos) it captures.
Use the UP/DOWN keys (to change the setting) and OK keys (to move to the next field) to set the four-digit code.
Set temperature unit
Select "ON" to open beep sound, "OFF" means close.
Select if record audio while recording a video.
Select "Time&date"/ "Date" if you want the date & time or only date (that the image was captured) imprinted on every photo/video, select "Off" for no imprint.
After select "On" enter A four-digit password to protect your camera against unauthorized access. Use the UP/DOWN keys (to change the setting) and OK keys (to move to the next field) to set the four-digit code.
Note: This password must be entered each time the camera is switched on in the TEST mode before the camera can be used. If you forget the password by accident, “1111" is the all-purpose password.
Select "Yes" and press OK to restore all parameters to the original factory default settings. If the camera is behaving oddly and you think you may have changed the setting for something accidentally (but aren't sure which one), this will reset all parameters to their most commonly used or "generic" settings.
Displays current firmware version for reference.
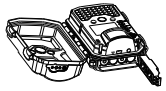
Mounting
There are two ways to mount the Apeman trail camera: using the provided adjustable web belt, or the tripod socket.
Using the Adjustable Web Belt
Push one end of the belt through the two brackets on the back of the camera. Thread the end of the strap through the buckle. Fasten the belt securely around the tree trunk by pulling the end of the strap firmly so there is no slack left.
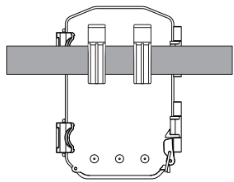
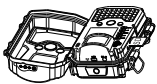
Using the Tripod Socket
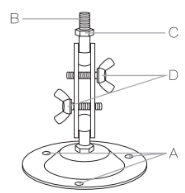
(A) Drilled holes
(B) Tripod bolt
(C) Counter screw
(D) Hinge screws
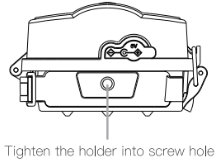
The camera is equipped with a socket at the bottom end to enable mounting on a tripod we provided.
To test whether the Apeman trail camera can effectively monitor the area you choose, this test is recommended to check the sensing angle and monitoring distance of the Apeman trail camera. To perform the test:
All photos and videos taken by the Apeman trail camera can be viewed directly on the built-in screen, also can be protected, unprotected and deleted directly on the camera.
Reviewing the Files Directly on the Camera
Put the power switch to TEST position, press (Mode) key twice to enter the Replay mode.
Press Mode) key again to quit the Replay mode.
In Replay mode, The icon on the upper left corner of the screen represents the file type." " represents photo,"
 " represents video.
press (UP) : page forward
Press (DOWN) : page backward.
When check videos in the Replay mode, (OK) key is Play/Pause key, press ( Menu] to stop playing video;
In Replay mode, Press (Menu] to enter the reply mode menu;
Delete all the files, but the protected file won't be delete.
Show all taken pictures in a slide-show
(1) Write-protect current file
Protect the current files from being mistakenly deleted
Note: In the Replay mode, there will be an icon " " on the top right, if the file is protected. The protected file can't be deleted, but can be formatted.
(2) Write-protect all files
Protect all files from being mistakenly deleted
(3) Unlock current file
Cancel the current file protection. In the Replay mode, if the file protection is canceled, the icon “ Os will disappear.
(4) Unlock all files
Cancel all files protections
When using a PC (or Mac*) to view photos (or video clips*), First, put the power switch to the [OFF] position, connect the devk". Then you could view images/videos saved on the SD card directly on the PC.
*video files may require additional software for viewing on a Mac.
Camera takes continuous images of no subject/Trigger more often
A camera has what is known as a “false trigger" if the PIR sensor thinks that there is motion and heat in front of the camera lens when there is no subject in the image. These "False Triggers" are the result of placing the camera in an environ ment where there is motion associated with tree branches creating motion in front of the camera or an area where there is high heat in the foreground and any motion from wind could set off the camera. Setting a camera up over water is also a potential cause for this issue. To remedy this situation:
Please check and confirm if you turn on “Time-lapse", turn it off.
Battery life is shorter than expected
Camera won't power up
Camera stops taking images / Video length is shorter than expected/Can't trigger at night
In most cases, it causes by battery quality. Please change to use Energizer® 1.5V AA batteries. If the problem still cannot be solved, please contact Apeman custom er service.
Camera won't trigger or take pictures.
Make sure that the camera power switch is in the "ON" position and not in the "OFF" or "TEST" modes.
Please follow the steps below to test the sensor and camera:
(1) Testing the sensor
A. Place the power button at the *TEST“ position,close the camera case, and place it on the table;
B. Do a parallel movement in front of the camera.
C. Check if the blue indicator light will blink.If yes, then the sensor can work.
(2) Testing the camera
A. Format the SD card and restore the camera to factory settings;
B. Set the “PIR Intervalo to the shortest time;
C. Place the power button at the "ON" position, close the camera case, and place it on the table;
D. Do a parallel movement in front of the camera for about 3 minutes;
E. Check if there is picture taken by the camera under Replay mode. If the problem still cannot be solved, please contact Apeman customer service.