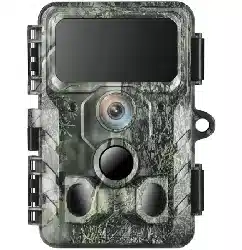
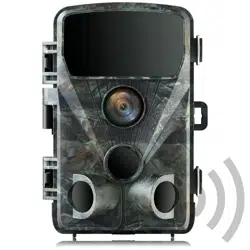
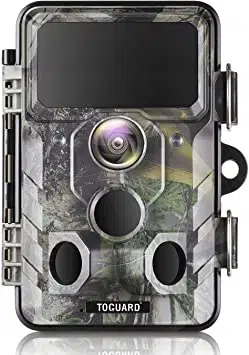
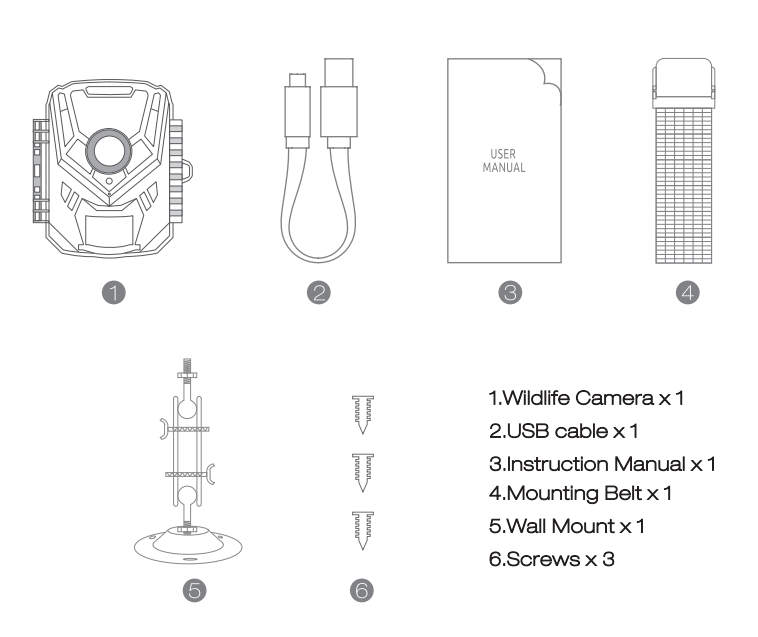
Instruction manual Camera
Packing list
Please carefully unpack camera and check that below accessories are contained in the box
Introduction
The Wildlife Camera is a wildlife and surveillance camera with an infrared aeneor. The sensor can detect sudden changes to the ambient temperature within an evaluation area. The signals of the hlghly sensltlve infrared sensor (PIR, passive infrared sensor) switch on the camera, activating picture of video mode.
Features Of Wildlife Camera
1. GMOS sensor.
2. 16 Mega Pixels HD photo and 1O8OP Full HD Video
3. 2 inch LGD Screen Display
4. Up to 2O Meters IR Night Vision Range
5. Full automatic IR filter, Color photo and video in daytime / Black and white photo at night.
6. Trigger speed: ApproxO.5 - 0.8 Seconds.
7. Set up Serial No. to record the position.
8. Time, date, temperature, phase and Serial No. will be stamped on the photo.
9. Password protection. 1O. Power indicating.
11. Built-in test function about environmental temperature.
12. Built-in microphone and speaker.
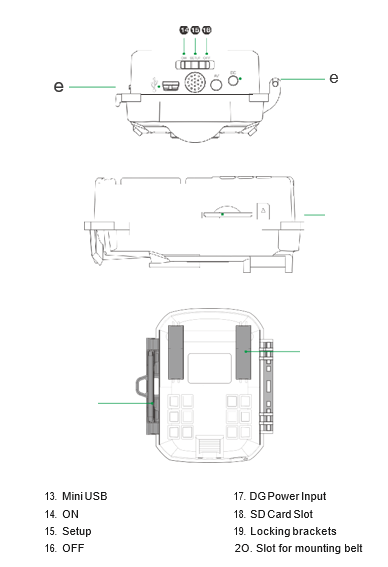
13. Mini USB 2. O interface.
14. Waterproof standard IP56.
15. Working temperature: -2O°G to 6O°G.
16. Extremely low power consumption in standby operation providing extremely long operating time.
Features Of Wildlife Camera
- Gamera trap for hunting
- Animal or incident observation.
- Motion-triggered security camera for domestic, office or public use.
- Any internal and external surveillance.
STRUCTURE
Understanding the camera structure helps to use this product more skillfully.
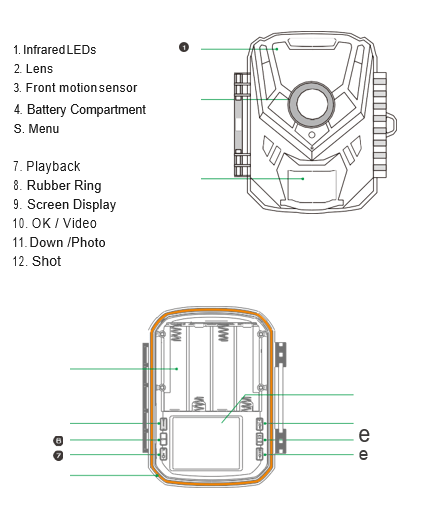
- The monitor is only switched on in the SETUP mode for changing menu settings or viewing existing photos and videos.
- A SD memory card must have been inserted into the memory card slot to save photos and videos.
- Using the mini USB connection (USB 2. O), the camera can be connected to a computer to download photos and videos.
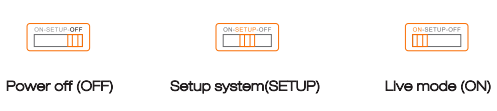
- Using the mode switch, the three operating modes: OFF, SETUP and ON can be selected.
PREPARING THE CAMERA
Note :
- SD memory cards up to a capacity of 32 GB are supported.

- 4 new LR6 (AA) Batteries with the same specification.
- The camera must be inserted 4 x 1. SV AA batteries. Do not use new and old batteries together. DG interface needs 6V/1.5A adaptor with 3.5 mm (outer diameter) 1.3 mm (inner) plug head.
- Insert GLASS6 or higher class SD card (GLASS1O recommend). Prior to insert into memory card, ensure that the lateral write protection on the memory card has not been locked.
- Switch on the camera. 3 switches: power off (OFF), setup menu /SETUP mode (SETUP) and live mode (ON).
- New memory card is recommended to be formatted when using (as below described).
- Please note that the camera will power off when power is very low.

Operation (See Figures Below)
- Open the locking brackets — insert batteries -insert memory card—switch to SETU the system menu by pressing MENU button-choose to format memory carcel—choose to reset to factory. (this step can be skipped)—choose to setup system time. Open the battery cover Insert 4pcs batteries. Battery model: AALR6 > Ensure that the lateral write protection on the memory card has not been activated > Insert GLASS6 or above Micro SD memory card in the memory card slot before switching on the camera and select SETUP mode to adjust settings
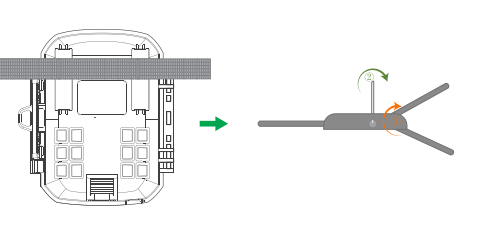
Assembly With Strap
USING THE CAMERA AND SETUP MENU
Using The Camera
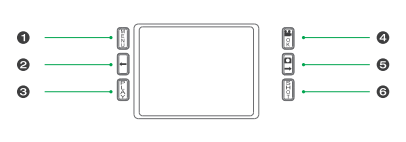
Operating Buttons
Functions of operating buttons in recording mode:
Below, the operating buttons are described in the recording mode with non-activated menu.
- Menu : Short press to enter or exit setup menu
- UP: Short press to scroll through the setup menu and select media files In playback.
- Playback : Short press to enter or exit Playback Mode.
- OK/Video Mode:
- Short press to confirm choice in setup menu.
- Short press to switch to Video Mode in Photo Mode
- Down/ Photo Mode :
- Short press to scroll through the setup menu and select media files in playback.
- Short press to switch to Photo Mode in Video Mode
- Shot: Short press to take a photo or start/stop video recording.
Mode Switch
1. Shift the switches to choose work mode
2. Press OK and DOWN button to switch between Video and Photo Mode.
3. Press the MENU key to open setting menu. Press OK to confirm the setting changes.
4. Press the MENU key one more time to return to previous menu or exit the settings MENU.
5. Switch the mode selector to "OFF" to power off the camera.
Setup menu
1. Mode
- Photo, Video, Photo+Video, Select whether photos or videos should be taken when motion is detected. When in the "Photo+Video" mode, the camera first takes a set number of photos prior to recording a video.
2. Photo Resolution
- 16MP (53T6*3O24) 12MP (46O8*2592)/8MP (3B4O*216O)/5MP (3O72*1728)/3MP (23O4*1296)/1MP (128O*72O).
- Select the desired resolution for photos. We recommend the resolution 12 A higher resolution produces a somewhat better photo quality but results in larger files requiring more space on the memory card 16 M and 12 M resolutions are generated by interpolation which can also affect quality.
Taking a 16GB memory card for example:

3. Photo series: 1 P, 2P. 3P
4. Video resolution
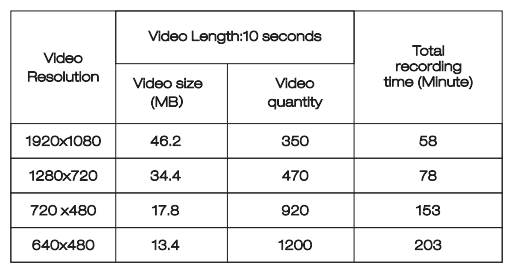
- 192Ox1O8OP, 128Dx72OP, 72Dx48OP, 64Dx48OP. Select the required video resolution. Select the number of photos to be taken in succession when the camera is triggered in the Photo mode. Please also observe the parameter interval!
- A higher resolution produces higher-quality videos but results in larger files requiring more space on the memory card. Videos are recorded in AVI format which can be played back on most video devices.
Taking 16 GB memory card for example:
5. Video Length
Default 5 seconds, optional 3s-59s, 1-1OMinutes Specify the duration of a video recording when the camera is trigged automatically. The recording period for videos is not limited in the SETUP mode.
- In the SETUP mode in the daytime and at night.
- When recording manually, the camera will stop automatically after 29 minutes recording;
- When recording manually, the camera will stop when one video clip size gets to 4GB
- When recording manually, the camera will stop when the memory card is full or ultra-low power.
- In live mode (ON) at night the camera will work automatically as per the video length setting. For low power, it will stop recording in advance.
- Please set the shorter video length to guarantee a long-time usage of batteries.
6. Audio recording
- Turn on/off audio recording
7. Slot leg: Defaulted 1 MIN. optional from 5 seconds-6O minutes. Select the shortest period 1'or the camera to wait before it reacts to the successive triggering of the main sensor after an animal has first been detected. The camera does not record any photos or videos during the selected interval. This prevents the memory card from being filled with unnecessary shots.
- The shot lag is short, the camera shooting frequency would be high, and there would be high consumption of the power. It would affect the usage days of the batteries.
- On the opposite, if the shot lag is long, it would be a lower consumption of power to guarantee a long-time usage.
8. Sensitivity of motion sensors
- Select "High" For interior areas and environments with little interference
- Select "Medium" for exterior areas and environments with a normal amount of interference,
- select "Low" for an environment with a high level of interference.
9. Target recording time
- Press "OK", and then select "ON" to set the starting working and ending working time. After finishing setting, the camera only worM during the set time every day. Beyond the period, the camera is in standby.If the start time is, for instance, set to 18:35 and the end time to 8:25, the camera will be operational from 6:35 pm of the current day until B:25 am of the following day. The camera will not be triggered and will not take any photos or videos outside of this period.
1O. Time lapse
- Press "MENU" to find "Time lapse". Press "OK", then select "ON" to set the time interval, and set the values of Hr, Min, and Sec. For example, if the process of flowers blooming has to be recorded, time-lapse can be used. The camera automatically takes pictures in every set time interval.
11. Language
- Select the desired menu language. The following languages are available: English, German, French, Spanish, Chinese, etc.
12. Time&date
- Press”MENU"to find "1me & Date". Press"OK", then select Set time & date: Set the time and date according to the current time.
- Press Left/Right button to change the value, press "OK " to confirm changes and move to next number.
- Time formats: 12f24hr Date formats: dcI/mmfyyyy, yyyy/mrru’dd, mm/ dd/yyyy;
13. Photo stamp
- Turn on/off display of watermark on photo
14. Password protection
- Select "Password protection". Press "OK", and then select "ON" to set the password of the camera. A password is a 4-digit number selected between O-9. If the password is lost, press MENU key and REPLAY at the same time, and slide the operating mode selector from OFF to SETUP position. The camera is unlocked.
15. Beep sound
16. Format memory card
- Select to format memory card on this camera, we suggest format the memory card on computer then format it on this camera again for first use.
17. Serial NO.
- Press ”OK”, and then select ”ON” to set the serial number for the camera. You can use a combination of 4 digits to document the location on the photos. When using several cameras, this makes it easier to identify the location when viewing photos.
18. Reset settings
- Select to reset the camera to the default settings. Please note to set date and time again.
19. Version
- Select to check the camera's current firmware version number.
2O. Playback
- Slide the operating mode selector switch to "SETUP" position. Press replay key and Up /Down key to review the photos/ videos.While reviewing photos, press Up /Down key to page up/down. While reviewing videos, press OK key to start playing, press OK one more time to stop. Press replay key to return to standby.
- Delete selection: You can use this function to delete individual recordings from the memory card. Press MENU key under the mode of playback, move the select bar to "Delete current file" and press OK to delete the selected recording.
- Delete all recordings: You can use this function to delete all recordings from the memory card. Press MENU key under the mode of playback, move the selection bar to "Delete all files" and press OK to delete all recordings.
- Activate slide show: This function can be used to play back the photos stored on the memory card automatically. Each photo is shown for about 2 seconds. To stop the slide show and keep the current image permanently on the screen, press the OK button.
Write protection
- This function can be used to protect individual recordings of all saved recordings from accidental deletion.
- SeIect "Write-protect current tile" to protect the currently selected recording from accidental deletion.
- SeIect "Write-protect all files" to protect all saved recordings from accidental deletion.
- SeIect "Unlock current file" to remove the write protection for the currently selected recording.
- SeIect "Unlock all files" to remove the write protection for all saved recordings.
ENTERING LIVE MODE
Adjusting And Installing The Camera
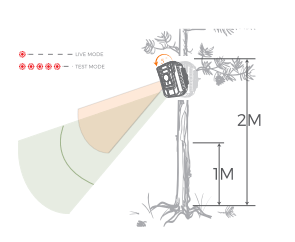
- The SETUP mode is advantageous for determining the best possible detection angle and range of the movement sensor. For this purpose, attach the camera at approx. 1 -2m height to a tree and align the camera with a desired direction.
- For 1 meter height, Place the camera parallel to the ground.
- For 2 meters height, 1It the camera down five degrees to the ground.
Setting Up The Live Mode
The standard application of the Wildlife Camera is the Live mode.
- In this mode , photos are either triggered by movement sensors or at intervals according to the respective setting.
- To set up the Live mode, switch mode switch to ON position. The red LED will flash for 15 times when you just switch to Live mode (ON), and then the camera work automatically and enters the Standby mode. As soon as wild animals or other objects directly enter the detection area of the sensor zone, the camera starts to record photos and videos.
Note:
- In the daytime. IR LEDs will not light up. The photos and videos are in color. At night. IR LEDs will give lights, and the photos and videos are in black and white.
- The Shot lag is 1 minute defaulted. The optional is 5a-6O MIN, Please set up recording mode and related parameters before entering Live mode.
- When Flash Light is set to "Auto", the camera will adjust the brightness of IR LEDs automatically in low power. When shooting at night, the brightness will decrease automatically, and the shooting effect will become a little poor. For ultra-low power, shooting will stop at night.
Connection to computer
Please shift Mode to "SETUP", and connect the camera to computer with USB cable, the camera LCD will show ”MSDC prompt This indicates connecting successfully. And then read or copy the data in SD card to the computer.
- Connect the camera to your computer using the USB cable.
- The camera switches on automatically in the USB mode, irrespective of the selection on the mode switch.
- The camera installs itself on the computer as an additional drive under the name "Removable storage device
- Double click on the device to detect the folder "DCIM"
- The photos and videos are in the subfolders of the "DCIM™ folder.
- You can copy or move photos and video files on the computer. Alternatively, you can insert the memory card in a card reader on the computer.
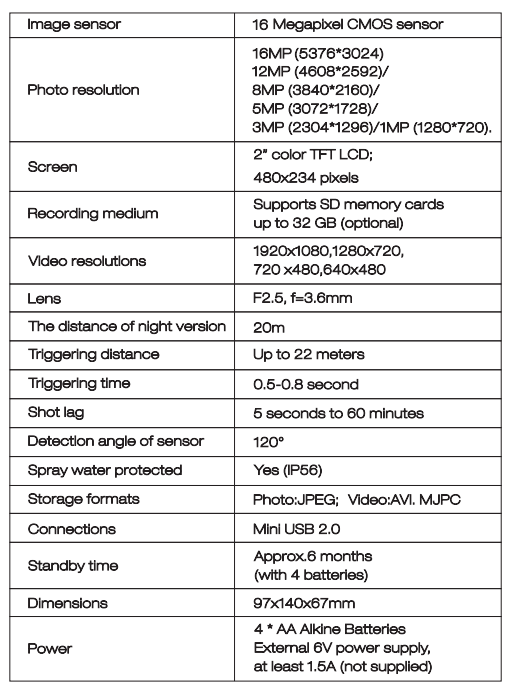
TECHNICAL SPECIFICATION
SIMPLE TROUBLESHOOTING
1. The camera will not turn on
- Please check whether the batteries are installed in proper way.
- Check if the battery capacity is low or exhausted. If so. please replace by new batteries.
2. TLie camera turns off automatically
- Please check whether the battery capacity is low or exhausted. If so, try to change new batteries for outdoor using or connect AC adapter for indoor using.
- Please check if SD card is full. If so, transfer images and videos to your computer or delete some files in the Replay Mode
3. It shows 'SD card Error"
- Please ensure that SD card is with class 1O standard or higher level.
- Please use the camera to format SD card at the first time.
4. It shows 'SD card Error"
- Please ensure that SD card is with class 1O standard or higher level.
- Please use the camera to format SD card at the first time.
5. The image is not clear
- Please ensure that you have removed the protective film on IR LEDs and lens before using.
6. The camera does not take images or record videos
- Check If the memory of SD card is full, transfer images or videos to your computer or delete some files in the Replay Mode.
Care
- Do not use any corrosive cleaners, such as methylated spirits, thinners, etc. to clean the camera housing and supplied accessory. When required, the clean system components with a soft dry cloth.
Storage
- Always remove the battery from the housing if the camera is not being used for some time and store the battery separately. On a day to day basis and over longer periods the batteries can be kept at a dry location out of the reach of children.