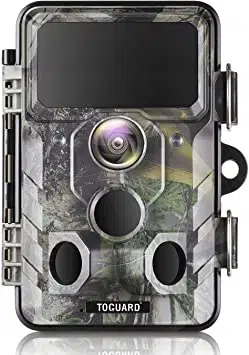
User manual Trail Camera
Your camera
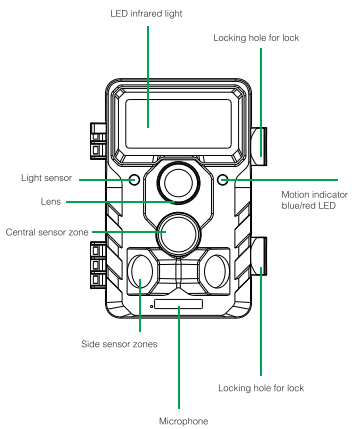
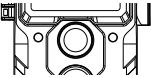
Front view
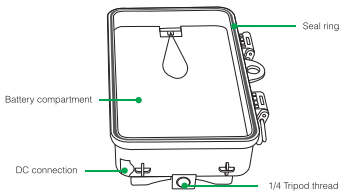
Inside views
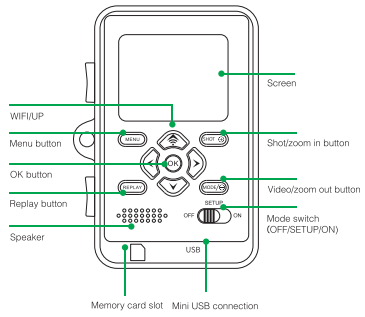
- The monitor is only switched on in the SETUP mode for changing menu settings or viewing existing photos.
- An SD or SDHC memory card must have been inserted into the memory card slot in order to save photos.
- Using the mini USB connection (USB 2.0), the camera can be connected to a computer.
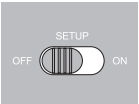
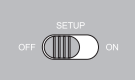
- Using the mode switch the three operating modes OFF, SETUP and ON can be selected.
Preparing the camera
Opening and closing the camera
Operating buttons, connections and batteries are located inside the Wildlife Camera.
A fixing for a padlock is provided between the two locking brackets, allowing the camera to be securely locked.
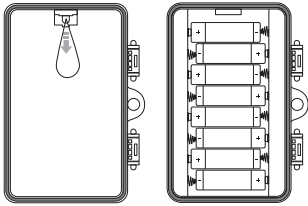
Inserting the batteries
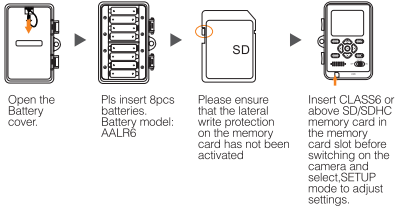
Open the camera as described in section 6.1 to insert the batteries. The battery compartment is housed in the right, rear part of the camera. Now open the protective cover of the battery compartment by pulling the clamping closure at the top slightly inwards before lifting off the cover.
First remove any existing batteries from the battery compartment. Insert 8 fully charge batteries as shown in the below figure. When insertig batteries ensure correct position as marked for each battery in the battery compartment.
Note:
- We recommend using 8 x alkaline AA batteries to ensure the camera's normal function.
- An alarm is sounded if battery charge is too low.
Inserting the memory card
A memory card must have been inserted in order to save photos and videos. Insert a SD/SDHC memory card in the memory card compartment before switching on the camera.
Switch off the camera and open as described in section 6.1.
Prior to inserting the memory card ensure that the lateral write protection on the memorycard has not been activated (see figure).
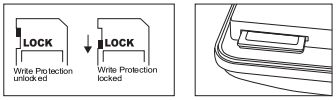
If the camera displays "Card protected", remove the memory card and change the position of the memory protection.
Insert the memory card as shown in the adjacent illustration. Push the memory card into compartment until it clicks into place.
To remove the memory card push card in again until it is partly ejected.
Note: SD/SDHC memory cards up to a capacity of 32 GB are supported.
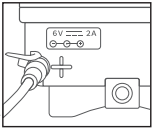
External power supply
The camera can be operated using power from an external power supply. A 6 V power supply with at least 1.5 A is required containing a connector with a 3.5 mm external and 1.35 mm internal diameter (internal pisitive pole, external negative pole ).
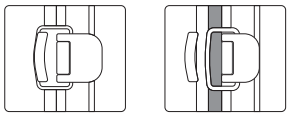
Assembly with strap
Use the securing strap supplied to attach the Wildlife Camera to a tree or another object. The illustrations below demonstrate how to fasten the securing strap.
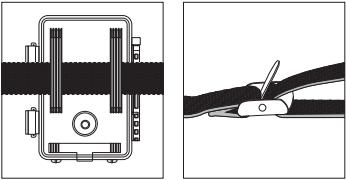
Position the Wildlife Camera as desired and pull the loose end of the securing strap tight until the camera is firmly secured.
To release the securing strap again, pull at the tab of the securing strap.
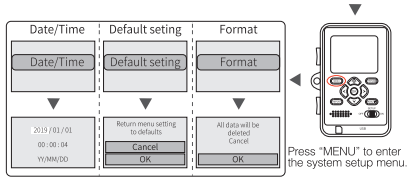
Operation graphi expression Operation (see figures below):
Open the locking brackets and the protective cover of the battery compartment- insert batteries -insert memory card- switch to SETUP- enter system menu by pressing MENU button- choose to format memory card -choose to reset to factory {this step can be skipped) -choose to setup system time
The power supply may not be used during thunderstorms. Otherwise danger of electrocution.
Using the camera
Prior to setting up the camera for surveillance, it must be set up for the respective purpose. For this purpose, there is a setup mode available. In addition to changing settings, photos and videos can be taken and existing photos can be viewed in this mode.
Mode switch
Open the camera as described in section 6.1. The Mode switch is located at the bottom edge on the left inside. 3 operating modes can be selected:
OFF: The camera is completely switched off in the OFF mode.
SETUP: Select SETUP mode to adjust settings and make or playback photos and videos.
ON: The camera is activated to take photos automatically (Live mode).
Operating buttons
Set the mode switch to SETUP and the camera and monitor are switched on. Using the operating buttons different functions can now be activated and settings can be changed. For this purpose, the following operating buttons are provided on the display panel:
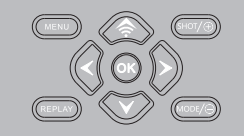
Functions of operating buttons in recording mode
Below, the operating buttons are described in the recording mode with non activated menu.
 Open the Settings menu using the MENU button.
 Press this button to start the replay mode.
 Change to the manual recording mode and record a video.
 Change to the manual recording mode and take a photo.
 No function(in recording mode).
Functions of operating buttons in replay mode
Below, the operating buttons are described in the replay mode with non activated menu.
Select the Replay menu using the MENU button.
Press the button to return to recording mode.
 View existing pictures backwards and drag up wards to view photo and increase the video play volume.
 View existing pictures forwards and drag down wards to view photo and decrease the video play volume.
 Drag right to view and skip ahead the video.
 Drag left to view and skip back the video.
 Start and end replay of videos /image cut save after zoom.
Zoom out the photos and decrease the video play volume.
Zoom in the photos and increase the video play volume.
Functions of operating buttons in menu
Below, the operating buttons are described in the replay mode with activated menu. (Recording and Replay mode).
Close the Main menu or any sub menu by pressing the MENU button.
Move up one menu point or increment value by 1.
Move down one menu point or decrease value by 1.
Move forwardly to the data setting.
Move backwardly to the data setting.
Open selected options or accept selected settings. Confirm each change to a setting by pressing OK. If the change is not confirmed by pressing the OK button, the new setting are lost when leaving the menu.
No function (in MENU mode).
Settings
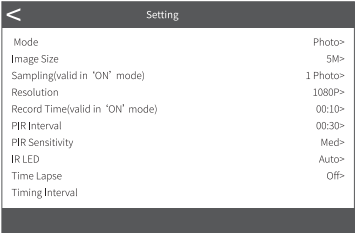
Prior to using the H85 Camera, change the settings as required.Slide the mode switch of the H85 Camera to the SETUP position to start the setup mode. In the Photo or Video mode press the MENU button to call up the menu. All menu options of the H85 Camera and possible setting values for the recording mode are listed below. The standard setting is always highlighted in bold.

- Mode: Photo, Video, Photo + VideoSelect whether photos or videos should be taken when motion is detected. When in the Photo + Video" mode, the camera first takes a set number of photos prior to recording a video.
- PIR Interval: Defaulted 30seconds, optional from 5seconds ~60minutes Select the shorsetup period for the camera to wait before it reacts to the successive triggering of the main sensor after an animal has first been detected. The camera does not record any images or videos during the selected interval. This prevents the memory card from being filled with unnecessary shots.
Note:
- The interval time is short, the camera shooting frequency would be high, and there would be high consumption of batteries. It would effect the usage days of the batteries. It is just on the opposite,the interval time is long, would be a lower consumption of batteries to guarantee a long time usage.
- PIR Sensitivity: High/ Medium/Low
- Time lapse: Off/OnWhen "on" has been selected, the camera would automatically takes photos in the selected time interval, irrespective of whether or not the PIR sensor has detected a motion or not. This is useful for observing cold blooded animals e.g. snakes or plan ts opening up, etc. As soon as the "On" setting has been confirmed by pressing the OK button, you can enter the interval time after which photos are to be taken.
Note:
- In this mode, the PIR function would stop working, and the camera would take photos in the setting interval time.
- IR LED: Auto/ Super Fine/ EconomySet the infrared LEDs brightness.
- Monitoring Period: Off/OnSet timer to "On" if camera should only be active within a certain time. Once "On" has been confirmed with the OK button, the start and end time can be set. If the start time is, for instance set to 18:35 hrs and the end time to 8:25 hrs, the camera will be operational from 6:35 pm of the current day until 8:25 am of the following day. The camera will not be triggered and will not take any photos or videos outside of this period.
- Side PIR Setup: Off/On The two side PIR sensor zones provide a wide detection angle and detect more potential triggers. Sometimes you only wish to observe a certain point. Too many irrelevant triggers from the side sensor zones outside of this point continuously switch the camera on and off, considerably affecting battery life. In some situations it may be difficult to remove interfering branches or avoid sun light. In these situations you can switch off the side sensor zones.

- Image size: 20M (5120 x 3840), 16M 4608 x 3456), 12M (4032 x 3024), 8M (3264 x 2448), 5M (2592 x 1944), 3M (2048 x 1536), 2M (1600 x 1200 ) Select the desired resolution for photos. We recommend the resolution 5M. A higher resolution produces a somewhat better photo quality but results in larger files requiring more space on the memory card..
- Picture NO: 1P, 2P, 3P, 4P, 5P, 6P, 7P, 8P, 9P, 10P. Select the number of photos to be taken in succession when the camera is triggered in the Photo mode. Please also observe the parameter Interval!
- Shutter speed: 1/15, 1/20, 1/30

- Resolution : 1296P (1728 x 1296), 1080P (1920 x 1080, 30 fps), 720P (1080 x 720, 30 fps), 480 (848 x 480, 30 fps), 360 (640×360,30fps) Select the required video resolution.A higher resolution produces higher quality videos but results in larger files requiring more space on the memory card. Videos are recorded in AVI format which can be played back on most video equipment.
- Video Length : Defaulted 10seconds, optional 5seconds~180seconds Specify the duration of a video recording when the camera is triggered automatically. The recording period for videos is not limited in the SETUP mode.
- Record Audio: Off/On

- Language: Select the desired menu languageThe following languages are available: English, German, Danish, French, Spanish, Chinese, etc.
- Default settings(Reset to factory): Cancel /OKPress "OK" to reset the camera settings to the default values and confirm the selection by pressing the OK button.
- Format: Cancel/OKAll files are deleted by formatting the memory card. Press OK button and confirm formatting by selecting "OK". We recommend formatting the memory card if it has already been used in other devices or if it is a new card. Caution: Ensure that files still required have been backed up prior to formatting!
- Date/Time: Set date and time
- Time Format: 12hour/ 24hour
- Date Stamp: On/Off Select "ON" to print the date, time, temperature and moon phase on each photo or video. Otherwise select "Off".
- Beep Sound: On/Off
- Camera name: Trail Camera (can only be used for photos not for videos) You can use a combination of 10 digits and 26 letters to document the location on the photos and videos. When using several cameras this makes it easier to identify the location when viewing photos and videos.
- Password Setting: Off/OnAfter selecting "On" enter a four digit password to protect your camera against unauthorised access. This password must be entered each time the camera is switched on in the SETUP mode before the camera can be used.
Note: If you forgot your password, please unlock the camera with password "OPEN".
- WIFI SSID: Toguard -H85-****
You can use a combination of 10 digits and 26 letters to document the location on the photos and videos. When using several cameras this makes it easier to identify the location when viewing photos and videos.
- WIFI Password: Default 12345678
- Auto WIFI Off: 1 Minute, 2Minutes, 3MinutesIf there is no operation more than the selected time, then the WIFI will disconnect automatically.
- Auto power off: 3 min/5 min/10 min/Offlf there is no operation more than the selected time, then the camera will turn off automatically in SETUP mode.
- Backlight timer: 1 Minute, 3Minutes, 5Minutes, OffThe LCD monitor would automatically turn off after the setting time.
- Version: MCUVER:xxxxx, DSPVER:xxxxx
Mcu FW Updateln replay mode the option Delete is available in the menu.
- Delete: Select the "Delete" option to remove individual or all photos and videos from the memory card thus making storage room for new photos and videos.
- Single: Using this option you can delete individual photos and videos. After selection the option by pressing the OK button, the photo and video to be deleted is shown. Confirm deletion by selecting "Yes" and confirming the selection by pressing the OK button. To end the deletion process, select "No" and confirm by pressing OK.
- All: Select option "All" to delete all photos and videos on your memory card. To confirm deletion of all your photos and videos, select "Yes" and press the OK button. Select "No" to interrupt the deletion operation.
Connect the Bluetooth
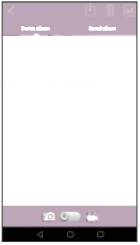
Slide the mode switch of the camera to the TEST or ON position, and then turn on the mobile phone dick the app and enter STEP1 as show in the following figure.
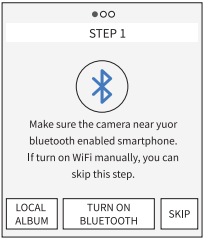
1. Click to enter "LOCAL ALBUM", users can view the picture or video which they download before.
2. When the user doesn't want to use the Bluetooth function, just press the button on the camera to open the WiFi directly. And press "Skip" in the APP to enter Wifi interface.
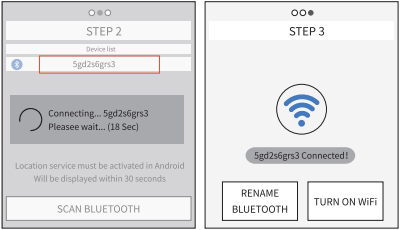
3. Click "TURN ON BLUETOOTH", and turn on the Bluetooth accordingly to the prompt oftheAPP. TheAPP will enter "STEP2" and automatically search Bluetooth device by itself, as shown the figure below:

3. The searched Bluetooth devices will permutation displayed under the "device list"as shown below:
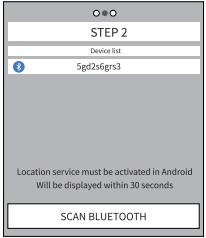
4.Click the appropriate Bluetooth device, APP would connect with the camera Bluetooth. The mobile phone will pop up the window" Connecting,,, please wait.."After successful connection, the APP would enter into the "STEP 3", and then the camera Bluetooth match successfully with the mobile phone Bluetooth.
WiFi connection
When the Bluetooth connection success, the APP would enter STEP3 as shown below diagram.
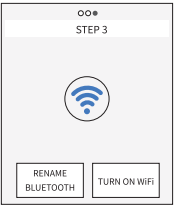
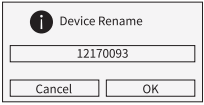
1. Click "RENAME BLUETOOTH",user could modify the Bluetooth device name accordingly to their own needs, after the modification, click "OK" button and save it. Details as below shown diagram
2. Click "TURN ON WiFi", after 5s countdown, it would jump to the interface of "WiFi SETTING" Details as below shown diagram:

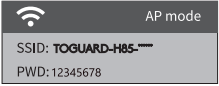
When the camera receives the command to turn on WiFi, the hotspot would be turn on as below shown:
Operate the steps 1-4 following the"WiFi SETTING" intherface.
a. Click the "WiFi SETTING" button as below shown.
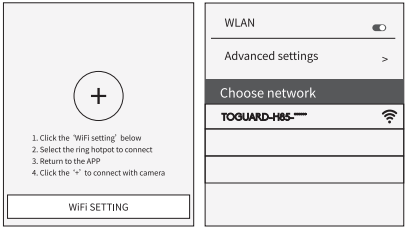
b.Connect with the correct WiFi hotpot, the initial password is 12345678
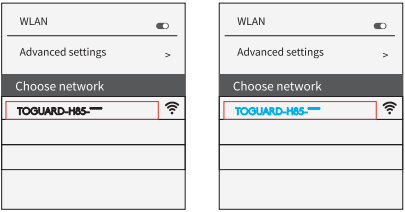
After successful connection, the interface display in the camera as below shown

C. Return back to APP after the WiFi successful connection. And then theAPP would automatically connect with camera, or click "+" to manually connect.
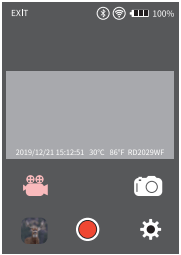
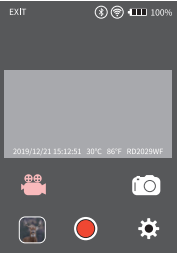
1. When the App and camera connect successfully,the interface as below:
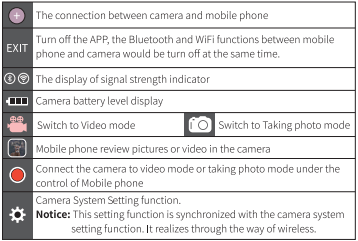
2. Click the icon  to enter the pictures review as shown below diagram.
 Select the picture or video to download, and press the button to save files to mobile phone.
 Press this icon to delete the selected the picture or video. After the picture or video is deleted, the file could not be recovered, please use caution.
 Select all the files.
 Toggle Switch, the switch between picture review and video
3.Click the icor  to enter the menu setting, as shown below diagram.
Aligning the camera
The Test mode is advantageous for determining the best possible detection angle and range of the movement sensor. For this purpose attach the camera at approx. 1-2 m height to a tree and align the camera with a desired direction. Move slowly from one side of the observed area to the other. Move parallel to the camera. Try out different angles and distances.
- The blue LED on the front of the camera indicates that you were detected by a side sensor zone.
- The red LED on the front of the camera indicates that you were detected by a central sensor zone.
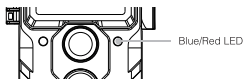
In this way you can determine the best position for aligning the camera. The LED only lights up in the SETUP mode as soon as one of the sensors has detected movement. The LEDs do not light up when in Live mode.
In order to prevent incorrect signals and unnecessary photos, we recommend not using the camera at sunny points and check that no branches are in the active area of the sensor. Optimum alignment is in North or South direction. The detection range of the sensors is approx 120°. Also check that the camera is set to the correct height in line with the point to be observed. Where necessary, point the camera down for optimum alignment.
Note: Wildlife Camera corresponds to protection class IP 66. The camera is protected against dust and spray water and can thus be used in any weather condition.
Setting up the Live mode
The standard application of the Wildlife Camera is the Live mode. When in this mode, photos are either triggered by movement sensors or at intervals according to the respective setting.
To set up the Live mode, switch mode switch to ON position.
The red status LED flashes for approx. 5 seconds after which the camera operates automatically and enters the Standby mode.
As soon as wild animals or other objects directly enter the detection area of the central sensor zone, the camera starts to record photos and videos. Where wild animals enter the detection range of the side sensors, the sensors detect the movement and activate the camera. As soon as the wild animals move further into the detection range of the central sensor zone, the camera starts to take photos/videos.
Where after movement has been detected by the side sensors no further movement is detected for five minutes, the camera returns to its Standby mode.

Advantages of PIR sensors (Passive Infrared Sensors)
In order to save on battery power, an infrared camera is normally in Standby mode in which only the main sensor is active. As soon as the central sensor zone detects wild animals, the camera is switched on and starts taking photos. The time between the activation and the start of shooting is referred to as triggering time.
Where wild animals do, however, move past the camera swiftly, it is possible that the photo only shows the rear part of the body or possibly nothing at all. The Wildlife Camera solves this problem due to the unique design of the lateral PIR sensor zone. The combination of the two lateral sensor zones and central sensor zone produces a 100°-120° induction angle, by far exceeding the angle of an individual sensor.
Where wild animals first pass through the detection range of the side PIR sensor zone, the camera is activated and is ready to start shooting after 0.4 seconds.
Where the wild animal then slowly enters the detection range of the central sensor, the camera starts shooting and thus records the entire body of the animal. This process takes approx. 0.2 seconds. Where the wild animal remains only within the detection range of the side sensor zones, the system is designed as follows to prevent the permanent supply of power to the camera: Where the wild animal does not enter the detection range of the central sensor zone and thus does not trigger the sensor, the camera returns to the Standby mode after 5 minutes.
Where triggering incidents occur twice in succession only within the detection range of the side sensor zone, the camera is not activated by the side sensor zone but only by the central sensor zone. At a later stage when the wild animal finally enters the detection range of the central sensor zone and des not move rapidly, the photo (based on the standard reaction time of one second) will probably capture the entire body of the animal.
Night recording
During night recording the infrared LEDs (IR LEDs) at the front of the Wildlife Camera provide the light required for taking photos. Wildlife Camera uses IR LEDs with a long wavelength, to keep red light to a minimum. The provided number of IR LEDs generates a high deflection anglethus allowing night recording at a distance of 3 m to 20 m, without overexposing the object. Reflecting objects can, however, also cause overexposure within this range (e.g. road signs).
Please note that night recording using IR LEDs produces black and white images.
File format
The Wildlife Camera stores photos and videos on the memory card in the folder "DCIM 100MEDIA". Photos are given a file name with extension "JPG" (Example: "SUNP001.JPG"), videos, are given the extension ".AVI' (Example: 'SUNP0002.AVI").
When in SETUP and OFF mode use the enclosed USB cable to transfer files onto the computer. Alternatively you can insert the memory card in a card reader on the computer.
The video file can be played with most standard programs, such as Windows Media Player, QuickTime etc.
Connecting to computer
The H85 Camera can be connected to a computer using the supplied USB cables to view existing photos/videos.
System requirements
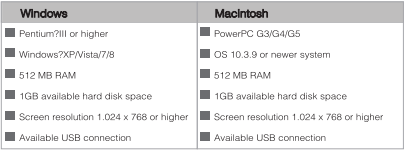
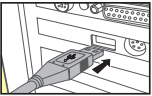
- Connect the camera to your computer using the USB cable.
- The camera switches on automatically in the USB mode, irrespective of the selection on the mode switch.
- The camera installs itself on the computer as an additional drive under the name "Removable storage device".
- Double click on the device to detect the folder "DCIM".
- The photos and videos are located in the sub folders of the "DCIM" folder.
- You can copy or move photo and video files on the computer. Alternatively you can insert the memory card in a card reader on the computer.
Note: Mac computers show an "Unknown" drive on the desktop. When clicking on this drive, the program "iPhoto" is automatically started.
Simple Trouble Shooting
The camera will not turn on
- Please check the batteries if they are installed in proper way.
- Check if the battery capacity is low or exhausted. If so, please replace them with new batteries.
The camera turns o ff automatically
- Please check whether the battery capacity is low or exhausted. If so, try to change new batteries for outdoor using or connectAC adaptor for indoor using.
- Please check if SD card is full. If so, transfer images and videos to your computer or delete some files in the Replay Mode.
It shows "SD card Error"
- Please ensure that SD card is with class 10 standard or higher level.
- Please use the camera to format SD card at the first time.
Videos are choppy or jumpy when played on a computer
- Ensure that the computer system requirements are met.
- Ensure AVI format Video clip can be played on your computer.
The image is not clear
- Please ensure that you removed the protective films on IR LEDs and lens before using.
- Please ensure that the lens is not dirty.
The camera does not take images of record videos
- If the memory of SD card is full, transfer images or videos to your computer or delete some files in the Replay Mode.
- The memory card is not formatted properly. Format the SD card again or use a new card.
Camera can not turn off
- Once such malfunction occurs, remove all the batteries to reset the camera.
Forget the password
- Please enter the words "OPEN", in case that you forget the password to start the machine.