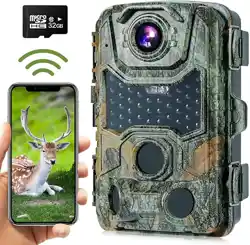
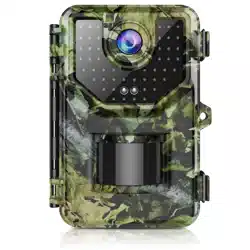
Vikeri E2 1080P 16MP Trail Camera
Product's Documents
Below are documents related to this product, you can read online or download:
- Owner's manual - (English) Read Online | Download pdf
User manual Camera
E2 Trail Camera is an advanced model for daily use. If you are interested in wildlife monitoring or you would like to see who are the secret visitors in your garden, E2 Trail Camera is the perfect choice for you.
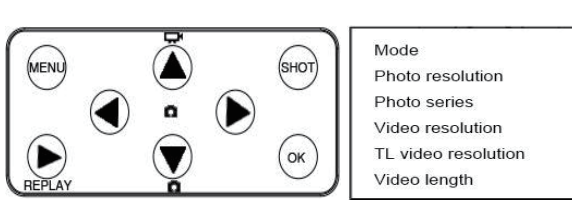
1. Structure
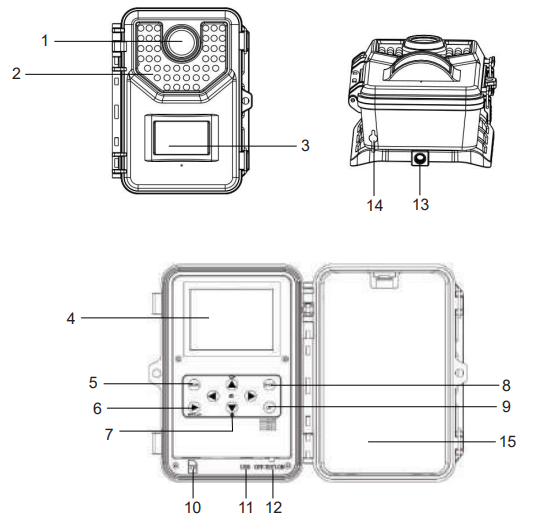
1.Lens
2.Infrared LEDs
3.PIR motion sensor
4.LCD screen
5.Menu button
6.Replay button
7.Navigation buttons
8.Shot button
9.OK button
10.TF card slot
11.USB slot
12.Operating mode switch
13.Fixation port
14.6V 1.5A Power supply port
15.Baterry slots
Key | Function |
MENU | Press to open or close the menu |
REPLAY | Press to preview photos and videos on LCD screen |
Up | Navigation Up (in Menu mode); View previous photo/video (in Playback mode); Switch to Video (in Setup mode) |
Down | Navigation Down (in Menu mode); View next photo/video (in Playback mode); Switch to Photo (in Setup mode) |
Left | Navigation Left (in Menu mode) |
Right | Navigation Right (in Menu mode) |
SHOT | Press to take picture/record video (in Setup mode) |
OK | Start/Stop playing video file (Playback mode); Confirm/Enter (in Menu mode) |
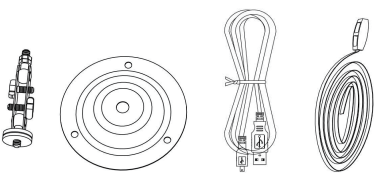
2. Components
Micro USB Cable
Fixation Kit
Installation Belt
3. Parameter
Photo Resolution |
16MP/12MP/8MP/5MP |
Video Resolution |
1080P/720P/D1/VGA |
Detection Angle |
Up to 120 ° |
Detection Distance |
80ft (day), 65ft (night) |
Fill Light LED Wavelength | 940nm (No Glow) |
Fill Light LED Quantity | 48 pcs |
Trigger Time |
0.2s - 0.5s |
Waterproof Level | IP66 |
Working Temperature |
- 4°F - 160°F |
Memory Card Type | Up to 32G TF Card (Class 10) |
Power Supply Type | Battery/External |
Battery Type | AA Battery |
Working Voltage |
6V |
External Power Supply |
DC 6V |
Standby Time | Up to 6 Months |
Photo Format | JPEG |
4. Function
Mode |
You could choose the working mode of E2 | Photos (default) Videos Photos & Videos |
Photo Resolution | You can choose different photo resolution | 16MP |
12MP | ||
8MP | ||
5MP (default) |
Photo Series |
You can set the photo quantity when the camera is activated | 1 photo (default) 2 photos in
series 3 photos in series |
Video Resolution |
You can choose different video resolution | 1920*1080P
1280*720P (default) 720*480P
640*480P |
TL Video(1) Resolution | You can choose the resolution of time lapse video | 2592*1944P
2048*1536P
(default) |
Video Length |
You can adjust the video length | 10 seconds
(default)
3 seconds min. 10 minutes max. |
Audio Recording | You can decide if you want the camera to record sounds | On (default)
Off |
Shot Lag |
The time interval between each trigger (2) | 30 seconds (default) 2 seconds min. 60 minutes max. |
IR Distance | You can choose the IR distance. Further you choose, further the camera could detect, but the battery runs faster | Near Middle (default) Far |
Sensitivity Motion Sensors |
You can adjust the sensitivity of the motion detection sensor. | Low Middle (default) High |
Target Recording Time(3) | You can set the camera to record between a certain period | On (to set the period) Off (default) |
Time Lapse(4) | Set up time lapse mode and the length of the lapse. | Normal TL video Off (default) |
Language |
To set different language | English (defalut), Deutsch, Dansk, Suomi, Svenska, Español, Français, Italiano, Nederlands, Portugués, 简体中文, 繁體中文, 日本語 |
Endless Capture | If Endless Capture mode is on, the camera won’t stop recording when the memory card is full but will delete the oldest videos or photos to keep recording continuously | On
Off (default)
|
Time & Date | To set time and date. You can also choose the time format (24h or 12h) and choose the date format (dd/mm/yyyy, yyyy/mm/dd or mm/dd/yyyy) | Set Time & Date Time Format Date Format |
Photo Stamp |
To choose if there will be time and date on the photo. | Time & Date (default) Date Off |
Password Protection | Set up password to secure your camera | On
Off (default) |
Beep Sound | Turn on or turn off the operation sound | On (default)
Off |
Format Memory Card | Decision with caution! You will lose all of the data in the memory card if you decide to format it |
Yes
No (default) |
Serial NO | To set up the serial number of the camera(5) | On
Off (default) |
Reset Settings | Reset all the settings to the original settings | Yes
No (default) |
| Version | Version of the system | 30350.86 (default) |
(1) TL Video: Time lapse video. Camera will first of all, take photos between certain period (set up in “Target Recording Time” and “Time Lapse”), then the camera will generate a video with these photos. This function usually used to record flower bloom.
(2) For example, we set the 1 minute video length and 30 seconds shot lag. When the camera detect an animal, it will start to record a 1-minute video. However, the camera will not detect continuously. When the video is done, the camera will not detect immediately. It will detect again 30 seconds after the video in order to save the battery.
(3) In order to use the “Target Recording Time” function, please make sure that you have already turn off ht e “Time Lapse” function and set up the length of the lapse between each photo.
(4) If you turn on the “Time Lapse” and turn off the “Target Recording Time”, the camera will take photos until the memory card is full.
(5) If you use several cameras at the same time and you want to recognize which camera took which photos and videos, set up a serial number could help you. The serial number will show on the bottom right of the photos or videos.
As the Trail Camera doesn't have built-in memory,a Micro SD memory card must be inserted into the camera before using.
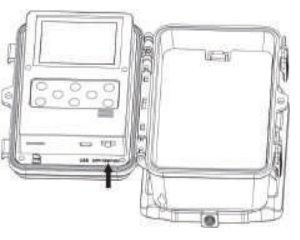
1.1.Open the camera by unlocking two side locks.
1.2.Open the battery compartment.
1.3.Place 4 or 8 AA 1.5V type alkaline batteries into slots.NOTE:Must be alkaline.If you have only 4 AA alkaline batteries,and make sure to place them all in the upper or lower half of the battery compartment.
1.4.Insert Micro SD memory card.

Please note:
Ÿ TF high-speed card (Micro SD memory card) of Class 10 is required for this camera.
Ÿ This camera is compatible for using Micro SD (TF) cards with a capacity up to 32GB.
Ÿ Please format your Micro SD (TF) card before the first use.
Ÿ Camera must be turned off before inserting or taking out the memory card.
Ÿ Do not take out Micro SD (TF) card or disconnect the camera from USB port while formatting the card or transferring data to your computer,otherwise recorded data and memory card may become damaged.
As soon as you have inserted the batteries and a Micro SD card,the camera is ready for work! All you need to do is to choose a position for it and turn it on by setting the operating mode switch to ON.
The camera has the following default settings:
Ÿ Mode:Photo
Ÿ Photo resolution:5MP
Ÿ Photo series:1 photo
Ÿ Video resolution:1280x720P
Ÿ Video length:10 seconds
Ÿ Audio recording:On
Ÿ Shot lag:30 seconds
Ÿ Motion sensor sensitivity:Middle
Ÿ Target recording time:Off
Ÿ Time lapse:Off
With the default settings,the camera will first take 1 photos when its motion sensor detects a moving object.Please note that If you want sharper image quality,you can turn up the resolution,however photo and video files created with these settings will take more space on memory card.
For instance,4GB Micro SD (TF) card can store about 140 photos plus 70 videos (10 sec each) with the default settings.Therefore if you are using a small capacity Micro SD (TF) card,or considering to set your camera for a longer period of time,you might want to reduce photo and/or video resolution in the Settings.
2.1.Positioning the Camera
In TEST mode you can work out the best exposure angle and range of the motion sensor. First put the operating mode switch to TEST, then align the camera as follows:
Fasten the camera to a tree or any other suitable object using the included strap and align the camera in the desired direction. Then move slowly from one side of the target area to another. While doing this, watch the indicator located between IR LEDs.
If the red indicator lights up,you have been detected by the motion sensor. This way you can find the best position for the camera.The detecting range of the sensor is 120°.
NOTE:Setting the camera too close to tree branches can result in many “empty” photos as the motion sensor will detect movements of tree branches and leaves.You can also adjust the sensor sensitivity to the lower level to avoid irrelevant triggering.
2.2.Turning on the Camera
To turn on the camera, set the operating mode switch to ON. You will see a blinking blue indicator on the front panel. After 15 seconds the camera will start to operate independently and will go into standby mode. As soon as any object enters the detecting range of the motion sensor, the camera will be activated and will start capturing photos and/or videos (depending on the selected setup).
When the object moves out of the detecting range of the motion sensor, the camera will go back into standby mode.
In the nighttime, infrared LEDs will provide the required light for capturing photos/videos.The effective range of the IR LEDs is 10- 65ft. Pictures and videos taken at night are black and white.
NOTE:During the night,camera will use more energy for IR LEDs.Therefore,if the battery is low (Less than 1/2),the camera will not take photos or shoot videos at night,while in the daytime,the camera will work normally even with a low battery.
You can quickly preview recorded photos and videos on LCD screen.Open the camera by unlocking two side locks and set the operating mode switch to the TEST position.Press REPLAY key and Up/Down navigation keys to review the photos/videos.To play videos,press OK key to start playing and press OK again to stop.Press REPLAY key to return back to standby
3.1.Delete Selected Files
You can use this function to delete photos/video recordings from the memory card.Find the file you want to delete in REPLAY mode,then press MENU key,select “Delete current file” and press OK to delete the selected recording
3.2.Delete All Files
You can delete all recordings from the memory card by pressing MENU key when in REPLAY mode,then select “Delete all files” and press OK.
3.3.Activate Slide Show
For an automatic review of the photos and videos stored on the memory card,press MENU in REPLAY mode,and select “Activate Slide Show”.Each photo/video will be displayed for about 2 seconds.To stop the slide show and keep the current image on the screen,press the OK button.
3.4.Write Protection
This function can be used to protect individual files from accidental deletion.When in REPLAY mode,press MENU and select “Write protect,” then choose “Write-protect current file” to protect the selected photo/video.Select “Write-protect all files” to protect all recordings from accidental deletion.Select “Unlock current file” to remove write protection for the selected recording.
Select “Unlock all files” to remove write protection for all saved recordings.
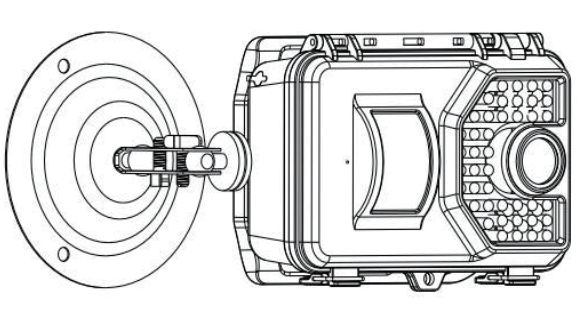
If you want to put the camera on the wall, the Fixation Kit is ready for you:
1. Mark the installation position with the help of the metal plate and make holes in the wall;
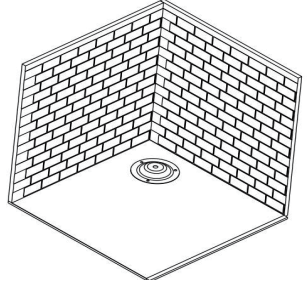
2. Put the green components in the holes;
3. Fix the Fixation Kit by following the picture;
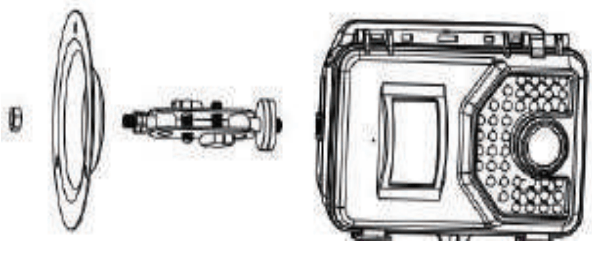
4. Put the camera at the position you have chosen and fix the camera with screws;
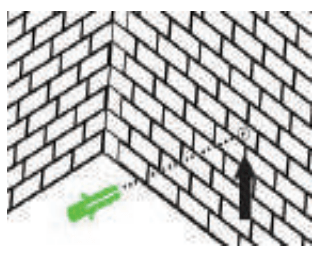
If you want to Install the camera on a tree, you could simply use the Installation Belt:
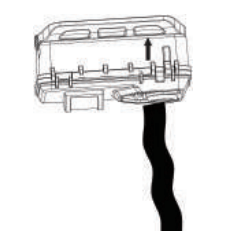
1. Pass the Installation Belt through the support on the back of the camera. If the Belt is too long for the tree which you choose, there are 3 holes on each side the support, you could pass the Installation Belt through several holes to shorten the belt;
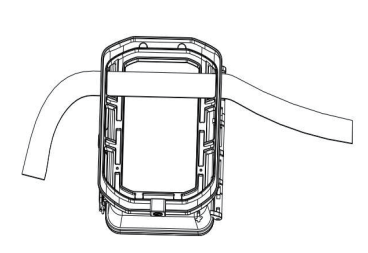
2. Put the camera on the bottom of the tree;
3. Go to the other side of the tree, pass the belt through the buckles by following the picture;
4. Adjust the position of the camera then tighten the belt;
5. If you afraid that the camera would fall, you could also use the Fixation Kit and the Installation Belt together to make sure that the camera is sturdily fixed on the right position.
I can’t turn on my camera!
My camera is not taking photos or recording videos!
The camera doesn’t detect anything!
Why the camera doesn’t record during the night but it works well during day time!
My “Target Recording Time” function doesn’t work!