User Manual Apeman H70 Wildlife Camera

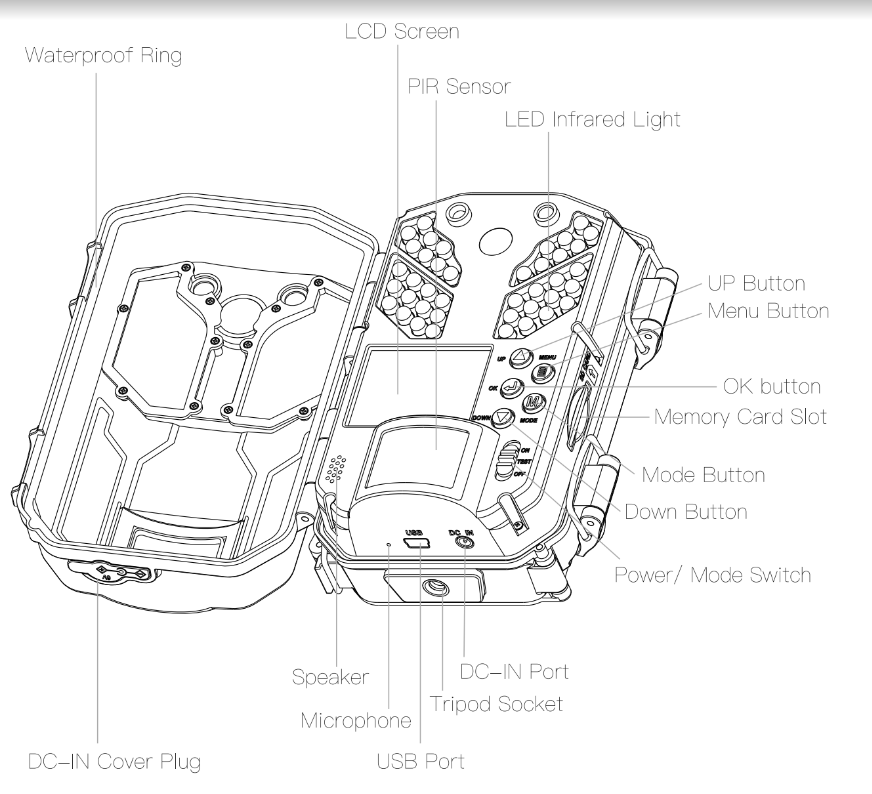
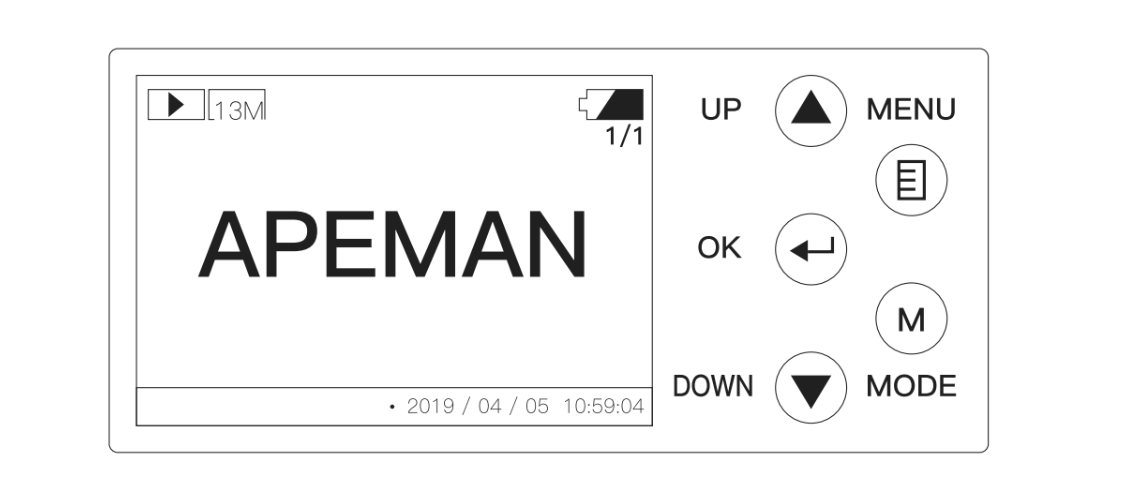
CAMERA OVERVIEW
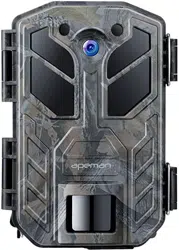
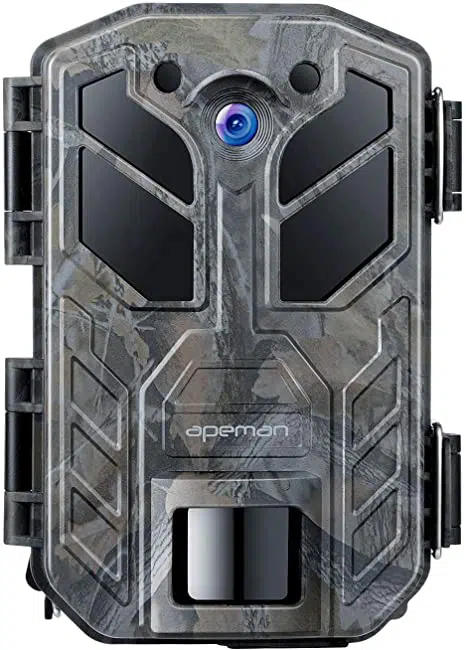
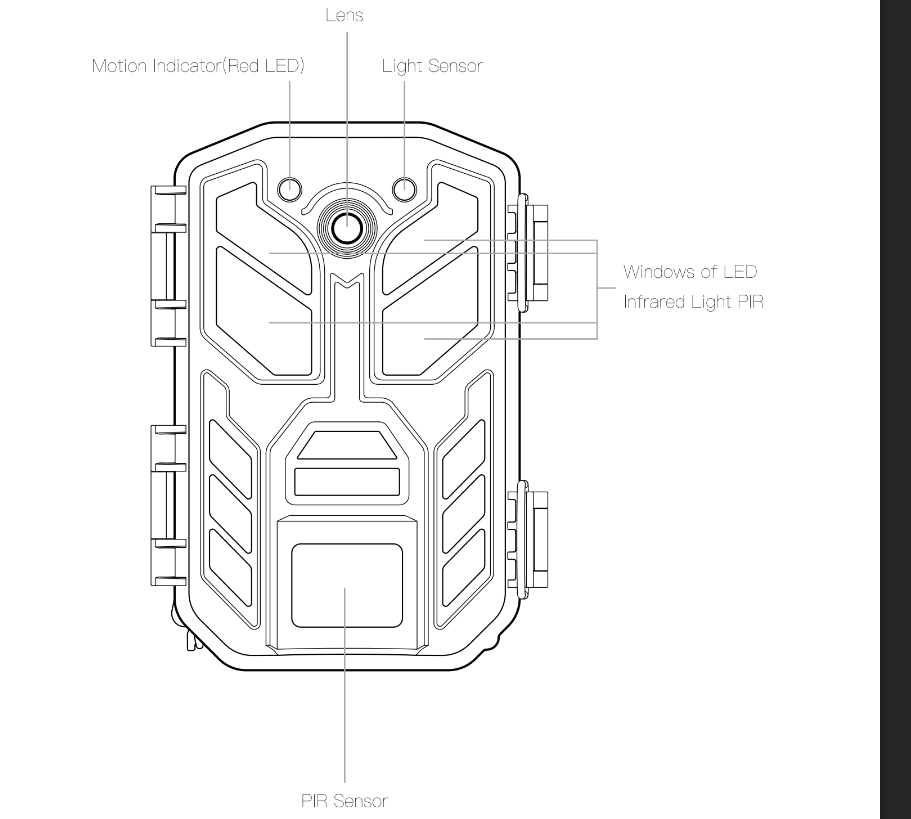
Front View
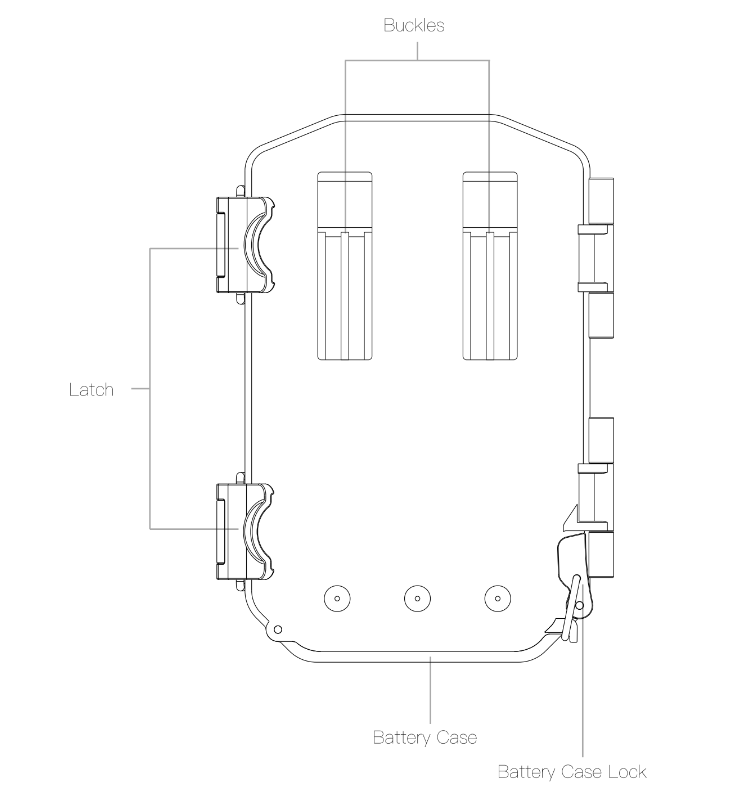
Back View
Inside view
QUICK START INSTRUCTION
Loading The Batteries
Normal AA batteries
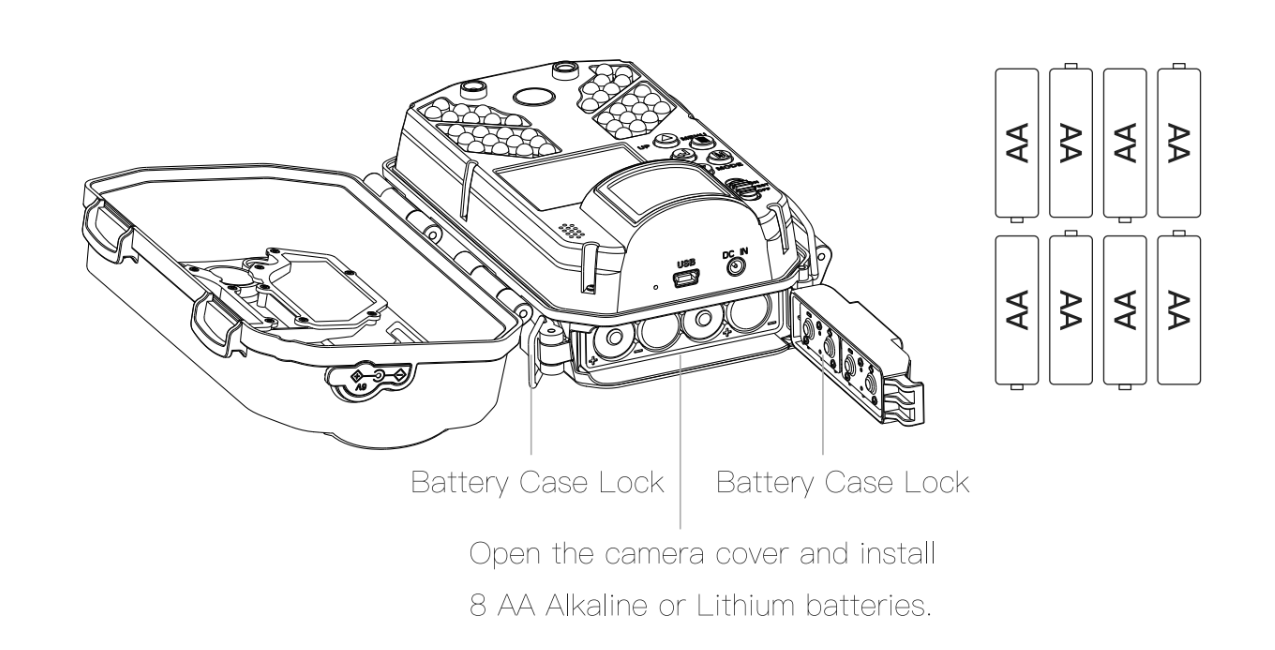
Note : Anytime you load or unload batteries, make sure that the camera is OFF
Important Battery Information
- Only use Alkaline or Lithium batteries. We recommend the use of Energizer batteries.
- Do not mix old and new batteries. Always replace ALL the batteries at the same time.
- When the camera is not in use, please remove the batteries.
External Power Supply
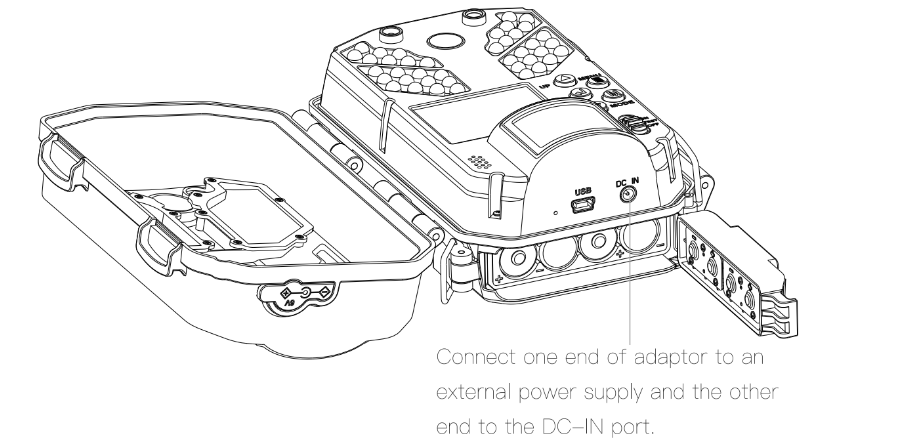
- The camera also can be operated by using power from an external power supply, conncect the external power supply to the "DC-IN" jack at the bottom of the Apeman trail camera.
- External power supply output: 6V / 2A
- DC-IN plug size: 3.5mm*1.35mm
Inserting the SD Card
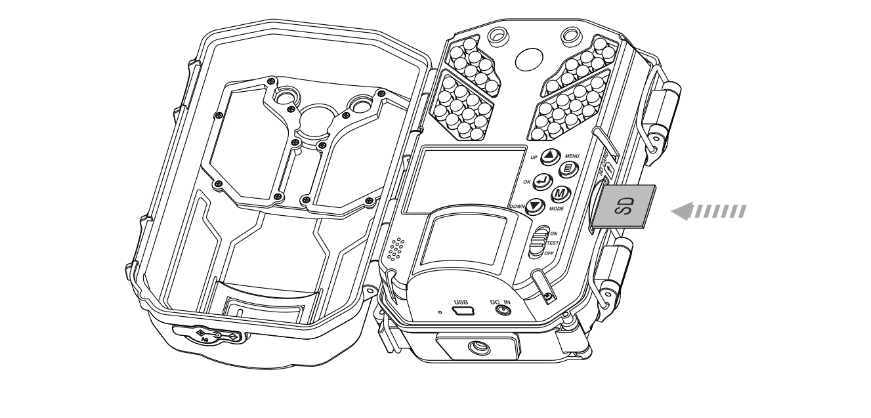
Still under OFF mode, insert the SD card (using class 6 or faster SD Cards, up to 32 GB) in the direction indicated on the card, until you hear an audible click.
Note : Camera will not operate without a SD card installed.
Light Up the LCD Display
Slide the Mode Switch to the TEST position, LCD screen light.
Note: The LCD screen only can be used under TEST mode.

Select Language and Set Clock
- The language selection menu will jump out directly when you first time use the camera.
- Select the language you need, press OK button to lock-in your selection.
- Then set local time and date, use UP/DOWN to navigate between options and OK to lock-in your selection.
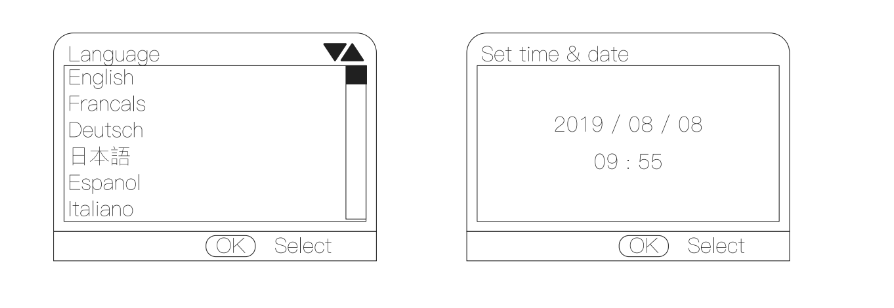
Format the SD Card
Caution: Formatting the SD card by using the "Format" parameter before using it for the first time is recommended, especially when a card has been used in other devices.
Run Quick Start
- Slide the Mode Switch to the On position, close cover, motion indicator flashes for 10 seconds, the camera will operate using Default Settings.
- You may also customize the settings in Setting Menu to meet your using requirements.
- Option: Default Setting
- Mode: Motion Detect
- Interval: 30 seconds
- Photo or Video: Photo
- Photo Size: 13MP
- Multi-Shot: 1-Triggered
Viewing Files
View on the LCD screen
Open cover, slide the Mode Switch to the TEST position and press MODE button twice to check your images and videos.
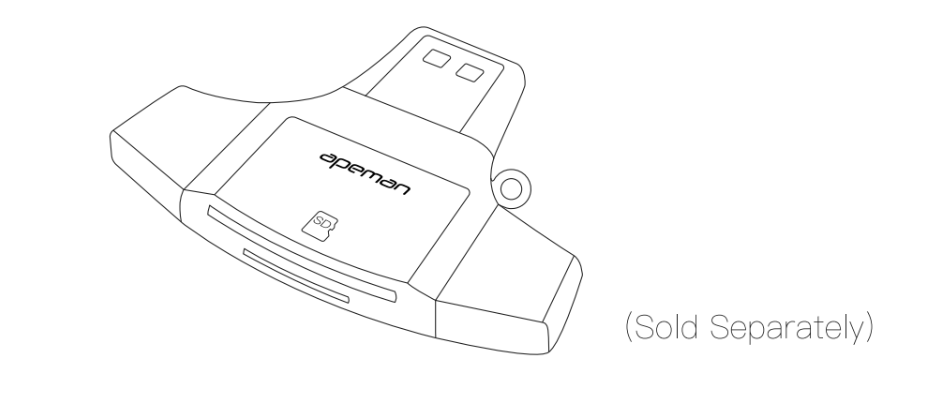
Removing the SD Card
Remove the SD Card, and load the SD card into the 4 in 1 card reader (Sold Separately) to view or move stored images to another location.
Important: Make sure that the camera is in the OFF position before removing SD card.
This section explains how to set up and use the advanced fuctionality of Apemaan trail camera.
Changing Parameter Settings Must be Completed in TEST Mode!
Key Description to Change Settings
- Once in TEST mode, pressing the [MENU] button to enter the settings list, the name of the parameter will be shown on the bulit-in LCD.
- Pressing the [UP] or [DOWN] key scrolls to the next or previous parameter, then press [OK] button to choose the parameter you want and pressing the [UP] or [DOWN] key lets you select a fifferent setting for currently displayed parameter, pree the [OK] button to save the new setting (actually change it). When the operation is done, it will return to main Settings menu automatically. [MENU] can also be pressed anytime you want to cancel changing a parameter's setting after a new setting has been selected (but OK has not been pressed yet).
- After setting the parameters to your preferences, be sure to move the switch to ON to begin actually taking photos or videos. No images will be captured if the switch is left in the TEST position (unless you press the [OK] key after exiting the menu).
The Settings Menu - Parameters and Setting List (Bold=Default)/Descriptions
- Mode: Photo, Video, Photo+Video
- Selects whether still photos or video clips are captured when the camera is triggered. Photo+Video mode combines both Photo and Video, so a still photo and a video clip are both captured for each trigger.
- Photo Size: 3MP; 5MP; 8MP; 13MP; 16MP; 20MP; 30MP (only affects video clips in Photo or Photo+Video modes)
- Selects resolution for still photos.
- Capture Series: 1 photo; 2 photo; 3 photo
- Selects how many photos are taken in sequence per trigger in Photo mode.
- Video Size: 4K; 2.7K; 1080P; 720P; VGA
- Selects video resolution.
- Video Length: 3 seconds~59 seconds; 1 minute~10 minute (default 10 seconds) (only affects video clip in Video or Photo+Video modes)
- Specify the duration of a video recording when the camera is triggered automatically.
- Interval: 5 seconds~59 seconds, 1 minute~60 minute (default 30 seconds)
- Select the length of time that the camera will "wait" until ut responds to any additional triggers from the PIR after an animal is first detected and remains within the sensor's range. During this user set "ignore triggers" interval, the camera will not capture photos/videos. This prevents the card from filling up with too many redundant images.
Caution:
PIR Interval has great influence on battery working time. The shorter the interval, the high frequency to capture target, but more power consumption. The longer the interval, the lower frequency to capture the target and less power consumption.
- PIR Sensitivity: Low; Middle; High
- PIR Sensitivity allows you to control as to how much movement and at what distance the camera will trigger. High sensitivity will allow for more distance, but will make the camera slightly more susceptible to false triggers and is ideal for open areas such as fiels and food plots. Low sensitivity will shorten the distance but lower the chance of false triggers and is ideal for close range traps and deeply wooeded areas.
- IR Brightness: Economics; Normal; Highlight
- Set the infrarwd LEDs brightness during Night Vision operation.
- Economics will decress the IR brightness and save battery life, but photos may be darker. A Highlight IR brightness setting will produce brighter photos, but the electric consumption is accelerated. Normal is a good compromise.
- Time Switch: Off/On
- Set Time Switch to "On", if camera should only be active within a certain time. Once "On" has been confirmed with the OK key, the start and end time can be set.
- If the start time is, for instance set to 18:35 and the end time is 8:25, the camera will be operation from 6:35 pm of the current day until 8:25 am of the following day. The camera will not be triggered and will not take any photos when the time is not included in this period.
- Time Lapse: Off/On
- Turn Time Lapse recording mode on/off. When activated, this function forces the camera to take pictures even when it is not triggered by a nearby live target, useful for constant monitoring of an area that might be far away from the camera. This is also useful for observing cold blooded animals (e.g snakes) or outdoor plants etc. As soon as the "On" setting has been confirmed by pressing the OK key, you could enter the interval time ( 15 seconds~60 seconds) after which photos are to be taken.
- Note: The captured phtos are automaticaaly compressed into short time-lapse videos.
- Caution: In this mode, the PIR detection would stop working.
- TL Video Size: 13MP; 5 MP; 3MP
- Select video resolution of time-lapse video.
- Language: English; Francais; Deutsch; Espanol; Italiano; 日本语;简体中文
- Select the desired menu language.
- Set Clock
- IMPORTANT! Use to set date and time.
- Temperature Unit: ° F ; ° C
- Beep Sound: Off/On
- Select "On" to open beep sound, "Off" means close.
- Audio Recording: On/Off
- Select if record audio while recording a video.
- Time Stamp: On/Off
- Select "On", the date, time, the current temperature and moon phase will be imprinted on your captured files.
- Password Set: On/Off
- Select a 4 digit security code for your camera.
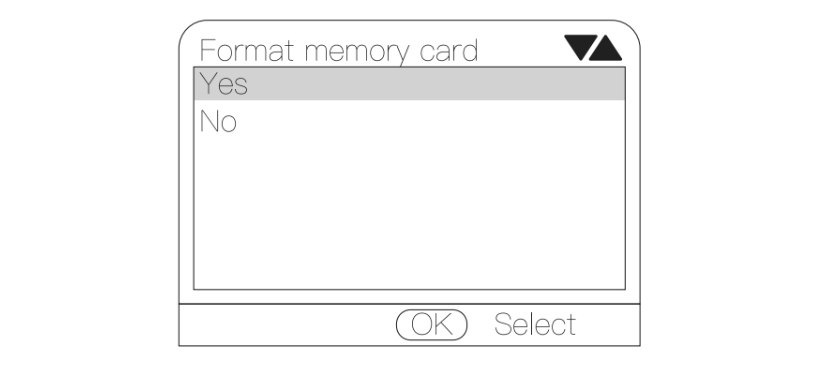
- Format: Yes/No
- Deletes (erases) all files stored on a card to prepare it for reuse. Always format a card that has been previosuly used in other devices or if it is a new card.
- Caution: Make sure you have downloaded and abaked up any files you want to preserve first!
- Default Set: Yes/No
- You can reset your camera to the factory default settings. Choose either YES - all setups restored to factory default or NO - keep custom settings.
- If the camera is bahaving oddly and you think you may have changed the setting for something accidentally ( but aren't sure which one), this will reset all parameters to default setting
- Version
- Display current firmware version for reference.
MOUNTING THE CAMERA
- Mounting with a Strap/Wall Mount
- Place camera on a tree or pole approximately 3-6 ft.high.
Hint:
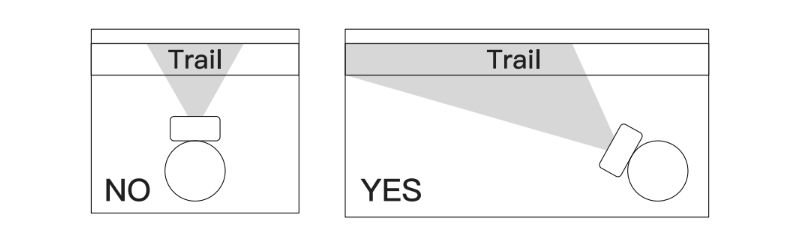
- If you are mounting camera to cover a trail, face the camera down the trail titled at a slight downward angle.
- Face the camera North or South to avoid over exposure from the sun.
- Clear brush away from camera front to avoid false triggers from the wind.
TECHNICAL SPECIFICATIONS
- Picture resolution: Default 13MP; Max.30MP
- Lens: F=2.5 f=8.7mm, 55°
- Storage: SD or SDHC Card, Maximum capacity 32 GB ( Class 6 or higher)
- Triggers time: 0.2s
- IR Leds/PCS: 850nm/40pcs, brightness adjustable
- PIR sensitivity: adjustable
- PIR distance: 0~20M
- PIR angle: 90°
- PIR delay: 3S~60 minute
- Screen: 2.0"TFT-LCD
- Working modes: Photo/Video/Photo+Video/Timelapse
- Photo: JPEG; 3M/5M/8M/13M/16M/20MP/30MP
- Video: AVI; 4K/2.7K/1080P/720P/VGA
- Video length: Optional, 10s~10min
- Language: English; Francais; Deutsch; Espanol; Italiano; 日本语;简体中文
- Mic: Built-in
- Speaker: Built-in
- Temperature monitor: Yes
- Working voltage: DC 6V
- Battery type: 4/8 AA battery
- External power supply: DC 6V/2.0A
- Standby time: Approx 6 month (8x AA batteries recommended)
- Waterproof level: IP66
- Dimension: 145(L)X105(W)X68(H)mm
- Weight: Approx 285+-5g (battery excluded)
TROUBLESHOOTING
- Camera takes continuous images of no subject/Trigger more often
- A camera has what is known as a “false trigger” if the PIR sensor thinks that there is motion and heat in front of the camera lens when there is no subject in the image. These “False Triggers” are the result of placing the camera in an environment where there is motion associated with tree branches creating motion in front of the camera or an area where there is high heat in the foreground and any motion from wind could set off the camera. Setting a camera up over water is also a potential cause for this issue. To remedy this situation:
- Try moving the camera to an area that does not have any of these issues or try changing the "PIR Sensitivity" on the menu settings.
- If the camera continues to take images when there is no subject in them try placing the camera in an inside environment and aiming at a location where there is no motion.
- If the camera continues to show issues then there is probably an electronic component issue. If this is the case please contact Apeman customer service.
- The interval of taken pictures is the same time period.
Please check and confirm if you turn on “Time-lapse”, turn it off.
- Battery life is shorter than expected
- Setting parameters like Camera Series, Video Length, PIR Interval, PIR Sensitivity. and IR brightness will affect battery work efficiency and lifespan. In short, high trigger frequency will decrease battery life.
- Check to make sure you have used new alkaline or lithium batteries. Apeman recommends using Energizer 1.5V AA batteries in your trail camera to obtain maximum battery life.
- Camera won't power up
- After inserting 8 AA batteries, put the power button on “TEST” position, but nothing appears on the LCD screen.
Make sure that you have installed 8 batteries in the battery compartment and the batteries are installed correctly, observing proper polarity.
- The camera could power on normally, but the LCD screen turn black after 10s.
Please confirm if the power button is at the “ON” position, turn it to “TEST” position.
- Camera stops taking images / Video length is shorter than expected.
- Please make sure that the SD card is not full. If the card is full, the camera will stop taking images.
- Camera works normally at the beginning, and stop working, even power off automatically. But when you check the camera, there still some battery power left. Video length is shorter than expected.
In most cases, it causes by battery quality. Please change high quality batteries. If this is the case, please contact Apeman customer service.
- Camera won't trigger or take pictures.
- Make sure that the camera power switch is in the “ON” position and not in the “OFF” or “TEST” modes.
- If you have used an SD card in another device before inserting it in your trail camera, you might want to try formatting the card using the “Format” parameter in
TEST mode (make sure you have backed up any important flles first, as formatting will erase all previous files). In some cases, other devices may change the format— ting of the SD card so that it will not work properly with the camera.
- If the problem still can’t be solved. Please follow the steps below to test the camera:
- Format the SD card and restore the camera to factory settings;
- Set the “PIR Interval” to “10s”;
- Place the power button at the "ON” position, close the camera case, and place it on the table;
- Do a parallel movement in front of the camera for about 3 minutes;
- Check if there is picture taken by the camera under Replay mode.
If this is the case. please contact Apeman customer service.