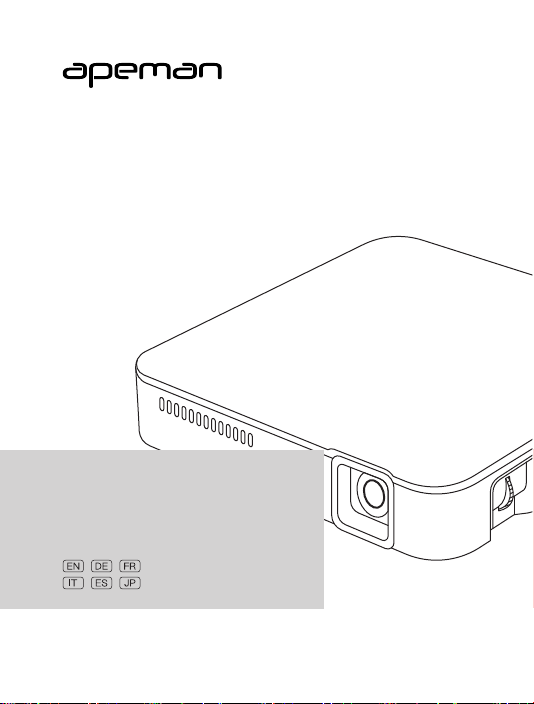
M4
Projector
User Manual

Menu
1English
15
Deutsch
29
Français
43Italiano
57Español
71
日本語


Contents
Warning
Introduction
Product Features
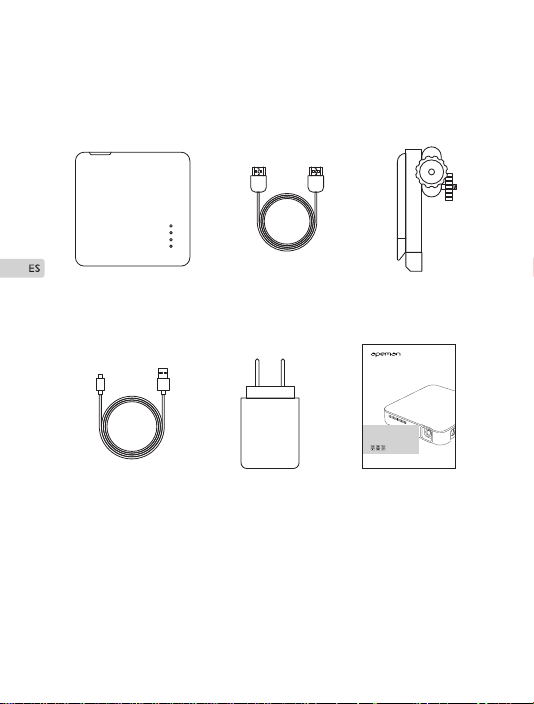
Package Contents
Projector Part Locations
Operation Guide
Power On/Off
Connections
Adjusting the Projection Image
Adjusting Focus
Adjusting Volume
Specifications
Q&A
Warranty
2
3
7
12
13
14
1

Warning
To avoid the risk of electric shock or damaging the internal
components, please do not disassemble M4 Projector by yourself.
Please use the equipped AC adapter and follow the instructions
mentioned in this manual to operate M4 Projector.
Please do not block the airflow outlet on the side of M4 Projector.
Never drop or insert an object into any opening.
Close supervision is necessary when M4 Projector is used by or
near children or the mentally disabled individuals.
Please do not place or use M4 Projector in direct sunlight, near
heaters or damp rooms. Charge M4 Projector periodically if not
use for a long time.
Please unplug M4 Projector during lightning storms or without
using it for long periods of time.
·
·
·
·
·
·
2

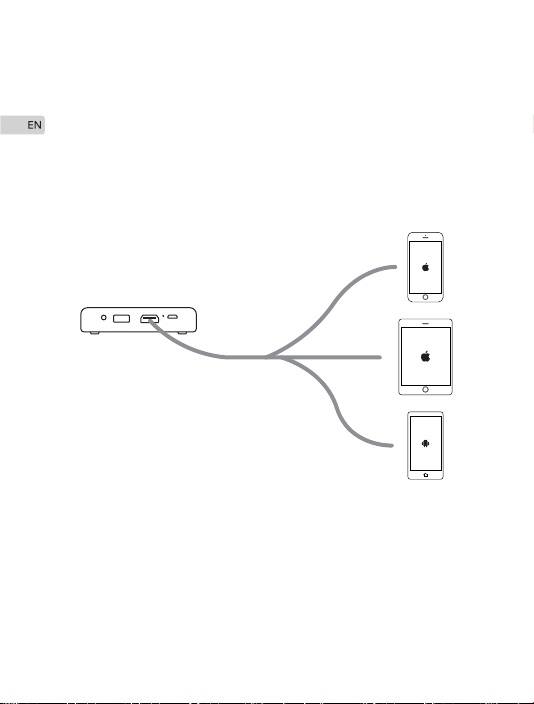
Introduction
Multi-Screen Function
M4 Projector supports multi-screen sharing display with many
devices including PC, laptop, iPad, iPhone and other
smartphones(support MHL), allowing you to enjoy videos, games
and images with your family.
Power Bank Function
M4 Projector is equipped with built-in 3400mAh rechargeable
lithium battery, which can be used as a power bank. Connect your
device to M4 Projector with a USB cable.
This section introduces your new M4 Projector and describes the
features and capabilities.
Product Features
3
⑤
②①
⑥
M4
Projector
User Manual
④
③
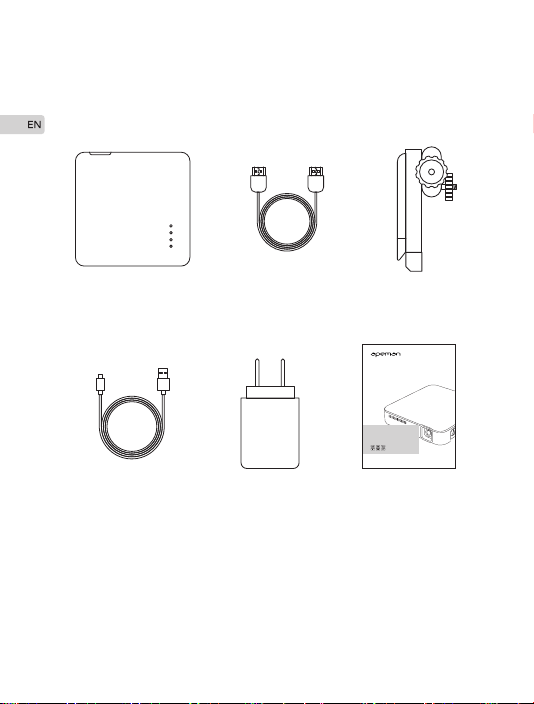
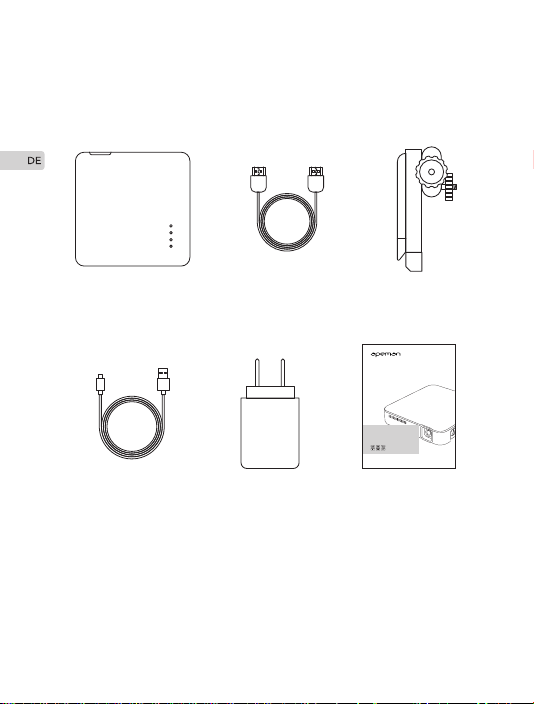
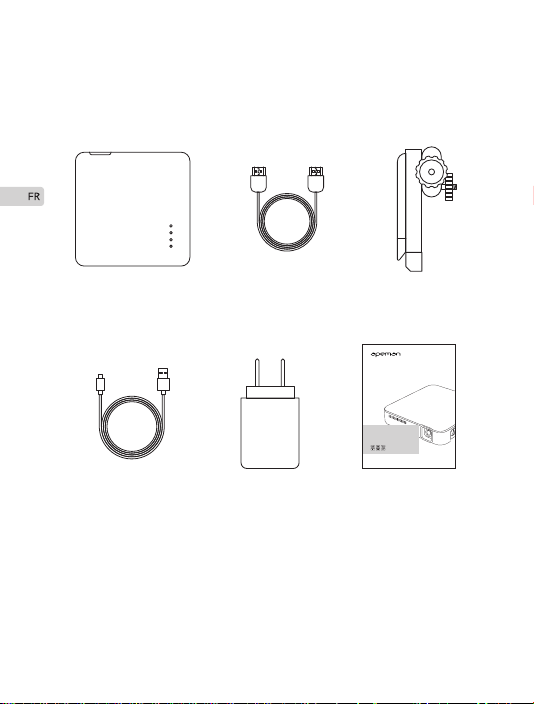
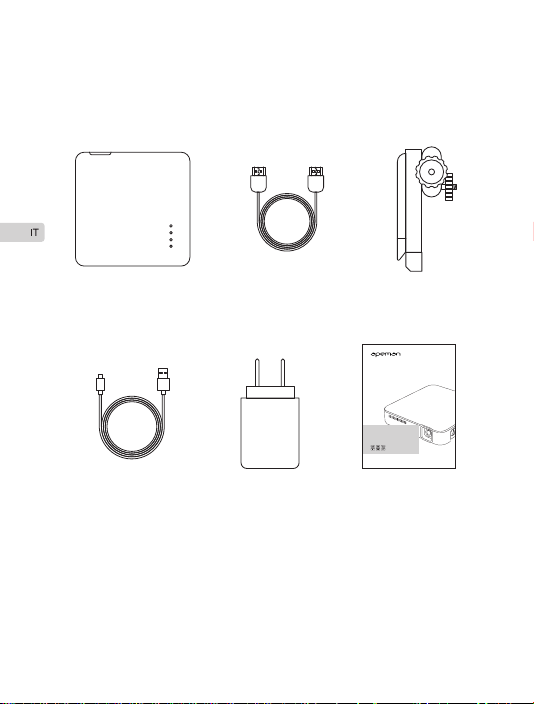
Package Contents
④ USB Charging Cable ⑤ AC Adapter ⑥ User Manual
③ Tripod② HDMI Cable① APEMAN M4 Projector
4
6
7
8
9
10
11
1
2 3 45
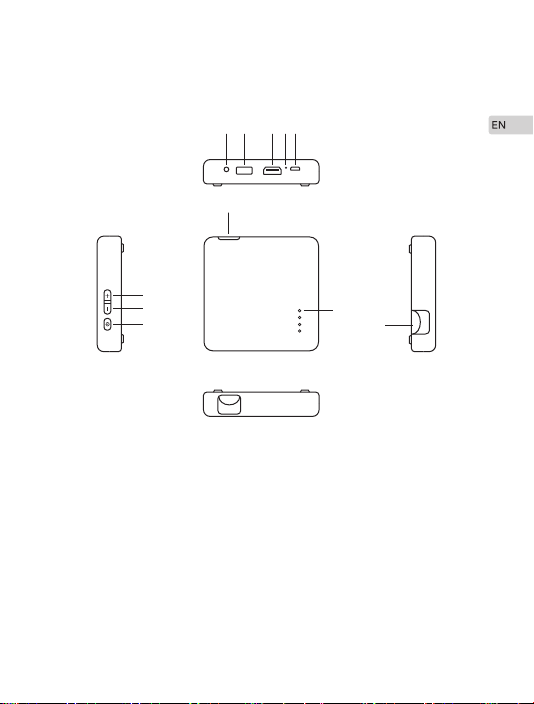
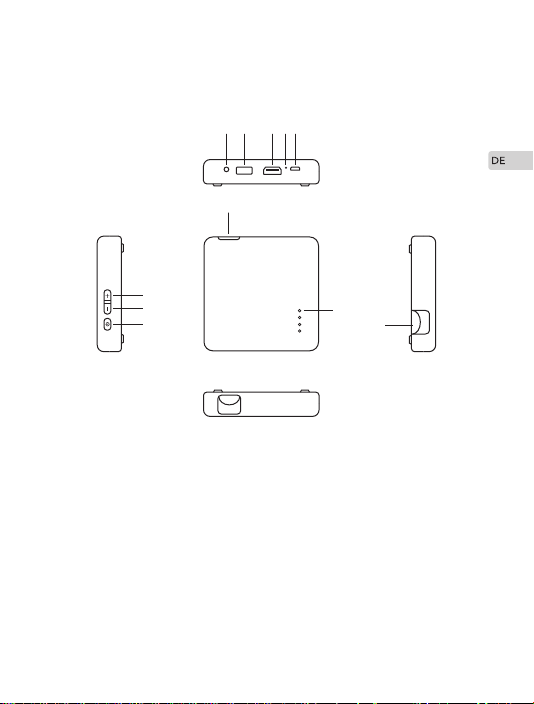
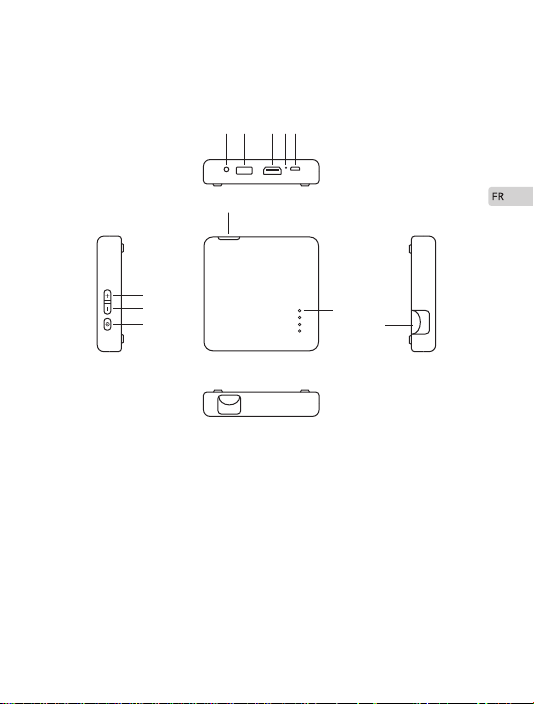
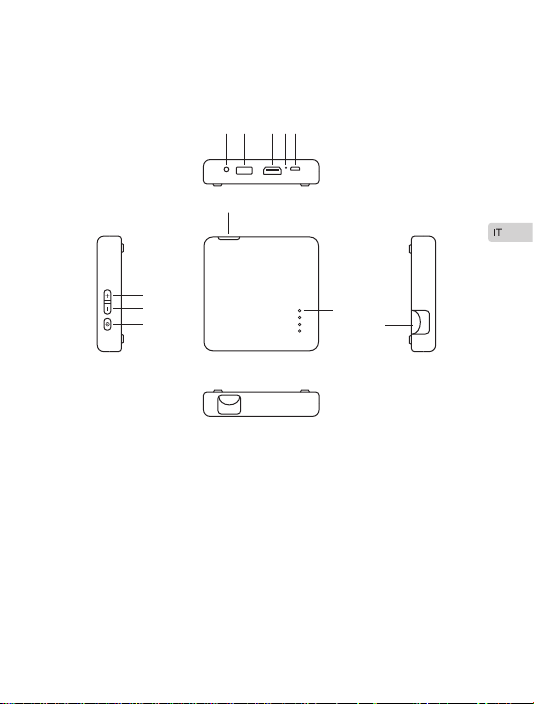
Projector Part Locations
5
1. 3.5mm earphone jack
2. Standard USB 5V /
1A power output
3. HDMI signal input port
4. Reset button
5. Micro USB 5V /
2.4A power input
6. Optical Lens
7. Volume up
8. Volume down
9. Power switch
10. Backlit Battery Indicator
11. Focusing wheel

LED lights indicate the battery status. Only one LED
light is on and flashes means low power. Use the
provided AC Adapter to charge your Projector.
Otherwise the Projector will automatically shut down
when the power is too low.
M4 Projector shall be charged with the equipped
charger. When the LED Indicator light on in White and
flashes, the Projector is currently charging. Each LED
light stands for 25% power, when all the 4 LED lights
are on, the Projector is fully charged.
Fully charging the battery of M4 Projector needs 3-5
hours before first use. It will last about 2 hours once it’s
fully charged.
Note: 1.
2.
3.
6

Operation Guide
Power On
Turn on the projector by pressing Power Button for 3-5 seconds.
Power Off
Turn off M4 Projector by pressing Power Button for 3-5 seconds.
Power On/Off
7
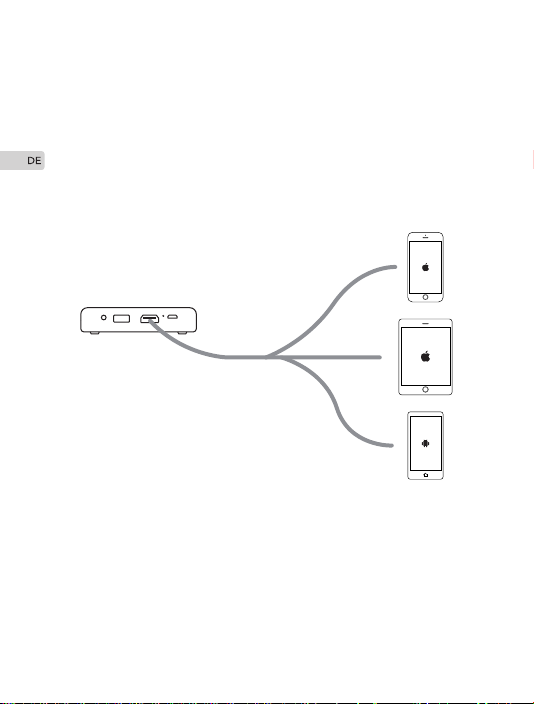
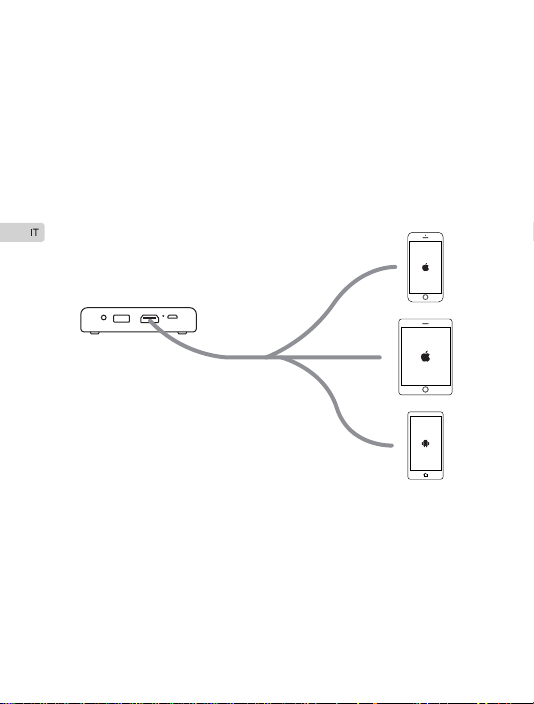
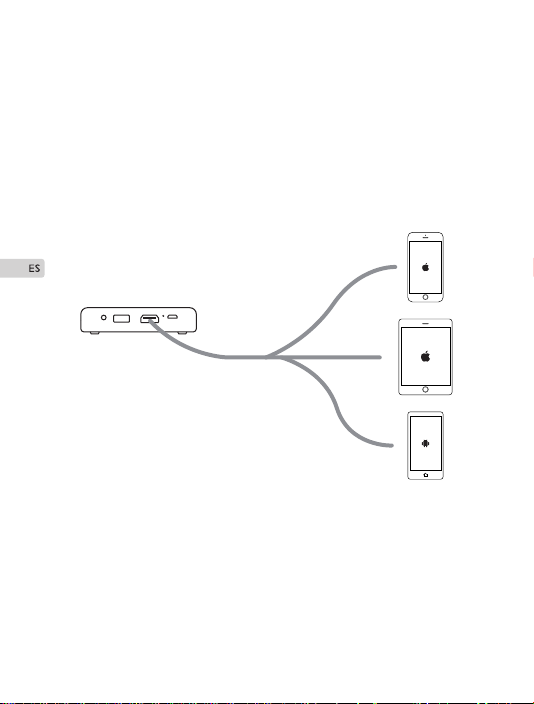
Proceed as follows to connect M4 Projector to your device.
Before connecting, you need to use a correct signal cable for
each source and ensure that cable is securely connected.
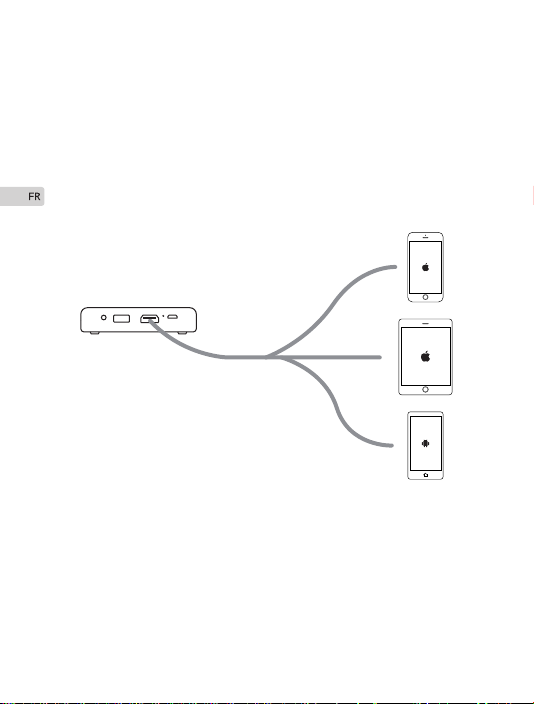
Connect your device(iPhone/iPad) to M4 Projector via HDMI
cable to Apple Lightning Digital AV Adapter(not included).
Connect your device(Android Smartphone) to M4 projector via
MHL cable(not included). Make sure that your smartphone
supports MHL function and screen sharing.
·
·
Connections
Connecting to iPhone, iPad and Android Smartphone
8
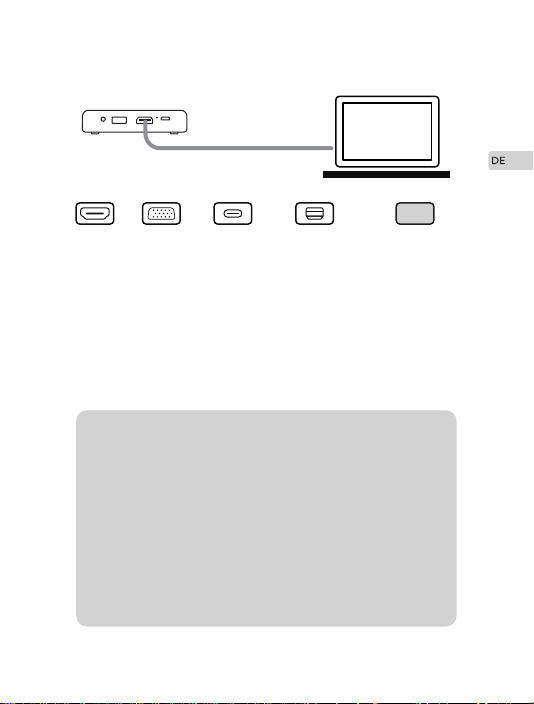
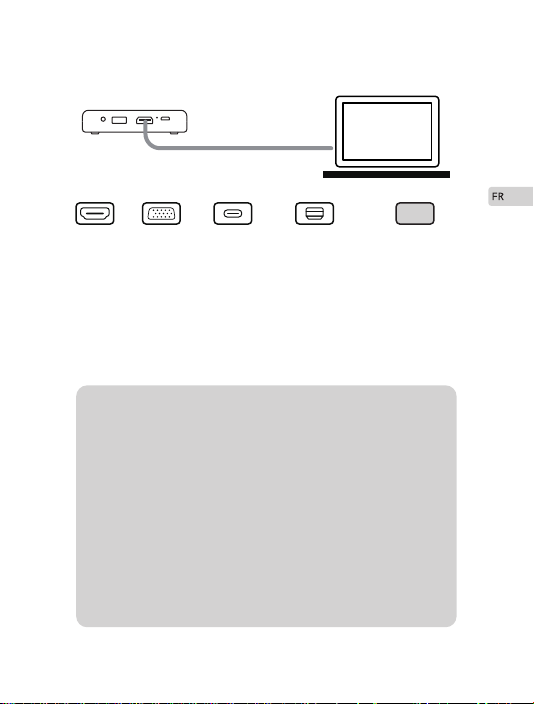
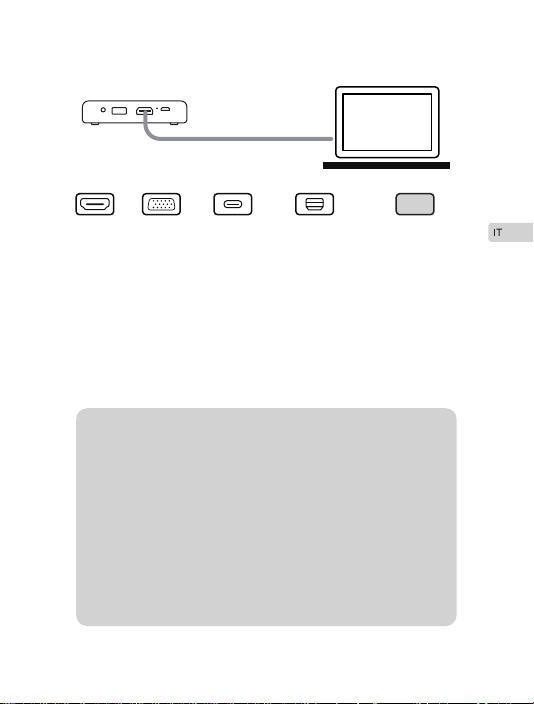
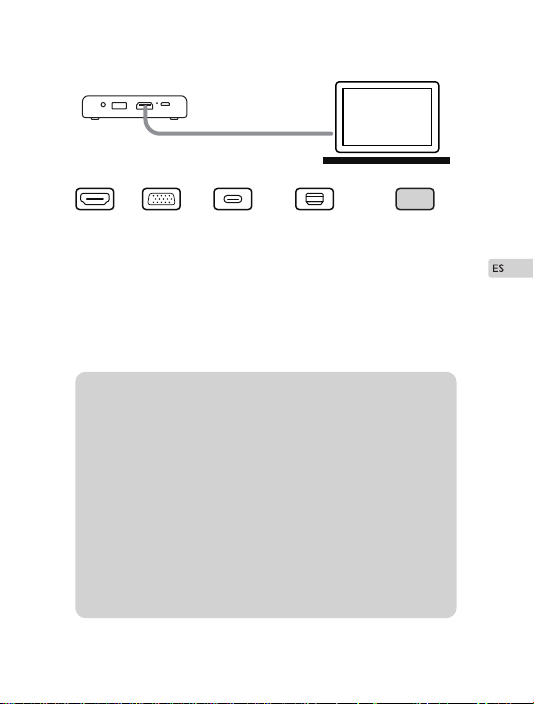
HDMI VGA USB-C Thunderbolt OtherAdapter
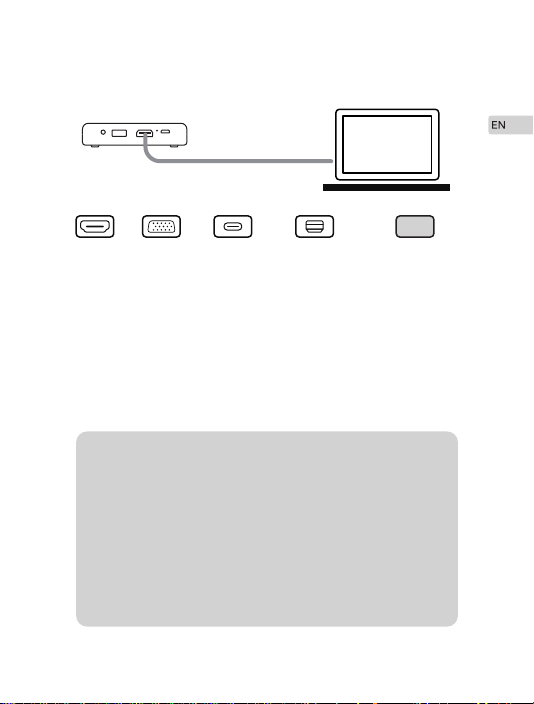
If your laptop has HDMI port, use the HDMI cable to connect your
laptop to the projector, and set projection mode on your laptop.
If your laptop does not have HDMI port, you may need HDMI to
VGA adapter(not included), Apple MFi Certified USB C to HDMI
Adapter(not included), Apple MFi Certified Thunderbolt to HDMI
Adapter(not included) or other adapters for connection.
·
·
Connecting to Your Laptop
M4 Projector supports Amazon Fire Stick and Chromecast.
You can charge your VGA adapter with a USB cable
connected to Projector’s USB output port.
For most of the Windows 7 computers,press
[Windows]+ [P] to make projection.
For Macbook, click “enable mirror”on the top right
display setting bar with a monitor icon.
Google or contact your computer service center for
projection instruction.
Tips: 1.
2.
3.
4.
5.
9

30”
80cm
130cm
260cm
50”
100”
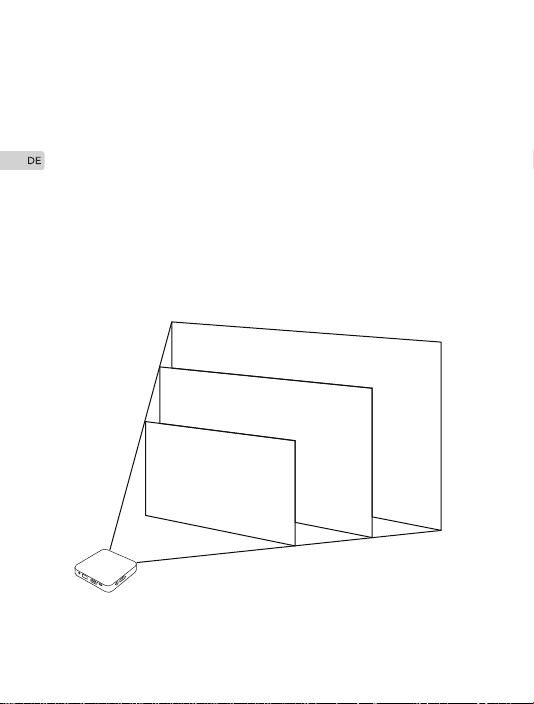
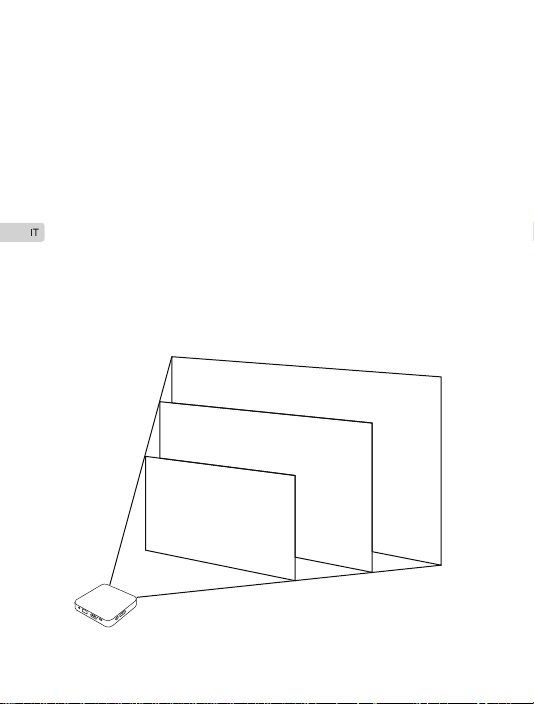
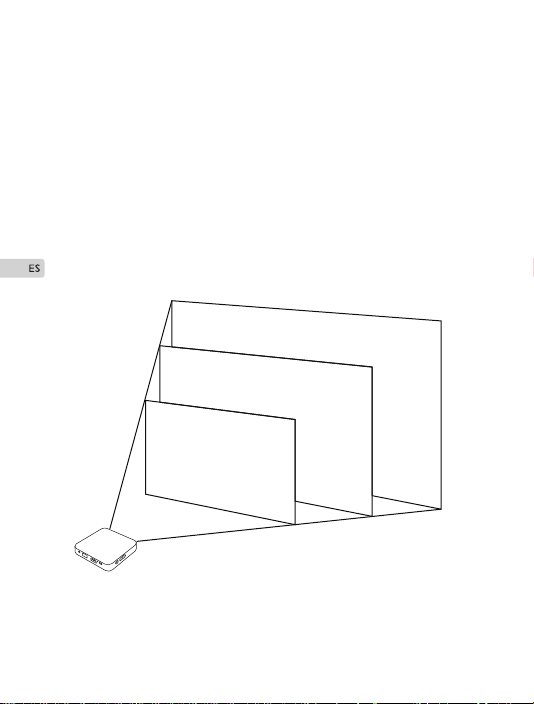
Place your M4 Projector on a flat level surface at the optimal
distance from the screen or wall and move it horizontally.
See the picture below. The result of this calculation tells you
roughly how far back the projector should be positioned from the
screen in order to project a focused image large enough to fill the
screen. Recommended projecting distance is 0.8-2.6 meters.
Adjusting the Projection Image
10

Scroll Focus Ring of M4 Projector to adjust the projection image.
Adjusting Focus
Pressing Volume Up “+” or Down “-” on the side of M4 Projector
to adjust the volume.
Adjusting Volume
11
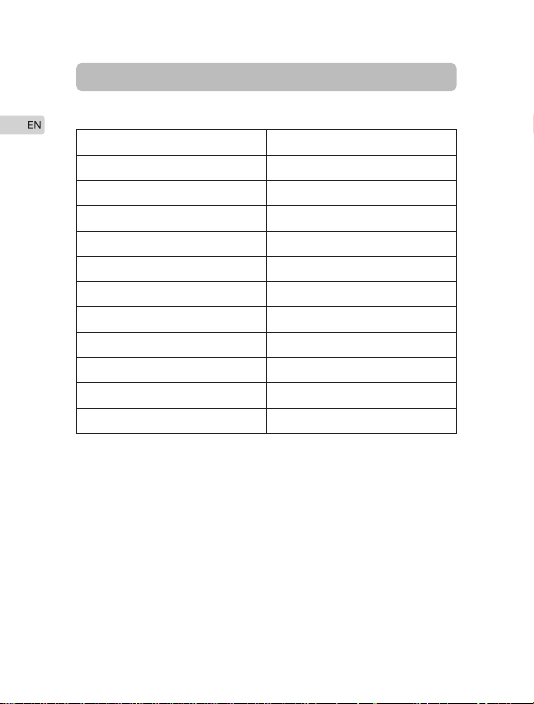
Specifications
Display
Product Dimension
Image Size
Projection Distance
Resolution
Aspect Ratio
Throw Ratio
Charger
Built-in Battery
Power output
Projection Time
Built-in Speaker
DLP Technology
98*98*21.5mm
30”-100”
0.8-2.6m
854*480(WVGA)
16:9
1.2:1
100V-240V
3.7V/3400mAh
USB 5V/1A
≈2 Hours
Double 1-Watt loudspeakers
12

Q&A
Q:
A:
Q:
A:
Q:
A:
Q:
A:
Q:
A:
My projector is not turning on?
Make sure the internal battery of M4 Projector is fully charged
or connect it with the equipped power adapter.
The projected video is blurry?
Please enjoy your movies in dark environment. Move M4
Projector horizontally to suitable distance(0.8-2.6m) and then
scroll Focus Ring to adjust focus.
No voice output via HDMI connection?
Make sure the signal source channel of your device is convert-
ed to HDMI signal. Turn up the volume of M4 Projector and
your device. No sound is coming out if headphone is plugged
into the audio jack.
The image is stuck?
Reset M4 Projector via Reset Hole.
I can turn on the projector, but no image is displayed?
Make sure that your device is connected to projector correct-
ly. Check if the input signal source is correct, and then switch
into projection mode. Wait for a while and operate it again.
Please set resolution under 1080P. If it isn’t working, please
reset M4 Projector.
13
This product is covered under a one-year limited warranty from
the date of purchase. Please feel free to contact us if you have
any product problem.
Warranty
14

Inhaltsverzeichnis
Warnhinweise
Einführung
Eigenschaften des Projektors
Verpackungsinhalt
Tastenbelegung
Einführung der Bedienung
Einschalten/Ausschalten
Verbindungen
Einstellung des Projektionsbildes
Einstellung des Fokuses
Einstellung der Lautstärke
Spezifikationen
Q&A
Garantie
16
17
21
26
27
38
15

Warnhinweise
Um das Risiko eines Stromschlags oder einer Beschädigung der
internen Komponenten zu vermeiden, zerlegen Sie den M4
Projektor nicht selbst.
Bitte verwenden Sie den mitgelieferten Ladeadapter und befolgen
Sie die Anweisungen in diesem Handbuch, um den M4 Projektor
zu bedienen.
Bitte blockieren Sie nicht den Luftstrom Auslass an der Seite des
M4 Projektors. Führen Sie keine Gegenstände in Öffnungen ein.
Eine enge Überwachung ist erforderlich, wenn der Projektor von
oder in der Nähe von Kindern oder geistig behinderten Personen
benutzt wird.
Bitte platzieren oder verwenden Sie den M4 Projektor nicht in
direktem Sonnenlicht, in der Nähe von Heizkörpern oder feuchten
Räumen. Laden Sie den M4 Projektor regelmäßig auf, wenn Sie
ihn längere Zeit nicht benutzen.
Ziehen Sie den M4 Projektor während eines Gewitters oder ohne
Verwendung für längere Zeit aus der Steckdose
·
·
·
·
·
·
16

Einführung
Multi-Bildschirm-Funktion
M4 Projektor unterstützt Multi-Bildschirm-Sharing-Display mit
vielen anderen Geräten wie PC, Laptop, iPhone, iPad, und
anderen Smartphones (unterstützt MHL-Funktion), so dass Sie
Videos, Spiele und Bilder mit Ihrer Familie genießen können.
Energiebank-Funktion
M4 Projektor hat eingebaute 3400mAh wiederaufladbare
Lithium- Batterie, die als eine Powerbank verwendet werden
kann. Verbinden Sie Ihr Gerät durch einer USB-Kabel mit dem
Projektor.
In diesem Abschnitt wird Ihr neuer M4-Projektor vorgestellt und
die Eigenschaften und Funktionen werden beschrieben.
Eigenschaften des Produkts
17
⑤
②①
⑥
M4
Projector
User Manual
④
③
Verpackungsinhalt
18
④ USB-Ladekabel ⑤ Wechselstromadapter
⑥ Benutzerhandbuch
③ Stativ② HDMI Kabel ① APEMAN M4 Projektor
6
7
8
9
10
11
1
2 3 45
Tastenbelegung
19
1. 3.5mm Kopfhöreranschluss
2. Standard-USB-Anschluss
5V / 1A für den Ladeausgang
3. HDMI Signaleingangsanschluß
4. Reset-Taste
5. Mikro-USB 5V / 2.4A
Energieeingang
6. Optisches Objektiv
7. Lautstärke erhöhen
8. Lautstärke nach unten
9. Netzschalter
10. Beleuchtete
Batterie-Anzeigelampe
11. Fokussierrad

LED-Lichter zeigen den Batteriestatus an. Nur ein
LED-Licht ist an und blinkt bedeutet geringe
Leistung. Verwenden Sie das mitgelieferte Netzteil,
um Ihren Projektor aufzuladen. Andernfalls wird der
Projektor automatisch heruntergefahren, wenn der
Strom zu niedrig ist.
Der M4 Projektor wird mit dem mitgelieferten
Ladegerät. Wenn die LED-Anzeige in Weiß
aufleuchtet und blinkt, lädt der Projektor gerade.
Jedes LED-Licht steht für 25% Leistung, wenn alle
4 LED-Leuchten an sind, ist der Projektor voll
geladen.
Vor dem ersten Gebrauch dauert das vollständige
Aufladen des Akkus des M7 Projektors 3-5 Stunden.
Es dauert etwa 2 Stunden, bis es vollständig
aufgeladen ist.
Hinweis: 1.
2.
3.
20

Einführung der Bedienung
Einschalten
Schalten Sie den Projektor ein, indem Sie den Netzschalter 3-5
Sekunden lang drücken.
Ausschalten
Schalten Sie M4 Projektor aus, indem Sie den Netzschalter für
3-5 Sekunden drücken.
Einschalten/Ausschalten
21
Befolgen Sie die nachstehenden Schritte, um den Projektor an
eine Video- oder Audioquelle anzuschließen. Wenn Sie Ihr Gerät
anschließen, müssen Sie für jede Quelle die richtigen Signalkabel
verwenden und sicherstellen, dass die Kabel fest verbunden sind.
Schließen Sie Ihre Geräte (iPhone / iPad) über ein HDMI-Kabel
und den Apple Lightning Digital-AV-Adapter (nicht im Lieferum-
fang enthalten) an den Projektor an.
Schließen Sie Ihr Gerät (Android Smartphone) über ein MHL-Ka-
bel (nicht im Lieferumfang enthalten) an den Projektor M4 an.
Stellen Sie sicher, dass Ihr Smartphone MHL-Funktion und
Bildschirmfreigabe unterstützt.
·
·
Verbindungen
Verbindung mit iPhone, iPad und Android Smartphones
22
HDMI VGA USB-C Thunderbolt OtherAdapter
Wenn Ihr Laptop über einen HDMI-Anschluss verfügt, verbinden
Sie Ihren Laptop über das HDMI-Kabel mit dem Projektor und
stellen Sie den Projektionsmodus auf Ihrem Laptop ein.Bild:mit
Laptop über HDMI verbinden
Wenn Ihr Laptop keinen HDMI-Anschluss hat, verwenden Sie bitte
ein VGA zu HDMI-Kabel (nicht im Lieferumfang enthalten).
·
·
Verbindung mit Laptop
Der Projektor unterstützt Amazon Fire Stick und Chrome-
cast.
Sie können Ihren VGA-Adapter mit einem USB-Kabel
aufladen, das an den USB-Ausgang des Projektors
angeschlossen ist.
Drücken Sie bei den meisten Windows 7-Computern
[Windows] + [P], um eine Projektion zu erstellen.
Für Macbook, klicken Sie auf "enable Mirror" in der oberen
rechten Display-Einstellleiste mit einem Monitor-Symbol.
Google oder wenden Sie sich an Ihren Computer Service
Center für Anweisungen zur Projektion.
Tipps: 1.
2.
3.
4.
5.
23
30”
80cm
130cm
260cm
50”
100”
Stellen Sie Ihren M4-Projektor auf eine ebene Fläche im
optimalen Abstand vom Bildschirm oder der Wand und bewegen
Sie ihn horizontal.
Sehen Sie das Bild unten. Das Ergebnis dieser Berechnung sagt
Ihnen ungefähr, wie weit der Projektor vom Bildschirm entfernt
sein sollte, um ein scharfes Bild zu projizieren, das groß genug ist,
um den Bildschirm zu füllen. Der empfohlene Projektionsabstand
beträgt 0,8-2,6 Meter.
Einstellung des Projektionsbildes
24

Schrollen Sie Fokusring des M4 Projektors, um das Projektions-
bild einzustellen.
Einstellung des Fokuses
Drücken Sie die Lautstärketaste oben "+" oder unten"-" auf der
Seite von Projektors, um die Lautstärke einzustellen.
Einstellung der Lautstärke
25
Spezifikationen
Bildschirm
Produktsabmessung
Größe der Bilder
Projektionsabstand
Auflösung
Seitenverhältnis
Wurf-Verhältnis
Ladegeräts
Eingebaute Batterie
Ausgangsleistung
Projektionszeit
Eingebauter Lautsprecher
DLP Technologie
98*98*21.5mm
30”-100”
0.8-2.6m
854*480(WVGA)
16:9
1.2:1
100V-240V
3.7V/3400mAh
USB 5V/1A
≈2 Stunden
Doppelter 1-Watt loudspeakers
26

Q&A
Q:
A:
Q:
A:
Q:
A:
Q:
A:
Q:
A:
Mein Projektor lässt sich nicht einschalten?
Stellen Sie sicher, dass der interne Akku des Projektors
vollständig geladen ist, oder schließen Sie ihn an den
mitgelieferten Netzadapter an.
Das projizierte Video ist verschwommen?
Bitte genießen Sie Ihre Filme in dunkler Umgebung. Bewegen
Sie den Projektor horizontal in den am besten geeigneten
Abstand (0,8-2,6 m) und dann rollen Sie mit dem Fokusrad,
um den Fokus einzustellen.
Keine Sprachausgabe über HDMI-Verbindung?
Stellen Sie sicher, dass der Signalquellenkanal Ihres Geräts in
ein HDMI-Signal umgewandelt wird. Erhöhen Sie die
Lautstärke des Projektors und Ihres Geräts. Nach dem
Anschließen eines Kopfhörers wird kein Ton ausgegeben.
Das Bild ist blockiert?
Reseten sie dem Projektor über dem Reset-Loch.
Ich kann den Projektor einschalten, aber kein Bild wird
angezeigt?
Stellen Sie sicher, dass Ihr Gerät korrekt an den Projektor
angeschlossen ist. Überprüfen Sie, ob die Eingangssig-
nalquelle korrekt ist und dann wechseln Sie in den Projektion-
smodus. Warten Sie eine Weile und bedienen Sie es. Bitte
stellen Sie die Auflösung unter 1080P ein. Wenn es nicht
funktioniert, führen Sie Reset des Projektors bitte durch.
27
Dieses Produkt umfasst eine einjährige Garantie ab Kaufdatum.
Bitte zögern Sie nicht uns zu informieren, was wir tun können, um
Ihnen zu helfen, wenn Sie ein Produktproblem haben.
Garantie
28
Table Des Matières
Attention
Introduction
Fonction du Produit
Contenu du Colis
Position de La Pièce du Projecteur
Guide d'Opération
Puissance On/OFF
Connexions
Ajustement de L'Image de Projection
Ajustement du Focus
Ajustement du Volume
Spécifications
Q&A
Garantie
30
31
35
40
41
42
29

Attention
Ne démontez pas le projecteur par vous-même pour éviter les
chocs électriques et les dommages aux composants internes.
Utilisez l'adaptateur de charge fourni et suivez le manuel d'utilisa-
tion pour utiliser correctement le projecteur.
Ne bloquez pas la sortie d'air sur le côté du projecteur. Evitez de
le faire tomber ou d'insérer des objets dans aucune des
ouvertures de l'appareil.
Une surveillance étroite est nécessaire lorsque le projecteur est
utilisé par ou près des enfants ou des personnes handicapées
mentales.
Evitez d'utiliser le système à proximité d'un point d'eau, de le
mettre directement en contact avec les rayons du soleil, ou près
d'un appareil de chauffage. Si vous ne l'utilisez pas pendant une
longue période, chargez le projecteur régulièrement.
Débranchez le projecteur pendant les orages ou ne pas l'utiliser
pendant une longue période.
·
·
·
·
·
·
30

Introduction
Fonction Multi-écran
Le projecteur M4 prend en charge le partage multi-écran avec
des autres divers appareils tels que PC, ordinateur portable,
iPad, iPhone et les autres smartphones (soutien fonction MHL),
vous permettant de profiter de vidéos, jeux et images avec votre
famille.
Fonction de Puissance Mobile
Le projecteur M4 est équipé d'une batterie de lithium recharge-
able 3400mAh qui peut être utilisée comme batterie de secours.
Connectez votre appareil au projecteur via un câble USB.Package
Contents
Cette section présente votre nouveau projecteur M4 et décrit ses
caractéristiques et ses capacités. Product Features
Fonction du Produit
31
⑤
②①
⑥
M4
Projector
User Manual
④
③
④ Câble de chargement USB
⑤ Adaptateur pour
courant alternatif
Contenu du Colis
⑥ Manuel l’Utilisateur
③ Trépied② Câble HDMI① APEMAN M4 Projecteur
32
6
7
8
9
10
11
1
2 3 45
Position de La Pièce du Projecteur
33
1. Jack 3,5 mm pour écouteurs
2. Sortie standard USB 5V / 1A
3. Sortie de HDMI
4. Boutton de réinitialisation
5. Sortie de Micro USB 5V / 2.4A
6. Objectif op
7. Volume plus
8. Volume moinstique
9. Interrupteur d'alimentation
10. Indicateur de batterie
rétroéclairé
11. Roue de focalisation

Les lumières LED indiquent l'état de la batterie. Un
seul voyant DEL est allumé et clignote, cela signifie
que la puissance est faible. Utilisez l'adaptateur
secteur fourni pour charger votre projecteur.
Sinon, le projecteur s’éteint automatiquement
lorsque l’alimentation est trop faible.
Le projecteur M4 doit être rechargé avec de
chargeur équipé. Lorsque le voyant DEL s'allume
en blanc et clignote, le projecteur est en cours de
chargement. Chaque voyant correspond à 25% de
la puissance, lorsque les 4 voyants sont allumés, le
projecteur est complètement chargé.
Le chargement complet de la batterie du
projecteur M4 nécessite 3 à 5 heures avant la
première utilisation. Il durera environ 2 heures une
fois complètement chargé.
Remarque: 1.
2.
3.
34

Guide d'Opération
Allumer
Allumez le projecteur en appuyant sur l'interrupteur d'alimentation
pendant 3-5 secondes.
Éteindre
Éteignez le projecteur M4 en appuyant sur le bouton d'alimenta-
tion pendant 3-5 secondes.
Puissance On/Off
35
Procédez comme suit pour connecter le projecteur à votre
appareil. Avant la connexion, vous devez utiliser un câble de signal
adapté à chaque source et vous assurer que le câble est correcte-
ment branché.
Connectez vos appareils (iPhone / iPad) au projecteur via un
câble HDMI à un Adaptateur AV Numérique Apple Lightning (non
inclus).
Assurez-vous que votre smartphone prend en charge la fonction
MHL et le partage d'écran. Connectez votre appareil au project-
eur via un câble MHL (non inclus).
·
·
Connexions
Connexion avec iPhone, iPad et les Smartphones Android
36
HDMI VGA USB-C Thunderbolt OtherAdapter
Si votre ordinateur portable est équipé d'un port HDMI, utilisez le
câble HDMI pour connecter votre ordinateur portable au project-
eur et réglez le mode de projection sur l’ordinateur portable.
Si votre ordinateur portable n'a pas de port HDMI, veuillez utiliser
un câble VGA vers HDMI (non inclus).
·
·
Connexion avec ordinateur portable
M4 Projector prend en charge Amazon Fire Stick et
Chromecast.
Vous pouvez charger votre adaptateur VGA avec un
câble USB connecté au Port de sortie USB du
projecteur.
Pour la plupart des ordinateurs Windows 7, appuyez
sur [Windows] + [P] pour effectuer une projection.
Pour Macbook, cliquez sur "Activer le miroir" en haut à
droite de la barre des paramètres d'affichage avec une
icône de moniteur.
Google ou contactez votre centre de service informa-
tique pour des instructions de projection.
Conseils: 1.
2.
3.
4.
5.
37

30”
80cm
130cm
260cm
50”
100”
Placez votre projecteur M4 sur une surface plane à la distance
optimale de l'écran ou du mur et déplacez-le horizontalement.
Voir l'image ci-dessous. Le résultat de ce calcul vous indique
approximativement à quelle distance le projecteur doit être
positionné de l'écran afin de projeter une image focalisée
suffisamment grande pour remplir l'écran. La distance de
projection recommandée est de 0.8-2.6 mètres.
Ajustement de L'Image de Projection
38

Faites défiler la bague de mise au point du projecteur M4 pour
ajuster l'image de projection.
Ajustement du Focus
Appuyez sur la touche volume haut '+' ou volume bas ' - ' Du côté
de projecteur pour régler le volume.
Ajustement du Volume
39
Spécifications
Technologie d’image
Dimension du Produit
Taille de l'Image
Distance de Projection
Résolution Native
Ratio d'Aspect
Ratio de Projection
Chargeur
Batterie Intégrée
Puissance de Sortie
Temps de Projection
Haut-parleur Intégré
Technologie DLP
98*98*21.5mm
30”-100”
0.8-2.6m
854*480(WVGA)
16:9
1.2:1
100V-240V
3.7V/3400mAh
USB 5V/1A
≈2 Heures
Haut-parleurs doubles1 watts
40

Q&A
Q:
A:
Q:
A:
Q:
A:
Q:
A:
Q:
A:
Mon projecteur ne s'allume pas?
Assurez-vous que la batterie interne du projecteur est
complètement chargée ou connectez-la avec l'adaptateur
secteur équipé.
La vidéo de projection est floue?
Veuillez profiter de vos films dans un environnement sombre.
Faites défiler la molette de mise au point pour ajuster le focus.
Et déplacez le projecteur à la distance la plus appropriée
(0.8-2.6 m).
Il n'y a pas de sortie vocale via une connexion HDMI?
Assurez-vous que le canal source du signal de votre appareil
est converti en signal HDMI. Augmentez le volume du project-
eur et de votre appareil. Si vous connectez avec des
écouteurs,aucun son ne sort si les écouteurs sont branchés.
L'image est bloquée?
Réinitialiser le projecteur avec le bouton de réinitialisation.
Je peux allumer le projecteur, mais aucune image n'est
affichée?
Assurez-vous que votre ordinateur portable ou votre appareil
a été correctement connecté au projecteur. Vérifiez si la
source du signal d'entrée est correcte, passez en mode de
projection et attendez un moment avant de l'utiliser. Veuillez
ajuster la résolution sous 1080P. Si cela ne fonctionne pas,
veuillez réinitialiser le projecteur.
41
Ce produit est couvert par une garantie limitée d'un an à compter
de la date d'achat. N'hésitez pas à nous contacter si vous avez un
problème de produit.
Garantie
42
Contenuti
Avvertenze
Introduzione
Caratteristiche
Contenuto confezione Disposizione
Componenti proiettore
Guida
Accensione/spegnimento
Connessioni
Regolazione immagini
Regolazione focus
Regolazione volume
Specificazioni
Q&A
Garanzia
44
45
49
54
55
56
43

Avvertenze
Per evitare il rischio di scosse elettriche o danneggiamenti ai
componenti interni, non smontare il proiettore.
Utilizzare l'adattatore AC fornito in confezione ed seguire le
istruzioni riportate in questo manuale per utilizzare il proiettore
M4.
Non bloccare l'uscita del flusso d'aria sul lato del proiettore.
Non inserire oggetti all’interno del proiettore, non inserire oggetti
all’interno del proiettore.
È necessaria la supervision dei genitori quando il priettore è
utilizzato da bambini o disabili mentali.
Non posizionare o utilizzare il proiettore M4 alla luce diretta del
sole, vicino a caloriferi o ambienti umidi. Carica periodicamente il
proiettore M4 se non lo usi per un lungo periodo.
Scollegare il proiettore durante temporali o quando non lo si
utilizza per molto tempo.
·
·
·
·
·
·
44

Introduzione
Funzione multi schermo
Il proiettore supporta la visualizzazione multi schermo con molti
dispositive tra cui computer, smartphone, iphone (Supporto MHL)
che consente di godere a pieno di videogiochi, video e immagini
con la famiglia e amici.
Funzione powerbank
M4 Projectorè dotato di una batteria ricaricabile da 3400mAh
che può essere usata come power bank. Connetti il tuo device al
proiettore con un cavo USB.
Questa selezione introduce il proiettore e descrive le sue
caratteristiche e capacità.
Features prodotto
45
⑤
②①
⑥
M4
Projector
User Manual
④
③
Contenuto confezione
46
④ Cavo di ricarica USB
⑤ Adattatore per corrente alternata
⑥ Manuale utente
③ Treppiedi② Cavo HDMI① APEMAN M4 Proiettore
6
7
8
9
10
11
1
2 3 45
Posizione parti proiettore
47
1. Connettore da 3,5 mm
per auricolare
2. Porta di ingresso USB 5V / 1A
3. Porta di ingresso HDMI
4. Pulsante Reset
5. Porta di ingresso
Micro USB 5V / 2.4A
6. Obiettivo di Proiezione
7. Volume Su
8. Volume Giù
9. Tasto Accensione /
Spegnimento
10. Indicatore della batteria
retroilluminato
11. Messa a fuoco

Solo una luce LED è accesa e lampeggia significa bassa
potenza. Utilizzare l'adattatore CA in dotazione per
caricare il proiettore. Altrimenti il proiettore si spegne
automaticamente quando la potenza è troppo bassa.
Il proiettore M4 deve essere caricato con in dotazione.
Quando l'indicatore LED si accende in bianco e lampeg-
gia, il proiettore è attualmente in carica. Ogni luce a LED
indica il 25% di potenza, quando tutte le 4 luci a LED
sono accese, il proiettore è completamente carico.
La carica completa della batteria del proiettore M4
richiede circa 3-5 ore prima del primo utilizzo. Durata
batteria: circa 2 ore.
Note: 1.
2.
3.
48

Guida operativa
Accensione
Premere il tasto di accesione per 3-5 secondi
Spegnimento
Tieni premuto il testo off per 3-5 secondi.
Accensione/Spegnimento
49
Seguire quanto segue per connettere il proiettore al dispositivo.
Prima di effettuare il collegamento è necessario utilizzare i cavi
corretti e assicurarsi che siano collegati bene.
Connetti il tuo device(iPhone/iPad) al proiettore tramite ingress
HDMI e adattatore Apple lighting (non incluso).
Connetti il tuo device (Smartphone Android) al proiettore tramite
cavo MHL (non incluso).
·
·
Connessioni
Connetti il tuo Iphone, iPad e altri smartphone android.
50
HDMI VGA USB-C Thunderbolt OtherAdapter
Se il laptop è dotato di porta HDMI, utilizzare il cavo HDMI per
collegare il laptop al proiettore e impostare la modalità di proiezi-
one sul computer.
Se il tuo computer non ha una porta HDMI, potresti aver bisogno
di un adattatore da HDMI a VGA (non incluso), adattatore da USB
C a HDMI Apple MFi Certifica (non incluso), Apple MFi Certi fied
Thunderbolt ad HDMI Adapter (non incluso) o altri adattatori per
la connessione.
·
·
Connessione con il tuo computer
Il proiettore supporta Amazon Fire Stick e Chrome-
cast.
È possibile usare l'adattatore VGA con un cavo USB
collegato al Porta di uscita USB del proiettore.
Per la maggior parte dei computer Windows 7,
premere [Windows] + [P] per effettuare la proiezione.
Per Macbook, fare clic su "Abilita mirror" sulla
barra delle impostazioni di visualizzazione in alto a
destra con l'icona di un monitor.
Google o contatta il centro di assistenza del
computer per le istruzioni di proiezione.
Sugerimenti: 1.
2.
3.
4.
5.
51
30”
80cm
130cm
260cm
50”
100”
Posiziona il proiettore su una superficie piatta ad una distanza
ottimale dallo schermo o dal muro .
Guarda l’immagine qui sotto. Il risultato di questo calcolo indica in
modo approssimativo in che punt oil proiettore deve essere
posizionato per proiettare un’immagine abbastanza grande da
riempire lo schermo.
La distanza di proiezione consigliata è di 0,8-2,6 metri.See the
picture below. The result of this calculation tells you roughly how
far back the projector should be positioned from the screen in
order to project a focused image large enough to fill the screen.
Recommended projecting distance is 0.8-2.6 meters.
Regolazione immagine
52

Regola l’anello del proiettore per correggere l’immagine proiettata.
Regolazione focus immagine
Premi il tasto “+” o “-“ per regolare il volume del proiettore.
Regolazione volume
53
Spécifications
Display
Dimensioni prodotto
Grandezza immagine
Distanza aproiettore
Risoluzione
Proporzioni
Rapporto
Caricatore
Batteria
Power output
Tempo di proiezione
Speaker
Tecnologia DLP
98*98*21.5mm
30”-100”
0.8-2.6m
854*480(WVGA)
16:9
1.2:1
100V-240V
3.7V/3400mAh
USB 5V/1A
≈2 Hours
Doppio Altoparlanti da 1 Watt
54

Q&A
Q:
A:
Q:
A:
Q:
A:
Q:
A:
Q:
A:
Il proiettore non si accende?
Assicurarsi che la batteria interna sia carica o collegare
l’alimentazione.
Il video proiettato è sfocato?
Vedi I film in ambiente buio.. Spostare il proiettore M7
orizzontalmente a una distanza adeguata (0,8-2,6 m) e quindi
scorrere la ghiera della messa a fuoco per regolare la messa
a fuoco.
Nessun audio dall’ingresso HDMI?
Assicurati che il canale sorgente del tuo dispositivo sia
convertito in segnale HDMI. Alzare il volume del proiettore e
del dispositivo. Non viene emesso alcun suono se le cuffie
sono inserite nella presa audio.
L’immagine è bloccata?
Riaccia il proiettore tramite l’apposito tasto
Posso accendere il proiettore ma non vedo nessun video?
Assicurarsi che il dispositivo sia collegato correttamente al
proiettore. Controllare che la sorgente del segnale di ingresso
è corretta, quindi passare alla modalità di proiezione.
Aspettare poco tempo e riattivalo. Si prega di impostare la
risoluzione sotto 1080P. Se non funziona, resettare il
proiettore.
55

Questo prodotto è coperto da una garanzia di un anno dalla data
di acquisto.
Non esitate a contattarci se avete qualche problema con il
prodotto.
Garanzia
56

Menú de Contenido
Advertencia
Introducción
Características del Producto
Contenido del Paquete
Elementos del Proyector
Guía de Funcionamiento
Encendido / Apagado
Conexiones
Ajuste de la Imagen de Proyección
Ajuste del Enfoque
Ajuste del Volumen
Especificaciones
Preguntas y Respuestas
Garantía
58
59
63
68
69
70
57

Advertencia
Para evitar el riesgo de descarga eléctrica o daños a los compo-
nentes internos, no desmonte el proyector.
Utilice el adaptador suministrado y siga las instrucciones de este
manual para usar el proyector.
Por favor, no obstruya la salida de salida de aire en el lateral del
proyector. No deje caer ni inserte un objeto en ninguna abertura
u orificio.
Es necesaria la supervisión adulta cuando el proyector es utilizado
por o cerca de niños o personas con discapacidad.
Por favor, no coloque ni use el proyector a luz directa del sol,
cerca de calefactores o habitaciones con humedad. Cargue la
bacteria del proyector periódicamente si no lo usa durante un
tiempo prolongado.
Desenchufe el proyector durante tormentas eléctricas o si no lo
usa durante períodos prolongados.
·
·
·
·
·
·
58

Introducción
Función para pantalla múltiple
El proyector M4 es compatible con la visualización para uso
compartido de pantallas múltiples con muchos dispositivos
diversos, como: PC, portátiles, iPad, iPhone de sobremesa y
teléfonos inteligentes Smartphone(admite MHL), lo que le permite
disfrutar videos, juegos e imágenes con su familia.
Función de Batería interna
El proyector M4 está equipado con una batería recargable de litio
de 3400 mAh, que puede usar como fuente de alimentación
interna. Conecte su dispositivo al Proyector M4 con un cable USB
para recargar.
Esta sección presenta su nuevo proyector M4 y describe las
características y capacidades.
Características del Producto
59
⑤
②①
⑥
M4
Projector
User Manual
④
③
④ Cable de carga USB ⑤ Adaptador de CA
Contenidos del Paquete
⑥ Manual de Usuario
③ Trípode② Cable HDMI① Proyector APEMAN M4
60

6
7
8
9
10
11
1
2 3 45
Ubicaciones de Partes del Proyector
61
1. Jack de 3,5mm para salida de audio
2. Potencia de salida
estándar USB 5V / 1A
3. Puerto HDMI de entrada
4. Botón de reinicio
5. Potencia de entrada
micro USB 5V / 2.4A
6. Lente óptica
7. Subir volumen
8. Bajar volumen
9. Interruptor de
alimentación
10. Indicador de batería
retroiluminada
11. Rueda de enfoque

Las luces LED indicaran el estado de la batería. Solo una
luz LED está encendida y parpadea significa baja
potencia. Use el adaptador de CA suministrado para
cargar su proyector. De lo contrario, el proyector se
apagará automáticamente cuando la potencia sea
demasiado baja.
El proyector 2.M4 se cargará con el de cargador
suministrado. Cuando el indicador LED se ilumina en
blanco y parpadea, el proyector se está cargando en ese
momento. Cada luz LED representa el 25% de potencia,
cuando las 4 luces LED están encendidas, el proyector
está completamente cargado.
Para cargar completamente la batería del proyector M4,
necesita 3-5 horas antes del primer uso. La duración
de uso será de aproximadamente 2 horas.
Nota: 1.
2.
3.
62

Guía de Funcionamiento
Encendido
Encienda el proyector presionando el botón de encendido
durante 3-5 segundos.
Apagado
Apague el proyector M4 presionando el botón de encendido
durante 3-5 segundos.
Encendido / Apagado
63
Proceda de la siguiente manera para conectar el proyector a su
dispositivo. Antes de la conexión, debe usar los cables de señal
correctos y asegurarse de que los cables estén conectados de manera
segura.
Conecte sus dispositivos (iPhone / iPad) al Proyector M4 a través
del cable HDMI y el Adaptador AV digital Apple Lightning (no
suministrado).
Conecte su dispositivo (teléfono inteligente Android) al proyector
M4 a través del cable MHL (no incluido). Asegúrese de que su
teléfono inteligente sea compatible con la función MHL y el uso
compartido de pantalla.
·
·
Conexiones
Conexión con iPhone y iPad
64
HDMI VGA USB-C Thunderbolt OtherAdapter
Si su portátil tiene un puerto HDMI, use el cable HDMI para
conectar su portátil al proyector y configure el modo de proyec-
ción en su computadora portátil.
Si su portátil no tiene un puerto HDMI, es posible que necesite un
adaptador de HDMI a VGA (no suministrado) u otros adaptadores
para la conexión.
·
·
Conexión con la Portátil
El Proyector M4 es compatible con Amazon Fire
Stick y Chromecast google.
Puede cargar su adaptador VGA con un cable USB
conectado al Puerto de salida USB del proyector M4.
Para la mayoría de las computadoras con Windows
7, presione [Windows] + [P] para hacer una
proyección.
Para Macbook, haga clic en "habilitar espejo" en la
barra de configuración de la pantalla superior
derecha con un icono de monitor.
Google o comuníquese con el centro de servicio de su
computadora para obtener instrucciones de proyección.
Consejos: 1.
2.
3.
4.
5.
65
30”
80cm
130cm
260cm
50”
100”
Coloque su proyector M4 en una superficie plana y nivelada a una
distancia óptima de la pantalla o pared y gradúelo horizontal-
mente.
Ver la siguiente imagen. El resultado de este cálculo le indica
aproximadamente qué tan atrás debe colocarse el proyector
desde la pantalla para proyectar una imagen enfocada lo
suficientemente grande como para llenar la pantalla. La distancia
de proyección recomendada es de 0.8-2.6 metros.
Ajuste de la Imagen Proyectada
66

Desplazar el anillo de enfoque del proyector M4 para ajustar la
imagen de proyección.
Ajuste de Enfoque
Presionando Subir volumen "+" o Abajo "-" del lado de Proyector
M4 para ajustar el volumen.
Ajuste de Volumen
67
Especificaciones
Monitor
Dimensión del Producto
Tamaño de la Imagen
Distancia de Proyección
Resolución
Relación / Aspecto
Ratio
Cargador
Batería Integrada
Salida de Potencia
Tiempo de proyección
Altavoz Incorporado
Tecnología DLP
98*98*21.5mm
30”-100”
0.8-2.6m
854*480(WVGA)
16:9
1.2:1
100V-240V
3.7V/3400mAh
USB 5V/1A
≈2 Horas
Doble Altavoces de 1 vatio
68

Q&A
Q:
A:
Q:
A:
Q:
A:
Q:
A:
Q:
A:
¿Mi proyector no se enciende?
Asegúrese de que la batería interna del proyector esté
completamente cargada o conéctela con el adaptador de
corriente suministrado.
¿El video proyectado está borroso?
Intente visualizar sus películas en un ambiente oscuro. Mueva
el proyector horizontalmente a la distancia adecuada (0,8-2,6
m) y luego desplace la rueda de enfoque para ajustar el
enfoque.
¿No hay salida de voz a través de una conexión HDMI?
Asegúrese de que el canal de la fuente de señal de su disposi-
tivo se convierte en señal HDMI. Suba el volumen del proyector
y su dispositivo. No escuchara sonido si conecta los
auriculares.
¿La imagen está detenida?
Restablezca el proyector a través de Restablecer orificio o
reset.
¿Puedo encender el proyector, pero no se muestra ninguna
imagen?
Asegúrese de que su dispositivo esté conectado correcta-
mente al proyector. Verifique si la fuente de la señal de
entrada es correcta, y luego cambie al modo de proyección.
Espere un momento y vuelva a intentarlo. Por favor, configure
la resolución en 1080P. Si no funciona, reinicie el proyector.
69
Este producto cubre una garantía de un año desde la fecha de
compra. Por favor, no dude en contactar con nosotros por si
podemos ayudarlo si tiene algún problema con un producto.
Garantía
70
ディレ クトリ
注意事項
製品紹介
製品の機能
プロジェクター の 紹 介
プロジェクタ構造解析
操 作 ガ イド
電源のオン/オフ
接続
投写画像の調整
フォーカス の 調 整
音量の調整
仕様
質問&回答
保障期間
72
73
77
82
83
84
71

注意事項
感電や内部部品の損傷を防ぐため、M4プロジェクタを自分で分解し
ないでください。
付属のACアダプタを使用し、本書に記載されている指示に従ってM4
プロジェクタを 操 作してください 。
M4プロジェクター側面にある通気口をふさがないでください。
物を開口部に落としたり、入れたりしないでください。
子供や知的障害を持つ人がM4プロジェクタを使用するときは、注意
深く監視する必要があります。
直射日光の当たる場所、ヒーターの近く、湿気の多い場所にM4プロ
ジェクターを設置したり使用したりしないでください。長期間使用し
ない場合は、M4プロジェクターを定期的に充電してください。
雷雨やプロジェクタを長時間使用しないときは、M4プロジェクタの電
源プラグを抜いてください。
·
·
·
·
·
·
·
72

製品紹介
マルチスクリーン機能
プロジェクターは、マルチスクリーン共有ディスプレイをサポートし、
PC、ラップトップ、iPad、iPhone、その他のスマートフォン(MHL対応)
をサポートしており、家族と一緒にビデオ、ゲーム、写真を楽しむこと
ができます。
モバイルパワー機能
M4プロジェクタには、3400mAhの充電式リチウムバッテリが内蔵さ
れています。これは、USBケーブルをデバイスとM4プロジェクタに接
続することでモバイル電 源として使用できます。
このセクションでは、アップグレードされた新しいM4プロジェクター
を紹介し、その特徴と機能について説明します。
製品の機能
73
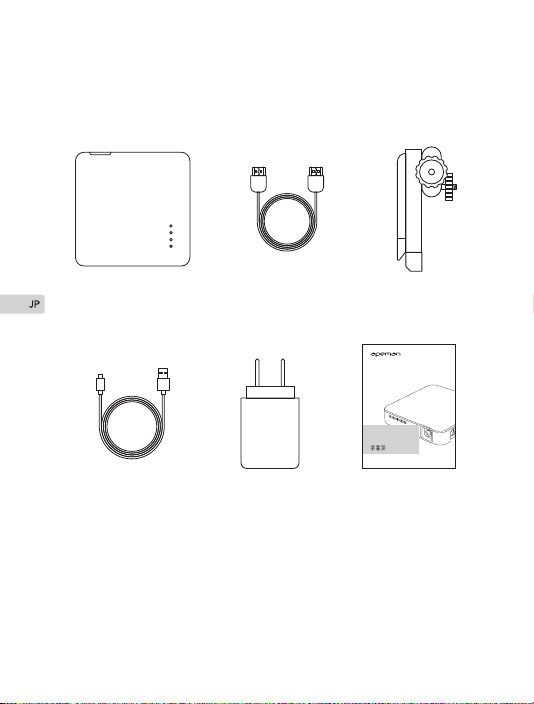
⑤
②①
⑥
M4
Projector
User Manual
④
③
④USBデータケーブル ⑤ACアダプター
梱包内容
⑥ユーザーマニュアル
③三脚②HDMIケーブル①APEMANM4プロジェクタ
74

6
7
8
9
10
11
1
2 3 45
プロジェクタ構造解析
75
1.3.5mmイヤホン端子
2.標準USB5V/1A電力出力
3.HDMI入力端子
4.リセットボタン5.Micro
USB5V/2.4A電力出力
6.光学レンズ
7.ボリュームアップ
8.ボリュームダウン
9.電源スイッチ
10.LIGHTインジケーター
11.フォーカスレバー

LEDライトは、電力使用量を示します。1つのLEDのみが点灯
し、点滅し、低電力を示します。 付属のACアダプターを使用
してプロジェクターを充電してください。そうしないと、バッ
テリーが低すぎるとプロジェクターは自動的にオフになりま
す。
M4プロジェクターは、装備された充電ーによって充電する
必要があります。LEDが点灯して点滅しているときは、プロジ
ェクターは充電中です。 各LEDは電力の25%を表し、4つの
LEDがすべて点灯すると、プロジェクターは完全に充電されます。
最初に使用する前に、M4プロジェクターを3-5時間充電しま
す。初めて充電された場合、2時間持続することができます。
Nota: 1.
2.
3.
76

操 作 ガ イド
電源オン
電源ボタンを3〜5秒間押して電源を入れます。
電源オフ
電源ボタンを3〜5秒間押してシャットダウンします。
電源のオン/オフ
77
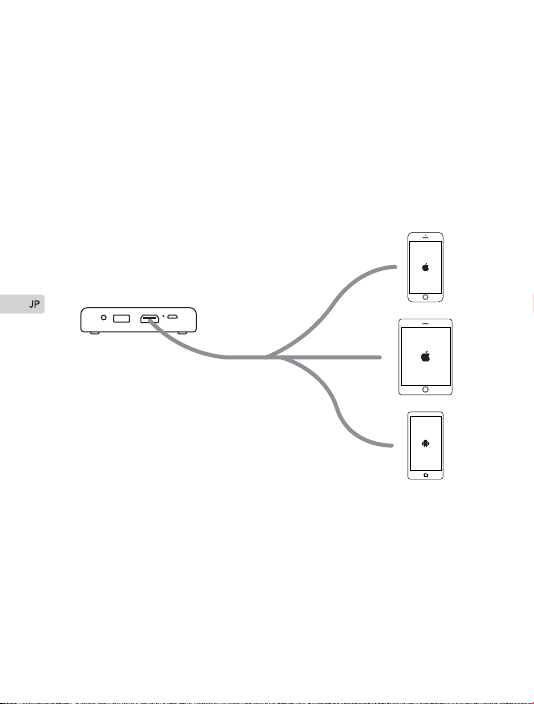
M4プロジェクタをデバイスに接続する手順は次のとおりです。 接続
する前に、正しい信号伝送ケーブルを使用して機器インタフェースを
接続し、信号伝送ケーブルが確実に接続されていることを確認する
必要があります。
HDMIケーブル及びアップルデジタルオーディオコンバータ(Apple
Digital Audio Converter)(別途購入)を使用して、M4プロジェクタと
デバイス(Apple/タブレット)を接続します。
MHLライン(別途購入)を使用してM4プロジェクターとアンドロイド(
Android)フォンデバイスを接続します。 また、お使いの携帯電話が
MHLとスクリーンキャスト機能を備えていることを確認してください。
·
·
接続
サポートデバイス:Applephone、タブレット、Androidphone
78
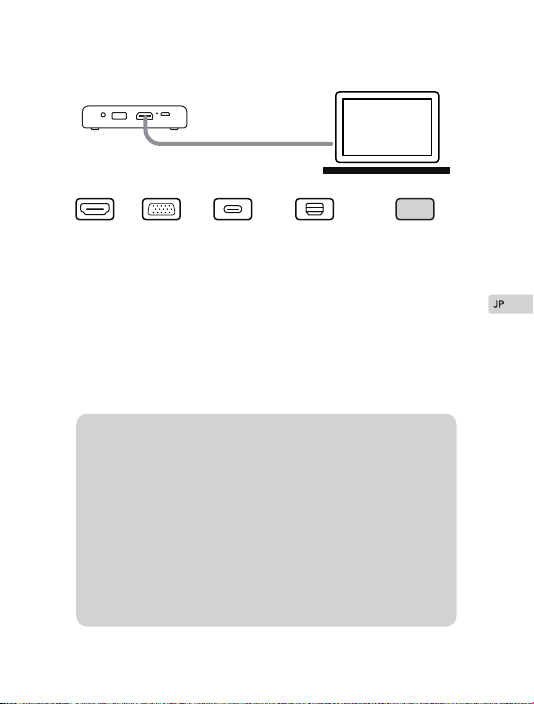
79
ラップトップにHDMIポートがある場合は、HDMIケーブルを使用して
ラップトップをプ ロジェクタに 接 続し、ラップトップにプロジェクション
モードを設定します。
ラップトップにHDMIポートがない場合は、HDMItoVGAアダプタ(別
途購入)、AppleMFi認定USBCtoHDMIアダプタ(別途購入)、Apple
MFi認定ThunderbolttoHDMコンバータ(付属していません)または
他のアダプター接続を使用してください。
·
·
ラップトップ を 接 続
M4プロジェクターは、Amazonのテレビのスティックと
Googleテレビのスティックをサポートしています。
USBケーブルをプロジェクターのUSB出力ポートに接続す
ることにより、VGAアダプターを充電することができます。
ほとんどのWindows7コンピュータでは、[Windows] + [P]
を押して投写します。
Macbookの場合は、右上の設定バーで[EnableMirror(ミラー
を有効にする)]をクリックし、モニタアイコンを表示します。
Googleによるプロジェクトの指導、またはコンピュータサ
ービスセンターのクリック。
ヒ ン ト:
HDMI VGA USB-C Thunderbolt OtherAdapter
1.
2.
3.
4.
5.
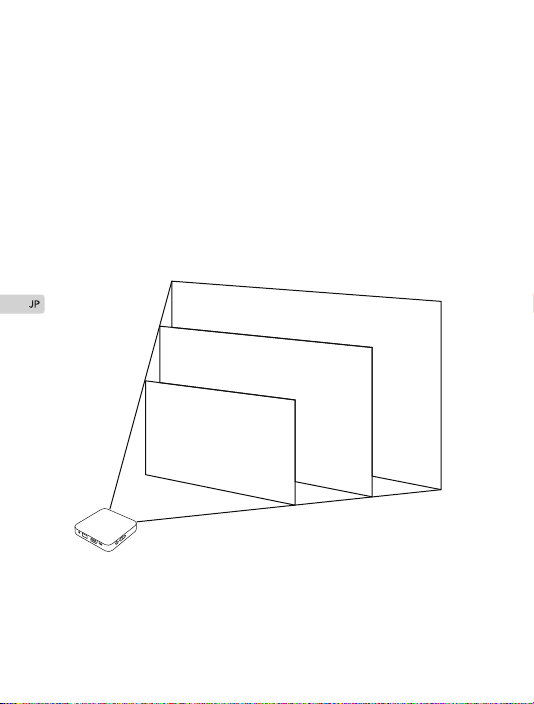
カーテンまたは壁から最適な水平面にM4プロジェクタを置き、水平
に移 動します。
以下に示すように。 計算された結果は、プロジェクタを画面からどれ
だけ遠くに配置して、画面全体を満たすのに十分な焦点を当てた画
像を投影するかをおおまかに示すことができます。 最高の投影距離
は0.8〜2.6メートルです
投写画像の調整
80
30”
80cm
130cm
260cm
50”
100”

M4プロジェクタのフォーカスホイールを回して、投写された画像を
調整します。
フォー カシング
M4は、プロジェクタの側面にある音量「+」と「-」を押して音量を調整し
ます。
音量の調整
81
仕様
ディスプレー
製品サイズ
画像サイズ
投射距離
解像度
画面比率
投影比
充電器
内蔵バッテリ
出力電力
投射時間
内蔵スピーカー
DLP技術
98*98*21.5ミリメートル
30”-100”
0.8-2.6メートル
854*480(WVGA)
16:9
1.2:1
100V-240V
3.7V/3400ミリアンプ
USB5V/1A
≈2時間
デュアル1ワットスピーカー
82

Q&A
Q:
A:
Q:
A:
Q:
A:
Q:
A:
Q:
A:
プロジェクターの電源を入れることができません。どうすればい
いで す か?
M4プロジェクターの内蔵バッテリーが完全に充電されているか、
付属の電源アダプターに接続されていることを確認してください。
投写映像がぼやけていますが、どうしますか?
暗い環境で映画を楽しんでください。M4プロジェクタを適切な距
離(0.8 m〜2.6 m)まで水平に動かし、フォーカスリングを回して
ピントを調整してください。
HDMI接続でサウンド出力がありません。どうすればいいですか?
デバイスのソースチャンネルがHDMI信号に変換されていること
を確認してください。 M4プロジェクターとデバイスの音量を上げ
てください。 ヘッドフォンがオーディオジャックに挿入されている
と、音が鳴りません。
画像がフリーズになりますが、どうすればいいですか?
M4プロジェクタをリセットしてください。
プロジェクターの電源を入れることはできますが、画像は表示さ
れません。どうすればいいですか?
お使いのデバイスとプロジェクターが正しく接続されていること
を確認し、入力ソースが正しいことを確認してください。
投影モードに切り替えます。 しばらく待ってからもう一度 お 試しく
ださい。解像度を1080Pに設定してください。動作しない場合は、
M4プロジェクタをリセットしてください。
83
この製品には、購入日から1年間の保証が付いています。製品に問題
が発生した場合は、お気軽にお問い合わせください。
保障期間
84


Version 3.1

封面封底
内页
尺寸
装订方式
:128g 铜版纸 过哑膜
:80g 金太阳双胶
:88mm*118mm 出血裁掉
:胶装