Kneel down and adjust the Bar to shoulder height. Grip the Bar with an overhand grip. Lift
the Bar above your head by extending your arms. Lower the Bar to your shoulders slowly.
Repeat.
BAR
Triceps Extension
Biceps
C
u
r
l
s
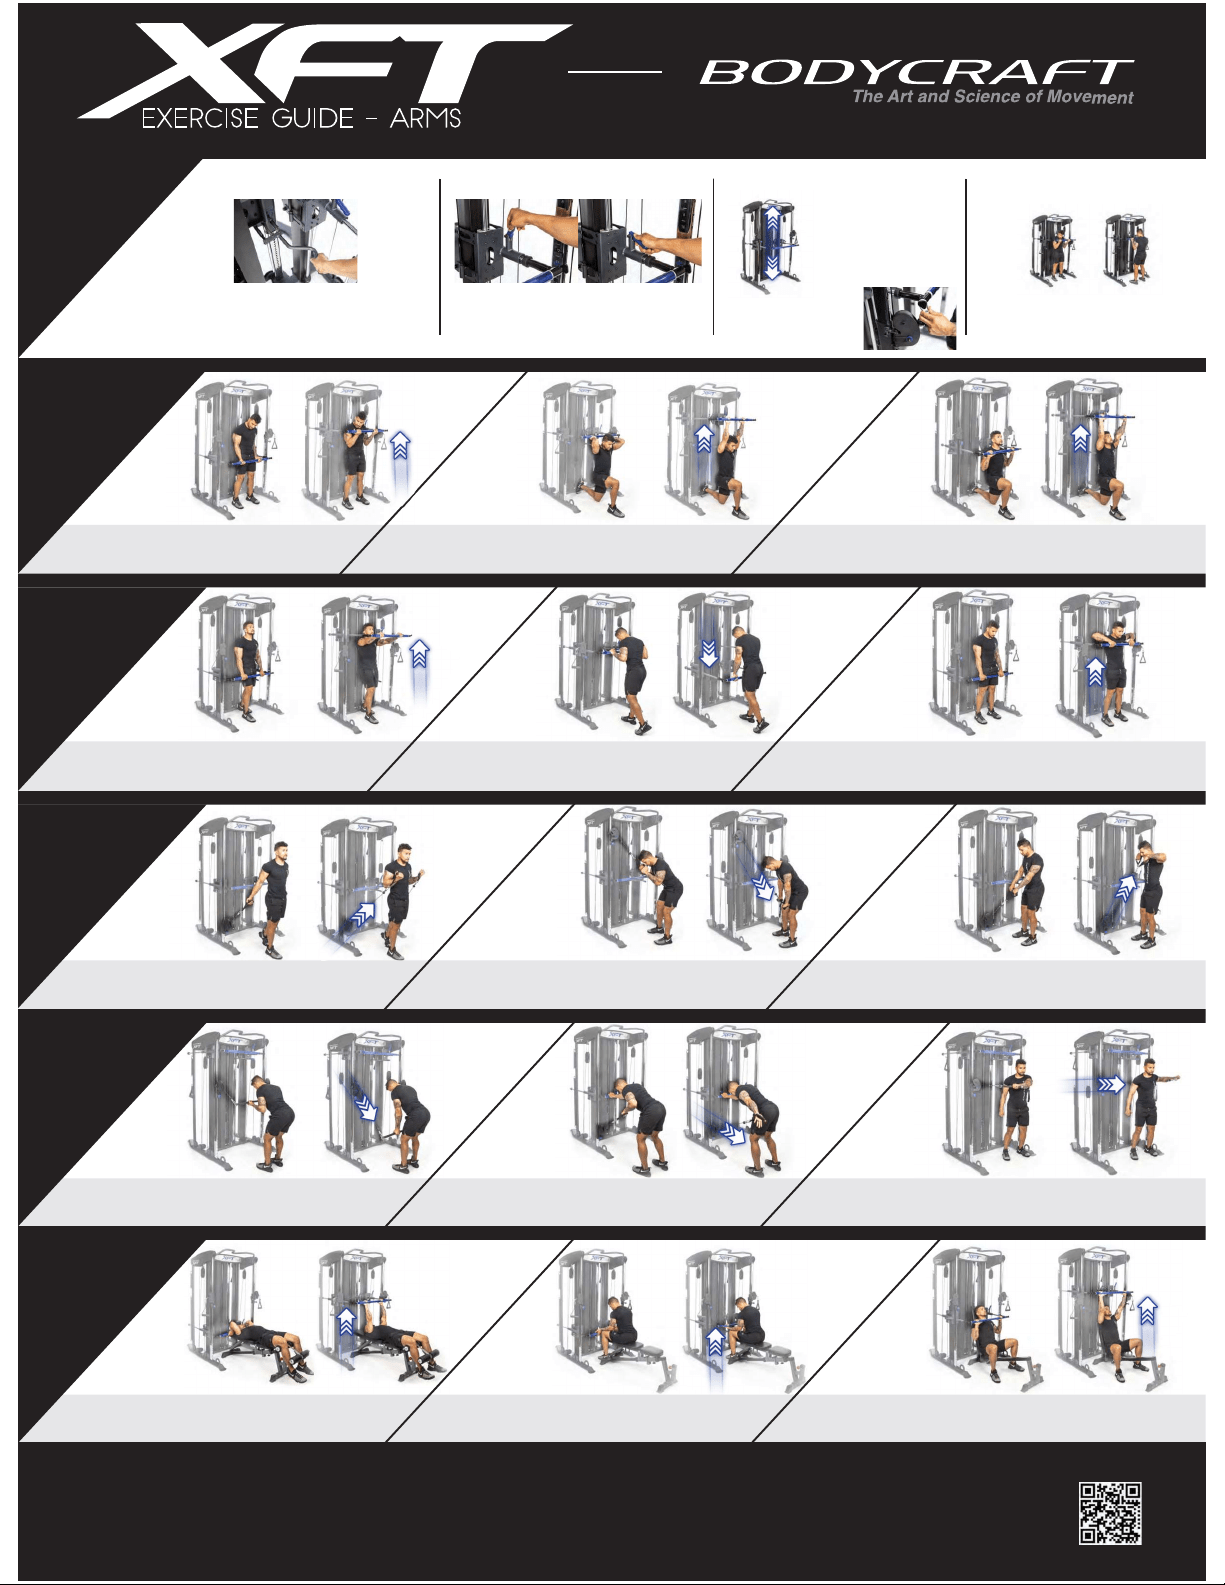
EXERCISE GUIDE - ARMS
Adjust the Bar to below your waist. Stand straight holding the Bar with an underhand grip,
your hands shoulder width apart. Keeping your upper arms stationary, curl the Bar
forward and up until the Bar is at shoulder level with your biceps fully contracted.
Return to the starting position. Repeat.
Kneel down and adjust the Bar to shoulder height. The Bar should be behind your head. Grasp the Bar
behind your head and lock elbows into place. Extend at elbows until your hands are above your head.
Lower and repeat.
BAR
T
r
iceps Push
dow
n
Fro
n
t Raise
Upr
i
ght Row
Adjust the Bar to below your waist. Keep your chest and head up. Place your hands in
an overhand grip on the Bar. Stand up with a tight core and flat back. Keeping a
slight bend in the elbows, raise the Bar up and in front of you. Pause when your
arms are parallel with the ground. Slowly lower the Bar to your hip. Repeat.
Adjust the Bar to shoulder height. Grip the Bar with an overhand grip, with your hands slightly less
than shoulder width apart. Lock your elbows to your sides and push the Bar down towards the
floor until your arms are fully extended. Return to the start position while keeping your elbows
stationary. Repeat.
Adjust the Bar to thigh height. Stand with your back straight, holding the Bar with an overhand grip. Keep
your arms extended with a slight bend at the elbows. Lift the Bar and raise your elbows up and out to the side.
Keep the Bar close to your body as you raise it up to your chin. Return to the start position.
Repeat.
Attach both Handles to one Pulley and lower it. Grip the Handles with an overhand grip with
your arms fully extended. Keep your shoulders back. Raise the Handles straight up in one
smooth movement, until it is just below your chin. Slowly lower to the start position
Repeat.
CABLE
Tri
ceps
Pulldown
B
i
ceps
C
u
r
l
Upright Ro
w
Lower both Pulleys and attach both Handles. Grip the Handles with a shoulder width
underhand grip. Keep your elbows close to your sides. Curl your arms upward from the
elbows in a smooth arc. Lower the Handles back to the starting position in a smooth motion.
Repeat.
CABLE
T
r
i
ceps K
i
ckbac
k
Reverse
C
url
Crossbody Pull
Adjust both Pulleys to shoulder height and attach the Long Bar. Grip the bar with an underhand grip.
This is the start position. Moving only your forearms, pull the Long Bar down towards the floor
until your arms are fully extended. Return to the start position moving your forearms only.
Repeat.
Adjust a Pulley to shoulder height and attach the Sport Stick. Reach across your body and grab the Sport
Stick using an overhand grip. Pull the Sport Stick in front of your body in a lateral motion and extend
your arm to the side. Slowly return to the starting position.
Repeat.
BENCH
Wr
i
s
t C
url
P
r
o
n
e Tri
c
eps
E
xtension
Seated
Shoulder
Press
Adjust the Bar to Flat Bench height. Place a bench so that the top is near the Bar. Lie on your back
and grab the Bar using an overhand grip. Keep the upper arms in place as you bend at the
elbow extend your arms above your head. Once the Bar reaches the top, pause and
slowly lower the Bar towards your head. Repeat.
HOW TO
USE
Lower a Pulley and attach one Handle. Grab the Handle of a lowered cable Pulley with one hand.
Keep a tight core and flat back as you bend at the hips, resting your opposite hand on the XFT.
This is the start position. Extend your hand behind you keeping your elbow to your side.
Repeat.
K
n
e
eli
n
g
Sh
o
ulder
Pr
e
ss
Place a bench inside the XFT Bar. While seated, adjust the Bar to shoulder height. Grip the Bar with
an overhand grip. Lift the Bar straight over your head by extending your arms. Then lower the Bar to
your shoulders slowly.
Repeat.
Adjust the Bar to Flat Bench height. Place a bench so that the top is near the Bar. Sit on the bench
and grasp the Bar using an underhand grip. Rest the back of your forearms on your upper thighs
with your palms facing up. Lower the Bar past your knees by bending your wrists only.
Now curl the Bar upwards. Repeat.
Attach both Handles to one Pulley and raise it to the top. Grip the Handles with an overhand grip. Lock
your elbows to your sides and pull the Handles down towards the floor until your arms are fully
extended. Return to the start position moving your forearms only.
Repeat.
ADJUST THE BAR HEIGHT LOCK THE BAR IN PLACE
UNLOCKED LOCKED
RESISTANCE/DOUBLE UP WORKOUT DIRECTION
To adjust the Bar height unlock the Quick-Set Handle by pulling it to the left.
Once the Quick-Set Handle is unlocked you can adjust the Bar vertically. Be sure
to lock the Bar back in place by pushing the Quick-Set Handle back to the right.
Note: Some workouts will require you to disengage the Bar, get into
starting position, and then engage the Bar.
The XFT Bar can be locked so it doesn’t move horizontally during a
workout. To lock the Bar in place make sure the Blue Handles are
down. To unlock the Bar make sure the Blue Handles are up.
Note: This makes the XFT function like a Smith machine.
Some workouts using the XFT Bar can be performed
facing either direction. For example: the pictures above
show a bicep curl being done facing away and towards
the XFT.
The XFT Bar has resistance In both directions.
Depending on the workout you will either be
pushing up or pulling down the XFT Bar.
Each weight plate is 10 pounds. The Bar has
1:1 ratio for 10 pounds resistance per plate.
The Cables provide a 2:1 ratio for 5 pounds
resistance per plate per side.
To double up the weight on the XFT Bar
place the pulley hooks onto the sides of
the XFT Bar. Hold the hooks vertically
and simply slide over the Bar ends.
The BodyCraft XFT has been designed to provide exercises for your entire body. This poster illustrates only a sample of available exercises. We hope you enjoy many healthy years of use. Learning to use and maintain your XFT is very important for your personal safety and the proper function of the machine. Be sure to read all of the
information carefully before using. The information in this guide is general in nature; for detailed information about exercise, consult your physician and your local fitness dealer. Your local fitness dealer can provide reputable books and referrals to personal trainers. WARNING: Before beginning this or any exercise program,consult
your physician. This is especially important for persons over the age of 35, or with preexisting health problems. Recreation Supply, Inc. assumes no responsibility for injury or property damage sustained by or through the use of this product. GENERAL EXERCISE GUIDELINES: There are many theories as to the proper number of
repetitions and sets of repetitions of any specific exercise. In fact, we are all unique individuals and what may be effective for one person may not be for the next. For your specific needs, we recommend consultations with your fitness dealer or a certified personal trainer. For general guidelines, we recommend 6-12 repetitions per
set and 2-3 sets per any given exercise. Intensity is more important than the number of reps and sets. The amount a muscle group is stressed (to failure) is directly proportional to the amount of increased strength/growth. Please remember to start easy and increase the total time and the number of repetitions gradually. Overdoing
it in the beginning can cause unnecessary muscle soreness. If at any time you feel excessive pain, stop immediately. Determine what is wrong before continuing. Rest is a very important part of the process. Begin each session with a 5-15 minute warm up period of light exercise and stretching. During the routine, be sure to
maintain proper form and move through the full range of motion. Be sure to breathe naturally; do not hold your breath. End each session with a 5-10 minutes of light stretching. Stretching can help relieve soreness and increase flexibility. Plan to spend the first two weeks getting familiar with the machine and accustomed to the
routines. Do not quit! Variety of exercises can be a motivating factor. Remain committed and your exercise time will soon become a time you anticipate.
© 2020 - Bodycraft® is a division of Recreation Supply, Inc. 7699 Green Meadows Dr N, Lewis Center, OH 43035 Phone: 800-990-5556 Fax: 740-965-2449
For videos, guides, and information
scan the QR code below.
Adjust the bar to below your waist. Grab the bar with an overhand grip. Your arms should
be fully extended towards the floor. Raise (shrug) your shoulders up in a slow movement.
Do not use your biceps to assist in lifting the barbell. Lower your shoulders using a smooth
movement. Repeat.
BAR
Lat P
ul
l
Down
Bent Ov
e
r Row
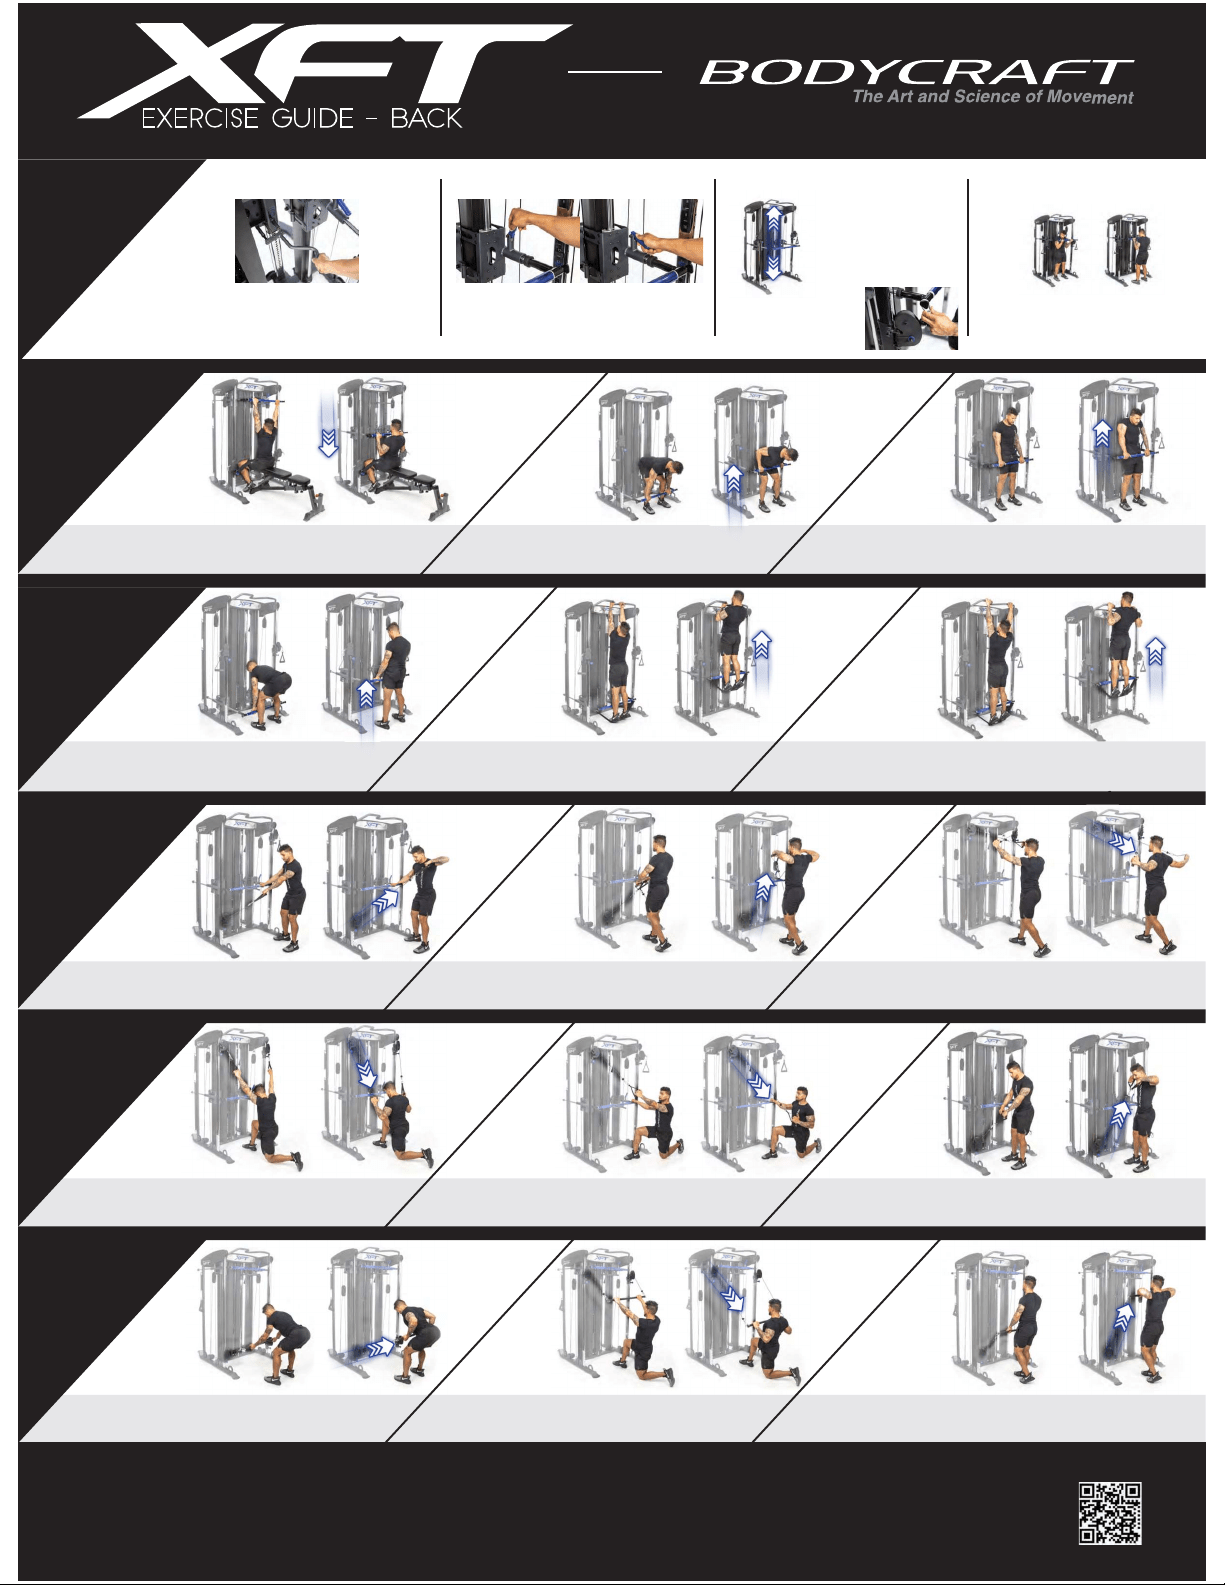
EXERCISE GUIDE - back
Center a Flat Bench so that the top is near the weight stack. Sit on the bench and adjust the Bar upward to
full arms length. Attach the Assist Strap to the Pop Pins and then adjust both pulleys downward until the
Assist Strap is tight across your knees. Grab the Bar with an overhand grip slightly wider than shoulder
width. Pull the Bar down to your chest. Slowly allow the Bar to rise to the starting position. Repeat.
BAR
As
s
iste
d
Chin U
p
D
e
adl
if
t
Assisted Pull Up
Adjust the Bar to waist height and lock it in place using the Quick-Set Handle. Attach the Assist Strap to both ends
of the Bar. Push the Bar down toward the floor and CAREFULLY step onto the Assist Strap. Grab the Chin Bar using
a wide overhand grip. Pull yourself up so your chin is above the Pull Up Bar. Lower yourself slowly. Do not lock out
the elbow. Repeat. CAREFULLY step off the Assist Strap.
Raise both Pulleys and attach a Handle to each. Using an overhand grip, grab the right Pulley with
your left hand and the left Pulley with your right so that the cables cross. Keeping only a slight bend
at your elbow, pull the Handles back across your body using the muscles in your back. Slowly go
back to the starting position Repeat.
CABLE
Rear Delt
One Arm
Low Row
Revers
e
F
ly
Attach a Handle to a Low Pulley. Grab the handle with an overhand grip. With a tight core,
pull back bending at the elbow, expanding your chest while tightening your back. Hold the
contraction in your back and slowly bring your arm back to the starting point.
Repeat.
Lower both Pulleys and attach a Handle to each. Using an overhand grip, grab the right Pulley with
your left hand and the left Pulley with your right so that the cables cross. Engage your abs and
pull the Handles towards your face. Separate your hands as you pull. Slowly go back to the
starting position. Repeat.
CABLE
O
n
e
A
r
m
Hi
gh
Row
K
n
eeli
n
g Lat
Pulldo
w
n
Upr
i
ght r
ow
Raise both Pulleys and attach a Handle to each. Using an overhand grip grab both Handles
and kneel down. Pull the Handles towards the top of your chest while arcing your elbows
out to the sides of your body. Return to the start position by arcing your elbows
forward while relaxing your shoulders. Repeat.
LONG
BAR
K
n
e
eling Hi
g
h
Row
Reverse Grip
Row
Upright Ro
w
Lower both Pulleys and attach the Long Bar to each side. Lean forward, keeping your back
straight and grip the Long Bar using an underhand grip. Keeping your torso stationary,
pull the Long Bar back towards you. Return to the start position in a smooth movement.
Repeat.
HOW TO
USE
The BodyCraft XFT has been designed to provide exercises for your entire body. This poster illustrates only a sample of available exercises. We hope you enjoy many healthy years of use. Learning to use and maintain your XFT is very important for your personal safety and the proper function of the machine. Be sure to read all of the
information carefully before using. The information in this guide is general in nature; for detailed information about exercise, consult your physician and your local fitness dealer. Your local fitness dealer can provide reputable books and referrals to personal trainers. WARNING: Before beginning this or any exercise program,consult
your physician. This is especially important for persons over the age of 35, or with preexisting health problems. Recreation Supply, Inc. assumes no responsibility for injury or property damage sustained by or through the use of this product. GENERAL EXERCISE GUIDELINES: There are many theories as to the proper number of
repetitions and sets of repetitions of any specific exercise. In fact, we are all unique individuals and what may be effective for one person may not be for the next. For your specific needs, we recommend consultations with your fitness dealer or a certified personal trainer. For general guidelines, we recommend 6-12 repetitions per
set and 2-3 sets per any given exercise. Intensity is more important than the number of reps and sets. The amount a muscle group is stressed (to failure) is directly proportional to the amount of increased strength/growth. Please remember to start easy and increase the total time and the number of repetitions gradually. Overdoing
it in the beginning can cause unnecessary muscle soreness. If at any time you feel excessive pain, stop immediately. Determine what is wrong before continuing. Rest is a very important part of the process. Begin each session with a 5-15 minute warm up period of light exercise and stretching. During the routine, be sure to
maintain proper form and move through the full range of motion. Be sure to breathe naturally; do not hold your breath. End each session with a 5-10 minutes of light stretching. Stretching can help relieve soreness and increase flexibility. Plan to spend the first two weeks getting familiar with the machine and accustomed to the
routines. Do not quit! Variety of exercises can be a motivating factor. Remain committed and your exercise time will soon become a time you anticipate.
© 2020 - Bodycraft® is a division of Recreation Supply, Inc. 7699 Green Meadows Dr N, Lewis Center, OH 43035 Phone: 800-990-5556 Fax: 740-965-2449
Shrugs
Adjust the Bar to the lowest position. Bend forward at your waist and grip the Bar with
an overhand grip. Keep your back straight and roughly parallel to the floor. Without
moving your torso, lift the Bar up towards your stomach. Return to the start position.
Repeat.
Adjust the Bar to waist height and lock it in place using the Quick-Set Handle. Attach the Assist Strap to
both ends of the Bar. Push the Bar down toward the floor and CAREFULLY step onto the Assist Strap.
Grab the Chin Bar using an underhand grip. Pull yourself up so your chin is above the Pull Up Bar.
Lower yourself slowly. Do not lock out the elbow. Repeat. CAREFULLY step off the Assist Strap.
Adjust the Bar to the bottom. Place your feet shoulder width apart. Bend over and grab the Bar with
an overhand, shoulder width grip. Bend your knees until your shins almost touch the Bar. Lift your
chest and straighten your back. Slowly stand up while holding the Bar. Lower the Bar to the
bottom. Repeat.
Attach both Handles to one Pulley and lower it. Grip the Handles with an overhand grip with
your arms fully extended. Keep your shoulders back. Raise the Handles straight up in one
smooth movement, until it is just below your chin. Slowly lower to the start position
Repeat.
Attach a Handle to a High Pulley. Grab the Handle with an overhand grip and kneel down. With
a tight core, pull back bending at the elbow, expanding your chest while tightening your back.
Hold the contraction in your back and slowly bring your arm back to the starting point.
Repeat.
Raise both Pulleys and attach the Long Bar to each side. Grab the Long Bar with an overhand grip
and kneel down. With a tight core, pull back bending at the elbow, expanding your chest while
tightening your back. Hold the contraction in your back and slowly bring your arms back to
the starting point. Repeat.
Lower both Pulleys and attach the Long Bar to each side. Grip the Long Bar with an overhand grip with
your arms fully extended. Keep your shoulders back. Raise the Long Bar straight up in one smooth
movement, until it is just below your chin. Slowly lower to the start position
Repeat.
ADJUST THE BAR HEIGHT LOCK THE BAR IN PLACE
UNLOCKED LOCKED
RESISTANCE/DOUBLE UP WORKOUT DIRECTION
To adjust the Bar height unlock the Quick-Set Handle by pulling it to the left.
Once the Quick-Set Handle is unlocked you can adjust the Bar vertically. Be sure
to lock the Bar back in place by pushing the Quick-Set Handle back to the right.
Note: Some workouts will require you to disengage the Bar, get into
starting position, and then engage the Bar.
The XFT Bar can be locked so it doesn’t move horizontally during a
workout. To lock the Bar in place make sure the Blue Handles are
down. To unlock the Bar make sure the Blue Handles are up.
Note: This makes the XFT function like a Smith machine.
Some workouts using the XFT Bar can be performed
facing either direction. For example: the pictures above
show a bicep curl being done facing away and towards
the XFT.
The XFT Bar has resistance In both directions.
Depending on the workout you will either be
pushing up or pulling down the XFT Bar.
Each weight plate is 10 pounds. The Bar has
1:1 ratio for 10 pounds resistance per plate.
The Cables provide a 2:1 ratio for 5 pounds
resistance per plate per side.
To double up the weight on the XFT Bar
place the pulley hooks onto the sides of
the XFT Bar. Hold the hooks vertically
and simply slide over the Bar ends.
For videos, guides, and information
scan the QR code below.
BAR
B
ench
Pre
s
s
In
cli
ne
Be
n
c
h
Pr
e
ss
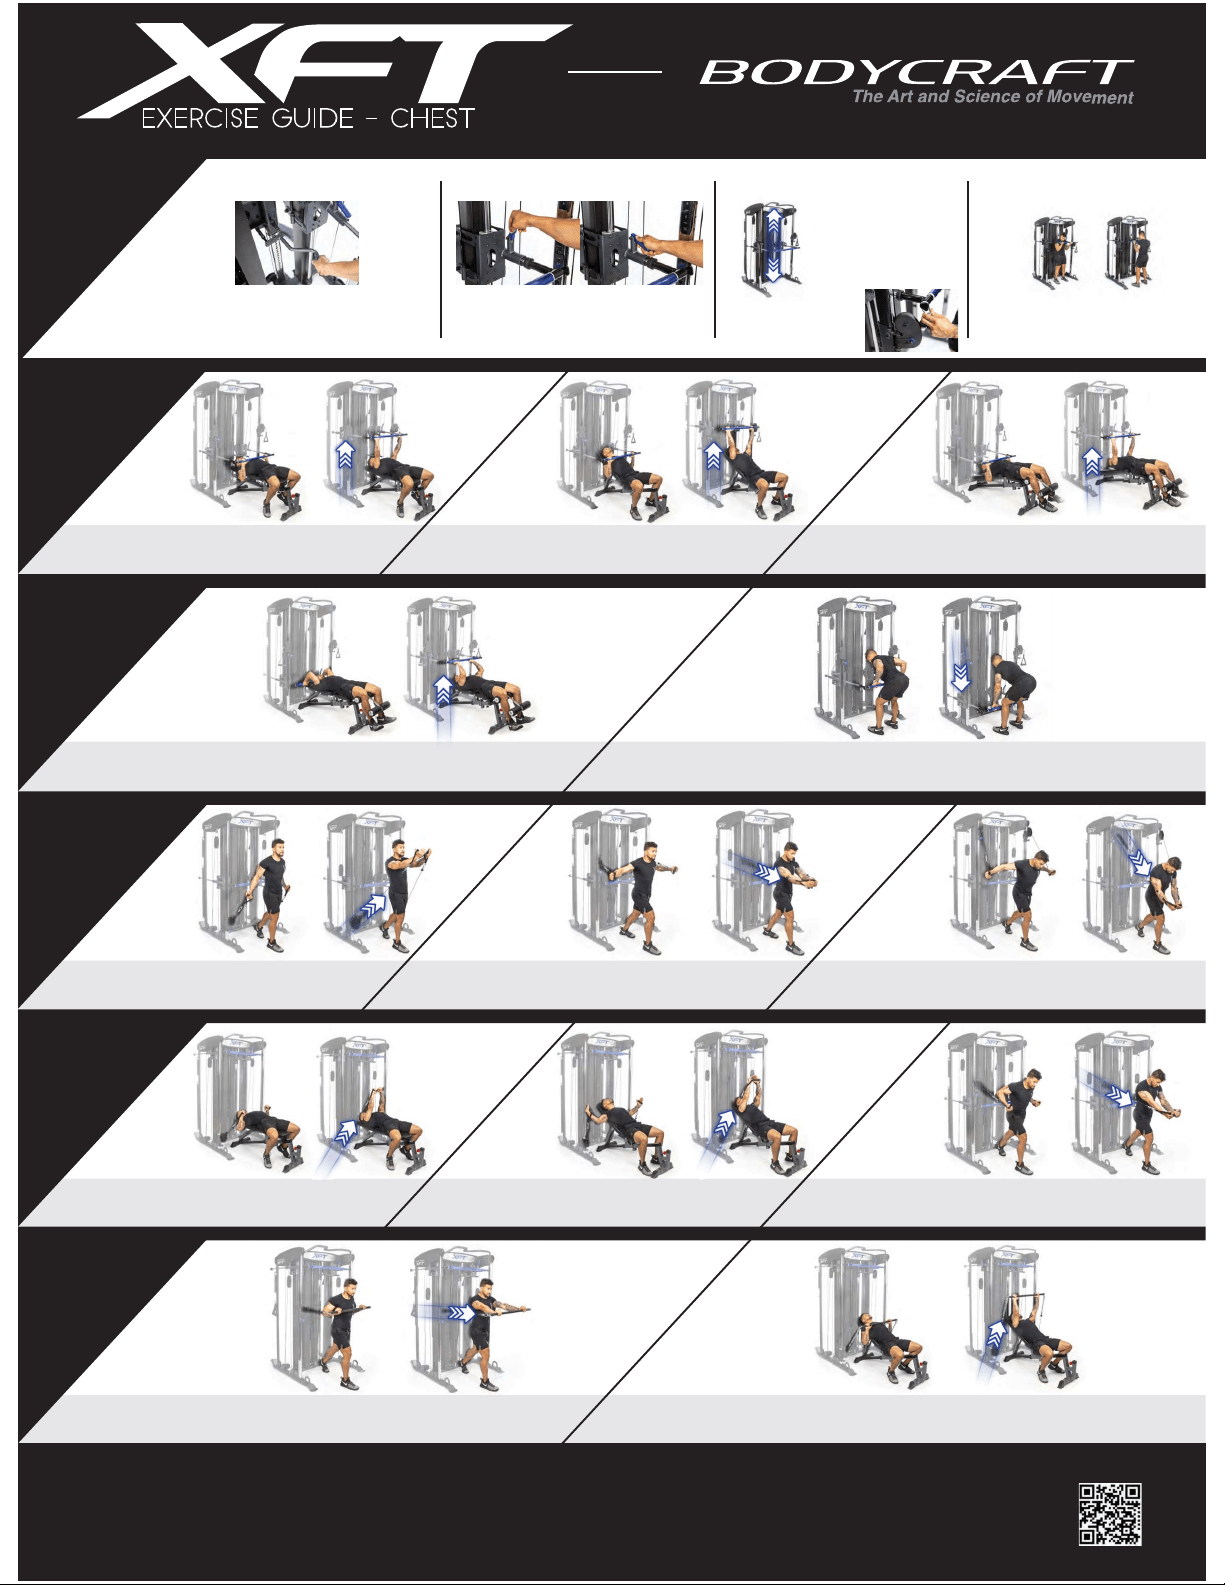
EXERCISE GUIDE - CHEST
Center a bench near the weight stack. Adjust the bench so it is at an incline. Lie on your back, and
adjust the Bar height to chest level using the Quick-Set Handle. Using an overhand grip, push the Bar
straight up until your arms are extended. Lower the Bar slowly until it touches your chest. Repeat.
When done, use the Quick-Set Handle to adjust the Bar height to full arms length and exit XFT.
BAR
P
u
llo
v
er
D
e
c
l
in
e
B
e
nch
Pres
s
CABLE
Mid
Fly
Low
F
ly
Hi
gh
Fl
y
CABLE
Incl
in
e
F
ly
B
e
nch
Press
Underhand Press
LONG
BAR
Incl
i
ne Press
Standing Che
s
t
Press
HOW TO
USE
St
an
di
n
g Bar
Di
p
s
Center a bench near the weight stack. Adjust the bench so it is at a decline. Lie on your back, and adjust the
Bar height to chest level using the Quick-Set Handle, then lock the Bar into place. Using an overhand grip,
push the Bar up until your arms are fully extended. Lower the Bar slowly until it touches the middle of your
chest. Repeat. When done, use the Quick-Set Handle to adjust the Bar height to full arms' length and exit XFT.
Place a bench so that the top is near the weight stack and centered. Adjust the bench so it is flat. Use the Quick-Set Handle to lower the
Bar to bench height. Lie on your back and grab the Bar using an overhand grip. Pull the Bar from behind your head to over your chest
keeping arms locked and rotating at shoulders. Once the Bar reaches the top, pause and slowly lower the Bar behind your head.
Repeat.
Adjust bar height to chest level. With a slight bend at the waist, push the bar straight down until your arms are fully extended.
Return to the chest.
Repeat.
Lower both Pulleys and attach both Handles. Grip the Handles with an underhand grip.
With your chest up, bring the Handles up and to the front of your body. The Handles will
meet at shoulder height. Then slowly lower the Handles to the starting position.
Repeat.
Adjust both Pulleys to chest height and attach both Handles. Grip the Handles with a neutral grip.
With your chest up, bring the Handles around and to the front of your body. The Handles will meet at
chest height and arms extended. Then slowly bring the Handles to the starting position.
Repeat.
Adjust both Pulleys to a high position and attach both Handles. Grip the Handles with an overhand
grip. With your chest up, bring the Handles down, around, and to the front of your body. The Handles
will meet at waist height and arms extended. Then slowly bring the Handles to the starting position.
Repeat.
Lower both Pulleys and attach both Handles. Place a bench so that the top is near the weight stack
and centered. Adjust the bench so it has a slight incline. Lie on your back and grab the Handles using
a neutral grip. Allow the Handles to pull your arms outwards. In a semi-circular motion, pull the
Handles upwards and converge above your chest. Lower to starting position. Repeat.
Lower both Pulleys and attach both Handles. Place a bench so that the top is near the
weight stack and centered. Lie on your back and grab the Handles using an overhand grip.
Push the Handles straight up and together until your arms are extended. Lower the Handles
slowly to the starting position. Repeat.
Adjust both Pulleys to chest height and attach both Handles. Grip the Handles with an underhand
grip. Bend your elbows so that the Handles are by you sides. Extending through your elbows with
palms up push the Handles forward until your arms are extended.
Repeat.
Adjust the Pulleys to the bottom and attach the Long Bar using the chains. Place a bench so that the top is near the weight stack and
centered. Adjust the bench so it has a slight incline. Lie on your back and grab the Long Bar using an overhand grip. Push the Long
Bar straight up until your arms are fully extended. Lower the Long Bar slowly until it touches your upper chest.
Repeat.
Adjust the Pulleys to chest height and attach the Long Bar using the chains. Standing with one foot in front of the other grab the Long
Bar using an overhand grip. Push the Long Bar straight out until your arms are fully extended. Bring the Long Bar back to your chest
slowly until it touches your mid chest.
Repeat.
Center a bench near the weight stack. Adjust the bench so it is flat. Lie on your back, and adjust the
Bar height to chest level using the Quick-Set Handle. Using an overhand grip, push the Bar straight
up until your arms are extended. Lower the Bar slowly until it touches your chest. Repeat. When
done, use the Quick-Set Handle to adjust the Bar height to full arms length and exit XFT.
ADJUST THE BAR HEIGHT LOCK THE BAR IN PLACE
UNLOCKED LOCKED
RESISTANCE/DOUBLE UP WORKOUT DIRECTION
To adjust the Bar height unlock the Quick-Set Handle by pulling it to the left.
Once the Quick-Set Handle is unlocked you can adjust the Bar vertically. Be sure
to lock the Bar back in place by pushing the Quick-Set Handle back to the right.
Note: Some workouts will require you to disengage the Bar, get into
starting position, and then engage the Bar.
The XFT Bar can be locked so it doesn’t move horizontally during a
workout. To lock the Bar in place make sure the Blue Handles are
down. To unlock the Bar make sure the Blue Handles are up.
Note: This makes the XFT function like a Smith machine.
Some workouts using the XFT Bar can be performed
facing either direction. For example: the pictures above
show a bicep curl being done facing away and towards
the XFT.
The XFT Bar has resistance In both directions.
Depending on the workout you will either be
pushing up or pulling down the XFT Bar.
Each weight plate is 10 pounds. The Bar has
1:1 ratio for 10 pounds resistance per plate.
The Cables provide a 2:1 ratio for 5 pounds
resistance per plate per side.
To double up the weight on the XFT Bar
place the pulley hooks onto the sides of
the XFT Bar. Hold the hooks vertically
and simply slide over the Bar ends.
The BodyCraft XFT has been designed to provide exercises for your entire body. This poster illustrates only a sample of available exercises. We hope you enjoy many healthy years of use. Learning to use and maintain your XFT is very important for your personal safety and the proper function of the machine. Be sure to read all of the
information carefully before using. The information in this guide is general in nature; for detailed information about exercise, consult your physician and your local fitness dealer. Your local fitness dealer can provide reputable books and referrals to personal trainers. WARNING: Before beginning this or any exercise program,consult
your physician. This is especially important for persons over the age of 35, or with preexisting health problems. Recreation Supply, Inc. assumes no responsibility for injury or property damage sustained by or through the use of this product. GENERAL EXERCISE GUIDELINES: There are many theories as to the proper number of
repetitions and sets of repetitions of any specific exercise. In fact, we are all unique individuals and what may be effective for one person may not be for the next. For your specific needs, we recommend consultations with your fitness dealer or a certified personal trainer. For general guidelines, we recommend 6-12 repetitions per
set and 2-3 sets per any given exercise. Intensity is more important than the number of reps and sets. The amount a muscle group is stressed (to failure) is directly proportional to the amount of increased strength/growth. Please remember to start easy and increase the total time and the number of repetitions gradually. Overdoing
it in the beginning can cause unnecessary muscle soreness. If at any time you feel excessive pain, stop immediately. Determine what is wrong before continuing. Rest is a very important part of the process. Begin each session with a 5-15 minute warm up period of light exercise and stretching. During the routine, be sure to
maintain proper form and move through the full range of motion. Be sure to breathe naturally; do not hold your breath. End each session with a 5-10 minutes of light stretching. Stretching can help relieve soreness and increase flexibility. Plan to spend the first two weeks getting familiar with the machine and accustomed to the
routines. Do not quit! Variety of exercises can be a motivating factor. Remain committed and your exercise time will soon become a time you anticipate.
© 2020 - Bodycraft® is a division of Recreation Supply, Inc. 7699 Green Meadows Dr N, Lewis Center, OH 43035 Phone: 800-990-5556 Fax: 740-965-2449
For videos, guides, and information
scan the QR code below.
HOW TO
USE
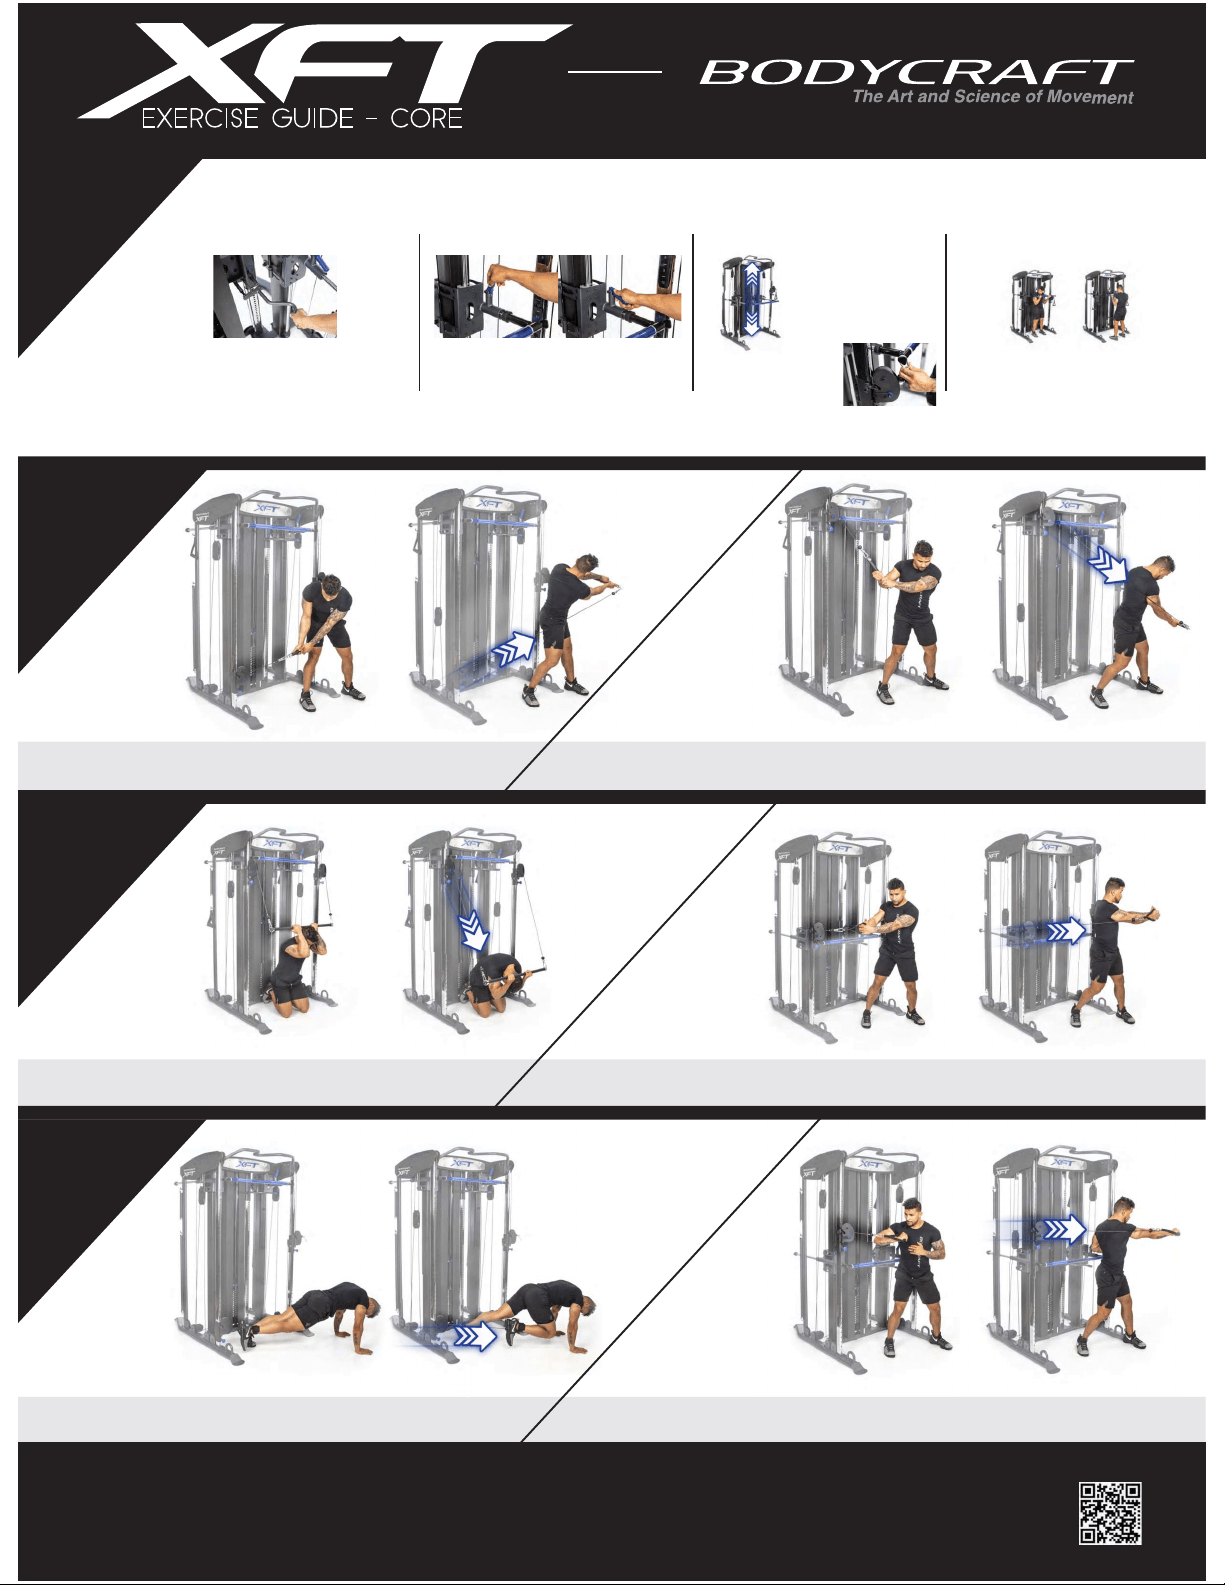
EXERCISE GUIDE - Core
SPORTS
STICK
Wood
Ch
op High To Low
Wood Chop Low To High
Adjust one Pulley to a low position an attach the Sports Stick. Standing with your feet shoulder width apart and to the side of
the Pulley grip the Sports Stick with both hands. Keeping your arms extended pull the Sports Stick across your body to your
opposite side. Start at knee height and end at shoulder height. Allow your hips and torso to rotate.
Repeat.
CABLE
Core Twist
Ab Crunc
h
Adjust both Pulleys to a high position and attach the Long Bar. Using both hands grip the Long Bar with an overhand
grip. Kneel down facing away from the XFT and hold the Long Bar behind your head. Using your abdominal muscles,
crunch your chest toward your hips until your head is at your knees.
Repeat.
Adjust a Pulley to mid height and attach a Handle. Hold the Handle with both hands. Keeping your arms straight, rotate your torso to the
opposite side until the cable makes contact with your shoulder. Slowly return to the start position.
Repeat.
CABLE
Twist To Press
K
n
ees
To
C
h
es
t
Adjust a Pulley to a low position and attach the Ankle Cuff. With the Ankle Cuff attached to your leg get into a plank position.
While in plank position raise your knee toward your chest. Slowly return to the start position.
Repeat.
Adjust one Pulley to a high position an attach the Sports Stick. Standing with your feet shoulder width apart and to the side of
the Pulley grip the Sports Stick with both hands. Keeping your arms extended pull the Sports Stick across your body to your
opposite side. Start at shoulder height and end at thigh height. Allow your hips and torso to rotate.
Repeat.
Adjust a Pulley to mid height and attach a Handle. Grip the Handle with one hand using an overhand grip. Using your core twist your body
away from the XFT. While twisting, press the Handle forward extending through your elbow. Your arm should be extended and in front of
your chest. Return to the start position.
Repeat.
ADJUST THE BAR HEIGHT LOCK THE BAR IN PLACE
UNLOCKED LOCKED
RESISTANCE/DOUBLE UP WORKOUT DIRECTION
To adjust the Bar height unlock the Quick-Set Handle by pulling it to the left.
Once the Quick-Set Handle is unlocked you can adjust the Bar vertically. Be sure
to lock the Bar back in place by pushing the Quick-Set Handle back to the right.
Note: Some workouts will require you to disengage the Bar, get into
starting position, and then engage the Bar.
The XFT Bar can be locked so it doesn’t move horizontally during a
workout. To lock the Bar in place make sure the Blue Handles are
down. To unlock the Bar make sure the Blue Handles are up.
Note: This makes the XFT function like a Smith machine.
Some workouts using the XFT Bar can be performed
facing either direction. For example: the pictures above
show a bicep curl being done facing away and towards
the XFT.
The XFT Bar has resistance In both directions.
Depending on the workout you will either be
pushing up or pulling down the XFT Bar.
Each weight plate is 10 pounds. The Bar has
1:1 ratio for 10 pounds resistance per plate.
The Cables provide a 2:1 ratio for 5 pounds
resistance per plate per side.
To double up the weight on the XFT Bar
place the pulley hooks onto the sides of
the XFT Bar. Hold the hooks vertically
and simply slide over the Bar ends.
Quick-Set HandleQuick-Set Handle
The BodyCraft XFT has been designed to provide exercises for your entire body. This poster illustrates only a sample of available exercises. We hope you enjoy many healthy years of use. Learning to use and maintain your XFT is very important for your personal safety and the proper function of the machine. Be sure to read all of the
information carefully before using. The information in this guide is general in nature; for detailed information about exercise, consult your physician and your local fitness dealer. Your local fitness dealer can provide reputable books and referrals to personal trainers. WARNING: Before beginning this or any exercise program,consult
your physician. This is especially important for persons over the age of 35, or with preexisting health problems. Recreation Supply, Inc. assumes no responsibility for injury or property damage sustained by or through the use of this product. GENERAL EXERCISE GUIDELINES: There are many theories as to the proper number of
repetitions and sets of repetitions of any specific exercise. In fact, we are all unique individuals and what may be effective for one person may not be for the next. For your specific needs, we recommend consultations with your fitness dealer or a certified personal trainer. For general guidelines, we recommend 6-12 repetitions per
set and 2-3 sets per any given exercise. Intensity is more important than the number of reps and sets. The amount a muscle group is stressed (to failure) is directly proportional to the amount of increased strength/growth. Please remember to start easy and increase the total time and the number of repetitions gradually. Overdoing
it in the beginning can cause unnecessary muscle soreness. If at any time you feel excessive pain, stop immediately. Determine what is wrong before continuing. Rest is a very important part of the process. Begin each session with a 5-15 minute warm up period of light exercise and stretching. During the routine, be sure to
maintain proper form and move through the full range of motion. Be sure to breathe naturally; do not hold your breath. End each session with a 5-10 minutes of light stretching. Stretching can help relieve soreness and increase flexibility. Plan to spend the first two weeks getting familiar with the machine and accustomed to the
routines. Do not quit! Variety of exercises can be a motivating factor. Remain committed and your exercise time will soon become a time you anticipate.
© 2020 - Bodycraft® is a division of Recreation Supply, Inc. 7699 Green Meadows Dr N, Lewis Center, OH 43035 Phone: 800-990-5556 Fax: 740-965-2449
For videos, guides, and information
scan the QR code below.
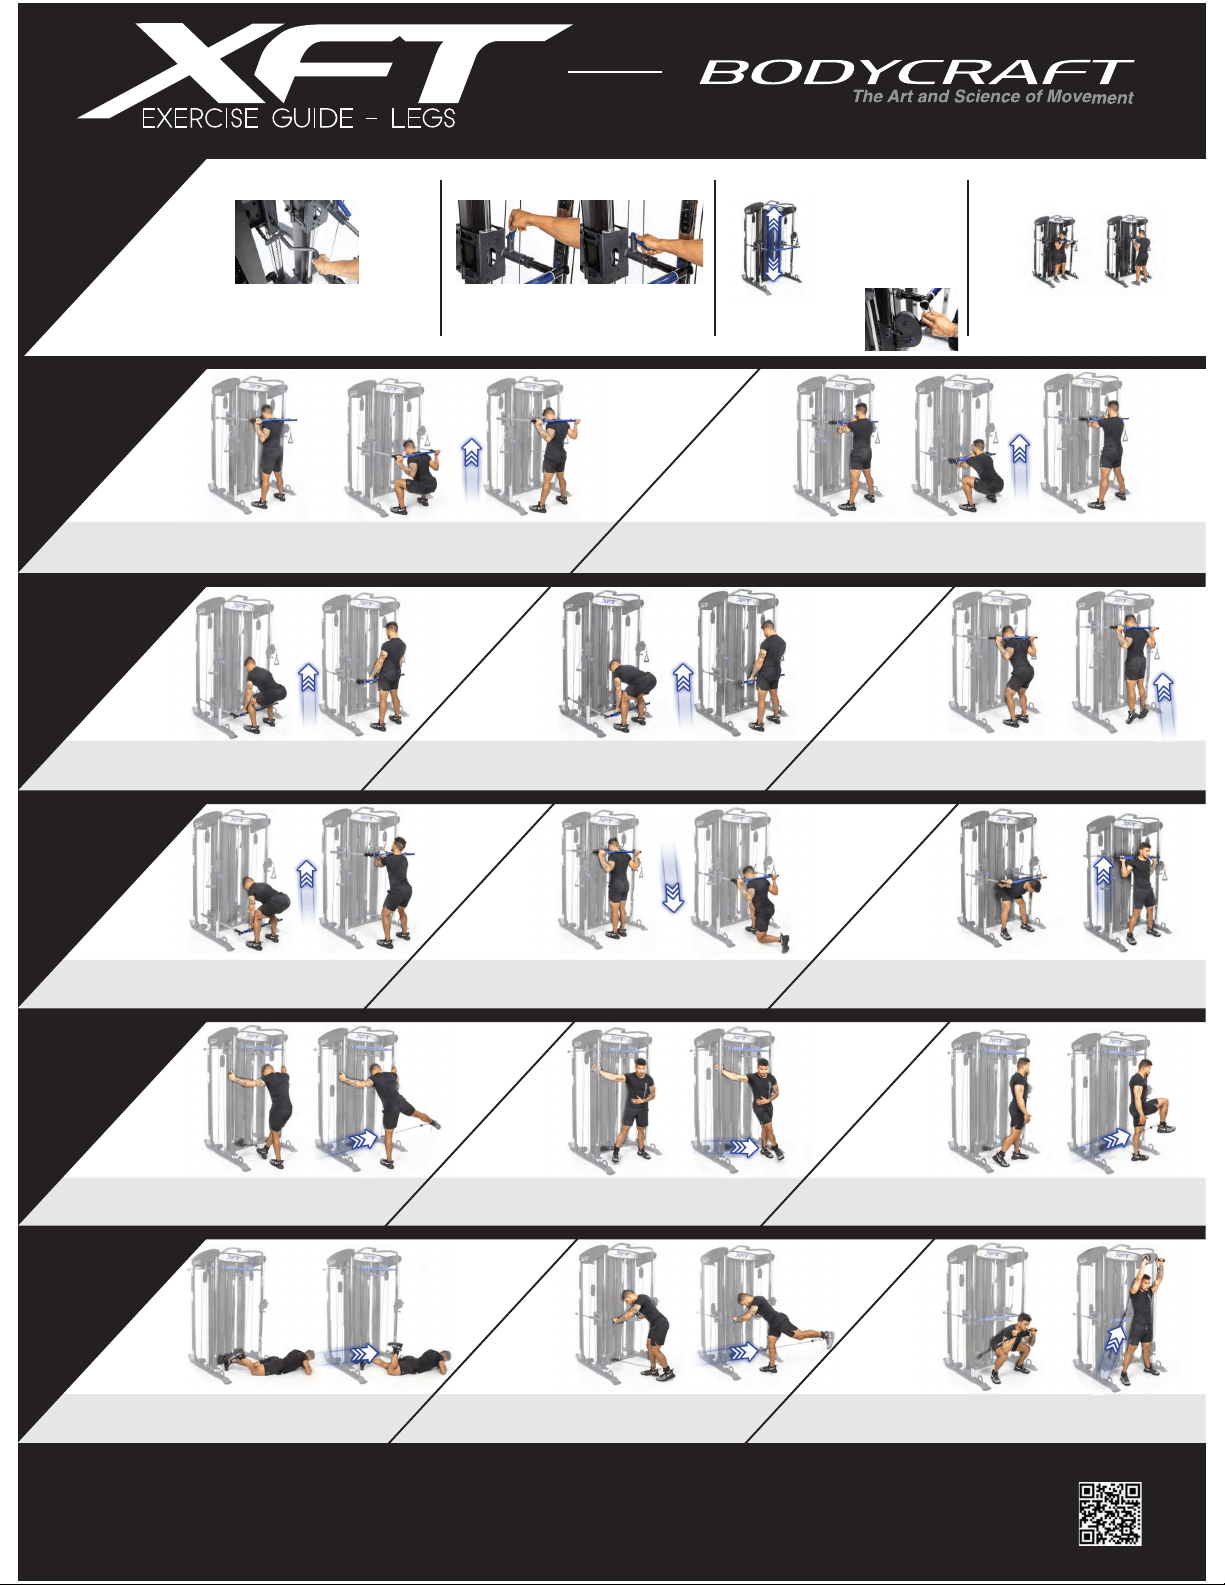
BAR
Barbell
C
lean
Squat
EXERCISE GUIDE - Legs
Raise the Bar to shoulder height and position your body under it so that the Bar is resting high on the back of your shoulders. Grip the Bar with your hands
comfortably wider than your shoulders and stand with your feet shoulder width apart. Unlock the Quick-Set Handle to disengage the weight and sit down
into a squat position until your thighs are parallel to the floor. Lock the Quick-Set Handle to engage the weight. Push up through your heels while until you
are standing upright. Repeat. When done, disengage the Quick-Set Handle at the bottom to then safely raise the bar. Lock at standing height and exit.
Adjust the Bar to the bottom. Stand with your feet a little wider than shoulder width apart with
your hands firmly gripped on the Bar at about the same width as your feet. Thrust your hips
forward into the Bar. At the same time bring the Bar up along your body using the initial
thrust. Finish with the Bar resting across your upper pectoral muscles. Repeat.
BAR
R
ev
erse Lunge
Fro
nt
S
q
uat
Kneel down and adjust the Bar so it is resting on your shoulders. Grip the Bar using an overhand grip with your
elbows bent. Stand up straight with a tight core. Slowly, step back with one foot. Your toes should be straight
and facing forward. Keep the front knee bent. Bend and lower the back knee to where it is just above the
ground. Step forward to the starting position. Repeat.
Adjust the Bar so it is just below shoulder height. Position the Bar across your Trap muscles.
With a tight core and flat back, raise yourself up with your feet only. Pause at the top of the
raise. Slowly lower yourself down but do not touch the ground.
Repeat.
BAR
St
r
aight L
e
g
Dead Lift
D
e
ad
Li
f
t
Calf
Raise
Adjust the Bar to the bottom. Place your feet shoulder width apart. Squat down, keeping your
back straight and grip the Bar with an overhand grip. Extend your arms and stand up. As you
lift the Bar your back should be straight. Standing straight, rotate your shoulders back.
Lower the Bar back to the floor. Repeat.
CABLE
Hi
p
Addu
ct
i
on
H
i
p A
b
d
uct
i
on
Knee R
a
is
e
Attach the Ankle Cuff to a low Pulley. Hold the XFT for balance and slowly lift your leg up
to the outside of your body. Pause and slowly return your leg to starting position.
Repeat.
CABLE
L
e
g Kickb
a
ck
Leg Cu
rl
HOW TO
USE
Adjust a Pulley to a low position and attach the Ankle Cuff. Hold on to the XFT if you need to.
Brace your core and maintain a flat back as you kick your leg back and up. Slowly return
your leg to the starting position, not allowing the foot to touch the ground.
Repeat.
S
q
uat To Press
Adjust the Pulleys to the bottom and attach a Handle to each. Squat with your feet shoulder-width apart
with the Handles above your shoulders. Push through your heels to stand while pressing the Handles
overhead with arms fully extended. Squat down keeping your back flat and your knees over your toes.
Repeat.
Raise the Bar to shoulder height so that the Bar is resting high on the front of your shoulders. Keeping your elbows high, place your arms up and under
the Bar. The Bar should be resting on the front of your shoulders. Stand with your feet shoulder width apart. Unlock the Quick-Set Handle to disengage
the weight and sit down into a squat position until your thighs are parallel to the floor. Lock the Quick-Set Handle to engage the weight. Push up
through your heels while straightening your hips and knees, until you are standing straight. Repeat
Adjust the Bar to the bottom. Place your feet shoulder width apart. Bend at the waist keeping your back
straight and knees slightly bent until you feel tension in your hamstrings. Grip the Bar with an overhand
grip. Extend your arms and stand up. As you lift the Bar your back should be straight. Standing
straight, rotate your shoulders back. Lower the Bar back to the floor. Repeat.
Attach the Ankle Cuff to a low Pulley. Hold the XFT for balance and slowly lift your leg up
and across your body. Pause and slowly return your leg to starting position.
Repeat.
Attach the Ankle Cuff to a low Pulley. Hold the XFT for balance and slowly lift your leg up,
bending your knee and raising it above your waist. Pause and slowly return your leg to
starting position.
Repeat.
Adjust a Pulley to a low position and attach the Ankle Cuff. Lie face down and make sure your
leg is fully extended. Remaining flat , with no arching of your spine, curl your leg up in an
arching motion by bending your knees. Slowly lower your legs to the starting position.
Repeat.
ADJUST THE BAR HEIGHT LOCK THE BAR IN PLACE
UNLOCKED LOCKED
RESISTANCE/DOUBLE UP WORKOUT DIRECTION
To adjust the Bar height unlock the Quick-Set Handle by pulling it to the left.
Once the Quick-Set Handle is unlocked you can adjust the Bar vertically. Be sure
to lock the Bar back in place by pushing the Quick-Set Handle back to the right.
Note: Some workouts will require you to disengage the Bar, get into
starting position, and then engage the Bar.
The XFT Bar can be locked so it doesn’t move horizontally during a
workout. To lock the Bar in place make sure the Blue Handles are
down. To unlock the Bar make sure the Blue Handles are up.
Note: This makes the XFT function like a Smith machine.
Some workouts using the XFT Bar can be performed
facing either direction. For example: the pictures above
show a bicep curl being done facing away and towards
the XFT.
The XFT Bar has resistance In both directions.
Depending on the workout you will either be
pushing up or pulling down the XFT Bar.
Each weight plate is 10 pounds. The Bar has
1:1 ratio for 10 pounds resistance per plate.
The Cables provide a 2:1 ratio for 5 pounds
resistance per plate per side.
To double up the weight on the XFT Bar
place the pulley hooks onto the sides of
the XFT Bar. Hold the hooks vertically
and simply slide over the Bar ends.
The BodyCraft XFT has been designed to provide exercises for your entire body. This poster illustrates only a sample of available exercises. We hope you enjoy many healthy years of use. Learning to use and maintain your XFT is very important for your personal safety and the proper function of the machine. Be sure to read all of the
information carefully before using. The information in this guide is general in nature; for detailed information about exercise, consult your physician and your local fitness dealer. Your local fitness dealer can provide reputable books and referrals to personal trainers. WARNING: Before beginning this or any exercise program,consult
your physician. This is especially important for persons over the age of 35, or with preexisting health problems. Recreation Supply, Inc. assumes no responsibility for injury or property damage sustained by or through the use of this product. GENERAL EXERCISE GUIDELINES: There are many theories as to the proper number of
repetitions and sets of repetitions of any specific exercise. In fact, we are all unique individuals and what may be effective for one person may not be for the next. For your specific needs, we recommend consultations with your fitness dealer or a certified personal trainer. For general guidelines, we recommend 6-12 repetitions per
set and 2-3 sets per any given exercise. Intensity is more important than the number of reps and sets. The amount a muscle group is stressed (to failure) is directly proportional to the amount of increased strength/growth. Please remember to start easy and increase the total time and the number of repetitions gradually. Overdoing
it in the beginning can cause unnecessary muscle soreness. If at any time you feel excessive pain, stop immediately. Determine what is wrong before continuing. Rest is a very important part of the process. Begin each session with a 5-15 minute warm up period of light exercise and stretching. During the routine, be sure to
maintain proper form and move through the full range of motion. Be sure to breathe naturally; do not hold your breath. End each session with a 5-10 minutes of light stretching. Stretching can help relieve soreness and increase flexibility. Plan to spend the first two weeks getting familiar with the machine and accustomed to the
routines. Do not quit! Variety of exercises can be a motivating factor. Remain committed and your exercise time will soon become a time you anticipate.
© 2020 - Bodycraft® is a division of Recreation Supply, Inc. 7699 Green Meadows Dr N, Lewis Center, OH 43035 Phone: 800-990-5556 Fax: 740-965-2449
For videos, guides, and information
scan the QR code below.
Go
od Mo
rnin
gs
Adjust the Bar to mid height. Bending over at the waist and keeping your back flat, position yourself
so the Bar is resting on your shoulders and you are facing away from the XFT. Stand up bending
at your hips until you are vertical.
Repeat.