
Loading ...
Loading ...
Loading ...
Wall-mounting the boiler (continued)
&IGURE Place boiler on wall-mount bracket
ing stud or washer. Perform all procedures given in the Boiler
Manual on previous pages before mounting the boiler.
Install the wall-mount bracket (by installer)
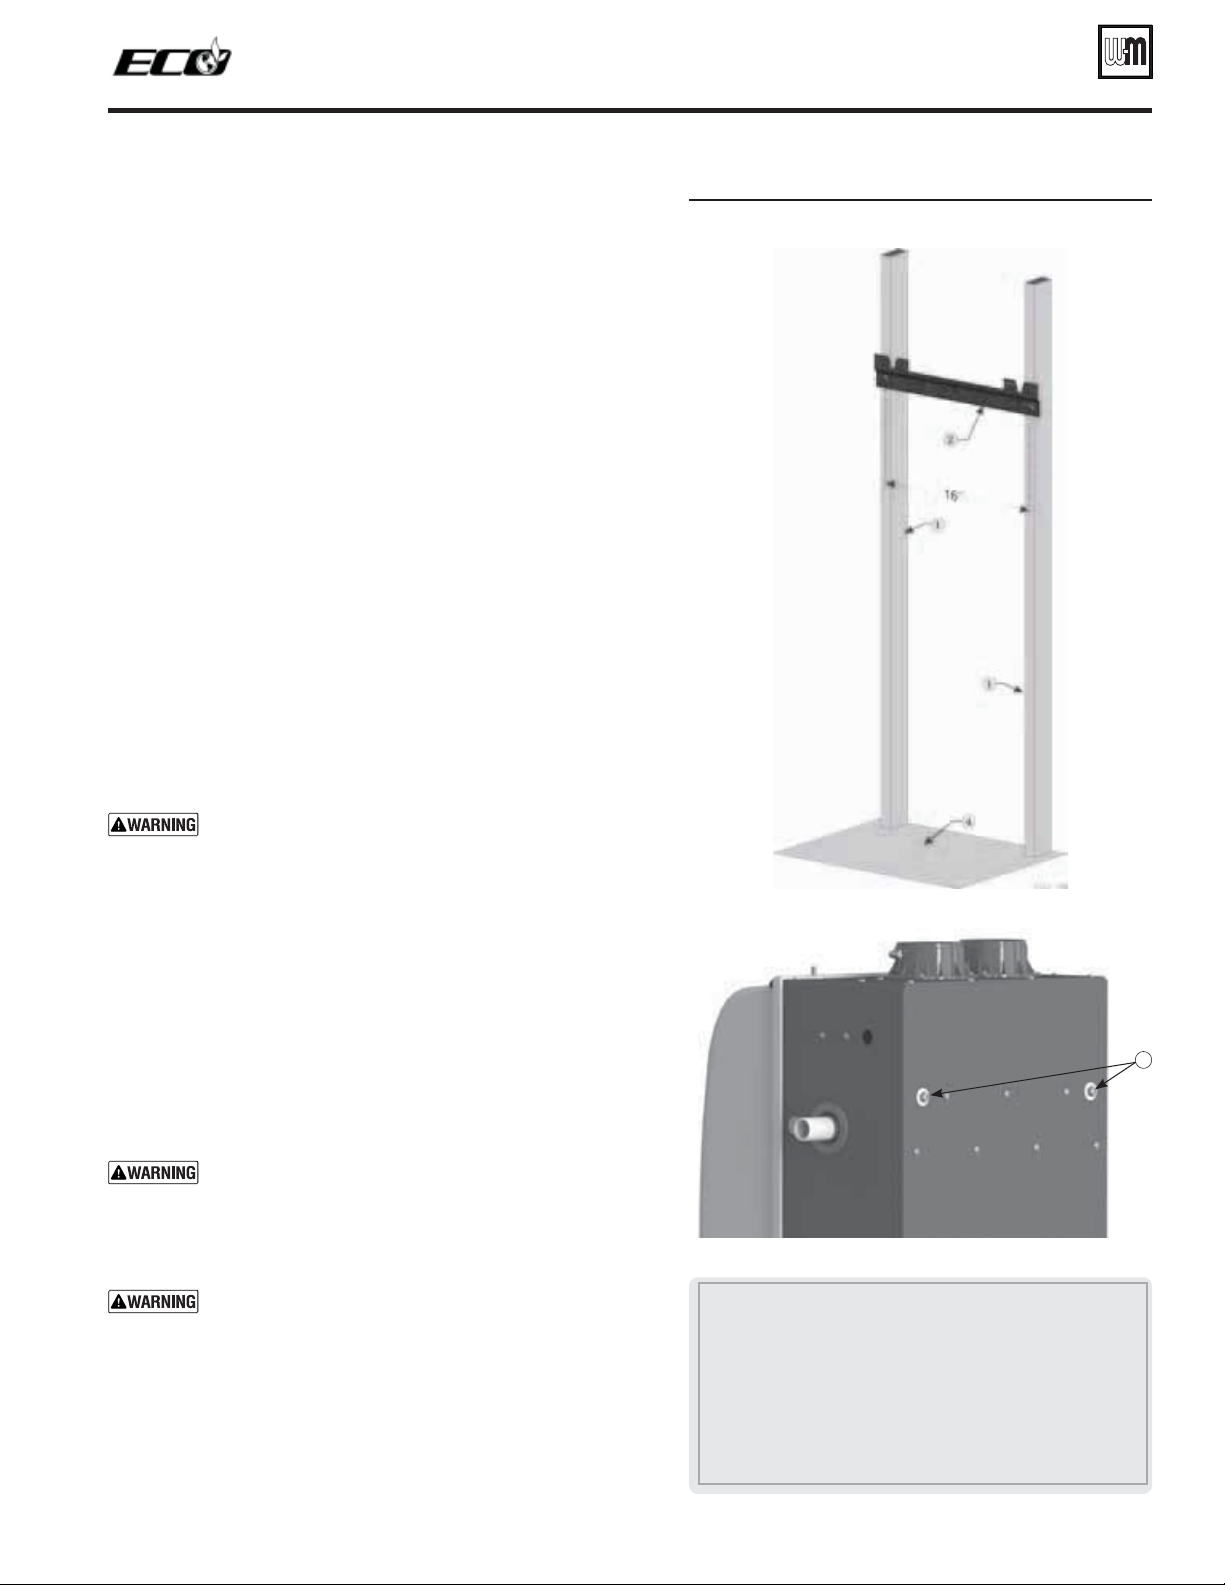
1. See Figure 4, page 8.
2. Locate the studs — must be on 16-inch centers. See previous page
instructions if studs are not on 16-inch centers.
3. Place the wall-mount bracket (item 2, Figure 4, page 8) on the wall,
using a level to align correctly.
4. Place the wall-mount bracket so the mounting slots are centered
over the studs.
5. Level the bracket and trace the outline of the screw slots with a
pencil.
6. Remove the mounting bracket and drill holes 1/4” diameter by 3
inches deep, centered on the screw slot outlines. (For metal stud
walls, using 3/16” toggle bolts, drill required clearance holes.)
7. Position the wall-mount bracket on the wall. Insert and loosely
tighten the two lag screws (or toggle bolts for metal studs).
8. Level the wall-mounting bracket. Then tighten lag screws securely.
For drywall or plaster lathe installations, avoid tightening so much
that the bracket digs into the wall surface.
Place boiler on bracket
1. See Figure 5. The wall-mount bracket must be installed before
mounting the boiler.
2. Measure 22
1/2 inches below the bottom edge of the wall-mount
bracket (item 2). Strike a line or place a piece of masking tape with
its top edge even with the 22
1/2-inch mark. (This line, or tape,
will indicate whether the boiler has been properly seated onto the
wall-mount bracket.)
4HEBOILERISHEAVY
, and requires two people to lift and
place. Wear non-slip leather gloves to prevent possibility
of cuts from sheet metal edges.
The jacket door can be left in place when handling the boiler,
but the boiler must ONLY be lifted by the bottom and rear of
the sheet metal housing — NOT by any pipe or plastic part.
3. /BTAINASSISTANCETOLIFTTHEBOILERINTOPOSITION
.
4. Lift the boiler high enough that its mounting studs (item 3) will
be above the wall-mount bracket (item 2).
5. Let the rear of the boiler slide against the lag screw heads as you
lower the boiler into place. The V-groove will help guide the studs
into the slot.
6. When the brackets are engaged correctly, the bottom of the boiler
enclosure will be at or near the pencil line, or tape, you applied
in step 2.
7. Adjust the studs properly until engaged with the bracket and the
boiler slips into the correct position.
When mounting the boiler, use the method described in
paragraph 2 above to ensure the mounting studs are properly
engaged. If not, the boiler could fall. Failure to comply could
result in severe personal injury, death or substantial property
damage.
8. Ensure boiler is level front-to-back.
Ensure boiler is NOT pitched upward with the front of the boiler
higher than the back of the boiler. This can prevent conden-
sate from draining properly. Failure to comply could result in
severe personal injury, death or substantial property damage.
Floor-standing boiler option
An optional accessory to allow the boiler to be placed on a level
floor is available from Weil-McLain. See kit instructions (available
on website) details. See “BOILER ACCESSORIES” on page 107 for
part number information.
1 Studs — Pre-drill through the wall into the studs ¼ inch diameter x 3
inches deep — Studs must be on 16-inch centers. If studs are any other
spacing, provide a secure, solid mounting surface on which to attach the
boiler wall-mounting bracket.
2 Wall-mount bracket — secure wall mount bracket to wall as instructed
on previous page.
3 Boiler mounting studs— The V-groove on the wall-mount bracket will
help guide the studs into the slots. The studs are attached to the back of
the boiler.
4 Floor surface
Part number 550-142-122/0513
9
TM
GAS-FIRED WATER BOILER — Boiler Manual
3
Loading ...
Loading ...
Loading ...