Loading ...
Loading ...
Loading ...
➔ Clean the interior and exterior of the case with a soft, damp cloth without cleaning agents only.
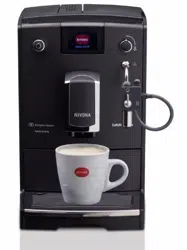
➔ Empty the drip pan (picture 1/N) and the used coffee tray (picture 1/O) when the display shows
itat the latest (only when the device is switched on, because the device only then recognises that
the bowls have been emptied).
Information: Occasionally, use some soap water for cleaning the drip pan (picture 1/N).
➔ The water tank should be rinsed with clear water daily and refilled with fresh, cool water.
Information: Dried milk residues are hard to remove.
➔ Therefore, clean the milk frother, tube and outlet regularly.
Information: From time to time (ideally prior to a longer break in preparation, but definitely regularly!)
the milk frother has to be dismantled completely into individual parts and cleaned under clear water.
➔ Pull the milk frother downwards (picture 10/11) and dismantle it into its individual parts (picture
1/R).
➔ Clean the individual parts (picture 1/R) thoroughly and assemble the milk frother again.
➔ Insert the assembled milk frother upwards onto the steam tube up to the stop (picture 10/11).
Information: Your appliance is fitted with rear rolls (picture 1/Q) (only designs 670
, 675, 680). These
enable the movement on even working surfaces. That, you can also clean underneath the appliance.
5.7. Cleaning of the brewing unit
Warning: Only remove the brewing unit when the appliance is turned off.
Warning: Clean the brewing unit after a carried out cleaning programme for example, but at least once
a month. Otherwise the guarantee claims may expire.
If required, the brewing unit should be taken out and cleaned under running water. Do not use
cleaning agents under any circumstances but only clear, clod water! For hygiene reasons we recommend
to take out the brewing unit i.e. after a carried out cleaning programme (see point 5.4.) and to clean
it thoroughly.
➔ Open the service door on the case on the right (picture 1/L) by slightly pulling the unlocking
device in the handle to you and slowly removing the service door of the appliance's case.
➔ Unlock the brewing unit by pressing the red switch upwards and to turn the handle to the left up
to the stop and click (picture 12).
➔ Then, carefully remove the brewing unit with the handle.
➔ Clean the brewing unit under cold water and leave to dry.
➔ Carefully insert the brewing unit again and lock it by holding the red switch down and by turning
the handle to the right up to the stop and click.
➔ Close the service door again, in doing so, guide the pins at the rear end of the service door into
the gaps. Then, shut the service door (picture 1/L) until it clicks.
5.8. Change lter
After the ow of approximately 50 l of water, the effect of the lter is exhausted. The display shows
“CHANGE FILTER’’.
You can still prepare beverages. However, we recommend to always change the lter immediately.
➔ Turn the rotary to “SETTINGS’’. Press the rotary.
➔ Turn the rotary to “FILTER’’. Press the rotary.
30
5. Cleaning and care
Loading ...
Loading ...
Loading ...