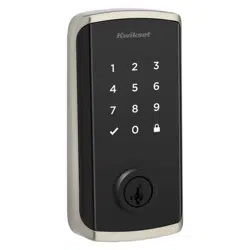
Make sure your door Is compatible. If you have a standard deadbolt mounted separately from the handle below it. your door is compatible.
Remove your existing deadbolt from your door.
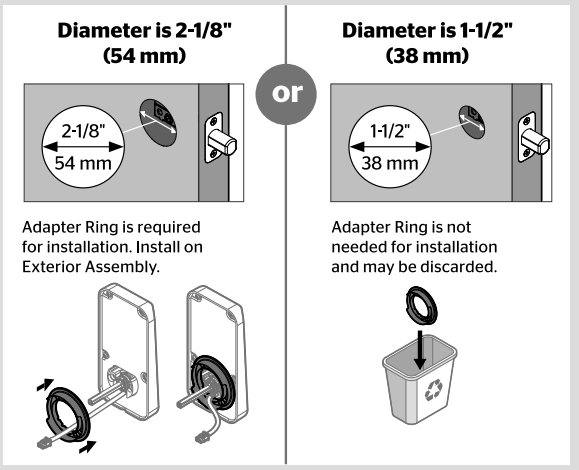
Measure to confirm that the hole in the door Is either 2-1/8" (54 mm) or 1-1/2" (38 mm).
Measure to confirm that the backset is either 2-3/8” or 2-3/4" (60 or 70 mm).
Measure to confirm that the hole in the door edge is 1" (25 mm).
Measure to confirm that the door is between 1-3/8" and 2" (35 mm and 51 mm) thick.
Install the latch and strike
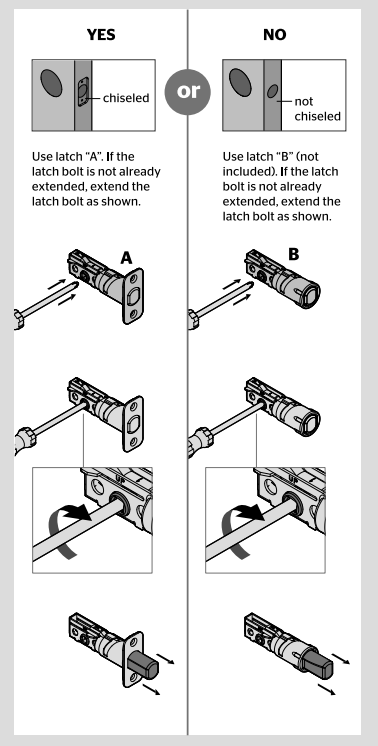
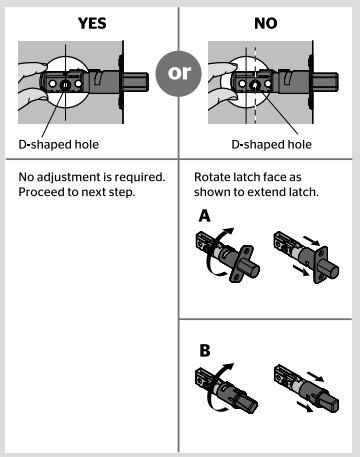
Is the door edge chiseled?
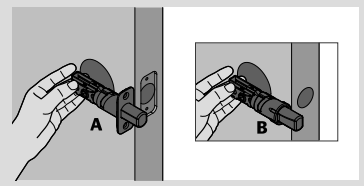
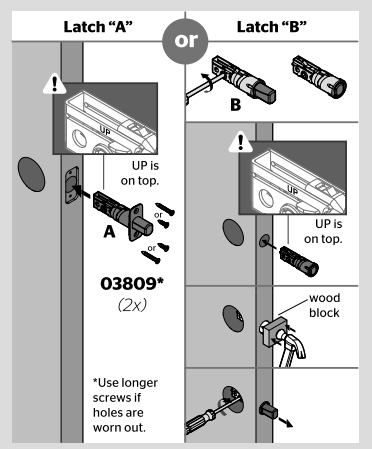
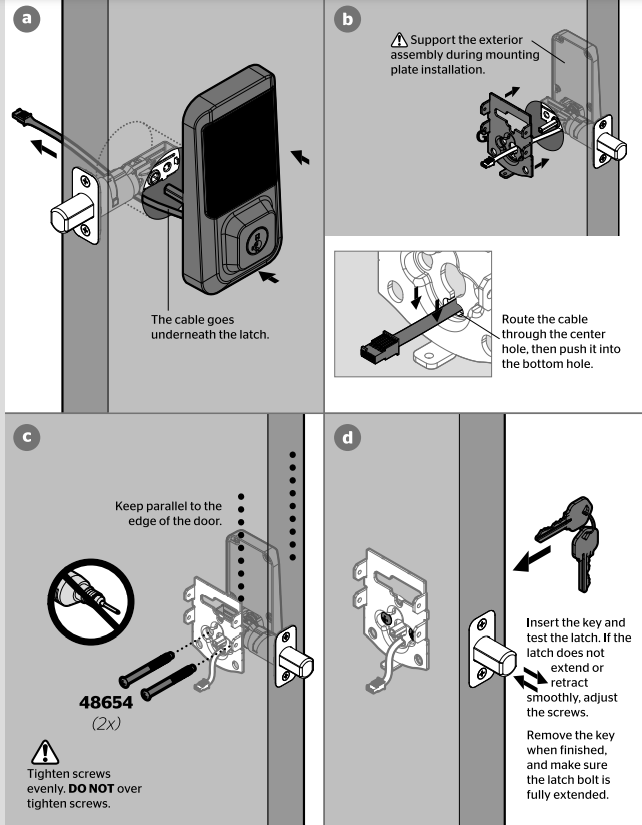
Hold the latch in front of the door hole, with the latch D Which latch are you installing? face flush against the door edge.
Is the D-shaped hole centered in the door hole?
Which latch are you installing?
Install the strike on the door frame.
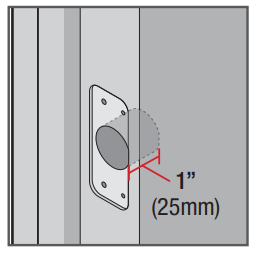
Make sure the hole in the door frame is drilled a minimum of 1" (25 mm) deep.
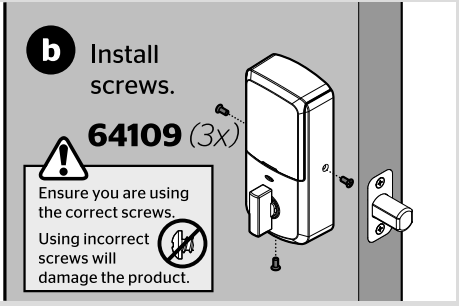
Install the exterior keypad
What is the diameter of the hole in the door?
Locate the screws for step 3D and keep them within reach.
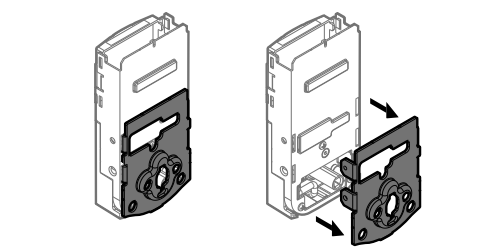
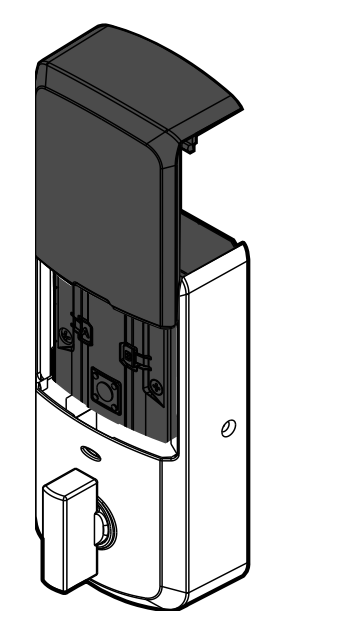
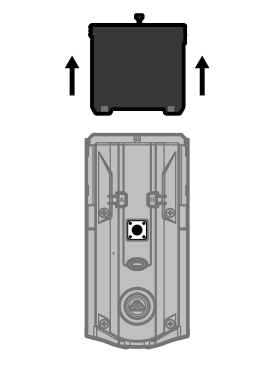
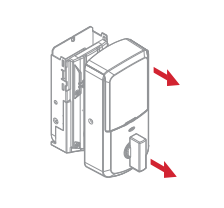
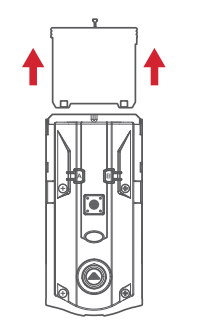
Remove the mounting plate from the interior assembly.
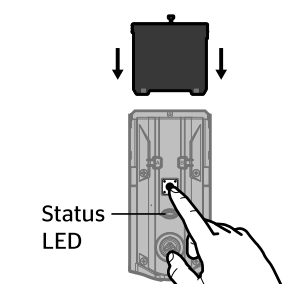
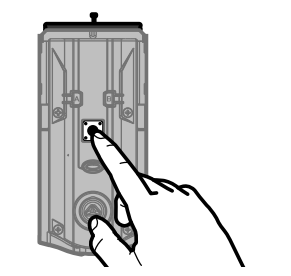
Install the exterior keypad and mounting plate.
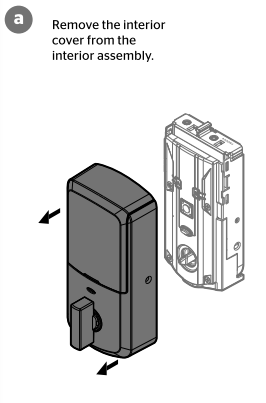
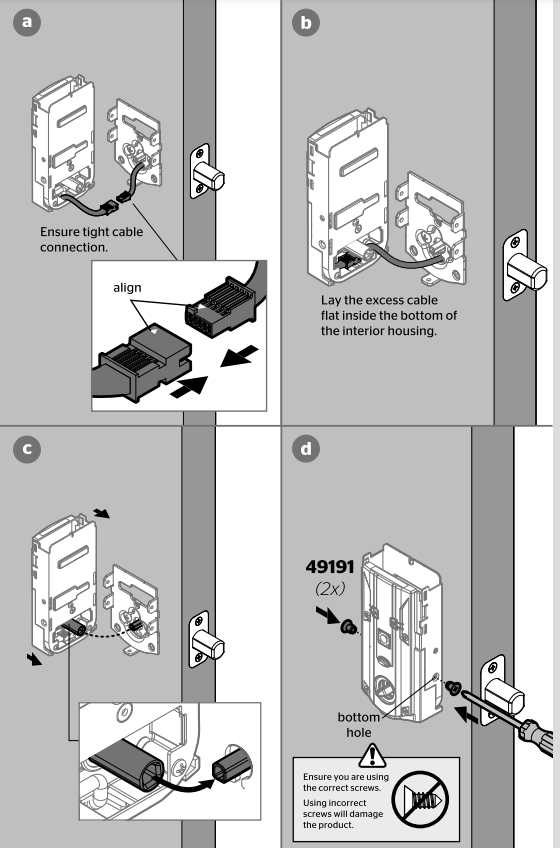
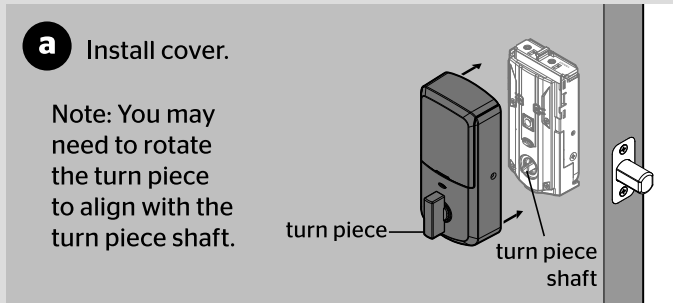
Install the interior assembly
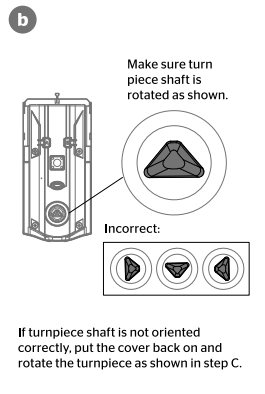
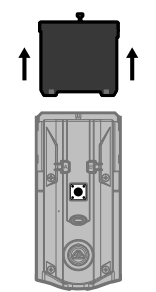
Ensure the turnpiece shaft is pointing up, and remove the interior cover and battery pack from the interior assembly.
a. Remove the interior cover from the interior assembly.
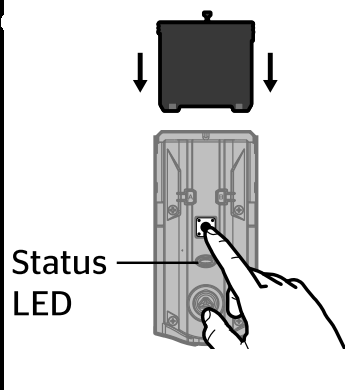
b. Make sure turn piece shaft is rolated as shown
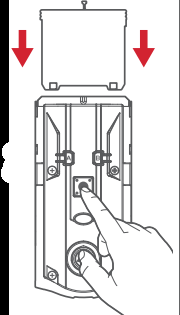
If turnpiece shaft is not oriented correctly, put the cover back on and rotate the turnpiece as shown in step C.
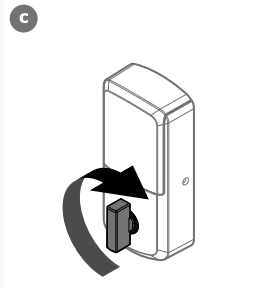
c. If the turnpiece shaft is pointing down, place the cover back onto the interior assembly and rotate the turnpiece until you hear it click. You may need to apply some force. Once the turnpiece shaft is correctly oriented, remove the cover again.
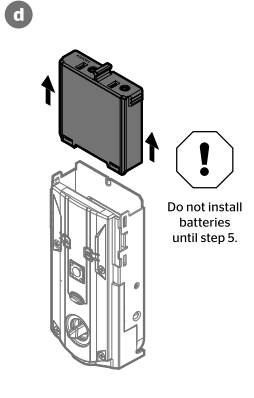
d. Do not install batteries until step 5.
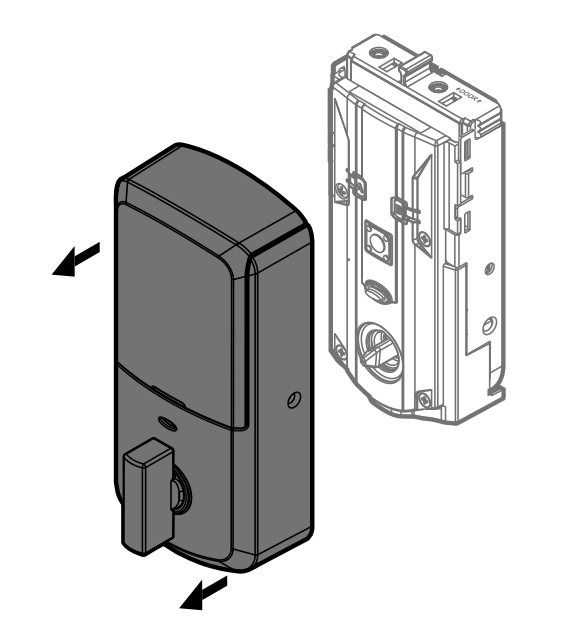
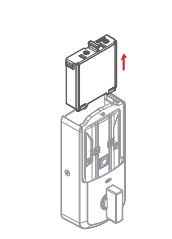
Install the interior assembly onto the mounting plate.
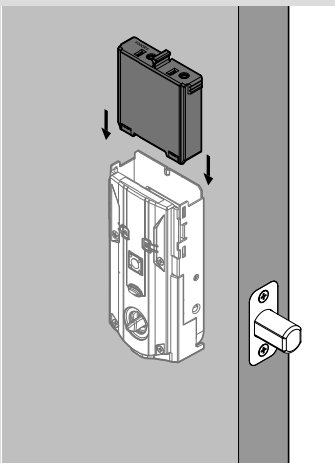
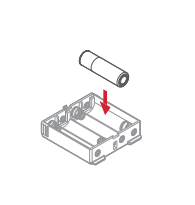
Install the batteries and perform the door handing process
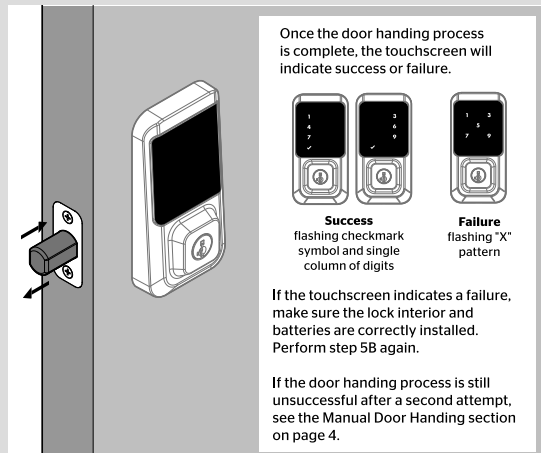
This step will teach your lock the orientation of your door and is crucial to lock operation.
Install 4 AA batteries in the battery pack.
With the door open, install the battery pack to initiate auto-handing.
After a few seconds, the latch bolt will retract and extend on its own to learn the orientation of the door. This is called the door handing process, and it is crucial to lock operation.
If the door handing process is still unsuccessful after a second attempt, see the Manual Door Handing section on page 4.
Test the lock and check door alignment
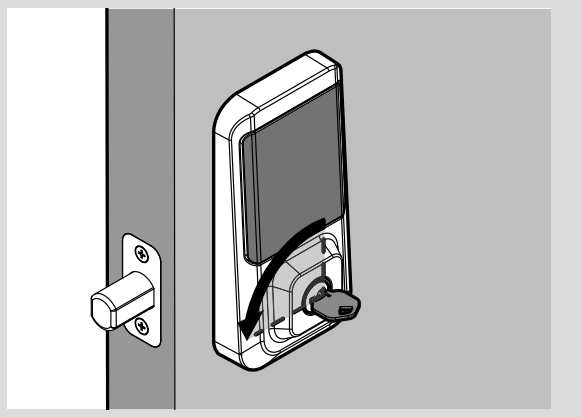
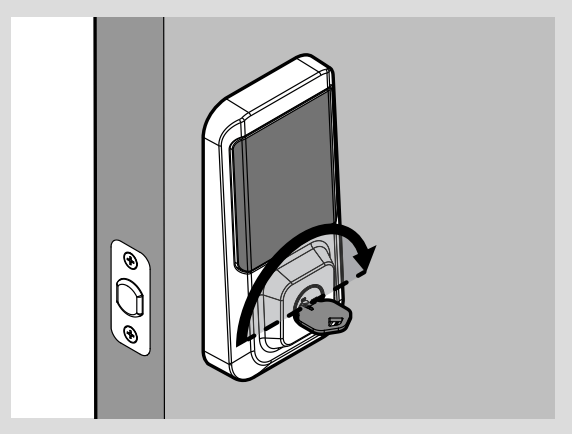
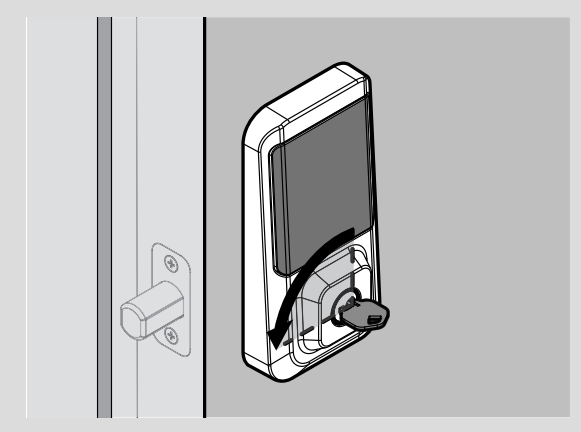
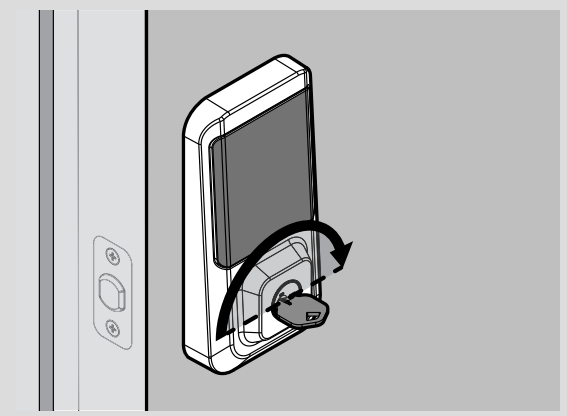
With the door open, insert the key to extend the latch. Ensure that the latch extends smoothly.
Turn the key 180° to retract the latch. Ensure that the latch retracts smoothly.
Close the door. Insert and rotate the key to lock the door. Ensure that the door locks smoothly.
Turn the key 180° to retract the latch. Ensure that the door unlocks smoothly.
If your door does not lock and unlock smoothly, make sure you replaced your previous latch and strike with those supplied in the box. If you still experience locking errors, call Kwikset Support to order a Warped Door Service Kit.
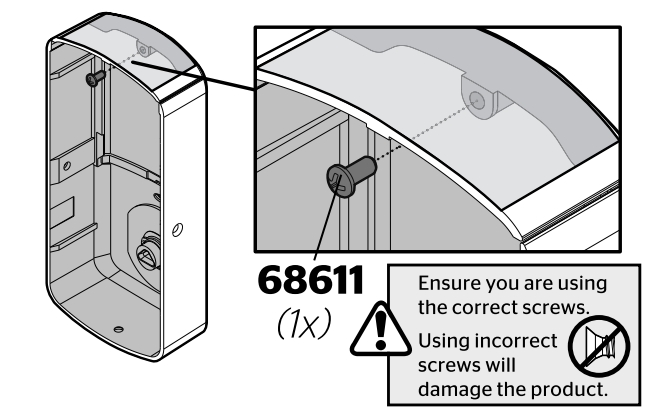
Install the interior cover
Important Information about the interior cover
The window on the interior cover is unlocked by default for easier access to the battery pack and buttons.
For additional security, you may choose to lock the window by installing the security screw.
When the window is locked, you will need to remove the entire interior cover and screws to access the battery pack and buttons.
Cover Installation
Battery Pack Access
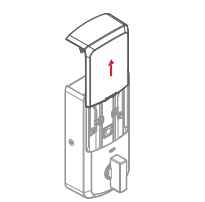
If the window is unlocked, slide up the window to access the battery pack.
If the window is locked, remove the interior cover and screws to access the battery pack.
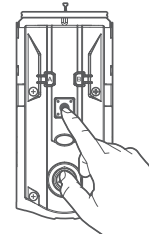
Download the app and create an account
The Kwikset app is needed to use this lock. If this lock was professionally installed (or installed by someone other than the homeowner), make sure this step is performed by the homeowner.
Reference Guide
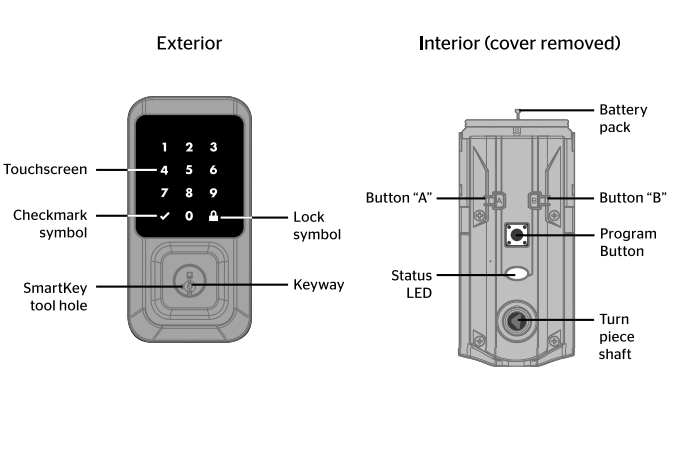
SmartCode at a Glance
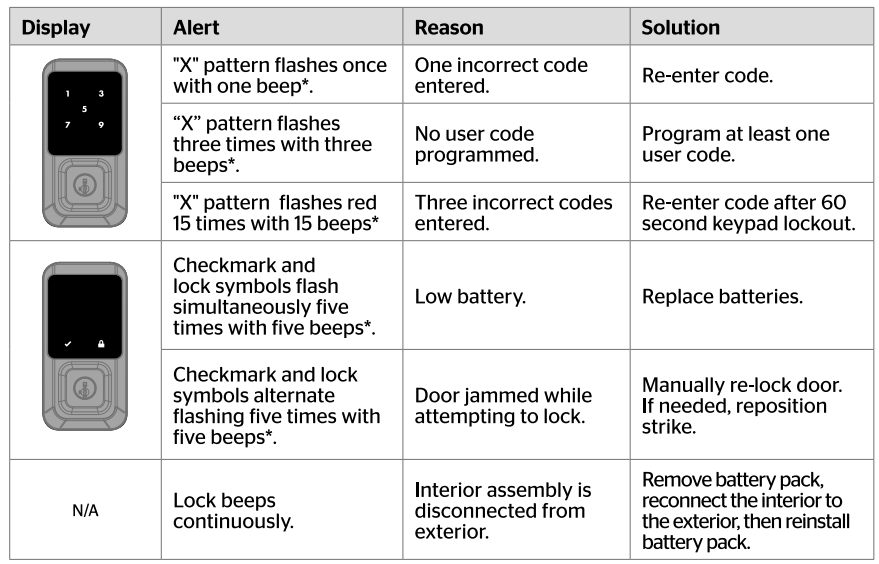
System Alerts
*Beeping sounds will only be heard if Lock Sounds have not been disabled in the app.
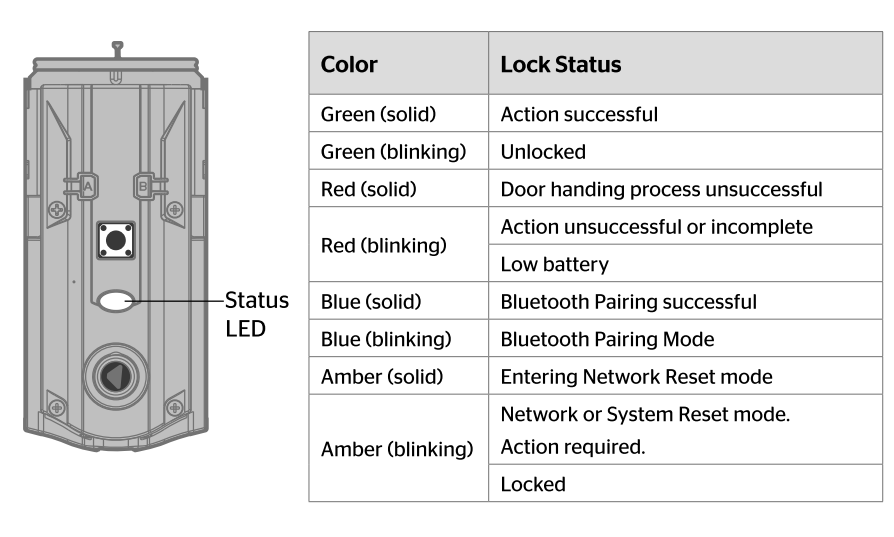
Status LED colors
These features can be adjusted in some smart home apps.
Manual Door Handing
If needed, the door handing process can be initiated manually. This is useful if the lock is being moved to a different door.
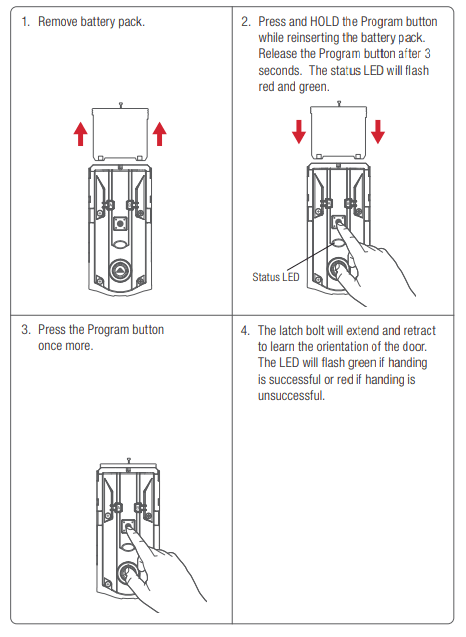
Remove battery pack.
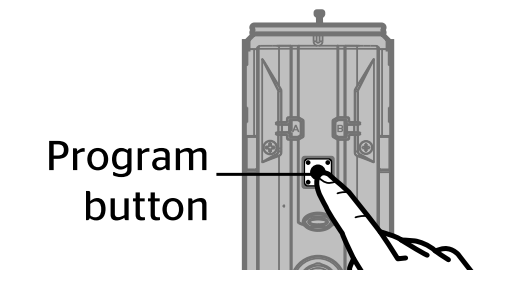
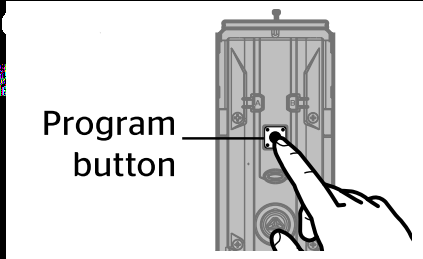
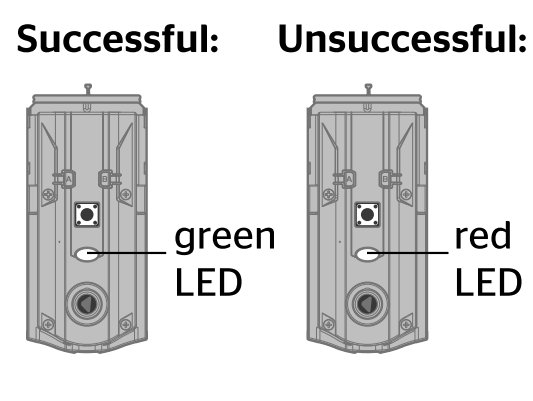
Press and HOLD the Program button while reinserting the battery pack. Release the Program button after 3 seconds. The status LED will flash red and green.
Press the Program button once more.
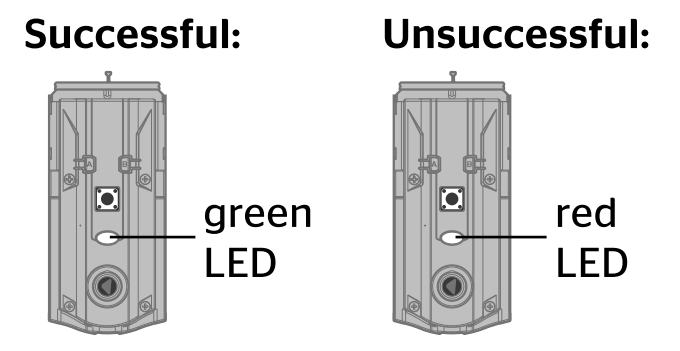
The latch bolt will extend and retract to learn the orientation of the door. The LED will flash green if handing is successful or red if handing is unsuccessful.
Network Reset
Network Reset will delete all Wi-Fi settings, Bluetooth pairings, user associations, and remove the lock from the account.
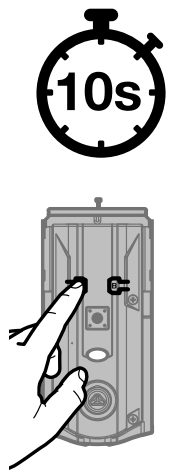
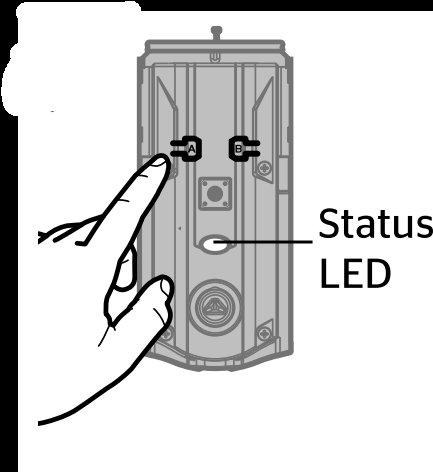
Press and HOLD "A" for 10 seconds. You will hear 1 short beep and see an amber LED. Note: After 3 seconds, you will hear 1 short beep and see a blue LED. You should continue to hold "A” to enter network reset mode.
Release “A.” You will see a blinking amber LED to indicate it is in network reset mode.
Press and release the Program button to confirm network reset. The Program button must be pressed within 10 seconds of releasing "A" or the function will time out
If successful, you will hear 1 long beep and see a green LED. If unsuccessful, you will hear 5 rapid beeps and see a blinking red LED. If unsuccessful, repeat from step 1.
.
System Reset
System Reset will delete all access codes and lock settings including lock handing. The lock will run the handing process at the end of the System Reset.
Press "A" 10 times. You will hear 1 short beep and see a blinking amber LED to indicate it is in system reset mode.
Press and release the Program button to confirm system reset
If successful, you will hear 1 long beep and see a green LED, and the reset process will begin. During the reset process, the LED will blink green/red a few times and will beep when complete. If unsuccessful, you will hear 5 rapid beeps and see a blinking red LED. If unsuccessful, repeat from step 1.
Factory Reset
Factory Reset will delete all Wi-Fi settings, Bluetooth pairings, user associations, remove the lock from the account, and reset all lock settings including handing.
Remove battery pack.
Press and HOLD the Program button while reinserting the battery pack. Keep holding the button for 30 seconds until the lock beeps and the status LED flashes red.
Press the Program button once more. The LED will flash green and red, and the auto-handing process will begin.
The latch will retract and extend to learn the orientation of the door. The LED will flash green if auto-handing is successful or red if autohanding is unsuccessful.
Troubleshooting
Door Preparation
What is the door thickness requirement for Halo and Aura locks?
Halo Keypad, Halo Touchscreen, and Aura support 1-3/8” to 2” (35mm - 51mm) door thickness.
Halo Touch supports 1-3/4” to 2” (44mm - 51mm) door thickness.
Is there a door thickness kit for Halo and Aura locks to support doors thicker than 2” (51mm)?
Yes, a kit (83033) is available to install Halo and Aura locks on doors with a thickness between 2” (51mm) and 2-1/4” (57mm). Call our support center at 1-800-327-5625 to order a thick door kit.
What door hole diameter is required to install Halo and Aura locks?
Halo Keypad, Halo Touchscreen, and Aura locks are compatible with 1-1/2” (38mm) and 2-1/8” (54mm) door holes.
Halo Touch fingerprint locks require 2-1/8” (54mm) door holes.
What do I need to correct a door that is warped or has been affected by weather?
Please refer to the Warped Door Installation Guide for the necessary adjustments to properly prepare your door for a smart lock installation.
Installation
How do I install Halo or Aura lock on my door?
To install your Halo or Aura lock, refer to the following instructions:
Halo / Aura Interactive Guide
Halo Touch Installation Guide PDF
Halo Touchscreen Installation Guide PDF
Halo Keypad Installation Guide PDF
Aura Installation Guide PDF
Why is the lock performing the opposite when I’m locking or unlocking the door using the Kwikset app?
Perform the following steps to correct the issue:
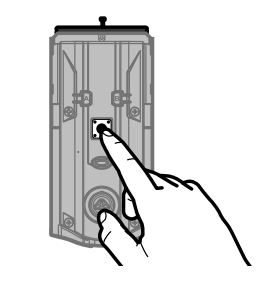
Check that the lock orientation is correct. Note: “UP” on latch should be facing up (Fig. 1).
If incorrect, reinstall the lock to correct orientation. Installation Guide links can be found in Question 2A. During installation, ensure that turnpiece shaft is pointing up (Fig. 2). To rotate turnpiece shaft, put the cover back on the interior and rotate the turnpiece until it is pointing up. You may hear a click.
Perform Manual Door Handing steps.
If the above steps do not fix the issue, call our support center at 1-800-327-5625 to order a new latch.
What is “handing” or latch calibration?
Handing, or latch calibration, is the way that the smart lock learns the orientation of your door (left- or right-handed).
How do I “hand” or calibrate my lock?
A1: The first time the battery is inserted, the lock will perform automatic calibration, or “handing.” You will know the handing is taking place when the latch bolt retracts and extends on its own.
A2: The first time that lock or unlock is performed using the Kwikset app or access code, the lock will automatically perform latch calibration.
A3: Perform Manual Door Handing steps.
The turnpiece is difficult to turn by hand.
Perform Manual Door Handing steps.
My lock is giving me a jam error.
A1: With the door open, press the lock button. If you do not get a jam error with the door open, the strike pocket on your door frame may not be deep enough. Ensure that the strike pocket is at least 1” (25mm) deep.
A2: Perform Manual Door Handing steps.
Batteries
How do I replace the (4) AA batteries?
If the security screw is not installed, slide the interior cover window up. If the security screw is installed, remove the entire interior cover.
Remove the battery pack.
Replace the batteries.
How can I tell if the batteries need to be replaced?
A1: For Aura and Halo Keypad, the keypad flashes red with fast beeping sound for three to four seconds after a motorized operation, such as locking or unlocking with an access code.
For Halo Touchscreen, the checkmark and lock symbols flash simultaneously five times with five beeps after a motorized operation, such as locking or unlocking with an access code.
For Halo Touch, the exterior LED flashes red and beeps after a motorized operation, such as locking or unlocking with a fingerprint.
A2: A battery level indicator is also available in the Kwikset app, along with a notification when the battery level is low. In addition, the interior status LED will blink red.
What can I do if I frequently need to replace batteries?
A1: Check that the Kwikset app is updated to the latest version and that your lock’s firmware does not need to be updated.
A2: Check that the door is properly aligned. For helpful tips on getting the door to align, refer to the Warped Door Installation Guide. Resistance to both locking and unlocking because of door misalignment will reduce both motor and battery life.
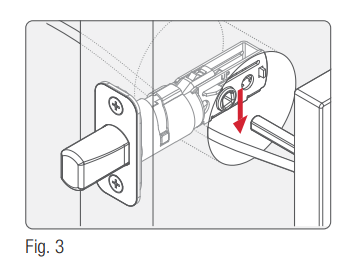
A3: Check that the lock is properly installed, and the cable is routed and stored correctly (Fig. 3).
A4: Perform Manual Door Handing to make sure that the lock knows the correct direction for locking and unlocking.
A5: Make sure that the lock has a strong Wi-Fi connection with the router. For better Wi-Fi coverage within the home, please investigate using a mesh Wi-Fi network where several endpoints are deployed to provide the best Wi-Fi coverage.
A6: Call our support center at 1-800-327-5625 for additional help and product replacement if needed.
Kwikset App
What app do I use to manage my Halo or Aura lock?
Kwikset App is used to manage Halo Touch, Halo Touchscreen, Halo Keypad, and Aura locks.
Where can I download the Kwikset app?
The Kwikset App is available for free download from Google Play or the App Store by searching for “Kwikset” and installing the “Kwikset Smart Lock App.”
Where can I get help with the Kwikset app?
The Kwikset App Support page can help answer any questions you have about the Kwikset app
How do I create an account to be able to manage my Halo or Aura lock using the Kwikset app?
A Kwikset account is required to maintain secure access and management of Halo and Aura locks. Please refer to the app tutorial for Creating Your Account.
How do I create a “Home” within the Kwikset app?
Please refer to the app tutorial for Creating Your First Home.
How do I add a lock within a “Home” in the Kwikset app?
Please refer to the app tutorial for Adding Your First Lock.
How do I discover or pair the lock in the Kwikset app?
Please refer to the app tutorial for Adding Your First Lock.
How do I connect to a Wi-Fi network with my lock? kwikset/app?
Please refer to the app tutorial for Adding Your First Lock.
Why does the app ask for permissions to media files, photos, and location?
This is a requirement of the smartphone and the iOS and Android operating systems, and not specifically a requirement of the Kwikset App.
How do I reset my password for my Kwikset account?
A1: If you know your current password, complete the following steps:
Open the Kwikset app.
Tap the icon.
Select Account Settings.
Select Account.
Select Change Password.
You will be prompted to enter your old password, then the New Password fields must be filled out.
A2: If you do not remember your password, complete the following steps:
Open the Kwikset app.
Tap the icon.
Select Log Out.
Select Forgot Password to initiate the recovery process.
How do I enroll the fingerprint of another person that I want to be able to use the lock?
Complete the following steps:
Open the Kwikset app.
Select the lock.
Tap on the icon.
Add a user fingerprint by following the instructions.
How do I delete a user?
Complete the following steps:
Open the Kwikset app.
Select the lock.
Tap on the icon.
Select the user you would like to delete.
Select Delete.
How do I limit the access times for a user?
Complete the following steps:
Open the Kwikset app.
Select the lock.
Tap on the icon.
Select the user.
Select Schedule Type.
Select your desired schedule type and specify the desired access times.
How do I change my security question for my account?
A1: Complete the following steps:
Open the Kwikset app.
Select the icon.
Select Account Settings.
Select Accounts.
Select Change Security Questions.
A2: Complete the following steps:
Go to GoConcourse
Enter your email and password.
Select the icon.
Select Change Security Questions.
Follow the steps to update your security question and answer.
NOTE: If prompted, select Kwikset (US) or Weiser (Canada).
How do I disable my account?
Complete the following steps:
Go to GoConcourse
Enter your email and password.
Select the icon.
Select Enable/Disable My Account
Tap Disable.
The app is reporting the incorrect lock status.
Complete the following steps:
Manually lock and unlock the door lock with your phone in Bluetooth range (30ft) and with Bluetooth turned on.
Refresh the app by pulling down on the main screen.
Close the app.
Relaunch the app.
Why isn’t my Aura lock sending lock event notifications?
Aura is a Bluetooth lock so the smartphone needs to be within 30’ of the lock to receive lock event notifications.
My history is not reflecting the correct time. How do I fix this?
First, check that your Kwikset app is updated to the latest version. If the time stamp is still not correct, complete the following steps:
Open the Kwikset app.
Tap History.
Tap Clear History.
Bring your phone within Bluetooth range of the door lock with the app running in the foreground.
I don’t see a time stamp in my history.
First, check that your Kwikset app is updated to the latest version. If the time stamp is still not visible, complete the following steps:
Open the Kwikset app.
Tap History.
Tap Clear History.
Bring your phone within Bluetooth range of the door lock with the app running in the foreground.
Note: You may still see events without a time stamp if those events occurred when the lock’s time was not set.
My access codes are staying yellow.
The app will attempt to program the access code for 5 minutes, during which the text will be yellow. If the app is unsuccessful after 5 minutes, tap on the yellow code and choose Retry, or Cancel the attempt.
I haven’t received my text verification code.
A1: Make sure you correctly entered your mobile phone number.
Do not enter the country code.
A2: Verification code may be sent from these phone numbers. Check that these numbers are not in your phone’s block contact list.
iOS:
Settings > Phone > Blocked Contacts > Swipe left on the phone number then tap Unblock.
Android:
Settings > Messages > Blocked Contacts > Swipe left on the phone number then tap Unblock.
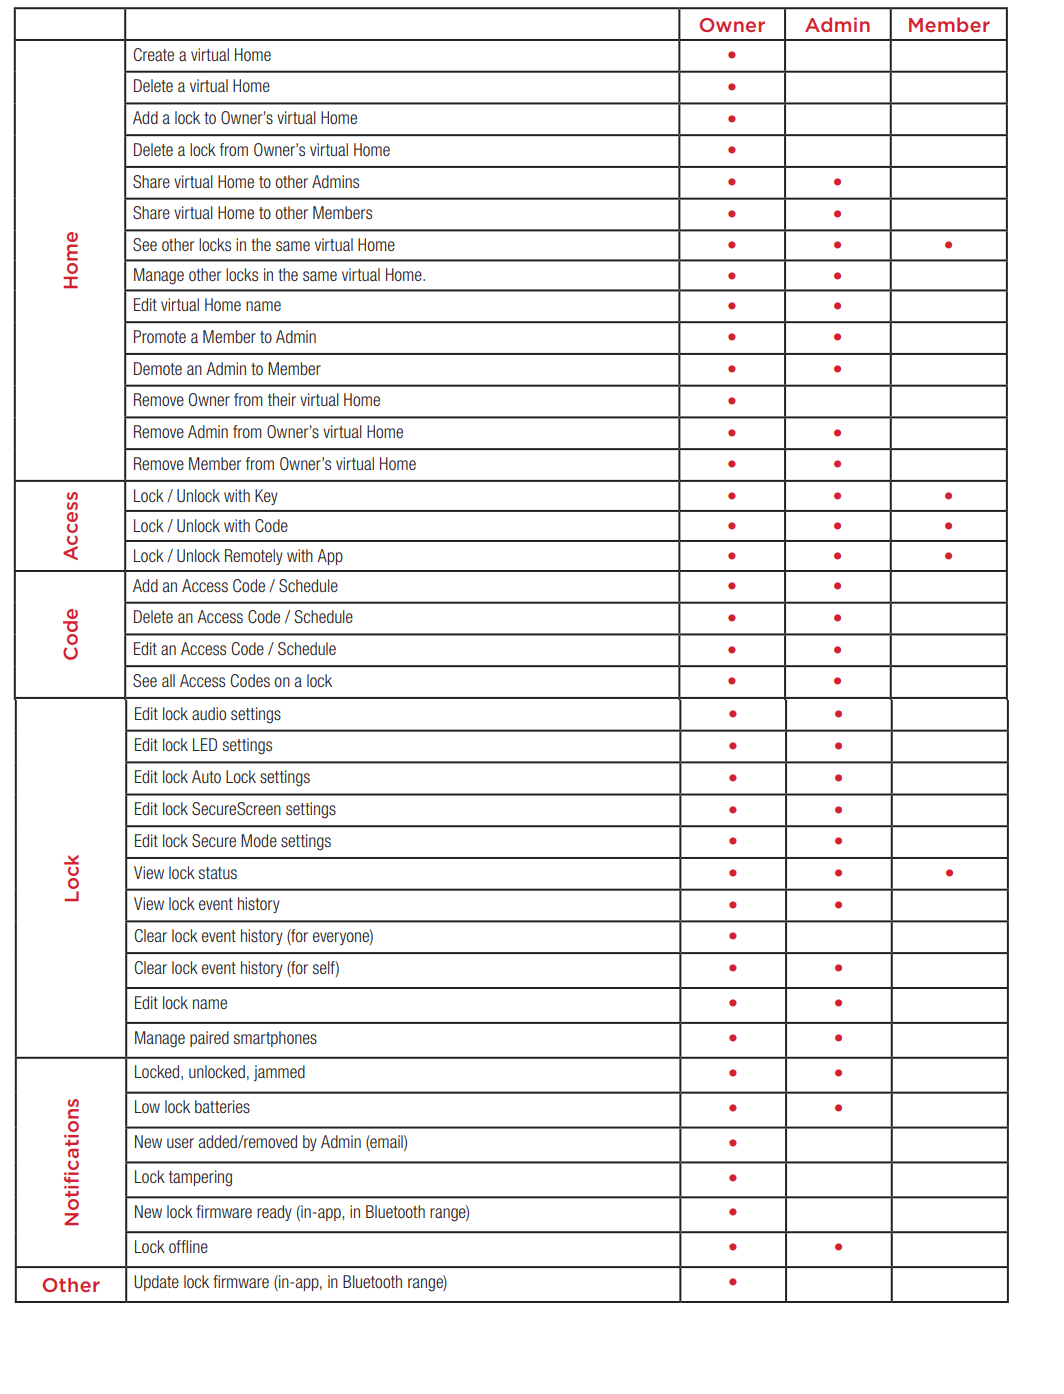
What is the difference between an Owner, an Admin, and a Member?
Bluetooth
When should I delete the lock from my smartphone’s Bluetooth list?
A1: After deleting the lock from the app.
A2: When trying to re-pair or re-activate the lock after a failed attempt.
Bluetooth pairing is not working.
Remove the lock from your smartphone’s Bluetooth device list (if it exists).
Turn off and on the Bluetooth services on your smartphone.
Try again.
My lock will not pair after the first pairing attempt failed.
Remove the lock from your smartphone’s Bluetooth device list (if it exists).
Turn off and on the Bluetooth services on your smartphone.
Try again.
The lock flashes red when I try Bluetooth pairing.
Remove the lock from your smartphone’s Bluetooth device list (if it exists).
Turn off and on the Bluetooth services on your smartphone.
Try again. If you are the Owner of the lock, you may also perform a Factory Reset.
I cannot connect to my lock via Bluetooth after successful pairing.
Turn off and on the Bluetooth services on your smartphone.
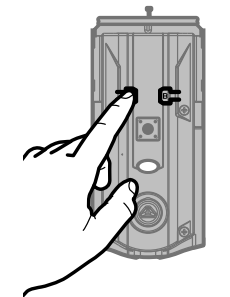
Power cycle your lock: remove the battery pack, press and hold the program button for 5 seconds, press and hold button A for 5 seconds, then replace the battery.
Try again. You may need to reboot your phone.
When trying to pair Bluetooth, my lock beeps 3 times.
Remove the lock from your smartphone’s Bluetooth device list (if it exists).
Turn off and on the Bluetooth services on your smartphone.
Try again. If you are the Owner of the lock, you may also perform a Factory Reset.
I deleted the app and then reinstalled it but now the app is reporting a “No lock paired” error.
Remove the lock from your smartphone’s Bluetooth device list (if it exists).
Turn off and on the Bluetooth services on your smartphone.
Bluetooth pair the lock with your smartphone.
Try again.
I see my lock during the Bluetooth pairing process, what do I do now?
On the search results screen, tap on the lock you wish to pair.
What type of Wi-Fi network do Halo locks require?
The home Wi-Fi network needs to be 2.4GHz and password protected with WPA2 encryption.
I am able to lock and unlock my Halo lock remotely and receive notifications, but my app says “No Lock Paired.”
Your app is controlling via Wi-Fi. Complete the Bluetooth pairing process for the optimal experience. Some features are only available via Bluetooth. Please refer to the app tutorial for Adding Your First Lock.
I don’t see my Wi-Fi network on the search results screen.
A1: Complete the following steps:
Wait until the Wi-Fi scan is complete (circle stops spinning).
Tap Manual Settings.
Manually enter your Wi-Fi name (SSID) and password.
A2: Complete the following steps:
Unhide the network or set it to broadcast.
Complete the lock activation.
Re-hide the network.
A3: If MAC address filtering is enable, complete the following steps:
Disable the router’s MAC address filtering. Refer to the router manufacturer’s instructions for specific steps.
Activate your Halo lock.
After the lock has been successfully added to the Wi-Fi network, go to the router’s administrative dashboard. Find Halo’s MAC address and add it to the router’s list of authorized devices. Refer to the router manufacturer’s instructions for specific steps.
Re-enable MAC address filtering.
How do I change my Wi-Fi network settings after I have already activated my Halo lock?
To change the Wi-Fi network of a lock that has already been activated, Factory Reset the lock then re-activate the lock with the new Wi-Fi network settings:
Follow the steps below to perform a Factory Reset to delete the current Wi-Fi settings on the lock. Please note, a Factory Reset will delete all access codes, smartphone pairings, and lock settings.
Be sure to delete the lock from the app and remove the lock from the smartphone’s Bluetooth device list per the steps below.
Re-activate your lock with the new Wi-Fi network settings. Follow the steps in the app tutorial for Adding Your First Lock
Factory Reset
Factory Reset will delete all Wi-Fi settings, delete user associations, reset all lock settings including handing, and delete access codes and event history from the lock. Note: Access codes and event history will still appear in the app and cloud until the lock is deleted from the app. Factory Reset should be used when you want to change the lock owner, you have lost your phone, or you are troubleshooting on a new installation.
Delete the lock from the Kwikset app.
Remove the lock from the Bluetooth list on your device by tapping “Forget Device” in the Bluetooth settings.
Remove the battery pack.
Press and HOLD the Program button while reinserting the battery pack. Keep holding the button for 30 seconds or until the lock beeps and the status LED flashes red. Then release the Program button.
After the beeping stops, press and release the Program button once more. The LED will flash green and red, and the auto-handing process will begin. Note: It can take a few seconds for the handing to start.
The latch will retract and extend to learn the orientation of the door. This confirms the Factory Reset has been completed. The LED will flash green if autohanding is successful or red if auto-handing is unsuccessful. If the Factory Reset is not successful, perform the steps again until the LED flashes green and red.
Smart Home Setup
How do I enable Amazon Alexa?
Follow the setup instructions in the Amazon Alexa Guide.
How do I enable Google Assistant?
Follow the setup instructions in the Google Assistant Guide.
Device Compatibility
Please see the Device Compatibility list to see if your device is compatible.
Router Compatibility
Please see the Router Compatibility list to see if your router is compatible.
NOTE: Halo locks implement a standard based Wi-Fi radio and should work with majority of the routers available in the market that are Wi-Fi certified.
Halo Touch
How do I enroll a fingerprint for the lock?
Open the Kwikset app with your phone in Bluetooth range (30ft) and with Bluetooth turned on.
Select the icon.
Select the icon.
Enter Name.
Select Schedule Type then click Submit.
Follow the instructions on the app to enroll your fingerprint.
Make sure that the fingers are dry.
. Adjust the finger to cover the sensor with the middle portion of the finger, especially when enrolling a child’s finger.
Make sure to lift the finger after each successful fingerprint scan until the app shows 100% enrollment.
NOTE: If you are unable to enroll a specific fingerprint because of fingerprint damage, dry skin, etc., please use a different finger.
My registered fingerprints are unable to unlock the door?
If your registered fingerprints are unable to unlock the door, you will need to delete the existing fingerprints and re-enroll the fingerprint into the lock. NOTE: If you are unable to enroll a specific fingerprint because of fingerprint damage, dry skin, etc., please use a different finger.
Select the icon.
Select the Name of the person whose fingerprints you need to delete.
Tap the icon next to the registered fingerprints to delete them.
Select Schedule Type then click Submit.
Follow the instructions on the app to enroll your fingerprint.
Make sure that the fingers are dry.
Adjust the finger to cover the sensor with the middle portion of the finger, especially when enrolling a child’s finger.
Make sure to lift the finger after each successful fingerprint scan until the app shows enrollment.
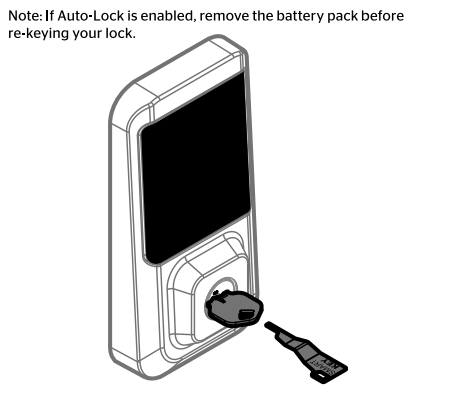
SmartKey Re-Keying
Re-key the lock to work with your existing key. See the supplied SmartKey Re-key instructions for more information.
 Prepare the door and check dimensions
 Make sure your door Is compatible. If you have a standard deadbolt mounted separately from the handle below it. your door is compatible.
 Remove your existing deadbolt from your door.
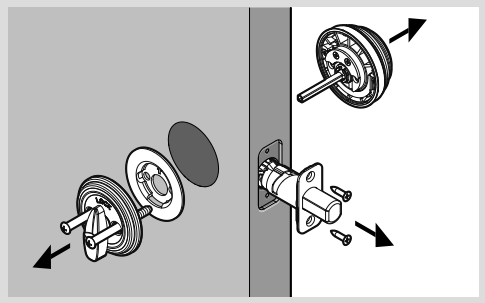
 Measure to confirm that the hole in the door Is either 2-1/8" (54 mm) or 1-1/2" (38 mm).
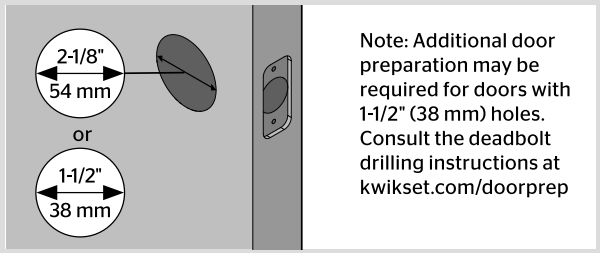
 Measure to confirm that the backset is either 2-3/8” or 2-3/4" (60 or 70 mm).
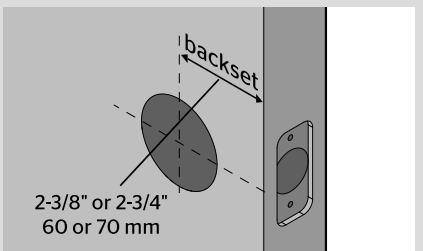
 Measure to confirm that the hole in the door edge is 1" (25 mm).
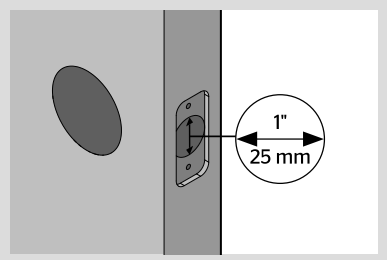
 Measure to confirm that the door is between 1-3/8" and 2" (35 mm and 51 mm) thick.
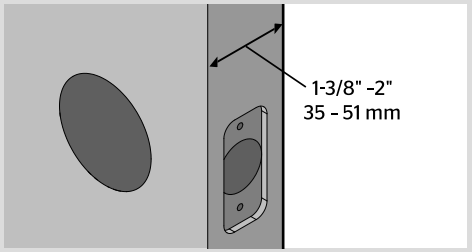
 Install the latch and strike
 Make sure the hole in the door frame is drilled a minimum of 1" (25 mm) deep.
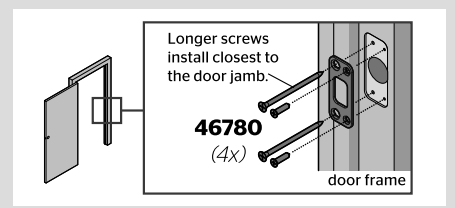
 Install the exterior keypad

 Install the interior assembly
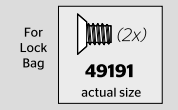
 Install the batteries and perform the door handing process
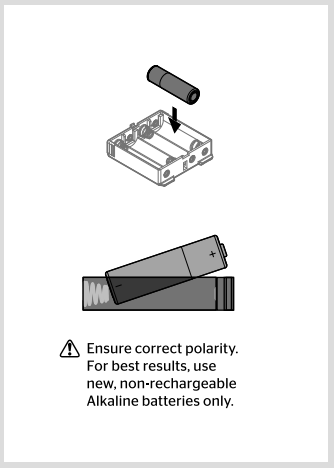

 If your door does not lock and unlock smoothly, make sure you replaced your previous latch and strike with those supplied in the box. If you still experience locking errors, call Kwikset Support to order a Warped Door Service Kit.
 Install the interior cover
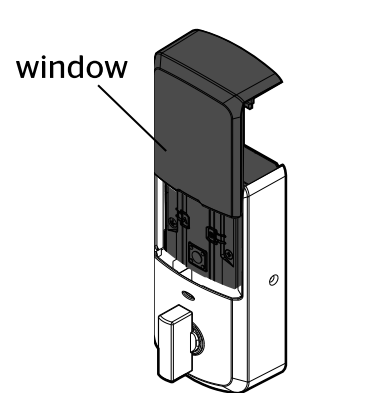
 Download the app and create an account
 What is the door thickness requirement for Halo and Aura locks?
 Is there a door thickness kit for Halo and Aura locks to support doors thicker than 2” (51mm)?
 What door hole diameter is required to install Halo and Aura locks?
 What do I need to correct a door that is warped or has been affected by weather?
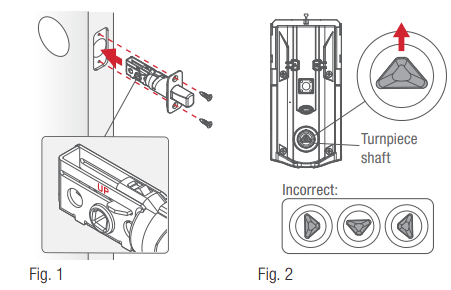

 icon.
icon. icon.
icon.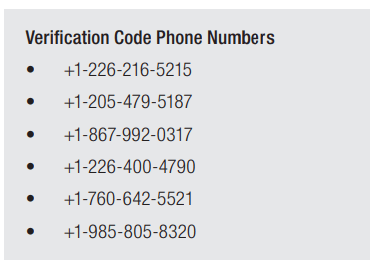
 icon.
icon. icon.
icon. icon next to the registered fingerprints to delete them.