Documents: Go to download!
User Manual
- User Manual - (English)
- Dimension Guide - (English)
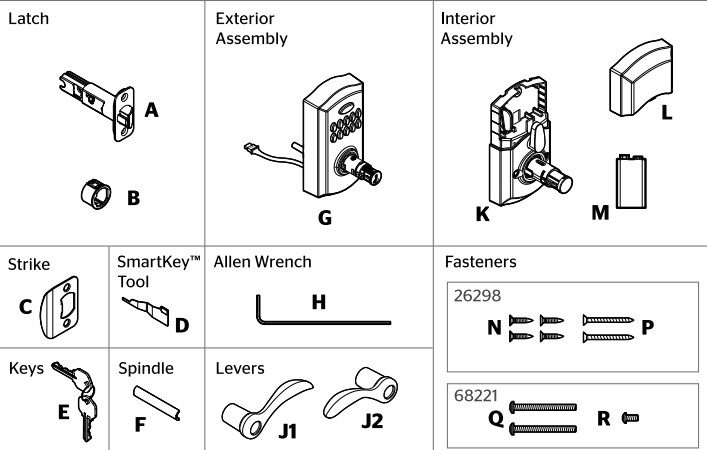
- Part in the box
- Prepare the door and check dimensions
- Install the latch and strike
- Install the exterior keypad, spindle, and interior assembly
- Install levers
- Test latch operation
- Install batery
- Add user code
- OPTINAL: Enable/Disable programming code
- Test the lock and review lock functionality
- System Signals
- How to add permanent or one-time User Codes
- How to enable/disable User Codes
- How to mute/unmute lock
- How to delete individual User Codes
- How to delete all User Codes
- How to change the auto-locking duration
- Factory Reset
- Troubleshooting
Table of contents
USER MANUAL SmartCode 955 Electronic Lever Metal Lock
Part in the box
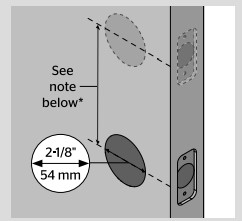
Prepare the door and check dimensions
| A. Measure to confirm that the hole in the door is 2-1/8" (54 mm). | B. Measure to confirm that the backset is either 2-3/8" or 2-3/4" (60 or 70 mm). | |
If you are installing this lever below an existing lock or you plan to install a lock above this lever. make sure that the distance between holes is at least 61/2" (165mm). | 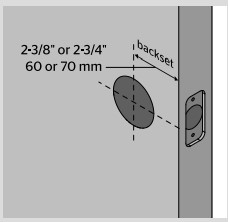 |
| C. Measure to confirm that the hole in the door edge is 1" (25 mm). | D. Measure to confirm that the door is between 1-3/8" and 1-3/4" (35mm. and 44 mm) thick. | |
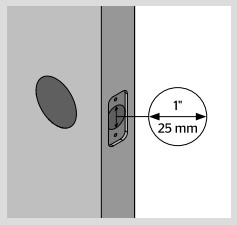 |  |
Install the latch and strike
A. Hold the latch in front of the door hole, with the latch face flush against the door edge
B. Are the latch holes centered in the door hole?
C. Is the door edge chiseled?
D. Install strike on the door frame
Install the exterior keypad, spindle, and interior assembly
A. Install exterior keypad
B. Install spindle
C. OPTIONAL: Install security set screw
D. Connect and secure cable to interior assembly
E. Install interior assembly and secure with mounting screws
Install levers
A. Install exterior lever
B. Insert key and turn 90° clockwise.
C. Secure exterior lever
D. Install interior lever
E. Secure interior lever
Test latch operation
Close door. test latch operation and make adjustments as needed:
The small bolt of the latch should not enter the strike hole. If it enters the strike hole. reposition strike.
If latch is loose in the strike. adjust the strike tab so it grips the latch bolt better when the door is closed.
Install batery
A. Remove interior cover.
B. Connect 9V battery.
C. Secure battery into interior assembly.
D. Reinstall battery cover.
Add user code
Move swiftly during programming. If no digit is pressed for 10 seconds. the system will time out and you will need to restart the procedure.
A. Make sure the door is open.
Press and release the Program button using the SmartKey tool or a paper clip. You will hear two beeps.
B. Press 1. You will hear one short beep and the keypad will flash green once.
C. Press Kwikset.
D. Enter a User Code. It must be between 4 and 8 digits.
E. Press Kwikset.
F. You will hear one long beep and the keypad will flash green if successful. If you hear three beeps and the keypad flashes red. it was unsuccessful. Repeat from step A.
OPTINAL: Enable/Disable programming code
A. A Programming Code enables you to make changes without needing to access the Program button. This is ideal for landlords to allow programming from the outside. without access to the interior Program button.
Please note that once a Programming Codeis enabled. the Program button is disabled and canbe used only to factory reset the lock.
B. Make sure the door is open. Press and release the Program button using the SmartKey tool or a paper clip. You will hear two beeps.
C. Press 3. You will hear one short beep and the keypad will flash green.
D. Press Kwikset.
E. Enter a Programming Code. It must be between 4 and 8 digits.
The Programming Code cannot be the sameas any user code.
F. Press Kwikset.
G. Re-enter Programming Code.
H. Press Kwikset. You will hear one long beep and the keypad will flash green if successful. If you hear three beeps and the keypad flashes red. it was unsuccessful. Repeat from step A.
Test the lock and review lock functionality
Unlocking the Door with a User Code
Unlocking the Door with a Key
Turnpiece Functions - Choosing a Mode
Emergency Egress
Re-key the lock (if needed)
SmartCode 955 at a Glance
System Signals
How to add permanent or one-time User Codes
- Make sure the door is open.
- If you have not enabled a Programming Code, press and release the Program button. You will hear two beeps. If you have enabled a Programming Code, enter your Programming Code, then press Kwikset. You will hear one short beep and the keypad will flash green.
- Press 1 to add a permanent user code that can be used for entry at all times, until deleted. Press 7 to add a one-time user code. A one-time user code may be used only once, which will be deleted immediately after use (typically used in emergency cases when you need to give one-time access to a person). You will hear one short beep and the keypad will flash green.
- Press Kwikset.
- Enter a new User Code. It must be between 4 and 8 digits. For security reasons, the first 4 digits of each user code must be unique. For example, you are unable to program a user code 4-8-1-5-1 as well as a user code 4-8-1-5-2.
- Press Kwikset You will hear one long beep and the keypad will flash green if successful. If you hear three beeps and the keypad flashes red, it was unsuccessful. Repeat from step 1.
How to enable/disable User Codes
- Make sure the door is open.
- If you have not enabled a Programming Code, press and release the Program button. You will hear two beeps. If you have enabled a Programming Code, enter your Programming Code, then press Kwikset. You will hear one short beep and the keypad will flash green.
- Press 6 You will hear one short beep and the keypad will flash green.
- Press Kwikset. You will hear one long beep and the keypad will flash green if successful. If you hear three beeps and the keypad flashes red, it was unsuccessful. Repeat from step 1.
How to mute/unmute lock
If the lock is muted, you will not hear beeping during programming, normal operation, or system signals. You will still get a low battery alarm.
- Make sure the door is open.
- If you have not enabled a Programming Code, press and release the Program button. You will hear two beeps. If you have enabled a Programming Code, enter your Programming Code, then press Kwikset. You will hear one short beep and the keypad will flash green.
- Press 5 You will hear one short beep and the keypad will flash green.
- Press Kwikset. You will hear one long beep and the keypad will flash green if successful. If you hear three beeps and the keypad flashes red, it was unsuccessful. Repeat from step 1.
How to delete individual User Codes
1. Make sure the door is open.
2. If you have not enabled a Programming Code. press and release the Program button. You will hear two beeps.
If you have enabled a Programming Code. enter your Programming Code. then press Kwikset. You will hear one short beep and the keypad will flash green.
3. Press 2 to delete a user code.
You will hear one short beep and the keypad will flash green.
4. Press Kwikset.
5. Enter the User Code you wish to delete.
Press Kwikset
6. Enter the User Code Again.
7. Press Kwikset. You will hear one long beep and the keypad will flash green if successful. If you hear three beeps and the keypad flashes red. it was unsuccessful. Repeat from step 1.
How to delete all User Codes
1. Make sure the door is open.
2. If you have not enabled a Programming Code. press and release the Program button. You will hear two beeps
If you have enabled a Programming Code. enter your Programming Code. then press Kwikset. You will hear one short beep and the keypad will flash green.
3. Press 4. You will hear one short beep and the keypad will flash green.
4. Press Kwikset.
5. Enter 9-9-9-9-9-9.
6. Press Kwikset.
7. Enter 9-9-9-9-9-9.
8. Press Kwikset. You will hear one long beep and the keypad will flash green if successful. If you hear three beeps and the keypad flashes red. it was unsuccessful. Repeat from step 1.
How to change the auto-locking duration
1. Make sure the door is open.
2. If you have not enabled a Programming Code. press and release the Program button. You will hear two beeps.
If you have enabled a Programming Code. enter your Programming Code. then press Kwikset. You will hear one short beep and the keypad will flash green.
3. Press 8. You will hear one short beep and the keypad will flash green.
4. Press Kwikset.
5. Enter delay time between 1-99 seconds.
6. Press Kwikset. You will hear one long beep and the keypad will flash green if successful. If you hear three beeps and the keypad flashes red. it was unsuccessful. Repeat from step 1.
Factory Reset
A factory reset will delete all codes associated with the lock.
1. Make sure the door is open and unlocked. 2. Press and hold the Program button for 30 seconds using the SmartKey" tool or a paper clip. You will hear one long beep. 3. Press and release the Program button. You will hear one short beep. 4. Test with an existing User Code. the lock should not work. | 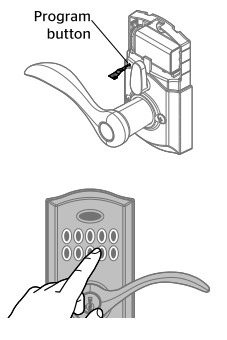 |
Troubleshooting
Keypad is not responding.
- Check battery.
Desired user code cannot be programmed.
- For security reasons, the first 4 digits of each user code must be unique. For example, you are unable to program a user code 4-8-1-5-1 as well as a user code 4-8-1-5-2.
Key cannot be removed when unlocked.
- This is a feature to ensure the door is always locked and the key is removed (store room function). To remove the key, return the key to vertical position to remove.
Emergency egress function.
- This lock has an emergency egress function which allows you to exit by turning the lever on the inside, regardless of whether it is in Aulo-lock or Passage mode.
See other models: 99130-003 92640-001 99070-103 99130-010 99120-037
