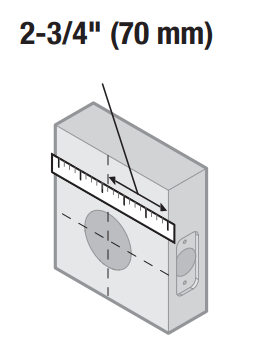
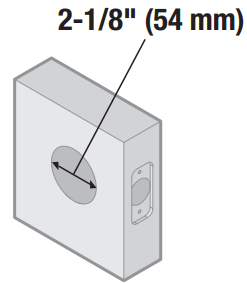
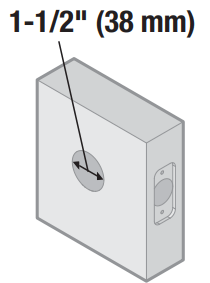
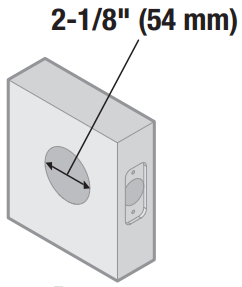
5 Determine the diameter of the hole in your door:
→
Move to next step
→
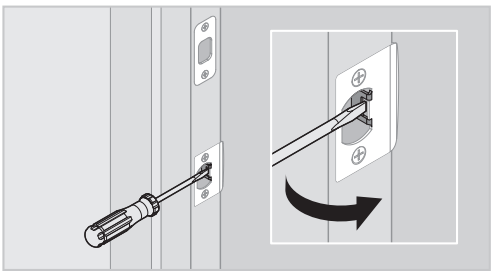
Test if latch bolt fully extends and retracts. Chisel out area inside hole as needed so latch can operate smoothly.
6 If needed, see the door drilling instructions, available on the SmartCode 914 product page of www.kwikset.com.
7
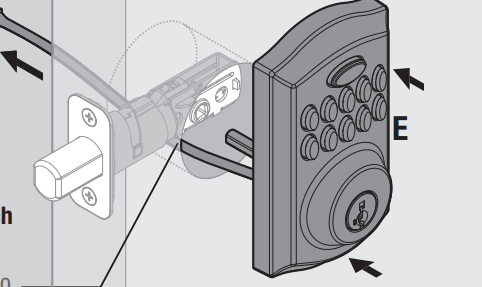
→
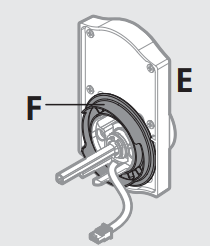
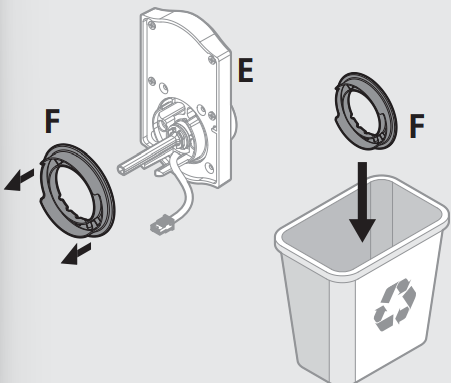
Make sure “F” is installed on “E”
→
Remove and discard “F”
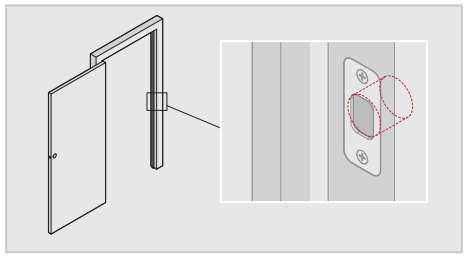
8 Cable goes underneath latch
as below
9 Route cable through center hole,
10 Keep parallel to edge of door
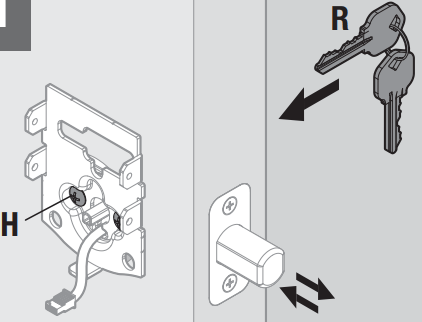
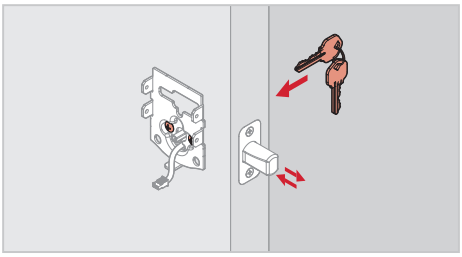
11 Insert key and test latch. If latch does not extend or retract smoothly, adjust screws (H). Remove key when finished and make sure the latch bolt is fully extended.
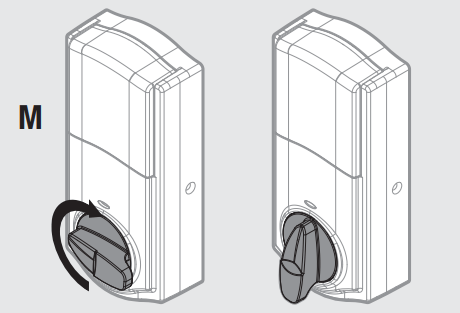
12 Make sure turnpiece is in the vertical position
13 Separate “M” and “J”
Make sure turnpiece shaft is rotated as shown:
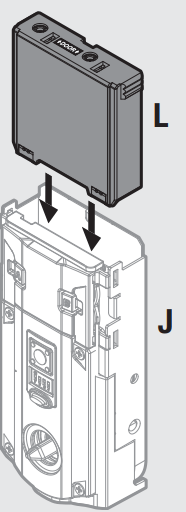
14 Separate “L” and “J”
15 Add batteries
Ensure correct polarity. For best results, use new non-rechargeable Alkaline batteries only.
Note: “Inclusion” refers to the process in which the lock is added to a Z-Wave or ZigBee controller. “Exclusion” refers to the process in which the lock is removed from a Z-Wave or ZigBee controller.
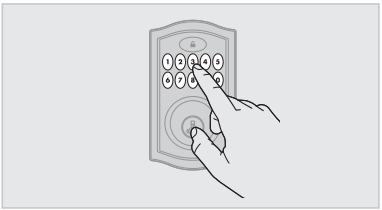
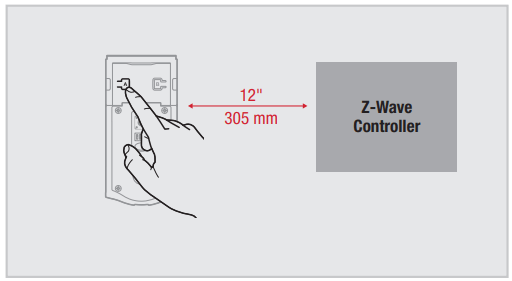
Hold the lock interior a maximum of 12" (30.5 cm) from your Z-Wave controller, and initiate the Inclusion process at the controller. Refer to your Z-Wave control system instructions for more information. Press button “A” on the lock one time to Include it in your system. The controller and lock must remain stationary for a total of 60 seconds during the Inclusion process.
If Inclusion is unsuccessful, initiate the Exclusion process at the controller, then press button “A” on the lock one time. Once the lock is fully excluded from the system, repeat the Inclusion process.
Z-Wave locks only
Press button “A” once.
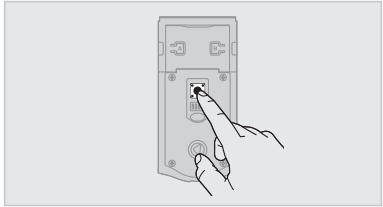
18 Remove battery pack
19
20 Lay excess cable flat inside the bottom of the interior housing (J).
21
22
23 DOOR HANDING PROCESS
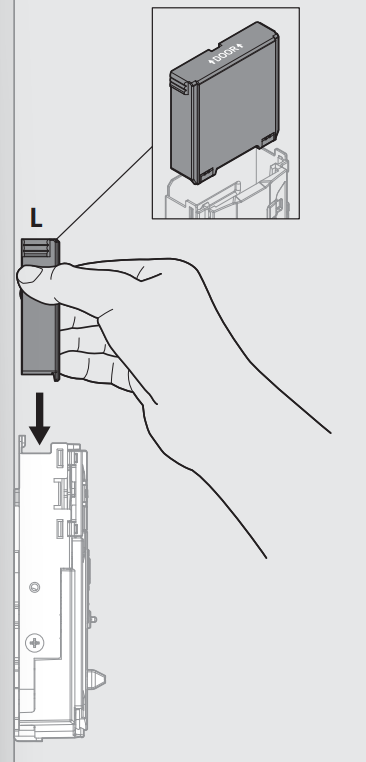
Press and hold the Lock button while installing battery pack (L). Hold button until the latch bolt starts moving on its own.
24 Did the latch bolt retract and extend on its own when the battery pack was installed?
YES => Door Handing Process was successful! Proceed to Step 25 after latch bolt stops moving.
NO => Remove battery pack, wait 15 seconds, then attempt Step 23 again.
25 ZigBee locks only
Perform the Inclusion Process:
Note: “Inclusion” refers to the process in which the lock is added to a Z-Wave or ZigBee controller. “Exclusion” refers to the process in which the lock is removed from a Z-Wave or ZigBee controller.
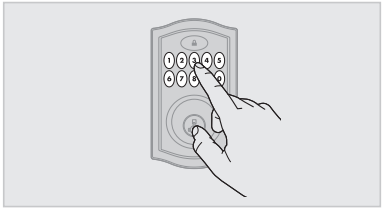
Initiate the Inclusion process at your ZigBee controller. Refer to your ZigBee control system instructions for more information. Press button A” on the lock four (4) times to Include it in your system.
If Inclusion is unsuccessful, initiate the Exclusion process at the controller, then press button “B” nine (9) times. Once the lock is fully excluded from the system, repeat the Inclusion process.
26 Program the lock.
27 Install “M” after the lock has been programmed.
28 Keep “P” in a safe place, as you will need it to access the back panel for additional programming.
29 If needed, rekey the lock to work with your existing key. See the supplied SmartKey Rekey instructions for more information.
TROUBLESHOOTING
Mastercode
A. About the Mastercode
Using a Mastercode is an optional, added-security measure. It is not enabled by default. A Mastercode is used to add and delete user codes, but it cannot unlock the door (unless the same code is programmed as a user code, though this is not recommended). The Mastercode must be 4-8 digits.
B. Enabling and Setting the Mastercode
Programming timeout: If no button is pressed for five seconds, the system will time out (indicated by three beeps and a red flashing keypad), and you will need to restart the procedure.
1. Keep door open. Press and HOLD the Program button until the keypad flashes green (about 5 seconds).
2. Enter new Mastercode.
3. Press Lock button once.
4. Re-enter Mastercode
5. Press Lock button once.
If programming is successful, the keypad will flash green once with one beep. If programming is unsuccessful, the keypad will flash red three times with three beeps. Make sure the Mastercode has not already been programmed. Attempt the procedure again, making sure to enter the same new Mastercode in step 2 and 4.
6. Make sure switch #3 is on, and press the Program button once. If you hear three beeps and see the keypad flash green, the Mastercode is enabled. Note: The lock will time out after five seconds.
C. Adding User Codes with the Mastercode Enabled
The procedure for adding user codes is different when the Mastercode is enabled. For instuctions on how to add user codes when the Mastercode is disabled, see the Installation and User Guide that came with your lock.
1. Keep door open. Press the Program button once. The keypad will flash green and you will hear three beeps.
2. Enter Mastercode
3. Press Lock button once
4. Enter new user code.
5. Press Lock button once.
If programming is successful, the keypad will flash green once with one beep. If programming is unsuccessful, the keypad will flash red three times with three beeps. Make sure the user code is not a duplicate and that it is between 4 and 8 digits during your next attempt. Make sure the lock has room for an additional code. If all user codes are filled, delete a code to make room for this one. Make sure to enter a valid Mastercode in step 2.
6. While the door is open and locked, test the user code to make sure it unlocks the door.
D. Deleting a Single User Code with the Mastercode Enabled
1. Keep door open. Press the Program button once. The keypad will flash green and you will hear three beeps.
2. Press Lock button once.
3. Enter Mastercode
4. Press Lock button once.
5. Enter user code to be deleted.
6. Press Lock button once
7. Re-enter user code to be deleted.
8. Press Lock button once.
9. While the door is open and locked, test the user code to make sure it no longer unlocks the door.
If programming is successful, the keypad will flash green once with one beep.
If programming is unsuccessful, the keypad will flash red three times with three beeps. Make sure to enter the same valid code in steps 5 and 7. Make sure to enter a valid Mastercode in step 3.
E. Deleting All User Codes with the Mastercode Enabled
1. Keep door open. Press the Program button once. The keypad will flash green and you will hear three beeps.
2. Press Lock button once.
3. Enter Mastercode.
4. Press Lock button once.
5. Press “9” six times
6. Press Lock button once.
7. Press “9” six times.
8. Press Lock button once.
9. Press the Lock button while the door is open and unlocked. If the latch bolt does not extend to lock, then all codes have been successfully deleted.
F. Disabling and Deleting the Mastercode
1. Keep door open. Press and HOLD the Program button until the keypad flashes green (about 5 seconds).
2. Press Lock button once.
3. Enter Mastercode
4. Press Lock button once.
5. Re-enter Mastercode.
6. Press Lock button once.
7. Make sure switch #3 is on, and then press the Program button once. If you don’t immediately hear three beeps and see the keypad flash green, the Mastercode is disabled.
Note: The lock will time out after five seconds.
If programming is successful, the keypad will flash green once with one beep.
If programming is unsuccessful, the keypad will flash red three times with three beeps. Make sure the Mastercode has been enabled before trying to disable it. Attempt this procedure again, making sure to enter the same Mastercode in steps 3 and 5.
Troubleshooting: Installation
The interior mounting screws are difficult to tighten.
The interior and exterior assembly won’t mount parallel to the door edge.
The interior assembly does not fit on the mounting plate.
If you encounter any of the problems above, the deadbolt latch may be installed upside down. Remove the interior assembly, mounting plate, and exterior assembly from the door, and look at the latch inside the door hole.
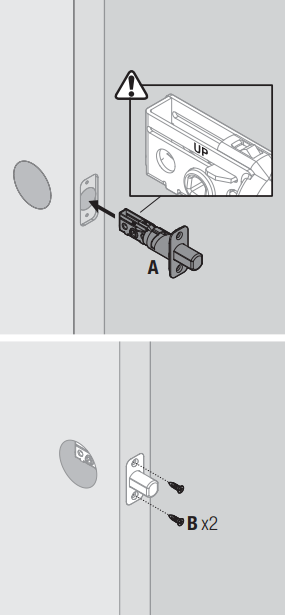
If the word “UP” is upside down and at the bottom of the latch, the latch is installed incorrectly
Reinstall the latch, making sure the word “UP” faces upward.
D. The turnpiece is upside down, or it cannot rotate to a vertical position.
The turnpiece was rotated past its normal range.
If the interior assembly is not installed on the door, place the interior cover over it. Align the hole in the turnpiece with the shaft.
The turnpiece should be able to rotate to the vertical position.
If it cannot rotate to the vertical position, use force to rotate the turnpiece clockwise until it clicks. The turnpiece should now be able to rotate to the vertical position.
If the interior assembly is installed on the door, and the turnpiece cannot rotate to a vertical position, perform the door handing process.
Troubleshooting: Door Jamming and Door Handing
The lock jams and the turnpiece does not rotate smoothly. The lock beeps, the keypad flashes red, and the door cannot lock.
The door handing process was not executed during installation.
Perform the door handing process in the Installation Guide
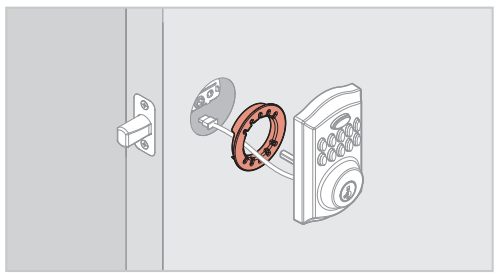
The hole in the door is misaligned.
Disassemble the lock, and reinstall it without the adapter ring on the exterior side of the door.
The wrong deadbolt latch is installed
SmartCode deadbolts require a tapered latch bolt for ease of operation. If the latch being used is from an older lock, it will likely not have a tapered latch bolt. Remove the lock from the door, including the old latch. Replace with the new tapered latch that came with the lock and reinstall the lock.
The deadbolt latch and strike are misaligned, causing the latch to bind.
Adjust the tab of the lower strike (for your knob or lever) to help align the upper latch and strike so that the upper latch bolt enters the strike when the door is locked. If needed, call Kwikset to order a warped door kit.
The lower latch and lower strike (for your knob or lever) are misaligned, putting too much load on the deadbolt latch.
As a test, rotate the turnpiece on the deadbolt so the latch is retracted (unlocked), and close the door. If you have to push, pull or lift the door to get it to close, adjust the position of the lower strike.
The hole in the door frame for the latch bolt is not drilled deep enough.
Make sure the hole in the door frame is drilled at least 1” (25 mm) deep.
The mounting plate is placing tension on the torque blade.
Attempt to lock and unlock the door with the key. If it is unable to rotate, remove the interior assembly from the mounting plate. Test the key again. If it is still unable to rotate, loosen the screws on the mounting plate and reposition the plate so there is no tension on the cylinder torque blade. Make sure the latch bolt can operate smoothly with the key and reinstall the interior assembly
The battery level is too low.
Rotate the interior turnpiece to manually lock the door, then rotate it again to unlock the door. Remove the battery pack, and replace the batteries with a new set of good quality disposable alkaline batteries. Reinstall the battery pack. Press the lock button on the exterior keypad or execute a lock command inside your smart home app to lock the door.
C. The Status LED is solid red after the door handing process.
The lock interior is not mounted perpendicular to the ground.
Remount lock interior assembly as illustrated in the Installation Guide.
The hole in the door is misaligned.
Disassemble the lock, and reinstall it without the adapter ring on the exterior side of the door.
The battery level is too low.
This is indicated by the keypad flashing red three times with three beeps.
Use a fresh set of batteries, and perform the door handing process again.
The latch and strike are misaligned, causing the latch to bind.
If you have not already done so, perform the door handing process while the door is open. If it is successful only when the door is open, the latch and strike are not aligned as they should be. Ensure door preparation is in accordance with the door drilling instructions, available online.
D. The deadbolt latch does not extend or retract on its own during the door handing process.
The door handing process was not performed correctly.
Make sure to press and hold the Lock button until the battery pack is fully inserted into the interior assembly and the latch bolt starts to move on its own.
The latch and strike are misaligned, causing the latch to bind.
If you have not already done so, perform the door handing process while the door is open. If it is successful only when the door is open, the latch and strike are not aligned as they should be. Ensure door preparation is in accordance with the door drilling instructions, available online.
The keypad is unresponsive.
Make sure switch #3 is on. Use a fresh set of batteries and perform the door handing process. If the latch does not extend or retract, and the lock does not beep, press each individual key on the keypad (one at a time) and listen for beeping sound. If no beeping is heard, this is a keypad error. Contact Technical Support for further troubleshooting.
Troubleshooting: Keypad
A. The keypad is unresponsive.
Keypad error test Install a fresh set of batteries and turn switch #3 to the ON position. Test each button on the keypad (one at a time) and listen for a beep on each button press. If beeping is not heard on all buttons, contact Technical Support for further troubleshooting.
B. The Lock button does not lock the door.
No user codes are programmed.
If there are no codes in the lock, the lock button will not lock the door.
Program at least one user code and test the Lock button again.
The door handing process was not executed.
Perform the door handing process, following the instructions inside the installation guide.
The battery is too low to lock the door.
This is indicated by the keypad flashing red three times with three beeps.
Remove the batteries and replace with a fresh set.
Keypad lockout
If three incorrect codes were entered within one minute, the keypad will lock for 60 seconds
Troubleshooting: Smart Home Systems
The lock was not removed completely from another network before being paired with the new network.
Follow your smart home system’s instructions to remove (exclude/unpair) the device from any other network. Then, attempt to pair (add/include) the lock again.
The lock is not close enough to the controller.
Some Z-wave systems require that the lock be within 12” of the controller during the pairing process. If the lock has already been installed on the door, remove the interior assembly from the mounting plate. Make sure the batteries are installed, and bring the interior assembly next to the controller. Follow your smart home system’s instructions to begin pairing at the controller. The lock may need to remain stationary for 60 seconds during pairing.
Note: Some locks have an anti-tamper alarm that will sound if the interior is disconnected from the exterior. If this alarm is heard, perform the following:
a. Remove the battery pack from the interior. b. Remove the exterior assembly from the door. c. Connect the cable from the exterior assembly to the interior assembly. d. Reinstall the battery pack. e. Perform the pairing process while the interior and exterior are connected.
B. I can see the lock in my controller, but I can’t control it from the controller.
The system needs a repeater or router to reach the lock.
Adding repeaters to your system may help communication between your lock and the controller, especially if they are far away from each other.
The network configuration changed.
If any repeaters or routers in the system were moved since adding the lock to the system, perform the “rediscover” process in your system’s user interface.
The lock is in sleep mode.
If the lock has been unable to communicate with the system after multiple attempts, it will go into sleep mode. Lock and unlock the door with a key so that the lock status transmits to the system. If it still does not communicate, remove (exclude/unpair) the lock from your system.
Then, pair (add/include) the lock with your system again. If the problem persists, add a repeater or router between the controller and lock if none presently exist in the system.
The light module or switch is not beaming capable.
Z-Wave locks: Ensure the light module or switch located between the controller and lock is beaming capable.
ZigBee locks: Ensure the router is reachable by both controller and lock.
C. The lock fails to update or pair with a service provider's ZigBee smart home system.
Lock fails to OTA (Over the Air) update firmware.
1. Reboot the lock:
a. Remove the battery pack from the lock.
b. Press the "Program" button for 5 seconds and then the “A” button for 5 seconds.
c. If TS (touchscreen controller) shows low battery trouble for the lock subjected to the firmware update then install new batteries in pack.
d. Replace the battery pack into the lock.
e. If lock still fails to OTA update firmware, proceed to Step 2.
2. Delete, default, and pair lock again:
a. Delete the lock from TS (touchscreen controller).
b. Perform a factory reset:
i. Remove the battery pack from the lock.
ii. Press the "Program" button for 5 seconds and then the "A" button for 5 seconds.
iii. Press and hold the "Program" button while reinserting the battery pack. Keep holding the button for 30 seconds until the lock beeps and the status LED flashes red.
iv. Press the "Program" button momentarily.
v. After several seconds, the lock will flash the status LED red and green several times and beeps twice(if a udio is enabled) to indicate factory reset is complete.
c. For model 910 or 914, perform handing on the lock. For model 916, it will automatically perform handing.
d. Pair the lock with TS again.
e. If lock still fails to OTA update firmware, proceed to Step 3.
3. If lock still fails to OTA update firmware after going through steps 1 and 2, it is recommended that your MSO/service provider contact Kwikset/Weiser for advanced replacement of the lock.
Troubleshooting: Battery
A. The batteries drain within one day.
The lock must be replaced. Contact Technical Support.
B. The batteries drain within one week.
Keypad error.
C. The batteries drain within a few weeks
The smart home system’s user interface falsely reports a low battery.
If you receive an alert from your smart home system indicating that the battery is low, confirm this is true at the lock. Turn on switch #1 so that the status LED flashes every six seconds. If the LEDs turn amber or green, followed by a red flash, the battery is low. If the red flash is not seen, the battery is not low. This is an error on the smart home system side that will often be fixed when the lock is manually locked or unlocked.
The Wireless Card LEDs are staying on.
Remove the battery pack, press and hold the program button for 10 seconds. Replace the battery pack. If the Wireless Card LEDs continue to stay on, contact Technical Support.
The smart home system controller’s communication with the lock is draining the battery.
Remove the lock from your system. Put a new set of batteries in the lock. Operate the lock in stand-alone mode for a week. If the batteries drain within the week, the problem resides in the lock. If the batteries do not drain, the problem may be the smart home controller. Call Technical Support.
The smart home system controller’s ping frequency is too high.
Decrease the ping frequency from the controller to the lock to the lowest possible setting.
D. The lock still shows low battery behavior locally and/or on SmartHome console after fresh batteries were installed:
To ensure proper operations post power cycle, allow 30 seconds between battery removal and replacement. If the lock still displays low battery behavior and/or fails to join/rejoin a ZigBee network, remove the battery pack, press and hold the program button for 5 seconds then press and hold button A for 5 seconds. Replace the battery pack.
Troubleshooting: Battery FAQ
How long will the lock operate on a set of batteries?
Based on 10 operations per day, a single, new set of Alkaline batteries will operate the lock for over a year.
What type of batteries do you recommend?
For best results, use new non-rechargeable Alkaline batteries only.
I am planning to be away for several months. Will my lock operate when I get back?
When the system is idling, it consumes minimum power (very close to battery shelf life.) With alkaline batteries, the lock should be operable after years of idle.
I replaced my batteries less than a year ago and need to replace them again.
Check your door alignment. If the deadbolt makes several unsuccessful attempts to lock or unlock the door, it may mean that the door is warped and the latch does not line up correctly with the strike. Operating the lock excessively reduces battery life. Avoid turning on the keypad light unnecessarily.
What settings should I use to get the maximum battery life out of my lock?