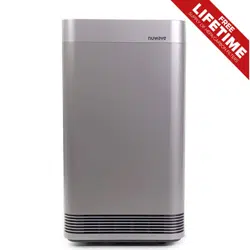
Owner’s Manual Air Purifier
PARTS DESCRIPTION
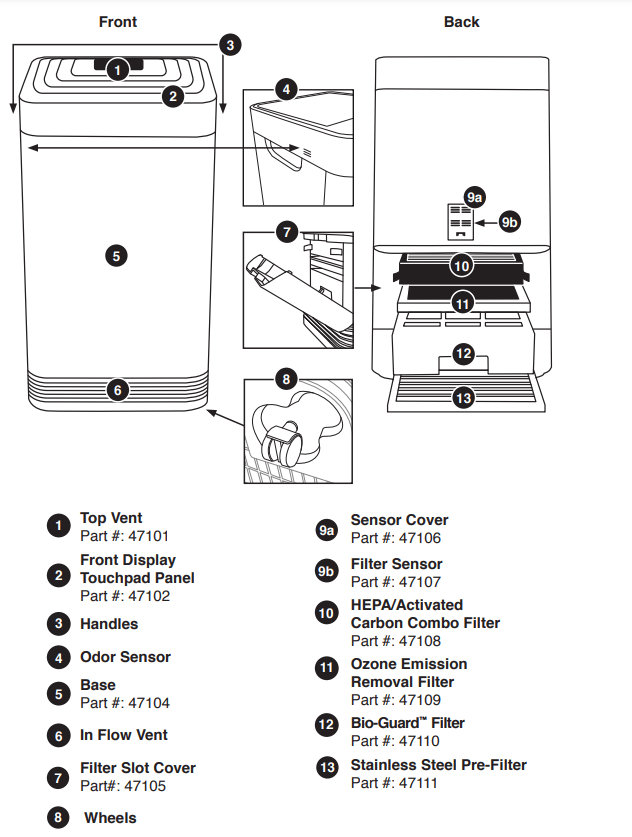
ASSEMBLY GUIDE
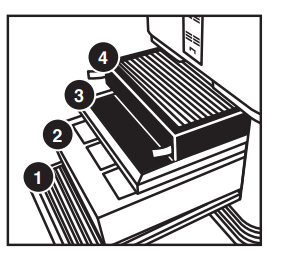
Air Filter Assembly
- The OxyPure comes with four different preassembled filters inside the unit. When filters require replacement or cleaning, follow all directions when assembling. See Care & Maintenance.
The order of the filters inside the OxyPure is as follows:
- Stainless Steel Pre-Filter 2. Bio-Guard™ Filter
- Ozone Emission Removal Filter
- HEPA/Activated Carbon Combo Filter
Filter Functions: Air purifiers are more effective in operation when all windows and doors are closed. Purifies extra-large rooms up to 1,200 sq. ft.
Stainless Steel Pre-Filter Washable and reusable for up to 20 years. Captures and collects large particles, pollutants, and allergens including pet hair, dander, and pollen.
Bio-Guard™ Filter: Washable and reusable for up to 20 years. 8,000V, positive and negative charges capture and trap pollutants as small as 0.09 microns, including bacteria, mold, viruses, smoke, pollen, and allergens.
Ozone Emission Removal Filter: Reusable for up to 20 years. Not Washable. Eliminates ozone emissions and other harmful airborne chemicals.
HEPA/Activated Carbon Combo Filter Lifespan, up to 5 years. Not Washable. Captures and traps pollen, allergens, industrial emissions, VOCs including formaldehydes, household fumes, odors and nitrogen dioxides from gas stoves and car exhausts.
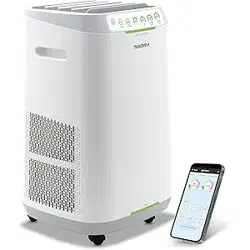
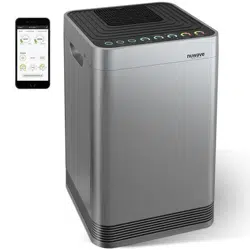
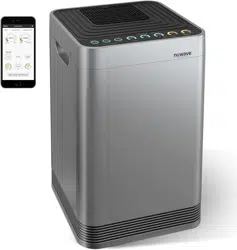
WIFI CONNECTION
The OxyPure is equipped with WIFI to operate the unit from any location. To set up and activate the WIFI:
- Download the NuWave Connect app via the Apple Store or Google Play on your smartphone or device and open the app.
- Make sure your phone is connected to your network. Open the app and follow the instructions for the verification process. Once verification is complete, begin adding devices. To add a device tap "+" then, select "OxyPure."
- Next, plug the OxyPure into a compatible power outlet. To activate Wi-Fi Pairing Mode, press and hold the power button on the OxyPure for 2 seconds until the Wi-Fi light begins to rapidly blink at a rate of about 2 blinks per second. Once the Wi-Fi light is rapidly blinking, in the app, tap the Finish Network Configuration button on the bottom of the Add Device page.
- Next, you will be prompted to either connect to your network or confirm your existing network password. Note: To either connect to or change networks, depending on your phone, you may be removed from the app to complete the network connection. Return back to the NuWave Connect app and continue with the setup process.
- When the OxyPure is connected to the WIFI, the "WIFI" light will stop flashing and stay continuously lit.
- If the OxyPure did not connect to your network, the WIFI light will turn off. Follow steps 3-4. Make sure to select the proper WIFI network and type the correct password.
WIFI LED Status Pairing Mode & Standby Mode
| Solid Light |
The OxyPure is paired with the WIFI and ready to be used. |
| Rapid Blinking Light |
The OxyPure is in Pairing Mode. The OxyPure will remain in Pairing Mode for up to 3 minutes, or until your device is paired. |
| Slow Blinking Light |
The OxyPure is in Standby Mode. |
| No Light |
The OxyPure’s WIFI is off. |
Note: If the light on your unit is blinking slower, the unit is in WIFI Standby Mode. To exit Standby Mode and initiate the Pairing Mode, press and hold power for 2 seconds until the WIFI light begins blinking rapidly.
Note: The OxyPure, as with most IoT devices, will only connect to a 2.4GHz* network.
- To reset the OxyPure WIFI, press and hold down “Power” for 3 seconds. Follow step 4. The OxyPure can now be operated from any location.
*Most routers will broadcast in 2.4GHz. If you need help activating 2.4GHz, contact your ISP (Internet Service Provider).
OPERATING INSTRUCTIONS

 Power ON/OFF
- Plug in unit into an outlet. “Power” will be lit in red and unit will be in standby mode.
- Press “Power”. Unit will turn on and “Power” will be lit green.
- Press “AUTO”. "AUTO" will illuminate.
- Bars next to “AIR” and “ODOR” will illuminate, measuring current air quality.
- The fan will start.
- Press “Power” again to turn unit off.
- When selecting a different mode other than the default "AUTO" before turning off, the unit will run the previously selected mode when it is powered back on.
 AUTO: When AUTO function is used, the unit will adjust the fan speed automatically (no time limit).
- Press "AUTO". "AUTO" will be lit.
ECO-FRIENDLY MODE OxyPure will turn on automatically once it detects poor air quality. The fan speed will adjust based on the quality of air.
- Press “POWER" and "ULTIMATE CLEAN" at the same time. POWER will be backlit yellow.
- Press “POWER" and "ULTIMATE CLEAN" again to turn off the Eco-Friendly Mode. “POWER" will no longer be yellow.
 ULTIMATE CLEAN: When in ULTIMATE CLEAN mode, the unit will automatically adjust to the highest or lowest fan speed based on air quality (no time limit).
- Press “ULTIMATE CLEAN”. ULTIMATE CLEAN will be lit green.
- Press “ULTIMATE CLEAN” to turn off.
ULTIMATE CLEAN with TURBO: Cleans at the highest fan speed for ½ hour and will switch to "ULTIMATE CLEAN" mode.
- Press "ULTIMATE CLEAN". ULTIMATE CLEAN will be lit green.
- Press “TURBO”. Default is ½ hour and can adjust from 1 to 2 hours.
- Press “TURBO” a fourth time to turn off.
 FAN SPEED: Adjust from 6 speeds (LOW to HIGH)
- Press "FAN SPEED" to adjust.
- To go back to the lowest level of fan speed, continue to press "FAN SPEED" until the first bar is lit.
SLEEP MODE: When in Sleep Mode the LED lights will be off but the fan will still be active. Adjust the fan speed prior to going into Sleep Mode.
- Manually adjust FAN SPEED.
- Press and hold "FAN SPEED" for 2 seconds to activate SLEEP MODE.
- Unit will run under the fan speed that was previously selected.
- To turn off Sleep Mode, press any button.
Note: ULTIMATE CLEAN and TURBO will work during Sleep Mode.
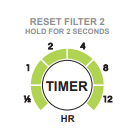 TIMER: Use the TIMER function to choose the duration of operation.
- Press “TIMER”. The bar next to ½ hour will be lit.
- There are 6 preset times to choose from.
- Press “TIMER” to increase time.
- Choose from ½ hour, 1, 2, 4, 8, or 12 hours.
- After pressing "TIMER" six times, all bars will be lit.
- Press “TIMER” once more to turn TIMER off
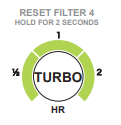 TURBO: The TURBO function cleans the air using the highest fan speed at selected times.
- Press “TURBO” to adjust from ½ hour, 1, or 2 hours.
- When the selected time has finished, TURBO will shut off automatically.
- To go back to the lowest level, continue to press "TURBO" until bar next to ½ is lit.
TURBO with TIMER: When using TURBO with TIMER the default time is set to 2 hours.
- Press "TIMER" to increase or decrease the time.
- Choose from ½ hour, 1, 2, 4, 8, or 12 hours.
TURBO with AUTO: Use the TURBO function to select desired time limit. Once time is up, the unit will switch to "AUTO."
- Press "TURBO" to adjust from ½ hour, 1, or 2 hours.
- Press "AUTO".
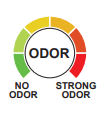
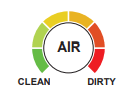 AIR QUALITY INDICATOR: The OxyPure will automatically measure and display the current air quality in the room.
- The bars will illuminate around “AIR” and “ODOR”, indicating the current air quality. Bars will increase and decrease, and are color coded, according to air quality.

CLEAN AND REPLACE FILTER INDICATORS
- The lights next to CLEAN FILTER 2 and REPLACE FILTER 4 will illuminate, indicating that the filters will need to be cleaned or replaced.
- To reset Indicators, see “Resetting the Filter and Air Quality Indicators” in Care & Maintenance.
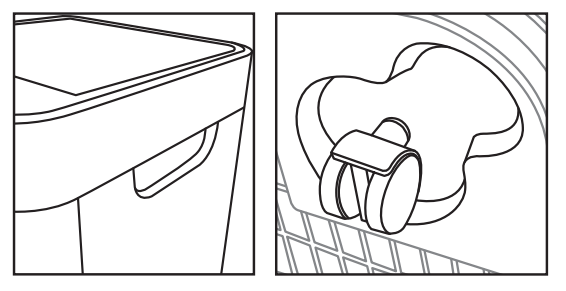
The OxyPure can easily be moved from one location to another. Just hold the OxyPure by the handles on each side and roll the unit to the chosen location. The wheels underneath provide extra maneuverability and mobility whenever it's needed.
CARE & MAINTENANCE
Before First Use
- Wipe Top Vent and In Flow Vent with a slightly damp cloth or paper towel. Dry thoroughly before use.
After Use
- The OxyPure should be cleaned periodically and after excessive use to ensure proper performance and function. To clean the outsides of the OxyPure, use a cloth or paper towel to remove dust and other particles. For tougher buildup, use a damp cloth or paper towel and dry thoroughly
Cleaning the Top Vent and In Flow Vent
- Use a soft brush to remove dust and debris.
- If needed, use a slightly wet paper towel or damp cloth to remove larger buildup. Do not use any harsh abrasives or cleaning pads on Top Vent or any part of the unit.
Cleaning the Odor Sensor Opening
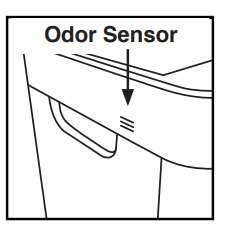
The Odor Sensor is located on the side corner of the OxyPure toward the top, under the small grill opening.
- Keep Odor Sensor clear of dust and debris using a soft cloth to maintain accurate odor readings.
- DO NOT tamper with Odor Sensor or opening over Sensor. Do not spray inside or near small grill opening over the Odor Sensor. Doing so may cause the Sensor to malfunction and can void your warranty.
CAUTION: DO NOT drop any dust or residue into the OxyPure when cleaning.
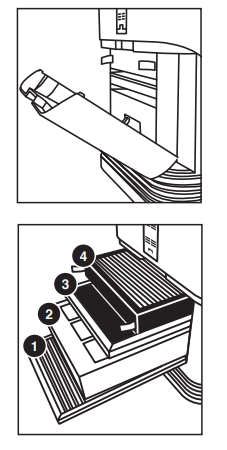
The order of the filters inside the OxyPure is as follows (bottom to top):
- Stainless Steel Pre-Filter (washable)
- Bio-Guard™ Filter (washable)
- Ozone Emission Removal Filter (not washable)
- HEPA/Activated Carbon Combo Filter (not washable)
- The OxyPure should be placed on the floor when assembling the filters.
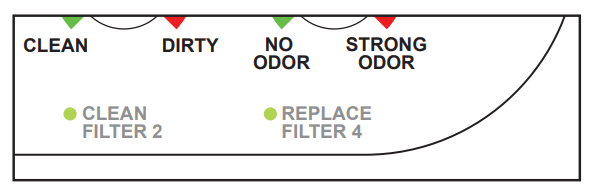
The CLEAN FILTER 2 indicator will turn blue after 3 to 6 months, indicating the filter should be cleaned for optimal results (Bio-Guard™ Filter). The CLEAN FILTER 2 indicator will turn red after 6 months of use, indicating the filter needs to be cleaned.
The REPLACE FILTER 4 indicator will turn red when the filter (HEPA/ Activated Carbon Combo Filter) needs to be replaced. The filter will last up to 5 years depending on how often the unit is running in its environment.
Changing the Filters
The filters inside the filter slot need to be changed or cleaned on schedule to help the OxyPure maintain optimum, efficient performance.
- Remove Filter Slot Cover in back rear of the OxyPure using its built-in handle.
- Slide out filters that need cleaning or replacement.
- Allow washable filters to dry completely before reinstalling into unit.
- Never place a wet filter into the OxyPure.
- Filter Slot Cover must be secure or unit will not work.
DO NOT WASH Ozone Emission Removal Filter or HEPA/Activated Carbon Combo Filter. Ozone Emission Removal Filter should be replaced every 20 years. The HEPA/Activated Carbon Combo Filter should be replaced every 5 years, depending on how often the unit is running in its environment.
CAUTION: Unplug the OxyPure from the power source before inserting or removing any parts or attachments and before cleaning.

Cleaning the Filters
To clean the Bio-Guard™ Filter:
- Remove filter.
- Spray mild degreaser, let sit for 2-3 minutes.
- Submerge in warm water, shake, remove.
- Repeat process until clean.
- Rinse with warm water.
- Dry completely before use.
The Pre-Filter collects large particles and will need to be cleaned at least once every two months depending on use.
- Use a vacuum or paper towel to remove any dust or lint.
- Clean with warm soapy water.
- Rinse thoroughly and remove any soap particles on the filter.
- Allow filter to dry completely BEFORE placing back into OxyPure (up to 12-24 hours to dry).
Resetting the Filter and Air Quality Indicators
- To reset the Air Quality Indicator for AIR, press and hold down “TIMER” for 2 seconds until a beep is heard.
- After a filter is cleaned or replaced and indicator is reset, the first green bar around AIR will be lit.
- To reset the Air Quality Indicator for ODOR, press and hold down “TURBO” for 2 seconds until a beep is heard.
- After a filter is cleaned or replaced and indicator is reset, the first green bar around ODOR will be lit.
Cleaning the Filter Sensor
The Filter Sensor is located on the back, above the Filter Slot Cover.

- Open the panel (Sensor Cover).
- Using a dry cotton swab or small, soft brush, gently remove any dirt or dust from the Sensor.
- For more buildup on Sensor, wipe with a slightly wet cotton swab.
- Remove any moisture with a dry cotton swab.
- The Filter Sensor requires regular cleaning (approx. every 3 months) for the unit to operate efficiently.
- If the OxyPure is set up in an area with high dust accumulation, more frequent cleaning of the Filter Sensor is needed.
- Do not use the cotton swab on any part or area other than the Filter Sensor.
Cleaning Underneath Top Vent
The Top Vent of the OxyPure can be removed to clean the surface underneath the Top Vent and the inner vent screen.
To clean the surface underneath and inner vent screen:
- Turn the OxyPure off and unplug the unit.
- Lift the Top Vent using the built-in tab.
- Using a dry or slightly wet paper towel, wipe up any dust or accumulated particles off surface and inner vent screen.
To clean the inner wall opposite of the fan or to remove an object that has fallen through the inner vent:
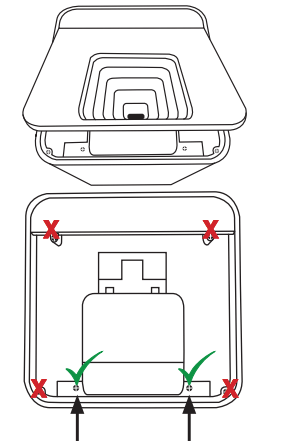
- After removing Top Vent, locate the two screws closest to the end on the inner vent near the grill opening, underneath the main Top Vent. DO NOT unscrew the four outer screws.
- Use a Phillips screwdriver to loosen the two screws (only).
- Lift up inner vent.
- Only a portion of the inner vent will lift up.
- After cleaning inner wall with a soft cloth or paper towel, reassemble inner vent, retightening the two screws, and replace Top Vent.
- Make sure all parts are secure before plugging OxyPure back in and turning on again.
Note: DO NOT unscrew the four outer screws located toward the corners. Doing so will void your warranty.
Do not immerse the OxyPure in water. Clean with a damp sponge or cloth and wipe dry.
Make sure all parts and covers are securely attached.

TROUBLESHOOTING
| Problem: |
Solution(s): |
| Unit does not turn on. |
- The plug is not in the wall outlet. Plug into wall outlet.
- “Power” on touchpad panel is not on. Press “Power”.
- The Filter Slot Cover in the back rear is off or loose. Make sure Filter Slot Cover is on securely
|
| TIMER does not work when pressed. |
The unit is not reading the function selected. Press “FAN SPEED” or “AUTO”, then press “TIMER”. |
| The fans are not blowing. |
- An appropriate outlet is not being used. Make sure outlet has appropriate voltage for use.
- The Filter Slot Cover in back rear is not properly in place. Make sure Filter Slot Cover is on securely.
|
| Speed of the airflow is not changing when “FAN SPEED” is pressed. |
Unit may be in manual AUTO mode. Set the OxyPure to other operating mode on the touchpad then press “FAN SPEED”. |
| Airflow out of Top Vent is weak. |
Air filter(s) are dirty. Change or clean the air filters. |
| Unit is producing smoke or odor. |
Air filter(s) are dirty. Change or clean the air filters. If problem continues, contact Customer Service at 1-877-689-2838 or email [email protected]. |
| CLEAN and REPLACE FILTER Indicators have not reset after filter(s) has been cleaned or changed. |
- The Filter Sensor is not reading the new filter installed. Turn unit off then turn on. Press and hold down “TIMER” for 2 seconds until a beep is heard.
- Turn unit off, unplug and adjust filter(s). Plug in and turn the unit ON again.
- The Filter Slot Cover in back rear is not securely in place. Make sure Filter Slot Cover is on securely.
- The Filter Sensor is dirty. Clean the Filter Sensor.
|
| ULTIMATE CLEAN does not come on when pressed. |
The unit is not reading the function selected. Turn the unit ON/OFF by pressing "POWER" twice. |
| POWER is blinking red. |
- Filters are not properly installed or are loose. Turn off unit and unplug. Check that filters are properly installed and not loose. Plug unit in and press POWER to turn ON.
- When the Filter Slot Cover is removed, "Power" will be backlit solid red. Pressing "Power" will make it blink; however, as a safety measure, the unit will not be operational when the Filter Slot Cover is removed. Ensure that Filter Slot Cover is installed securely.
|
| Odor Sensor is not resetting itself and not clearing all bars. All bars are flashing |
Contact Customer Service at 1-877-689-2838 or email [email protected]. |