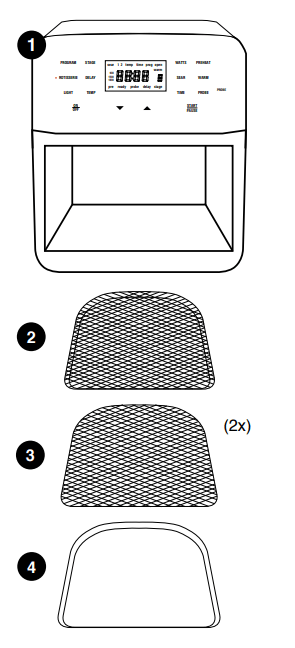
Clean all parts thoroughly with hot water, a nonabrasive sponge, and mild dish detergent, or in the dishwasher, top rack only.
Wipe the insides and outside of the Brio with a wet cloth. Do not immerse the Brio in water. Dry thoroughly.
USE THE DRIP TRAY AT ALL TIMES.
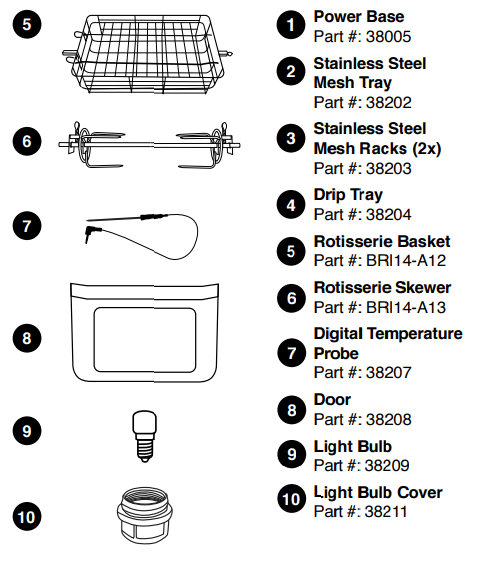
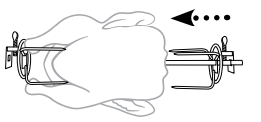
Rotisserie Skewer Assembly
To assemble the Rotisserie Skewer with poultry and other meats, follow the steps below:
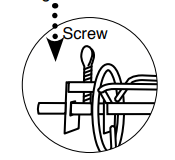
Screw one Rotisserie Skewer fork onto the end of the Skewer with the rectangular end.
Push the Skewer through the center of the meat until the Skewer pierces the food all the way through and out the other side.
Place the second Rotisserie Skewer fork onto the other end of the Skewer and push the fork forward until it pierces the end of the meat. Tighten the screw of the fork. If necessary, loosen screw and move the first fork forward until it pierces the other end of the meat then retighten. Make sure both screws are tight and in place.
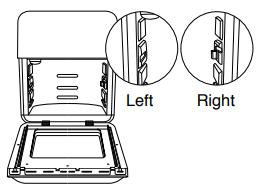
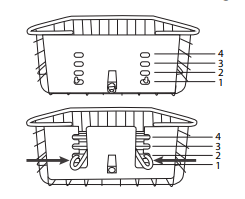
After placing food onto the Rotisserie Skewer and securing, slide between Position 2 and Position inside the Brio. The rectangular end of the spit should be on the left when sliding in. Keep the right side slightly tilted upward while sliding in.
Bring down the right side of the spit into the Shaft Bracket, then insert the left spit (bar) of the Skewer into the hole (Shaft Support Hole) in the inner wall.
Notes:
For better results use kitchen twine around chicken or other meats.
Always check that there is sufficient space above and below food so it can rotate freely without obstruction.
When using Rotisserie Skewer, place Drip Tray on the bottom.
Rotisserie Basket Assembly
To assemble the Rotisserie
Basket into the Brio, follow the steps and illustrations below:
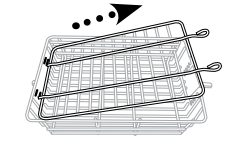
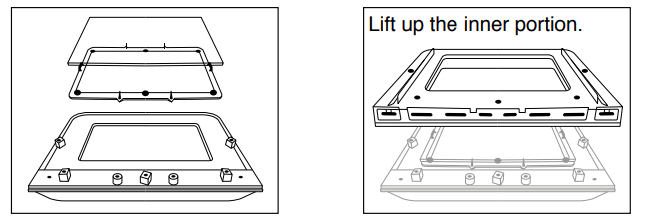
Remove top lid from Rotisserie Basket: Squeeze prongs on outside of top lid toward middle and lift up. Remove other end from holes.
Place food in Basket.
Adjust top lid to fit over food: Place ends of top lid into slots above where top of food ends. Squeeze prongs on outside of top lid and slide down into position and place prongs into correct position.
Position of prongs should be lined up and opposite of slot holes on other side.
Make sure top lid lies flat on food and fit is snug.
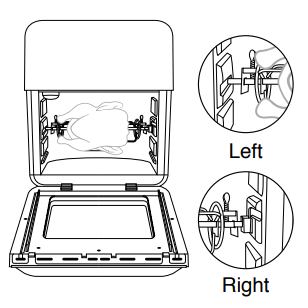
After placing food into the Basket and securing, take the Basket and slide in between Position 2 and Position 3 inside the Brio. The rectangular end without grooves should be on the left. Keep the right side slightly tilted upward while sliding in.
Bring down the right side of the bar of Basket into the bracket, then insert the left bar of the Basket into the hole in the inner wall.
Notes:
Always check that there is sufficient space above and below food so it can rotate freely without obstruction.
When using Rotisserie Basket, place Drip Tray on the bottom.
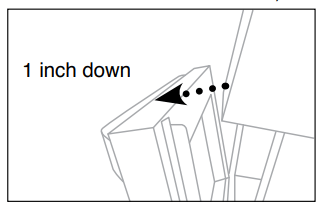
To Remove Door
Make sure your Brio has completely cooled. Open the Door down partially (opened about down 1 inch/25mm).
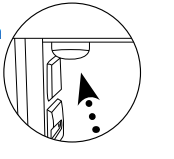
Holding the Door handle securely, lift up the right Door side first from the hinge and then the left side to remove.
Place the Door back into the hinge slots and press down. Open and close Door to ensure it’s secure
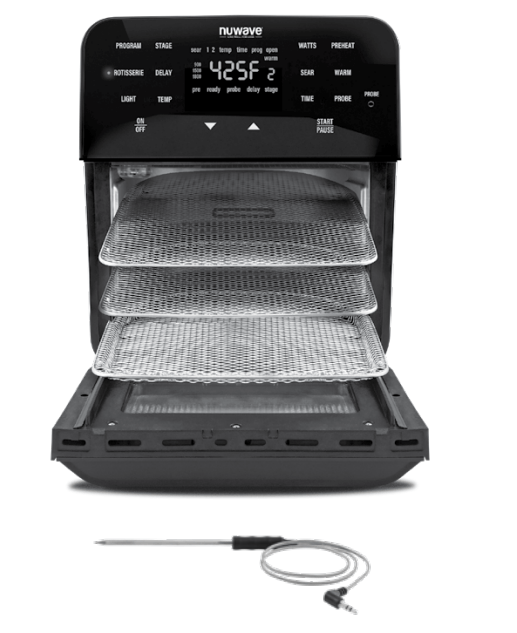
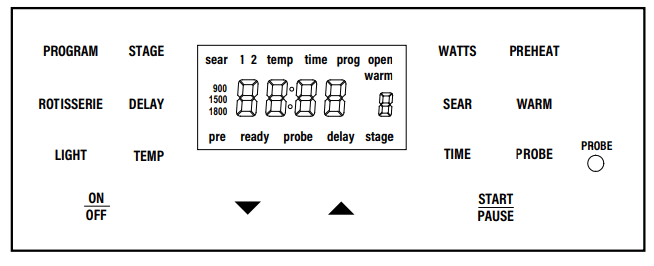
QUICKSTART
ON/OFF
Press ON/OFF to turn the Brio OFF and stop the cooking process.
To convert from Fahrenheit to Celsius, press TEMP for1 second. Do the same to change again.
START/PAUSE
Select a cooking function, press START/PAUSE to begin cooking. To mute/unmute the beep from the Brio, press and hold SEAR and STAGE for 1 second.
WARM
Press and hold down WARM for 1 second to activate the Warm function independently.
PREHEAT
Press PREHEAT. The temp and time is adjustable using Up or Down Arrows. To begin, press START/PAUSE. Once it has reached the set temperature the Brio will beep and a 5-minute countdown will begin. Place your food into the Brio. The Brio will begin automatically when closed.
TIME
Use Up and Down Arrow keys to adjust temperature and time before and during the cooking process.
Days/Hours: To switch the timer to Days and Hours press PROGRAM and TIME, to go back to Hours and Minutes press PROGRAM and TIME again.
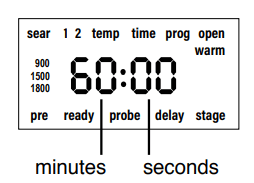
TIME format: You can change the format to display minutes and seconds (ex 10:59, 10 minutes and 59 seconds). Press and hold TIME for 1 second, if you press it again it will go back to the default setting.
Month/Day: Press STAGE and TIME to change the format to months and days.
Setting the clock: Press PREHEAT and TIME at the same time. The display with show “12:00” and “:” will flash. Use the Up and Down Arrows to set the time
TEMP
Adjust the cooking temperatures. Press TEMP, adjust with the Up and Down Arrows, before and while in the cooking process.
SEAR
Press SEAR. If preferred, adjust Sear temp and time and press START/PAUSE.
PROBE
Plug the Probe into Brio (Jack). Press PROBE and set Probe target internal temperature for food using the Up or Down Arrows. Insert the other end of the Probe into your food. Press START/PAUSE to begin cooking.
ROTISSERIE
After placing food on Skewer, in Basket and into the Brio, press ROTISSERIE. Use the Up or Down Arrows to adjust temp and time. Press START/PAUSE to automatically turn spit and begin cooking.
PROGRAM
Press PROGRAM and press Up or Down Arrows to choose preset items (1-100) to cook. Press Up or Down Arrows when in each cooking function to adjust temps and times. Press START/PAUSE to begin the chosen program.
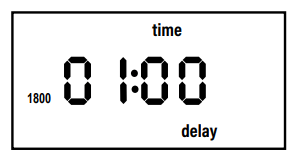
DELAY
Set your temp and time. Press DELAY and press Up or Down Arrows to adjust Delay time. Adjustable up to 24 hours. After setting cooking function and Delay time, press START/PAUSE. Press DELAY at any time to cancel Delay.
STAGE
To add a cooking stage press STAGE once and adjust by pressing the Up or Down Arrows.
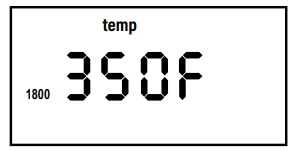
WATTS
Controls the power consumption of your Brio. The default wattage on the Brio is 1800W. The lower wattage will consume less energy, ideal if your home does not take 1800 watts. Press WATTS to adjust from 1800W to 900W to 1500W.
INSTRUCTIONS
Note: Preset temperatures and times may need minor adjustments to best suit your desired results.
CAUTION: This appliance cooks using hot air. DO NOT fill the Baking Pan with oil.
Operation:
Place the Brio on a level, even, and stable heatresistant surface.
Plug the Brio into a standard wall socket. The power plug is included.
Note: Do not cover or block the vent located on the top or the back of the Brio. Doing so can prevent proper ventilation and will adversely affect the cooking results.
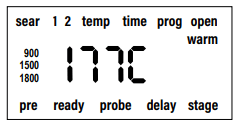
Fahrenheit to Celsius
Press and hold TEMP for 1 second. The Brio will display temperature settings in degrees Celsius (C).
Press and hold TEMP for 1 second again to switch back to degrees Fahrenheit (F).
You will not be able to switch between F and C while the Brio is cooking.This can only be done during the setup.
Switch from Hours : Minutes to Minutes : Seconds
By default, the Brio displays all times in hours and minutes. You can change this format to minutes and seconds.
Press and hold TIME for 1 second. The Brio will display the time format in minutes and seconds.
Press and hold TIME for 1 second again to return the time display format to hours and minutes.
You will not be able to switch between time formats while the Brio is cooking. This can only be done during the setup.
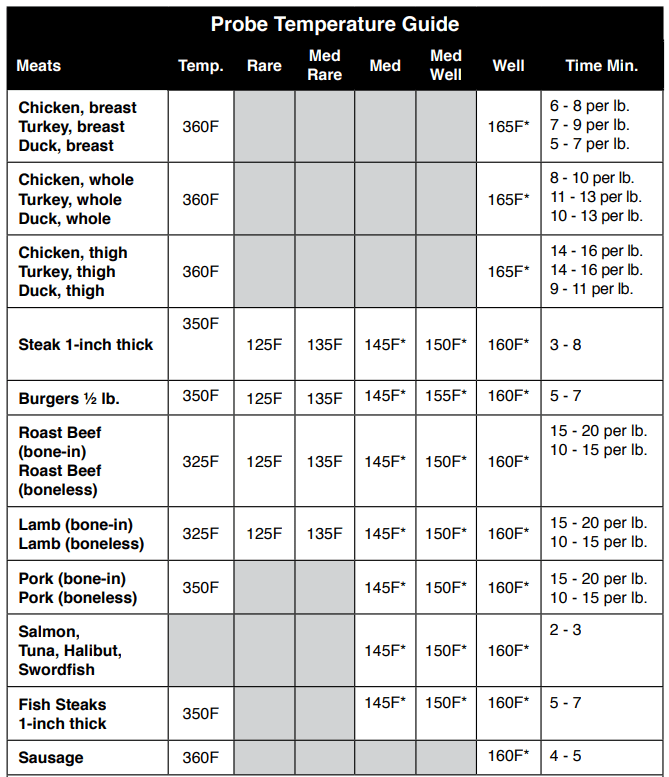
Note: Times may vary. Consuming raw or undercooked meats, poultry, or seafood may increase your risk of food borne illness. *To reduce the risk, cook your food to USDA-safe temperatures.
Getting Started
Press the up or down arrows to adjust the temperature and time.
Press ON/OFF to turn your Brio on and off.
To adjust the cooking time, press TIME.
The default cooking time is 15 minutes.
Press START/PAUSE to begin cooking. The (:) will flash, indicating your Brio is now cooking.
To pause cooking, press START/PAUSE. The (:) will no longer flash, indicating the Brio is now paused.
To resume cooking unpause) press START/ PAUSE once again. Note: Opening the door will pause cooking, closing the door will resume cooking. The light will turn on automatically when the door is open.
Once the Brio finishes cooking, End will be displayed and the Brio will beep three times.
To mute/unmute the beep from the Brio, press and hold down SEAR and STAGE for 1 second.
LIGHT
Press LIGHT once to turn the light on. Press again to turn off. To change light bulb in oven, see "Light Bulb Replacement under Cleaning and Maintenance.”
WATTS
The default wattage of the Brio is 1800 watts.
To change the wattage, press WATTS once. 900 will illuminate, indicating the Brio is now set to 900 watts.
Press WATTS again and will illuminate. The Brio is now set to 1500 watts.
Press WATTS once more and 1800 will illuminate, indicating the Brio is now set to the default of 1800 watts.
Note: If the wattage is changed from 1800W to either 900W or 1500W and the Brio is unplugged, the Brio will remember the last wattage setting when plugged back in and turned on.
DELAY
Delay function is used to delay your cooking start time.
Press the up or down arrows to adjust the temperature and time.
Press ON/OFF.
Press and hold LIGHT and DELAY for 1 second.
Delay time can be adjusted up to 24 hours (24:00)
During delay the (:) will flash, indicating the delay time countdown has started.
To stop the Delay function at any time press DELAY. The Brio will end the delay cycle and move on to the next cooking function.
After delay time has elapsed the Brio will automatically move on to the next cooking function.
Once the Brio finishes cooking your food, End will be displayed and the Brio will beep three times.
TEMP
Press the up or down arrows to adjust the temperature and time.
Press TEMP to see or adjust your cooking temperature.
Press START/PAUSE to begin cooking at set temperature.
TIME
Press the up or down arrows to adjust the temperature and time.
Press TIME to see or adjust cooking time.
Press START/PAUSE to begin cooking at set time.
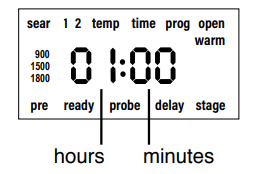
Notes: The following are temperature and time ranges:
60F~275F: 00:00-99:59 (0 minutes to 99 minutes, 59 seconds).
280F~ 345F: 00:00-24:00 (0 minutes to 24 hours).
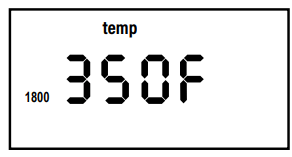
350F~400F: 00:00-01:00 (1 hour).
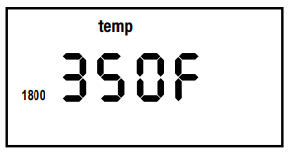
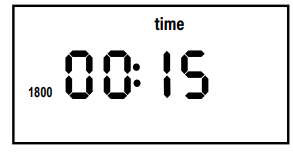
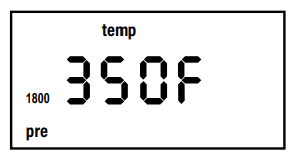
Stage 1 default: 350F, 00:15.
Stages 2-5 default: 350F,
405F~425F: 00:00-00:15 (15 minutes).
STAGE
Stage cooking is used to cook your foods at different temperatures and times throughout the cooking process.
Up to 5 stages of cooking can be set. Delay, Preheat, Sear 1, Sear 2, and Warm are NOT considered stages in the cooking process.
Press the up or down arrows to adjust the temperature and time.
Stage 1: Press ON/OFF.
Default temperature and time for Stage 1 cooking is 350F for 15 min.
Press TIME.
Stage 2: To add additional stages press STAGE once.
Press TIME.
For only two stages of cooking leave the time at 00:00 for stages 3-5 and those stages will be skipped.
Press START/PAUSE to begin cooking. The Brio will cook your food with the set temperature and time for each stage.
When the Brio is finished cooking, End will be displayed and the Brio will beep three times.
To set additional stages with cooking settings repeat steps above. The number above stage will change each time STAGE is pressed.
After the temperature and time is set for Stage 5, if STAGE is pressed again the Brio will go back to Stage 1.
Notes:
The display will only indicate the stage cooking number when two or more stages are used. Display will not show stage cooking number if only one stage of cooking is used.
During cooking, press STAGE to see and adjust upcoming cooking stages.
If no time is set for stages 2-5 those stages will be skipped in the cooking cycle.
PREHEAT
The Preheat function ensures your Brio reaches the desired temperature before cooking begins. Preheat is perfect for foods that require a crispier finish such as frozen appetizers, French fries, or chicken wings. Max 425F
Press the up or down arrows to adjust the temperature and time.
Press ON/OFF.
Press PREHEAT.
The Brio will always preheat to the cooking temperature of the next cooking cycle.
Press START/PAUSE. The Brio will begin preheating to the set temperature.
During preheat the cooking temperature can be adjusted.
When the Brio reaches the preheat temperature the Brio will beep once and begin a minute countdown.
The Brio will maintain the preheat temperature during the 5-minute countdown.
Cooking temperature and time can be adjusted during the 5-minute countdown.
If no action is taken within the 5-minute countdown the Brio will automatically go into standby mode.
Place your food into the Brio and close the door. The Brio will begin cooking at the set temperature and time.
When the Brio is finished cooking End will be displayed and the Brio will beep three times.
Note: Press PREHEAT to cancel the Preheat function at any time. When Preheat is canceled the Brio will end the Preheat cycle and automatically go into the next cooking cycle.
AUTO PREHEAT
Press PROGRAM and PREHEAT at the same time to turn on Auto Preheat.
Auto Preheat will automatically preheat the Brio to the set cooking temperature.
After it has reached the set cooking temperature, Brio will go into a minute countdown just like the typical PREHEAT function.
After the countdown, the Brio will cook at the set cooking temperature and cooking time.
To turn off Auto Preheat press PROGRAM and PREHEAT at the same time.
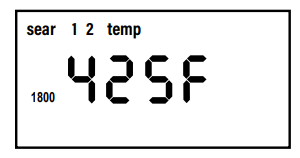
SEAR
Sear 1 will always be directly BEFORE regular stage cooking.
Sear 2 will always be directly AFTER regular stage cooking.
SEAR 1
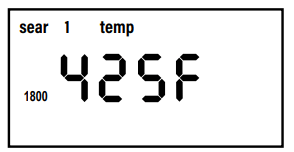
Default sear 1 temperature is 425F and default sear 1 time is 5 min. (00:05).
Press ON/OFF.
Press SEAR once.
Adjust the temperature for sear 1. 425F is the maximum searing temperature.
Press TIME.
Adjust the time for sear 1. Time can be adjusted up to 15 min. (00:15).
Press START/PAUSE to begin cooking.
Once sear 1 is complete the Brio will beep once and automatically go into regular) stage cooking.
When the Brio is finished cooking your food, End will be displayed and the Brio will beep three times.
SEAR 1 2
Sear 1 2 is used to sear before and after regular stage cooking
Press ON/OFF. Adjust your cooking temperature and time for regular stage cooking
Press SEAR twice. Press START/PAUSE. The Brio will sear at 425F for 5 min (sear 1), go into regular stage cooking, and then sear again at 425F for 5 min. (sear 2).
To set a different temperature and time for Sear 1 and 2 press SEAR once and adjust Sear 1 temperature and time. Press SEAR again. Adjust Sear 2 temperature and time.
Press START/PAUSE to begin cooking.
Once the Sear 1 cycle is complete the Brio will beep once and automatically go into regular stage cooking.
Once the stage cooking cycle is complete the Brio will beep once and automatically go into Sear 2 cooking.
When the Brio is finished cooking your food, End will be displayed and the Brio will beep three times
Example Sear food at 425F for 3 min. (Sear 1), cook food at 350F (default) for 15 min. (default), and sear again at 380F for 5 min. (Sear 2): Press ON/OFF. Default setting for regular cooking temperature and time will be displayed. Press SEAR once. 425F (default) will be displayed. Press TIME. Press up or down arrows to adjust time to 00:03. Press SEAR again. Press up or down arrows to adjust temperature to 380F. Press TIME. 00:05 (default) will be displayed. Press START/PAUSE
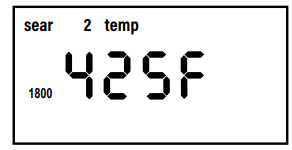
SEAR 2
Default sear 2 temperature is 425F and default sear 2 time is 5 minutes (00:05).
Press ON/OFF. Adjust cooking temperature and time for regular (stage 1) cooking.
Press SEAR three times.
425F is the maximum searing temperature.
Press TIME. Adjust the sear 2 (searing) time up to min. (00:05).
Press START/PAUSE to begin cooking.
Once regular stage cooking cycle is complete, the Brio will beep once and automatically go into Sear 2 cooking.
When the Brio is finished cooking your food, End will be displayed and the Brio will beep three times.
Using SEAR as Independent Function
Press SEAR and hold for 1 second.
The Brio will begin to sear at 425F for 5 minutes.
Temperatures and Times can be adjusted at any time.
SEAR will flash.
Once the SEAR time end the Brio will display “End”.
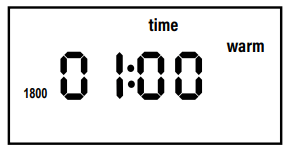
WARM
Warm can be used as an independent function to heat up your food. Default is 140F for 1 hour.
Press and hold down WARM for 1 second. The Brio will automatically begin the WARM function.
When the warming time is finished, End will be displayed and the Brio will beep three times.
To adjust the time or temperature, press either TIME or TEMP and the up or down arrows.
Using Warm After Cooking Ends to Keep Your Food Warm
Press and hold WARM for 1 second. Press the up or down arrows to adjust the warming temperature.
Press TIME. Press the up or down arrows to adjust the warming time.
Press START/PAUSE to start cooking. The Brio will cook the regular stage cooking cycle then will go into Warm at the set temperature and time.
Notes:
WARM temperature can be adjusted up to 200F.
WARM can be set immediately after adjusting regular cooking times and temperatures, before the Brio cooks your food.
To cancel WARM function at any time press WARM. WARM function will end and WARM will no longer be displayed.
WARM can be used with the Program function option as well. Press PROGRAM and then press WARM and adjust warming temperature and time
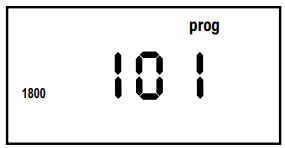
PROGRAM
Program function represents Memory Entry, the storage of frequently used cooking sequences, and Memory
Recall, the retrieval of cooking sequences for recipes.
Memory Recall
Press PROGRAM. Press the up or down arrows to choose the program number to recall.
Numbers 1-100 are preset programs.
Numbers 101-150 are your created unique programs (recipes).
Once your program number is chosen, press START/ PAUSE to begin cooking. Temperature and time can be adjusted, if desired. The Brio will cook at the programmed temperatures and times.
Notes:
Refer to 100 Presets in the Quickstart Guide sheet for preprogrammed recipes 1-100.
Preset temperatures and times for program recipes can be adjusted. Adjusted temps and times will not be saved when a program number (1-100) is recalled once again.
Storing Recipe Before Cooking
Press ON/OFF. Enter your cooking functions including temperatures and times for recipe.
Press and hold PROGRAM for 1 second. Press the Up and Down Arrows to choose number to save your program recipe to (101-150 only).
Press and hold PROGRAM for 1 second again to store and save the program recipe to the chosen program number.
Program recipe is now stored and available for future recall.
Press START/PAUSE to begin cooking your set program (recipe).
Storing Recipe During Cooking
Press ON/OFF. Enter your cooking functions including temperatures and times for recipe.
Press START/PAUSE to begin cooking.
During cooking, press and hold PROGRAM for 1 second. Press the Up or Down Arrows to choose program number to save your program recipe to (101- 150 only).
Press and hold PROGRAM for 1 second again to store and save program recipe to your chosen program number.
Program (recipe) is now stored and available for future recall.
The Brio will continue to cook your recipe just programmed and stored.
Storing Recipe After Cooking has Completed
Press ON/OFF. Enter your cooking functions including temperatures and times for recipe.
Press START/PAUSE to begin cooking.
When the cooking is finished and “End” is displayed, press and hold PROGRAM for 1 second. Press the up and down arrows to choose the program number to save your program recipe to (101- 150 only).
Press and hold PROGRAM for 1 second again to store and save program recipe to the chosen program number.
Program (recipe) is now stored and available for future recall.
Viewing Current Program Number During Cooking
While the Brio is cooking, press and hold down PROGRAM for 1 second. The current program number cooking will be displayed.
Release PROGRAM to see the previous screen.
Viewing Program Cooking Functions
You can view cooking functions associated with a program before or during the cooking process.
View Before Cooking
Press PROGRAM. Locate the program number you want to review by pressing the up or down arrows.
Once the program number is displayed, press STAGE to review each phase function) of cooking.
Adjustments to temperatures and times for each function can be made at this time.
View During Cooking
1. Press STAGE to review each phase (function) of cooking.
2. Continue to press STAGE to scroll through each programmed function for chosen program number.
Adjustments to temperatures and times can be made for each function at this time.
Editing and Modifying a Saved Program
Edit Before Cooking
3. Press PROGRAM. Locate the program number you want to edit by pressing the up or down arrows.
4. Once your chosen program number is displayed, press STAGE until the function to edit is displayed.
Adjust TEMP and TIME.
5. Once all your edits are made press PROGRAM.
6. Press the Up or Down Arrows to locate the program number to save the edits to. Press and hold PROGRAM for 1 second again to save and store your edits.
Edit During Cooking
When the Brio is cooking, press STAGE. Press the Up or Down Arrows to select the cooking function to edit.
Press TIME. Press the Up and Down Arrows to adjust the cooking time.
If there are additional cooking functions you want to edit, press STAGE until the function to edit is reached.
The Brio will continue cooking your food with the adjusted temperatures and times to each function. Functions that have already ended in the cooking cycle cannot be edited.
Once all your edits are made, press and hold PROGRAM for 1 second.
Use the Up or Down Arrows to locate the program number to save the edits to Press and hold PROGRAM for 1 second again to save and store your edits.
When the Brio has finished cooking, “End” will be displayed followed by “SAVE”, and the Brio will beep.
Notes:
If any recipe is saved into a program (memory slot) that you’ve already filled, the new recipe with set temperatures and times will override the previous program recipe (101-150 only).
Preset temperatures and times for program recipes 1-100 can be adjusted. Adjusted temps and times will not be saved when a program number (1-100) is recalled once again.
PROBE
The digital temperature Probe is used to show an accurate internal temperature of your food.
Place end of Probe plug) into the Brio (jack). Set cooking functions, temperatures, and times with stages as desired.
Press PROBE. The current Probe temperature reading will be displayed.
Press and hold down PROBE for 1 second to set the target Probe temperature.
Press the up and down arrows to set the target internal temperature for your food to reach. Internal temperature can be set in Probe up to 212F.
Insert other end of Probe into the side of the food. Place your food into the Brio.
Press START/PAUSE. The current Probe temperature will be displayed.
To see the current cooking temperature press TEMP. To change the cooking temperature, press the up or down arrows to adjust.
Press PROBE to go back and see the current internal temperature reading.
To see target Probe temperature, press and hold PROBE for sec. Target internal temperature can still be adjusted by pressing the up or down arrows.
The Brio will cook until the set internal temperature on the Probe is reached. When target temperature is reached, End will be displayed and the Brio will beep three times.
Example When cooking chicken to an internal temperature of 170F:
Set the Probe target temperature to 165F. When the internal temperature of chicken reaches 165F the Brio will automatically turn off or go into Warm function if WARM was chosen, pressed).
Note: Rotisserie function will not work with Probe. If the Probe is connected to the Brio, Rotisserie will be disabled and the Brio will beep three times
ROTISSERIE
Press ROTISSERIE. The light next to ROTISSERIE will illuminate.
Press TIME.
Press START/PAUSE to begin cooking. The Rotisserie Skewer (spit), Basket, or Drum will begin to turn.
When the Brio is finished cooking your food, End will be displayed and the Brio will beep three times.
See Rotisserie Skewer Assembly, Rotisserie Basket Assembly under “Assembly Guide” for more.
Notes:
Always check that there is sufficient space above and below food so it can rotate freely without obstruction.
When using Rotisserie Skewer, Basket, or Drum place Drip Tray on the bottom.
Slow-Cook
Slow-cook roasts, chicken, or any other food items.
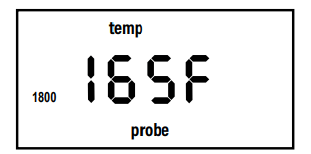
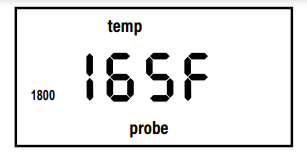
Press and hold PROBE for 1 second. The display will show 165F. Press Up or Down to set the target internal temperature.
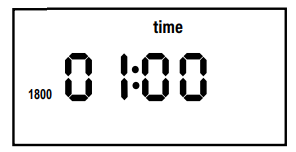
Press PROGRAM and PROBE at the same time. This will start the slowcooking process. 01:00 (1 hour) will be displayed. This is the default cooking time.
Press up or down to adjust the time.
Place the Probe in the food and place in the Brio.
Press START/PAUSE.
The Brio will begin cooking and current Probe temperature will be displayed. he Brio will cook for the amount of time you set for slow cooking.
When the time runs out, the display will show “End”.
Carryover Cooking
If you would like to do a high sear at the end of cooking while using the Probe, you can set the Brio to begin the Sear function up to 30 degrees before the target probe temperature is reached.
Set your cooking temperature, and then press and hold PROBE for second to set the target probe temperature.
Press SEAR and PROGRAM at the same time. The Display will show 10F.
At this time you can press up or down to set the number of degrees below the target probe temperature you would like the Probe to reach before the Brio begins the final Sear function.
Example: Cooking temperature 375F. The target probe temperature 135F. Begin Sear function. Cook at 15F before target probe temperature:
Press up or down to set cooking temperature to 375F
Press and hold PROBE for 1 second. Display will show 160F. Press up or down to set the target probe temperature to 135F.
Press PROBE and PROGRAM at the same time. The display will show 10F. Press up or down to set the temperature to 15F.
Press START/PAUSE. The Brio will begin cooking at 375F and the display will show the current internal temperature of the food.
When the internal temperature reads 120F the Brio will begin to cook in the Sear function until the target probe temperature is reached. Once 135F is reached the Brio will finish cooking and “End” will be displayed.
LOCK
Lock is used to stop the function of the Brio. While in Lock mode, your Brio’s buttons will not respond to any action until the Brio is unlocked.
Press ON/OFF. Set cooking temperature.
To lock the Brio functions, press PROGRAM and STAGE at the same time. Remaining cooking time will be displayed.
NO buttons will function during Lock except LIGHT and ON/OFF.
To unlock your Brio’s functions, press PROGRAM and STAGE at the same time once again. The Bravo will unlock and “LOC” be displayed.
ON/OFF button will work during Lock function if the Brio needs to be turned off.
CLEANING & MAINTENANCE
Hand-wash
Clean your Brio after every use or in between a number of large batches. Do not use metal utensils or harsh abrasives when cleaning as this can damage the coating.
Unplug the Brio and make sure it cools completely.
Use a damp cloth to wipe the outside of the appliance.
Clean the Mesh Tray, Mesh Racks, Drip Tray, Grill/Griddle Plate, Rotisserie Basket, Rotisserie Skewer, Door, Silicone Cupcake Liners, and Non-Stick Baking Pan with a nonabrasive sponge, hot water, and mild detergent. Dry thoroughly.
To clean Probe, wipe end with a damp cloth or paper towel. Allow to dry.
Tip: If there is residual food or particles on the Tray, Racks, Grill/ Griddle Plate, Rotisserie Skewer, Basket, or Baking Pan, add some hot water and let soak separately for about 10 minutes for easier cleaning. Then, use a soft cleaning brush to remove any lingering food. Dry parts thoroughly.
Top rack: Rotisserie Basket, Rotisserie Skewer, Silicone Cupcake Liners, and Baking Pan.
Note: Water can get inside the Door if washed in the dishwasher. It is recommended you hand-wash the Door.
IMPORTANT - Do not immerse the Brio and door in water or attempt to cycle through dishwasher. The outer surface may be cleaned by wiping carefully with a damp dishcloth or sponge. Make sure the Brio has cooled completely prior to cleaning.
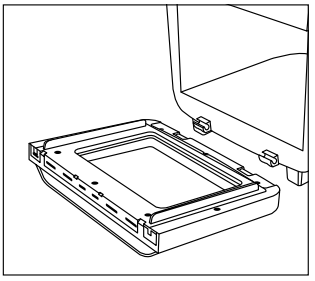
Removing Door for Cleaning
The Door on the Brio is removable for easier, more thorough cleaning, including glass. To remove Door and clean all parts:
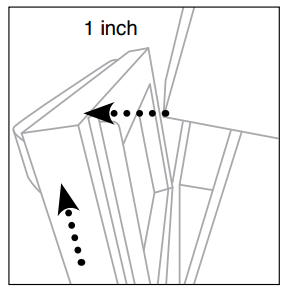
Make sure the Brio has completely cooled. Open the Door down partially (opened down 1 inch).
Holding the Door handle securely, lift up. Clean both sides with a damp cloth or paper towel. Dry thoroughly.
Remove Door Glass for Cleaning
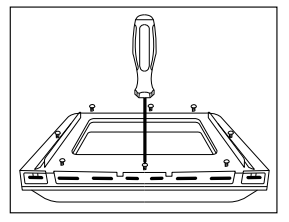
Place the Door on a flat surface. Using a Phillips screwdriver, remove all screws.
Carefully lift up and remove the glass from center window. Gently clean the glass with a damp cloth or paper towel.
For tougher buildup, soak in water first or run under warm water. Dry thoroughly. Return all the screws before replacing Door.
Light Bulb Replacement
Turn off and unplug Brio. Ensure the Brio, bulb cover, and the bulb have cooled completely. Unscrew light bulb cover and light bulb.
Storage
Unplug the Brio and let it cool down completely.
Make sure that all the parts are clean and dry.
Store in a cool dry place
TROUBLESHOOT GUIDE
The Brio is not turning on or working.
The Brio is not plugged in.
Did not press ON/OFF button.
Insert the plug into an appropriate grounded power socket. Press ON/OFF button.
The ingredients fried in the Brio are not completely cooked.
Too many ingredients were used.
The cooking temperature is too low.
The cooking time is too short.
Remove some ingredients from the Tray or Racks; smaller batches air-fry more evenly. Cook at a higher temperature. Set the Brio to air-fry for a longer time.
Fried snacks are not crispy when they come out of the Brio.
Use snacks designed to be baked in a traditional oven, or lightly brush some olive oil onto the snacks beforehand for a crispier result.
White smoke is coming out of the product.
You are frying greasy foods. The Trays or Racks contain greasy residue from previous uses.
When preparing greasy ingredients in the air fryer, large amounts of oil can smoke and infiltrate the Brio. Oil can produce white smoke and the Tray or Racks might become hotter than usual. This will not affect the final cooking result. White smoke is caused by grease heating up in the Tray or Racks. Make sure you clean Tray and Racks properly after use.
Fresh French fries are fried unevenly in the Brio.
You did not soak the potato sticks properly before air-frying them.
You did not use the right potato type or they were not fresh.
Soak potato sticks in a bowl of water for at least 30 minutes, remove them, and dry with paper towels. Use fresh potatoes and make sure they stay firm during air-frying.
Fresh French fries are not crispy when they come out of the Brio.
The crispiness of the fries depends on the amount of oil and water in the fries.
Make sure you dry the potato sticks properly before adding oil. Cut the potato sticks smaller and dry them for a crispier result. Add slightly more oil on potatoes before placing in Brio for a crispier result
Error Message:
Solution(s):
Prb1
Probe not connected to the Brio. Plug the Probe into the Brio’s Probe Jack.
Prb2
The Probe target internal temperature is set higher than set cooking temperature.
Prb3
Probe short Circuit. Contact Customer Service Department at 1-877-689-2838
Prb4
Probe sensor not detecting temperature increase. Ensure the Probe is inserted into the food and the food is in oven during cooking
Prb5
Rotisserie function was turned on with Probe connected. Unplug Probe or cancel Rotisserie function
Er1
Temperature Sensor overheated. Turn the Brio off to cool. If the Brio is not working after it cools down, contact Customer Service.
Er2
Temperature Sensor short circuit. Contact Customer Service Department at 1-877-689-2838
Er3
Temperature Sensor is open. Contact Customer Service Department at 1-877-689-2838