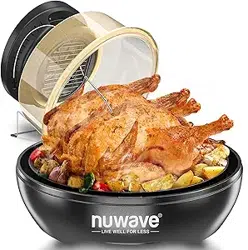
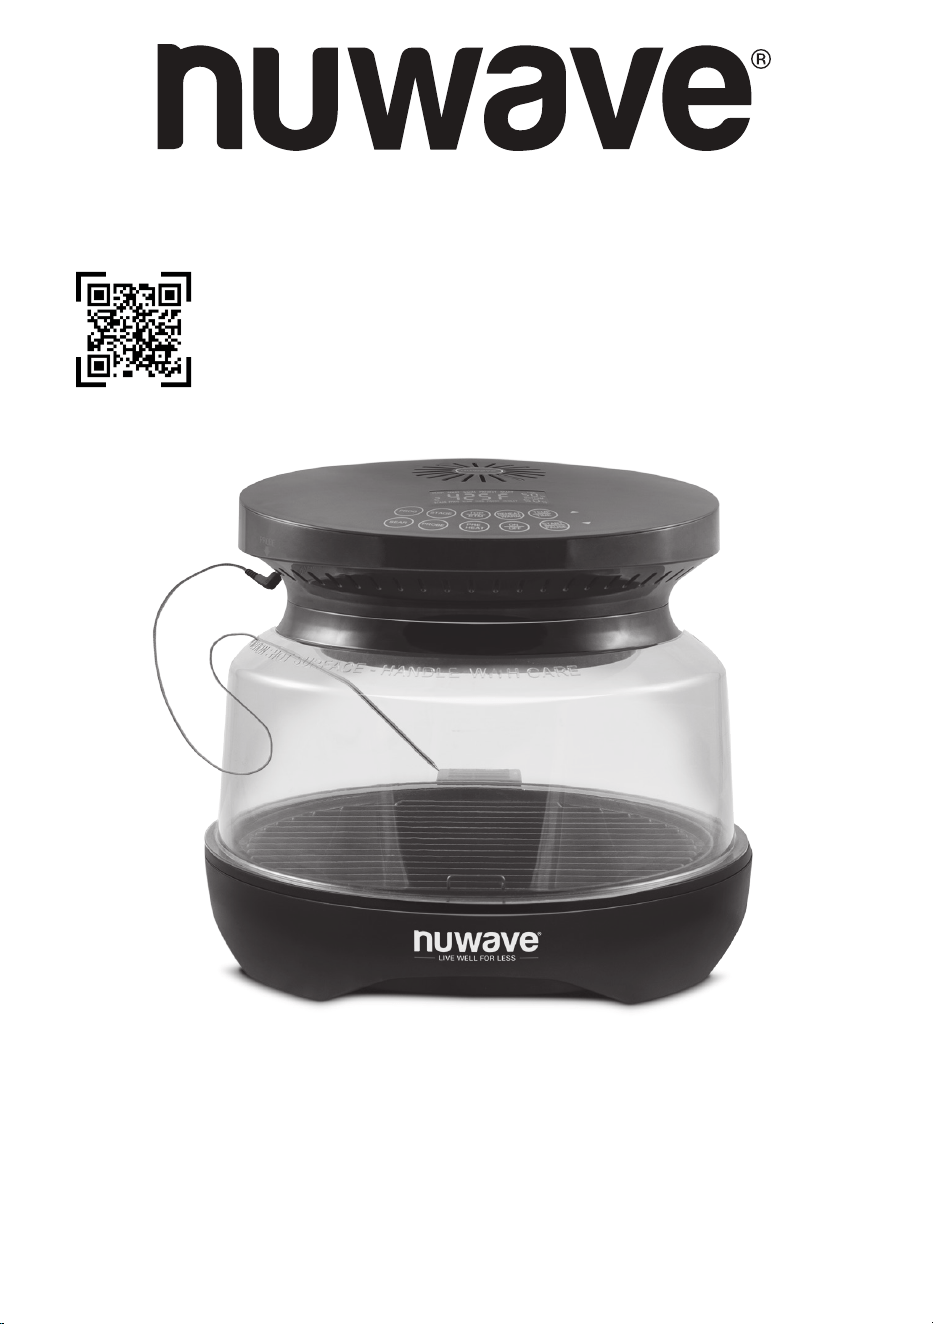
Owner’s Manual
Model: 20755
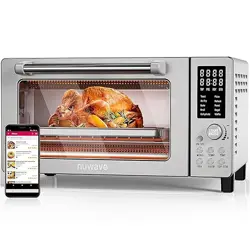
PRIMO® GRILL & OVEN
Master Your
Primo Grill & Oven
Scan the code to find recipes,
how-to videos and more!
Customer Service: support@nuwavenow.com
Questions or Concerns?
1-888-502-7805
Mon-Fri 7:30am-4:30pm CST

2 | nuwavenow.com
Register Today!
Use your smartphone or device to scan the QR code located on the back
of your unit to register your product, or visit nuwavenow.com/register.
Connect with Us!
#nuwavenow
Visit nuwavenow.com to see other great products and accessories.
THANK YOU!
Congratulations on your Nuwave® purchase. We know there are many options available
and sincerely appreciate the trust you have placed in us.
For the last 30 years, we have committed to introducing products that promote healthy
living at affordable prices. By combining the highest quality designs with cutting edge
technology, we have always strived to blend feature, function, and innovation into every
product we make. We hope you will agree.

nuwavenow.com | 3
TABLE OF CONTENTS
Safeguards & Information .........................................................................................4-5
Power-Supply Cords....................................................................................................5
Parts & Accessories ..................................................................................................6
Ordering Parts .............................................................................................................6
Assembly Guide ........................................................................................................7
Before First Use...........................................................................................................7
Operation .................................................................................................................... 8-13
Control Panel ............................................................................................................... 8
Operating Buttons Functions .......................................................................................9-13
2-Button Combination Functions .................................................................................13
Temperature and Measure Charts ............................................................................ 14
Care & Maintenance ..................................................................................................15
Troubleshooting ........................................................................................................16
Limited Warranty .......................................................................................................17-19
Duralon® Blue Ceramic Non-Stick Coating
The Non-Stick Grill is made with 10th generation healthy Duralon® Blue Ceramic Non-
Stick Coating which promotes creation of up to 92% more infrared radiant heat to penetrate
food and cook on the inside and outside at the same time for moist, avorful results. The
Gen 10 Duralon Blue Ceramic Coating also promotes faster, even heating, releases food
effortlessly and makes cleanup a breeze. It’s also healthier and safer than other non-stick
coatings because it contains no PFOA, which has been linked to certain types of cancer, or
PTFE, which may start to degrade at temperatures over 500°F.

4 | nuwavenow.com
SAFEGUARDS & INFORMATION
READ ALL INSTRUCTIONS and WARNINGS Only use the appliance as intended and
always follow basic safety precautions. Avoid any misuse of the Primo Grill & Oven that
can void your warranty and create the risk of serious injury.
ALWAYS KEEP THIS MANUAL HANDY FOR FUTURE REFERENCE.
WARNING: When using the Primo®,
basic safety precautions should always
be followed:
IMPORTANT SAFEGUARDS
1. Read all instructions instructions,
safeguards, and warnings before using
the appliance.
2. DO NOT touch hot surfaces. Use
handles or knobs.
3. To protect against electrical shock do not
immerse cord, plugs, or the Power Head
in water or other liquid.
4. Close supervision is necessary when
any appliance is used by or near
children.
5. Unplug from outlet when not in use and
before cleaning. Allow to cool before
putting on or taking off parts.
6. DO NOT operate any appliance with
a damaged cord or plug or after the
appliance malfunctions or has been
damaged in any manner. Any service
MUST be done by Nuwave LLC or
authorized by the manufacturer for
repairs.
7. The use of accessory attachments
not recommended by the appliance
manufacturer may cause injuries.
8. DO NOT use outdoors.
9. DO NOT let cord hang over edge of
table or counter or touch hot surfaces.
10. DO NOT place on or near a hot gas or
electric burner, or in a heated oven.
11. Extreme caution must be used when
moving an appliance containing hot oil
or other hot liquids.
12. ALWAYS when disconnecting, turn any
control to “off”. Then remove plug from
outlet.
13. DO NOT use the appliance for other
than intended use.
14. Save these instructions.
ADDITIONAL SAFEGUARDS
1. ALWAYS grab the Power Head and
Base by the handles. Wear oven mitts
when handling any part after cooking.
2. Unplug the Primo from outlet when not in
use and before cleaning.
3. DO NOT wrap or line the Base Tray or
Grill with foil as this can cause the unit to
overheat.
4. NEVER put the Primo against the wall
or other appliances. There should be at
least 3 inches of free space for the back
side, left/right sides, and the upper side
of the Primo.
5. DO NOT place anything on top of the
Primo.
6. ALWAYS remove the Dome away from
you so the escaping steam is directed
away from your face. Keep away from
the hole in the Dome while Primo is
cooking
7. It is normal for some smoke to escape
the Primo when heating for the first time.
8. If a lot of smoke is escaping from the air
vent during operation, unplug the Primo
immediately and contact Customer
Service.*
9. DO NOT clean with metal scouring pads.
Pieces can break off the pad and touch
electrical parts, creating a risk of electric
shock.
10. The Primo is not intended to be operated
by means of an external timer or
separate remote-control system.
nuwavenow.com | 5
SAFEGUARDS & INFORMATION
Power-Supply Cords
The plug for this appliance is designed for
polarized outlets and only fits one way.
DO NOT attempt to modify the plug.
1. The marked electrical rating of the
extension cord should be at least as
great as the electrical rating of the
appliance.
2. The longer cord should be arranged so
that it will not drape over any countertop
or tabletop where it could be pulled on or
tripped over unintentionally.
3. The Primo should be operated on a
separate electrical outlet from other
operating appliances due to wattage
limitations.
CAUTION
• DO NOT cover the air inlet and outlet
vents while the Primo is operating.
• NEVER touch the insides or outside of
the Primo while it is operating.
We recommend to read the entire manual
before using the Primo.
NOTICE: THE FAILURE TO FOLLOW ANY
OF THE IMPORTANT SAFEGUARDS,
ADDITIONAL SAFEGUARDS, OR THE
INSTRUCTIONS FOR SAFE USE IS A
MISUSE OF YOUR PRIMO THAT CAN
VOID YOUR WARRANTY AND CREATE
THE RISK OF SERIOUS INJURY.
NOTE: Place the Primo on a surface that is
horizontal, even, and stable.
The Primo is intended for normal household
use. It is not intended to be used in
environments such as staff kitchens/
cafeterias of shops, offices, farms, or other
work environments. Nor is it intended
to be used by clients in hotels, motels,
bed and breakfasts, and non-residential
environments.
11. DO NOT place the Primo close to
flammable materials, heating units, or
wet environments.
12. ALWAYS grab the Power Head and
Base by the handles. Wear oven mitts
when handling any part after cooking.
13. ALWAYS grab the Power Head and
Base by the handles. Wear oven mitts
when handling any part after cooking.
14. Stop or pause cooking before removing
the Dome. The Dome with Power Head
should be placed on the Dome Holder.
15. NEVER block the air vents.
16. Make sure the Primo is always clean
prior to cooking.
17. DO NOT use the Grill Plate outside of
the base.
18. DO NOT use metal utensils on the
ceramic nonstick Base and Grill plate.
*Customer Service Department:
support@nuwavenow.com
WARNING
DO NOT place the unit on or near a hot
gas burner, electric burner, or in a heated
oven or a stovetop.
NOTICE
It’s perfectly normal for your new unit to produce a heated plastic smell when used for
the rst time.This will go away after the rst few uses.
6 | nuwavenow.com
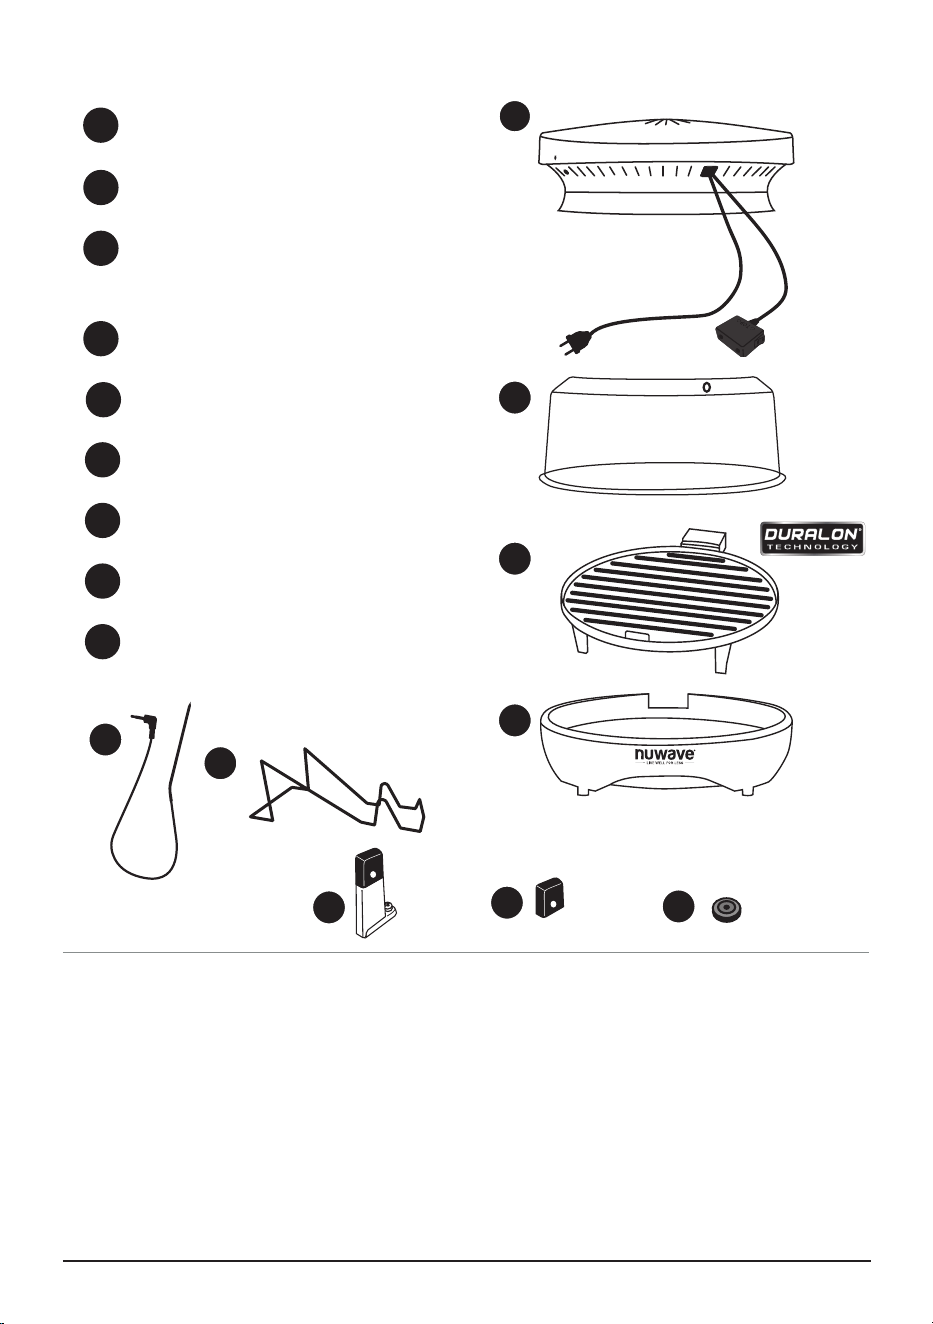
PARTS & ACCESSORIES
Over the lifetime of your Primo Grill & Oven, you may nd yourself needing a new part or
accessory, and if you do, Nuwave has you covered.
Ordering new parts and accessories is quick and easy. Have ready down the name and
number for the part you want, then contact Customer Service by emailing:
• support@nuwavenow.com
Or order directly online at: www.nuwavenow.com
ORDERING PARTS
Power Head
Part #: PMA1
Power Dome
Part #: PMA2
Non-Stick Grill Plate with
Duralon® Blue Ceramic Coating
Part #: PMA4
Base
Part #: PMA5
Probe
Part #: PMA6
Dome Holder
Part #: PMA7
Grill Plate Feet
Part #: PMP3
Grill Plate Silicone feet
Part #: PMP1
Base Tray Rubber Feet
Part #: PMP2
1
2
3
4
5
6
7
8
9
1
2
3
5
4
6
7
8
9
PROBE
nuwavenow.com | 7
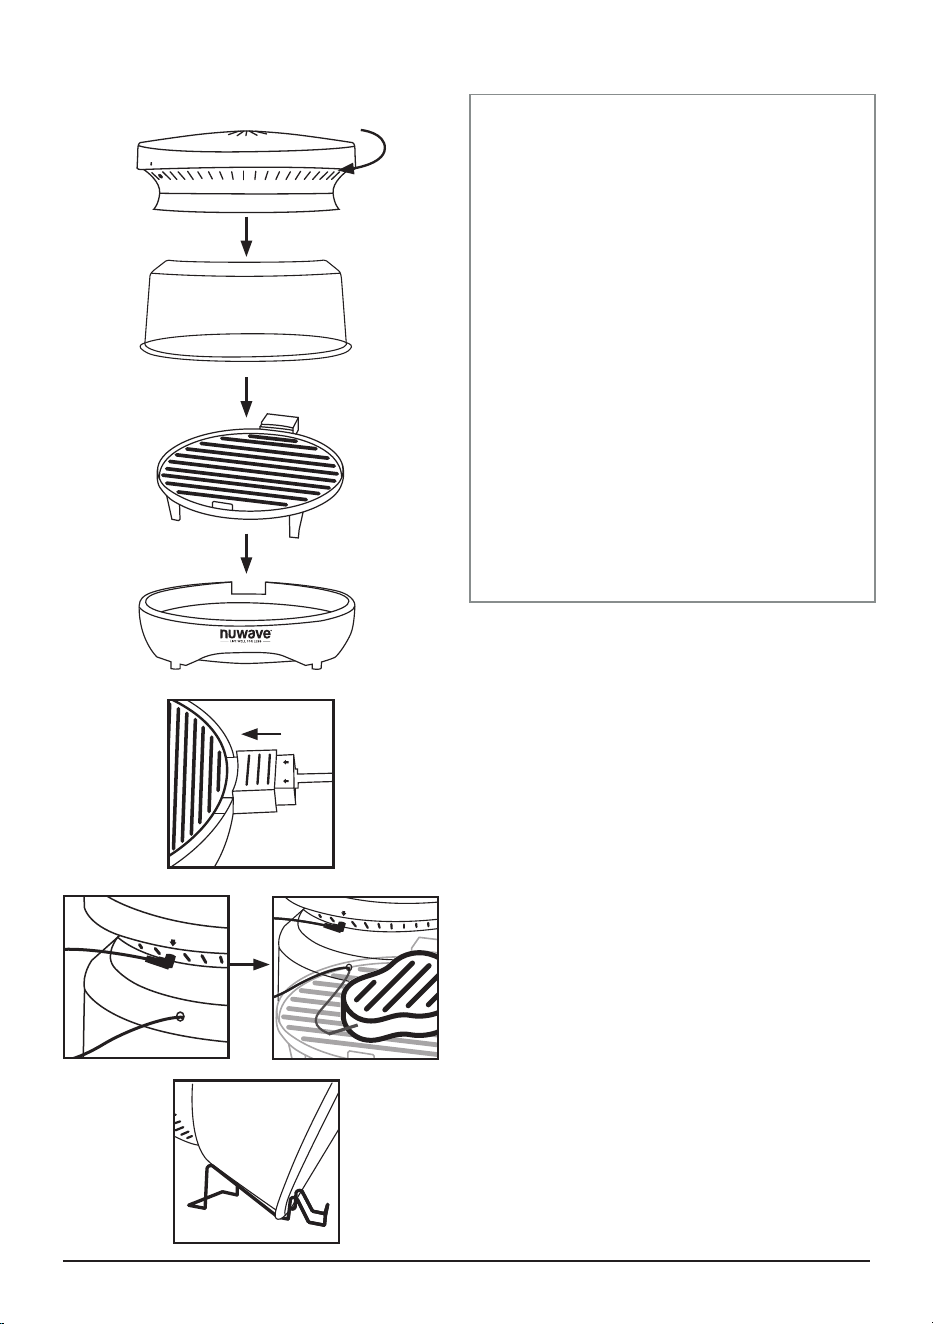
ASSEMBLY GUIDE
1. Remove all protective film and
sticker (a sticker is on the top of the
power head.
2. Thoroughly wash the dome, grill and
base using a non-abrasive soapy
sponge, rinse thoroughly and dry.
3. Clean the probe using the same
method but do not immerse the
probe in water.
4. Thoroughly wipe the top and the
underside of the power head with a
slightly damp cloth.
5. Once all parts are dry, run the Primo
Grill without any food inside at
400°F for 20 minutes to burn off any
lingering residue or oils.
Before First Use
TOP
PROBE
PROBE
PROBE
Connecting Power Head to Dome
1. Place the Power Head on rim of the
Dome.
2. Lock into place by bracing the Power
Head and rotating clockwise until the
locking lugs are engaged. Lift the Power
Head to verify it’s secure.
Assembling the Primo
1. Place the Base on a firm, stable surface.
2. Place the Grill Plate inside the Base with
the plug positioned in the Base opening.
3. Connect the power cord to the Grill Plate
and plug into an outlet.
4. Place the Dome with the Power Head
onto the base.
5. When using the probe, plug into the jack
on the Power Head and run the probe
through the hole in the Power Dome.
See page 10 for more detailed probe
instructions.
6. To use the Dome Holder, set the dome
at a 45° angle, when flipping/turning the
food.
Lock
NOTE: PROBE AND POWER HEAD
ARE NOT DISHWASHER SAFE
8 | nuwavenow.com
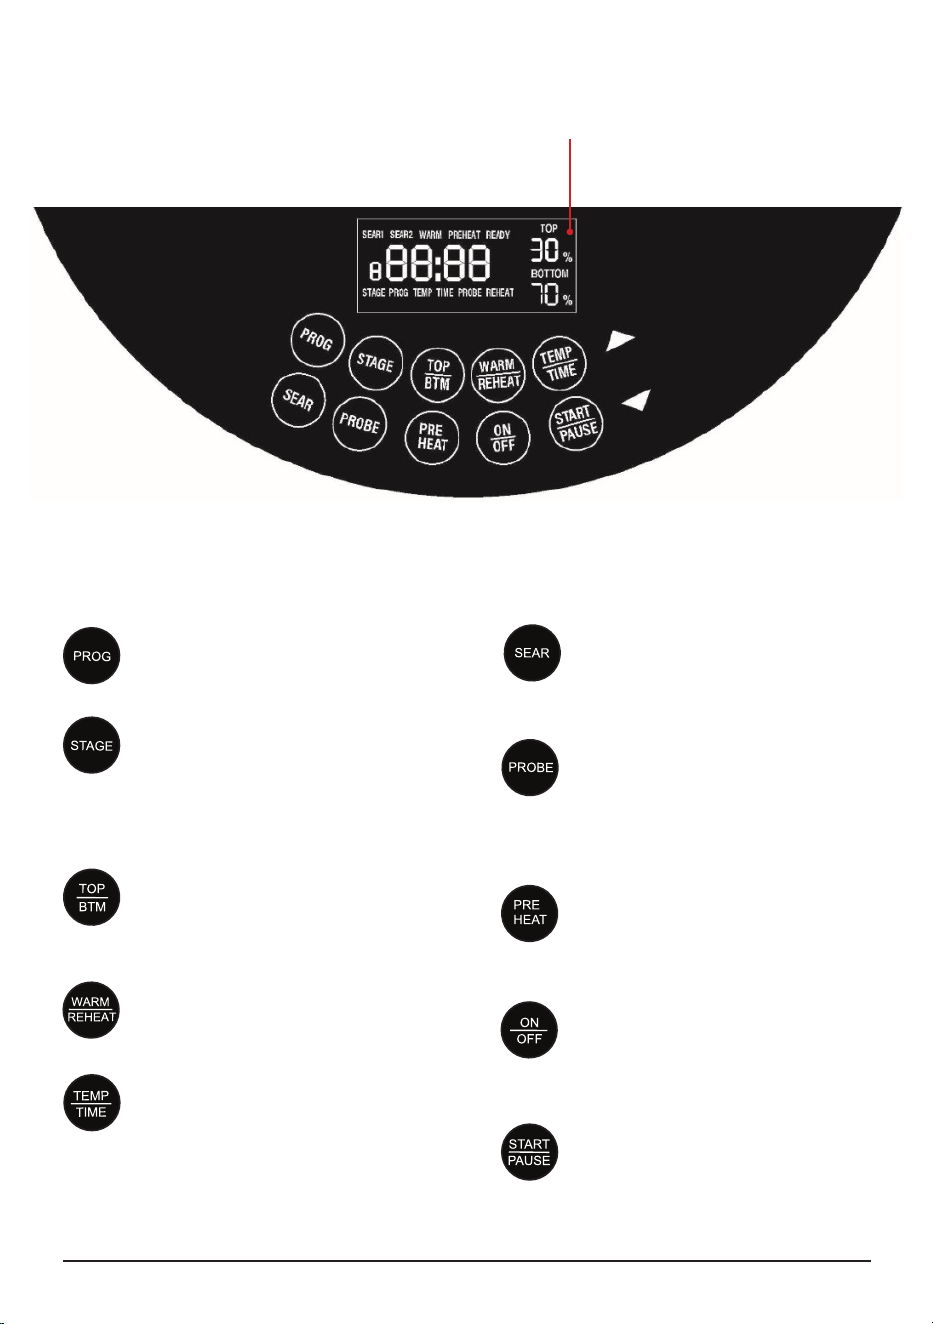
CONTROL PANEL
PROG
Access the 100 preset recipes or
the 50 user-made presets.
STAGE
Set the Primo to change cooking
temperature automatically after a
set amount of time. This can be
done up to 5 times.
TOP/BTM
Adjust the heating percentage
between the Power Head and the
Grill Plate, both will equal 100%.
WARM/REHEAT
Keep your food warm at low heat,
or reheat your leftovers.
TEMP/TIME
Press to switch between showing
the cooking temperature and
time on the display. Adjust either
one using the arrows.
SEAR
Cook at a high heat to seal in the
juices. This can be done before
cooking, after cooking or both.
PROBE
Set the target food temperature
and the probe will tell the Primo
to stop cooking when your food is
done.
PREHEAT
Automatically bring the Primo to
the set temperature before you
begin cooking.
ON/OFF
Turn the Primo ON and OFF,
or cancel the current cooking
function.
START/PAUSE
Begins the set cooking process,
or pauses cooking.
LED Display

nuwavenow.com | 9
OPERATING BUTTONS FUNCTIONS
ON/OFF Press
1. ON/OFF once to turn your Primo
on. Press again to turn off, this will
cancel all function.
START/PAUSE
1. Press START/PAUSE to begin
cooking at 350°F for 15 minutes,
which are the default settings.
2. Press START/PAUSE once during
cooking to pause.
3. Press START/PAUSE a second
time to resume cooking.
• Remaining cooking time
will be displayed and the
countdown will continue.
4. When the Primo is finished
cooking, it will beep three times
and “End” will be displayed.
TEMP/TIME
1. Press ON/OFF. The default 350°F
will be displayed.
• Use the arrows to adjust
the temperature in 5°F
increments. Hold down
the arrows to change the
temperature faster.
2. Press TEMP/TIME to switch the
display to the default cooking time
of 15 minutes.
• Use the arrows to adjust the
time in 1-minute increments.
Hold down the arrows to
change the time faster.
3. Press START/PAUSE. The Primo
will cook your food at the set
cooking temperature and time.
PREHEAT Function
The Preheat function is set to
automatically preheat before the
cooking cycle, to the set temperature.
1. Adjust the temperature and time.
2. Press START/PAUSE to begin
the cooking cycle.
3. Once the set temperature is
reached the display will show
“READY” and the 10-second
countdown begins.
4. Press START/PAUSE twice and
set the food inside.
5. Once the dome is secure on the
base tray, press START/PAUSE
to begin the cooking cycle.
When executing multiple functions, the cooking sequence will always be as follows:
Preheat, Sear 1, Stage 1~5 / Prob, Sear 2, Warm.
NOTE:
• If no action is taken before the
end of the 10-second countdown,
the Primo will begin cooking
automatically.
Enable automatic preheat by
pressing and holding PREHEAT.
Repeat to switch back.
Automatic Preset
1. Press and hold PREHEAT until 2
beeps are heard. The automatic
preheat is turned off.
2. Repeat to turn back on.
Changing the Default Temperature
and Time
1. Set the new default temperature
or time.
2. Press and hold START/PAUSE
until you hear 2 short beeps.
10 | nuwavenow.com
SEAR Function
The Sear Function has two modes.
Sear 1 occurs before cooking
and Sear 2 occurs after. Sear 1 2
combines these two functions. The
default sear is 400°F for 5 minutes
which can be increased up to 30
minutes.
1. Set the cooking temperature and
time.
2. Press to the SEAR(S) to be used,
if desired. adjust the temperature
and time.
Press START/PAUSE to begin the
cooking cycle.
NOTE:
• If the temperature probe reaches the
set temperature before the end of the
cooking cycle, SEAR 2 will not occur.
Independent Sear
The Primo can sear without the need
to set a separate cooking cycle. Just
press and hold SEAR until the Primo
begins to sear at the default setting.
You can adjust the temperature and
time at any point while searing.
OPERATING BUTTONS FUNCTIONS
PROBE Function
The Digital Temperature Probe
measures the internal temperature of
your food as it cooks and can tell your
Primo to stop cooking once your food
reaches its target temperature.
1. Plug the Probe into the Power
Head and run the Probe through
the hole in the dome.
2. Add your food to the Primo and
insert the probe into the thickest
part of the food. Make sure the
probe isn’t touching any bones.
3. Press and hold PROBE to adjust
the target temperature. The
default 165°F will be shown on the
display but this can be adjusted
between 50°F and 212°F using
the arrows.
4. Press START/PAUSE to begin
cooking.
5. Once the probe temperature
is 10°F below the target
temperature, the Primo will beep 3
times. This allows you to remove
your food to finish cooking on the
counter if you desire. If you don’t
remove your food, the Primo will
continue cooking until the target
temperature is reached.
TOP/BOTTOM Function
This refers to the amount of heat
coming from the top and bottom
heating elements. You can adjust
your Primo to cook from the top or
bottom and the amount of power.
Default - Top 30%, Bottom 70%. Both
together will equal 100%.
1. Press ON/OFF.
2. Press TOP/BTM. TOP will flash.
• Press the Up or Down arrows
to adjust TOP heat percentage.
As TOP goes higher, BOTTOM
goes lower. TOP and BOTTOM
percentages will always equal
100%.
• When using TOP only at 100%,
FP will be displayed.
• BOTTOM max power is 70%.
• The Primo will cook your food
using the adjusted top and
bottom power levels.
• When finished, the display will
show End and the Primo will
beep three times.
3. The TOP/BOTTOM percentage
can be adjusted while using the
Program or Stage function.

nuwavenow.com | 11
OPERATING BUTTONS FUNCTIONS
PROG
The Primo includes 100 preset
recipes along with slots for 50 user-
created recipes.
How To Recall A Preset
1. Press PROG. 1 will be shown on
the display.
2. Use the arrows to select your
desired preset and press START/
PAUSE to begin cooking.
NOTE:
• Consult your Quick Start Guide or
Recipe Book for the 100 presets.
• You may adjust the cooking
temperature and time of the preset
recipes but these changes will not
save.
How To Program & Save Your Own
Recipe
1. Set the cooking temperature and
time .
2. Can add cooking functions such
as Preheat, Sear or Warm, if
desired.
3. Press and hold PROG will hear a
beep and 101 will display.
4. Select preset to be used from
101-150.
5. Press and hold PROG will hear 2
NOTE:
• If you press PROBE and the Primo
beeps three times and the display
shows “Prb1” that means your Probe
isn’t plugged in.
• The cooking temperature must
be higher than the target Probe
temperature otherwise the Primo will
not cook.
• Once the target temperature is
reached, the Primo will stop cooking
regardless of the cooking time or
programmed functions remaining.
beeps, the preset is saved.
6. Press START/PAUSE to begin
cooking.
NOTE:
• You may save your custom recipe
at any point before, during or after
cooking.
• If you save your custom recipe
in a slot that already has a recipe
assigned to it, your new recipe will
override the old one.
How To Save a Recipe From An
Adjusted Preset
1. Press PROG. 1 will be shown on
the display, then select the preset
to be used.
2. Make all adjustments to the
temperature and time.
3. Press and hold PROG until 101
appears.
4. Select preset to be used (101-
150).
5. Press START/PAUSE to begin
the cooking cycle.
STAGE
You can program your Primo to cook
for a maximum of 5 stages. The
default for Stage 1 is 350°F and 15
minutes. For stages 2-5 the default is
350°F and the time 00:00.
1. Press STAGE, stage 1 will
display.
2. Adjustments can be made to the
temperature and time.
3. Press STAGE again for
stage. Can adjust the cooking
temperature and enter the time.
4. Repeat step 2 for all stages to be
used.
5. Press START/ PAUSE to begin
cooking
NOTE:
• By default, stages 2-5 have no
cooking time set. You must set the
desired time for each stage or else
the Primo will skip that stage.
• Other functions such as Preheat
and Sear can be added to cooking
stages but when doing so, the
display will not show the stage
number.
• When using the probe, the Primo
will stop cooking when the target
temperature has been reached
regardless of the stages remaining.

12 | nuwavenow.com
OPERATING BUTTONS FUNCTIONS
WARM/REHEAT
Warm
This function keeps your food warm after it’s finished cooking until you are ready to
serve. The default setting is 140°F for 1 hour.
1. Set the temperature, time and any of the functions.
2. Press WARM/REHEAT and adjust the temperature and time as desired.
3. Press START/PAUSE to begin cooking. The warming cycle will begin once the set
cooking cycle has ended.
NOTE:
• The temperature and time for the warming cycle can be adjusted at any time.
• Cancel the programmed warming cycle by pressing WARM/REHEAT.
Independent Warm Warm the food without cooking. The default is 140F, for 1 hour.
Range is 140F-200°F, up to 3 hours.
1. Press WARM/REHEAT and TOP/BTM at the same time.
2. The Primo will automatically begin warming for the default setting, the
temperature and time can be adjusted.
Reheat
The default is set to 360°F for 4 minutes.
3. Press and hold down WARM/REHEAT will beep 2 times and will begin reheating
automatically.

nuwavenow.com | 13
2-BUTTON COMBINATION FUNCTIONS
OPERATING BUTTONS FUNCTIONS
+
+
+
SLOW COOK
The Primo can slow cook at low heat
when using the Probe. The default cooking
temperature is 190°F.
1. Insert the probe into your food and set
the target temperature.
2. Press PROG and PROBE to enable
the Slow Cook function. Set your
desired cooking temperature and time.
The maximum Slow Cook temperature
is 235°F and the maximum time is 6
hours.
3. Press START/PAUSE to begin
cooking.
MUTE
To mute the beep sounds.
1. Press both STAGE + SEAR until
2 beeps are heard.
2. Repeat to unmute.
LOCK
To lock the control panel.
1. Press and hold together PROG +
STAGE until 2 beeps are heard.
2. Repeat to unlock or press the
ON/OFF button.
NOTE:
• The cooking temperature must be at
least 10°F higher than the target internal
temperature.
NOTICE
• While cooking, the dome must be placed completely level to the Base Tray.
• DO NOT tilt the dome or leave the dome ajar during use.
• Steam will emit from the dome where the probe is placed.
14 | nuwavenow.com
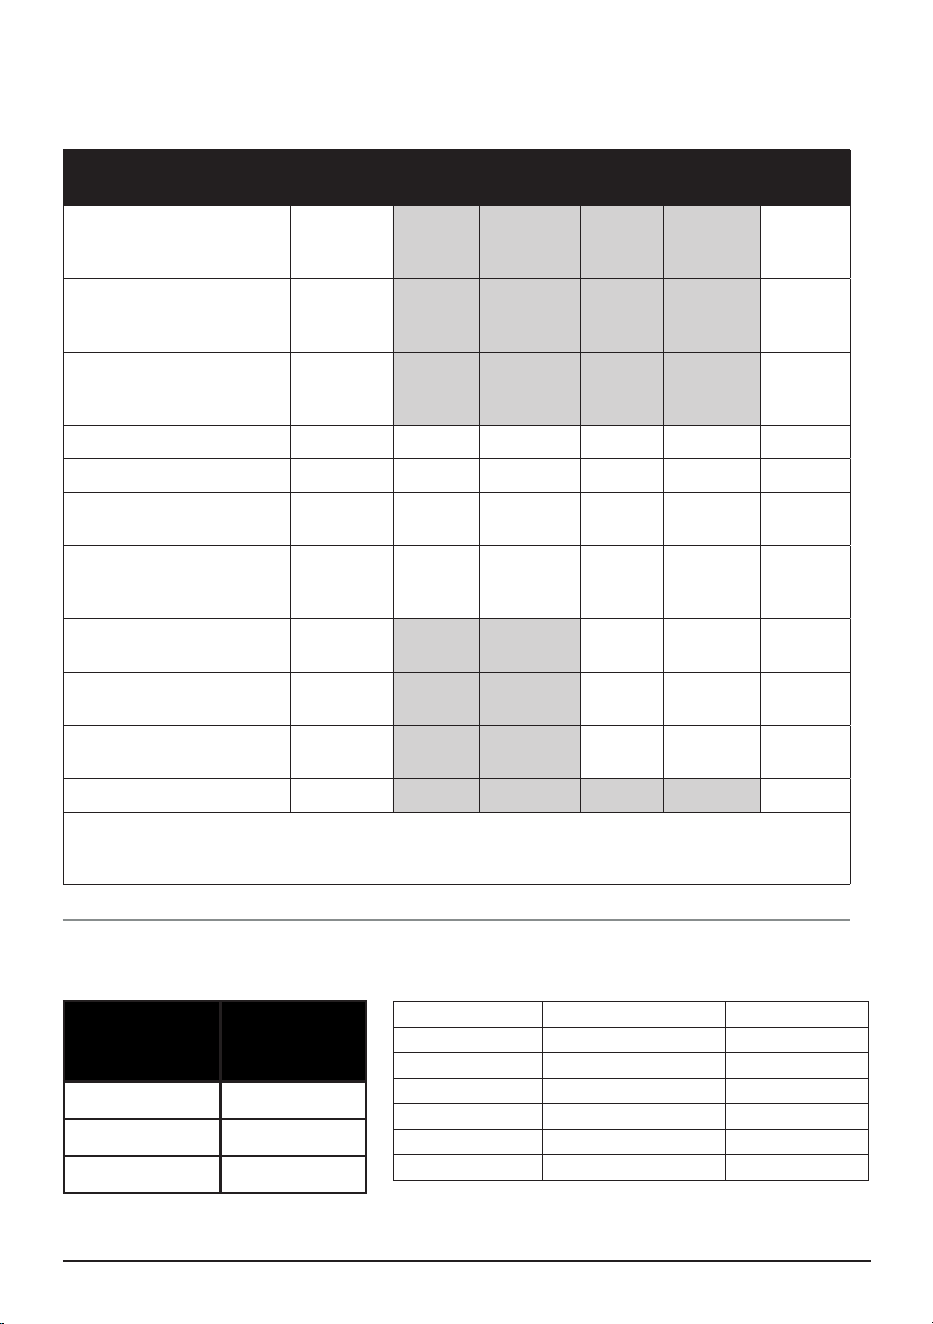
Probe Temperatures
TEMPERATURE CHARTS
Meats
Oven
Temp.
Rare
Med
Rare
Med
Med
Well
Well
Chicken, breast
Turkey, breast
Duck, breast
360
165*
Chicken, whole
Turkey, whole
Duck, whole
360 165*
Chicken, thigh
Turkey, thigh
Duck, thigh
360 165*
Steak 1" thick (25mm) 400 125 135 145* 150* 160*
Burgers ½ lb (227g) 400 125 135 145* 155* 160*
Roast Beef (bone-in)
Roast Beef (boneless)
350 125 135 145* 150* 160*
Roast Lamb
(bone-in)Lamb
(boneless)
350 125 135 145* 150* 160*
Pork (bone-in)
Pork (boneless)
350 145* 150* 160*
Salmon, Tuna, Halibut,
Swordfish
400 145* 150* 160*
Fish Steaks 1" thick
(25mm)
400 145* 150* 160*
Sausage 400 160*
NOTE: Times may vary depending on cooking preference. Consuming raw or undercooked
meats, poultry, or seafood may increase your risk of food borne illness. *To reduce the risk,
cook your food to USDA-safe temperatures.
Cooking Tem-
perature
Selectable
Cooking
Time
50°F–275°F 00:00–99:59
280°F–350°F 00:00–24:00
350°F–400°F 00:00–01:00
Cooking Time
Measurement Chart
Teaspoon = t Fahrenheit = °F Minute = min
Tablespoon = T Celsius = °C Second = sec
Cup = c Fluid Ounces = oz Inch = in.
Ounce = oz Liter = L Dozen = doz
Pound = lb(s) Milliliter = ml Hour = hr
Quart = qt Package = pkg. Gram = g
Pint = pt Gallon = gal Kilogram = kg
nuwavenow.com | 15
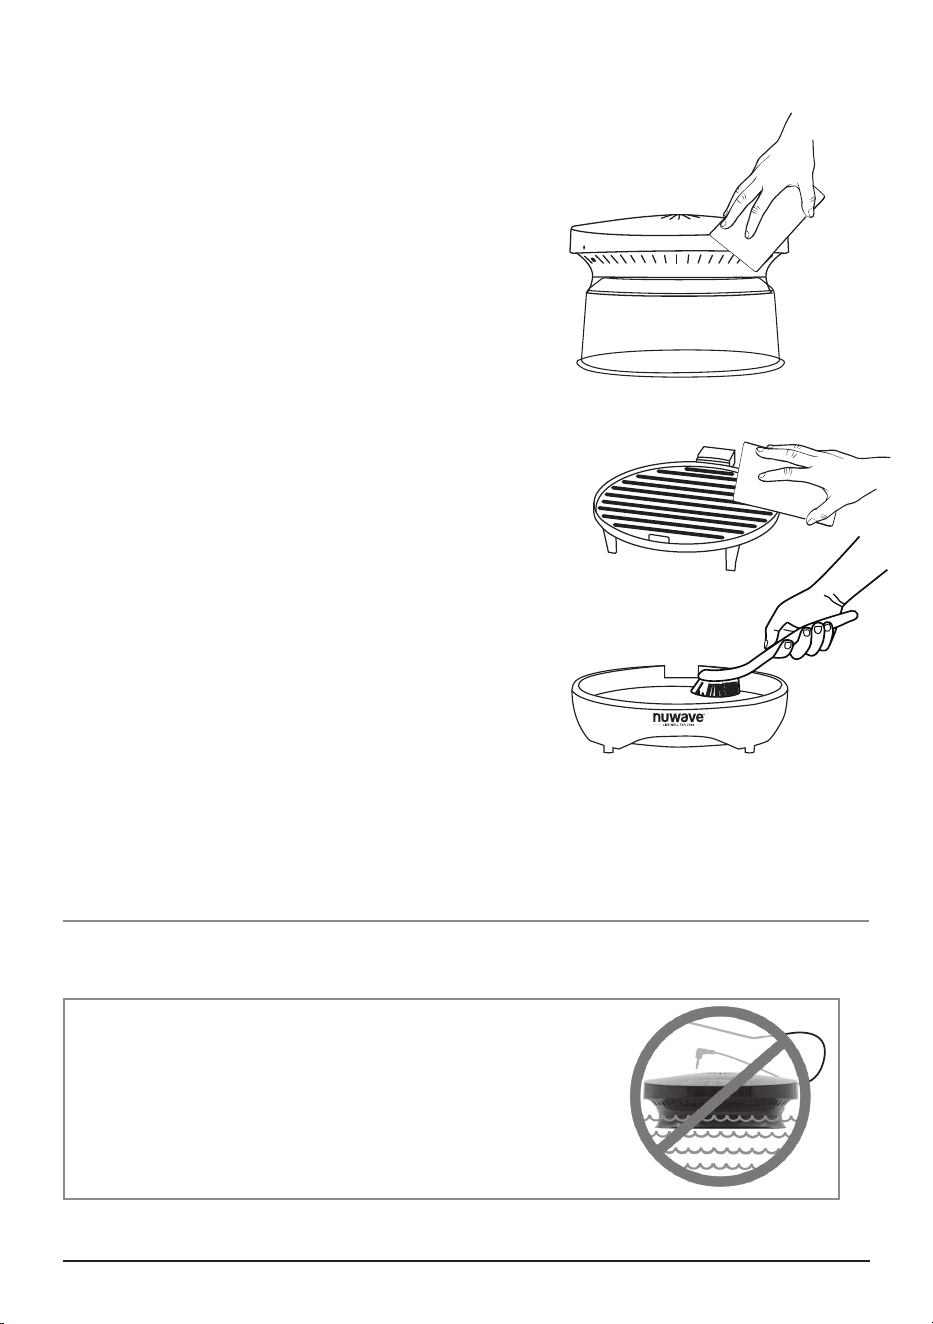
CARE & MAINTENANCE
AFTER USE:
Once cooled, separate all parts and wash
accordingly.
1. Unplug the Primo from both the wall outlet and
the grill plug.
2. Use a damp cloth to wipe down the top and
underside of the Power Head.
3. The Probe and Dome are hand wash only. Do
not immerse the probe in water.
4. The Grill Plate and Base Tray can be washed
by hand or in the dishwasher, top rack and air
dry only cycle.
• The Probe and Dome are hand wash only.
• Wash the Grill Plate and Base by hand or in the
dishwasher, top rack and air dry only cycle.
NOTE:
• DO NOT use harsh abrasives, steel scour pads,
or metal utensils when cleaning the Grill Plate as
this may damage the non-stick coating.
Clean after every use and between large batches.
STORAGE
1. Unplug the appliance and let it cool down
completely.
2. Make sure that all the parts are cleaned and
dry.
PROBE
IMPORTANT- DO NOT immerse Power Head or Probe
in water or attempt to cycle through dishwasher. The
outer surface may be cleaned by wiping carefully
with a damp dishcloth or sponge. Make sure the
Primo has cooled completely prior to cleaning.

16 | nuwavenow.com
TROUBLESHOOTING GUIDE
The Primo is engineered with an automatic shut-off feature to prevent overheating during
use. If the Primo shuts off to cool itself down, an odor may be detected. Unplug the Primo
and wait for it to completely cool down. To prevent the Primo from overheating, do not cook
foods at higher temperatures or for longer times than recommended.
The Primo does not turn on.
Plug may not be in the outlet. Plug in the Primo.
The food is cooked unevenly.
Check cooking process throughout. Turn or rotate as needed to ensure even cooking.
The Primo is not heating.
Make sure the Primo is plugged in. Unplug Primo and plug the Primo back in and see if the
Primo comes up to correct temperature. If this problem persists, contact Customer Service.
Error Code Prb1 is displayed and Probe is not working.
Probe not connected to the Primo. Connect Probe to the Primo.
Error Code Prb2 is displayed and Probe target temp is higher than cooking temp.
Probe target temperature higher than cooking temperature. Reset Probe target
temperature lower than cooking temperature.
Error Code Prb3 is displayed and Probe has a short circuit.
Turn the Primo off to cool. If still not working contact Customer Service.
Error Code Prb4 is displayed and Probe Sensor is not detecting temperature increase.
Allow food to come up to room temperature or thaw before inserting Probe into food.
Error Code Er1 is displayed and the Primo is not cooking.
Turn the Primo off and unplug to cool. If still not working after cooling and turned on,
contact Customer Service.
Error Code Err1 is displayed and the Primo is not cooking.
Temperature Sensor Short Circuit. Contact Customer Service.
Error Code Err2 is displayed and the Primo is not cooking.
Temperature Sensor is open. Contact Customer Service.
Error Code Err3 is displayed and the Primo is not cooking.
Top heater malfunctioned. Contact Customer Service.
Error Code Err4 is displayed and the Primo is not cooking.
Bottom heater in abnormal condition Bottom heater circuit has broken. Contact Customer
Service.
Contact Customer Service at support@nuwavenow.com

nuwavenow.com | 17
LIMITED WARRANTY
THE MANUFACTURER WARRANTS
Nuwave, LLC warrants that Primo® Grill & Oven will be free from manufacturer defects
for 1 year from the date of purchase, under normal household use, and when operated in
accordance with the Manufacturer’s written instructions This Limited Warranty covers for
the Original Purchaser only. The Manufacturer will provide the necessary parts and labor
to repair the product at the Nuwave LLC Service Department. After the expiration of the
warranty, the cost of the parts and labor will be the responsibility of the owner.
THE WARRANTY DOES NOT COVER
The Limited Warranty is voided if repairs are made by an unauthorized dealer, or the
serial number data plate is removed or defaced. Normal deterioration of nish due to
use or exposure is not covered by this Warranty. This Limited Warranty does not cover
failure, damages or inadequate performance due to accident, acts of God (such as
lightning), uctuations in electric power, alterations, abuse, misuse, misapplications,
corrosive-type atmospheres, improper installation, failure to operate in accordance with
the Manufacturer’s written instructions, abnormal use, commercial or rental uses, or resold
units. Nuwave LLC reserves the right to void the Limited Warranty, where allowable by law,
for products purchased from an unauthorized dealer.
TO OBTAIN SERVICE
The owner shall have the obligation and responsibility to pay for all services and parts not
covered by the warranty; prepay the freight to and from Service Department for any part
or system returned under this warranty; and carefully package the product using adequate
padding material to prevent damage in transit. The original container is ideal for this
purpose. Include in the package the owner’s name, address, daytime telephone number,
a detailed description of the problem, and RGA (Return Goods authorization number). To
obtain the RGA number, email us at: support@nuwavenow.com.
Provide the product model & serial number and proof of date of purchase (a copy of the
receipt) when making claims under this warranty.
MANUFACTURER’S OBLIGATION
The Manufacturer’s obligation under this Limited Warranty is limited, to the extent
allowable by law, to repairing or replacing any part covered by this Limited Warranty
which upon examination is found to be defective under normal use. The Limited Warranty
is applicable only within the continental United States and only to the original purchaser
of the manufacturer’s authorized channels of distribution.THE LIMITED WARRANTY
MAY NOT BE ALTERED, VARIED OR EXTENDED EXCEPT BY A WRITTEN
INSTRUMENT EXECUTED BY THE MANUFACTURER. THE REMEDY OF REPAIR OR
REPLACEMENT AS PROVIDED UNDER THIS LIMITED WARRANTY IS EXCLUSIVE. IN
NO EVENT SHALL THE MANUFACTURER BE LIABLE FOR ANY CONSEQUENTIAL
OR INCIDENTAL DAMAGES TO ANY PERSON, WHETHER OR NOT OCCASIONED
BY NEGLIGENCE OF THE MANUFACTURER, INCLUDING WITHOUT LIMITATION,
DAMAGES FOR LOSS OF USE, COSTS OF SUBSTITUTION, PROPERTY DAMAGE,
OR OTHER MONEY LOSS.

18 | nuwavenow.com
LIMITED WARRANTY
Some states do not allow the exclusion or limitation of incidental or consequential
damages, so the above limitation exclusions may not apply. This Limited Warranty gives
specic legal rights, and there may also be other rights which vary from state to state.
EXCEPT AS OTHERWISE EXPRESSLY PROVIDED ABOVE, THE MANUFACTURER
MAKES NO WARRANTIES EXPRESSED OR IMPLIED ARISING BY LAW OR
OTHERWISE, INCLUDING WITHOUT LIMITATION, THE IMPLIED WARRANTIES OF
MERCHANTABILITY AND FITNESS FOR A PARTICULAR PURPOSE TO ANY OTHER
PERSON. READ YOUR OWNER’S MANUAL. IF YOU STILL HAVE ANY QUESTIONS
ABOUT OPERATION OR WARRANTY OF THE PRODUCT, PLEASE CONTACT
NUWAVE LLC.
DISPUTE RESOLUTION PROCEDURE
For disputes relating to use of the website or use or purchase of a Nuwave product or
service (collectively “Disputes”), you agree to rst contact Nuwave LLC at
legal@nuwavenow.com. If we cannot resolve your dispute informally, any and all disputes
shall be submitted to nal and binding arbitration. You may start the arbitration process by
submitting in writing a demand to the American Arbitration Association (“AAA”) and sending
a copy to Nuwave. Nuwave will pay all ling costs. A single arbitrator of the AAA will
conduct the arbitration in a location convenient to you or by phone. The arbitrator’s award
will be binding and may be entered as a judgment in a court of competent jurisdiction.
The arbitration will be conducted in accordance with the provisions of AAA’s Commercial
Arbitration Rules and Mediation Procedures in effect at the time of submission of your
demand for arbitration. See https://www.adr.org/sites/default/les/CommercialRules_Web.
pdf. Except as may be required by law as determined by an arbitrator, no party or arbitrator
may disclose the existence, content, or results of any arbitration hereunder without prior
written consent of both parties.
A. WAIVER OF RIGHT TO SUE. By agreeing to arbitration, you understand that, to the
maximum extent permitted by law, you are agreeing to waive your right to le suit in any
court, to a court hearing, a judge trial, or a jury trial.
B. CLASS ACTION WAIVER. To the maximum extent permitted by law, you expressly
agree to refrain from bringing or joining any claims in any representative or class-wide
capacity, including but not limited to, bringing or joining any claims in any class action or
class-wide arbitration.
C. OPT OUT PROCEDURE. To request to opt out of arbitration you must contact
Nuwave LLC at legal@nuwavenow.com, Nuwave LLC, 560 Bunker Ct., Vernon Hills, IL
60061, U.S.A. You will have thirty (30) days from the date of product delivery to opt out
of arbitration with respect to any dispute arising out of or relating to use or purchase of
any Nuwave product. If more than 30 days have passed, you are not eligible to opt out
of arbitration and will have waived your right to sue or participate in a class action with
respect to the dispute arising out of your purchase or use of a Nuwave product. For any
dispute arising out of your use of Nuwave’s website, you have thirty (30) days from the
date you provided information to the website to opt out of arbitration. If more than 30 days
have passed, you are not eligible to opt out of arbitration and you will have waived your

nuwavenow.com | 19
LIMITED WARRANTY
READ YOUR OWNER’S MANUAL
If you still have any questions about operation or warranty of this product, please email us:
support@nuwavenow.com
right to sue and participate in a class action with respect to the dispute arising out of your
use of Nuwave’s website.
D. SOME MATTERS ARE NOT SUBJECT TO ARBITRATION. Notwithstanding the
foregoing, the following shall not be subject to arbitration and may be adjudicated only in
the state and federal courts of Illinois: (i) any dispute, controversy, or claim relating to or
contesting the validity of our intellectual property rights and proprietary rights, including
without limitation, patents, trademarks, service marks, copyrights, or trade secrets; (ii)
an action by a party for temporary, preliminary, or permanent injunctive relief, whether
prohibitive or mandatory, or other provisional relief; or (iii) interactions with governmental
and regulatory authorities. You expressly agree to refrain from bringing or joining any
claims in any representative or class-wide capacity, including but not limited to, bringing or
joining any claims in any class action or any class-wide arbitration.
Para la versión en español de este manual,
visita www.nuwavenow.com.

Item No: BM20755
V1-YK
06-17-24
FOR HOUSEHOLD USE ONLY
120VAC, 60Hz, 1500 Watts
Model:
20755
For patent information please go to:
www.nuwavenow.com/legal/patent
Designed & Developed in USA
Nuwave LLC
560 Bunker Ct.
Vernon Hills, IL 60061, U.S.A.
Made in China
©2024 Nuwave LLC • All Rights Reserved.
PRIMO® GRILL & OVEN
Master Your Primo Grill & Oven
Scan the code to find recipes,
how-to videos and more!
www.nuwavenow.com
Customer Service: support@nuwavenow.com
Questions or Concerns?
1-888-502-7805
Mon-Fri 7:30am-4:30pm CST