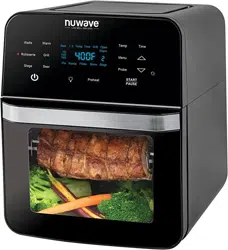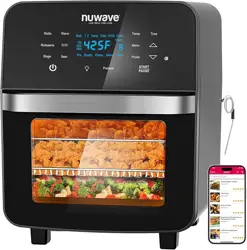
Owner’s Manual
AIR FRYER
Master Your
Brio Air Fryer
Scan the code to find recipes,
how-to videos and more!
Customer Service: support@nuwavenow.com
Questions or Concerns?
1-888-502-7805
Mon-Fri 7:30am-4:30pm CST

Register Today!
Use your smartphone or device to scan the QR code located on the back
of your unit to register your product, or visit nuwavenow.com/register.
Connect with Us!
#nuwavenow
Visit nuwavenow.com to see other great products and accessories.
THANK YOU!
Congratulations on your Nuwave® purchase. We know there are many options available
and sincerely appreciate the trust you have placed in us.
For the last 30 years, we have committed to introducing products that promote healthy
living at affordable prices. By combining the highest quality designs with cutting edge
technology, we have always strived to blend feature, function, and innovation into every
product we make. We hope you will agree.
2 | nuwavenow.com

ENGLISH
TABLE OF CONTENTS
Para la versión en español de este manual, visita www.nuwavenow.com
Important Safeguards ..................................................................4 – 5
Parts & Accessories .....................................................................6
Assembly Guide ...........................................................................7– 9
General Use...................................................................................10 –15
Cleaning & Maintenance ..............................................................16-17
Troubleshooting Guide ................................................................18-19
Limited Warranty ..........................................................................19-22
Menu Preset ..................................................................................22-23
nuwavenow.com | 3

1. Read all instructions, safeguards, and
warnings before using the appliance.
2. Do not touch hot surfaces. Use handles
or knobs.
3. Do not immerse cord, plugs, or Power
Head in water or other liquid.
4. Close supervision is necessary when
any appliance is used by or near
children.
5. Unplug from outlet when not in use and
before cleaning. Allow it to cool before
putting on or taking off parts.
6. Do not operate any appliance with
a damaged cord or plug or after the
appliance malfunctions or has been
damaged in any manner. Any service
MUST be done by Nuwave LLC or
authorized by the manufacturer for
repairs.
7. The use of accessory attachments is
not recommended by the appliance
manufacturer as it may cause injuries.
8. Do not use outdoors.
9. Do not let cord hang over edge of table
or counter or touch hot surfaces.
10. Do not place on or near a hot gas or
electric burner, or in a heated oven.
11. Extreme caution must be used when
moving an appliance containing hot oil
or other hot liquids.
12. Always when disconnecting, turn all
controls to “off”. Then remove plug from
outlet.
13. Do not use the appliance for anything
other than intended use.
14. Save these instructions.
NOTICE: THE FAILURE TO
FOLLOW ANY OF THE IMPORTANT
SAFEGUARDS, ADDITIONAL
SAFEGUARDS, OR THE
INSTRUCTIONS FOR SAFE USE
IS A MISUSE OF YOUR BRIO THAT
CAN VOID YOUR WARRANTY AND
CREATE THE RISK OF SERIOUS
INJURY.
IMPORTANT SAFEGUARDS
When using electrical appliances, basic safety precautions should always be followed
including the following:
15. ALWAYS set up the Brio on a
horizontal, even, and stable surface.
16. ALWAYS keep hands and face away
from the steam and hot air released
from the air outlet vent during normal
operation, or when opening the unit to
remove or adjust the food.
17. ALWAYS unplug the Brio and contact
NuWave Customer Service* if an
excess amount of smoke escapes the
unit during operation. Note: A small
amount of smoke is normal when using
the Brio for the rst time.
18. NEVER put the Brio against the wall or
other appliances or allow anything to
block the air vents.
19. ALWAYS keep at least 3 inches of free
space around the Brio.
20. NEVER place anything on top of the
Brio.
21. NEVER use metal utensils with the
coated Grill/Griddle plate as doing so
can damage the surface.
ADDITIONAL SAFEGUARDS
4 | nuwavenow.com

ENGLISH
IMPORTANT SAFEGUARDS
Electrical Information
A short power-supply cord (or detachable power-supply cord) is provided
to reduce the risk of becoming entangled in or tripping over a longer cord.
Longer detachable power-supply cords or extension cords are available and
may be used if care is exercised in their use. If a longer detachable power-
supply cord or extension cord is used:
1. The marked electrical rating of the extension cord should be at least as
great as the electrical rating of the appliance.
2. The longer cord should be arranged so that it will not drape over the
countertop or tabletop where it could be pulled on or tripped over.
3. The appliance has a polarized plug (one blade is wider than the other). To
reduce the risk of electric shock, this plug is intended to fit into a polarized
outlet only one way. If the plug does not fit fully into the outlet, reverse the
plug. If it still does not fit, contact a qualified electrician. Do not attempt to
modify the plug in any way. If the appliance is of the grounded type, the
cord set or extension cord should be a grounding-type 3-wire cord.
WARNING
Do not place the unit on or near a hot gas burner, electric burner, or in a
heated oven or on a stovetop.
NOTICE
It is perfectly normal for your new unit to produce a heated plastic smell when
used for the first time. This will go away after the first few uses.
nuwavenow.com | 5
1800
1500
700
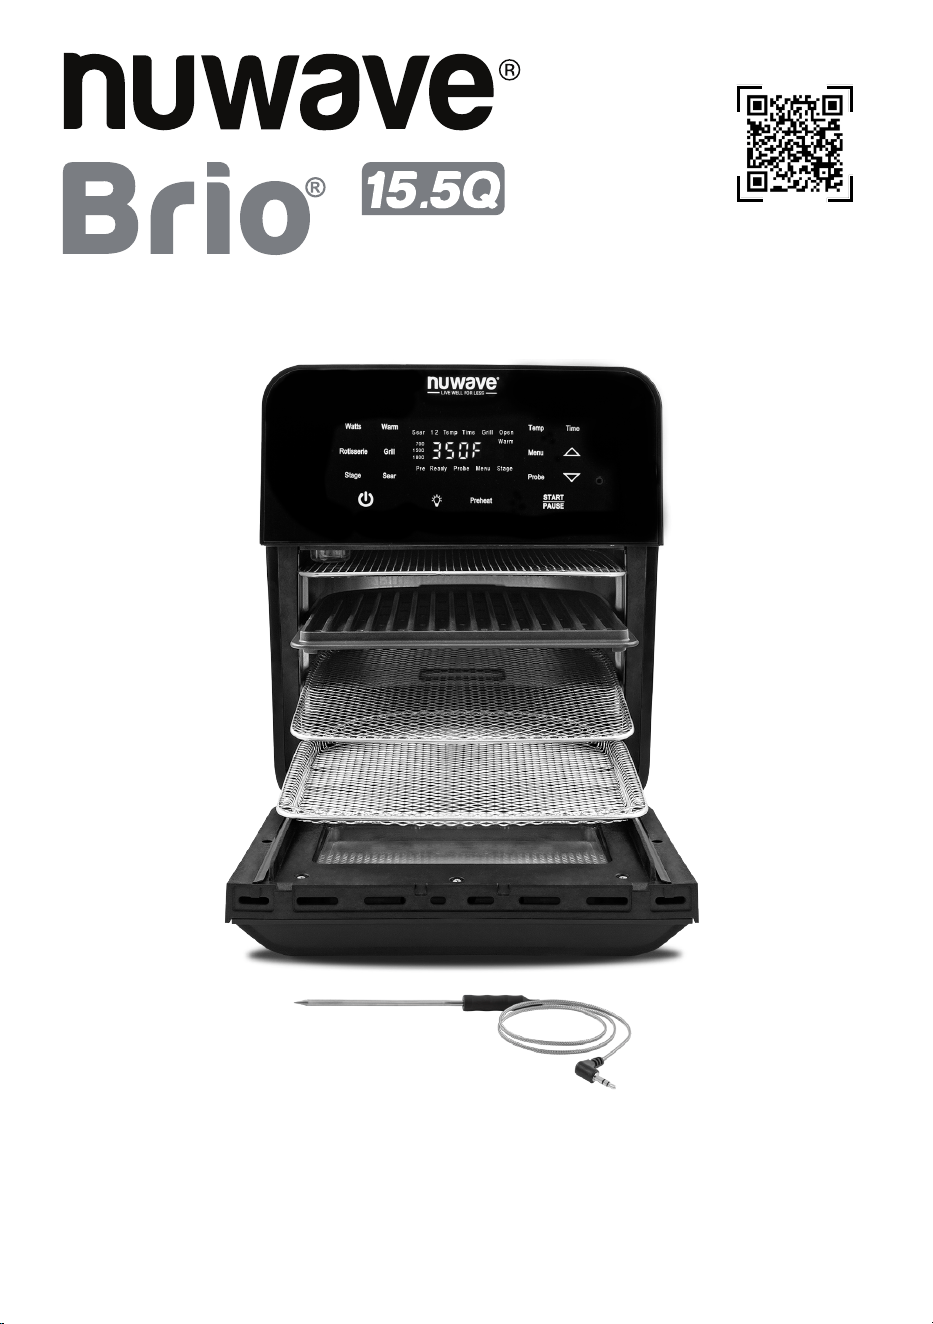
Power Base
Part #: B15A11
Door
Part #: B15P1
Plastic Hinge (2)
Part #: B15P6
Door Screws (2)
Part #: B15P8
Stainless Steel
Mesh Rack
Part #: B15A3
Grill/Griddle Plate
Part #: B15A12
Digital Temperature
Probe
Part #: B15A7
Light Bulb
Part #: B15P2
Light Bulb Cover
Part #:B15P4
Rotisserie Basket
Part #: B15A4
Rotisserie Skewer
Part #: B15A5
Stainless Steel
Mesh Tray
Part #: B15A2
Drip Tray
Part #: B15A7
PARTS & ACCESSORIES
6 | nuwavenow.com
ENGLISH
Before Use
1. Remove all the packaging materials.
2. Remove all tape and stickers.
3. Clean all parts thoroughly with hot water, a nonabrasive sponge, and mild dish
detergent. If washing in the dishwasher, use the top rack only. The temperature
probe MUST be hand washed.
4. Wipe the inside and outside of the Brio with a wet cloth. Do not immerse the Brio in
water. Dry thoroughly.
USE THE DRIP TRAY AT ALL TIMES.
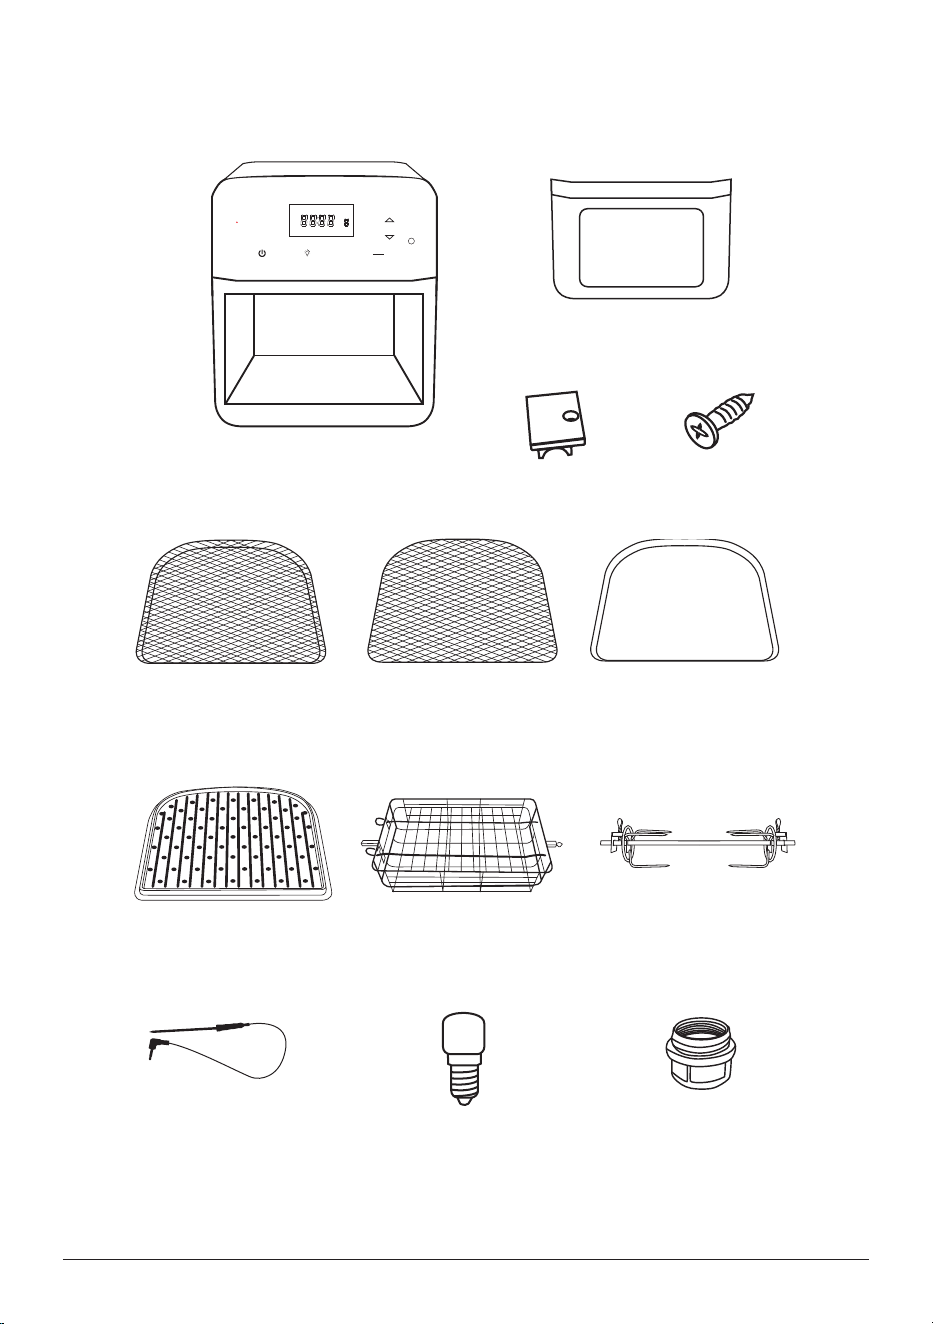
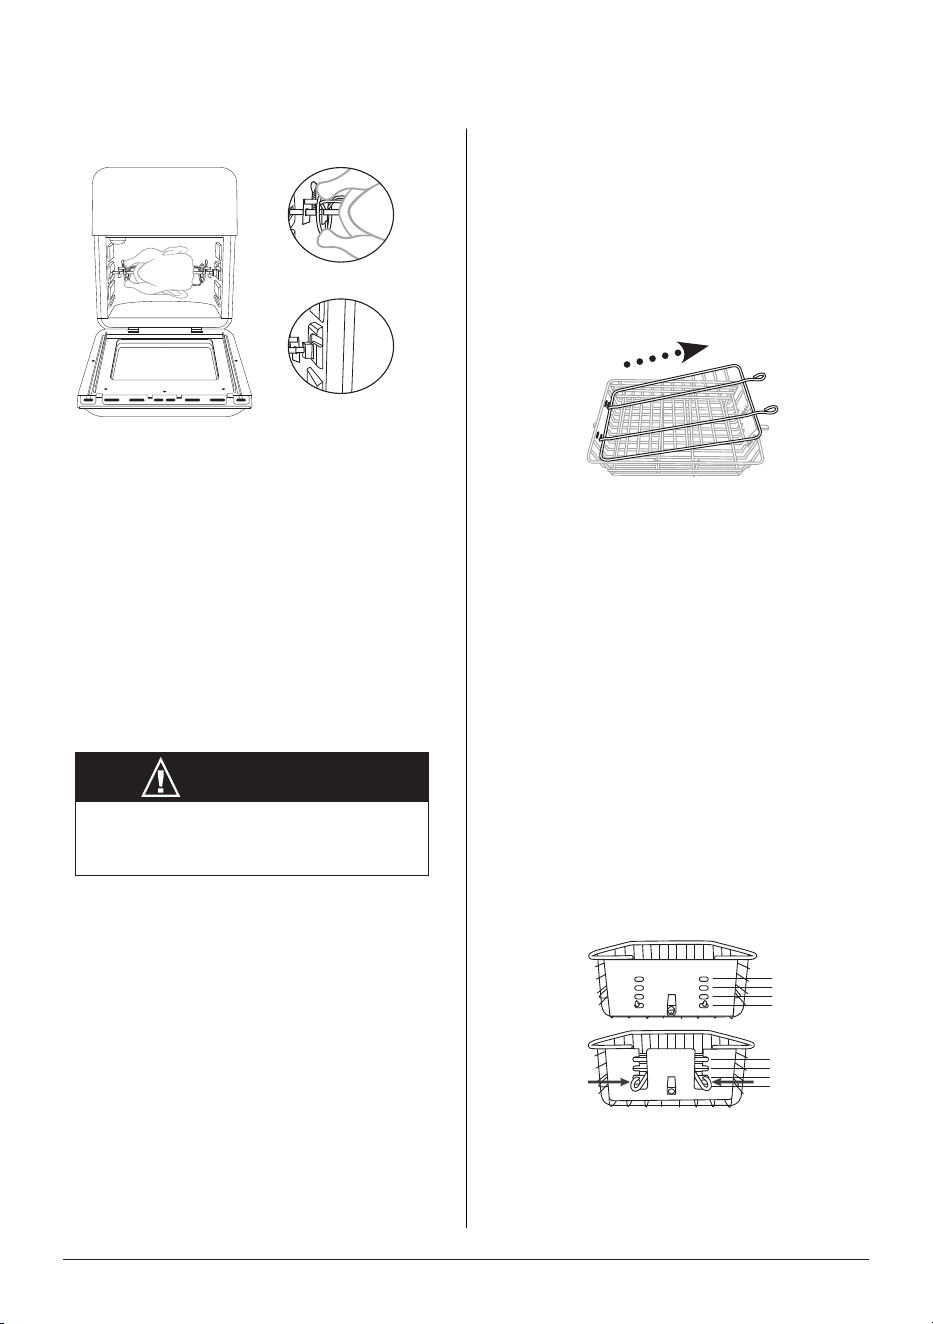
Rotisserie Skewer Assembly
To assemble the Rotisserie Skewer with
poultry and other meats, follow the steps
below:
1. Screw one Rotisserie Skewer fork
onto the end of the Skewer with the
rectangular end.
2. Push the Skewer through the
center of the meat until the Skewer
emerges from the other side.
3. Place the second Rotisserie Skewer
fork onto the other end of the Skewer
and push the fork forward until it
pierces the end of the meat. Tighten
the screw of the fork. If necessary,
loosen the screw and move the rst
fork forward until it pierces the other
end of the meat then retighten. Make
sure both screws are tight and in
place.
Screw
4. After securing the food on the
Rotisserie Skewer, insert the
rectangular end of the spit into the
hole on the left. Keep the right side
slightly tilted upwards.
5. Bring down the right side of the spit
and slide into the Shaft Bracket.
ASSEMBLY GUIDE
Left Shaft
Brackets
Right Shaft
Bracket
nuwavenow.com | 7
Notes:
• For better results, use kitchen twine
around the chicken or other meats.
• Always check that there is sufcient
space above and below your
food so it can rotate freely without
obstruction.
• When using the Rotisserie Skewer,
place the Drip Tray on the bottom.
CAUTION
Rotisserie Skewer parts will be hot during
and after use. Use oven gloves when
handling.
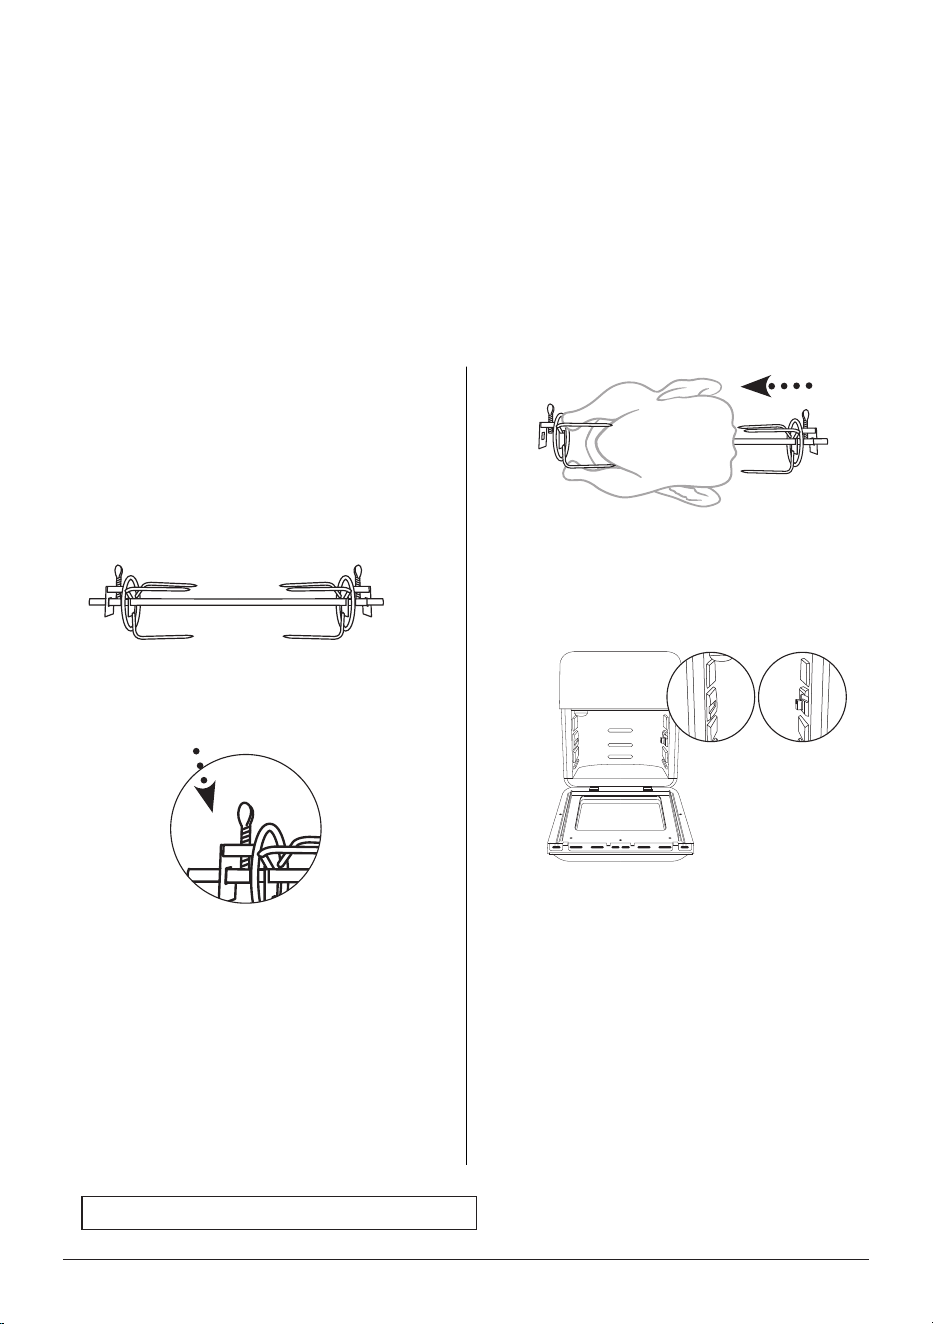
Rotisserie Basket Assembly
To use the Rotisserie Basket with the
Brio, follow the steps and illustrations
below:
1. To remove the top lid from the
Rotisserie Basket: Squeeze the
prongs on the outside of the top lid
toward the middle and lift. Remove
the other end from the holes.
2. Place your food in the Basket.
3. Adjust the top lid to t over your
food: Place the ends of the top
lid into the slots, pictured below.
Squeeze the prongs on the outside
of the top lid and slide them down
into position, line up with the slots
on the opposite side.
• Be sure the top lid lies at over
the food and that it ts snugly.
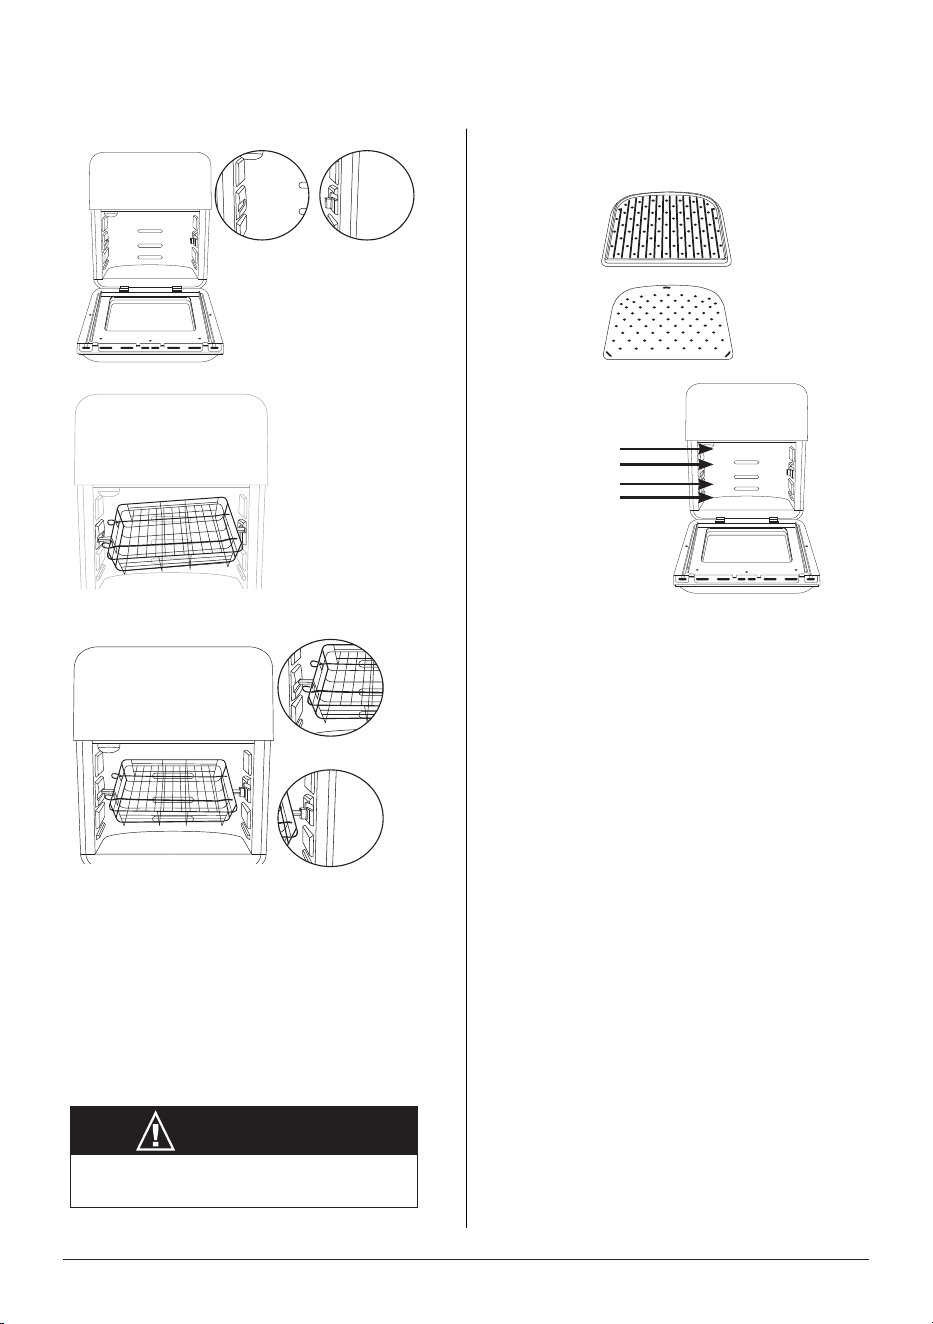
4. After securing your food in the
Basket, take the Basket and insert
the rectangular end of the basket
into the hole on the left. Keep the
right side slightly tilted upwards.
Insert left side before the right side
to avoid scraping on the unit.
5. Bring down the right side of the bar
and place it into the bracket.
6. Press Start to begin the cooking
cycle.
4
3
2
1
4
3
2
1
ASSEMBLY GUIDE
Left Shaft Brackets
Right Shaft Brackets
8 | nuwavenow.com
ENGLISH
Notes:
• Always check that there is sufcient
space above and below the basket
so it can rotate freely without
obstruction.
• When using the Rotisserie Basket,
place the Drip Tray on the bottom.
Left
Right
Grill/Griddle Plate Assembly
4
3
2
1
Position:
Griddle
Grill
• The Grill/Griddle Plate can
be used in Positions 1-3, see
picture. For crispier results it’s
recommended to use Position 3.
• Position 4 is primarily used for
dehydrating foods using the
Mesh Rack.
CAUTION
Rotisserie Basket parts will be hot during
and after use. Use oven gloves.
ASSEMBLY GUIDE
Left Shaft
Brackets
Right Shaft
Brackets
nuwavenow.com | 9

Setting the Clock
Press and hold Preheat and Time at the same time until 2 beeps are heard. The display
will show “12:00” and “:” will ash. Use the Up and Down arrows to set the time.
• The clock is programmed using the 24-hour format.
Lock- To disable all functions
1. Press Menu and Stage at the same time. LOC will appear in the display.
2. Repeat to unlock.
• The unit will remain in locked mode, even when turned off.
Mute- to disable the beeping sound.
1. Press Sear + Stage for 1 second.
2. Repeat to unmute, will hear 2 beeps.
• When muted, the beeps sound is canceled for all functions.
POWER
Turns the Brio on. When turned off cancels all functions.
START/PAUSE
Starts, pauses, and resumes cooking.
1. Press START to begin cooking.
2. To pause cooking, press START/PAUSE.
3. To resume cooking press START again.
• When the door opens the Brio will pause and cooking resumes when the door
shuts.
Up and Down Arrows
The Up/Down arrows can adjust for Temp, Time, Menu, and Grill.
1. Select function.
2. Press and hold Up/Down arrow till selection appears.
• Press and hold the arrows Up/Down to quickly reach your selection.
Temp
The default cooking temperature is 350F, and the range is 50F-425F.
1. Press Temp, use the Up/Down arrows to adjust the temperature.
• The Up arrow will increase, and the Down arrow will decrease the temperature.
GENERAL USE
10 | nuwavenow.com

ENGLISH
GENERAL USE
Switching from Fahrenheit to Celsius
The defaults will always display: Fahrenheit 350°F and Celsius 177°F.
1. Press and hold Temp until 2 beeps are heard. Will display 177°F.
2. Repeat to switch to Fahrenheit.
• You will not be able to switch while the Brio is cooking.
Adjusting Default Temperature
Default temperature is 350°F, this can be changed for your convenience.
1. Set the new default temperature.
2. Press and hold the START until 2 beeps are heard.
• You will not be able to switch while the Brio is cooking.
• You can change both temperature and time at the same time.
Time
The default cooking time is 15 minutes.
1. Press Time use the Up/Down arrows to adjust the time.
• The Up arrow will increase and the Down arrow will
decrease the temperature.
Change Time to Minutes/Seconds
1. Press and hold Time, will hear 2 beeps and 15:00 will be
displayed.
2. Repeat to return to Hours/Minutes (00:15).
Change Time to Days/Hours
1. Press Menu and Time, will hear 2 beeps and Hr will be displayed.
2. Press Time and the time will display in day and hour (00.00).
3. Repeat to return to Hours/Minutes (00:15).
Change Time to Month/Day
1. Press and hold Stage and Time will hear 2 beeps and dA will be displayed.
2. Press Time and 00:00 will be displayed.
3. Repeat to return to Hours/Minutes (00:15).
Adjusting Default Time
1. Set the new default time.
2. Press and hold the START until 2 beeps are heard.
• You will not be able to switch settings while the Brio is cooking.
• You can change both temperature and time at the same time.
1800
1500
900
0 1:00
hours minutes
1800
1500
700
60:00
minutes seconds
nuwavenow.com | 11

Preheat
The Brio will preheat automatically to set the cooking temperature for all functions.
1. Set the cooking temperature and time.
2. Press START, Pre and the temperature will ash in
the display.
3. Once preheated, the Brio will beep twice, display
“Ready”, countdown to 10 seconds, will beep once
and begin cooking.
4. Place the food in the Brio during the countdown,
and will beep twice when nished.
5. When the Brio is nished cooking, it will beep 3
times and the LED display will show “End”.
• All functions will preheat unless cancelled.
• The Preheat cycle can be canceled anytime by
pressing Preheat.
Auto Preheat
The Brio, by default, will automatically preheat for all
cooking functions and certain programmed presets.
This function can be disabled.
1. Press and hold Menu + Preheat until 2 beeps are heard.
2. Repeat to add the preheat.
Rotisserie
When activated the light next to the function will illuminate. Default is 350°F for 30 minutes.
1. Place food on the Rotisserie Skewer or in the Rotisserie Basket
2. Set onto the Shaft Brackets , shown in the Assembly.
3. Press Rotisserie and the light will be lit. While preheating the light will be off.
4. If needed, adjust the temperature and time.
5. Press START to begin the cooking.
Notes:
• Always check that there is sufcient space above and below your food, so it can
rotate freely without obstruction.
• When using the Rotisserie Skewer or Basket, place the Drip Tray on the bottom.
• Use oven mitts when removing food from the rotisserie.
• Do not use the Probe with the Rotisserie function.
1800
35 0F
1800
35 0F
1800
35 0F
1800
35 0F
GENERAL USE
12 | nuwavenow.com

ENGLISH
GENERAL USE
Grill
When activated can select from levels 1-9. Default is Level 4, 425°F for 9 minutes.
Maximum grill time is 15 minutes.
1. Press Grill and select level to be used.
2. If needed, adjust the temperature.
3. Press START, the cooking cycle will begin.
Notes:
• The probe cannot be used with the grill function,
Probe
Will cook to a set internal target temperature. The default is 165°F, the range is
50°F-212°F.
1. Plug the probe into the probe jack.
2. Press Probe the current temperature is displayed.
3. Press and hold Probe, 165°F default set the internal target temperature.
4. Insert the probe into the thickest part of the food, then place in the Brio.
5. Be sure the probe wire is placed on the right side of the Brio.
6. Press START to begin cooking.
7. Once the target temperature reaches within 10 degrees,
the Brio will beep 3 sets of double beeps.
• When inserting the probe, in food, do not touch the
bone, this will give a false reading
• Press Probe to view the current temperature. .
Level 1-425°F/5min
Level 2-425°F/7min
Level 3-425°F/8min
Level 4-425°F/9min
Level 5-425°F/10min
Level 6-425°F/11min
Level 7-425°F/12min
Level 8-425°F/13min
Level 9-425°F/15min
nuwavenow.com | 13

GENERAL USE
Slow-Cook
Slow Cook is achieved when the Internal temperature is reached and maintained for a set time.
1. Set the probe internal target temperature.
2. Press Menu and Probe 01:00” (1 hour) will be displayed, adjust the amount of time to
slow-cook.
3. Insert the Probe into the food, be sure to place the wire on the right side of the door.
4. Press START and the cooking cycle will begin.
5. Once the food reaches the internal target temperature, the slow cook time will display.
Menu
Menu function has 100 preprogrammed presets and 50 of your own unique recipes The
100 presets are listed in the Quick Start Guide and Recipe book.
Using the 100 Menu Presets
1. Press Menu, 1 will display, then select preset number. For presets 101-150, press
Menu twice and 101 will display.
2. If needed, adjust the temperature and time.
3. Press START to begin cooking.
• Some Menu presets may have more than one stage, press Stage button to select
each stage to view or adjust the temperature and time.
• The functions Sear, Preheat, Warm can be added to the preset but will not remain.
Making your own presets (101-150)
1. Set the temperature and time.
2. Press Menu twice, 101 will display.
3. Select preset number to be used.
4. Press and hold Menu until 2 beeps are heard, the temperature will display.
5. Press START to begin cooking.
• Can add functions Sear, Preheat, and Warm to the user preset.
Making presets from adjusted presets
1. Press Menu to preset number to edit. Adjust the temperature and time.
2. Press and hold Menu until 101 appears, then select preset number from 101-150.
3. Press and hold Menu until 2 beeps are heard.
14 | nuwavenow.com

ENGLISH
Stage
5 stages gives you the ability to cook your food at different temperatures throughout
the cooking process. The default for Stage 1 is 350°F for 15 minutes, and 350°F for 0
minutes for all subsequent stages.
1. Press Stage, Stage 1 will display..
2. Adjust the cooking temperature and time.
3. Press Stage again to add Stage 2.
4. Adjust the cooking temperature and time, then repeat until you have programmed all the
stages you need (up to 5 stages).
5. Press START/PAUSE to begin cooking process.
• You can add the probe and other functions to any stage.
• If time is not entered in a stage, that stage will be skipped.
Sear
Sear Can Sear before (Sear1), at the end (Sear 2), or both for the cooking process Default
temperature is 425F for 5 minutes, up to 30 minutes.
1. Adjust your cooking temperature and time.
2. Press Sear to engage the Sear 1 only, press again for both, Sear 1 2, press again for
Sear 2 only.
3. Adjustment for Sear temperature and time can be made for each sear.
4. Press START/PAUSE to begin the cooking cycle.
• When Sear 1 is selected, once the preheat has nished the sear will begin
• Once the Sear 1 cycle is nished, the Brio will automatically go into the cooking cycle.
Warm
Warm can be added to the regular cooking cycle, a Menu preset, Grill, or Rotisserie
functions. Default is 140°F for 1 hour. Range is 140’F-200°F, for 3 hours.
1. If needed adjust the temperature and time.
2. Press Warm, then set the temperature and time.
3. Once the cooking cycle completes, warm will begin.
• Warm can be added to the regular cooking cycle, a Menu preset, Grill, or Rotisserie
functions.
Using Warm Independently
The default is 140°F for 1 hour. Range is 140’F-200°F for 3 hours.
1. Press and hold Warm until 2 beeps are heard, the warming begins.
GENERAL USE
nuwavenow.com | 15
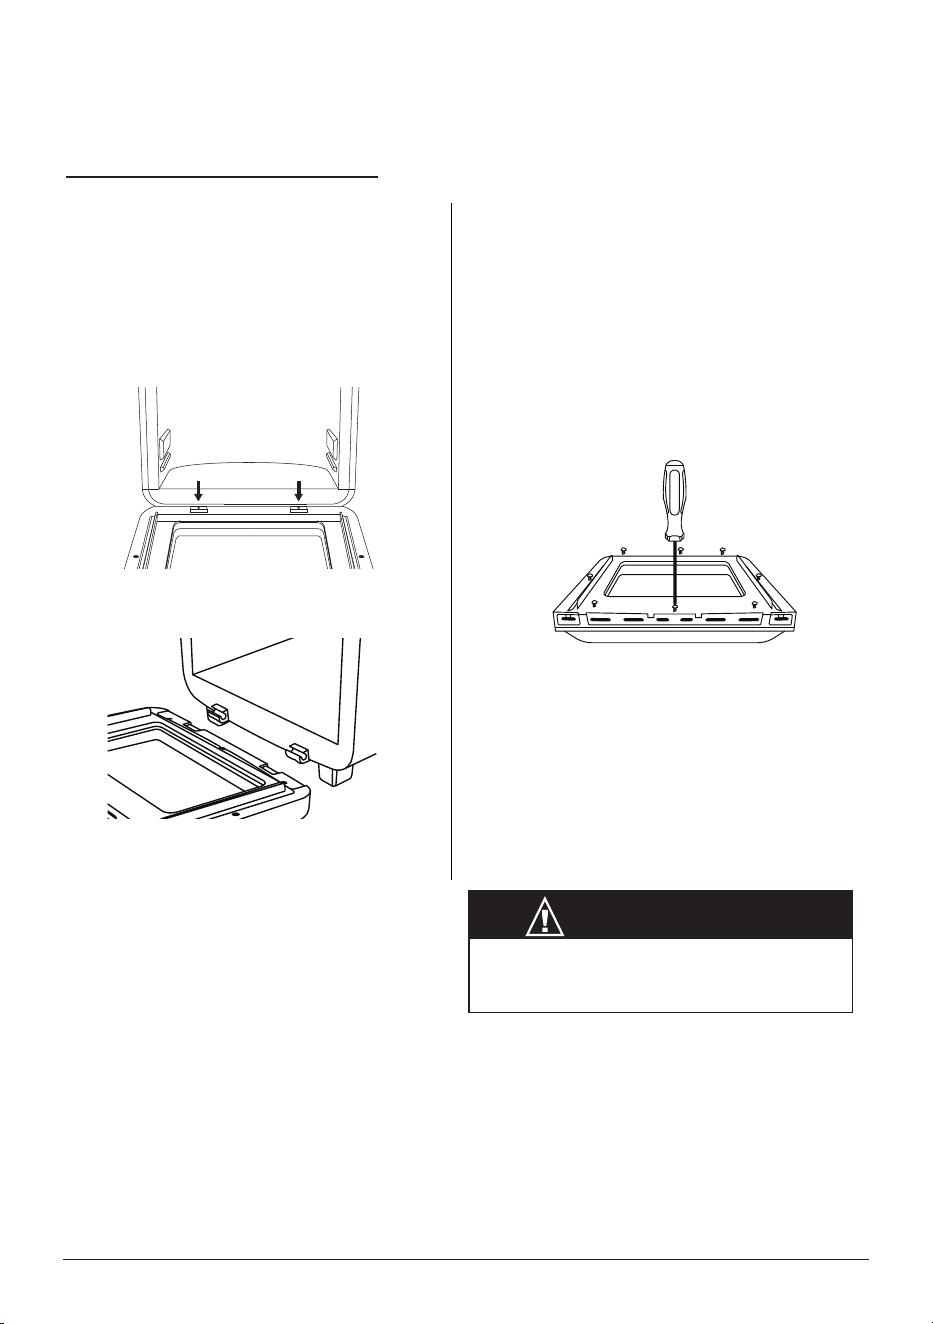
CLEANING & MAINTENANCE
To Remove the Plastic Window
1. The Brio Door can be disassembled
to clean the inner plastic window.
Fully open the Brio Door.
2. Using a screwdriver, unscrew the
screws around the inner Door border
(See below).
3. To reassemble the Plastic Window,
secure it with the screws.
Note: Do not disassemble the Door
unless it is absolutely necessary for
cleaning or maintenance. Do not use
abrasive material for cleaning as this can
damage the plastic window.
To Remove the Brio Door
1. Open the Brio Door.
2. Using a screwdriver, unscrew both
screws located at the Door hinge to
remove the Door (as shown in image
below).
3. Lift the door to unhook the hinges.
4. To put the Door back onto the Brio,
hook the hinges together and secure
them with the screws.
CAUTION
The Brio Door will be hot after use. Make sure
your Brio has completely cooled before any
cleaning and maintenance.
Removing the Door for Cleaning
16 | nuwavenow.com

ENGLISH
CLEANING & MAINTENANCE
Hand-wash
Clean your Brio after every use or in between a number of large batches. Do not use metal
utensils or harsh abrasives when cleaning as this can damage the coating.
1. Unplug the Brio and cool completely.
2. Use a damp cloth to wipe the outside of the appliance.
3. Clean the Mesh Tray, Mesh Racks, Drip Tray, Grill/Griddle Plate, Rotisserie Basket,
Rotisserie Skewer, and Door with a nonabrasive sponge, hot water, and mild
detergent. Dry thoroughly.
4. To clean the Probe, wipe it with a cloth dampened with soapy water. Repeat to rinse
and allow the Probe to dry
Tip: If there is residual food or particles on the Tray, Racks, Grill/Griddle Plate, Rotisserie
Skewer, or Basket, add some hot water and let the item soak separately for about 10
minutes for easier cleaning. Then, use a soft cleaning brush to remove any lingering food.
Dry all parts thoroughly.
Dishwasher
Bottom rack: Mesh Tray, Mesh Racks, Drip Tray and, Grill/Griddle Plate.
Top rack: Rotisserie Basket, Rotisserie Skewer.
Note: Water can get inside the Door if it is washed in the dishwasher. It is recommended
you hand-wash the Door.
MPORTANT - Do not immerse the Brio and door in water (water can get inside) or
attempt to cycle them through the dishwasher. It is recommended you hand-wash
only. The outer surface may be cleaned by carefully wiping it with a damp dishcloth or
sponge. Make sure the Brio has cooled completely prior to cleaning.
Light Bulb Replacement
1. Turn off and unplug the Brio. Ensure that the Brio, bulb cover, and the bulb have
cooled completely.
2. Unscrew the light bulb cover and light bulb.
3. Replace and appropriately discard the non-working bulbs.
Note: You can order the light bulb by contacting Customer Service.
• Use part number BGP1. The light bulb can also be purchased at your local hardware
store. The Brio uses an oven incandescent light bulb 25W - 120/125 Volt -T6 E14
screw.
CAUTION
The Brio Door will be hot after use. Make sure your Brio has completely cooled before any cleaning
and maintenance.
nuwavenow.com | 17

The Brio is not turning on or working.
1. Brio is not plugged in.
2. The Power button was not pressed.
Insert the plug into an appropriate grounded power socket. Press the Power button.
The ingredients are not completely cooked.
1. Too many ingredients were used.
2. The cooking temperature is too low.
3. The cooking time is too short.
Remove some ingredients from the Brio; air-fry smaller batches more evenly. Cook at a
higher temperature. Set the Brio to air-fry for a longer time.
The food is fried unevenly.
1. Certain types of ingredients need to be shaken or ipped halfway through the cooking
process.
Fried snacks are not crispy when they come out of the Brio.
1. The type of snack used was meant to be prepared in a traditional deep fryer.
Use snacks designed to be baked in a traditional oven, or lightly brush some oil onto the
snacks before placing them into Brio for crispier results.
White smoke is coming out of the Brio.
1. Frying greasy foods may cause white smoke to appear.
2. The Rack contains greasy residue from previous uses.
When preparing greasy ingredients in the air fryer, substantial amounts of oil can smoke
and inltrate the Brio. The oil will produce white smoke and the Brio might become hotter
than usual. This will not affect the nal cooking result. White smoke is caused by grease
heating up in the Brio. Make sure you clean the Riser and Rack properly after each use.
French fries are fried unevenly in the Brio.
1. You did not soak the potato sticks properly before air-frying them.
2. You did not use the right potato type, or they were not fresh.
Soak the potato sticks in a bowl of water for at least 30 minutes, remove them, and dry
them with paper towels. Use fresh potatoes and make sure they stay rm during air frying.
French fries are not crispy when they come out of the Brio.
1. The crispiness of the fries depends on the amount of oil and water in the fries.
Make sure you dry the potato sticks properly before adding oil. Cut the potato sticks
smaller and dry them for a crispier result. Put slightly more oil on the potatoes before
placing them in the Brio for crispier results.
TROUBLESHOOTING GUIDE
18 | nuwavenow.com

ENGLISH
Prb1
Probe not connected to the Brio. Plug the Probe into the Brio’s
Probe Jack.
Prb2
The Probe target internal temperature is set higher than set
cooking temperature.
Prb3
The Probe has short circuited.
Contact Customer Service at [email protected]
Prb4
The Probe sensor is not detecting temperature increase. Ensure
the Probe is inserted into the food and the food is in the unit while
cooking. Be sure that the Probe is not touching bone.
Prb5 the probe is plugged in with the Rotisserie function.
Error Message: Solution(s):
Er1
Temperature sensor has overheated. Turn the Brio off and
allow it to cool. If the Brio is not working after it cools down,
contact Customer Service.
Err1
Temperature Sensor has short circuited. Contact Customer
Service.
Err2 Temperature Sensor is open. Contact Customer Service.
TROUBLESHOOTING GUIDE
LIMITED WARRANTY
THE MANUFACTURER WARRANTS
Nuwave, LLC warrants that Brio
®
Air Fryer 15.5Q capacity will be free from manufacturer
defects for 1 year from the date of purchase, under normal household use, and when
operated in accordance with the Manufacturer’s written instructions This Limited Warranty
covers for the Original Purchaser only. The Manufacturer will provide the necessary parts
and labor to repair the product at the Nuwave LLC Service Department. After the expiration
of the warranty, the cost of the parts and labor will be the responsibility of the owner.
nuwavenow.com | 19

LIMITED WARRANTY
THE WARRANTY DOES NOT COVER
The Limited Warranty is voided if repairs are made by an unauthorized dealer, or the
serial number data plate is removed or defaced. Normal deterioration of nish due to use
or exposure is not covered by this Warranty. This Limited Warranty does not cover failure,
damages or inadequate performance due to accident, acts of God (such as lightning),
uctuations in electric power, alterations, abuse, misuse, misapplications, corrosive-
type atmospheres, improper installation, failure to operate in accordance with the
Manufacturer’s written instructions, abnormal use, commercial or rental uses, or resold
units. Nuwave LLC reserves the right to void the Limited Warranty, where allowable by
law, for products purchased from an unauthorized dealer.
TO OBTAIN SERVICE
The owner shall have the obligation and responsibility to pay for all services and parts
not covered by the warranty; prepay the freight to and from Service Department for any
part or system returned under this warranty; and carefully package the product using
adequate padding material to prevent damage in transit. The original container is ideal
for this purpose. Include in the package the owner’s name, address, daytime telephone
number, a detailed description of the problem, and RGA (Return Goods authorization
number). To obtain the RGA number, email us at: [email protected]
Provide the product model & serial number and proof of date of purchase (a copy of the
receipt) when making claims under this warranty.
MANUFACTURER’S OBLIGATION
The Manufacturer’s obligation under this Limited Warranty is limited, to the extent
allowable by law, to repairing or replacing any part covered by this Limited Warranty
which upon examination is found to be defective under normal use. The Limited
Warranty is applicable only within the continental United States and only to the original
purchaser of the manufacturer’s authorized channels of distribution.THE LIMITED
WARRANTY MAY NOT BE ALTERED, VARIED OR EXTENDED EXCEPT BY A
WRITTEN INSTRUMENT EXECUTED BY THE MANUFACTURER. THE REMEDY OF
REPAIR OR REPLACEMENT AS PROVIDED UNDER THIS LIMITED WARRANTY IS
EXCLUSIVE. IN NO EVENT SHALL THE MANUFACTURER BE LIABLE FOR ANY
CONSEQUENTIAL OR INCIDENTAL DAMAGES TO ANY PERSON, WHETHER OR
NOT OCCASIONED BY NEGLIGENCE OF THE MANUFACTURER, INCLUDING
WITHOUT LIMITATION, DAMAGES FOR LOSS OF USE, COSTS OF SUBSTITUTION,
PROPERTY DAMAGE, OR OTHER MONEY LOSS.
Some states do not allow the exclusion or limitation of incidental or consequential
damages, so the above limitation exclusions may not apply. This Limited Warranty gives
specic legal rights, and there may also be other rights which vary from state to state.
EXCEPT AS OTHERWISE EXPRESSLY PROVIDED ABOVE, THE MANUFACTURER
MAKES NO WARRANTIES EXPRESSED OR IMPLIED ARISING BY LAW OR
OTHERWISE, INCLUDING WITHOUT LIMITATION, THE IMPLIED WARRANTIES OF
MERCHANTABILITY AND FITNESS FOR A PARTICULAR PURPOSE TO ANY OTHER
PERSON. READ YOUR OWNER’S MANUAL. IF YOU STILL HAVE ANY QUESTIONS
ABOUT OPERATION OR WARRANTY OF THE PRODUCT, PLEASE CONTACT
NUWAVE LLC.
20 | nuwavenow.com

ENGLISH
LIMITED WARRANTY
DISPUTE RESOLUTION PROCEDURE
For disputes relating to use of the website or use or purchase of a Nuwave product or
service (collectively “Disputes”), you agree to rst contact Nuwave LLC at
legal@nuwavenow.com. If we cannot resolve your dispute informally, any and all disputes
shall be submitted to nal and binding arbitration. You may start the arbitration process by
submitting in writing a demand to the American Arbitration Association (“AAA”) and sending
a copy to Nuwave. Nuwave will pay all ling costs. A single arbitrator of the AAA will
conduct the arbitration in a location convenient to you or by phone. The arbitrator’s award
will be binding and may be entered as a judgment in a court of competent jurisdiction.
The arbitration will be conducted in accordance with the provisions of AAA’s Commercial
Arbitration Rules and Mediation Procedures in effect at the time of submission of your
demand for arbitration. See https://www.adr.org/sites/default/les/CommercialRules_Web.
pdf. Except as may be required by law as determined by an arbitrator, no party or arbitrator
may disclose the existence, content, or results of any arbitration hereunder without prior
written consent of both parties.
A. WAIVER OF RIGHT TO SUE. By agreeing to arbitration, you understand that, to
the maximum extent permitted by law, you are agreeing to waive your right to le
suit in any court, to a court hearing, a judge trial, or a jury trial.
B. CLASS ACTION WAIVER. To the maximum extent permitted by law, you expressly
agree to refrain from bringing or joining any claims in any representative or class-
wide capacity, including but not limited to, bringing or joining any claims in any class
action or class-wide arbitration.
C. OPT OUT PROCEDURE. To request to opt out of arbitration you must contact
Nuwave LLC at legal@nuwavenow.com, Nuwave LLC, 560 Bunker Ct., Vernon
Hills, IL 60061, U.S.A. You will have thirty (30) days from the date of product
delivery to opt out of arbitration with respect to any dispute arising out of or relating
to use or purchase of any Nuwave product. If more than 30 days have passed, you
are not eligible to opt out of arbitration and will have waived your right to sue or
participate in a class action with respect to the dispute arising out of your purchase
or use of a Nuwave product. For any dispute arising out of your use of Nuwave’s
website, you have thirty (30) days from the date you provided information to the
website to opt out of arbitration. If more than 30 days have passed, you are not
eligible to opt out of arbitration and you will have waived your right to sue and
participate in a class action with respect to the dispute arising out of your use of
Nuwave’s website.
D. SOME MATTERS ARE NOT SUBJECT TO ARBITRATION. Notwithstanding the
foregoing, the following shall not be subject to arbitration and may be adjudicated
only in the state and federal courts of Illinois: (i) any dispute, controversy, or claim
relating to or contesting the validity of our intellectual property rights and proprietary
rights, including without limitation, patents, trademarks, service marks, copyrights,
or trade secrets; (ii) an action by a party for temporary, preliminary, or permanent
injunctive relief, whether prohibitive or mandatory, or other provisional relief; or (iii)
interactions with governmental and regulatory authorities. You expressly agree
nuwavenow.com | 21

LIMITED WARRANTY
to refrain from bringing or joining any claims in any representative or class-wide
capacity, including but not limited to, bringing or joining any claims in any class
action or any class-wide arbitration.
100 Presets
Beef/Pork
(Refer to Recipe Book for Preset #1-27)
Rack
Position
Temp.
Time
(Min.)
Probe
1. Prime Rib* (Rare) 2 425°F 120°F
2. Prime Rib* (Medium Rare) 2 425°F 130°F
3. Prime Rib* (Medium) 2 425°F 135°F
4. Prime Rib* (Medium Well) 2 425°F 145°F
5. Prime Rib* (Well) 2 425°F 165°F
6. Rotisserie Prime Rib* (Rare) 425°F 120°F
7. Rotisserie Prime Rib* (Medium Rare) 425°F 130°F
8. Rotisserie Prime Rib* (Medium) 425°F 135°F
9. Rotisserie Prime Rib* (Medium Well) 425°F 145°F
10. Rotisserie Prime Rib* (Well) 425°F 165°F
11. Rotisserie Cuban Pork Loin* (Medium Well) 375°F 145°F
12. Rotisserie Cuban Pork Loin* (Well) 375°F 165°F
13. Classic Bacon Cheeseburger* (Rare) 2 425°F 120°F
14. Classic Bacon Cheeseburger* (Medium Rare) 2 425°F 130°F
15. Classic Bacon Cheeseburger* (Medium) 2 425°F 135°F
16. Classic Bacon Cheeseburger* (Medium Well) 2 425°F 145°F
17. Classic Bacon Cheeseburger* (Well) 2 425°F 165°F
18. Grilled Chimichurri Skirt Steak* (Well) 2 425°F 165°F
19. Spicy Rumaki* 2 360°F 12
20. Apple Glazed Pork Tenderloin* (Medium Well) 2 425°F 145°F
21. Apple Glazed Pork Tenderloin* (Well) 2 425°F 165°F
22. Grilled Ham and Cheese* 2 400°F 6
23. Party Meatballs* 2 400°F 15
24. Peppered Beef Tenderloin* 400°F 8
25. Philly Cheese Steak Braid* 2 375°F 13
26. Rotisserie Smoked Bacon-Wrapped Pork Tenderloin* (Medium Well) 375°F 145°F
27. Rotisserie Smoked Bacon-Wrapped Pork Tenderloin* (Well) 375°F 165°F
Poultry
(Refer to Recipe Book for Presets #28-36)
Rack
Position
Temp.
Time
(Min.)
Probe
28. Lemon-Thyme Rotisserie Chicken* 350°F 165°F
29. Buffalo Chicken Wings* 3 300°F 20
30. Spinach-Stuffed Chicken* 2 400°F 165°F
31. Chicken Satay* 2 400°F 7
32. Grilled Chicken Tenders* 2 400°F 165°F
33. Parmesan Chicken Tenders* 2 400°F 165°F
34. Butter-Infused Chicken* 2 375°F 165°F
35.
Rotisserie Game Hens with Roasted
Carrots and Caraway*
350°F 165°F
36. Southern Fried Chicken Thighs* 2 400°F 165°F
22 | nuwavenow.com

ENGLISH
100 Presets
Fish/Seafood
(Refer to Recipe Book for Presets #37-38)
Rack
Position
Temp.
Time
(Min.)
Probe
37. Rotisserie Swordsh Steak with Charred Lemons* 360°F 145°F
38. Cajun Shrimp* 2 360°F 6
Vegetables/Snacks
(Refer to Recipe Book for Presets #39-51)
Rack
Level
Temp.
Time
(Min.)
Probe
39.
Home Fries*
3 390°F 14
40.
Rotisserie Roasted Summer Vegetables*
425°F 6
41. Air Fry Tortillas* 425°F 3
42. Green Beans* 3 425°F 10
43. Pasta Bake* 2 390°F 10
44. Roasted Tomatoes 2 390°F 20
45. Santa Fe Stuffed Bell Peppers* 2 360°F 165°F
46. Kale Chips* 3 390°F 4
47. Roasted Root Vegetables* 3 330°F 35
48. Twice Baked Potatoes* 1 390°F 78
49. Roasted Brussels Sprouts* 2 390°F 11
50. Dehyrated Vidalia Onions 2 120°F 10 hrs
51. Dried Roma Tomatoes 2 145°F 10 hrs
52. Dried Raw Almonds 2 and 3 150°F 24 hrs
53. Dehydrated Baby Banana Chips 2 and 3 135°F 8 hrs
Desserts
(Refer to Recipe Book for Presets #52-58)
Rack
Position
Temp.
Time
(Min.)
Probe
54. Banana and Nutella Wontons* 2 350°F 7
55. Pineapple Crescent* 2 350°F 10
56. Apple Pie Egg Rolls* 2 390°F 10
57. Berry Cheesecake Egg Rolls* 2 390°F 10
58. Apple Pie* 1 320°F 30
Grilled Foods
(Refer to Recipe Book for Presets #59-71)
Rack
Position
Temp.
Time
(Min.)
Probe
59. Griddled Chicken and Pepper Quesadillas* 2 425°F 3
60. Griddled Turkey Sandwich* 2 350°F 2
61. Grilled Atlantic Salmon* 2 425°F 145°F
62. Grilled Bluen Tuna* 2 425°F 145°F
63. Grilled Chicken Breast* 2 425°F 165°F
64. Grilled Filet Mignon* (Rare) 2 425°F 120°F
65. Grilled Filet Mignon* (Medium Rare) 2 425°F 130°F
66. Grilled Filet Mignon* (Medium) 2 425°F 135°F
67. Grilled Filet Mignon* (Medium Well) 2 425°F 145°F
68. Grilled Filet Mignon* (Well) 2 425°F 165°F
69. Grilled Polish Sausage* 2 425°F 160°F
70. Grilled Spiced-Rubbed Pork Chops* (Medium Well) 2 425°F 145°F
71. Grilled Spiced-Rubbed Pork Chops* (Well) 2 425°F 165°F
Frozen Foods (Presets #72-91 under “Frozen Quick Meals”)
Rack
Position
Temp.
Time
(Min.)
Probe
92. Regular Fries, 1/2 bag 2 390°F 21
93. Regular Fries, 1/2 bag, extra crispy 2 390°F 23
94. Regular Fries, full bag 2 390°F 24
95. Regular Fries, full bag, extra crispy 2 390°F 26
96. Mini Pancakes 2 375°F 5
97. French Toast 2 390°F 11
98. Wafe 2 390°F 5
99. Pretzels 2 390°F 4
100. Churro 2 375°F
10
nuwavenow.com | 23

AIR FRYER
Master Your Brio Air Fryer
Scan the code to find recipes,
how-to videos and more!
Item No: BM38021
V2-JL
07-31-24
FOR HOUSEHOLD USE ONLY
120VAC, 60Hz, 1800 Watts
For patent information please go to:
www.nuwavenow.com/legal/patent
Designed & Developed in USA
Nuwave LLC
560 Bunker Ct.
Vernon Hills, IL 60061, U.S.A.
Made in China
©2024 Nuwave LLC • All Rights Reserved.
www.nuwavenow.com
Customer Service: support@nuwavenow.com
Questions or Concerns?
1-888-502-7805
Mon-Fri 7:30am-4:30pm CST