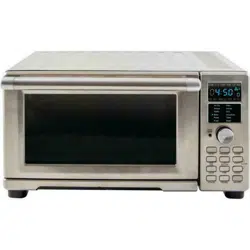
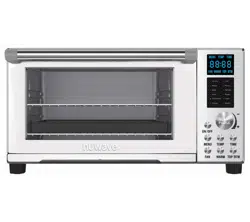
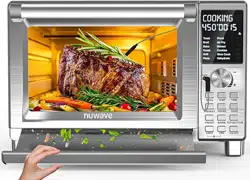
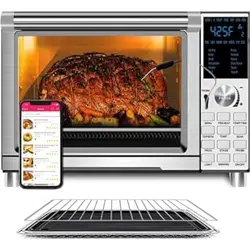
User Manual for Air Fryer Oven
12 PRESETS
|
Air Fry Automatic
Preheats to 450F
• Default Temp: 360F
• Default Time: 15 min.
• Heat Source: High Fan (level 3)
• Rack Position: 1, 2, or 3
|
Pizza
Automatic Preheats to 450F
• Default Temp: 400F
• Default Time: 15 min.
• Heat Source: Top/Bottom (30/100 percent)
• Will have a preheat
• Rack Position: 1 or 2. (For crispier results use position 1.)
• Note: Times & temps will vary on the size of the pizza.
|
|
Bake
Automatic Preheats to 450F
• Default Temp: 350F
• Default Time: 25 min.
• Heat Source: Top/Bottom (100/100 percent)
• Will have a preheat
• Rack Position: 1, 2, or 3
|
Reheat
• Default Temp: 350F
• Default Time: 10 min.
• Heat Source: Top/Bottom (100/100 percent)
• Rack Position: Any
|
|
Broil
Automatic Preheats to 450F
• Default Temp: 500F
• Default Time: 5 min.
• Heat Source: Top (100 percent)
• Rack Position: 2 or 3
|
Roast
Automatic Preheats to 450F
• Default Temp: 375F
• Default Time: 30 min.
• Heat Source: Top/Bottom (100/100 percent)
• Will have a preheat
• Rack Position: 1
|
|
Dehydrate
• Default Temp: 100F
• Default Time: 2 hours
• Heat Source: Medium Fan (level 2)
• Rack Position: Any
|
Slow Roast
• Default Temp: 275F
• Default Time: 1 hour
• Probe: 165F
• Heat Source: Top/Bottom (100/100 percent)
• Rack Position: 1, 2, or 3
|
|
Frozen Automatic Preheats to 450F
• Default Temp: 375F
• Default Time: 30 min.
• Heat Source: Top/Bottom (100/100 percent)
• Rack Position: Any
|
Toast Automatic Preheats to 450F
• Default Temp: 425F
• Default Time: 5 min.
• Heat Source: Top/Bottom (100/100 percent)
• Rack Position: 3
|
|
Grill Automatic Preheats to 450F Default Temp: 425F
• Default Time: 15 min.
• Heat Source: Top/Bottom (50/100 percent)
• Will have a preheat to 450F
• Rack Position: 1
|
Yogurt*
*Refer to page 25 for directions.
|
If Automatic Preheat is turned off the Presets will not preheat automatically.
To convert from Fahrenheit to Celsius press SEAR and TEMP/ TIME. Do the same to switch back.
Note:
• The uni preheats to the default temperature of menu program. To turn off automatic preheat, press PREHEAT and preheat will turn off.
• NEVER Allow any food to touch the heating elements directly.
• Default temperatures, times, and rack positions are a guide. Adjustments may need to be made to reach desired result.
• Fan speed of High (level 3) is the default setting unless speed is adjusted. Dehydrate should be the lowest fan setting (level 1).
MEASUREMENT CHART
|
Teaspoon = t
|
Fahrenheit = °F
|
Minute = min
|
|
Tablespoon = T
|
Celsius = °C
|
Second = sec
|
|
Cup = c
|
Fluid Ounces = fl oz
|
Inch = in.
|
|
Ounce = oz
|
Liter = L
|
Dozen = doz
|
|
Pound = lb(s)
|
Milliliter = ml
|
Hour = hr
|
|
Quart = qt
|
Package = pkg.
|
Gram = g
|
|
Pint = pt
|
Gallon = gal
|
Kilogram = kg
|
PROBE TEMPERATURE CHART

Helpful Hints
1. To add more time during current cooking cycle, turn START/ PAUSE clockwise. Monitor your food to ensure it doesn't overcook.
2. Some moisture may appear on the Bravo’s door during certain cooking cycles.
3. When air-frying, food can be lightly coated with oil beforehand to boost crispiness and browning.
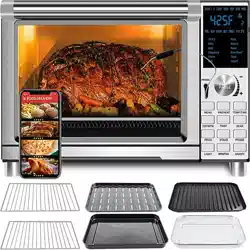
PARTS & ACCESSORIES

1.Base Part #: 26815
2. Handle
3. Digital Display Menu
4a. Probe Input (Jack)
4b. Temperature Probe Part #: 26808
5. Dial
6. Functions
7. Pull-Out Crumb Tray Part #: 26801
8. 2 Heavy-Duty Cooking Racks Part #: 26802
9. Enamel Baking Pan and Enamel Broiler Rack Part #: 26804
10. Air Fry Basket Part #: 26806
11. Light Bulb Part#: 26807
12. Light Bulb Cover Part#: 26809
ASSEMBLY GUIDE
1. Place the Bravo on a level, even, and stable heat-resistant surface.
2. Slide the Cooking Rack(s) into Position 1, 2, 3, or 4 of the Bravo.
3. Place Baking Pan with Broiler Rack on Cooking Rack in Position 1.
4. Place the Air Fry Basket on top of Baking Pan. It is recommended to use Air Fry Basket with Baking Pan to optimize cooking results.
5. Place Crumb Tray into position by sliding it into slot at bottom of Oven. To remove, push down slightly and pull out.
6. Plug the appliance into a standard wall socket. The power plug is located in the rear of the unit.
Note:
Do not cover or block the intake air vents located in the back and sides of the Bravo, as doing so can prevent proper ventilation.

QUICKSTART
ON/OFF
Turns the Bravo ® ON and OFF. This also stops any cooking function. While cooking press ON/OFF to cancel.
MENU
Choose between the 12 cooking menu options. Turn START/PAUSE to choose between each.
PREHEAT
Heats to a desired temperature. By default the preheat temperature is set to 350F.
TEMP/TIME
Use start/pause turn clockwise to increase, counterclockwise to decrease. Allows you to adjust temperature and time before and during the cooking process. To convert from Fahrenheit to Celsius press SEAR and TEMP/TIME. Do the same to switch back.
• Days/Hours: To switch the timer to Days and Hours press PROG andbTEMP/TIME, to go back to Hours and Minutes press PROG and TEMP/ TIME again.
• TIME format: You can change the format to display minutes and seconds (ex 10:59, 10 minutes and 59 seconds). Press and hold TIME for 1 second, if you press it again it will go back to the default setting.
Note: To adjust the default temperature, press and hold START/PAUSE for 1 second and adjust. This will be the new default temperature.
To adjust the default time press TIME then press and hold START/PAUSE for 1 second and adjust. This will be the new default time.
TOP/BTM
Adjusts the temperatures of the top and bottom heating elements. Default is set to 100/100.
TOAST
Select between 10 levels. Default is Level 5, 425F for 5 minutes. Lower the number with the START/PAUSE dial for lighter toast or raise it for darker toast.
SEAR
Sears your food before the initial cooking process to preserve juices. Default is 450F for 5 minutes.
PROG
Gives you access to 100 cooking presets and allows you to store an additional 50 of your own. Refer to the Program section.
WRM/FAN
• WRM: Keeps your favorite leftovers warm after cooking. Default temperature 140F, default time1 hour, up to 3 hours 50F-200F.
• FAN: Adjust between 0 and 3 fan speeds.
STAGE
Lets you cook at different temps and times throughout the cooking process. PROBE Use the included Digital Probe for perfect results every time.
LIGHT
Turns the internal light on and off.
Note: Refer to INSTRUCTIONS for detail explanation for each button and features.
INSTRUCTIONS
Getting Started
1. Press ON/OFF once to turn your Bravo on.

2. Press START/PAUSE to begin cooking at 350F for 15 minutes, which are the default settings.
• 357F will be displayed and a countdown will begin.
• To adjust cooking temperature, turn the START/PAUSE Dial clockwise to increase, or counterclockwise to decrease temperature in 5F increments. Quickly turn the Dial to adjust in larger increments.
• Both the cooking temperature and time can be adjusted during cooking by pressing TEMP/TIME then turning the START/ PAUSE Dial to adjust each.
3. Press START/PAUSE once during cooking to pause.
4. Press START/PAUSE a second time to resume cooking.
• Remaining cooking time will be displayed and the countdown will continue.
Setting the Clock
1. Press PREHEAT and TEMP/TIME at the same time.
2. Turn the START/PAUSE to set the clock. When 12:00 is reached, PM will be displayed. Unplug the Bravo to cancel the clock.
Displaying Clock During Cooking:
1. Press PREHEAT and TEMP/TIME at the same time. The display will show the current time.
• Time can be adjusted by turning START/PAUSE.
• The clock time will remain displayed until START/PAUSE button is pressed.
WRM/FAN
FAN – Level 3, High (Full) Speed

1. Press and hold WRM/FAN for 1 second. 3 above STG and FAN will be displayed.
2. Rotate the START/PAUSE dial to adjust the fan speed.
3. To turn the fan off, press and hold WRM/FAN for 1 second until the icon is no longer displayed.
WRM (WARM)
1. Press ON/OFF.

2. Press WRM/FAN. Default is 140F for 1 hour (“01:00”). ����� �����
• Adjust warming temperature/time by turning START/PAUSE clockwise to increase, or counterclockwise to decrease temperature in 5F increments. Quickly turn Dial to adjust in larger increments. Temperature range is 50F ~ 200F.
• WRM will be displayed when Warm function is used.
3. Press START/PAUSE to begin cooking.
Notes:
• The fan is not on during the Warm function.
• Warm will always be the last cooking function executed by the Bravo. For example, the order of cooking functions: Preheat » Sear 1 » Regular Cooking Cycle » Sear 2 » Warm » End.
Independent WARM
This feature will keep your food warm for up 3 hours.
1. Press WRM/FAN and TOP/ BTM at the same time to turn Individual WARM feature.
2. Default time is 1 hr max is 3 hr.
3. 50F - 200F is the temperature range.
TOP/BTM
Default – Top 100%, Bottom 100%. This refers to the amount of heat coming from the top and bottom heating elements.
1. Press ON/OFF.

2. Press TOP/BTM, 100 and TOP will be displayed. Adjust the amount of heat �coming from the top heating element by turning START/PAUSE. Adjustable in 10% increments.
3. Press TOP/BTM again, 100 and BTM will be displayed. Adjust the amount of heat coming from the bottom heating element by turning START/PAUSE. Adjustable in 10% increments.
4. After top and bottom heat percentages have been chosen, press START/ PAUSE.
Note: While using Broil from the MENU, the BTM power is not adjustable. The Broil function only uses the TOP heating element.
TEMP/TIME
Default – 350F, 15 minutes

1. Press TEMP/TIME once.
• Turn the START/PAUSE clockwise to increase time in 1-minute increments. Quickly turn the Dial to adjust in��larger increments.
• Turn the START/PAUSE counterclockwise to decrease time in 1-minute increments. Quickly turn the dial to adjust in larger increments.
• Time range is 99 hours, 99 minutes (“00:00”–“99:99”).
2. Press TEMP/TIME, 350F and TEMP will be displayed.
• Turn the START/PAUSE clockwise to increase temperature in 5F increments. Quickly turn the dial to adjust in larger increments.
• Turn the START/PAUSE counterclockwise to decrease temperature in 5F increments. Quickly turn the dial to adjust in larger increments.
3. Press START/PAUSE to begin cooking.
4. When the Bravo is finished cooking your food, End will be displayed and the unit will beep three times.
Notes:
• Press TEMP/TIME to see current cooking temperature and current remaining cooking time.
• START/PAUSE can be turned in conjunction with pressing TEMP/TIME to adjust your temperature and time during cooking.

PREHEAT
1. Press ON/OFF. Adjust cooking temperature and cooking time.

• Turn START/PAUSE clockwise to increase temperature in 5F increments. Quickly turn the dial to adjust in larger increments.
• Turn START/PAUSE counterclockwise to decrease temperature in 5F increments. Quickly turn the dial to adjust in larger increments.
2. Press PREHEAT.
3. Press START/PAUSE to begin preheating.
• When the preheat temperature is reached, the unit will beep twice, display “Rdy”, and a 10 second countdown will begin. When the countdown ends, the unit will automatically start cooking at the set cooking temperature.
4. Carefully place food into the Bravo.
Notes:
• Cook time and cook temperature can be adjusted during preheat or after preheat temperature is reached.
• If using a Preprogrammed Menu function with a built-in preheat, after a countdown ends, press START/PAUSE and turn to change regular cooking time. (See Preprogrammed Menu Functions.)
AUTO PREHEAT
1. Press MENU and PREHEAT at the same time to turn on Auto Preheat.
• Auto Preheat will automatically preheat the Bravo to the set cooking temperature.
• After it has reached the set cooking temperature, Bravo will go into a 5-minute countdown just like the typical PREHEAT function.
• After the countdown, the Bravo will cook at the set cooking temperature and cooking time.
2. To turn off Auto Preheat press MENU and PREHEAT at the same time.
DELAY
Default – 1 hour.

1. Press ON/OFF
2. Press PROG and TOP/ BTM
• Adjust delay time by turning START/PAUSE clockwise to increase time in 1-minute increments or by turning START/PAUSE counterclockwise to decrease time in 1-minute increments. Quickly turn the dial to adjust in larger increments.
• Maximum delay time is 24 hrs. (“24:00”).
3. Press START/PAUSE to begin delay time countdown.
• The set delay time will be displayed with a countdown.
4. Once delay countdown is complete, the Bravo will begin cooking at set cooking temperature and time (default is 350F for 15 minutes).
Using Delay with Cooking Function
Example 1: Delay cooking 40 minutes, cook at 360F for 20 minutes.
1. Press TEMP/TIME. Adjust cooking temperature to 360F.
2. Press TEMP/TIME a second time. Adjust cooking time to 20 min.
3. Press PROG and TOP/ BTM at the same time. Adjust Delay time to 40 min.
4. Press START/PAUSE. The Bravo will delay for 40 minutes, then begin to cook at 360F for 20 minutes.
Example 2: Delay cooking 60 minutes (1 hour), cook at 400F for 10 minutes.
1. Press TEMP/TIME. Adjust cooking temperature to 400F.
2. Press TEMP/TIME a second time. Adjust cooking time to 10 min.
3. Press PROG and TOP/ BTM at the same time. Adjust Delay time to 1 hr.
4. Press START/PAUSE. The Bravo will delay for 1 hr, then begin to cook at 400F for 10 minutes.
5. When the Bravo is finished, “End” will be displayed and the unit will beep three times.
Note: Delay will always be the first function executed by the Bravo.
MENU

1. Press ON/OFF.
2. Press MENU. Selected setting will be flashing.
3. To select from the menu turn START/PAUSE or press MENU.
4. Once desired menu is chosen, press START/ PAUSE to begin cooking. The cooking time will be displayed.
• When the Bravo is finished cooking, End will be displayed and the unit will beep three times.
• Turn START/PAUSE to adjust temperature and time, if necessary.
• You can adjust the temperature and time for any menu option with a built-in preheat (See 12 Preprogrammed Menu chart.)
Notes:
• Some Menu options require preheating. This step is preprogrammed into each Menu option that requires it. Menus with built-in preheat include “Air Fry”, “Bake”, “Pizza”, “Frozen”, “Toast”, “Broil”, “Grill”, and “Roast”.
• Once preheat temperature is reached, the Bravo will beep, 5 will be displayed, and a 5-minute countdown will begin.
SEAR: Default — 450F, 5 minutes.
SEAR 1

This is set to default BEFORE the regular cooking stage.
1. Press ON/OFF.
2. Press SEAR once, 1 will be displayed.
3. Press START/PAUSE. SEAR 1 will be displayed, colon (:) will flash.
• The unit will cook at 450F for 5 min. (SEAR 1), cook at 350F for 15 min. (default), display End, and beep three times, indicating that your cooking is complete.
Note:
• Regular cooking stage temperature and time can be adjusted by turning START/ PAUSE after Step 1.
SEAR 1 2
1. Press ON/OFF.
2. Press SEAR twice. 450F, TEMP, and SEAR 1 and 2 will be displayed.
3. Press START/PAUSE. SEAR 1 will be displayed and colon (:) will flash. TIME, TOP, and BTM will be displayed.
• The unit will cook at 450F for 5 min. (SEAR 1), cook at 350F for 10 min. (default), and cook again at 450F for 5 min. (SEAR 2). SEAR 2 will be displayed, colon (:) will flash, End will be displayed, and the unit will beep three times, indicating your cooking is complete.
SEAR 2

Sear 2 will always be the stage AFTER the regular cooking stage.
1. Press ON/OFF.
2. Press SEAR three times, 2 will be displayed.
• Press START/PAUSE. The unit will cook at 350F for 15 min. (default), cook at 450F for 5 min. (SEAR 2), display End, and beep three times, indicating your cooking is complete.
Notes:
• Press SEAR four times to clear out Sear function.
• Maximum time for all Sear functions is 30 min. (“00:30”).
• Maximum temperature for all Sear functions is 500F.
STAGE

You can program a maximum of 5 stages.
1. Press ON/OFF.
2. Press STAGE.
• Press TEMP/TIME. Turn START/PAUSE to adjust this stage’s cooking temperature and time.
3. Press STAGE again to program another stage of cooking.
• Press TEMP/TIME. Turn START/PAUSE to adjust this stage’s cooking temperature and time.
4. Press START/PAUSE to begin cooking the stages programmed.
SEAR 1, SEAR 1 2, DELAY, and WARM with STAGE COOKING
Example: Delay for 1 hour » adjust to 350F (Sear 1) for 4 min. » Cook at 325F for 20 min. (Stage 1) » Cook at 300F for 40 min. (Stage 2) » Cook at 350F for 10 min. (Stage 3) » Cook at 400F for 5 min. (Sear 1 2) » WARM at 125F for 30 min.
1. Press ON/OFF. Adjust temperature to 325F by turning START/PAUSE, 350F is the default.

2. Press TEMP/TIME. Adjust time to 20 min. by turning START/PAUSE.

3. Press PROG and TOP/BTM at the same time to set delay. Turn START/PAUSE to adjust time to 1 hour (“01:00”).

4. Press SEAR once. Turn START/PAUSE to adjust temperature to 350F. Press TEMP/TIME. Turn START/ PAUSE to adjust time to 4 min. 1 will be displayed.
5. Press STAGE. Turn START/PAUSE to adjust temperature to 300F. Press TEMP/TIME. Turn START/ PAUSE to adjust time to 40 min.
6. Press STAGE again. Turn START/PAUSE to adjust temperature to 350F. Press TEMP/TIME. Turn START/ PAUSE to adjust time to 10 min.
7. Press SEAR again. Turn START/PAUSE to adjust temperature to 400F. Press TEMP/TIME. Turn START/ PAUSE to adjust time to 5 min., 2 will flash.
8. Press WARM. Turn START/ PAUSE to adjust warming temperature to 125F. Press TEMP/TIME. Turn START/ PAUSE to adjust warming time to 30 min.
9. Press START/PAUSE to begin the cooking process.
Notes:
• During cooking, the Bravo will display all functions programmed for that cooking cycle. The function that the Bravo is currently cooking in will flash.
• The remaining time for that function or stage will count down and colon (:) will flash. The remaining functions for that cycle will remain displayed.
LOCK
Lock is used to stop the function of the Bravo. While in Lock mode, your Bravo’s buttons will not respond to any action until the unit is unlocked.

1. Press ON/OFF. Set cooking temperature. (See TEMP/TIME.)
2. To lock unit functions, press PROG and STAGE at the same time. Remaining cooking time will be displayed.
• NO buttons will function during Lock except LIGHT and ON/OFF.
3. To unlock your Bravo’s functions, press PROG and STAGE at the same time once again. The Bravo will unlock and LOC be displayed.
• ON/OFF button will work during Lock function if the Bravo needs to be turned off.
PROBE
The digital Temperature Probe is used to show an accurate internal temperature of food. Default – 165F.

1. Insert end of Temperature Probe into your food. Place food in oven. Leave enough of the wire to exit the oven over the top of the door.
2. Insert the Probe into the Probe Input (Jack).
3. Press ON/OFF. Adjust desired cooking temperature.
4. Press and hold PROBE for 1 second.
5. Adjust the Probe temperature to the desired internal cooked temperature. Temperature range is 50F ~ 212F.
Note:
The Bravo will cook your food until Probe temperature is reached. If time runs out before Probe temperature is reached, the unit will continue to cook until Probe temperature is achieved.
6. Press START/PAUSE. The current internal Probe temperature will be displayed.
7. Press TEMP/TIME to display the set cooking temperature, default is 350F.
• Press hold PROBE for 1 sec. to display the set temperature of the Probe. Turn START/ PAUSE to adjust temperature, if desired.
• Press PROBE to display the current internal temperature of your food.
8. Once the set temperature of the Probe is reached, the Bravo will stop cooking and End will be displayed.
Notes:
• When the Probe is unplugged and PROBE is pressed, Prb1 (error) will be displayed and the unit will beep three times. This indicates PROBE was pressed but that the Probe plug was not inserted into the Probe Input (Jack).
• If your cooking temperature is set lower than the set Probe Temperature, and START/PAUSE is pressed, Prb2 (error) will be displayed and the unit will beep three times.
• If Probe temperature was not reached after preset cooking time finished, the unit will continue cooking. To see remaining cooking time, press TEMP/TIME twice (if not cooking within a timed countdown). ON will be displayed and stay at ON, indicating that the preset cooking time has run out.

Using Sear 1 2 with Probe Example: Sear 1 » Stage 1,2,3 » Sear 2 » Warm » Probe temperature 200F. If Probe temperature achieved 200F at stage 2, the Bravo will stop cooking for remaining stages but still cook your food for Sear 2 and Warm functions.
To avoid “unsafe” status (Probe is shunted outside of the cavity but oven started working with the Probe set and activated), the Bravo will shut off when:
1. If the target temp is over 250F and the Probe does not increase in 5F after 60 min, shut the unit off immediately.
Or
2. If the target temp is under 250F and the Probe does not increase in 5F after 120 min, shut the unit off immediately. “Prb4” will be displayed.
Note: To cancel any function or stage during the cooking cycle, press TEMP/TIME (if not cooking within a timed countdown) and turn START/ PAUSE Dial until time reads 00:00. This will stop the function and move on to the next function in the cooking cycle.
TOAST
TOAST activates the TOAST menu function. The default temperature is 425F, and the default TOP/BTM heat is 100/100.
Press TOAST. The LED display will show “TOAST” and “5.” To adjust the toasting level between “1” and “10,” turn the START/PAUSE dial to the left for lighter toast, right for darker toast. Toasting levels in minutes and seconds are as follows at 425F:
• 1  03:00
03:00
• 2 03:30
• 3 04:00
• 4 04:30
• 5 05:00
• 6 05:30
• 7 06:00
• 8 06:30
• 9 07:00
• 10 07:30
To adjust the toasting temperature for each level, press TEMP/TIME to display the toasting temperature. To adjust the toasting temperature, use the START/PAUSE dial.
To adjust the toasting time, press the TEMP/TIME. The display will show the toasting time determined by the toasting level. To adjust the toasting time, use the START/PAUSE dial.
When the toasting level, or the time and temperature, is selected, place toast into oven and press START/PAUSE button. When finished, the LED display will show “End” and will beep three (3) times.
YOGURT
Select Yogurt 275F will be default. Probe default is 185F, insert it into the milk and secure it with the probe clip. Place the bowl into the Bravo and hit START/PAUSE.
When the milk reaches 175F: Bravo will sound two beep warning as it approaches 185F. Let it cool to 110F. To speed this process, open the Bravo’s door or remove the bowl and place it in an ice water bath (leave the probe connected).
When the temp reaches 110F, the Bravo will beep for 10 minutes, or until deactivated. Place the bowl back into the Bravo and close the door and press START/PAUSE. The unit will maintain to 110F for up 8 hours.
PROGRAM
PROGRAM represents Memory Entry (the storage of frequently used cooking sequences) and Memory Recall (retrieval of cooking sequences). Program slots number 1-100 are designated for preset programs. 101-150 are for your own unique programs.
The unit comes with 100 preprogramed cooking recipes along with an additional 50 memory slots to add your own unique recipes the way you like them cooked.
• Preset temperatures and times for program recipes 1-100 can be adjusted. Adjusted temps and times will not be saved when a program number (1-100) is recalled once again.
Refer to the Quickstart Guide for the list.
Memory Recall: Press the PROG button. The display will show prog and 1.
1. Use the START/PAUSE dial to choose the desired program number to recall.
• Numbers 1-100 are preset programs.
• Numbers 101-150 are your unique programs.
2. Once the program number is chosen, press the START/PAUSE button to begin cooking. You can make temperature and time adjustments, if desired.
3. The unit will cook your food at the programmed settings.
Program Your Own Recipe Before Cooking:
1. Set your cooking functions, including temperatures and times.
2. Press and hold the PROG button for 1 second. The display will show prog and 101.
3. Turn START/PAUSE to choose your desired program number to save the program to (101-150).
4. Press and hold the PROG button for 1 second again to store and save the program to your chosen program number. The program is now stored and available for future recall.
5. Press the START/PAUSE button to begin cooking the program.
Program Your Own Recipe During Cooking:
1. Set your cooking functions, including temperatures and times.
2. Press the START/PAUSE button to begin cooking.
3. During cooking, press the PROG button for 1 second. The display will show prog and 101.
4. Use the START/PAUSE dial to choose your desired program number to save the program to (101-150).
5. Press the PROG button for 1 second again to store and save the program to your chosen program number. The program is now stored and available for future recall.
6. The unit will continue to cook your programmed recipe.
Program Your Own Recipe After cooking:
1. Set your cooking functions, including temperatures and times.
2. Press START/PAUSE to begin cooking.
3. When the cooking process is finished and the display shows End, press PROG for 1 second. The display will show prog and 101.
4. Turn START/PAUSE to choose the desired program number to save the program to (101-150).
5. Press PROG for 1 second again to store and save the program to your chosen program number. The program is now stored and available for future recall.
To View Current Program During Cooking:
1. During cooking, press PROG.
2. The display will show the currently running program for 1 second.
3. The display will go to a countdown.
To View Program Cooking Functions:
1. View Before cooking:
• Press PROG and find the program number to review by turning START/PAUSE.
• Once your program number shows in the display, press STAGE to review each phase of cooking.
• Adjustments to temperatures and times can be made for each function at this time.
2. During cooking:
• Press the STAGE button to review each phase of cooking.
• Continue to press the STAGE button to scroll through all programmed functions for that program number.
• Adjustments to temperature and time can be made for each function at this time.
• Cooking functions that have already completed will not be displayed.
To Edit a Program:
1. Edit Before Cooking:
• Press PROG and find the program number you want to edit by turning START/PAUSE.
• Once the program number shows in the display, press STAGE until the function you would like to edit shows in the display.
• Using TEMP/TIME and START/PAUSE, make the edits to temperature and time as desired.
• Once all edits are made, press PROG for 1 second. The display will show prog and 101.
• Turn START/PAUSE to find the program number to save your edits to.
• Press PROG for 1 second to save and store the edits.
2. Edit During Cooking:
• During cooking, press TEMP/TIME and use the START/PAUSE dial to adjust the cooking temperature.
• Press the TEMP/ TIME and use START/ PAUSE to adjust the cooking time.
• If there are more cooking functions that you would like to edit, press STAGE until you reach the function to edit.
• Use TEMP/TIME and START/PAUSE to make your edits.
• The Bravo will continue the cooking process with the edits that you have made.
Notes:
• Functions that have already ended in the cooking cycle cannot be edited.
• Once all edits are made, continue to allow the Bravo to cook.
• When cooking has finished, the unit will beep three times and the display will show End followed by SAVE.
• Press PROG for 1 second. The display will show prog and 101.
• Use START/PAUSE to find the program number to save your edits to.
• Press PROG for 1 second to save and store your edits.
Notes:
• If you save any recipe to an already filled memory slot, the new recipe will override the previous recipe. Any edits to a preset program (1-100) can only be saved and stored into program numbers 101-150. You cannot save an adjusted preset program to its original preset program number.
• Preset temperatures and times for program recipes 1-100 can be adjusted. Adjusted temps and times will not be saved when a program number (1-100) is recalled once again.

Notes:
• For chicken or other large items, use Position 1 (with Baking Pan and Broiler Rack) as shown above.
• When cooking pizza, for crispier results use position 1.
Carryover Cooking:
1. During cooking, it will display current probe temperature, while it displays probe temperature, “PRB” is lit.
2. During cooking, press TEMP/TIME. Press TEMP/ TIME again and the chosen temperature of the oven (default 350F) will display. While it displays the cooking temperature, “PRB” is no longer lit.
3. Press and hold PROBE button for 1second. Adjust desired probe temperature by using the START/PAUSE dial.
4. When the unit reaches 10F under the target Probe temperature, the unit will alert with 3 sets of short beep sounds.
• This will happen every time the probe is in use.
• If desired cooking time is finished but desired probe temperature is not achieved yet, the unit will continue cooking until probe temperature is achieved.
Example:
Probe: 200F Regular Cooking: 380F, 5 min.
Sear 2: 400F, 2 min.
Warm: 140F, 30 min.
5. If probe temperature was not achieved under regular cooking 380F, 5 min., the unit shall continue to cook at 380F until probe temperature is reached and then go to Sear 2 and then to warm.
CLEANING & MAINTENANCE
Before First Use:
Wash all removable parts 1 in warm, soapy water or in the dishwasher, top rack only.
1. Remove all the packaging materials.
2. Remove the glue and labels on the appliance.
3. Clean the Cooking Racks, Baking Pan, Broiler Rack, Air Fry Basket and Crumb Tray thoroughly with hot water, a nonabrasive sponge, and mild dish detergent, or in the dishwasher, top rack only.
4. Rinse the Pizza Stone with hot water before use. Allow the Stone to dry at least 30 minutes then place in a very hot oven for 30-45 minutes. Turn off oven and allow the Pizza Stone to completely cool before touching.
5. Wipe the insides and outside of the Bravo with a damp dishcloth or wet cloth and dry thoroughly.
IMPORTANT - Do not immerse unit in water or attempt to cycle through dishwasher. The outer surface may be cleaned by wiping carefully with a damp dishcloth or sponge. Make sure unit has cooled completely prior to cleaning.
Clean After Each Use:
1. Allow the Bravo to cool completely before cleaning.
2. Always unplug the Bravo from the electrical outlet. NEVER clean the unit while it is plugged in.
3. Never use harsh abrasive or corrosive product cleaners, as they may damage the finish or oven surface. Wipe the exterior with a clean, damp cloth and dry thoroughly.
4. Apply the cleaning agent directly to a cloth towel, not directly to the unit, before cleaning.
5. To clean interior, use a damp cloth, mild liquid soap solution, and a clean cloth towel.
6. Never use steel wool pads, etc., on interior or exterior of the Bravo.
7. NEVER HANDLE A HOT PIZZA STONE. Allow the Pizza Stone to completely cool before cleaning. Once cooled, wipe the Stone with a clean damp towel then rinse in a sink with cool water and dry completely. WARNING: NEVER submerge or rinse a hot Pizza Stone in water. The hot Stone may crack and break underwater, causing injury.
8. When the glass window is completely cool, spray glass cleaner on a clean cloth towel. Clean both inside and outside of window. Use a damp cloth to rinse the window then dry completely with a clean dry towel.
9. To remove crumbs, slide out the Crumb Tray and discard crumbs. Wipe clean and replace. Crumb Tray should be emptied and cleaned after each use. Never operate the oven without the Crumb Tray in place.
10. To remove baked-on grease, soak Baking Pan, Broiler Rack, Air Fry Basket, Cooking Racks, and Crumb Tray, in hot, soapy water. Dry thoroughly. Never operate the, oven without the Crumb Tray in place.
Storage
• Unplug the Bravo and let unit cool down completely.
• Make sure that all parts are cleaned and dry.
• Never wrap the cord around the Bravo.
TROUBLESHOOT GUIDE
The Bravo was engineered with an automatic shut-off feature to prevent overheating during use. If the Bravo shuts off to cool itself down, an odor may be detected. Unplug the unit and wait for it to completely cool down. To prevent the Bravo from overheating, do not cook foods at higher temperatures or longer times than recommended.
The Bravo does not work.
1. The Bravo is not plugged in. Did not press “ON/OFF”.
2. Insert the plug into an appropriate grounded power socket. Press “ON/OFF”. If still not working, contact Customer Service at 1-877-689-2838 or email [email protected].
The door to Bravo will not close completely.
1. Food item is too large. Oven racks or accessories are not properly set in place.
2. Use smaller amounts of food to cook. Make sure Racks and Pans are slid into place and pushed all the way to the back of the unit.
The food is cooked unevenly.
1. Check cooking progress throughout. Turn or rotate as needed to ensure even cooking.
Bake vs. Roast vs. Broil
1. Use Bake when cooking items that rise (e.g., cakes and cookies). Use Roast for dense foods that are browned throughout the cooking process. Use Broil to quickly brown or crisp a food item.
The Crumb Tray will not slide back into position.
1. The Crumb Tray is not placed into the slot correctly. Something is blocking the Tray from sliding into position.
2. Remove the Crumb Tray and clean away any food items that may have accumulated in the back of the Bravo.
White smoke is coming out of the product.
1. You are cooking greasy foods. The Baking Pan or Broiler Rack contains greasy residue from previous uses. When preparing greasy ingredients in the unit, large amounts of oil can smoke. The oil will produce white smoke. This will not affect the final cooking effect. White smoke is caused by grease heating up on the Cooking Racks, Baking Tray, Broiler Rack, Air Fry Basket, and/or Crumb Tray.
2. Clean Cooking Racks, Ba king Tray, Broiler Rack, Air Fry Basket, and/or Crumb Tray regularly between use.
The LED screen is blank.
1. The Bravo overheated and has shut itself down. No action was taken after certain stages of cooking and unit shut down. Control Panel not working correctly.
2. Unplug the Bravo and allow the unit to completely cool. Plug back in and see if it is working. If the LED screen remains blank, contact Customer Service at 1-877-689-2838 or email [email protected].
The Bravo is not heating.
1. Unit is unplugged. The Bravo has overheated. Heating elements are not working.
2. Make sure the Bravo is plugged in. Make sure the unit is has completely cooled. Plug in and see if unit comes up to correct temperature. If unit continues to not heat up, contact Customer Service at 1-877-689-2838 or email help@nuwavenow.
| Error Message: |
Solution(s): |
| Prb1 |
Probe not connected to the unit. Plug the Bravo into the appropriate power socket. |
| Prb2 |
The Probe target internal temperature is set higher than set cooking temperature. |
| Prb3 |
Probe Short Circuit.
Contact Customer Service Department at 1-877689-2838 or help@nuwavenow.
|
| Prb4 |
Probe sensor not detecting temperature increase. Ensure the Probe is inserted into the food and the food is in oven during cooking. |
| Er1 |
NTC Temperature Sensor overheated. Turn unit off to cool. If the Bravo is not working after it cools down, contact Customer Service. |
| Err1 |
NTC Temperature Sensor short circuit. Contact Customer Service Department at 1-877-689-2838 or help@nuwavenow. |
| Err2 |
NTC Temperature Sensor is open. Contact Customer Service Department at 1-877-689-2838 or help@nuwavenow. |
| Err8 |
A button may be jammed. |