CP-FR601SW SERIES
USER GUIDE
WATER
PURIFIER
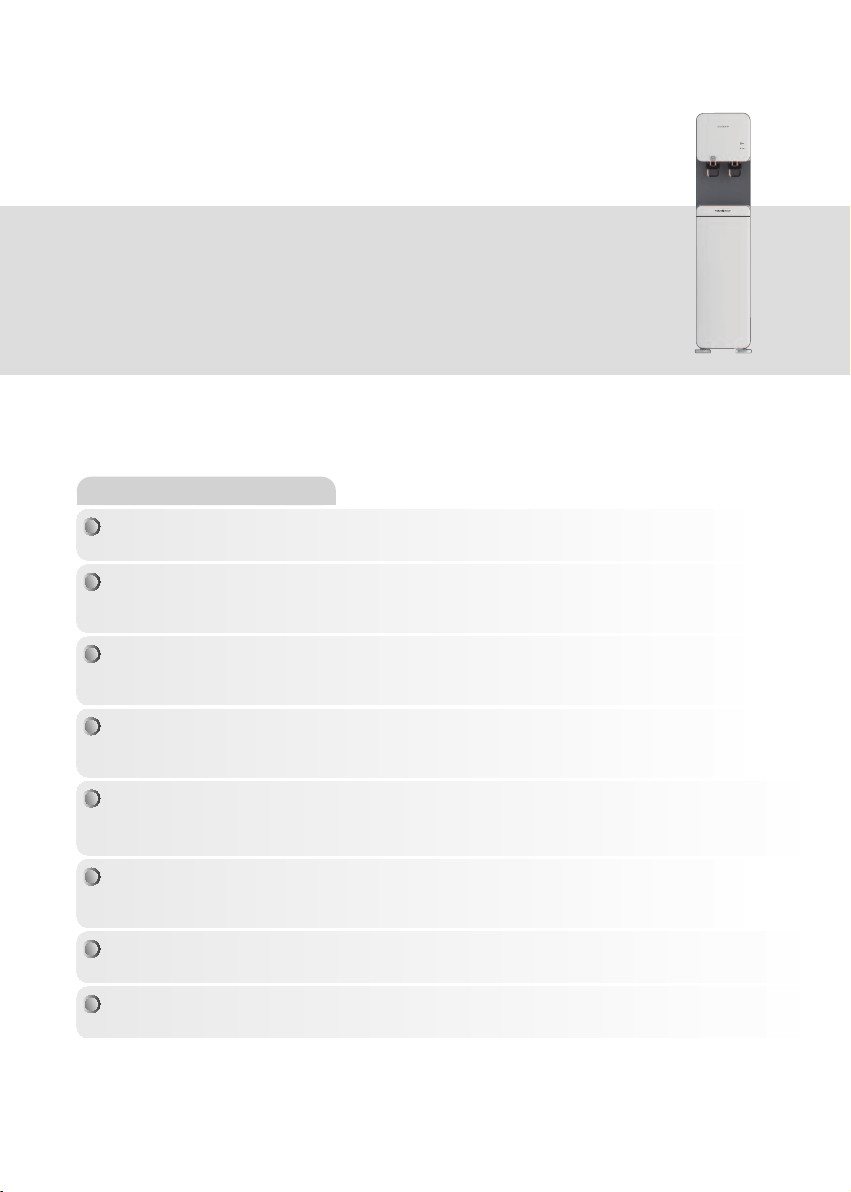
4-Step Filtration System
The 4-step filtration system of Cuckoo Water Purifier makes clean and healthy water.
Reverse Osmosis Filtration system
Clean water is provided by applying a reverse osmosis membrane.
Operation Status Indicator
For added convenience, you are able to check the operation status through the operation status
indicator.
Refined Design
The slim and refined shape makes it a perfect fit for any setting.
Individual Power Switches for Hot and Cold Water
Energy efficient design with individual "hot" & "cold" power switches.
Double Water Level Sensor
This product employs a double water level sensor to prevent water leaks, overflow and increase
stability.
Stainless Steel Water Tank
Using a stainless steel water tank improves the water quality and cleanliness.
Child Lock button
The child lock button prevents children or others from the burn hazards associated with hot
water.
Thank you for choosing Cuckoo Water Purifier.
Please keep this User Manual (including the Warranty) for your reference.
This manual will guide you when you use and when functions do not work properly.
To our customers!

CONTENTS
Before Use
Warnings for Safe Use
Cautions for Safe Use
Names of Parts / Information on Components
Filtration Circuit / Filtration System
Details to Check before Installation
How to Install the Product
Details to Check before Use
How to Use
How to Clean the Cold Water Tank
How to Clean Tray / How to Clean Faucet
How to Replace the Filter
Recommended Filter Replacement Cycle /
Recommendations
Filter Arrangement / How to Install Overturning
Prevention Wire
Please check before asking for support
Product Specifications
Before Asking for Support
Service Guide
How to Use
4
Warnings for Safe Use
•This symbol is to remind you to be cautious about a
potentially dangerous situation under special ircumstances.
•
Please read the details carefully and follow the instructions to
avoid dangerous situations.
•This symbol is used to indicate actions that are prohibited.
Potentially dangerous situation that can
cause serious injuries or death if not avoided.
Potentially dangerous situation that can
cause minor injuries if not avoided.
•This symbol is used to indicate 'instructed' actions.
Please comply with the 'Warnings for Safe Use' as they are provided to ensure safe and proper use of the
product and prevent accidents and dangerous situations.
The 'Warnings for Safe Use' section is divided into 'Warning' and 'Caution' which are defined as follows.
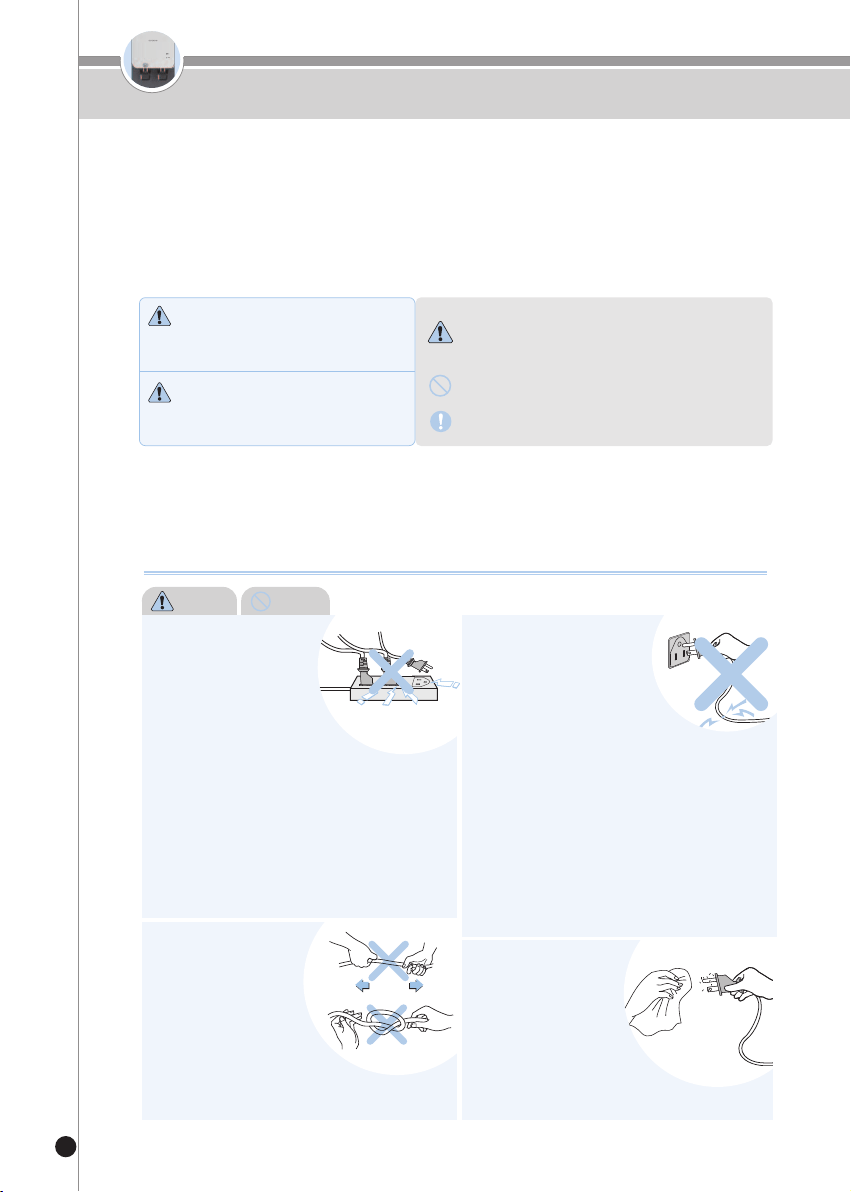
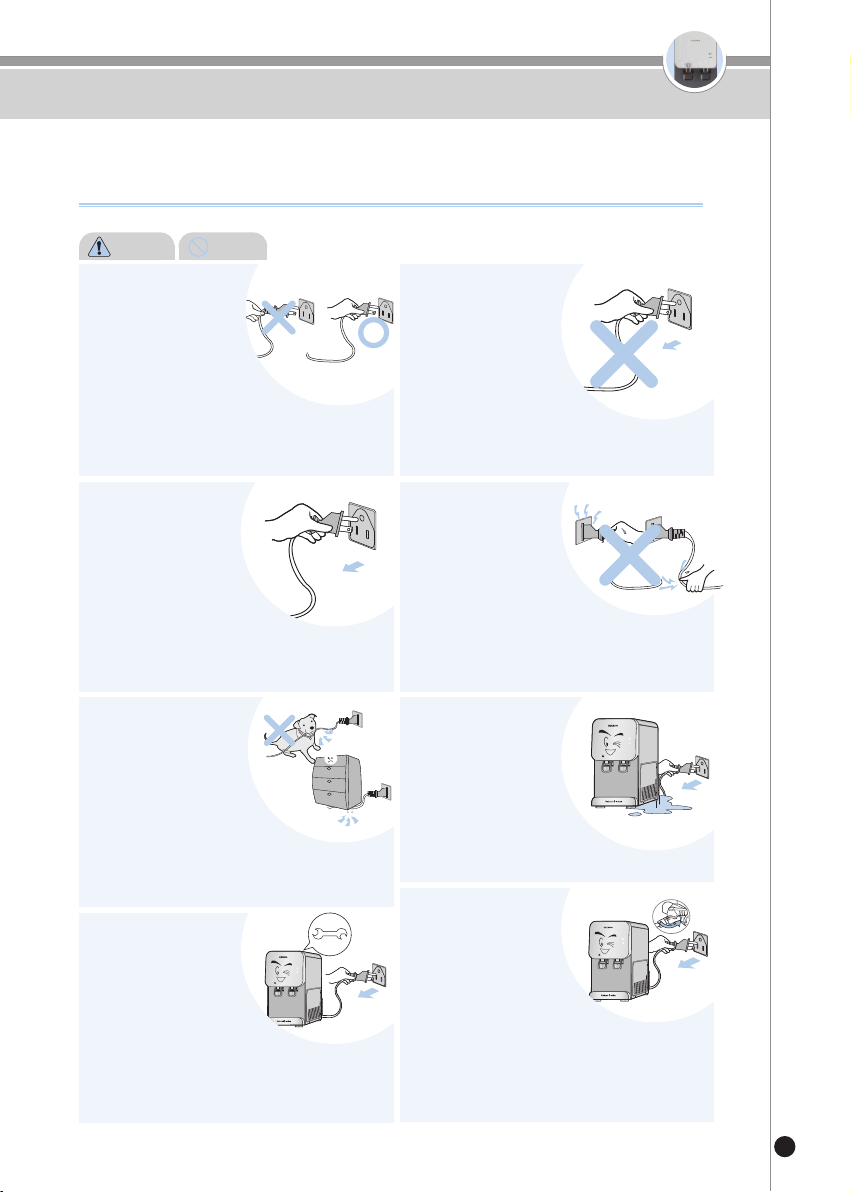
Do not bend, tie or pull
the power cord by
force.
•This may cause electric shock
or fire due to a short circuit.
Please check the state of the
power cord frequently.
Wipe off any foreign
substance on the
power plug with a
dry cloth.
•This may cause electric shock
or fire.
Please check the state of the power
plug frequently.
Warning Do not
Plug the power plug into
a 120V outlet with
at least a rating of 10A
and power surge
protection. Do not plug
multiple products into
the same power outlet or
extension cord simultaneously.
•When multiple products are plugged into the same power
outlet or if the product is plugged into an inappropriate
power input, it may cause heating, fire and electric shock.
Please check the condition of the power outlet frequently.
•If there is a foreign substance or water on the power plug,
please wipe it clean before plugging it into the socket.
•Use an extension cord of 10 A or higher.
Stop the use and contact
Customer Service when
the power cord or plug is
damaged or the power
outlet is loose.
•If the sheath of the power cord is peeled off or bent due to
negligence, it may cause fire or electric shock. Please
check the state of the power cord, plug and outlet
frequently.
•To prevent dangerous situations due to the damage of the
power cord or plug, please contact the manufacturer,
distributor or Cuckoo website.
•We strongly recommend that the damaged parts be
repaired or replaced from the Cuckoo website.
•This may cause electric shock or fire due to a short circuit.
About Power Supply
Warning
Caution
5
Warnings for Safe Use
Please turn off the
product by pressing
the power button.
Also, unplug the
product before
inspection, repair or
replacement of its components.
•This may cause electric shock or breakdown.
Please check the state of the power cord
frequently.
When you do not use
the product for a long
time, close the tap
water supply valve,
drain the remaining
water from the tank by
pressing the "Out Flow"
button and unplug the power plug.
•This may cause electric shock or fire. Please check
the state of the power cord and plug frequently.
•Before using the product again, please refer to the
'Details to Check before Use.'
Make sure the power
cord is not under a
heavy object or near
sharp objects.
Please ensure that it is
not damaged by your pet.
•If the power cord is damaged, it may cause electric
shock or fire. Please check the state of the power
cord frequently.
If the power supply
area is wet, unplug
the product and let it
dry completely before
use.
•This may cause electric shock
or fire.
Please check the state of the power
cord and plug frequently.
In case of water leak
or cleaning, please
unplug the power
plug first.
•This may cause electric shock or
malfunction.
Please check the state of the power
cord and plug frequently.
Do not plug or unplug
the power plug with
wet hands.
•Unplugging the power plug
with wet hands may cause
electric shock.
•Pulling the power cord by force candamage the cord and
may cause a short circuit or electric shock.
Please check the state of the power cord and plug
frequently.
Do not pull the power
cord when unplugging
the product.
•Force applied to the power
cord may cause electric shock or fire.
Please check the state of the power cord
and plug frequently.
Use 120V power
input only.
•This may cause electric
shock or fire.
•The product will not operate
properly.
•Please check the state of the power
cord and plug frequently.
About Power Supply
Warning Do not
6
Warnings for Safe Use
Installation Issues
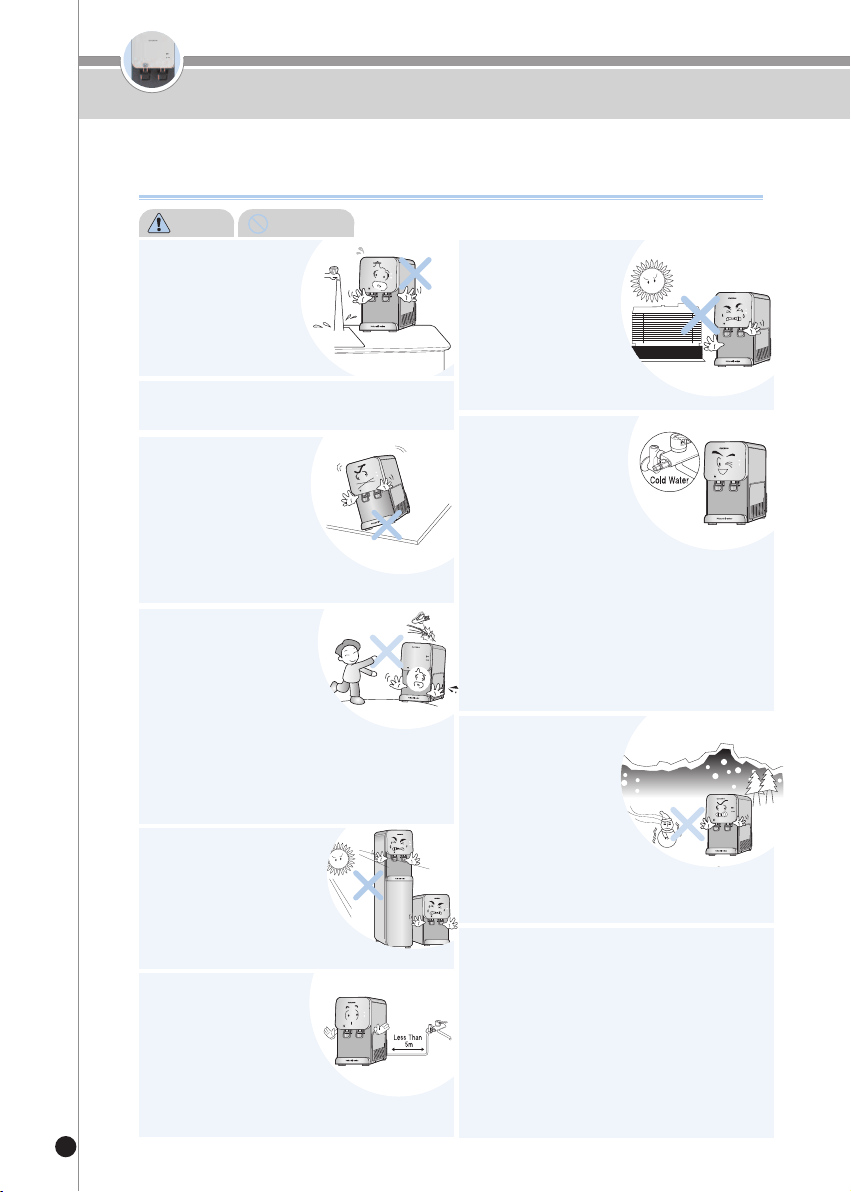
Make sure the
distance of the tap
water supply tube
connecting the product
to the tap water
supplying valve is less than 5m.
•This may cause reduced performance of the product.
Avoid direct sunlight
and high temperature.
•This may cause color
changes.
•Please check the state of the
power cord frequently.
This product is not
intended for use by
people(including children)
who lack physical or
mental abilities, or lack
experience and knowledge
to be able to use the product safely without
supervision or instruction.
•Do not let children play with the device.
•It may cause electric shock or injury.
Do not place the
product in an area
that falls below 0℃.
•This may cause the filter
or the internal components
to freeze, causing malfunction.
If the surrounding temperature falls below 0℃,
it may cause the water inside the filter and / or
tubing to freeze, causing malfunction of the
product. Thus, please ensure that the surrounding
temperature does not fall below 0℃.
•In case that tap water is frozen and cannot be supplied
to the product because of lower than freezing
temperature of the surroundings, please turn off the
hot water power for safety.
Do not place it in a
bumpy or inclined
area. Do not place it
on a rug, cushion or
laminated floor.
•This may cause malfunction,
unwanted noise or injury.
Please check the state of the product frequently.
Use tap water as the
supplying water,
and install the Tap
water supplying valve
to the “Cold” water pipe.
•
Do not use underground water
or any other than tap water.
•The replacement cycle of the filter will vary according
to the region and the amount of water use.
•Connecting the water supply valve to the hot water pipe
may cause damage to the filter or malfunction of the
product.
Do not place it in an
area with potential for
gas leak or near a
heating product.
•This may cause fire or
explosion.
Do not place the
product in a place
with high moisture
or dust.
•This may cause electric
shock or fire.
Warning
Prohibited
Do not install the product near the
bathroom.
7
Warnings for Safe Use
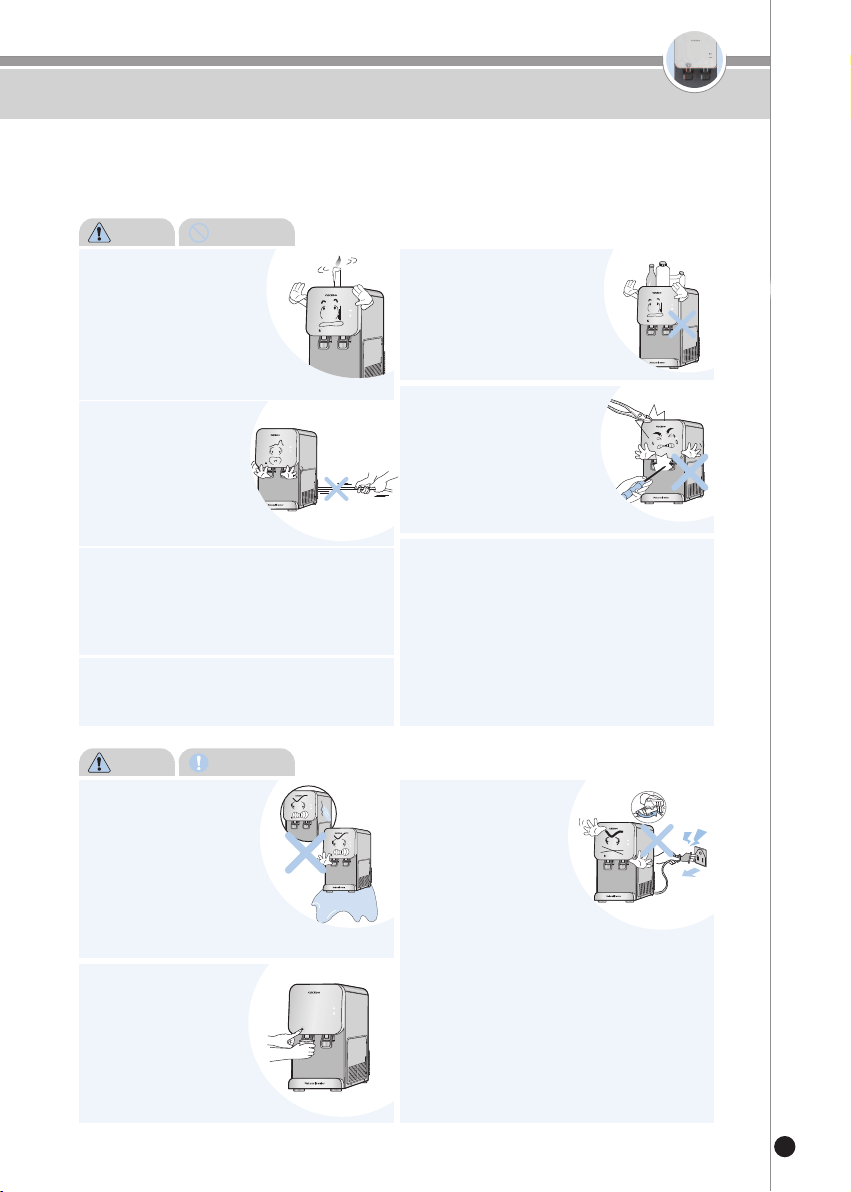
Do not pull the power
cord or the connecting
tube or grab the water
faucet when moving
the product.
•This may cause damage to the
product. Please check the state
of the power cord frequently.
Do not disassemble or
modify the product.
•This may cause fire or electric shock.
•Do not allow anyone other than a
professional to disassemble or
repair the product.
•Contact Cuckoo website or certified
distributor for repair, AS service and information.
Do not let children or anyone to control
the control panel too much.
•It may cause malfunction or accidents.
In order to prevent accidents and injury,
make sure that your hands or other parts
of the body do not touch the condenser
(radiator) at the back of the product, as it
gets hot during use.
•This may lead to burns or accidents.
Do not turn on the Cold & Hot
buttons when the tank is empty.
•This may cause malfunction of the product
•First open the tap water valve to check if the water is cut
off. Do not press the“Cold”&“Hot”buttons when the
tank is empty. Fill the tank fully with water before pressing
“Cold”&“Hot”buttons.
•
If the“Hot”button is pressed when the tank is empty, the safety
product will be turned on automatically to prevent the heater from
running. This will cause lukewarm water to be extracted. Please
contact Cuckoo website or certified distributor .
Do not place any heating
product, such as a
microwave, electric oven
or toaster, or flammable
materials such as candles
or gas containers, on top of
the product.
•There is risk of fire, electric shock or accidents.
Do not place any chemicals,
water bottles or small metal
materials on top of the
product.
•This may cause fire or damage the
product when it enters into theproduct.
Please be cautious
when using hot water.
•Make sure you do not
come into direct contact
with the hot water as it is
extremely hot with risk of burn.
Make sure seniors and children
take special precautions.
If you smell burning or
see smoke from the product,
unplug the product
immediately and close the
tap water supply valve.
Then, contact Cuckoo
website or certified distributor
immediately.
•This may cause electric shock.
If you smell burning or
see smoke from the
product, unplug the
product immediately
and close the tap water
supply valve.
After that please contact
Cuckoo website or certified
distributor.
•This may cause fire.
Warning
Do not
Warning
Instruction
8
Cautions
for Safe Use
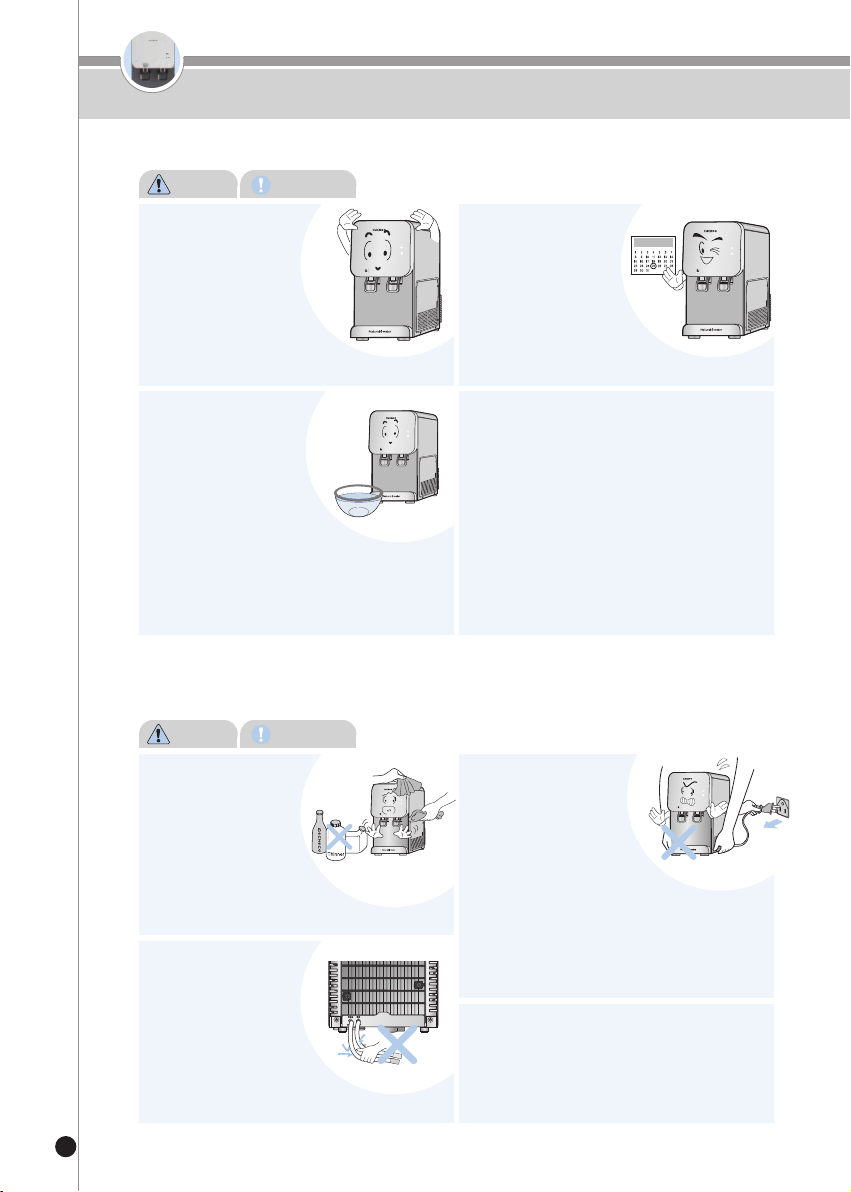
Do not disconnect the
tube at the back of
the product during
the operation.
•This will lead to water leak,
causing product malfunction.
Do not use the purified water for a fish
tank, an aquarium etc.
•The purified water may not be suitable for fish causing
to death.
Do not clean the
product using
benzene or thinner.
•This may damage the
product.
Do not move the
product during
operation.
•Do not shake or move the
product when the power is on.
The tube could be disconnected,
causing product malfunction or water leak.
After a long disconti
nued use, drain out
water completely from
the tank, and fill it with
water and drain it out
again before use.
•Approximately 3.5L of water will be
drained from the cold water tank.
•Approximately 2.5L of water (Stand Type) will be drained
from the hot water tank.
(Approximately 6L (Stand Type) of water will be drained
when hot water is drained before cold water. Drain cold
water before draining hot water.
Make sure tank cover
inside the product
and the lid cover of
the product are
completely closed
before use.
•This may allow foreign substances
to enter.
Replace the filter
according to the
replacement cycle.
•This may reduce the
purification function or
cause bad odor.
•Please refer to Page 23 for the filter
replacement cycle.
Please use only genuine Cuckoo Filter.
•Use of any filter other than a genuine Cuckoo filter may
cause a decrease in water filtration performance, an
abnormal taste, water leak, or malfunction.
Cautions
Instruction
Cautions
Prohibited
9
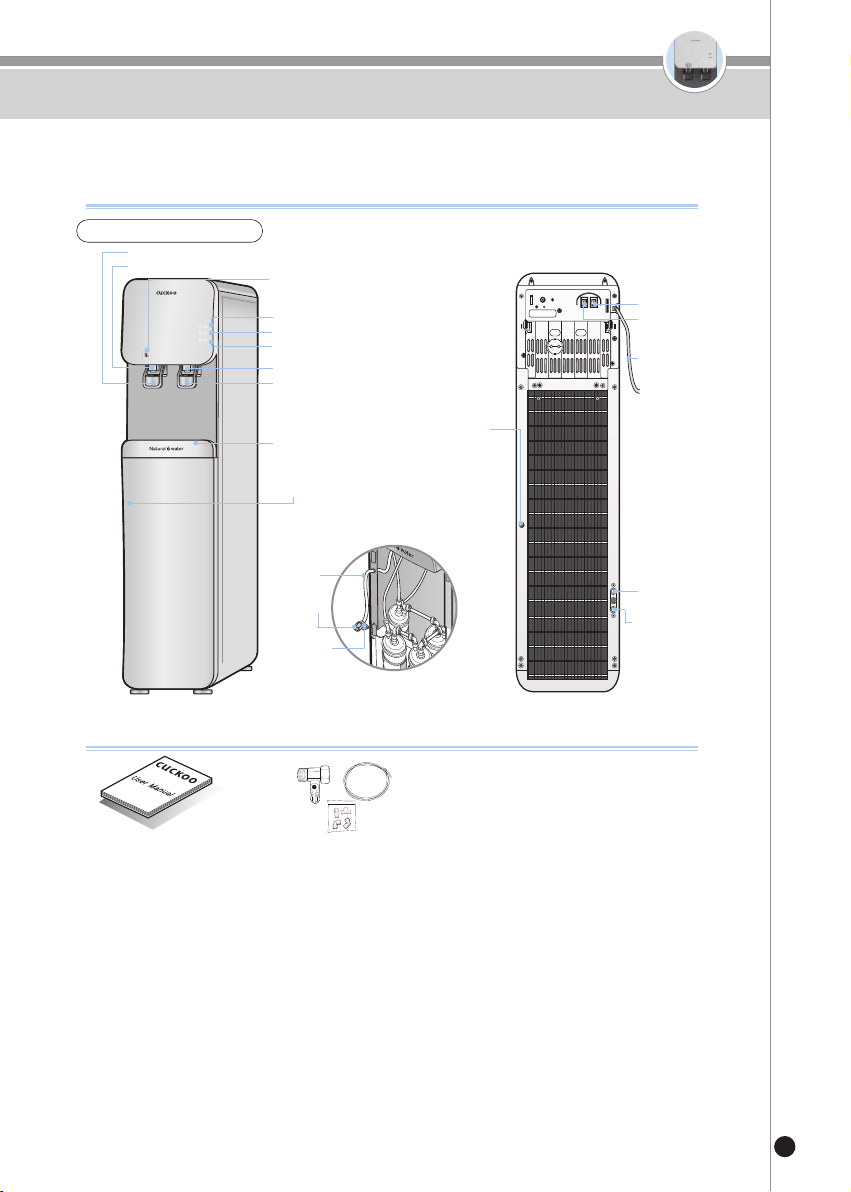
Names of Parts / Information on Components
Names of Parts
Component Information
User Manual
Installation Kit
Cold Water Faucet
Cold Water Lever
Child Lock button
Hot Water Faucet
Hot Water Lever
Tray
Hot Water Drain
Hot Water
Drain Valve
Hot
Water
Drain
Tap Water Input
Drain Water Outlet
Hotbutton
Coldbutton
Power Cord
Tray Drain Tube
Connecting Hole
Stand Type : CP-FR601SW
Cap
Cold Water Indicator
Hot Water Indicator
Full Indicator
10
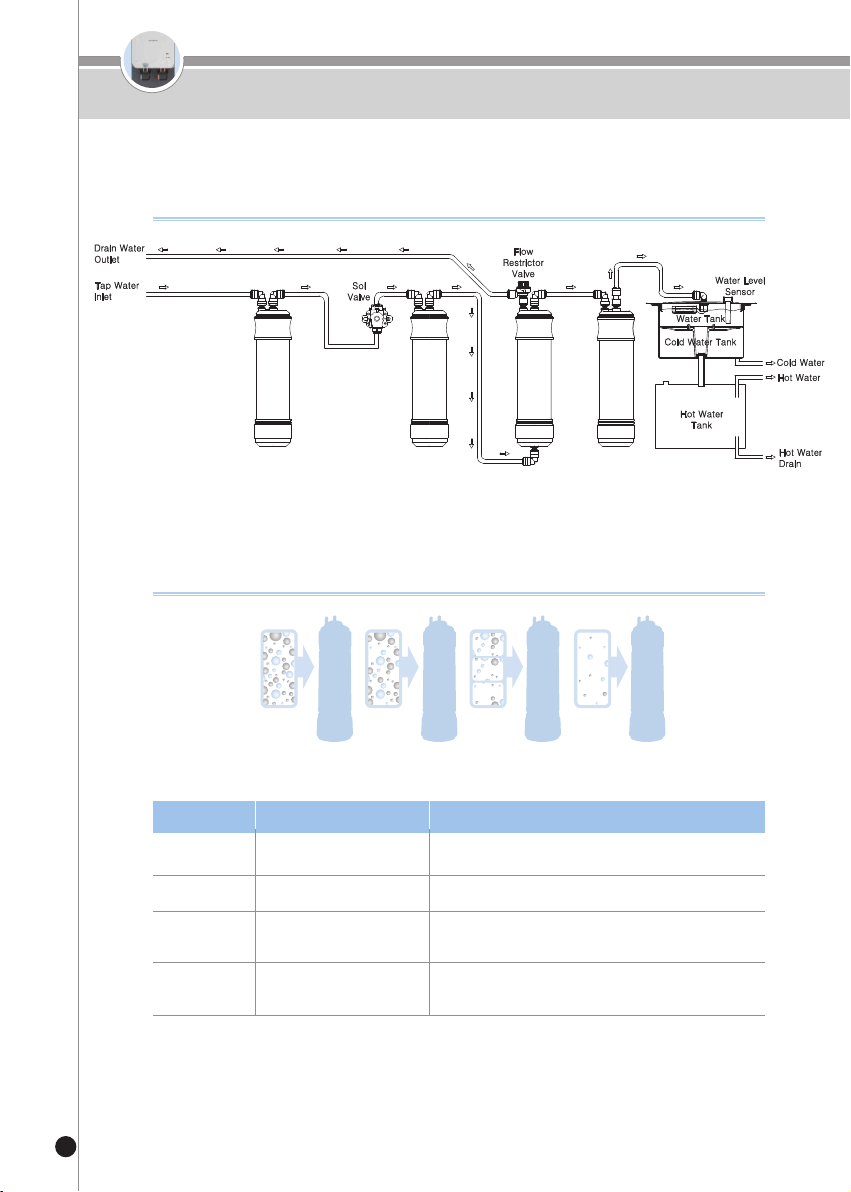
Filtration Circuit / Filtration System
Step 1
Sediment Removes rust sediments and floating matters.
Step 2
Pre Carbon 2.0
Removes residual chlorine and organic
materials.
Step 3
RO
Remove pollutants such as heavy metals,
microorganisms,
organic matter and ionic substances.
Step 4
Natural 2.0
Contains anti-bacterial properties and removes
smell of gases and organic materials.
Filtration Circuit
Filtration System
※ If Cuckoo Filter (genuine) is not used or if the filter is used for a prolonged period, its performance could decrease.
Steps Filter Name Filter Function
Step 1
Sediment
Step 2
Pre Carbon
2.0
Step 3
RO
Step 4
Natural 2.0
Uses of Drained Water
- Use it while cleaning the cloths, house & toilets.
- Never use it for Drinking & cooking purpose.
Sediment
CP-FR601SW
Pre
Carbon
2.0
Natural
2.0
RO
※ Actual product may differ from image shown.
11
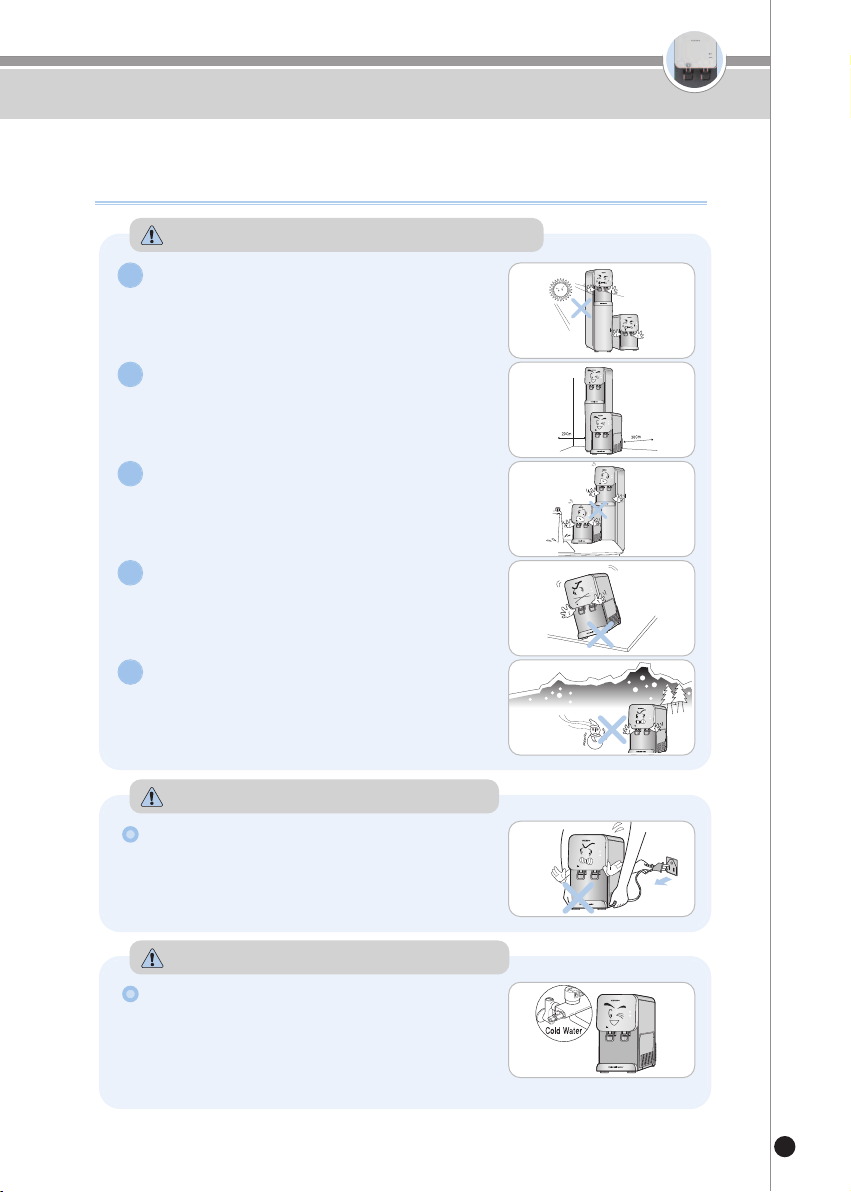
Details to Check before Installation
Details to Check before Installation
Do not place the product in direct
sunlight or near a heating product.
This may cause color changes or fire.
1
Allow installation space.
To allow convenient replacement of the filters, make sure
the product is placed 20cm away from the wall and that
the distance of the water supply hose connecting the
product to the water supply valve is less than 5m.
2
Avoid areas with high moisture/humidity,
dust or water splash.
This may cause a malfunction.
3
Avoid areas that are uneven, inclined
or not solid.
This may cause fire or a damage to the
product.
4
Avoid areas where the temperature falls below 0 ℃.
This product is for indoor use. If the surrounding
temperature falls below 0
, it may cause the filters
and/or the internal components to freeze, causing
breakdown of the product.
5
Cautions when Installing the Product
Please be careful when moving the product.
Do not tilt the product at an angle over 45
.
Wait at least 30 minutes before plugging the
power cord after moving the product.
Cautions on Moving the Product
Connect the tube to the cold water pipe.
Connecting the hose to the hot water pipe may
cause damage to the filter or breakdown of the
product.
Refer to How to Install the Product (Page 12) for
how to connect the tube.
Cautions on Connecting the Tube
12
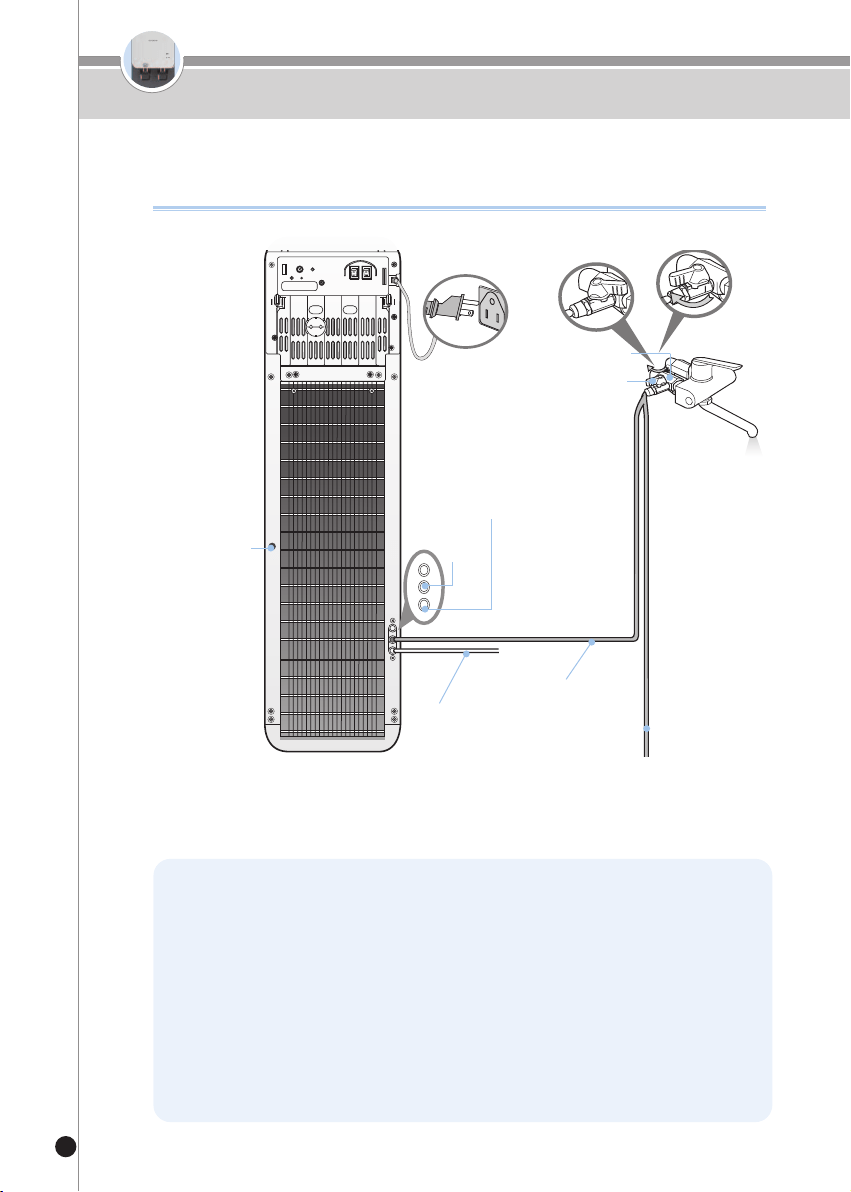
How to Install the Product
How to Install the Product
Tap water
supply valve
Close
Open
Cold water pipe
Tray drain tube
connecting hole
Tap
Water
Input
Drain Water Outlet
Drain water outlet Tube
Tap water supply tube
Close the cold water supply:
- Turn the shut-off valve located under your sink clockwise.
Release pressure:
- Once the cold water supply is closed and there is no flow to the faucet, open the flow of cold
water from the sink faucet (lift faucet as if to run cold water) to release any pressure.
Disconnect feedline from under sink to the sink faucet:
- Spin the riser nut from the existing cold water shut-off. This disconnects the water feedline from
the faucet.
Attach T-Valve to water inlet feedline:
- With the water inlet shut off valve remaining closed, screw the T-Valve (from Install Kit) onto the
cold water inlet feed.

13
How to Install the Product
Connect the sink feed line to T-Valve:
- Connect the nut (from the sink faucet feed line) to the open end of the T-Valve and tighten. Make
sure the connection between the T-Valve and sink feed line is secure.
Connect ¼” Water Line:
- Locate the "tap water inlet" on the water filtration unit and insert the 1/4" tubing (from install kit),
connect the other end of the 1/4" tubing to the T-Valve quick connect connection. Make sure both
connections are secure.
Reverse Osmosis Drain Line and Saddle Valve:
-
Reverse osmosis filters require a drain line be connected from the RO membrane to a drain pipe.
Locate a horizontal or vertical section of drain pipe (wastewater from the sink) under the sink
before the p-trap and away from the garbage disposal. The saddle valve is installed to hold this
drain line connection firmly onto the drain pipe.
Saddle Valve:
-
Place the saddle valve (from install kit) in the selected location of drain pipe. Mark the area where the saddle
valve has its 1/4" opening on the drain pipe.
Drill Drain Line:
- Drill a 1/4" hole through the marked area that represented the opening of the saddle valve. Only
drill through one side of the drain pipe, do NOT drill all the way through the other side of pipe.
Line up Saddle Valve:
- Arrange the saddle valve onto the drain pipe so that the 1/4" hole you drilled matches up with the
1/4" hole in the saddle valve. Use a bit of the water line tubing or a drill bit to ensure the holes are
aligned.
Secure Saddle Valve:
-
With the holes still aligned, secure the saddle valve clamps in place. Make sure the hole are still aligned before
tightly securing the saddle valve nuts.
Connect Drain Line:
-
Secure the second ¼” water line in the saddle valve opening (to the drain line) on one end, to the
external output of the water cooler on the other end. Make sure the connections are secure. The drain
line (from water unit) should be fully into the drain pipe and secure.
Double check all connections:
- Check all water line connections to ensure they are secure
Turn on Cold water:
- Reopen the cold water inlet valve by turning counter clockwise. This will allow water flow through
the attached water line, into filters and to the water unit. CHECK THERE ARE NO LEAKS
Flush Filters:
- Allow the water tanks to fill completely and empty the contents to flush the unit. Complete this
process twice. The water level indicators will illuminate brightly when tank is full.
Turn on Hot/Cold Function
-
After flushing the filters and unit, allow the hot and cold water tanks to fill completely. Once full,
you may turn on the hot and cold buttons on the unit to heat and cool the purified water.
*It is very important to allow the tanks to fill completely before turning the hot/cold on.
14
Details to Check before Use
Details to Check before Use
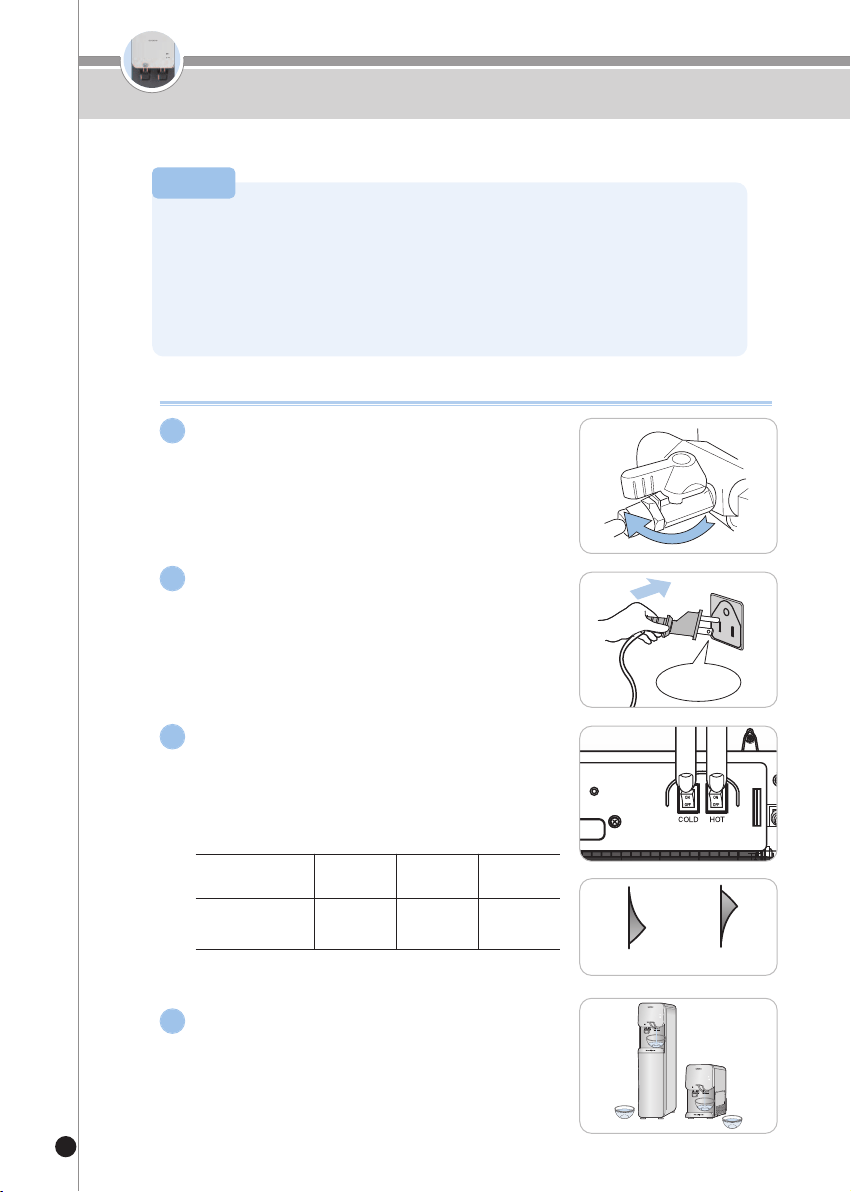
Connect the power supply.
The product is exclusively use for 110V-120V 50-
60 Hz. Connect it to the exclusive power outlet.
After checking if the water supply is cut off,
connect to the power supply.
Before connecting the power, check if the
Cold&Hot buttons are turned off.
Open the tap water supply valve.
First, open the tap water supply valve to check if
the water supply is cut off, and then open the tap
water supply valve.
2
1
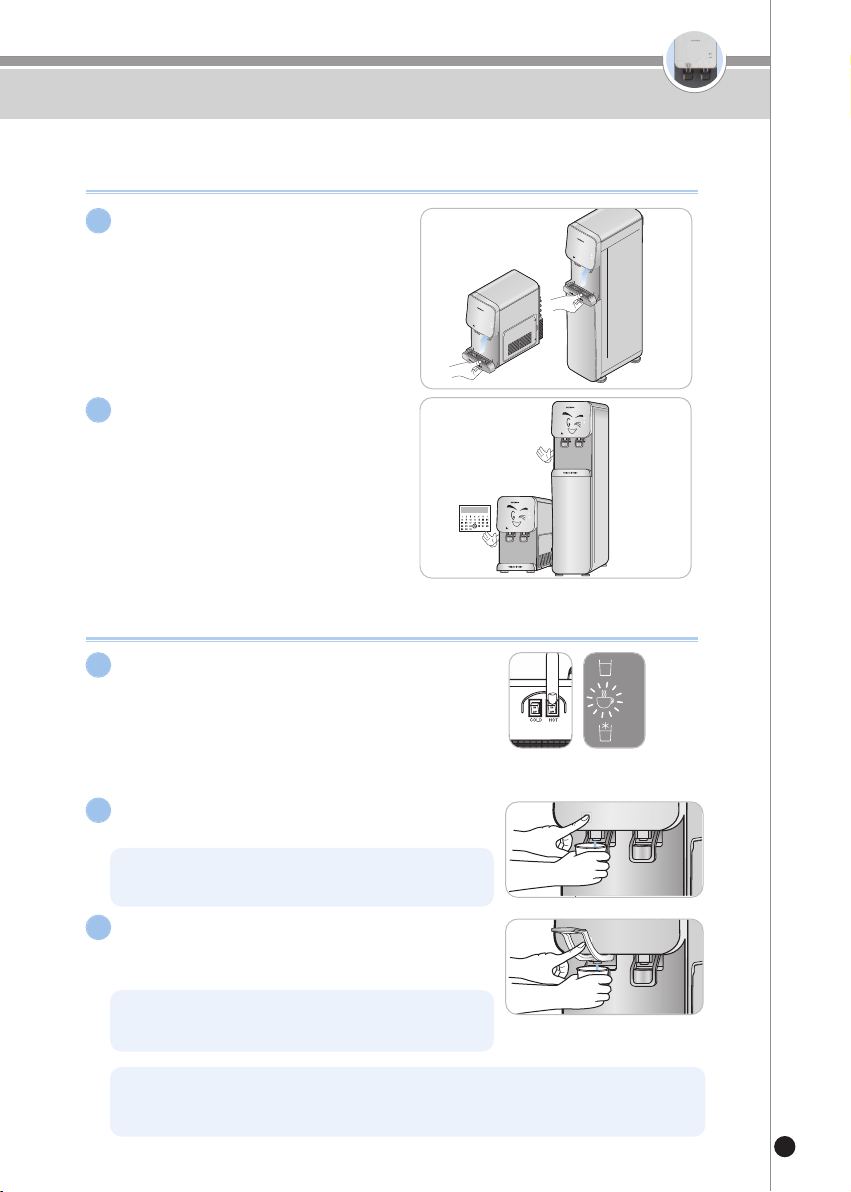
Press the Hot/Cold buttons to turn
them on.
If you want to use hot water, press the Hot button.
And, if you want to use cold water, press the Cold
button. Then the related indicator will get turned on.
Purified water will be supplied, unless you press any button.
Power On Power Off
3
After long discontinued use or upon
installation, completely drain out the tank.
Fill it with water and drain it again before
use.
4
Open
Do not turn on the “Cold” & “Hot” buttons without water in the tank.
(It may cause malfunction of the product.)
·Turn on the “Cold” & “Hot” buttons after filling the tank with water up to the limit.
·
If you press the power button without water in the tank, the safety feature will activate, so the hot water heater
will not be heated.This will cause lukewarm water to flow. Then, visit CUCKOO website for more information.
·Frequently check if the water supply is cut off and if the tap water supply valve is closed. Do not turn
on the “Cold” & “Hot” buttons without water in the tank.
Caution
Model
Cold Water
Indicator
Hot Water
Indicator
Full
Indicator
CP-FR601SW
Blue Red Green
AC 110V-120V
15
Details to Check before Use / How to Use
Details to Check before Use
Empty the tray on a regular
basis.
5
Replace and clean the filters
regularly.
You need to regularly replace the
filters to ensure clean water.
▶
Refer to Page 23 for the filter replacement
cycle.
▶ Before turning on the Hot button, make sure the
water supply is available and the tap water supply
valve is open.
6
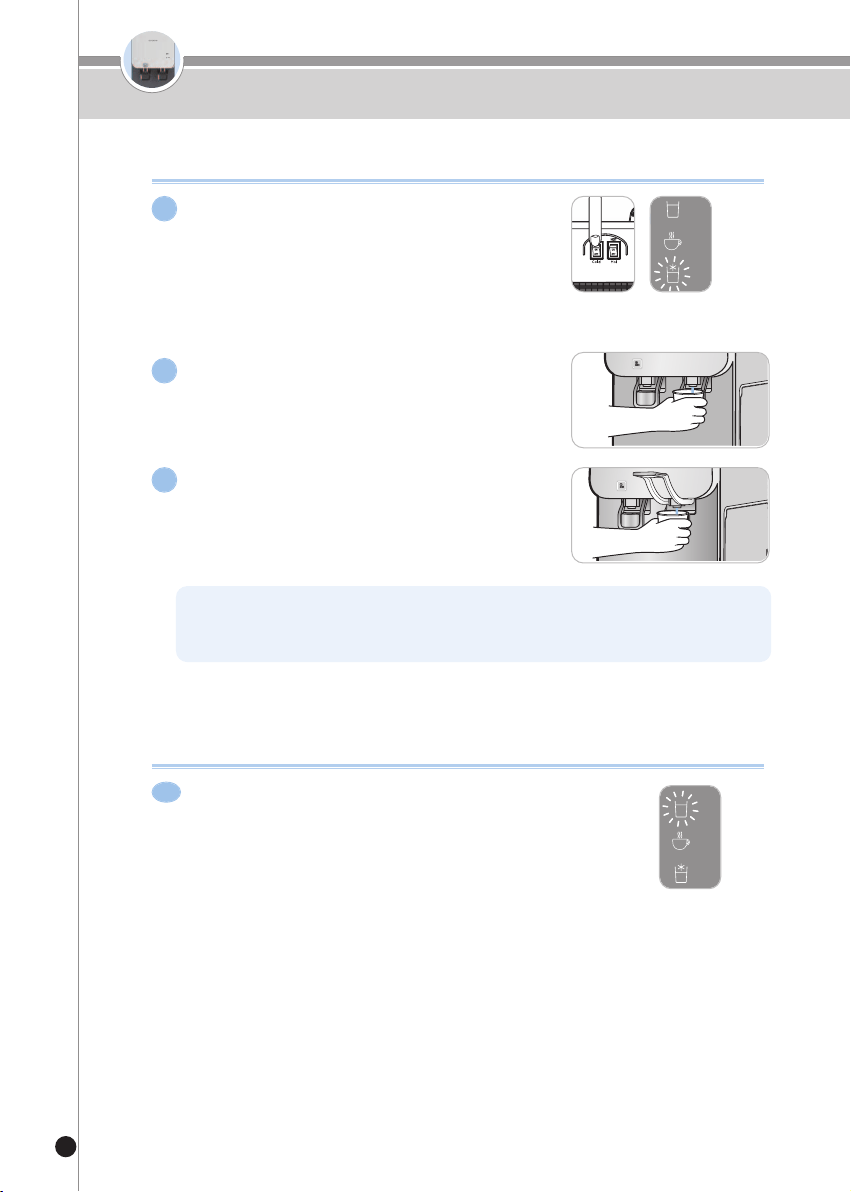
How to Get Hot Water
Press theHotbutton to turn it on.It
takes about 30 minutes for the heater to
heat the water.
1
Gently push the hot water lever and then
press the Child Lock button.
2
Lift the hot water lever up at a 90angle
andpress the Child Lock button for a
continuous extraction of hot water.
3
Do not press the hot water lever while pressing the Child
Lock button. Doing so may create a splash and potential
burn.
After the discharge of hot water, slowly return the lever to its
original position. (If this is done too quickly, you may be burnt
by splashing hot water)
The first glass may be lukewarm. This is due to the outflow of cold water and hot
water through the same pipe. After the first glass, hot water will be extracted at a
normal temperature.
FULL
HOT
COLD
16
How to Use
▶ Before turning on theColdbutton, make sure the
water supply is available and the tap water supply
valve is open.
Press theColdbutton to turn it on. It
takes 60 minutes for the cooler (condenser)
to cool the water.
1
Gently push the cold water lever.
2
Lift the cold water lever up at a 90angle,
Then continuous extraction of cold water
is available.
3
How to Get Cold Water
Full (Water Level) Display Function
If the “Full” water level is not detected for 300 minutes, it is judged to be a
single water level, and the “FULL” water lamp flashes twice.
When the water level in the tank is low, the
“FULL” water lamp will gradually turn bright. This
indicates that water is being filled in the water
tank. When the water level is full, the “FULL”
water lamp lights up completely.
1
The first glass may be lukewarm. This is due to the outflow of cold water and hot
water through the same pipe. After the first glass, cold water will be extracted at a
normal temperature.
FULL
HOT
COLD
FULL
HOT
COLD
17
How to Clean the Cold Water Tank
How to Clean the Cold Water Tank
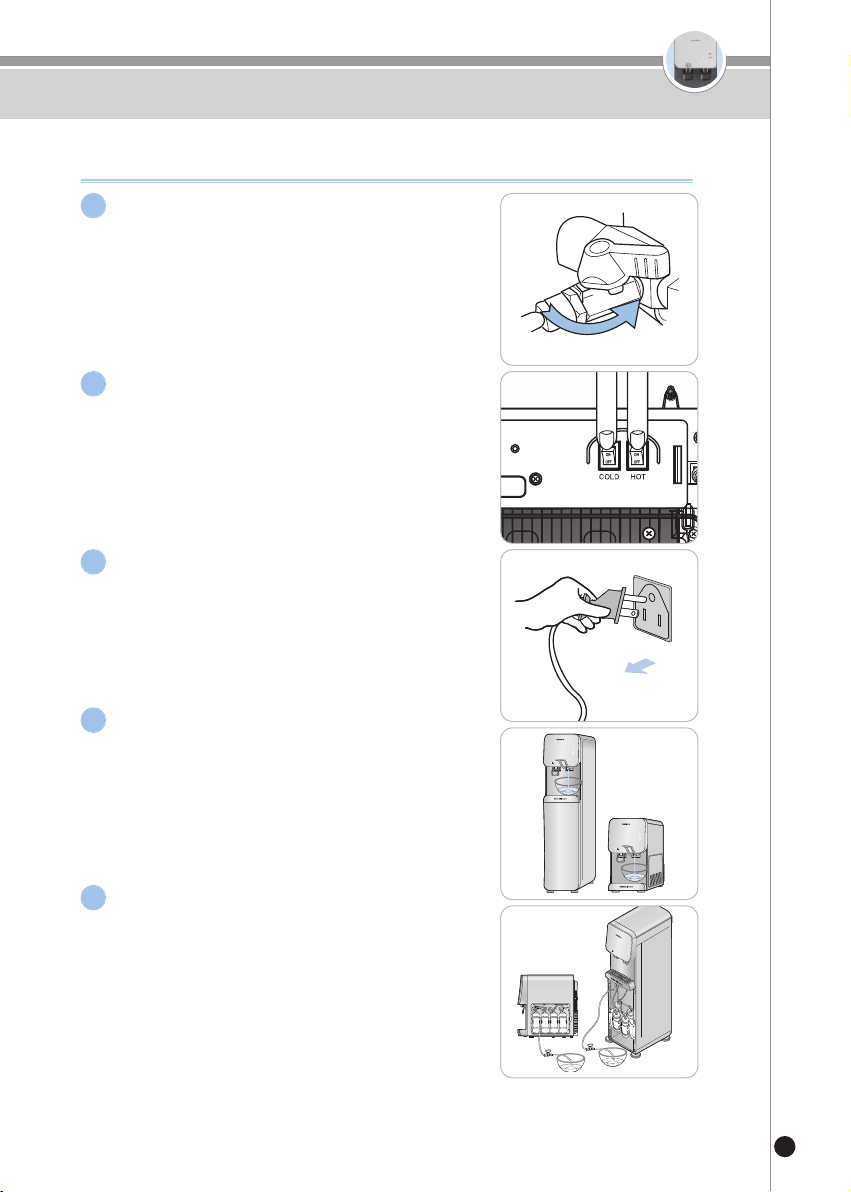
First close the tap water supply valve.
1
Press theHot/Cold button to turn
it off.
2
Unplug the power plug for safety.
3
Drain the cold water tank through the cold
water faucet.
Drain water into a clean bowl as it will be used to
clean the tank.
Approximately 3.8L of water will be drained, so use a
bowl in an appropriate size.
4
Connect the hot water drain tube to the hot water
faucet and the hot water drain in order to drain out
all the hot water from the hot water tank.
Be careful as the hot water is extremely hot.
Approximately 1.4L and 2.5L of water will be drained from the
Half Type and Stand Type respectively, so prepare a bowl in an
appropriate size.
If you drain hot water before draining cold water, about 5.2L for
Half Type and 6L for Stand Type of water will be drained. Drain
cold water before draining hot water.
(After completely draining hot water, please close it with a ball
valve or an end cap)
5
Close
18
How to Clean the Cold Water Tank
How to Clean the Cold Water Tank
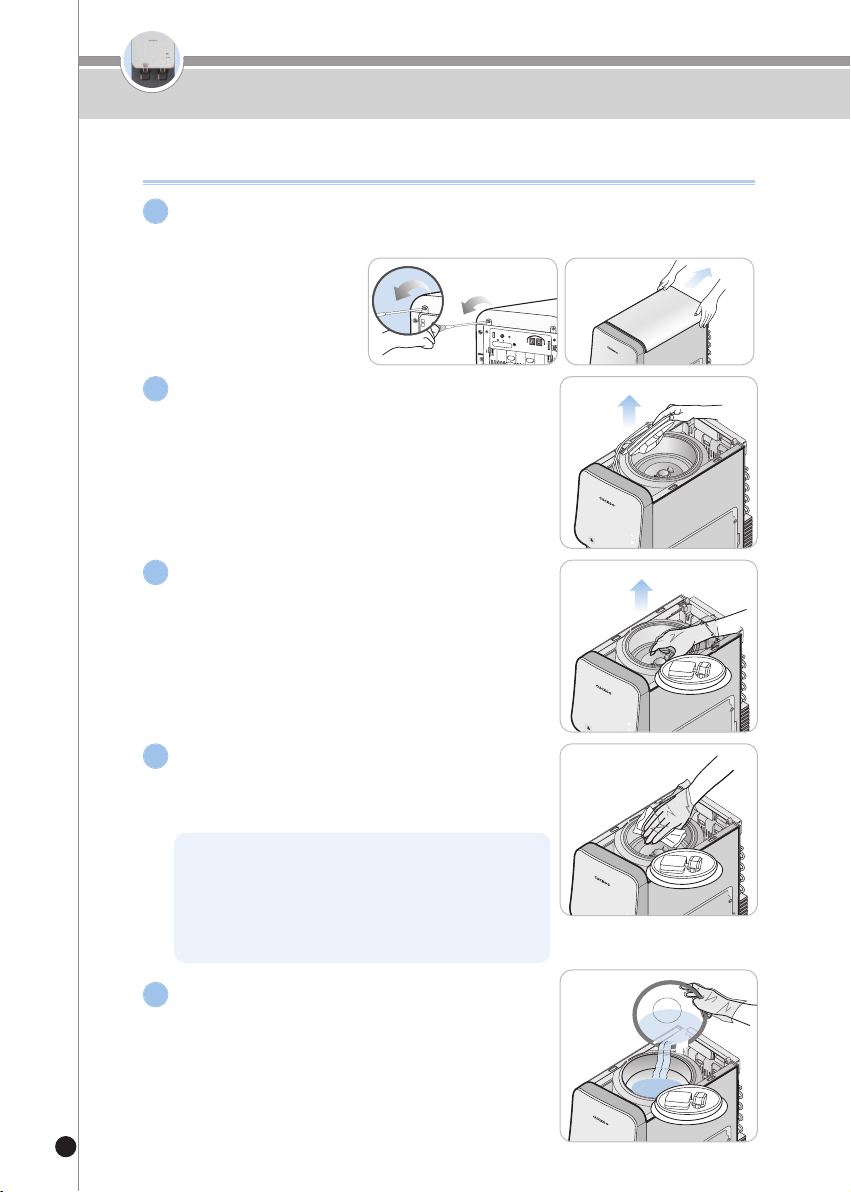
Remove the lid cover of the product.
Requires a phillips head + screwdriver.
6
Remove the cover from the cold water
tank.
The upper part of cold water tank is slightly warm
because it contains ambient water and hot water
steam.
7
Remove separator from the cold water
tank by pulling the separator.
When you remove the separator and clean the
inside of the tank, please wear gloves to ensure it
is properly sanitized.
8
Wipe out the inside of the tank with a
clean and soft cloth.
Make sure no foreign substances are left inside the
tank.
9
Pour the drained water (refer to Step. 4)
into the tank and wash it.
Completely drain the used water through the cold
water faucet.
Remove the hot water drain ball valve (end cap) and
completely drain the water that flowed into the hot
water tank. Then close the cap.
10
Scale may form inside the tank due to minerals melted
in the water. When you use the water purifier
infrequently, drain water through the cold / hot water
faucet once every two to three days.Then you can
prevent scale from forming. (It is best to use the purified
water within a short period of time.)
19
How to Clean the Cold Water Tank
How to Clean the Cold Water Tank
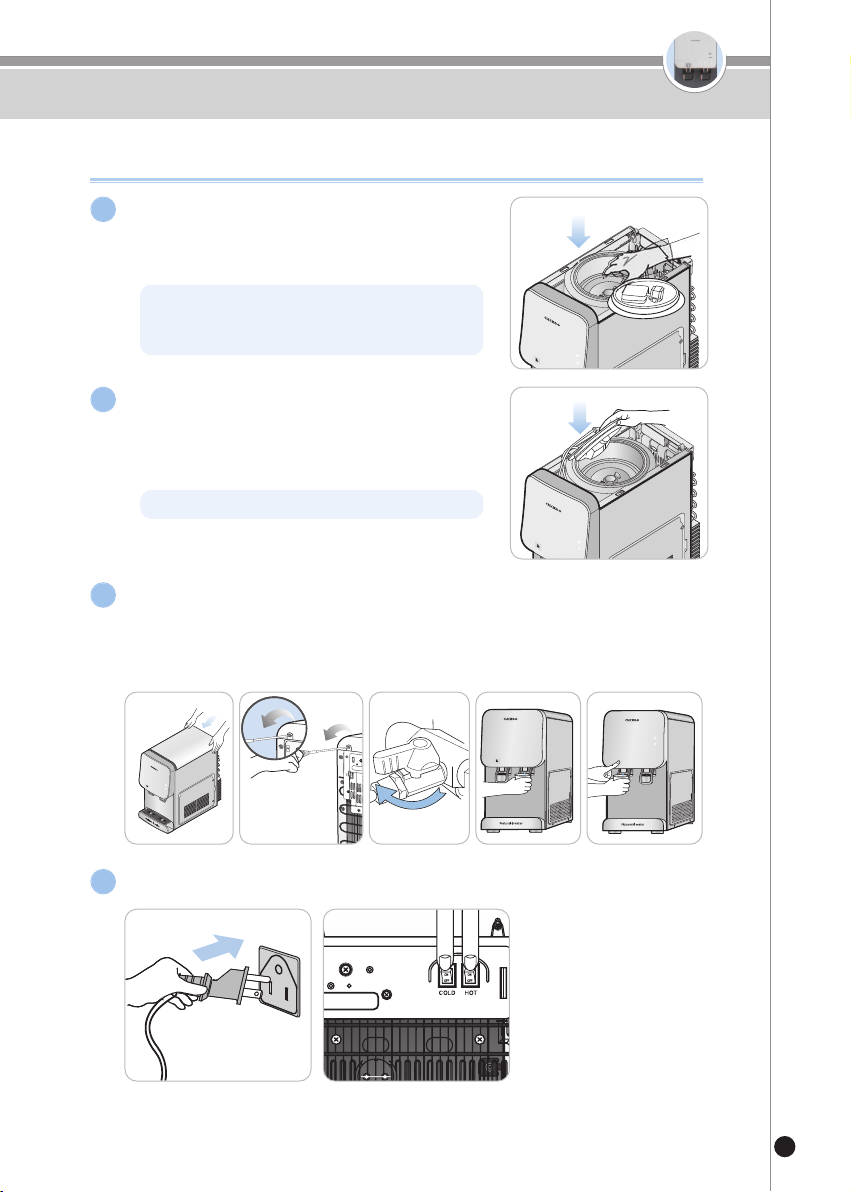
Reassemble the separator to the cold
water tank.
Cautiously press the separator into place.
11
Please install the cover on the cold
water tank.
Make sure the cover of cold water tank is
completely closed.
12
Place the lid cover on the product and fasten it with screws.
Open the tap water supply valve and check whether water flows
from the hot/cold water faucets.
Tighten the screw with a phillips head '+' screwdriver.
13
After checking water flow through the hot water faucet, turn on theHotbuttons.
Clean the tank on a regular basis in order to drink clean and healthy water.
14
Plug power plug and press theCold/Hotbuttons to turn them on.
Open
If it is not placed properly, the operation of the
compressor will be effected, which can cause noise.
Please make sure place the separator properly.
Otherwise, foreign substances may enter into the tank.
20
How to Replace the Filter
How to Clean Tray
How to Clean Faucet
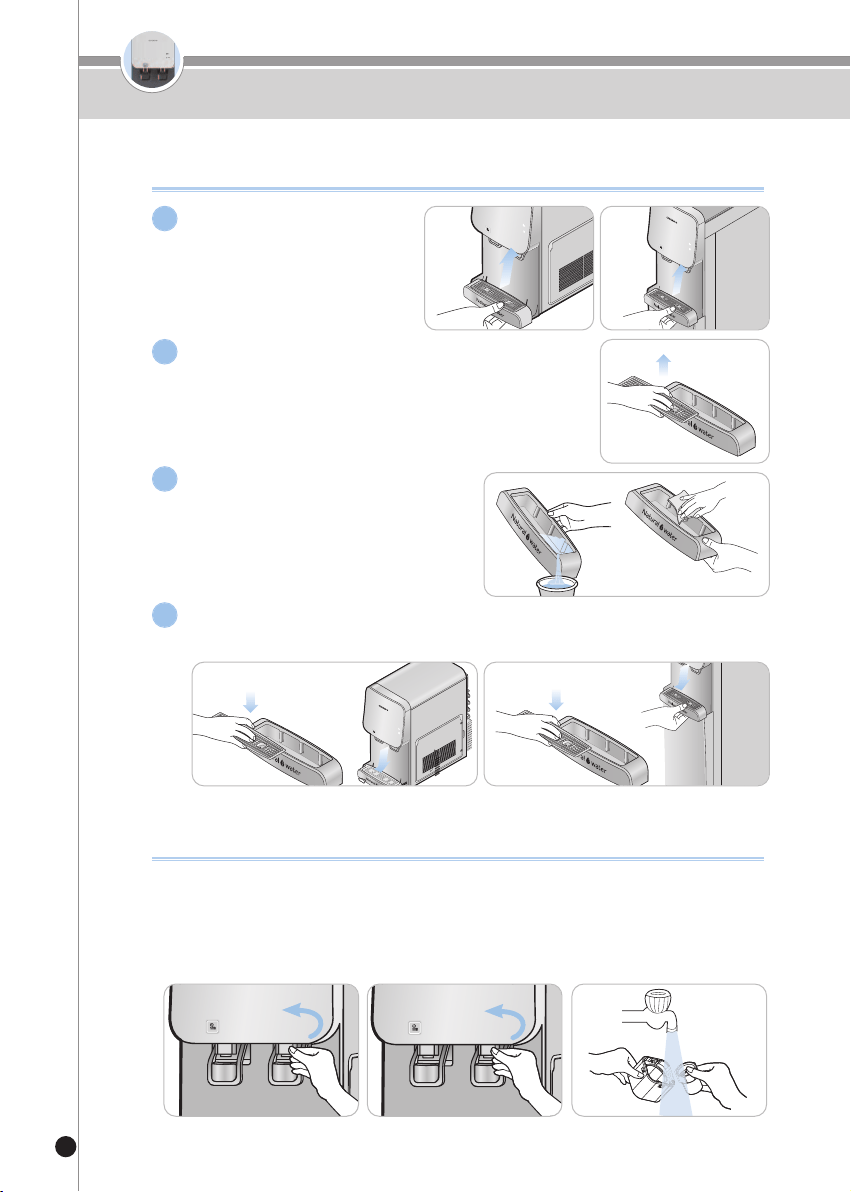
Separation of Tray
Hold and move the tray
upwards to separate the
tray.
1
Separation of Tray Cover
After removing the tray, pull from the hole of the
cover on the top of the tray to separate the tray
cover.
2
Cleaning of Tray
Throw away the stagnant water in the
tray, and remove the remaining with a
soft cloth, etc.
3
Assembly of Tray
After finishing the cleaning of the tray, assemble it in the reverse order of dismantling.
Turn the faucet cover counterclockwise to separate it.
Turn the faucet outlet counterclockwise to separate it.
Clean the faucet cover and outlet with running water.
Wear gloves for sanitation.
4
21
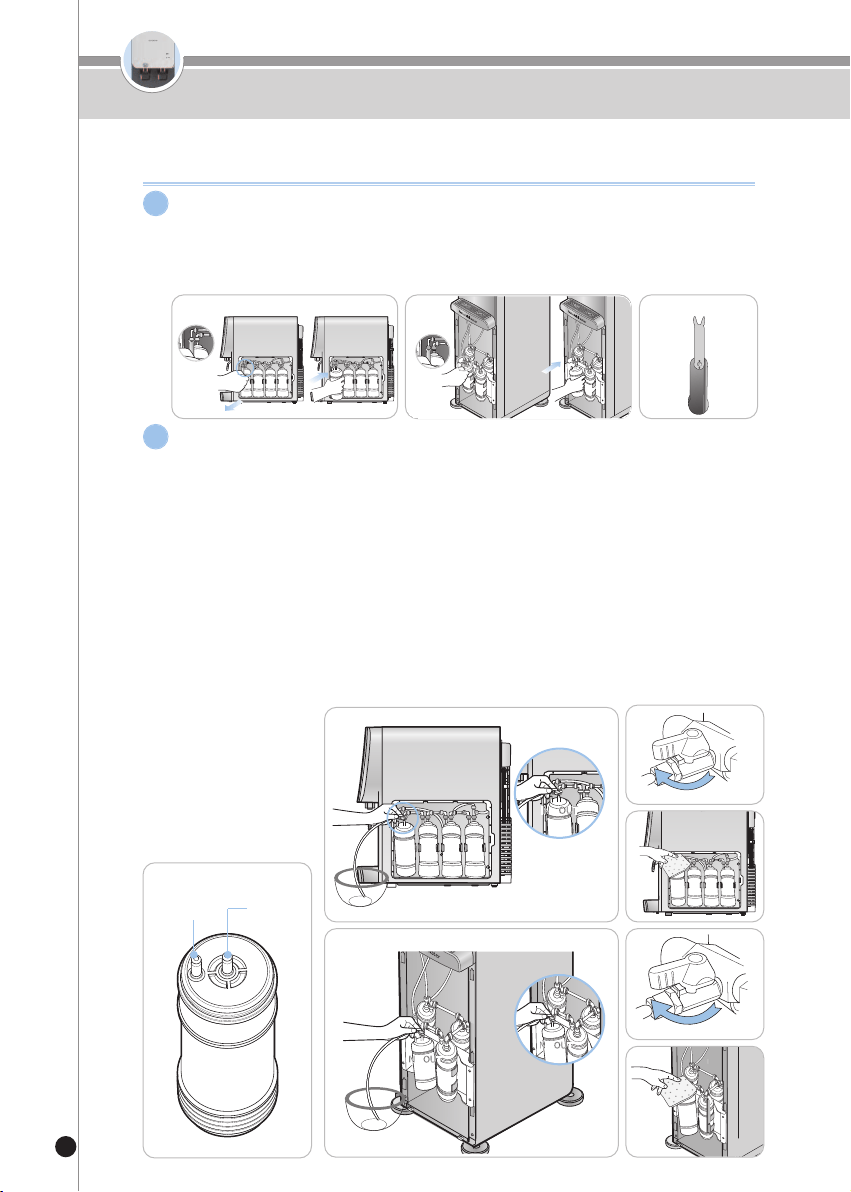
How to Replace the Filter
How to Replace the Filter (CUCKOO Filter (genuine) must be used)
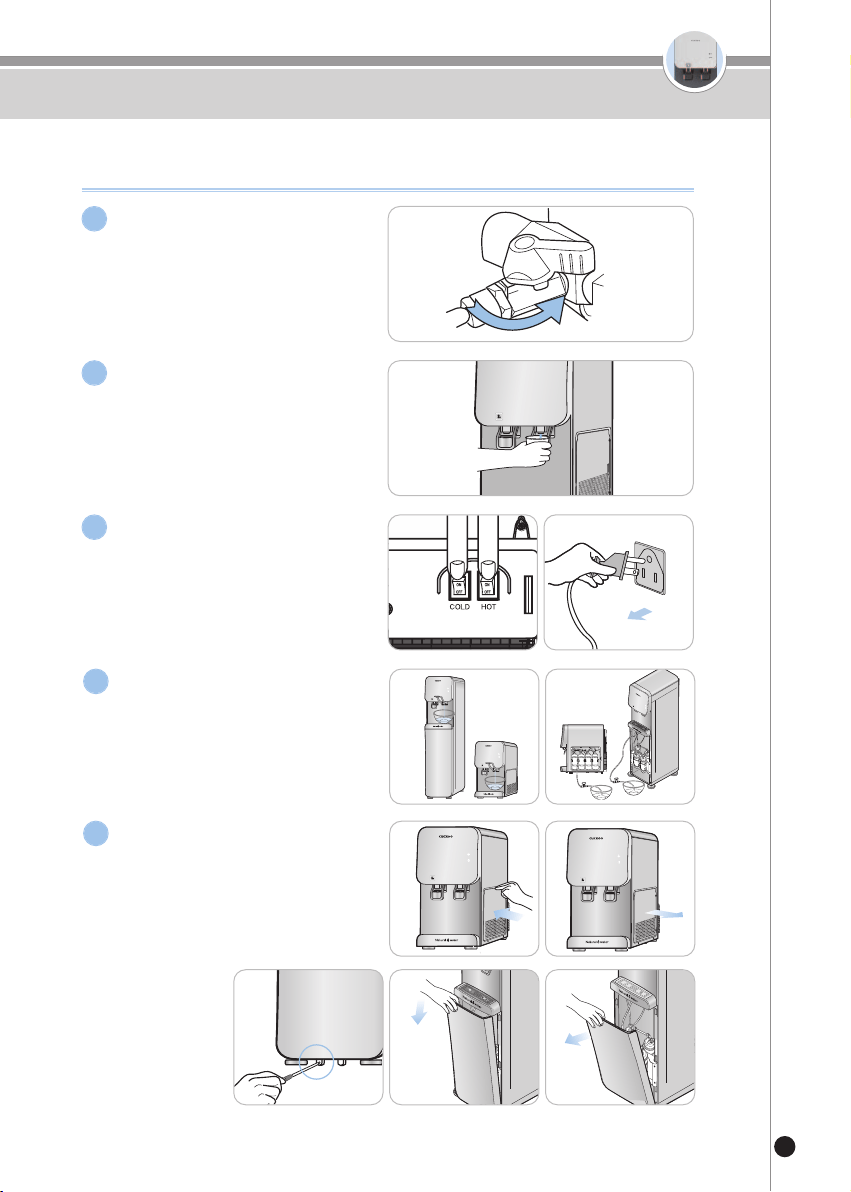
Close the tap water supply
valve.
1
Remove the remaining
pressure inside the pipe.
Drain approximately 3~4 cups
(500cc) of water from the cold water
faucet.
2
Turn off theHot/Cold
buttons, and unplug the
product.
3
Drain out all the water
remaining in the purifier.
4
For the Half Type, remove the
right side cover for filter
replacement.
Requires a phillips head +
screwdriver.
※ When removing screws, please
make water
purifier fully
drained before
leaning it.
Leaning it with
residual water
inside may cause spillover.
5
Close
22
How to Replace the Filter
Before replacing the filter, detach the connecting tube of the filter
you wish to replace.
Detach the connecting tube using an appropriate tool (fitting separator). Damage to the
fitting and/or connecting tube may cause water leak.
6
How to Replace the Filter (CUCKOO Filter (genuine) must be used)
Connect the outlet of the previous filter to the inlet of the replaced filter and
connect a separate water extraction tube to the outlet of the replaced filter. Then,
open the tap water supply valve to allow water to pass through.
Especially for the SEDIMENT, allow water to pass through for about 5 minutes.
Connect PRE CARBON 2.0 NATURAL 2.0 to the previous filters, and allow water to pass
through for about 7 minutes.
Connect the RO to the previous filters, and allow water to pass through for about 10
minutes.
※ In case of RO, let the water pass through the external drain water control valve.
※ In case of RO, be careful as there are two water outlet each for purified water and drain water.
Allow plenty of water to pass through or else it will affect the taste and quality of water.
It is important to supply the purifier with water to check for any water leaks after filter
replacement.
7
Fitting Separator
Open
Open
Inlet
Outlet
23
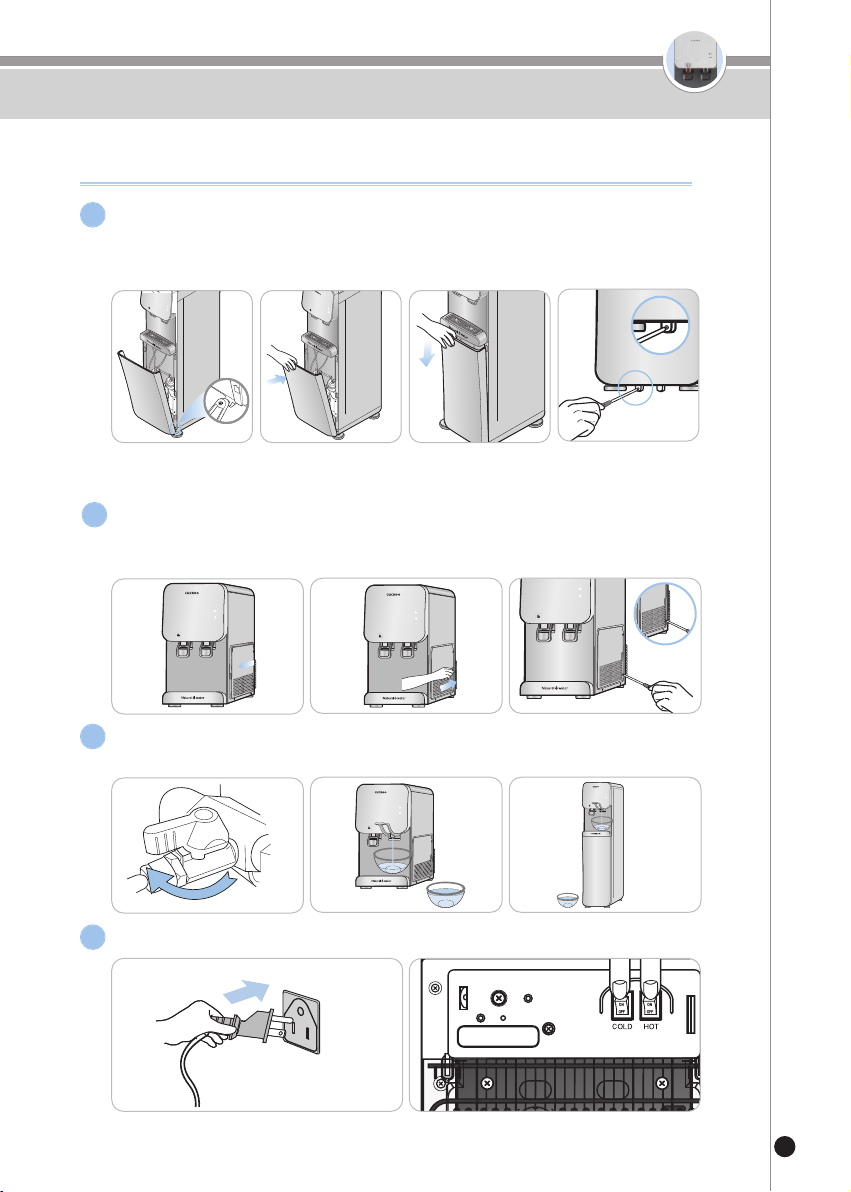
How to Replace the Filter
(Stand Type) Place the lower front cover again and fasten it with screws.
Find the accurate place of the screws to ensure the cover to be fastened properly.
Requires a phillips head+ screwdriver.
※ When removing the screws, please make sure the water purifier is fully drained
before leaning it. Leaning it with residual water inside may cause spillover.
8
Turn on the tap water supply valve and fill the tank with water up to the
limit then drain it out. Repeat twice.
10
After filling the tank with water, connect the power plug.
11
How to Replace the Filter (CUCKOO Filter (genuine) must be used)
(In Case of Half Type) Place the right side cover again and fasten it
with screws.
Requires a cross + screwdriver.
9
Open
24
Filter Arrangement / How to Install Overturning
Prevention Wire
Recommended Filter Replacement Cycle
The filter replacement cycle is determined with the use of 10 L, and
may be affected by the condition of tap water.
Recommendations
Filtration Capacity
Filtration capacity is the recommended amount of usage by the rate of removal of
chloroform etc. This is to get the life span of of the filters in the purifier.
Filter Replacement Cycle
The filter replacement cycle means the expected cycle (period) that the filters can
perform properly.
The filter replacement cycle may vary based on usage. Its standard cycle has been set
under condition that the supply is tap water with about 10L (drinking water (for four
people) used per day.
In the reverse osmosis membrane filter system, the water purified
through
the filter is 20~35% of the raw water (Water temperature 25℃, Water Pressure 0.34
MPa). This can vary depending on water temperature and water pressure.
Sediment
Sediment 3.0 (optional)
Precarbon 2.0
RO membrane
Natural 2.0
Mineralizer (optional)
1800L / 6 months
1800~2400L /6~8 months
1800L / 12 months
3600~5400L / 24months
3600L / 12 months
3600L / 12 months
※ Note: the above replacement cycles are estimates only and may vary depending on feedwater condition.
CP-DRP1201SW
Sediment Filter Model 1800L

25
Filter Arrangement / How to Install Overturning
Prevention Wire
Filter Arrangement
Step 1
Sedim
ent or
Sedim
ent
3.0
Step 2
Pre
Carbon
2.0
Step 3
RO
Memb
rane
Step 4
Natural
2.0 or
Mineraliz
er
CP-FR601SW
How to Install Overturning Prevention Wire
To prevent overturning of the water purifier, make sure to attach the overturning prevention
wire on the wall. Please attach to the wall when wire and pin are expanded
26
Please check before
asking for support.
When the Water Purifier is not used properly, in compliance with the User Manual, the product may operate
abnormally even if it is not broken down. In such case, please take the following instructions accordingly. If you
cannot solve the problem, please contact Cuckoo website.
Problem Checklist
Recommendation
The water has an
unpleasant taste or
odor.
•Have you not used the Water Purifier for a
long time?
•Is it time to replace the filter(s)?
•Have you not used hot water for a long
time?
•Drain the water from the hot/cold water tanks and
clean the cold water tank.
•Replace the filter (with a genuine filter of Cuckoo).
•Drain the water from the hot water tank through the
hot water drain tube from the back. Discharge hot
water through the hot water faucet frequently.
There is no water
coming out.
•Is the tap water connected properly?
•Is your household water pressure low?
•Are you getting cold water but not hot
water?
•Do you think there is a problem with the
hot/cold water lever?
•Open the tap water supply valve.
•Check if the feed tube is bent.
•Check if the water supply is cut off.
•Attaching External Pump (Optional) / Contact
Customer service.
•Push the hot water lever as you press the Child
Lock button.
•Check whether the hot water indicator is on.
•Check if the power is on.
※If you still don't get any hot water after checking
the above, please contact our customer service.
•Contact Cuckoo website.
The hot water
temperature is too low.
•Is the hot water indicator on?
•Did you already extract a lot of hot water?
•Is the temperature of purified water at room
temperature?
•Turn the “Hot” button "ON" and make sure the
hot water indicator is on.
•If you extracted all of the hot water from the hot
water tank, you need to wait 30 minutes to re-heat
the water.
•Turn the “Hot” button "OFF" and contact
Customer Service.
27
When the Water Purifier is not used properly, in compliance with the User Manual, the product may operate
abnormally even if it is not broken down. In such case, please take the following instructions accordingly. If you
cannot solve the problem, please contact Cuckoo website.
Problem Checklist
Recommendation
The cold water
temperature is too high.
•Is the cold water indicator on?
•Did you already use a lot of cold water?
•Is the back of the product properly
ventilated?
•Turn the “Cold” button "ON" and make sure the
cold water indicator is on.
•If you used all the cold water in the cold water tank,
you need to wait approximately 1 hour to re-cool
the water.
•Check if the radiator at the back of the product is
blocked. Remove any objects blocking the radiator.
•Move the product to a well-ventilated area.
(contact customer service before moving and
re-installing the product)
There is a sudden
decrease in the amount
of purified water.
•Did you close the tap water supply
valve?
•Is it time to replace the filter?
•Open the tap water supply valve.
•Replace the filter with Cuckoo Filter (genuine).
There is a loud noise
coming from the purifier.
•Did you place the product on a flat area?
•Is it in contact with other
products/products?
•Does it happen when you extract water
from the faucet?
•Does it get noisy after the pump operation?
•Place the product on an even and sturdy area.
•Make sure the product is not in contact with other
product.
•Because the water purifier is directly connected to
tap water, the water immediately flows when water
is extracted. The noise is caused by the water flow
which is normal.
•It is the pump working in order to supply purified
water to the tank, which is a normal operation after
water extraction.
There are floating
substances in the water.
•Is it time to replace the filter? •Replace the filter with Cuckoo Filter (genuine).
Water is leaking from the
purifier.
•Is the assembled (connecting) part
defective?
•Is your home or external environment
humid?
•After closing the tap water supply valve, unplugging
the product and contact Cuckoo website.
•When moisture in the air comes in contact with the
cold part of the purifier, it'll condense on the purifier
like dew.
A similar phenomenon can be seen with water
droplets forming on glass.
Please check before
asking for support.

28
Product Specifications
The information (exterior, design and specifications) provided in this User Manual is subject to change without prior
notice to improve the quality of the product.
Drinking Water Coolers
Capacity
260 (W) x 482 (D) x 1156 (H) mm
Stand Type
CP-FR601SW
Hot : 465W(3.9A) / Cold : 100W(1.3A) / TOTAL : 565W(5.2A)
1.5L
2.0L
2.5L
6.0L
R-134a, 1.2oz
N (Temperate)
For indoor use
Product Name
Types
Model
Rated Voltage
Power Consumption
Purification Method
Filter Types
(Materials)
Purified Water
Cold Water
Hot Water
Total Capacity
Single phase current AC 120V/60Hz
Reverse Osmosis Filtration System
SEDIMENT / SEDIMENT 3.0
PRE CARBON 2.0
RO MEMBRANE
NATURAL 2.0 / MINERALIZER
Types of Refrigerants
Climate Classification
High-side : 186psig, Low-side : 88psig
The high and low-side design pressure
Installation Area
Size
50.5lb
0.14~0.7MPa (1.4~7.0bar)
Normal Operation Pressure
Weight
29
MEMO
30
MEMO

31
MEMO

Z0307-0299S0 Rev.2
We provide satisfying consultation and services concerning your complaints, suggestions, and recommendations
upon receiving your troubled product model name, status, and contact information.
♣ After reading this manual, keep it in a place easily accessible to the user for future reference.
♣ This manual includes the warranty.
♣ Caution : Please read this manual carefully to ensure safety and a longer product lifespan.
http://www.cuckooamerica.com