
Operator’s Manual
www.mechmaxx.com
FORESTRY MULCHER
WARRANTY

1
www.mechmaxx.com
For the sake of this manual, the front of the machine is the side with the rotor exposed. The rear has deflection chains.
For compact track loaders and rubber tire machines, when the Mulcher is mounted on the front of the machine, the front
of the mulcher is facing the same forward direction. If mounted on the rear, the front of the mulcher is facing away from
the rear of the carrier. Mounting for excavators and other boom-type installations may vary but references to the front
and rear of the Mulcher remain the same.
ORIENTATION
DESCRIPTION AND APPLICATIONS
DESCRIPTION AND APPLICATIONS
The Forestry Mulcher was designed for shredding woody materials. The forestry mulcher excels at processing yard waste,
land preparations and slash reduction. It has multiple uses for farmers, parks, golf course, loggers, landclearing compa-
nies, ranchers, foresters and Silva culturists.
The Mulcher’s patented fixed tools are designed to withstand daily brush shredding, land clearing and stump grinding
operations.
The Mulcher shreds material into a fine particle size by going over the shredded material until the desired texture is
achieved. If left on the ground the shredded material is beneficial to the soil. On steep slopes the output from the Mulcher
is ideal for interim erosion control.
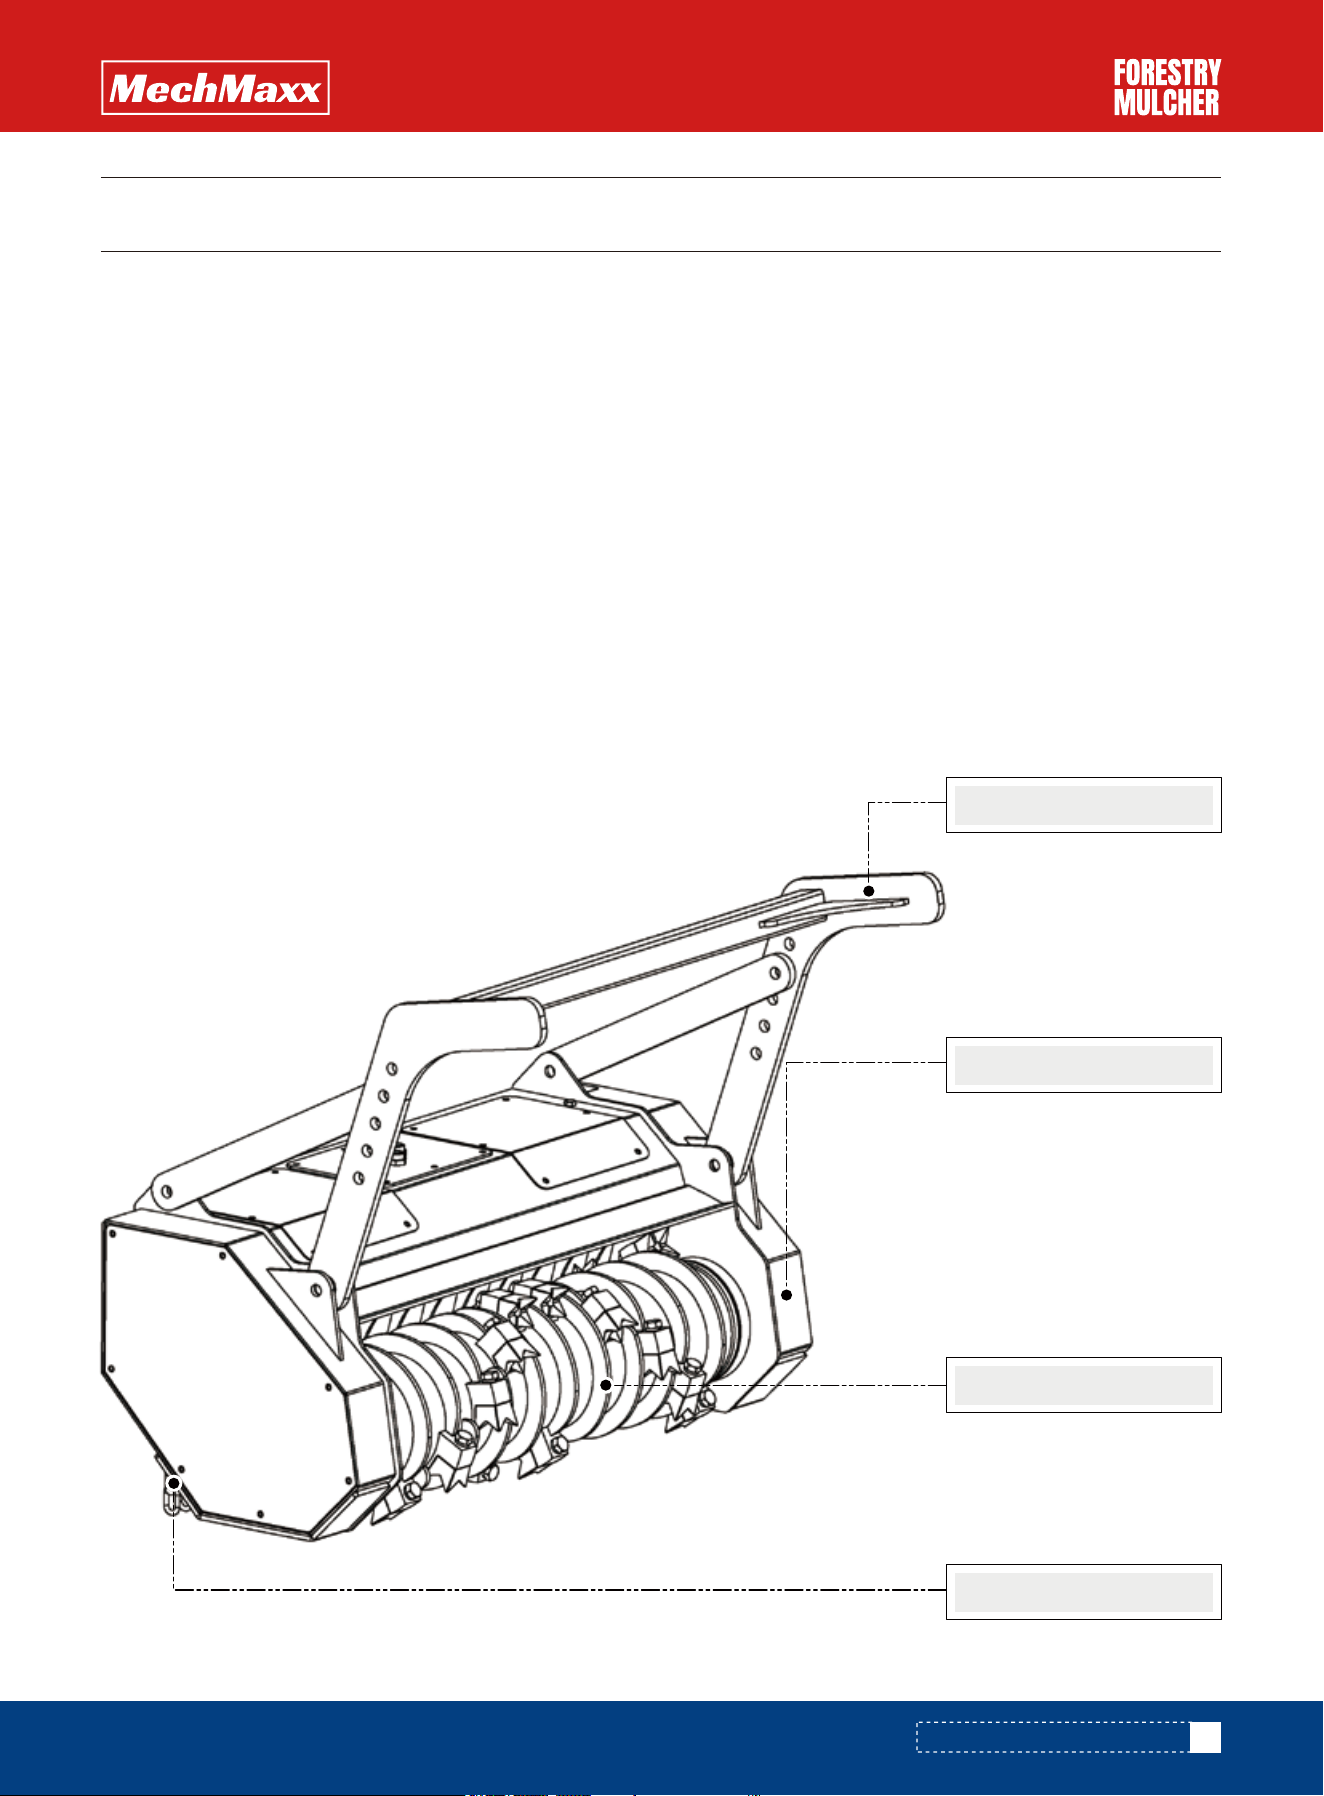
Pushbar
Belt Cover
Rotor
Chain
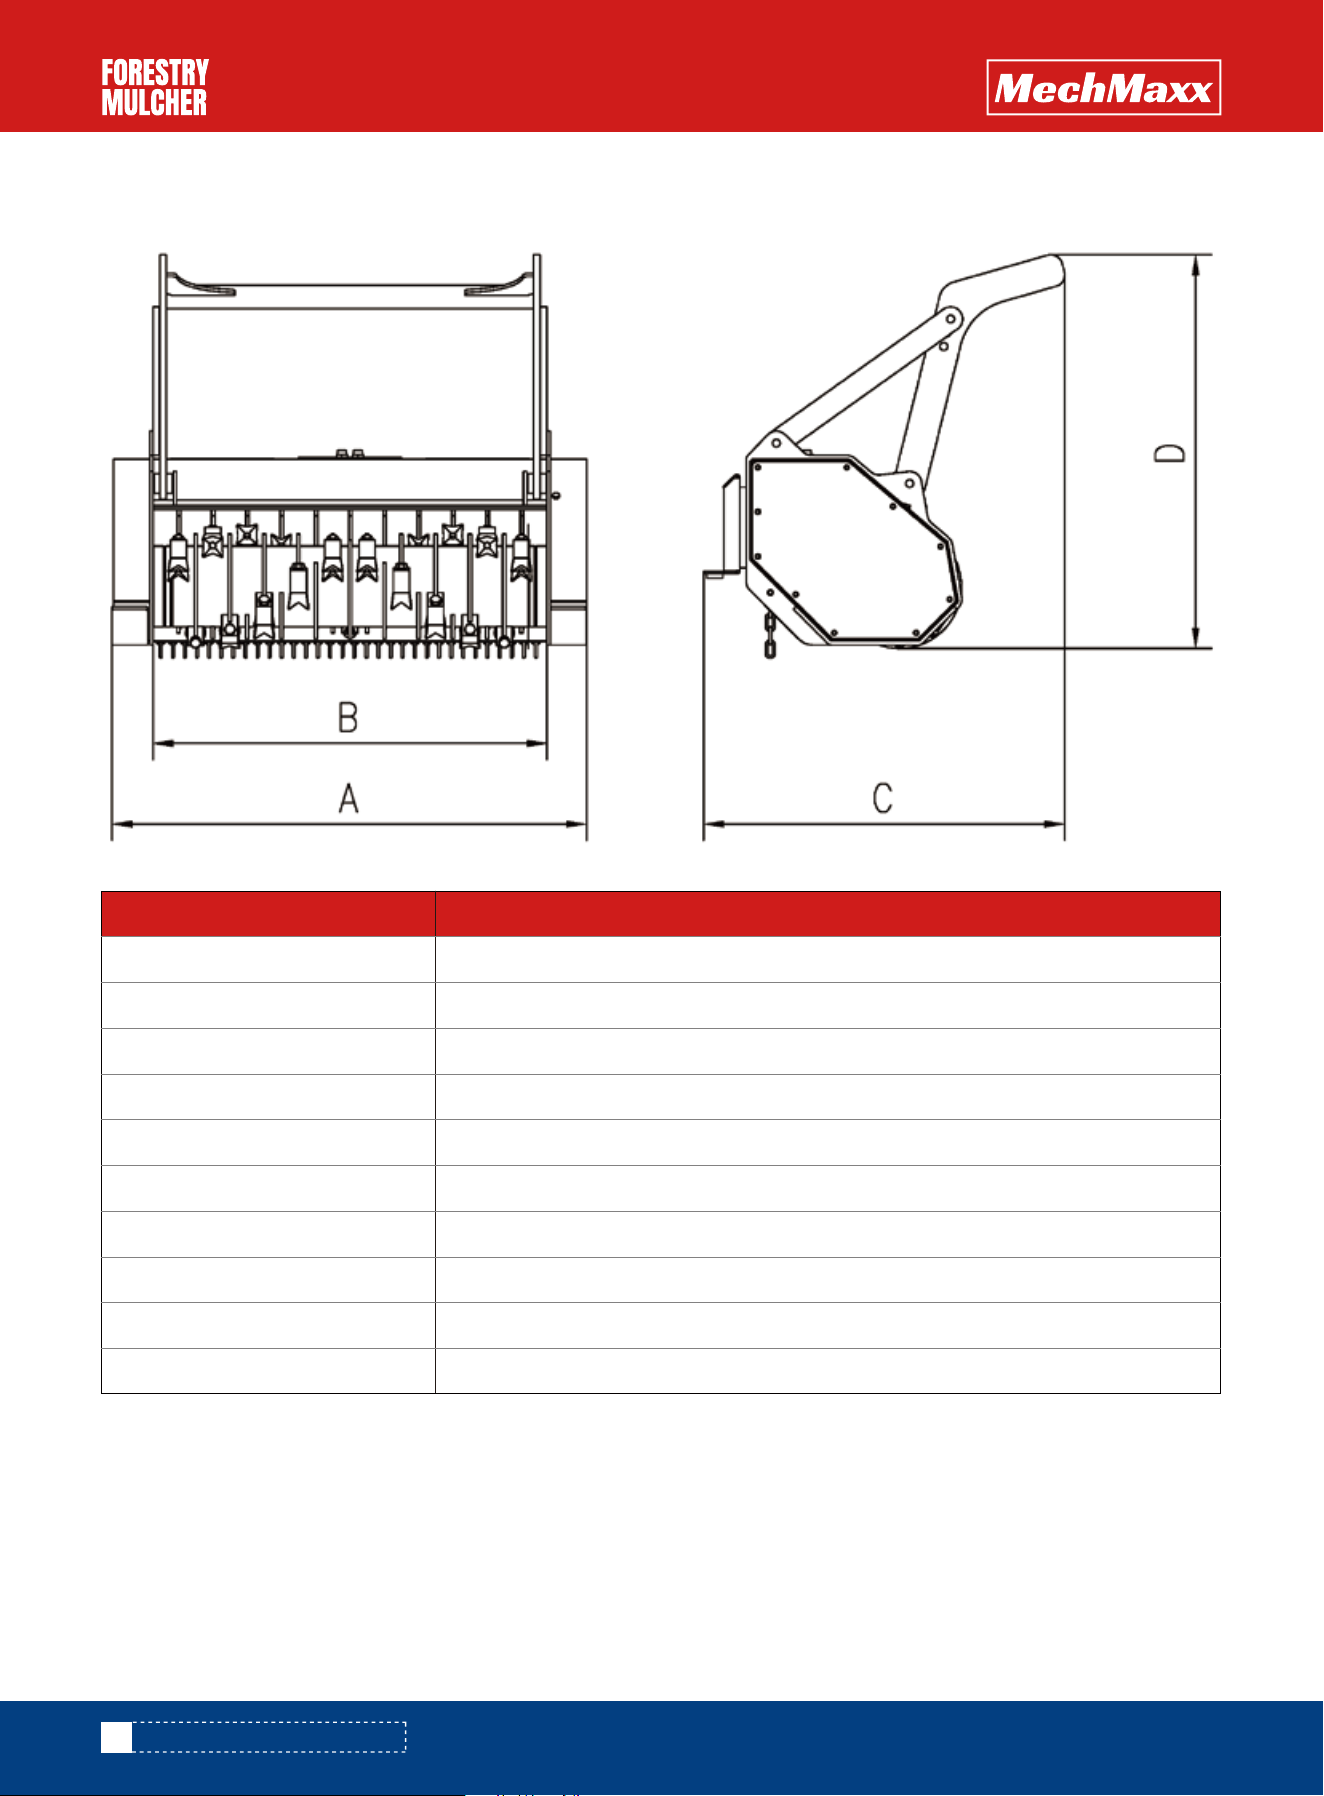
TECHNICAL SPECIFICATIONS
2
www.mechmaxx.com
Total width (A)
Working width (B)
Length (C )
Total height (D)
Weight
Driving method
Flow range
Maximum pressure
Number of bits
Maximum cutting diameter
Synchronous Belt
in
in
in
in
lbs
L/min
bar
in
46
37
36
36.6
705.4
40-60
210
21
3.9
Model MCH37
DESCRIPTION AND APPLICATIONS
SAFETY SYMBOLS & DEFINITIONS
SAFETY DECALS
3
www.mechmaxx.com
SAFETY INFORMATION
SAFETY INFORMATION
Safety alert symbols are used throughout this manual to draw your attention to possible dangers. These symbols and
their explanations deserve your careful attention and understanding. The safety warnings do not by themselves eliminate
any danger. The instructions or warnings they give are not substitutes for proper preventive measures. These safety
instructions are not meant to cover every possible condition that may occur.
This symbol, the industry’s “Safety Alert Symbol”, is used throughout this manual and on labels on
the Mulcher itself to warn of the possible dangers that may lead to personal injury. Read these
instructions carefully. It is essential for your safety that you read the instructions and safety regula-
tions BEFORE you attempt to transport, assemble or operate this unit.
Make certain that all of the safety decals on the unit are maintained in good legible condition. Replacement decals are
available through. Specify the part number that is provided in the lower right hand corner of the decal.
Obey all of the safety labels on the Mulcher. They are provided for your protection. If any labels are removed, damaged or
made unreadable in any way, contact Fecon for a replacement.
If the Mulcher is equipped with any options, read and understand ALL of the safety precautions and warnings for that
particular option BEFORE performing maintenance or operating.
PRIOR TO OPERATION
•Read this manual in its entirety and follow ALL safety procedures
•Check all lubrication points and fluid levels.
•Inspect all fasteners for tightness with the power turned off.
The word DANGER, preceded by the safety alert symbol, indicates immediate hazards which WILL
result in severe personal injury or death if not avoided.
The word WARNING, preceded by the safety alert symbol, indicates hazards or unsafe practices
which COULD result in severe personal injury or death if not avoided.
The word CAUTION, preceded by the safety alert symbol, indicates hazards or unsafe practices which
COULD result in minor personal injury if not avoided.
The word CAUTION, not preceded by the safety alert symbol, indicates hazards or unsafe practices
which COULD result in equipment damage if not avoided.
The word NOTICE not preceded by the safety alert symbol, indicates information or a company policy
that relates directly or indirectly to the safety of personnel or the protection of property.

4
www.mechmaxx.com
SAFETY INFORMATION
GENERAL PRECAUTIONS
THE HAZARD ZONE
1.Tag the engine operating area to show that the Mulcher is being serviced.
2.The Mulcher discharges material out the front. When cutting with the Mulcher, never discharge
material in the direction of bystanders nor allow anyone near the machine while in operation.
3.Bystanders must be at least 300 feet (90 meters) away when cutting.
4.It is the operator’s responsibility to ensure personnel do not enter the hazard zone.
5.Clear the work area of objects (fencing, rocks, bottles, wire, etc.) which could become projectiles.
6.The tractor cab door must be equipped with minimum ½” (1.25cm) polycarbonate. This is not only to
protect the operator from thrown objects, but will also protect from hanging objects, such as rebar,
tree limbs, or other objects from entering the cab.
7.Disengage power to the Mulcher and shut off the tractor engine before leaving the operators area.
8.Disengage power to the Mulcher and shut off the tractor engine before performing maintenance on
the mulcher.
9.Never place hands or feet under the Mulcher or near any moving parts when unit is running. Always
keep clear of the front discharge area when operating the Mulcher.
10.Stop all action, read and observe the operation and safety manual in its entirety, following all
safety precautions before operating or performing maintenance.
11.Do not operate the Mulcher without all guards in place. Always use safe operating practices.
12.Hydraulic fluid is under high pressure. Always use safe operating procedure. Each Mulcher is tested
and inspected prior to shipping. However, over time any hydraulic system may develop fluid leaks and
very small leaks may produce high pressure discharge flows capable of causing injury should skin
come in contact with such discharge.
13.Keep a sufficient distance away from all electrical power lines.
14.Operators of the Mulcher should never ride passengers on the machine.
15.Always wear appropriate personal protection apparel (safety goggles, hard hat, ear protection and
approved safety shoes) when operating the Mulcher. Other safety attire such as ear protection,
gloves, dust masks, etc, should be worn as required by warning decals on the machine, in the opera-
tor’s manual or specific job site requirements.
16.Never operate this or any other machine when fatigued, tired, under the influence of alcohol, illegal
drugs or medication. All personnel must be in good physical and mental condition to operate the
Mulcher.
Flying debris or objects can cause serious injury or death.
Improper operation and failure to follow safety precautions can cause serious injury or death. All
personnel must be clear of the hazard zone while the Mulcher is in operation.
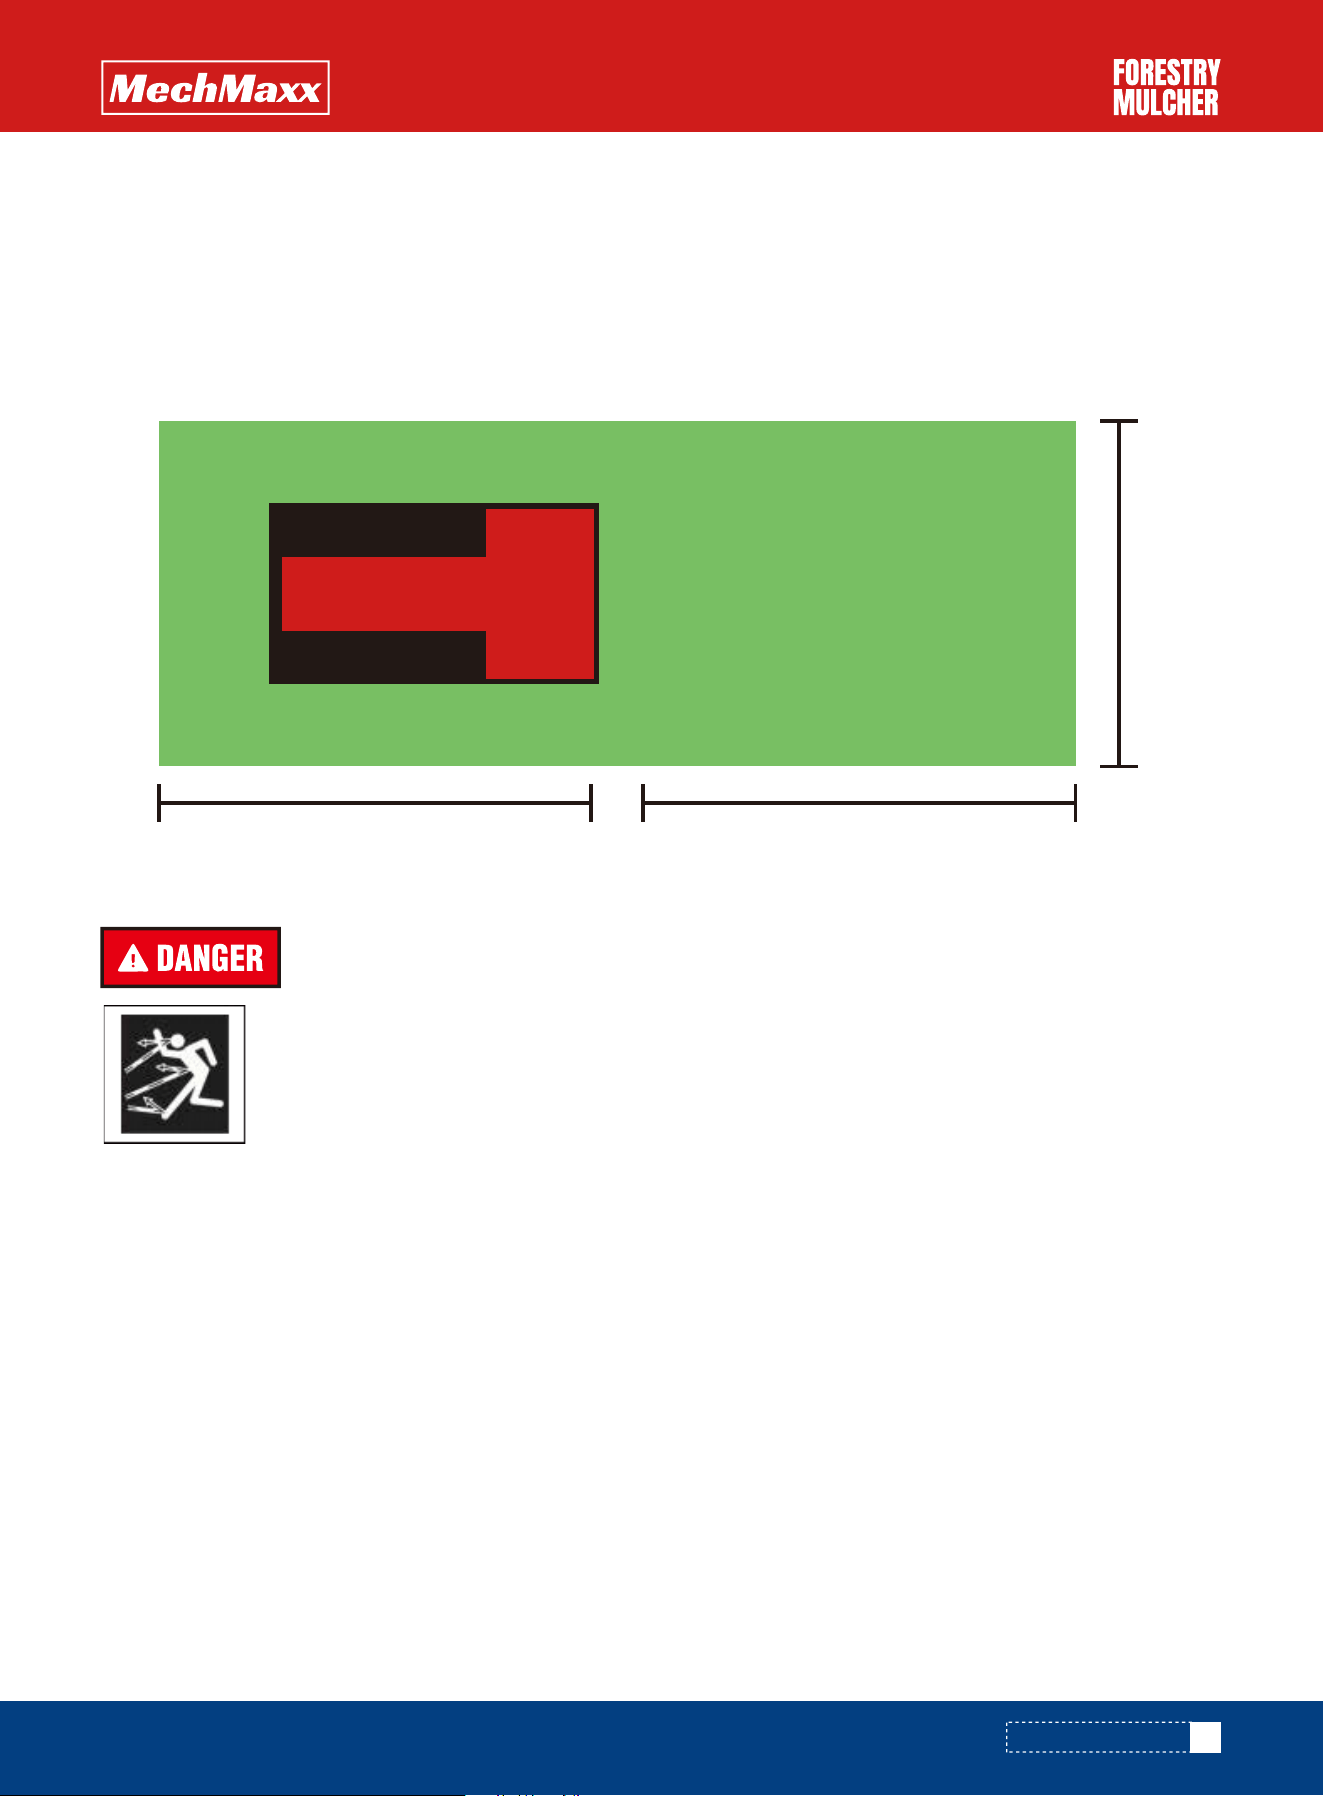
The Hazard Zone is illustrated below. All personnel should be kept clear of this zone while the Mulcher is operating.
The shaded areas in the Hazard Zone must be considered off limits to all individuals. The operator should follow the
precautions below before operation of the Mulcher.
5
www.mechmaxx.com
SAFETY INFORMATION
•It is the operator’s responsibility to ensure that no one enters the Hazard Zone.
•Warn all persons in the area of the Hazard Zone.
•Stay alert for outsiders entering the work area who may not be aware of the Hazard Zone.
•Land clearing operations generally involve other machinery and people on the same site. Maintain an awareness of all
working traffic within 150 ft (45 m) to each side and 300 ft (90 m) in front and behind the Mulcher.
HAZARD ZONE PRECAUTIONS
DANGEROUS LOCATIONS
Flying debris or objects can cause serious injury or death.
Improper operation and failure to follow safety precautions can cause serious injury or death. All
personnel must be clear of the hazard zone while the Mulcher is in operation.
DANGER EXISTS MOST PROMINENTLEY IN FRONT AND BEHIND THE MULCHER.
Pieces of wood and rock can project from the Mulcher. This condition is dangerous. This will occur when the mulcher is
raised high enough to allow material to escape.
Follow These Precautions:
•Never allow anyone to enter the Hazard Zone of the Mulcher while it is operation.
•Inspect the carrier and mulcher daily for damaged or missing deflection chains and flaps.
Be Especially Careful:
•When the Mulcher is being raised up and out of the material that it is working.
•When the Mulcher is lowered into new material.
Close the hydraulic trap door (if equipped) while pull-working to better contain material. This also increases the fineness
of the shredded product.
300 ft (90m) 300 ft (90m)
300 ft (90m)
CARRIER
MULCHER

6
•Sparks from power equipment do start wildfires. Be careful on hot, dry days and be sure the equipment is checked
regularly.
•Mulch before 10 am, but never when its windy or excessively dry. Rotating metal pieces can strike rock and create
sparks and start fires.
•When doing any work outdoors with mechanical equipment, keep a shovel and fire extinguisher nearby.
•Keep a cell phone nearby and call 911 immediately in case of fire.
•Remove all fiberous mulch, leaves, paper and other flammable material accumulated in the engine compartment. This
could cause a fire.
•Marshland, when dry, is highly flammable. Marshland can self-ignite even in low temperatures. Always keep the engine
compartment and engine clean.
•Check fuel, lubrication and hydraulic system for leaks. Have any leaks repaired immediately. Clean up any excess oil, fuel
or other flammable fluids and dispose of properly.
•Be sure the fire extinguisher is present and working.
A step-up of safety procedures and precautions is required when working:
•Near streets.
•Near highways.
•In parks, golf courses or other inhabited areas.
•Near buildings.
Establish safety parameters that fit the site
•String red and white colored barrier tape to secure the work area.
•Place signs warning of mowing zone (if working alongside of highway) 1000 ft (300m) minimum before edge of Hazard
Zone is breached.
•Utilize a traffic director when the hazard Zone impinges on pedestrian or vehicular traffic.
•Erect barriers.
FIRE PREVENTION
URBAN PRECAUTIONS
CARRIER VEHICLE FIRE PREVENTION
www.mechmaxx.com
SAFETY INFORMATION
Operation of this equipment may create sparks that can start fires around dry vegetation.
7
OPERATION SAFETY/ THE OPERATOR
OPERATION SAFETY/ THE OPERATOR
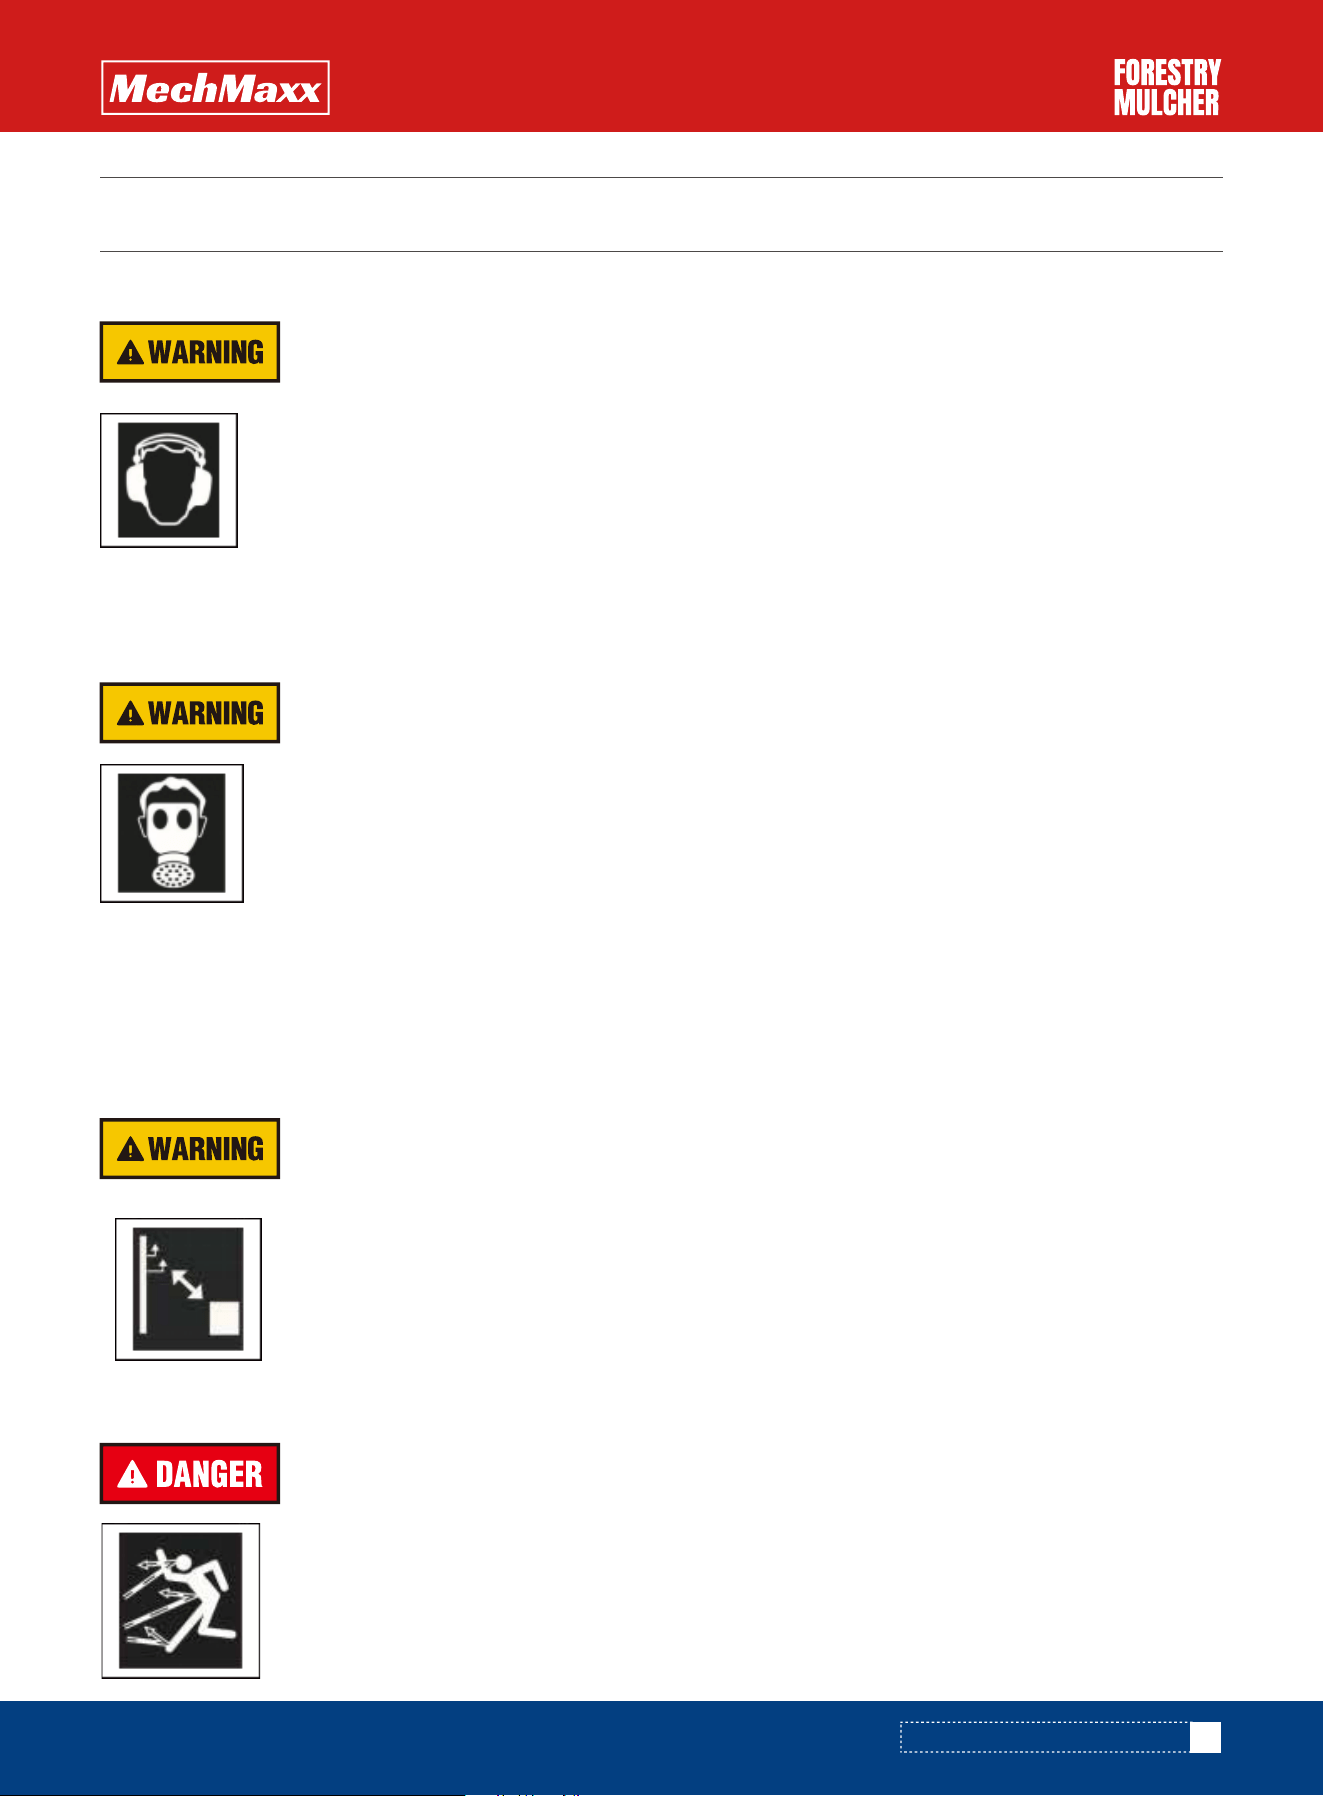
SOUND LEVELS/ HEARING PROTECTION
PROTECTION FROM FLYING OR FALLING OBJECTS
AVOID POWER LINES
OPERATOR PROTECTION
DUST PROTECTION
www.mechmaxx.com
Flying debris or objects and falling objects can cause serious injury or death.
Hearing protection must be used in this area.
Take the following precautions:
•Always keep doors and windows of the tractor closed.
•Use EU approved hearing protectors or ANSI S3 19-1975 approved hearing protectors with a noise
reduction rating (NPR) of 25dB (A).
•Ear plugs (disposable or re-useable)
•Ear muff
Take the following precautions:
•Keep the door shut and windows of carrier closed.
•Utilize an EU approved or NIOSH approved respirator with replaceable filters rated for dust collection.
•Install minimum of ½” (1.25cm) thick Lexan polycarbonate cab windows.
•Install approved FOPS falling object protection.
•Replace damaged or missing polycarbonate windows or falling object protection components.
Prolonged and excessive exposure to dust can cause complications of your respiratory system.
Prolonged and excessive exposure to dust can cause chronic and acute health problems.
Be alert of the possibility of projectiles exiting the Mulcher. Falling brush, branches and trees also present a potential
hazard to the operator.
Serious injury or death can result from contact with electric lines. Never move any part of the equip-
ment closer than 10 ft (3 meters) plus twice the line insulator length to an electric line. Use a signal
person to guide the operator. Use shrouds or insulators as necessary.
Be aware of the direction that trees are felling. Always direct away from power lines.
8
OPERATION SAFETY/ THE OPERATOR
STOPPING THE ROTOR BEFORE EXITING THE CAB
CARRIER VEHICLE PREPERATION/ MAINTENANCE
SHIELDING
REFER TO THE SAFETY SECTION IN THE MANUAL FOR MORE INFORMATION.
www.mechmaxx.com
Improper operation and failure to follow safety precautions can cause serious injury or death. All personnel must be clear
of the Hazard Zone while the Mulcher is in operation.
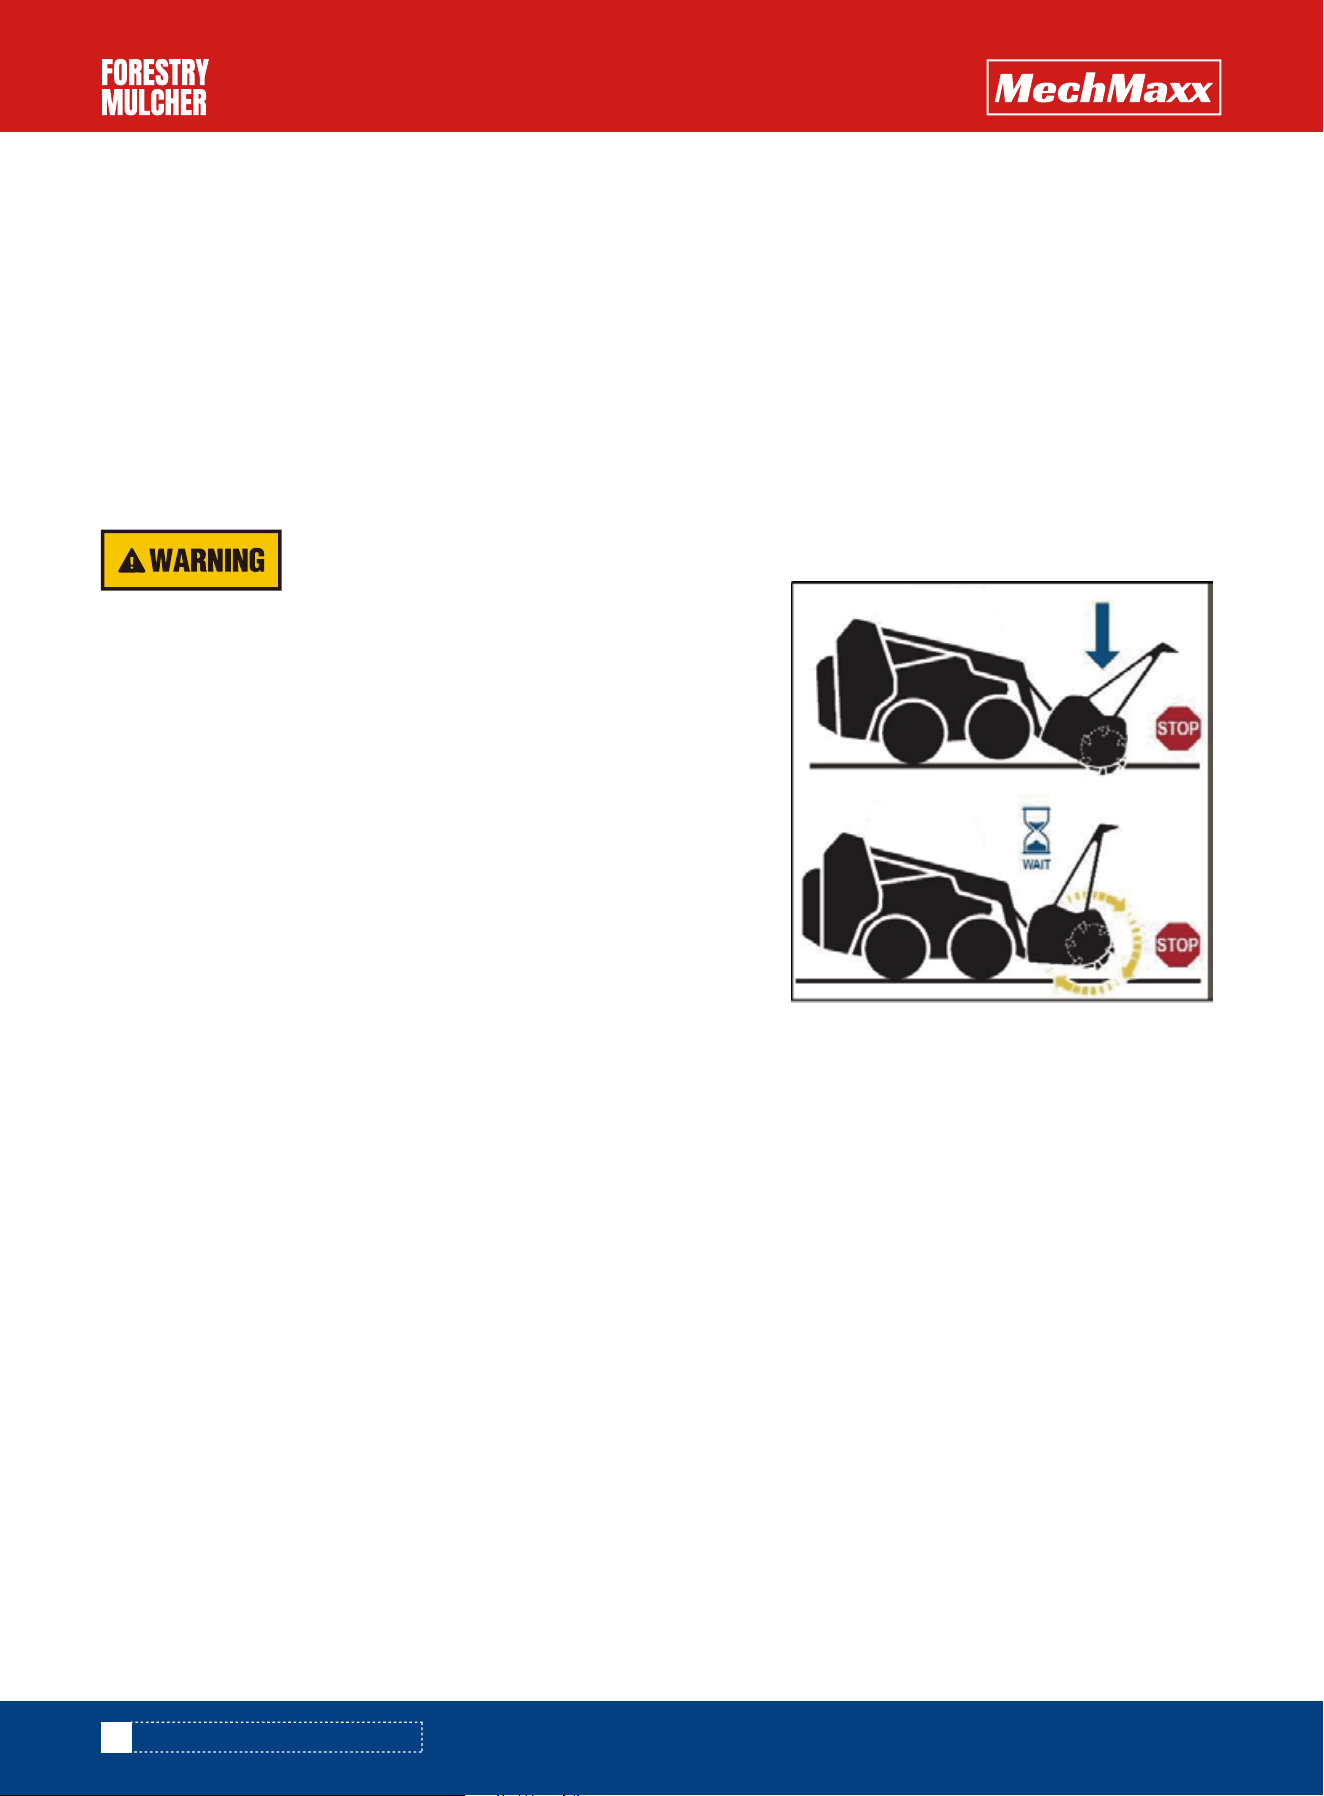
To stop the rotor:
1.Lower the engine speed to idle.
2.Shut off power to the Mulcher circuit.
3.Push the rotor into the ground or other debris until the blade carrier
stops.
If the is no place to stop the rotor, wait for the rotor to stop before
exiting the cab.
The following precautions are recommended for operator protection. Additional guarding may be required to protect the
carrier, such as belly pans or skid plates, etc. Always follow safety regulations and certifications for your specific indus-
try. Check with the manufacturer of your carrier for recommended operator protection.
•Shut off the engine. Put carrier in a depressurized state.
•Wait until all machine components have completely stopped before touching them.
•Secure lifting cylinder with locking device before entering a hazardous area.
•Insert safety lock before entering any hazardous area.
•Attach support before entering a hazardous area.
•Wear EU or ANSI approved protective eyewear such as safety glasses, goggles, and face shield.
•Wear EU or ANSI approved hard hat.
•Wear appropriate ear protection.
•Approved safety shoes are an excellent safeguard for anyone on or around machinery.
•Improper operation and failure to follow safety precautions can cause serious injury or death. All personnel must be clear
of the hazard zone while the Mulcher is in operation.
•Shielding is essential to protecting the carrier and the operator. All parts of the carrier closest to the Mulcher are most
susceptible to damage.
•Use appropriate material as brush guards.
•The operator area should be protected as noted on pages -.
•Shielding must allow good access to service the machine and clean and remove debris.
Contact with the blades or blade carrier can cause serious injury or death. Do not exit the vehicle
before the blade stops.

9
OPERATION SAFETY/ THE OPERATOR
FORESTRY PRIME MOVERS WITH ENCLOSED CAB:
www.mechmaxx.com
•A ½” (1.25cm) thick polycarbonate or equal, should be installed in place of or outside the cab glass between the opera-
tor and the Mulcher.
•A steel mesh screen of 2” (5cm) maximum openings and ¼” (.6cm) diameter wire is recommended outside of the cab
between the operator and the Mulcher.
EXCAVATORS AND BOOM TYPE CARRIERS WITH ENCLOSED CAB:
•Front of cab facing the boom should have ½” (1.25cm) thick polycarbonate or equal, should be installed in place of or
outside the cab glass between the operator and the Mulcher.
•A steel mesh screen of 2” (5cm) maximum openings and ¼” (.6cm) diameter wire is recommended outside of the cab
between the operator and the Mulcher.
COMPACT TRACK LOADERS AND SKID STEERS:
•Do not operate without and enclosed cab.
•Front of cab facing the boom should have ½” (1.25cm) thick polycarbonate or equal, should be installed in place of or
outside the cab glass between the operator and the Mulcher.
•A steel mesh screen of 2” (5cm) maximum openings and ¼” (.6cm) diameter wire is recommended outside of the cab
between the operator and the Mulcher.
PTO CARRIERS:
•A ½” (1.25cm) thick polycarbonate or equal, should be installed in place of or outside the cab glass between the opera-
tor and the Mulcher.
•A steel mesh screen of 2” (5cm) maximum openings and ¼” (.6cm) diameter wire is recommended outside of the cab
between the operator and the Mulcher.
CARRIER CLEAN-UP
•Periodic removal of debris and dust from the carrier vehicle is essential to the continued successful operation and fire
prevention.
•Open all compartments and remove all flammable debris such as leaves, twigs, pine needles, wood chips, dust and any
leaking or spilt oil or fuel.
•Upon discovery of oil or fuel leaks, repair and clean up immediately. Oil attracts dust and creates a fire hazard by insulat-
ing lines causing excess heat generation. Inspect and clean all dust from fittings and lines.
•Provisions should be made for removal of shredded wood build-up between hoses, lift arms, lines and other “nooks and
crannies”.
•A blower or compressed air should be used to knock the dust and wood chips off the entire carrier at least twice per
day, wherever permissible by the carrier manufacturer.
•Clean the engine radiator as required to avoid overheating.
•Use water only if it can dry thoroughly before operating. Dust clings to anything wet and a wet radiator can quickly
restrict air flow.
•Contain and dispose of any petro-chemical runoff through a licensed processing facility.
•Do not dispose of petro-chemical runoff into municipal waste.
•Do not use high pressure washer directly on electrical contacts.
•Be careful using high pressure washers, which may bend and split the radiator fins.

OPERATION SAFETY/ THE OPERATOR
10
www.mechmaxx.com
LONG TERM STORAGE
1.Clean the unit of any dirt and debris.
2.Inspect for signs of hydraulic fluid leakage and repair before storing.
3.Properly maintain all grease points to prevent rust due to condensation.
POLICING THE WORK AREA
Before starting, a visual survey of the area to be worked is helpful in identifying any undesirable items that may be
present. Remove them as much as is practical before proceeding.
AVOID METAL WIRE
Metal can damage both the carbide tools and the chipper knives. Wire seeks to wrap itself around the rotor shaft, espe-
cially near the bearings. The wire can tighten and squeeze past the grease seals causing bearing damage if not removed.
USE CAUTION WITH STRINGY VEGETATION
Shredding material like palmetto, bird of paradise and yard waste ties with plastic can damage the rotor bearings. The
Mulcher readily handles this material but the operator should exercise additional caution while working it.
AVOID PLASTICS
• Hoses, bags, tarps and ropes must be removed as soon as they are seen.
• Mattresses, rugs, clothes and cloth will plug the machine and cause the rotor to stall.
• Periodically inspect the rotor for foreign debris.
• The walk-around should be performed before each shift and before moving the machine or even starting the engine.
• The following describe in detail the recommended items to be checked, whether it is a daily check (every 8 hours) or a
weekly check (every 40 hours).
PRE-OPERATION INSPECTIONS
DAILY PRE-OPERATION CHECKLIST
CHECK EVERY 8 HOURS (DAILY)
The Pre-Operation Inspection that an operator does before starting a piece of equipment is the single most important
responsibility of the day. The operator is the key component in the walk-around and it is their responsibility to solicit help
as required if areas of distress or concern are noted. Cell phones and digital pictures are extremely helpful when commu-
nicating potential problems or concerns.
1.Check the condition of the cutting tools.
2.Check for loose fasteners on the rotor.
3.Check for loose hardware and tighten as needed.
4.Inspect that all safety guards are in place.
5.Replace any missing or damaged safety decals.
6.Check all safety surfaces for wear. Replace as needed.
7.Check all hydraulic connections for signs of fluid leakage.
8.Check hydraulic hoses for signs of wear.
Before operating the Mulcher it is important to inspect the following items for safety and performance.
Once the Pre-Operation Walk-Around is complete a final inspection should be done by operating the Mulcher for a short
period of time. Stop the unit and check for loose hardware and leaks.
ATTACHING THE UNIT
ATTACHING THE UNIT
11
www.mechmaxx.com
The Forestry Mulcher is suited for a wide range of tractors. Due to differences in attachment mounting methods among
different brands of tractor, it is important to consult the specific tractors owner’s manual for proper attachment method.
1.Drive the tractor to the Forestry Mulcher and connect to the tractor.
2.Secure the lock down levers
1.Lower the Forestry Mulcher to the ground.
2.Stop the tractor engine, release hydraulic pressure in the hoses and
disconnect the 3 hoses.
3.Release locking levers.
4.Start the engine and disengage the loader mounting plate from the unit.
3.Connect the 3 hydraulic hoses with the tractor engine OFF.
REMOVING THE UNIT
The following instructions will help to assure that the forestry mulcher is operated safely and effectively. Read this
section carefully and use extreme caution at all times.
OPERATIONAL SAFETY
Note: Do not attempt to operate attachments with damaged or
disengaged lock pins.
• Never expose yourself or a bystander to the spinning rotor.
• When driving the tractor to and from the worksite, carry the Mulcher as low as possible to the
ground to avoid the possibility of tipping forward.
• Do not carry passengers on the Mulcher.
• Never leave the Mulcher unattended in a raised position.
• The tractor and Mulcher should be stopped and inspected for damage after striking a foreign object
and the damage should be repaired before restarting and continuing work.
• Cut only in daylight or good artificial light.
• Keep all nuts, bolts and screws tight and be sure the equipment is in safe working condition.
• Check the rotor tool mounting bolts for proper tightness at frequent intervals.
• Attaching the Mulcher to the tractor will change the operating characteristics of the tractor.
Reduce speeds on slopes and make turns gradually to prevent tipping or loss of control. Exercise
caution when changing direction on slopes.
• Stay alert for drop-offs or holes in the terrain.
• Use caution when walking on the Mulcher. The surface can be slick when wet.
Flying debris or objects and falling objects can cause serious injury or death.

12
MULCHING TECHNIQUES
MULCHING TECHNIQUES
www.mechmaxx.com
For fine grind, raise head slightly off ground AFTER contact.
Position the Mulcher so that:
• If equipped with a trap door, put it in the open position to allow maximum exposure of the mulcher tools to the work.
• Engage the work fully.
• Lower the head as the work allows. When RPM begins to drop, move carrier slowly back while continuing to lower the
head. Rotate the head downward as the head approaches the ground using care not to rotate the head too quickly.
• Begin shredding pullback when chains are slightly off the ground and the front corner of the mulcher shoes contact the
ground.
• The mulcher is moved slowly back grinding the material repeatedly against the counter combs inside the body. Closing
the trap door (if equipped) will retain as much material as possible within the mulcher shroud for safe operation and
maximum shredding.
Begin by raising the head above the work to be done or as high as possible. This rotates the entire tractor and trap door
(if equipped) upwards to maximize the rotor area to the work. Move the carrier forward to engage the work.
Now the head is positioned properly for shredding the work you have taken down. A major factor in successful operation
is learning how soon to start going back the way you came. It is in this mode that the finish work is performed.
Just as when push working, work the lift slightly up and down in response to the cutter head system pressure or adjust
the maximum travel speed setting.
Rotating the mulcher head too quickly will cause excessive debris to be thrown at the carrier. Gauge the carrier speed
and shredding depth by monitoring the hydraulic pressure in response to the mulcher tools contacting and grinding the
work.
PUSH WORKING
PULL WORKING
Before changing direction, make sure that all personnel are outside of the hazard zone as described
in the "Hazard Zone Precautions" .
13
www.mechmaxx.com
STUMP GRINDING
STUMP GRINDING
•The tilted-back cutter head is raised up and slowly brought down to plane a layer off the stump. Raise up and plane
down.
•As a general rule, do not rotate the cutter head forward because the rotor might catch the loose stump and fire it back
at the tractor.
•Sometimes it is better to dig a hole with the rotor to roll the stump into so that it can be pinned in one place to be
ground down.
•Lower the mulcher to keep the stump engaged and pinned to the ground. Proceed grinding downward with the Mulcher’s
tools climbing up and over the stump.
•Repeat this process as the mulcher works through the stump 1-2 inches (50mm- 100mm) at a time, taking great care
not to fling the shrinking stump under the carrier.
•Grinding off stumps still in the ground simply requires the back-and-forth
rocking of the tractor while the cutter head is being incrementally lowered.
•Stump grinding is most effective in the forward direction. This allows the rotor
to walk over the stump as it grinds with the added force of gravity and positive
kinetic energy in its favor.
•All final grinding should be done in the backward direction. Raise the head clear of the materials and move forward to
begin each finishing pass.
•Begin shredding pullback when chains are slightly off the ground and the front corner of the mulcher shoes contact the
ground.
OUT OF GROUND (LOOSE) STUMPS
FIXED (IN GROUND) STUMPS
FINISHING THE WORK
Deeper Cavity = Greater Surface Area = Greater Friction. A rotor that moves back and forth changes
the angle of attack, changes the arc of the tool, has less total friction to overcome, tears the fiber
laterally, and helps split the tree fibers horizontally. Those are lot of reasons to be moving the
tractor.
Now that the material has been taken down, shredded and stumps have been removed, its time to do the finishing grind.
For fine grind raise head slightly off ground AFTER contact. The slower the carrier speed, the finer
the grind.
Moving the tractor back and forth while doing stumps or
stems is important because it multiplies the effectiveness
by changing the physics. A rotor that is not moved back and
forth has to overcome the friction of the cavity that it is
creating in the stump.

14
www.mechmaxx.com
HYDRAULIC PUSH BAR OPERATION (IF EQUIPPED)
HYDRAULIC PUSH BAR OPERATION (IF EQUIPPED)
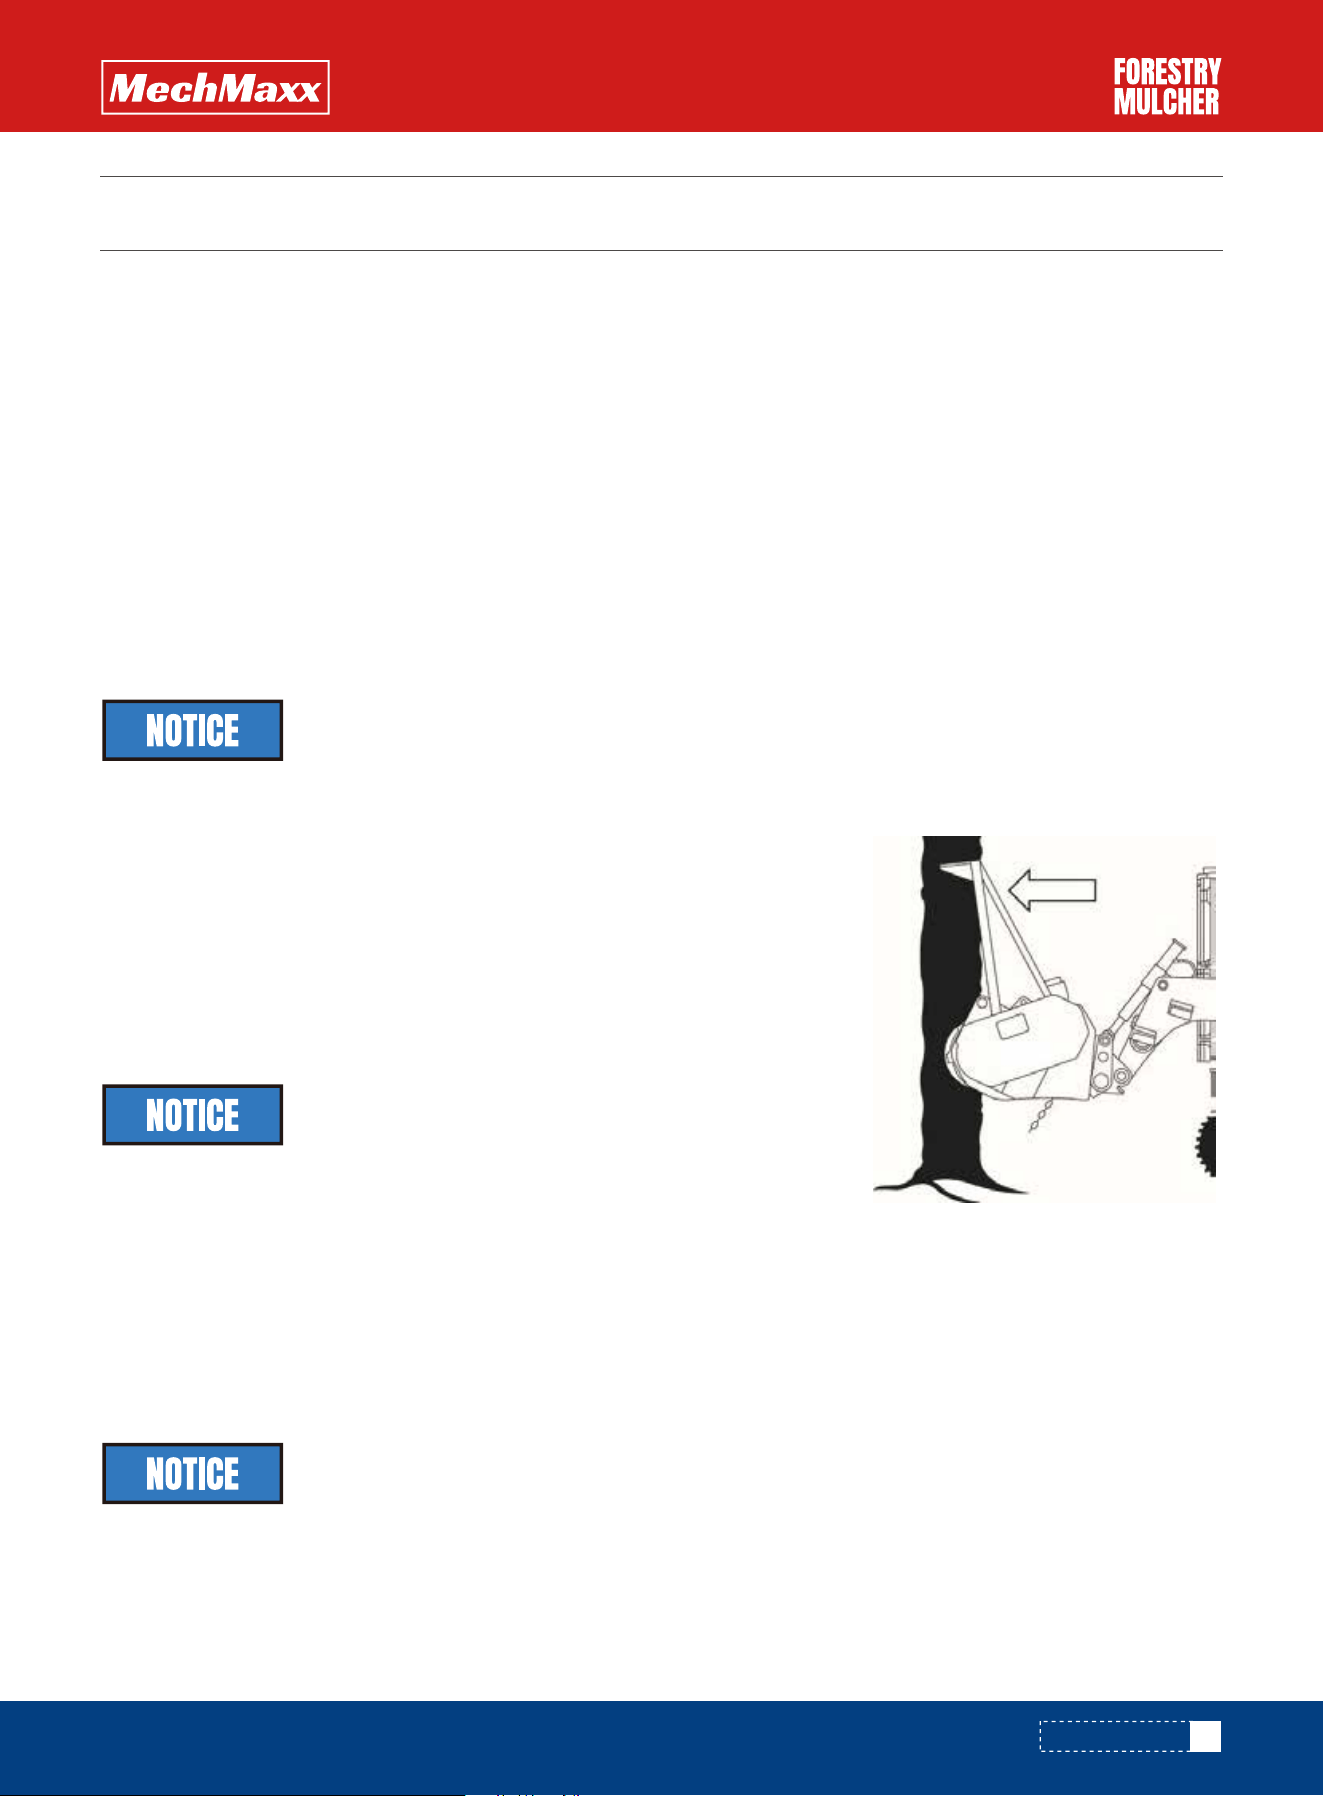
•The push bar leans small trees over so that when they engage the mulching rotor, they do not fall on the carrier.
FOR SMALLER TREES:
•Retract the hydraulic top link or hydraulic cylinders of loader arms to rotate the mulcher back far enough so that all the
tools contact the tree and begin to cut through it
•Tag the engine operating area to show that the Mulcher is being serviced.
•Read the owners manual in its entirety and follow all safety procedures before operating or performing maintenance.
•Perform maintenance only after the carrier has been shutoff. Wait until all machine components have completely
stopped before touching them.
•Dismantle the Mulcher only on flat and firm ground.
•Hydraulic fluid under pressure. Use safe operating procedures at all times.
•Always double check the stability of the Mulcher before reaching under or into the unit.
•Secure lifting cylinder with locking device before entering hazardous area.
•Insert safety lock before entering hazardous area.
•Attach support before entering hazardous area.
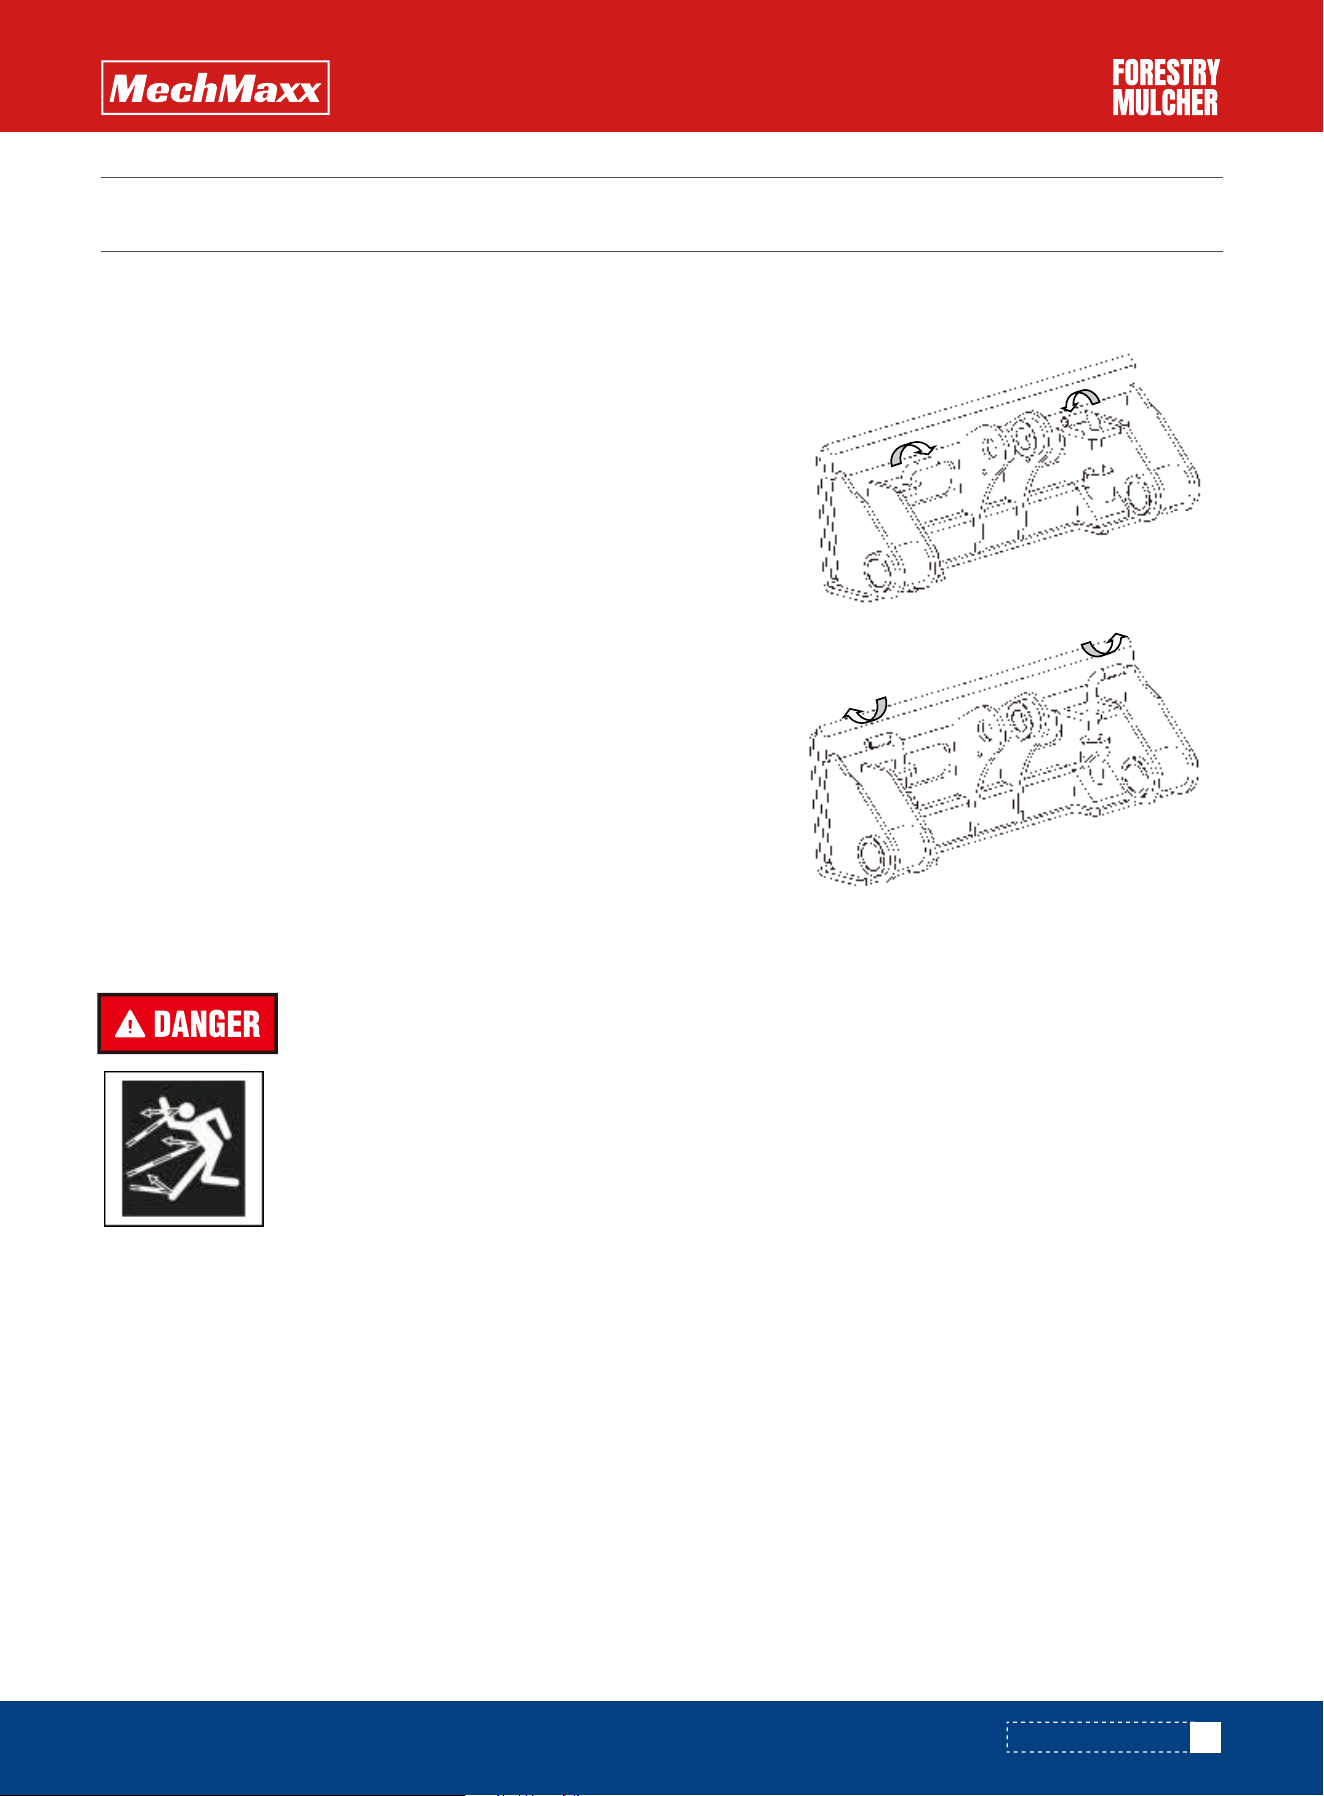
•To elevate the rotor above ground level, adjust the depth shoes down or position the depth shoes on firm blocks. This
will allow the rotor to be rotated for cleaning, replacing belts and replacing tools. While performing maintenance, only
rotate the rotor manually!
•The weight of the mulcher lightens the carriers rear wheel weight. When transporting the unit, at least 20% of the
carriers unladen weight has to lie on the front axle to assure reliable steering and avoid tipping backwards. Weight the
carrier front accordingly.
•Use only original equipment parts for repairs.
FOR LARGER TREES:
The manufacturer’s warranty is conditional upon following all maintenance recommendations.
REGULAR MAINTENANCE
Proper preventative maintenance will help ensure that the Mulcher will perform to its full capabilities and eliminate
unnecessary breakdowns due to neglect.
SAFETY WHILE MAINTAINING

15
www.mechmaxx.com
•Remove the inspection plate in the belt housing to check belt tension.
•Press down in the center of the belt with two fingers, applying 30-40 pounds of pressure, and measure the belt deflec-
tion.
- Polychain belt – 30 lbs (13.5kg) pressure = ½” (1.25cm) deflection
- 3 groove v-belt – 40 lbs (18kg) pressure = 5/16” (.7cm) deflection
•Over tensioning shortens belt and bearing life.
•Keep belts free from foreign material, which may cause slippage or damage.
•Never apply belt dressing as this will damage the belt and cause early failure.
•1.Remove the covers to expose the drive motor, adjustment bolt and fixing screws.
•2.Loosen the fixing screws until the drive housing can be moved with the adjusting rod.
•3.Once the proper tension is achieved, tighten the fixing screws except the one holding the adjusting rod.
•4.With the drive housing secured to the sidewall, loosen the adjusting rod.
•5.Tighten the locknuts on the adjusting rod.
•Go over the mulcher and check all bolts for tightness after the first 10 hours of use.
•Check all bolts daily thereafter.
Grease daily. Use 1 pump of grease for each hour of operation. For best results and to ensure long component life, grease
4 pumps every 4 hours of operation.
The mulching rotor is driven by power drive belts. The belt(s) tension should be checked after the first 8 hours and every
40 hours afterwards.
ROTOR POWER BELTS
ADJUSTING BELT TENSION
LUBRICATION POINTS
ROTOR BEARINGS
Grease every 50 hours 1-2 pumps maximum.
Open front access panels on each side. Use hand pump only.
DRIVE HOUSING
The mulcher is assembled with superior grade fasteners with locking nuts where applicable and torqued to their proper
range. All precautions are taken to keep bolts tight but with the forces exerted by the mulcher the potential for loosening
bolts exists.
CHECK FOR LOOSE FASTENERS
HYDRAULIC PUSH BAR OPERATION (IF EQUIPPED)
Do not operate the Mulcher without all guards in place. Side access panels must be re-installed prior
to running.
Over-lubricating sealed drive housings will cause premature seal failure resulting in bearing failure,
premature shaft wear and/or hydraulic motor shaft wear.
The manufacturer’s warranty is conditional upon using a quality #2 lithium based grease.
Excessive lubrication can elevate the operating temperature of the drive housing.
16
www.mechmaxx.com
•Remove fixing hardware.
•Remove old tool and insert new tool.
•Install new fixing hardware and torque to factory specifications. Use only factory supplied high strength bolts.
•Torque values for each specific rotor are located in the parts manuals.
•Do not discard used parts into municipal waste stream.
•Disassemble and contain hydraulic components in approved container.
•Discard through a licensed processing facility.
Visually check the cutting tools daily for damaged carbides, worn chipper knives and loose hardware.
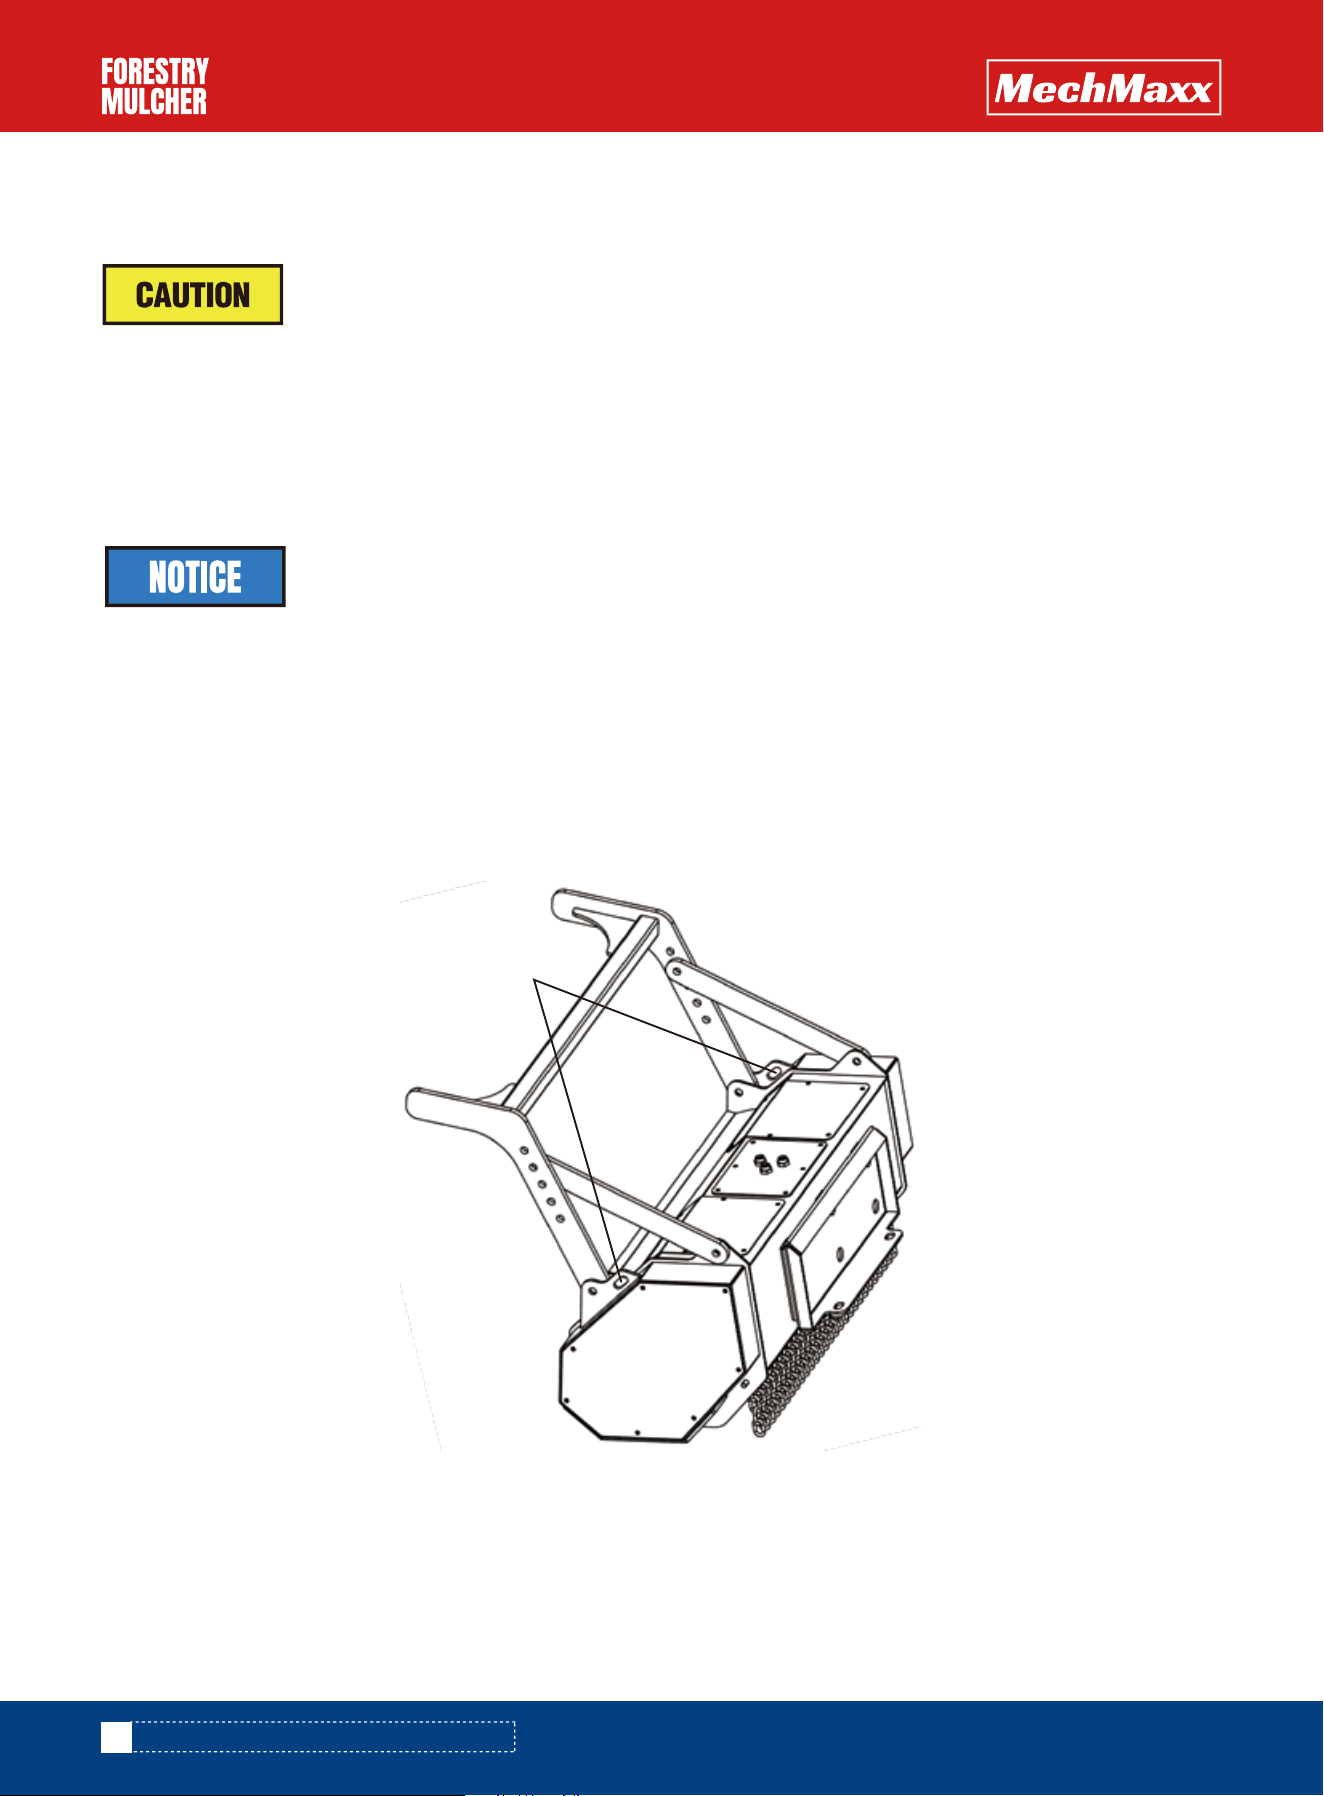
•Use the identified lifting hooks to lift the Fecon Mulcher. Use approved chains in good condition to lift the mulcher.
ROTOR MAINTENANCE
TOOL REPLACEMENT
DISPOSAL PROCEDURE
LIFTING POINTS
HYDRAULIC PUSH BAR OPERATION (IF EQUIPPED)
All tools must be checked for proper torque after the first 20-40 hours of runtime. Failure to check
torque after this initial period can result in tool and tool holder failure.
Always use new hardware to ensure proper torque.
Lift Points
1.Lower the Mulcher to the ground.
2.Shut off the engine of the host tractor.
3.De-pressurize the hydraulic system. Refer to the host tractor operator’s manual for pressure release functions.
4.Disconnect all hydraulic hoses at the QD manifold as shown at right.
5.Disconnect all electrical connections at the tractor
6.Notify anyone affected by the lockout tagout.
LOCKOUT TAGOUT PROCEDURE